

Page 1
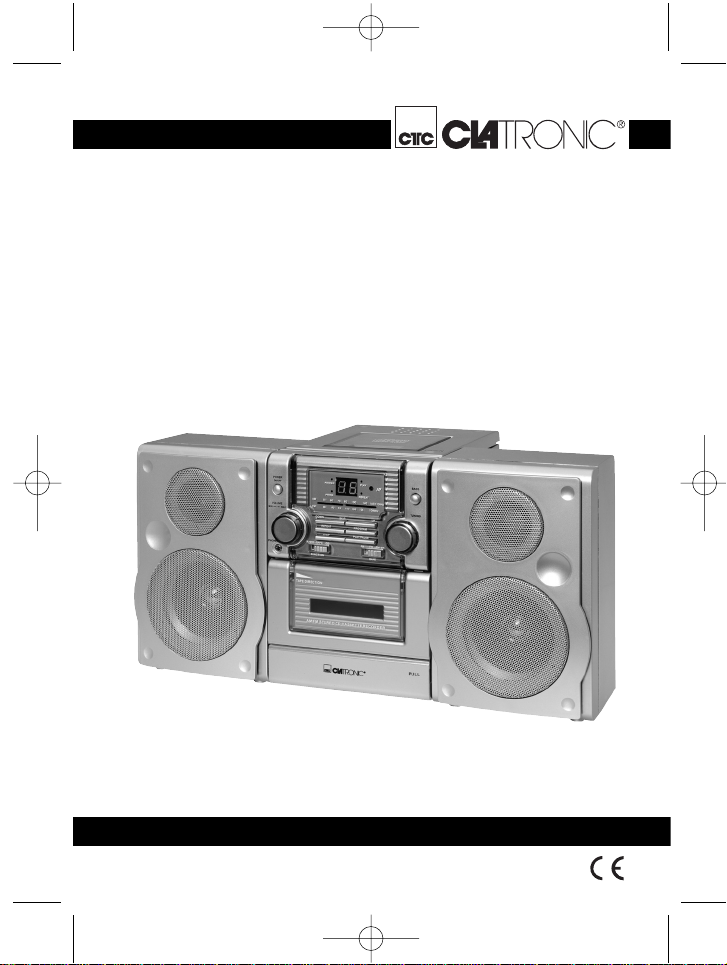
MC 1019 CD
Bedienungsanleitung/Garantie
Gebruiksaanwijzing/Garantie • Mode d’emploi/Garantie
Instrucciones de servicio/Garantía • Istruzioni per l’uso/Garanzia
Instruction Manual/Guarantee • Instrukcja obsługi/Gwarancja
A használati utasítás/garancia
Stereo-Music-Center
Stereo muziekinstallatie • Music center stéréo
Equipo de música estéreo • Stereo-Music Center
Stereo Music Centre • Centrum Muzyki stereofonicznej
Stereo-Music Center
5....-05-MC1019CD 28.07.2004 9:35 Uhr Seite 1
Page 2
Inhalt
Inhoud • Sommaire • Indice • Indice • Contents • Spis treści • Tartalom
D
Übersicht Bedienelemente . . . . . . . . . . . . . . . . . . . . . . . . . . . .Seite 3
Bedienungsanleitung . . . . . . . . . . . . . . . . . . . . . . . . . . . . . . . .Seite 4
Garantie . . . . . . . . . . . . . . . . . . . . . . . . . . . . . . . . . . . . . . . . . .Seite 11
NL
Overzicht bedieningselementen . . . . . . . . . . . . . . . . . . . . . . . .Pagina 3
Gebruiksaanwijzing . . . . . . . . . . . . . . . . . . . . . . . . . . . . . . . . .Pagina 13
Garantie . . . . . . . . . . . . . . . . . . . . . . . . . . . . . . . . . . . . . . . . . .Pagina 19
F
Aperçu des éléments de commande . . . . . . . . . . . . . . . . . . . .Page 3
Mode d’emploi . . . . . . . . . . . . . . . . . . . . . . . . . . . . . . . . . . . . .Page 21
Garantie . . . . . . . . . . . . . . . . . . . . . . . . . . . . . . . . . . . . . . . . . .Page 27
E
Vista de conjunto Elementos de mando . . . . . . . . . . . . . . . . .Página 3
Instrucciones de servicio . . . . . . . . . . . . . . . . . . . . . . . . . . . . .Página 29
Garantia . . . . . . . . . . . . . . . . . . . . . . . . . . . . . . . . . . . . . . . . . .Página 36
I Descrizione dei singoli pezzi . . . . . . . . . . . . . . . . . . . . . . . . . Pagina 3
Istruzioni per l’uso . . . . . . . . . . . . . . . . . . . . . . . . . . . . . . . . . .Pagina 37
Garanzia . . . . . . . . . . . . . . . . . . . . . . . . . . . . . . . . . . . . . .Pagina 44
GB
Control element overview . . . . . . . . . . . . . . . . . . . . . . . . . . . . .Page 3
Instruction Manual . . . . . . . . . . . . . . . . . . . . . . . . . . . . . . . . . .Page 45
Guarantee . . . . . . . . . . . . . . . . . . . . . . . . . . . . . . . . . . . . . . . . Page 51
PL
Przegląd elemetów obsługi . . . . . . . . . . . . . . . . . . . . . . . . . .Strona 3
Instrukcja obsługi . . . . . . . . . . . . . . . . . . . . . . . . . . . . . . . . . .Strona 52
Gwarancja . . . . . . . . . . . . . . . . . . . . . . . . . . . . . . . . . . . . .Strona 59
H
A hasznalt elemek megtekintése . . . . . . . . . . . . . . . . . . . . . .Oldal 3
A hasznalati utasítás . . . . . . . . . . . . . . . . . . . . . . . . . . . . . . . .Oldal 61
Garancia . . . . . . . . . . . . . . . . . . . . . . . . . . . . . . . . . . . . . . . . . .Oldal 68
5....-05-MC1019CD 28.07.2004 9:35 Uhr Seite 2
Page 3
3
5....-05-MC1019CD 28.07.2004 9:35 Uhr Seite 3
Page 4
Allgemeine Sicherheitshinweise
Um das Risiko von Feuer oder einem elektrischen Schlag zu vermeiden, sollten
Sie das Gerät nicht Regen oder Feuchtigkeit aussetzen.Das Gerät nicht in
unmittelbarer Nähe von Wasser betreiben (z.B. Badezimmer, Schwimmbecken,
feuchte Keller).
Verwenden Sie das Gerät nur für den vorgesehenen Zweck.
Das Gerät ausschließlich an eine vorschriftsmäßig installierte Steckdose ansch-
ließen. Achten Sie darauf, dass die angegebene Spannung mit der Spannung der
Steckdose übereinstimmt.
Bei Verwendung von externen Netzteilen auf die richtige Polarität und Spannung
achten, Batterien stets richtigherum einlegen.
Das Gerät so aufstellen, dass vorhandene Lüftungsöffnungen nicht verdeckt werden.
Niemals das Gehäuse des Gerätes öffnen. Durch unsachgemäße Reparaturen
können erhebliche Gefahren für den Benutzer entstehen.Bei Beschädigung des
Gerätes, insbesondere des Netzkabels, das Gerät nicht mehr in Betrieb nehmen,
sondern von einem Fachmann reparieren lassen.Netzkabel regelmäßig auf
Beschädigungen prüfen.
Ein defektes Netzkabel darf nur vom Hersteller, unserem Kundendienst oder einer
ähnlich qualifizierten Person durch ein gleichwertiges Kabel ersetzt werden, um
Gefährdungen zu vermeiden.
Benutzen Sie das Gerät längere Zeit nicht, ziehen Sie den Netzstecker aus der
Steckdose, bzw.entnehmen Sie die Batterien.
Diese Symbole können sich ggfs. auf dem Gerät befinden und sollen Sie auf folgendes hinweisen:
Das Blitz-Symbol soll den Benutzer auf Teile im Inneren des Gerätes hinweisen, die gefährlich hohe Spannungen führen.
Das Symbol mit Ausrufezeichen soll den Benutzer auf wichtige
Bedienungs- oder Wartungs-Hinweise in den Begleitpapieren hinweisen.
Geräte mit diesem Symbol arbeiten mit einem „Klasse 1-Laser“ zur
Abtastung der CD.Die eingebauten Sicherheitsschalter sollen verhindern,
dass der Benutzer gefährlichem, für das menschliche Auge nicht sichtbarem Laserlicht ausgesetzt wird, wenn das CD-Fach geöffnet ist.
Diese Sicherheitsschalter sollten auf keinen Fall überbrückt oder manipuliert werden, sonst besteht die Gefahr, dass Sie sich dem Laser-Licht aussetzen.
4
D
5....-05-MC1019CD 28.07.2004 9:35 Uhr Seite 4
Page 5

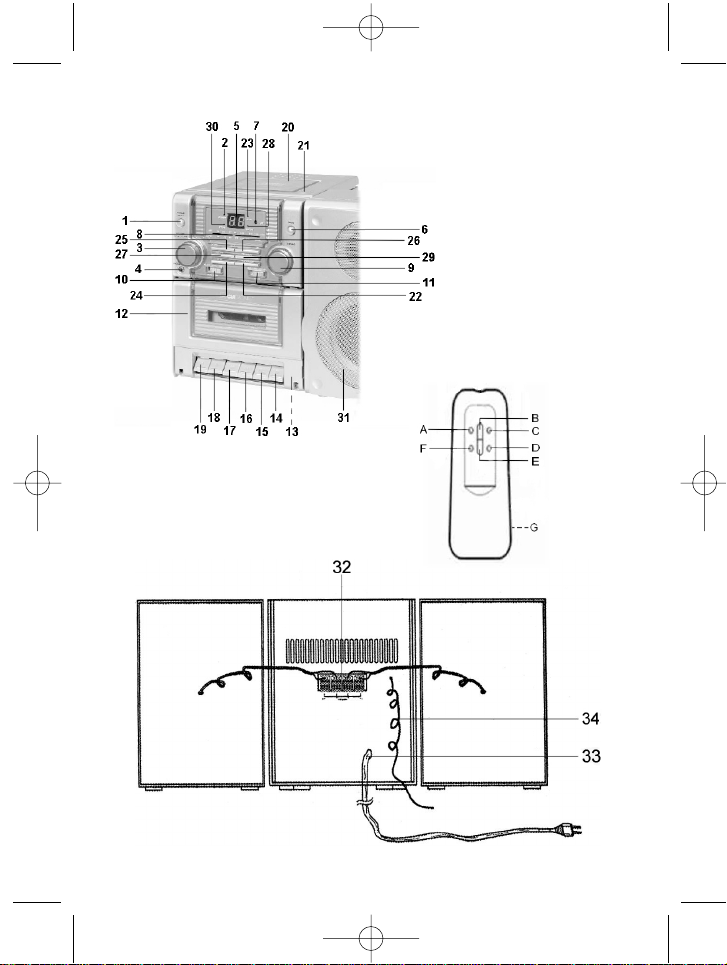
Beschreibung der Bedienelemente
1 POWER Schalter (ON/OFF)
2 Kontrollleuchte POWER
3 VOLUME Lautstärkeregler
4 PHONES (Kopfhöreranschluss)
5 LED-Display
6 BASS Ein/Aus Schalter
7 IR Sensor für die Fernbedienung
8 Frequenzskala
9 TUNING Regler
10 FUNCTION Funktionswahlschalter (RADIO/TAPE/CD)
11 BAND Bandwahlschalter (AM/FM/FM ST)
12 Kassettenfach
13 Klappe PULL (ziehen)
14 II Pause Taste – Kassette
15 / Stop/Auswurftaste – Kassette
16 Vorwärts spulen Taste – Kassette
17 Rückwärts spulen Taste – Kassette
18 Wiedergabe Taste – Kassette
19 Aufnahmetaste – Kassette
20 CD-Fach
21 OPEN Taste zum Öffnen des CD-Fachs
22 CD PLAY/PAUSE Taste
23 Kontrollleuchte PLAY
24 CD STOP Taste
25 DOWN CD SKIP Taste (Suchlauf rückwärts)
26 UP CD SKIP Taste (Suchlauf vorwärts)
27 REPEAT Wiederholungstaste
28 Kontrollleuchte REPEAT
29 PROGRAM Programmierungstaste
30 Kontrollleuchte PROGRAM
31 Lautsprecher
Rückseite
32 Lautsprecher Anschlüsse
33 Netzanschluss
34 FM Wurf antenne
Fernbedienung
A I SKIP/SEARCH Suchlauf Taste / rückwärts
B / II PLAY/PAUSE Taste
C I SKIP/SEARCH Suchlauf Taste / vorwärts
D REPEAT Taste
E STOP Taste
F MEMORY T aste
G Batteriefach
5
D
5....-05-MC1019CD 28.07.2004 9:35 Uhr Seite 5
Page 6

Inbetriebnahme des Gerätes/Einführung
• Lesen Sie vor der Inbetriebnahme die Bedienungsanleitung sorgfältig durch!
• Entfernen Sie, wenn vorhanden, Transportsicherungen an CD- und
Kassettenteil.
• Wählen Sie einen geeigneten Standort für Gerät und Lautsprecher. Geeignet
wäre eine trockene, ebene, rutschfeste Fläche, auf der Sie das Gerät gut bedienen können.
• Achten Sie darauf, dass das Gerät ausreichend belüftet wird!
• Schließen Sie die Lautsprecher an die Anschlüsse (32) auf der Rückseite an.
Stromversorgung
• Stecken Sie den Netzstecker in eine vorschriftsmäßig installierte
Schutzkontaktsteckdose, 230 V, 50 Hz.Achten Sie darauf, dass die
Netzspannung mit den Angaben auf dem Typenschild übereinstimmt.
Batterien einlegen
(Batterien nicht im Lieferumfang enthalten)
• Öffnen Sie den Batteriefachdeckel (G) auf der Rückseite der Fernbedienung.
• Legen Sie 2 Mignon Batterien des Typs LR 6 “AA” 1,5V ein. Achten Sie auf die
richtige Polarität (siehe Batteriefachboden)! Wird die Fernbedienung längere
Zeit nicht benutzt, entnehmen Sie bitte die Batterien, um ein “Auslaufen”von
Batteriesäure zu vermeiden.
• Wechseln Sie immer den kompletten Batteriesatz aus, erneuern Sie nicht nur
eine Batterie.
Achtung: Batterien gehören nicht in den Hausmüll. Bitte geben Sie verbrauchte
Batterien bei zuständigen Sammelstellen oder beim Händler ab.
Werfen Sie Batterien niemals ins Feuer.
Allgemeine Bedienung
POWER ON/OFF (1): Schaltet das Gerät betriebsbereit bzw.aus. Die
Kontrollleuchte POWER (2) zeigt die Funktion an.
BASS Ein/Aus (8): Dient zum Verstärken oder Reduzieren der Bässe.
Ein = Schalter gedrückt.
Lautstärke: Mit dem VOLUME Lautstärkeregler (3) lässt sich die
gewünschte Lautstärke einstellen.
PHONES (4): Stecken Sie den Stecker eines Kopfhörers in die
Kopfhörerbuchse, werden die Lautsprecher stumm geschaltet. Sollte Ihr Stecker nicht passen, verwenden Sie einen
geeigneten Adapter.
Lautsprecher (31): Schließen Sie die Lautsprecher an die Anschlüsse (32) auf
der Rückseite an.
6
D
5....-05-MC1019CD 28.07.2004 9:35 Uhr Seite 6
Page 7

Infrarot
Fernbedienung: Zur kabellosen Fernbedienung aus einer Entfernung von bis
zu 5 Metern. Lässt die Reichweite nach, müssen die
Batterien ausgetauscht werden. Achten Sie bei Bedienung
auf freie Sicht zwischen Fernbedienung und
Infrarotempfänger des Gerätes.
Transportsicherung CD Fach
Öffnen Sie bitte das CD Fach (20), indem Sie die OPEN Taste (21) drücken.
Entfernen Sie vor der Inbetriebnahme, wenn vorhanden, die Transportsicherung
aus dem CD-Player.
Ausschalten
Das Gerät ist außer Betrieb, wenn der Funktionswahlschalter (10) in Position TAPE
bzw.auf POWER OFF steht und alle Bandlauffunktionen ausgeschaltet sind. Die
Kontrollleuchte POWER (2) erlischt.Ziehen sie anschließend den Netzstecker.
Radiobetrieb
1. Stellen Sie den Funktionswahlschalter (10) auf Position RADIO.
2. Das gewünschte Frequenzband können Sie mit dem Bandwahlschalter (11)
wählen.
Mittelwelle = AM (Mono), UKW = FM, UKW Stereo = FM ST.
3. Stellen Sie mit dem TUNING Regler (9) den gewünschten Sender ein.
4. Ist der Empfang bei einem FM Stereo Sender zu schwach und rauscht der
empfangene Sender, versuchen Sie, durch Drehen und An- bzw.Abwickeln und
Ändern der Länge der Antenne den Empfang zu verbessern. Ist keine
Verbesserung zu erreichen, empfiehlt es sich, auf FM (UKW-Mono) zu schalten.
5. Zum Empfang von AM Sendern ist eine Antenne im Gerät integriert.Das Gerät
kann durch Verdrehen und Änderung auf den Sender ausgerichtet werden.In
diesem Frequenzband werden Sendungen nur in Mono ausgestrahlt.
Kassettenbetrieb
Kassetten wiedergeben
1. Wählen Sie die Funktion TAPE (10).
2. Öffnen Sie die Klappe (13).
3. Drücken Sie die / Stop/Auswurftaste (15) um das Kassettenfach (12) zu öffnen.
4. Schieben Sie eine bespielte Audio-Kassette mit dem Band nach unten und der
zu hörenden Seite nach vorne in das Fach.Schließen Sie das Kassettenfach.
5. Drücken Sie die Wiedergabe Taste (18), um das Band wiederzugeben.
6. Mit der / Stop/Auswurftaste (15) können Sie die Wiedergabe anhalten.
7. Spulen Sie das Band bei Bedarf mit den Pfeiltasten sinngemäß vor oder zurück
= vorwärts (16); = rückwärts (17). Drücken Sie zwischen dem Umschalten
7
D
5....-05-MC1019CD 28.07.2004 9:35 Uhr Seite 7
Page 8

und zum Anhalten der Bandlauffunktion immer die / Stop/Auswurftaste
(15). Somit vermeiden Sie Schäden am Gerät oder eine Beschädigung des
Bandes.
8. Bei erneutem Drücken der / Stop/Auswurftaste öffnet sich die Klappe des
Kassettenfachs.
9. Um die Wiedergabe kurz zu unterbrechen, drücken Sie die II Pause T aste (14).
Nochmaliges Drücken setzt die Wiedergabe fort.
Kassetten aufnehmen
1. Legen sie eine Audio-Kassette mit der zu bespielenden Seite nach vorne ein.
Vergewissern Sie sich, dass die Kassette nicht kopiergeschützt ist (die
Kopierschutzzunge an der oberen Schmalseite der Kassette darf nicht herausgebrochen sein).
2. Wählen Sie die Aufnahmequelle mit dem Funktionswahlschalter (10) aus und
starten Sie diese Quelle. Sie nehmen von der Tonquelle auf, die Sie hören. Der
Aufnahmepegel wird automatisch ausgesteuert. Änderungen an Klang und
Lautstärke verändern die Aufnahme nicht.
3. Drücken Sie bitte die Aufnahmetaste (19), (die Wiedergabe T aste wird
automatisch mit runtergedrückt). Die Aufnahme beginnt.Alle vorherigen
Aufnahmen werden automatisch gelöscht.
4. Sie können die Aufnahme mit der II Pause Taste (14) kurz unterbrechen oder
mit der / Stop/Auswurftaste (15) anhalten.
CD Betrieb
So geben Sie eine CD wieder
1. Schieben Sie den Funktionswahlschalter (10) auf CD.
2. Drücken Sie die Taste zum Öffnen des CD-Fachs (21).
3. Legen Sie eine Audio-CD mit dem Aufdruck nach oben auf den Zentrierkegel
und schließen Sie den CD-Fachdeckel (20).
4. Im Display (3) erscheint “- -“ und dann die Anzahl der Titel/Tracks.
5. Drücken Sie die /II CD PLAY/PAUSE Taste (22/B), um die CD wiederzugeben.
Die Kontrollleuchte PLAY (23) leuchtet. Die CD wird vom ersten Titel an abgespielt. Das aktuelle Lied erscheint in der Anzeige.
6. Um eine CD zu entnehmen, drücken Sie die CD STOP Taste (24/E), öffnen
das CD-Fach mit der OPEN Taste (21) und heben die CD vorsichtig ab.
Bitte beachten Sie diesen Hinweis zum Abspielen von CDs und CDRs im MP3
Format! Das Gerät ist nicht MP3 fähig. Die CD beginnt zwar zu drehen, der
Ton kann aber nicht wiedergegeben werden.
Halten Sie den CD-Deckel bitte stets geschlossen.
Hinweis: Wenn eine Disk falsch herum eingelegt wird, bzw. keine Disk eingelegt
ist, erscheint die Meldung “- -” auf dem Display.
8
D
5....-05-MC1019CD 28.07.2004 9:35 Uhr Seite 8
Page 9

Beschreibung der CD Tasten
/ II PLAY/PAUSE (22/B): Sie können die Wiedergabe kurz unterbrechen.
Nochmaliges Drücken der Taste setzt die
Wiedergabe an derselben Stelle fort (die
Kontrollleuchte PLAY (23) blinkt).
DOWN/I SKIP/SEARCH (25/A): 1 x drücken = Beginnt das aktuelle Lied wieder
von vorne.
2 x drücken = Springt zum vorherigen Titel.
3 x drücken = Spielt ein Lied davor usw.Halten
Sie die Taste gedrückt, setzt ein Musiksuchlauf
ein.
UP/I SKIP/SEARCH (26/C): Mit dieser Taste können Sie zum nächsten bzw.
übernächsten Titel springen usw. Halten Sie die
Taste gedrückt, setzt ein Musiksuchlauf ein.
STOP (24/E): Die CD wird angehalten.
REPEAT (27/D): 1x drücken (REPEAT-LED blinkt (28)): Das aktu-
elle Lied wird ständig wiederholt.
2x drücken (REPEAT-LED leuchtet): Die kom-
plette CD wird ständig wiederholt.
3x drücken:Die Funktion wird deaktiviert.
Programmierte Wiedergabe
Lässt die Programmierung einer beliebigen Titelfolge zu.
1. Drücken Sie STOP.
2. Drücken Sie die PROGRAM/MEMORY Taste (29/F).Im Display blinkt “0”
(Speicherplatz) und die Kontrollleuchte PROG (30).Wählen Sie mit den
UP/DOWN-I / I SKIP/SEARCH Tasten den gewünschten Titel aus und
drücken Sie erneut die PROGRAM/MEMORY Taste.Wiederholen Sie den
Vorgang, bis Sie alle Titel ausgewählt haben.
3. Drücken Sie die /II PLAY/PAUSE Taste. Die Wiedergabe wird gestartet. Die
Anzeige PROG blinkt.Mit dieser Taste können Sie das Programm ebenso kurz
unterbrechen (siehe Abschnitt PLAY/PAUSE).
4. Drücken Sie einmal die STOP Taste, wird die Wiedergabe gestoppt, das
Programm bleibt jedoch erhalten.
5. Zur erneuten Wiedergabe des Programms, drücken Sie bitte erst die PRO-
GRAM/MEMORY Taste (29/F) und anschließend die /II PLAY/PAUSE Taste.
Das Gerät stoppt automatisch, nachdem alle programmierten Titel wiedergegeben
wurden. Die programmierte Reihenfolge bleibt im Speicher enthalten bis Sie in
einen anderen Modus wechseln oder die CD aus dem CD Fach entnommen wird
bzw.das Gerät ausgeschaltet wird.
9
D
5....-05-MC1019CD 28.07.2004 9:35 Uhr Seite 9
Page 10
Sie haben die Möglichkeit die programmierten Titel mit der REPEAT-Funktion zu
kombinieren. Nachdem Sie programmier t und das Gerät gestartet haben, drücken
Sie bitte die REPEAT Taste (27/D) bis zu 3 x und die Funktionen können, wie unter
Abschnitt “REPEAT” beschrieben, angewendet werden.
Hinweis: Kompakt-Disks:
• Es können mit diesem Gerät sowohl CDs mit 8cm bzw.12cm Durchmesser
abgespielt werden. Hinweis: Jeweils nur eine Disk in das CD-Fach einlegen.
• Nur Audio CDs, CD-R und CD–RW Disks können mit diesem Gerät abgespielt
werden.
• Die CD stets mit dem Label nach oben in das CD-Fach legen.Kompakt-Disks
können jeweils nur auf einer Seite abgespielt werden.
• Fingerabdrücke und Staub sollten mit einem weichen Tuch sorgfältig von der
Signalseite der CD (Seite ohne Label) abgewischt werden.Mit einer geradlinigen Bewegung von innen zum Rand hin leicht abwischen.
• Nach dem Abspielen sollten CDs wieder in ihrer Hülle aufbewahrt werden,
damit sie nicht zerkratzt werden.
• CDs nicht direkter Sonneneinstrahlung, hoher Feuchtigkeit oder länger hohen
Temperaturen aussetzen, damit sie sich nicht verziehen.
• Kein Papier auf die CD kleben oder etwas darauf schreiben.
• Keine Reinigungsmittel oder Antistatik-Sprays wie bei Phonographen aufsprühen.
10
D
5....-05-MC1019CD 28.07.2004 9:35 Uhr Seite 10
Page 11

Garantie
Wir übernehmen für das von uns vertriebene Gerät eine Garantie von 24 Monaten
ab Kaufdatum (Kassenbon).
Innerhalb der Garantiezeit beseitigen wir unentgeltlich die Mängel des Gerätes oder
des Zubehörs*), die auf Material- oder Herstellungsfehler beruhen, durch Reparatur
oder, nach unserem Ermessen, durch Umtausch.Garantieleistungen bewirken
weder eine Verlängerung der Garantiefrist, noch beginnt dadurch ein Anspruch auf
eine neue Garantie!
Als Garantienachweis gilt der Kaufbeleg. Ohne diesen Nachweis kann ein kostenloser Austausch oder eine kostenlose Reparatur nicht erfolgen.
Im Garantiefall geben Sie bitte das Grundgerät in der Originalverpackung zusammen
mit dem Kassenbon an Ihren Händler.
*) Schäden an Zubehörteilen führen nicht automatisch zum kostenlosen Umtausch
des kompletten Gerätes.Wenden Sie sich in desem Fall bitte an unsere Hotline!
Glasbruchschäden bzw.Brüche von Kunststoffteilen sind grundsätzlich kostenpflichtig!
Sowohl Defekte an Verbrauchszubehör bzw.Verschleißteilen (z.B.Motorkohlen,
Knethaken, Antriebsriemen, Ersatzfernbedienung, Ersatzzahnbürsten, Sägeblättern
usw.), als auch Reinigung, Wartung oder der Austausch von Verschleißteilen, fallen
nicht unter die Garantie und sind deshalb kostenpflichtig!
Die Garantie erlischt bei Fremdeingriff.
Nach der Garantie
Nach Ablauf der Garantiezeit können Reparaturen kostenpflichtig vom entsprechenden Fachhandel oder Reparaturservice ausgeführt werden.
11
D
5....-05-MC1019CD 28.07.2004 9:35 Uhr Seite 11
Page 12

Service
Clatronic International GmbH
Industriering Ost 40
D-47906 Kempen/Germany
Für technische Fragen haben wir für Sie folgende Telefon-Hotline eingerichtet:
0 21 52 / 20 06 – 666
Verschleißteile und Ersatzteile für unsere Unterhaltungselektronik (soweit diese
nicht vom Fachmann ausgewechselt werden müssen) wie z. B.Fernbedienungen,
Bedienteilklappen,
Lautsprecherblenden usw. können Sie mit Angabe des Gerätetyps unter folgender
e-mail-Adresse bestellen:
hotline@clatronic.de
Interessieren Sie sich für weitere Clatronic-Produkte?
Besuchen Sie doch einmal unsere Homepage unter
www.clatronic.de oder www.clatronic.com
12
D
5....-05-MC1019CD 28.07.2004 9:35 Uhr Seite 12
Page 13
Algemene veiligheidsinstructies
Voorkom risico’s voor brand en elektrische schokken en stel het apparaat niet bloot
aan regen of vocht. Gebruik het apparaat niet in de directe nabijheid van water
(bijv.badkamer, zwembad, vochtige kelder).
Gebruik het apparaat uitsluitend voor het daarvoor bestemde doel.
Sluit het apparaat uitsluitend aan op een correct geïnstalleerde contactdoos.Let op
dat de aangegeven spanning overeenstemt met de spanning van de contactdoos.
Let bij het gebruik van externe adapters op de juiste polariteit en spanning en
plaats batterijen altijd in de juiste richting.
Plaats het apparaat zodanig dat de aangebrachte luchtopeningen niet worden afgedekt.
Open nooit de behuizing van het apparaat.Door ondeskundige reparaties kunnen
aanzienlijke gevaren voor de gebruiker ontstaan. Neem het apparaat niet meer in
gebruik wanneer het apparaat - en in het bijzonder de kabel - beschadigingen vertoont, maar laat het eerst door een vakman repareren.Controleer de kabel regelmatig op beschadigingen.
Een defecte kabel mag alleen door de fabrikant, onze technische dienst of een
soortgelijk gekwalificeerd persoon worden vervangen. Alleen zo kunnen gevaren
vermeden worden.
Onderbreek de stroomtoevoer of verwijder de batterijen wanneer u denkt, het apparaat langere tijd niet te gebruiken.
Volgende symbolen kunnen op uw apparaat zijn aangebracht. Zij hebben de volgende betekenis:
Het bliksemsymbool wijst de gebruiker op onderdelen in het inwendige
van het apparaat die gevaarlijk hoge spanning voeren.
Het symbool met het uitroepteken verwijst naar belangrijke
bedienings- en onderhoudsinstructies in de begeleidende documentatie.
Apparaten met dit symbool werken met een „klasse 1-laser„ voor de aftasting van de CD.De ingebouwde veiligheidsschakelaars moeten voorkomen dat de gebruiker wordt blootgesteld aan gevaarlijke, voor het menselijk oog onzichtbaar laserlicht wanneer het CD-vak geopend is.
Deze veiligheidsschakelaars mogen in geen geval overbrugd of gemanipuleerd
worden omdat u anders gevaar loopt, aan het laserlicht te worden blootgesteld.
13
NL
5....-05-MC1019CD 28.07.2004 9:35 Uhr Seite 13
Page 14

Beschrijving van de bedieningselementen
1 POWER-schakelaar (ON/OFF)
2 Controlelamp POWER
3 VOLUME volumeregelaar
4 PHONES (koptelefoonaansluiting)
5 LED-display
6 BASS aan-/uitschakelaar
7 IR Sensor voor de afstandsbediening
8 Zenderschaal
9 TUNING-regelaar
10 FUNCTION Functiekeuzeschakelaar (RADIO/TAPE/CD)
11 BAND Bandkeuzeschakelaar (AM/FM/FM ST)
12 Cassettevak
13 Klep PULL (trekken)
14 II Pauzetoets – cassette
15 / Stop/uitwerptoets – cassette
16 vooruitspoeltoets cassette
17 terugspoeltoets cassette
18 Weergavetoets – cassette
19 Opnametoets – cassette
20 CD-lade
21 OPEN toets voor het openen van de CD-lade
22 CD PLAY/PAUSE-toets
23 Controlelamp PLAY
24 CD STOP-toets
25 DOWN CD SKIP-toets (terug)
26 UP CD SKIP-toets (vooruit)
27 REPEAT herhalingstoets
28 Controlelamp REPEAT
29 PROGRAM programmeertoets
30 Controlelamp PROGRAM
31 Luidspreker
Achterzijde
32 Aansluitingen luidsprekers
33 Netaansluiting
34 FM draadantenne
Afstandsbediening
AI SKIP/SEARCH zoekfunctie-toets / achteruit
B / II PLAY/PAUSE-toets
C I SKIP/SEARCH zoekfunctie-toets / vooruit
D REPEAT-toets
E STOP-toets
F MEMORY-toets
G Batterijvakje
14
NL
5....-05-MC1019CD 28.07.2004 9:35 Uhr Seite 14
Page 15

Ingebruikname van het apparaat/Inleiding
• Lees vóór de ingebruikname de gebruikshandleiding zorgvuldig door!
• Verwijder zo nodig de transportbeveiligingen aan de CD-lade en het cassettedeck.
• Kies een geschikte plaats voor installatie en luidsprekers.Deze geschikte plaats
moet droog, vlak en slipvast zijn en alle mogelijkheden voor een comfortabele
bediening bieden.
• Let op een goede beluchting van het apparaat!
• Sluit de luidsprekers aan op de aansluitingen (32) aan de achterzijde.
Stroomverzorging
• Steek de netsteker in een correct geïnstalleerde en geaarde contactdoos 230 V,
50 Hz. Let op dat de netspanning overeenstemt met de gegevens op het
typeplaatje.
Plaatsen van de batterijen
(niet bij de levering inbegrepen)
• Open het deksel van het batterijenvakje (G) aan de achterzijde van de
afstandsbediening.
• Plaats 2 mignonbatterijen van het type LR 6 „AA“ 1,5V. Let goed op de juiste
polariteit (zie bodem van het batterijenvakje)! Verwijder de batterij wanneer de
afstandsbediening gedurende een langere periode niet wordt gebruikt. Zo voorkomt u lekkage van batterijzuur.
• Wissel altijd het complete batterijset uit, vervang nooit alleen maar één batterij.
Let op: batterijen horen niet in het huisafval.Geef verbruikte batterijen af bij het
gemeentelijke milieupark of bij de handelaar.
Gooi batterijen nooit in het vuur.
Algemene bediening
POWER ON/OFF (1): schakelt de installatie in of uit. Het controlelampje POWER
(2) geeft de functie weer.
BASS Aan/Uit (8): Versterkt of vermindert het geluid van de bassen.
Aan = schakelaar ingedrukt.
Volume: Met de VOLUME-regelaar (3) kunt u de gewenste geluids-
sterkte instellen.
PHONES (4): Wanneer u de steker aansluit op de bus van de koptelefoon,
worden de luidsprekers “stomgeschakeld”.Gebruik een
adapter wanneer de steker niet past.
Luidsprekers (31): Sluit de luidsprekers aan op de aansluitingen (32) aan de
achterzijde.
15
NL
5....-05-MC1019CD 28.07.2004 9:35 Uhr Seite 15
Page 16

Infraroodafstandsbediening: gebruik deze voor een kabelloze bediening tot op een
afstand van 5 meter.Wanneer de reikwijdte minder wordt,
dienen de batterijen te worden vervangen. Let bij de bediening op een vrij signaalveld tussen de afstandsbediening en
de infraroodsensor aan het apparaat.
Transportbeveiliging CD-lade
Open het CD-vakje (20) door de OPEN-toets (21) in te drukken.Verwijder vóór de
ingebruikname, indien voorhanden, de transportbeveiliging uit de CD-speler.
Uitschakelen
Het apparaat is uitgeschakeld wanneer de functiekeuzeschakelaar (10) op TAPE of
POWER OFF staat en alle bandloopfuncties uitgeschakeld zijn.Het controlelampje
POWER (2) dooft.Trek vervolgens de netsteker uit de contactdoos.
Radiomodus
1. Zet de functieschakelaar (10) op de positie RADIO.
2. Kies de gewenste frequentieband met de bandkeuzeschakelaar (11).
middengolf = AM (mono), UKW = FM, UKW Stereo = FM ST.
3. Stel met de TUNING-regelaar (9) de gewenste zender in.
4. Wanneer de ontvangst bij een FM-stereozender te zwak is en de ontvangen
zender ruist, kunt u proberen de ontvangst te verbeteren door de antenne te
draaien en op en af te wikkelen.Wanneer geen verbetering merkbaar is, is het
zinvol om over te schakelen naar FM (UKW-mono).
5. Voor de ontvangst van AM-zenders is een antenne in het apparaat geïntegreerd. Het apparaat kan door draaien en veranderen van de positie worden ingesteld op de zender.In dit frequentiebereik worden programma’s alleen in mono
ontvangen.
Cassettemodus
Cassettes afspelen
1. Kies de functie TAPE (10).
2. Open de klep (13).
3. Druk op de / Stop-/uitwerptoets (15) om het cassettevak (12) te openen.
4. Plaats een bespeelde audiocassette met het bandje naar onder en de bijbehorende zijde naar voor in het vakje.Sluit het cassettevakje.
5. Druk op de weergavetoets (18) om de cassette af te spelen.
6. Met de / Stop/uitwerptoets (15) kunt u de weergave beëindigen.
7. Spoel de cassette desgewenst overeenkomstig de pijltoetsen vooruit of terug.
= vooruit (16), = terug (17). Druk tussen het omschakelen en voor het
stoppen van de bandloopfunctie altijd op de / Stop/uitwerptoets (15).Op
deze wijze voorkomt u dat het cassettedeck of het bandje beschadigd wordt.
16
NL
5....-05-MC1019CD 28.07.2004 9:35 Uhr Seite 16
Page 17

8. Door het opnieuw indrukken van de / Stop/uitwerptoets opent u het klepje
van het cassettevak.
9. Voor een korte onderbreking van de weergave drukt u de II PAUSE-toets (14)
in. Na het nogmaals indrukken van deze toets wordt de weergave voortgezet.
Cassettes opnemen
1. Plaats een audiocassette met de te bespelen kant naar voor in het cassettevak.
Waarborg dat de cassette niet tegen kopiëren beveiligd is (de kopieerbeschermlip aan de bovenste smalle zijde van de cassette mag niet verwijderd
zijn).
2. Kies de opnamebron via de functiekeuzesschakelaar (10) en start deze geluidsbron. U neemt op van de geluidsbron die u hoort.Het geluidsniveau van de
opname wordt automatisch geregeld.Verandering aan geluid en volume veranderen de opname niet.
3. Druk op de opnametoets (19) (de weergavetoets wordt automatisch mee
omlaag gedrukt). De opname begint.Alle eerdere opnames worden automatisch gewist.
4. Met de II pauzetoets (14) kunt u de opname kortstondig onderbreken of met de
/ Stop-/uitwerptoets (15) beëindigen.
CD-modus
Zo kunt u CD’s afspelen
1. Schuif de functiekeuzesschakelaar (10) naar de stand CD.
2. Druk de toets in om de CD-lade (21) te openen.
3. Plaats een audio-CD met de opdruk naar boven op de centreerkegel en sluit de
CD-lade (20).
4. Op het display (3) verschijnt „- -“ en vervolgens het aantal titels/tracks.
5. Druk op de toets / II CD PLAY/PAUSE (22/B) om de CD af te spelen. Het
controlelampje PLAY (23) brandt. De CD wordt vanaf de eerste titel afgespeeld.
Het huidige nummer verschijnt op het display.
6. Om een CD te verwijderen drukt u op de CD STOP-toets (24/E), opent de
CD-lade met de OPEN-toets (21) en neemt de CD voorzichtig uit het apparaat.
Belangrijke opmerking over CD’s en CDR’s in MP3-formaat! Dit apparaat is
niet geschikt voor MP3. De CD begint weliswaar te draaien, maar er kan geen
geluid worden weergegeven.
Houd de CD-lade verder steeds gesloten.
Opmerking: Wanneer een CD verkeerd om geplaatst wordt of géén CD geplaatst
is, verschijnt de melding „- -“ op het display.
17
NL
5....-05-MC1019CD 28.07.2004 9:35 Uhr Seite 17
Page 18

Beschrijving van de CD-toetsen
/ II PLAY/PAUSE (22/B): U kunt de weergave kort onderbreken.Door het
nogmaals indrukken van de toets wordt de weergave vanaf hetzelfde punt voortgezet (het controlelampje PLAY (23) knippert).
DOWN/I SKIP/SEARCH (25/A): 1 x indrukken = De huidige titel begint opnieuw.
2 x indrukken = Springt naar de volgende titel.
3 x indrukken = Speelt een eerdere titel enz.
Wanneer u de toets ingedrukt houdt, kunt u snel
naar titels zoeken.
UP/I SKIP/SEARCH (26/C): Met deze toets kunt u naar de volgende of de
daaropvolgende titel springen enz.Wanneer u
de toets ingedrukt houdt, kunt u snel naar titels
zoeken.
STOP (24/E): De CD wordt gestopt.
REPEAT (27/D): 1 x indrukken (REPEAT-LED knippert (28)):de
huidige titel wordt steeds herhaald.
2 x indrukken (REPEAT-LED brandt): de comple-
te CD wordt steeds herhaald.
3 x indrukken: de functie wordt gedeactiveerd.
Geprogrammeerde weergave
Biedt de mogelijkheid om een willekeurige titelvolgorde te programmeren.
1. Druk op de STOP-toets.
2. Druk op de PROGRAM/MEMORY-toets (29/F). Op het display knippert "0"
(geheugenplaats) en het controlelampje PROG (30). Selecteer de gewenste titel
met de toetsen UP/DOWN-I / I SKIP/SEARCH en druk opnieuw op de
PROGRAM/MEMORY-toets.Herhaal deze stappen totdat u alle gewenste titels
hebt uitgekozen.
3. Druk op de /II PLAY/PAUSE-toets.De titels worden afgespeeld. De weergave
PROG knippert. Met deze toets kunt u het programma eveneens kortstondig
onderbreken (zie hoofdstuk PLAY/PAUSE).
4. Wanneer u één keer op de STOP-toets, wordt de weergave onderbroken, maar
blijft het programma behouden.
5. Druk eerst op de PROGRAM/MEMORY-toets (29/F) en daarna op de /II
PLAY/PAUSE-toets om het programma opnieuw weer te geven.
Het apparaat stopt automatisch nadat alle geprogrammeerde titels zijn afgespeeld.
De geprogrammeerde volgorde wordt in het geheugen opgeslagen totdat u in een
andere modus overschakelt, de CD uit de CD-lade verwijdert of het apparaat uitschakelt.
U hebt de mogelijkheid, de geprogrammeerde titels met de REPEAT-functie te com-
18
NL
5....-05-MC1019CD 28.07.2004 9:35 Uhr Seite 18
Page 19
bineren. Nadat u de programmering hebt afgesloten en het apparaat gestart hebt,
drukt u de REPEAT -toets (27/D) tot 3 x in. Op deze wijze kunt u de functies zoals
in het hoofdstuk “REPEAT” beschreven, gebruiken.
Opmerking: compact discs:
• U kunt met dit apparaat zowel CD‘s met een diameter van 8 cm als met een
diameter 12 cm afspelen. Opmerking:plaats telkens slechts één CD in de CDlade.
• U kunt alléén audio-CD’s, CD-R en CD-RW-discs met dit apparaat afspelen.
• Plaats de CD altijd met het label naar boven in de CD-lade.Compact discs kunnen slechts aan één kant worden afgespeeld.
• Vingerafdrukken en stof moeten met een zachte doek zorgvuldig van de signaalkant van de CD (kant zonder label) worden verwijderd. Veeg de CD in rechte bewegingen van binnen naar de rand voorzichtig schoon.
• Na het afspelen moeten de CD’s weer in de hoes / box worden bewaard, zodat
de toplaag niet kan worden beschadigd.
• Stel CD’s niet bloot aan directe zoninstraling, hoge luchtvochtigheid of gedurende een langere tijd aan hoge temperaturen omdat zij dan kromtrekken.
• Plak géén papier op de CD en schrijf er niets op. Sproei géén reinigingsmiddelen of antistatische sprays op de CD zoals bij platenspelers.
Dit apparaat is gekeurd conform de op dit moment van toepassing zijnde CErichtlijnen zoals bijvoorbeeld elektromagnetische compatibiliteit en laagspanningsvoorschriften en is geconstrueerd volgens de nieuwste veiligheidstechnische voorschriften.
Technische wijzigingen voorbehouden!
Garantie
Voor het door ons geleverde apparaat verlenen wij een garantie van 24 maanden
vanaf koopdatum (kassabon).
Eventuele gebreken aan het apparaat of aan het toebehoren*) die zijn ontstaan
door productie- of materiaalfouten verhelpen wij binnen deze periode kosteloos
door middel van reparatie of, naar ons oordeel, door vervanging.Eventuele garantiegevallen verlengen noch de geldigheidsduur van de garantie, noch begint daardoor een nieuwe garantieperiode!
Het koopbewijs geldt als garantiebewijs.Zonder dit bewijs kan geen kosteloze
reparatie of vervanging plaatsvinden.
Geef in geval van garantie het apparaat met de kassabon en in de originele verpakking af bij uw handelaar.
*) Schade aan onderdelen leidt niet automatisch tot kosteloze vervanging van het
complete apparaat. Neem in dit geval contact op met onze hotline! De reparatie van
glasbreuk of breuk van kunststofonderdelen wordt altijd berekend!
19
NL
5....-05-MC1019CD 28.07.2004 9:35 Uhr Seite 19
Page 20

Niet defecten aan de hulpstukken of aan de slijtende onderdelen (bijv. koolborstels,
deeghaken, drijfriemen, reserveafstandsbediening, reservetandenborstels, zaagbladen enz.), maar ook reiniging, onderhoud of de vervanging van slijtende delen
vallen niet onder de garantie en geschieden altijd tegen berekening!
Bij ingrepen door derden komt de garantieverlening te vervallen.
Na de garantieperiode
Na afloop van de garantieperiode kunnen reparaties tegen berekening worden uitgevoerd door de betreffende vakhandelaar of de technische dienst.
20
NL
5....-05-MC1019CD 28.07.2004 9:35 Uhr Seite 20
Page 21
Conseils de sécurité
Pour éviter tout risque d’incendie ou d’électrocution ne mettez en aucun cas votre
appareil en contact avec la pluie ou de l’humidité.Ne laissez jamais fonctionner
votre appareil à proximité d’eau (par ex.salle de bains, bassin de piscine, cave
humide).
N’utilisez l’appareil qu’aux fins auxquelles il est destiné.
Ne branchez l’appareil que dans une prise de courant en bon état de fonctionne-
ment.Veillez à ce que la tension électrique de l’appareil corresponde à celle indiquée sur la prise de courant.
Si vous utilisez une alimentation électrique externe, vérifiez la polarité et la tension
électrique. Placez toujours correctement les piles.
Installez toujours l’appareil de façon à ce que les ouvertures de ventilation ne
soient pas obstruées.
N’ouvrez jamais le bloc moteur de l’appareil. Des réparations mal appropriées peuvent entraîner des risques importants pour l’utilisateur.En cas d’endommagement
de l’appareil, en particulier du câble d’alimentation, ne mettez plus l’appareil en
marche et laissez un spécialiste se charger de la réparation. Contrôlez régulièrement le bon état du câble d’alimentation.
Pour éviter tout risque, seul le fabricant, son service après-vente ou un spécialiste
à qualification similaire sont aptes à remplacer un câble défectueux par un câble
équivalent.
Si l’appareil n’est pas utiliser pendant assez longtemps, débranchez le câble d’alimentation ou retirez les piles.
Vous pouvez éventuellement trouver ces symboles sur l’appareil, qui ont la signification suivante:
L’éclair indique à l’utilisateur les pièces dangereuses, situées à l’intérieur
de l’appareil, qui conduisent de hautes tensions.
Le point d’exclamation attire l’attention de l’utilisateur sur les remarques
importantes d’utilisation et d’entretien données dans les documents de
l’appareil.
Les appareils dotés de ce symbole fonctionnent avec un „laser de la classe 1“ pour la lecture des disques CD.Les boutons de sécurité intégrés
sont chargés d’éviter qu’à l’ouverture du compartiment à CD l’utilisateur
entre en contact avec la lumière laser qui est dangereuse et invisible à
l’oeil humain.
Il est absolument interdit de court-circuiter ou manipuler ces boutons de sécurité,
ce qui risquerait sinon de mettre l’utilisateur en contact avec la lumière laser.
21
F
5....-05-MC1019CD 28.07.2004 9:35 Uhr Seite 21
Page 22

Description des éléments de commande
1 Touche POWER (ON/OFF)
2 Lampe témoin POWER
3 VOLUME Régulateur
4 PHONES (Raccord écouteurs)
5 Affichage à cristaux liquides
6 Touche BASS Marche/Arrêt
7 IR Capteur pour télécommande
8 Bande de fréquence
9 Régulateur TUNING
10 FUNCTION Sélecteur de fonctions (RADIO/TAPE/CD)
11 BAND Sélecteur de fréquences (AM/FM/FM ST)
12 Compartiment des cassettes
13 Levier PULL (tirer)
14 Touche Pause II – cassette
15 Touche Stop/Eject / – cassette
16 touche rem bobinage avant – cassettes
17 touche rem bobinage arrière – cassettes
18 Touche de lecture – cassette
19 Touche d’enregistrement – cassette
20 Compartiment à CD
21 Touche OPEN pour ouvrir le compartiment à CD
22 Touche CD PLAY/PAUSE
23 Lampe témoin PLAY
24 Touche STOP CD
25 Touche DOWN-CD SKIP (arrière)
26 Touche UP-CD SKIP (avant)
27 Touche de répétition REPEAT
28 Lampe témoin REPEAT
29 Touche de programmation PROGRAM
30 Lampe témoin PROGRAM
31 Haut-parleurs
Dos de l’appareil
32 Raccordements haut-parleurs
33 Raccordement électrique
34 Antenne flexible FM
Télécommande
A Touche recherche arrière I SKIP/SEARCH
B T ouche / II PLAY/PAUSE
C Touche recherche avant I SKIP/SEARCH
D Touche REPEAT
E T ouche STOP
F Touche MEMORY
G Compartiment des piles
22
F
5....-05-MC1019CD 28.07.2004 9:35 Uhr Seite 22
Page 23

Avant la première utilisation/Introduction
• Lisez consciencieusement le mode d‘emploi avant la première utilisation!
• Retirez le cas échéant les emballages de sécurité de la partie CD et cassettes.
• Choisissez un endroit approprié pour l’appareil et les haut-parleurs. Il convient
de choisir une surface sèche, plane et stable sur laquelle vous puissiez aisément utiliser l’appareil.
• Veillez à ce que l’appareil soit suffisamment ventilé!
• Raccordez les haut-parleurs aux prises (32) situées au dos de l’appareil.
Alimentation électrique
• Branchez l’appareil dans une prise de courant en bon état de fonctionnement
de 230 V, 50 Hz.Veillez à ce que la tension électrique corresponde aux
données indiquées sur la plaque signalétique.
Pose des piles
(non comprises à la livraison)
• Ouvrez le couvercle du compartiment à piles (G) situé au dos de la télécommande.
• Installez 2 piles mignon de type LR 6 « AA » 1,5 V.Veillez à respecter la polarité (voir au fond du compartiment) ! Si la télécommande n’est pas utilisée pendant un certain temps, retirez les piles pour éviter que l’acide des piles ne
coule.
• Changez toujours le jeu complet de piles et pas seulement une seule d’entre
elles.
Attention: ne jetez pas vos piles dans les ordures ménagères. Nous vous prions
de les ramener à un centre de recyclage approprié ou chez le fabricant.
Ne jetez jamais les piles dans le feu.
Conseils généraux d’utilisation
POWER ON/OFF (1): pour mettre l’appareil en marche ou l’arrêter. La lampe
témoin POWER (2) indique la fonction choisie.
BASS Marche/Arrêt (8): pour augmenter ou réduire les graves.
Marche = touche est enfoncée.
Volume: Le son peut être réglé à souhait à l’aide du bouton de
VOLUME (3).
PHONES (4): Si vous branchez la fiche d’un casque dans la prise, les
haut-parleurs s’arrêtent automatiquement. Si la fiche de
votre casque ne convient pas, utilisez un adaptateur qui
conviennent.
Haut-parleurs (31): Raccordez les haut-parleurs aux prises (32) situées au
dos de l’appareil.
23
F
5....-05-MC1019CD 28.07.2004 9:35 Uhr Seite 23
Page 24

Télécommande à
infrarouges: pour une utilisation sans fil à une distance allant jusqu’à 5
mètres. Si le champ d’action diminue, les piles doivent
être changées.Veillez lors de l’utilisation à ce qu’il n’y ait
pas d’obstacle entre la télécommande et le récepteur
infrarouge de l’appareil.
Sécurité de transport du compartiment à CD
Pour ouvrir le compartiment à CD (20), enfoncez la touche OPEN (21).Retirez,
avant la première utilisation, les sécurités de transport se trouvant éventuellement
sur le lecteur de CD.
Pour arrêter l’appareil
L’appareil est hors service quand le sélecteur de fonction (10) est sur la position
TAPE voire sur POWER OFF et toutes les fonctions de déroulement de bande sont
désactivées. La lampe témoin POWER (2) est éteinte. Vous pouvez alors débrancher le câble d’alimentation.
Fonction radio
1. Placez le sélecteur de fonctions (10) sur la position RADIO.
2. Sélectionnez la bande de fréquences désirée à l’aide du sélecteur de fréquences (11).
ondes moyennes = AM (mono), UKW = FM, UKW Stéréo = FM ST.
3. Réglez l’émetteur souhaité à l’aide du bouton TUNING (9).
4. Si la réception d’une station de radio est trop faible et grésille, essayez d’améliorer la réception en changeant l’orientation ou la longueur de l’antenne. Si vous
n’obtenez aucun amélioration, il est conseillé de passer en FM (UKW-Mono).
5. Pour une réception de stations AM, une antenne est intégrée à l’appareil.
L’appareil peut être déplacé et orienté différemment pour une meilleure réception.Pour cette bande de fréquences, les stations ne sont émises qu’en mono.
Fonction cassettes
Lecture de cassettes
1. Choisissez la fonction TAPE (10).
2. Ouvrez le couvercle (13).
3. Enfoncez la touche / Stop / Eject (15) pour ouvrir le compartiment à cassettes (12).
4. Introduisez une cassette audio enregistrée dans le compartiment en orientant la
bande vers le bas et la face à écouter vers l’avant. Fermez le compartiment.
5. Enfoncez la touche de lecture (18) pour écouter la cassette.
6. Vous pouvez interrompre la lecture grâce à la touche / Stop/Eject (15).
7. Si nécessaire, faites dérouler la bande dans le sens indiqué sur les touches
marquées d’une flèche. = vers l’avant (16), = en arr ière (17). Enfoncez
24
F
5....-05-MC1019CD 28.07.2004 9:35 Uhr Seite 24
Page 25

toujours la touche / Stop/Eject (15) avant de changer le sens de déroulement de la bande.Vous évitez ainsi d’endommager votre appareil ou la bande
de la cassette.
8. La porte du compartiment à cassettes s’ouvre si vous enfoncez à nouveau la
touche / Stop/Eject.
9. Pour interrompre la lecture pour un court instant, enfoncez la touche Pause II
(14). Si vous enfoncez la touche à nouveau, la lecture reprend.
Enregistrement de cassettes
1. Introduisez une cassette audio avec la face à enregistrer devant.Assurez-vous
que la cassette n’est pas protégée contre la copie (la languette de protection
anti-copie sur la face mince supérieure de la cassette ne doit pas être cassée).
2. Sélectionnez la source d’enregistrement avec le sélecteur de fonction (10) et
faites démarrer cette source.Vous enregistrez de la source audio sur laquelle
vous écoutez.Le niveau d’enregistrement est commandé automatiquement.
Les modifications de la tonalité et du volume ne changent pas l’enregistrement.
3. Enfoncez la touche d’enregistrement (19) (la touche de lecture s’enfonce
automatiquement): L’enregistrement commence.Tous les autres enregistrements sont alors automatiquement effacés.
4. Vous pouvez interrompre l’enregistrement pour un court instant grâce à la touche II Pause (14) ou complètement arrêter grâce à la touche / Stop/Eject
(15).
Fonction CD
Pour écouter un CD
1. Placez le sélecteur de fonctions (10) sur CD.
2. Enfoncez la touche (21) pour ouvrir le compartiment à CD.
3. Posez un disque audio sur le cône central de l’appareil en orientant la face
imprimée vers le haut puis fermez le couvercle (20).
4. Sur l’écran (3), apparaît le symbole « - -« , puis le nombre de titres/plages.
5. Pour lire un CD, enfoncez la touche de lecture CD PLAY/PAUSE / II (22/B).
La lampe témoin PLAY (23) s’allume. Le CD est lu à partir du premier
titre. Le titre en cours apparaît sur l’écran.
6. Pour sortir le disque, enfoncez la touche CD STOP (24/E), ouvrez le couvercle du compartiment à l’aide de la touche OPEN (21) et retirez le disque délicatement.
Nous vous prions de respecter les instructions données pour la lecture de
CD et CDR en format MP3 ! Cet appareil ne lit pas les MP3. Même si le CD se
met à tourner, le son ne peut pas être restitué.
Maintenez le couvercle de l’appareil toujours fermé.
Remarque: si un disque a été placé à l’envers, ou s’il n’y a pas de disque dans
l’appareil, le signe “- -” apparaît sur l’écran.
25
F
5....-05-MC1019CD 28.07.2004 9:35 Uhr Seite 25
Page 26

Description des touches à CD
/ II PLAY/PAUSE (22/B): Vous pouvez interrompre la lecture pour un court
instant. Si vous enfoncez à nouveau cette touche, la lecture recommence automatiquement (la
lampe témoin PLAY (23) clignote).
DOWN/I SKIP/SEARCH (25/A): 1 pulsion = la chanson en cours recommence
depuis le début.
2 pulsions = pour passer au titre précédent.
3 pulsions = pour lire la chanson précédente,
etc. Si vous maintenez la touche enfoncée, la
recherche automatique est activée.
UP/I SKIP/SEARCH (26/C): Vous pouvez grâce à cette touche passer au
titre suivant ou celui d’après, etc.Si vous maintenez la touche enfoncée, la recherche automa-
tique est activée.
STOP (24/E): Le CD est arrêté.
REPEAT (27/D): 1 pulsion (REPEAT-LED clignote (28)):le titre en
cours sera sans cesse répété.
2 pulsions (REPEAT-LED s’éclaire): le disque
complet sera sans cesse répété.
3 pulsions: la fonction est désactivée.
Programmation de la lecture
Permet de programmer les titres dans l’ordre choisi.
1. Enfoncez la touche STOP.
2. Enfoncez la touche PROGRAM/MEMORY (29/F).“0” (plage mémoire) et le
témoin lumineux PROG (30) clignotent sur l’écran.Sélectionnez le titre désiré à
l’aide des touches UP/DOWN-I / I SKIP/SEARCH puis enfoncez à nouveau
la touche PROGRAM/MEMORY. Procédez de la façon suivante jusqu’à ce que
vous ayez sélectionné tous les titres désirés.
3. Enfoncez la touche /II PLAY/PAUSE.La lecture commence. Les lettres PROG
clignotent. Grâce à cette touche, vous pouvez également interrompre le programme pour un court instant (voir section PLAY/PAUSE).
4. Enfoncez une fois la touche STOP, pour arrêter la lecture sans toutefois effacer
le programme.
5. Enfoncez d’abord la touche PROGRAM/MEMORY (29/F) pour continuer le pro-
gramme puis la touche / II PLAY/PAUSE.
L’appareil s’arrête automatiquement après la lecture du dernier titre. L’ordre programmé reste sauvegardé jusqu’à ce que vous changiez de mode, par ex.TAPE ou
que vous retiriez le disque du compartiment ou que vous arrêtiez l’appareil.
Vous pouvez combiner les titres programmés avec la fonction REPEAT.Après avoir
26
F
5....-05-MC1019CD 28.07.2004 9:35 Uhr Seite 26
Page 27

programmé l’appareil et l’avoir mis en marche, enfoncez la touche REPEAT (27/D)
3x.Vous pouvez maintenant utiliser les fonctions, comme décrit dans la section
«REPEAT».
Remarque: disques compacts:
• Cet appareil peut lire aussi bien des disques de 8 et 12 cm de
diamètre.Remarque: ne placez qu’un disque à la fois dans l’appareil.
• Cet appareil ne peut lire que des disques audio CD-R et CD-RW.
• Placez toujours les disques en orientant le côté imprimé vers le haut.
• Il est recommandé de supprimer les traces de doigt ou de poussière sur les disques (côte non-imprimé). Nettoyez le disque d’un mouvement rectiligne du
milieu du disque vers l’extérieur.
• Il est recommandé de toujours ranger les disques dans leur étui après utilisation, pour éviter de les rayer.
• N’exposez jamais vos disques directement à des rayons de soleil, à une forte
humidité ou à de hautes températures pendant une période prolongée.
• Ne collez ni n’écrivez jamais rien sur les disques.
• Ne vaporisez jamais de détergent ou de spray antistatique sur les disques.
Cet appareil a été contrôlé d’après toutes les directives européennes actuelles
applicables, comme par exemple concernant la compatibilité électromagnétique et
la basse tension. Cet appareil a été fabriqué en respect des réglementations techniques de sécurité les plus récentes.
Sous réserve de modifications techniques.
Garantie
Nous accordons une garantie de 24 mois à dater de la date d’achat (ticket de
caisse) pour l’appareil que nous vendons.
Pendant la durée de la garantie, nous éliminons gratuitement les défauts de l’appareil ou des accessoires *) découlant d’un vice de matériau ou de fabrication au
moyen d’une réparation ou, selon notre estimation, au moyen d’un remplacement.
Les prestations dans le cadre de la garantie n’entraînent aucune prorogation de la
durée de garantie et ne donnent pas droit à une nouvelle garantie !
Le justificatif de garantie est le reçu. Sans ce justificatif, aucun remplacement
gratuit ni aucune réparation gratuite ne peuvent être effectués.
En cas de recours à la garantie, rapportez l’appareil dans son emballage d’origine
accompagné du ticket de caisse à votre revendeur.
*) Les endommagements de pièces d’accessoires ne justifient pas automatiquement l’échange gratuit de l’appareil complet. Contactez alors notre centrale téléphonique! La casse de pièces en verre ou en plastique est dans tous les cas à votre
charge!
Les défauts sur les accessoires ou les pièces d’usure (p.ex.les charbons de
27
F
5....-05-MC1019CD 28.07.2004 9:35 Uhr Seite 27
Page 28

moteurs, crochets, courroies d’entraînement, télécommande de rechange, brosses
à dents de rechange, lames de scies etc.) ainsi que le nettoyage, l’entretien ou le
remplacement de pièces d’usure ne sont pas garantis et sont donc payants !
En cas d’intervention étrangère, la garantie devient caduque.
Après la garantie
Après écoulement de la durée de garantie, les réparations peuvent être effectuées,
contre paiement, par le commerce spécialisé ou le service de réparation.
28
F
5....-05-MC1019CD 28.07.2004 9:35 Uhr Seite 28
Page 29

Indicaciones generales para su seguridad
Vd. no debe dejar expuesto el aparato ni a la lluvia ni a la humedad, a fin de disminuir así el riesgo de incendio o de sacudida eléctrica.
Por tanto, no debe utilizar el aparato cerca de agua – por ejemplo, cerca de la
bañera, de una piscina o de un sótano húmedo.
Utilice el aparato únicamente para la finalidad para la que ha sido construido.
El aparato se ha de conectar únicamente a una caja de toma de corriente instalada
reglamentariamente. Cerciórese de que la tensión indicada concuerda con la tensión de la caja de enchufe.
Preste atención a que sea correcta la polaridad cuando se empleen fuentes de alimentación externas. Las pilas se han de introducir siempre correctamente.
El aparato se ha de dejar puesto de modo que no se tapen los orificios de aireación existentes.
Jamás se abrirá la carcasa del cuerpo del aparato.Las reparaciones mal hechas
pueden generar considerables peligros para el usuario.
En caso de estar deteriorado el aparato, en especial el cable de conectar a red, ya
no se ha de poner más en servicio el aparato, sino que se hará que lo repare un
especialista. Controle periódicamente el cable de conexión a red para ver si se ha
deteriorado.
Sólo el fabricante, nuestro servicio posventa o un técnico con una cualificación
similar pueden cambiar un cable defectuoso por otro similar, para evitar todo tipo
de riesgo.
Saque de la toma de corriente la clavija de conectar a la red o bien quite las pilas
cuando no se vaya a usar el aparato durante largo tiempo.
Estos símbolos pueden encontrarse en caso dado en el aparato, y son para indicar
lo siguiente:
El símbolo del rayo advierte al usuario que hay componentes internos del
aparato que pueden tener tensiones peligrosamente altas.
El símbolo con el signo de exclamación advierte al usuario que hay
instrucciones de manejo y de mantenimiento importantes en la documentación que va adjunta.
Aparatos que llevan puesto este símbolo operan con un ”Lector Clase 1”
para explorar el CD. Los interruptores de seguridad incorporados sirven
para impedir que el usuario esté expuesto a luz láser invisible peligrosa
para la vista del usuario cuando está abierto el compartimiento del CD.
Bajo ningún concepto se ha de hacer un puenteado sobre estos interruptores de
seguridad ni deben ser manipulados. De hacerlo, existe el peligro de que Vd.esté
expuesto a la luz láser.
29
E
5....-05-MC1019CD 28.07.2004 9:35 Uhr Seite 29
Page 30

Descripción de los elementos de manejo
1 Interruptor POWER (ON/OFF)
2 Lámpara de control POWER
3 VOLUME Regulador de volumen
4 PHONES (Toma para auriculares)
5 Visualizador LED
6 BASS Interruptor (ON/OFF)
7 IR Sensor para el mando a distancia
8 Escala de emisores
9 Regulador-TUNING
10 FUNCTION Botón de función (RADIO/TAPE/CD)
11 BAND Interruptor selector de bandas (AM/FM/FM ST)
12 Casetón
13 Tapa PULL (tirar)
14 Tecla Pause II – cassette
15 Tecla de expulsión / Stop – cassette
16 Tecla de bobinado en avance – cassette
17 Tecla de bobinado en retroceso – cassette
18 Tecla de reproducción – cassette
19 Tecla de grabación – cassette
20 Compartimento de CD
21 OPEN Para abrir el portadisco
22 Tecla CD PLAY/PAUSE
23 Lámpara de control PLAY
24 Tecla CD STOP
25 Tecla DOWN CD SKIP (bobinado hacia atrás)
26 Tecla UP CD SKIP (bobinado hacia delante)
27 Tecla de repetición REPEAT
28 Lámpara de control REPEAT
29 Tecla de programación PROGRAM
30 Lámpara de control PROGRAM
31 Altav oces
Parte posterior
32 Conexiones de altavoz
33 Conexión a la red
34 Cable de antena FM
Mando a distancia
A Tecla búsqueda en retroceso I SKIP/SEARCH
B T ecla / II PLAY/PAUSE
C Tecla búsqueda en avance I SKIP/SEARCH
D Tecla REPEAT
E T ecla STOP
F Tecla MEMORY
G Cámara para pilas
30
E
5....-05-MC1019CD 28.07.2004 9:35 Uhr Seite 30
Page 31

Puesta en servicio del aparato / Introducción
• ¡Antes del uso del aparato debe leer atentamente las instrucciones de manejo!
• Quite las protecciones de transporte de la unidad de CD y de la casetera, si
están todavía.
• Elija una ubicación apropiada para su aparato, p.ej.una superficie seca, llana y
antideslizante, donde pueda manejar bien su aparato.
• ¡Tenga atención que su aparato tenga suficiente ventilación!
• Conecte los altavoces a las conexiones (32) que se encuentran en la parte
posterior.
Alimentación de corriente
• Introduzca la clavija en una caja de enchufe con tomatierra 230V, 50Hz e instalada por la norma.Verifique que la corriente que quiere utilizar corresponde con
la indicada en la placa descriptiva.
Introducir baterías
(no está incluido en el suministro)
• Abra la cámara de baterías (G) que se encuentra en la parte trasera del mando
a distancia.
• Introduzca 2 baterías del tipo mignon LR 6 „AA“ 1,5V . ¡Tenga atención con la
polaridad correcta (vea la indicación en el suelo del compartimento de baterías
o la estampación en la parte exterior)! En caso de que no utilice el mando a
distancia durante un largo periodo de tiempo, aparte las baterías, para evitar un
derrame del líquido de las baterías.
• Siempre cambie el paquete de baterías por completo, no sólo una.
Atención: Las baterías no se deben tirar a la basura doméstica. Por favor lleve las
baterías usadas a sitios especiales de recogida o a su concesionario.
Nunca tire las baterías al fuego.
Utilización general
POWER ON/OFF (1): Aquí se conmuta el aparato entre (conectado) y (desconec-
tado). La lámpara de control POWER (2) indica la función.
BASS ON/OFF (8): Sirve para reforzar o reducir los tonos bajos.
on = Interruptor presionado.
Volumen: Con el regulador de volumen (3) se puede ajustar el volu-
men deseado.
PHONES (4): Conecte la toma del casco en la toma del aparato.Los alta-
voces se apagan.Si la toma del casco no corresponde, utilice un adaptador apropiado.
Altavoces (31): Conecte los altavoces a las conexiones (32) que se encu-
entran en la parte posterior.
31
E
5....-05-MC1019CD 28.07.2004 9:35 Uhr Seite 31
Page 32

Control inhalámbrico
infrarrojo: Para la operación inhalámbrica hasta una distancia de 5
metros. En caso que la distancia de operación se reduzca
deben cambiarse las baterías. Durante la utilización, verifique que el espacio entre el mando a distancia y el receptor
a infrarrojo del aparato esté libre.
Seguridad de transporte del portadisco
Abra por favor el portadisco (20), presionando la tecla OPEN (21).Antes del servicio aparte el dispositivio de seguridad del transporte, en caso de que haya uno.
Desconexión
El aparato está fuera de servicio, si el selector de funciones (10) está en la posición TAPE es decir POWER OFF y todas las pasadas de la cinta estén desconectadas. POWER (2) se apagará. Desenchufe luego el cable de red.
Funcionamiento de radio
1. Posicione el selector de funciones (10) a la posición RADIO.
2. Elija con el interruptor selector de bandas (11) la banda de frecuencias deseada.
Amplitud modulada = AM (monofónica), Frecuencia modulada = FM,
Frecuencia modulada estereo = FM ST.
3. Utilizar el control de sintonización de emisoras TUNING (9) para sintonizar la
emisora deseada.
4. Si la recepción de una emisora FM estereo es demasiado débil y la emisora
recibida hace ruidos, intente de mejorar la recepción, girando, cambiando de
ángulo o de largura la antena. Si no se mejora la recepción, se recomienda de
conmutar al modo de FM mono.
5. Para la recepción de emisores AM hay una antena integrada en el aparato.
Cambiando o girando el aparato se puede orientar éste con el emisor.En esta
banda de frecuencia, los programas se emiten sólo en calidad „monofónica“.
Operación de casettes
Reproducir casetes
1. Seleccionar la función TAPE (10).
2. Abra la tapa (13).
3. Presione la tecla / Stop/de expulsión (15) para abrir el compartimiento de
la cassette (12).
4. Introducir en el compartimiento un cassette grabado, con la cinta hacia abajo y
el lado que se pretende escuchar hacia adelante. Conecte el compartimento de
casetes.
5. Presione la tecla de reproducción (18), para reproducir la cinta.
6. Con la tecla de expulsión / Stop (15) puede parar la reproducción.
32
E
5....-05-MC1019CD 28.07.2004 9:35 Uhr Seite 32
Page 33

7. En caso de que sea necesario bobine o rebobine con la teclas de flecha, conforme al sentido. = en avance (16), = en retroceso (17). Presione, entre
los cambios y para parar la pasada de la cinta, siempre la tecla de expulsión
/ Stop (15).De esta forma evita daños en el aparato o un desperfecto de la
cinta.
8. Al presionar de nuevo la tecla de expulsión / Stop se abre la tapa del
casetón.
9. Para interrumpir brevemente la reproducción, presione la tecla Pause II (14). Al
presionar de nuevo, continuará la reproducción.
Grabar casetes
1. Inserte una audio-casete con el lado a grabar hacia adelante.Cerciórese de
que la casete no esté protegida contra copiado (la lengüeta protectora de
copiado en el lado estrecho superior de la casete no debe haber sido arrancada).
2. Elija la fuente de grabación con el selector de función (10) y haga arrancar, en
caso dado, dicha fuente.Efectuará la grabación desde la fuente sonora que
escucha. El nivel del registro es ajustado automáticamente. Los cambios del
sonido y del volumen no modificarán la grabación.
3. Presione por favor la tecla de grabación (19), (la tecla de reproducción se
presionará de forma automática). Se inicia la grabación. Todas las grabaciones
anteriores se borrarán.
4. La grabación se puede interrumpir brevemente, con la tecla Pause II (14), o
parar, con la tecla de expulsión / Stop (15).
Funcionamiento de CD
Manera de reproducir un CD
1. Empuje el selector de funciones (10) a la posición CD.
2. Presione el botón para abrir la tapadera del portadisco (21).
3. Introduzca un compact-disc con la impresión para arriba encima del cono centrado y cierre el portadisco (20).
4. En el visualizador (3) aparece ”--”y después el número de títulos/tracks.
5. Presione la tecla CD PLAY/PAUSE / II (22/B), para reproducir el disco compacto.La lámpara de control PLAY (23) se ilumina.El CD es reproducido a partir de la primera pieza. El título actual aparecerá en el visualizador.
6. Para sacar un disco compacto, apriete la tecla CD STOP (24/E), abra la tapa
con la tecla OPEN (21) y extraiga cuidadosamente el disco compacto.
¡Se ruega tener atención con la nota referente a la reproducción de CDs y
CDRs en el formato MP3! El aparato no es apropiado para el formato MP3. El
disco comenzará a girarse, pero no se podrá reproducir el sonido.
Mantenga siempre cerrada la tapa de la cámara para discos compactos.
Nota: Si se ha colocado un compact disc de forma errónea, o todavía no se ha
33
E
5....-05-MC1019CD 28.07.2004 9:35 Uhr Seite 33
Page 34

colocado ninguno, aparecerá la notificación “- -”en el visualizador.
Descripción de las teclas CD
/ II PLAY/PAUSE (22/B): Permite la interrupción breve de la reproducción.
Pulsando esta tecla de nuevo, la reproducción
continuará a partir de este mismo punto (la lámpara de control PLAY (23) parpadea).
DOWN/I SKIP/SEARCH (25/A): 1 x presionar = La canción actual empieza de
nuevo.
2 x presionar = Salta al título anterior.
3 x presionar = Reproduce una canción previa
etc. Al mantener la tecla apretada, empieza la
busca de una canción.
UP/I SKIP/SEARCH (26/C): Con esta tecla puede saltar al título siguiente o
al subsiguiente etc. Al mantener la tecla apreta-
da, empieza la busca de una canción.
STOP (24/E): Se detiene el CD.
REPEAT (27/D): 1 x presionar (parpadea el LED-REPEAT (28)):
El título actual se repite continuamente.
2 x presionar (se ilumina el LED-REPEAT): El
CD completo se repite continuamente.
3 x presionar: La función está desactivada.
Reproducción programada
Permite la programación de una sucesión de títulos al azar.
1. Presione la tecla STOP.
2. Presione la tecla PROGRAM/MEMORY (29/F). En el display parpadea “0”
(espacio de memoria) y la lámpara de control PROG (30). Elija con las teclas
UP/DOWN-I / I SKIP/SEARCH el título deseado y presione de nuevo la
tecla PROGRAM/MEMORY. Repita el procedimiento hasta que haya elegido
todos los títulos.
3. Presione la tecla /II PLAY/PAUSE.Se inicia la reproducción. La indicación
PROG parpadea. Con esta tecla puede también interrumpir brevemente el programa (véa el apartado PLAY/PAUSE).
4. Si presiona una vez la tecla STOP, se para la reproducción, pero el programa
se sigue manteniendo.
5. Para la reproducción repetida del programa, se ruega presionar primero la tecla
PROGRAM/MEMORY (29/F) y a continuación la tecla / II PLAY/PAUSE.
El aparato para automáticamente después de la reproducción de todos los títulos
programados.El orden programado se quedará en la memoria hasta que cambie a
otro modo o al apartar el CD del portadisco es decir al desconectar el aparato.
34
E
5....-05-MC1019CD 28.07.2004 9:35 Uhr Seite 34
Page 35

Tiene la posibilidad de combinar los títulos programados con la función REPEAT.
Después de haber programado y activado el aparato, presione por favor la tecla
REPEAT (27/D) hasta 3x y las funciones se podrán aplicar como indicado bajo el
apartado “REPEAT”.
Indicación: Discos compactos:
• Con este aparato se pueden reproducir discos compactos con un diámetro de
8cm o 12cm . Nota:Solamente debe introducir un disco en el portadisco.
• Solamente se podrán reproducir con este aparato discos compactos Audio,
CD-R y CD-RW.
• Siempre debe introducir el disco compacto con la etiqueta hacia arriba en el
portadisco. Los discos compactos sólo se podrán reproducir por una cara.
• Huellas dactilares y polvo deberían ser despolvoreados cuidadosamente de la
cara de señal (cara sin etiqueta). La limpieza debería efectuarse con un movimiento ligero y en línea recta del interior al borde.
• Después de la reproducción deberían guardarse los discos compactos de
nuevo en el estuche para que no se rayen.
• No exponga discos compactos a la directa irradiación solar, a alta humedad o
durante mucho tiempo a altas temperaturas de calor.De esta forma evitará que
los discos compactos se deformen.
• No pegue papel sobre el disco compacto o escriba algo sobre éste.
• No rocie detergentes o aerosoles antiestáticos como es el caso con los fonógrafos.
Este aparato se ha examinado según las normativas actuales y vigentes de la
Comunidad Europea, como p.ej.compatibilidad electromagnética y directiva de
baja tensión y se ha construido según las más nuevas especificaciones en razón
de la seguridad.
No reservamos el derecho de efectuar modificaciones técnicas.
35
E
5....-05-MC1019CD 28.07.2004 9:35 Uhr Seite 35
Page 36

Garantía
Para el aparato comercializado por nosotros nos responsabilizamos con una
garantía de 24 meses a partir de la fecha de compra (factura de compra).
Durante el período de garantía nos encargamos gratuítamente de los defectos del
aparato y de los accesorios*), que se hayan originado por defectos del material o
de la fabricación. Dependiendo de nuestra estimación se realizará una reparación
o un cambio.¡Los servicios de garantía no prolangan la garantía, ni se incia por
ello un período nuevo de garantía!
Como comprobante para la garantía es válido la factura de compra.Sin este comprobante no se podrá realizar un cambio o una reparación gratuíta.
En el caso de garantía lleve el aparato base en el embalaje original y la factura de
compra a su concesionario.
*) Defectos en los accesorios de uso o en las piezas de desgaste (p.ej.escobillas
de carbón del motor, varillas amasadoras, correas de transmisión, mando a
distancia de repuesto, cepillos de dientes de repuesto, hojas de sierra etc.), como
también la limpieza, mantenimiento o el recambio de piezas de desgaste no recaen en la garantía e irán al cargo del cliente!
En caso de intervención ajena se expira la garantía.
Después de la garantía
Después de haber expirado la garantía se pueden realizar las reparaciones por el
concesionario o por el servicio de reparaciones. Los gastos irán al cargo del cliente.
36
E
5....-05-MC1019CD 28.07.2004 9:35 Uhr Seite 36
Page 37

Avvertenze generali per la sicurezza
Per evitare il rischio di incendio o di scosse, non si deve mai tenere l’apparecchio
sotto la pioggia o in ambienti umidi. Quindi non usare l’apparecchio nelle immediate
vicinanze di acqua, per esempio in prossimità di una vasca, di una piscina o in una
cantina umida.
Utilizzare l’apparecchio solo per l’uso previsto.
Collegare l’apparecchio esclusivamente ad una presa installata a norma. Fare
attenzione a che la tensione indicata corrisponda alla tensione della presa. Se si
impiegano alimentatori esterni, fare attenzione all’esattezza di polarità e di tensione, inserire le batterie sempre correttamente.
Collocare l’apparecchio in modo che le aperture per l’aerazione esistenti non vengano coperte.
Non togliere mai la protezione dell’apparecchio.Riparazioni non a regola d’arte
possono causare notevoli pericoli per l’utente.Se l’apparecchio presenta danni,
soprattutto nella zona del cavo di collegamento, non metterlo più in funzione, ma
farlo riparare prima da un esperto. Esaminare regolarmente il cavo di collegamento
alla rete per verificare che non ci siano danni.
Un cavo di collegamento difettoso può essere sostituito con un cavo equivalente
solo dal produttore, dal nostro servizio assistenza o da persone similmente qualificate, al fine di evitare pericoli.
Se l’apparecchio non viene usato per un periodo di tempo prolungato, togliere il
blocchetto alimentatore dalla presa ovvero estrarre le batterie.
Questi simboli possono trovarsi eventualmente sull’apparecchio e rimandano ai
seguenti elementi:
Il simbolo del lampo fa presente all’utente la presenza di pezzi all’interno
dell’apparecchio che possono produrre alte tensioni pericolose.
Il simbolo con il punto esclamativo fa presente all’utente la presenza di
importanti avvertenze per l’uso e la manutenzione nei fogli di accompagnamento dell’apparecchio.
Gli apparecchi dotati di questo simbolo lavorano con un „Laser classe 1“
per riprodurre i CD.Gli interruttori di sicurezza integrati hanno lo scopo di
impedire che l’utente venga esposto alla luce non visibile del laser, pericolosa per l’occhio umano, aprendo lo scomparto per i CD.
Questi interruttori di sicurezza non devono mai essere cavallottati né manipolati
perché altrimenti sussiste il rischio di esposizione alla luce del laser.
37
I
5....-05-MC1019CD 28.07.2004 9:35 Uhr Seite 37
Page 38

Descrizione degli elementi di comando
1 Interruttore POWER (ON/OFF)
2 Indicatore luminoso POWER
3 Manopola volume VOLUME
4 PHONES (Collegamento cuffie)
5 Visore LED
6 Interruttore on/off BASS
7 IR Sensore per il telecomando
8 Scala emittenti
9 Manopola TUNING
10 FUNCTION Selettore funzioni (RADIO/TAPE/CD)
11 BAND Selettore frequenza (AM/FM/FM ST)
12 Vano cassette
13 Sportello PULL (tirare)
14 II Tasto pausa – Cassetta
15 / Tasto Stop / Eject – Cassetta
16 Tasto avanzamento – Cassetta
17 Tasto riavvolgimento – Cassetta
18 Tasto per la riproduzione – Cassetta
19 Tasto per la registrazione – Cassetta
20 Vano CD
21 OPEN Tasto per l’apertura del vano CD
22 Tasto CD PLAY/PAUSE
23 Indicatore luminoso PLAY
24 Tasto STOP CD
25 Tasto DOWN CD SKIP (indietro)
26 Tasto UP CD SKIP (avanti)
27 REPEAT Tasto ripetizione
28 Indicatore luminoso REPEAT
29 PROGRAM Tasto programmazione
30 Indicatore luminoso PROGRAM
31 Altoparlanti
Retro
32 Collegamenti altoparlanti
33 Collegamento alla rete
34 Antenna a filo FM
Telecomando
A Tasto ricerca indietro I SKIP/SEARCH
B T asto / II PLAY/PAUSE
C Tasto ricerca avanti I SKIP/SEARCH
D Tasto REPEAT
E T asto STOP
F Tasto MEMORY
G Vano batterie
38
I
5....-05-MC1019CD 28.07.2004 9:35 Uhr Seite 38
Page 39

Messa in funzione dell’apparecchio/Introduzione
• Prima di mettere in funzione l’apparecchio leggere attentamente le istruzioni per
l’uso!
• Rimuovere, se presenti, le protezioni di trasporto su parte CD e cassetta.
• Scegliere un luogo idoneo per l’apparecchio, per esempio una superficie asciutta, piana e non scivolosa, dove poter comandare bene l’apparecchio.
• Fare attenzione che l’apparecchio sia sufficientemente areato!
• Collegare gli altoparlanti ai collegamenti (32) sul retro dell’ apparecchio.
Alimentazione elettrica
• Infilare la spina in una presa regolarmente installata con contatto di terra da
230 V, 50 Hz.La tensione di rete deve assolutamente corrispondere a quella
indicata sulla targa dati.
Inserire le batterie
(non incluso nella fornitura)
• Aprire il coperchio dello scomparto por tabatter ie (G) sul lato poster iore del telecomando.
• Inserire 2 batterie del tipo mignon LR 6 „AA“ 1,5V.Fare attenzione ad inserire i
poli correttamente (fondo del vano batterie o incisione sul lato esterno)! Nel
caso in cui il telecomando non venga utilizzato per periodi di tempo prolungati,
si consiglia di estrarre le batterie allo scopo di evitare che si verifichi una fuoriuscita dell’acido delle batterie.
• Quando si sostituiscono le batterie, si raccomanda di effettuare sempre la sostituzione dell’intero set e di non limitarsi a sostituire soltanto una delle batterie.
Attenzione: non gettare le batterie nei rifiuti domestici. Buttare le batterie usate
negli appositi contenitori o restituirle al negoziante.
Non buttare mai le batterie nel fuoco.
Uso generale
POWER ON/OFF (1): mette in funzione l‘ apparecchio oppure lo spegne. La lam-
pada spia POWER (2) indica la funzione.
BASS ON/OFF (8): serve per intensificare o ridurre i suoni bassi.
On = Tenere l’interruttore premuto.
Volume: Con il regolatore VOLUME (3) si può regolare il volume
desiderato.
PHONES (4): Inserire la spina delle cuffie nella presa per le cuffie: le
casse diventano mute.Nel caso in cui la presa non è adatta, adoperare un adattatore.
Altoparlanti (31): Collegare gli altoparlanti ai collegamenti (32) sul retro dell’
apparecchio.
39
I
5....-05-MC1019CD 28.07.2004 9:35 Uhr Seite 39
Page 40

Telecomando
infrarosso: per il comando senza fili fino ad una distanza di 5 metri. Se
questo raggio d’azione diminuisce, si devono sostituire le
batterie. Per il comando non vi devono essere ostacoli tra il
telecomando e il ricevitore a infrarossi dell‘apparecchio.
Sicurezza trasporto vano CD
Aprire il vano CD (20) premendo il tasto OPEN (21). r ima della messa in funzione,
se presente, togliere il dispositivo di sicurezza per il trasporto dal lettore CD.
Spegnere
L’apparecchio è fuori esercizio quando il selettore funzioni (10) è su TAPE o
POWER OFF e tutte le funzioni di scorrimento del nastro sono disattivate.
L’indicatore luminoso di controllo POWER (2) si spegne.Infine staccare la spina.
Funzionamento radio
1. Regolare l’interruttore (10) in corrispondenza della posizione RADIO.
2. Selezionare la banda di frequenza desiderata servendosi del selezionatore
bande (11).
Onda Media = AM (Mono), UKW = FM, UKW Stereo = FM ST.
3. Sintonizzare il canale desiderato con il tasto TUNING (9).
4. Se la ricezione di un’emittente FM Stereo è troppo debole e si sente un fruscio,
cercare di migliorare la ricezione girando e/o modificando la posizione e la
lunghezza dell’antenna. Se non è possibile ottenere un miglioramento, si consiglia di passare a FM (UKW Mono).
5. Nell’apparecchio è integrata un’antenna per ricevere emittenti AM.
L’apparecchio può essere rivolto verso l’emittente girandolo e modificandone la
posizione. In questa frequenza vengono trasmesse solo trasmissioni in “mono”.
Funzionamento registratore
Riprodurre cassette
1. Scegliere la funzione TAPE (10).
2. Aprire lo sportello (13).
3. Premere il tasto di emissione (15) / per aprire il vano cassette (12).
4. Inserire una cassetta audio con il nastro rivolto verso il basso e disporre il lato
da ascoltare rivolto verso l’esterno.Chiudere il vano cassette.
5. Premere il tasto di riproduzione (18), per la riproduzione della cassetta.
6. Per interrompere la riproduzione, premere il tasto / Stop/Eject (15).
7. Se necessario avanzare o riavvolgere il nastro con i tasti a freccia. = avanzamento (16), = riavvolgimento (17). Passando da una funzione all’altra o per
interrompere la funzione premere sempre il tasto / Stop/Eject (15).Si evitano cos” guasti sia all’apparecchio che al nastro.
8. Premendo nuovamente il tasto / Stop/Eject si apre lo sportello del vano cas-
sette.
40
I
5....-05-MC1019CD 28.07.2004 9:35 Uhr Seite 40
Page 41

9. Per interrompere brevemente la riproduzione, premere il tasto per la pausa II
(14). Premendo nuovamente si continua la riproduzione.
Registrare cassette
1. Inserire una cassetta audio con il lato da registrare rivolto in avanti.Accertarsi
che la cassetta non sia protetta contro la registrazione (la linguetta in alto non
deve essere staccata).
2. Selezionare la sorgente di registrazione con il selettore funzioni (10) e dare
avvio a questa sorgente.La registrazione avviene dalla sorgente acustica che
state ascoltando.Il livello di registrazione viene regolato automaticamente.
Modifiche di tono e volume non comportano una modifica della registrazione.
3. Premere il tasto di registrazione (19), (il tasto per la riproduzione si abbassa automaticamente). Inizia la registrazione. Tutte le registrazioni precedenti si
cancellano automaticamente.
4. Potete interrompere brevemente la registrazione con il tasto per la pausa II (14)
o fermarla con il tasto / Stop/Eject (15).
Funzionamento CD
Così si riproduce un CD
1. Porre il selettore (10) su CD.
2. Premere il tasto per aprire il coperchio del vano CD (21).
3. Inserire direttamente sopra il cilindro una CD audio con l’etichetta sulla par te
superiore e chiudere il coperchio del vano (20).
4. Nel display (3) appare “- -“ e poi il numero dei titoli/track.
5. Per riprodurre il CD premere il tasto / II CD PLAY/PAUSE (22/B). L’indicatore
luminoso di controllo PLAY (23) è acceso. La lettura del CD inizierà dalla prima
traccia. Nel display appare il brano attualmente riprodotto.
6. Per togliere un CD, premere il tasto CD STOP (24/E), aprire il coperchio del
vano con il tasto OPEN (21) e togliere delicatamente il CD.
Prestare attenzione a questa avvertenza per la riproduzione di CD e CDR in
formato MP3! L’apparecchio non è adatto a MP3. Sebbene il CD inizi a girare,
non è possibile riprodurre la funzione audio.
Tenere sempre chiuso il coperchio.
Attenzione: se un dischetto viene inserito rovesciato, o se non c’è nessun dischet-
to, nel display appare “„- -”.
41
I
5....-05-MC1019CD 28.07.2004 9:35 Uhr Seite 41
Page 42

Descrizione dei tasti CD
/ II PLAY/PAUSE (22/B): La ripetizione può essere interrotta. Premendo
nuovamente il tasto, si rimette in funzione la
ripetizione allo stesso punto di prima (l’indicatore
luminoso PLAY (23) lampeggia).
DOWN/I SKIP/SEARCH (25/A): Premere 1 volta = Dà avvio al brano attuale
dall’inizio.
Premere 2 volte = Passa al brano successivo.
Premere 3 volte = Riproduce un brano precedente ecc.Tenendo premuto il tasto, si mette in
funzione una ricerca dei brani.
UP/I SKIP/SEARCH (26/C): Con questo tasto si può passare al prossimo
brano o successivi.Tenendo premuto il tasto, si
mette in funzione una ricerca dei brani.
STOP (24/E): si ferma il CD.
REPEAT (27/D): Premendo 1 x (il LED REPEAT lampeggia (28)::
il brano attuale viene riprodotto in continuazione.
Premendo 2 x (il LED REPEAT rimane acceso)
tutto il CD viene continuamente riprodotto.
Premendo 3 x la funzione è disattivata.
Ripetizione programmata
Permette la programmazione di una sequenza di brani desiderata.
1. Premere il tasto STOP.
2. Premere il tasto PROGRAM/MEMORY (29/F). Nel display si illumina „0“ (spazio
memoria) e la spia di controllo PROG (30). Scegliere il brano desiderato con i
tasti UP/DOWN I / I SKIP/SEARCH e premere nuovamente il tasto PROGRAM/MEMORY. Ripetere la procedura finché avete selezionato tutti i brani.
3. Premere il tasto /II PLAY/PAUSE.La riproduzione ha inizio. Il display PROG
lampeggia. Con questo tasto si può anche sospendere per un attimo il programma (v.cap. PLAY/PAUSE).
4. Premendo di nuovo il tasto STOP, si ferma la riproduzione, tuttavia il program-
ma rimane.
5. Per riprodurre nuovamente il programma premere prima il tasto
PROGRAM/MEMORY (29/F) e poi il tasto /II PLAY/PAUSE.
Quando tutti i brani programmati sono stati riprodotti l’apparecchio si blocca automaticamente. La successione programmata rimane nella memor ia finché si passa a
un‘altra modalità, p.e.TAPE o il CD viene prelevato dal vano CD o l‘apparecchio
viene spento.
42
I
5....-05-MC1019CD 28.07.2004 9:35 Uhr Seite 42
Page 43

Avete la possibilità di combinare i brani programmati con la funzione REPEAT.
Dopo aver programmato e avviato l’apparecchio dovete premere il tasto REPEAT
(27/D) fino a 3x e le funzioni possono essere applicate come descritto in
“REPEAT”.
Nota: Compact Disc:
• Con questo apparecchio si possono riprodurre sia CD di 8 cm che CD di 12 cm
di diametro.
Nota: inserire un solo disco nel vano CD.
• Con questo apparecchio si possono riprodurre solo CD audio, CD-R e CD–RW.
• Inserire sempre i CD nel rispettivo vano con l’etichetta sempre rivolta verso l’alto.I Compact disc possono essere riprodotti solo su un lato.
• Togliere accuratamente con un panno morbido impronte di dita e polvere dal
lato segnale del CD (lato senza etichetta). Pulire con un leggero movimento rettilineo dall’interno verso il bordo.
• Dopo la riproduzione conservare i CD nella loro custodia affinché non si graffino.
• Evitare l’esposizione diretta dei CD ai raggi del sole, ad umidità elevata o ad
alte temperature per un lungo periodo di tempo affinché non si deformino.
• Non incollare carta sui CD né scriverci sopra qualcosa.
• Non usare detergenti o spray antistatici come per i fonografi.
Questo apparecchio è stato controllato sulla base di tutte le direttive CE attuali in
vigore in questo settore, quali per esempio la normativa in materia di compatibilità
elettromagnetica e la direttiva in materia di bassa tensione, ed è stato costruito
conformemente alle norme di sicurezza più moderne.
Con riserva di apportare modifiche tecniche.
43
I
5....-05-MC1019CD 28.07.2004 9:35 Uhr Seite 43
Page 44

Garanzia
Per l’apparecchio da noi messo in commercio ci assumiamo una garanzia di
24 mesi dalla data di acquisto (scontrino).
Durante la garanzia noi ci impegniamo ad eliminare gratuitamente i guasti dell’apparecchio o degli accessori*), dovuti a difetti di materiale o di fabbricazione, riparandoli o, a nostra discrezione, sostituendoli.Le prestazioni in garanzia danno luogo a
una proroga della garanzia né danno diritto ad una nuova garanzia!
Per la garanzia è sufficiente lo scontrino di acquisto.Senza questo scontrino non
sussiste il diritto né ad una sostituzione né ad una riparazione gratuita.
In caso di garanzia consegnare al vostro rivenditore l’apparecchio base nell’imballaggio originale unitamente allo scontrino.
*) Danni agli accessori non giustificano automaticamente lo scambio gratuito dell’apparecchio completo.Si prega di mettersi in contatto con la nostra centrale telefonica. Danni alle parti di vetro oppure fratture ai pezzi di materia plastica sono obbligatoriamente a spese del cliente.
La riparazione di pezzi d’uso ovvero soggetti a logoramento (cursori, ganci impastatori, cinghie di trasmissione, telecomandi di ricambio, spazzolini di ricambio,
lame di seghe ecc.) come anche operazioni di pulizia e manutenzione o la sostituzione di pezzi soggetti a logoramento non rientrano nella garanzia e quindi sono a
pagamento!
La garanzia si annulla nel caso di intervento da parte di terzi.
Dopo la garanzia
Al termine della garanzia le riparazioni possono essere eseguite dietro pagamento
dal corrispettivo negozio specializzato o servizio riparazioni.
44
I
5....-05-MC1019CD 28.07.2004 9:35 Uhr Seite 44
Page 45

General safety instructions
To avoid the risk of fire or an electric shock, you should not expose the device to
rain or moisture.Consequently, do not use the device in the immediate vicinity of
water - for example near a bath tub, a swimming pool or in a damp cellar.
Use the device only for the intended purpose.
Only connect the device at a properly installed plug socket.Pay attention that the
specified voltage corresponds to the voltage of the plug socket.
When using external mains supply, pay attention to the correct polarity and voltage.
Always place the batteries in the correct direction.
Assemble the device in such a way that the available ventilation openings are not
covered.
Never open the housing of the device. Incorrect repairs can constitute a considerable risk for the user.Should the device become damaged, in particular the mains
supply cable, do not operate the device any longer, but rather have it repaired by an
expert. Check the mains supply cable regularly for damage.
For safety reasons a broken or damaged mains lead may only be replaced by an
equivalent lead from the manufacturer, our customer service department or a
similary qualified person.
If the device is not used for a longer period, remove the plug connector from the
plug socket or take out the batteries.
These symbols may be found on the machine and are intended to indicate the
following:
The lightning symbol should advise the user of parts in the inside of the
device which carry dangerously high voltage levels.
The symbol with an exclamation mark should advise the user of important
operation or maintenance instructions in the accompanying documentation.
Devices bearing this symbol work with a „class 1 laser“ for tracing the CD.
The built-in safety switches should prevent the user being exposed to dangerous laser light, which is invisible to the human eye, when the CD compartment is opened.
Under no circumstances should these safety switches be bypassed or manipulated,
as this could result in a danger of exposure to the laser light.
45
GB
5....-05-MC1019CD 28.07.2004 9:35 Uhr Seite 45
Page 46

Description of the Controls
1 POWER switch (ON/OFF)
2 POWER control lamp
3 VOLUME
4 PHONES (headphone connection)
5 LED display
6 BASS on/off switch
7 IR Sensor for the remote control
8 Station scale
9 TUNING control
10 FUNCTION Function selector (RADIO/TAPE/CD)
11 BAND Band selector switch (AM/FM/FM ST)
12 Cassette compartment
13 PULL flap
14 II Pause key - cassette
15 / Stop/Eject key - cassette
16 forward button – cassette
17 rewind button – cassette
18 Playback key - cassette
19 Recording key - cassette
20 CD compartment
21 OPEN button to open the CD compartment
22 CD PLAY/PAUSE button
23 PLAY control lamp
24 CD STOP button
25 DOWN CD SKIP button (back)
26 UP CD SKIP button (ahead)
27 REPEAT button
28 REPEAT control lamp
29 PROGRAM programming button
30 PROGRAM control lamp
31 Loudspeakers
Reverse
32 Loudspeaker connections
33 Mains connection
34 FM throw-out aerial
Remote control
AI SKIP/SEARCH button reverse search
B / II PLAY/PAUSE button
C I SKIP/SEARCH button forward search
D REPEAT button
E STOP button
F MEMORY button
G Battery compartment
46
GB
5....-05-MC1019CD 28.07.2004 9:35 Uhr Seite 46
Page 47

Start-up of the device/Introduction
• Read the operating instructions thoroughly before the start-up!
• Remove any transport safety equipment on the CD and cassette sections.
• Select an appropriate location for the device, e.g.a dry, flat, non-slip surface on
which the device can be easily operated.
• Make sure that the device is adequately ventilated!
• Connect the loudspeakers to the connections (32) on the rear.
Power supply
• Insert the plug into a properly installed 230 V, 50 Hz power socket.Please
ensure that the mains voltage corresponds to the information on the type plate.
Inserting the Batteries
(not supplied)
• Open the lid of the battery compartment (G) on the back of the remote control.
• Insert 2 batteries of type LR 6 „AA“ 1,5V.Please ensure that the polarity is correct (see the floor of the battery compartment or the inscription on the outside)!
If the remote control is not used for a prolonged period, remove the batteries in
order to prevent battery acid leaking.
• Always replace the complete set of batteries.Do not replace just one batter y.
Warning: batteries are not to be disposed of together with domestic wastes.
Dispose of the used batteries at the relevant collection bin or at your dealer’s.
Never throw batteries into the fire.
General Operation
POWER ON/OFF (1): Switches the unit to „ready for operation“ or to „off“.The
POWER (2) control lamp shows the function.
BASS ON/OFF (8): to increase or decrease the bass output.
On = switch pressed.
Volume: You can set the desired volume using the VOLUME control
(3).
PHONES (4): Insert the plug of a set of headphones into the headphone
socket – the loudspeakers are „muted“.If your headphone
plug does not fit, please use a suitable adapter.
Loudspeakers (31): Connect the loudspeakers to the connections (32) on the
rear.
Infrared
remote control: For operating the music centre from a distance of up to 5
metres without a lead. If the range of the remote control is
reduced, the batteries have to be replaced.When operating
the remote control ensure that there is nothing blocking the
view between the remote control unit and the infra-red
receiver on the music centre.
47
GB
5....-05-MC1019CD 28.07.2004 9:35 Uhr Seite 47
Page 48

CD deck transport protection
Please open the CD compartment (20) by pressing the OPEN button (21). Remove
the transport protection from the CD player if present before use.
Switching off
The machine is switched off if the function selector switch (10) is in the TAPE or
POWER OFF position and all tape functions are switched off.The POWER (2) control lamp goes off.Then remove the mains lead.
Radio Mode
1. Turn the function selector switch (10) to the RADIO position.
2. Select the desired frequency band with the band selection switch (11).
Medium wave = AM (mono), VHF = FM, VHF Stereo = FM ST.
3. Tune in the desired station with the station adjustment knob TUNING (9).
4. If reception is poor for an FM Stereo station and the station rustles, try to improve reception by turning, winding and unwinding the antenna or by modifying its
length. If it does not improve, switch to FM (VHF mono).
5. An aerial is integrated into the device for the reception of AM stations.The
machine can be aligned to the station by turning it. In this frequency band programs are transmitted in „mono“ only.
Cassette Operation
Playing Cassettes
1. Select the function TAPE (10).
2. Open the flap (13).
3. Press the / Stop/Eject button (15) in order to open the cassette compartment (12).
4. Push a recorded audio cassette, with the tape downwards and the listening side
facing forwards, into the compartment.Close the cassette compartment.
5. Press the playback key (18) to listen to the tape.
6. With the / stop/eject key (15) you can stop playback.
7. Wind the tape forwards or backwards if necessary in the direction of the arrow
keys. = forwards (16), = reverse (17). Always press the / stop/eject key
(15) when changing the direction or stopping the tape.This prevents damage to
the machine and the tape.
8. If the / stop/eject button is pressed again the flap of the cassette compartment opens.
9. In order to interrupt playback briefly, press the II PAUSE button (14).Pressing
again continues playback.
Recording Cassettes
1. Insert an audiocassette with the side on which you wish to record facing forwards.Ensure that the cassette is not copy-protected (the copy protection tab
on the top narrow side of the cassette must not have been removed).
48
GB
5....-05-MC1019CD 28.07.2004 9:35 Uhr Seite 48
Page 49

2. Select the source from which you wish to record with the function switch (10)
and then start playback from this source if necessary. The sound source which
you are listening to is the one from which the recording is made.The recording
level is controlled automatically. Any changes to the sound and volume do not
affect the recording.
3. Please press the record button (19) (the playback button is automatically
pressed down at the same time). Recording now begins. All previous recordings
are automatically erased.
4. The recording can be interrupted briefly using the II pause key (14), or stopped
by means of the / stop/eject button (15).
CD Mode
This is how you play a CD
1. Push the function selection switch (10) to CD.
2. Press the key to open the CD deck cover (21).
3. Insert a music CD with the label facing upwards on the central button and close
the CD deck cover (20).
4. „- -“ appears in the display (3) followed by the number of tracks.
5. Press the / II CD PLAY/PAUSE button (22/B) to listen to the CD.The PLAY
control lamp (23) lights up.The CD will play from the first title.The current track
appears in the display.
6. To remove a CD, press the CD STOP key (24/E), open the CD deck with the
OPEN key (21) and take out the CD carefully.
Please note these instructions for playing back CDs and CDRs in MP3 format! The device is not able to play back MP3 files.The CD begins to turn, but
the sound cannot be heard.
Always keep the CD deck cover closed.
Note: If a disc is inserted incorrectly, or no disc is inserted, the symbol „- -“ appears
in the display.
Description of the CD buttons
/ II PLAY/PAUSE (22/B): You can briefly interrupt the playing. Renewed
pressing of the button will re-start the playing
from the same place (the PLAY control lamp (23)
flashes).
DOWN/I SKIP/SEARCH (25/A): Press once = This starts the current track again
from the beginning.
Press a second time = This jumps back to the
previous track.
Press a third time = This plays the song before
etc. If the button is kept pressed down, the
machine starts to search through the tracks.
49
GB
5....-05-MC1019CD 28.07.2004 9:35 Uhr Seite 49
Page 50

UP/I SKIP/SEARCH (26/C): With this button you can jump to the following
track or the next track but one etc. If the button is
kept pressed down, the machine starts to search
through the tracks.
STOP (24/E): The CD is stopped.
REPEAT (27/D): Press once (the REPEAT LED (28) flashes):the
current track is repeated continuously.
Press a second time (the REPEAT LED emits a
fixed light):the whole CD is played continuously.
Press a third time: the function is deactivated.
Programmed Play
This can be used to program any desired sequence of tracks.
1. Press the STOP key.
2. Press the PROGRAM/MEMORY key (29/F). "0" (storage location) flashes in the
display together with the PROG (30) control lamp.Use the SKIP UP/DOWN I /
I buttons to select the desired track and then press the PROGRAM/MEMORY
button again.Repeat the procedure until all the desired tracks are selected.
3. Press the /II PLAY/PAUSE button.The playback starts. The PROG display flas-
hes.Press this button to pause briefly the playback (see the section on
PLA Y/PAUSE).
4. Press once the STOP key to stop the playback while retaining the program.
5. To play the programme again, please first press the PROGRAM/MEMORY button
(29/F) and then the / II PLAY/PAUSE key.
The device stops automatically once the entire sequence of programmed tracks is
completed.The programmed order remains in the memory until you select another
mode, e.g.TAPE, the CD is removed from the CD compartment or the machine is
switched off.
It is also possible to combine the programmed tracks with the REPEAT function. After
you have programmed and started the device, please press the REPEAT button
(27/D) up to three times and then you can use the functions as described under
„REPEAT“.
Note: Compact Disks:
• This device is able to play CDs with a diameter of 8 cm and 12 cm.Note: Only
place one disc in the CD compartment at a time.
• Only audio CDs, CD-R and CD-RW disks can be played on this machine.
• Always place the CD into the CD compartment with the label facing upwards.
Compact discs can only be played on one side.
• Fingerprints and dust should be carefully removed from the recorded side of the
CD (the side without the label) with a soft cloth.Wipe off in straight lines from the
centre to the edge.
50
GB
5....-05-MC1019CD 28.07.2004 9:35 Uhr Seite 50
Page 51

• After being played, CDs should be returned to their case so that they do not
become scratched.
• Do not expose CDs to direct sunlight, high humidity levels or prolonged high
temperatures in order to prevent them from warping.
• Do not adhere any paper to the CD or write on it.
• Do not spray any cleaning agents or antistatic sprays on to the CD as in the
case of phonographs.
This device has been tested according to all relevant current CE guidelines,
such as electromagnetic compatibility and low voltage directives, and has been
constructed in accordance with the latest safety regulations.
Subject to technical changes without prior notice!
Guarantee
The device supplied by our Company is covered by a 24 month guarantee starting
on the date of purchase (receipt).
During the life of the guarantee any fault of the device or its accessories *) ascribable to material or manufacturing defects will be eliminated free of charge by repairing or, at our discretion, by replacing it.The guarantee services do not entail an
extension of the life of the guarantee nor do they give rise to any right to a new
guarantee!
Proof of the guarantee is provided by the proof of purchase.Without proof of
purchase no free replacement or repair will be carried out.
For repairs or replacement during the life of the guarantee return the device in its
original packing together with the proof of purchase to your dealer.
*) Damage to accessories does not mean automatic free replacement of the whole
machine. In such cases please contact our hotline. Broken glass or breakage of
plastic parts are always subject to a charge.
Defects to consumables or parts subject to wearing (e.g. motor pistons, kneading
blades, drive shafts, spare remote control, spare toothbrushes, saw blades, etc.) as
well as cleaning, maintenance or the replacement of said parts are not covered by
the guarantee and hence are to be paid!
The guarantee lapses in case of unauthorized tampering.
After the expiry of the guarantee
After the expiry of the guarantee repairs can be carried by the competent dealer or
repair service against the payment of the ensuing costs.
51
GB
5....-05-MC1019CD 28.07.2004 9:35 Uhr Seite 51
Page 52

Ogólne wskazówki związane z bezpieczną obsługą
Urządzenie chronić należy przed deszczem i wilgocią, aby zapobiec groźbie
pożaru lub porażeniu prądem. Nie należy go więc używać w pobliżu wody, a
więc przykładowo w pobliżu wanny, basenu lub w zawilgoconej piwnicy.
Urządzenie należy używać tylko zgodnie z jego przeznaczeniem.
Urządzenie należy podłączyć tylko i wyłącznie do przepisowo zamontowanego
gniazdka.
Proszę zwrócić uwagę na to, żeby podane napięcie zgadzało się z napięciem w
gniazdku.
W przypadku używania oddzielnych zasilaczy należy zwrócić uwagę na biegunowość i napięcie, baterie muszą zostać włożone do urządzenia zgodnie z oznaczoną biegunowością.
Urządzenie należy w taki sposób ustawić, żeby istniejące otwory wentylacyjne
nie zostały przykryte.
Nigdy nie wolno otwierać obudowy urządzenia. Niefachowo przeprowadzone
naprawy mogą być groźne w skutkach dla użytkownika. Przy uszkodzeniu
urządzenia, w szczególności kabla sieciowego, urządzenie nie może być
używane dopóki nie zostanie naprawione przez osobę z wymaganymi uprawnieniami. Przewód zasilający należy regularnie sprawdzać, czy nie jest uszkodzony.
W razie awarii proszę nie naprawiać urządzenia samemu lecz skorzystać z
pomocy autoryzowanego specjalisty.Jeżeli przewód zasilający nieodłączalny
ulegnie uszkodzeniu, to powinien on być wymieniony u wytwórcy lub w specjalnym zakładzie naprawczym albo przez wykwalifikowaną osobę w celu uniknięcia zagrożenia.
Jeżeli urządzenie nie będzie przez dłuższy czas używane, należy wyciągnąć
wtyczkę z gniazdka lub wyjąć baterie.
Poniższe symbole mogą znajdować się na urządzeniu i mają zwracać Państwa
uwagę na:
Symbol błyskawicy ma zwrócić uwagę użytkownika na znajdujące się
we wnętrzu urządzenia części, które są pod niebezpiecznie wysokim
napięciem.
Symbol z wykrzyknikiem ma zwrócić uwagę użytkownika na znajdujące
się w załączonych dokumentach ważne wskazówki związane z
obsługą i konserwacją urządzenia.
Urządzenia z tym symbolem używają do odczytywania dźwięku z płyty
kompaktowej „Lasera klasy A“. Wbudowany wyłącznik bezpieczeństwa
ma zapobiec temu, żeby użytkownik w czasie otwierania kieszeni odtwarzacza płyt kompaktowych został poddany niebezpiecznemu dla
ludzkich oczu oddziaływaniu niewidocznego światła lasera.
52
PL
5....-05-MC1019CD 28.07.2004 9:35 Uhr Seite 52
Page 53

Wyłącznika tego nie należy w żadnym wypadku zmostkować lub też przy nim
manipulować, ponieważ grozi to niebezpieczeństwem, że użytkownik poddany
zostanie oddziaływaniu niebezpiecznego dla ludzkich oczu niewidocznego
światła lasera.
Opis elementów obsługi
1 Włącznik POWER (ON/OFF)
2 Lampka kontrolna POWER
3 VOLUME regulator głośności
4 PHONES (Podłączenie na słuchawki)
5 Wyświetlacz LED
6 Włącznik/ wyłącznik BASS
7 IR Sensor zdalnego sterowania
8 Skala radiowa
9 Regulator -TUNING
10 FUNCTION Przełącznik wyboru funkcji (RADIO/TAPE/CD)
11 BAND Przełącznik wyboru pasma (AM/FM/FM ST)
12 Kieszeń kasety
13 Pokrywka PULL (ciągnąć)
14 II Przycisk przerwa - kaseta
15 / Przycisk Stop/ Wyrzucanie - kaseta
16 Przycisk przewijania do przodu – kaseta
17 Przycisk przewijania do tyłu – kaseta
18 Przycisk odtwarzania - kaseta
19 Przycisk nagrywania - kaseta
20 Pomieszczenie na CD
21 Przycisk OPEN do otwierania pojemnika na CD
22 Przycisk CD PLAY/PAUSE
23 Lampka kontrolna PLAY
24 Przycisk CD STOP
25 DOWN CD SKIP przejście do przodu
26 UP CD SKIP przejście do tyłu
27 Przycisk powtarzania REPEAT
28 Lampka kontrolna REPEAT
29 Przycisk programowania PROGRAM
30 Lampka kontrolna PROGRAM
31 Głośnik
Strona odwrotna
32 Podłączenia głośników
33 Podłączenie do sieci
34 Drut anteny FM
53
PL
5....-05-MC1019CD 28.07.2004 9:35 Uhr Seite 53
Page 54

Zdalne sterowanie
A Przycisk przeszukiwanie do tyłu I SKIP/SEARCH
B Przycisk / II PLAY/PAUSE
C Przycisk przeszukiwanie do przodu I SKIP/SEARCH
D Przycisk REPEAT
E Przycisk STOP
F Przycisk MEMORY
G Miejsce na baterie
Uruchomienie urządzenia / Wprowadzenie
• Przed uruchomieniem urządzenia proszę przeczytać dokładnie instrukcję
obsługi!
• Usunąć zabezpieczenia transportowe części kasetowej i do płyt CD.
• Proszę wybrać odpowiednie miejsce do ustawienia urządzenia np. suchą,
równą i nie śliską powierzchnię, na której będziecie Państwo mogli łatwo
obsługiwać urządzenie.
• Proszę uwzględnić wystarczającą wentylację urządzenia!
• Proszę podłączyć głośniki do podłączeń (32) z tyłu urządzenia.
Zasilanie prądem
• Podłączyć wtyczkę do prawidłowo zainstalowanego gniazda o napięciu 230
V 50 Hz. Zwrócić uwagę na zgodność napięcia w sieci z danymi na tabliczce.
Wkładanie baterii
(nie objęte dostawą)
• Proszę zdjąć osłonę kieszeni na baterie (G) znajdującą się z tyłu pilota.
• Proszę umieścić w środku 2 baterii typu LR 6 „AA“ 1,5V. Proszę pamiętać o
właściwej polarności (patrz spód kieszeni na baterie ewent. wytłoczenie na
stronie zewnętrznej)! Jeżeli przez dłuższy czas nie korzystają Państwo z
pilota proszę wyjąć baterie, aby zapobiec „wyciekowi” kwasu akumulatorowego.
• Proszę zawsze wymieniać komplet baterii, proszę nie zmieniać tylko jednej
baterii.
Uwaga: Baterii nie należy wrzucać do zwykłych domowych śmieci. Zużyte
baterie proszę oddać do punktu zbiórki odpadów specjalnych lub do punktu
sprzedaży.
Nigdy nie wrzucaj baterii do ognia.
54
PL
5....-05-MC1019CD 28.07.2004 9:35 Uhr Seite 54
Page 55

Ogólne zasady obsługi
POWER ON/OFF (1): przełącza urządzenie z „włącznik” na „wyłącznik”.
O działaniu informuje lampka kontrolna POWER (2).
BASS włącznik/
wyłącznik (8): służy do wzmacniania lub redukcji basów.
Włączone = Włącznik wciśnięty.
Głośność: Przy pomocy regulatora VOLUME (3) można ustawić
żądaną siłę głosu.
PHONES (4): włożyć wtyczkę słuchawek w gniazdko dla słuchawek,
głośniki zostają wyciszone. Jeżeli wtyczka słuchawek nie
pasuje do gniazdka, należy użyć odpowiedniego adap-
tera.
Głośnik (31): Proszę podłączyć głośniki do podłączeń (32) z tyłu
urządzenia.
Pilot na
podczerwień: dla zdalnej obsługi z odległości do 5 metrów. Jeżeli
odległość ta zmniejszy się, należy wymienić baterie. W
trakcie użytkowania należy zwrócić uwagę na zachowanie
wolnej przestrzeni pomiędzy pilotem zdalnego sterowania
a odbiornikiem promieni podczerwonych urządzenia.
Zabezpieczenie transportowe do kieszeni na płyty CD
Proszę otworzyć szufladkę płyty CD (20), naciskając przycisk OPEN (21). Przed
uruchomieniem proszę usunąć zabezpieczenie transportowe odtwarzacza płyt
kompaktowych, o ile zostało założone.
Wyłączanie
Urządzenie jest wyłączone, jeżeli przełącznik wyboru funkcji (10) znajduje się w
pozycji TAPE lub POWER OFF i wszystkie funkcje przesuwu taśmy są wyłączone. Lampka kontrolna POWER (2) gaśnie. Na koniec proszę wyciągnąć wtyczkę
z kontaktu.
Działanie radia
1. Przełącznik wyboru funkcji (10) ustawić w pozycji RADIO.
2. Pożądane pasmo częstotliwości wybrać przełącznikiem wyboru pasma (11).
Fale średnie = AM (mono), UKF-Mono = FM, UKF-Stereo = FM ST.
3. Proszę wystroić żądaną stację przy pomocy gałkido wystrajania stacji
TUNING (9).
4. W przypadku, gdy odbiór stacji nadającej w stereo na falach UKF jest za
słaby lub słyszalne są zakłócenia, proszę spróbować obrócić, zgiąć lub
zmienić długość anteny aby polepszyć odbiór. Gdy nie została osiągnięta
poprawa zalecamy przełączenie na UKF-Mono.
5. W celu odbioru stacji AM w urządzeniu zintegrowana jest antena. Kręcąc i
zmieniając pozycję urządzenie można ustawić na stację nadawczą. W tym
paśmie częstotliwości programy nadawane są tylko monofonicznie.
55
PL
5....-05-MC1019CD 28.07.2004 9:35 Uhr Seite 55
Page 56

Magnetofon
Odtwarzanie kaset
1. Proszę wybrać funkcję TAPE (10).
2. Otworzyć przykrywkę (13).
3. Proszę wcisnąć przycisk / Stop/ Wyrzucanie kasety (15) celem otwarcia
kieszeni kasety (12).
4. Nagraną kasetę magnetofonową należy wsunąć do kieszeni taśmą do dołu i
tą stroną do przodu, która ma być słuchana. Proszę zamknąć kieszeń na
kasety.
5. Proszę wcisnąć przycisk odtwarzania (18), by rozpocząć odtwarzanie
taśmy.
6. Przyciskiem / Stop/ Wyrzucanie (15) kasety mogą Państwo zatrzymać
odtwarzanie.
7. W razie potrzeby proszę przewinąć taśmę przy pomocy przycisków oznaczonych strzałkami odpowiednio do przodu lub do tyłu. = do przodu (16),
= do tyłu (17). Między przełączaniem kierunku przesuwu taśmy i w celu
zatrzymania biegu taśmy proszę zawsze używać przycisk / Stop/
Wyrzucanie kasety (15) . W ten sposób unikają Państwo uszkodzeń urządzenia lub taśmy.
8. Po ponownym wciśnięciu przycisku / Stop/ Wyrzucanie kasety otwiera
się pokrywka kieszeni kasety.
9. By na krótko przerwać odtwarzanie, proszę wcisnąć przycisk II PAUSE (14).
Dla kontynuacji odtwarzania wcisnąć ten klawisz ponownie.
Nagrywanie kaset
1. Proszę włożyć kasetę audio, stroną nagrywaną do przodu. Proszę się
upewnić, że kaseta nie ma zabezpieczenia przed kopiowaniem (bolec blokady w górnej węższej części kasety nie może być wyłamany).
2. Przy pomocy przycisku funkcyjnego (10) proszę wybrać źródło nagrywania i
włączyć je. Nagrywanie odbywa się ze źródła, które Państwo słyszycie.
Poziom nagrywania dostrajany jest automatycznie-. Zmiany dźwięku i siły
głosu nie zmieniają jakości nagrania.
3. Proszę wcisnąć przycisk nagrywania (19) (przycisk odtwarzania jest
wciskany razem z nim samoczynnie). Nagrywanie rozpoczyna się. Wszystkie
wcześniejsze nagrania kasowane są automatycznie.
4. Przyciskiem II Pause (14) mogą Państwo na krótko przerwać nagrywanie lub
zatrzymać je przyciskiem / Stop/ Wyrzucanie kasety (15).
Działanie CD
Płyty kompaktowe odtwarzać można w następujący sposób
1. Przełącznik wyboru funkcji (10) proszę ustawić na CD.
2. Aby otworzyć pokrywę kieszeni CD (21) proszę nacisnąć przycisk.
56
PL
5....-05-MC1019CD 28.07.2004 9:35 Uhr Seite 56
Page 57

3. Proszę włożyć CD z nagraniem na centralny stożek nadrukiem do góry i
zamknąć pokrywę kieszeni CD (20).
4. W wyświetlaczu (3) pojawia się ”--”, a następnie liczba tytułów.
5. Proszę wcisnąć przycisk / II CD PLAY/PAUSE (22/B), by uruchomić odtwarzanie płyty kompaktowej. Lampka kontrolna PLAY (23) świeci się. Płyta
kompaktowa odtwarzana będzie od pierwszego tytułu. Aktualna piosenka
pojawia się w wyświetlaczu.
6. Aby wyjąć CD należy nacisnąć przycisk CD STOP (24/E), otworzyć przy
pomocy przycisku OPEN (21) pokrywę CD i unieść ostrożnie CD.
Proszę uwzględnić tą wskazówkę odnośnie odtwarzania płyt CD i CDR w
formacie MP3! Urządzenie to nie obsługuje formatu MP3. Wprawdzie
płyta kompaktowa zaczyna się kręcić, jednak dźwięk nie jest odtwarzany.
Prosz zawsze zamyka pokryw.
Wskazówka: Jeżeli płyta kompaktowa zostanie włożona odwrotną stroną,
wzgl. nie zostanie włożona żadna płyta, to w wyświetlaczu pojawia się meldunek „- -”.
Opis przycisków odtwarzacza płyt CD
/ II PLAY/PAUSE (22/B): odtwarzanie może zostać na krótko przerwane.
Ponowne naciśnięcie klawisza rozpocznie odtwarzanie płyty w tym samym miejscu (lampka
kontrolna PLAY (23) miga).
DOWN/I SKIP/SEARCH (25/A):Naciśnięcie 1x = Aktualny utwór odtwarzany
jest od początku.
Naciśnięcie 2x = Przeskakuje do poprzedniego
tytułu.
Naciśnięcie 3x = Odtwarza utwór poprzedzający itd. Po wciśnięciu przycisku rozpoczyna
się proces przeszukiwania skali odbiornika.
UP/I SKIP/SEARCH (26/C): Przy pomocy tego przycisku mogą Państwo
przejść do następnego lub jeszcze wcześniejszego tytułu. Po wciśnięciu przycisku rozpoczy-
na się proces przeszukiwania skali odbiornika.
STOP (24/E): De CD wordt gestopt.
REPEAT (27/D): Naciśnięcie 1 x (dioda elektroluminescencyjna
REPEAT miga (28): aktualnie odtwarzany utwór
będzie stale powtarzany.
Naciśnięcie 2 x (dioda elektroluminescencyjna
REPEAT świeci się): powtarzane są wszystkie
nagrania CD.
Naciśnięcie 3 x: dezaktywacja funkcji.
57
PL
5....-05-MC1019CD 28.07.2004 9:35 Uhr Seite 57
Page 58

Odtwarzanie zaprogramowane
Pozwala na zaprogramowanie dowolnej kolejności tytułów.
1. Proszę nacisnąć przycisk STOP.
2. Proszę nacisnąć przycisk PROGRAM/MEMORY (29/F). W wyświetlaczu miga
„0” (pozycja w pamięci) i lampka kontrolna PROG (30). Przyciskami
UP/DOWN I / I SKIP/SEARCH proszę wybrać pożądany tytuł i wcisnąć
ponownie przycisk PROGRAM/MEMORY. Proszę powtarzać tę czynność do
momentu wybrania wszystkich utworów.
3. Proszę wcisnąć przycisk /II PLAY/PAUSE. Uruchomione zostaje odtwarzanie. Wskaźnik PROG miga. Państwo również na krótko przerwać odtwarzanie
programu (patrz odcinek PLAY/PAUSE).
4. Jeżeli nacisną Państwo jeden raz przycisk STOP, odtwarzanie zostaje zatrzymane, program zostanie jednak zachowany.
5. Celem ponownego odtwarzania programu proszę wcisnąć najpierw przycisk
PROGRAM/MEMORY (29/F), a następnie przycisk / II PLAY/PAUSE.
Po odtworzeniu wszystkich zaprogramowanych utworów urządzenie samoczynnie się zatrzyma. Zaprogramowana kolejność pozostaje w pamięci do chwili, aż
zmienią Państwo tryb pracy urządzenia, np. TAPE, albo jeżeli płyta kompaktowa
zostanie wyjęta z pojemnika na CD, lub jeśli urządzenie zostanie wyłączone.
Istnieje możliwość połączenia zaprogramowanych utworów z funkcją REPEAT.
Po zaprogramowaniu i uruchomieniu urządzenia, należy do 3 x nacisnąć przycisk REPEAT (27/D) a następnie można korzystać z funkcji w sposób opisany w
punkcie „REPEAT”.
Wskazówka: dyski kompaktowe:
• W tym urządzeniu można odtwarzać zarówno CD o średnicy 8 cm jak i 12
cm.Wskazówka: zawsze proszę wkładać tylko jeden dysk do pojemnika na
CD.
• W tym urządzeniu można odtwarzać tylko CD audio, CD-R i CD-RW.
• Płyty kompaktowe wkładać do pojemnika na CD zawsze etykietką do góry.
Dyski mogą być odtwarzane tylko po jednej stronie.
• Odciski palców i kurz należy usuwać starannie miękką ściereczką po stronie
zapisu CD (strona bez etykietki). Wycierać lekko ruchami prostoliniowymi od
wewnątrz do krawędzi.
• Po zakończeniu odtwarzania dyski powinny być przechowywane w okładce
na CD, by chronić je przed porysowaniem.
• Płyt CD nie wystawiać na bezpośrednie działanie słońca, wysokiej wilgotności lub na dłuższy czas wysokich temperatur, aby się nie
zniekształciły.
• Nie naklejać papieru na CD i nie pisać niczego na płycie.
• Nie spryskiwać środkami czyszczącymi czy rozpylaczami antystatycznymi,
tak jak w przypadku fonografów.
58
PL
5....-05-MC1019CD 28.07.2004 9:35 Uhr Seite 58
Page 59

Niniejsze urządzenie odpowiada wymaganiom normy bezpieczeństwa użytkowania oraz spełnia wymagania dyrektywy niskonapięciowej i kompatybilności elektromagnetycznej.
Zastrzega się prawo do zmian technicznych!
WARUNKI GWARANCJI
Przyznajemy 24 miesiące gwarancji na produkt licząc od daty zakupu.
W tym okresie będziemy bezpłatnie usuwać w terminie 14 dni od daty dostarczenia wadliwego sprzętu z kartą gwarancyjną do miejsca zakupu wszystkie uszkodzenia powstałe w tym urządzeniu na skutek wady materiałów lub wadliwego
wykonania, naprawiając oraz wymieniając wadliwe części lub (jeśli uznamy za stosowne) wymieniając całe urządzenie na nowe.
Sprzęt do naprawy powinien być dostarczony w komplecie wraz z dowodem
zakupu oraz z ważną kartą gwarancyjną do sprzedawcy w miarę możliwości w
oryginalnym opakowaniu lub innym odpowiednim dla zabezpieczenia przed uszkodzeniem. W razie braku kompletnego opakowania fabrycznego, ryzyko uszkodzenia sprzętu podczas transportu do i z miejsca zakupu ponosi reklamujący.
Naprawa gwarancyjna nie dotyczy czynności przewidzianych w instrukcji obsługi,
do wykonania których zobowiązany jest użytkownik we własnym zakresie i na
własny koszt.
Gwarancja nie obejmuje:
• mechanicznych, termicznych, chemicznych uszkodzeń sprzętu i wywołanych
nimi wad,
• uszkodzeń powstałych w wyniku działania sił zewnętrznych takich jak wyładowania atmosferyczne, zmiana napięcia zasilania i innych zdarzeń losowych,
• nieprawidłowego ustawienia wartości napięcia elektrycznego, zasilanie z nieodpowiedniego gniazda zasilania,
• sznurów połączeniowych, sieciowych, żarówek, baterii, akumulatorów,
• uszkodzeń wyrobu powstałych w wyniku niewłaściwego lub niezgodnego z
instrukcją jego użytkowania, przechowywania, konserwacji, samowolnego
zrywania plomb oraz wszelkich przeróbek i zmian konstrukcyjnych dokonanych
przez użytkownika lub osoby niepowołane,
• roszczeń z tytułu parametrów technicznych wyrobu, o ile są one zgodne z
podanymi przez producenta,
• prawidłowego zużycia i uszkodzeń, które mają nieistotny wpływ na wartość
lub działanie tego urządzenia.
Karta gwarancyjna bez pieczątki sklepu, daty sprzedaży, nie wypełniona, źle
wypełniona, ze śladami poprawek, nieczytelna wskutek zniszczenia, bez
możliwości ustalenia miejsca sprzedaży oraz dołączonego dowodu zakupu jest
nieważna.
Korzystanie z usług gwarancyjnych nie jest możliwe po upływie daty ważności
gwarancji. Gwarancja na części lub całe urządzenie, które są wymieniane kończy
59
PL
5....-05-MC1019CD 28.07.2004 9:35 Uhr Seite 59
Page 60

się, wraz z końcem gwarancji na to urządzenie.
Wszystkie inne roszczenia, wliczając w to odszkodowania są wykluczone chyba, że
prawo przewiduje inaczej. Roszczenia wykraczające poza tą umowę nie są
uwzględniane przez tą gwarancję.
Gwarancja na sprzedany towar konsumpcyjny nie wyłącza, nie ogranicza ani
nie zawiesza uprawnień kupującego wynikających z niezgodności towaru z umową.
Gwarancja oraz zawarte w niej warunki obowiązują na terenie Rzeczpospolitej
Polskiej.
60
PL
5....-05-MC1019CD 28.07.2004 9:35 Uhr Seite 60
Page 61

Általános biztonsági rendszabályok
A tűzkeletkezés vagy az áramütés kockázatának elkerülése végett ne tegye ki a
készüléket esőnek vagy nedvességnek! Ne működtesse a készüléket víz közvetlen közelében (pl. fürdőszobában, úszómedence mellett, nedves pincében).
Csak arra a célra használja a készüléket, mire készült!
Mindig csak előírásszerűen szerelt konnektorba csatlakoztassa a készüléket!
Ügyeljen rá, hogy a megadott feszültség egyezzen a hálózati feszültséggel!
Külső áramforrás használata esetén ügyeljen a megfelelő polaritásra és fes-
zültségre, az elemeket mindig jó irányban helyezze be!
Úgy állítsa fel a készüléket, hogy ne záródjanak el a meglévő szellőzőnyílások!
Soha ne nyissa ki a készülék burkolatát! A szakszerűtlen javítások jelentős ves-
zély forrásai lehetnek a használók számára. Ha a készülék, különösen a hálózati
csatlakozó kábel megsérült, a készüléket nem szabad üzembe helyezni, hanem
előbb szakemberrel meg kell javíttatni. Rendszeresen ellenőrizendő, hogy a
hálózati csatlakozó kábelen nincs-e sérülés.
Veszélyhelyzetek elkerülése végett a hibás csatlakozó kábelt csak a gyártóval, a
mi vevőszolgálatunkkal vagy hasonló szakképzettségű más személlyel szabad
pótoltatni azonos értékű kábellel.
Ha hosszabb időn át nem használja a készüléket, húzza ki a csatlakozó dugaszt
a konnektorból, ill. vegye ki belőle az elemeket!
Adott esetben a készüléken az alábbi szimbólumokat láthatja, amelyek a
következőkre hívják fel az Ön figyelmét:
A villám-szimbólum olyan alkatrészekre figyelmeztet a készülék belsejében, amelyek veszélyesen nagy feszültséget vezetnek.
A felkiáltójellel ellátott szimbólum a kísérőpapírokban található fontos
kezelési vagy karbantartási útmutatásokra hívja fel a használó figyelmét.
Az ezzel a szimbólummal jelzett készülékek „1. osztályú lézerrel“
működve tapogatják le a CD-t. A beépített biztonsági kapcsolók megakadályozzák, hogy a használó emberi szemmel nem látható, veszélyes
lézersugárzás hatásának legyen kitéve, amikor a CD-rekesz fel van
nyitva.
Ezeket a biztonsági kapcsolókat semmi esetre sem szabad „megpatkolni“ vagy
más módon manipulálni, különben Ön lézersugárhatás veszélyének teheti ki
magát.
61
H
5....-05-MC1019CD 28.07.2004 9:35 Uhr Seite 61
Page 62

A kezelő elemek bemutatása
1 POWER kapcsoló (ON/OFF)
2 POWER ellenőrzőlámpa
3 VOLUME hangerő-szabályozó
4 PHONES (felhallgató csatlakozás)
5 LED display
6 BASS be-/kikapcsológomb
7 IR A távkapcsoló érzékelője
8 Adóskála
9 TUNING szabályozó
10 FUNCTION Funkcióválasztó kapcsoló (RADIO/TAPE/CD)
11 BAND Sávválasztó kapcsoló AM/FM/FM ST)
12 Kazetta-fiók
13 Ajtó PULL (húzni)
14 II szünet gomb – kazetta
15 / stop/kivetőgomb – kazetta
16 előrepörgetés gomb – kazetta
17 visszapörgetés gomb – kazetta
18 lejátszás gomb – kazetta
19 felvétel gomb – kazetta
20 CD fiók
21 OPEN gomb a CD-fiók felnyitására
22 CD PLAY/PAUSE gomb
23 PLAY ellenőrzőlámpa
24 CD-leállító (STOP) gomb
25 DOWN-CD SKIP gomb (ugrás hátra)
26 UP CD SKIP gomb (ugrás előre)
27 REPEAT ismétlőgomb
28 REPEAT ellenőrzőlámpa
29 PROGRAM programozógomb
30 PROGRAM ellenőrzőlámpa
31 Hangszóró
Hátlap
32 Hangszóró-csatlakozó bemenetek
33 A hálózati csatlakozó kimenete
34 FM kivető antenna
Távkapcsoló
AI SKIP/SEARCH gomb folyamatos keresés hátra
B / II PLAY/PAUSE gomb
C I SKIP/SEARCH gomb folyamatos keresés előre
D REPEAT gomb
E STOP gomb
F MEMORY gomb
G Elemtartó rekesz
62
H
5....-05-MC1019CD 28.07.2004 9:35 Uhr Seite 62
Page 63

A készülék használatba vétele / Bevezetés
• Használatbavétel előtt gondosan olvassa végig a használati utasítást!
• Távolítsa el a szállítási biztonságot szolgáló csomagolóelemeket a CD- és
kazettarészből, amennyiben vannak benne ilyenek!
• Válasszon megfelelő helyet a készülék és a hangszóról felállítására! Erre
száraz, sima, csúszásmentes felület lenne alkalmas, amelyen jól lehet a készüléket kezelni.
• Ügyeljen rá, hogy a készülék megfelelően szellőzzön.
• Kapcsolja a hangszórókat a hátlapon lévő csatlakozókra (32)!
Áramellátás
• Dugja a csatlakozó dugaszt előírásszerűen szerelt, 230 V, 50 Hz-es földelt
konnektorba! Ügyeljen rá, hogy a hálózati feszültség egyezzen a típuscímke
adataival!
Az elemek behelyezése
(nem hozzá járó tartozék)
• Nyissa ki a távkapcsoló hátlapján lévő elemtartó rekesz (G) fedelét!
• Tegyen be 2 db LR 6 „AA“ típusú 1,5 V-os elemet! Ügyeljen a helyes polaritásra (lásd az elemtartó rekesz fenekén)! Ha hosszabb időn át nem használja a távkapcsolót, vegye ki belőle az elemeket, nehogy az akkumulátorsav
„kifusson”!
• Mindig a teljes elemkészletet cserélje, ne csak az egyik elemet!
Figyelem: A használt elem nem a háztartási szemétbe való! Adja le a használt
elemeket az illetékes gyűjtőhelyen vagy a kereskedőnél!
Soha ne dobjon elemet a tűzbe!
Általános kezelés
POWER ON/OFF (1): Üzemkész állapotba kapcsolja, ill. kikapcsolja a kés-
züléket. A POWER (2) ellenőrző lámpa kijelzi a funkciót.
BASS Be/ki (8): A basszus erősítésére vagy mérséklésére szolgál.
Be = a kapcsoló be van nyomva.
Hangerő: A VOLUME szabályozóval (3) beállítható a kívánt hangerő.
PHONES (4): Ha fejhallgató dugaszát dugja a csatlakozóhüvelybe,
némára kapcsolja vele a hangszórókat. Ha meglévő
dugasza nem illene a csatlakozóhüvelybe, használjon
megfelelő adaptert!
Hangszóró (31): Kapcsolja a hangszórókat a hátlapon lévŒ csatlakozókra
(32)!
63
H
5....-05-MC1019CD 28.07.2004 9:35 Uhr Seite 63
Page 64

Infravörös
távkapcsoló: Kábel nélküli készülékkezeléshez legfeljebb 5 m-es távol-
ságból. Ha ez a távolság csökken, ki kell cserélni az elemeket. A távkapcsoló használatakor ügyeljen arra, hogy a
távkapcsoló és a készülék infravörös vevője között semmi
se álljon az útban.
CD-tartó szállítási biztosítás
Az OPEN gombot (21) megnyomva, nyissa ki a CD-tartót (20)! Használat előtt
vegye ki belőle a szállítási biztonságot szolgáló elemeket.
Kikapcsolás
Amikor a funkcióválasztó kapcsoló (10) TAPE helyzetben, ill. POWER OFF-on áll,
és minden szalagfuttató funkció ki van kapcsolva, a készülék üzemen kívül van.
A POWER (2) ellenőrző lámpa kialszik.Ezt követően húzza ki a hálózati csatlakozót a konnektorból!
Rádió üzemmód
1. Állítsa a (10) funkcióválasztó kapcsolót RADIO állásba!
2. Válassza meg a sávválasztóval (11) a kívánt frekvenciasávot!
középhullám = AM (mono), URH = FM, URH sztereo = FM ST.
3. Állítsa be a TUNING állomáskereső gombbal (9) a kívánt adót!
4. Ha egy FM sztereó adó nagyon gyengén fogható és zajos, próbálja meg az
antenna elforgatásával és hosszának fel- illetve letekercselésével javítani. Ha
javulás nem érhető el, ajánlatos átkapcsolni FM (URH monó) adóra.
5. Az AM-adók vételére szolgáló antenna be van építve a készülékbe. A készülék forgatással és helyzetváltoztatással tájolható az adóra. Ebben a frekvenciatartományban csak mono adásokat sugároznak.
Kazettalejátszó üzemmód
Kazetták lejátszása
1. Válassza a TAPE (10) funkciót!
2. Nyissa ki az ajtót (13)!
3. A kazettatartó (12) felnyitásához nyomja meg a / stop/kivetőgombot
(15)!
4. Dugjon a kazettatartóba egy műsoros audiokazettát úgy, hogy a szalag
lefelé, a hallgatandó oldal pedig előre nézzen! Zárja le a kazettatartó
rekeszt!
5. A szalag lejátszásához nyomja meg az lejátszás gombot (18)!
6. A lejátszást az / stop/kivetőgombbal (15) leállíthatja.
7. Szükség esetén pörgesse a szalagot a nyíllal jelölt gombokkal
64
H
5....-05-MC1019CD 28.07.2004 9:35 Uhr Seite 64
Page 65

értelemszerűen előre vagy vissza! = előre (16), = visszafelé (17). A
szalagfuttató funkciók átkapcsolásai között és a futtatás leállításához mindig
nyomja meg az / stop/kivetőgombot (15)! Ezzel elkerülhető a készülék
meghibásodása vagy a szalag megrongálódása.
8. Az / stop/kivetőgomb ismételt megnyomására felnyílik a kazettatartó
ajtaja.
9. Ha rövid időre meg akarja szakítani a lejátszást, nyomja meg a II PAUSE
gombot (14). Ha a gombot ismét megnyomja, a lejátszás folytatódik.
Felvétel kazettára
1. Helyezzen be egy hangkazettát úgy, hogy az az oldala nézzen előre, amelyre felvételt akar készíteni. Győződjön meg róla, hogy a kazetta nem
másolásvédett-e (a kazetta felső keskeny oldalán lévő másolásvédő nyelv
nincs-e kitörve).
2. A funkcióválasztó kapcsolóval (10) válassza ki a hangfelvétel forrását, és
indítsa el a forrást! Arról a hangforrásról fog felvételt készíteni, amelyet hall.
A felvétel szintjét a készülék automatikusan vezérli. A hangszín és a hangerő
változtatása nem befolyásolja a felvételt.
3. Nyomja meg a felvétel gombot (19), (az lejátszás gomb vele együtt
automatikusan lenyomódik). A felvétel elkezdődik. Ezzel együtt automatikusan törlődik minden korábbi felvétel.
4. A II szünet gombbal (14) a felvételt rövid időre megszakíthatja, vagy az /
stop/kivetőgombbal (15) leállíthatja.
CD üzemmód
CD-t az alábbi módon játszhat le
1. Tolja a (10) funkcióválasztó kapcsolót CD-re!
2. Nyomja meg a gombot a CD-rekesz (21) felnyitásához!
3. Helyezzen rá a központozó kúpra egy audio-CD-t címkés oldalával felfelé, és
zárja le a CD-rekesz (20) fedelét!
4. A display-n (3) ”- -”, utána pedig a korongon lév darabok (tracks) száma
jelenik meg.
5. A CD lejátszásához nyomja meg az / II CD-PLAY/PAUSE gombot (22/B)!
A PLAY ellenőrző lámpa (23) folyamatosan ég. A CD az első címtől kezdve
végigfut. A kijelzőn megjelenik az éppen játszott szám.
6. A CD kivételéhez nyomja meg a CD STOP-gombot (24/E), az OPEN
gombbal (21) nyissa fel a CD-fedelet, és óvatosan emelje le a korongot!
Ha MP3 formátumú CD-ket vagy CDR-eket kíván lejátszani, vegye figyelembe a következőket: A készülék MP3 lejátszására nem alkalmas. A CD
elkezd ugyan forogni, de a hangot nem lehet megszólaltatni.
Egyébként tartsa a CD-fedelet mindig lecsukva!
65
H
5....-05-MC1019CD 28.07.2004 9:35 Uhr Seite 65
Page 66

Figyelem: Ha hibásan van behelyezve a korong, ill. ha nincs korong behelyezve, „- -“ jelzés jelenik meg a display-n.
A CD-gombok leírása
/ II PLAY/PAUSE (22/B): Rövid időre megszakíthatja vele a lejátszást. A
gomb ismételt megnyomása után a lejátszás
ugyanazon a helyen folytatódik (a PLAY
ellenőrző lámpa (23) villog).
DOWN/I SKIP/SEARCH (25/A):1 x megnyomva = Újra elölről kezdi az éppen
játszott számot.
2 x megnyomva = Az előző számra ugrik.
3 x megnyomva = Az egyik előtte lévő számot
játssza stb. Ha lenyomva tartja, folyamatos
zenekeresés indul el. Ha lenyomva tartja,
folyamatos zenekeresés indul el.
UP/I SKIP/SEARCH (26/C): Ezzel a gombbal ugorhat a következő, ill. a
következő utáni számra stb. Ha lenyomva tart-
ja, folyamatos zenekeresés indul el.
STOP (24/E) Leállítja a CD-t.
REPEAT (27/D): 1 x megnyomva (REPEAT-LED villog (28)):
Állandóan ismétli az éppen forgó számot.
2 x megnyomva (REPEAT-LED ég): Állandó
ismétli az egész CD-t.
3 x megnyomva: A funkció ki van kapcsolva.
Programozott lejátszás
Tetszés szerint számsorrend programozását teszi lehetővé.
1. Nyomja meg a STOP gombot .
2. Nyomja meg a PROGRAM/MEMORY gombot (29/F). A kijelzőn „0”
(tárolóhely) és a PROG (30) ellenőrzőlámpa villog. Válassza ki a UP/DOWNI / I SKIP/SEARCH gombokkal a kívánt számot, és nyomja meg ismét a
PROGRAM/MEMORY gombot! Ismételje ezt a folyamatot mindaddig, míg az
összes kívánt számot ki nem választotta.
3. Nyomja meg az /II PLAY/PAUSE gombot! Megindul a lejátszás. A PROG
felirat villog. Megindul a lejátszás (lásd a PLAY/PAUSE c. fejezetet).
4. Ha egyszer megnyomja a STOP gombot, megszakad a lejátszás, de a pro-
gram megmarad.
5. Ha ismét le kívánja játszani a programot, nyomja meg először a PRO-
GRAM/MEMORY gombot (29/F), utána pedig a /II PLAY/PAUSE gombot!
Miután a készülék az összes beprogramozott számot lejátszotta, magától leáll. A
programozott sorrend mindaddig megmarad a memóriában, amíg csak másik
üzemmódra, pl. TAPE-re nem vált át, vagy amíg ki nem veszi a CD-t a CD-tartóból, ill. ki nem kapcsolja a készüléket.
66
H
5....-05-MC1019CD 28.07.2004 9:35 Uhr Seite 66
Page 67

Lehetősége van arra, hogy a beprogramozott címeket a REPEAT funkcióval
kombinálja. Miután befejezte a programozást, és elindította a készüléket, nyomja meg a REPEAT gombot (27/D) legfeljebb 3-szor, és így a “REPEAT” (ismétlés) fejezetekben leírtak szerint működtethető a funkció.
Útmutató lézer-korongok esetére:
• Ezzel a készülékkel 8 cm, ill. 12 cm átmérőjű CD-k egyaránt lejátszhatók.
Figyelem: Egyszerre mindig csak egy korongot helyezzen be a CD-fiókba!
• Ezzel a készülékkel csak audio CD-ket, CD-R-eket és CD–RW korongokat
lehet lejátszani.
• A CD-t mindig a címkéjével felfelé helyezze be a CD-fiókba! A lézer-korongoknak mindig csak az egyik oldala játszható le.
• A CD jeleket tartalmazó oldaláról (a címke nélküli oldalról) célszerű puha
ruhával letörölni az ujjlenyomatokat és a port. A korongot egyenletes körkörös, puha mozdulatokkal, a közepétől a széle felé haladva törölgesse le!
• Lejátszás után legjobb a CD-t ismét a tokjába visszatéve tartani, hogy meg
ne karcolódjék.
• Ne tegye ki a CD-ket közvetlen napsugárzásnak, nagy környezeti páratartalomnak vagy hosszabb időig tartó magas hőmérsékletnek, nehogy elvetemedjenek!
• A CD-re sem papírt ragasztani, sem semmit ráírni nem szabad.
• A CD-re nem szabad a hagyományos hanglemezekhez hasonló módon tisztítószert vagy elektrosztatikus feltöltődést gátló szert fújni.
Ezt a készüléket az Európa Tanács minden vonatkozó aktuális irányelve szerint
(pl. elektromágnesesség-elviselő képesség vagy kisfeszültség-elviselő képesség) ellenőriztük, és a legújabb biztonságtechnikai előírások szerint készült.
Megjegyezzük az esetleges müszaki változásokat!
67
H
5....-05-MC1019CD 28.07.2004 9:35 Uhr Seite 67
Page 68

Garancia
Garanciális igényeivel forduljon, kérem, a szerződéses kereskedőjéhez!
A garancia igazolására a pénztári nyugta szolgál. E nélkül az igazolás nélkül sem
díjmentes csere, sem díjtalan javítás nem végezhető.
Garanciális esetben eredeti csomagolásában adja át az alapkészüléket a pénz-
tári bizonylattal együtt annak a kereskedőnek, akitől a készüléket vásárolta!
*) A tartozékok hibái nem eredményezik automatikusan az egész készülék
díjtalan cseréjét. Ilyen esetekben forduljon „forró vonalunkhoz”! Az üvegtörésből,
ill. a műanyag alkatrészek töréséből eredő hibák megszüntetése mindenkor
térítésköteles.
Sem az elhasználódó tartozékokban, ill. kopó alkatrészekben (pl. szénkefe,
dagasztóhorog, hajtószíj, póttávvezérlő, pótfogkefe, fűrészlap stb.) bekövetkező
hibák, sem a tisztítás, karbantartás vagy a kopó alkatrészek cseréje nem esik a
garancia hatálya alá, következésképp térítésköteles.
Illetéktelen beavatkozás a garancia megszűnését eredményezi.
A garanciális idő után
A garanciális idő eltelte után a megfelelő szakkereskedésben vagy javítószolgálatnál végeztethet térítésköteles javításokat.
68
H
5....-05-MC1019CD 28.07.2004 9:35 Uhr Seite 68
Page 69

5....-05-MC1019CD 28.07.2004 9:35 Uhr Seite 69
Page 70

5....-05-MC1019CD 28.07.2004 9:35 Uhr Seite 70
Page 71

5....-05-MC1019CD 28.07.2004 9:35 Uhr Seite 71
Page 72

Stünings Medien, Krefeld • 07/04
D-47906 Kempen/Germany · Industriering Ost 40
Internet: http://www.clatronic.de · email:info@clatronic.de
Technische Daten
Modell: MC 1019 CD
Spannungsversorgung: 230 V, 50 Hz
Ausgangsleistung: 100 W PMPO
Schutzklasse:
ΙΙΙΙ
Radioteil
Frequenzbereiche: UKW/FM 88-108 MHz
MW/AM 540-1600 KHz
Dieses Gerät wurde nach allen zutreffenden,
aktuellen CE-Richtlinien geprüft, wie z.B.
elektromagnetische Verträglichkeit und
Niederspannungsdirektive und wurde nach den
neuesten sicherheitstechnischen Vorschriften
gebaut.
Technische Änderungen vorbehalten!
Bitte führen Sie das ausgediente Gerät
einer umweltgerechten Entsorgung zu.
5....-05-MC1019CD 28.07.2004 9:35 Uhr Seite 72
 Loading...