

Page 1
44656-05-MC 1003 CD 16.03.2004 16:32 Uhr Seite 1
Bedienungsanleitung/Garantie
Instruction Manual/Guarantee
Instrukcja obsługi/Gwarancja
Instrucciones de servicio/Garantía
A használati utasítás/Garanflie
Istruzioni per l’uso/Garanzia
Stereo-Music-Center
Stereo Music Centre
Centrum Muzyki stereofonicznej
Equipo de música estéreo
Centru de muzicæ stereo
Stereo-Music-Center
MC 1003 CD
Page 2

44656-05-MC 1003 CD 16.03.2004 16:32 Uhr Seite 2
Inhalt
Contents • Spis treści • Indice • Conflinut • Indice
Übersicht Bedienelemente . . . . . . . . . . . . . . . . . . . . . . . . . .Seite 3
D
Bedienungsanleitung . . . . . . . . . . . . . . . . . . . . . . . . . . . . . . .Seite 5
Garantie . . . . . . . . . . . . . . . . . . . . . . . . . . . . . . . . . . . . . . . .Seite 8
Control element overview . . . . . . . . . . . . . . . . . . . . . . . . . . .Page 3
GB
Instruction Manual . . . . . . . . . . . . . . . . . . . . . . . . . . . . . . . . .Page 10
Guarantee . . . . . . . . . . . . . . . . . . . . . . . . . . . . . . . . . . . . . .Page 14
Przegląd elemetów obsługi . . . . . . . . . . . . . . . . . . . . . . . . .Strona 3
PL
Instrukcja obsługi . . . . . . . . . . . . . . . . . . . . . . . . . . . . . . . .Strona 15
Gwarancja . . . . . . . . . . . . . . . . . . . . . . . . . . . . . . . . . . .Strona 20
Vista de conjunto Elementos de mando . . . . . . . . . . . . . . . .Página 3
E
Instrucciones de servicio . . . . . . . . . . . . . . . . . . . . . . . . . . . .Página 21
Garantia . . . . . . . . . . . . . . . . . . . . . . . . . . . . . . . . . . . . . . . .Página 25
Privire de ansamblu al modului de întrebuinflare . . . . . . . .Paginæ 3
RO
Mod de întrebuinflare . . . . . . . . . . . . . . . . . . . . . . . . . . . . . .Paginæ 27
Garanflie
I Descrizione dei singoli pezzi . . . . . . . . . . . . . . . . . . . . . . . .Pagina 3
. . . . . . . . . . . . . . . . . . . . . . . . . . . . . . . . . . . . . .
Istruzioni per l’uso . . . . . . . . . . . . . . . . . . . . . . . . . . . . . . . . .Pagina 33
Garanzia . . . . . . . . . . . . . . . . . . . . . . . . . . . . . . . . . . . .Pagina 37
Paginæ 31
Page 3
44656-05-MC 1003 CD 16.03.2004 16:32 Uhr Seite 3
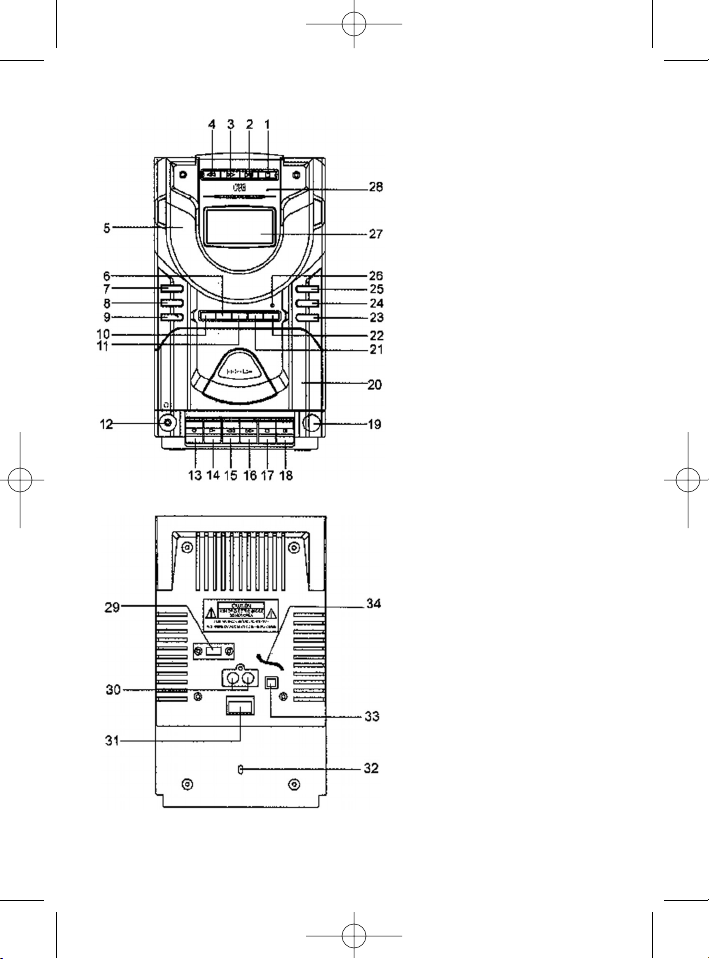
Übersicht der Bedienelemente
1 STOP-Taste
2 PLAY/PAUSE-Taste
3 SYMBOL-DOWN-Taste Forw
4 SYMBOL-UP-Taste REV
5 CD-Fach
6 BAND-Taste
7 Ein-/Aus-Taste CD
8 REPEAT-/M-UP-Taste
9 PROGRAMM-Taste Memory
10 PRESET-EQ-Taste
11 Funktionstaste TUNER
12 Kopfhörerbuchse
(3,5 mm Klinke)
13 Aufnahme-Taste (RECORD)
14 Wiedergabe-Taste (Play)
15 Rücklauf-Taste (REW)
16 Vorlauf-Taste (F.FWD)
17 Stop- und Auswurf-Taste
18 PAUSE-Taste Cassette
19 Infrarot-Sensor für
Fernbedienung
20 Kassettenfach
21 Funktionstaste TAPE
22 Funktionstaste CD
23/
Lautstärke-Taste (VOLUME)
24
25 Taste zum Öffnen
des CD-Fachs
26 MUTE-LED
27 Display
28 Stand-by-LED
Rückseite
29 Beat-Cut-Schalter
/Mono-Stereo-Schalter
/Optional
30 Lautsprecher-Anschlüsse
31 System-Power-Schalter
32 AC-Ausgang
33 AM-Antennen-Anschluss
(Wurfantenne)
34 FM-Antenne
3
Page 4
44656-05-MC 1003 CD 16.03.2004 16:32 Uhr Seite 4
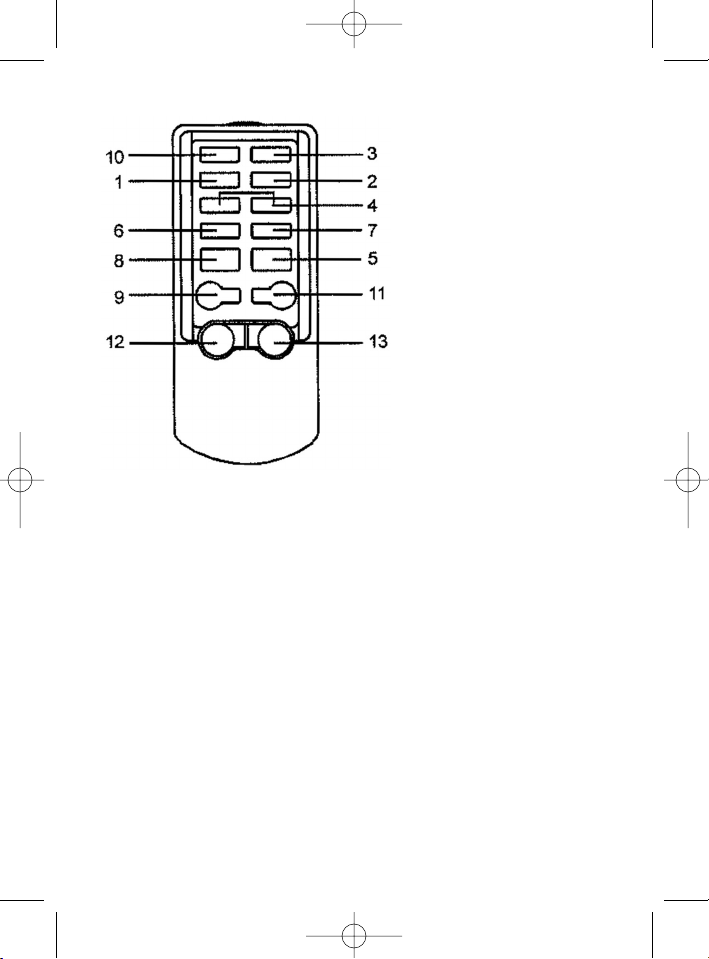
Fernbedienung
1 Tuner-(Radio)-Taste
2 2-CD-Taste
3 TAPE-(Kassetten)-Taste
4 Tuning Vorwärts-/Rückwärts-Taste – CD-Suchlauf-Taste
5 CD-Play/Pause-Taste
6 REPEAT-/M-UP-Taste
7 CD-MEMORY-Taste
8 STOP-Taste
9 Stummschalten-Taste
10 BAND-Taste
11 Power-On/Off-Taste
12 VOLUME-leiser-Taste
13 VOLUME-lauter-Taste
4
Page 5

44656-05-MC 1003 CD 16.03.2004 16:32 Uhr Seite 5
Allgemeine Sicherheitshinweise
Um das Risiko von Feuer oder einem elektrischen Schlag zu vermeiden, sollten
Sie das Gerät nicht Regen oder Feuchtigkeit aussetzen. Das Gerät nicht in
unmittelbarer Nähe von Wasser betreiben (z.B. Badezimmer, Schwimmbecken,
feuchte Keller).
Verwenden Sie das Gerät nur für den vorgesehenen Zweck.
Das Gerät ausschließlich an eine vorschriftsmäßig installierte Steckdose
anschließen. Achten Sie darauf, dass die angegebene Spannung mit der Spannung
der Steckdose übereinstimmt.
Bei Verwendung von externen Netzteilen auf die richtige Polarität und Spannung
achten, Batterien stets richtigherum einlegen.
Das Gerät so aufstellen, dass vorhandene Lüftungsöffnungen nicht verdeckt werden.
Niemals das Gehäuse des Gerätes öffnen. Durch unsachgemäße Reparaturen
können erhebliche Gefahren für den Benutzer entstehen. Bei Beschädigung des
Gerätes, insbesondere des Netzkabels, das Gerät nicht mehr in Betrieb nehmen,
sondern von einem Fachmann reparieren lassen. Netzkabel regelmäßig auf
Beschädigungen prüfen.
Ein defektes Netzkabel darf nur vom Hersteller, unserem Kundendienst oder einer
ähnlich qualifizierten Person durch ein gleichwertiges Kabel ersetzt werden, um
Gefährdungen zu vermeiden.
Benutzen Sie das Gerät längere Zeit nicht, ziehen Sie den Netzstecker aus der
Steckdose, bzw.entnehmen Sie die Batterien.
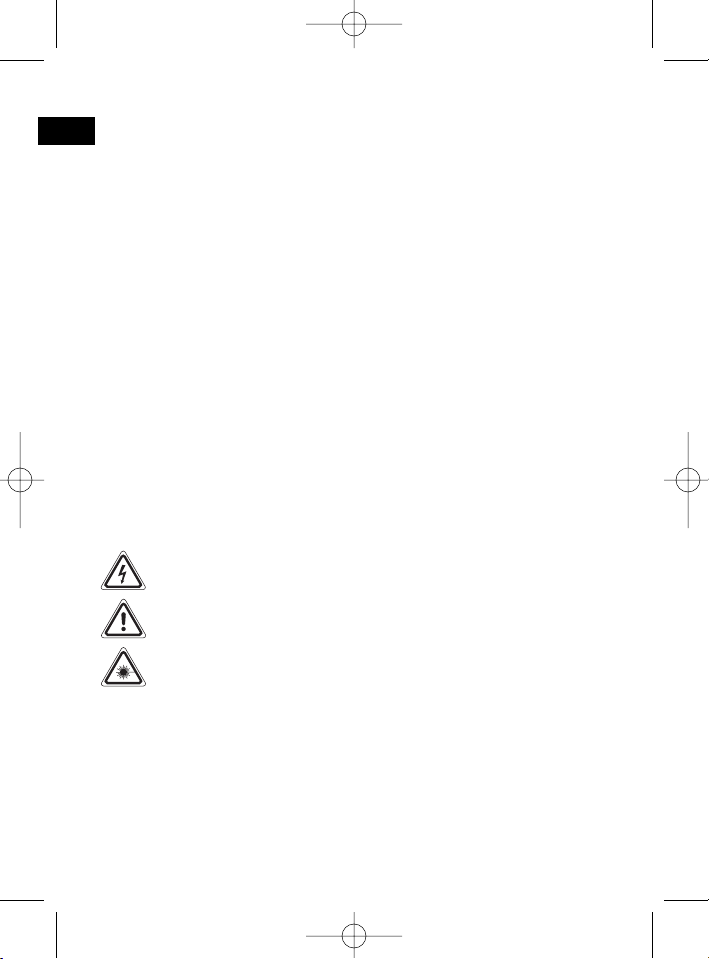
Diese Symbole können sich ggfs. auf dem Gerät befinden und sollen Sie auf folgendes hinweisen:
Das Blitz-Symbol soll den Benutzer auf Teile im Inneren des Gerätes hinweisen, die gefährlich hohe Spannungen führen.
Das Symbol mit Ausrufezeichen soll den Benutzer auf wichtige
Bedienungs- oder Wartungs-Hinweise in den Begleitpapieren hinweisen.
Geräte mit diesem Symbol arbeiten mit einem „Klasse 1-Laser“ zur
Abtastung der CD. Die eingebauten Sicherheitsschalter sollen verhindern,
dass der Benutzer gefährlichem, für das menschliche Auge nicht sichtbarem Laserlicht ausgesetzt wird, wenn das CD-Fach geöffnet ist.
Diese Sicherheitsschalter sollten auf keinen Fall überbrückt oder manipuliert werden, sonst besteht die Gefahr, dass Sie sich dem Laser-Licht aussetzen.
D
Spezielle Sicherheitshinweise
• Lesen Sie vor der Inbetriebnahme sorgfältig die Bedienungsanleitung.
• Achten Sie darauf, dass die Belüftungslöcher frei sind.
5
Page 6

44656-05-MC 1003 CD 16.03.2004 16:32 Uhr Seite 6
D
• Entfernen Sie, wenn vorhanden, Transportsicherungen an CD- und
Kassettenteil.
• Wählen Sie einen geeigneten Standort für Gerät und Lautsprecher.
Geeignet wäre eine trockene, ebene, rutschfeste Fläche, auf der Sie das Gerät
gut bedienen können.
• Schließen Sie die Lautsprecher auf der Rückseite an “SPK. R und L” an.
• Legen Sie 2 Batterien Type “AAA” in die Fernbedienung ein. Achten Sie auf die
richtige Polarität.
• Stecken Sie den Netzstecker in die Netzsteckdose. Achten Sie darauf, dass die
Netzspannung mit den Angaben auf den Typenschild übereinstimmt.
Inbetriebnahme des Gerätes
Allgemeine Bedienung
STANDBY/ON (7): Schaltet das Gerät Betriebsbereit bzw. in den Standby Modus.
PRESET EQ (10): Taste zum Auswählen 4 verschiedener Klangbilder (CLASSIC,
ROCK, POP, FLAT).
VOLUME (23+24): Zum Einstellen der individuellen Lautstärke.
Kopfhöreranschluss (12): Stecken Sie den Stecker eines Kopfhörers in die
Kopfhörerbuchse, werden die Lautsprecher stummgeschaltet. Sollte Ihr Stecker
nicht passen, verwenden Sie einen geeigneten Adapter.
Infrarot-Fernbedienung: Zur kabellosen Fernbedienung aus einer Entfernung von
bis zu 5 Metern. Lässt diese Reichweite nach, müssen die Batterien ausgetauscht
werden. Achten Sie bei der Bedienung auf freie Sicht zwischen Fernbedienung und
Infrarotempfänger des Gerätes.
MUTE (9 Fernbedienung): Dient zum schnellen Abstellen der Lautstärke. Zum
Beheben dieser Funktion erneut auf die MUTE Taste drücken.
Radio hören
1. Drücken Sie den Funktionsschalter TUNER (11).
2. Wählen Sie das gewünschte Frequenzband mit der Band Taste (6) aus.
UKW Stereo = FM ST / UKW = FM / Mittelwelle = AM (Mono)
3. Stimmen Sie mit den Tasten vorwärts (3) und rückwärts (4) den
gewünschten Sender ab.
4. Im Display (27) erscheint “Stereo”, wenn Sie den Sender in Stereo-Qualität
empfangen. Ist der Empfang zu schwach und rauscht der empfangene Sender
erscheint dieses Symbol nicht im Display (27). Versuchen Sie, mit Drehen und
An- bzw. Abwinkeln und Ändern der Länge der Antenne den Empfang zu verbessern.
5. Für den Empfang von MW/AM-Sendern verfahren Sie auf entsprechende
Weise. In diesem Frequenzband werden Sendungen nur in Mono ausgestrahlt.
6. Zum Abspeichern des gewählten Senders drücken Sie zuerst die MEMORY
Taste (9 am Gerät) oder PROG./MEMORY (7 an der Fernbedienung) danach
können Sie mit der REPEAT/M-UP (6) Taste an der Fernbedienung den
6
Page 7

44656-05-MC 1003 CD 16.03.2004 16:32 Uhr Seite 7
gewünschten Speicherplatz auswählen. Drücken Sie erneut die MEMORY
Taste. Ihr Sender ist jetzt gespeichert. Es stehen Ihnen 40 Stationstasten (20 je
Band) zu Verfügung.
Anmerkung: Zum Empfang von MW/AM Sendern ist dem Gerät eine Antenne beigelegt. Stecken Sie den Stecker der Antenne in die Buchse (33) an der Rückseite
des Gerätes.
Kassette hören
Kassetten wiedergeben
1. Drücken Sie die Funktionstaste TAPE (21).
2. Öffnen Sie das Kassettenfach (20) durch Drücken der Taste Kassettenfachtaste
(17).
3. Schieben Sie ein bespielte Audio-Kassette mit dem Band nach unten und der
zu hörenden Seit nach vorn in das Fach. Schließen Sie das Fach.
4. Drücken Sie die Play-Taste (14), um das Band wiederzugeben.
5. Sie beenden die Wiedergabe mit der Stop Taste (17).
6. Spulen Sie das Band bei Bedarf mit der Taste ( 16) vor bzw. mit der Taste (15)
zurück. Drücken Sie zwischen dem Umschalten und zum Anhalten der
Bandlauffunktionen immer die Taste Stop (17). Somit vermeiden Sie mechanische Schäden oder eine Beschädigung des Bandes.
7. Bei erneutem Drücken der Taste Stop (17) öffnet sich die Kassettenfachklappe
(20).
8. Um die Wiedergabe kurz zu unterbrechen, drücken Sie die Pause Taste (18).
Nochmaliges Drücken gibt die Wiedergabe frei.
Kassetten aufnehmen
1. Legen Sie eine Audio Kassette mit dem Band nach unten und der zu bespielenden Seite nach vorne ein. Vergewissern Sie sich, dass die Kassette nicht
kopiergeschützt ist (die Kopierschutzzunge an der oberen Schmalseite der
Kassette darf nicht herausgebrochen sein).
2. Wählen Sie die Aufnahmequelle mit den Funktionstasten (6,11, und 22) aus
und starten Sie diese Quelle. Sie nehmen von der Tonquelle auf, die Sie hören.
Der Aufnahmepegel wird automatisch ausgesteuert. Änderungen an Klang und
Lautstärke verändern die Aufnahme nicht.
3. Drücken Sie die Record Taste (13) Die Play Taste wird automatisch mit nach
unten gedrückt Die Aufnahme beginnt. Alle vorherigen Aufnahmen werden
automatisch gelöscht.
4. Sie können die Aufnahme mit der Pause Taste (18) kurz unterbrechen oder mit
der Stop Taste (17) anhalten.
D
7
Page 8

44656-05-MC 1003 CD 16.03.2004 16:32 Uhr Seite 8
D
So geben Sie eine CD wieder:
1. Drücken Sie die Funktionstaste CD (22).
2. Öffnen Sie das CD-Fach (5) durch Drücken der Taste CD/OPEN/CLOSE (25).
3. Legen Sie eine Audio-CD mit dem Aufdruck nach oben auf den Zentrierkegel
und schließen das CD-Fach.
4. In der Anzeige wird nach einigen Sekunden die Gesamtzahl der Lieder/Tracks’s
und die Gesamtspieldauer der CD angezeigt.
5. Drücken Sie die Taste Play/Pause (2), um die CD wiederzugeben. Die CD wird
vom ersten Titel an abgespielt. Das aktuelle Lied wird im Display (27) angezeigt.
6. Mit den Lautstärketasten (23+24) können Sie die gewünschte Lautstärke einstellen.
Beschreibung der CD-Tasten:
PLAY/PAUSE (2): Sie können die Wiedergabe kurz unterbrechen. Die Zeit-Anzeige
blinkt.
Vorwärts (3) Rückwärts (4): Mit diesen Tasten können Sie durch kurzes
Drücken zum nächsten bzw. vorherigen Titel springen. Halten Sie eine dieser
Tasten gedrückt, setzt der Musiksuchlauf ein.
STOP (1): Die CD wird angehalten.
REPEAT (8): 1 x drücken: Die komplette CD wird ständig wiederholt.
2 x drücken: Das aktuelle Lied wird fortlaufend wiederholt.
3 x drücken: Die Funktion wird deaktiviert.
MEMORY (9): Lässt die Programmierung einer beliebigen Titelfolge zu,
1. Drücken Sie die Taste Stop (1).
2. Drücken Sie die Taste MEMORY (9) und wählen Sie mit der Suchlauftaste
Vorwärts (3) oder Rückwärts (4) das Lied an.
3. Drücken Sie erneut die Taste MEMORY (9). Die Anzeige wechselt auf “02”.
Geben Sie den nächsten Titel an u.s.w....
4. Starten Sie den CD Spieler. Das Programm wird wiedergegeben. Um ein
Programm zu löschen, drücken Sie die Taste STOP (1). Sie können bis zu
20 Titel programmieren.
CD’s abspielen
Dieses Gerät entspricht den einschlägigen CE-Richtlinien und
ist nach den neuesten sicherheitstechnischen Vorschriften gebaut.
Technische Änderungen vorbehalten!
Garantie
Wir übernehmen für das von uns vertriebene Gerät eine Garantie von 24 Monaten
ab Kaufdatum (Kassenbon).
8
Page 9

44656-05-MC 1003 CD 16.03.2004 16:32 Uhr Seite 9
Innerhalb der Garantiezeit beseitigen wir unentgeltlich die Mängel des Gerätes oder
des Zubehörs*), die auf Material- oder Herstellungsfehler beruhen, durch Reparatur
oder, nach unserem Ermessen, durch Umtausch. Garantieleistungen bewirken
weder eine Verlängerung der Garantiefrist, noch beginnt dadurch ein Anspruch auf
eine neue Garantie!
Als Garantienachweis gilt der Kaufbeleg. Ohne diesen Nachweis kann ein kostenloser Austausch oder eine kostenlose Reparatur nicht erfolgen.
Im Garantiefall geben Sie bitte das Grundgerät in der Originalverpackung zusammen
mit dem Kassenbon an Ihren Händler.
*) Zubehörteile unterliegen der gesetzlichen Gewährleistungspflicht ( 6 Monate)
und führen nicht zum kostenlosen Umtausch des kompletten Gerätes. In diesem
Fall nicht das Gerät, sondern nach Absprache mit unserem Kundendienst, nur das
defekte Zubehörteil einschicken bzw. bestellen! Glasbruchschäden sind grundsätzlich kostenpflichtig!
Sowohl Defekte an Verbrauchszubehör bzw. Verschleißteilen (z.B. Motorkohlen,
Knethaken, Antriebsriemen, Ersatzfernbedienung, Ersatzzahnbürsten, Sägeblättern
usw.), als auch Reinigung, Wartung oder der Austausch von Verschleißteilen, fallen
nicht unter die Garantie und sind deshalb kostenpflichtig!
Die Garantie erlischt bei Fremdeingriff.
Nach der Garantie
Nach Ablauf der Garantiezeit können Reparaturen kostenpflichtig vom entsprechenden Fachhandel oder Reparaturservice ausgeführt werden.
Service
Verschleißteile (soweit diese nicht vom Fachmann ausgewechselt werden müssen),
Ersatzkannen, Staubsaugerfilterbeutel usw. können Sie mit Angabe des Gerätetyps
unter folgender Telefon-Hotline bestellen:
0 21 52 / 2006 – 666
Für die Bestellung via Internet haben wir für Sie folgende e-mail-Adresse
eingerichtet:
hotline@clatronic.de
Interessieren Sie sich für weitere Clatronic-Produkte?
Besuchen Sie doch einmal unsere Homepage unter
www.clatronic.de oder www.clatronic.com
D
9
Page 10
44656-05-MC 1003 CD 16.03.2004 16:32 Uhr Seite 10
GB
To avoid the risk of fire or an electric shock, you should not expose the device to
rain or moisture. Consequently, do not use the device in the immediate vicinity of
water - for example near a bath tub, a swimming pool or in a damp cellar.
Use the device only for the intended purpose.
Only connect the device at a properly installed plug socket. Pay attention that the
specified voltage corresponds to the voltage of the plug socket.
When using external mains supply, pay attention to the correct polarity and voltage.
Always place the batteries in the correct direction.
Assemble the device in such a way that the available ventilation openings are not
covered.
Never open the housing of the device. Incorrect repairs can constitute a considerable risk for the user. Should the device become damaged, in particular the mains
supply cable, do not operate the device any longer, but rather have it repaired by an
expert. Check the mains supply cable regularly for damage.
For safety reasons a broken or damaged mains lead may only be replaced by an
equivalent lead from the manufacturer, our customer service department or a
similary qualified person.
If the device is not used for a longer period, remove the plug connector from the
plug socket or take out the batteries.
These symbols may be found on the machine and are intended to indicate the
following:
The lightning symbol should advise the user of parts in the inside of the
device which carry dangerously high voltage levels.
The symbol with an exclamation mark should advise the user of important
operation or maintenance instructions in the accompanying documentation.
Devices bearing this symbol work with a „class 1 laser“ for tracing the CD.
The built-in safety switches should prevent the user being exposed to dangerous laser light, which is invisible to the human eye, when the CD compartment is opened.
Under no circumstances should these safety switches be bypassed or manipulated,
as this could result in a danger of exposure to the laser light.
General safety instructions
Special Safety Instructions
• Read the operating instructions carefully before using the device.
• Make sure that the ventilation holes are free.
10
Page 11

44656-05-MC 1003 CD 16.03.2004 16:32 Uhr Seite 11
Overview of the Components
1 STOP key
2 PLAY/PAUSE key
3 SYMBOL DOWN key - Forw.
4 SYMBOL UP key - REV
5 CD deck
6 BAND key
7 ON/OFF key - CD
8 REPEAT /M-UP key
9 PROGRAM key - memory
10 PRESET EQ key
11 TUNER function key
12 Headphone socket (3.5 mm jack)
13 RECORD key
14 PLAY key
15 REWIND key
16 FORWARD key
17 Stop and Eject key
18 PAUSE key - cassette
19 Remote control infrared sensor
20 Cassette deck
21 TAPE function key
22 CD function key
23/
VOLUME key
24
25 Key to open the CD deck
26 MUTE LED
27 Display
28 Stand-by LED
Rear view
29 Beat Cut switch
/ Mono-Stereo switch / optional
30 Loudspeaker sockets
31 System Power switch
32 AC output
33 AM antenna (extensible antenna)
connection
34 FM antenna
Remote Control
1 Tuner (radio) key
2 2 CD key
3 TAPE key
4 Tuning forward/backward key
– CD search key
5 CD Play/Pause key
6 REPEAT/M-UP key
7 CD MEMORY key
8 STOP key
9 MUTE key
10 BAND key
11 Power On/Off key
12 VOLUME low key
13 VOLUME high key
Device Start-up
• Remove, if present, the transport protection on the CD and cassette deck.
• Choose a suitable place for the device and the loudspeakers. A dry, level and
slip-proof surface from where the device can be easily operated should be
chosen.
• Connect the loudspeakers on the rear in „SPK.R and L“.
• Insert 2 AAA type batteries in the remote control. Make sure that the polarities
match.
• Insert the plug in the socket. Make sure that the line voltage meets the values
indicated on the nameplate.
GB
11
Page 12

44656-05-MC 1003 CD 16.03.2004 16:32 Uhr Seite 12
GB
STANDBY/ON (7): switches the device on or puts it in standby mode.
PRESET EQ (10): Key to select from 4 different types of sound (CLASSIC, ROCK,
POP, FLAT).
VOLUME (23 + 24): to set the volumes.
Headphone socket (12): insert the headphone jack. The loudspeakers are mute. If
the jack does not fit in, use a suitable adapter.
Infrared remote control: for wireless remote control up to a distance of 5 meters. If
this range is not reached, the batteries need to be changed. When using, make
sure that no object obstructs the distance between the remote control and the device’s infrared receiver.
MUTE (9 remote control): it is used to zero immediately the volume.To remove
this function, press the MUTE key again.
General Operating
Listening to the Radio
1. Press the TUNER function selector (11).
2. Select the desired frequency band with the Band key (6).
USW Stereo = FM ST / USW = FM
3. Tune in on the desired broadcasting station with the Forward key (3) and the
Backward (4) key.
4. „Stereo“ appears on the display (27) if the station is received in stereo quality. If
the reception is weak and the received station rustles, this symbol does not
appear on the display (27). Try to improve the reception by moving around and
changing the length of the antenna.
5. To receive MW/AM radio stations proceed as described above. In this frequency
band reception is possible only in MONO quality.
6. To save the selected stations press first the MEMORY key (9 on the device) or
PROG./MEMORY (7 on the remote control) and then select the desired
memory slot with the REPEAT/M-UP (6) key on the remote control. Press the
MEMORY key again.The station is now saved.There are 40 available station
keys (20 per band).
Note: to receive MW/AM stations the device is supplied with an antenna. Insert the
antenna jack in the socket (33) on the rear of the device.
Listening to Cassettes
Playing cassettes
1. Press the TAPE function key (21).
2. Open the cassette deck (20) by pressing the cassette deck key (17).
3. Insert a recorded audiocassette with the tape facing down and the side to be
played facing out. Close the deck.
4. Press the Play key (14) to play the cassette.
5. To stop the cassette, press the Stop button (17).
12
Page 13

44656-05-MC 1003 CD 16.03.2004 16:32 Uhr Seite 13
6. To wind the cassette forward or back use keys (16) and (15) respectively.
Always press key Stop (17) when switching between or stopping cassette functions in order to avoid mechanical damages or damages to the tape.
7. Press the key Stop (17) again to open the cassette deck (20).
8. To briefly stop the playing, press the Pause key (18). Press again to resume
playing.
Recording Cassettes
1. Insert the audiocassette with the tape facing down and the side to be played
facing out. Make sure that the cassette is protected against recording (the
recording protection tongue on the top of the narrow side of the cassette must
not be broken).
2. Select the recording source with the function keys (6, 11 and 22) and start the
source. The source that is heard on the device is recorded. The recording level
is controlled automatically.Changes in the tone and volume do not affect the
recording.
3. Press the Record key (13). The Play key is automatically pressed down as well.
The recording starts. All previous recordings are erased automatically.
4. The recording can be briefly stopped with the Pause key (18) or stopped completely with the Stop key (17).
Playing CD’s
This is how to play a CD:
1. Press the CD function key (22).
2. Open the CD deck (5) by pressing the CD/OPEN/CLOSE key (25).
3. Insert an audio CD with the printed side facing up and positioned the centering
cone and close the CD deck.
4. After a few seconds the display shows the total number of tracks and the total
playing time.
5. Press the Play/Pause key (2) to play the CD.The CD starts to play from the first
track. The current track is shown on the display (27).
6. Set the desired volume with the volume keys (23 + 24).
Description of the CD Keys
PLAY/PAUSE (2): The playback can be briefly stopped. The time display flashes.
Forward (3) Back (4): it is possible to skip forward or backward from one
track to another by pressing one of these keys briefly. By keeping the key pressed,
you can search through the track.
STOP (1): the CD is stopped.
REPEAT (8): Press once: the whole CD is repeated continuously.
Press twice: the current track is repeated continuously.
Press a third time: the function is deactivated.
GB
13
Page 14

44656-05-MC 1003 CD 16.03.2004 16:32 Uhr Seite 14
MEMORY (9): It allows you to program your favorite sequence of tracks.
GB
1. Press the STOP key (1).
2. Press the MEMORY key (9) and select the track with the forward (3) or back (4)
key.
3. Press the MEMORY key (9) again.The display changes to „02“. Enter the track
and so on.
4. Start the CD player.The program is played. To delete the program, press the
STOP key (1). Up to 20 tracks can be programmed.
This appliance conforms with the CE directives for radio interference suppression
and low-voltage safety and has been built to meet current safety requirements.
Subject to technical changes without prior notice!
Warranty
The device supplied by our Company is covered by a 24 month warranty starting
on the date of purchase (receipt).
During the life of the warranty any fault of the device or its accessories *) ascribable
to material or manufacturing defects will be eliminated free of charge by repairing
or, at our discretion, by replacing it.The warranty services do not entail an extension of the life of the warranty nor do they give rise to any right to a new warranty!
Proof of the warranty is provided by the proof of purchase. Without proof of purchase no free replacement or repair will be carried out.
For repairs or replacement during the life of the warranty return the device in its original packing together with the proof of purchase to your dealer.
*) Accessories are subject to the legally envisaged warranty obligation (6 months)
and do not entitle to the free replacement of the entire device. In this case, only the
faulty accessory will be sent in or ordered with the agreement of our customer service! Damages to glass parts are not free of charge!
Defects to consumables or parts subject to wearing (e.g. motor pistons, kneading
blades, drive shafts, spare remote control, spare toothbrushes, saw blades, etc.) as
well as cleaning, maintenance or the replacement of said parts are not covered by
the warranty and hence are to be paid!
The warranty lapses in case of unauthorized tampering.
After the expiry of the warranty
After the expiry of the warranty repairs can be carried by the competent dealer or
repair service against the payment of the ensuing costs.
14
Page 15

44656-05-MC 1003 CD 16.03.2004 16:32 Uhr Seite 15
Ogólne wskazówki związane z bezpieczną obsługą
Urządzenie chronić należy przed deszczem i wilgocią, aby zapobiec groźbie
pożaru lub porażeniu prądem. Nie należy go więc używać w pobliżu wody, a
więc przykładowo w pobliżu wanny, basenu lub w zawilgoconej piwnicy.
Urządzenie należy używać tylko zgodnie z jego przeznaczeniem.
Urządzenie należy podłączyć tylko i wyłącznie do przepisowo zamontowanego
gniazdka.
Proszę zwrócić uwagę na to, żeby podane napięcie zgadzało się z napięciem w
gniazdku.
W przypadku używania oddzielnych zasilaczy należy zwrócić uwagę na biegunowość i napięcie, baterie muszą zostać włożone do urządzenia zgodnie z oznaczoną biegunowością.
Urządzenie należy w taki sposób ustawić, żeby istniejące otwory wentylacyjne
nie zostały przykryte.
Nigdy nie wolno otwierać obudowy urządzenia. Niefachowo przeprowadzone
naprawy mogą być groźne w skutkach dla użytkownika. Przy uszkodzeniu
urządzenia, w szczególności kabla sieciowego, urządzenie nie może być
używane dopóki nie zostanie naprawione przez osobę z wymaganymi uprawnieniami. Kabel sieciowy należy regularnie sprawdzać, czy nie jest uszkodzony.
W celu uniknięcia niebezpieczeństwa, uszkodzony kabel podłączenia do sieci
może być wymieniany na kabel tej samej jakości wyłącznie przez producenta,
nasz serwis lub inną osobę o odpowiednich kwalifikacjach.
Jeżeli urządzenie nie będzie przez dłuższy czas używane, należy wyciągnąć
wtyczkę z gniazdka lub wyjąć baterie.
Poniższe symbole mogą znajdować się na urządzeniu i mają zwracać Państwa
uwagę na:
Symbol błyskawicy ma zwrócić uwagę użytkownika na znajdujące się
we wnętrzu urządzenia części, które są pod niebezpiecznie wysokim
napięciem.
Symbol z wykrzyknikiem ma zwrócić uwagę użytkownika na znajdujące
się w załączonych dokumentach ważne wskazówki związane z
obsługą i konserwacją urządzenia.
Urządzenia z tym symbolem używają do odczytywania dźwięku z płyty
kompaktowej „Lasera klasy ą“. Wbudowany wyłącznik bezpieczeństwa
ma zapobiec temu, żeby użytkownik w czasie otwierania kieszeni odtwarzacza płyt kompaktowych został poddany niebezpiecznemu dla
ludzkich oczu oddziaływaniu niewidocznego światła lasera.
PL
15
Page 16

44656-05-MC 1003 CD 16.03.2004 16:32 Uhr Seite 16
Wyłącznika tego nie należy w żadnym wypadku zmostkować lub też przy nim
PL
manipulować, ponieważ grozi to niebezpieczeństwem, że użytkownik poddany
zostanie oddziaływaniu niebezpiecznego dla ludzkich oczu niewidocznego
światła lasera.
Specjalne wskazówki na temat bezpieczeństwa
• Przed uruchomieniem należy dokładnie zapoznać się z instrukcją obsługi.
• Proszę pamiętać, aby otwory wentylacyjne pozostawały nie zasłonięte.
Przegląd elementów obsługi
1 Przycisk STOP
2 Przycisk PLAY/PAUSE
3 Symbol do dołu - przewijanie do
przodu
4 Symbol do góry - przewijanie do
tyłu
5 Szuflada CD
6 Przełącznik zakresów
7 Przycisk włączania / wyłączania
odtwarzacza CD
Przycisk powtarzania REPEAT /M-UP
8
9 Przycisk pamięci PROGRAM
Przycisk programowania PRESET EQ
10
11 Przełącznik funkcyjny radio-
odbiornika
Gniazdo na słuchawki (wtyk 3,5 mm)
12
13 Przycisk nagrywania (RECORD)
14 Przycisk odtwarzania (Play)
15 Przycisk przewijania do tyłu (REW)
16 Przycisk przewijania do przodu
(F.FWD)
17 Przycisk stopu i otwierania
18 Przycisk PAUZA dla odtwarzacza
kaset
19 Czujnik na podczerwień do zdalnego
sterowania
20 Szuflada na kasety
21 Przycisk funkcyjny TAPE (kaseta)
22 Przycisk funkcyjny CD
23/
Regulator głośności (VOLUME)
24
25 Klawisz do otwierania kieszeni na
płyty CD
16
26 Dioda MUTE
27 Wyświetlacz
28 Dioda trybu czuwania
Widok od tyłu:
29 Przełącznik beat cut/ przełącznik
mono - stereo / opcja
30 Gniazda do głośników
31 Przełącznik System Power
32 Wyjście AC
33 Wejście do anteny (paskowej) AM
34 Antena UKF
Pilot:
1 Przycisk TUNER (odbiornik radiowy)
2 Przycisk 2 CD
3 Przycisk TAPE (kasety)
4 Przycisk przewijania do przodu
/ do tyłu - klawisz poszukiwania CD
5 Przycisk play/pause CD (odtwar-
zanie / pauza dla CD).
6 Przycisk REPEAT/M-UP (powtar-
zanie)
7 Przycisk CD MEMORY (programo-
wania utworów CD)
8 Przycisk STOP
9 Wyłączenie głosu
10 Przełącznik zakresów
11 Wyłącznik zasilania
12 Przycisk zmniejszania głośności
13 Przycisk zwiększania głośności
Page 17

44656-05-MC 1003 CD 16.03.2004 16:32 Uhr Seite 17
Uruchomienie urządzenia
• Proszę usunąć zabezpieczenie transportowe, jeżeli takie umieszczone
zostało na odtwarzaczu płyt kompaktowych lub na części magnetofonowej.
• Proszę wybrać odpowiednie miejsce do ustawienia urządzenia i głośników.
Właściwym miejscem jest sucha, równa i nie śliska powierzchnia, na której
można łatwo obsługiwać urządzenie.
• Proszę podłączyć głośniki po tylnej stronie do „SPK. R i L”.
• Proszę umieścić 2 baterie typu „AAA” w pilocie. Proszę pamiętać, aby
ułożenie ich było zgodnie z biegunami.
• Proszę włożyć wtyczkę przewodu zasilającego do gniazda. Należy sprawdzić, czy napięcie sieciowe odpowiadał danym zawartym na tabliczce znamionowej.
Obsługa ogólna
STANDBY/ON: Urządzenie jest gotowe do pracy lub znajduje się w trybie czu-
wania.
PRESET EQ (10): Przycisk do wybierania 4 różnych rodzajów tonu (CLASSIC,
ROCK, POP, FLAT).
VOLUME (23+24): Do ustawiania indywidualnej głośności
Gniazdo do słuchawek (12): Gdy włożymy wtyk słuchawek do gniazda na
słuchawki dochodzi do wyłączenia głośników. Gdyby twój wtyk nie pasował
należy zastosować odpowiedni adapter.
Pilot na podczerwień: Służy do bezprzewodowej obsługi z odległości do 5
m. Gdy zasięg jego działania zmniejsza się należy wymienić baterie. Przy
obsługiwaniu należy pamiętać o zachowaniu wolnej przestrzeni pomiędzy pilotem a odbiornikiem na podczerwień urządzenia.
MUTE (9 na pilocie): służy do szybkiego wyłączania głośności. Aby skasować
to ustawienie należy wcisnąć ponownie przycisk MUTE.
Słuchanie odbiornika radiowego
1. Proszę wcisnąć klawisz funkcyjny TUNER (11).
2. Proszę wybrać pasmo częstotliwości za pomocą przycisku wyboru częstotliwości (6).
UKF stereo = FM ST / UKF = FM / Fale średnie = AM (mono)
3. Używając przycisków do przodu (3) oraz do tyłu (4) proszę dostroić
odbiornik.
4. Na wyświetlaczu (27) pojawia się „STEREO”, gdy stacja odbierana jest stereofonicznie. Gdy odbiór jest za słaby lub słyszalne są zakłócenia symbol
ten nie pojawia się na wyświetlaczu (27). Pokręcając anteną i zmieniając kąt
jej nachylenia proszę spróbować poprawić odbiór.
5. Aby ustawić odbiór na falach średnich proszę postępować w taki sam
sposób jak opisano powyżej. Na tym paśmie audycje nadawane są tylko
monofonicznie.
17
PL
Page 18

44656-05-MC 1003 CD 16.03.2004 16:32 Uhr Seite 18
6. Aby zapamiętać wybraną stację radiową proszę wcisnąć najpierw przycisk
PL
MEMORY (9 na urządzeniu) lub PROG/MEMORY (7 na pilocie), a następnie
za pomocą klawisza REPEAT Im-Up (6) na pilocie możesz wybrać miejsce w
pamięci. Proszę ponownie wcisnąć klawisz MEMORY. Teraz stacja została
zapamiętana. Do twojej dyspozycji stoi 40 klawiszy przyporządkowania stacji
(po 20 dla każdej fali).
Uwaga: Aby umożliwić odbiór audycji nadawanych na falach średnich i UKF do
urządzenia dołączona została antena. Proszę umieścić wtyk anteny w gnieździe
antenowym (33) znajdującym się na tylnej stronie urządzenia.
Słuchanie kaset
Odtwarzanie kaset
1. Proszę wcisnąć klawisz funkcyjny TAPE (21).
2. Proszę otworzyć kieszeń na kasety (20) wciskając klawisz otwierania kieszeni (17).
3. Proszę wsunąć naganą kasetę taśmą do dołu, a stroną przeznaczoną do
odtwarzania do przodu. Proszę zamknąć kieszeń.
4. Aby rozpocząć odtwarzanie kasety należy wcisnąć przycisk Play (14).
5. Wciśnięcie przycisku Stop (17) powoduje zakończenie odtwarzania.
6. W razie konieczności taśmę można przewinąć do przodu używając w tym
celu przycisku (16), do tyłu zaś używając przycisku (15). Przy przełączaniu i
zatrzymywaniu funkcji przewijania taśmy należy zawsze wcisnąć przycisk
Stop (17). Dzięki temu zapobiegniecie Państwo powstawaniu szkód mechanicznych oraz ewentualnemu uszkodzeniu taśmy.
7. Przy ponownym wciśnięciu klawisza Stop (17) otwiera się kieszeń na kasety
(20).
8. Aby na krótko przerwać odtwarzanie proszę wcisnąć przycisk PAUSE (18).
Ponowne jego wciśnięcie powoduje powrót do odtwarzania.
Nagrywanie kasety
1. Proszę włożyć kasetę taśmą do dołu, a stroną przeznaczoną do nagrywania
do przodu. Proszę upewnić się, czy kaseta nie jest zabezpieczona przed
nagrywaniem (wypustka zabezpieczenia przed kopiowaniem na górnej wąskiej stronie kasety nie może być wyłamana).
2. Proszę wybrać źródło, z którego będziecie Państwo nagrywać używając w
tym celu klawisza funkcyjnego (6, 11 i 22), a następnie uruchomić je.
Nagrywanie następuje z tego źródła, które jest słyszane. Poziom głośności
nagrywania sterowany jest automatycznie. Zmiany brzmienia dźwięku i
głośności nie mają wpływu na nagrywanie.
3. Proszę wcisnąć przycisk Record - nagrywanie (13). Przycisk Play zostaje
automatycznie wciśnięty do dołu. Rozpoczyna się nagrywanie. Wszystkie
wcześniejsze nagrania zostają automatycznie skasowane.
18
Page 19

44656-05-MC 1003 CD 16.03.2004 16:32 Uhr Seite 19
4. Można na krótko przerwać nagrywanie używając w tym celu przycisku (18)
lub zakończyć je poprzez wciśnięcie klawisza Stop (17).
Odtwarzanie płyt kompaktowych
W ten sposób następuje odtwarzanie płyt kompaktowych:
1. Proszę wcisnąć przycisk funkcyjny CD (22).
2. Proszę otworzyć kieszeń na płyty CD wciskając klawisz CD/OPEN/CLOSE
(25).
3. Proszę umieścić na stożku centrującym płytę kompaktową nadrukiem do
góry, a następnie zamknąć kieszeń.
4. Na wyświetlaczu po kilku sekundach pojawia się liczba całkowita utworów
oraz długość całkowita utworów na CD.
5. Aby rozpocząć odtwarzanie CD proszę wcisnąć klawisz Play/Pause (2).
Teraz rozpoczyna się odtwarzanie CD od pierwszego utworu. Aktualnie odtwarzany utwór pokazywany jest na wyświetlaczu (27).
6. Za pomocą przycisków regulacji głośności (23+24) można ustawić
głośność.
Opis przycisków odtwarzacza płyt kompaktowych
PLAY/PAUSE (2): można na krótko przerwać odtwarzanie. Wyświetlacz czasu
pulsuje.
do przodu (3) do tyłu (4): za pomocą tych przycisków poprzez ich krót-
kie wciśnięcie możliwe jest przeskoczenie do następnego lub poprzedniego
utworu. Gdy przytrzymamy dłużej jeden z tych przycisków rozpoczyna się poszukiwanie w trakcie utworu. STOP (1): CD zostaje zatrzymana.
REPEAT (8): Wciśnięcie 1 x: cała CD będzie powtarzana.
Wciśnięcie 2 x: aktualny utwór będzie stale powtarzany
Wciśnięcie 3 x: funkcja zostaje dezaktywowana
MEMORY (9): Umożliwia zaprogramowanie utworów w dowolnej kolejności.
1. Proszę wcisnąć przycisk Stop (1).
2. Wciśnij przycisk MEMORY (9) i wyszukaj za pomocą przycisków poszukiwania do przodu (3) i do tyłu (4) wybrany utwór.
3. Należy ponownie wcisnąć klawisz MEMORY (9). Na wyświetlaczu pojawia się
ponownie „02”. Proszę wprowadzić kolejny utwór, itd.
4. Proszę uruchomić odtwarzacz CD. Program zaczyna być odtwarzany. W
celu skasowania programu należy wcisnąć przycisk STOP (1). Istnieje
możliwość zaprogramowania do 20 utworów.
PL
Niniejsze urządzenie odpowiada normom CE sieci tradiowo-telewizyjnej i
bezpieczeństwa niskonapięciowego oraz zbudowane jest według najnowszej
techniki bezpieczeństwa pracy.
Zastrzega się prawo do zmian technicznych!
19
Page 20

44656-05-MC 1003 CD 16.03.2004 16:32 Uhr Seite 20
PL
Przyznajemy 24 miesięcy gwarancji na produkt licząc od daty zakupu.
W tym okresie będziemy bezpłatnie usuwać w terminie 14 dni od daty dostarczenia wadliwego sprzętu z kartą gwarancyjną do miejsca zakupu wszystkie uszkodzenia powstałe w tym urządzeniu na skutek wady materiałów lub wadliwego
wykonania, naprawiając oraz wymieniając wadliwe części lub (jeśli uznamy za stosowne) wymieniając całe urządzenie na nowe.
Sprzęt do naprawy powinien być dostarczony w komplecie wraz z dowodem
zakupu oraz z ważną kartą gwarancyjną do sprzedawcy w miarę możliwości w
oryginalnym opakowaniu lub innym odpowiednim dla zabezpieczenia przed uszkodzeniem. W razie braku kompletnego opakowania fabrycznego, ryzyko uszkodzenia sprzętu podczas transportu do i z miejsca zakupu ponosi reklamujący.
Naprawa gwarancyjna nie dotyczy czynności przewidzianych w instrukcji obsługi,
do wykonania których zobowiązany jest użytkownik we własnym zakresie i na
własny koszt.
Gwarancja nie obejmuje:
• mechanicznych, termicznych, chemicznych uszkodzeń sprzętu i wywołanych
nimi wad,
• uszkodzeń powstałych w wyniku działania sił zewnętrznych takich jak wyładowania atmosferyczne, zmiana napięcia zasilania i innych zdarzeń losowych,
• nieprawidłowego ustawienia wartości napięcia elektrycznego, zasilanie z nieodpowiedniego gniazda zasilania,
• sznurów połączeniowych, sieciowych, żarówek, baterii, akumulatorów,
• uszkodzeń wyrobu powstałych w wyniku niewłaściwego lub niezgodnego z
instrukcją jego użytkowania, przechowywania, konserwacji, samowolnego
zrywania plomb oraz wszelkich przeróbek i zmian konstrukcyjnych dokonanych
przez użytkownika lub osoby niepowołane,
• roszczeń z tytułu parametrów technicznych wyrobu, o ile są one zgodne z
podanymi przez producenta,
• prawidłowego zużycia i uszkodzeń, które mają nieistotny wpływ na wartość
lub działanie tego urządzenia.
Karta gwarancyjna bez pieczątki sklepu, daty sprzedaży, nie wypełniona, źle
wypełniona, ze śladami poprawek, nieczytelna wskutek zniszczenia, bez
możliwości ustalenia miejsca sprzedaży oraz dołączonego dowodu zakupu jest
nieważna.
Korzystanie z usług gwarancyjnych nie jest możliwe po upływie daty ważności
gwarancji. Gwarancja na części lub całe urządzenie, które są wymieniane kończy
się, wraz z końcem gwarancji na to urządzenie.
Wszystkie inne roszczenia, wliczając w to odszkodowania są wykluczone chyba, że
prawo przewiduje inaczej. Roszczenia wykraczające poza tą umowę nie są
uwzględniane przez tą gwarancję.
Gwarancja oraz zawarte w niej warunki obowiązują na terenie Rzeczpospolitej
Polskiej.
WARUNKI GWARANCJI
20
Page 21

44656-05-MC 1003 CD 16.03.2004 16:32 Uhr Seite 21
Indicaciones generales para su seguridad
Vd. no debe dejar expuesto el aparato ni a la lluvia ni a la humedad, a fin de disminuir así el riesgo de incendio o de sacudida eléctrica.
Por tanto, no debe utilizar el aparato cerca de agua – por ejemplo, cerca de la
bañera, de una piscina o de un sótano húmedo.
Utilice el aparato únicamente para la finalidad para la que ha sido construido.
El aparato se ha de conectar únicamente a una caja de toma de corriente instalada
reglamentariamente. Cerciórese de que la tensión indicada concuerda con la tensión de la caja de enchufe.
Preste atención a que sea correcta la polaridad cuando se empleen fuentes de alimentación externas. Las pilas se han de introducir siempre correctamente.
El aparato se ha de dejar puesto de modo que no se tapen los orificios de aireación existentes.
Jamás se abrirá la carcasa del cuerpo del aparato. Las reparaciones mal hechas
pueden generar considerables peligros para el usuario.
En caso de estar deteriorado el aparato, en especial el cable de conectar a red, ya
no se ha de poner más en servicio el aparato, sino que se hará que lo repare un
especialista. Controle periódicamente el cable de conexión a red para ver si se ha
deteriorado.
Sólo el fabricante, nuestro servicio posventa o un técnico con una cualificación
similar pueden cambiar un cable defectuoso por otro similar, para evitar todo tipo
de riesgo.
Saque de la toma de corriente la clavija de conectar a la red o bien quite las pilas
cuando no se vaya a usar el aparato durante largo tiempo.
Estos símbolos pueden encontrarse en caso dado en el aparato, y son para indicar
lo siguiente:
El símbolo del rayo advierte al usuario que hay componentes internos del
aparato que pueden tener tensiones peligrosamente altas.
El símbolo con el signo de exclamación advierte al usuario que hay
instrucciones de manejo y de mantenimiento importantes en la documentación que va adjunta.
Aparatos que llevan puesto este símbolo operan con un ”Lector Clase 1”
para explorar el CD. Los interruptores de seguridad incorporados sirven
para impedir que el usuario esté expuesto a luz láser invisible peligrosa
para la vista del usuario cuando está abierto el compartimiento del CD.
Bajo ningún concepto se ha de hacer un puenteado sobre estos interruptores de
seguridad ni deben ser manipulados. De hacerlo, existe el peligro de que Vd. esté
expuesto a la luz láser.
E
21
Page 22

44656-05-MC 1003 CD 16.03.2004 16:32 Uhr Seite 22
E
• Antes de la puesta en servicio, lea detenidamente el manual.
• Tenga atención que los agujeros de ventilación estén libres.
Vista de conjunto de los elementos
de mando
1 Tecla STOP
2 Tecla PLAY / PAUSE
3 Tecla Forw SYMBOL DOWN (sím-
4 Tecla Rev SYMBOL UP (símbolo
5 Portadisco
6 Tecla BAND
7 Tecla CD conexión / desconexión
8 Tecla M-UP / REPEAT
9 Tecla Memory PROGRAMM
10 Tecla PRESET EQ
11 Tecla de función TUNER
12 Adaptador de auriculares (jack de
13 Tecla de grabación (RECORD)
14 Tecla de reproducción (Play)
15 Tecla de retroceso (REW)
16 Tecla de avance (F.FWD)
17 Tecla de parada y de eyección
18 Tecla cassette PAUSE
19 Sensor infrarrojo para el mando a
20 Compartimiento de la cassette
21 Tecla de función TAPE
22 Tecla de función CD
23/
24
25 Tecla para abrir el portadisco
26 MUTE-LED
27 Visualizador
28 LED-Stand-by
Indicaciones especiales de seguridad
Vista parte trasera
29 Interruptor Beat Cut / Interruptor
Mono-Stereo / Opcional
30 Conexiones para los altavoces
bolo indicando hacia abajo)
indicando hacia arriba)
3,5 mm)
distancia
Tecla de volumen (VOLUME)
31 Interruptor System Power
32 Salida AC
33 Antena AM (antena de cable)
Conexión
34 Antena FM
Mando a distancia
1 Tecla Tuner (Radio)
2 Tecla CD
3 Tecla Tape (Cassettes)
4 Tecla sintonización en avance / en
retroceso - Tecla de búsqueda CD
5 Tecla CD Play / Pause
6 Tecla REPEAT / M-UP
7 Tecla CD MEMORY
8 Tecla STOP
9 Tecla de conmutación a mudez
10 Tecla BAND
11 Tecla POWER On/Off
12 Tecla VOLUME más bajo
13 Tecla VOLUME más alto
22
Page 23

44656-05-MC 1003 CD 16.03.2004 16:32 Uhr Seite 23
Puesta en servicio del aparato
• En caso de que haya piezas de seguridad para el transporte, aparte estas del
CD y del cassette.
• Elija una ubicación apropiada para el aparato y los altavoces. Apropiado sería
una superficie seca, llana y antideslizante, donde pueda manejar bien el aparato.
• Conecte los altavoces en la parte trasera en “SPK.R y L“.
• Coloque 2 baterías del tipo “AAA“ en el mando a distancia. Tenga atención con
la polaridad correcta.
• Introduzca la clavija de red en una caja de enchufe.Tenga atención que la tensión de red coincida con las indicaciones de la placa de tipo.
Servicio general
STANDBY/ON (7): Conecta el aparato en el modo de funcionamiento o en el modo
de Standby.
PRESET EQ (10): Tecla para elegir cuatro sonidos diferentes (CLASSIC, ROCK,
POP, FLAT).
VOLUME (23+24): Para regular el volumen personal deseado.
Adaptador de auriculares (12): Si introduce la clavija de un auricular en el adap-
tador de auriculares, los altavoces se conmutarán al estado de mudez. Si su clavija
no es apropiada, utilice un adaptador apropiado.
Mando a distancia infrarrojo: Para el mando a distancia sin cable desde una
distancia de hasta 5 metros. En caso de que el alcance se disminuya, debería
cambiar las baterías. Al utilizar el mando a distancia, tenga atención que no haya
objetos entre el mando a distancia y el receptor infrarrojo del aparato.
MUTE (9 Mando a distancia): Sirve para la desconexión rápida del volumen. Para
activar de nuevo el volumen, debe presionar nuevamente la tecla MUTE.
Escuchar radio
1. Presione el interruptor de función TUNER (11).
2. Con la tecla BAND (6) elija la banda de frecuencias deseada.
Ondas ultracortas stereo = FM ST / Ondas ultracortas = FM
Ondas medias = AM (Mono)
3. Sintonice la emisora deseada con las teclas en avance (3) y en retroceso
(4).
4. En el visualizador (27) aparece “Stereo“, en caso de que reciba la emisora en
calidad de stereo. Si la emisora es demasiada débil y la emisora recibida tiene
muchas interferencias, no aparecerá este símbolo en el visualizador (27).
Intente mejorar la recepción de la emisora, girando, cambiando de ángulo o
cambiando la largura de la antena.
5. Para la recepción de emisoras de ondas medias (AM) proceda de la misma
manera. En esta banda de frecuencias las transmisiones solamente se realizan
en mono.
E
23
Page 24

44656-05-MC 1003 CD 16.03.2004 16:32 Uhr Seite 24
6. Para grabar la emisora elegida, presione primero la tecla MEMORY (9 en el
E
aparato) o PROG./MEMORY (7 en el mando a distancia). Después puede elegir con la tecla REPEAT/M-UP (6) en el mando a distancia el sitio de grabación
deseado. Presione de nuevo la tecla MEMORY. Su emisora está ahora grabada. Tiene a su disposición 40 teclas de estaciones (20 por banda).
Nota: Para la recepción de emisoras de ondas medias (AM) se ha suministrado un
cable. Introduzca la clavija de la antena en el adaptador (33) que se encuentra en
la parte trasera del aparato.
Escuchar cassettes
Reproducir cassettes
1. Presione la tecla de función TAPE (21).
2. Presione la tecla del compartimiento de la cassette (17), para abrir el compartimiento de la cassette (20).
3. Coloque en el compartimiento una audiocassette grabada con la abertura de la
cinta hacia abajo y la cara a escuchar hacia adelante. Cierre el compartimiento
de la cassette.
4. Presione la tecla PLAY (14) para reproducir la cinta.
5. Usted puede parar la reproducción con la tecla STOP (17).
6. En caso de que sea necesario desbobine la cinta en retroceso (15) o en avance con las teclas (16). Entre los cambios o para parar la función de pasada de
la cinta, presione siempre la tecla STOP (17). De esta manera evita daños
mecánicos o estropear la cinta.
7. En caso de que presione nuevamente la tecla STOP (17), se abrirá la tapa del
compartimiento de la cassette.
8. Para interrumpir brevemente la reproducción, presione la tecla PAUSE (18). Si
presiona de nuevo esta tecla, se activará la reproducción.
Grabar cassettes
1. Coloque una audiocassette con la cinta hacia abajo y con la cara a grabar
hacia adelante. Tenga atención que la cassette no esté protegida contra copias
(la lengüeta de protección en la parte superior de la cassette no debe estar
quebrada).
2. Elija la fuente de grabación con las teclas de función (6, 11 y 22) y inicie esta
fuente. Usted grabará de la fuente de sonido que está escuchando. El nivel de
grabación se modula automáticamente. Cambios en el sonido o en el volumen,
no cambiarán la grabación.
3. Presione la tecla de grabación (13). La tecla PLAY se presionará también
automáticamente hacia abajo. La grabación se inicia. Todas las grabaciones
anteriores se eliminarán de forma automática.
4. Puede interrumpir brevemente la grabación con la tecla PAUSA (18) o pararla
con la tecla Stop (17).
24
Page 25

44656-05-MC 1003 CD 16.03.2004 16:32 Uhr Seite 25
Reproducir Compact Discs
De esta manera reproducirá un CD:
1. Presione la tecla de función CD (22).
2. Abra el portadisco (5) presionando la tecla CD/OPEN/CLOSE (25).
3. Coloque un CD con la etiqueta hacia arriba sobre el cono de centrar y cierre el
portadisco.
4. Después de unos segundos se indicará en el visualizador la cantidad de títulos
/ tracks y la duración completa de reproducción del CD.
5. Para reproducir el CD, presione la tecla PLAY/PAUSE (2). El CD se reproducirá
desde el primer título. El título actual aparecerá en el visualizador (27).
6. Con las teclas de volumen (23+24) puede regular el volumen deseado.
Descripción de las teclas del CD
PLAY/PAUSE (2): Puede interrumpir brevemente la reproducción. La indicación de
tiempo parpadea.
en avance (3) en retroceso (4): Con estas teclas, presionando breve, puede
saltar al título anterior o al título siguiente. Si mantiene una de estas teclas presionadas, se iniciará la búsqueda rápida.
STOP (1): Se parará el CD.
REPEAT (8): 1 x presionar: El CD completo se reproducirá continuamente.
MEMORY (9):
1. Presione la tecla STOP (1).
2. Presione la tecla MEMORY (9) y elija con la tecla de búsqueda en avance (3) o
en retroceso (4) el título.
3. Presione de nuevo la tecla MEMORY (9).La indicación cambia a _02_.
Introduzca el próximo título etc..
4. Conecte el CD-Player.El programa se reproducirá. Para eliminar el programa,
presione la tecla STOP (1). Puede programar hasta 20 títulos.
Este aparato responde a las directivas de CE para la supresión de interferencias y
la seguridad de baja tensión y ha sido construido según las últimas prescripciones
de seguridad técnica.
No reservamos el derecho de efectuar modificaciones técnicas.
2 x presionar: El título actual se repetirá de forma continua.
3 x presionar: La función se desactiva.
Con esta tecla se puede programar una sucesión de títulos voluntaria.
E
Garantía
Para el aparato comercializado por nosotros nos responsabilizamos con una
garantía de 24 meses a partir de la fecha de compra (factura de compra).
Durante el período de garantía nos encargamos gratuítamente de los defectos del
aparato y de los accesorios*), que se hayan originado por defectos del material o
25
Page 26

44656-05-MC 1003 CD 16.03.2004 16:32 Uhr Seite 26
de la fabricación. Dependiendo de nuestra estimación se realizará una reparación
E
o un cambio. ¡Los servicios de garantía no prolangan la garantía, ni se incia por
ello un período nuevo de garantía!
Como comprobante para la garantía es válido la factura de compra. Sin este comprobante no se podrá realizar un cambio o una reparación gratuíta.
En el caso de garantía lleve el aparato base en el embalaje original y la factura de
compra a su concesionario.
*) Los accesorios se someten a la obligación legal de cambio (6 meses) y no conllevan al cambio gratuíto del aparato entero.¡En este caso no se debería envíar el
aparato entero, sino, trás ponerse en contacto con su concesionario, solamente
enviar o pedir el accesorio defecto! ¡Respecto a roturas de cristal no se hará cargo
el fabricante !
Defectos en los accesorios de uso o en las piezas de desgaste (p.ej. escobillas de
carbón del motor, varillas amasadoras, correas de transmisión, mando a distancia
de repuesto, cepillos de dientes de repuesto, hojas de sierra etc.), como también la
limpieza, mantenimiento o el recambio de piezas de desgaste no recaen en la
garantía e irán al cargo del cliente!
En caso de intervención ajena se expira la garantía.
Después de la garantía
Después de haber expirado la garantía se pueden realizar las reparaciones por el
concesionario o por el servicio de reparaciones. Los gastos irán al cargo del cliente.
26
Page 27

44656-05-MC 1003 CD 16.03.2004 16:32 Uhr Seite 27
Indicaflii de siguranflæ generale
Ca sæ evitafli pericolul de foc sau de øoc electric, sæ nu punefli aparatul la ploaie
sau la umezealæ. Sæ nu folosifli aparatul în apropierea apei - de exemplu în
apropierea unei cadei de baie, unui bazin de înot sau o pivniflæ umedæ.
Folosifli aparatul numai pentru scopul fabricat.
Bægafli aparatul numai în prizæ care a fost instalat reglementar. Avefli grijæ ca
tensiunea înscrisæ este coresppunzætoare cu tensiunea de la prizæ.
Dacæ folosifli piese de reflea externe, sæ avefli grijæ ca sæ aibæ polaritatea potrivitæ,
bateriile sæ le bægafli întotdeauna în direcflia corectæ.
Sæ deplasafli aparatul dumneavoastræ în totdeuna aøa, ca øliflurile de aerisire sæ
nu fie acoperite.
Sæ nu deschidefli nici o datæ carcasa aparatului. Prin reparaturi necalificate se
mæreøte pericolul pentru pentru persoana care foloseøte aparatul. Dacæ se stricæ
aparatul, mai deosebit cablul, atuncea sæ nu mai folosifli aparatul, ci sæ-l ducefli la
un specialist sæ-l reparæ. Sæ controlafli cablul regular ca sæ constatafli dacæ este
defect.
Un cablu defect nu este voie sæ-l reparafli dumneavoastræ ci sæ-l dafli la fabricant, la
serviciul de reparat al nostru sau la o persoanæ în alcelaøi fel de calificatæ care
schimbæ acest cablu defect. De calificarea acesta este nevoie ca sæ se evitæ
pericolul de accidentare.
Dacæ nu folosifli aparatul mai mult timp, atuncea sæ-l scoatefli din prizæ, sau sæ-i scoatefli bateriile.
Simbolele care sînt eventual înscrise pe aparat, sînt înscrise ca sæ væ indicæ la
urmætoarele feluri:
Simbulul pentru fulger indicæ pe piese din înæuntrul aparatului care sînt
sub mare tensiune.
Simbolul cu semnul de exclamare væ dæ atenflia pe indicaflii importante pe
hîrtiile adæugate ca conflin indicafliile de siguranflæ sau indicaflii de îngrijirea
aparatului.
Aparate cu simbolul acesta lucreazæ cu un "clasa 1-laser" care
exploreazæ datele de pe CD. Întrerupætoarele de siguranflæ care sînt
montate, sînt ca sæ evitæ ca oamenii sæ nu ajungæ în contact cu razele
laser, care nu se væd cu ochiul uman øi sînt foarte periculoase, cînd se
deschide sertarul de CD.
Nu este voie ca acestea întrerupætoare sæ fie conciliate sau manipulate deoarece în
alt fel se mæreøte pericolul de a se expune razelor laser.
RO
27
Page 28

44656-05-MC 1003 CD 16.03.2004 16:32 Uhr Seite 28
RO
• Înainte de punerea în funcfliune citifli cu atenflie instrucfliunile de utilizare.
• Atenflie la gurile de aerisire ale aparatului. Trebuie sæ fie în permanenflæ libere.
Privire generalæ asupra elementelor
de deservire
1 Tasta STOP
2 Tasta PLAY/PAUSE
3 Tasta SYMBOL DOWN înainte
4 Tasta SYMBOL UP înapoi
5 Læcaø pentru CD
6 Tasta pentru banda de frecvenflæ
(BAND)
7 Tasta de pornire/oprire pentru CD
8 Tasta REPEAT /M-UP
9 Tasta PROGRAMM pentru progra-
mare
10 Tasta PRESET EQ
11 Tastæ funcfliune radio (TUNER)
12 Mufæ pentru cæøti (jack de 3,5 mm)
13 Tasta pentru imprimare (RECORD)
14 Tasta pentru redare (PLAY)
15 Tasta pentru derulare înapoi (REW)
16 Tasta pentru derulare înainte
(F.FWD)
17 Tasta Stop øi pentru ejectare
18 Tasta PAUSE pentru casetofon
19 Senzor infraroøu pentru telecomandæ
20 Læcaø pentru casetæ
21 Tastæ funcfliune casetofon
22 Tasta funcfliune CD
23/
Tasta VOLUME
24
25 Tasta pentru deschiderea capacului
de la CD
26 MUTE-LED
27 Ecran
28 Stand-by-LED
Indicaflii speciale de siguranflæ
Spatele aparatului
29 Comutator Beat Cut / Comutator
Mono-Stereo / Opflional
30 Legæturi pentru difuzoare
31 Comutator System Power
32 AC ieøire
33 Legætura pentru antena AM
(antenæ detaøabilæ)
34 Antenæ FM
Telecomandæ
1 Tasta (TUNER) pentru radio
2 Tasta pentru CD
3 Tasta (TAPE) pentru casetofon
4 Tasta pentru cæutare înainte øi înapoi
radio - tasta pentru cæutare CD
5 Tasta Play/Pause CD
6 Tasta REPEAT M-UP
7 Tasta pentru programare CD
8 Tasta STOP
9 Tasta pentru oprirea sunetului
10 Tasta (BAND) pentru banda de
frecvenflæ
11 Tasta power on/off
12 Tasta pentru potrivirea volumului
mai încet
13 Tasta pentru potrivirea volumului
mai tare
28
Page 29

44656-05-MC 1003 CD 16.03.2004 16:32 Uhr Seite 29
Punerea în funcfliune a aparatului
• Îndepærtafli, în cazul în care existæ, protecflie la transport a CD-ului øi casetofonului.
• Alegefli o suprafaflæ adecvatæ pentru pozarea aparatului øi a boxelor. O suprafaflæ
uscatæ, planæ, antiderapantæ ar fi potrivitæ pentru a putea folosi aparatul în
condiflii optime.
• Conectafli boxele în spate la "SPK. R øi L".
• Punefli 2 baterii tip "AAA" în telecomandæ. Atenflie la polaritate!
• Conectafli la reflea. Tensiunea din reflea trebuie sæ corespundæ cu indicafliile de
pe plæcufla de marcæ a aparatului.
Deservire generalæ
STANDBY/ON (7): porneøte sau opreøte aparatul .
PRESET EQ (10): tasta pentru alegerea celor 4 tonalitæfli (CLASSIC, ROCK, POP,
FLAT).
VOLUME (23 + 24): pentru reglarea individualæ a volumului.
Mufa pentru cæøti (12): Dacæ introducefli cæøtile în mufa pentru cæøti difuzoarele se
vor deconecta. În cazul în care cæøtile dvs. nu se potrivesc folosifli un adaptor
adecvat.
Telecomandæ cu infraroøu: pentru o comandæ færæ cablu de la o distanflæ de pânæ
la 5 metri. În cazul în care aceastæ distanflæ se micøoreazæ, schimbafli bateriile. În
timpul comenzii færæ cablu îndreptafli telecomanda direct spre emiflætorul infraroøu al
aparatului.
MUTE (9 telecomandæ): se foloseøte la oprirea rapidæ a volumului. Pentru înlæturarea acestei funcflii apæsafli din nou tasta MUTE.
Ascultarea radioului
1. Apæsafli comutatorul TUNER (11).
2. Alegefli banda de frecvenflæ doritæ cu ajutorul tastei Band (6).
UKW Stereo = FM ST / UKW = FM / Undæ medie = AM (Mono)
3. Selectafli postul dorit cu ajutorul tastelor înainte (3) øi înapoi (4).
4. Pe ecran (27) apare afiøajul "Stereo" atunci când recepflionafli postul stereo. În
cazul în care postul a fost recepflionat cu zgomot de fond, acest simbol nu va fi
afiøat pe ecran (27). Încercafli sæ îmbunætæflifli recepflionarea postului învârtind
antena øi modificându-i poziflia.
5. Pentru recepflionarea posturilor MW/AM procedafli în acelaøi mod. Pe aceastæ
bandæ de frecvenflæ posturile sunt emise doar mono.
6. Pentru introducerea în memorie a postului ales apæsafli mai întâi tasta MEMORY
(9 la aparat) sau PROG./MEMORY (7 la telecomandæ), apoi alege poziflia doritæ
de memorare cu ajutorul tastei REPEAT IM-UP (6) de la telecomandæ. Apæsafli
din nou tasta MEMORY. Postul dvs. este acum memorat. Væ stau la dispoziflie
40 de poziflii pentru memorare (20 pentru fiecare bandæ de frecvenflæ).
RO
29
Page 30

44656-05-MC 1003 CD 16.03.2004 16:32 Uhr Seite 30
Notæ: Aparatul este dotat cu antenæ pentru receptarea posturilor MW/AM.
RO
Introducefli antena în mufa (33) din spatele aparatului.
Ascultarea casetelor
Redarea casetelor
1. Apæsafli tasta TAPE (21).
2. Deschidefli capacul casetofonului (20) apæsând tasta de deschidere (17).
3. Introducefli o casetæ audio înregistratæ în compartimentul capacului cu banda în
jos øi cu partea pe care dorifli sæ o ascultafli în afaræ. Închidefli capacul.
4. Apæsafli tasta Play (14) pentru redarea casetei.
5. Putefli opri redarea casetei apæsând tasta Stop (17).
6. Derulafli caseta înainte cu tasta (16). Respectiv cu tasta (15) înapoi. Apæsafli în
timpul derulærii øi pentru oprire întotdeauna tasta STOP (17). Astfel evitafli
defecfliuni mecanice sau defectarea benzii.
7. Apæsând din nou tasta STOP (17) deschidefli capacul casetofonului (20).
8. Pentru a opri redarea pentru scurt timp, apæsafli tasta Pause (18). Apæsând încæ
o data pornifli din nou redarea casetei.
Imprimarea casetelor
1. Introducefli o casetæ audio cu banda în jos øi cu partea pe care dorifli sæ o imprimafli în afaræ. Verificafli dacæ caseta este protejatæ împotriva imprimærii(clapeta
de protecflie împotriva imprimærii din partea îngustæ a casetei trebuie sæ fie intactæ).
2. Alegefli sursa de imprimare cu ajutorul tastelor (6, 11 øi 22) øi pornifli aceastæ
sursæ. Imprimafli de la sursa pe care o auzifli. Indicatorul pentru imprimare este
modulat automatic. Modificæri de sunet øi volum nu afecteazæ imprimarea.
3. Apæsafli tasta Record (13). Tasta Play va fi automat apæsatæ în jos. Începe imprimarea. Toate imprimærile anterioare vor fi automat øterse.
4. Putefli întrerupe imprimarea pentru scurt timp cu ajutorul tastei Pause (18) sau
putefli opri imprimarea cu tasta Stop (17).
Ascultarea CD-urilor
Redarea unui CD:
1. Apæsafli tasta funcfliune CD (22)
2. Deschidefli capacul CD-ului (5) apæsând tasta CD/OPEN/CLOSE (25)
3. Introducefli un CD audio cu eticheta îndreptatæ în sus øi închidefli capacul.
4. Dupæ câteva secunde vor apærea pe ecran numærul melodiilor øi durata totalæ
de înregistrare.
5. Pentru redarea CD-ului apæsafli tasta Play/Pause (2). CD-ul va fi redat începând
cu prima melodie. Melodia curentæ va fi afiøatæ pe ecran (27).
6. Cu tastele pentru reglarea volumului (23+24) putefli regla volumul dorit.
30
Page 31

44656-05-MC 1003 CD 16.03.2004 16:32 Uhr Seite 31
Descrierea tastelor CD-ului:
PLAY/PAUSE (2): putefli întrerupe redarea pentru scurt timp. Ledul pentru duratæ
clipeøte.
înainte (3) înapoi (4): cu aceste taste putefli særi la urmætoarea melodie sau
la cea anterioaræ. Dacæ flinefli apæsatæ una dintre aceste taste, pornifli procesul de
cæutare al muzicii.
STOP (1): se opreøte CD-ul.
REPEAT: (8): Dacæ apæsafli 1 datæ: întregul CD va fi repetat permanent.
Dacæ apæsafli de 2 ori: melodia curentæ va fi continuu repetatæ.
Dacæ apæsafli de 3 ori: funcflia va fi dezactivatæ.
MEMORY (9): permite programarea aleatorie a melodiilor.
1. Apæsafli tasta Stop (1).
2. Apæsafli tasta MEMORY (9) øi alegefli melodia doritæ cu ajutorul tastelor înainte
(3) øi înapoi (4).
3. Apæsafli din nou tasta MEMORY (9). Pe ecran va fi afiøat "O2". Introducefli
urmætorul titlu etc.
4. Pornifli CD-Player-ul. Vor fi redate titlurile programate. Pentru øtergerea unei programæri, apæsafli tasta STOP (1). Putefli programa pânæ la 20 de titluri.
Aparatul acesta este corespunzætor cu directivele-CE respective øi este fabricat
dupæ indicafliile de siguranflæ cele mai noi!
Schimbæri technice sînt rezervate!
Garanflie
Acordæm pentru aparatul nostru o garanflie de 24 de luni începând cu data
achiziflionærii (bon de casæ).
Pe durata perioadei de garanflie remediem gratuit defecfliunile aparatului sau ale
accesoriilor*) rezultate ca urmare a unor defecfliuni din fabricaflie, reparând sau, în
funcflie de aprecierea noastræ, înlocuind aparatul. Reparafliile în garanflie nu duc la
prelungirea teremenului de garanflie øi nici la obflinerea unei noi garanflii!
Pentru a beneficia de garanflie, cumpærætorul este obligat sæ prezinte chitanfla/factura originalæ de cumpærare a aparatului. Færæ aceastæ dovadæ nu se poate efectua
înlocuirea sau reparaflia gratuitæ a aparatului.
Pentru a beneficia de reparaflii în garanflie, clientul se va adresa reprezentantului firmei predând aparatul în ambalajul sæu original împreunæ cu bonul de casæ.
*) Accesoriile se încadreazæ în obligafliile legale de garanflie (6 luni) øi nu implicæ
înlocuirea gratuitæ a aparatului. În acest caz nu trimitefli resp. comandafli aparatul,
ci dupæ o consultare în prealabil cu serviciului nostru cu clienflii, doar accesoriul
defect! Deteriorærile componentelor din sticlæ trebuie plætite!
RO
31
Page 32

44656-05-MC 1003 CD 16.03.2004 16:32 Uhr Seite 32
Atât defectele de la accesoriile funcflionale resp. componetele care se uzeazæ (de
RO
ex. paleta de fræmântat, curea de distribuflie, telecomandæ de rezervæ, periufle de
dinfli de rezervæ, pânza de fieræstræu) cât øi curæflarea, întreflinerea sau înlocuirea
componentelor care se uzeazæ, nu untræ sub incidenfla garanfliei øi de aceea trebuie
plætite!
Garanflia dispare în cazul intervenfliei stræine.
Post-garanflie
Dupæ scurgerea teremenului de garanflie reparafliile pot fi efectuate gratuit de cætre
service-ul autorizat.
32
Page 33

44656-05-MC 1003 CD 16.03.2004 16:32 Uhr Seite 33
Avvertenze generali per la sicurezza
Per evitare il rischio di incendio o di scosse, non si deve mai tenere l’apparecchio
sotto la pioggia o in ambienti umidi. Quindi non usare l’apparecchio nelle immediate
vicinanze di acqua, per esempio in prossimità di una vasca, di una piscina o in una
cantina umida.
Utilizzare l’apparecchio solo per l’uso previsto.
Collegare l’apparecchio esclusivamente ad una presa installata a norma. Fare
attenzione a che la tensione indicata corrisponda alla tensione della presa. Se si
impiegano alimentatori esterni, fare attenzione all’esattezza di polarità e di tensione, inserire le batterie sempre correttamente.
Collocare l’apparecchio in modo che le aperture per l’aerazione esistenti non vengano coperte.
Non togliere mai la protezione dell’apparecchio. Riparazioni non a regola d’arte
possono causare notevoli pericoli per l’utente. Se l’apparecchio presenta danni,
soprattutto nella zona del cavo di collegamento, non metterlo più in funzione, ma
farlo riparare prima da un esperto. Esaminare regolarmente il cavo di collegamento
alla rete per verificare che non ci siano danni.
Un cavo di collegamento difettoso può essere sostituito con un cavo equivalente
solo dal produttore, dal nostro servizio assistenza o da persone similmente qualificate, al fine di evitare pericoli.
Se l’apparecchio non viene usato per un periodo di tempo prolungato, togliere il
blocchetto alimentatore dalla presa ovvero estrarre le batterie.
Questi simboli possono trovarsi eventualmente sull’apparecchio e rimandano ai
seguenti elementi:
Il simbolo del lampo fa presente all’utente la presenza di pezzi all’interno
dell’apparecchio che possono produrre alte tensioni pericolose.
Il simbolo con il punto esclamativo fa presente all’utente la presenza di
importanti avvertenze per l’uso e la manutenzione nei fogli di accompagnamento dell’apparecchio.
Gli apparecchi dotati di questo simbolo lavorano con un „Laser classe 1“
per riprodurre i CD. Gli interruttori di sicurezza integrati hanno lo scopo di
impedire che l’utente venga esposto alla luce non visibile del laser, pericolosa per l’occhio umano, aprendo lo scomparto per i CD.
Questi interruttori di sicurezza non devono mai essere cavallottati né manipolati
perché altrimenti sussiste il rischio di esposizione alla luce del laser.
Avvertenze speciali di sicurezza
• Prima di mettere in funzione l’apparecchio leggere attentamente le istruzioni per
l’uso.
• Fare attenzione che i fori per l’aerazione siano liberi.
33
I
Page 34

44656-05-MC 1003 CD 16.03.2004 16:32 Uhr Seite 34
Descrizione dei comandi
I
1 Tasto STOP
2 Tasto PLAY/PAUSE
3 SYMBOL DOWN Tasto FORW
4 SYMBOL UP Tasto REV
5 Vano CD
6 Tasto BAND
7 Tasto CD On/Off
8 Tasto REPEAT/M-UP
9 Tasto Memory PROGRAMM
10 Tasto PRESET EQ
11 Tasto TUNER
12 Presa cuffia (spina per jack 3,5 mm)
13 Tasto di registrazione (RECORD)
14 Tasto di riproduzione (Play)
15 Tasto di riavvolgimento rapido
(REW)
16 Tasto di avanzamento rapido
(F:FWD)
17 Tasto Stop e Eject
18 Tasto PAUSE cassetta
19 Sensore a infrarossi per telecoman-
do
20 Vano cassette
21 Selettore TAPE
22 Selettore CD
23 Tasto per la regolazione
}
del volume (VOLUME)
24
25 Tasto per l’apertura del vano CD
26 MUTE-LED
27 Visore
28 LED Stand-by
Retro
29 Selettore Beat Cut / Selettore
Mono-Stereo / Opzionale
30 Collegamenti altoparlanti
31 Selettore System Power
32 Uscita AC
33 Collegamento antenna AM (antenna
a filo)
34 Antenna FM
Telecomando
1 Tasto Tuner (radio)
2 Tasto 2 CD
3 Tasto TAPE (cassette)
4 Tasto Tuning avanti/indietro - tasto
ricerca CD
5 Tasto Play/Pause CD
6 Tasto REPEAT/M-UP
7 Tasto CD MEMORY
8 Tasto STOP
9 Tasto Mute
10 Tasto BAND
11 Tasto Power On/Off
12 VOLUME tasto per abbassare
13 VOLUME tasto per alzare
Messa in funzione dell’apparecchio
• Togliere l’eventuale dispositivo di sicurezza per il trasporto da CD e scomparto
cassette.
• Scegliere un luogo idoneo per l’apparecchio e gli altoparlanti, per esempio una
superficie asciutta, piana e non scivolosa, dove poter comandare bene l’apparecchio.
• Collegare gli altoparlanti sul retro a “SPK.R e L“.
• Inserire nel telecomando 2 batterie del tipo “AAA“.
Fare attenzione che i poli coincidano.
• Inserire la spina nella presa. Fare attenzione che i dati riportati sulla matricola
coincidano con la tensione di rete.
34
Page 35

44656-05-MC 1003 CD 16.03.2004 16:32 Uhr Seite 35
Uso generale
STANDBY/ON (7): l’apparecchio è pronto per l’uso, cioè si trova nella modalità
standby.
PRESET EQ (10): tasto per selezionare 4 diversi tipi di musica (CLASSIC, ROCK,
POP, FLAT).
Volume (23 + 24): per regolare il volume a piacere.
Collegamento cuffie (12): inserendo la spina delle cuffie nell’apposito collegamen-
to gli altoparlanti si spengono. Se la spina non entra, usare un adattatore.
Telecomando a raggi infrarossi: per telecomandare da una distanza fino a 5
metri. Se questa distanza si riduce, si devono sostituire le batterie. Nel comando
prestare attenzione che tra il telecomando e il ricevitore infrarossi dell’apparecchio
non ci siano ostacoli.
MUTE (9 telecomando): Serve per spegnere rapidamente il volume.
Per ripristinare il volume premere di nuovo il tasto MUTE.
Ascoltare la radio
1. Premere il selettore TUNER (11).
2. Selezionare la banda di frequenza desiderata con il tasto Band (6).
UKW Stereo = FM ST / UKW = FM / Onda media = AM (Mono)
3. Con i tasti avanti (3) e indietro (4) selezionare l’emittente desiderata.
4. Nel visore (27) compare “Stereo“ quando si riceve l’emittente in stereofonia. Se
la ricezione è troppo debole e disturbata, questo simbolo non compare nel visore (27). Cercate di migliorare la ricezione girando, orientando e modificando la
lunghezza dell’antenna.
5. Per la ricezione di emittenti MW/AM procedere allo stesso modo. In questa
banda di frequenza si trasmettono solo trasmissioni in mono.
6. Per memorizzare l’emittente desiderata, premere prima il tasto MEMORY (9
sull’apparecchio) o PROG./MEMORY (7 sul telecomando). Poi si può scegliere
la posizione di memoria desiderata con il tasto REPEAT/M-UP (6) sul telecomando. Premere di nuovo il tasto MEMORY. Ora la stazione radio è stata
memorizzata. Sono a vostra disposizione 40 tasti di stazioni (20 per ogni
banda).
Nota: per la ricezione delle emittenti MW/AM all’apparecchio è acclusa un’antenna.
Inserire la spina dell’antenna nella presa (33) sul retro dell’apparecchio.
I
Ascoltare cassette
Riprodurre cassette
1. Premere il tasto TAPE (21).
2. Aprire il vano cassette (20) premendo l’apposito tasto (17).
3. Inserire nello scomparto cassette una cassetta audio registrata con il nastro
rivolto verso il basso e il lato da ascoltare rivolto in avanti. Chiudere il vano.
4. Premere il tasto Play (14) per riprodurre il nastro.
35
Page 36

44656-05-MC 1003 CD 16.03.2004 16:32 Uhr Seite 36
5. Si pone termine alla riproduzione con il tasto Stop (17).
I
6. Se necessario, far avanzare il nastro con il tasto (16) o riavvolgerlo con il tasto
(15). Prima di passare da una funzione all’altra e per fermare il nastro, premere
sempre il tasto STOP (17). Così si evitano danni meccanici o un danneggiamento del nastro.
7. Premendo nuovamente il tasto STOP (17) si apre lo scomparto per le cassette
(20).
8. Per interrompere per un attimo la riproduzione, premere il tasto Pause (18).
Premendo un’altra volta si riavvia la riproduzione.
Registrare cassette
1. Inserire una cassetta audio con il nastro rivolto verso il basso e il lato da registrare rivolto in avanti. Accertarsi che la cassetta non sia protetta contro la registrazione (la linguetta sul lato superiore sottile della cassetta non deve essere
staccata).
2. Selezionare una fonte di registrazione con i tasti (6, 11 e 22) e dare avvio a
questa fonte. La registrazione avviene dalla fonte sonora che state ascoltando. Il
livello della registrazione viene regolato automaticamente. Modifiche di tono e
volume non cambiano la registrazione.
3. Premendo il tasto Record (13) si aziona automaticamente anche il tasto Play.
La registrazione ha inizio. Tutte le registrazioni precedenti si cancellano automaticamente.
4. Si può sospendere per un attimo la registrazione con il tasto Pause (18) o fermarla con il tasto Stop (17).
Lettura CD
Così si ascolta un CD:
1. Premere il selettore CD (22).
2. Aprire il vano CD (5) premendo il tasto CD/OPEN/CLOSE (25).
3. Mettere al centro un CD con l’etichetta rivolta verso l’alto e richiudere il vano
CD.
4. Nel visore compare dopo alcuni secondi il numero complessivo dei brani e la
durata totale del CD.
5. Premere il tasto PLAY/PAUSE (2) per riprodurre il CD.Il CD viene riprodotto a
partire dal primo brano. Il brano attualmente riprodotto è segnalato nel visore
(27).
6. Con i tasti di regolazione del volume (23+24) si può regolare il volume desiderato.
Descrizione dei tasti CD
PLAY/PAUSE (2): si può sospendere la riproduzione per un attimo. Il visore dell’ora
lampeggia.
36
Page 37

44656-05-MC 1003 CD 16.03.2004 16:32 Uhr Seite 37
avanti (3) indietro (4): premendo leggermente questi tasti si può passare al
brano successivo o precedente. Tenendo premuto uno di questi tasti, ha inizio la
ricerca del brano musicale.
STOP (1): si ferma il CD
REPEAT (8):
Premendo 1x: si riproduce continuamente tutto il CD.
Premendo 2x: il brano attuale viene ripetuto in continuazione.
Premendo 3x: la funzione è disattivata.
MEMORY (9): consente di programmare la riproduzione dei brani in una successione qualsiasi.
1. Premere il tasto Stop (1).
2. Premere il tasto MEMORY (9) e selezionare il brano con il tasto di ricerca avanti (3) o indietro (4).
3. Premendo di nuovo MEMORY (9). Il visore passa a “02“. Impostare il titolo successivo eccetera.
4. Avviare il lettore CD. La riproduzione del programma ha inizio.Per cancellare un
programma, premere il tasto STOP (1). Si possono programmare fino a 20 titoli.
Questo apparecchio corrisponde alle norme CE per i disturbi radio e la sicurezza
contro le correnti a basso voltaggio ed è stato costruito in base alle più recenti
norme tecniche di sicurezza.
Con riserva di apportare modifiche tecniche.
Garanzia
Per l’apparecchio da noi messo in commercio ci assumiamo una garanzia di
24 mesi dalla data di acquisto (scontrino).
Durante la garanzia noi ci impegniamo ad eliminare gratuitamente i guasti dell’apparecchio o degli accessori*), dovuti a difetti di materiale o di fabbricazione, riparandoli o, a nostra discrezione, sostituendoli. Le prestazioni in garanzia danno luogo a
una proroga della garanzia né danno diritto ad una nuova garanzia!
Per la garanzia è sufficiente lo scontrino di acquisto. Senza questo scontrino non
sussiste il diritto né ad una sostituzione né ad una riparazione gratuita.
In caso di garanzia consegnare al vostro rivenditore l’apparecchio base nell’imballaggio originale unitamente allo scontrino.
*) Gli accessori sottostanno all’obbligo di garanzia legale (6 mesi) e la loro sostituzione non comporta la sostituzione gratuita di tutto l’apparecchio. In questo caso
non inviare tutto l’apparecchio ma, d’intesa con il nostro servizio assistenza, ordinare / inviare solo l’accessorio difettoso! Le sostituzioni di pezzi in vetro sono sempre
a pagamento!
I
37
Page 38

44656-05-MC 1003 CD 16.03.2004 16:32 Uhr Seite 38
La riparazione di pezzi d’uso ovvero soggetti a logoramento (cursori, ganci impa-
I
statori, cinghie di trasmissione, telecomandi di ricambio, spazzolini di ricambio,
lame di seghe ecc.) come anche operazioni di pulizia e manutenzione o la sostituzione di pezzi soggetti a logoramento non rientrano nella garanzia e quindi sono a
pagamento!
La garanzia si annulla nel caso di intervento da parte di terzi.
Dopo la garanzia
Al termine della garanzia le riparazioni possono essere eseguite dietro pagamento
dal corrispettivo negozio specializzato o servizio riparazioni.
38
Page 39

44656-05-MC 1003 CD 16.03.2004 16:32 Uhr Seite 39
Technische Daten
Modell: MRC 1003 CD
Spannungsversorgung: 230 V, 50 Hz
Schutzklasse:
Ausgangsleistung: 100 W PMPO
Frequenzbereiche: UKW/FM 87,5-108 MHz
Dieses Gerät entspricht den CE-Richtlinien.
Bitte führen Sie das ausgediente Gerät
einer umweltgerechten Entsorgung zu.
ΙΙ
MW/AM 522-1620 KHz
D-47906 Kempen/Germany · Industriering Ost 40
Internet: http://www.clatronic.de · email: info@clatronic.de
Stünings, Krefeld • 08/01
 Loading...