

Page 1

Owner’s Manual
CDP-102 and CDP-202
CDP-102
中文
ENGLISH
Page 2
NOTICE
All
This means that your Classé product was subjected to the most rigorous manufacturing and safety tests in the world. The CE
This equipment has been tested and found to comply with the limits for a Class B digital device, pursuant to Part 15 of the
will not occur in a particular installation. If this equipment does cause interference to radio or television reception, which can
This product incorporates copyright protection technology that is protected by U.S. patents ad other intellectual property
The information contained in the manual is subject to change without notice. The most current version of this manual will be
posted on our web site at http://www.classeaudio.com.
CAUTION
TO REDUCE THE RISK OF ELECTRICAL SHOCK, DO NOT
WARNING: TO REDUCE THE RISK OF FIRE OR ELECTRIC SHOCK,
symbol (shown left) indicates compliance of this device with the EMC
Classé products are designed to comply with international directives on the Restriction of Hazardous
ENGLISH
Page 3
Important Safety Instructions
1. Read these instructions.
2. Keep these instructions.
3. Heed all warnings.
4. Follow all instructions.
5. Do not use this apparatus near water.
6. Clean only with dry cloth.
7. Do not block any ventilation openings. Install in accordance with the manufacturer»s instructions.
8. Do not install near any heat sources such as radiators, heat registers, stoves, or other apparatus (including ampli–ers)
9. Do not defeat the safety purpose of the polarized or grounding-type plug. A polarized plug has two blades with one
wider than the other. A grounding type plug has two blades and a third grounding prong. The wide blade or the
10. Protect the power cord from being walked on or pinched particularly at plugs, convenience receptacles, andthe point
where they exit from the apparatus.
11. Only use attachments/accessories speci–ed by the manufacturer.
12. Use only with the cart, stand, tripod, bracket, or table speci–ed by the manufacturer, or sold with the
13. Unplug this apparatus during lightning storms or when unused for long periods of time.
14. Refer all servicing to quali–ed service personnel. Servicing is required when the apparatus has been damaged in any
way, such as power-supply cord or plug is damaged, liquid has been spilled or objects have fallen into the apparatus, the
15. Do not expose this apparatus to dripping or splashing and ensure that no objects –lled with liquids, such as vases, are
placed on the apparatus.
16. To completely disconnect this apparatus from the AC Mains, disconnect the power supply cord plug from the AC
17. The mains plug of the power supply cord shall remain readily operable.
18. Do not expose batteries to excessive heat such as sunshine, –re or the like.
The lightning —ash with arrowhead symbol within an equilateral triangle is intended to alert the user to the
presence of uninsulated ≈dangerous voltage∆ within the product»s enclosure that may be of suf–cient magnitude
The exclamation point within an equilateral triangle is intended to alert the user to the presence of important
WARNING : To reduce the risk of –re or electric shock, do not expose this apparatus to rain or moisture . .
ENGLISH
Page 4

Welcome to the Classé family
......................................................................
...........................................................................
ventilation
...............................................................................
.........................................................................
warm up/break-in period
......................................................................
...............................................................................
fl exible GUI
.......................................................................
...................................................................................................
................................................................
....................................................................
AES/EBU digital output
The Remote Control
....................................................................................
..........................................................................
................................................................................
............................................................................................
time display
.......................................................................
4
the home screen
..........................................................................................
4
ENGLISH
Page 5

The Menu System
...............................................................................
teach IR
..........................................................................................
triggers
..................................................................................
..............................................................................................
version info
............................................................................................
......................................................................................
timeout
temporary display
..........................................................................
volume display
................................................................................................
the system setup
..........................................................................................
................................................................................
volume setup
.......................................................................................
video setup
video standard
...............................................................................
............................................................................................
4
.............................................................................
......................................................................................
.....................................................................................
Troubleshooting
....................................................................................
Technische Daten CDP-202
..........................................................................
ENGLISH
Page 6

Welcome to the Classé family
years of continuous re–nement, and we are sure that you will enjoy it for many
years to come.
We value our relationship with our customers. Please allow us to stay in touch
with you by returning your warranty card now, before you pack up the shipping
warranty service can be obtained easily and quickly, even if you have mislaid
your original sales slip.
You will –nd the warranty registration card at the end of the separate warranty
Please, take a few minutes to fi ll out the warranty
your room, its acoustics, and the associated equipment you have chosen to use
with your player. All of these factors in—uence the ultimate performance of your
For this reason, we strongly encourage you to have your
ENGLISH
Page 7

Important! Keep all packing materials for future transport of your Classé
than its purpose-designed packing material may result in
This disc player has been designed to operate optimally on any stable and level
As with any digital component, it is best to place the disc player somewhat
ventilation
Your Classé disc player generates a certain amount of heat in the course of
ENGLISH
Page 8

The serial number for your disc player is found on the rear of the unit. Please
To register your purchase, visit the Classé website (www.classeaudio.com) and
WARRANTY REGISTRATION
This disc player is set at the factory (internally) for 100V, 120V, 230V, or 240V
AC mains operation, as appropriate for the country in which it is to be sold.
The voltage setting may not be changed by the user.
Warning: The voltage setting of your disc player may not be changed
your local authorized Classé dealer or distributor.
This disc player includes protection circuitry that prevents the player from
At startup:
ENGLISH
Page 9

The
will —ash to indicate the condition.
warm up/break-in period
Your new Classé disc player will deliver outstanding performance immediately.
The only exception to this rule is if the unit is placed in standby or unplugged
you should never have to repeat the initial 300 hour break-in period.
your new player. We understand that you are anxious to plug everything in and
ENGLISH
Page 10

fl exible GUI
The LCD touchscreen on the front panel of your new component supports an
Throughout the development phase, perhaps the most important testing of
viewing.
Another bene–t of having worked with highly re–ned circuit designs so
We are con–dent that your new Classé disc player will give you many years of
ENGLISH
Page 11
MENU
CDP-202
LOAD
�
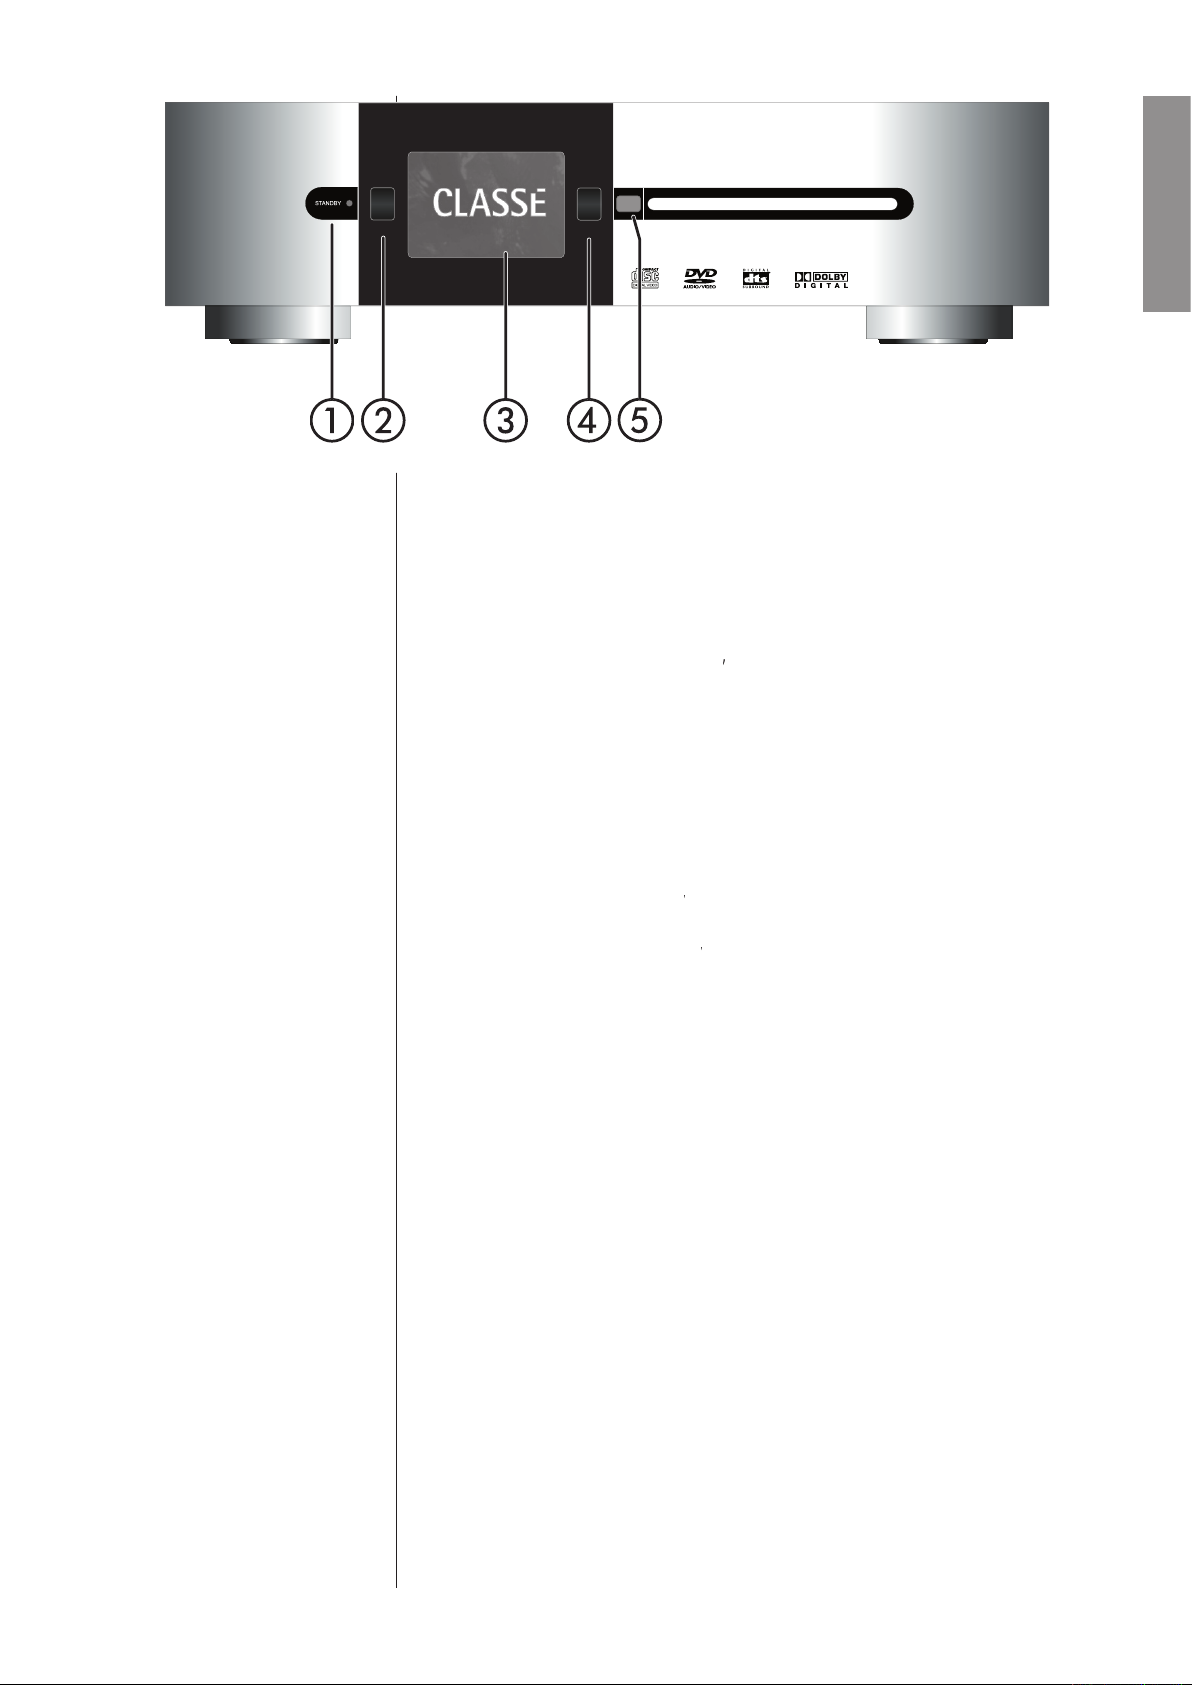
The front panel
mode that leaves the player off, yet ready
The current state of the player is indicated by the LED on the
AC mains voltage out of range
vacation or other travel, we suggest you disconnect it from the AC mains.
Also, it is a good practice to physically disconnect any and all valuable
ENGLISH
Page 12

Menu
button will call up the menu system,
You may control the player by using the front panel
LCD touchscreen
Menu
button, you can also call up the menu system, which
options (including the
in which the menu system itself displays), and several custom-
later in this
4 Eject button
The front panel
Eject
button operates the slot-loading mechanism of the
A blue light illuminates the slot when there is no disc loaded.
The
(IR)
and
transmitter
are located behind this
window. Ordinarily, the disc player must be able to ≈see∆ the remote
and
mini-jacks and
to solve the problem. For more information about
later in this manual, or contact your
ENGLISH
Page 13
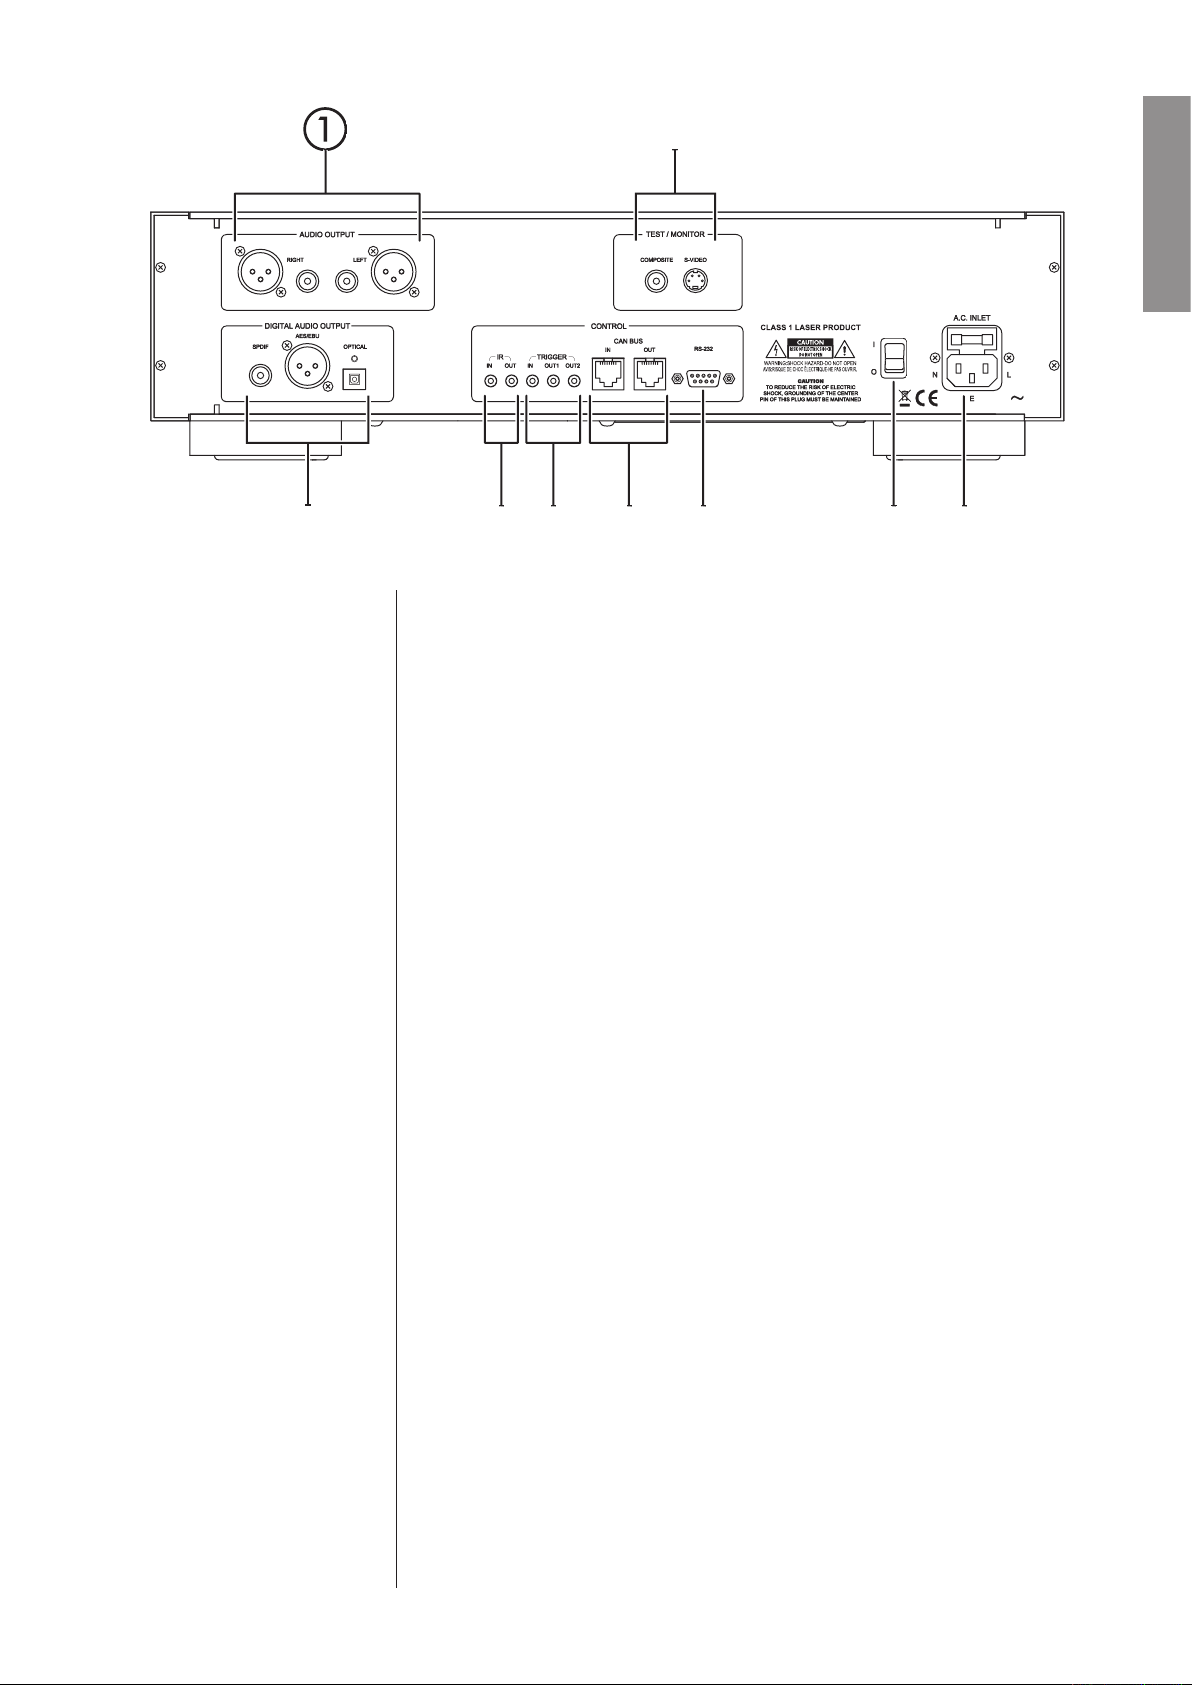
The front left and right channels are supported with both balanced analog
Technically, balanced audio interconnections provide two distinct bene–ts:
ENGLISH
Page 14

The pin assignments of these XLR-type female output connectors are:
Pin 1: Signal ground
Pin 2: Signal + (non-inverting)
Pin 3: Signal √ (inverting)
Connector ground lug: chassis ground
These pin assignments are consistent with the standards adopted by the
Audio Engineering Society.
The disc player is equipped with both S-Video and Composite video
The S-Video output employs the standard S-Video (mini-DIN) connector,
while the Composite output employs a high quality RCA connector.
This disc player has three digital outputs, all of which carry the same
with the available connections on your A/V preampli–er/processor. Only
of the three connections is needed.
ENGLISH
Page 15

The coaxial digital output provides a digital audio signal via a 75
coaxial
AES/EBU digital output
The AES/EBU output provides a digital audio signal via a 110
balanced
The optical digital output provides a digital audio signal via a standard
4 IR Input and Output
Your Classé player includes two
th
and
The list of commands available is quite extensive, enabling even complex
(chains of commands strung together) to operate —awlessly. If this
your authorized Classé dealer.
is a bit of a misnomer: the input and
in nature, not infrared. They are used
with standard IR receivers, distribution ampli–ers, and emitters (available
ENGLISH
Page 16
Note: Many IR repeater systems do not yet support the stripped-
Your dealer can assist you in designing an effective IR
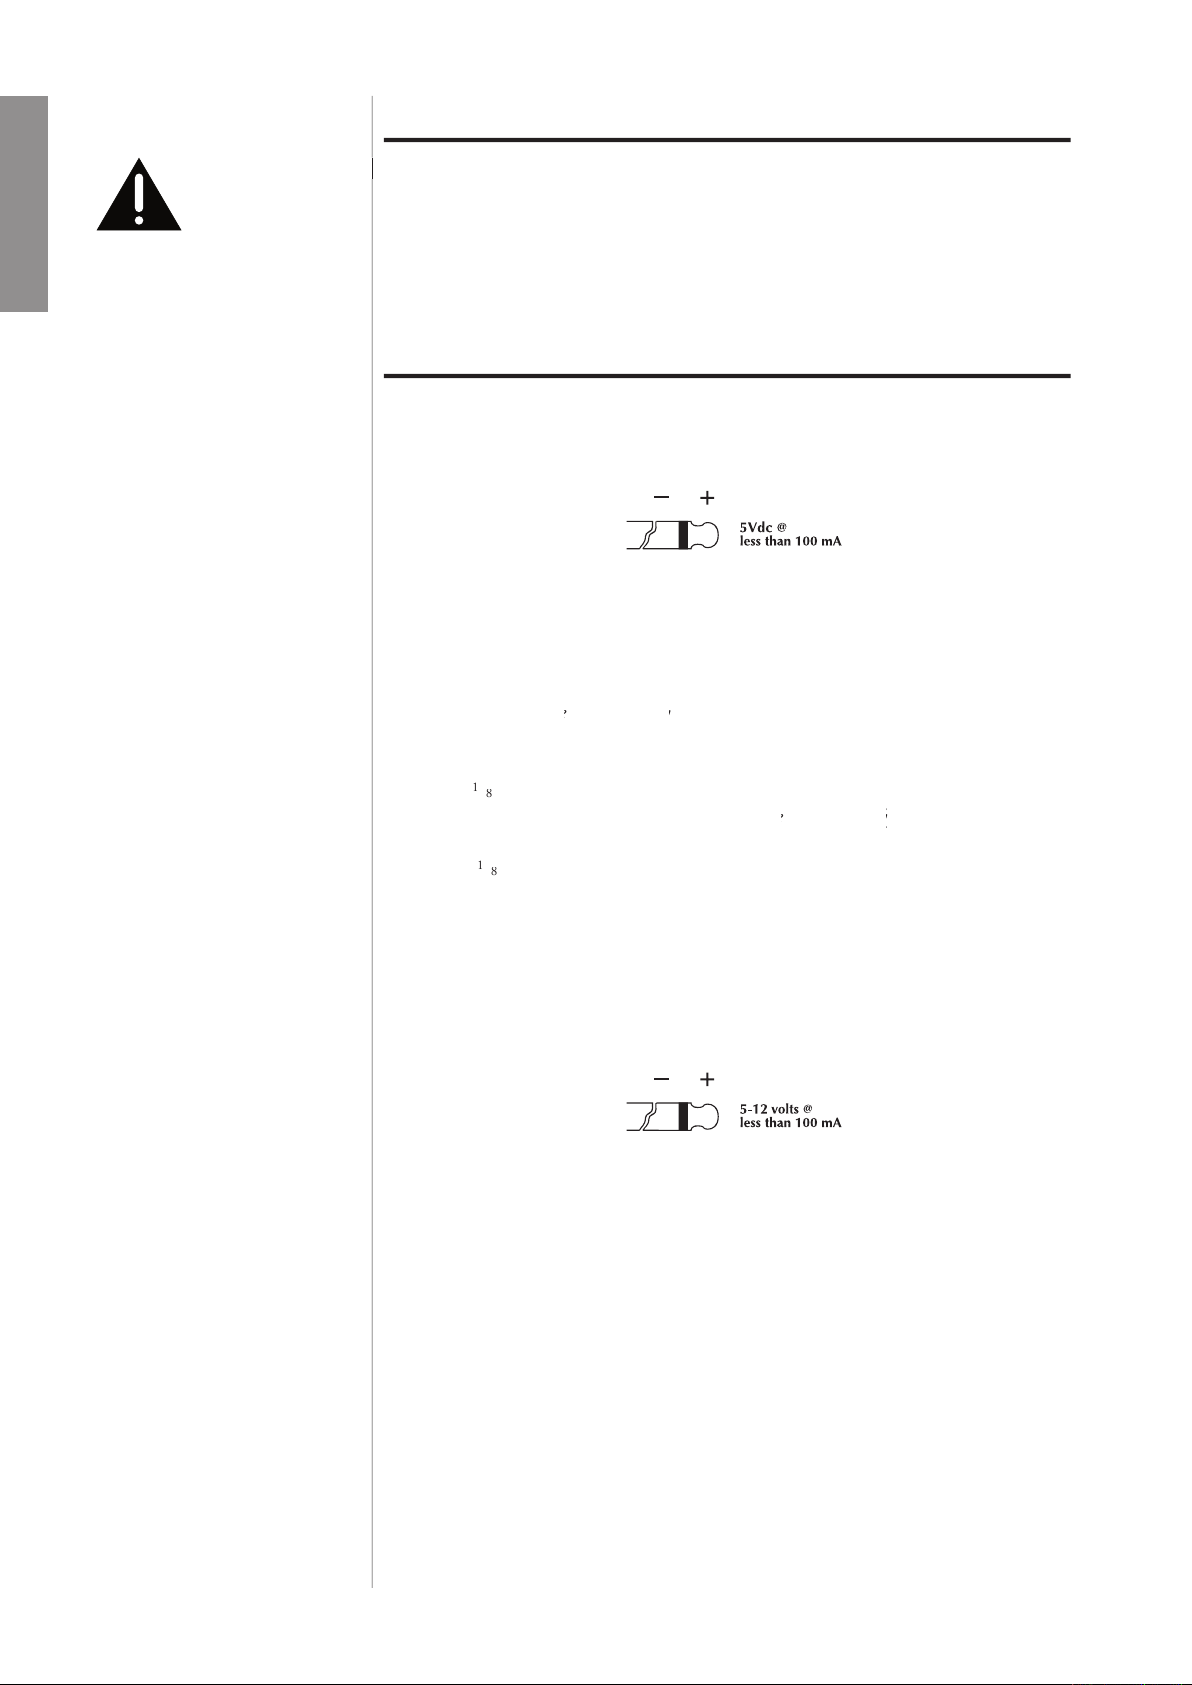
The player is designed to respond to IR commands of 5VDC, with the tip
and
automatically, usually in concert with the A/V
The
th
and
Two
th
Trigger Out to toggle your Classé power ampli–er between operate and
The remote Trigger In will respond to the presence of 5√12VDC, with tip
These RJ-45 connectors are reserved for future control and communication
ENGLISH
Page 17
This port has two purposes:
and Crestron
The main power switch is located at the right side of the rear panel. The
mode before being switched off. Switching the
mode.
Danger! Potentially dangerous voltages and current capabilities exist
within your disc player, even when disconnected from AC
An IEC standard power cord (supplied) is used with the disc player. Plug
wall outlet.
The AC inlet assembly includes a built-in fuse for the protection of the
Caution: There are no user-serviceable parts inside the disc player. Do
ENGLISH
Page 18
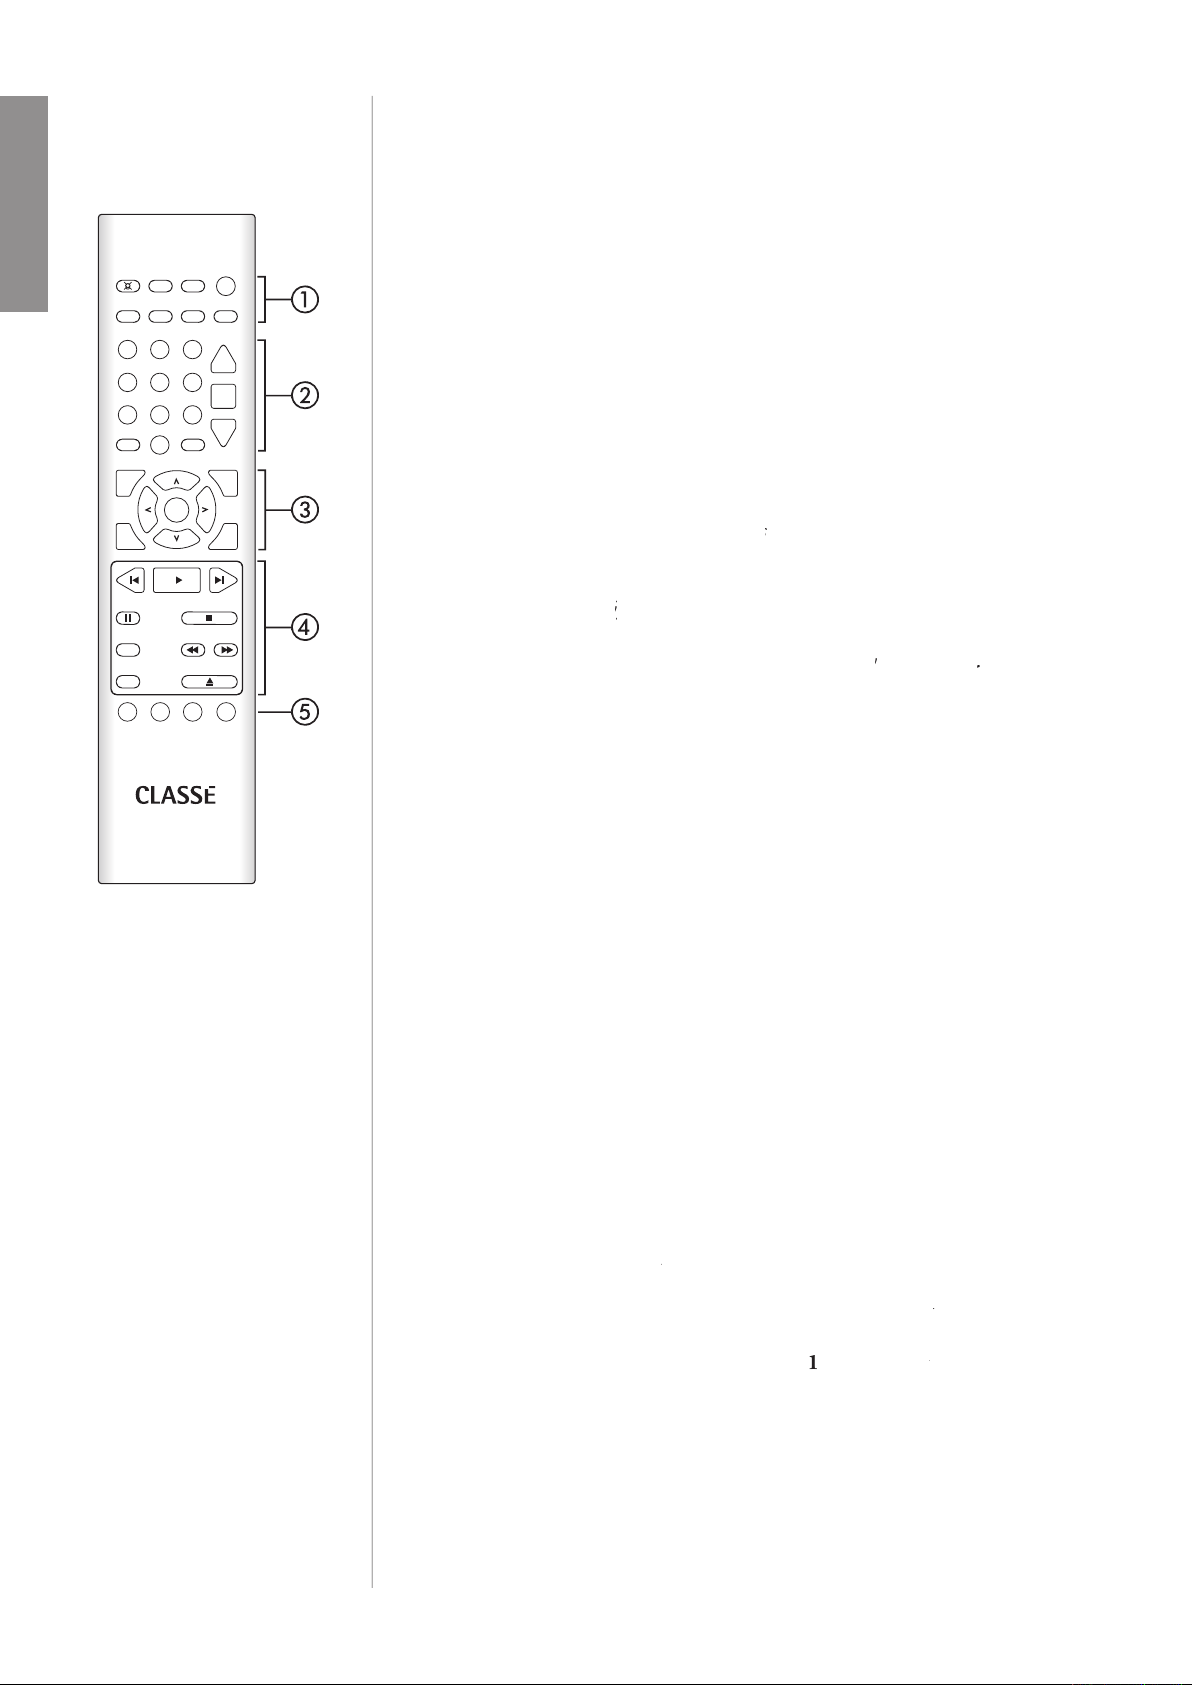
The Remote Control
Your new disc player comes with a versatile remote control which can control
This section along the top of the remote control includes two groups of
The general group is located in the topmost row, and includes:
Light
takes you directly to the
screen in the LCD menu
) cycles through the three brightness settings of
and
The DVD-speci–c group addresses secondary features of the DVD
Zoom
views of the DVD.
Angle
cycles through the available camera angles of the DVD
feature of the DVD standard.)
Audio
cycles through the various available soundtracks on the
The next section down on the remote control provides the numeric keypad
Numeric Keypad
can be used to access speci–c tracks/
key. The
2
keys in
ENGLISH
Page 19

Time
cycles through the four time display modes:
time elapsed on disc
time remaining on track
time remaining on disc
(for Program) allows you to quickly and easily create a
(for Program) allows you to quickly and easily create a Prog
will take you directly to the program
will take you directly to the program Prog
and
buttons, and can use the
Enter
button
a second time returns you to wherever you had been. (Note
program
function is not available during
play
pause
Vol
(for Volume) buttons raise and lower the output level,
Mute
will engage the mute function as you have de–ned it
for
The central section of the remote control contains the navigation keys.
This array of keys is similar to what you may have seen on remote controls
serves two functions: it calls up the menu system when
you need it in order to adjust something to your preference;
returns you to the
when at
restores the normal display of chapter/track, time, and
a note about DVD menus: The DVD standard supports two levels of menus:
within the title.
ENGLISH
Page 20

whatever title you are watching at the moment.
Title
watching.
Enter
4 Transport Controls
You will –nd the transport controls used to control the day-to-day
(previous) will move backward through the chapters or tracks
with most players, the single exception to this is the –rst time
you press the
key, which will take you to the beginning of
key again within
will start the disc spinning (if necessary) and start
will move forward through the tracks (or the playlist, if
you have created one), one track at a time.
will stop the music but allow the disc to continue
applies to both the music and the spinning of the disc.
When you press
will cycle the disc player through its repeat modes.
provides a ≈rewind∆ function, the nature of
which is dictated by your
selection in the
for more information.)
provides a ≈fast forward∆ function, the nature
selection in
for more information.)
will cause the inserted disc to spin down and then eject.
ENGLISH
Page 21

The remote control can also be programmed to perform user de–ned
keys are available for controlling features not
Note: The Fkeys on all Classé remote controls issue the same
you have grabbed the proper remote, since all your Classé
ENGLISH
Page 22
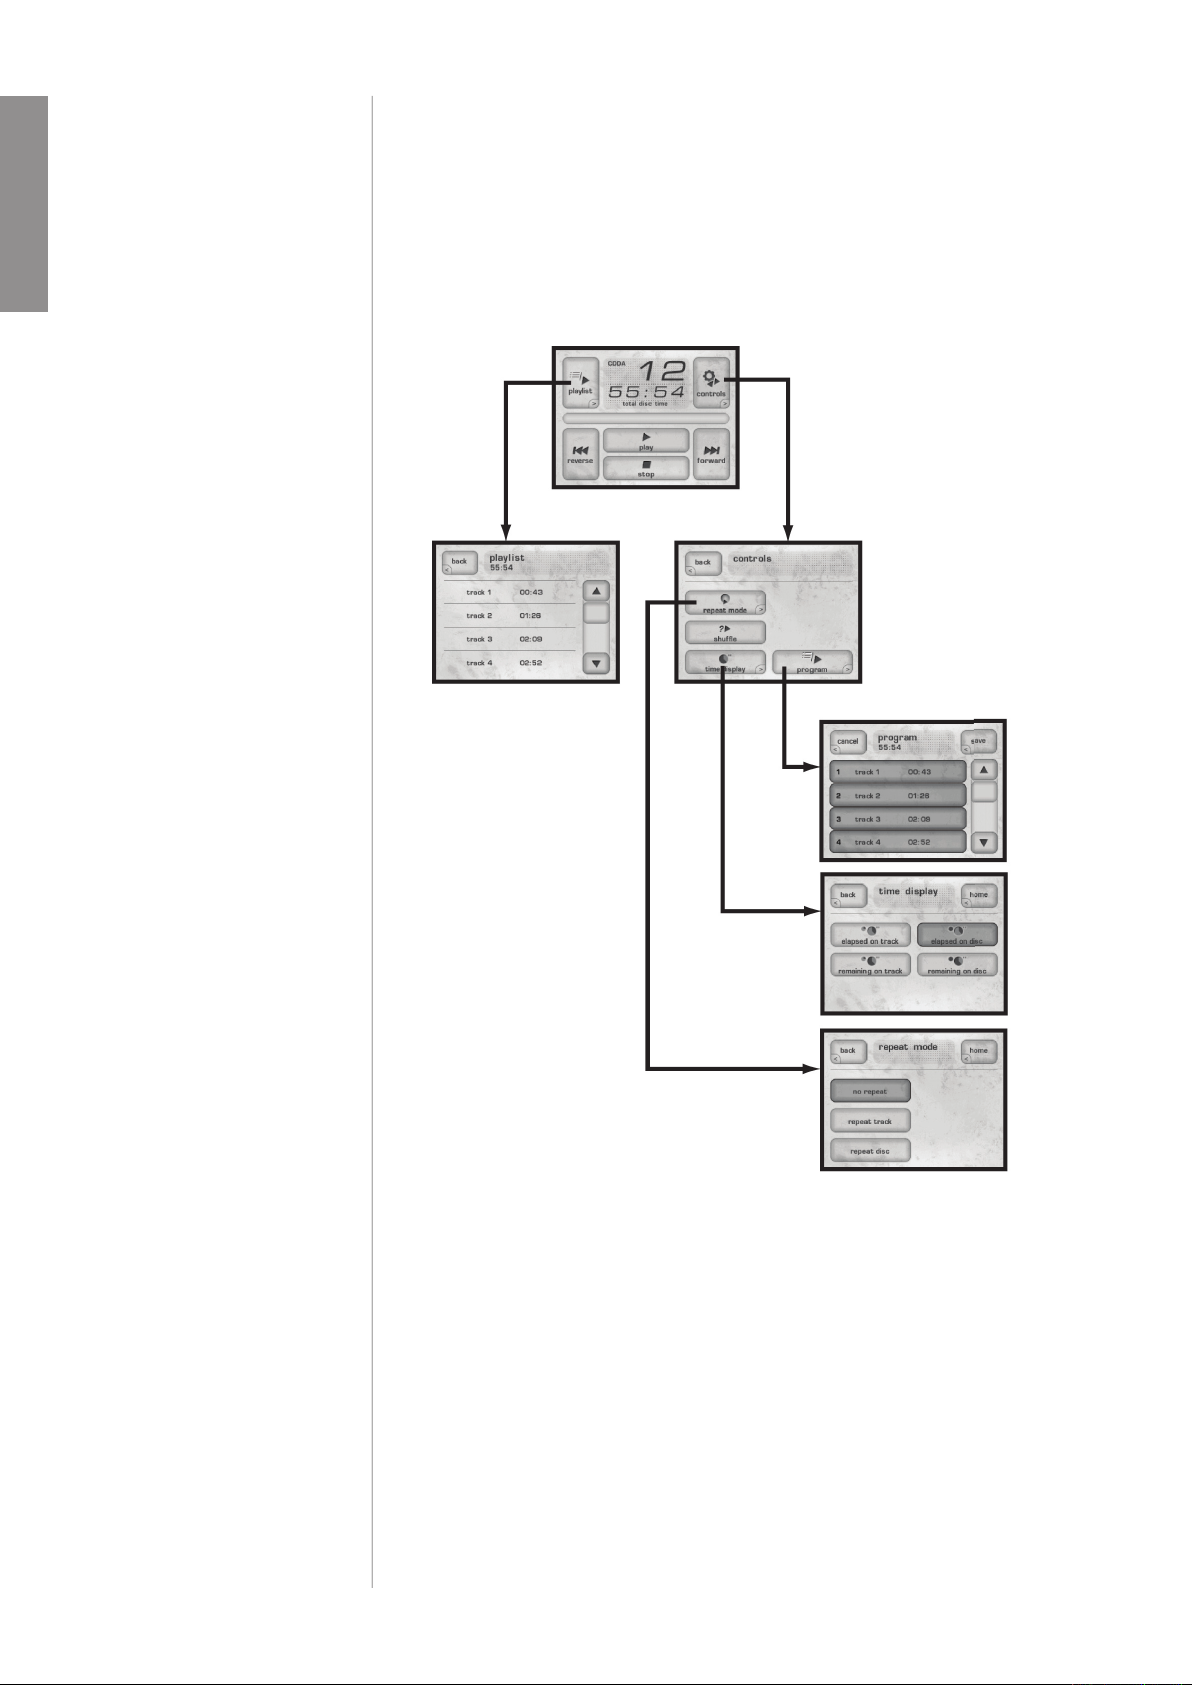
Your disc player includes a versatile touchscreen LCD display which supports
when playing a CD, and when playing a DVD. We will present these separately.
The operational menu consists of several screens that can be accessed directly
ENGLISH
Page 23

playlist
playlist
You may, however, jump to any track by touching it on the screen.
The
and
program
which you may select any of the three repeat modes available:
and
will repeat the
shuffl e
time display
program
program
button on the
When you –rst load a CD, the default program for the disc is to play all the
You can store thousands of playlists.
To remove a playlist, simply deselect all tracks and press the
ENGLISH
Page 24
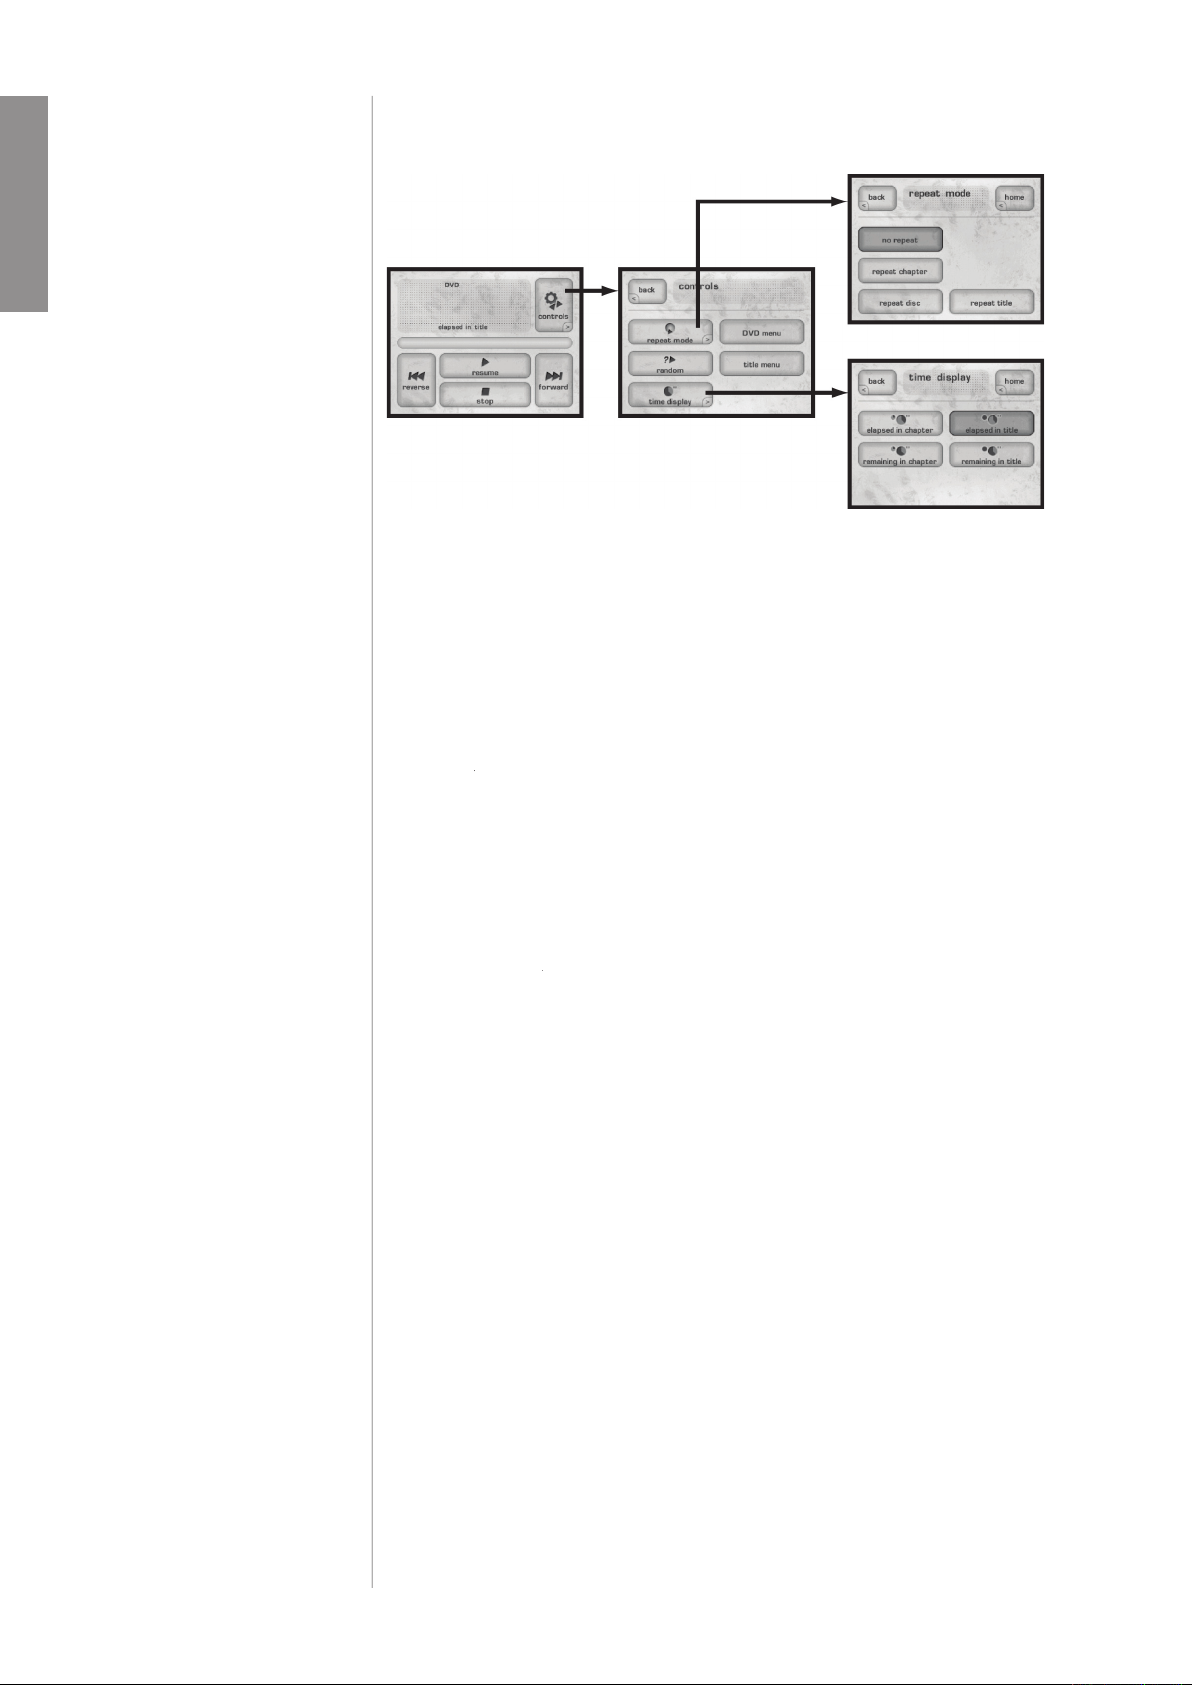
When a DVD is inserted, a different set of controls is displayed.
The
home
screen for DVDs is presented at left in the graphic above, and
button in the top right corner of the
home
screen takes
you to the controls screen. It contains four buttons:
will return you to the
home
screen
takes you to another screen in which you can select any of
will play chapters within the current title in random order. This
time display
changes the way in which time information for the disc is
ENGLISH
Page 25

The Menu System
The disc player uses its versatile touchscreen display to make a wide variety of
Menu
button to the left of the LCD touchscreen brings up a
This menu system provides access to many installation-speci–c features that let
you customize how the disc player works within the context of your particular
system setup
The most extensive part of the menu system is under the
button.
This section is both comprehensive and essential to taking full advantage of the
for all the details.
ENGLISH
Page 26
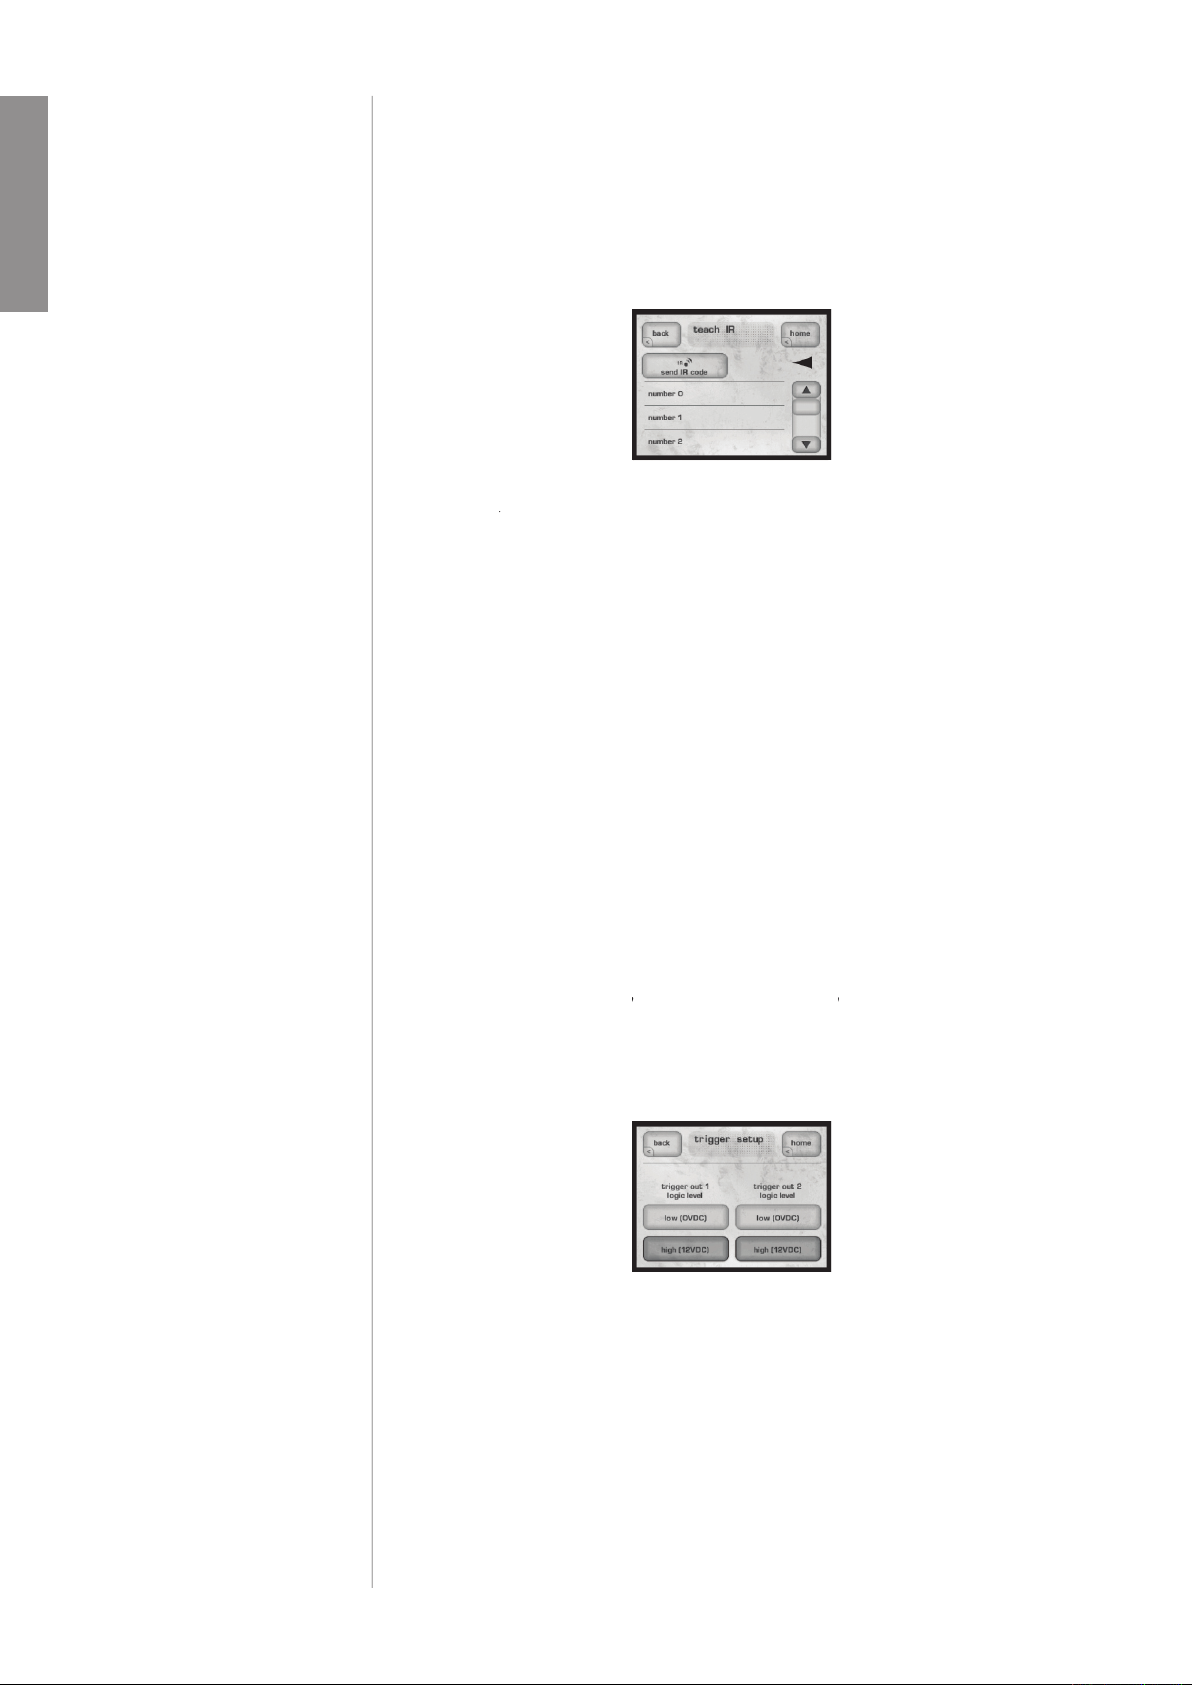
The disc player has discrete infrared (IR) command codes for all its functions,
The
teach IR
screen provides a scrolling list of all the available IR codes. By
button, the disc player will transmit the appropriate
your authorized Classé dealer.
This button brings up the
menu, which itself has subordinate
(essentially 0V), or
(approximately 12VDC)
when the trigger is activated. The ability to change the level of a trigger»s
state
ENGLISH
Page 27
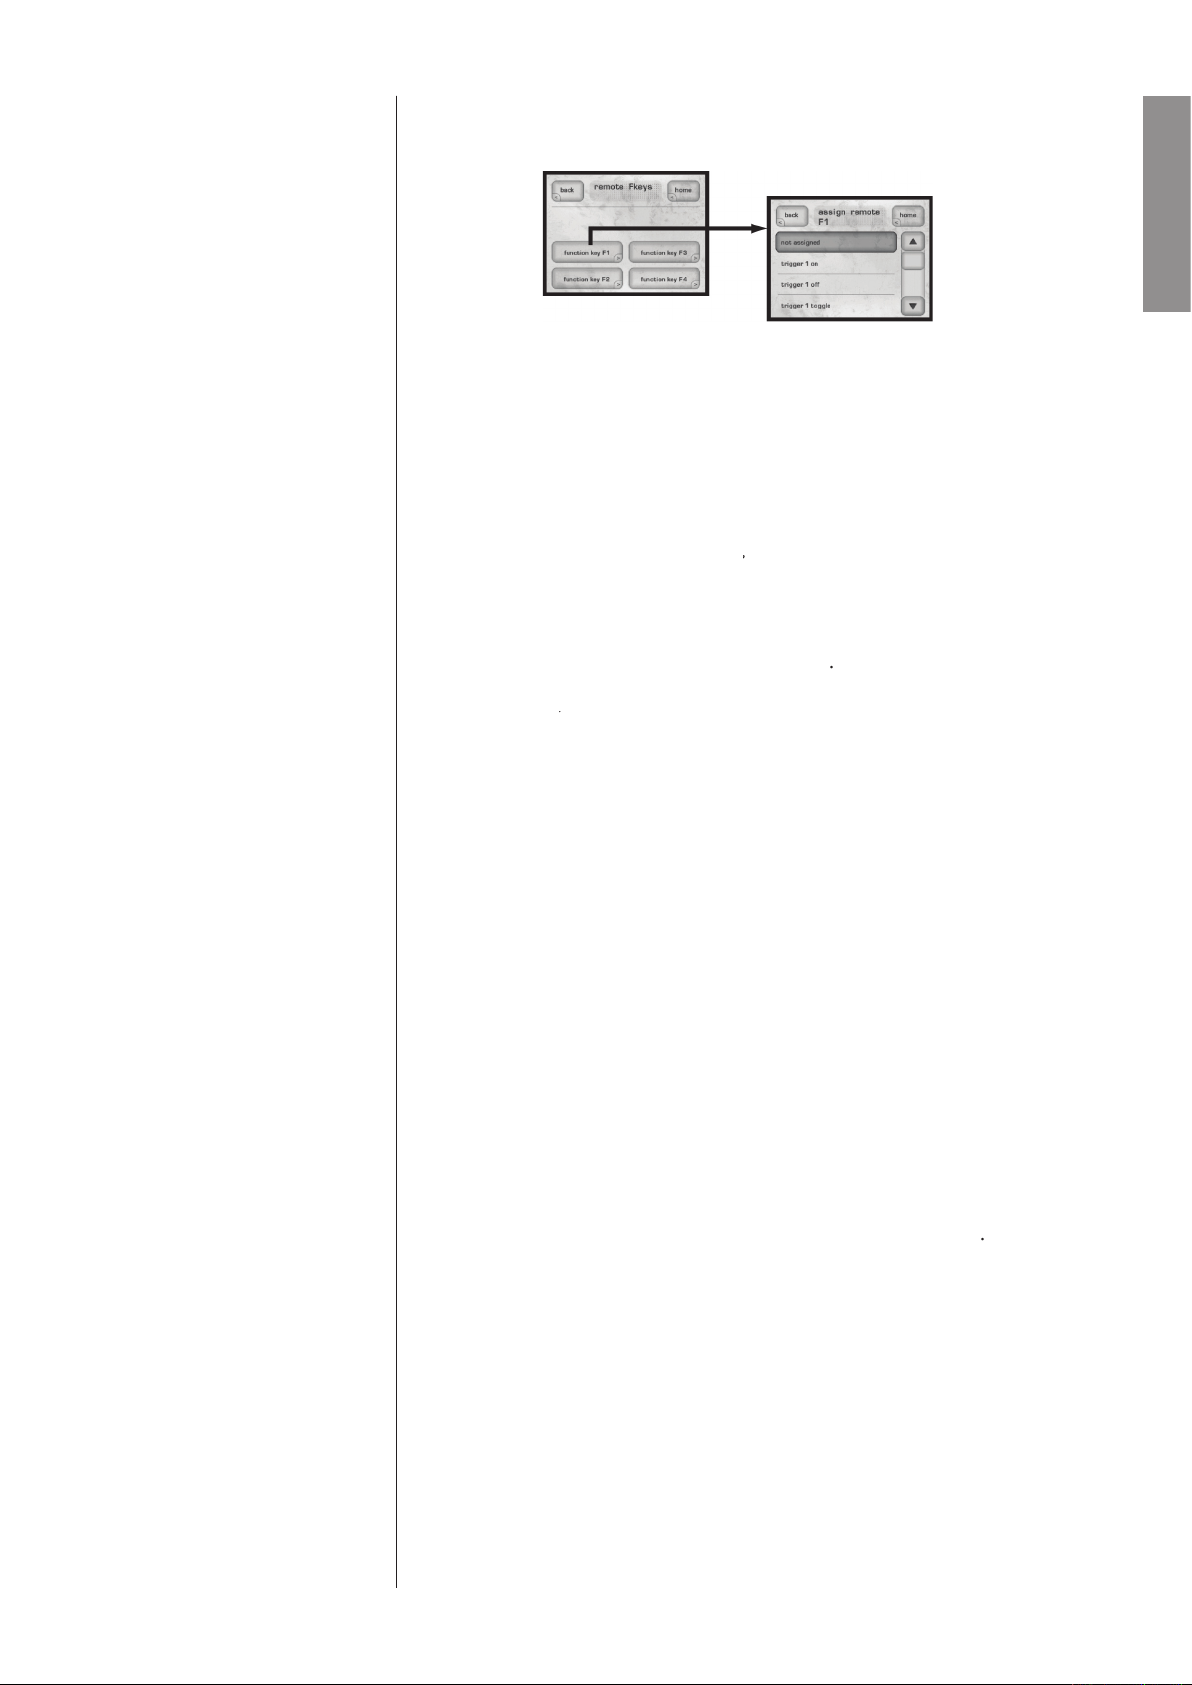
This button brings up the
The remote control supplied with your Classé product includes four user-
function keys
You can use the Fkeys to give you instant access to speci–c system functions that
frequently, you may want to consider
to toggle that function on and off. Doing so will
The
menu has four buttons, one each for the four
on your
on the
on the CD
While this is intended to minimize confusion amongst different remotes (since
could set the preampli–er to the
input, and
ENGLISH
Page 28

status
The
The
version info
button on the status screen takes you to the
version
screen. From time to time Classé develops new software that
version has its own Version Number. The Version Info Screen displays the
Version Number of the software that your unit is running. The latest software
sensors
The
button on the status screen takes you to the
screen, which
The
menu allows you to de–ne your preferences for three aspects
of the backlighting, the
timeout
of the
language
used.
ENGLISH
Page 29

The
setting has three possible values:
and
your listening room while using the system. A
brightness setting usually
works best in brightly-lit rooms; you may –nd that a lower setting is less visually
brightness setting of the display somewhat distracting. If so, you
timeout
of the backlighting so as to turn it off entirely after a
will illuminate the display as soon as you interact with any of the disc player
timeout setting. The lamp in the LCD display was designed for harsh
you keep the timeout delay set to less than one minute.
The
language
When playing a DVD, the touchscreen displays the picture information in a
When you use any of the control functions of the disc player, the display will
The temporary display setting determines how long this user interface remains
ENGLISH
Page 30

Absolute
ENGLISH
Page 31

button to the left of the LCD touchscreen, followed by
button, will bring you to a menu system
the system setup
There are four submenus that can be accessed from the system setup menu. Each
will be covered in turn.
The
button gives you access to six controls pertaining to how your
ENGLISH
Page 32

When a disc has been incorrectly authored, the audio can be out of sync from
The delay is adjustable in 10ms steps and operates within a range of +/- 200 ms
The digital outputs can be con–gured in any of three ways, based on how you
ƒ for example, if you plan to use only the stereo analog outputs, and
ƒ which passes along the native signal of whatever disc is playing,
whether that is PCM, Dolby Digital, DTS, or anything else. This setting
ƒ if the soundtrack you are playing contains multichannel
would be compatible with stereo playback, or further processing with
The volume setup menu allows you to set up several volume-related parameters
ƒ The maximum volume screen allows you to establish a
with 100 indicating that you do not want any arti–cial limit placed on
ƒ Here you may select the level you prefer after the
last volume
is the last level selected before the unit was powered down.
ƒ Gives you three different types of muting function.
muting literally mutes the output when you engage the
muting allows you to select a speci–c volume setting that you
want used when you engage
works as most
buttons work, attenuating the current
volume by the amount you specify.
ENGLISH
Page 33

The
setting adjusts the speaker distance settings manually.
when you are supposed to hear it, despite the varying distances usually involved.
The
level trims
adjustments adjust the speakers» levels manually. A noise
The
button engages and disengages the Late Night mode
video setup
Taking full advantage of the extensive video capabilities of the disc player is
These settings are usually preset for the geographic market in which you
NTSC/PAL/native
ƒ either choose the broadcast standard for your area,
ƒ the ≈video setup∆ in North America assumes that black
ENGLISH
Page 34

You have three choices for the way widescreen movies will be displayed on your
4:3
ƒ If you have a 4:3 display and prefer to have it –lled at all times, the
you insert, and play that version.
ƒ If you have a modern, widescreen display that supports different
letterbox
ƒ If you have a 4:3 display, but prefer to see widescreen movies
The DVD standard supports multiple soundtracks and languages, all on the
ƒ selects the ≈best∆ available soundtrack automatically.
ƒ if you prefer uncompressed digital audio, even if it means fewer
ƒ states a preference for 5.1 channel Dolby Digital
ƒ indicates a preference for soundtracks intended to be
ƒ when selected, the DTS (Digital Theater Systems) soundtrack is
ENGLISH
Page 35

You can also set a preference for the spoken language used in the soundtrack
Automatic
English, French, German,
subtitle language
Your choices are
English, French, German, Spanish
When this button is highlighted, the player will automatically start playback
when a CD is inserted.
press and hold
the button during the scanning process. By contrast, the same
latching
The disc player is equipped with a set of parental controls, similar to those
button allows you to set a four-digit numeric password,
which will be required to play any disc that exceeds the rating you select.
button gives you a list of eight ratings, with the
button gives you a list of eight ratings, with the set rating
button prevents unrated movies from playing without
button enables the parental control feature.
ENGLISH
Page 36

button on
VERSION INFO
on the LCD touchscreen,
MENU
button beside the
LCD
touchscreen, then selecting
from the touchscreen menu, followed by
VERSION INFO
The Version Info Screen displays the Version Number of the software your unit
Version Number on your Version Info screen is lower than the Software Version
ENGLISH
Page 37

Troubleshooting
your dealer, however, check to see if the problem is listed here. If it is, try the
Gently clean the disc itself using a damp, soft cloth, wiping along
The disc itself may already be damaged. Try several other
Ensure the player is plugged into the AC mains, and that the AC
Check that the main power switch on the rear of the unit is on.
Your display may be set to timeout, and the disc player may
you can see the state of the unit, or simply press the
key on
Unplug the unit for at least thirty seconds and then plug it in
Verify that the AC mains is not out of range. The unit will
voltages by not powering up.
Check the fuse by removing the AC cord from the back of the
If none of these solutions work, please consult your Classé dealer
Check that the disc is compatible with your disc player. It will
WMA, AAC, Video-CD, and S-VCD discs.
Ensure that the disc surface is clean, and try reinserting it.
Check that the label side of the CD is facing up.
ENGLISH
Page 38

4. The disc is spinning but there is no sound in one or both
Check that both interconnect cables are properly connected
Ensure that the preampli–er/ampli–er units being used are
Press the
Using the rear panel power switch, turn off the unit for at least
Ensure that there are no obstacles between the IR remote and the
Mute
If the batteries are weak, replace them with fresh ones.
To remove dust from the cabinet of your disc player, use a feather duster or a
Caution! At no time should liquid cleaners be applied directly to the
to electronic components within the unit.
ENGLISH
Page 39

All speci–cations are accurate at the time of printing. Classé reserves the right to
8 Hz √ 20 kHz Ø0.1dB
110dB typical
better than 115dB
1 x Cirrus Logic CS4928
Audio sample rate
192kHz
CD, CD-R, CD-RW, DVD Audio, DVD Video,
VCD, SVCD, MP3, AAC, WMA, DTS CD,
DVD-R, DVD+R, DVD-RW, DVD+RW
55W
determined by the needs of country for which
the unit was manufactured; cannot be reset by dealer or user
Width: 17.5∆ (445mm)
Depth: 16.5∆ (419mm)
Height: 4.75∆ (121mm)
27 lbs (12.3 kg)
35 lbs (15.9 kg)
Telephone +1 (514) 636-6384
AMX
®
®
is a registered trademark of AMX Corporation of Richardson, TX. All rights reserved.
ENGLISH
Page 40

40
All speci–cations are accurate at the time of printing. Classé reserves the right to
110dB typical
better than 115dB
3 x Burr Brown PCM1792
Audio sample rate
192kHz
CD, CD-R, CD-RW, DVD Audio, DVD Video,
VCD, SVCD, MP3, AAC, WMA, DTS CD,
DVD-R, DVD+R, DVD-RW, DVD+RW
55W
determined by the needs of country for which
the unit was manufactured; cannot be reset by dealer or user
Width: 17.5∆ (445mm)
Depth: 16.5∆ (419mm)
Height: 4.75∆ (121mm)
27 lbs (12.3 kg)
35 lbs (15.9 kg)
Telephone +1 (514) 636-6384
AMX
®
®
is a registered trademark of AMX Corporation of Richardson, TX. All rights reserved.
ENGLISH
Page 41

ENGLISH
Page 42
(CE )
标志的官方认可。
FCC
15
B
Macrovision
Macrovision
授权限制的情景。不得进行逆向工程或拆卸。
http://www.classeaudio.com
注 意 !
注意:
EMC
Classé
WEEE
Classé
__________________
中文
Page 43

重要安全注意事项
1.
2.
3.
4.
5.
6.
7.
8.
9.
10.
11.
12.
13.
14.
15.
16.
17.
18.
中文
43
Page 44

Classé
.........................................................................
4
..............................................................................
4
.......................................................................................................
4
................................................................................................
4
.......................................................................................................
4
................................................................................................
4
....................................................................................
4
GUI
............................................................................................
.........................................................................................
超长使用寿命
...........................................................................................................
...........................................................................................................
.......................................................................
4
AES/EBU
..........................................................................
...........................................................................................................
CDP-102
CDP-202
..........................................................................................
播放列表
.........................................................................................
.........................................................................................
.........................................................................................
.......................................................................................
4
.................................................................................................
4
中文
Page 45

45
.......................................................................................................
.........................................................................................
.........................................................................................
..................................................................................
.................................................................................................
.........................................................................................
.........................................................................................
超时
.................................................................................................
.........................................................................................
.......................................................................................................
..............................................................................
.........................................................................................
.........................................................................................
.........................................................................................
.........................................................................................
.............................................................................................
4
.........................................................................................
4
.........................................................................................
.................................................................................................
.......................................................................................................
.......................................................................................................
保管和维护
........................................................................................
...............................................................................................................
中文
Page 46

46
Classé
Classé
Classé
中文
Page 47

Classé
够空间。我们建议留出
8
厘米)的自由空间,
中文
Page 48

48
(www.classeaudio.com)
WARRANTY REGISTRATION
100V
240V
230V
Classé
Classé
-15%
+10%
120V
95V√135V
10%
LED
LCD
15%
LED
状况。
中文
Page 49

49
300
300
中文
Page 50

LCD
Classé
Classé
中文
Page 51

MENU
CDP-202
LOAD
�
RS-
LED
LED
状态的含义如下:
=
=
中文
Page 52

Menu
LCD
LCD
CD
DVD
Menu
Eject
Classé
中文
Page 53

XLR
RCA
/
XLR
输出连接到这些输入孔,连接时使用高质量的平
平衡音频互连电缆最初是在专业的音乐界发展起来的,目的是保留
6
EMI
RFI
Classé
平衡的模拟互连电缆。
中文
Page 54

XLR
1
2
3
Audio Engineering Society
标准一致。
(RCA)
RCA
输出尽可能好。但是,该连接标准不能提供平衡互连方式
RCA
/
S
视频和复合视频输出,可用来在视频显示器
LCD
视频输出使用标准的
S
视频(微型
DIN
输出使用高质量的
RCA
A/V
/
A/V
/
中文
Page 55

RCA
75
/
AES/EBU
AES/EBU
输出通过带
XLR
110
/
AES/EBU
EIAJ
/
A/V
/
4
输出(将相同的信号传递给下一个产品)。该特点允许用户以“菊
中文
Page 56

Delta
Delta
Classé
5V
/
视频设备都可以给相关设备提供某种直流控制电压,以
A/V
DC
5√12V
12V
100mA
RJ-45
CAN
中文
Page 57

i-Command
AMX
Crestron
IEC
标准的电源线(随机提供)。将电源线
IEC
/
中文
Page 58

4
Light
LCD
DVD
DVD
标准的次要功能——您可能
Zoom
DVD
Angle
DVD
DVD
标准的这项可选功能)。
Audio
CD/DVD
12
2
中文
Page 59

Time
光盘播放时间、
光盘剩余时间。
Enter
Vol
/
输出,则这两个按钮将不起作用。
Mute
LCD
/
中文
Page 60

DVD
Title
DVD
Enter
LCD
Enter
4
中文
Page 61

DC
Ê>ÃÃjÊ
中文
Page 62

CDP-102
CDP-202
LCD
CD
CD
中文
Page 63

播放列表
playlist
控制菜单
CD
time display
编程
program
CD
CD
中文
Page 64

DVD
DVD
home
控制
4
DVD
DVD
time display
中文
Page 65

LCD
Menu
中文
Page 66

IR
IR
IR
Classé
LCD
触发器
DC
12V
中文
Page 67

CD
输入,同时使播放机开始
中文
Page 68

version info
www.classeaudio.com
中文
Page 69

够醒目。
超时
never
language
DVD
FBI
DVD
中文
Page 70

Absolute
0
Home
标准的人们所喜欢的方式,其中
中文
Page 71

LCD
中文
Page 72

Ø200
10
PCM
PCM
DTS Neo:6
0
100
100
中文
Page 73

距离
level trims
dB SPL
C
75 dB SPL
/
/
输出以符合不同的标准,则两种选择如下所述:
NTSC/PAL/
NTSC
PAL
0
7.5 IRE
0 IRE
中文
Page 74

4:3
4:3
4:3
16:9
letterbox
4:3
4:3
标准支持光盘上的多种配音和多种语言。这种多功能性可能使播
DVD
DVD
5.1
2.0
PCM
杜比
5.1
5.1
杜比立体声
Dolby Pro Logic
Dolby Pro Logic
DTS
中文
Page 75

Automatic
CD
DVD
DVD
latching
CD
CD
CD
DVD
8
R
中文
Page 76

www.classeaudio.com
LCD
VERSION
MENU
VERSION
中文
Page 77

30
CD
视频、
WMA
AAC
VCD
SVCD
中文
Page 78

4.
30
任何时候都不应该直接使用液体清洁剂进行清洁,那样可能损坏播
中文
Page 79

8 Hz √ 20 kHz Ø0.1dB
0.001%
2V
4V
110dB
115dB
1 x Cirrus Logic CS4928
192kHz
CD
视频、
VCD
AAC
WMA
DVD-R
55W
)
)
4.75∆ (121
)
27
(12.3
)
35
(15.9
)
H8T 1B3
+1 (514) 636-6384
+1 (514) 636-1428
http://www.classeaudio.com
cservice@classeaudio.com
Classé
标志是加拿大拉欣市
Classé Audio
Equity
AMX
®
®
AMX
Rockleigh
Crestron
中文
Page 80

0.001%
2V
4V
110dB
115dB
3 x Burr Brown PCM1792
192kHz
CD
视频、
VCD
AAC
WMA
DVD-R
55W
)
)
4.75∆ (121
)
27
(12.3
)
35
(15.9
)
H8T 1B3
+1 (514) 636-6384
+1 (514) 636-1428
http://www.classeaudio.com
cservice@classeaudio.com
Classé
标志是加拿大拉欣市
Classé Audio
Equity
AMX
®
®
AMX
Rockleigh
Crestron
中文
Page 81

中文
Page 82

Asia
All Others
©
V 2.2
 Loading...