

Page 1
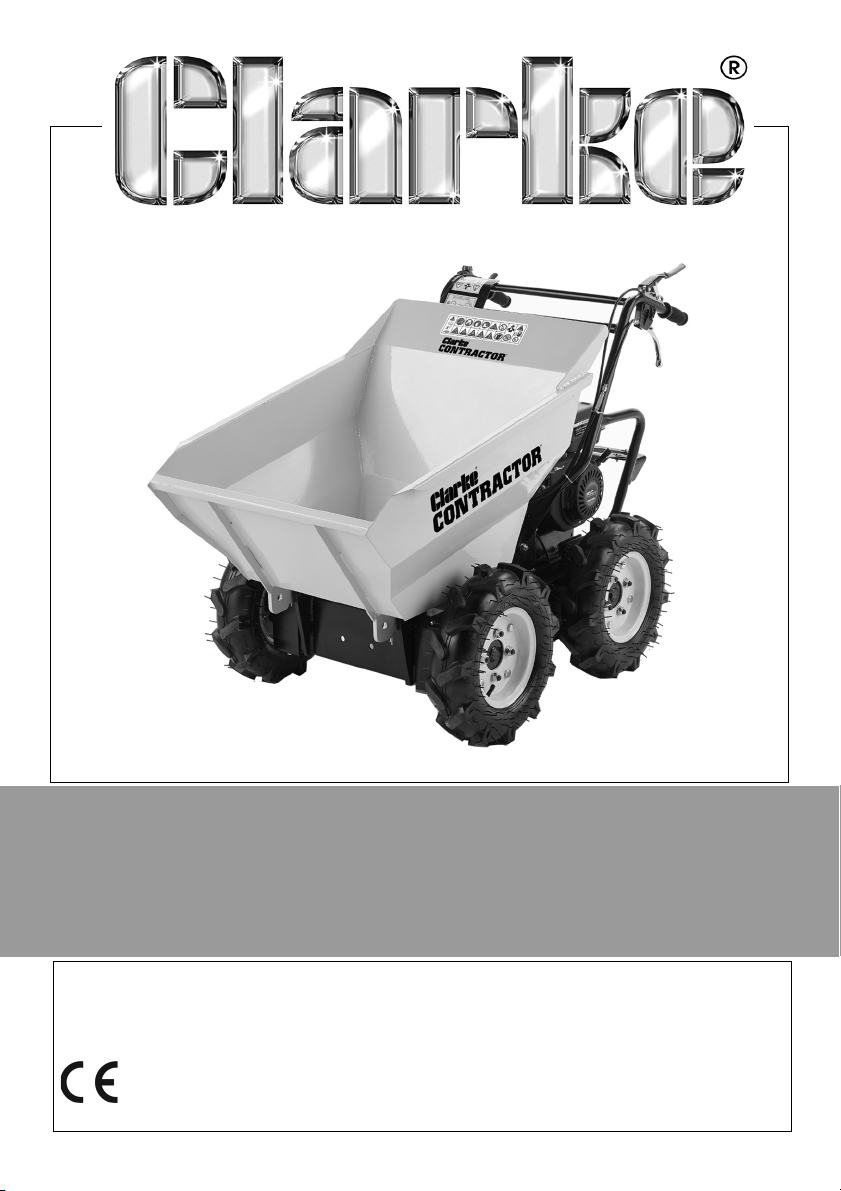
300KG DUMPER TRUCK
MODEL NO: CDT300
PART NO: 3400875
OPERATION & MAINTENANCE
INSTRUCTIONS
ORIGINAL INSTRUCTIONS GC0620 - ISS 3
Page 2

INTRODUCTION
Thank you for choosing this Clarke Dumper Truck. Before attempting to use this
product, please read this manual thoroughly and follow the instructions
carefully. In doing so you will ensure the safety of yourself and that of others
around you, and you can look forward to your purchase giving you long and
satisfactory service.
Please keep these instructions in a safe place for future reference.
GUARANTEE
This product is guaranteed against faulty manufacture for a period of 12
months from the date of purchase. Please keep your receipt which will be
required as proof of purchase.
This guarantee is invalid if the product is found to have been abused or
tampered with in any way, or not used for the purpose for which it was
intended.
Faulty goods should be returned to their place of purchase, no product can
be returned to us without prior permission. This guarantee does not effect your
statutory rights.
ENVIRONMENTAL RECYCLING POLICY
If disposing of this product or any damaged components, do not dispose of
with general waste. This product contains valuable raw materials. Metal
products should be taken to your local civic amenity site for recycling of metal
products.
2
Parts & Service: 020 8988 7400 / E-mail: [email protected] or [email protected]
Page 3
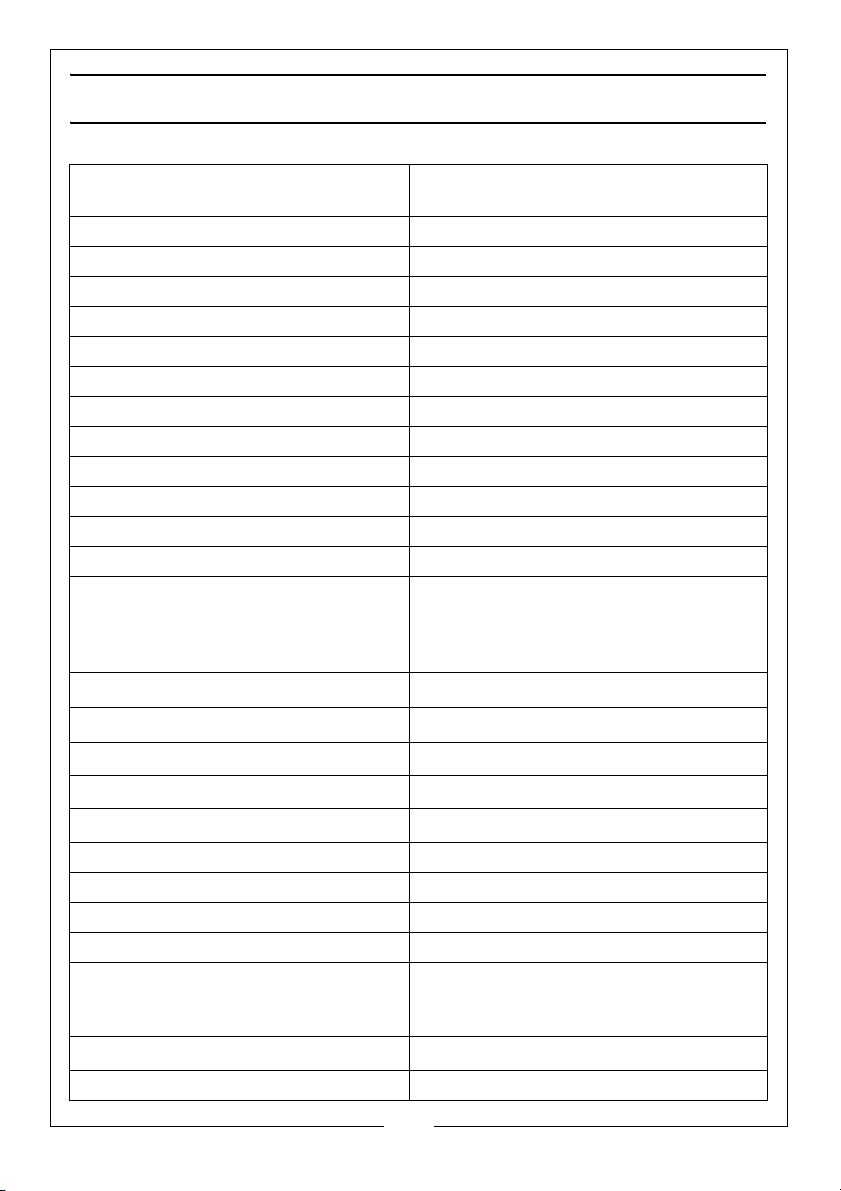
TECHNICAL SPECIFICATIONS
Engine type 4-stroke OHV single cylinder petrol
engine with forced air cooling
Capacity 196 cc
Power output 6.44 Hp (4.8 kw) @ 3600 rpm
Engine rpm (max) 3600
Oil capacity 0.6 L
Oil type SAE 15W-40
Fuel type Regular unleaded
Fuel Capacity 3.6 L
Fuel consumption 395 g/kWh
Spark Plug F7TC or equivalent
Ignition system Transistorised magneto
Starter type Cord/hand recoil
Clutch Dry, cable operated
Emissions CO - 380.35 g/kWh
HC - 5.31 g/kWh
NOx - 2.24 g/kWh
CO2 - 811.46 g/kWh
2 - 4.9
3 - 6.4
<20
2
2
o
Vibration (at handle)
Uncertainty Factor (K)
3.92 m/s
1.5 m/s
Sound pressure (LpA) 75 dB
Sound power (L
Guaranteed Sound power (L
) 95 dB
WA
) 98 dB
WA
Uncertainty Factor (K) 2.51 dB
Dimensions overall (L x W x H) 1380 x 760 x 985 mm
Weight 147 kg
Max Load capacity 300 kg /125 L
Speed in forward gears (km/h) 1 - 2.6
Max gradient (loaded)
Recommended tyre size/pressure 4.00-8” (30 psi)
3
Parts & Service: 020 8988 7400 / E-mail: [email protected] or [email protected]
Page 4

SAFETY WARNINGS
GENERAL
1. ALWAYS read and ensure you fully understand the following precautions
and the hazards associated with this machine. Do not allow anyone who
has not read these instructions to operate it.
2. ALWAYS check for damage before use. Any damage should be properly
repaired. If in doubt, do not use the machine and consult your local dealer.
3. Never carry out any modifications to this machine. If experiencing difficulty
of any kind consult your local Clarke dealer.
WORK AREA
1. Keep the work area tidy and well lit. Cluttered and dark areas invite
accidents.
2. Keep children and bystanders away. Distractions can cause you to lose
control.
3. ALWAYS be alert and adopt a firm stance when handling the machine.
4. NEVER operate an engine driven unit in an explosive atmosphere, near
combustible materials, or where there is insufficient ventilation.
5. NEVER start the engine in confined spaces. Exhaust fumes are dangerous,
containing carbon monoxide which is an odourless and dangerous gas.
Only operate in outdoor, well ventilated areas.
PERSONAL SAFETY
1. Stay alert, watch what you are doing and use common sense when
operating a machine. Do not use while you are tired or under the influence
of drugs, alcohol or medication. A moment of inattention while operating
powered equipment may result in personal injury.
2. Dress properly. Do not wear loose clothing or jewellery. Keep your hair,
clothing and gloves away from moving parts. Loose clothes, jewellery or
long hair can be caught in moving parts.
3. ALWAYS use BOTH hands to control the machine.
4. ALWAYS wear ear defenders/protection, safety shoes and safety glasses
manufactured to the latest European standards.
5. NEVER allow anyone without the necessary physical strength to operate
this machine as its handling may require a degree of physical exertion.
4
Parts & Service: 020 8988 7400 / E-mail: [email protected] or [email protected]
Page 5

MACHINE USE AND CARE
1. Store out of the reach of children and do not allow persons unfamiliar with
the machine or these instructions to operate it. Machines are dangerous in
the hands of untrained users.
2. Maintain equipment. Check for misalignment or binding of moving parts,
breakage of parts and any other condition that may affect the machine’s
operation. If damaged, have the machine repaired before use. Many
accidents are caused by poorly maintained machines.
3. Use the machine in accordance with these instructions and in the manner
intended, taking into account the working conditions and the work to be
performed. Use of the machine for operations different from intended use
could result in a hazardous situation.
4. Always observe the safety precautions for the handling of fuel.
5. NEVER make any adjustment or perform a service operation with the
engine running.
6. Position the machine in such a way that it cannot move during re-fuelling
or maintenance.
7. Always keep your hands away from any moving parts.
8. Always slow the engine down as far as possible when not actually working
and shut off as soon as possible.
9. Avoid contact with hot surfaces including the engine and muffler. They will
remain hot for a short time after switching off the engine. Allow the engine
to cool before making any adjustments or carrying out any maintenance.
REFUELLING
1. Always refuel in a well ventilated area. Do not smoke or allow sparks, open
flames or other sources of ignition near the unit while adding fuel.
2. Always stop the engine and allow it to cool down before re-fuelling. Never
remove the cap of the fuel tank or add fuel while the engine is running or
hot. Do not use the machine if any fuel leaks are detected.
3. Always refuel away from any source of heat.
4. Loosen the fuel tank cap slowly to relieve any pressure in the tank.
5. Only fill to the level specified and avoid over-filling.
6. Use only the correct fuel as stated in the specification. Replace the fuel
cap securely and wipe up any spilled fuel. Never run the engine without
the fuel cap in place.
7. Store spare fuel in containers designed and certified for this purpose.
5
Parts & Service: 020 8988 7400 / E-mail: [email protected] or [email protected]
Page 6
SERVICE & REPAIRS
1. Check the machine for damage before use. DO NOT use if the machine is
damaged. Any damage should be properly repaired or the part replaced.
If in doubt, DO NOT use the dumper truck. Consult your local dealer.
2. When necessary, have this machine serviced or repaired by a qualified
person using identical replacement parts. This will ensure that the safety of
the machine is maintained.
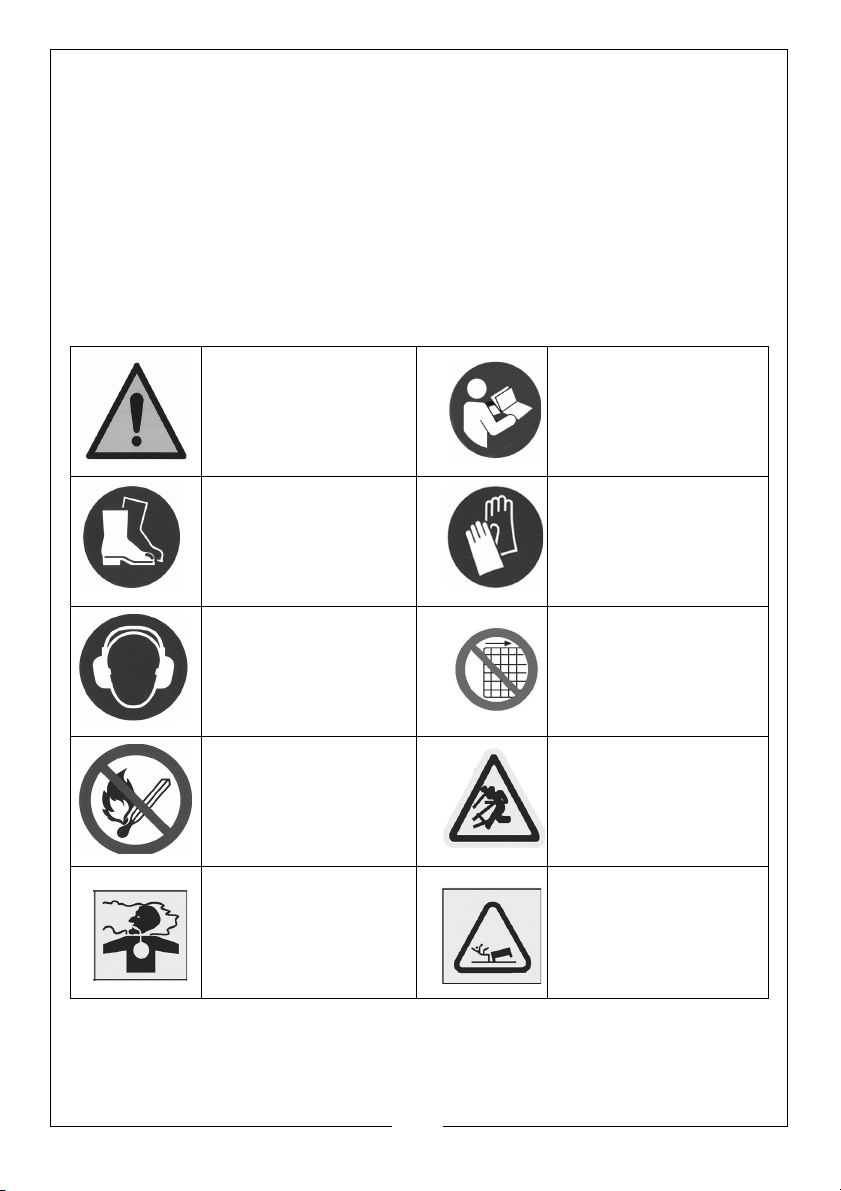
SAFETY SYMBOLS
The following symbols appear on the machine
General hazard Read these
instructions before use
Wear safety
footwear.
Wear ear defenders Never tamper with or
No open flame, no
open ignition source,
smoking prohibited.
Hazard of breathing
in toxic fumes given
off by the machine
Wear safety gloves
remove protective
guards or other safety
devices.
Thrown objects
Hazard of crushed
feet.
6
Parts & Service: 020 8988 7400 / E-mail: [email protected] or [email protected]
Page 7
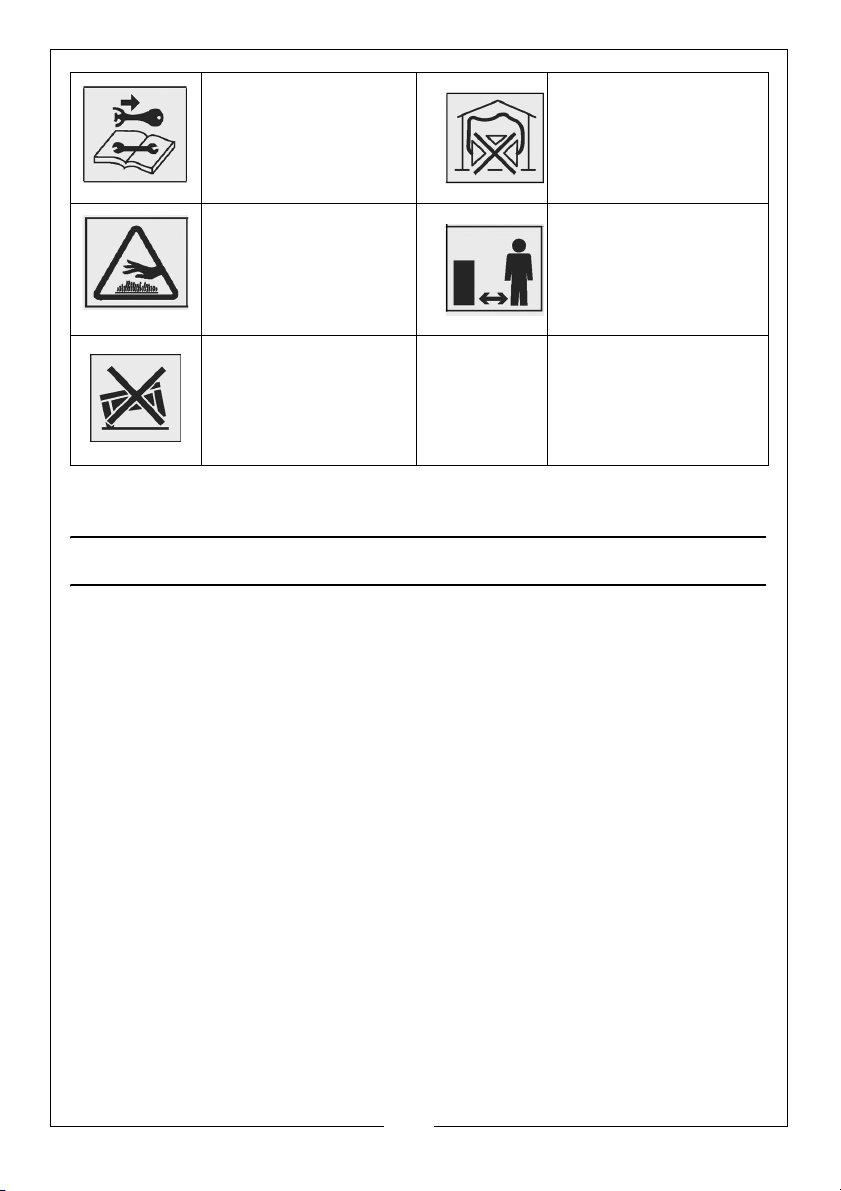
Always turn off the
engine before
starting
maintenance.
Never start or run the
engine in a closed
area.
Keep away from hot
parts of the machine
Do not operate on
slopes of greater
than 20 degrees or at
an inclined position.
Keep bystanders
away
CONTENTS
Remove the components from the packaging and inspect for signs of
damage which may have occurred during transit. Should any damage be
apparent, please inform your Clarke dealer immediately.
The following items are supplied loose.
• Machine assembly with cables & handles attached.
•Load box
• 4 x Wheels
Fixings pack containing:
• 2 x R-Clips
• 16 x M12 nuts/washers
• 4 x M10 x 45 bolts/nuts /washers
• 4 x M10 x 25 bolts/nuts/washers
7
Parts & Service: 020 8988 7400 / E-mail: [email protected] or [email protected]
Page 8
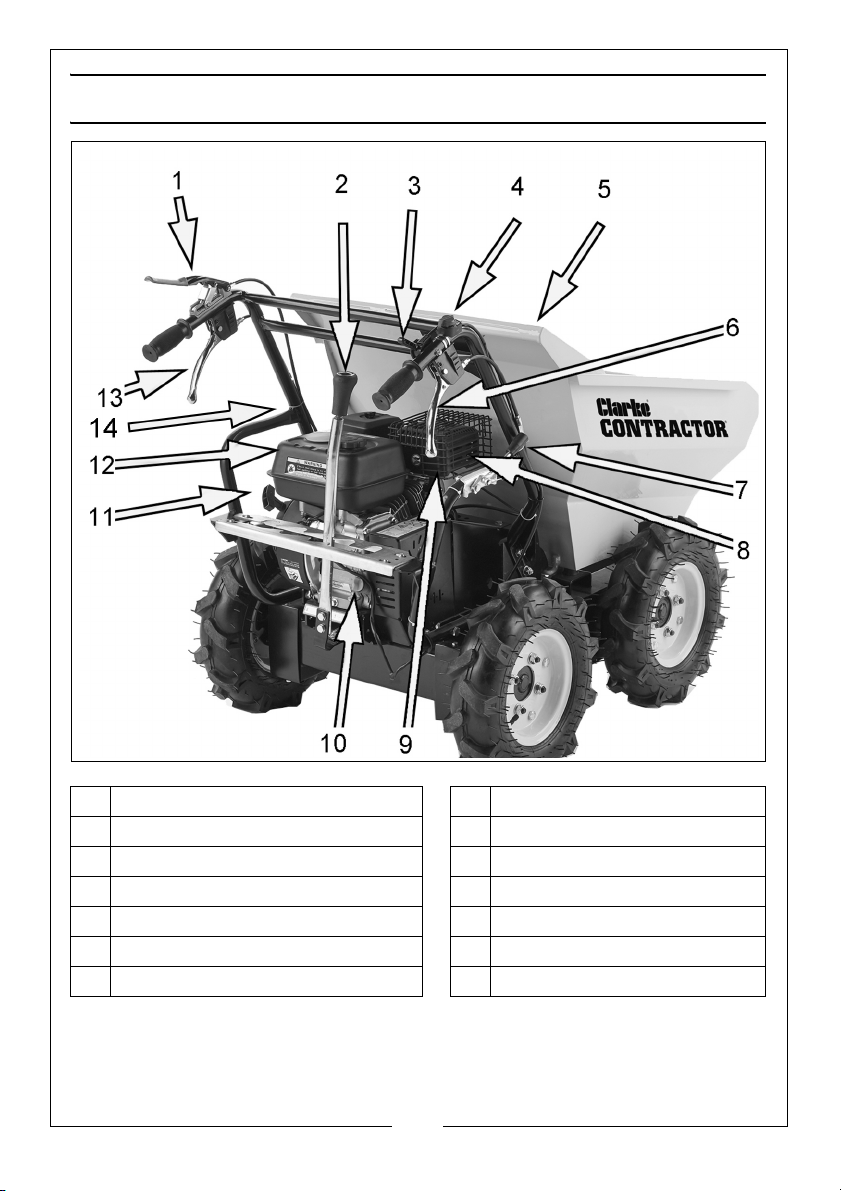
OVERVIEW
1
Clutch lever (dead-man’s handle)
2
Gear selection lever
3
Throttle control
8
Air Filter
9
Choke control
10
Oil filler/dipstick
4 Engine switch 11 Recoil starter
5Load box 12Fuel tank
6 Right steering lever 13 Left steering lever
7 Tipping handle 14 Handle Assembly
8
Parts & Service: 020 8988 7400 / E-mail: [email protected] or [email protected]
Page 9
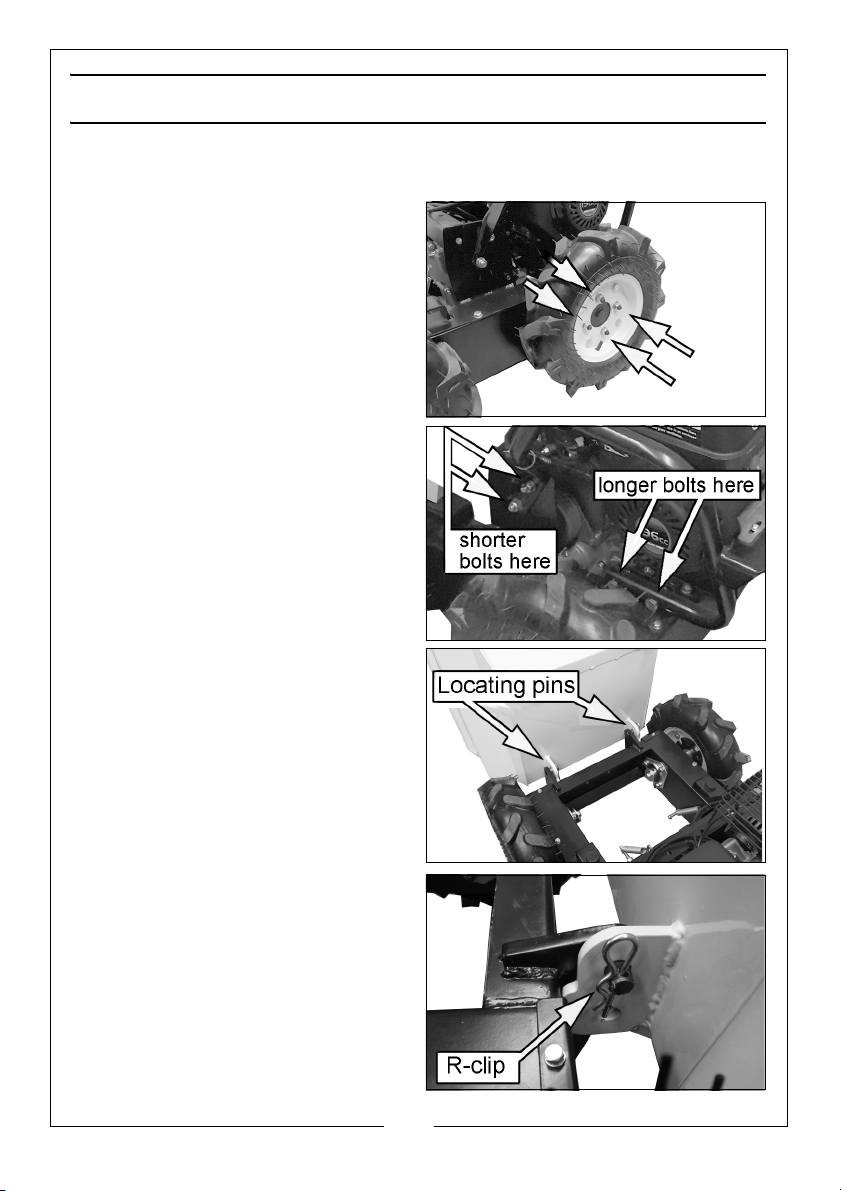
ASSEMBLY
FITTING THE WHEELS
1. Fit the wheels and secure each
wheel with 4 x nuts and washers.
CONNECTING THE HANDLE
Mount the handle and frame
assembly to the chassis and secure it
with M10 bolts, nuts and washers at
the front and rear.
• Use the 25 mm bolts at the front
and the 45 mm bolts at the
rear.
MOUNTING THE LOAD BOX
1. Position the load box on the
locating pins as shown.
NOTE: The load box is large and
heavy so we recommend
the help of an assistant.
2. Secure at the front with 2 x R-clips.
9
Parts & Service: 020 8988 7400 / E-mail: [email protected] or [email protected]
Page 10
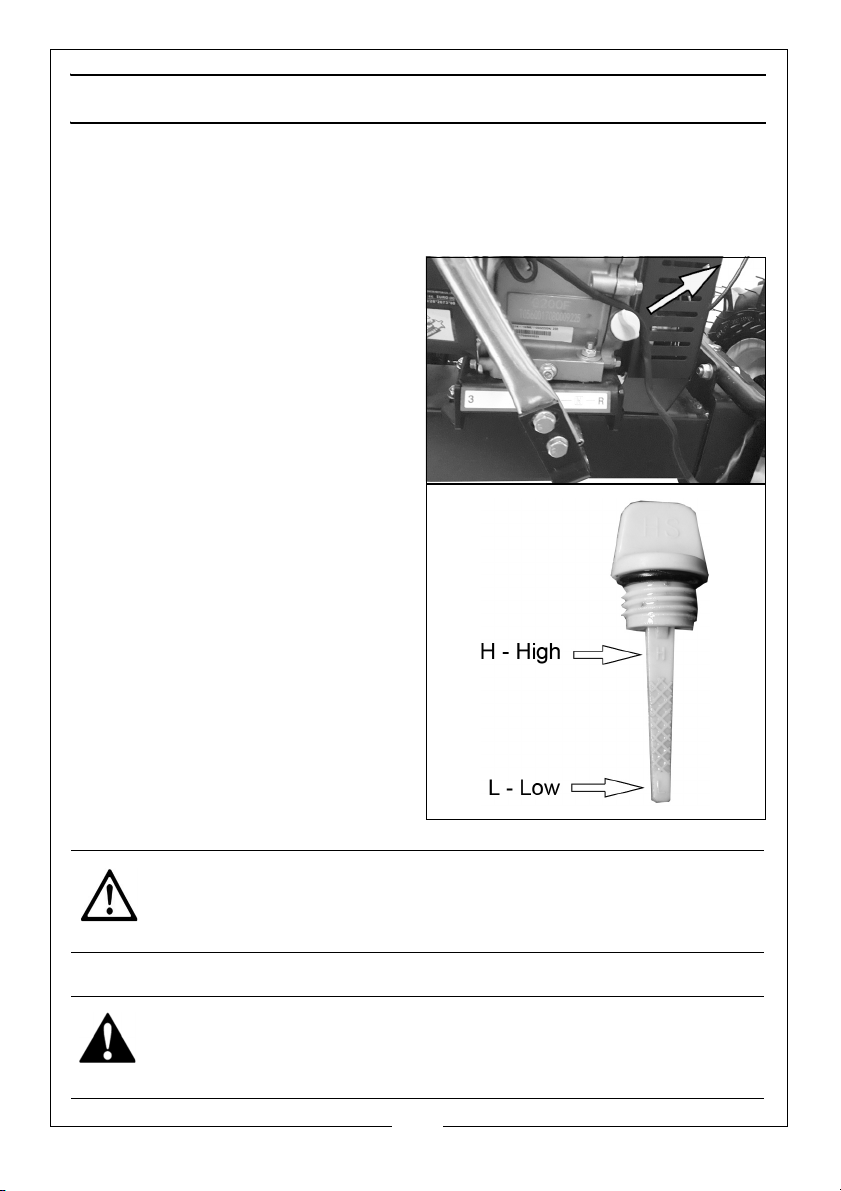
BEFORE USE
IMPORTANT: The truck is shipped without oil in the engine and must be filled
to the correct level before use, see below.
ENGINE OIL
1. Turn the oil filler cap anticlockwise
and remove it from the engine.
Wipe the integral dipstick with a
clean cloth.
2. Screw the oil filler cap back into
place and then remove it again.
3. If the oil reads low on the dipstick,
add oil to the oil reservoir (Max
0.6L).
• We recommend the use of
SAE15W-40 oil.
• Do not overfill.
4. Replace the oil filler cap.
NOTE: Running the engine with
insufficient oil will cause
engine damage.
FILLING WITH FUEL
CAUTION: NEVER FILL ABOVE THE SHOULDER OF THE FUEL STRAINER IN
THE TOP OF THE TANK.
• Use regular unleaded petrol.
WARNING: NEVER REFILL THE FUEL TANK WHEN THE ENGINE IS
HOT....ALWAYS WAIT UNTIL IT HAS COOLED DOWN SUFFICIENTLY.
10
Parts & Service: 020 8988 7400 / E-mail: [email protected] or [email protected]
Page 11
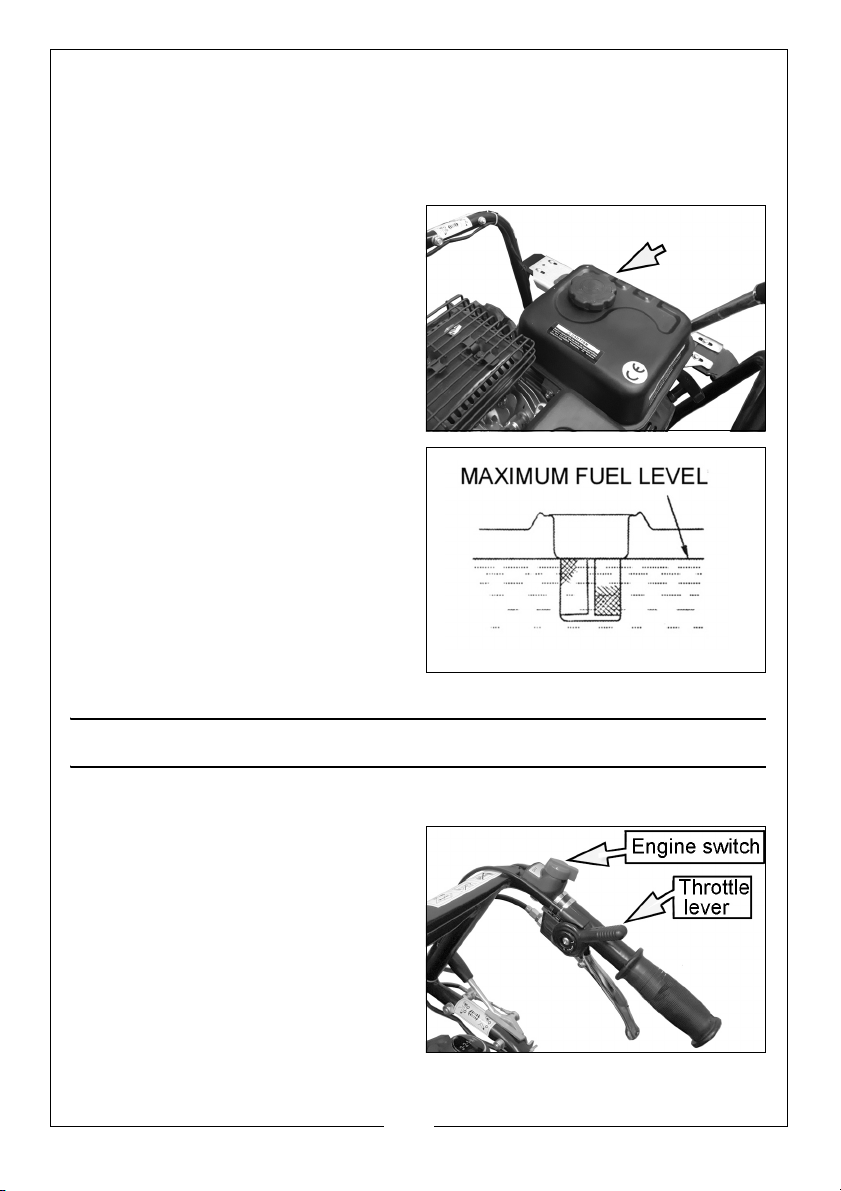
• Refuel in a well-ventilated area, away from any sources of ignition.
• If the engine has been running, allow it to cool before refuelling.
• Do not leave fuel within the reach of children.
• Refuel carefully to avoid spilling fuel.
1. Remove the fuel tank cap.
2. Pour unleaded petrol through the
fuel strainer and into the fuel tank
using a funnel.
• Do not fill above the fuel
strainer shoulder.
• Use unleaded petrol with a
pump octane rating of 86 or
higher.
3. Replace the fuel filler cap
securely.
4. The fuel strainer should be
checked periodically and any
accumulated contaminants
should be removed.
5. Wipe away any spillage
thoroughly, replace the cap on
the fuel container and move the
container a safe distance away.
STARTING
STARTING A COLD ENGINE
1. Before starting the engine for the
first time always check the oil level
as shown on page 10.
2. Turn the engine switch on.
3. Set the throttle lever on the
handlebar to the half-way
position.
11
Parts & Service: 020 8988 7400 / E-mail: [email protected] or [email protected]
Page 12
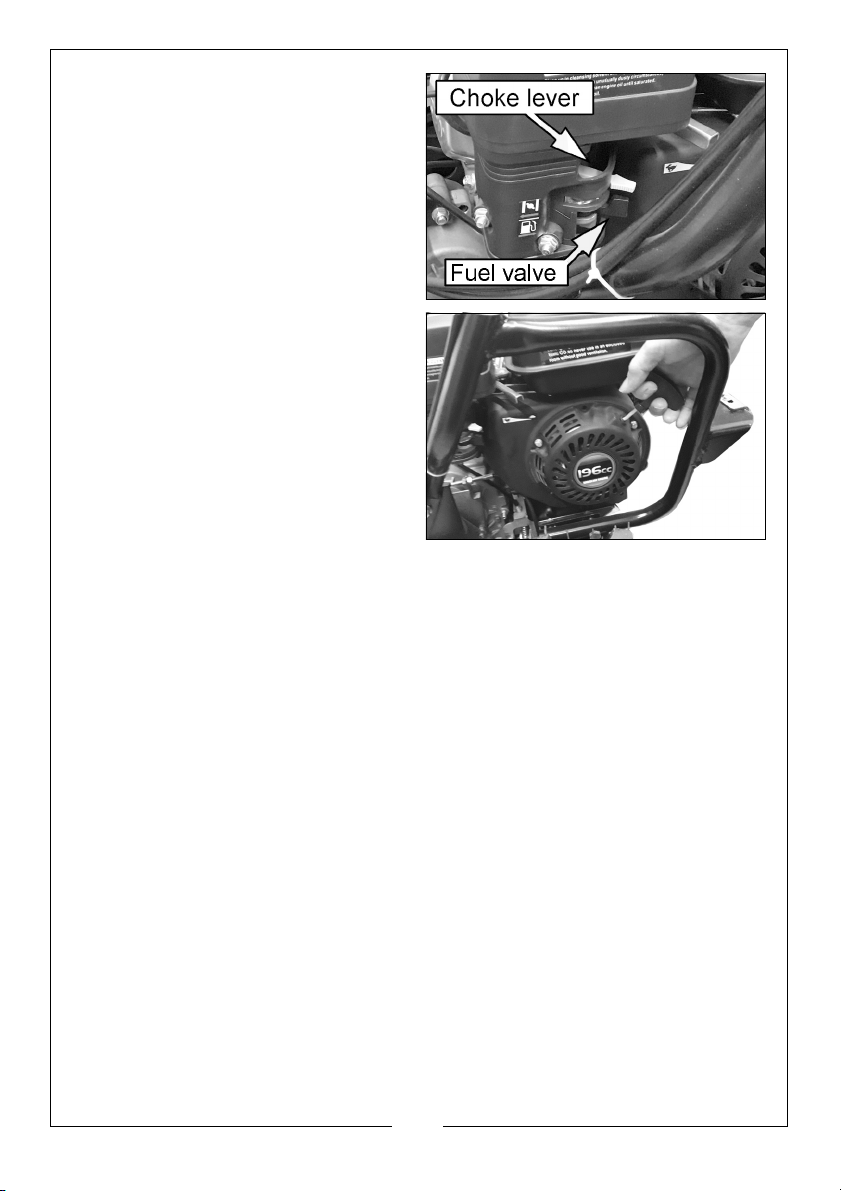
4. Move the choke lever on the
engine to the full choke position.
5. Turn the fuel valve lever to the on
position.
6. Ensure the engine switch is in the
on position.
7. Pull the handle on the recoil
starter slowly several times to help
fuel to flow into the engine’s
carburettor. Hold the handle firmly
and pull the cord out a short
distance until resistance is felt.
Now pull the handle firmly and
briskly and allow the cord to return
gently.
8. Do not let the cord snap back. If
necessary, pull several times until
the engine starts.
9. Allow the engine to run for several seconds to warm up, then gradually
move the choke lever to the OPEN position.
STARTING A WARM ENGINE
Restarting an engine that is already warm from previous running does not
normally require the use of the choke.
1. Ensure the engine switch is on.
2. Set the throttle lever on the handlebar at the half-way position.
3. Hold the handle on the recoil starter firmly and pull out a short distance
until you feel some resistance. Then pull the handle smoothly and briskly
and allow to return gently. Do not let the handle snap back. If necessary,
pull again until the engine starts.
12
Parts & Service: 020 8988 7400 / E-mail: [email protected] or [email protected]
Page 13
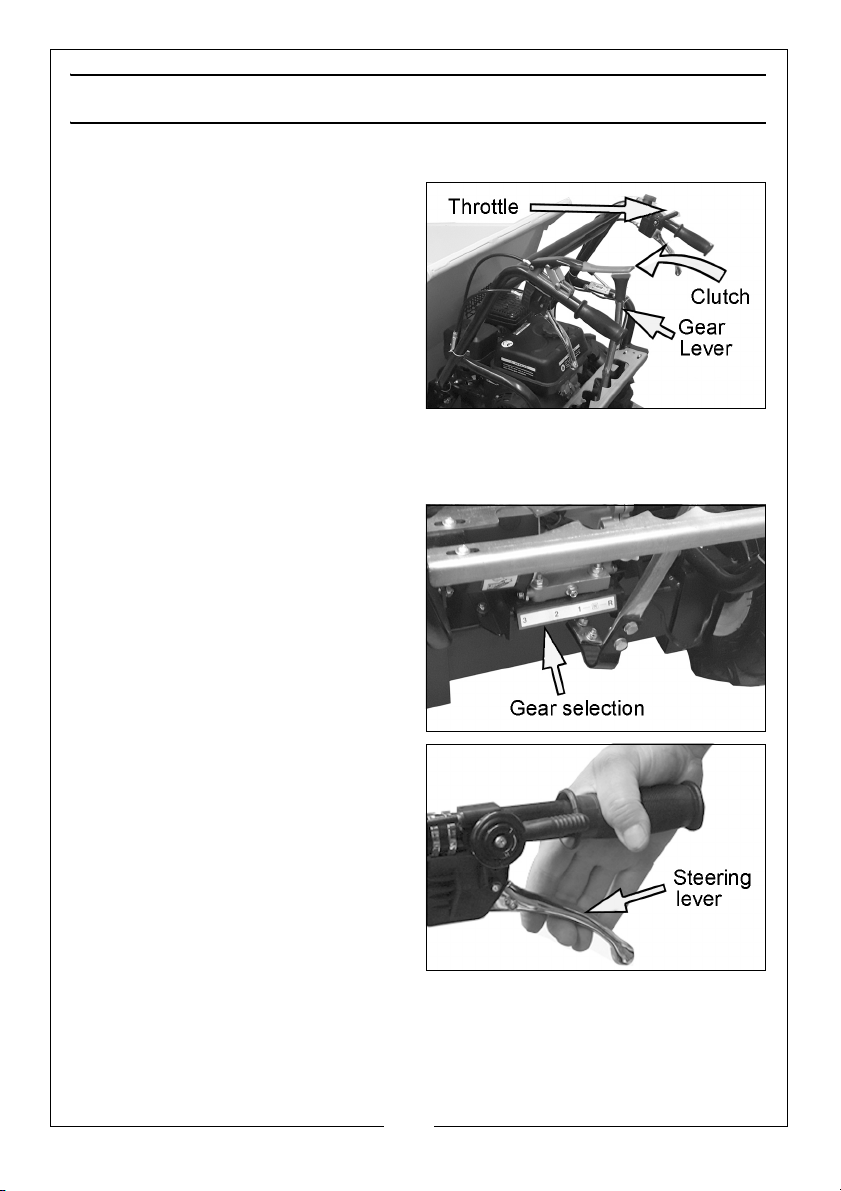
OPERATING
CONTROLLING THE SPEED AND DIRECTION
1. After the engine warms up, move
the throttle lever to set the engine
speed.
2. Engage the required gear and
slowly press down the clutch
control lever to engage the drive.
3. If the gear does not engage
straight away, slowly release the
clutch lever and try again.
• The truck will now start moving.
• When the clutch control lever is released, drive will be disengaged
and the truck will stop automatically.
The gear selected is shown on the
label at the bottom of the truck.
• 3 x forward, neutral and reverse
4. The truck has the steering levers
on the handlebars. To turn right or
left, simply squeeze the
corresponding right or left steering
lever.
NOTE: The sensitivity of the steering
increases in proportion to the
speed of the truck and
weight of the truck. With the
load box empty, a light
pressure on the lever is all
that is needed to turn. When the truck is loaded, more pressure is
required.
The truck has a maximum load capacity of 300kg. However, it is advisable to
assess the weight of the load and adjust it according to the ground on which
13
Parts & Service: 020 8988 7400 / E-mail: [email protected] or [email protected]
Page 14
the truck will be used. Also, bear in mind the weight of the truck added to that
of the load.
Take extra care working over areas of rough ground use a low gear.
Avoid sharp turns and frequent changes of direction, in particularly on rough,
hard terrain with sharp, uneven points with a high degree of friction.
Take extra care when working in adverse weather conditions (ice, heavy rain
and snow) or on types of ground that could make the truck unstable.
If the truck is stopped on a steep slope, place a chock against one or more of
the wheels to prevent unexpected movement.
IDLE SPEED
Set the throttle lever to its SLOW position to reduce stress on the engine when
no work is being done.
• Lowering the engine speed will reduce fuel consumption and help
extend the life of the engine.
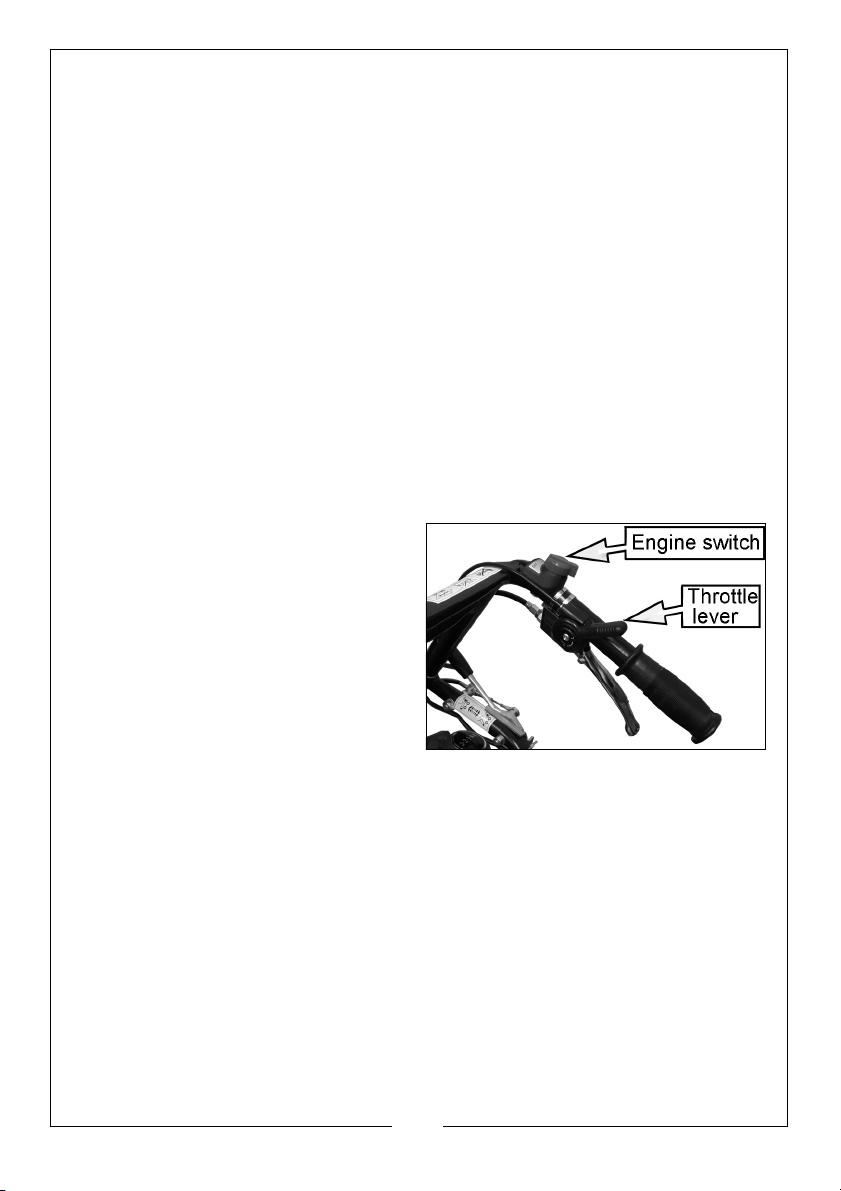
STOPPING THE ENGINE
1. Move the throttle lever to the slow
position.
2. Let the engine idle for one to two
minutes.
3. Turn the engine switch to the off
position.
4. Turn the fuel valve lever to the off
position.
Do not move the choke to stop the
engine.
To stop the engine in an emergency simply turn the engine switch to the off
position. Under normal conditions use the above procedure.
14
Parts & Service: 020 8988 7400 / E-mail: [email protected] or [email protected]
Page 15
MAINTENANCE
Proper maintenance and lubrication will help keep the truck in perfect
working condition.
CARE AND PREVENTIVE MAINTENANCE
Turn off the engine and let it to cool before touching engine components.
1. Inspect the general condition of the truck. Check for loose screws,
misalignment or binding of moving parts, cracked or broken parts and any
other condition that may affect its safe operation.
2. Remove all debris that may have accumulated in the truck. Clean after
each use if working in a dirty environment. Use a premium quality
lightweight machine oil to lubricate all moving parts.
3. Never use a pressure washer to clean your truck. Water can penetrate
areas of the machine and its transmission parts and cause damage to
spindles, gears, bearings, or parts of the engine. The use of pressure
washers will result in shortened life and reduce serviceability.
LUBRICATION
The gearbox is pre-lubricated and sealed for life at the factory.
With the engine stopped, remove the engine oil filler plug and check (with the
machine standing level) that the oil is between the upper and lower marks on
the dipstick as shown on page 10. Top up if required.
If changing the engine oil, it should be drained when the engine is hot and oil
will flow more freely. When it is fully drained, replace the drain cap and fill up
with new oil.
TYRE PRESSURES
Check the tyre pressures periodically to make sure they are properly inflated.
• The recommended pressure is 30psi for all tyres. Do not over-inflate.
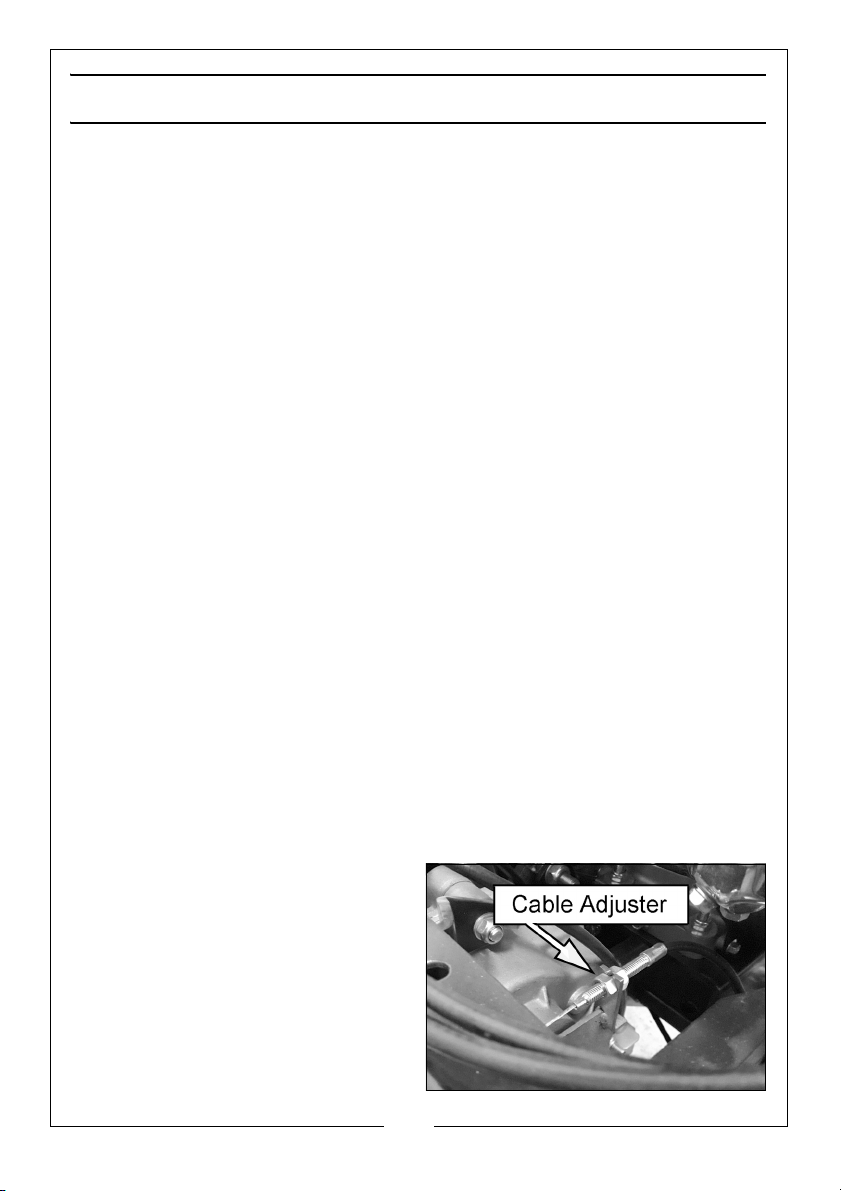
CLUTCH ADJUSTMENT
As the clutch wears with long term
use the lever could develop a wider
operating range and become
harder to use. This means that it will
be necessary to adjust the cable.
Set the clutch lever to its original
position using the cable adjuster and
the locking nut.
15
Parts & Service: 020 8988 7400 / E-mail: [email protected] or [email protected]
Page 16
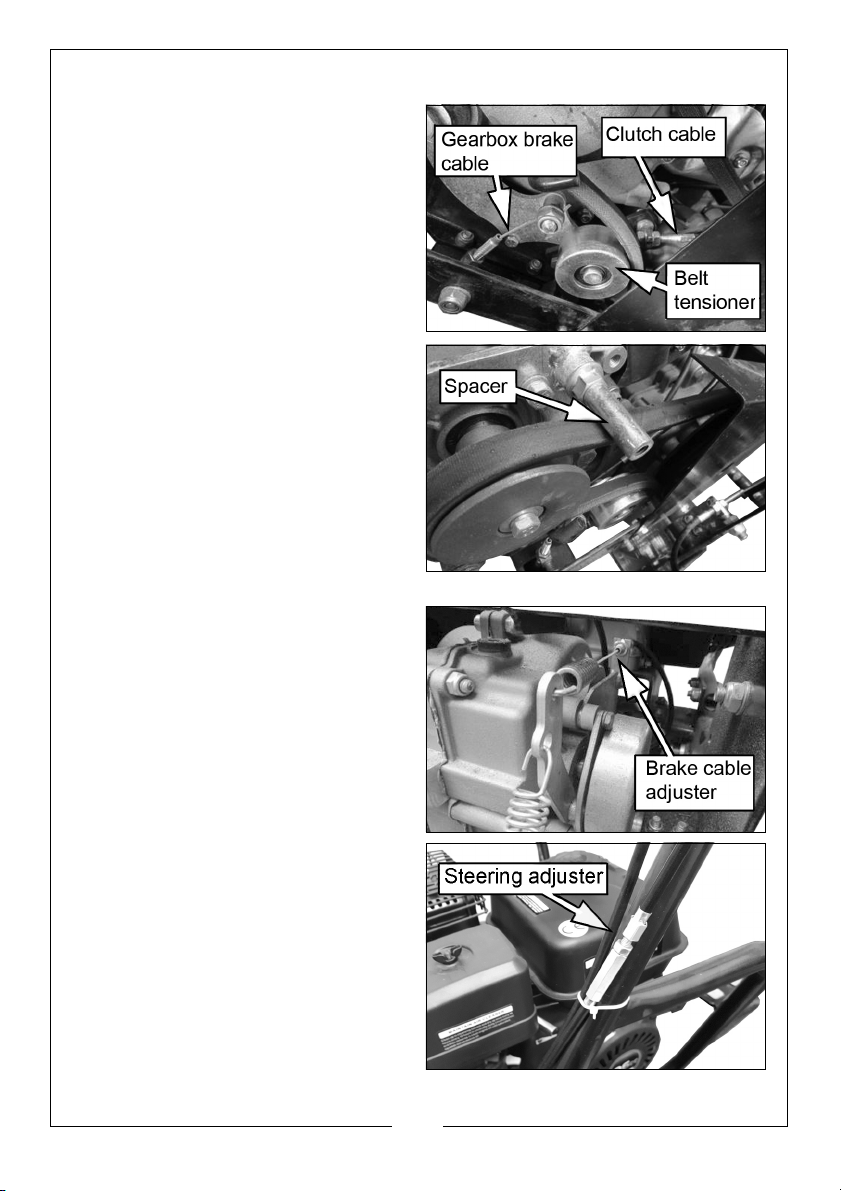
DRIVE BELT ADJUSTMENT
The drive belt tension can be
adjusted by means of the cable
pulling on the cam shown.
This in turn also operates the cable to
disengage the gearbox brake.
The drive belt can be seen after
removing the belt pulley cover. When
removing the belt pulley cover, take
care not to unscrew the spacer
shown from the engine. It must
remain fitted to the engine when
tensioning the belt.
The spacer prevents belt chatter
once the belt has been adjusted.
BRAKE CABLE ADJUSTMENT
When the drive belt tensioner is
adjusted it can alter the effectiveness
of the brake which could allow the
truck to move forward when starting.
ADJUSTING THE STEERING
If you have difficulty steering the
truck you will need to adjust the
steering levers with the adjusters
provided.
Slacken off the locknut and unscrew
the adjusters to eliminate the play in
the cable which can occur after
initial use and normal wear.
Take care not to unscrew the
adjusters too far or this will result in loss
of traction. Tighten the locknut when you are finished.
16
Parts & Service: 020 8988 7400 / E-mail: [email protected] or [email protected]
Page 17
LONG TERM STORAGE
If you do not expect to use the truck for some time then the following tasks
should be undertaken before storing.
1. Empty the fuel tank completely by draining the fuel via the carburettor.
Place a container below the carburettor and use a funnel to avoid
spillage. Remove the carburettor drain bolt and sediment cup, then move
the fuel valve to the ON position. After all fuel has drained, re-fit the drain
bolt and sediment cup.
2. Start the engine and allow to run until it stops for lack of fuel. Ensure the fuel
cap is secure.
3. Remove the spark plug and pour several drops of oil into the cylinder.
4. Crank the engine slowly using the recoil starter in order to distribute oil
around the cylinder and piston, then replace the spark plug.
5. Carefully clean all parts, ensuring a film of oil covers any bare metal parts.
Use a brush to clean the cooling fins. Oil the linkage at the carburettor.
6. Store in a dry environment.
SERVICE AND REPAIRS
In the event of damage or broken components, replacements are available
from Clarke Parts & Service. The engine should be serviced by a qualified
technician. Please contact your CLARKE dealer for technical support.
FAULT FINDING
In the event that you find difficulty in starting or there is lack of power, the
problem probably lies with either fuel or ignition. The checks on the following
page will help to diagnose the problem. Should these checks not solve the
problem consult your CLARKE dealer.
Problem Cause Solution
Engine fails to start Spark plug lead is loose
or disconnected
Out of fuel or stale fuel. Ensure the fuel tank has
Choke lever not in the
correct (open) position
Blocked fuel line Clean out fuel line
The spark plug may be
dirty or gap is excessive.
17
Parts & Service: 020 8988 7400 / E-mail: [email protected] or [email protected]
Check that plug lead is
secure.
sufficient clean fuel.
Set the choke to the cold
starting position.
Clean it and have it tested.
Page 18
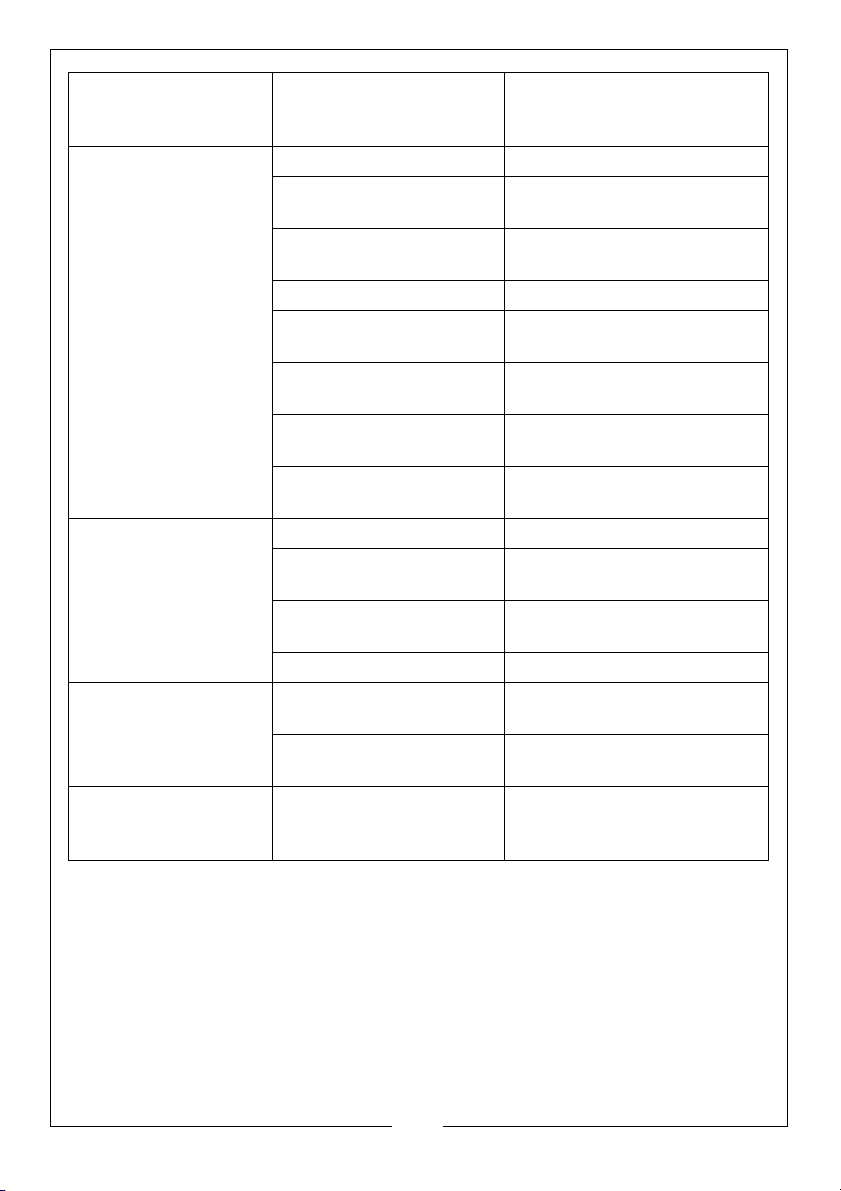
Carburetor flooding Wait a few minutes before
attempting to start with the
choke in the normal setting.
Engine runs erratically Spark plug lead is loose Secure plug lead
Engine running on choke
Move choke lever to OFF
starting setting
Blocked fuel line or stale
fuel
Drain fuel tank & fill with fresh
fuel.
Breather vent blocked Clear vent
Water or dirt in fuel
system
Drain fuel tank & refill with
fresh fuel.
Dirty air cleaner Remove and clean air
cleaner.
Improper carburetor
adjustment
Fuel cap breather is
clogged.
Refer to separate engine
manual
Remove cap then replace
loosely. Clean if required.
Engine overheats Engine oil level low Fill crankcase with correct oil
Dirty air cleaner Remove and clean air
cleaner
Carburetor not adjusted
correctly
Refer to separate engine
manual
Airflow restricted Remove housing & clean
Machine does not
move when engine is
running
Machine jumps out of
gear
Gear not correctly
selected
Drive belt is slack
Clutch cable too loose
Loose drive belt
between engine and
Ensure gear lever is not in
between two different gears
Tighten drive belt.
Adjust the cable as on p 16.
Tighten drive belt.
Adjust the cable as on p 16.
gearbox
18
Parts & Service: 020 8988 7400 / E-mail: [email protected] or [email protected]
Page 19
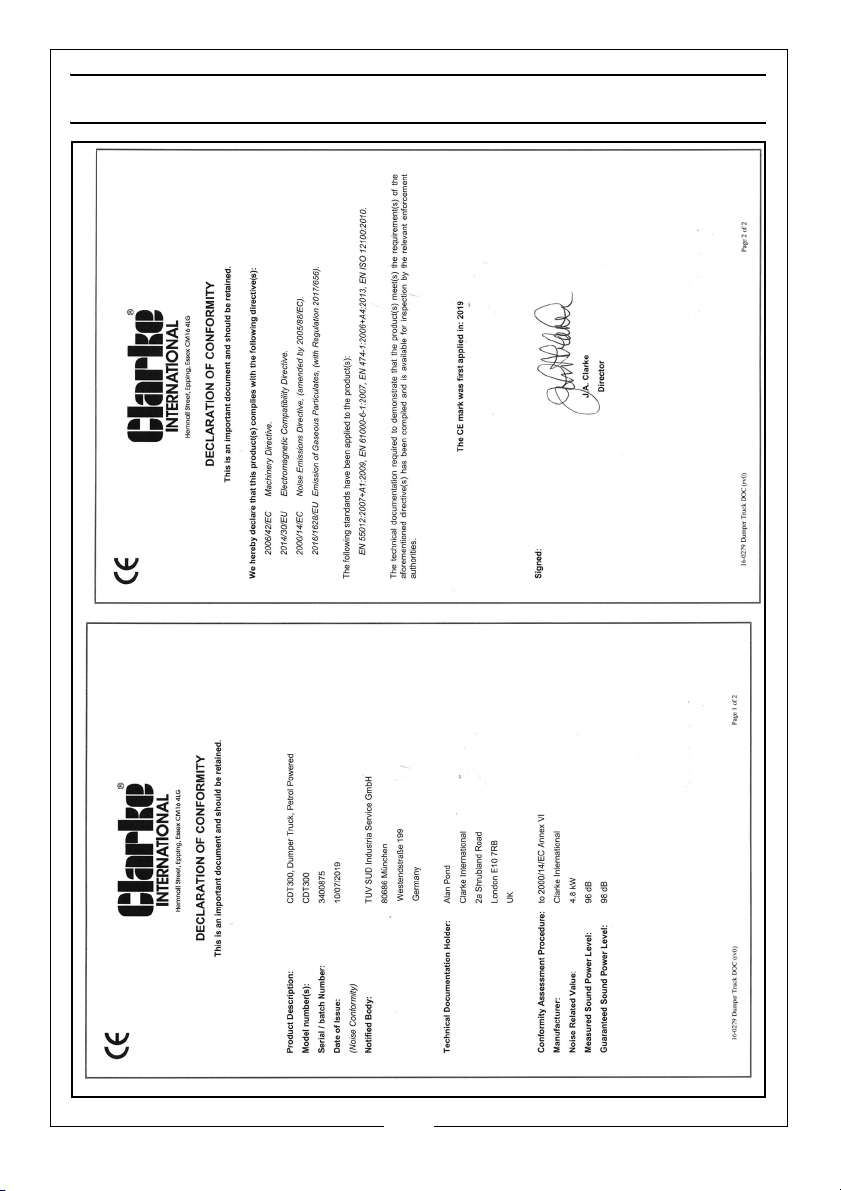
DECLARATION OF CONFORMITY
19
Parts & Service: 020 8988 7400 / E-mail: [email protected] or [email protected]
Page 20
 Loading...