

Page 1

PEN-TYPE DIGITAL MULTIMETER
MODEL NO: CDM80C
PART NO: 4501160
OPERATING INSTRUCTIONS
GC0715
Page 2

INTRODUCTION
Thank you for purchasing this CLARKE product.
This instrument is a professional, portable multimeter with an easy to read LCD
display. It incorporates overload protection, low battery indication, with both
auto-range and manual ranges available.
During use, the instrument automatically shows the value and unit of the
measurement. The meter includes Data Hold and Max. Hold features and
automatic power-off.
Before attempting to use this product, please read this manual thoroughly and
follow the instructions carefully. In doing so you will ensure the safety of yourself
and that of others around you, and you can look forward to your purchase
giving you long and satisfactory service.
GUARANTEE
This product is guaranteed against faulty manufacture for a period of 12
months from the date of purchase. Please keep your receipt which will be
required as proof of purchase.
This guarantee is invalid if the product is found to have been abused or
tampered with in any way, or not used for the purpose for which it was
intended.
Faulty goods should be returned to their place of purchase, no product can
be returned to us without prior permission.
This guarantee does not effect your statutory rights.
ENVIRONMENTAL RECYCLING POLICY
Through purchase of this product, the customer is taking on the
obligation to deal with the WEEE in accordance with the WEEE
regulations in relation to the treatment, recycling & recovery and
environmentally sound disposal of the WEEE.
In effect, this means that this product must not be disposed of with general
household waste. It must be disposed of according to the laws governing
Waste Electrical and Electronic Equipment (WEEE) at a recognised disposal
facility.
2
Parts & Service: 020 8988 7400 / E-mail: [email protected] or [email protected]
Page 3

SAFETY INFORMATION
WARNING: TAKE CARE WHEN USING THIS METER. IMPROPER USE CAN
RESULT IN ELECTRIC SHOCK OR DAMAGE TO THE METER. TAKE ALL
NORMAL SAFETY PRECAUTIONS AND FOLLOW THE SAFEGUARDS
SUGGESTED IN THIS MANUAL.
BEFORE USE
1. When using the meter, the user must observe all normal safety rules
concerning:
• General protection against electric shock
• Protection of the meter against misuse.
2. When the meter is delivered, confirm it has not been damaged in transit.
3. The test leads must be kept in good condition. Before using, check that the
insulation on the test leads has not been damaged or any wire exposed.
4. Use only the test leads supplied to ensure operational safety. If necessary,
they must be replaced with test leads of the same model or class.
DURING USE
1. Do not take measurements that exceed the maximum values for this
meter.
2. Do not touch the metal probes of the test leads when the meter is
connected to the circuit being measured.
3. Do not take voltage measurements if you suspect the value exceeds 600V.
4. If the appropriate value range is unknown, select the highest range on the
scale.
5. Disconnect the test leads from the circuit under test before turning the
rotary function selector.
6. Do not measure the resistance, diode or continuity of live circuits.
7. Do not connect the meter to any voltage source while the rotary selector is
in the Current, Resistance, Diode or Continuity range.
8. Do not use the meter near explosive gases or steam.
9. Stop using the meter if any abnormalities or faults are observed.
10. Do not use the meter unless its battery cover is correctly fastened.
11. Do not store or use the meter in areas exposed to direct sunlight, at high
temperature or with high relative humidity.
3
Parts & Service: 020 8988 7400 / E-mail: [email protected] or [email protected]
Page 4

12. To avoid false readings, replace the batteries as soon as the Low Battery
indicator appears.
13. Before use, verify the meter operation by measuring a known voltage.
14. Never touch exposed wiring, connections or any live circuit while taking
any measurements.
15. Keep your body isolated from ground by using dry clothing, rubber shoes,
rubber mats or any approved insulating material.
SAFETY SYMBOLS
Please read all of the safety and operating instructions carefully before using
this product. The following safety symbols may be found on the product.
General hazard
High voltage danger.
warning
Earth symbol Class II insulation without
earth conductor.
4
Parts & Service: 020 8988 7400 / E-mail: [email protected] or [email protected]
Page 5
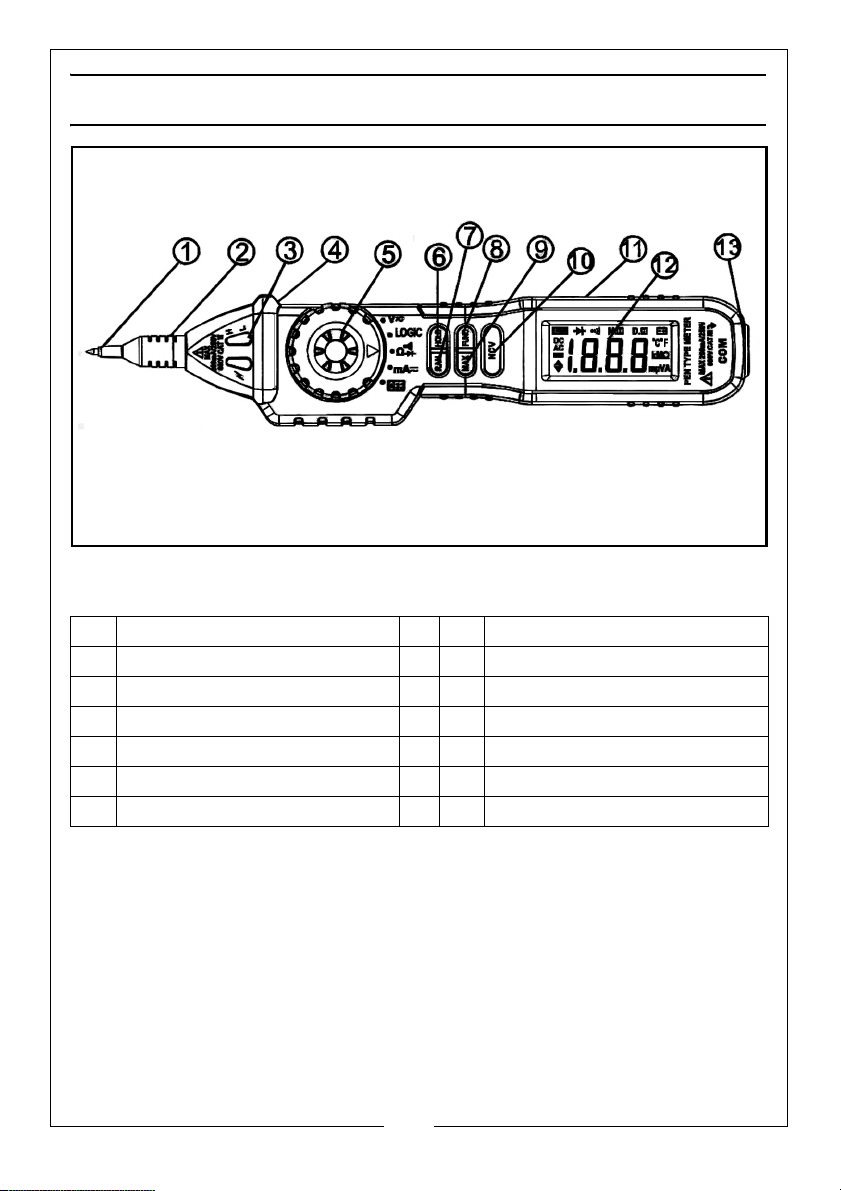
FEATURES
COMPONENTS OF THE METER
1 Positive test probe 8 Function Button
2 Probe cover (removable) 9 Max Hold Button
3 LED Indicators 10 Non-contact voltage button
4 Protective Shoulder 11 Panel
5 Rotary Switch 12 LCD Screen
6 Data Hold Button 13 COM jack
7Range Button
ITEMS SUPPLIED
• Multi-meter
• Black test lead & probe
• Pair crocodile clip extensions
• 2 x AAA batteries
• 1 x Belt pouch
5
Parts & Service: 020 8988 7400 / E-mail: [email protected] or [email protected]
Page 6

BUTTONS AND FUNCTIONS
Button Function Description
HOLD Any mode Press to hold the current reading on the display.
Hold the button while turning on the meter to
turn off the auto power feature.
RANGE
MAX Any mode Press to hold the maximum measured value on
NCV Any mode Hold for non-contact voltage detection
FUNC V~ Logic
V
Ω
mA
Ω mA
Switch ranges in manual range. Hold to return
to auto range.
the display.
Switch between AC and DC voltage. Hold
down for Logic level test. Switch between
resistance, diode and continuity modes. Switch
between AC and DC current.
ADDITIONAL FEATURES
Rotary switch Selects between functions
Test probe For V/Ω / / measurements
COM Jack Common test lead input
LCD display Shows results of measurements
LED indicator In Logic mode, green indicates low level, red indicates
high level
Probe cover Used when making category III or higher measurements.
Twist to remove if making category II or lower
measurements.
Protection ring Keep hands behind the protective shoulder and away
from the probe tip to avoid injury.
6
Parts & Service: 020 8988 7400 / E-mail: [email protected] or [email protected]
Page 7

SPECIFICATIONS
Model Number CDM80C
Product Dimensions 222 x 44 x 30 mm
Weight (inc batteries) 130g
Test leads length (inc probe) 1000 mm
Fuse protection 400mA/600V
Power 2 x AAA batteries
Maximum display value 1999
Over-range indication “1”
Polarity display “-” for negative polarity
Detects and measures voltages DCV 200m/2/20/200/600 ± 0.7%
ACV 200m, 2,20,200 ± 0.8% 600± 1.0%
Detects and measures resistance Ohm 200 ± 1.0% 2k,20k,200k, 2M ± 1%,
20M ± 1%
Detects and measures current DC: 20mA, 200mA ± 1.5%
AC: 20mA, 200mA ± 2.0%
Operating temperature
Storage temperature
°C
0 - 40
-10°C to 50°C
7
Parts & Service: 020 8988 7400 / E-mail: [email protected] or [email protected]
Page 8

OPERATION
Before taking the measurement of voltage with the probe, make sure there is
no electronic device connected to the test socket of the instrument.
DC VOLTAGE MEASUREMENT
Range Resolution Accuracy
200mV
2V 0.001V
20V 0.01V
200V 0.1V
600V 1V
Input impedance: 10MΩ
Overload protection: 200mV range: 250V DC or AC rms 2 V-600V ranges: 600V
DC or AC rms
Max. input voltage: 600V DC
AC VOLTAGE MEASUREMENT
Range Resolution Accuracy
200mV
2V 0.001V
20V 0.01V
200V 0.1V
600V 1V ± 1.0% of reading, ± 3 digits
0.1
0.1
mV
± 0.7% of reading, ± 2 digits
mV
± 0.8% of reading, ± 3 digits
Input impedance: 10MΩ
Overload protection: 200mV range: 250V DC or AC rms 2V-600V ranges: 600V
DC or AC rms
Frequency range: 40-400Hz
Response: average (rms of sine wave)
Max. input voltage: 600V AC rms
8
Parts & Service: 020 8988 7400 / E-mail: [email protected] or [email protected]
Page 9

RESISTANCE
Range Resolution Accuracy
Ω
200
2kΩ
20kΩ
200kΩ
2MΩ
20MΩ
Open circuit voltage: 250mV
Overload protection: 250V DC or AC rms
0.1Ω ± 1.0% of reading, ± 3 digits
0.001Ω
0.01Ω
0.1Ω
0.001MΩ
0.01MΩ ± 1.0% of reading, ± 5 digits
± 1.0% of reading, ±1 digits
CONTINUITY
Function Description
The built-in buzzer sounds when the resistance is less than 50Ω
Open circuit voltage: approximately 500mV
Overload protection; 250V or AC rms
DIODE TEST
Range Description
0.001V Displays approx forward-biased voltage
Forward DC current: approximately 1mA
Reverse DC voltage: approximately 1.5V
Overload protection: 250V or AC rms
DC CURRENT MEASUREMENT
Measuring Range Resolution Accuracy
20mA 0.01mA
200mA 0.1mA
Overload protection: re-settable fuse.
Parts & Service: 020 8988 7400 / E-mail: [email protected] or [email protected]
± 1.5% of reading, ± 3 digits
9
Page 10

AC CURRENT MEASUREMENT
Measuring Range Resolution Accuracy
20mA 0.01mA
200mA 0.1mA
Overload protection: re-settable fuse
Frequency range: 40Hz to 200Hz
Response: average (rms of sine wave).
± 2% of reading, ± 3 digits
LOGIC TEST
Function Description
0V Low”0” 1.5V 3.5V High”1” 5V
Logic
Input impedance: 1MΩ
Overload protection: 250V or AC rms
I----------------------------I------------------------------I------------------------------I
Green Green /Red Red LED
LED on LED off on
10
Parts & Service: 020 8988 7400 / E-mail: [email protected] or [email protected]
Page 11

USING THE METER
READING HOLD
1. During measurement, press the “HOLD” button to keep the current reading
on the display. “D.H” will appear on the display. Press the “HOLD” again to
return to normal display.
MAX HOLD
1. During measurement, press the “MAX” button and the display will show the
maximum value recorded. “M.H” will appear on the display. Press “MAX”
again to return to normal display.
FUNCTION BUTTON
1. In voltage/current modes, press the “FUNC” button to switch between AC/
DC. At the resistance/diode/continuity position, press “FUNC” to switch
between these modes.
MANUAL RANGE
1. In voltage/current/resistance modes, the default range is “AUTO”. Press the
“RAN” button to switch to manual range. Each press of the button
increases the range, and returns to the lowest range once pressed in the
highest range. Hold down the “RAN” to return to auto range.
AUTO POWER OFF
1. The meter has an auto power off feature that will turn the meter off
automatically if left on. After approx. 14 minutes of non-use, the meter will
sound 5 short beeps and then 1 minute later the meter will sound 1 long
beep and turn itself off.
2. After auto power off has occurred, either move the rotary switch or press
the “FUNC”, “MAX” or “RAN” buttons to turn the meter back on.
3. In you hold down the “HOLD” button when turning on the meter, this will
disable the auto power off function. The auto power off function will reenable after the meter is turned off again.
PREPARING FOR MEASUREMENT
1. Select the desired function using the rotary switch. If in manual mode,
select the highest range first if the value to be measured is unknown
beforehand and then lower as needed.
11
Parts & Service: 020 8988 7400 / E-mail: [email protected] or [email protected]
Page 12
2. When connecting the meter to a circuit, connect the common lead first,
then the meter’s test probe.
3. If the battery voltage becomes <2.4V, the symbol appears on the
display. Replace the batteries before making measurements.
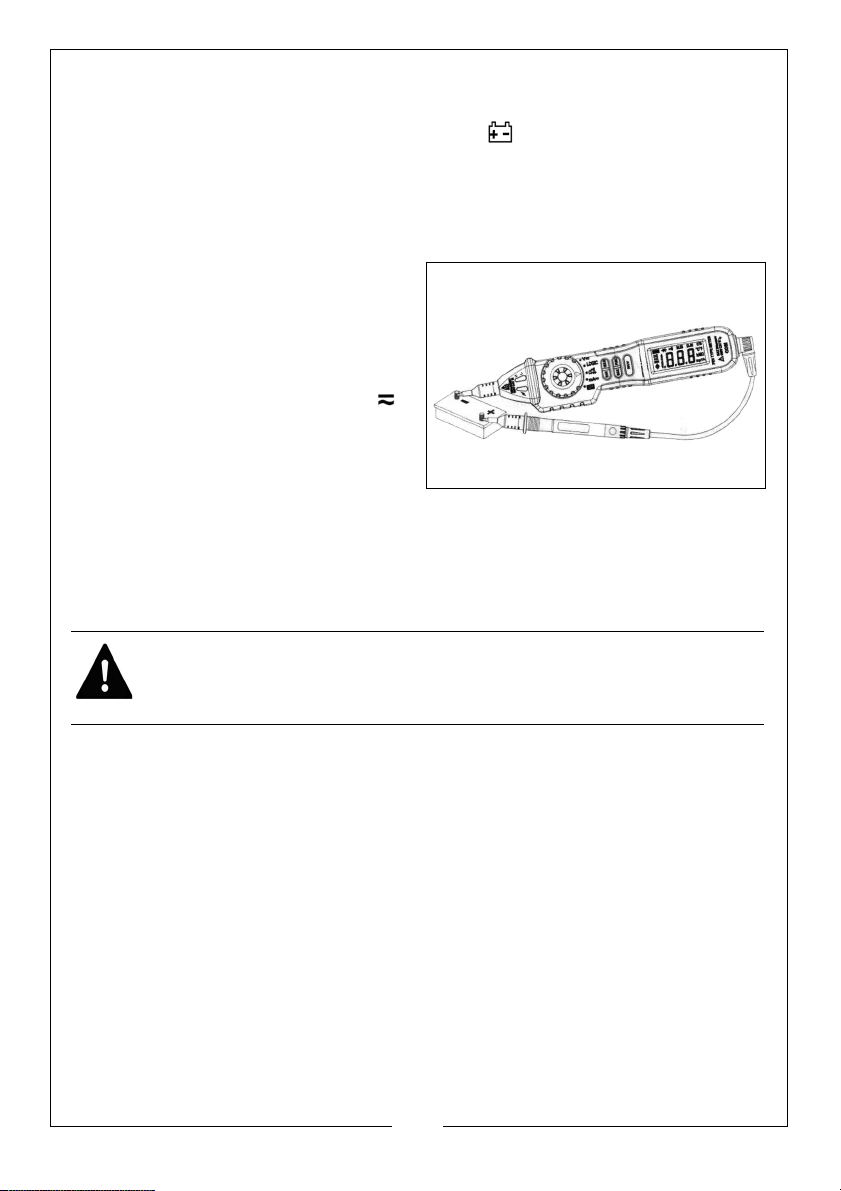
DC VOLTAGE
1. Use the probe cover if making
measurements on category III or
above installations.
2. Insert the black test lead into the
“COM” jack.
3. Turn the rotary switch to the V
position.
4. The default mode is DC voltage.
Press the “RAN” to switch the
manual range if needed.
5. Connect the test probe and test lead across the voltage source or load
measurement.
• The display will show the measured value. Observe the polarity of the
test probe for DC voltage measurements.
WARNING: TO PREVENT ELECTRIC SHOCK AND DAMAGE TO THE METER
OR PERSONNAL INJURY, DO NOT MEASURE VOLTAGES THAT MAY EXCEED
600VDC.
NOTE: Before connecting the probe and test lead at lower voltage
ranges, the display may show erratic readings. This is normal
because the meter is highly sensitive. Once a connection is
made, the true reading will be displayed.
NOTE: OL indicated an over range situation in manual mode. A higher
range should be selected.
NOTE: In manual mode, select the highest range first if the value to be
measured is unknown beforehand and lower as needed.
12
Parts & Service: 020 8988 7400 / E-mail: [email protected] or [email protected]
Page 13

AC VOLTAGE
WARNING: TO PREVENT ELECTRIC SHOCK AND DAMAGE TO THE METER
OR PERSONNAL INJURY, DO NOT MEASURE VOLTAGES THAT MAY EXCEED
600V AC RMS.
1. Use the probe cover if making
measurements on category III or
above installations.
2. Insert the black test lead into the
“COM” jack.
3. Turn the rotary switch to the V
position.
4. The default mode is DC voltage.
Press the “FUNC” to switch to AC
voltage. Press “RAN” to select
manual range if needed.
5. Connect the test probe and test lead across the voltage source or load
measurement.
• The display will show the measured value.
NOTE: Before connecting the probe and test lead at lower voltage
ranges, the display may show erratic readings. This is normal
because the meter is highly sensitive. Once a connection is
made, the true reading will be displayed.
NOTE: OL indicated an over range situation in manual mode. A higher
range should be selected.
NOTE: In manual mode, select the highest range first if the value to be
measured is unknown beforehand and lower as needed.
NOTE: Millivolt range is only available in manual range mode.
13
Parts & Service: 020 8988 7400 / E-mail: [email protected] or [email protected]
Page 14
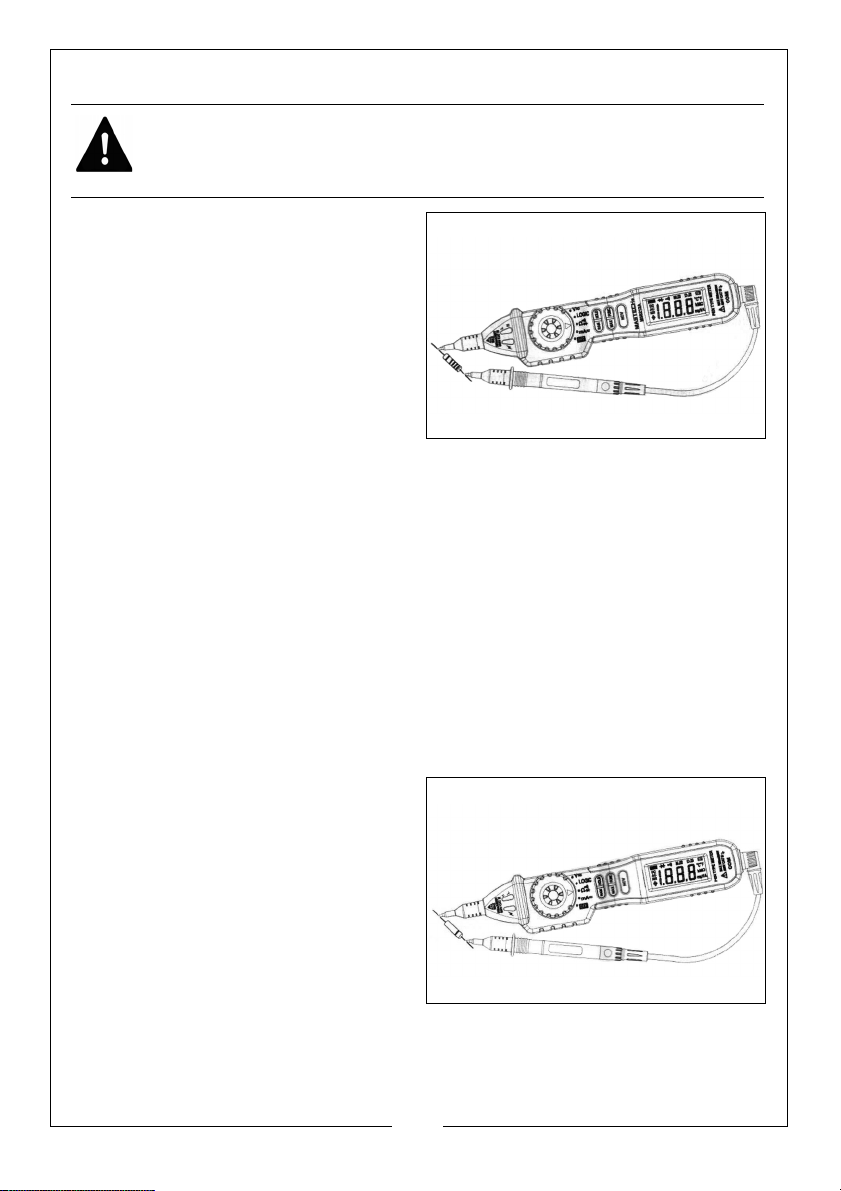
RESISTANCE
WARNING: TO PREVENT ELECTRIC SHOCK BE SURE ALL POWER TO THE
CIRCUIT IS OFF AND ANY CAPACITORS HAVE FULLY DISCHARGED BEFORE
MEASURING RESISTANCE.
1. Use the probe cover if making
measurements on category III or
above installations.
2. Insert the black test lead into the
“COM” jack.
3. Turn the rotary switch to the Ω
position.
4. Press “RAN” to switch to manual
range if needed.
5. Connect the test probe and test lead across the resistance for
measurement.
• The display will show the measured value.
NOTE: OL indicated an over-range situation in manual mode. A higher
range should be selected.
NOTE: If the resistance is greater than 1Ω
seconds to get a stable reading. This is normal for high resistance
measurements. When the leads are not connected or when
measuring an open circuit, the display will read “O.L”.
, the meter may take few
DIODE TEST
1. Use the probe cover if making
measurements on category III or
above installations.
2. Insert the black test lead into the
“COM” jack.
3. Turn the rotary switch to the
position.
4. The default mode is resistance.
Press “FUNC” to switch to diode
test.
5. Connect the test probe to the anode (+) and the test lead to the cathode
(-) of the diode.
Parts & Service: 020 8988 7400 / E-mail: [email protected] or [email protected]
14
Page 15
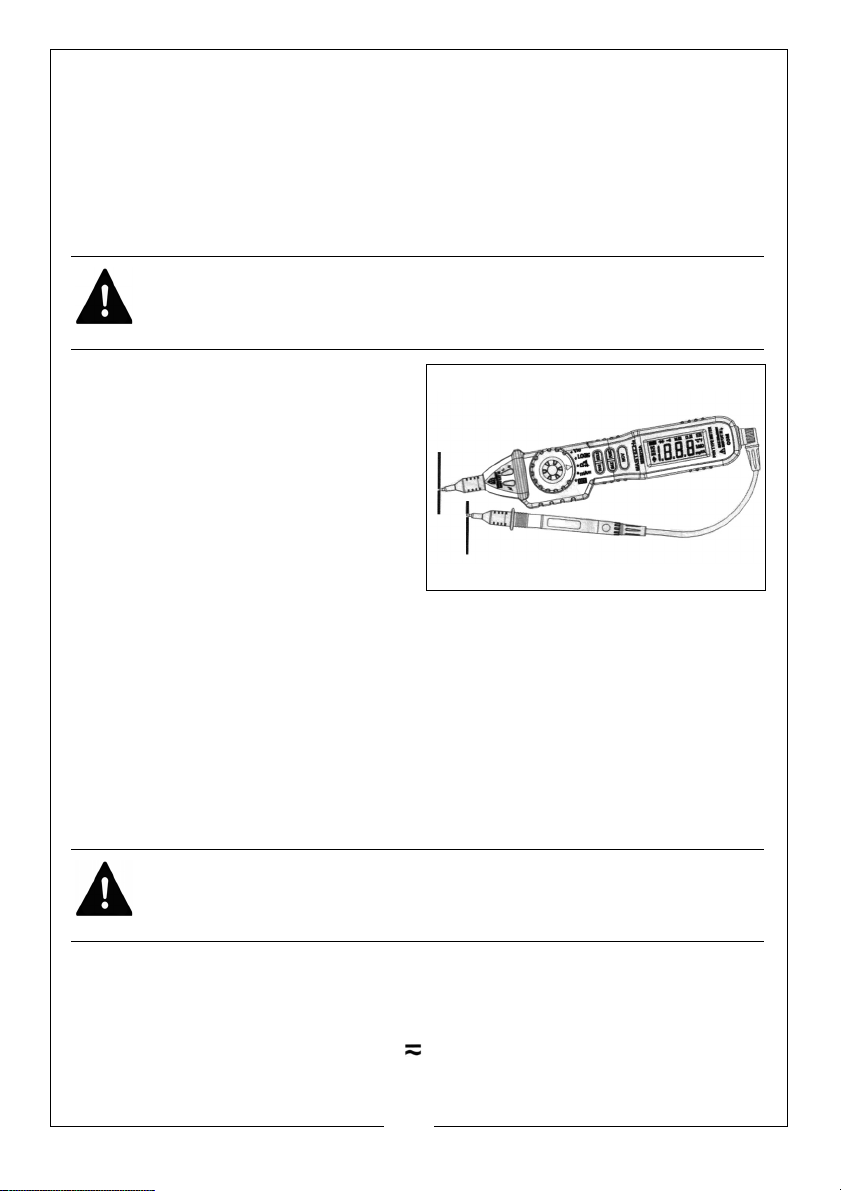
• The display will show the measured value.
NOTE: The display shows the approx. forward voltage drop. If the
connections are reversed or the leads are not connected, the
display will show “O.L”.
CONTINUITY
WARNING: TO PREVENT ELECTRIC SHOCK BE SURE ALL POWER TO THE
CIRCUIT IS OFF AND ANY CAPACITORS HAVE FULLY DISCHARGED BEFORE
MEASURING CONTINUITY.
1. Use the probe cover if making
measurements on category III or
above installations.
2. Insert the black test lead into the
“COM” jack.
3. Turn the rotary switch to the
position.
4. The default mode is resistance.
Press “FUNC” to switch to
continuity.
5. Connect the test probe and the test lead across the circuit for
measurement.
• If the measured resistance is less than 50Ω, the buzzer will sound.
NOTE: If the leads are not connected or the resistance is higher than
200Ω
, the display will show “O.L”.
DC CURRENT
WARNING: RISK OF ELECTRIC SHOCK. NEVER MEASURE CURRENT WHERE
OPEN CIRCUIT VOLTAGES EXCEED 250V TO PREVENT DAMAGE TO THE
METER OR PERSONAL INJURY
1. Use the probe cover if making measurements on category III or above
installations.
2. Insert the black test lead into the “COM” jack.
3. Turn the rotary switch to the “mA ” position.
15
Parts & Service: 020 8988 7400 / E-mail: [email protected] or [email protected]
Page 16

4. The default mode is DC current. Press “RAN” to switch to manual range if
needed.
5. Connect the test probe and test lead in series with the circuit under
measurement.
• The display will show the measured value. Observe the polarity of the
test probe for DC Current measurements.
NOTE: “O.L” indicated an over-range situation in manual mode. A higher
range should be selected.
AC CURRENT
WARNING: RISK OF ELECTRIC SHOCK. NEVER MEASURE CURRENT WHERE
OPEN CIRCUIT VOLTAGES EXCEED 250V TO PREVENT DAMAGE TO THE
METER OR PERSONAL INJURY
1. Use the probe cover if making measurements on category III or above
installations.
2. Insert the black test lead into the “COM” jack.
3. Turn the rotary switch to the “mA ~”“ position.
4. The default mode is DC current. Press “FUNC” to switch to AC Current. Press
RAN to switch to manual range if needed.
5. Connect the test probe and test lead in series with the circuit under
measurement.
6. The display will show the measured value. Observe the polarity of the test
probe for AC Current measurements.
NOTE: “O.L” indicated an over-range situation in manual mode. A higher
range should be selected.
LOGIC TEST
WARNING: TO PREVENT ELECTRIC SHOCK AND DAMAGE TO THE METER
OR PERSONAL INJURY, DO NOT MEASURE VOLTAGES THAT MAY EXCEED
100V AC RMS.
1. Use the probe cover if making measurements on category III or above
installations.
2. Insert the black test lead into the “COM” jack.
3. Turn the rotary switch to the “LOGIC” position.
16
Parts & Service: 020 8988 7400 / E-mail: [email protected] or [email protected]
Page 17

4. Connect the black test lead to the circuit’s earth (-) terminal.
5. Hold down the “FUNC” button and touch the test probe to the circuit for
measurement. The LEDs near the tip of the meter will indicate the current
logic level (red indicates “high” level or “1” and green indicates “low” level
or “0”.
6. The display will also show the logic level along with the voltage measured
(“
▲“representing “high” level and “▼“representing “low” level).
NOTE: If the leads are disconnected or the voltage measured is less than
1.5V the LED will be green.
NOTE: “FUNC” button must be held down during logic testing.
NON-CONTACT VOLTAGE (NCV)
1. With the rotary switch in any position except OFF, hold down the “NCV”
button.
2. Move the tip of the meter near the voltage source or conductor. If the
voltage detected is greater than 110VAC, the buzzer will beep and the
NCV indicator near the tip of the meter will flash.
NOTE: Voltage may still exist even with no indication given off by the
meter. Do not solely rely on NCV detection to determine the
presence of voltage. Socket design, insulation thickness and other
factors may affect readings.
NOTE: The NCV indicator LED may flash while measuring DC/AC
voltage due to the presence of induced voltage. External
environmental interference from additional sources can falsely
trigger NCV detection.
17
Parts & Service: 020 8988 7400 / E-mail: [email protected] or [email protected]
Page 18

MAINTENANCE
GENERAL CARE
WARNING: BEFORE REMOVING THE REAR COVER, DISCONNECT THE
PROBES FROM THE CIRCUIT TO BE MEASURED. ENSURE THE COVER IS
TIGHTLY SECURED BEFORE USING THE INSTRUMENT.
Always move the rotary switch to the OFF position when the meter is not in use.
Clean the housing of the instrument only with a wet rag dripped with little
detergent but never chemical solution.
In case of any abnormality, stop using the meter and sent it for maintenance.
Repairs should only be carried out by trained personnel. Always remove test
leads from measuring circuits before opening the battery cover.
Remove the batteries if the meter is not to be used for an extended period of
time.
REPLACEMENT OF BATTERY AND FUSE
1. If the symbol appears on the LCD it indicates that the batteries should
be replaced. Undo the screw on the back of the meter to open the case.
The batteries for this multimeter are AAA and the replacements should be
of the same specification.
2. Don't put the instrument into use until the rear cover is screwed on after
replacing batteries.
18
Parts & Service: 020 8988 7400 / E-mail: [email protected] or [email protected]
Page 19

DECLARATION OF CONFORMITY
19
Parts & Service: 020 8988 7400 / E-mail: [email protected] or [email protected]
Page 20

 Loading...