

Page 1
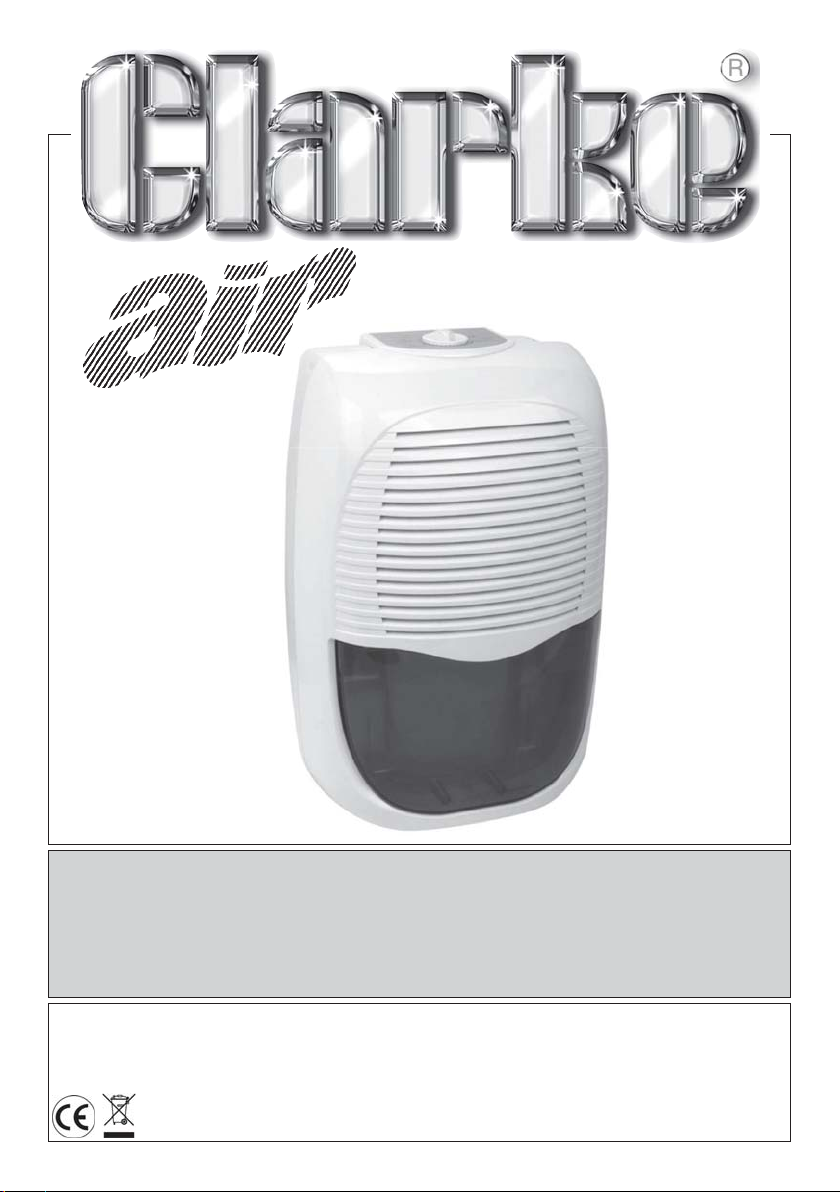
DEHUMIDIFIER
DEHUMIDIFIER
MODEL NO: CD1155
Part No: 6470619
USER INSTRUCTIONS
0608
Page 2
Thank you for purchasing this CLARKE Dehumidifier, which is designed for use in
a domestic and small office environment only.
Please read this instruction leaflet thoroughly and follow the instructions carefully,
in doing so you will ensure the safety of yourself and that of others around you, this
will also ensure that the dehumidifier will give you long and satisfactory service.
Please keep these instructions in a safe place for future reference.
CLARKE GUARANTEE
This CLARKE product is guaranteed against faulty manufacture for a period
of 12 months from the date of purchase. Please keep your receipt as proof
of purchase.
This guarantee is invalid if the product is found to have been abused or
tampered with in any way, or not used for the purpose for which is was
intended.
Faulty goods should be returned to their place of purchase, no product
can be returned to us without prior permission.
This guarantee does not effect your stationary rights.
CONTENTS
Guarantee ...................................................................................................... 1
Safety Precautions .......................................................................................... 2
Electrical Connections ................................................................................... 3
Technical Specification .................................................................................. 4
Parts Description ............................................................................................. 5
Setup & Operation ......................................................................................... 6
Maintenance ................................................................................................ 10
Troubleshooting ............................................................................................ 11
Parts List ......................................................................................................... 12
Waste electrical products should not be disposed of with household waste. Please dispose of at your local
Please Note that details and specifications herein, are correct of time of going to print.
However CLARKE International reserve the right to change specifications at any time without prior notice.
Copyright CLARKE International All rights Reserved 03/2006.
recycling facility.
Page 3
SAFETY PRECAUTIONS
WARNING:
PLEASE READ ALL INSTRUCTIONS CAREFULLY BEFORE OPERATING
This appliance is intended for domestic and small office use ONLY. Any
other use is not recommended by the manufacturer and may cause fire,
electric shocks or other injury to person or property.
• ALWAYS keep the unit in an upright position to avoid damage to the cooling
system, locate on a flat stable surface.
• DO NOT place the unit close to curtains or other objects (min. distance 0.5M).
• ALWAYS ensure that the air inlets and outlets are NOT blocked or covered.
• Operate this unit in an ambient temperature of between 5°C and 35°C.
• When using the unit to dry clothes, keep clothing a safe distance from the
unit to prevent water from dropping in.
• NEVER place anything on top of the unit and DO NOT cover with any kind of
material while in use.
• This product is intended for domestic and small office use ONLY and NOT for
commercial, industrial or outside use.
• To protect against electric shocks, DO NOT immerse unit, plug or cord in water
or spray with liquids.
• DO NOT operate the unit if the cord or plug becomes damaged, return to
an authorised service facility for examination and repair.
• ALWAYS switch the unit OFF before unplugging from the mains supply, failure
to do so could cause damage to the electronics in the unit.
• ALWAYS empty the water tank before storing the unit away.
• ALWAYS unplug the unit from the supply when not in use, when emptying the
water tank, and when moving to a new location.
• NEVER pull the cord to disconnect the unit from the power supply, always
grip the power plug and pull from the socket.
• Close supervision is necessary when any appliance is used by or near
children and pets.
• DO NOT run the power cord under carpeting, or cover with rugs or runners.
Arrange the cord away from areas where it may be tripped over.
• NEVER operate or store the unit in direct sunlight.
• ALWAYS take the unit to a qualified service engineer for repair. Repairs
carried out by unqualified people may cause damage to the unit or injury
to persons or property and invalidate the warranty.
Page 4
SAFETY PRECAUTIONS CONTINUED
• Where possible avoid the use of an extension cable as they may overheat
and become a fire risk. Only use an extension cord after ensuring it is in
perfect condition.
• DO NOT use the unit without the AIR FILTER.
• Check the household voltage to ensure it matches the units rated
specification before operating.
ELECTRICAL CONNECTIONS
This product is provided with a standard 13 amp, 230 volt (50Hz) BS1363 plug, for
connection to a standard, domestic electrical supply. Should the plug need
replacing at any time, ensure that a plug of identical specification is used.
WARNING:
Should it ever be necessary to change the plug, the wires in the
mains lead should be wired according to the following colour code:
BLUE - NEUTRAL
BROWN - LIVE
GREEN & YELLOW - EARTH
• Connect the BLUE coloured wire to the plug terminal marked with a
letter ‘N’ or coloured BLACK.
•
Connect the BROWN coloured wire to the plug terminal marked with
a letter ‘L’ or coloured RED.
• Connect the GREEN & YELLOW coloured wire to the plug terminal
marked with a letter ‘E’ or ‘ ’ or coloured GREEN or GREEN & YELLOW.
IMPORTANT!:
If this appliance is fitted with a plug which is moulded on to the electrical cable
(i.e. non-rewireable) please note:
• The plug MUST be thrown away if it is cut from the electric cable. There is a
danger of electric shock if it is subsequently inserted into a socket outlet.
• NEVER use the plug without the fuse cover fitted.
• Should you wish to replace a detached fuse carrier, ensure that the correct
replacement is used (as indicated by marker or colour code).
• The fuse in the plug MUST be replaced with one of the same rating (13amps)
and this must be approved to BS1362.
IMPORTANT!:
If in any doubt, DO NOT attempt any electrical repair yourself. Consult a qualified
technician.
Page 5
TECHNICAL SPECIFICATION
Description:
Model No: ............................................................................................ CD1155
Part No: ................................................................................................ 6470619
Use: ............................................................................... Domestic/Small office
Product Specification:
Operating Voltage: .................................................................................. 230V
Motor Wattage:....................................................................................... 250W
Operating Temperature: ................................................................ 5°C - 35°C
Max Extraction Rate: .................................................................. 10 Litres/Day
Tank Capacity: .................................................................................... 2.1 Litres
Dimensions & Weights:
Product: (length x width x height) .................................. 290 x 325 x 452mm
Weight: ................................................................... 11.5Kg (gross) 10Kg (nett)
Page 6
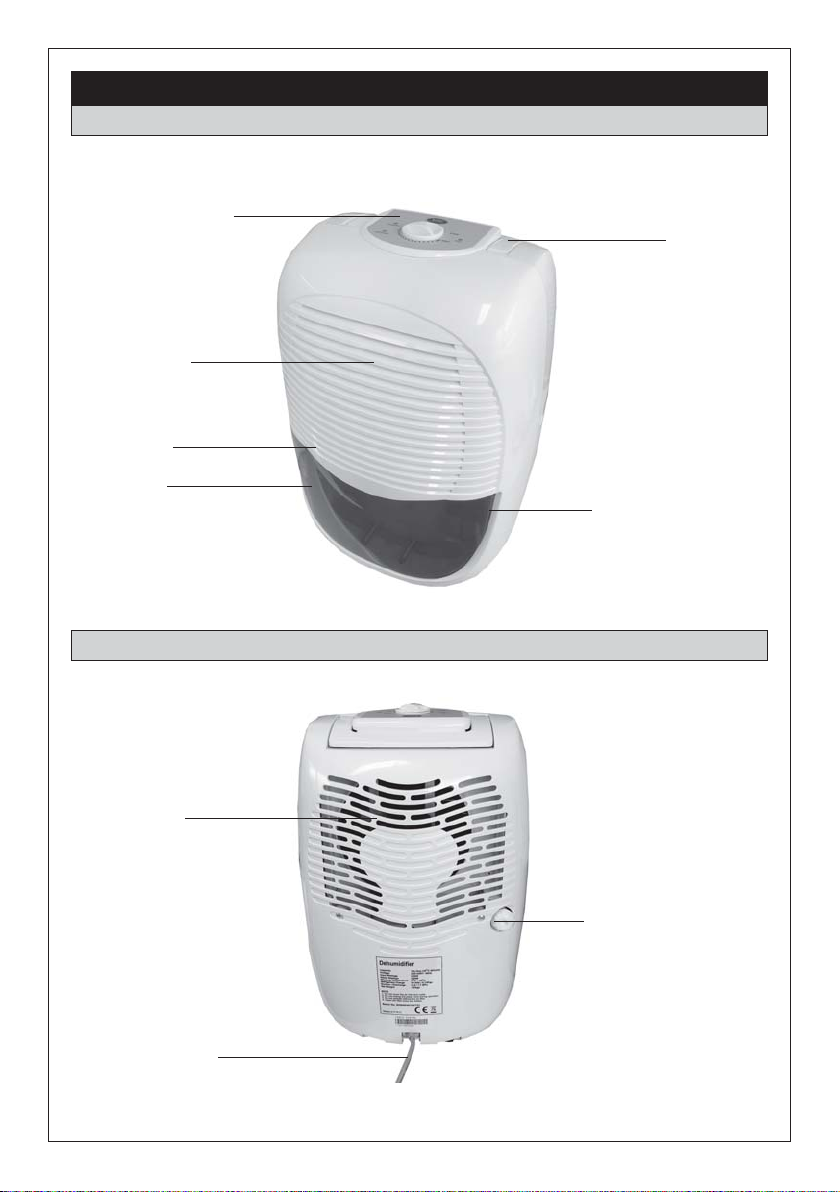
FRONT VIEW
Control panel
Air inlet
Filter
PARTS DESCRIPTION
Handle
Bucket
REAR VIEW
Air outlet
Power cord
storage
Finger grip to
pull out bucket
(both sides)
Drain connector
Page 7
SETUP AND OPERATION
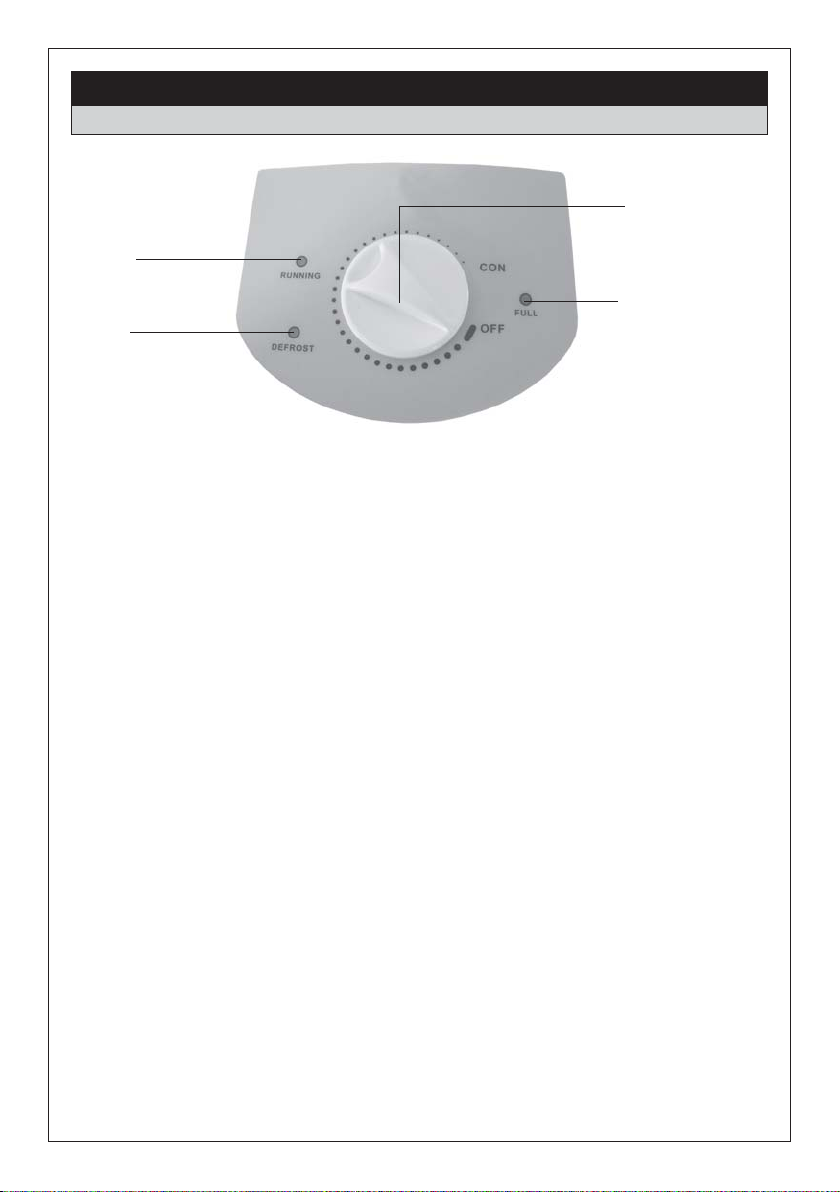
CONTROL PANEL
4
3
1
2
INDICATOR LIGHTS:
(1) FULL Indicator Illuminates when the water container is full. To empty
the water bucket, switch the unit off and unplug
from socket, carefully remove the bucket and empty
the collected water. Replace the bucket carefully
before switching unit back on.
(2) DEFROST
(3) RUNNING
(4) Humidity Control Turn the dial to OFF to stop the machine.
As a safety feature, the unit will run for three minutes before the compressor
starts.
If the ambient temperature is too low the unit will
automatically start to defrost and the light will
illuminate. The defrost lamp will also illuminate if the
air filter becomes clogged.
Illuminates when the dehumidifier is ON
Turn the dial to CON for continuous dehumidification.
OPERATION
NOTE: This unit operates within an ambient temperature of 5°C to 35°C.
1. Ensure that the unit is connected to the power socket.
2. Make sure the water tank is correctly positioned. (If the Full lamp
illuminates when unit is first switched on, remove the tank and replace it)
3. Turn the humidity control knob to the desired setting.
4. The unit will shut down when the humidity control is set to OFF position.
Page 8
SETUP AND OPERATION CONTINUED
BUCKET EMPTYING
1. When the bucket is full the ‘FULL’ light will illuminate.
2. Wait a few minutes to allow the machine to stop operating before
removing the bucket.
3. To remove the bucket, grip each side and lever out, carefully lift and pour
the water away, then replace back into the correct position.
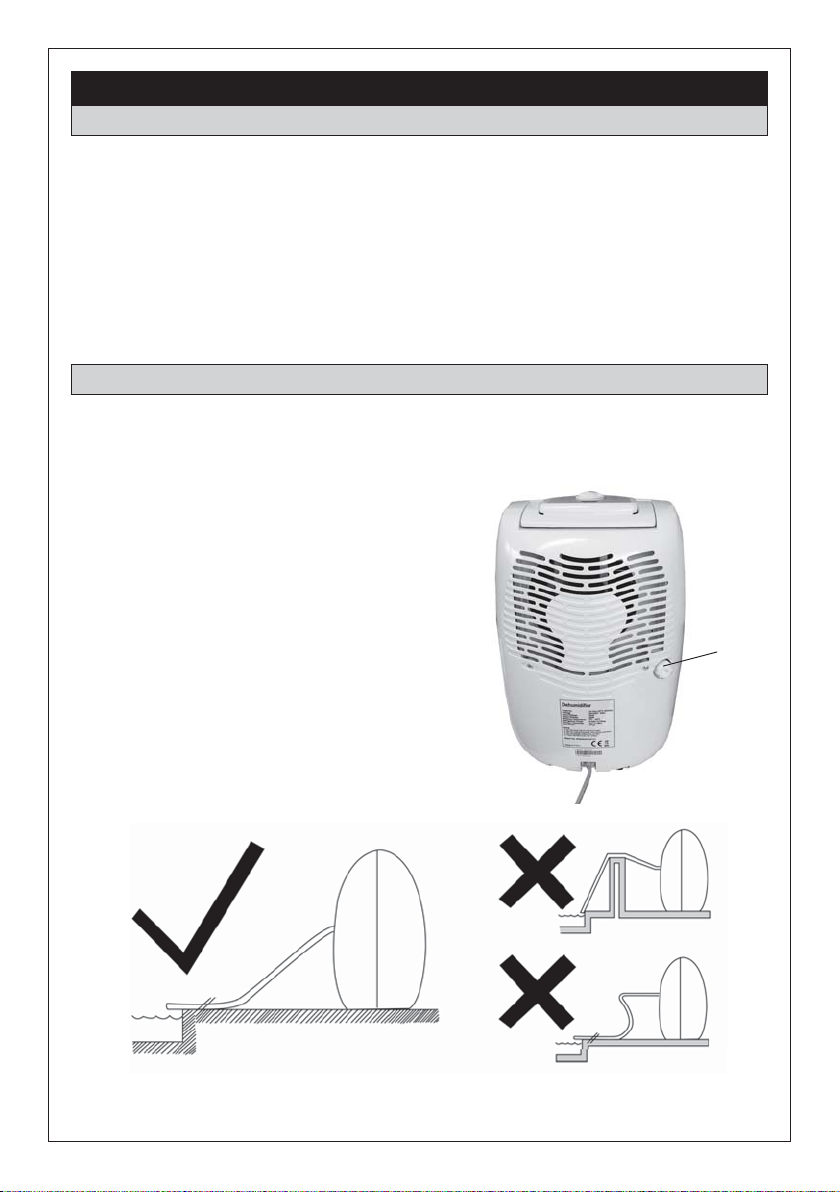
CONTINUOUS WATER DRAIN
For continuous water drainage use a hose with an inner diameter of 14 mm (not
supplied)
1. Turn the drain cover anticlockwise to
remove.
2. Remove the tube stopper from the
drainage tube.
3. Attach the hose to the drainage tube.
4. The hose should be lead to the drain
with no sharp bends.
5. Make sure the bucket is in place.
Drain
cover
Page 9

MAINTENANCE
CLEANING THE AIR FILTER
The air filter is located on the front of the unit.
To prevent dust from clogging your unit it must always be used with the filter in
place.
The build up of dust reduces the efficiency of the dehumidifier. Therefore the
air filter must be cleaned every two weeks, and more often if the unit operates
in a dusty atmosphere.
To remove the filter,
1. Remove the water bucket, empty contents if necessary.
2. The filter is behind the front grille reach underneath and you will be able to
pull the filter down until it is fully out.
3. Clean the filter with a vacuum cleaner, if it is very dirty, you can wash them
in warm water. DO NOT use hot or soapy water.
NOTE: Make sure the filter is completely dry before replacing it in the unit.
NOTE:
1. ALWAYS turn OFF and unplug from the mains supply before moving.
2. Empty the water bucket to avoid spillages.
3. Once the unit has been moved, before switching ON ensure that the
Do not bend the filter.
RELOCATING THE UNIT
dehumidifier is located on a flat, stable surface and that the bucket is
correctly installed.
Page 10
TROUBLE SHOOTING
PROBLEM: The unit fails to run:
CAUSE: TROUBLE SHOOTING:
Is the power cord unplugged or the
power OFF?
Is the ‘FULL’ light illuminated?
Has the fuse in the mains plug blown?
PROBLEM: The performance seems poor:
CAUSE: TROUBLE SHOOTING:
Are there any doors or windows open?
Is steam being generated in the room?
Is the room too big?
Is the room temperature or humidity
low?
Is the air filter dirty?
Are the inlet or air outlets covered?
Plug the unit in and switch the power
on.
Check if the bucket is full, empty if
required, check that the bucket is
installed correctly.
Replace the fuse with one of the same
rating.
Clean the air filter.
Remove the obstruction. Keep a
minimum distance of 0.5m between
the air inlet and other objects.
PROBLEM: The unit seems noisy:
CAUSE: TROUBLE SHOOTING:
Is the unit located on a flat stable
surface?
Is the air filter dirty?
NOTE:
• This model operates within a temperature range of 5°C to 35°C. Do not operate
the unit below 5°C. This could cause an accumulation of ice on the unit. If this
occurs unplug the unit and move to a place where water can be drained away.
• Whenever the compressor stops there will be at least a three minute wait before it
will restart, this ensures a smooth start and also helps to extends the life of the unit.
Move the unit to a more suitable
location.
Clean the air filter.
Page 11
PARTS LIST
ITEM: DESCRIPTION: PART NO:
1. Air Filter ........................................................................ EHCD115501
2. Control Panel ............................................................. EHCD115502
3. Bucket ......................................................................... EHCD115503
4. Power Cord................................................................. EHCD115504
WARNING: The use of spare parts or accessories, other than those supplied
by CLARKE international or one of its recognised dealers, may be
hazardous and could invalidate the guarantee.
NOTES: ...........................................................................................................................
.........................................................................................................................................
.........................................................................................................................................
.........................................................................................................................................
.........................................................................................................................................
.........................................................................................................................................
.........................................................................................................................................
.........................................................................................................................................
.........................................................................................................................................
.........................................................................................................................................
.........................................................................................................................................
.........................................................................................................................................
Page 12

 Loading...