

Page 1
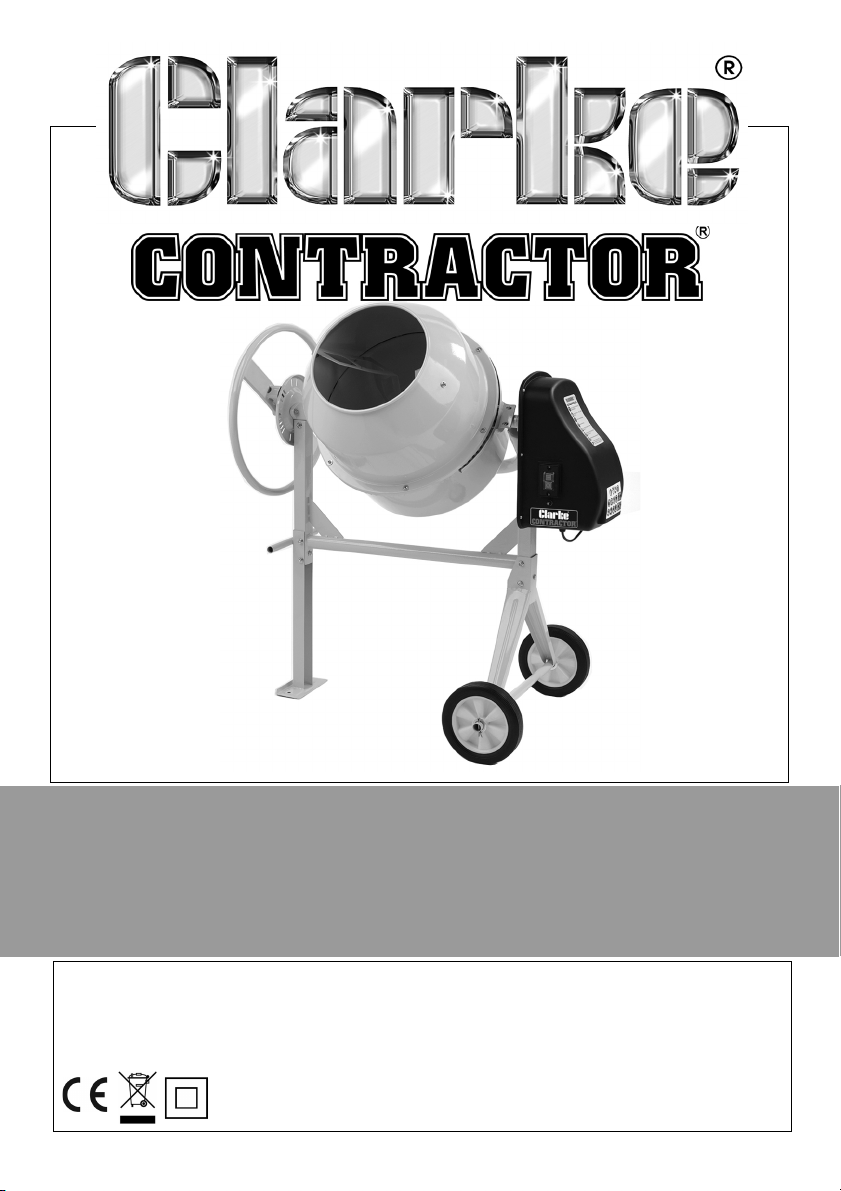
CEMENT MIXER
MODEL NO: CCM110
PART NO: 3400855
OPERATION & MAINTENANCE
INSTRUCTIONS
ORIGINAL INSTRUCTIONS GC05/17 ISSUE 2
Page 2
INTRODUCTION
Thank you for purchasing this CLARKE Cement Mixer.
Before attempting to use this product, please read this manual thoroughly and
follow the instructions carefully. In doing so you will ensure the safety of yourself
and that of others around you, and you can look forward to your purchase
giving you long and satisfactory service.
GUARANTEE
This product is guaranteed against faulty manufacture for a period of 12
months from the date of purchase. Please keep your receipt which will be
required as proof of purchase.
This guarantee is invalid if the product is found to have been abused or
tampered with in any way, or not used for the purpose for which it was
intended.
Faulty goods should be returned to their place of purchase, no product can
be returned to us without prior permission. This guarantee does not effect your
statutory rights.
SPECIFICATION
Max Drum capacity 110 Litre
Max Mixing Capacity 90 Litre
Drum Speed 33 rpm
Weight 43 kg
Dimensions: Length x Width x Height 1090 x 690 x 1242 mm
Power Cable Length 1350 mm
IP Rating IP44
Sound Pressure 61.41 dB(A)
Sound Power Measured 81 dB LWA
Sound Power Guaranteed 83 dB LWA
2
Parts & Service: 020 8988 7400 / E-mail: [email protected] or [email protected]
Page 3

GENERAL SAFETY PRECAUTIONS
1. Always keep the work area clean and well lit. Floors should always be kept
clear. Cluttered or dark areas invite accidents.
2. Always keep children and bystanders away while operating a power tool.
Distractions can cause loss of control.
3. Always stay alert & do not use a machine while you are tired or under the
influence of medication or alcohol.
4. Always wear suitable protective clothing and eye protection including
industrial gloves, ear defenders & approved impact resistant safety glasses.
(Eye glasses are NOT safety glasses). Wear a dust mask if handling cement
dust.
5. Never over-reach. Keep your proper footing and balance at all times to
enable better control of the machine in unexpected situations.
6. Never stand on the machine. Injury could occur from a fall.
7. Always store machines out of reach of children.
8. Always read and become familiar with the entire operating manual.
9. Never allow persons unfamiliar with this manual to operate this machine.
10. Always maintain the machine with care and keep it clean for best / safest
performance.
11. Never use this machine if any part is damaged. Have it inspected and
repaired by a competent technician.
12. Never modify this machine in any way. Use it only for the purpose for which
it is designed.
13. Always ensure the electrical cable is fully protected and there is no danger
of damage from equipment or materials. Always Inspect the cable before
use and replace if any damage is apparent.
14. Avoid inhaling cement dust while loading the mixer. Avoid contact with
cement or any mixing additives being used. Wear gloves/face mask if
necessary.
15. Always disconnect the machine from the power supply when not in use,
and before carrying out any maintenance.
16. Never leave the machine running unattended or leave the machine until it
comes to a complete stop.
17. Always keep your hands well clear of the rotating drum at all times. Never
put your hands inside the drum when the machine is switched on.
3
Parts & Service: 020 8988 7400 / E-mail: [email protected] or [email protected]
Page 4
18. Never put any tools or other objects in or around the drum while it is
rotating.
19. Never wear jewellery or loose clothing that could be snagged by any part
of the rotating drum.
20. Never load the drum when the machine is switched off. Always switch on
and ensure the drum is rotating before loading.
21. Do not operate this machine on a gradient. Always stand the mixer on firm,
level ground where it cannot tip over.
22. Always switch off and disconnect from the power supply before moving
the machine around the work site.
23. Never use the mixer if the power cable or other important parts of the
machine are damaged.
24. If an extension cable is used, the cable and plug must be of watertight
construction. Inadequate extension cables can be dangerous.
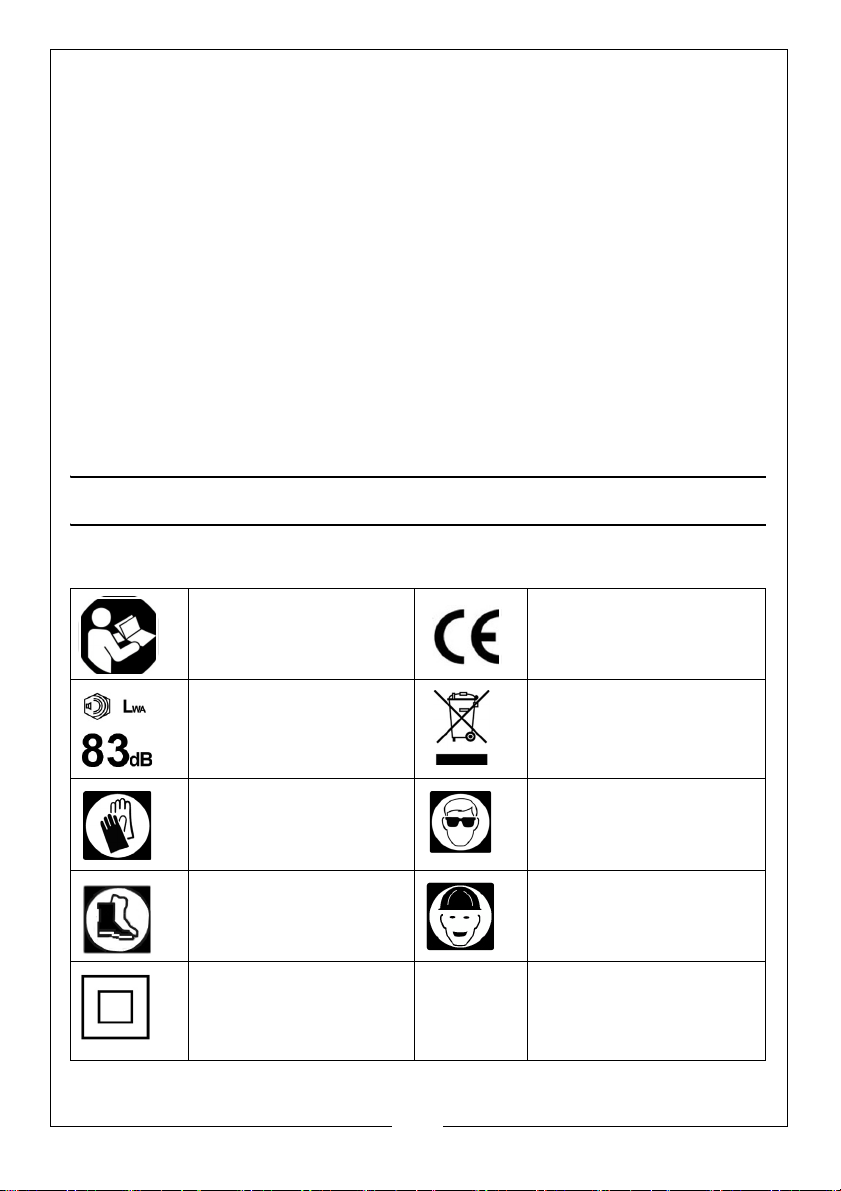
SAFETY SYMBOLS
The following symbols are shown on the product or it’s packaging.
Read instruction
manual before use
Sound Power Rating
label
Wear Gloves Wear eye protection
Wear protective
footwear
Class II product not
requiring an earth
connection.
4
Parts & Service: 020 8988 7400 / E-mail: [email protected] or [email protected]
CE Mark
Falls within Waste
Electrical Equipment
(WEEE) Directive
Wear protective head
wear
Page 5
ELECTRICAL CONNECTIONS
WARNING: READ THESE ELECTRICAL SAFETY INSTRUCTIONS
THOROUGHLY BEFORE CONNECTING THE PRODUCT TO THE MAINS
SUPPLY.
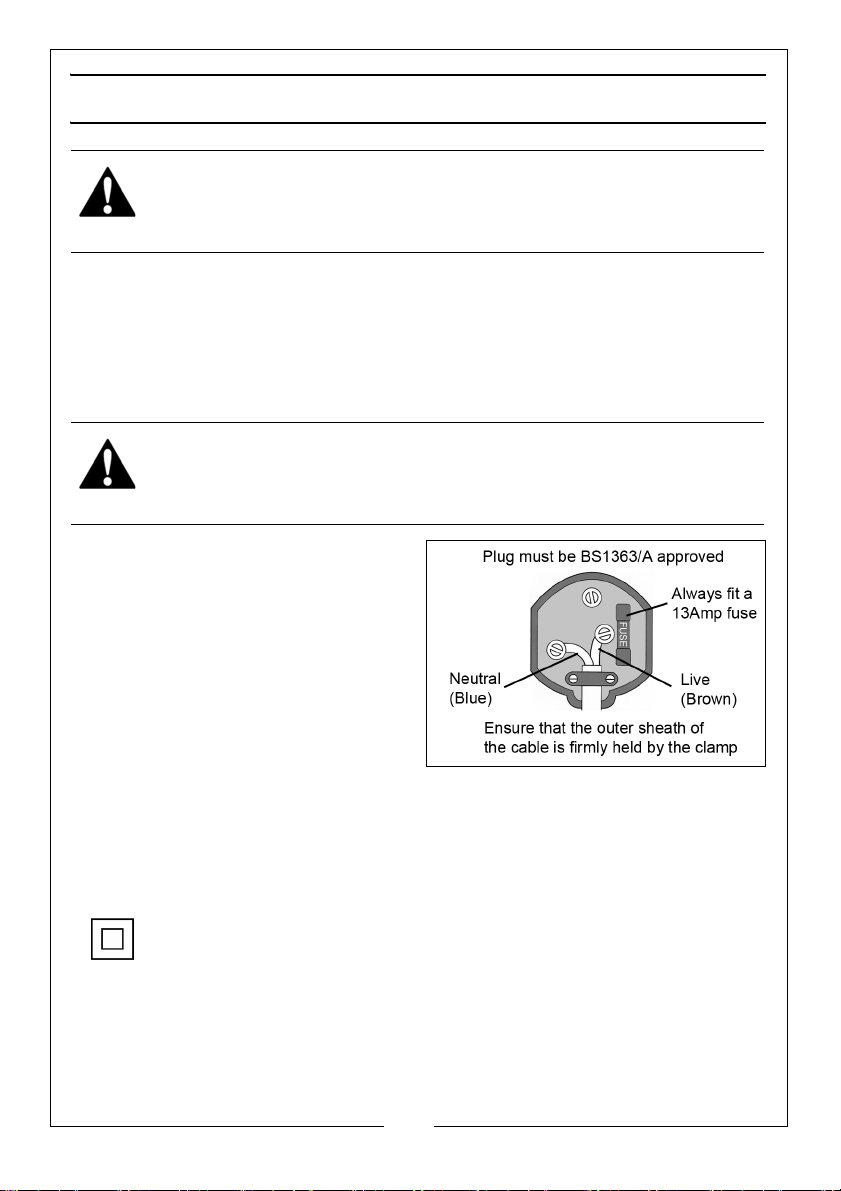
Connect the mains lead to a standard, 230 Volt (50Hz) electrical supply
through an approved 13 amp BS1363 plug, or a suitably fused isolator switch.
If the plug has to be changed because it is not suitable for your socket or
because of damage, it must be removed and a replacement fitted, following
the wiring instructions shown below. The old plug must be discarded safely as
insertion into a power socket could cause an electrical hazard.
WARNING: THE WIRES IN THE POWER CABLE OF THIS PRODUCT ARE
COLOURED IN ACCORDANCE WITH THE FOLLOWING CODE:
BLUE = NEUTRAL BROWN = LIVE
The wires in the mains lead should be
wired up in accordance with the
following colour code:
• Connect the BROWN coloured
wire to the plug terminal
marked a letter “L”.
• Connect the BLUE coloured wire
to the plug terminal marked a
letter “N”.
We strongly recommend that this machine is connected to the mains supply
via a Residual Current Device (RCD). If you are not sure, consult a qualified
electrician.
DO NOT try to carry out any repairs yourself.
This symbol indicates that this is a Class II product and does not
require an earth connection.
5
Parts & Service: 020 8988 7400 / E-mail: [email protected] or [email protected]
Page 6
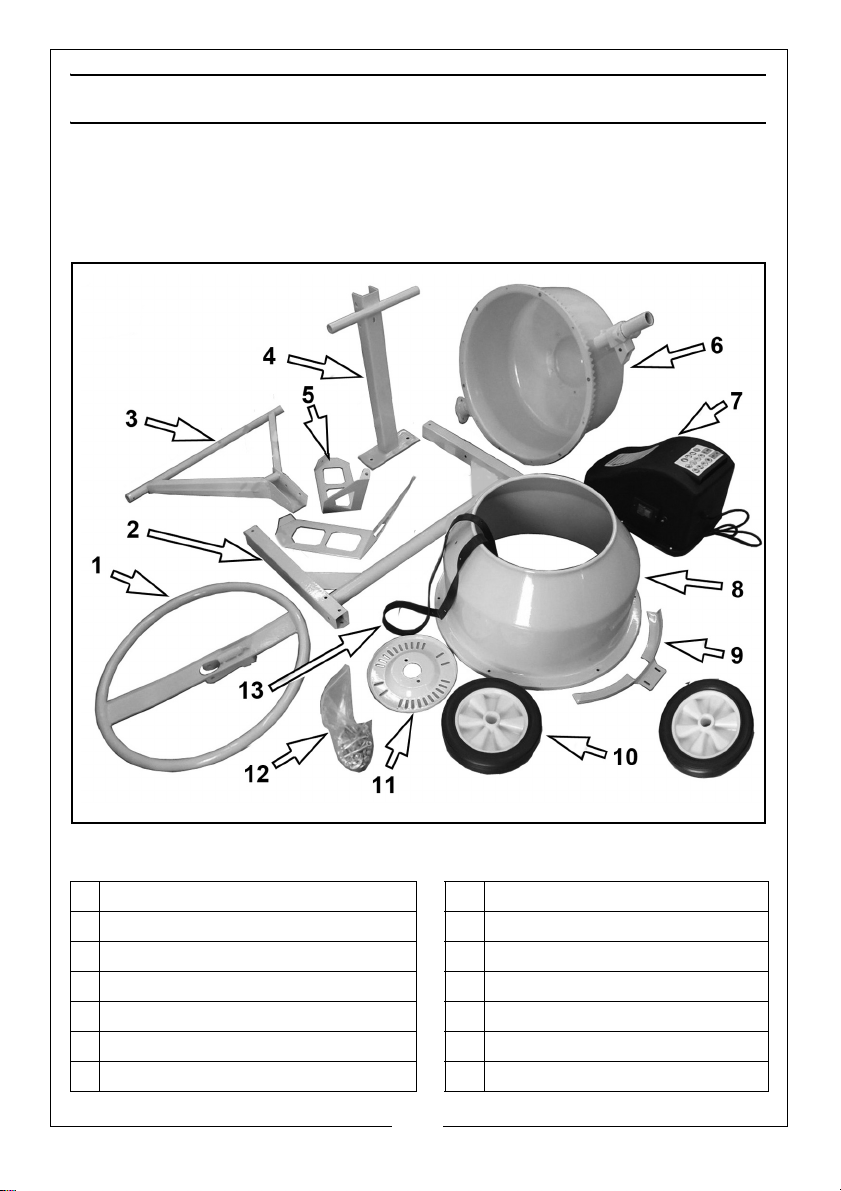
UNPACKING & PRE-ASSEMBLY CHECK
Remove all components from the packing case and lay them out neatly so
that they can be identified and checked for any possible damage during
transit. Should any component be found to be damaged or missing, please
contact your CLARKE dealer immediately.
Check the components against the following list.
1
1 x Tilt Handwheel
2
1 x Main Frame
3
1 x Axle Frame
4
1 x Support Stand
5
2 x Mixing Blades
6
1 x Lower Drum & Cradle Assembly
7
1 x Motor/Drive Assembly
8
1 x Upper Drum
9
1 x Drive Guard
10
2 x Wheels
11
1 x Angle Adjusting Plate
12
1 x Fixings Kit
13
1 x Rubber Seal
6
Parts & Service: 020 8988 7400 / E-mail: [email protected] or [email protected]
Page 7
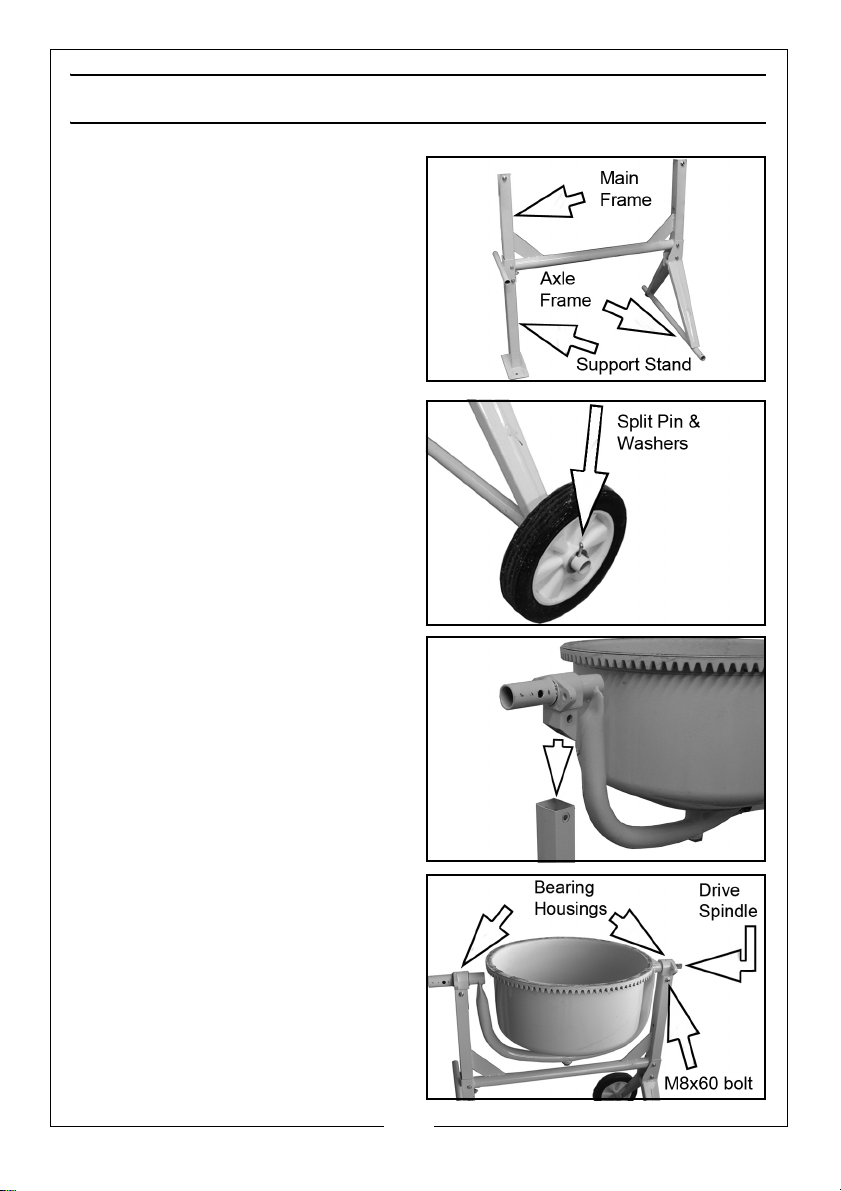
ASSEMBLY
1. Bolt the main frame to the axle
frame using M8 x 65mm bolts &
nuts supplied.
2. Bolt the support stand to the main
frame using M8 x 65mm bolts and
nuts.
3. Slide the flat washers onto the
axles, followed by a wheel and a
second flat washer.
4. Insert the split pins in to the holes in
each axle. Bend the ends of the
split pins backward to secure
them.
5. With the help of an assistant if
required, set the cradle and lower
drum assembly in position on the
main frame.
6. Secure the two bearing housings
to the main frame using M8 x 60
bolts & nuts.
Note that one bearing housing
includes the drive spindle and spur
gear to drive the mixer. This assembly
must be fitted to the end of the mixer
where the motor assembly will be
fitted this will be the end of the mixer
with the wheels.
7
Parts & Service: 020 8988 7400 / E-mail: [email protected] or [email protected]
Page 8
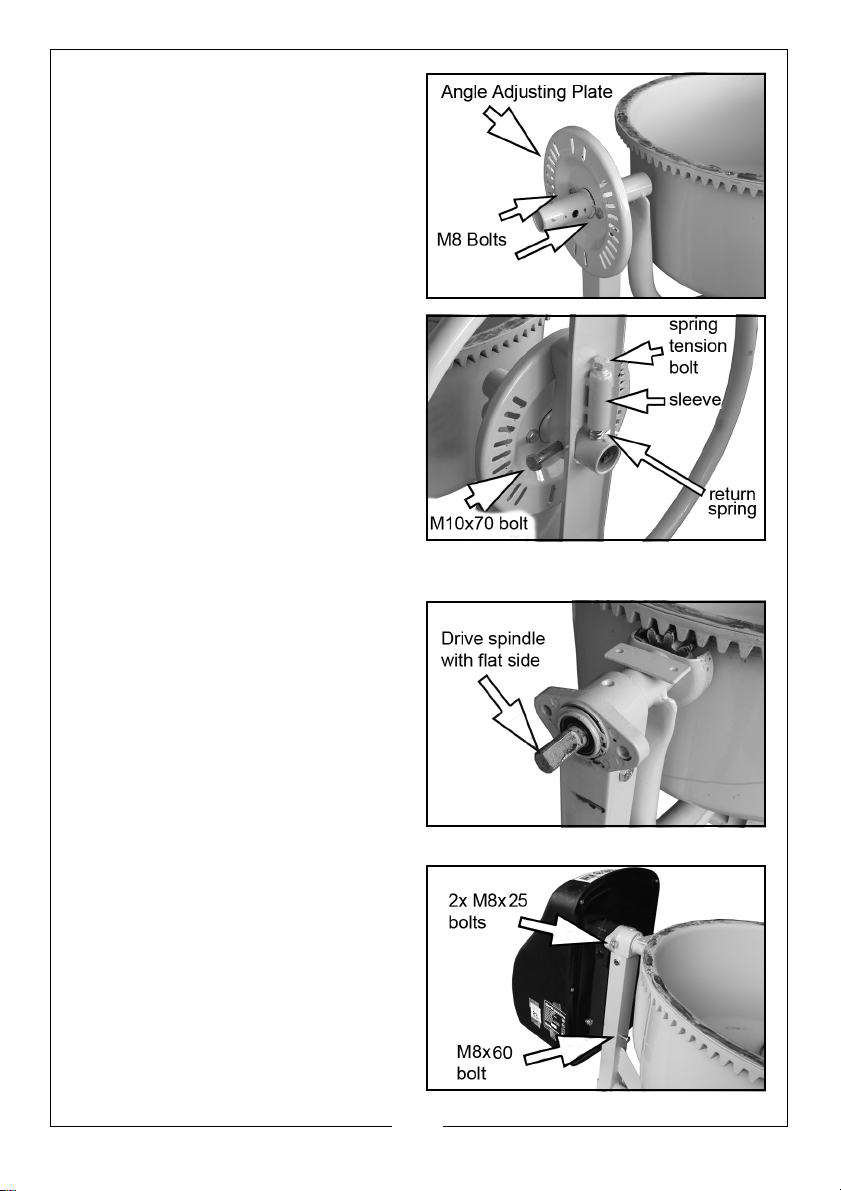
7. Fit the angle adjusting plate to the
bearing housing opposite the
drive spindle end. Slide it over the
cradle spindle and bolt it to the
bearing housing with two M8 x
25mm bolts.
8. Insert the return spring into the
sleeve on the tilt handwheel and
slide the handwheel onto the
cradle spindle. Insert the M10 x 70
securing bolt through the wheel
and through the cradle spindle
before securing with two M10 flat
nuts.
9. Adjust the tensioning bolt shown
to set the tension of the spring as
required when engaging the
wheel with the cradle.
10. Take the motor/drive assembly
and insert the drive spindle
through the drive pulley,
positioning the drive assembly
against the main frame.
NOTE: The drive spindle has a flat
side to correspond with the
flat provided in the drive
pulley. Rotate the lower
drum gently to turn the
spindle and align the flats.
11. Bolt the drive assembly to the
main frame using two M8 x 25
bolts through the bearing housing
and an M8 x 60mm bolt lower
down the frame.
8
Parts & Service: 020 8988 7400 / E-mail: [email protected] or [email protected]
Page 9
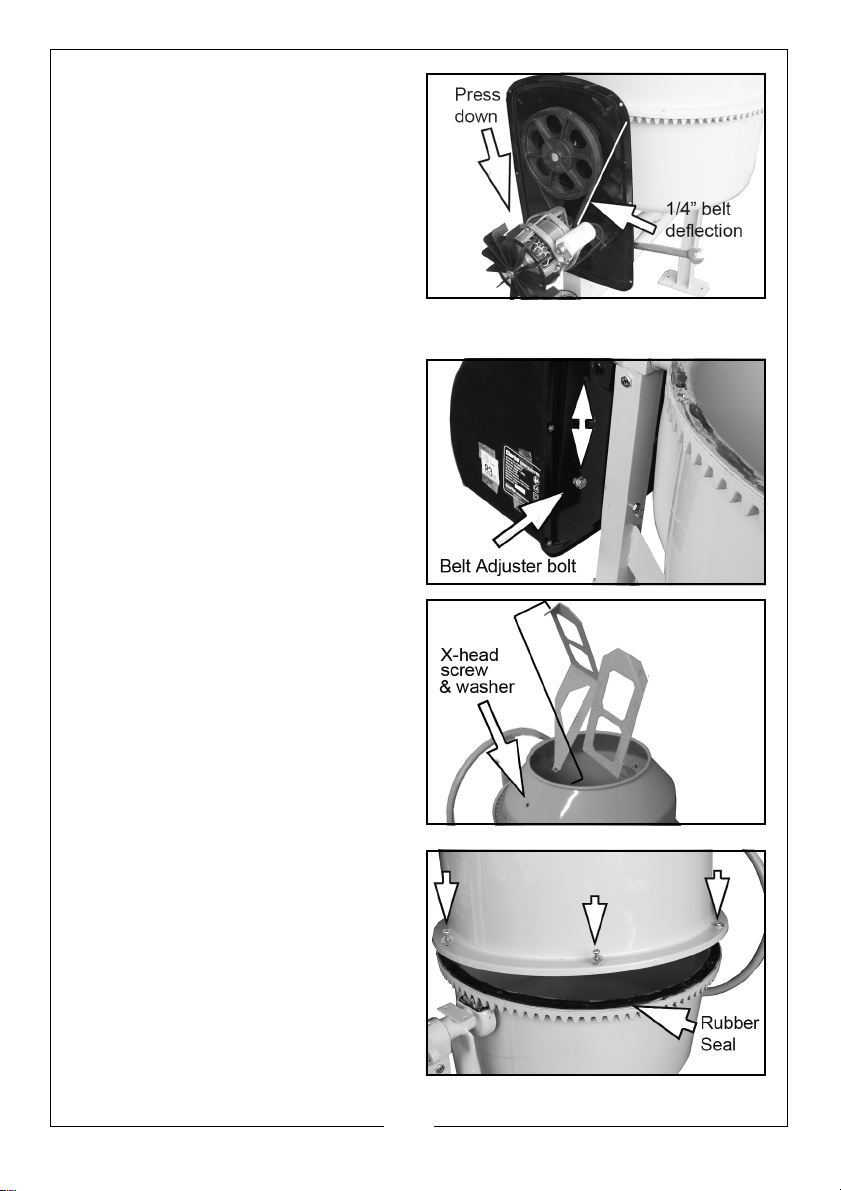
12. With the drive assembly in
position, remove the bolts, nuts
and washers securing the motor
cover to the backing plate and lift
away the cover.
13. Check that the drive belt can be
deflected no more than 1/4 inch
and that the belt runs true. If so,
re-fit the motor cover noting that
the small washers should be
behind the backing plate with the
nuts.
14. If the belt is slack, increase the
tension by loosening the belt
adjuster bolts shown and pushing
down on the motor to tighten the
belt, while re-tightening the belt
adjuster bolts. Re-fit the cover as
above.
15. Using the X-head screws, washers
and M8 nuts, loosely fit the blades
to the upper drum, noting that the
tapered end will be at the bottom
of the drum.
16. Carefully lay the rubber seal in
position on the lip of the lower
drum. Make sure the fixing holes in
the seal line up with those of the
drum.
17. Rest the upper mixing drum, (with
blades) on the rubber seal. Rotate
the upper drum gently without
dislodging the rubber seal until;
9
Parts & Service: 020 8988 7400 / E-mail: [email protected] or [email protected]
Page 10
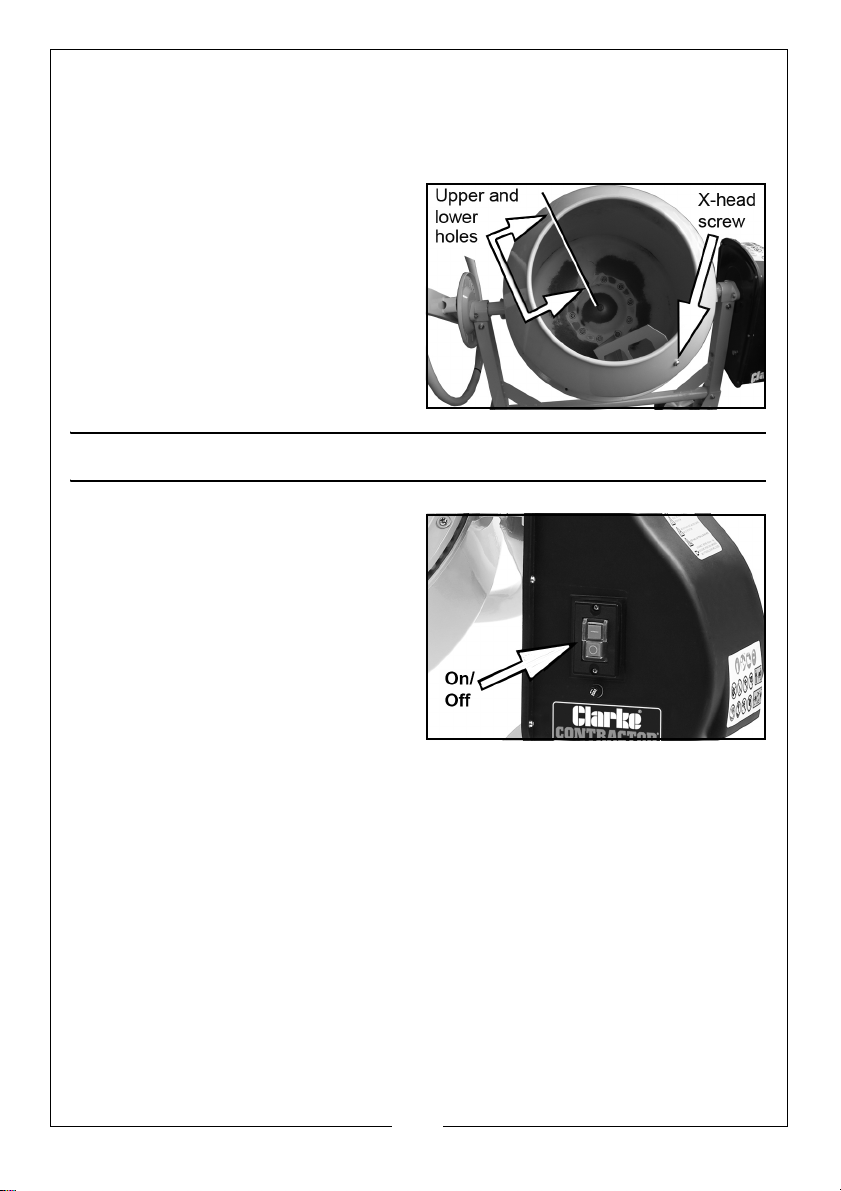
• all 6 holes in the upper drum line up with those in the rubber seal and
in the lower drum.
• the lower tips of the blades line up with their fixing holes in the
bottom of the lower drum.
18. When all fixing holes line up,
secure the upper drum to the
lower drum using the 6 cross-head
screws and washers.
19. Bolt the mixing blades into the
bottom of the mixing drum using
M8 x 20 bolts and nuts.
20. Tighten all fixings and check that
all components are secure.
OPERATION
1. Switch the mixer on by pressing
the green (I) switch on the motor.
Stop by pressing the red (O)
switch.
2. Introduce water first, to prevent
the mixer from clogging.
3. Add cement as required.
4. Add aggregate etc.
• Do not load the drum when the
machine is switched off. Always set the machine running before
filling.
• Do not stop and start the mixer while there is a heavy weight of
material inside the drum as the extra strain could be harmful to the
motor.
• Keep the drum rotating while emptying the mixture.
10
Parts & Service: 020 8988 7400 / E-mail: [email protected] or [email protected]
Page 11
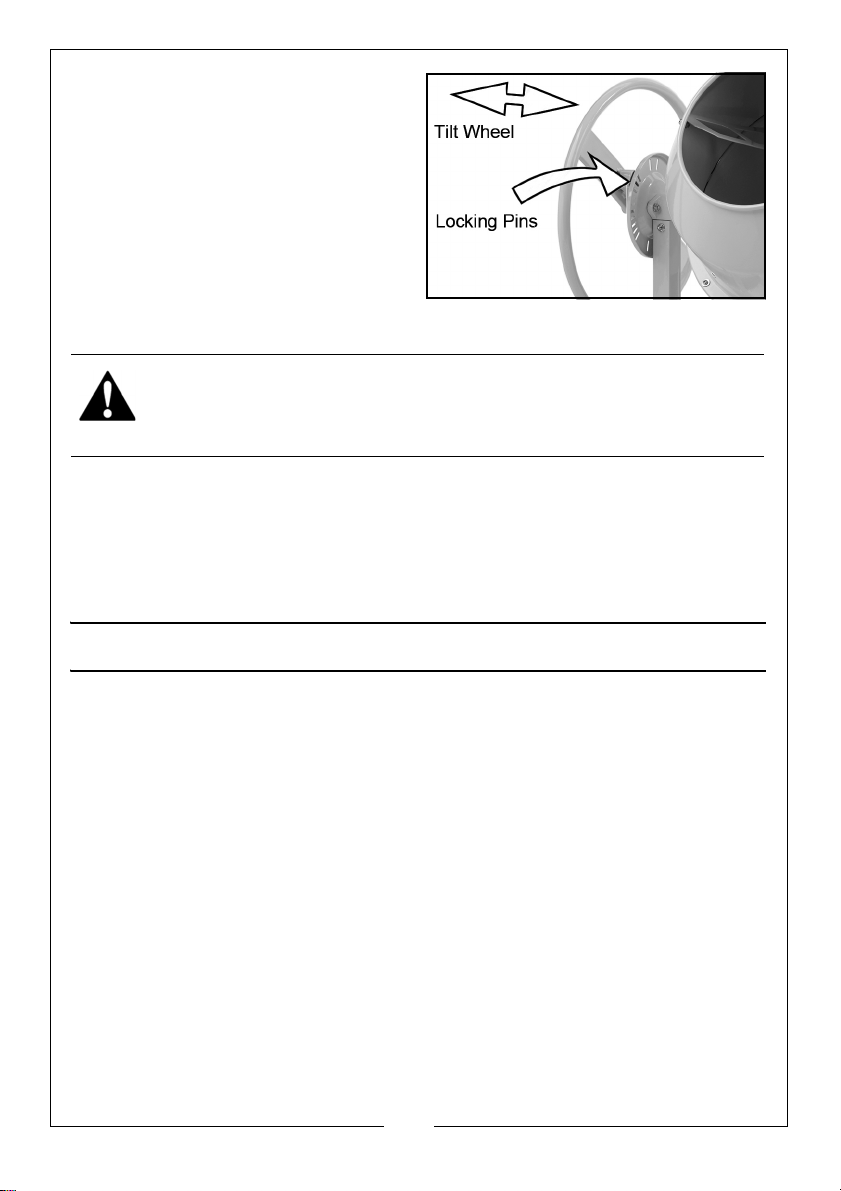
5. When emptying, grip the tilt angle
wheel firmly and tilt the wheel to
disengage the locking pins.
6. Use the wheel to tip the mixer
drum forward.
• Only discharge the mixer when
a suitable receptacle for the
cement mix is in position.
• Do not operate this machine
on a steep gradient. Always
stand the mixer on firm, level ground where it cannot tip over.
WARNING: REMEMBER THAT THE CENTRE OF GRAVITY OF THE LOADED
MIXER MAY PRESENT A HAZARD WHEN OPERATING ON UNEVEN GROUND.
• Always keep water well away from the motor and other electrical
components.
It is essential that the mixer is kept clean. Dried cement inside the drum will be
very difficult to remove. For the mixer to perform at its best it must be
thoroughly cleaned after every use.
CARE AND MAINTENANCE
BEFORE STARTING WORK
Inspect the power cable and ensure it is free from damage and is not in
danger of being damaged by vehicles, equipment or other operations taking
place on the work site.
AFTER USE
It is essential that the machine is hosed down thoroughly with clean water,
being sure to remove all traces of cement mix especially from around the
mixing blades, Take care to prevent water from entering the motor housing
and if necessary, wrap a polythene sheet or bag over it during cleaning.
Re-tighten the drive belt after the first 25 hours use. The belt should be able to
be deflected no more than 1/4 inch.
PERIODICALLY
After extensive use, inspect the paintwork and remove any rust that may be
apparent before touching up where necessary with a rust resistant paint.
11
Parts & Service: 020 8988 7400 / E-mail: [email protected] or [email protected]
Page 12
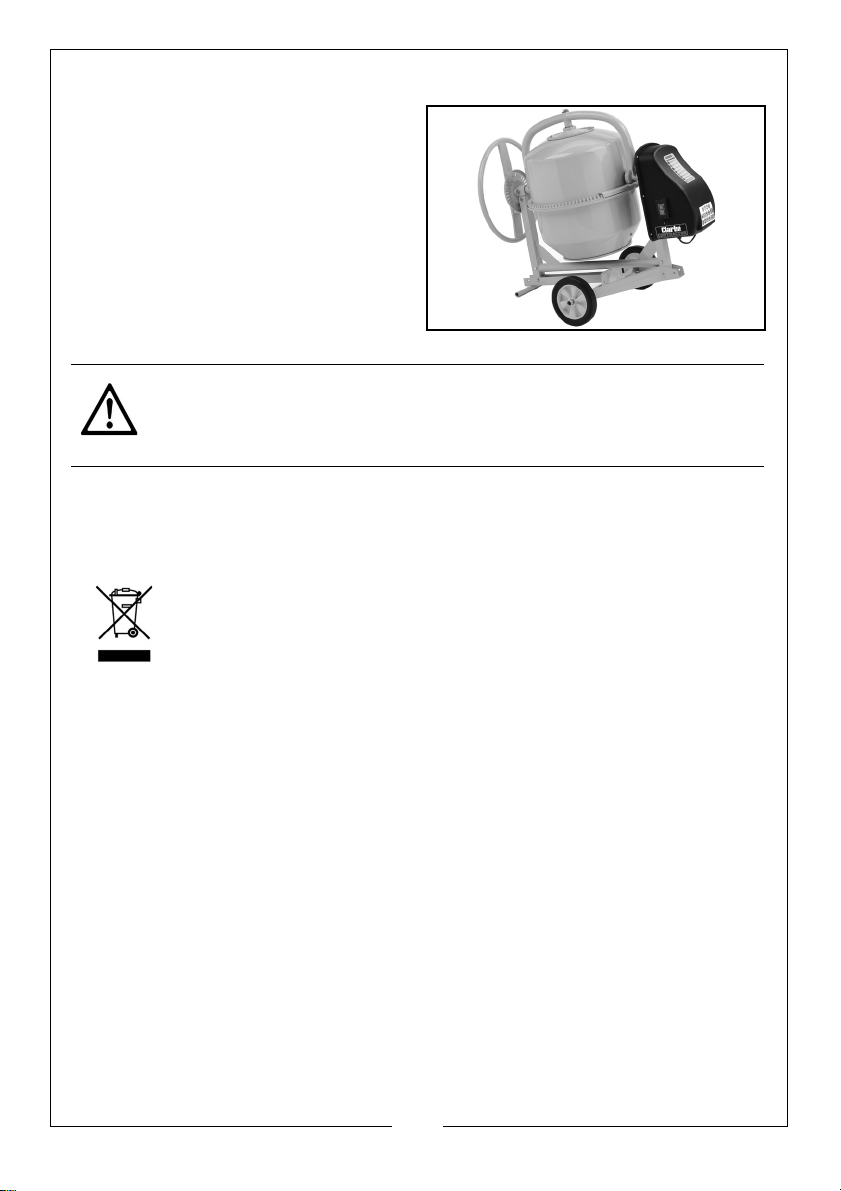
STORAGE
The mixer can be better stored with
the axle frame and support stand
folded away. Remove the axle frame
and support stand securing bolts and
lower the mixer to the floor with the
help of an assistant. Loosely re-fit the
bolts and nuts into their respective
holes. Leave the mixer with the drum
inverted to exclude water or debris.
Always store the mixer in a dry place
out of reach of children.
CAUTION: OWING TO THE WEIGHT AND BULK OF THE MIXER, TWO
PEOPLE WILL BE REQUIRED TO LOWER THE MIXER AND RE-FIT THE BOLTS.
Through the purchase of this product, the customer is taking on the obligation
to deal with the Waste Electrical/Electronic Equipment (WEEE) in accordance
with the WEEE regulations in relation to the treatment, recycling/recovery and
environmentally sound disposal of WEEE.
If disposing of this product or any broken parts, do not dispose of
with general waste. It must be disposed of according to the laws
governing Waste Electrical and Electronic equipment at a
recognized disposal facility.
12
Parts & Service: 020 8988 7400 / E-mail: [email protected] or [email protected]
Page 13
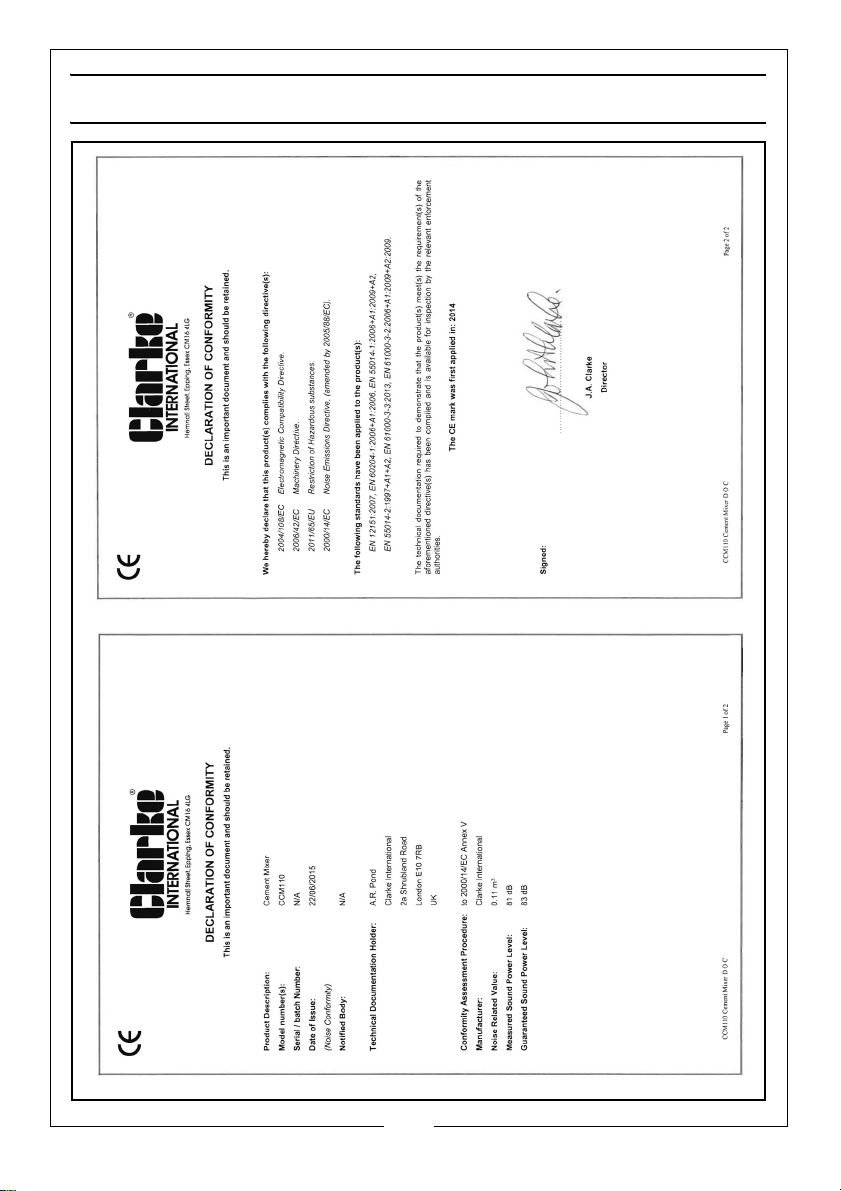
DECLARATION OF CONFORMITY
13
Parts & Service: 020 8988 7400 / E-mail: [email protected] or [email protected]
Page 14
Page 15
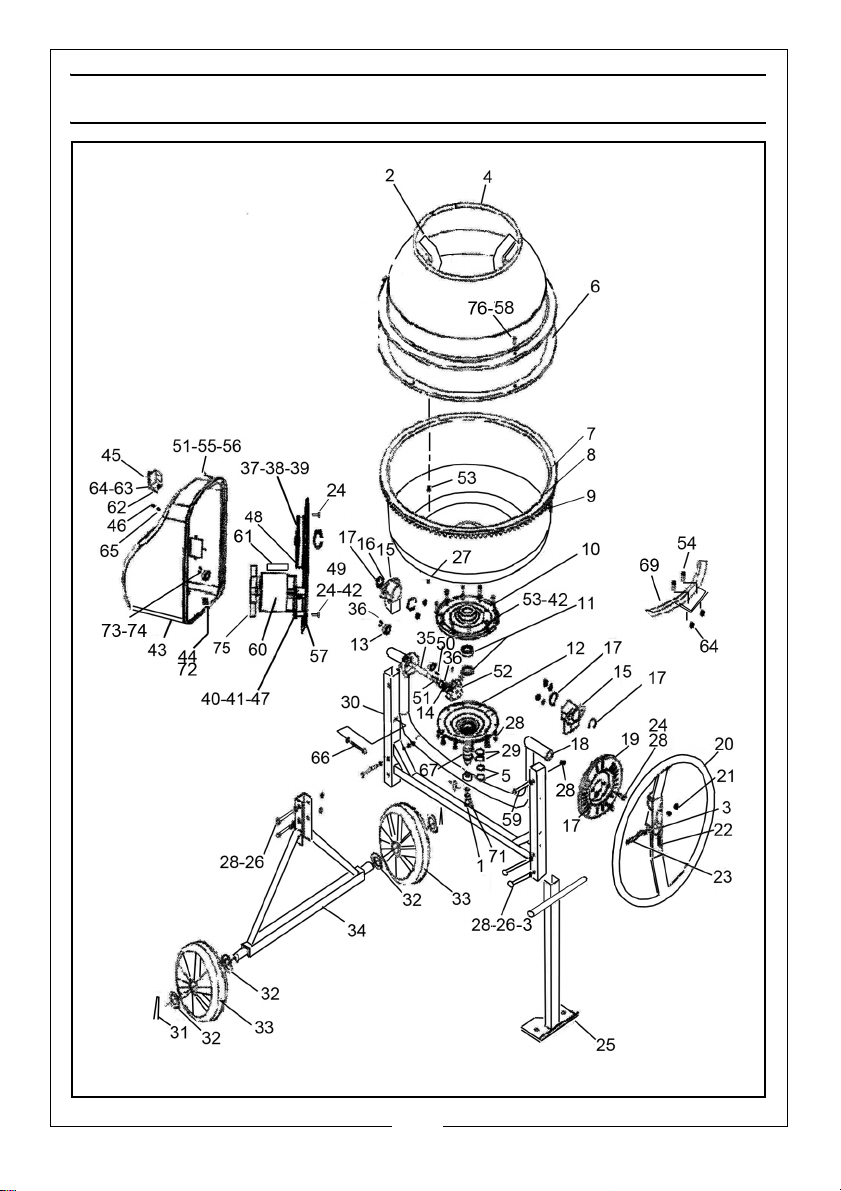
PARTS LIST
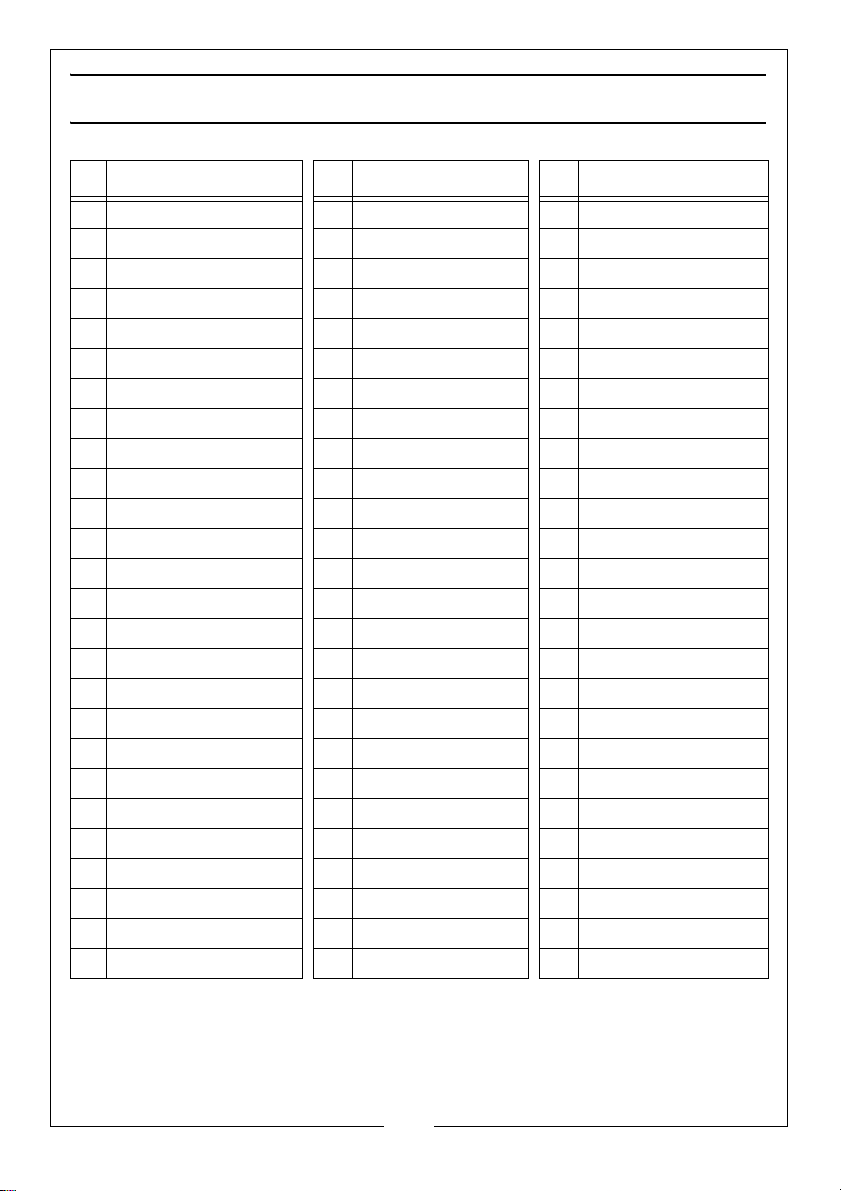
ID DESCRIPTION ID DESCRIPTION ID DESCRIPTION
1 Bolt M14 x 25 27 Locknut M8 53 Bolt M8 x 15
2 Mixer Blade 28 Nut M8 54 Screw M5 x 10
3 Washer 10 dia 29 Circlip 30 dia 55 Spring Washer M5
4 Upper Drum 30 Main Frame 56 Nut M5
5 Washer 24 dia 31 Split Pin 5 x 40 57 Motor Mount Plate
6 Rubber Seal 32 Washer 26 i/dia 58 Flat Washer
7 C/sunk screw M6x10 33 Wheel 59 Bolt M8 x 60
8 Lower Drum 34 Axle Frame 60 Motor
9 Gear Ring 35 Drive Shaft 61 Capacitor
10 Upper Bearing Cover 36 Circlip 15 dia 62 Screw M4 x 12
11 Bearing 6206 37 Driven Pulley 63 Washer 4 dia
12 Lower Bearing Cover 38 Nylon Washer 64 Nut M4
13 Bearing 6002 39 Circlip 30 dia 65 Spring Washer 5 dia
14 Washer 15 dia 40 Motor Mounting 66 Bolt M8 x 60
15 Bearing Housing 41 Flat Washer 67 Support Shaft
16 Washer 38 dia 42 Washer 8 dia 68 Screw M5 (for 69)
17 Circlip 38 dia 43 Motor Cover 69 Drive Guard Plate
18 Cradle 44 Power Cable 70 Washer 14 dia
19 Angle Adj Plate 45 On/Off Switch 71 Lock Washer 14 dia
20 Angle Adj Wheel 46 ST Screw 72 Cable Gland
21 Flat Nut M10 47 Bolt M8 x 16 73 Fuse
22 Coil Spring 48 Drive Belt 74 Fuse Holder
23 Bolt M10 x 70 49 Circlip 25mm 75 Fan
24 Bolt M8 x 25 50 Key C5 x 20 76 X-head Screw
25 Support Stand 51 Flat Washer M5
26 Bolt M8 x 65 52 Spur Gear
15
Parts & Service: 020 8988 7400 / E-mail: [email protected] or [email protected]
Page 16

 Loading...