

Page 1
CCS185 Circular Saw.fm Page 1 Tuesday, December 13, 2011 5:38 PM
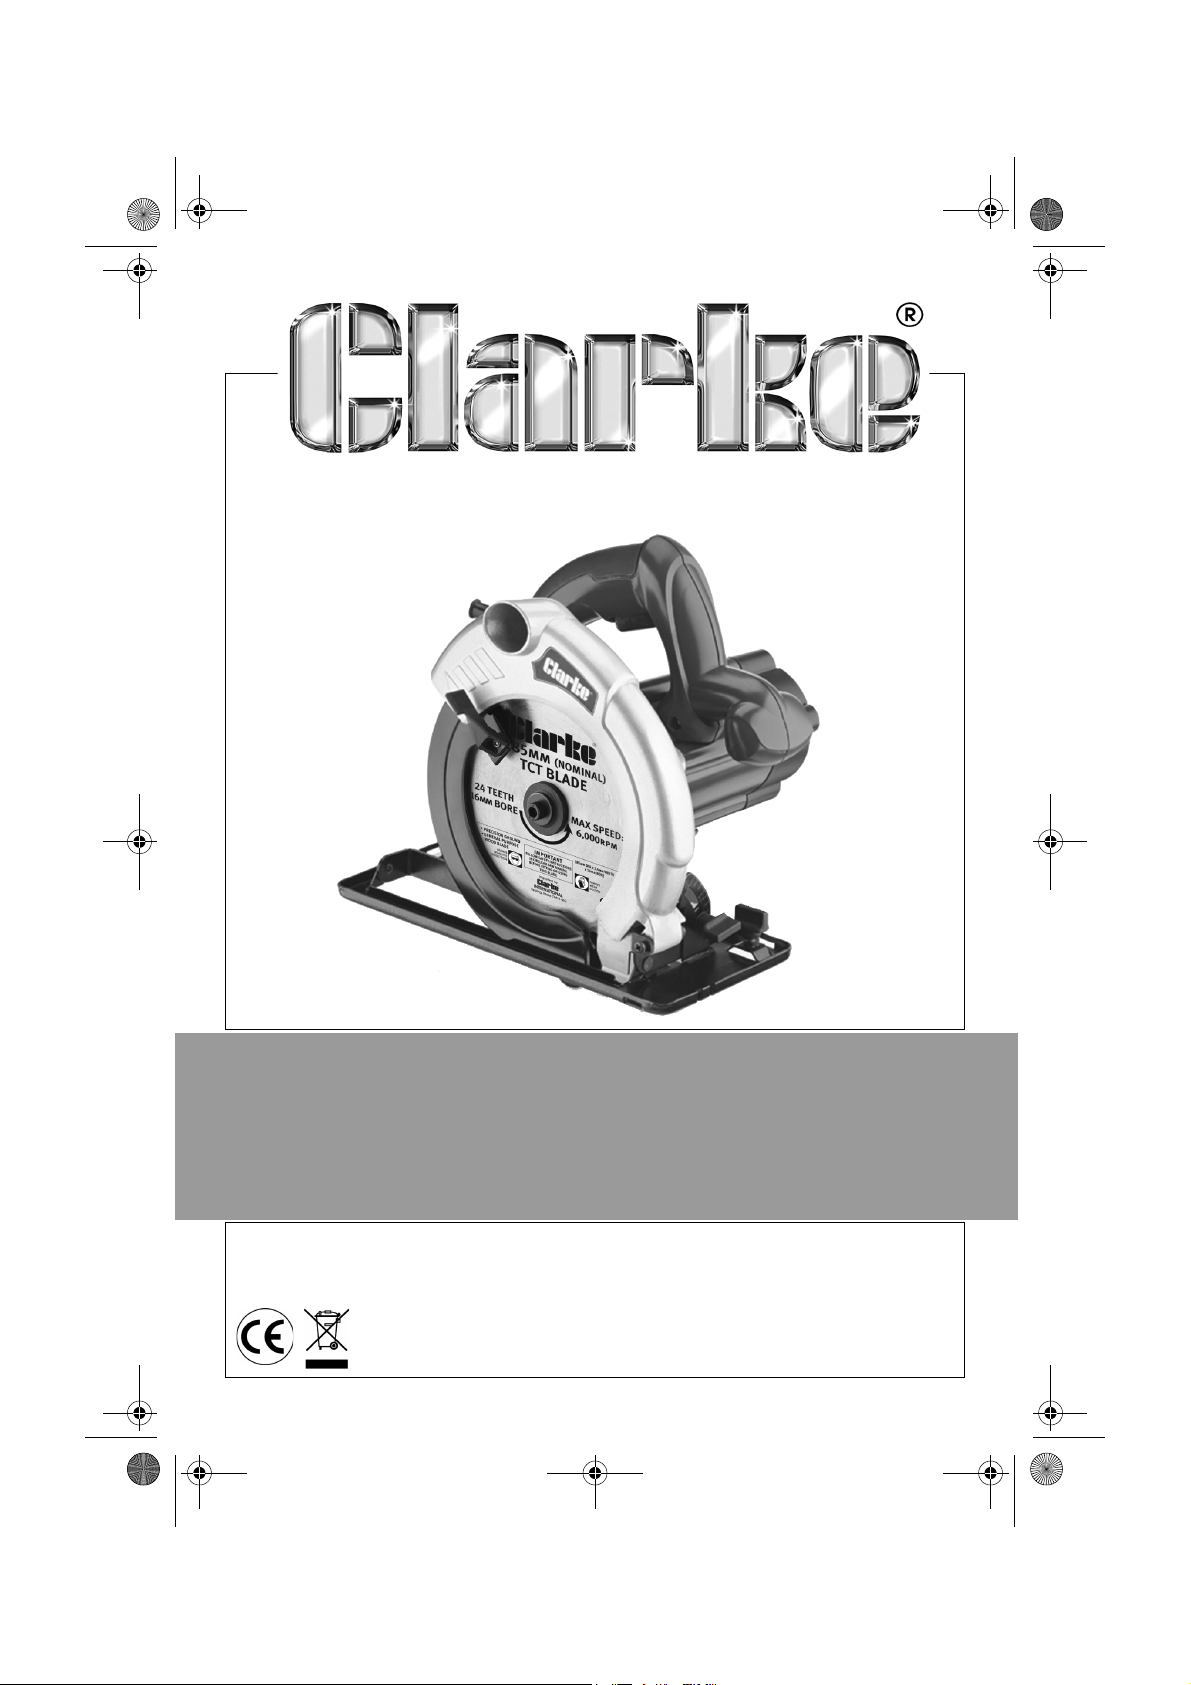
185MM CIRCULAR SAW
MODEL NO: CCS185
PART NO: 6462300
OPERATION & MAINTENANCE
INSTRUCTIONS
LS1211
Page 2
CCS185 Circular Saw.fm Page 2 Tuesday, December 13, 2011 5:38 PM
INTRODUCTION
Thank you for purchasing this CLARKE 185mm Circular Saw.
Before attempting to use this product, please read this manual thoroughly and
follow the instructions carefully. In doing so you will ensure the safety of yourself
and that of others around you, and you can look forward to your purchase
giving you long and satisfactory service.
GUARANTEE
This product is guaranteed against faulty manufacture for a period of 12
months from the date of purchase. Please keep your receipt which will be
required as proof of purchase.
This guarantee is invalid if the product is found to have been abused or
tampered with in any way, or not used for the purpose for which it was
intended.
Faulty goods should be returned to their place of purchase, no product can
be returned to us without prior permission.
This guarantee does not effect your statutory rights.
SPECIFICATIONS
Model Number CCS185
Rated Voltage 230V~50Hz
Power Input 1200 W
No Load Speed 4800 RPM
Maximum Depth of Cut
Blade Dimensions 185 mm Ø x 16 mm Bore
Sound Pressure Level LpA 96.3 dB(A)
Sound Power Level LWA 107.3 dB(A)
Uncertainty Factor (K) 3 dB(A)
Weight 4 kg
Vibration
Dimensions (L x W x H) 285 mm x 237 mm x 246 mm
65 mm @ 90
2.46 m/s
o
- 44 mm @ 45
2
Uncertainty Factor 1.5
2
Parts & Service: 020 8988 7400 / E-mail: [email protected] or [email protected]
o
Page 3
CCS185 Circular Saw.fm Page 3 Tuesday, December 13, 2011 5:38 PM
POWER TOOL SAFETY WARNINGS
WORK AREA
1. Keep the work area clean and well lit. Cluttered and dark areas invite accidents.
2. Do not operate power tools in explosive atmospheres, such as in the presence of
flammable liquids, gases or dust. Power tools create sparks which may ignite the
dust or fumes.
3. Keep children and bystanders away while operating a power tool. Distractions can
cause you to lose control.
ELECTRICAL SAFETY
1. Power tool plugs must match the outlet. Never modify the plug in any way. Do not
use adaptor plugs with earthed (grounded) power tools. Unmodified plugs and
matching outlets will reduce the risk of electric shock.
2. Do not expose power tools to rain or wet conditions. Water entering a power tool will
increase the risk of electric shock.
3. Do not abuse the cable. Never use it for carrying, pulling or unplugging the power
tool. Keep the cable away from heat, oil, sharp edges or moving parts. Damaged or
entangled cables increase the risk of electric shock.
4. When operating a power tool outdoors, use an extension cable suitable for outdoor
use. Use of a cable suitable for outdoor use reduces the risk of electric shock
5. If operating the power tool in a damp location is unavoidable, use a residual current
device (RCD) protected supply.
PERSONAL SAFETY
1. Stay alert, watch what you are doing and use common sense when operating a
power tool. Do not use a power tool while you are tired or under the influence of
drugs, alcohol or medication. A moment of inattention while operating power tools
may result in personal injury.
2. Use safety equipment. Always wear eye protection. Safety equipment such as dust
mask, non-skid safety shoes, hard hat, or hearing protection used for appropriate
conditions will reduce personal injuries.
3. Avoid accidental starting. Ensure the switch is in the off position before plugging in.
Carrying power tools with your finger on the switch or plugging in power tools that
have the switch on invites accidents.
4. Remove any wrench before turning the power tool on. A wrench left attached to a
rotating part may result in personal injury.
5. Do not overreach. Keep proper footing and balance at all times. This enables better
control of the power tool in unexpected situations.
6. Dress properly. Do not wear loose clothing or jewellery. Keep your hair, clothing and
gloves away from moving parts. Loose clothes, jewellery or long hair can be caught
in moving parts.
3
Parts & Service: 020 8988 7400 / E-mail: [email protected] or [email protected]
Page 4
CCS185 Circular Saw.fm Page 4 Tuesday, December 13, 2011 5:38 PM
POWER TOOL USE AND CARE
1. Do not force the power tool. Use the correct accessories for your application. The
correct power tool will do the job better and safer at the rate which it was designed
for.
2. Do not use the power tool if the switch does not turn it on and off. Any power tool that
cannot be controlled with the switch is dangerous and must be repaired.
3. Disconnect the plug from the power source before changing accessories, or storing
power tools. Such preventive safety measures reduce the risk of starting the power
tool accidentally.
4. Store idle tools out of the reach of children and do not allow persons unfamiliar with
the power tool or these instructions to operate it. Power tools are dangerous in the
hands of untrained users.
5. Maintain power tools. Check for misalignment or binding of moving parts, breakage
of parts and any other condition that may affect the power tool’s operation. If
damaged, have the power tool repaired before use. Many accidents are caused
by poorly maintained power tools.
6. Use the power tool and accessories in accordance with these instructions and in the
manner intended, taking into account the working conditions and the work to be
performed. Use of the power tool for operations different from intended could result
in a hazardous situation.
7. The performance of this tool may vary, depending upon variations in line voltage.
Extension cable usage may also affect performance.
SERVICE
1. Have your power tool serviced by qualified service personnel using only identical
replacement parts.
This will ensure that the safety of the power tool is maintained.
SAFETY INSTRUCTIONS FOR ALL SAWS
a. Keep hands away from cutting area and the blade. Keep your second hand on
the auxiliary handle, or motor housing. If both hands are holding the saw, they
cannot be cut by the blade.
b. Do not reach underneath the workpiece. The guard cannot protect you from the
blade below the workpiece.
c. Adjust the cutting depth to the thickness of the workpiece. Less than a full tooth
of the blade teeth should be visible below the workpiece.
d. Never hold the piece being cut in your hands or across your leg. Secure the
workpiece to a stable platform. It is important to support the work properly to
minimise body exposure, blade binding, or loss of control.
e. Hold the power tool by insulated gripping surfaces when performing an
operation. Contact with a”live” wire will also make exposed metal parts of the
power tool ”live” and shock the operator.
4
Parts & Service: 020 8988 7400 / E-mail: [email protected] or [email protected]
Page 5
CCS185 Circular Saw.fm Page 5 Tuesday, December 13, 2011 5:38 PM
f. Always use blades with the correct size and shape of arbor holes. Blades that do
not match the mounting hardware of the saw will run eccentrically, causing loss
of control.
g. Never use damaged or incorrect blade washers or bolt. The blade washers and
bolt were specially designed for your saw, for optimum performance and safety
of operation.
PREVENTION OF KICKBACK
Kickback is a sudden reaction to a pinched, bound or misaligned saw blade, causing
an uncontrolled saw to lift up and out of the workpiece toward the operator.
When the blade is pinched or bound tightly by the kerf closing down, the blade stalls
and the motor reaction drives the unit rapidly back toward the operator.
If the blade becomes twisted or misaligned in the cut, the teeth at the back edge of the
blade can dig into the top surface of the wood causing the blade to climb out of the
kerf and jump back toward the operator. Kickback is the result of saw misuse and/or
incorrect operating procedures or conditions and can be avoided by taking proper
precautions as given below.
a. Maintain a firm grip with both hands on the saw and position your arms to resist
kickback forces. Position your body to either side of the blade, but not in line with
the blade.
b. When the blade is binding, or when interrupting a cut for any reason, release the
trigger and hold the saw motionless in the material until the blade comes to a
complete stop. Never attempt to remove the saw from the work or pull the saw
backward while the blade is in motion or kickback may occur. Investigate and
take corrective actions to eliminate the cause of blade binding.
c. When restarting a saw in the workpiece, centre the saw blade in the kerf and
check that saw teeth are not engaged with the material. If the blade is binding,
it may walk up or kickback from the workpiece as the saw is restarted.
d. Support large panels to minimise the risk of blade pinching and kickback. Large
panels tend to sag under their own weight. Supports must be placed under the
panel on both sides, near the line of cut and near the edge of the panel.
e. Blade depth and bevel adjusting locking screws must be tight and secure before
making a cut. If blade adjustment shifts while cutting, it may cause binding and
kickback.
f. Use extra caution when making a “plunge cut” into existing walls or other blind
areas. The protruding blade may cut objects that can cause kickback.
5
Parts & Service: 020 8988 7400 / E-mail: [email protected] or [email protected]
Page 6
CCS185 Circular Saw.fm Page 6 Tuesday, December 13, 2011 5:38 PM
CIRCULAR SAW BLADE SAFETY WARNINGS
a. The maximum speed marked on the tool shall not exceed the maximum speed
marked on the blade.
b. Cracked circular saw blades shall be scrapped (repairing is not permitted).
Composite (tipped) circular saw blades, where the tip dimension is reduced to
less than 1 mm, shall be taken out of service.
c. Fastening screws and nuts shall be tightened using the tools supplied.
d. Clamping surfaces shall be cleaned to remove dirt, grease, oil and water.
e. Do not use loose rings or bushes to "make up" bore sizes on circular saw blades.
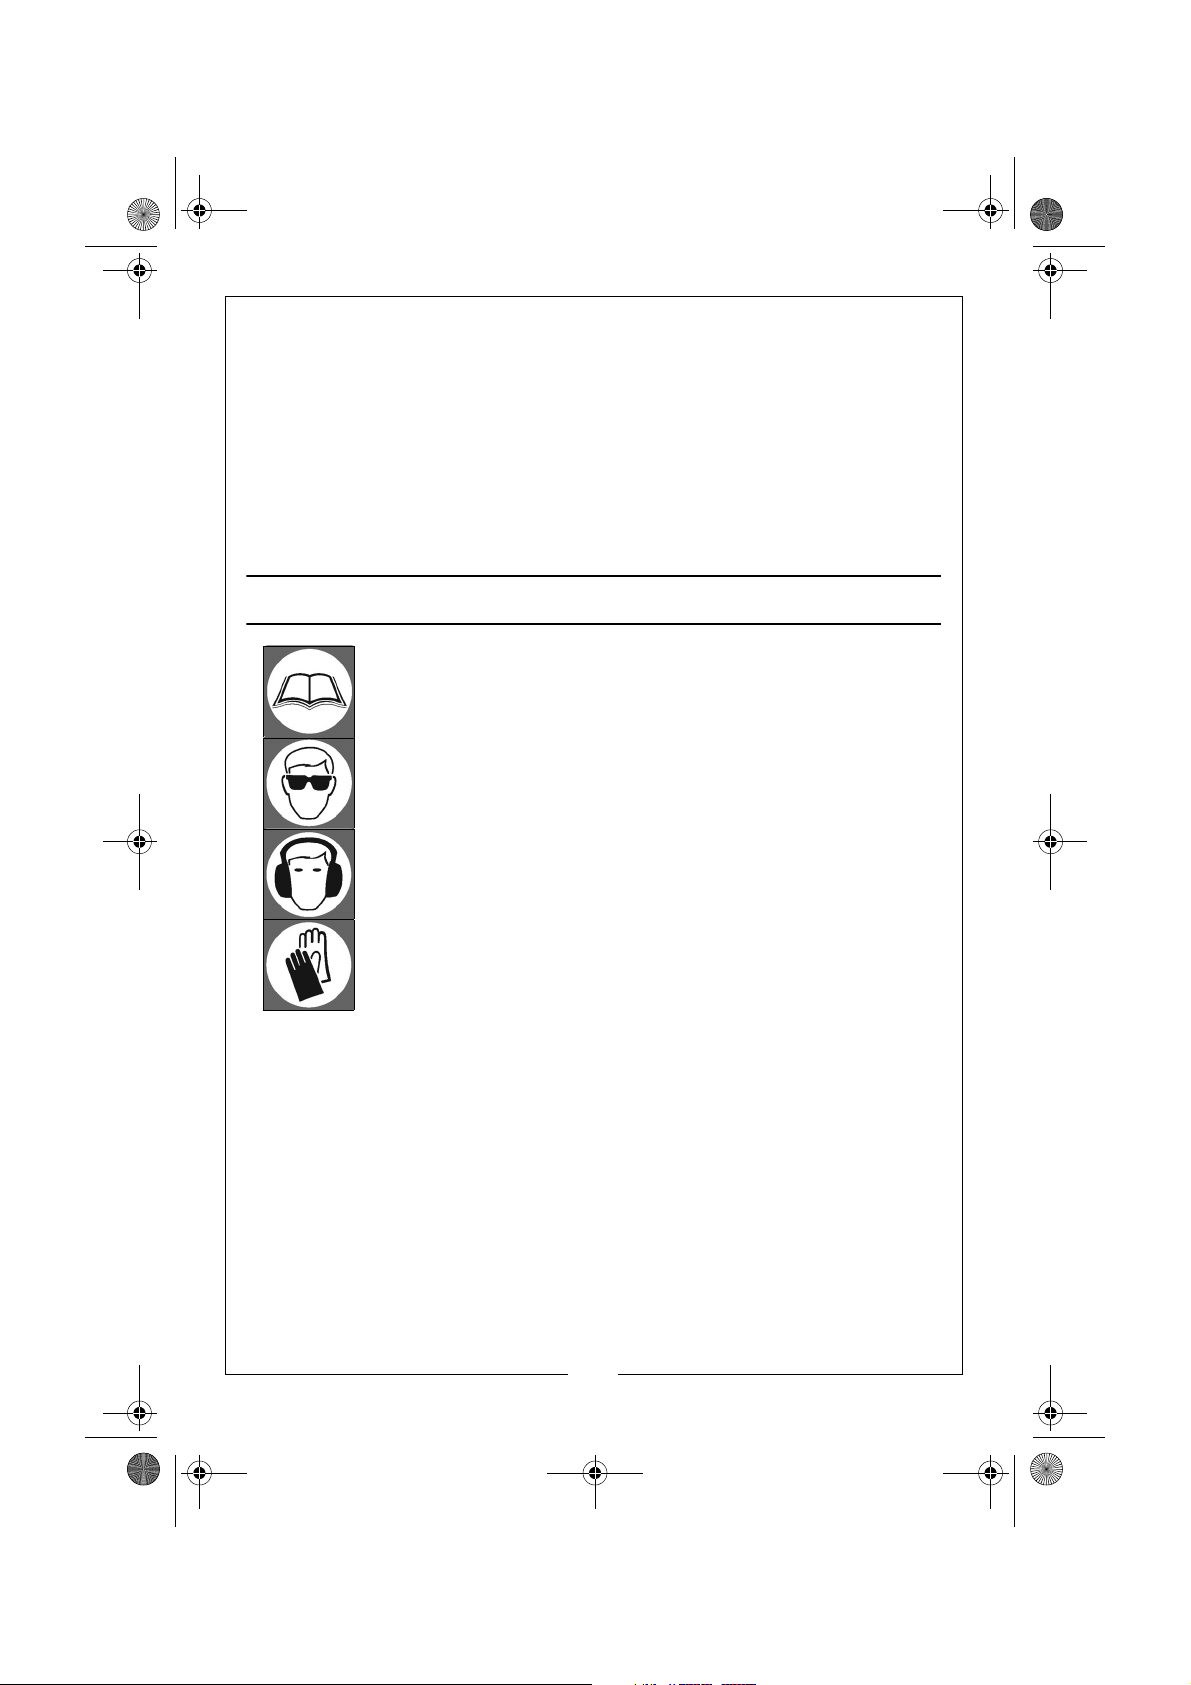
EXPLANATION OF SYMBOLS & PICTOGRAMS
Read Instruction Manual Before Use
Wear Eye Protection
Wear Ear Defenders
Wear Gloves
6
Parts & Service: 020 8988 7400 / E-mail: [email protected] or [email protected]
Page 7
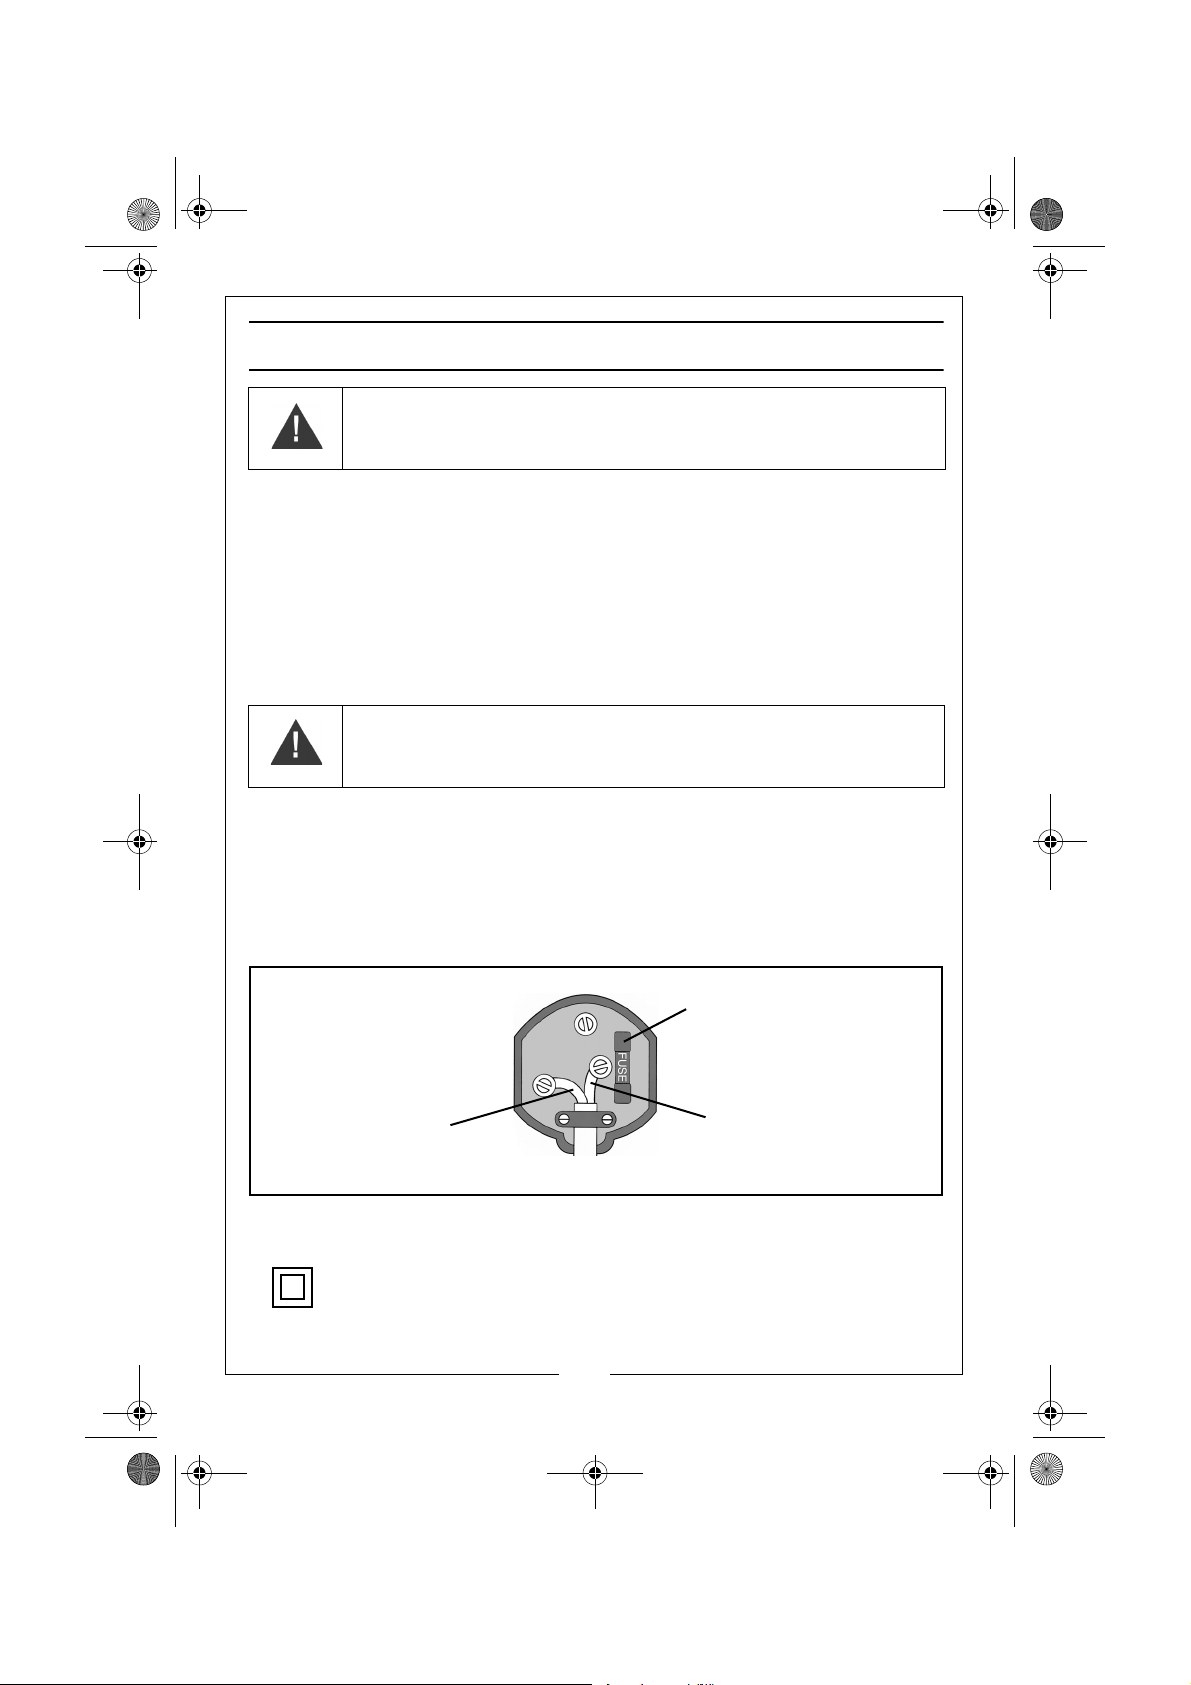
Plug must be BS1363/A approved.
Always fit a 13 Amp fuse.
Ensure that the outer sheath of the cable is firmly held by the clamp
Neutral
(Blue)
Live
(Brown)
CCS185 Circular Saw.fm Page 7 Tuesday, December 13, 2011 5:38 PM
ELECTRICAL CONNECTIONS
WARNING: READ THESE ELECTRICAL SAFETY INSTRUCTIONS
THOROUGHLY BEFORE CONNECTING THE PRODUCT TO THE MAINS
SUPPLY.
Before switching the product on, make sure that the voltage of your electricity supply is
the same as that indicated on the rating plate. This product is designed to operate on
230VAC 50Hz. Connecting it to any other power source may cause damage.
This product may be fitted with a non-rewireable plug. If it is necessary to change the
fuse in the plug, the fuse cover must be refitted. If the fuse cover becomes lost or
damaged, the plug must not be used until a suitable replacement is obtained.
If the plug has to be changed because it is not suitable for your socket, or due to
damage, it should be cut off and a replacement fitted, following the wiring instructions
shown below. The old plug must be disposed of safely, as insertion into a mains socket
could cause an electrical hazard.
WARNING: THE WIRES IN THE POWER CABLE OF THIS PRODUCT ARE
COLOURED IN ACCORDANCE WITH THE FOLLOWING CODE:
BLUE = NEUTRAL BROWN = LIVE
If the colours of the wires in the power cable of this product do not correspond with the
markings on the terminals of your plug, proceed as follows.
• The wire which is coloured Blue must be connected to the terminal which is
marked N or coloured Black.
• The wire which is coloured Brown must be connected to the terminal which is
marked L or coloured Red.
We strongly recommend that this machine is connected to the mains supply
via a Residual Current Device (RCD)
This symbol indicates that this is a Class II product, and does not require
an earth connection.
7
Parts & Service: 020 8988 7400 / E-mail: [email protected] or [email protected]
Page 8
CCS185 Circular Saw.fm Page 8 Tuesday, December 13, 2011 5:38 PM
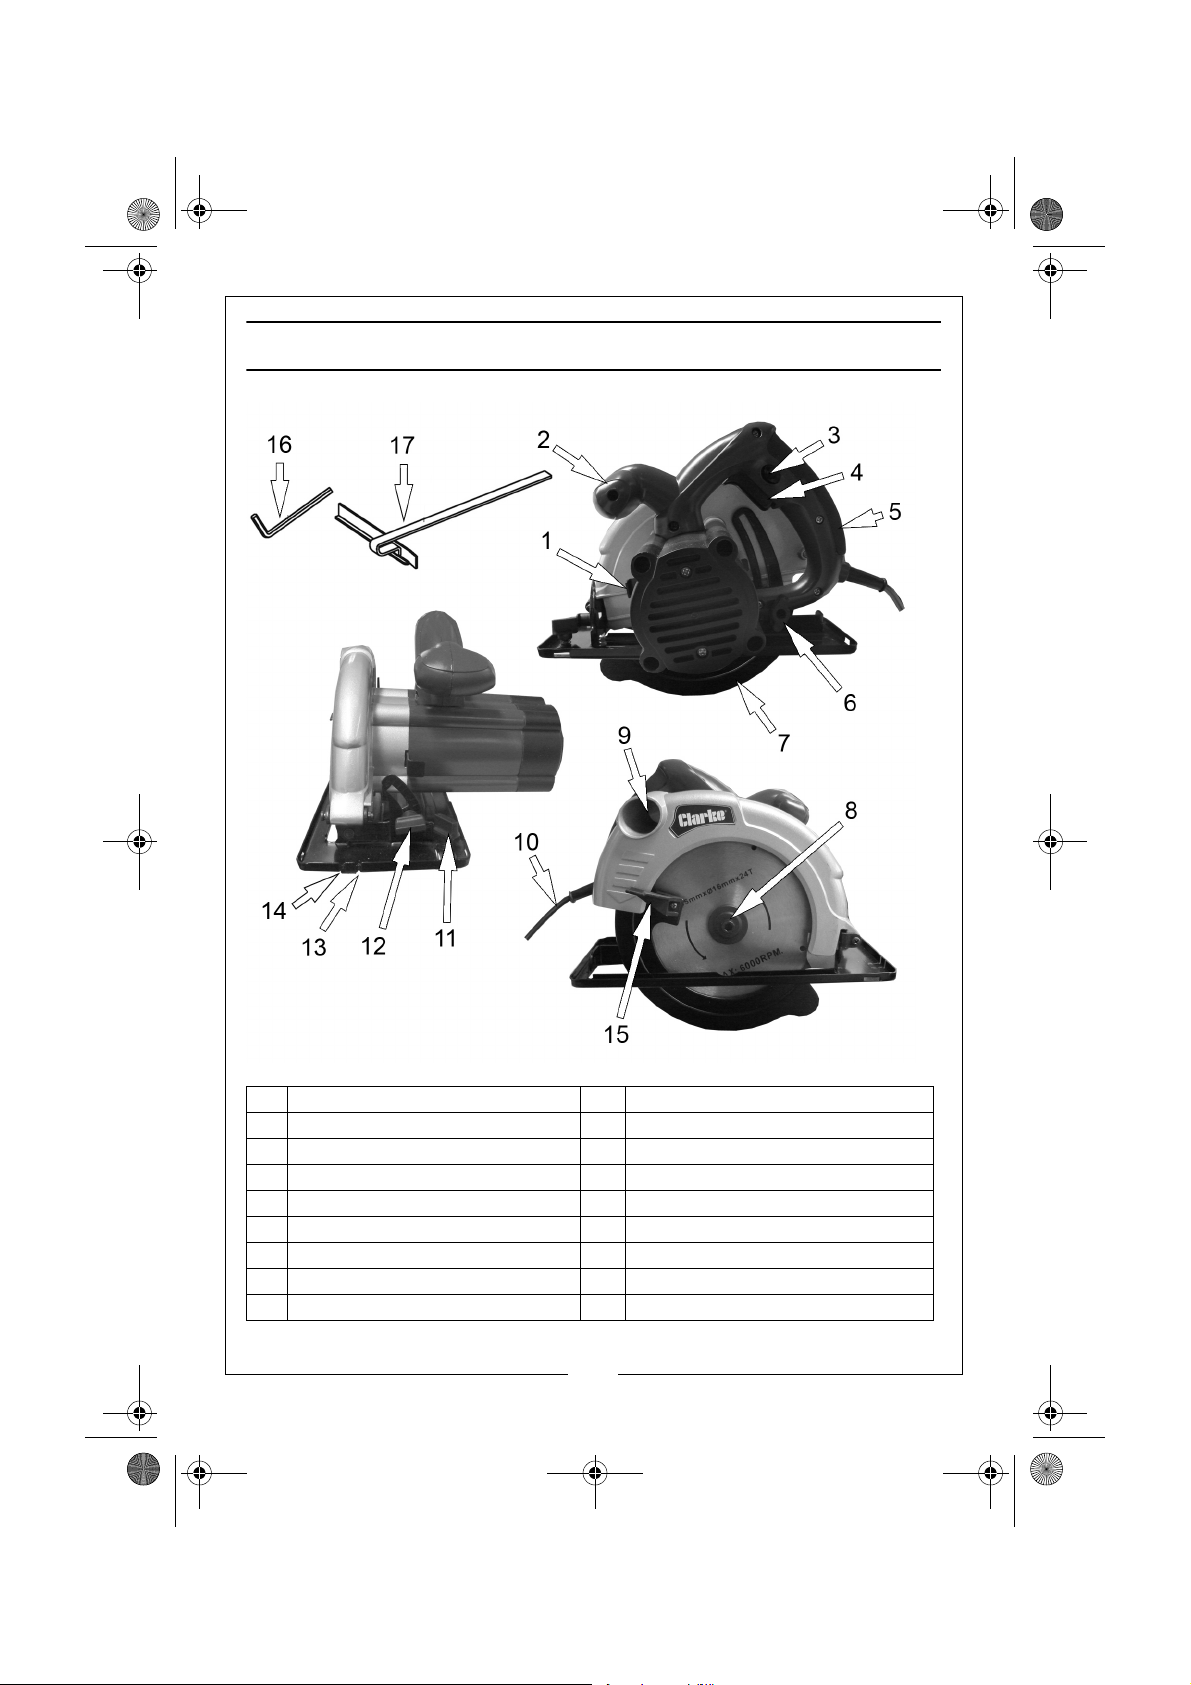
PART IDENTIFICATION.
1 Blade Lock 10 Mains Lead
2 Auxillary Handle 11 Parallel Guide Locking Screw
3 Safety Lock Button 12 Bevel Adjustment Knob
4 On/Off Trigger 13 Mark For Bevel Cut
5 Handle 14 Mark For Straight Cut
6 Depth Adjustment Knob 15 Lower Guard Retracting Lever
7 Lower Guard 16 Hexagon Key
8 Blade Clamping Screw 17 Parrallel Guide
9 Dust Extraction Outlet
8
Parts & Service: 020 8988 7400 / E-mail: [email protected] or [email protected]
Page 9
CCS185 Circular Saw.fm Page 9 Tuesday, December 13, 2011 5:38 PM
CARTON CONTENTS
The following items should be supplied in the carton. If any parts are missing or
damaged, please contact the Clarke dealer where you purchased the tool.
• 1 x 1200 Watt Circular Saw.
• 1 x 185 mm Ø x 16 mm Bore x 24 Tooth TCT blade.(assembled on tool).
• 1 x Parallel Fence.
• 1 x 6 mm Hexagon Key.
ADJUSTMENTS
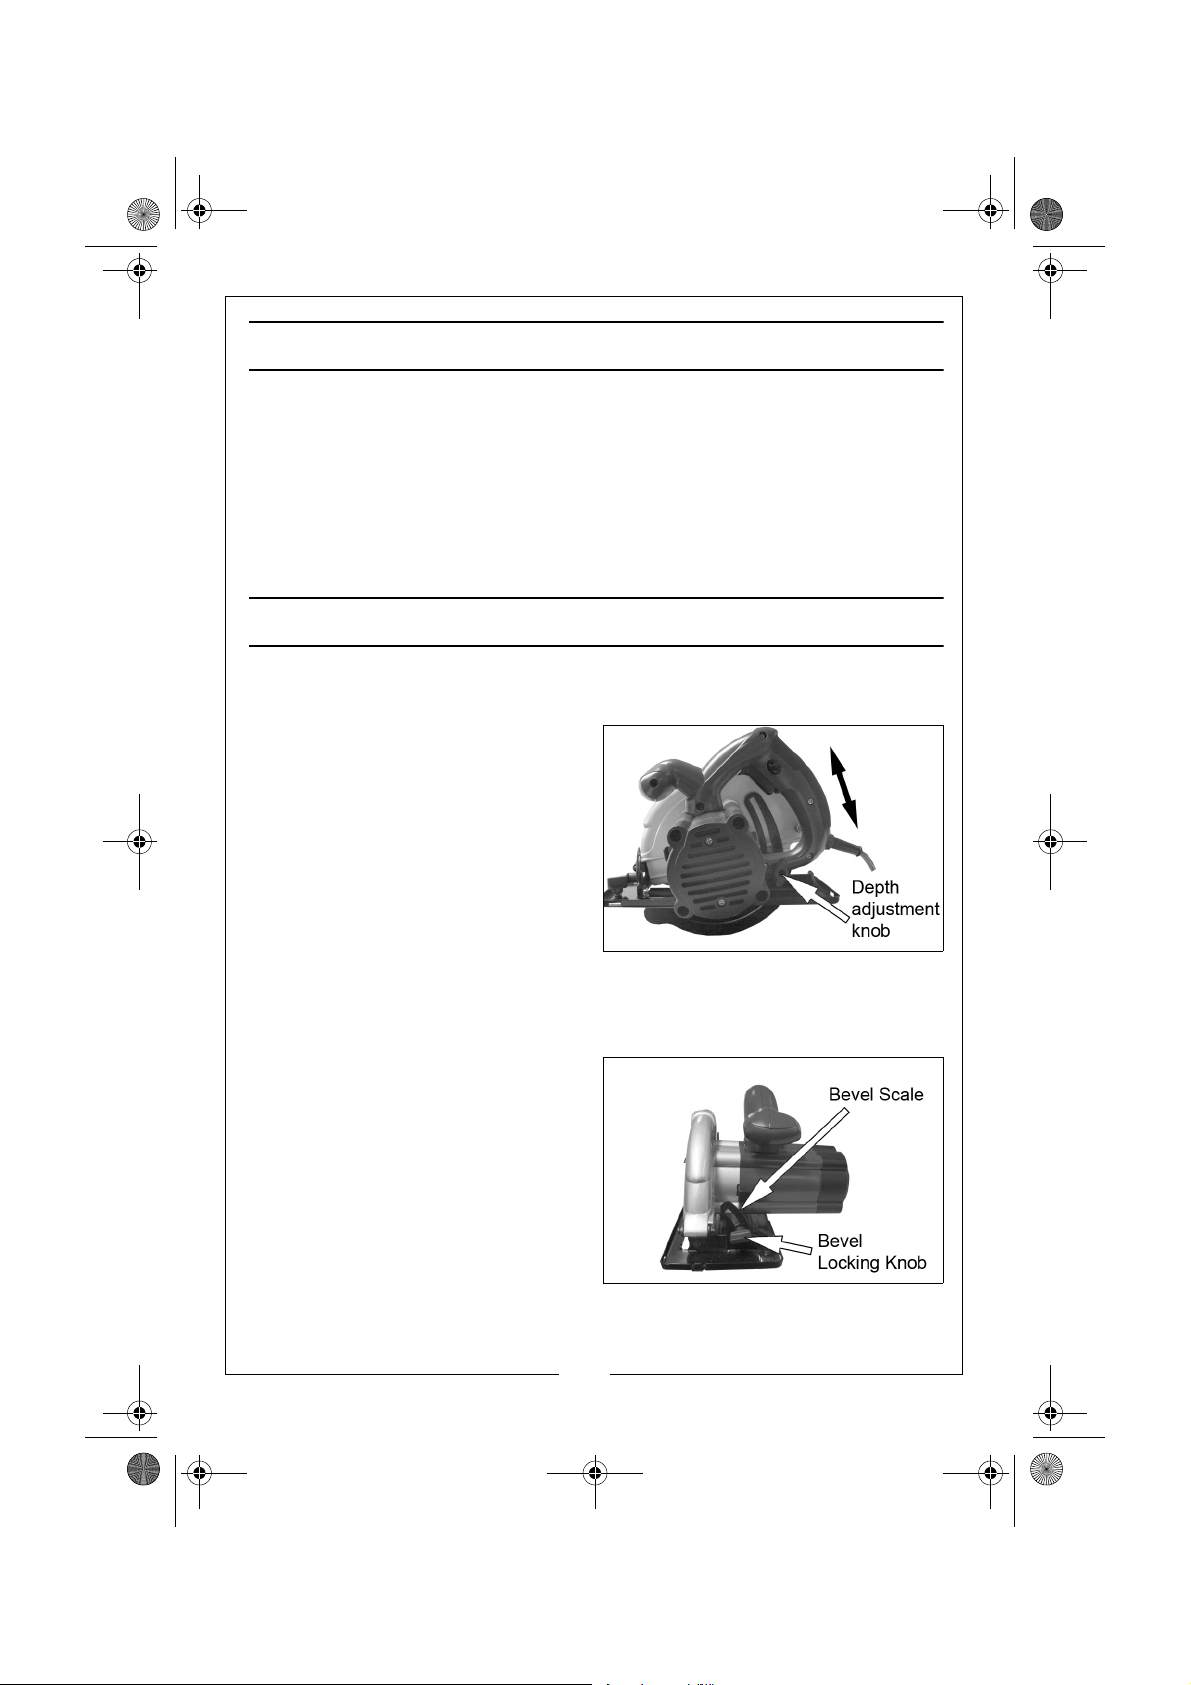
DEPTH OF CUT ADJUSTMENT
1. Loosen the depth adjustment
knob.
2. Adjust the base plate until the
required depth of blade is
protruding through the base
plate.
3. Tighten the depth adjustment
knob.
NOTE: For optimum results, a full
tooth of the blade teeth
should just be visible below the workpiece.
BEVEL ADJUSTMENT
1. Loosen the bevel locking knob.
2. Adjust the base plate to the
required angle (max
• Use the bevel scale as a guide
only, for accurate angles use a
protractor.
3. Tighten the bevel adjustment
knob to secure.
Parts & Service: 020 8988 7400 / E-mail: [email protected] or [email protected]
45o)
9
Page 10
CCS185 Circular Saw.fm Page 10 Tuesday, December 13, 2011 5:38 PM
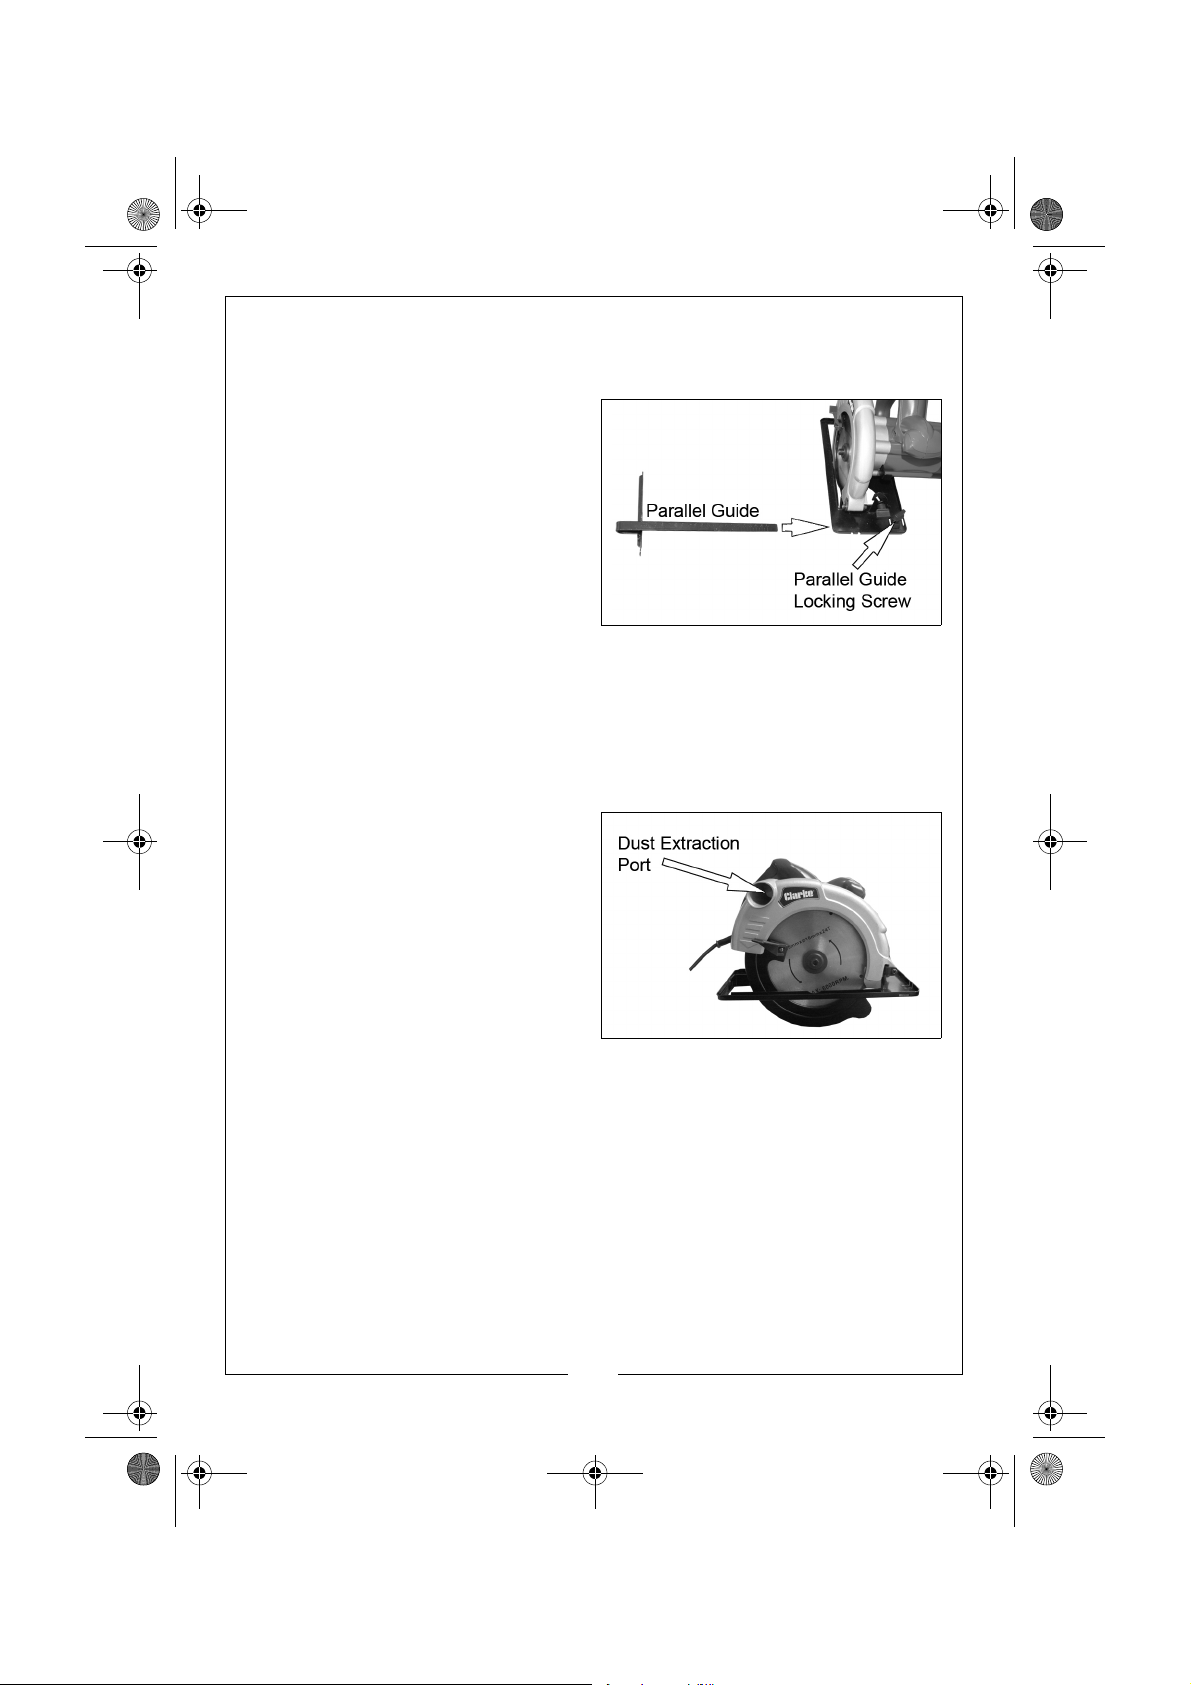
MOUNTING AND USING THE PARALLEL GUIDE
MOUNTING
1. Slide the parallel guide into the
base plate as shown.
2. Secure in place using the parallel
guide locking screw.
ADJUSTING
1. Loosen the Parallel Guide Locking
Screw.
2. Adjust the Parallel Guide to the
required length.
• There is a scale on the parallel guide that can be used to give an
approximate guide. always double check using an accurate ruler.
3. Tighten the Parallel Guide Locking Screw to secure the parallel guide in
position.
DUST EXTRACTION
The circular saw can be connected
to a dust extraction system, using a
suitable hose adaptor (not supplied).
• The internal diameter of the
dust extraction outlet is 30mm.
10
Parts & Service: 020 8988 7400 / E-mail: [email protected] or [email protected]
Page 11
CCS185 Circular Saw.fm Page 11 Tuesday, December 13, 2011 5:38 PM
OPERATION & USE
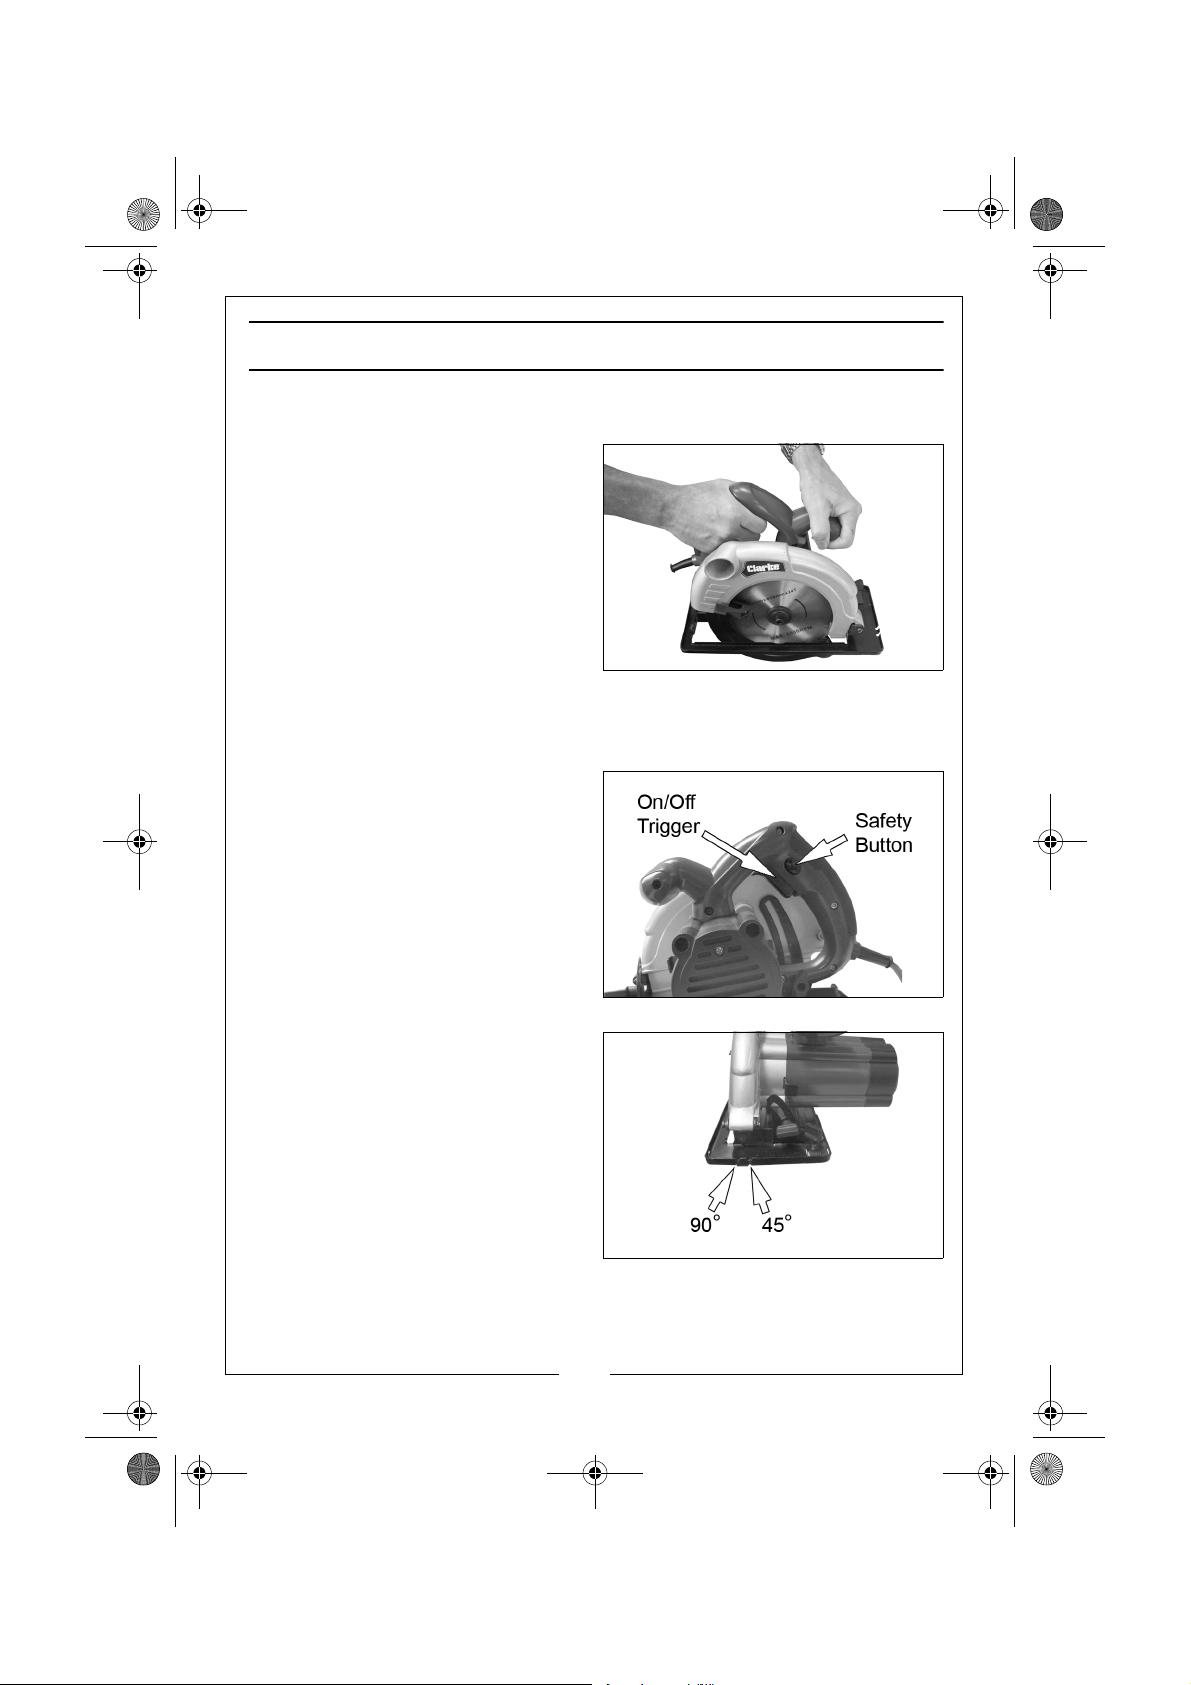
CORRECT HAND POSITION
For your own safety, always hold the
circular saw as shown in this picture,
with one hand on the main handle
and the other on the auxiliary handle.
SWITCHING ON/OFF
The on/off trigger is fitted with a safety button which prevents the circular saw
from being started accidentally. To start the saw:
1. Press and hold the safety button.
2. Squeeze the on/off trigger at the
same time.
3. Release the on/off trigger to stop
the saw.
4. The blade will continue to rotate
for several seconds after the
trigger has been released.
GUIDING THE CIRCULAR SAW
To achieve optimal results:
• Clamp the workpiece upside
down to minimise breakout.
• Follow the line drawn on the
workpiece using the 90
• If cutting a bevel angle of 45o,
follow the line drawn on the
workpiece using the 45
Parts & Service: 020 8988 7400 / E-mail: [email protected] or [email protected]
o
mark.
o
mark.
11
Page 12
CCS185 Circular Saw.fm Page 12 Tuesday, December 13, 2011 5:38 PM
MAINTENANCE
WARNING: DISCONNECT THE CIRCULAR SAW FROM THE MAINS SUPPLY
BEFORE FITTING REPLACEMENT BLADES, CLEANING OR ADJUSTMENT.
Keep the machine clean by wiping off dust with a clean cloth.
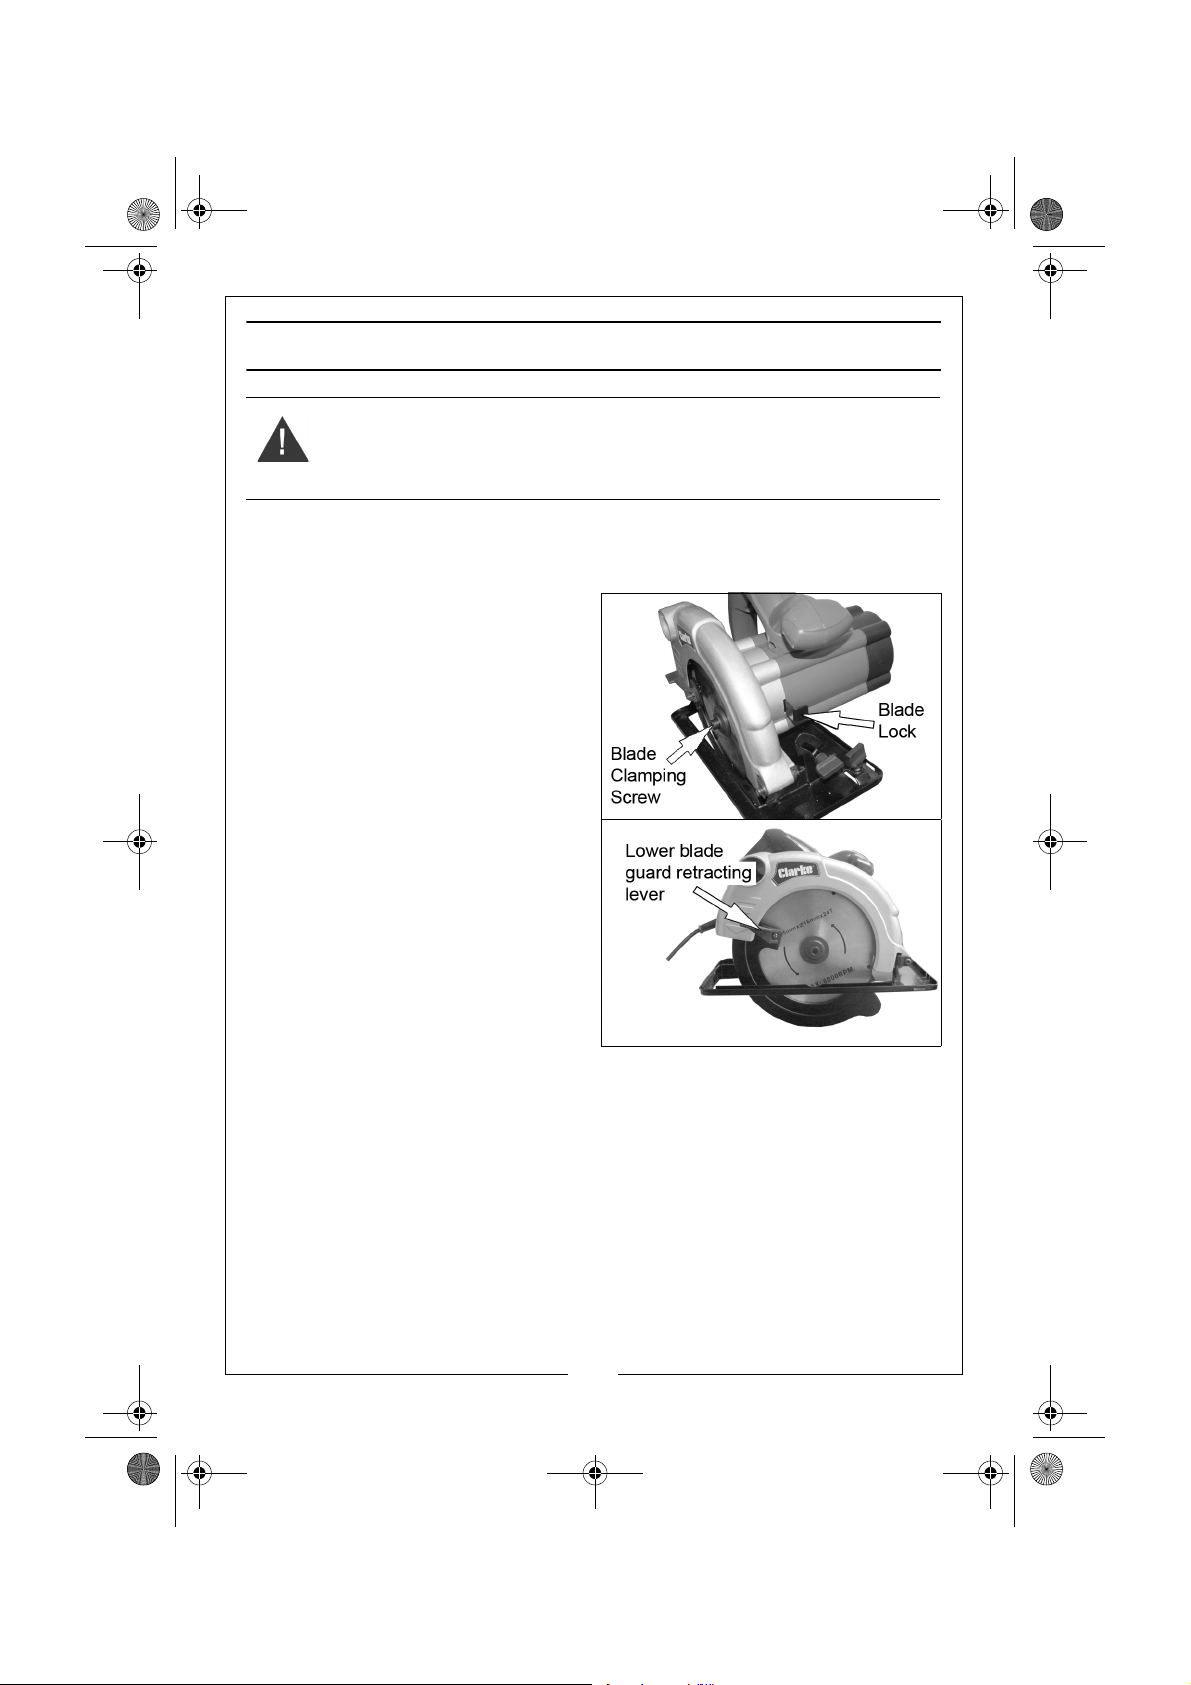
BLADE REPLACEMENT
1. Press and hold the Blade lock and
remove the blade clamping
screw using the hexagon key
supplied by turning it anticlockwise.
• The blade will rotate until the
blade lock is fully engaged.
2. Retract the lower blade guard
using the retracting lever and
replace the blade.
• Make sure you pay attention to
the blade direction marking on
the blade.
• Spare blades are available
from your local Clarke dealer.
3. Replace the blade clamping
screw by hand until it is holding
the blade in position.
4. Press and hold the blade lock and turn the blade by hand until the blade
lock is fully engaged.
5. Tighten the blade clamping screw using the hexagon key supplied.
12
Parts & Service: 020 8988 7400 / E-mail: [email protected] or [email protected]
Page 13
CCS185 Circular Saw.fm Page 13 Tuesday, December 13, 2011 5:38 PM
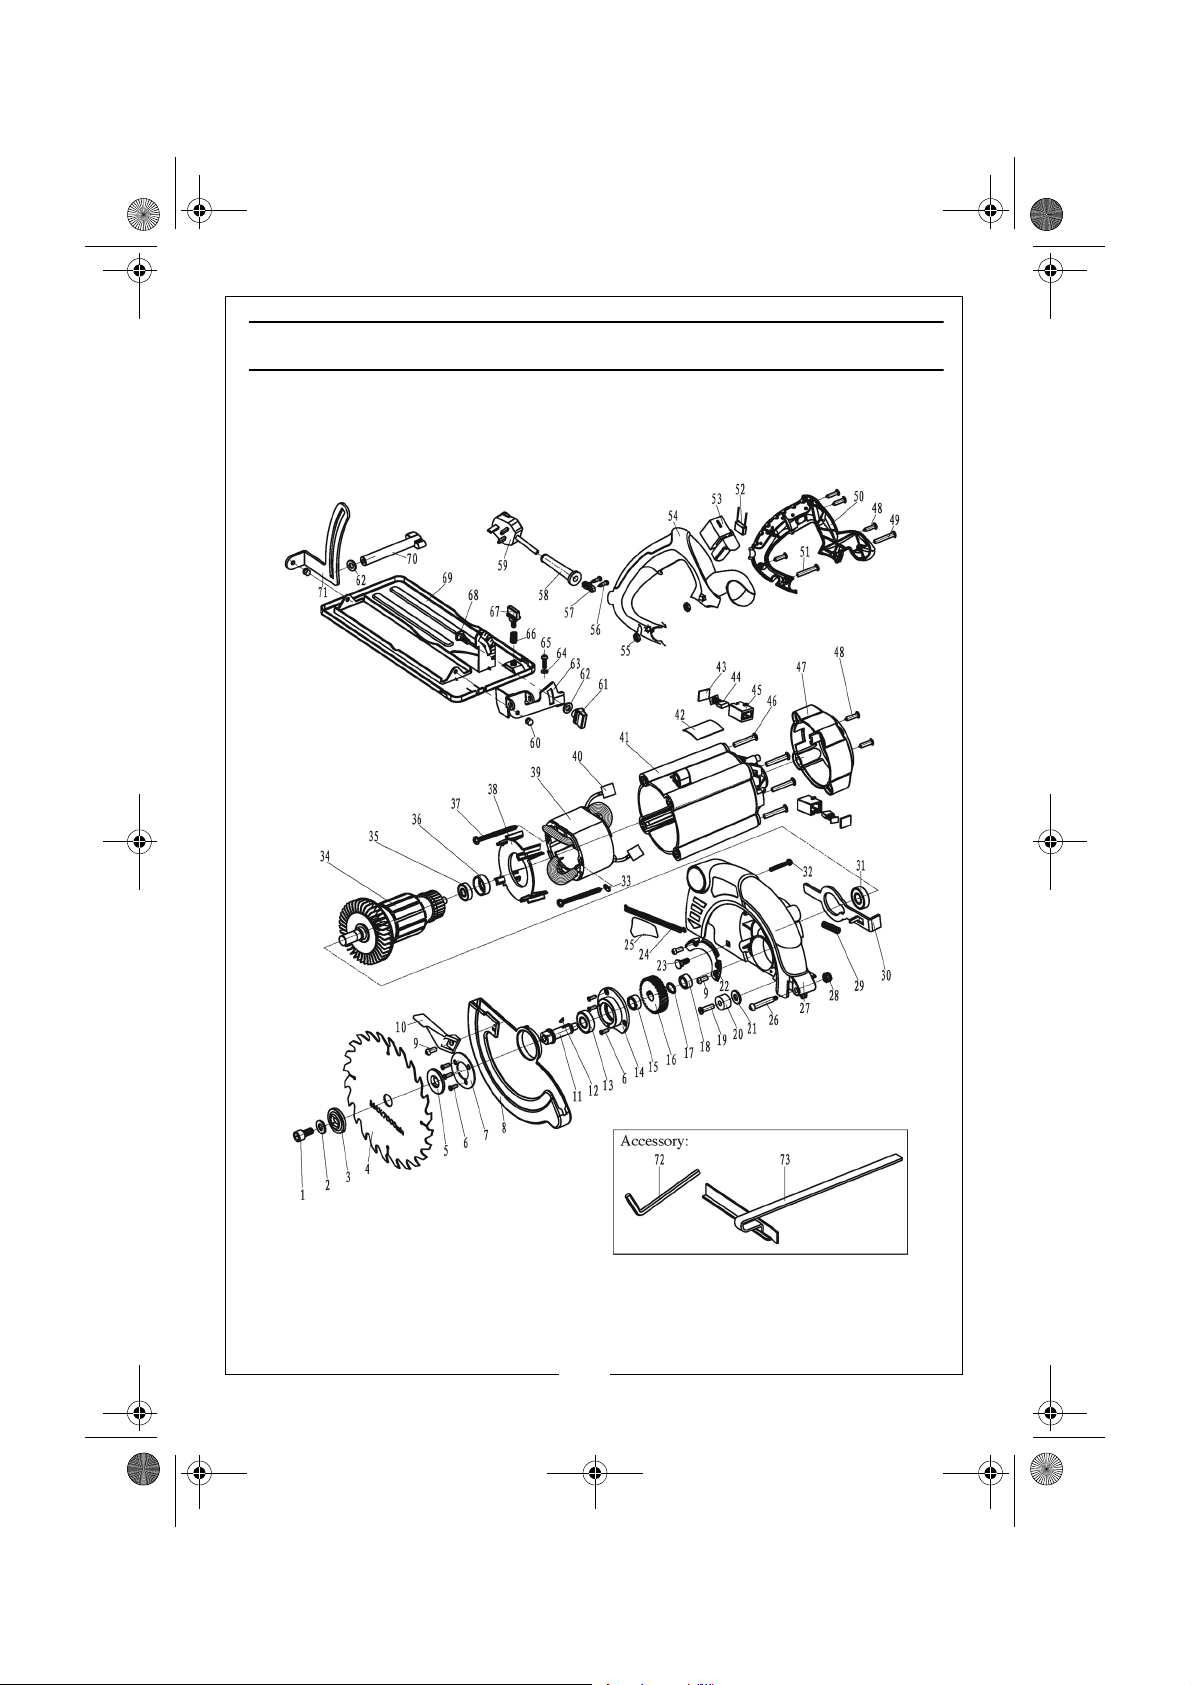
PARTS DIAGRAM
13
Parts & Service: 020 8988 7400 / E-mail: [email protected] or [email protected]
Page 14
CCS185 Circular Saw.fm Page 14 Tuesday, December 13, 2011 5:38 PM
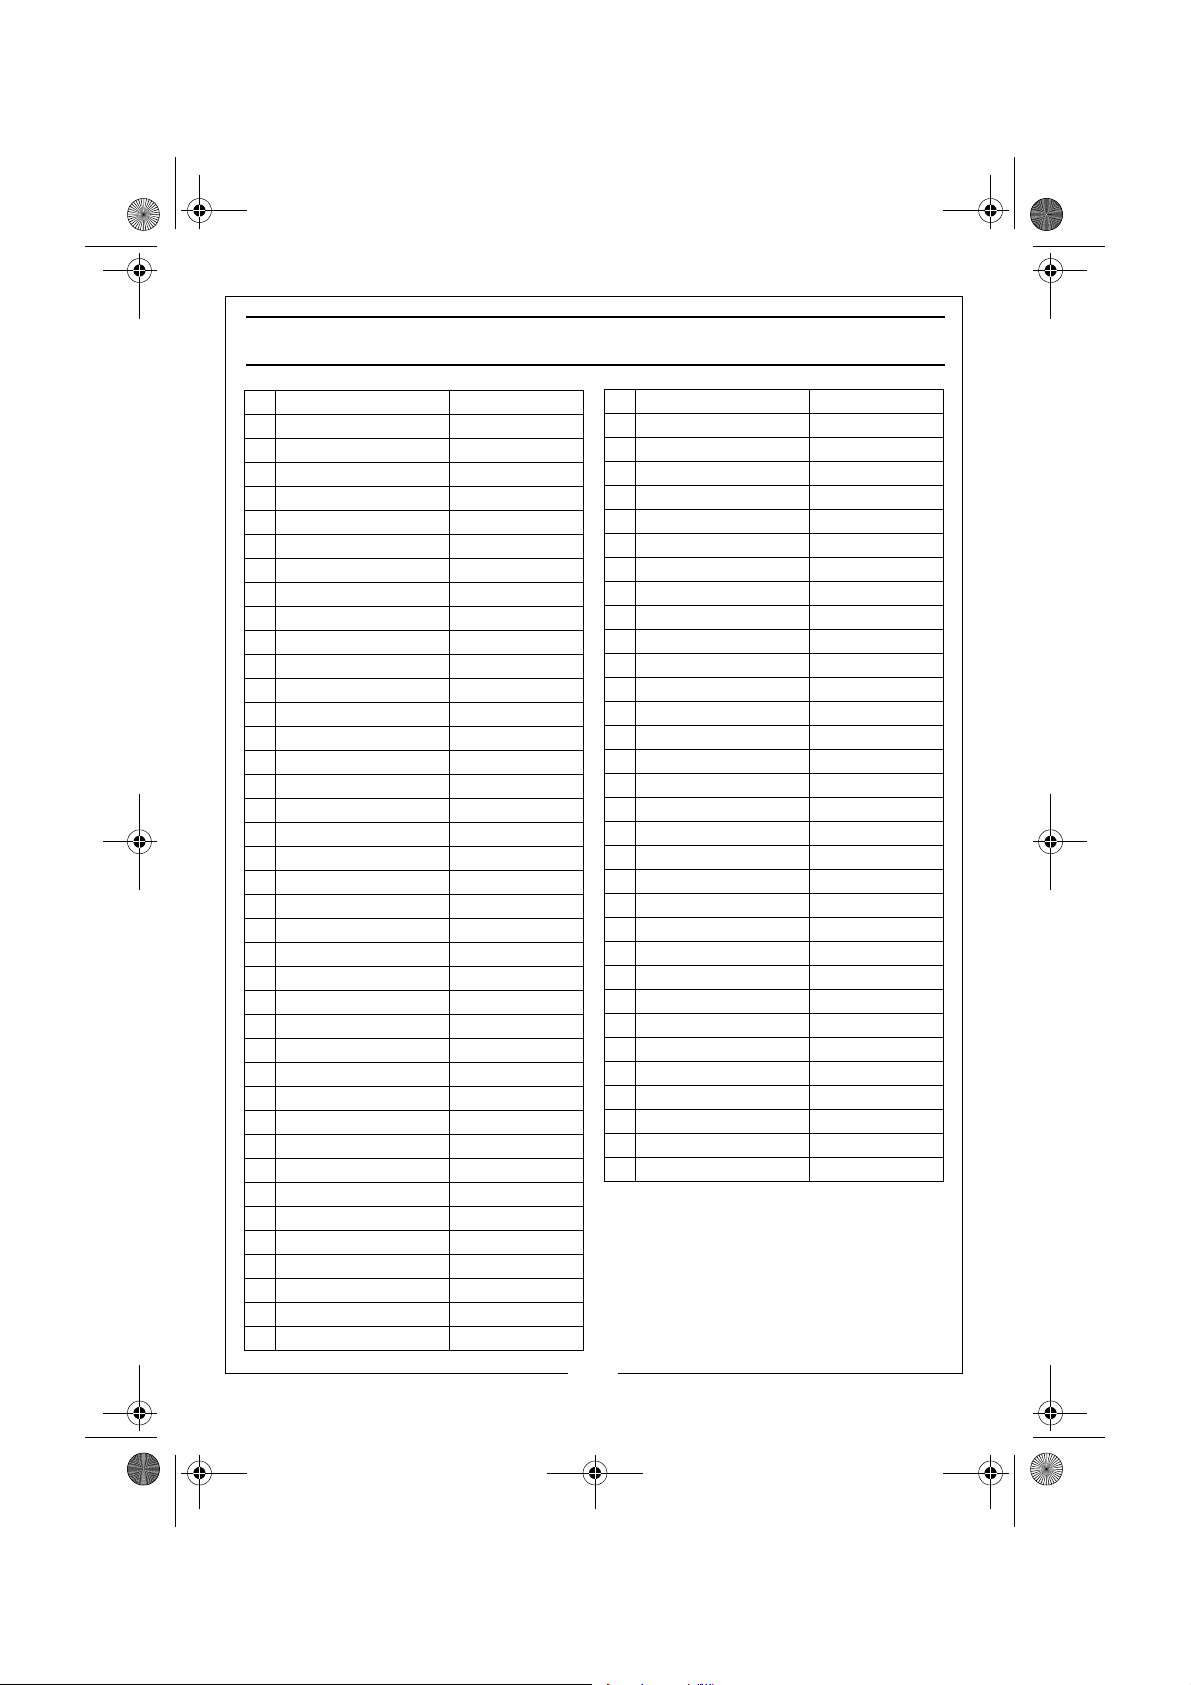
PARTS LIST
1 Screw M8x16 HTCCS18501
2 Washer HTCCS18502
3 Outer Flange HTCCS18503
4 Blade HTCCS18504
5 Clamping Flange HTCCS18505
6 Screw M4xi0 HTCCS18506
7 Mobile Guard Flange HTCCS18507
8 Blade Upper Guard HTCCS18508
9 Screw M4x8 HTCCS18509
10 Spanner HTCCS18510
11 Spindle HTCCS18511
12 Key 0 10x 3 HTCCS18512
13 Bearing 6001-2rs HTCCS18513
14 Front Cover HTCCS18514
15 Copper Sleeve HTCCS18515
16 Big Gear HTCCS18516
17 Retaining Ring HTCCS18517
18 Bearing HTCCS18518
19 Screw HTCCS18519
20 Fixed Ring HTCCS18520
21 Big Washer HTCCS18521
22 Small Iron Patch HTCCS18522
23 Bolt HTCCS18523
24 Revived Spring HTCCS18524
25 Brand Table HTCCS18525
26 Screw HTCCS18526
27 Head Cover HTCCS18527
28 Nut HTCCS18528
29 Self-locking Spring HTCCS18529
30 Self-locking Slice HTCCS18530
31 Bearing HTCCS18531
32 Screw HTCCS18532
33 Board HTCCS18533
34 Rotor HTCCS18534
35 Bearing HTCCS18535
36 Bearing Cover HTCCS18536
37 Screw HTCCS18537
38 Fan Shroud HTCCS18538
39 Stator HTCCS18539
40 Square Slice HTCCS18540
41 Housing HTCCS18541
42 Specification Table HTCCS18542
43 Brush Holder Cover HTCCS18543
44 Carbon Brush HTCCS18544
45 Brush Holey HTCCS18545
46 Screw HTCCS18546
47 Rear Shade HTCCS18547
48 Screw HTCCS18548
49 Screw HTCCS18549
50 Left Hand Shank HTCCS18550
51 Screw HTCCS18551
52 Cpacitor HTCCS18552
53 Switch HTCCS18553
54 Right Hand Shank HTCCS18554
55 Nut HTCCS18555
56 Screw HTCCS18556
57 Cable Flange HTCCS18557
58 Cable Sleeve HTCCS18558
59 Cable HTCCS18559
60 Nut HTCCS18560
61 Lock Button HTCCS18561
62 Flat Washer HTCCS18562
63 Angle Bracket HTCCS18563
64 Nut HTCCS18564
65 Screw HTCCS18565
66 Spring HTCCS18566
67 Button HTCCS18567
68 Bolt HTCCS18568
69 Base HTCCS18569
70 Depth Lock Pole HTCCS18570
71 Depth Bracket HTCCS18571
72 Spanner HTCCS18572
73 Parallel Guide HTCCS18573
14
Parts & Service: 020 8988 7400 / E-mail: [email protected] or [email protected]
Page 15
CCS185 Circular Saw.fm Page 15 Tuesday, December 13, 2011 5:38 PM
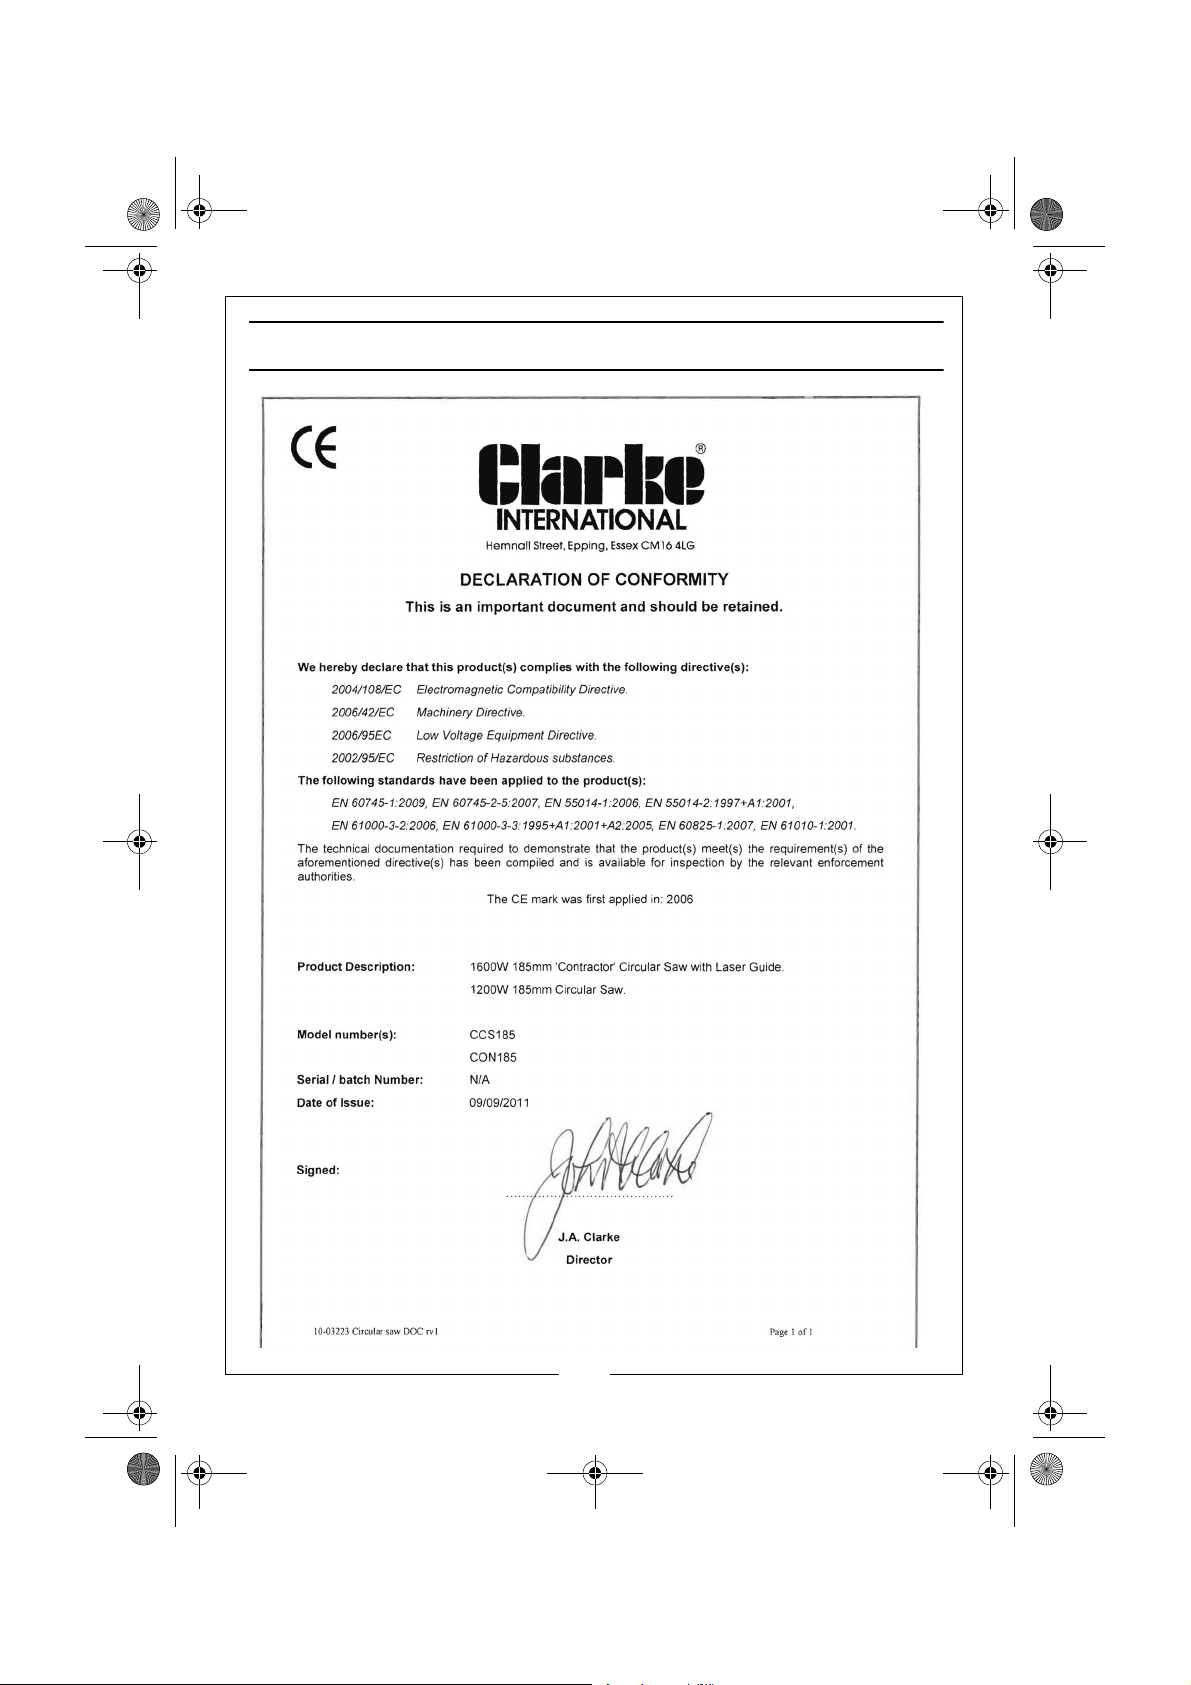
DECLARATION OF CONFORMITY
15
Parts & Service: 020 8988 7400 / E-mail: [email protected] or [email protected]
Page 16
CCS185 Circular Saw.fm Page 16 Tuesday, December 13, 2011 5:38 PM
 Loading...