


AIRBRUSH KIT
MODEL NO: CAB3B
PART NO: 3110320
OPERATION & MAINTENANCE
INSTRUCTIONS
ORIGINAL INSTRUCTIONS GC0720 - ISS 3

INTRODUCTION
Thank you for purchasing this CLARKE Airbrush kit.
Before attempting to use this product, please read this manual thoroughly and
follow the instructions carefully. In doing so you will ensure the safety of yourself
and that of others around you, and you can look forward to your purchase
giving you long and satisfactory service.
GUARANTEE
This product is guaranteed against faulty manufacture for a period of 12
months from the date of purchase. Please keep your receipt which will be
required as proof of purchase.
This guarantee is invalid if the product is found to have been abused or
tampered with in any way, or not used for the purpose for which it was
intended.
Faulty goods should be returned to their place of purchase, no product can
be returned to us without prior permission.
This guarantee does not effect your statutory rights.
SPECIFICATION
Paint jar capacity 22 cc
Metal paint cup capacity 5 cc
Connecting hose 4 mm dia x 1550 mm length
Airline connector size 1/4” bsp
Minimum airline hose size 3/8” (10mm)
Recommended operating pressure 29 psi/2bar (min15psi/max 50psi
Average air consumption 0.2 cfm
2
Parts & Service: 020 8988 7400 / E-mail: Parts@clarkeinternational.com or Service@clarkeinternational.com

GENERAL SAFETY RULES
Before using this equipment it is in your own interest to read and pay attention
to the following safety rules.
COMPRESSED AIR EQUIPMENT
1. Compressed air can be dangerous. Ensure that you are familiar with all
precautions relating to the use of compressors and compressed air.
2. Never direct a jet of compressed air at people or animals.
3. Always ensure that the equipment being used has a safe working pressure
exceeding the output pressure of the compressor that it is connected to.
4. Always ensure that the air supply is turned off and vent all compressed air
from the hose and equipment attached to it before disconnecting air
hoses or other equipment from your compressor.
5. Never exceed the operating pressure of 50 psi.
PAINT SPRAYING EQUIPMENT
We strongly recommend that paint spraying equipment be used in
conjunction with appropriate eye and face protecting goggles, glasses or
spray masks available from most DIY and hardware stores.
1. Always keep the equipment perfectly clean. This will not only prolong its life
but will also ensure you get the best results. See Maintenance.
2. Always ensure there is adequate ventilation. Do not spray or handle paint
in enclosed areas.
3. Never spray close to any source of heat or flame.
4. Always wear a suitable approved breathing mask when spraying, to
protect against inhalation of paint spray or fumes. An air feed mask may
be required when spraying some toxic types of paint. If in doubt, check
with the paint manufacturer.
5. Always check the manufacturer’s data sheets for the paint products being
sprayed for any particular hazards and follow the manufacturer’s
instructions. Take particular care if spraying isocyanate paints. Paint
products may be covered by COSHH Regulations.
6. Always disconnect the airbrush from the air supply when it is not in use and
before any disassembly.
7. Never spray paint towards people or animals.
8. Never smoke while spraying or preparing paints, or spray near a naked
flame or electrical sparks. Solvent based paints are flammable.
3
Parts & Service: 020 8988 7400 / E-mail: Parts@clarkeinternational.com or Service@clarkeinternational.com

AIR SUPPLY
For best results, the air supply to the airbrush must be clean and dry, with no oil
or water contamination. Follow the air compressor manufacturer’s guidelines
on installation and operation to ensure that your air supply is as clean as
possible.
The compressed air supply line to the airbrush must be fitted with a filter
capable of removing any oil or water together with a suitable pressure
regulator.
Higher pressure and contaminated air will shorten the airbrush life due to faster
wear and could become a safety hazard.
Water in the air line will also cause damage and may contaminate the paint
being used. Therefore ensure the air supply is properly filtered.
Line pressure, or supply hose inside diameter, should be increased to
compensate for unusually long air hoses (over 10 m). Minimum hose diameter
should be 10mm (3/8") ID and fittings should have the same inside dimensions.
AIRBRUSH ASSEMBLY
Connect one end of the mini air hose (supplied) to the airbrush. If using a
compressor, connect the airline hose to the airbrush mini hose, using the hose
adapter (supplied). Set the air pressure at the compressor to approx. 2 bar.
Alternatively, for smaller jobs, your airbrush can be used with CLARKE airbrush
propellant cans by screwing the air hose connector onto the air can.
Your airbrush is now ready for use.
PREPARATION BEFORE PAINTING
Mix the paint to the correct viscosity for spraying according to the
manufacturer’s instructions, make sure that you have enough thinners left to
clean the spray gun after use.
Do not fill the paint container more than 3/4 full. Make sure that the threaded
joint between the container and the airbrush are clean and before screwing
on the container. Always clean around the container sealing lip and keep any
container vent clear.
Remember that some modern paints require specialist respiratory
protection...always consult the paint manufacturers instructions.
4
Parts & Service: 020 8988 7400 / E-mail: Parts@clarkeinternational.com or Service@clarkeinternational.com

.
WARNING: NEVER SPRAY PAINT UNLESS YOU ARE WEARING SUITABLE,
APPROVED RESPIRATORY AND EYE PROTECTION.
Ensure that the area in which you will be spraying is clean and dust free. To
obtain best results, it is vital that the surface to be sprayed is well prepared. It
must be clean and dry, and free from dust, dirt oil or grease. Mask areas not to
be sprayed and cover adjacent equipment to protect from overspray.
Check the paint manufacturer’s instructions for any special surface
preparation required.
REMEMBER - TIME SPENT PREPARING SAVES TIME SPENT FINISHING.
PAINT THINNING
Paint thinning is particularly important when spraying. Many paints are
supplied ready for brush application and need to be sufficiently diluted for
spraying purposes. Always follow the paint manufacturers instructions. If in
doubt, always consult the paint manufacturer.
The following information can be used as a rough guide.
• Water based paints (emulsions) 10-20% water.
• Oil based paints (gloss) up to 10% thinners.
• Cellulose paints up to 50% cellulose thinners.
If in any doubt, contact the paint manufacturer.
• DO NOT OVERFILL PAINT CONTAINER - never more than three
quarters full.
5
Parts & Service: 020 8988 7400 / E-mail: Parts@clarkeinternational.com or Service@clarkeinternational.com

OPERATION
After mixing and thinning the paint, fill the paint jar no more than about 2/3
full. Attach the jar to the airbrush, turn the compressed air on, and depress the
trigger. Test on an old newspaper or similar and make any necessary spray
adjustments before spraying the workpiece.
ADJUSTING THE PAINT FLOW
Paint flow and spray pattern are adjusted by turning the air cap at the tip of
the airbrush. Paint flow is also affected by the amount the trigger is pulled
back.
The air cap is fully closed when it has been turned fully clockwise. Using the
thumb and forefinger, turn the air cap anti-clockwise to obtain various
degrees of paint flow.
Also check the adjustment of the needle sleeve which can also effect paint
flow when screwed in and out. Maximum flow will be attained by turning the
needle sleeve assembly approximately two full turns anti-clockwise.
Pull back on the trigger to obtain more paint and a wider coverage.
PAINTING PROCEDURES
1. Prepare the workpiece, masking off any areas not to be painted, (ensuring
the workpiece is clean and free of dust, grease etc).
2. Hold the nozzle of the airbrush about 6” from the surface being sprayed.
Use short strokes, moving steadily and parallel to the surface.
3. Spray several light coats, allowing each coat to dry before adding the next
until the desired coverage is achieved.
6
Parts & Service: 020 8988 7400 / E-mail: Parts@clarkeinternational.com or Service@clarkeinternational.com

4. Always test on a practice piece first to ensure the airbrush is working
correctly.
SPRAYING TECHNIQUES
Practice spraying on a piece of material with the same type of surface as the
article you wish to spray, eg. metal for a car body panel, wood for a piece of
furniture etc.
Always make adjustments to the spray pattern according to the conditions.
You may need to increase the paint and air flow when using a wider fan
setting.
To reduce overspray, always use the lowest possible air pressure that produces
an acceptable spray pattern.
• If the airbrush is too far from the surface or the paint is too thin, the
paint will start to dry before hitting the surface, resulting in a rough,
sandy finish. Allowing overspray to fall on a finished area will also
result in a rough finish. Too much paint feed or holding the airbrush
too close to the work can lead to runs and sagging.
• The paint should be agitated by gentle shaking at regular intervals
during use to ensure consistency and avoid colour difference due to
the paint settling in the container.
7
Parts & Service: 020 8988 7400 / E-mail: Parts@clarkeinternational.com or Service@clarkeinternational.com

To obtain the best results, keep your airbrush level and parallel to the surface
at all times. Keep the nozzle 23 - 30 cm from the surface and spray evenly from
side to side or up and down.
The airbrush should be perpendicular to the surface being covered and
moved parallel to it. The stroke is best started before the trigger is pulled and
likewise released before the stroke is ended. This gives accurate control of the
airbrush and material.
Do not spray at an angle as this will lead to paint runs on the surface. Try to use
smooth and even strokes.
When spraying large areas, using a cris-cross pattern as shown.
Try to avoid starting or stopping the airbrush while it is aimed at the surface to
be sprayed. Evenly control the speed of movement of the airbrush.
• Moving quickly over the surface will give a thin coat and slow
movement will give a heavy coat.
• Apply one coat at a time. If a further coat is required, make sure you
observe the manufacturers drying time recommendations before
applying a second coat.
• When spraying small areas, keep the output control on a low setting
as this will avoid using too much paint and prevent overspray.
• Where possible, avoid stopping and starting when spraying an
object. This can lead to too much or not enough paint being
applied.
• The material deposited should always be even and wet. Lap each
stroke over the preceding stroke to obtain a uniform finish.
• To ensure the edges are covered, start spraying just to the side of the
area being sprayed and do not stop until the spray has gone past
the opposite edge.
• Damage to the needle or nozzle, or any of the air ports, will result in a
faulty spray pattern. Take care when cleaning or assembling these
components.
8
Parts & Service: 020 8988 7400 / E-mail: Parts@clarkeinternational.com or Service@clarkeinternational.com

TROUBLESHOOTING
The following are typical faults encountered during airbrush work:
1. Grainy Spray: Caused by the paint being too thick. Dilute the paint as
appropriate, check the needle for dried up paint etc, check the air supply
pressure etc.
2. Buckling Paper: The paint may be too thin. Add paint to thicken the
mixture. Do not apply too heavily in one area. Move more quickly across
the work or reduce the spray.
3. Paint blobs at end of stroke: Depress the trigger before moving the airbrush
or stopping before releasing the trigger.
4. Flared ends: Caused by turning the wrist while airbrushing. The whole forearm should move horizontally or vertically across the workpiece.
5. Centipedes: Caused by spraying too much paint too close to the surface.
If a fine line is desired, lightly pull back on the trigger, practice on a test
piece first).
6. Splattering: Caused by allowing the needle to snap back into the tip.
Always release the trigger gently. Check for dried paint on the needle or
tip.
7. Curved stroke: Caused by moving the arm in an arc, too close to the
surface. The arm should always be parallel to the work.
8. Restricted spray: Can be caused by the needle being screwed in too far.
Undo the needle sleeve a turn.
9. Bubbles through paint cup: The air pressure may be too high. Adjust the
airline regulator. The paint cup stem may be clogged.
10. Spray cannot be shut off: The nozzle may be clogged. This is recognized by
a ‘spongy’ feel when the needle is set into the nozzle. Strip and clean the
airbrush, (see Maintenance).
11. Spitting: Caused by contamination either on the needle or in the paint
cup, the paint may be too thick.
If the airbrush motion is uneven, the paint finish will be uneven.
The most common problems are runs and sags, which are caused by one or
more of the following:
1. Not releasing the trigger at the end of the stroke.
2. Holding the airbrush still or moving too slowly.
3. Holding the airbrush too close to the surface.
4. Arcing motion with the airbrush.
9
Parts & Service: 020 8988 7400 / E-mail: Parts@clarkeinternational.com or Service@clarkeinternational.com

MAINTENANCE
ROUTINE CLEANING
The airbrush is a precision tool, so taking good care of your airbrush will result in
a longer service life.
Keep the airbrush and paint cup / jar clean at all times and do not leave the
airbrush standing with paint in the paint cup for long periods. This tends to gum
up the cup and the internal feeding channels. Most poor spraying results can
be traced back to an airbrush that has not been cleaned properly. Always
clean immediately after use. To clean the airbrush thoroughly, proceed as
follows.
1. Remove and empty the paint jar, wipe thoroughly including the inside of
the cover.
2. Fill the jar ½ full of thinners or water depending upon the paint being
sprayed, re-attach the airbrush and operate the spray to clean the needle,
air cap & nozzle etc. Take care to spray into a safe area, i.e., directly into a
cleaning cloth.
3. Operate the spray until the fluid is clear and no paint residue is visible on
the cloth. Remove the jar and operate the spray to expel thinners etc.
4. Dry with a clean cloth before packing away.
STRIPPING FOR FURTHER CLEANING
Should the airbrush become clogged, it is necessary to strip and clean the unit
which should be carried out on a clear work area. To do this, proceed as
follows:
1. Unscrew and remove the valve assembly using the wrench.
2. Unscrew and remove the tail cover.
10
Parts & Service: 020 8988 7400 / E-mail: Parts@clarkeinternational.com or Service@clarkeinternational.com

3. Loosen the needle locknut and gently withdraw the needle from the
airbrush assembly. Do not fully remove the locknut.
WARNING: THE NEEDLE IS VERY SHARP; ALSO, TAKE CARE NOT TO BEND
OR BREAK IT.
4. Remove the airbrush end cap.
5. Unscrew and remove the air cap.
6. Unscrew and remove the spray nozzle seat using the wrench.
At this stage it should not be necessary to strip down any further. Clean all
parts with solvent/thinners using cotton buds and a lint free cleaning cloth.
Take care when cleaning the inlet valve assembly and spray nozzle assembly.
These both have ‘O’ rings which need to be removed as they can be
damaged by solvents.
REASSEMBLY
Once all parts have been cleaned and dried, reassemble as follows:
1. Refit the ‘O’ rings to the valve (item 24) and spray nozzle (item 5)
assemblies, (shown in the parts diagram on page 10), replacing them with
new ones if damaged.
2. Refit the spray nozzle seat and gently tighten with the wrench.
3. Refit the air cap finger tight.
4. Refit the airbrush end cap.
5. Carefully insert the needle through the needle sleeve assembly. Push
carefully home until the needle seats into the air nozzle. Re-tighten the
needle locking nut, finger tight.
6. Refit the tail cover.
7. Replace the valve assembly and gently tighten with the wrench.
REMOVING & REPLACING THE NEEDLE SLEEVE
Should it be necessary to remove the needle sleeve assembly for cleaning,
dismantle the parts described above, then continue as follows:
1. Unscrew and remove the needle securing sleeve assembly.
2. Without the restraint of the needle sleeve assembly, the trigger and trigger
block will both fall out.
To reassemble, proceed as follows:
11
Parts & Service: 020 8988 7400 / E-mail: Parts@clarkeinternational.com or Service@clarkeinternational.com

1. Position the trigger block back into the trigger slot on the top of the airbrush
body, with the curved block face towards the tail opening.
NOTE: A pair of tweezers will be needed for this
2. Gripping the tab of the trigger block to steady the airbrush assembly, insert
the trigger into the trigger slot. Ensure the needle slot is in line with the
airbrush body to enable the needle to pass through.
3. Still maintaining a grip of the trigger block, screw the needle sleeve
assembly into the airbrush body until the end appears in the trigger slot. The
trigger and trigger block are now held in position.
4. Carefully insert the needle through the needle securing sleeve, trigger
block and trigger, and tighten the needle locking nut to hold the needle in
place against the nozzle.
5. Refit the tail cover.
.
AIRLINE ACCESSORIES AND EQUIPMENT
An extensive range of airline equipment and accessories is available from your
Clarke dealer including hoses, retractable hose reels, filter/regulators, in-line
regulators, pressure gauges, spray gun cleaning kit, respiratory masks and
safety goggles, Airbrush Propellant etc.
Contact your CLARKE dealer for further information, or CLARKE International
Sales Department on 01992 565300.
12
Parts & Service: 020 8988 7400 / E-mail: Parts@clarkeinternational.com or Service@clarkeinternational.com

DECLARATION OF CONFORMITY
13
Parts & Service: 020 8988 7400 / E-mail: Parts@clarkeinternational.com or Service@clarkeinternational.com
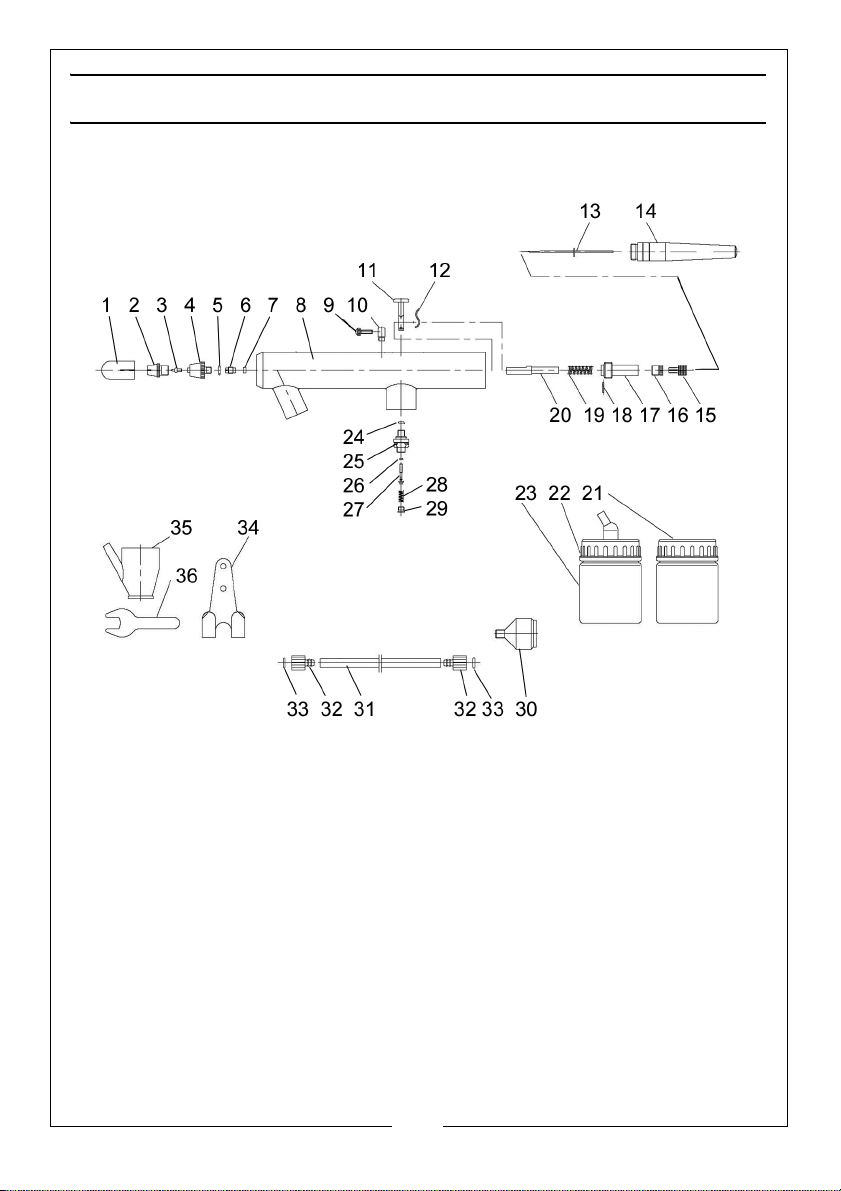
PARTS DIAGRAM
14
Parts & Service: 020 8988 7400 / E-mail: Parts@clarkeinternational.com or Service@clarkeinternational.com

PARTS LIST
NO DESCRIPTION NO DESCRIPTION
1 Airbrush End Cap 19 Needle Spring
2 Air Cap 20 Needle Sleeve
3 Spray Nozzle 21 Paint Jar Lid (1)
4 Spray Nozzle Seat 22 Paint Jar Lid (2)
5 O-ring 23 Glass Paint Jar
6 Direction Screw 24 O-Ring
7 Sealing Washer 25 Air Inlet Valve Body
8 Airbrush Body 26 O-ring
9 Trigger Stop Screw 27 Inlet Valve Pin
10 Screw Seat 28 Inlet Valve Spring
11 Trigger 29 Fixed Screw
12 Trigger Block 30 Inlet Hose Adaptor
13 Needle 31 Inlet Air Hose
14 Tail Cover 32 Hose Connector
15 Needle locknut 33 O-ring
16 Sleeve end cap 34 Suspension Hook
17 Securing sleeve 35 Paint Cup
18 Spring Pin 36 Open Wrench
15
Parts & Service: 020 8988 7400 / E-mail: Parts@clarkeinternational.com or Service@clarkeinternational.com

 Loading...