

Page 1

BELT SANDER
MODEL NO: BS1
PART NO: 6462050
OPERATION & MAINTENANCE
INSTRUCTIONS
ORIGINAL INSTRUCTIONS DL0122 -REV 2
Page 2
INTRODUCTION
Thank you for purchasing this CLARKE Belt Sander.
Before attempting to use this product, please read this manual thoroughly and
follow the instructions carefully. In doing so you will ensure the safety of yourself
and that of others around you, and you can look forward to your purchase
giving you long and satisfactory service.
GUARANTEE
This product is guaranteed against faulty manufacture for a period of 12
months from the date of purchase. Please keep your receipt which will be
required as proof of purchase.
This guarantee is invalid if the product is found to have been abused or
tampered with in any way, or not used for the purpose for which it was
intended.
Faulty goods should be returned to their place of purchase, no product can
be returned to us without prior permission.
This guarantee does not effect your statutory rights.
SPECIFICATIONS
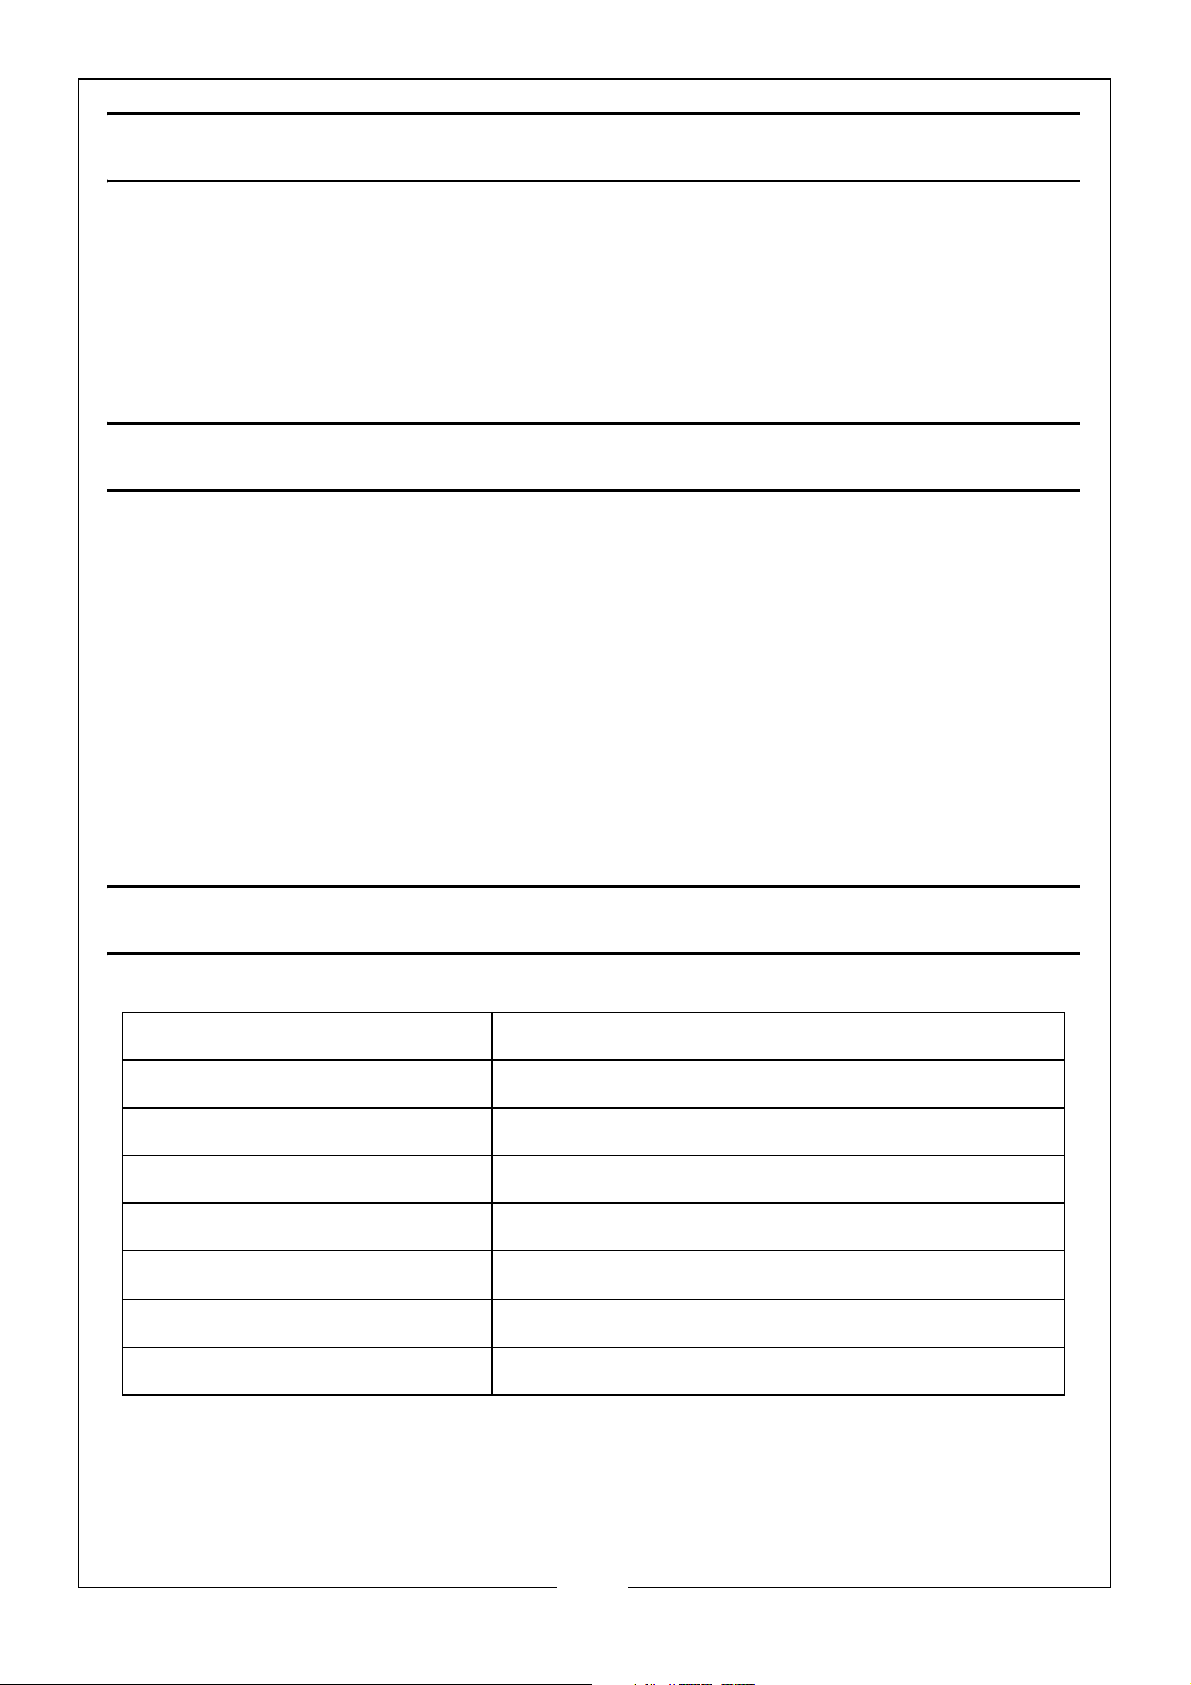
Model Number BS1
Rated Voltage 230V~50Hz
Power Input 900 W
No Load Speed 380m/min
Weight 3.7 kg
Vibration
Belt size 76 mm x 533 mm
>2.5 m/s
2
Sound power level 106 dBLwA
2
Parts & Service: 020 8988 7400 / E-mail: [email protected] or [email protected]
Page 3

POWER TOOL SAFETY WARNINGS
WORK AREA
1. Keep the work area clean and well lit. Cluttered and dark areas invite
accidents.
2. Do not operate power tools in explosive atmospheres, such as in the
presence of flammable liquids, gases or dust. Power tools create sparks
which may ignite the dust or fumes.
3. Keep children and bystanders away while operating a power tool.
Distractions can cause you to lose control.
ELECTRICAL SAFETY
1. Power tool plugs must match the outlet. Never modify the plug in any way.
Do not use adaptor plugs with earthed (grounded) power tools. Unmodified
plugs and matching outlets will reduce the risk of electric shock.
2. Do not expose power tools to rain or wet conditions. Water entering a
power tool will increase the risk of electric shock.
3. Do not abuse the cable. Never use it for carrying, pulling or unplugging the
power tool. Keep the cable away from heat, oil, sharp edges or moving
parts. Damaged or entangled cables increase the risk of electric shock.
4. When operating a power tool outdoors, use an extension cable suitable for
outdoor use. Use of a cable suitable for outdoor use reduces the risk of
electric shock
5. If operating the power tool in a damp location is unavoidable, use a
residual current device (RCD) protected supply.
PERSONAL SAFETY
1. Stay alert, watch what you are doing and use common sense when
operating a power tool. Do not use a power tool while you are tired or
under the influence of drugs, alcohol or medication. A moment of
inattention while operating power tools may result in personal injury.
2. Use safety equipment. Always wear eye protection. Safety equipment such
as dust mask, non-skid safety shoes, hard hat, or hearing protection used
for appropriate conditions will reduce personal injuries.
3. Avoid accidental starting. Ensure the switch is in the off position before
plugging in. Carrying power tools with your finger on the switch or plugging
in power tools that have the switch on invites accidents.
4. Remove any wrench before turning the power tool on. A wrench left
attached to a rotating part may result in personal injury.
3
Parts & Service: 020 8988 7400 / E-mail: [email protected] or [email protected]
Page 4

5. Do not overreach. Keep proper footing and balance at all times. This
enables better control of the power tool in unexpected situations.
6. Dress properly. Do not wear loose clothing or jewellery. Keep your hair,
clothing and gloves away from moving parts. Loose clothes, jewellery or
long hair can be caught in moving parts.
POWER TOOL USE AND CARE
1. Do not force the power tool. Use the correct accessories for your
application. The correct power tool will do the job better and safer at the
rate which it was designed for.
2. Do not use the power tool if the switch does not turn it on and off. Any
power tool that cannot be controlled with the switch is dangerous and
must be repaired.
3. Disconnect the plug from the power source before changing accessories,
or storing power tools. Such preventive safety measures reduce the risk of
starting the power tool accidentally.
4. Store idle tools out of the reach of children and do not allow persons
unfamiliar with the power tool or these instructions to operate it. Power tools
are dangerous in the hands of untrained users.
5. Maintain power tools. Check for misalignment or binding of moving parts,
breakage of parts and any other condition that may affect the power
tool’s operation. If damaged, have the power tool repaired before use.
Many accidents are caused by poorly maintained power tools.
6. Use the power tool and accessories in accordance with these instructions
and in the manner intended, taking into account the working conditions
and the work to be performed. Use of the power tool for operations
different from intended could result in a hazardous situation.
7. The performance of this tool may vary, depending upon variations in line
voltage. Extension cable usage may also affect performance.
SERVICING
1. Have your power tool serviced by qualified service personnel using only
identical replacement parts. This will ensure that the safety of the power
tool is maintained.
ADDITIONAL SAFETY WARNINGS FOR POWERED SANDERS
1. Secure the workpiece to a stable platform. Holding the workpiece by hand
or against your body may lead to loss of control.
2. Dust arising from sanding may endanger the health of the operator and
possible bystanders. Wear a dust mask and ensure that persons entering
the work area are also protected.
3. Remove all dust after sanding.
4
Parts & Service: 020 8988 7400 / E-mail: [email protected] or [email protected]
Page 5

4. Take care when sanding lead based paint or when sanding wood or metal
which may produce toxic dust, - do not let children or pregnant women
enter the work area.
VIBRATION
The declared vibration emission values stated in the specifications have been
measured in accordance with a standard test method provided by EN 60745
and may be used for comparing one tool with another. The declared vibration
emission value may also be used in a preliminary assessment of exposure.
WARNING: THE VIBRATION EMISSION VALUE DURING ACTUAL USE OF THE
POWER TOOL CAN DIFFER FROM THE DECLARED VALUE DEPENDING ON
THE WAYS IN WHICH THE TOOL IS USED. THE VIBRATION LEVEL MAY
INCREASE ABOVE THE LEVEL STATED.
5
Parts & Service: 020 8988 7400 / E-mail: [email protected] or [email protected]
Page 6
ELECTRICAL CONNECTIONS
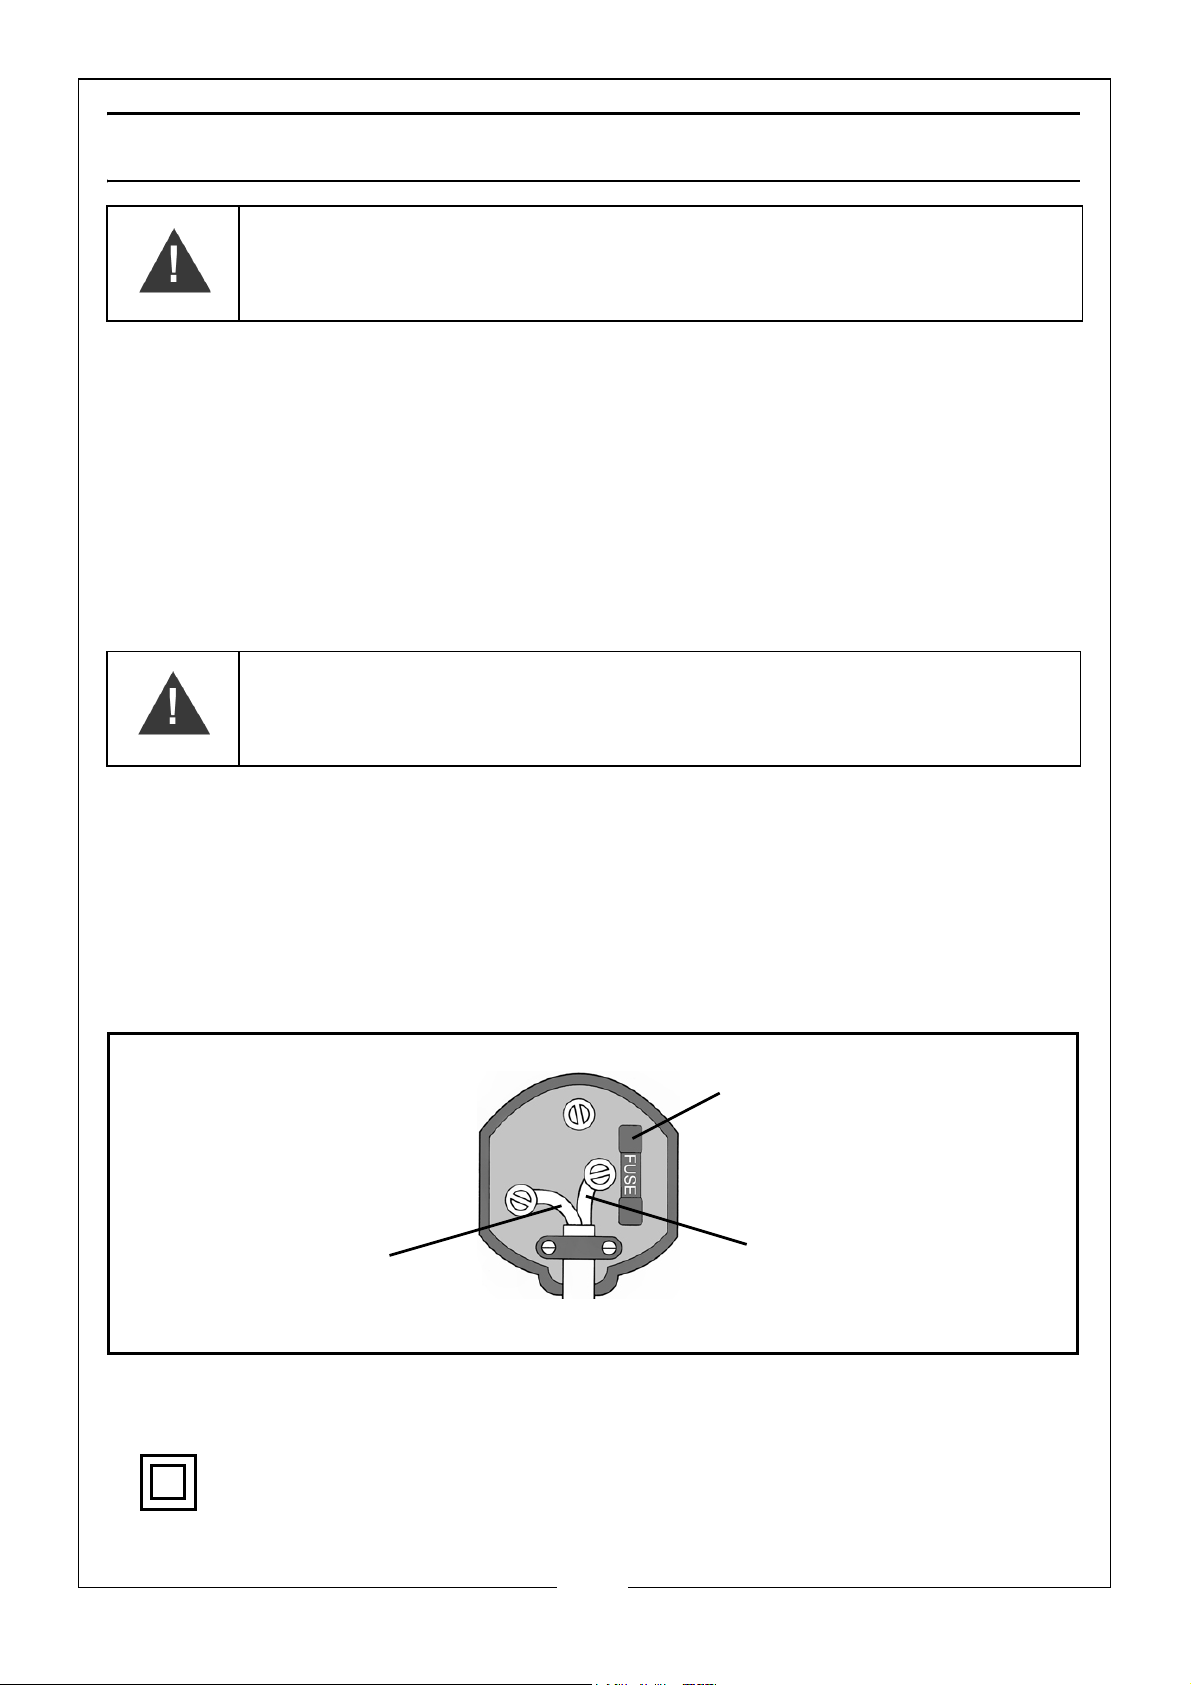
Plug must be BS1363/A approved.
Always fit a 13 Amp fuse.
Ensure that the outer sheath of the cable is firmly held by the clamp
Neutral
(Blue)
Live
(Brown)
WARNING: READ THESE ELECTRICAL SAFETY INSTRUCTIONS
THOROUGHLY BEFORE CONNECTING THE PRODUCT TO THE MAINS
SUPPLY.
Before switching the product on, make sure that the voltage of your electricity supply is
the same as that indicated on the rating plate. This product is designed to operate on
230VAC 50Hz. Connecting it to any other power source may cause damage.
This product may be fitted with a non-rewireable plug. If it is necessary to change the
fuse in the plug, the fuse cover must be refitted. If the fuse cover becomes lost or
damaged, the plug must not be used until a suitable replacement is obtained.
If the plug has to be changed because it is not suitable for your socket, or due to
damage, it should be cut off and a replacement fitted, following the wiring instructions
shown below. The old plug must be disposed of safely, as insertion into a mains socket
could cause an electrical hazard.
WARNING: THE WIRES IN THE POWER CABLE OF THIS PRODUCT ARE
COLOURED IN ACCORDANCE WITH THE FOLLOWING CODE:
BLUE = NEUTRAL BROWN = LIVE
If the colours of the wires in the power cable of this product do not correspond
with the markings on the terminals of your plug, proceed as follows.
•The Blue wire must be connected to the terminal marked N or
coloured Black.
•The Brown wire must be connected to the terminal marked L or
coloured Red.
We strongly recommend that this machine is connected to the mains supply
via a Residual Current Device (RCD)
This symbol indicates that this is a Class II product, and does not require
an earth connection.
Parts & Service: 020 8988 7400 / E-mail: [email protected] or [email protected]
6
Page 7
PREPARATION
CAUTION: DISCONNECT THE PLUG FROM THE POWER SUPPLY BEFORE
CHANGING THE BELT.
CHANGING THE SANDING BELT
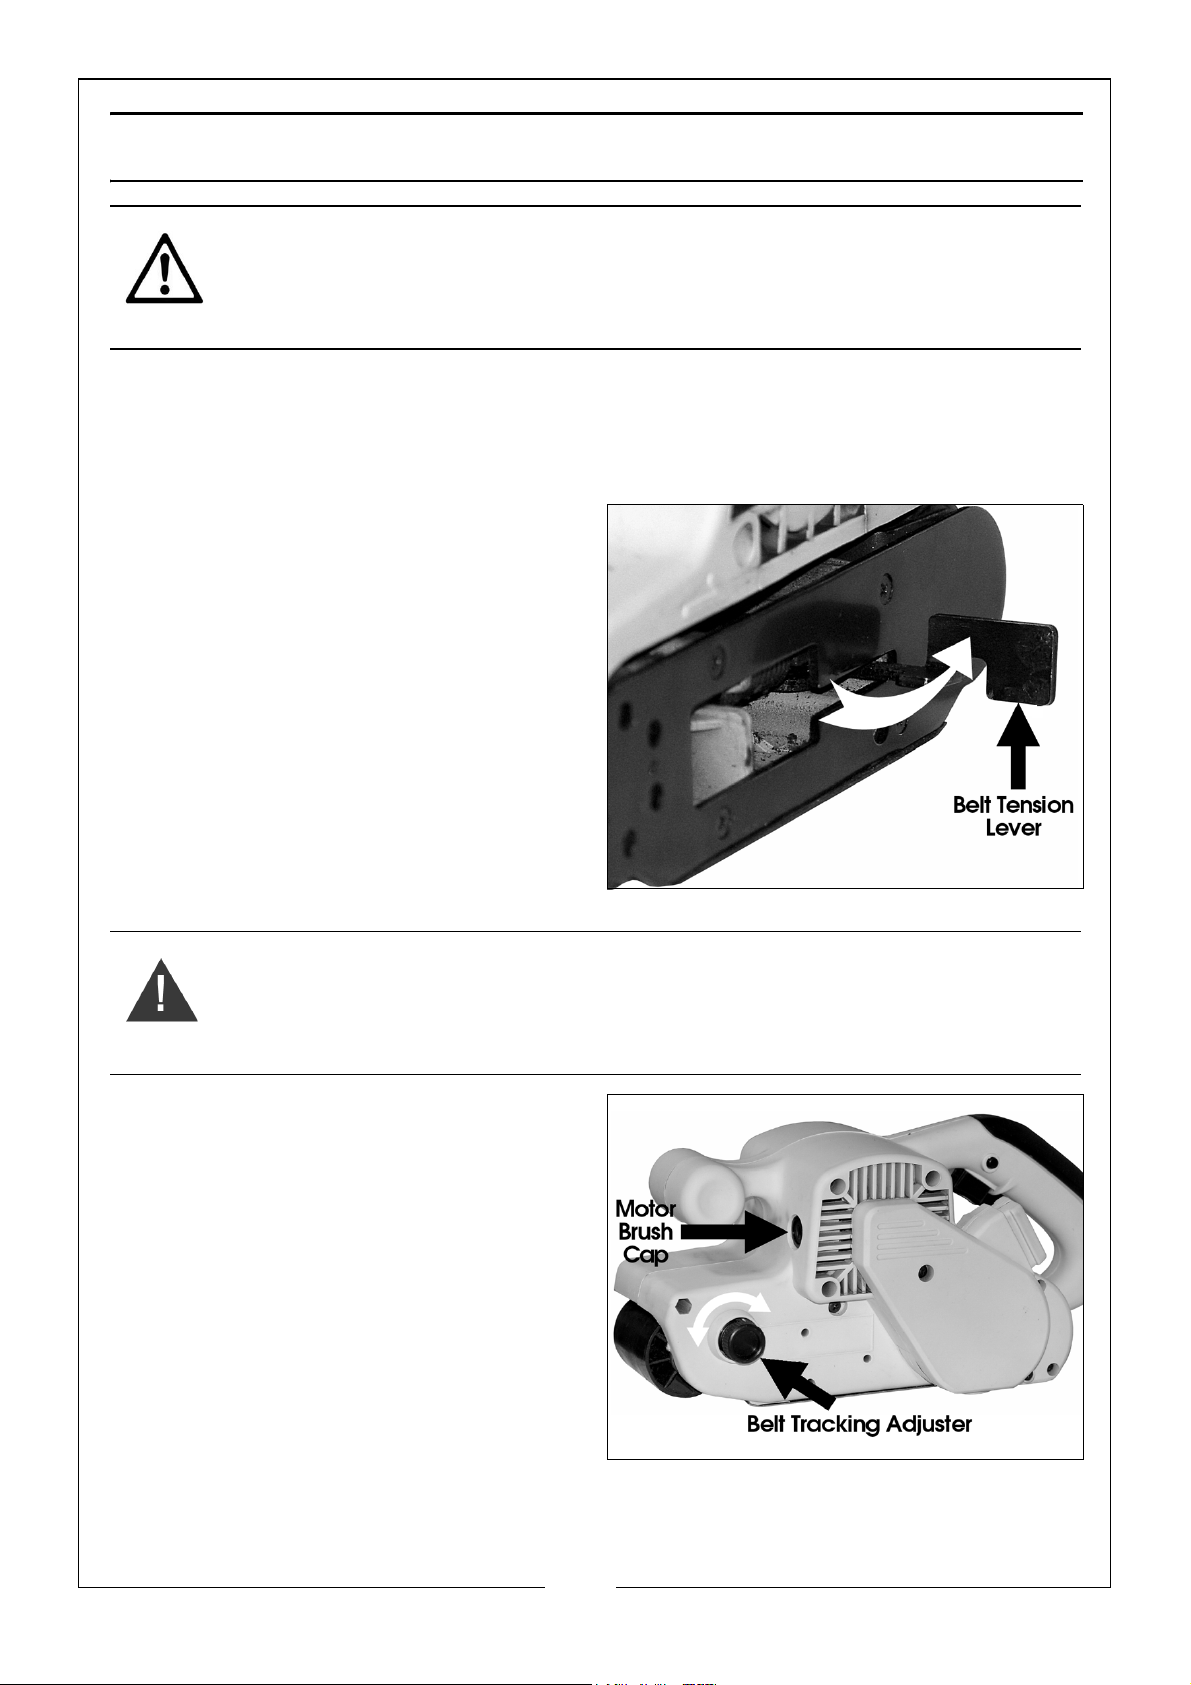
With the mains cable disconnected from the mains supply, select the abrasive
belt appropriate for the job in hand and attach it to the machine as follows:
1. Pull out the belt tension lever fully,
in the manner shown.
• This will allow the belt to be
slipped over the front and rear
rollers.
2. Centralise the belt, then gently
release the tensioning
lever...under control...do not allow
it to spring back.
ADJUSTING THE BELT TRACKING
WARNING: ALWAYS WEAR EYE PROTECTION WHEN ADJUSTING OR
OPERATING THE SANDER.
It is essential that the belt runs true
between the rollers otherwise it will
have the tendency to run off.
A tracking adjuster is provided as
indicated. Turn the adjuster so that
the front roller appears to be square,
then switch on the sander.
Observe the belt and turn the
adjuster knob clockwise or
anticlockwise to ensure the belt runs
truly.
Once satisfied, the sander is ready for use.
7
Parts & Service: 020 8988 7400 / E-mail: [email protected] or [email protected]
Page 8

FITTING THE DUST COLLECTION BAG
When using the belt sander, certain materials will generate harmful or toxic
dusts and grit. For this reason it is important to fit the dust collection bag. Do
not allow the dustbag to get too full. Empty the bag before it becomes
overloaded.
1. Attach the dust collection bag to the orifice at the rear of the tool by
pressing the lugs at the neck of the bag together so that the wire clamp
may be fitted over the neck of the orifice.
OPERATION
1. Connect the plug to the mains socket and switch on.
2. Hold the sander firmly with both hands
USING THE TRIGGER SWITCH
1. Squeeze the trigger, the belt sander will start.
2. Release the trigger to stop the belt sander.
3. If continuous operation is required, squeeze the trigger, and depress the
lock-on button and release the trigger.
4. To stop the belt sander, squeeze the trigger to release the lock-on button,
then release the trigger.
USING THE SANDER
1. Make sure that there are no nails or other objects in the area to be sanded.
2. Let the sander reach full speed before applying it to the work surface.
3. Do not apply pressure to the sander during use. The weight of the sander
alone is sufficient for normal use.
4. Move the sander evenly over the work area. Do not allow the sander to
stay in one place for too long, this will give an uneven finish.
5. Replace worn sanding belts. The performance of your sander is
dependant on the quality of the sanding belts being used.
6. Remove the sander from the work area before releasing the trigger, (wait
until the belt has stopped moving before putting the sander down.
SANDING HINTS
1. Always use both hands to hold the sander and clamp the workpiece for
added stability and safety.
8
Parts & Service: 020 8988 7400 / E-mail: [email protected] or [email protected]
Page 9
2. When sanding wood, always sand in the direction of the grain,
• Do not exert pressure on the sander.
• Regularly check the condition of the abrasive accessory and replace
when necessary.
• On very uneven surfaces or when removing layers of paint, start with a
coarse grit. On other surfaces, start with a medium grit. In both cases,
gradually change to a fine grit for a smooth finish.
MAINTENANCE
WARNING: MAKE SURE THAT THE BELT SANDER IS SWITCHED OFF AND
DISCONNECTED FROM THE MAINS SUPPLY BEFORE STARTING ANY
CLEANING OR MAINTENANCE PROCEDURES.
GENERAL CARE
Your sander has been designed to operate over a long period of time with a
minimum of maintenance. Continuous satisfactory operation depends upon
proper care.
1. Regularly clean the ventilation slots using a soft dry brush or dry cloth.
2. Only clean the motor housing using a clean damp cloth. Do not use any
abrasive or solvent-based cleaner.
A damaged power cable should be replaced by your Clarke dealer or a
qualified electrician.
The bearings in this sander are sealed for life and require no maintenance.
If the sander should become too hot, run it for 2 minutes without load.
Any worn or damaged parts should be replaced by qualified personnel. Keep
the handles clean and free from oil and grease. Refer to qualified service
personnel if internal maintenance is required.
CHANGING THE CARBON BRUSHES
1. With a suitable screwdriver, remove the carbon brush caps on either side of
the motor housing.
2. Remove the carbon brush/spring assembly.
3. If the carbon brushes are worn down to 4mm or less, replace them with
new brushes. Replace the carbon brush caps and tighten them.
NOTE: Both brushes must be replaced at the same time.
9
Parts & Service: 020 8988 7400 / E-mail: [email protected] or [email protected]
Page 10

TROUBLE SHOOTING
SANDER IS OVERHEATING
This indicates the machine is dirty. Clean the ventilation holes, and blow out
with compressed air or clean with a dry cloth.
Overloading the machine will also cause overheating. Do not apply excessive
pressure.
EXCESSIVE SPARKING OCCURS
This indicates worn brushes. This problem is quickly remedied but you should
consult your CLARKE dealer for parts and advice.
SANDER DOES NOT OPERATE WHEN SWITCHED ON
Check to ensure the fuse is sound and replace if necessary. If the fuse is sound
or blows repeatedly, consult your CLARKE dealer.
DUST IS NOT EXTRACTED
Dust bag is full and dust extractor flue is blocked. Remove and empty bag,
and clear any blockage.
ACCESSORIES
The following sanding belts are available from your Clarke dealer.
40 Grit, pack of 10 Part No. 6468040
60 Grit pack of 10 Part No. 6468042
80 Grit pack of 10 Part No. 6468044
120 Grit pack of 10 Part No. 6468046
SPARE PARTS
BS101 Dust collector bag
BS102 Motor Brushes
ENVIRONMENTAL RECYCLING POLICY
By purchasing this product, the customer is taking on the obligation to deal
with its safe disposal in accordance with the Waste Electrical and Electronic
Equipment (WEEE).
This product must not be disposed of with general household waste but be
disposed of according to the laws governing Waste Electrical and Electronic
Equipment (WEEE) at a recognised disposal facility.
This product contains valuable raw materials. Metal products should be taken
to your local civic amenity site for recycling.
10
Parts & Service: 020 8988 7400 / E-mail: [email protected] or [email protected]
Page 11
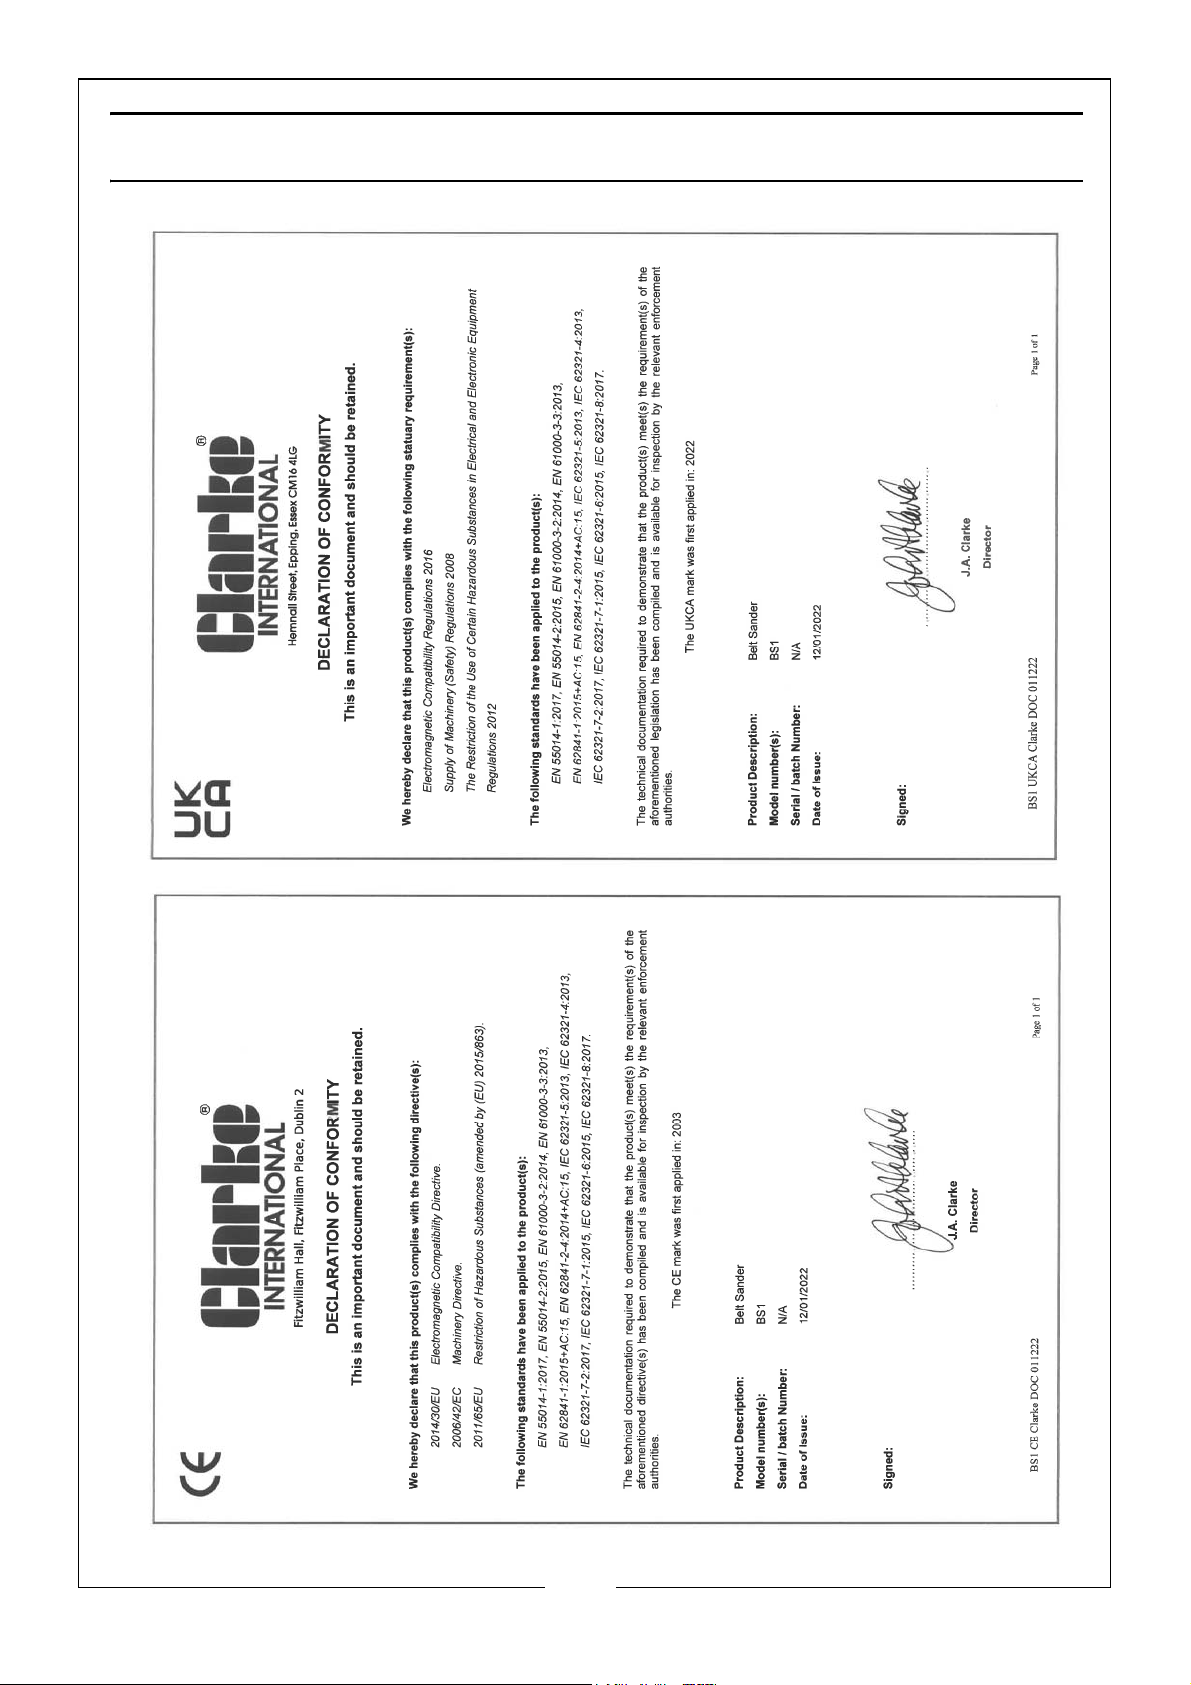
DECLARATION OF CONFORMITY
11
Parts & Service: 020 8988 7400 / E-mail: [email protected] or [email protected]
Page 12

 Loading...