

Page 1
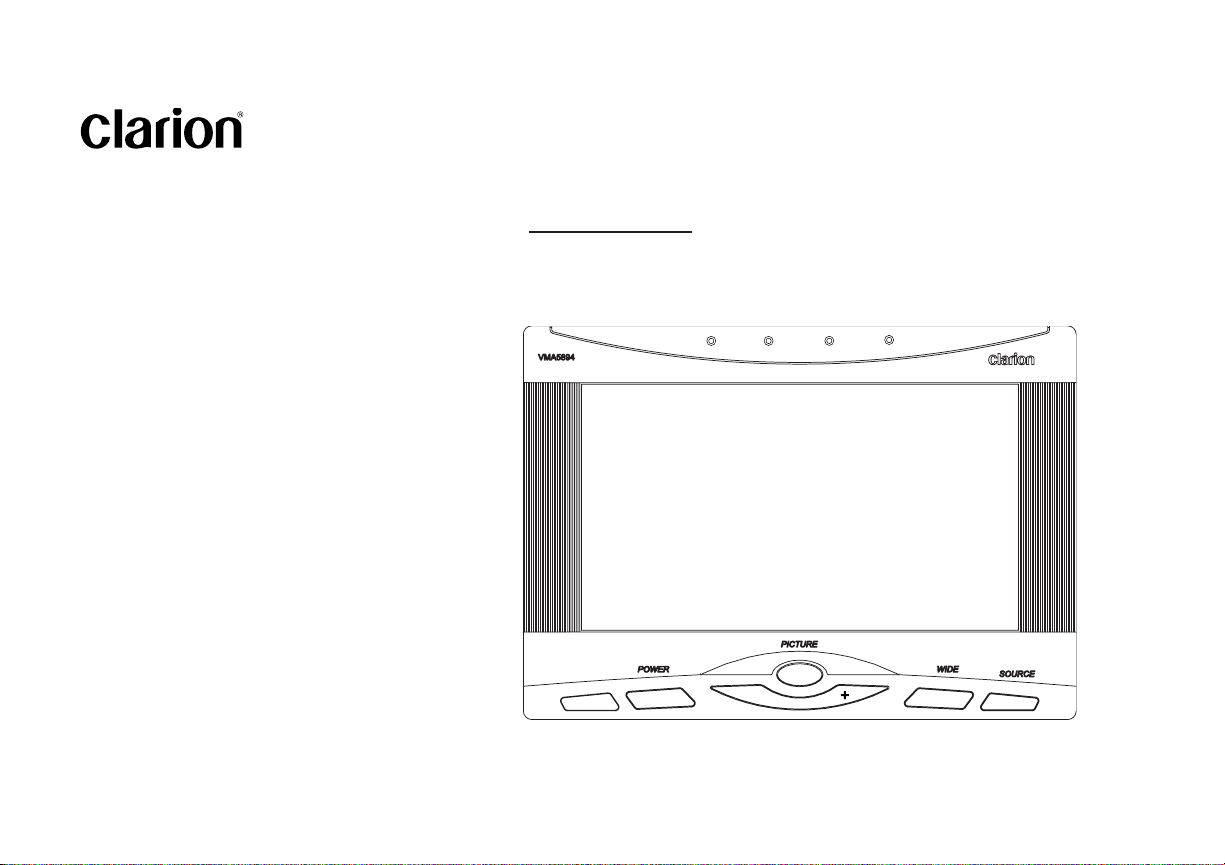
VMA5894 and VMA7194
5.8” or 7” Wide Screen Color LCD Monitor
Owner’s Manual
Installation Guide
-
Page 2

WARNING!
The Clarion VMA5894 and VMA7194
monitors are only designed to be
viewed by rear-seat occupants.
Digital video products are not intended
for viewing by the driver while the
vehicle is in motion. Such use may
distract the driver or interfere with the
driver’s safe operation of the vehicle,
and thus result in serious injury or
death. Such use may also violate state
law.
Clarion disclaims any liability for any
bodily injury, including fatalities, or
property damage that may result from
any improper or unintended uses of this
product.
About Installation
Installation of mobile audio and video components requires
experience with a variety of mechanical and electrical procedures.
Although this manual provides general installation and operation
instructions, it does not show the exact installation methods for
your particular vehicle.
If you do not have the required knowledge and experience to
successfully complete the installation, we strongly recommend
consulting an authorized Clarion dealer about professional
installation options.
FCC Approval
This equipment has been tested and found to comply with the limits
for a Class B digital device, pursuant to Part 15 of the FCC Rules.
These limits are designed to provide reasonable protection against
harmful interference in a residential installation. This equipment
generates, uses, and can radiate radio frequency energy and, if not
installed and used in accordance with the instructions, may cause
harmful interference to radio communications. However, there is no
guarantee that interference will not occur in a particular installation.
If this equipment does cause harmful interference to radio or
television reception, which can be determined by turning the
equipment off and on, the user is encouraged to consult the dealer
or an experienced radio/TV technician for help.
Copyright 2004 Clarion Corporation of America. All rights reserved.
Page 3

Contents
About Installation ....................................................................................................... 2
FCC Approval ............................................................................................................ 2
1. Introduction ............................................................................................... 5
Features..................................................................................................................... 5
Precautions................................................................................................................ 5
Please note................................................................................................................ 6
2. Using the monitor ...................................................................................... 6
Front panel controls...................................................................................................7
Wireless headphones ................................................................................................8
Playing a video or game ............................................................................................8
Adjusting the picture ..................................................................................................9
Turning the unit off and on.........................................................................................10
Switching between video sources ............................................................................. 10
Playing two videos or games at once........................................................................10
Changing the video output mode ..............................................................................1 0
Disabling automatic power on ................................................................................... 11
Returning adjustments to the factory settings ........................................................... 11
Using a remote control ..............................................................................................1 1
Connecting a video source........................................................................................11
3. Care and Maintenance ............................................................................... 12
Cleaning the cabinet.................................................................................................. 12
Cleaning the LCD panel ............................................................................................12
Servicing the monitor.................................................................................................12
VMA5894 and VMA7194 3
Page 4

4. Installation and Wiring .............................................................................. 13
What is included in the box .......................................................................................13
Before Starting........................................................................................................... 13
Installing the monitor .................................................................................................14
Wiring the monitor .....................................................................................................16
5. Troubleshooting ........................................................................................ 19
6. Specification .............................................................................................. 20
VMA5894 General Specifications.............................................................................. 20
VMA5894 Specifications ...........................................................................................20
VMA7194 General Specifications.............................................................................. 20
VMA7194 Specifications ...........................................................................................20
4 VMA5894 and VMA7194
Page 5

1. INTRODUCTION
Precautions
The Clarion 5.8-inch VMA5894 and 7-inch VMA7194 are highperformance video monitors designed specifically for the
mobile environment. Intended for use with other Clarion
multimedia products, they can also be integrated with many
other products as part of a complete mobile video solution.
Features
Two video inputs support simultaneous connection to both
dedicated video source units and optional audio/video components, such as camcorders or videogames.
• The infrared remote control receiver output allows integration with select Clarion DVD and VHS source units.
• The monitors automatically switch to operate with either
NTSC or PAL video signals (NTSC is the standard North
American video format).
• The 16:9 aspect ratio screen allows DVD films to be viewed
in their original aspect ratio for the best cinematic experience.
• Do not operate your monitor in ways other than those
described in this manual.
• Do not play a multimedia system when the car’s engine is
turned off. Doing so runs down the car’s battery.
• Do not disassemble or modify your monitor.
• Keep moisture away from the monitor. Water and humidity
may damage internal circuitry.
• Do not let the monitor become overheated.
If the temperature in the vehicle is high or the monitor has
been exposed to direct sunlight, cool the monitor (such as,
by running the air conditioning) before you turn it on.
• Keep all liquids, including beverages and cleaning fluids
away from the monitor. Liquids in the monitor can damage
the electronics and result in electrical shock or fire. If the
unit becomes wet, turn off all power and contact an authorized Clarion dealer to have the monitor inspected.
• Never press on the liquid crystal display (LCD) panel. You
may damage it.
Failure to observe these precautions may damage your car,
the monitor, or the video source, and may void the warranty.
VMA5894 and VMA7194 5
Page 6
Please note
e
In extremely cold weather the movement of the picture may
slow and the picture may darken. The picture will return to
normal once the temperature rises.
You may see small black or shiny dots in the liquid crystal
panel. These non-conforming pixels are normal and do not
indicate a product defect.
2. USING THE MONITOR
These monitors are components in a full audio/video system
that may include a VCR, DVD player, game player, camcorder,
or other video source unit.
Note:
If you have any questions about compatible components,
such as system controllers, source units, FM modulators, or
other audio/video products, please contact your authorized
Clarion dealer.
To operate the monitor, the vehicle ignition key switch must be
in the ACC or ON (run) position.
ACC or engin
ON position
WARNING!
To prevent the battery from going dead,
always operate this unit with the engine
running, if possible.
The video source unit (such as a DVD player) may turn on
automatically when you turn the ignition on.
6 VMA5894 and VMA7194
Page 7
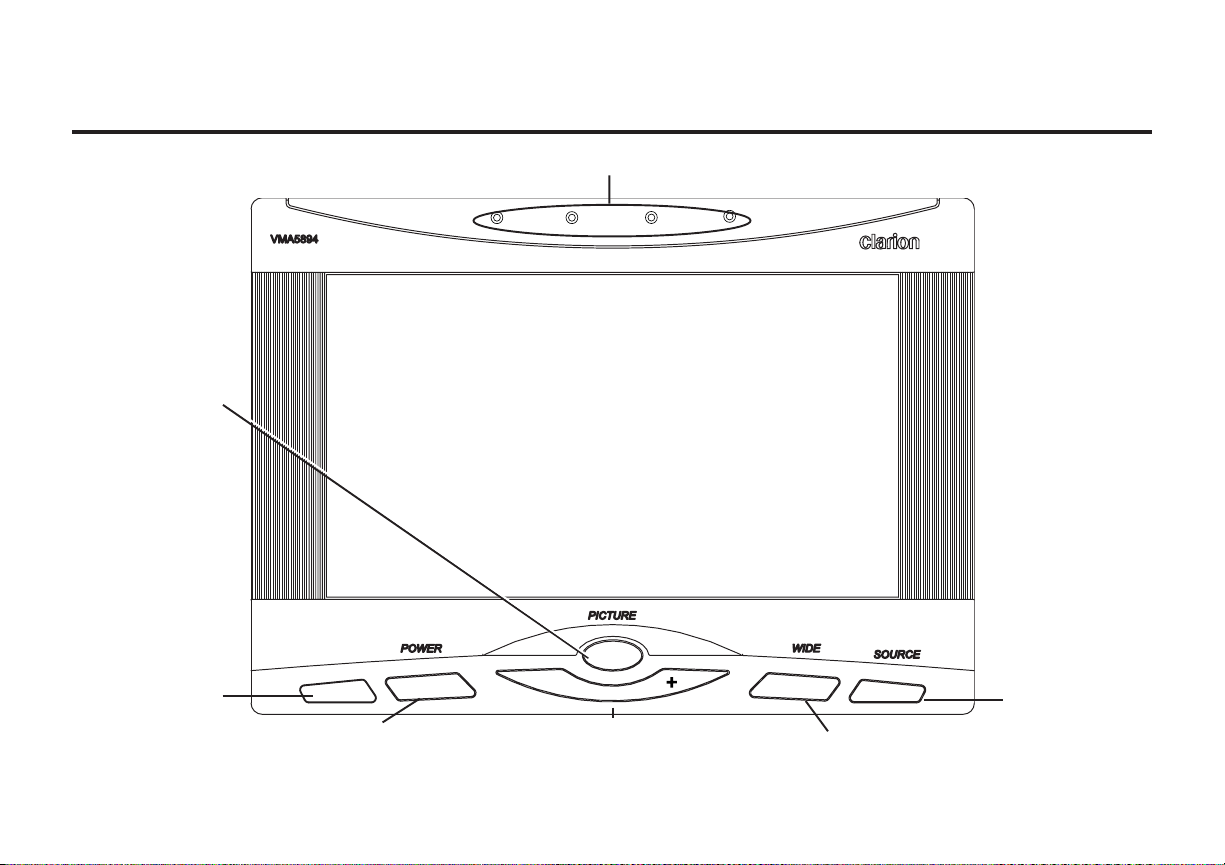
Front panel controls
Accesses the display
adjustment menus.
Each time you press
this button the unit
steps to the next setting
option and displays the
current setting.
Transmit infrared signals to the headphones
IR (infrared) receiver
for use with Clarion
remote control.
Turns power to the
monitor on and off
-
Increases, decreases or selects
adjustment settings
Selects the viewing mode
VMA5894 and VMA7194 7
Selects the
video
source
Page 8

Wireless headphones
Playing a video or game
Power OFF ON turns the headphones power on and off.
CH.A and CH.B select the infrared channel if you have two
monitors and two video source units (Configuration 2).
Configuration 1 Configuration 2
Monitor Monitor Monitor Monitor
IR CH A IR CH A IR CH A IR CH B
Video source Video source Video source
You don’t need to select the IR channel if you have only one
one monitor or two monitors and only one video source
(Configuration 1—both monitors play the same video or
game).
Volume adjusts the audio volume.
Battery compartment requires two AAA 1.5 volt batteries (not
included)
The monitor is preset at the factory to turn on automatically
when you start your car’s ignition. The monitor remains dark
until it detects a video signal.
1. Insert the media (tape, cartridge, game or disc) into the
video source.
2. Turn on the headphones.
If this is the first time you’ve used the unit, make sure your
headphones have fresh batteries installed.
Note
Your headphones must be in view of the monitor for the
infrared transmission to work.
3. Press play on the video source.
4. When you see the picture, press WIDE to select the display
mode. Depending on the video source:
CINEMA may stretch the image to fill the entire screen.
ZOOM may bring the image slightly closer.
NORMAL displays the image at its true aspect ratio (4:3)
8 VMA5894 and VMA7194
Page 9

WIDE stretches the image horizontally to fit the screen
(aspect ratio of 16:9).
4:3
16:9
Adjusting the picture
If the temperature is normal and the picture still doesn’t look
right, you may adjust the tint, color, brightness, and contrast.
1. Press PICTURE to display the adjustment menus.
5. Adjust the volume on your headphones.
Notes:
•
When using a DVD player as the source, make sure that the
unit’s output mode is set to “Wide” or “16:9.” This ensures
that the DVD player will generate a video signal, which can
take advantage of the monitor’s aspect ratio.
•
When using a source that generates a “normal”, 4:3 image
signal, such as a videogame or videocassette player, the
WIDE
button stretches the image to fit the screen. Some
minor image distortion may be visible.
The monitor displays the adjustment menus.
2. Press
PICTURE again until you reach the option you wish to
adjust.
The monitor displays the adjustment bar:
TINT adjusts the overall color of the monitor.
COLOR adjust the way each color displays.
BRIGHT adjusts the monitor’s brightness.
CONTRAST adjusts the differences between light and dark
areas.
3. Press the plus (+) end of the picture controls button to
increase the adjustment.
Press the minus (-) end of the picture controls button to
decrease the adjustment.
VMA5894 and VMA7194 9
Page 10

Each setting has 30 steps of adjustment range and is
preset at the factory to 15.
Once you’ve adjusted the picture, wait a moment and the
adjustment menus disappear.
Playing two videos or games at once
If your vehicle is equipped with two LCD monitors in the
headrests and two video source units, two different videos or
games can play at the same time.
Turning the unit off and on
Press POWER at any time to turn the unit off.
When you turn the vehicle’s ignition off, the monitor automatically shuts off.
Switching between video sources
If your vehicle has two video sources, for example, a DVD
player and a game console, you can easily switch between
them.
1. Press SOURCE.
The monitor displays AUX1.
2. Press
Note:
10 VMA5894 and VMA7194
SOURCE again to select AUX2.
If you’re using only one video source, the screen remains
dark when you select the unavailable source.
Each monitor transmits the infrared audio signal over its own
channel, A or B. When a vehicle has two monitors, the default
is to configure the monitor in the driver’s headrest to use IR
channel A, and the monitor in the passanger’s headrest to use
IR channel B. You can change this.
1. Press PICTURE several times to locate the IR CH option.
2. Press plus (+) or minus (+) to alternate between A and B.
Note:
You don’t need to select the IR channel if your vehicle has
only one monitor or only one video source.
Changing the video output mode
1. Press PICTURE several times to locate the VIDEOSYS
option.
2. Press plus (+) or minus (+) to alternate between NTSC and
PAL.
Page 11

Disabling automatic power on
Using a remote control
Your monitor is preset at the factory to switch on when you turn
on your vehicle’s ignition. You can set it up to remain off until
you press POWER on the monitor.
1. Press PICTURE several times until you reach the
AUTOPOWER option.
2. Press plus (+) or minus (+) to turn automatic power ON and
OFF.
Returning adjustments to the factory settings
1. Press PICTURE several times to locate the RESET option.
2. Press either minus (-) or plus (+) to reset the settings.
If you don’t wish to reset the settings, either press PICTURE
again or wait for the monitor to exit the picture adjustment
menus automatically.
Note:
If you reset the options and the monitor was set to source 2
(AUX2), the monitor reverts to the default setting of AUX1. If
there is no active video source on AUX1, the screen may go
dark. Press
SOURCE
to switch the monitor back to AUX2.
The LCD monitor comes with an IR receiver that works with
Clarion remote control devices. Aim the remote control at the
IR receiver during use.
Note:
The IR receiver only functions with select Clarion multimedia equipment.
Connecting a video source
The video sources you are using may be preinstalled for you,
or your configuration may be designed to allow you to change
devices.
For example, returning from a day at the beach, you may
disconnect your game from the game port and connect your
camcorder to view the video you just shot.
Caution
Always take care when disconnecting and
connecting electronic devices.
VMA5894 and VMA7194 11
Page 12

3. CARE AND MAINTENANCE
Cleaning the cabinet
Use a soft, dry cloth to gently wipe dust and dirt from the
cabinet.
Do not use benzene, thinner, car cleaner, or other cleaners.
These substances may damage the cabinet or cause the paint
to peel.
Cleaning the LCD panel
Use a soft, dry cloth to gently wipe off dust. The LCD panel
surface can be easily scratched. Do not rub it with any
abrasive object.
Servicing the monitor
In the event that trouble arises, never open the case or
disassemble the unit. The internal parts are not serviceable by
the user. Opening any components will void the warranty.
CAUTION!
Changes or modifications to this product not
approved by the manufacturer will void the
warranty and will violate FCC approval.
12 VMA5894 and VMA7194
Page 13

4. INSTALLATION AND WIRING
Before Starting
Read these instructions and the following precautions carefully.
What is included in the box
In addition to this manual, the box contains:
• Either a 5.8-inch VMA5894 or 7-inch VMA7194 monitor unit
• The wiring harness
• 1 DIN cable
• 2 audio/video input accessory cables
• 1 audio/video game port cable
• A flush-mount trim bezel
Disconnect the minus (-) terminal on the vehicle’s battery.
WARNING!
To prevent short circuits
during installation, be sure
to disconnect the battery.
Precautions
• This unit is exclusively for vehicles with a negative ground,
12V power supply.
• Do not open the case. There are no user-serviceable parts
inside. If you require assistance, consult your Clarion dealer
or an authorized Clarion service center.
• Use a soft, dry cloth to clean the screen. Never use a rough
cloth, thinner, benzene, alcohol, or other solvent. The
screen surface is easy to scratch—do not rub it when
cleaning.
VMA5894 and VMA7194 13
Page 14

• Always use great care when attaching anything to a vehicle!
Visually inspect all sides of any potential screw location to
ensure no damage will occur.
WARNING!
NEVER install this monitor where it is
visible from the driver’s seat, or where
it could injure any vehicle occupant in
case of an accident. Ensure that your
installation does not create risk of
head-strike injury, and that the monitor
will remain securely mounted in the
case of an accident or sudden maneuver.
Installing the monitor
These TFT LCD monitors are designed for custom installation.
While a basic flush-mount bezel is supplied, you may need
parts that are not included (depending on your installation).
Clarion also offers optional mounting kits:
• The ZMT003 is a flexible gooseneck mount.
• The PQE023 positions the monitor on the back of a vehicle
headrest.
Note:
The Clarion HRM100 and HRM150 headrest mounting kits
are not compatible with this monitor.
Flush mounting in the headrest
You may use the included trim bezel to flush-mount the
monitor.
1. Ensure that you will have sufficient clearance for the
monitor and its rear-located wiring harness.
2. Cut the opening.
3. Route the DIN-connector end of the wiring harness into the
opening from the rear out the front.
14 VMA5894 and VMA7194
Page 15

4. Insert the trim bezel and route the wiring harness through
the opening in the rear.
5. Firmly attach the bezel to the mounting surface and/or to
the interior of the mounting surface.
Mounting
tabs
Mounting
screw
holes
Wire harness opening
6. Connect the wiring harness to the monitor, and tuck the
excess wiring harness length carefully out of the way
behind the bezel.
7. Gently insert the monitor into the bezel.
Press only on the edges of the monitor, not on the screen.
You should hear a few soft clicks as the monitor locks into
place.
CAUTION!
NEVER press on the surface of the
screen! Gently press on the edges of
the monitor case. If you find that you cannot insert the monitor without excessive
force, you may need to check your wire
harness position for interference with the
insertion process. You may also need
make the opening slightly larger.
VMA5894 and VMA7194 15
Page 16

Removing the monitor from the bezel
To remove the monitor from the bezel, insert a flat card (such
as a credit card) between the monitor case and the side of the
bezel to release the spring clips.
Insert card
Custom Mounting using the threaded insert
The monitor base has a threaded insert (1/4 - 20) that can be
used with the optional Clarion ZMT009 gooseneck mounting
kit or with a 1/4 -20 machine screw in custom applications.
Wiring the monitor
Precautions
• Disconnect the negative battery terminal before making any
wiring connections.
• Be particularly careful where you route wires. Keep them
away from the engine, exhaust system, etc. Heat may
damage wires.
• If the fuse should blow, make sure all connections are
correct and no wires are damaged before replacing the
fuse. Always use fuses that are the same amperage value
as the original. When replacing a fuse, never let the battery
side touch any metal part or any other wire.
16 VMA5894 and VMA7194
Page 17

WARNING!
(+) V ACC
I
Be sure to disconnect the battery (-)
terminal before starting. This is to
prevent short circuits during installation.
Procedure
1. Disconnect the negative (-) lead from the vehicle’s battery.
2. Find a place in the vehicle for the video source(s).
3. Create passage holes for the power and video cables.
When drilling through metal or plastic, use grommets to
protect the cables from sharp edges that could penetrate
the insulation and cause a short circuit and device failure.
4. Connect the ground lead (black) securely to a clean metal
plate on the vehicle.
Use sand paper to remove any paint from the surface
where you attach the ground terminal.
5. Reconnect the negative (-) lead to the battery.
Monitor connections
CAUTION!
Some non-Clarion automotive D VD and VCP
source units use a similar connector for an
external IR receiver , but use different pin polarity than the Clarion uses. Connecting nonClarion source equipment to this connector
could cause equipment damage not covered by the warranty!
IR connector polarity:
R DATA LINE
VMA5894 and VMA7194 17
Page 18

Connections diagram
From VCR, DVD
player, etc.
From game port,
camcorder
or
+ (positive)
- (negative)
1. Audio L
2. IR GND
3. Audio R
4. VIDEO GND
5. VIDEO
To monitor
6. 12V GND
7. IR
8. 12V
9. GND
VMA5894 and VMA7194 18
Page 19

5. TROUBLESHOOTING
The system does not work
A fuse may be blown. Replace the external fuse with a fuse of
the same value.
The power wires may not be connected. Check the wiring
connections and retest.
No picture.
SOURCE to make sure the proper input is selected.
Press
If there is still no picture, press PICTURE. If the menu appears,
check the source unit and video connections. If no menu
appears, check all fuses and power connections to the monitor
and the associated equipment.
Note:
The monitor has an operating temperature range of
-1oC to 45oC (30oF - 113oF). If the temperature is outside
this operating range, the unit will not turn on, or the screen
may be slow to react to image changes. The monitor will
function normally once it returns to its proper operating
range.
With a DVD player and a widescreen DVD disc, there are
black bars above and below the picture.
Change the TV display mode to “Wide” in the DVD player’s
Setup menu.
After changing this setting, if there are still black bars, press
WIDE on the front panel of the monitor and select WIDE.
The screen is dark
The brightness is set too low. Press
BRIGHT option.
The interior of the vehicle is too hot or too cold. The monitor’s
operating temperature is -1 degree to 45 degrees Celsius (30
degrees to 113 degrees Fahrenheit).
Picture “rolls.”
Check that the VIDEOSYS setting is correct for the monitors
and DVDs being used (see “
Mode
”). PAL video often “rolls” on NTSC monitors.
Changing the Video Output
PICTURE and adjust the
VMA5894 and VMA7194 19
Page 20

6. SPECIFICATION
VMA7194 General Specifications
Note:
The technical data and the design of the equipment may
change for the sake of technical improvements without prior
notice.
VMA5894 General Specifications
Power requirement: 12V DC (9V-16V)
Power consumpaion: 6.5 watts, power on
0.6 amps (600mA)
Weight: 345 g
Dimensions (w x h x d): 161 x 115 x 29 mm
Included parts: LCD monitor
1 16P Main cable
2 8P AV cable
1 8P Game port cable
2-pin Molex power connector
Mounting bracket
VMA5894 Specifications
Display type: Color TFT Active Matrix LCD
Screen size: 5.8”
Pixels: 1200 x 234
Screen resolution 280,800 dots
Video input level (RCA) 1.0 volts peak to peak, NTSC
Power requirement: 12V DC (9V-16V)
Power consumpaion: 6.5 watts, power on
0.6 amps (600mA)
Weight: 345 g
Dimensions (w x h x d): 183.2 x 128 x 29 mm
Included parts: LCD monitor
1 16P Main cable
2 8P AV cable
1 8P Game port cable
2-pin Molex power connector
Mounting bracket
VMA7194 Specifications
Display type: Color TFT Active Matrix LCD
Screen size: 7”
Pixels: 1440 x 234
Screen resolution 336,960 dots
Video input level (RCA) 1.0 volts peak to peak, NTSC
20 VMA5894 and VMA7194
Page 21

Notes
VMA5894 and VMA7194 21
Page 22

Notes
22 VMA5894 and VMA7194
Page 23

LIMITED WARRANTY INFORMATION
For USA and Canada only
This product is warranted against all defects in material workmanship
for a period of one year from the date of original purchase. Clarion
ProAudio products, except for speakers, are covered by a two year
limited warranty when installed by an authorized Clarion dealer. The
conditions of this limited warranty and the extent of responsibility of
Clarion Corporation of America (“Clarion”) under this limited warranty
are as follows:
1. PROOF OF DATE OF PURCHASE WILL BE REQUIRED FOR
WARRANTY SERVICE OF THIS PRODUCT. IN THE CASE OF
THE TWO (2) YEAR LIMITED WARRANTY FOR CLARION
PROAUDIO PRODUCT, PROOF OF INSTALLATION BY AN
AUTHORIZED DEALER IS REQUIRED. INFORMATION ABOUT
CLARION AUTHORIZED WARRANTY SERVICE CENTERS MAY
BE OBTAINED BY CONTACTING CLARION AT THE ADDRESS
BELOW.
2. This limited warranty will become void if service performed by
anyone other than an approved Clarion Warranty Service Center
results in damage to the product.
3. This limited warranty does not apply to any product which has been
subject to misuse, neglect or accident, or which has had the serial
number altered, defaced or removed, or which has been connected,
installed, adjusted or repaired, other than in accordance with the
instructions furnished by Clarion.
4. This limited warranty does not cover car static or other electrical
interferences, tape head or laser pick-up cleaning or adjustments,
or labor costs for the removal or reinstallation of the unit for repair.
5. The sole responsibility of Clarion under this limited warranty shall be
limited to the repair of the product or replacement of the product, at
the sole discretion of Clarion.
6. Product must be shipped in its original carton or equivalent carton,
fully insured, with shipping charges prepaid. Clarion will not assume
any responsibility for any loss or damage incurred in shipping.
7. ALL IMPLIED WARRANTIES EXCEPT TO THE EXTENT
PROHIBITED BY APPLICABLE LAW SHALL HAVE NO GREATER
DURATION THAN THE WARRANTY PERIOD SET FORTH
ABOVE. UNDER NO CIRCUMSTANCES SHALL CLARION BE
LIABLE FOR ANY LOSS OR DAMAGE, DIRECT OR
CONSEQUENTIAL, ARISING OUT OF THE USE OR INABILITY
TO USE THE PRODUCT. BECAUSE SOME STATES DO NOT
ALLOW LIMITATIONS ON HOW LONG AN IMPLIED WARRANTY
LASTS OR EXCLUSIONS OR LIMITATIONS OF INCIDENTAL OR
CONSEQUENTIAL DAMAGES, THE ABOVE LIMITATIONS OR
EXCLUSIONS MAY NOT APPLY TO YOU.
8. THIS LIMITED WARRANTY GIVES YOU SPECIFIC LEGAL
RIGHTS, AND YOU MAY ALSO HAVE OTHER RIGHTS WHICH
VARY FROM STATE TO STATE.
9. Should you have any difficulties with the performance of this
product during the warranty period, please call or visit our web site
(www.clarion.com) for a listing of Authorized Warranty Service
Centers in your area. You may also contact Clarion at the address
listed below.
In USA:
Clarion Corporation of America
Attn: Customer Service Manager
661 W. Redondo Beach Blvd
Gardena, CA. 90247-4201
1-800-GO-CLARION
(310)327-9100
www.clarion.com
VMA5894 and VMA7194 23
In Canada:
Clarion Canada, Inc.
Warranty Service Center
2239 Winston Park Drive
Oakville, Ontario L6H
5R1
(905)829-4600
www.clarioncanada.com
 Loading...