

Page 1
DVD MULTIMEDIA STATION WITH BUILT-IN
NAVIGATION & 6.2” TOUCH PANEL CONTROL
NX403A
Owner’s manual
NX403A_FrontCover-EN.indd 1 2013-7-10 14:56:24
Page 2
1
NX403A
English
English
Owner’s Manual
Contents
1. FEATURES ...........................................................................................................3
Expanding Systems ..............................................................................................3
2. PRECAUTIONS ....................................................................................................4
3. CAUTIONS ON HANDLING.................................................................................6
Operation Panel ....................................................................................................6
USB Port ...............................................................................................................6
Cleaning ................................................................................................................6
Handling Discs ......................................................................................................7
4.Operational Panel ................................................................................................9
Functions of Buttons .............................................................................................9
5. REMOTE CONTROL..........................................................................................10
Functions of Remote Control Buttons ................................................................11
Functions of Remote Control Buttons ................................................................12
6. MAIN MENU.......................................................................................................13
7. DVD Video Player Operations .........................................................................14
Discs ...................................................................................................................14
Change DVD System Settings ............................................................................15
Watching to a disc ..............................................................................................15
Operate the DVD Player menu ............................................................................16
Operate the Video files Player menu...................................................................18
Switching Subtitles .............................................................................................18
Video files list ......................................................................................................18
8. CD ......................................................................................................................19
Listening to a disc/Ejecting a disc ......................................................................19
Showing CD Player mode screen .......................................................................19
Operate the CD Player menu ..............................................................................19
Listening to compressed audio ..........................................................................20
Tag display function ............................................................................................20
9. USB Audio Operations ....................................................................................22
Notes on using USB memories ...........................................................................22
Select USB Audio mode .....................................................................................22
Playing Audio files in USB memory ....................................................................23
10. USB Video Operations ....................................................................................24
Notes on using USB memories ...........................................................................24
Select USB Video mode .....................................................................................24
Playing video files in USB memory .....................................................................24
Playable Video file ...............................................................................................24
11. iPod/iPhone Operations .................................................................................26
Notes on using Apple iPod/iPhone .....................................................................26
iPod Audio ID3 Info .............................................................................................26
iPod audio playlist mode screen .........................................................................27
iPod Video Menu Operations ..............................................................................28
iPod Video ID3 mode screen ..............................................................................28
iPod Video List mode screen ..............................................................................29
iPod Video Simple Control Mode Screen ...........................................................29
iPod Video play mode screen .............................................................................29
12. Bluetooth AUDIO PLAYER OPERATIONS .....................................................31
Selecting the Bluetooth Audio mode ..................................................................31
Bluetooth audio player settings ..........................................................................31
Registering your Bluetooth audio player (Pairing)...............................................31
Selecting the Bluetooth audio player ..................................................................32
Controlling the Bluetooth audio player ...............................................................32
13. Bluetooth
TELEPHONE OPERATIONS ............................................................33
NX403A_Usermanual_EN.indd 1 2013-7-11 16:33:43
Page 3

2
NX403A
English
Owner’s Manual
Select the BT Phone mode .................................................................................33
Bluetooth Telephone settings .............................................................................33
Register your cellular phone (Pairing) .................................................................34
Select the cellular phone ....................................................................................34
Obtaining the Phone Book data .........................................................................34
Telephone operations .........................................................................................34
14. Tuner Operations ............................................................................................36
15. AUX .................................................................................................................37
16. Camera In Operations ....................................................................................37
17. Rear Source Operations .................................................................................38
DVD Video in Rear ..............................................................................................38
AUX1 ...................................................................................................................39
AUX2 ...................................................................................................................39
iPod Video in Rear ..............................................................................................39
18. Setting Operation ............................................................................................40
General Setup Menu ...........................................................................................40
Video Setup Menu ..............................................................................................41
Audio Setup Menu ..............................................................................................41
Navigation Setup Menu ......................................................................................41
Others Setup Menu .............................................................................................41
Set the Anti-Theft code .......................................................................................42
19. TROUBLESHOOTING .....................................................................................43
GENERAL ............................................................................................................43
DVD PLAYER ......................................................................................................43
USB DEVICE .......................................................................................................44
Bluetooth ............................................................................................................44
TV/VTR (When connecting an optional TV tuner, etc.)........................................45
20. ERROR DISPLAY.............................................................................................46
DVD PLAYER ......................................................................................................46
21. SPECIFICATIONS ............................................................................................47
22. WIRE CONNECTION GUIDE ...........................................................................49
NX403A_Usermanual_EN.indd 2 2013-7-11 16:33:43
Page 4
3
NX403A
English
English
Owner’s Manual
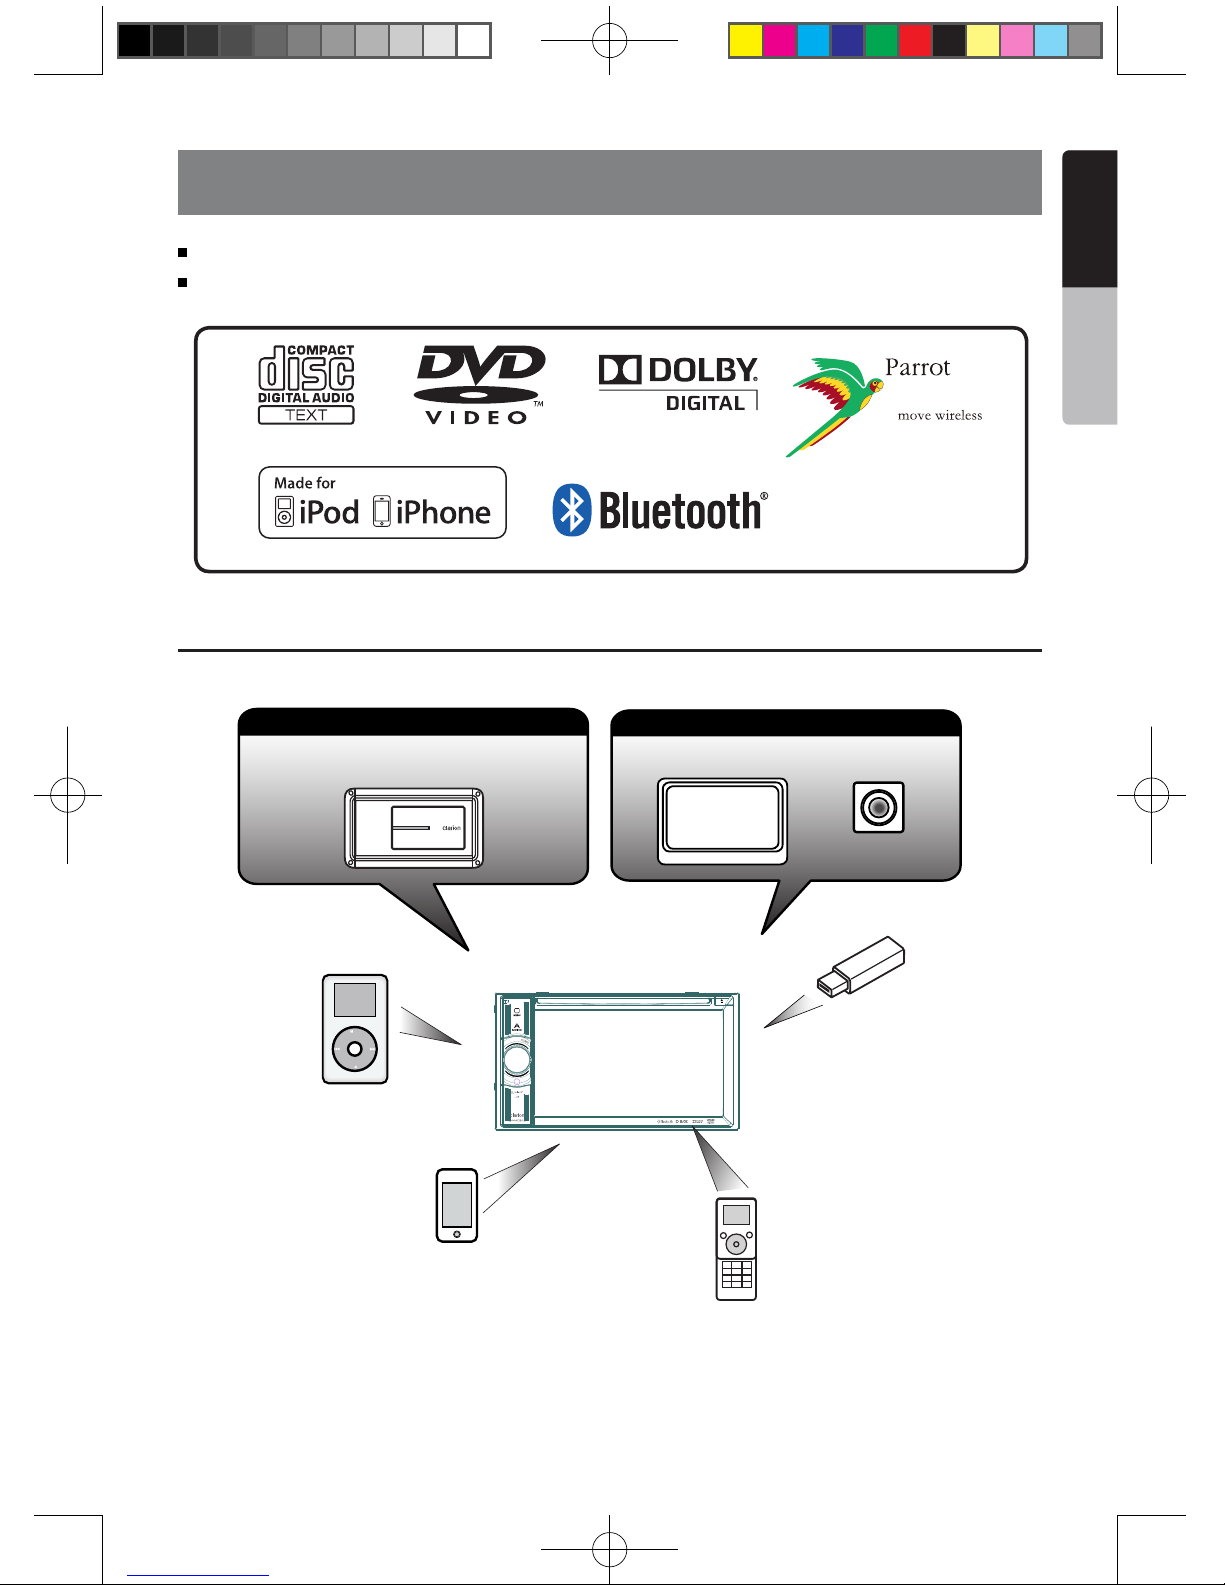
1. FEATURES
Expanding Systems
NOTE:
The items listed outside the frames are the commercial products generally sold.
Built-in Parrot Bluetooth® Handsfree(HFP) and Audio Streaming(A2DP & AVRCP)
Compatible with iPod® / iPhone® with Album Art
iPod
Expanding visual features
Rear monitor
Rear Vision Camera
Expanding audio features
External Power
Amplier
iPhone
USB
Memory
Bluetooth
Telephone
NX403A_Usermanual_EN.indd 3 2013-7-11 16:33:43
Page 5
4
NX403A
English
Owner’s Manual
2. PRECAUTIONS
• Foryoursafety,thedrivershouldnotwatchanyvideosourcesand/oroperatethecontrolswhiledriving.
Please note that watching and operating any video sources while driving are prohibited by law in some
countries. Also, while driving, keep the volume to a level at which external sounds can be heard.
•Donotdisassembleormodifythisunit.Itmaycauseanaccident,re,orelectricshock.
•Donotusethisunitwhenatroubleexists,suchasnoscreencontentappearsornosoundis
audible. It may cause an accident, fire, or electric shock. For that case, consult your authorized
dealer or a nearest Clarion service center.
•Incaseofaproblem,suchasanymaterialhasbeenenteredintheunit,theunitgetswet,or
smoke or strange smells come out of the unit, etc., stop using this unit immediately, and consult
your authorized dealer or a nearest Clarion service center.
Using it in that condition may cause an accident, fire, or electric shock.
•Useafusewiththesamespecicationonlywhenreplacingthefuse.
Using a fuse with a different specification may causes a fire.
•Fortheinstallationofthisunitorachangeintheinstallation,askyourauthorizeddealerora
nearest Clarion service center for safety. Professional skills and experiences are required to do
so.
WARNING
NX403A_Usermanual_EN.indd 4 2013-7-11 16:33:44
Page 6
5
NX403A
English
English
Owner’s Manual
1.When the inside of the car is very cold and
the player is used soon after switching on the
heater, moisture may form on the disc (DVD/
CD) or the optical parts of the player and
proper playback may not be possible. If
moisture forms on the disc (DVD/CD), wipe it
o with a soft cloth. If moisture forms on the
optical parts of the player, do not use the
player for about one hour. The condensation
will disappear naturally allowing normal
operation.
2.Driving on extremely bumpy roads which
cause severe vibration may cause the sound
to skip.
3.This unit uses a precision mechanism. Even
in the event that trouble arises, never open
the case, disassemble the unit, or lubricate
the rotating parts.
NX403A
NX403A_Usermanual_EN.indd 5 2013-7-11 16:33:44
Page 7
6
NX403A
English
Owner’s Manual
3. CAUTIONS ON HANDLING
Operation Panel
•Theoperationpanelwilloperateproperlyin
atemperature range of 0˚ to 60˚ C.
•Donotallowanyliquidsonthesetfrom
drinks, umbrellas etc. Doing so may damage
the internal circuitry.
•Donotdisassembleormodifythesetinany
way. Doing so may result in damage.
•Subjectingtheoperationpaneltoshocks
may result in breakage, deformation or other
damage.
•Donotletcigarettesburnthedisplay.
•Ifaproblemshouldoccur,havetheset
inspected at your store of purchase.
•Donotinsertobjectsorpokeinthespace
between the operation panel and the main
unit when the panel is tilted.
•Theremotecontrolunitmaynotworkifthe
remote control sensor is exposed to direct
sunlight.
•Inextremelycoldweather,thedisplay
movement may slow down and the display
may darken, but this is not a malfunction.
The display will work normally when the
temperature increases.
•Smallblackandshinyspotsinsidetheliquid
crystal panel are normal for LCD products.
For a longer service life, be sure to read the following cautions.
Cleaning
• Cleaningthecabinet
Use a soft, dry cloth and gently wipe off
the dirt. For tough dirt, apply some neutral
detergent diluted in water to a soft cloth, wipe
off the dirt gently, then wipe again with a dry
cloth.
Do not use benzene, thinner, car cleaner, etc.,
as these substances may damage the cabinet
or cause the paint to peel. Also, leaving rubber
or plastic products in contact with the cabinet
for long periods of time may cause stains.
• Cleaningtheliquidcrystalpanel
The liquid crystal panel tends to collect dust,
so wipe it off occasionally with a soft cloth.
The surface is easily scratched, so do not rub
it with hard objects.
USB Port
•TheUSBmemorystickmaystickoutwhen
inserted, so it may cause danger during
driving. In such cases, you can use a
commercial USB extension cable, etc., but
use it safely under your own judgement.
•TheUSBmemorysticksmustberecognized
as “USB mass storage class” to work
properly. Some models may not operate
correctly.
When the memorized data is lost or
damagedbyanychance,Clarionshallnot
be liable for any damage.
When using an USB memory stick, we
recommend that you backup your data stored
on it before by using a personal computer etc.
•DatalesmaybebrokenwhenusingUSB
memory sticks in the following situation:
When disconnecting the USB memory stick or
turning the power off during writing or reading
data.
When affected by static electricity or electric
noise.
Connect/disconnect the USB memory stick
when it is not accessed.
•SomeUSBmemorystickscannotbeinserted
to the main unit because of their shape. In
such cases, use a commercial USB extension
cable to connect them.
•Connectingwiththecomputerisnotcovered.
•Musicles(MP3,WMA,etc.)storedinthe
USB memory stick can be played back.
NX403A_Usermanual_EN.indd 6 2013-7-11 16:33:44
Page 8
7
NX403A
English
English
Owner’s Manual
Handling Discs
Handling
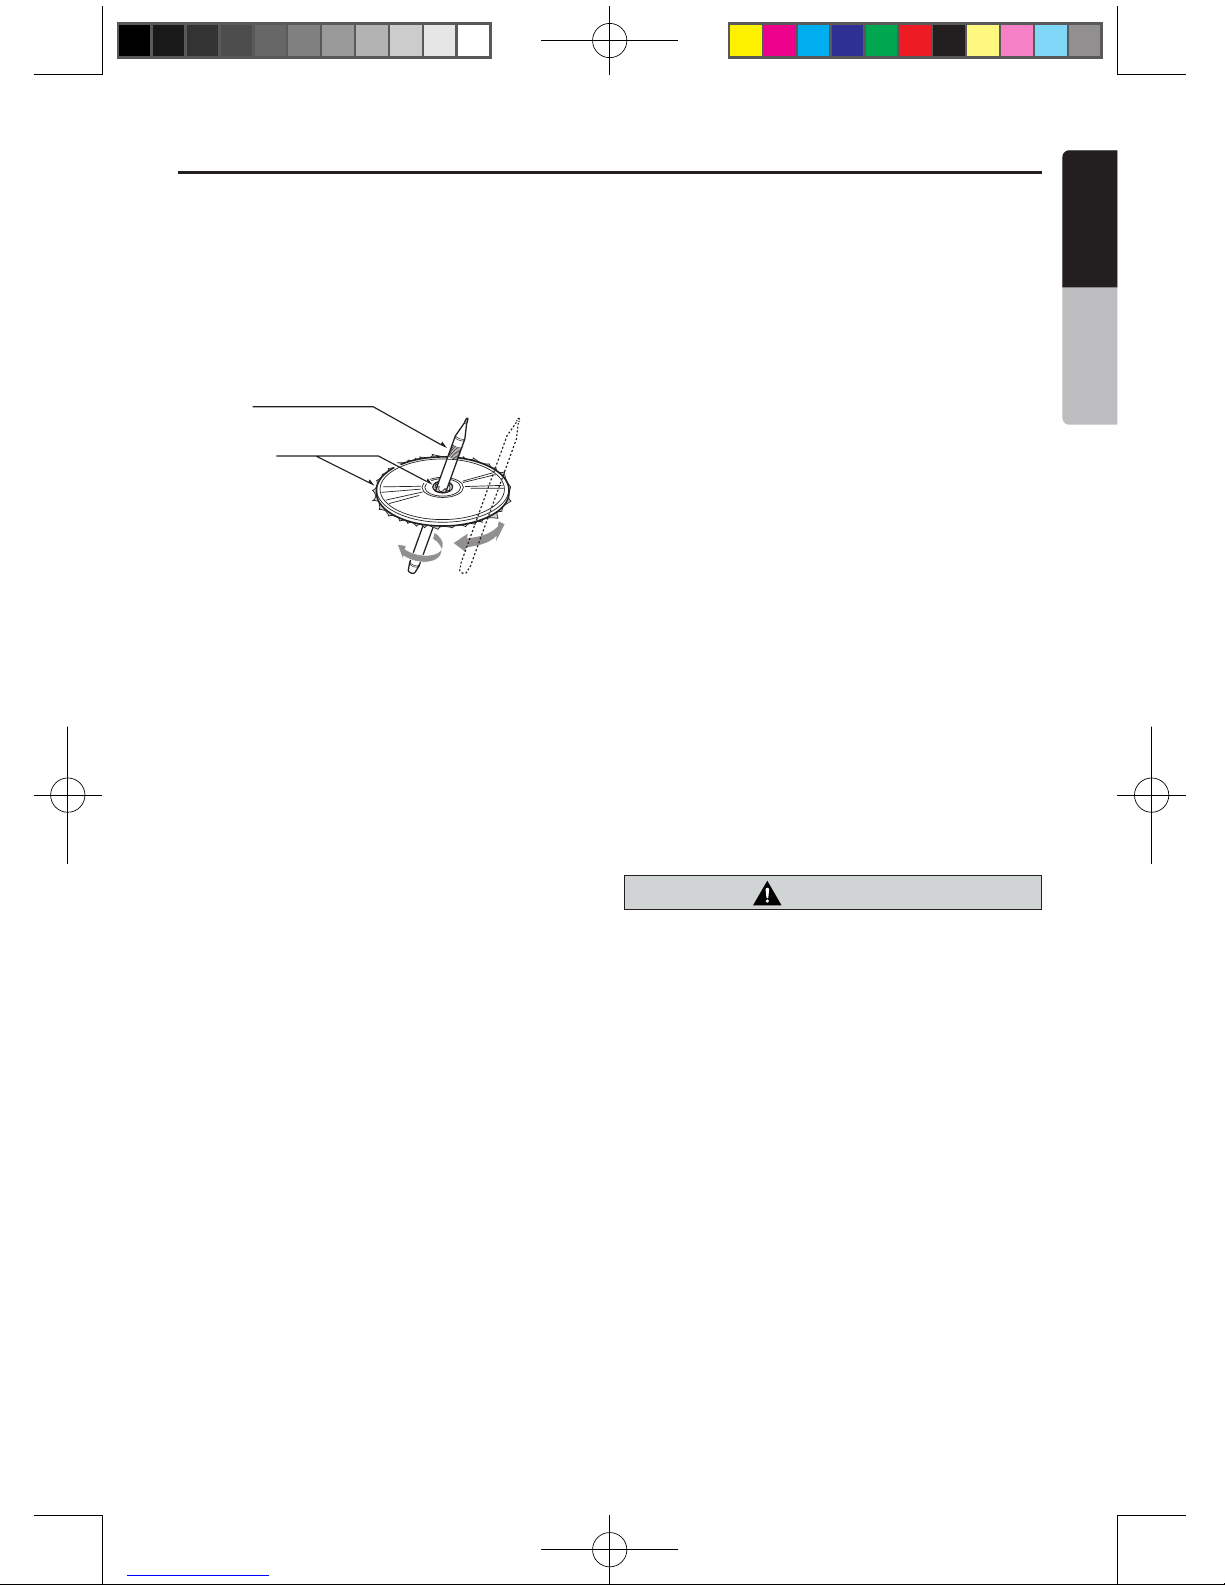
•Newdiscsmayhavesomeroughness
around the edges. If such discs are used,
the player may not work or the sound
may skip. Use a ball-point pen or the like
to remove any roughness from the edge
of the disc.
Ball-point pen
Roughness
Never stick labels on the surface of the
disc or mark the surface with a pencil or
pen.
•Neverplayadiscwithanycellophane
tape or other glue on it or with peeling off
marks. If you try to play such a disc, you
may not be able to get it back out of the
DVD player or it may damage the DVD
player.
•Donotusediscsthathavelarge
scratches, are misshapen, cracked,
etc. Use of such discs may cause
missoperation or damage.
•Toremoveadiscfromitsstoragecase,
press down on the center of the case
and lift the disc out, holding it carefully
by the edges.
•Donotusecommerciallyavailabledisc
protection sheets or discs equipped with
stabilizers, etc. These may damage the
disc or cause breakdown of the internal
mechanism.
Storage
•Donotexposediscstodirectsunlightor
any heat source.
•Donotexposediscstoexcesshumidity
or dust.
•Donotexposediscstodirectheatfrom
heaters.
Cleaning
•Toremovengermarksanddust,use
a soft cloth and wipe in a straight
line from the center of the disc to the
circumference.
•Donotuseanysolvents,suchas
commercially available cleaners, antistatic spray, or thinner to clean discs.
•Afterusingspecialdisccleaner,letthe
disc dry off well before playing it.
OnDiscs
•Exerciseagoodprecautionwhenloading
a disc. The operation panel will close
automatically when leaving it open for a
while.
•Neverturnoffthepowerandremovethe
unit from the car with a disc loaded.
CAUTION
Foryoursafety,thedrivershouldnot
insertorejectadisc,openingthe
operation panel while driving.
NX403A_Usermanual_EN.indd 7 2013-7-11 16:33:44
Page 9
8
NX403A
English
Owner’s Manual
•
This product incorporates copyright protection
technology that is protected by U.S. patents
and other intellectual property rights. Use of this
copyright protection technology must be authorized
by Rovi Corporation, and is intended for home and
other limited viewing uses only unless otherwise
authorized by Rovi Corporation.
Reverse engineering or disassembly is prohibited.
•
Manufactured under license from Dolby
Laboratories. “Dolby”, “Pro Logic” and the double-D
symbol are trademarks of Dolby Laboratories.
•
"Made for iPod," and "Made for iPhone" mean
that an electronic accessory has been designed to
connect specifically to iPod, or iPhone, respectively,
and has been certified by the developer to meet
Apple performance standards. Apple is not
responsible for the operation of this device or its
compliance with safety and regulatory standards.
Please note that the use of this accessory with iPod
or iPhone may affect wireless performance.iPhone
and iPod are trademarks of Apple Inc., registered in
the U.S. and other countries.
•
The Bluetooth® word mark and logos are owned
by the Bluetooth® SIG, Inc. And any use of such
marks by Clarion Co.,Ltd. is under license. Other
trademarks and trade names are those of their
respective owners.
•
DivX®, DivX Certified® and associated logos
are trademarks of Rovi Corporation or its
subsidiaries and are used under license.
DivX Certified® to play DivX® video, including
premium content. Covered by one or more
of the following U.S. patents: 7,295,673;
7,460,668; 7,515,710; 7,519,274 ABOUT DivX
VIDEO: DivX® is a digital video format created
by DivX, LLC, a subsidiary of Rovi Corporation.
This is an official DivXCertified® device that
plays DivX video. Visit DivX.
com for more information and software tools
to convert your files into DivX videos.
ABOUT DivX VIDEO-ON-DEMAND: This DivX
Certified® device must be registered in order
to play purchased DivX Video-on-Demand
(VOD)movies. To obtain your registration
code, locate the DivX VOD section in your
device setup menu. Go to vod.DivX.com for
more information on how to complete your
registration.
Abouttheregisteredmarks,etc.
NX403A_Usermanual_EN.indd 8 2013-7-11 16:33:44
Page 10

9
NX403A
English
English
Owner’s Manual
4.Operational Panel
Functions of Buttons
[Microphone]
[MENU]
[NAVI/AV]
[IR]
[Cover]
[AUX IN]
[REST]
[micro SD slot]
[POWER/VOL]
[Disc slot]
[ ]
[POWER/VOL] Knob
• Press this button to turn on the power.
• When the power is already on, it moves to the
Navigation mode. If Navigation mode is displayed, it
moves to the Navigation menu.
• Keep pressing this button more than 2 second to
turn off the power.
• Turn this button to left or right to decrease or
increase the volume of the system.
[NAVI/AV] Button
• Press this button to display NAVI, press again to
return current source.
• Press and hold this button for 2 seconds to display
the brightness setting menu.
[ ] Eject
• Press to eject disc from unit.
[MENU] Button
• Press this button to display main menu; press again
to return current source.
• Press and hold this button for 2 seconds to turn off
the monitor. Press any place of the screen to turn on
the monitor again.
[RESET] Button
• Press this button to hardware reset the unit.
Note: When the [RESET] button is pressed, frequencies
of radio stations, titles, etc. stored in memory are
cleared.
[micro SD slot ]
Insert a micro SD Card for MAP here. The micro SD
card for MAP is sold separately.
Note: The micro SD card is only for navigation. Please
don’t insert micro SD card for other purpose. After
insertion of micro SD card for MAP, don’t remove it;
otherwise, the navigation function will be disabled.
[AUX IN]
AUX 1 Connector.
[Microphone]
This is used for Bluetooth phone.
[IR] SENSOR
•Receiver for the remote control unit (operating range:
30 degree ins all directions).
NX403A_Usermanual_EN.indd 9 2013-7-11 16:33:44
Page 11
10
NX403A
English
Owner’s Manual
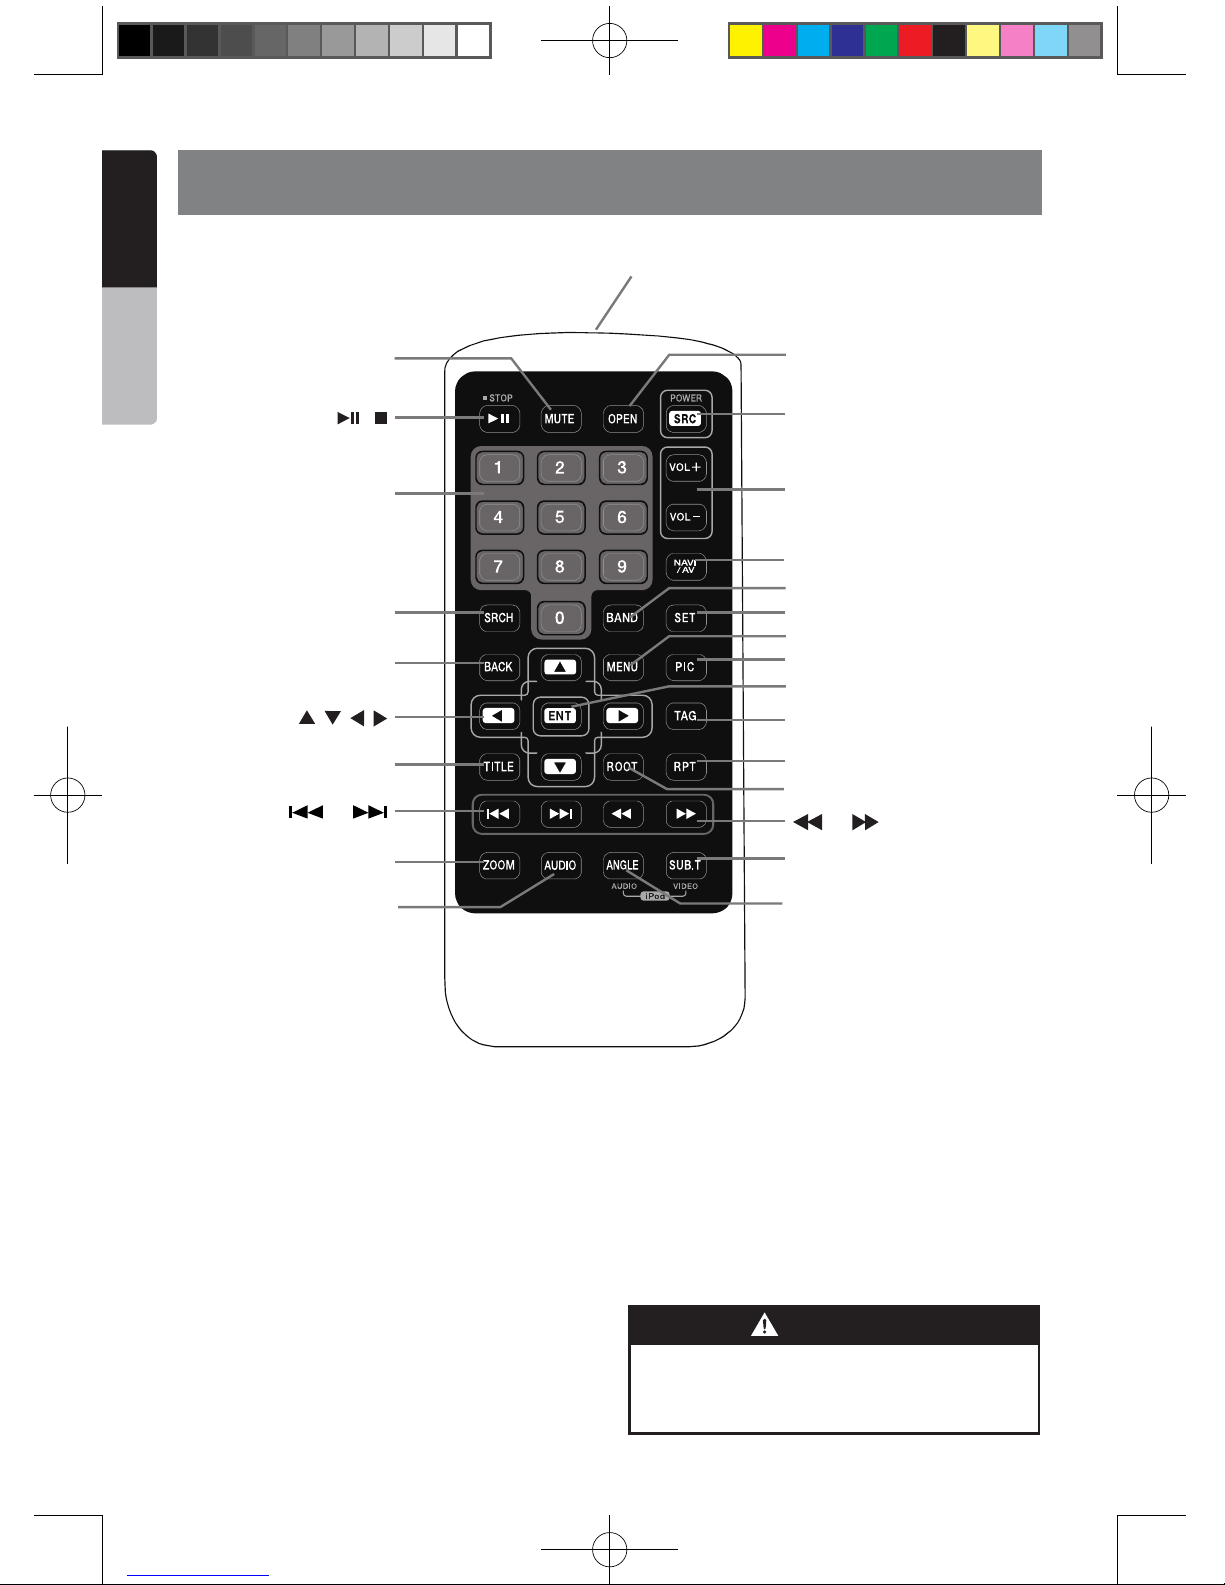
5. REMOTE CONTROL
Replacing the batteries
1.Press the retention tab and pull out the
battery tray and remove the old battery.
2. Insert the new CR2025 battery and slide
the battery tray back in the remote control
the same direction that you removed it.
Please ensure the tray is inserted in the
correct direction.
Note:
Using batteries improperly can cause them to
explode. Take note of the following points:
• When replacing batteries, replace both batteries
with new ones.
• Do not short-circuit, disassemble or heat batteries.
• Do not dispose of batteries into re or ames.
• Dispose of spent batteries properly.
Signal transmitter
Operating range : 30°in all directions
[ / ]
[ 0-9 ]
[SRCH]
[BACK]
[ , , , ]
[TITLE]
[ ], [ ]
[ZOOM]
[MUTE]
[AUDIO]
[POWER / SRC]
[VOLUME]
[SEL]
[PIC]
[TAG]
[RPT]
[ ], [ ]
[SUB.T]
[OPEN]
[ANGLE]
[NAV/ AV]
[MENU]
[BAND]
[ROOT]
[ENT]
Lithium batteries contain
Perchlorate
Dispose of discharged batteries properly.
WARNING
NX403A_Usermanual_EN.indd 10 2013-7-11 16:33:44
Page 12
11
NX403A
English
English
Owner’s Manual
[ / ] Button
• Press this button to play or pause video and audio
media.
• Press this button more than 1 second to stop video
and audio media.
[MUTE] Button
• Mute or Unmute the speaker.
• The symbol on upper right area of the screen
indicates that speaker is muted.
[POWER/SRC] Button
• Press this button to move the focus to next available
source item on main menu.
• Press this button to power on when the unit is power
off.
• Press this button more than 1 second to power off
when the unit is power on.
[0 - 9] Buttons
• Use in the Key Pad screen to select the radio or
Satellite Radio.
• Use to select the track in the track list screen.
• Press to enter DVD video chapters/titles in the Key
Pad screen.
[VOLUME] Buttons
• Increase and decrease volume.
[NAVI/AV] Button
• Press this button to switch between current source
and current position on navigation map.
[SRCH] Button
• Press this button to open chapter or title search
window while playing DVD.
[BAND] button
• Switch to next band alternately.
[SET] Button
• Press this button to open the Audio setting menu in
any mode.
[BACK] Button
• Press this button to quit main menu if current screen
is main menu.
[ ], [ ], [ ], [ ] Buttons
• Press this button for cursor movement in main menu
or Setting mode.
• From the main menu, you can select your desired
source or change your settings.
[MENU] Button
• Press this button to enter the MAIN MENU or return
current resource.
[PIC] Button
• Press and hold this button to change your monitor
brightness.
[ENT] Button
• Press to x the entered data in the Key Pad screen
or enter the item the cursor is on.
[TAG] Button
•The button is not effective.
[TITLE] Button
• Press to go to the title menu on the DVD.
[ROOT] Button
• Press to go to the root menu on the DVD.
[RPT] Button
• Press to perform chapter repeat / title repeat / repeat
off while playing DVD mode.
• Press to perform track repeat/repeat off while playing
CD.
• Press to perform repeat track /repeat folder/ repeat
off while playing MP3/WMA, or video les on disc.
• Press to perform repeat track /repeat folder/ repeat
off while playing MP3/WMA, or video les in USB
memory.
[ ], [ ] Buttons
• Press to seek the next available higher or lower
station in Tuner mode.
• In SIRIUS Radio mode, you will scroll through the
categories.
• Press to select the next higher or lower chapter
number in DVD video mode.
• Press to select the next higher or lower track in DVD
Audio, USB Video, USB Audio mode.
• Press for movement of background source in
Navigation mode.
[ ], [ ]Buttons
• Press to manually select the next higher or lower
station in Tuner and Satellite Radio modes.
• Press to perform fast-forward or fast-backward
searching. Press again to change the speed to 2x,
4x, 8x or 16x.
• Press for movement of background source in
Functions of Remote Control Buttons
You can use the remote control unit to control the NX403A.
Note:
• The wireless remote control operation may not be optimal in direct sunlight.
NX403A_Usermanual_EN.indd 11 2013-7-11 16:33:44
Page 13

12
NX403A
English
Owner’s Manual
Navigation mode.
[ZOOM] Button
• Press to turn on and zoom in while playing DVD. You
can zoom in up to 3x. (No all DVD disc supports this
function)
.
[AUDIO] Button
• Press to switch the AUDIO channel of the disc while
playing DVD.
[SUB-T] Button
• Press to switch next available subtitle while playing
DVD.
• Press to display Video menu in iPod mode.
[ANGLE] Button
• Press to switch the different ANGLE while playing
DVD. (No all DVD disc supports this function)
• Press to display Audio menu in iPod mode.
[OPEN] Button
• The button is not effective.
NX403A_Usermanual_EN.indd 12 2013-7-11 16:33:44
Page 14

13
NX403A
English
English
Owner’s Manual
6. MAIN MENU
8 3
11
1 4
6
5 7 10
9 13 2
14
15
12 22
19 20 16
18
17 21
1 - Disc Audio---Press the button to display the Disc
Audio mode.
2 - Disc Video---Press the button to display the Disc
Video mode.
3 - Bluetooth Audio--- Press the button to display the
Bluetooth Audio mode.
4 - USB Audio---Press the button to display the USB
Audio mode.
5 - USB Video---Press the button to display the USB
Video mode.
6 - iPod Audio---Press the button to display the iPod
Audio mode.
7 - iPod Video---Press the button to display the iPod
Video mode.
8 - Tuner---Press the button to display the Tuner mode.
9 - Camera---Press the button to display the Camera
mode.
10 - Navigation---Press the button to display the
Navigation mode.
11 - AUX1 ---Press the button to display the AUX1
mode.
12 - Telephone--- Press the button to display the
Telephone mode.
13 - AUX2 ---Press the button to display the AUX2
mode.
14 - Setting Button---Press the button to display the
Setting menu.
15 - Rear Button---Press the button to display the Rear
menu.
16 - Front Button---Press the button to display the Front
main menu.
17 - Rear iPod Video---Press the button to display the
Rear iPod Video mode.
18 - Rear Disc Video---Press the button to display the
Rear Disc Video mode.
19 - Rear AUX 2---Press the button to display the Rear
AUX2 mode
20 - 2-Zone Off---Press the button to close the rear
activity.
21 - Rear AUX 1---Press the button to display the Rear
AUX1 mode.
22 - Audio off---Press the button to make audio source
voice off.
Scrolling the menu
Press screen and scrolling to right or left it will switch to
next or previous page of main menu.
Moving the menu position
1. Press any quadrate icon on main menu more than 2
seconds, the icon will float on main menu.
2. Scrolling the floating icon to any position you want.
NX403A_Usermanual_EN.indd 13 2013-7-11 16:33:45
Page 15
14
NX403A
English
Owner’s Manual
7. DVD Video Player Operations
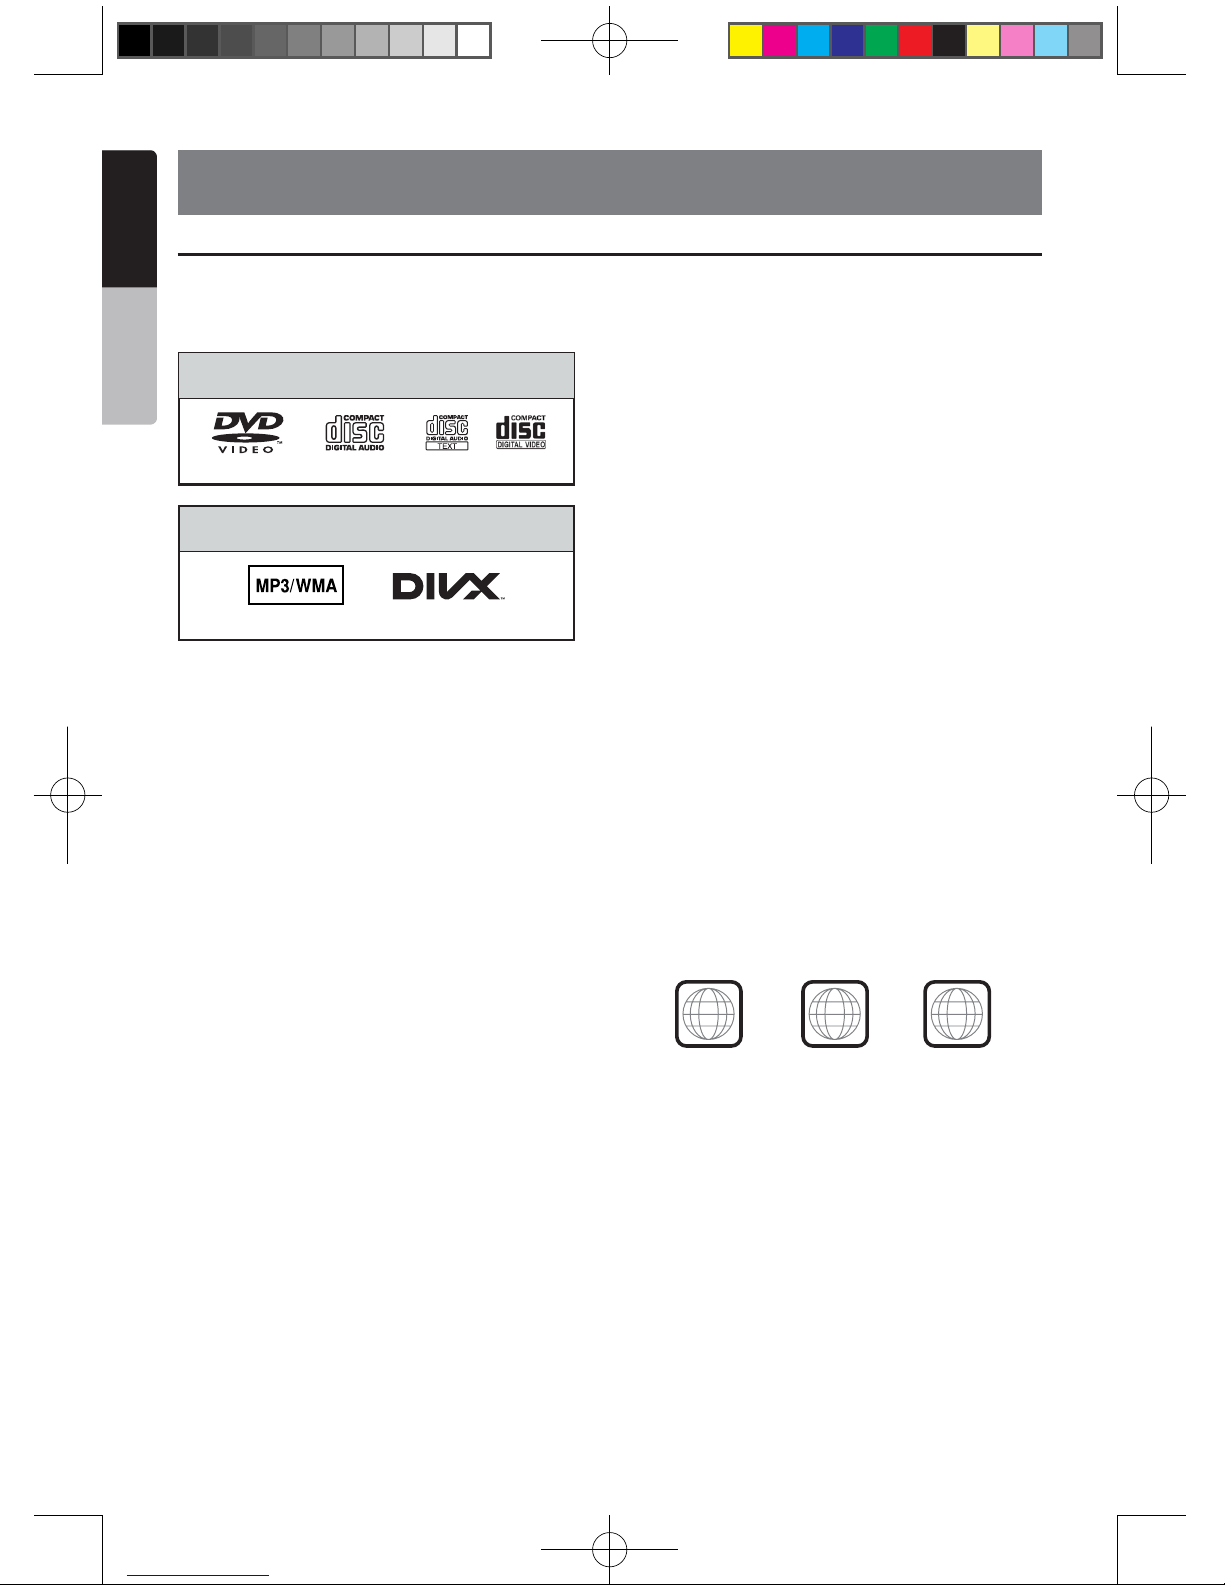
Playablediscs
This DVD video player can play the following
discs.
Playablediscs
CD TEXTDVD video discs Audio CDs
Playablemediales
MP3/WMA DivX
AboutCDExtradiscs
A CD Extra disc is a disc in which a total of two
sessions have been recorded. The rst session
is Audio session and the second session is Data
session.
Your personally-created CDs with more than
second data sessions recorded cannot be played
on this DVD video player.
Note:
•
When you play a CD Extra disc, only the first
session will be recognized.
AboutplayingaCD-R/CD-RWdisc(MP3,
WMA)
This player can play CD-R/CD-RW discs
previously recorded in music CD format (MP3,
WMA).
About playing a DVD-R/RW or DVD+R/RW
disc
This player cannot play DVD-R/RW and DVD+R/
RW discs previously recorded in video CD
format.
However, MP3/WMA les recorded on DVD-R/
RW and DVD+R/RW discs can be played.
Discsthatcannotbeplayedback
This DVD video player cannot play back DVD-
Audio, DVD-RAM, Photo CDs, etc.
Note:
•
I
t may also not be possible to play back CDs
recorded on a CD-R unit and CD-RW unit.
(Cause: disc characteristics, cracks, dust/dirt,
dust/dirt on player’s lens, etc.)
•
If a CD-R or CD-RW disc that has not been
finalized is played, it will take a long time to
start playing. Also, it may not be possible to
play depending on its recording conditions.
•
You cannot play SuperAudio CDs Playback of
the CD player is not supported even if it is a
hybrid disc.
AboutMP3/WMAplayback
This unit can play back CD-R/CD-RW, DVD-R/
RW and DVD+R/RW discs on which MP3/WMA
music data have been recorded.
For a detailed information, see the section
entitled “Listening to MP3/WMA”.
Note on region numbers
The DVD video system assigns a region number
to DVD video players and DVD discs by sales
area. DVD video players sold in Asia can play
back DVD discs with the region number “ALL”,
“3” or any combination of numbers that also
incorporate a “3”.
The DVD video region number is marked on the
disc jacket as shown below.
3
ALL
1
3
4
Asia
Discs
Video CD
NX403A_Usermanual_EN.indd 14 2013-7-11 16:33:45
Page 16
15
NX403A
English
English
Owner’s Manual
Change DVD System Settings
Note:
If the setup operation is performed in the middle of DVD
video play, the disc will restart from the beginning.
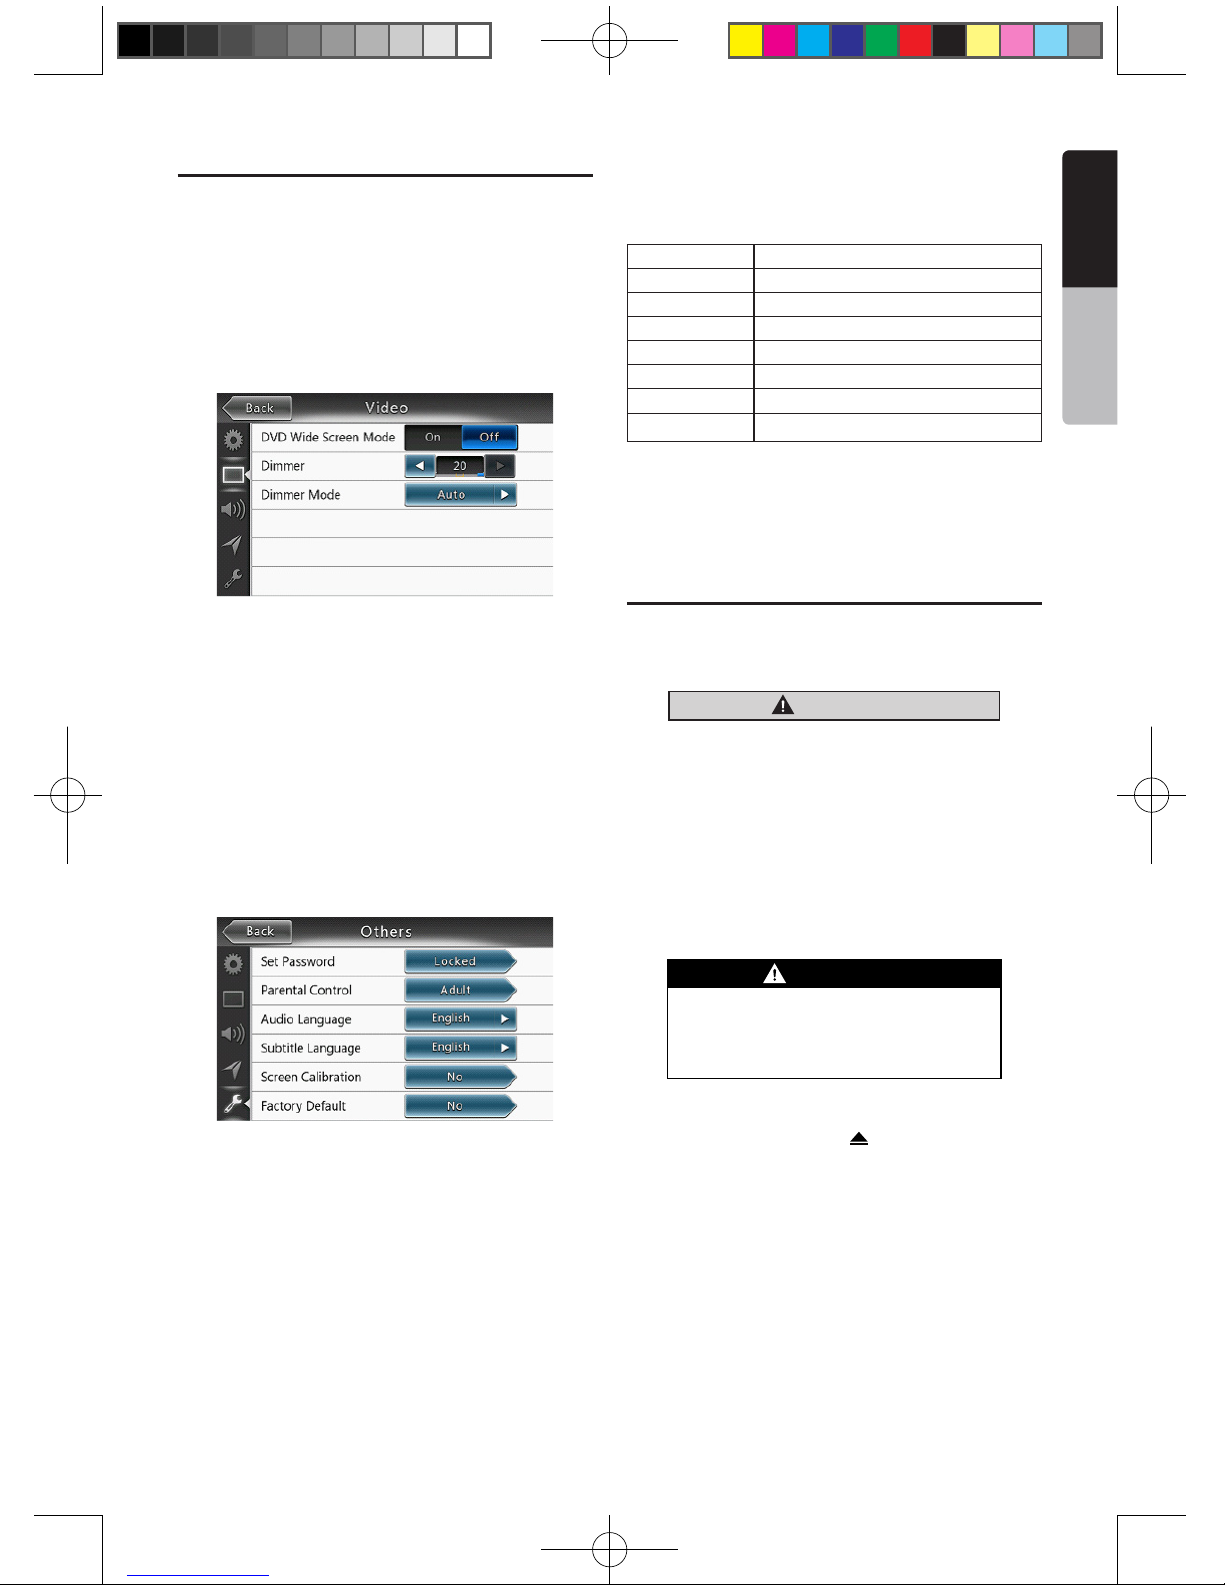
Selecting DVD Setup Menu
1. Press the [Settings] button on the Main Menu to
access the Video setup menu.
2. Press [Video] button. The video menu is displayed.
Setting up the Screen Size
Press the [DVD Wide Screen Mode] button to turn on
or turn off the DVD wide screen mode.
The factory default setting is “off”
Note: Not all DVD disc support this function.
Setting up the password for parental level
control
The factory default pass code is “0000”.
1.In Main Menu press [Settings] button. Press
[Others] button on the display. Touch the [Set
Password] ---- and a numerical key pad will appear.
Input a new password and come again. The password
is set.
Note:
When a disc with view restrictions is inserted, you will
be prompted to input this password. The disc will not be
viewable until the correct password is entered.
Set rating for parental level control
1.Select Others screen while in Setting mode. Press
[Parental Control] button. Press the desired rating for
level control. Use this table to set the parental level.
Kid Safe Kid Safe
G General Audiences
PG Parental Guidance Suggested
PG-13 Parents Strongly Cautioned
PG-R Parental Guidance Restricted
R Restricted
NC-17 No One 17 And Under Admitted
Adult Only Adult
• The contents that the parental level restricts vary
with the country code.
Note: The rating can be selected only under the
password unlocked status, and the limits can be set only
under the password locked status.
Watching to a disc
1. To load a disc:
Insert the disc into the center of the insertion slot the
label side facing up.
CAUTION
For your safety, the driver should not
insert or eject a disc, opening the
operation panel while driving.
Note:
• Never insert foreign objects into the disc insertion slot.
• If the disc is not inserted easily, there may be another
disc in the mechanism or the unit may require service.
• 8cm (single play) discs cannot be used.
2. Disc starts playing automatically.
WARNING
Some videos may be recorded at higher
than desired volume levels. Increase the
volume gradually from the minimal setting
after the video has started.
Ejecting a disc
1. To eject a disc press eject [ ] button. The play
mode then switches to the Tuner mode.
If the disc is left in the ejected position for 10
seconds, the disc is automatically reloaded. In this
case, the play mode will remain in the Tuner mode.
Note: If you force a disc into before auto reloading, it
may damage a disc.Change DVD System Settings
NX403A_Usermanual_EN.indd 15 2013-7-11 16:33:45
Page 17

16
NX403A
English
Owner’s Manual
Showing DVD Player mode screen
-After disc is loaded, the play mode is automatically
engaged.
Touch any place of the screen to display DVD Video
menu touch the screen again to return the playback
screen. The display will return to the playback screen,
if you do not touch the screen for 10 seconds.
1 - Option Button
2 - Show Cursor keys Button
3 - Previous Chapter /Fast Backward Button
4 - Play/Pause Button
5 - Next Chapter /Fast Forward Button
6 - Elapsed playing time
7 - Seek bar
8 - Total time
9 - Menu List Button
10 - System time
11 - Bluetooth status
12 - Front /Rear Button.
13 - DVD playback info
14 - Shortcut Button
15 - Repeat Switching Button
16 - Audio Channel switching Button
17 - Subtitle switching Button
18 - Info Button
19 - Direct chapter or title searching Button
Operate the DVD Player menu
You can select the button items displayed in the DVD
menu by directly touching it.
Play/Pause Playback
1. Touch [
] button to pause during playback.
2. Touch [ ] button again to resume playback.
Skip (Search) a Chapter
1. Press [ ] or [ ] button during playback.
Chapters are skipped down or up from current
locations, as many times as the button is pressed, and
playback starts.
Skip use seek bar
Press the triangle [ ] on seek bar and drag it to any
position where you want to start playback.
Fast Forward/Fast Backward
1. Press [ ] or [ ] button and hold 2 seconds to
start fast backward or fast forward during playback.
The playback speed starts at 2x, then will increase
to 4x, 8x, and 16x. Release the button will continue
playing with normal speed.
Note:
• No audio is reproduced during fast forward and fast
backward operation.
• The fast forward and fast backward speed may differ
depending on the disc.
Search function
You can locate the beginning of a scene using the
chapter numbers or title numbers recorded on the
DVD Video disc.
1. Showing the DVD Video menu, touch [ ] button.
The Key Pad screen appears with the chapter/Title
number input mode.
Touching [ ] button turns the Key Pad to the
chapter number input mode.
Touching [ ] button turns the Key Pad to the title
number input mode.
• Title
A large segment to divide the data area of the disc.
• Chapter
A small segment to divide the data area of the disc.
2. Input the number of the title/chapter that you want
to play with the [0] to [9] key.
3. Touch the [ ] button.Change DVD System
Settings
14
15 16 17 18 19
10111213
1 2 3 5
6
7 8 94
NX403A_Usermanual_EN.indd 16 2013-7-11 16:33:45
Page 18

17
NX403A
English
English
Owner’s Manual
Playback starts from the scene of the input title
number or chapter number.
NOTE:
*If the input title/chapter number does not exist or
searching with a title/chapter number is not allowed,
the screen image will not change.
4. Touch [ ] button to close the key pad.
Repeat Playback
This operation plays back chapters recorded on the
DVD-Video repeatedly.
1. Showing the DVD Video menu, touch [ ] button.
2. Touch [ ] key once for Repeat Chapter, again
for Repeat Title.
3. Press [ ] button again to turn off the repeat
playback.
Using the Title Menu
On DVD discs containing two or more titles, you can
select from the title menu for playback.
1. Showing the DVD Video menu, touch [ ] button
during playback.
* Depending on the disc, the title menu may not be
called.
2. Touch the title menu screen. And touch the Show
Cursor keys Button.
3. Select the items in the title menu screen by
directional buttons.
* Depending on the disc, items may not be selected
with the directional buttons.
4. Touch [ ] button to x on the selected item.
5. Touch [ ] button.
Switching Audio
On discs in which two or more audios or audio
languages have been recorded, you can switch among
the audio languages during playback.
1. Showing the DVD Video menu, touch [ ] button
during playback.
• Each time you touch the button, you can switch
among audio languages.
• It may take time to switch among audios.
Depending on the disc, up to 8 kinds of audios may
be recorded. For details, see the mark of the disc:
( Indicates that 8 audios have been recorded).
When the power is turned on and when the disc
is changed to a new one, the language set as the
factory default is selected. If that language has not
been recorded on disc the language is specied on
the disc.
Depending on the disc, switching may be
completely impossible or impossible on some
scenes.
Switching Subtitles
On DVD discs in with two or more subtitle languages
have been recorded, you can switch among the
subtitle languages during playback.
1. Showing the DVD Video menu, touch [ ] button
to select a subtitle during playback. Each time you
touch the key, you can switch among subtitles.
• It may take time to switch among subtitles.
Depending on the disc, up to 32 kinds of subtitles
may be recorded. For details, see the mark of the
disc: ( Indicates that 8 kinds of subtitles have
been recorded).
Depending on the disc, switching may be
completely impossible or impossible on some
scenes.
2. To turn off subtitles, repeat touching [ ] button
until subtitles are turned off.
Displaying the playback status
Touch [ ] button on DVD Player mode screen,
Playback status is displayed on screen.
Play MP4/Divx video files
This system can play video les (AVI/MP4, etc.) stored
on disc.
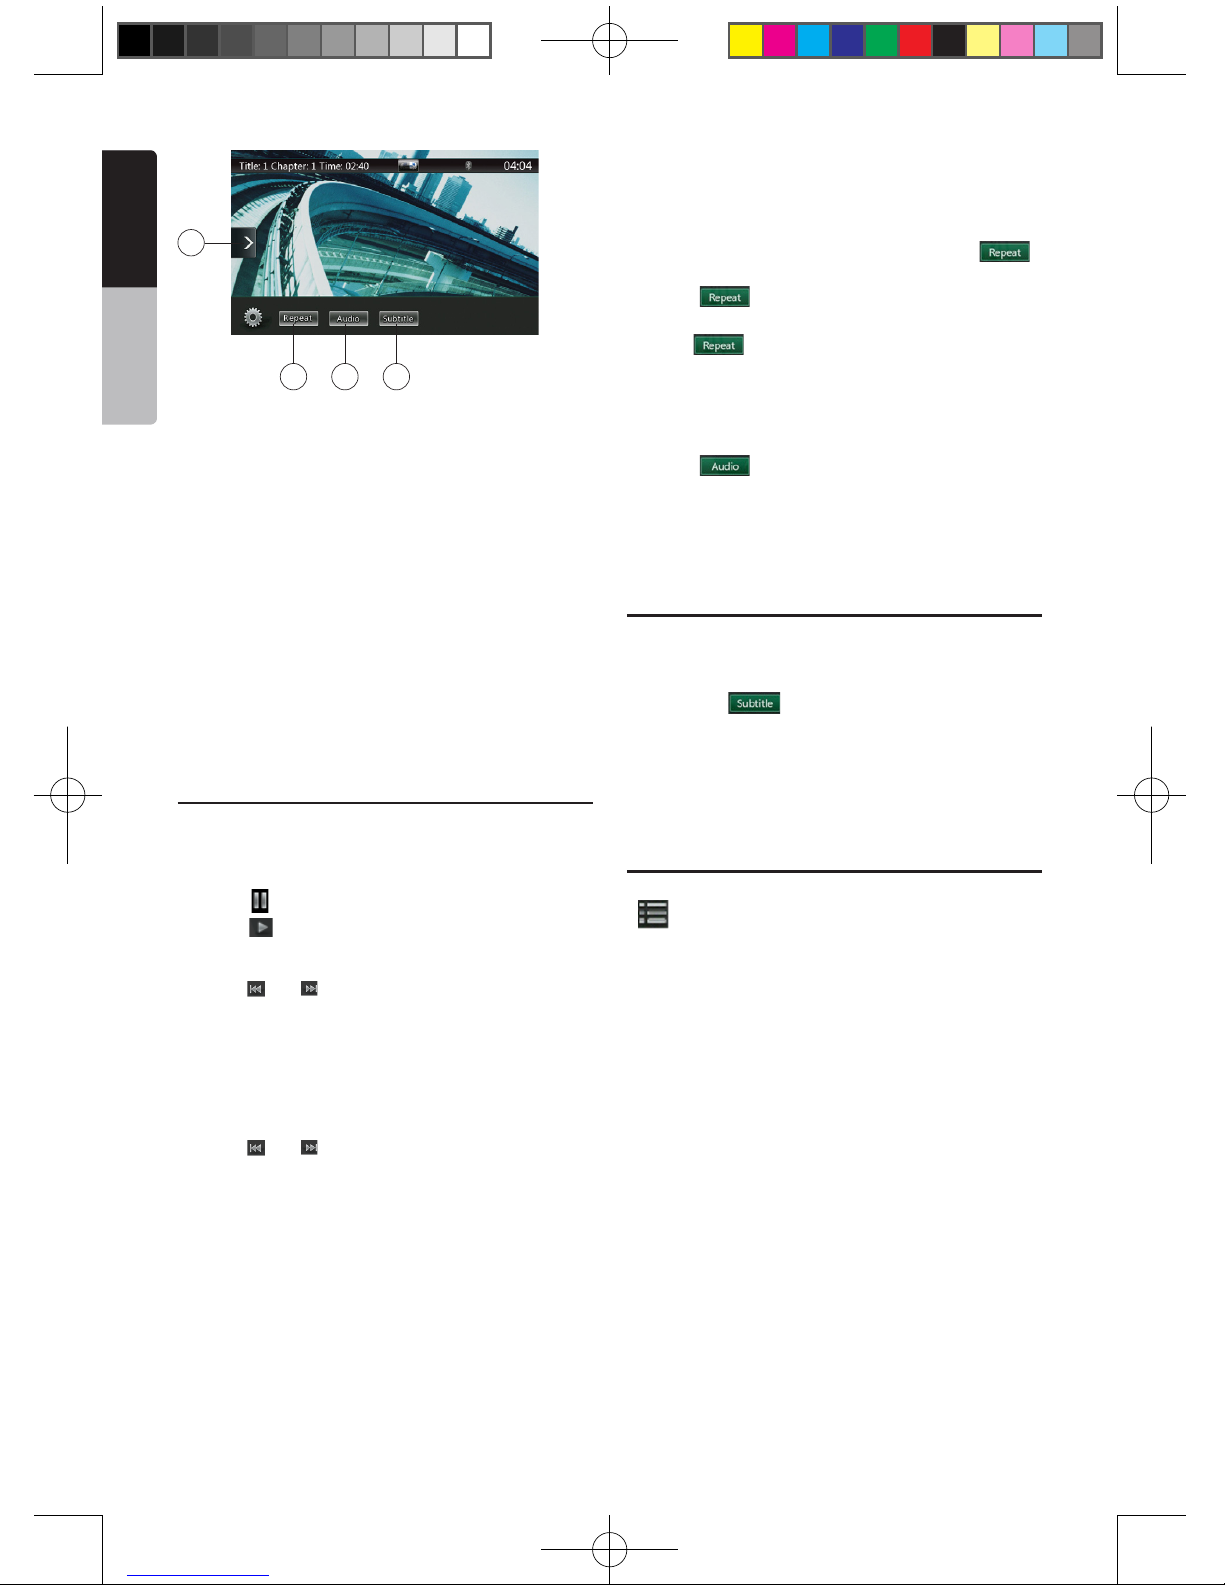
Showing video files Player mode screen
1. After disc with video les is loaded, touch [Disc
Video] button on MAIN MENU to show video les
player mode screen.
2. Touch the screen of the playing video le to display
Video les player menu touch the screen again to
return the playback screen. The display will return to
the playback screen, if you do not touch the screen
for 10 seconds.
1
2
3
4 5 6
78
9
10
NX403A_Usermanual_EN.indd 17 2013-7-11 16:33:45
Page 19
18
NX403A
English
Owner’s Manual
1 - Change Menu Bar Button
2 - Previous Track /Fast Backward Button
3 - Play/Pause Button
4 - Next Track/Fast Forward Button
5 - Elapsed playing time /Seek bar
6 - List Mode Button
7 - System time
8 - Bluetooth status
9 - Front /Rear Button
10 - Playback info
11 - Shortcut Button
12 - Repeat Button
13 - Audio Button
14 - Subtitle Button
Operate the Video files Player menu
You can select the button items displayed in the Video
les player menu by directly touching it.
Play/Pause Playback
1. Touch [ ] button to pause during playback.
2. Touch [ ] button again to resume playback.
Switch to Previous/next file
1. Press [ ] or [ ] button during playback to play
previous /next le
Skip using seek bar
Press the triangle on seek bar and drag it to any
position where you want to start playback.
Fast Forward /Fast Backward
1. Press [ ] or [ ] button and hold 2 seconds to start
fast backward or fast forward during playback. The
playback speed starts at 2x, then will increase to
4x, 8x, and 16x. Release the button will continue
playback with normal speed.
Note:
*No audio is reproduced during fast forward and fast
backward operation.
*The fast forward and fast backward speed may differ
depending on the disc.
Repeat Playback
This operation plays back video les recorded on the
disc repeatedly.
The repeat set as the factory default is Repeat all.
1. Showing the video les player menu, touch [ ]
button.
2. Touch [ ] button once for Repeat Track, again
for Repeat Folder.
3.Press [ ] button again for Repeat All.
Switching Audio
Some video les will have two or more audio channels;
you can switch among the audio channels during
playback.
1. Touch [ ] button during playback.
• Each time you touch the button, you can switch
among audio languages.
• It may take time to switch among audios.
Depending on the disc, switching may be impossible.
Switching Subtitles
Some video les will have two or more subtitles have
been recorded; you can switch among these subtitles
during playback.
1. Touch the [ ] button to select a subtitle during
playback.
• Each time you touch the key, you can switch among
subtitles.
• It may take time to switch among subtitles.
Depending on the disc, switching may be impossible.
Video files list
Showing the Video les player menu; touch the
[ ] button to display video les list screen.
Video les list operations is almost same as Disc Audio
player mode. Please refer to CD Player Operations.
12 13 14
11
NX403A_Usermanual_EN.indd 18 2013-7-11 16:33:46
Page 20

19
NX403A
English
English
Owner’s Manual
Listening to a disc/Ejecting a disc
Please refer to Disc Video Player Operations -watching
to a disc and Ejecting a disc.
Showing CD Player mode screen
1. After disc is loaded, the play mode is automatically
engaged.
2. If disc have been loaded you can touch [Disc Audio]
button on main menu to display CD player mode
screen.
1 - Option Button
2 - Elapsed playing time indicator
3 - Rotation effect
4 - Audio les or CD tracks.
5 - System time
6 - Bluetooth status
7 - Front /Rear Button
8 - Repeat Button
9 - Previous Track /Fast Backward Button
10 - Shortcut Button.
11 - Play/Pause Button
12 - Next Track/Fast Forward Button
13 - Shufe Button
14 - Direct Searching Button
15 - Scan Start/Stop Button
16 - Rotation Effect On/Off Button
17 - Song Title
18 - Artist/album Information
19 - Close option menu Button
Operate the CD Player menu
You can select the button items displayed in the CD
player menu by directly touching it in list.
Play/Pause Playback
1. Touch [ ] button to pause during playback.
2. Touch [ ] button again to resume playback.
Switch to Previous/next file or track
Press [ ] or [ ] button during playback to play
previous /next le.
• Pressing [ ] button starts playback from the
beginning of the next track.
• Pressing [ ] button starts playback from the
beginning of the current track. When this button is
pressed again within 2 seconds, playback starts
from the beginning of previous track.
Fast Forward /Fast Backward
1. Press [ ] or [ ] button and hold more than
2 seconds to start fast backward or fast forward
during playback. The playback speed starts at 2x,
then will increase to 4x, 8x, and 16x. Release the
button will continue playback with normal speed.
Note:
* No audio is reproduced during fast forward and fast
backward operation.
* The fast forward and fast backward speed may differ
depending on the disc.
Repeat Playback
* The repeat set as the factory default is Repeat All.
Touch [ ] button switch between Repeat Folder
Repeat All and Repeat Track.
Shuffle Playback
1. Touch [ ] button to shufe the tracks during
playback.
2. Touch this button again to turn off the feature.
Selecting a track on the Track List Screen
This function allows you to select tracks from a
displayed list.
1. Touch the track title on the display list. The selected
track will start playing.
2. When the desired track is not displayed, press and
ick the track list up or down.
3. Touch the desired track title key. The corresponding
track is started playback.
8. CD
9
4
11
10
12
13
14
15
16
32
1
18
19
67
17
8
5
NX403A_Usermanual_EN.indd 19 2013-7-11 16:33:46
Page 21

20
NX403A
English
Owner’s Manual
Scanning the Tracks
1. Touch [ ] button to show [Scan ] button.
2. Touch [Scan ] button during playback.
• It will play from next track, and each track will
display for 10 seconds.
• The [Scan ] button will switch to [Scan ]
button.
3. Touch [Scan ] button.
• It will continue playback from current track.
• [Scan ] button will switch to [Scan ]
button.
* The function will scan all tracks orderly in current
folder once. After Scan stopped playback will
continue.
Searching with the Track Number
This operation allows searching using the track
numbers recorded on the CDs.
1. Touch [ ] Button to show [ ] button.
2. Touch [ ] button .The numerical keypad will
appear on the screen and touch [ ] button.
3. Input the track number that you want to play back
with [0] to [9] key.
Playback starts from the track of the input track
number.
• If the input track number does not exist or searching
with track number is not allowed, the screen image
will not change.
• Touch the [ ] button will close the numerical
keypad.
• Touch [ ] Button will close the option window and
display playback screen.
Rotation Effect On/Off
This operation allows turn on/turn off rotation effect.
The factory default is On.
1. Touch [ ] Button to show [Rotation effect] button
2. Press button [ ] will turn on the Rotation effect.
3. Press button [ ] will turn off the Rotation effect.
Listening to compressed audio
This system can play audio les stored on disc.
MP3/ WMA/ AAC
Tag display function
This unit is an ID3 Tag compatible model.
This unit supports the ID3 TAGs of the Version 2.4, 2.3,
1.1 and 1.0.
In displaying, this unit gives priority to the Version 2.3
and 2.4 TAGs.
Note:
• Some CDs recorded on CD-R/RW mode may not be
usable.
Displaying MP3/WMA/AAC TAG titles
Tag information can be displayed for compressed
audio le containing Tag information.
MP3: title, artist, album
WMA: title, artist
AAC: can not display tag information.
Precautions when creating MP3 disc
• File extensions
1. Always add a le extension “.MP3” or “.mp3” to
an MP3 le, and “.WMA” or “.wma” to a WMA and
“.m4a” to a AAC le by using single byte letters.
If you add a le extension other than specied or
forget to add these le extension, the le cannot be
played. In addition, if you use upper case and lower
case letters (capital and small letters) mixed for le
extensions, normal play may not be possible.
2. Files other than MP3/WMA/AAC data cannot be
played.
Playing les with a format not supported will be
skipped, and the scan, random and repeat playback
mode may be canceled.
• File and Disc Not Supported
Files and discs with following extensions are not
supported: *.AAC, *.DLF, *.M3U, *.PLS, *.MP3 PRO
les, les with DRM, open session discs.
• Logical format (File system)
1. When writing an MP3/WMA/AAC le on a disc,
please select “ISO9660 level 1 or level 2 (without
including expansion format)” as the writing software
format. Normal playback may not be possible if the
disc is recorded on another format.
2. The folder name and le name can be displayed as
the title during MP3/WMA/AAC play .
• Entering File and Folder Names
Names using the code list characters are the only
le names and folder names that can be entered and
displayed. Using any other character will cause the le
and folder names to be displayed incorrectly.
• Folder structure
1. A disc with a folder having more than 8 hierarchical
levels will conict with the ISO9660 and playback
will be impossible.
• Number of les or folders
1. The maximum allowable number of folders is 200
(including root directory); the maximum allowable
number of les is 1500 (max. 200 per folder). This
represents the maximum number of tracks that can
be played back.
NX403A_Usermanual_EN.indd 20 2013-7-11 16:33:46
Page 22

21
NX403A
English
English
Owner’s Manual
2. Tracks are played in the order that they were
recorded onto a disc. (Tracks might not always be
played in the order displayed on the PC).
• Some noise may occur depending on the type of
encoder software used while recording.
• In case of a track recorded at VBR (variable bit rate),
the display for the play time of the track may be
slightly different from the actual play time. Also, the
recommended value of VBR ranges from 32 kbps to
320 kbps.
• After disc selection, the play mode is automatically
engaged.
Playback MP3/WMA/AAC menu
1. Repeat Playback
While playing MP3/WMA/AAC touch button can
switch between Repeat Folder, Repeat All and Repeat
Track, Repeat Folder and Repeat All.
2.Current Folder
• Showing title of current folder.
• The number on the folder symbol is the number of
les and folders number in current folder.
• Touch the title of current folder, play list will show
les and folders in upper folder.
*Other operations about playing MP3/WMA/AAC are
almost same as CD Player mode.
Stop Playback
1. Touch [ ] button to stop playback.
2. Touch [ ] button again to resume playback.
Playback resumes from start of the folder which
playing track is in.
•Other operations about playing MP3/WMA/AAC are
almost same as CD Player mode.
1
2
NX403A_Usermanual_EN.indd 21 2013-7-11 16:33:46
Page 23

22
NX403A
English
Owner’s Manual
This system can play audio les (MP3/WMA/AAC/
FLAC) stored in an USB memory which is recognized
as “USB Mass Storage Class device”. You can use
your USB memory as an audio device by simply
copying desired audio les into it.
Note:
• This system will not operate or may operate improperly
with some USB memory.
• Files protected with any DRM cannot be played.
Notes on using USB memories
General notes
• When no support les, the le list display nothing.
Notes on the Audio les
• This system can play the MP3/WMA/AAC/FLAC les
stored in the USB memory.
MP3 les:
• format: MPEG1/2 Audio layer3
• bit rate: 8k ~ 320kbps
• sampling frequency: 8/12/16/24/32/44.1/48KHz
• le extension: . mp3
WMA les:
• format: Windows media Audio standard L3
prole
• bit rate: 32 ~ 192KHz
• sampling frequency: 32/44.1/48 KHz
• le extension: .wma
AAC les
• format: Advanced Audio Coding LC-AAC,HEAAC
• sampling frequency: 32/44.1/48 KHz
• le extension: . m4a
FLAC les
• format: Free Lossless Audio Codec
• quantization bit rate: 16 or 24 bits
• sampling frequency: 44.1~192 KHz
• le extension: . ac
Notes on the folder structure
• The folder hierarchy must be within 8 hierarchical
levels. Otherwise, playback may be impossible.
• The maximum allowable number of folders is 65535
(including root directory and folders with no MP3/
WMA le).
• The maximum allowable number of les in a folder
is 65535.
• You can store the MP3 les, WMA les together in
a folder.
• The system may become slow if the les or folders
exceed the limitation above.
Notes on the Tag titles
The limitations on the Tag titles are same as those in
DVD Audio Player mode.
Select USB Audio mode
Connect your USB memory with MP3/WMA les to the
USB connector. The system will automatically detect
the connected device, and the [USB Audio] button on
main menu will be enabled.
• When an USB memory is already connected
Touch [USB Audio] button to select the USB Audio
mode.
The system changes to the USB Audio mode and
starts playback from the previous position or from the
beginning.
Note:
If you reconnect the same device that you disconnected
last, the system will play back where it left off.
1. Option Button
2. Play/Pause Button
3. Previous Track /Fast Backward Button
4. Next Track/Fast Forward Button
5. Repeat Button
6. Shufe Button
7. MP3/WMA les in list
8. Folders in list
9. Page Turning
9. USB Audio Operations
18
19
14
1
5
6
4
8
2
3
15
9
101112
13
16
17
7
NX403A_Usermanual_EN.indd 22 2013-7-11 16:33:46
Page 24
23
NX403A
English
English
Owner’s Manual
10. System time
11. Bluetooth status
12. Mute status
13. Playback status info
14. Album Art
15. Shortcut Button
16. Current ID3 info area
17. Elapsed playing time indicator/Seek bar
18. Direct Button
19. Scan Button
Playing Audio files in USB memory
Play/Pause Playback
1. Touch [ ] button to pause during playback.
2. Touch [ ] button again to resume playback.
Switch to Previous/next file
Press [ ] or [ ] button during playback to play
previous /next le.
• Pressing [ ] button starts playback from the
beginning of the next track.
• Pressing [ ] button starts playback from the
beginning of the current track; when this button is
pressed again within about 5 seconds, playback
starts from the beginning of previous track.
Fast Forward /Fast Backward
Press [ ] or [ ] button and hold more than
2 seconds to start fast backward or fast forward
during playback. The playback speed starts at 2x,
then will increase to 4x, 8x, and 16x .Release the
button will continue playback with normal speed.
Note:
*No audio is reproduced during fast forward and fast
backward operation.
*The fast forward and fast backward speed may differ
depending on the audio les.
Repeat Playback
* The repeat set as the factory default is Repeat All.
Touch the [ ] button once for Repeat Track, again for
Repeat Folder, Repeat All.
Shuffle Playback
1. Touch [ ] button to shufe the tracks in playing
folder during playback.
2. Touch this button again to turn off the feature.
Album Art work
If current audio le contains album art image in ID3,
the picture will be displayed in this area.
ID3 info area
This area display ID3 info of playing le: song title,
artist information, album information, number of
current le/total number in current folder, elapsed
playing time/total time of current le.
Skip use seek bar
Press on seek bar and drag it to any position where
you want to start playback.
Select a folder on display list
Touch the folder title on the display list, the display list
will display les and folders in selected folder.
Selecting a track on the display List
This function allows you to select tracks from a
displayed list.
1. Touch the track title on the display list. The selected
track will start playing.
2. When the desired track is not displayed, press and
ick the track list up or down.
3. Touch the desired track title key. The corresponding
track is started playback.
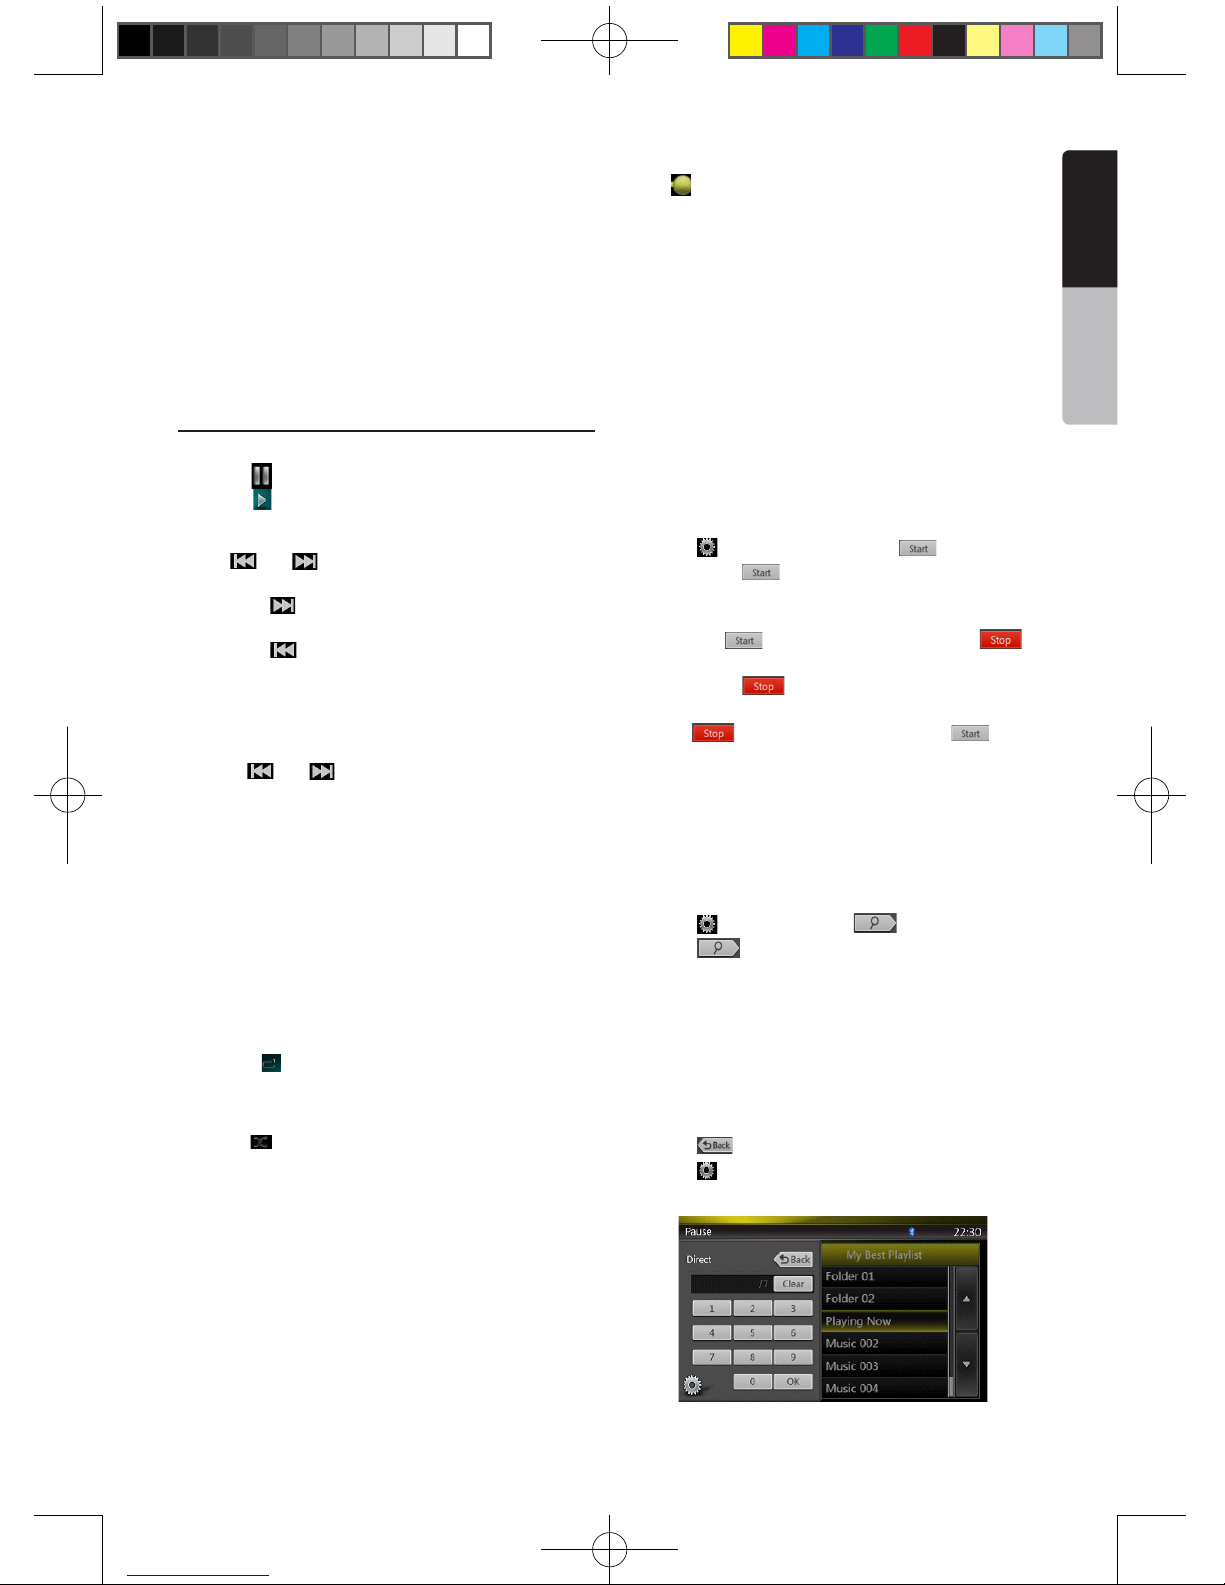
Scanning the Tracks
1. Touch [ ] Button to show [Scan ] button.
2. Touch [Scan ] button during playback.
• It will play from next track, and each track will
display for 10s seconds.
• The [Scan ] button will switch to [Scan ]
button.
3. Touch [Scan ] button.
• It will continue playback from current track.
• [Scan ] button will switch to [Scan ]
button.
* The function will scan all tracks orderly in current
folder once .After Scan stopped playback will
continue.
Searching with the Track Number
This operation allows searching using the track
numbers in playing folder.
1. Touch [ ] Button to show [ ] button.
2. Touch [ ] button .The numerical keypad will
appear on the screen.
3. Input the track number that you want to play back
with [0] to [9] key.
Playback starts from the track of the input track
number.
• If the input track number does not exist or searching
with a track number is not allowed, the screen image
will not change.
• Touch [ ] button will close the numerical keypad.
• Touch [ ] Button will close the option window and
display playback screen.
NX403A_Usermanual_EN.indd 23 2013-7-11 16:33:46
Page 25

24
NX403A
English
Owner’s Manual
10. USB Video Operations
This system can play USB video les (MP4, 3GP etc.)
stored in an USB memory which is recognized as
“USB Mass Storage Class device”. You can use your
USB memory as an audio device by simply copying
desired audio les into it.
Note:
• This system will not operate or may operate improperly
with some USB memory.
• Files protected with any DRM cannot be played.
Notes on using USB memories
General notes
When no support les, the le list display nothing.
Notes on the folder structure
The limitations on the folder structure are same as
those in USB Audio Player mode.
Notes on the Tag titles
The limitations on the Tag titles are same as those in
DVD Audio Player mode.
Select USB Video mode
Connect your USB memory with video les to the USB
connector. The system will automatically detect the
connected device, and the [USB Video] button on
main menu will be enabled.
• When an USB memory is already connected
Touch [USB Video] button on main menu to select the
USB Video mode.
The system changes to the USB Video mode and
starts playback from the previous position or from the
beginning.
Note: If you reconnect the same device that you
disconnected last, the system will play back where it
left off.
Playing video files in USB memory
If the video is playing, touch the screen of the playing
video to display Operation buttons.
* The display will return to the playback screen, if you
do not touch the screen for 10 seconds.
Playable Video file
*.mp4 les
• format: MPEG4 Visual
MPEG4 AVC (H.264)
• Picture size: 720 x 480 (MPEG4 Visual)
1920 x 1080 (MPEG4 AVC)
• Audio format: AAC
• Audio sampling frequency: 32/44.1/48 KHz
*.m4v les
• format: MPEG4 Visual
MPEG4 AVC (H.264)
• Picture size: 720 x 480
• Audio format: AAC
• Audio sampling frequency: 32/44.1/48 KHz
*.mpg les
• format: MPEG2
• Picture size: 720 x 480
• Audio format: MP3
• Audio sampling frequency: 32/44.1/48 KHz
*.3gp les
• format: MPEG4 Visual
H.263
• Audio format: AAC, AMR
• Audio sampling frequency: 8/16/32/44.1/48 KHz
1 - Previous Track /Fast Backward Button
2 - Play/Pause Button
3 - Next Track/Fast Forward Button
4 - Elapsed playing time indicator/Seek bar
5 - Menu List
6 - Repeat Button
7 - System time
8 - Bluetooth status
9 - Playback info
10 - Shortcut Button
Play/Pause Playback
1. Touch [ ] button to Pause playback.
2. Touch [ ] button to resume playback.
Switch to Previous/next file
Press [ ] or [ ] button during playback to play
previous /next le.
• Pressing [ ] button starts playback from the
beginning of the next track.
• Pressing [ ] button starts playback from the
beginning of the current track; when this button is
pressed again within about 5 seconds, playback
starts from the beginning of previous track.
10
1
2
3
4
9
8 7
5
6
NX403A_Usermanual_EN.indd 24 2013-7-11 16:33:46
Page 26

25
NX403A
English
English
Owner’s Manual
Repeat Playback
* The repeat set as the factory default is Repeat All.
Touch the [ ] button once for Repeat Track, again
for Repeat Folder, again for Repeat All.
Skip use seek bar
Press the on seek bar and drag it to any position
where you want to start playback.
Switch to USB Video Menu
Press [ ] button playback will be paused, and the
screen will switch to USB Video List.
1 - Option Button
2 - Play/Pause Button
3 - Previous Track /Fast Backward Button
4 - Next Track/Fast Forward Button
5 - Repeat Button
6 - Shufe Button
7 - Video les in list
8 - System time
9 - Bluetooth status
10 - Mute status
11 - Playback status info
12 - Album Art
13 - Shortcut Button
14 - Current ID3 info area
15 - Elapsed playing time indicator/Seek bar
16 - Direct Button
17 - Scan Button
Play/Pause Playback
*On USB Video menu screen, playback status is
pause.
Touch [ ] button to resume playback. The screen
will go to video screen automatically.
Switch to Previous/next file
Press [ ] or [ ] button during playback to play
previous /next le.
• Pressing [ ] button starts playback from the
beginning of the next track.
• Pressing [ ] button starts playback from the
beginning of the current track; when this button is
pressed again within about 5 seconds, playback
starts from the beginning of previous track.
Repeat Playback
* The repeat set as the factory default is Repeat All.
Touch the [ ] button once for Repeat Track, again for
Repeat Folder, again for Repeat All.
Shuffle Playback
1. Touch [ ] button to shufe the tracks in playing
folder during playback.
2. Touch this button again to turn off the feature.
Current file info area
This area displays info of current video le: le name,
number of current le/total number in current folder,
Elapsed playing time/total time of current le.
Skip use seek bar
Press on seek bar and drag it to any position where
you want to start playback.
Select a folder on display list
This operation is same as this in USB Audio mode.
Selecting a track on the display List
This operation is same as this in USB Audio mode.
Scanning the Tracks
This operation is same as this in USB Audio mode.
Searching with the Track Number
This operation is same as this in USB Audio mode.
12
3
5
6
4
7
2
1
13
8910
11
14
15
16
17
NX403A_Usermanual_EN.indd 25 2013-7-11 16:33:47
Page 27

26
NX403A
English
Owner’s Manual
11. iPod/iPhone Operations
iPod®/iPhone® can be connected by using the
connector cable supplied with the iPod/iPhone, but in
this case, you can enjoy its audio sound only. To enjoy
video movies stored in the iPod/iPhone with video
displaying them on this unit, it is required to use the
special connector cable (CCA-748-600) separately
sold.
However the new products such as iPhone 5,
iPod touch® (5th generation) and iPod nano®
(7th generation) only can connect 10-pin cable
(no video signal output),so these new products
cannot displaying video in video mode.
Note:
• This system will not operate or may operate improperly
with unsupported versions.
• For detailed information on the playable iPod/iPhone
models, see our home page: www.clarion.com
Notes on using Apple iPod/iPhone
• Do not connect an iPod/iPhone to this unit with a
headphone connected to the iPod/ iPhone.
• After the iPod/iPhone has been connected to this
unit, the buttons of iPod buttons are disabled for
operation in the Music mode. In the Video mode, do
not operate the buttons of iPod.
• When in the iPod mode, the screen image input
from the AUX terminal is output to the rear monitor.
• When no data is present, the title display will remain
blank.
• Set the language setting of iPod/iPhone to English
before connecting your iPod/iPhone. Some
characters of the other languages may not be
displayed correctly in this system.
• Precautions on battery consumption:
If the iPod/iPhone is connected to this unit when the
internal battery of iPod/iPhone has run down, this
function may not operate correctly. You must connect
the iPod/iPhone after charging the battery if it has run
down.
iPod Audio Menu Operations
Connect your iPod/iPhone to the USB connector.
The system will automatically detect the connected
device and the iPod Audio button will be enabled for
operation on the Main Menu screen.
The playback starts after a while, from where the iPod/
iPhone has been paused.
• When iPod/iPhone is already connected
Touch the [ ] key on the Main Menu
screen. The system changes to the iPod mode, and
starts playback from the previous position.
Press MENU button on Operational Panel to return to
the Main Menu.
iPod Audio ID3 Info
1 - Option Button
2 - Repeat Button
3 - Shufe Button
4 - Previous Track /Fast Backward Button
5 - Play/Pause Button
6 - Next Track/Fast Forward Button
7 - ID3 Information
8 - Next Page[ ] / Previous Page[ ] Button
9 - Category List
10 - System Time
11 - Bluetooth Status
12 - Playback Status
13 - Art Work
14 - Shortcut Button
15 - Progress bar
13
5
3
6
7
21
14
1011
12
15
4
9
8
NX403A_Usermanual_EN.indd 26 2013-7-11 16:33:47
Page 28
27
NX403A
English
English
Owner’s Manual
Play/Pause Playback
1. Touch [ ] button to pause during playback.
2. Touch [ ] button again to resume playback.
Switch to Previous/next file
• Press [ ] or [ ] button during playback to play
previous /next le.
• Pressing [ ] button starts playback from the
beginning of the next track.
• Pressing [ ] button starts playback from the
beginning of the current track; when this button is
pressed again within about 3 seconds, playback
starts from the beginning of previous track.
Fast Forward /Fast Backward
Press [ ] or [ ] button and hold more than 2
seconds to start fast backward or fast forward during
playback.
Note:
*No audio is reproduced during fast forward and fast
backward operation.
*The fast forward and fast backward speed may differ
depending on the audio les.
Repeat Playback
* depend on iPod.
1. Touch the [ ] button once for Repeat Track, again
for Repeat All.
Shuffle Playback
1. Touch [ ] button to shufe the tracks in playing
folder during playback.
2. Touch this button again to turn off the feature.
Album Art work
If current audio le contains album art image in ID3,
the picture will be displayed in this area.
ID3 info area
This area display ID3 info of playing le: song title,
artist information, album information (Genre, playlist
and release time).
Category List
Select different category songs to play. The
category is same as the iPod/iPhone.
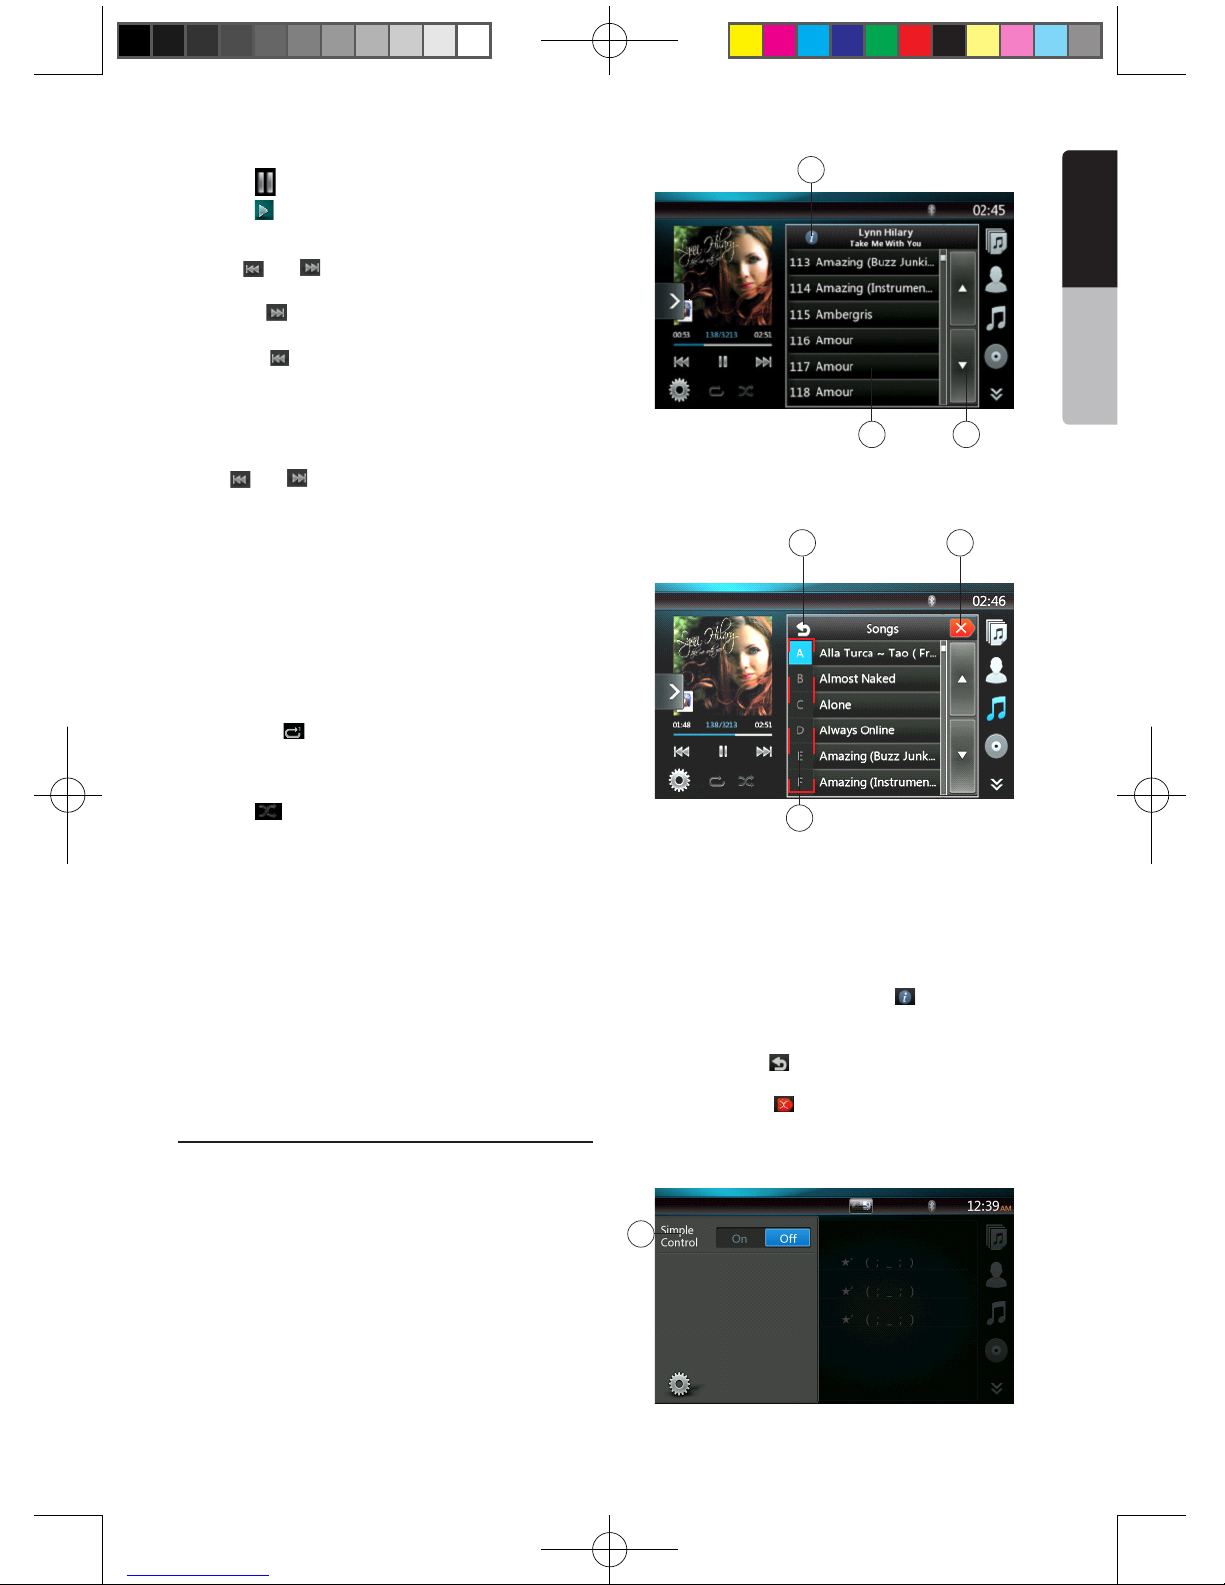
iPod audio playlist mode screen
1 - Switch to Information Button
2 - Playing List
3 - Page Turning
4 - Back to father folder
5 - Close the list mode
6 - Search with the rst alphabet in current list
iPod audio List mode screen
• In the ID3 information mode screen, press the ID3
info area to switch the playing list, and in the playing
list mode screen, press the button [ ] can back to
the father folder. If the list is in root, press it can close
the list.
• Press the button[ ] can back to the father folder. If
the list is in root, press it can close the list.
• Press the button [ ] to close the List and back to
the ID3 information mode.
Simple Control Mode
2
1
4
6
1
5
3
NX403A_Usermanual_EN.indd 27 2013-7-11 16:33:47
Page 29

28
NX403A
English
Owner’s Manual
1 - Simple Control Button
2 - Video Mode Button
• If the Simple Control is set to [ ] in option menu,
the screen will become Simple Control Mode. It can
also display the video of iPod/iPhone regardless it is
iPod Audio or iPod Video mode. But only “Previous
Track”、“Play/Pause” and “Next Track” can be
operated.
• Press [ ]the video will play from iPod.
Skipping a track (Simple Control Mode)
Press the [ ] or [ ] button during playback. Tracks
are skipped, as many times as the button is pressed,
and playback starts.
• Pressing the [ ] button starts playback from the
beginning of the next track.
• Pressing the [ ] button starts playback from the
beginning of the current track.
When this button is pressed again within about 2
seconds, playback starts from the beginning of the
previous track.
Note: In Simple Control Mode, the best way is to control
the iPod just on iPod.
Selecting a list item from a list screen
(1). Touch the list screen and ick up or down to scroll
the list.
(2). Touch a desired list item on the screen to display
the corresponding list of tracks.
(3). Touch the desired track name on the list to play it.
iPod Video Menu Operations
Connect your iPod/iPhone to the USB connector.
The system will automatically detect the connected
device and the iPod Video button will be enabled for
operation on the Main Menu screen.
• When an iPod/iPhone is already connected
Touch the [ ] key on the Main Menu screen.
The system changes to the iPod Video mode, and
starts playback from the previous position.
Press MENU button on Operational Panel to return to
the Main Menu.
• Viewing video data in the iPod/iPhone (only for the
iPod/iPhone with video features)
When you connect an iPod/iPhone with video features
by using the optional connector cable for iPod/iPhone
with video, you can enjoy the video data and slide
show data stored in the iPod/iPhone and show them
on the display of this unit (and the rear monitor if
connected).
iPod Video ID3 mode screen
1 - Option Button
2 - Repeat Button
3 - Previous Track Button
4 - Play/Pause Button
5 - Next Track Button
6 - Playing File Title
7 - Category List
8 - Next Page[ ] / Previous Page[ ] Button
6
12
4
5
6
21
13
910
12
14
3
15
7
8
NX403A_Usermanual_EN.indd 28 2013-7-11 16:33:47
Page 30

29
NX403A
English
English
Owner’s Manual
9 - System Time
10 - Bluetooth Status
11 - Playback Status
12 - Art Work
13 - Shortcut Button
14 - Progress bar
15 - Front /Rear Button
Note:
This icon shows only when 2-Zone on. This icon is in
some screen pictures and none in other some pictures.
It is better to be same setting in a manual. (Also, Navi
icon shows owned by setting. (There is no Navi icon
screen in this manual))
Play/Pause Playback
1. Touch [ ] button to pause during playback.
2. Touch [ ] button again to resume playback.
Switch to Previous/next file
• Press [ ] or [ ] button during playback to play
previous /next le.
• Pressing [ ] button starts playback from the
beginning of the next track.
• Pressing [ ] button starts playback from the
beginning of the current track.
Repeat Playback
* The repeat set as the factory default is depend on
iPod/iPhone.
1. Touch the [ ] button once for Repeat One, again
for Repeat All, again for Repeat Off.
Album Art work
If current audio le contains album art image in ID3,
the picture will be displayed in this area.
ID3 info area
The area is display the title of the playing le.
Category List
Select different category songs to play. The
category is same as the iPod/iPhone.
iPod Video List mode screen
This operation is same as this in iPod Audio mode.
iPod Video Simple Control Mode Screen
This operation is same as this in iPod Audio mode.
iPod Video play mode screen
1 - Previous Track /Fast Backward Button
2 - Play/Pause Button
3 - Next Track/Fast Forward Button
4 - Progress bar
5 - Menu List Button
6 - Repeat Button
7 - System time
8 - Bluetooth status
9 - Playback Info
Play/Pause Playback
1. Touch [ ] button to pause during playback.
2. Touch [ ] button again to resume playback.
Switch to Previous/next Track
• Press [ ] or [ ] button during playback to play
previous /next track.
• Pressing [ ] button starts playback from the
beginning of the next track.
3
4
5
21
7
8
9
6
NX403A_Usermanual_EN.indd 29 2013-7-11 16:33:47
Page 31

30
NX403A
English
Owner’s Manual
• Pressing [ ] button starts playback from the
beginning of the current track; when this button is
pressed again within about 5 seconds, playback
starts from the beginning of previous track.
beginning of the current track.
Fast Forward /Fast Backward
Press [ ] or [ ] button and hold more than 2
seconds to start fast backward or fast forward during
playback. The playback speed starts at 2x, then will
increase to 4x, 8x, and 16x. Release the button will
continue playback with normal speed.
Note:
*No audio is reproduced during fast forward and fast
backward operation.
*The fast forward and fast backward speed may differ
depending on the audio les.
Repeat Playback
* The repeat set as the factory default is Repeat Off.
Touch the [ ] button once for Repeat One, again
for Repeat All, again for Repeat Off.
Note:
The operation in iPod video mode are as same as iPod
Audio mode. Please refer to the iPod Audio Mode
operation.
Note:
Video playback is not available on all iPod/ iPhone
devices. Please contact your Clarion dealer for details.
An optional connection cable or accessory may be
required for this feature.
Note:
• “AUDIO ONLY” is displayed when the automobile is
moving.
• Image data may not be played back according to the
status of the iPod/iPhone
• The volume setting of video data is relatively lower than
audio data. Be sure to lower the volume setting before
switching to the other mode.
• Do not select the categories with no track registered
from the iPod menu screen. The iPod/iPhone may be
frozen. If the iPod/iPhone is frozen, reset the iPod/
iPhone by following the procedure described in the
instruction manual of the iPod/iPhone.
• Audio may be played back slightly out of
synchronization with video images.
NX403A_Usermanual_EN.indd 30 2013-7-11 16:33:48
Page 32

31
NX403A
English
English
Owner’s Manual
12. Bluetooth AUDIO PLAYER OPERATIONS
Some Bluetooth cellular phones have audio features,
and some portable audio players support the
Bluetooth feature. These devices will be called as
“Bluetooth audio players” in this manual. This system
can play audio data stored in a Bluetooth audio player.
Note:
• This system will not operate or may operate improperly
with some Bluetooth audio players.
• For detailed information on the playable Bluetooth
audio players, see our home page: www.clarion.com
Selecting the Bluetooth Audio mode
1. Touch the [Bluetooth Audio] key to select the
Bluetooth Audio mode.
The system changes to the Bluetooth mode. If the
connection with a Bluetooth audio player has been
already established, you may select the Music
function.
2. Press MENU button on Operational Panel to return
to the Main Menu.
• When the connection with blue icon a Bluetooth
audio player has been established, the [ ] icon is
displayed at the top of the screen.
Bluetooth audio player settings
You can conrm various information concerning
about the Bluetooth Interface features.
You can conrm various information concerning about
the Bluetooth Interface features.
1. Touch the [ ] button to display the information on
the screen.
2. When you nish conrming the Bluetooth
information, touch the [ ] button to return to the
previous screen.
If you want to change the Pin Code setting of this unit,
perform the following steps.
• The factory default setting is “1234”.
3. Touch the text box of the Pin Code item to display
the Ten-Key Pad screen.
4. Enter your desired 4-digit PIN number, and then
touch the [ ] key.
Note:
This model is not supported External MIC.
T2 sample is ENABLED. .
Registering your Bluetooth audio player
(Pairing)
You can register up to 3 Bluetooth audio players.
1. Turn on the power of the Bluetooth audio player you
wish to register.
2. Touch the Device key [ ] to display the Device
Select screen.
3. Touch the [ ] button to display the Inquiring Device
screen.
NX403A_Usermanual_EN.indd 31 2013-7-11 16:33:48
Page 33

32
NX403A
English
Owner’s Manual
4. Touch your desired Device and press [ ]
button to register for the Bluetooth audio player.
5. If entering the Pass Key code is prompted on your
Bluetooth audio player, enter the Pass Key code set
to this unit.
When the pairing operation completes, the registered
Bluetooth audio player is set as the current device,
after selecting the favorite icon, the display return to
the device list screen. Press [ ] button, the display
will return to the Bluetooth audio mode screen.
• To delete the Bluetooth audio player registration
1. Touch the [ ] button to delete the device.
A conrmation screen is displayed.
2. Touch the [ ] button to conrm delete.
Selecting the Bluetooth audio player
To change the current Bluetooth audio player to the
other device which is already registered, perform the
following operation.
1. Touch the Device key to [ ] display the Device
Select screen.
2. Touch the currently connected device, then press
the [ ] button to disconnect the active device.
3. Touch the desired Device key you wish to use. Press
[ ] button to select it as your active device.
The corresponding cellular phone is set as current
telephone.
4. Touch the [ ] button to return to the previous
screen.
Controlling the Bluetooth audio player
Note:
• Occasionally, depending on the environment, playback
sounds may be fragmented, or switch noises may be
generated.
Playing a music
After the connection with a Bluetooth audio player is
established, the play mode is automatically engaged.
• When playback is not started for some devices,
touch the [ ] button manually.
Pausing playback
1. Touch the [ ] button during playback.
Playback pauses.
2. To resume playback, touch the [ ] key. Playback
resumes.
Skipping a track (searching)
3. Press the [ ] or [ ] button during playback.
Stopping playback
4. Press the [ ] button during playback.
Tracks are stopped, press the [ ] button to
playback the rst Track.
NX403A_Usermanual_EN.indd 32 2013-7-11 16:33:48
Page 34

33
NX403A
English
English
Owner’s Manual
When the connection with your Bluetooth cellular
phone is established, the following functions are
available on this unit:
• Listening to your telephone calls on the car
speakers.
• Answering to an incoming call.
• Making a call using the Ten-Key pad screen.
• Making a call using the Phone Book data in the
selected cellular phone.
• Making a call using the History data of the dialed/
received calls.
Note:
• Some cellular phones may not be able to transfer the
Phone Book data to head unit.
• The Phone Book data transmission may take a long
time. The operations of sending calls are disabled
during the data transmission.
Select the BT Phone mode
1. Touch the [Bluetooth Telephone] key to select the
Bluetooth Telephone mode.
The Telephone screen is displayed.
2. Press MENU button on Operational Panel to return
to the Main Menu.
• When no Bluetooth Telephone connected, the icon
[ ] is displayed at the top of the screen.
• When the connection with a Bluetooth Telephone
has been established, the icon [ ] and signal level
indicator are displayed at the top of the screen.
Bluetooth Telephone settings
You can conrm various information concerning about
the Bluetooth Interface features.
1. Touch the [ ] button to display the information on
the screen.
2. Perform setting for the desired item. See the
following sections for detail.
3. When you nish conrming the Bluetooth
information, touch the [ ] key to return to the
previous screen.
If you want to change the Pass Key setting of this unit,
perform the following steps.
1. Touch the text box of the Pass Key item to display
the Ten-Key Pad screen.
• The factory default setting is “1234”.
2. Enter your desired 4-digit PIN number, and then
touch the [ ] button.
Setting Automatic Connection
The system automatically reconnects the cellular
phone after the connection is lost or the system is
restarted.
• The factory default setting is “OFF”. Touch the
[ ] or [ ] button of the Automatic Connection
item to set the function ON or OFF.
Setting Automatic Answer
If a call comes in, answer automatically after
5 seconds.
• The factory default setting is “OFF”. Touch the
[ ] or [ ] button of the Automatic Answer item
to set the function ON or OFF.
Setting Microphone Gain
You can adjust the input level of the microphone in
16 levels.
• Touch the level indicator button of the Microphone
Gain item to adjust the input level.
Note:
• The input level of the microphone can be affected by
its surroundings. Adjust the level if the person on the
other end of the telephone has a reception problem.
13. Bluetooth
TELEPHONE OPERATIONS
NX403A_Usermanual_EN.indd 33 2013-7-11 16:33:48
Page 35

34
NX403A
English
Owner’s Manual
Register your cellular phone (Pairing)
You can register up to 3 cellular phones. The
registering method is as same as “Registering your
Bluetooth audio player”.
1. Turn on the power of the cellular phone you wish to
register.
2. Touch the Device key [ ] to display the Device
Select screen.
3. Touch the [ ] key to display the Inquiring Device
screen.
4. Touch your desired Cellular key to select the key
for the cellular phone to be registered, and press[
] button to register for the Bluetooth cellular
phone.
• You cannot select the Cellular button of which
another cellular phone is already registered.
Select a blank Cellular button.
5. If entering the Pass Key code is prompted on your
cellular phone, enter the Pass Key code set in this
unit.
• You can change the Pass key setting of this
unit from the Bluetooth Info screen under the
Telephone Settings screen.
When the pairing operation completes, the
registered cellular phone is set as the current
telephone, and the display returns to the
Telephone screen.
• To delete the cellular phone registration
1. Touch the [ ] key to delete the device.
A conrmation screen is displayed.
2. Touch the [ ] key to conrm delete.
Select the cellular phone
To change the current cellular phone to the other
device which is already registered, perform the
following operation.
1. Touch the [ ] key to display the Device Select
screen.
2. Touch the currently connected device, then press
[ ] key to disconnect the active device.
3. Touch the desired Device key you wish to use. Press
[ ] key to select it as your active device. The
corresponding cellular phone is set as the current
telephone.
• If the power of the cellular phone is not turned on,
turn it on.
• The cellular phone may prompt to acknowledge the
Bluetooth connection or to enter the Pass Key code
of this unit. Perform these operations according to
the message displayed.
4. Touch the [ ] key to return to the previous
screen.
Obtaining the Phone Book data
Sending the Phone Book data from the cellular phone
enables you to make a call using the Phone Book
function from this unit.
Telephone operations
Making a call using the Ten-Key pad
1. Touch the [ ] key to display the Ten-Key pad
screen.
2. Enter the telephone number by using the Ten-Key
pad displayed on the screen.
NX403A_Usermanual_EN.indd 34 2013-7-11 16:33:48
Page 36

35
NX403A
English
English
Owner’s Manual
3. Touch the [ ] (Send) key to call the entered
number.
• The following Telephone Interrupt screen is
displayed during phone call.
• Touch the [ ] key to talk by using the cellular phone
and canceling the hands-free function (Private
Mode). To return to the hands-free mode, touch the
[ ] key again.
• Touch the [ ] key to mute the microphone. Now
you can hear the other side, but the other side
cannot hear your side.
• Touch the [ ] key to hold the current phone call,
now you can answer to the other incoming call.
Touch again to talk with previous call
If during a call with a third-party call, you can keep
the current call to answer a third party or hang up
the current call to answer a third party. You can also
ignore the third-party calls.
4. When the call is nished, touch [ ] key to hang
up.
Note:
• Depending on some special cellular phone, the
Telephone Interrupt screen may be closed and the
connection with this system may be disconnected
when entering the Private mode.
Making a call using the Phone Book
You can use the Phone Book data obtained from the
cellular phone to make a call from this unit.
Note:
• Before using this function, the Phone Book data must
be sent from the cellular phone.
• Only the Phone Book items with at least one telephone
number registered in the captured Phone Book data
are displayed on the Phone Book screen.
1. Touch the [ ] key to display the Phone Book
screen.
2. Touch the desired Name key you wish to dial.
• Flick the list up and down to scroll the list.
3. Touch the [ ] key to call the specied number.
The Telephone Interrupt screen is displayed, and
calling starts.
• When the call is nished, touch the [ ] key to
hang up.
Making a call using the History
The system will memorize the Dialed/Received calls
record data in the memory. You can conrm it and use
it to make a call from this unit.
1. Touch the [ ] key. The History List screen is
displayed.
• The items are sorted by Dialed, Missed and
Received calls.
• Flick the list up and down to scroll the list.
2. Touch the desired History item key you wish to dial.
3. Touch the [ ] key to call the specied number.
The Telephone Interrupt screen is displayed, and
calling starts.
• When the call is nished, touch the [ ] key to
hang up.
Answering to an incoming call
When a call comes in, the following Telephone
Interrupt screen appears.
You can answer to the incoming call on this system by
the following operation.
1. Touch the [ ] key to answer the call.
2. When the call is nished, touch the [ ] key to
hang up.
NX403A_Usermanual_EN.indd 35 2013-7-11 16:33:48
Page 37

36
NX403A
English
Owner’s Manual
14. Tuner Operations
Listening to the Tuner
1. Touch the Tuner button on the Main menu display.
The tuner mode screen is displayed.
2. Press the [FM1/2/3/AM] button to select the radio
band. Each time the button is pressed, the radio
reception band changes in the following order: FM1>FM2->FM3->AM -> FM1...
1. Preset Scan Button
2. Seek Down
3. Seek Up
4. Step Down
5. Step Up
6. Frequencies Display
7. System time
8. Bluetooth status
9. Preset List
10. DX/Local Display
11. Band Button
12. Shortcut Button
13. Option Button
Seek Tuning
1. Press the [FM1/2/3/AM] button to select the radio
band (FM or AM).
2. Touch the [ ] or [ ] button
• When Press the [ ] button, the station is searched
in the direction of higher frequency.
• When Press the [ ] button, the station is searched
in the direction of lower frequency.
Step Tuning
1. Press the [FM1/2/3/AM] button to select the radio
band (FM or AM).
2. Touch the [ ] or [ ] button in frequency menu to
tune up or down by one step.
Recalling a preset station
1. Press the [FM1/2/3/AM] button to select the desire
band (FM or AM) on the tuner.
2. Press the preset station (1 to 6) on Preset List.
Manual memory
1. Touch the desired Band key to select the band you
wish to store.
2. Tune to a station you want to store using the seek
tuning, step tuning, or preset tuning.
3. Touch and hold the desired Preset key you want to
store for about 3 seconds.
Auto Store
The Auto Store is a function for storing up to 6 stations
that are automatically searched in sequentially. If the
number of receivable stations cannot reach to 6, the
previous stored station remains.
1. Touch the [FM1/2/3/AM] button to select the
desired band. (FM or AM)
2. Press the [ ] button, and then press the [ ]
button to start the Auto Store.
A beep sounds and the stations with good reception
are stored automatically to the preset list.
Notes:
1. After auto store, the previous stored stations will be
overwritten.
2. The unit has 4 bands, but FM3 and AM can store by
AS function.
Preset Scan
The Preset Scan receives the stations stored in the
preset memory in order. This function is useful when
searching for the desired station in memory.
1. Touch the [FM1/2/3/AM] Button to select the desired
band. (FM or AM)
2. Touch the [ ] button to start the Preset Scan.
The unit starts scanning each station for 10 seconds
sequentially. But the station stored is not a valid
station; the scanning time is only 2 seconds.
3. When the desired station is tuned in, touch the
[ ] button again to stay in that station.
DX/Local Setting
The DX / Local setting changes the tuner sensitivity in
order to separate closely spaced stations. This feature
is useful in areas that have many radio stations in
close proximity.
113
12
7
11
8910
2
3
4
6
5
NX403A_Usermanual_EN.indd 36 2013-7-11 16:33:48
Page 38

37
NX403A
English
English
Owner’s Manual
1. Touch the [ ] button to switch to local tuner sensitivity.
2. Touch the [ ] button to switch to DX tuner sensitivity.
15. AUX
External peripheral devices, including a game console, camcorder, navigation unit, iPod/iPhone, etc. can be
connected to the AUX connector on the front or back of this unit using the A/V media cables.
Switching to AUX IN
Press [AUX1] /[AUX2] button on Main Menu to select desired mode (when unit is reading). If the external device
connected to AUX input have audio signal, the unit will broadcast audio of external device. Press Menu button on
Operational Panel to return to the Main Menu.
You cannot directly control external devices connected to AUX input.
16. Camera In Operations
Switching to Camera mode
Press [Camera] button on Main Menu to select desired mode.
The LCD will display the external camera video. The screen will display “No Video Signal” message, if a valid
camera is not connect to this head unit.
Press MENU button on Operational Panel to return to the Main Menu.
Note:
If the reverse cable is connected correctly to the car, the head unit to go to camera mode automatically when the car
is in reverses.
NX403A_Usermanual_EN.indd 37 2013-7-11 16:33:48
Page 39

38
NX403A
English
Owner’s Manual
17. Rear Source Operations
If a monitor is installed in the rear zone and connected
to the rear zone AV output, passengers in the back
seat can watch the DVD/iPod Video/AUX1/ AUX2
video separately from front source.
1. Press the button to access the front source.
2. Press the button to close the rear source.
Multi-Zone Operation
Independent sources can be played simultaneously
on the unit. For example, a FM/AM console can be
playback on the front screen while DVD video is
available to rear passengers. But now can’t select DVD
video in front.
Access Rear-Zone
1. Touch the Rear button [ ] on Main Menu to
access the Rear Source.
2. Select a source to play.
Exit Rear-Zone
1.Touch the 2-Zone off [ ] button to close the
Rear Source.
NOTE:
1.If the source is selected as the front, the source in rear
can’t be selected.
2.If the source is selected as the rear, the source in front
can’t be selected.
3.Press the Front Button to access the main
menu but not close the Rear Source.
DVD Video in Rear
1. [ ]: Option Button
Press the button can display the hidden button.
2. [ ]: Show Cursor keys Button
3. [ ]: Previous Track /Fast Backward Button.
4. [ ]: Play/Pause Button
5. [ ]: Next Track/Fast Forward Button
6. Elapsed playing time.
7. [ ] Menu List Button
8. [ ] Front/Rear button
If the screen displays Rear Source, press [ ] to
switch to Front Source.
If the screen displays Front Source, Press [ ] to
switch to Rear Source.
1
1 2 3 4
5
8
6 7
2
NX403A_Usermanual_EN.indd 38 2013-7-11 16:33:49
Page 40

39
NX403A
English
English
Owner’s Manual
DVD Video Rear Source Control Info mode.
Press [ ] button to return.
DVD Video Rear Source Control Direct
mode.
Note: More detail please refer to DVD Video Front
source.
AUX1
AUX2
iPod Video in Rear
iPod Video Rear Source Control Play Mode
1. [ ]: Previous Track /Fast Backward Button
2. [ ]: Play/Pause Button
3. [ ]: Next Track/Fast Forward Button
4. Progress bar
5. [ ]: Menu List Button
Press the Menu button can display the iPod Video
Rear Source mode screen.
6. [ ] Repeat Button
Same as iPod function of front source
7. [ ]/[ ]: Front/Rear button
If the screen displays Rear Source, press [ ] to
switch to Front Source.
If the screen displays Front Source, Press [ ] to
switch to Rear Source.
iPod Video Rear Source ID3 Mode
1 2 3 4
7
5 6
NX403A_Usermanual_EN.indd 39 2013-7-11 16:33:49
Page 41
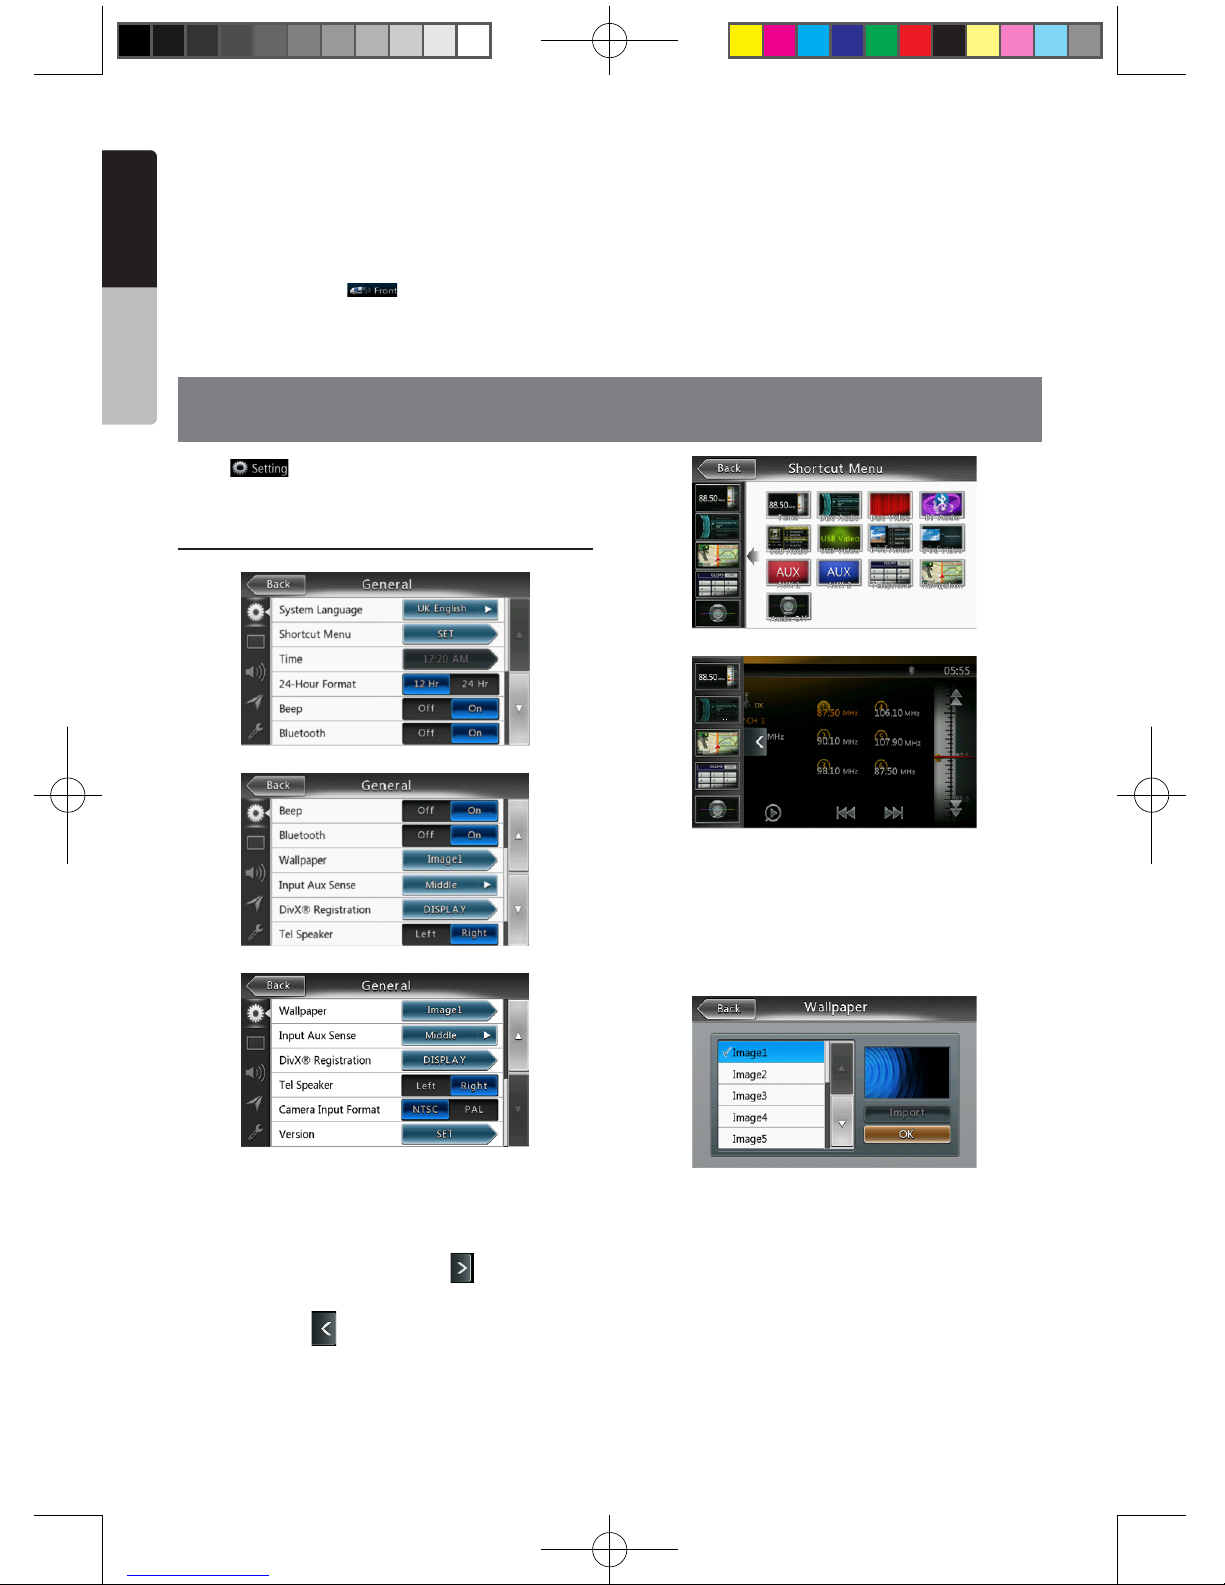
40
NX403A
English
Owner’s Manual
Note:
If the source is selected as the front, the source in rear
can’t be selected.
If the source is selected as the rear, the source in front
can’t be selected.
Press the Front Button to access the front main
menu but the rear source will keep running.
18. Setting Operation
Press [ ] button on the Main menu screen.
The Setting menu screen will be displayed.
General Setup Menu
System Language: Set the Language for system
screen.
Shortcut Menu: Set the shortcut mode from all of the
modes.
In the any modes, press the button [ ], the shortcut
menu will display from left screen.
Press the button [ ], the shortcut menu will be
hidden.
Time: Set system clock.
24-Hour Format: Set the time display mode.
Beep: Turn on or turn off the beep conrmation sound.
Bluetooth: Set the Bluetooth ON or OFF.
Wallpaper: Choose the desired wallpaper.
Input Aux Sense: Auxin input switch, including Low,
Mid, High.
Tel Speaker: There are two options, Left and Right.
For example, if current setting is Right, when BT
phone is coming in, only left speaker can hear the
phone.
DivX ® Registration: Display the information about
DivX® registration.
Camera Input Format: There are two options, NTSC
and PAL.
Version: Display the software version information.
NX403A_Usermanual_EN.indd 40 2013-7-11 16:33:49
Page 42

41
NX403A
English
English
Owner’s Manual
Note:
• Time and 24-Hour Format can be adjusted when set
the system time not to be synchronized with GPS local
time.
Video Setup Menu
This menu includes: DVD Wide Screen Mode;
Brightness. Dimmer Mode
DVD Wide Screen Mode: Set the DVD wide screen
mode on or off.
Dimmer: Set brightness value from 0 to 20.
Dimmer Mode: There are three options, Day, Night
and Auto.
Audio Setup Menu
This menu includes: Balance, Fader, Beat EQ, Sub
Woofer Ctrl, Sub Woofer Phase, High Pass Filter Low
Pass Filter, Amp Cancel Line Out and Magna Bass EX.
Balance: Choose the desired volume for left and right
speaker.
Fader: Choose the desired volume for front and rear
speaker.
Beat EQ: Choose the desired mode: Bass Boost,
Impact, Excite, Custom and OFF.
Sub Woofer Ctrl: Choose the desired sub woofer gain
from 0 to 14.
Sub Woofer Phase: Choose the sub woofer phase
normal or reverse.
High Pass Filter: Choose the frequency about the
high pass lter or enable. The frequencies include
62Hz, 95Hz and 135Hz.
Low Pass Filter: Choose the frequency about the low
pass lter or enable. The frequencies include 60Hz,
90Hz and 120Hz.
Amp Cancel: Choose the amp Cancel on or off.
Line out: Set the line out to subwoofer or rear.
Magna Bass EX: Choose the loudness on or off.
Navigation Setup Menu
This menu includes: GPS Time, Navi Interrupt, Voice
Guidance and Voice Guidance Mix.
GPS Time: Set the system time to be synchronized
with GPS local time or not.
Navi Interrupt: There are three choose: On/Popup/
Off. “On”: The navigation screen will cover to AV
screen when reaching some key point. “Popup”: When
small turn info window will pop up in the top of the
AV screen to indicate the key point. “Off”: Turn off this
function.
Voice Guidance: There are three choose: On/Mute/
Off. “On”:
ON:Interrupt function of voice guidance is on. While
interrupting no attenuate function of AV sound.
MUTE:Interrupt function of voice guidance is on. While
interrupting attenuate function sound is on.
Off:disable the navigation voice guidance.
Others Setup Menu
This menu include: Set Password; Parental
Control; Audio Language; Subtitle Language; Screen
Calibration and Factory Default.
Set password: Set the password for DVD parental
control.
Parental control: Set the rating of the age. It contains
Kid Safe/G/PG/PG- 13/PG-R/R/NC- 17/Adult.
Audio Language: Set the Language for DVD Audio.
NX403A_Usermanual_EN.indd 41 2013-7-11 16:33:49
Page 43

42
NX403A
English
Owner’s Manual
Subtitle Language: Set the Language for DVD subtitle.
Blinking LED: Set blinking LED on or off.
Screen Calibrate: The function of it is to select the TS
Calibrate YES or NO.
Factory Default: The function is to select to load
factory default or not.
Set the Anti-Theft code
1. If your unit is unlocked, hold the [ ] button
more than 2 seconds, then the Anti-Theft setting
mode will display. Users can change anti-theft
code.
Touch [Yes], the numerical keypad is displayed.
Enter the new password twice, then anti-theft code
is set and your unit is secured.
When the Anti-theft is “On”, you need enter correct
Anti-theft code to turn the unit on. If you enter
wrong code three times, the unit is locked, and must
be unlocked by the professionals.
2. If your unit is secured, hold the [ ] button more
than 2 seconds, then the Anti-Theft setting mode
will display. The numerical keypad is displayed,
enter the right code to unlock.
NX403A_Usermanual_EN.indd 42 2013-7-11 16:33:49
Page 44

43
NX403A
English
English
Owner’s Manual
19. TROUBLESHOOTING
GENERAL
DVD PLAYER
Problem Cause Measure
Power does not turn on. (No
sound is produced.)
Fuse is blown. Replace with a fuse of the
same amperage. If the fuse
blows again, consult your store
of purchase.
Incorrect wiring. Consult your installation center.
Nothing happens when buttons
are pressed.
Display is not accurate.
The microprocessor has
malfunctioned due to noise,
etc.
Press the reset button with a
thin rod.
Note:
When the Reset button is
pressed, turn o the ACC
power.
* When the Reset button is
pressed, frequencies of radio
stations, titles, etc. stored in
memory are cleared.
The remote control unit does
not work.
Direct rays of the sun fall on
the light-receptive part of the
remote control unit.
When direct rays of the sun fall
on the light-receptive part of
the remote control unit, it may
not work.
The battery of the remote
control unit is dead or there is
no battery in the remote control
unit.
Check the battery of the remote
control unit.
Problem Cause Measure
Disc cannot be loaded. A disc is already loaded. Eject the disc before loading
the new one.
There is foreign matter already
in the disc slot.
Remove the foreign matter, or
consult a service station.
Sound skips or is noisy. Disc is dirty. Clean the disc with a soft cloth.
Disc is heavily scratched or
warped.
Replace with a disc in good
condition.
Sound is bad directly after
power is turned on.
Condensation may form on the
internal lens when the car is
parked in a humid place.
Let dry for about 1 hour with the
power on.
Video images are not
displayed.
The parking brake is not
engaged.
Check that the parking brake is
engaged.
Disc cannot play with
the display “PARENTAL
VIOLATION” shown.
Feature exceeds set parental
level.
Release the view limitation or
change the parental level.
See the subsection “Setting up
the parental level”
NX403A_Usermanual_EN.indd 43 2013-7-11 16:33:49
Page 45

44
NX403A
English
Owner’s Manual
USB DEVICE
Problem Cause Measure
USB device cannot be inserted. The USB device has been
inserted with wrong direction.
Reversing the connection
direction of the USB device, try
it again.
The USB connector is broken. Replace with a new USB
device.
USB device is not recognized. The USB device is damaged. Disconnect the USB device
and reconnect. If the device
is still not recognized, try
replacing with a dierent USB
device.
Connectors are loose.
No sound heard with the
display “NO FILE” shown.
No MP3/WMA le is stored in
the USB device.
Store these les properly in the
USB device.
Sound skips or is noisy. MP3/WMA les are not
encoded properly.
Use MP3/WMA les encoded
properly.
The video image of iPod/
iPhone is disturbed.
The TV Signal setting of the
iPod/iPhone is not set correctly.
Set the TV Signal setting
(NTSC/PAL) of the iPod/iPhone
correctly.
Bluetooth
Problem Cause Measure
Cannot pair the Bluetooth
enable device with the car
audio system.
The device does not support
the proles required for the
system.
Use another device to connect.
The Bluetooth function of the
device is not enabled.
Refer to the user manual of the
device for how to enable the
function.
The audio quality is poor after
connection with a Bluetooth
enabled device.
The microphone is not correctly
positioned.
Use optional external
microphone and adjust the
position of it.
The Bluetooth reception is
poor.
Move the device closer to the
car audio system or remove
any obstacle between the
device and the system.
NX403A_Usermanual_EN.indd 44 2013-7-11 16:33:49
Page 46

45
NX403A
English
English
Owner’s Manual
TV/VTR (When connecting an optional TV tuner, etc.)
Problem Cause Measure
The image is not displayed. The parking brake is not
engaged.
Check that the parking brake is
engaged.
The display is dark. The brightness control is too
low.
Adjust the brightness properly.
The operating condition is not
good.
The temperature inside the
vehicle may be 0°C or lower. Set
to an appropriate temperature
(25°C or so) and check it again.
The headlight of the vehicle
is lit
The display is made dark
at night to prevent the glare
(When the headlight of the
vehicle is lit in the daytime, the
display gets dark).
When the VTR is connected,
the image is disturbed.
Improper NTSC/PAL setting Set the AUTO/PAL/NTSC
properly according to the VTR.
There are red, green, and blue
points in display.
-------------------- This is not a failure, but a
phenomenon peculiar to a
liquid crystal panel (The liquid
crystal panel is produced
according to technology with
very high precision. Note that,
though there are eective
pixels of 99.99% or more, pixel
missing or normally lit pixels
account for 0.01%).
NX403A_Usermanual_EN.indd 45 2013-7-11 16:33:49
Page 47

46
NX403A
English
Owner’s Manual
20. ERROR DISPLAY
If an error occurs, one of the following displays is displayed.
Take the measures described below to solve the problem.
DVD PLAYER
Display Cause Measure
BAD DISC A disc is caught inside the DVD
deck and is not ejected.
This is a failure of DVD deck’s
mechanism and consult your
store of purchase.
BAD DISC A disc cannot be played due to
scratches, etc.
Replace with a non-scratched,
non-warped disc.
BAD DISC A disc is loaded upside- down
inside the DVD deck and does
not play.
Eject the disc then reload it
properly.
PARENTAL VIOLATION Parental level error Set the correct Parental level.
DiscRegionincorrect Region code error Eject the disc, and replace
correct region code disc.
NX403A_Usermanual_EN.indd 46 2013-7-11 16:33:49
Page 48

47
NX403A
English
English
Owner’s Manual
21. SPECIFICATIONS
FM Tuner
Frequency Range: 87.5 MHz to 108.0 MHz
Usable Sensitivity: 8 dBµV
50dB Quieting Sensitivity: 14 dBµV
Alternate Channel Selectivity: 70 dB
Stereo Separation:
25 dB (1 kHz)
Frequency Response: 30 Hz to 14 kHz
AM Tuner
Frequency Range: 531 kHz to 1,629 kHz
Usable Sensitivity: 30 dBµV
DVD Player System
Digital Versatile Disc System with CDDA capable
Usable discs:
DVD video disc, Compact disc
Frequency Response: 20 Hz to 20 kHz
Sound/Noise Ratio: 95 dbA (1 W Ref)
Dynamic Range: 95 dB (1 kHz)
Distortion: 0.05%
Video system: NTSC/PAL
Audio/Video Input
Audio input voltage: ≤ 2 V
rms
Video input voltage: 1.0 V
p-p
@75
Audio input sensitivity (at 2 V output)
High: 325 mV
rms
Mid: 650 mV
rms
Low: 1.3 V
rms
Audio/Video output
Video output voltage: 1.0 V
p-p
@75
Screen Size: 6.2” wide type
Pixels: 1,152,000
Resolution: 800 x 480 x 3 (RGB)
Bluetooth
Specication: Bluetooth Ver 2.1+EDR
Prole: HFP1.5(Hands Free Prole)
HSP1.0 (Headset Prole)
A2DP (Advanced Audio Distribution Prole)
AVRCP1.2,1.3,1.4 (AV Remote Control Prole)
Power Class: 2
WMA mode
Bit rate: 64 kbps to 192 kbps
Sampling rate: 32 kHz, 44.1 kHz, 48 kHz
MP3 mode
Bit rate: 32 kbps to 320 kbps
Sampling rate: 32 kHz, 44.1 kHz, 48 kHz
USB
Specication: USB 1.1/2.0 (FS)
Playable audio format:
MP3(.mp3): MPEG 2/Audio Layer-3
WMA(.wma): Ver 7/8/9.1/9.2
Playable Video Format
Disc Video: .mp4 (MPEG4/AAC) 720*480
.avi (MPEG4/MP3) 720*480
.mpg (MPEG2/MP3) 720*480
USB Video: .mp4 (MPEG4/AAC) 480*272
.mp4 (H.264/AAC) 480*272
.3gp (MPEG4/AAC) 480*272
.avi (MPEG4/MP3) 480*272
.mpg (MPEG2/MP3) 480*272
General
Power source voltage:
14.4 VDC (10.8 to 15.6 V allowable)
Ground: Negative
Current consumption: 4.0 A @1 W
Auto Antenna Rated Current: 500 mA less
NX403A_Usermanual_EN.indd 47 2013-7-11 16:33:50
Page 49

48
NX403A
English
Owner’s Manual
NX403A dimensions:
NX403A weight: 2.4 kg
Remote Control dimensions:
Remote Control weight:
50g (including battery)
52 mm
mm421
12 mm
178 mm
61 3 mm
41 5 mm
100 mm
Note:
• Specications comply with JEITA Standards.
• Specications and design are subject to change without notice for further improvement.
NX403A_Usermanual_EN.indd 48 2013-7-11 16:33:50
Page 50

49
NX403A
English
English
Owner’s Manual
22. WIRE CONNECTION GUIDE
Note:
• Before installing, be sure to disconnect the negative cable of the car battery.
• In the optional devices, the RCA cables and the Connector cables are separately-sold
items.
NX403A
Yellow
GPS
Antenna
Radio Antenna
purple
purple
gray
Red
BLACK
BLACK
Red
R_AUX2_AUDIO_RCH
R_AUX2_AUDIO_LCH
R_AUX2_VIDEO
CAMERA_VIDEO_S
White
Yellow
iPod/iPhone
Rear Vision Camera
Refer to
page 50
NX403A_Usermanual_EN.indd 49 2013-7-11 16:33:50
Page 51

50
NX403A
English
Owner’s Manual
Power cable
10 yellow
1 black
2 brown
5 blue
4 blue/white
11 purple/black
12 purple
13 gray/black
14 gray
15 white
16 white/black
17 green
18 green/black
6 red
9 purple/white
8 grass-green
Note:
*1: Connecting the PHONE INTERRUPT terminal
The phone interrupt will mute the audio if the lead receives a negative or ground signal.
NX403A_Usermanual_EN.indd 50 2013-7-11 16:33:50
Page 52

Clarion Co., Ltd.
All Rights Reserved. Copyright © 2013: Clarion Co., Ltd.
NX403A_BackCover.indd 1 2013-7-10 14:54:53
 Loading...