

Page 1
Owner’s manual
Mode d’emploi
Manual de instrucciones
AM/FM CD PLAYER WITH DVD/CD/MD CHANGER
CONTROL
•
RADIO AM/FM-LECTEUR CD A VEC COMMANDE DE CHANGEUR
DVD/CD/MD
•
RADIO-REPRODUCTOR AM/FM DE DISCOS COMPACTOS CON
CONTROL DE CAMBIADOR DE DVD/DISCOS COMPACTOS/
MINIDISCOS
Page 2

Thank you for purchasing this Clarion product.
∗Please read this owner’s manual in its entirety before operating this equipment.
∗After reading this manual, be sure to keep it in a handy place (e.g., glove compartment).
∗Check the contents of the enclosed warranty card and keep it carefully with this manual.
∗This manual includes the operating procedures of the CD changer, MD changer, AUX, DAB, DSP
DVD, PHONE MUTE and TV tuner connected via the CeNET cable. The CD changer, MD changer
and TV tuner have their own manuals, but no explanations for operating them are described.
Contents
1. FEATURES................................................. 2
2. PRECAUTIONS.......................................... 3
Motorized Face ............................................4
Handling Compact Discs ............................ 4
3. CONTROLS................................................ 5
4. NOMENCLATURE ..................................... 6
Names of the Buttons and their Functions . 6
Major button operations when external equip-
ment is connected to this unit ......................7
Display Items .............................................. 9
LCD Screen ................................................ 9
5. REMOTE CONTROL................................ 10
Inserting the Batteries .............................. 10
Functions of Remote Control Unit Buttons 11
6. DCP .......................................................... 12
7. OPERATIONS .......................................... 13
Basic Operations ...................................... 13
Radio Operations...................................... 16
CD Operations .......................................... 17
Operations Common to Each Mode ......... 19
8. OPERATIONS OF ACCESSORIES ......... 22
CD/MD Changer Operations..................... 22
TV Operations........................................... 24
DSP Operations........................................ 26
Digital Radio/DAB Operations .................. 29
DVD Operations........................................ 33
9. IN CASE OF DIFFICULTY ....................... 34
10. ERROR DISPLAYS .................................. 35
11. SPECIFICATIONS.................................. 109
1.FEATURES
• Pop-Up Rotary Encoder Volume with Rubber
• Motorized Sloping Console Detachable Aluminum Face & High Visibility Multi-Color LC Display
• Controller for Optional DVD Deck, DSP/EQ & SIRIUS/TV/DAB Tuner Modules
• CD-R/CD-RW Compatible, Built-In CD TEXT, Also Reads CD TEXT Data from Clarion Compatible
CD Changer
• BEAT EQ for Sound Creation with 3 Adjustment Modes (3-Band P.EQ)
• CeNET with Balanced Audio Line Transmission and Dynamic Noise Cancelling
•
• 24-Bit/Advanced Multi-Bit D/A Converters with 128-Times Oversampling
• 8-Times Oversampling Digital Filter and Zero-Bit Detector™ Mute Circuit
• 4V / 4-Channel RCA Line Level Output/Input with Fader Control
• 4V / 2-Channel Non-Fade RCA Line Level Output with Volume Control
• 2-Channel RCA AUX Input with 3 Level Adjustments
®
FM Reception System
2 DXZ825
Page 3
2.PRECAUTIONS
English
1. When the inside of the car is very cold and the
player is used soon after switching on the
heater moisture may form on the disc or the
optical parts of the player and proper playback
may not be possible. If moisture forms on the
disc, wipe it off with a soft cloth. If moisture
forms on the optical parts of the player, do not
use the player for about one hour . The condensation will disappear naturally allowing normal
operation.
This equipment has been tested and found to comply with the limits for a Class B digital device, pursuant to Part 15 of the FCC Rules.
These limits are designed to provide reasonable
protection against harmful interference in a residential installation.
This equipment generates, uses, and can radiate
radio frequency energy and, if not installed and
used in accordance with the instructions, may
cause harmful interference to radio communications. However, there is no guarantee that interference will not occur in a particular installation.
If this equipment does cause harmful interference
to radio or television reception, which can be determined by turning the equipment off and on, the
user is encouraged to consult the dealer or an experienced radio/TV technician for help.
2. Driving on extremely bumpy roads which cause
severe vibration may cause the sound to skip.
3. This unit uses a precision mechanism. Even in
the event that trouble arises, never open the
case, disassemble the unit, or lubricate the rotating parts.
CAUTION
USE OF CONTROLS, ADJUSTMENTS, OR PERFORMANCE OF PROCEDURES OTHER THAN
THOSE SPECIFIED HEREIN, MAY RESULT IN
HAZARDOUS RADIATION EXPOSURE.
THE COMPACT DISC PLAYER and MINI DISC
PLA YER SHOULD NO T BE ADJUSTED OR REPAIRED BY ANYONE EXCEPT PROPERLY
QUALIFIED SERVICE PERSONNEL.
CHANGES OR MODIFICATIONS NOT EXPRESSLY APPROVED BY THE MANUFACTURER FOR COMPLIANCE COULD VOID THE
USER’S AUTHORITY T O OPERA TE THE EQUIPMENT.
INFORMATION FOR USERS:.
CHANGES OR MODIFICA TIONS T O THIS PRODUCT NOT APPROVED BY THE MANUFACTURER WILL VOID THE W ARRANTY AND WILL
VIOLATE FCC APPROVAL.
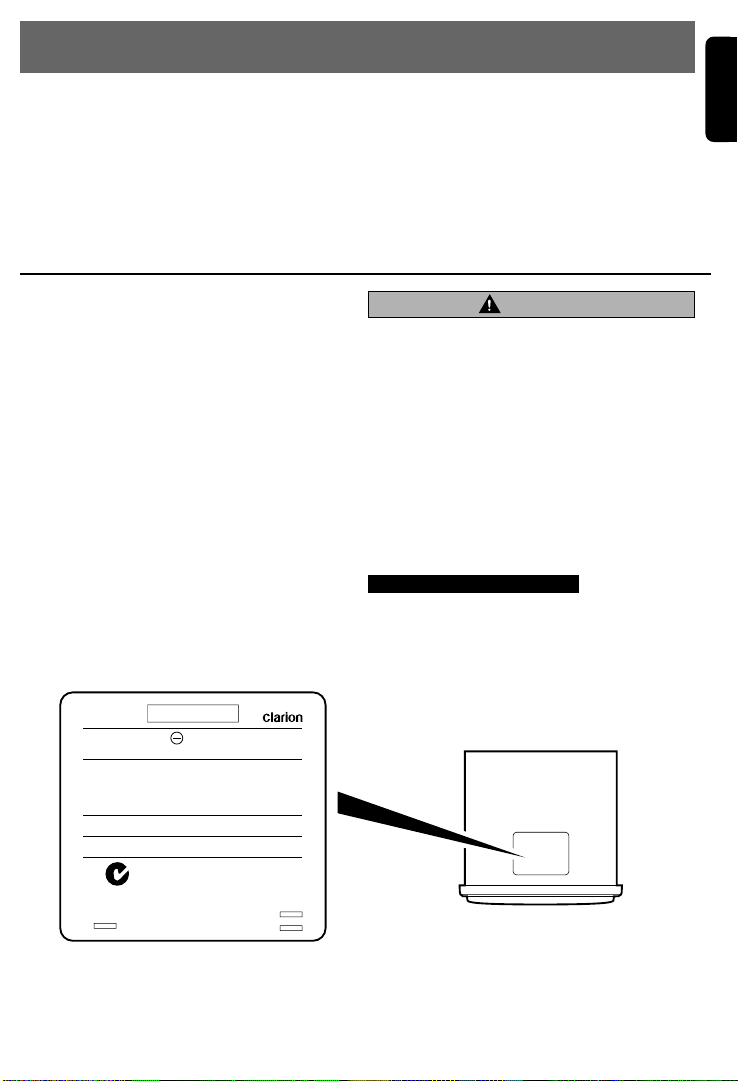
MODEL
12V GROUND
AM 530-1710kHz/FM 87.9-107.9 MHz
THIS DEVICE COMPLIES WITH PART 15 OF THE FCC RULES.
OPERATION IS SUBJECT TO THE FOLLOWING TWO CONDITIONS: (1) THIS DEVICE MAY NOT CAUSE HARMFUL INTERFERENCE, AND (2) THIS DEVICE MUST ACCEPT ANY INTERFERENCE RECEIVED, INCLUDING INTERFERENCE THAT MAY
CAUSE UNDESIRED OPERATION.
THIS PRODUCTION COMPLIES WITH DHHS RULES 21 CFR
SUB-CHAPTER J APPLICABLE AT DATE OF MANUFACTURE.
CLARION CO., LTD.
50 KAMITODA, TODA-SHI, SAITAMA-KEN, JAPAN.
051 722 877
MANUFACTURED:
SERIAL No.
PE-
286-
Clarion Co.,Ltd.
MADE IN
Bottom View of Source Unit
DXZ825 38 DXZ825
Page 4
Motorized Face
This unit uses motorized face to make largescreen displays possible.
When you use the motorized face, be sure to
close it.
CAUTION
BE CAREFUL NOT TO GET YOUR FINGERS
CAUGHT WHEN OPENING AND CLOSING
THE MOTORIZED FACE.
1. For safety’s sake, always close the MOTORIZED FACE before leaving this unit unused
for a prolonged period or switching OFF the
ignition key.
If you switch OFF the ignition key with the
MOTORIZED FACE tilted, the MOTORIZED
FACE does not close.
Handling Compact Discs
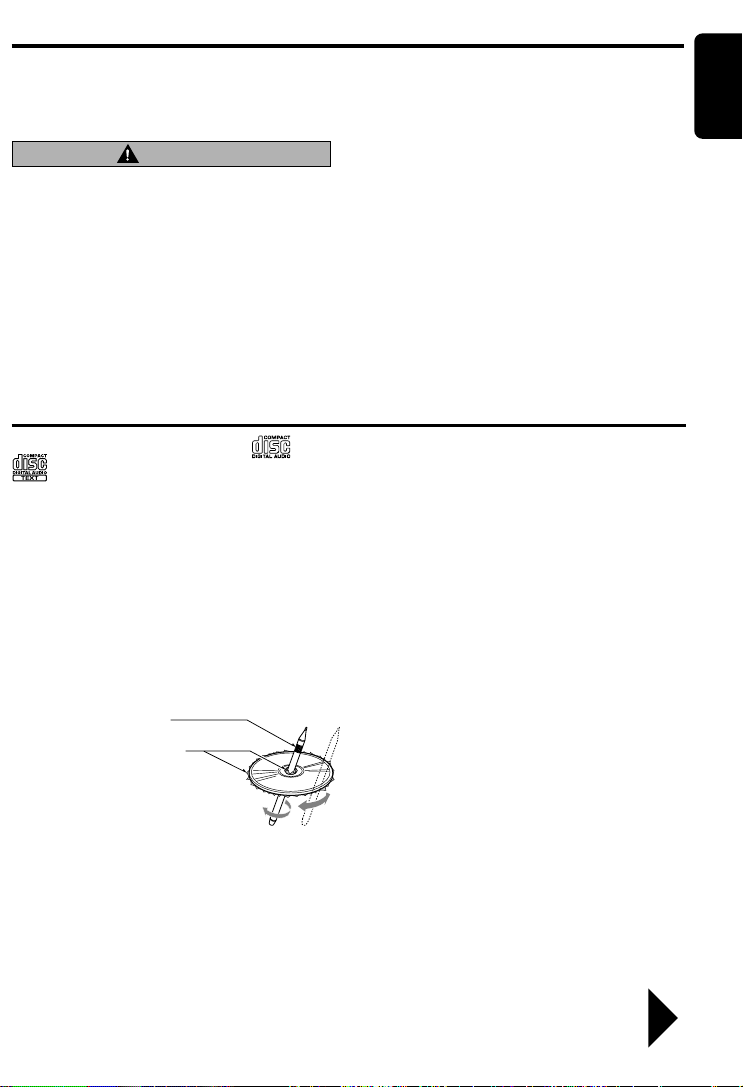
Use only compact discs bearing the or
mark.
Do not play heart-shaped, octagonal, or other
specially shaped compact discs.
Some CDs recorded in CD-R/CD-RW mode may
not be usable.
Handling
•
Compared to ordinary music CDs, CD-R and CDRW discs are both easily affected by high temperature and humidity and some of CD-R and
CD-RW discs may not be played. Therefore, do
not leave them for a long time in the car.
• New discs may have some roughness around
the edges. If such
discs are used, the
player may not work
or the sound may
skip. Use a ball-point
pen or the like to remove any roughness
from the edge of the
disc.
•
Never stick labels on the surface of the compact
disc or mark the surface with a pencil or pen.
• Never play a compact disc with any cellophane
tape or other glue on it or with peeling off
marks. If you try to play such a compact disc,
you may not be able to get it back out of the
Ball-point pen
Roughness
2. Before the MOTORIZED FACE closes, there
may be a sound from the safety mechanism.
This is normal.
3. If you move the MOTORIZED FACE by hand,
this may create play. To correct this play, with
the power on for the unit, press the [Q] button
to close the MOTORIZED FACE.
4. After a disc is ejected, the MOTORIZED
FACE automatically returns to the tilted or
closed state. If there is any obstruction when
the MOTORIZED FACE tries to close, the
safety mechanism is triggered and the MOTORIZED FACE returns to the open state. If
this happens, remove the obstruction, then
press the [Q] button.
5. To avoid scratching the compact disk, keep
the 12 or 8 cm CD level when inserting or removing them.
CD player or it may damage the CD player.
Do not use compact discs that have large
•
scratches, are misshapen, cracked, etc. Use of
such discs may cause misoperation or damage.
•
To remove a compact disc from its storage case,
press down on the center of the case and lift the
disc out, holding it carefully by the edges.
• Do not use commercially available CD protec-
tion sheets or discs equipped with stabilizers,
etc. These may damage the disc or cause
breakdown of the internal mechanism.
Storage
• Do not expose compact discs to direct sunlight
or any heat source.
• Do not expose compact discs to excess hu-
midity or dust.
• Do not expose compact discs to direct heat
from heaters.
Cleaning
• To remove fingermarks and dust, use a soft
cloth and wipe in a straight line from the center
of the compact disc to the circumference.
• Do not use any solvents, such as commercially
available cleaners, anti-static spray, or thinner
to clean compact discs.
• After using special compact disc cleaner, let
the compact disc dry off well before playing it.
English
Be sure to unfold and read the next page. / Veuillez déplier et vous référer à la page suivante.
Cerciórese de desplegar y de leer la página siguiente.
DXZ825 4
Page 5
English Français Español
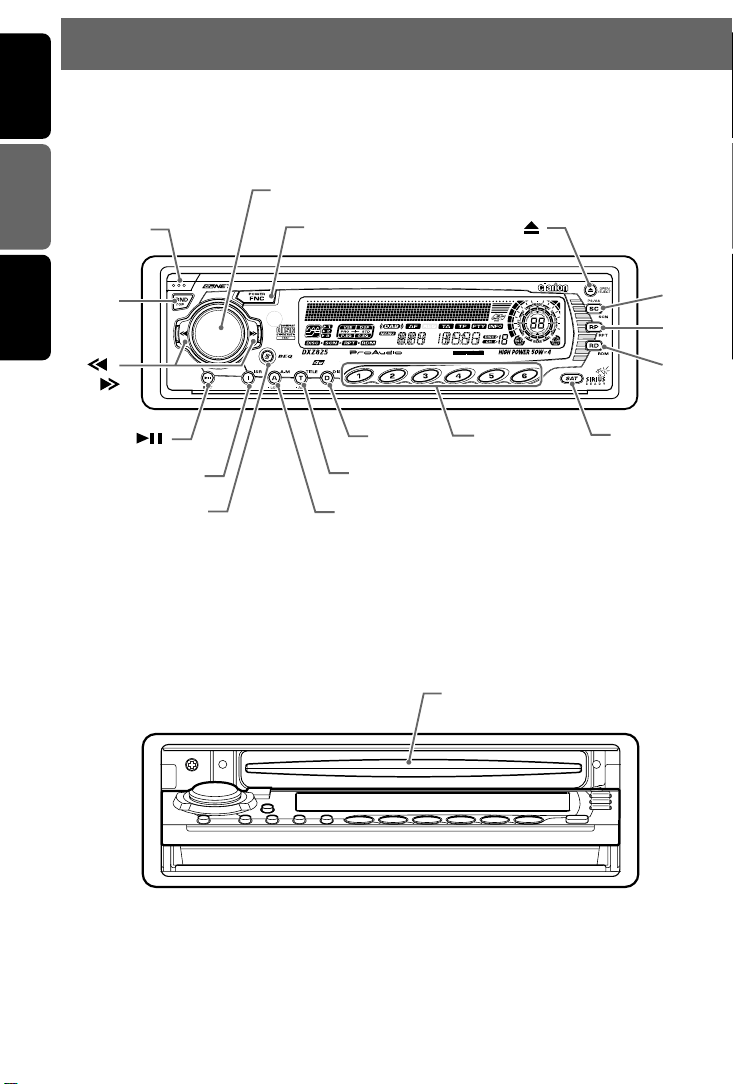
3.CONTROLS / LES COMMANDES / CONTROLES
Source unit / Appareil pilote / Unidad fuente
[
RELEASE
[
]
BND
[ ],
[ ]
]
[ ]
[ I ]
[
BEQ
[
ROTARY
]
[
FNC
[A]
]
]
[D]
[T]
[
DIRECT
[ ]
]
With the SLOPING CONSOLE opened / Ouvrez la CONSOLE RABATTABLE
Apertura de la CONSOLA INCLINABLE
[
CD SLOT
]
[
SAT
[SC]
[RP]
[RD]
]
Note: Be sure to unfold this page and refer to the front diagrams as you read each chapter.
Remarque: Veuillez déplier cette page et vous référer aux schémas quand vous lisez chaque chapitre.
Nota: Cuando lea los capítulos, despliegue esta página y consulte los diagramas.
Page 6

English
4.NOMENCLATURE
Note:
• Be sure to read this chapter referring to the front diagrams of chapter “3. CONTROLS” on page 5 (unfold).
Names of the Buttons and their Functions
[RELEASE] button
• Press the button to remove the DCP.
[ROTARY] knob
• Press the front part of the knob to adjust. The
knob will pop up.
• Adjust the volume by turning the knob clockwise or counterclockwise.
• Use the knob to perform various settings.
[FNC] button
• Press the button to turn on the power.
Press and hold the button for 1 second or
longer to turn off the power.
• Switches the operation mode among the radio mode, etc.
[Q] button
• Use the button to open the motorized face.
• Ejects a CD when it is loaded into the unit.
[SC] button
• P erforms preset scan while in the radio mode.
When the button is pressed and held, auto
store is performed.
• Performs scan play for 10 seconds for each
track while in the CD mode.
[RP] button
• Repeat play while in the CD mode.
[RD] button
• Performs random play while in the CD mode.
[DIRECT] button
• Stores a station into memory or recall it directly while in the radio mode.
[D] button
• Switches the display indication(Main
display,clock display).
[T] button
• Use the button to input a title in the CD mode.
• Press and hold the button for 1 second or
longer to enter the adjust mode.
[A] button
• Press and hold the button for 1 second or
longer to turn the loudness on or off.
• Use the button to switch to the audio mode
(non fader volume/bass/mid/treble, balance/
fader adjustment)
[BEQ] button
• Use the button to select one of the three
types of sound characteristics already stored
in memory.
[ I ] button
• Recalls ISR radio station in memory.
• Press and hold for 2 seconds or longer:
Stores current station into ISR memory (radio
mode only).
[ ] button
• Plays or pauses a CD while in the CD mode.
[a], [d] button
• Selects a station while in the radio mode or
selects a track when listening to a CD. These
buttons are also used to make various settings.
• Press and hold the button for 1 second or
longer to switches the fast-forward/fast-backward.
6 DXZ825
[BND] button
• Switches the band, or seek tuning or manual
tuning while in the radio mode.
• Plays a first track while in the CD mode.
[CD SLOT]
• CD insertion slot.
Page 7

Major button operations when external equipment is
connected to this unit
English
●When the CD/MD/DVD changer
is connected
∗ For details, see the section “CD/MD
changer operations”. For the DVD
changer, refer to the Owner’s Manual provided with the DVD changer.
[SC] button
• Performs scan play for 10 seconds for each
track. Disc scan play is performed when the
button is pressed and held.
[RP] button
•
Performs repeat play. When this button is
pressed and held, disc repeat play is performed.
[RD] button
• Performs random play. Also performs disc random play when the button is pressed and held
[DIRECT] button
• Designates the disc to be played.
[D] button
• When the button is pressed and held,
switches the disc titles or track titles while in
the MD changer mode.
• When the button is pressed and held,
switches the user titles or track titles ,etc.while
in the CD changer mode.
[T] button
• Use the button to input a title in the CD
changer mode.
•
Use the button to scroll the title during CD-text play
or MD changer play in the CD changer mode.
[ ] button
• Plays or pauses a CD, MD or DVD.
[a], [d] button
• Selects a track when listening to a disc.
• Press and hold the button for 1 second or
longer to switches the fast-forward/fast-backward.
[BND] button
• Plays a first track.
●When the TV/D AB is connected
∗ For details, see the section “TV opera-
tions” or “DAB operations”.
∗ A Digital Radio (DAB) program can be re-
ceived only in Canada.
[SC] button
• Performs preset scan while in the radio mode.
When the button is pressed and held, auto
store is performed. (This function is only TV
tuner.)
[RP] button
•
Press the button to turn on or off the AF (Alternative Frequency) function in the DAB mode.
(This function is only DAB tuner.)
[RD] button
•
Use the button to set the PTY (Programme Type)
standby mode or PTY items in the DAB mode.
• Switches the TV picture mode or VTR (external)
picture mode.
[DIRECT] button
•
Stores a station into memory or recall it directly.
[a], [d] button
• Selects a station.
[BND] button
• Switches the band.
• When the button is pressed and held,
switches seek tuning or manual mode.
●When the DSP is connected
∗ The factory default setting is “STD” (stan-
dard).
This section describes the major buttons to
be operated in the STD mode.
∗ For details, see the section “DSP Opera-
tions”.
[A] button
• Use the button to select from between G.EQ
or DSF.
After G.EQ is selected, press the [D] button
and then the [A] button to turn on or off the
G.EQ (DSF) effect.
After G.EQ is selected, press the [BND] button and then the [DIRECT] button to select
the G.EQ (DSF) menu.
[T] button
•
Use the button to select the “STD” or “PRO” mode.
Press and hold the [T] button for 1 second or
longer to show the adjustment selection display and then press the [a] button or [d]
button to select “AC-P SEL ” in the display.
Turn [ROTARY] knob clockwise or counter-
clockwise to set the mode to “STD” or “PRO”.
Press [T] button to return to the previous mode.
DXZ825 75 DXZ825
Page 8

English
● When the Sirius Satellite
Radio is connected
∗ For details, refer to the Owner’s Manual
provided with the Sirius Satellite Radio.
[FNC] button
• Press the button to switch the operation mode
among the SIRIUS mode, etc.
[SC] button
• Performs category scan while in the SIRIUS
mode. When the button is pressed and held,
preset scan is performed.
[DIRECT] button
• Stores a station into memory or recall it directly while in the SIRIUS mode.
[a], [d] button
• Press the button to selects a station.
[SAT] button
• Press the button to switch the SIRIUS mode.
What is Sirius Satellite Radio?
Sirius is radio the way it was meant to be: Up to
100 new channels of digital quality programming
delivered to listeners coast to coast via satellite.
That means 50 channels of completely commercial-free music. Plus up to 50 more channels of
news, sports, and entertainment from names
like CNBC, Discovery, SCI-FI Channel, A&E,
House of Blues, E!, NPR, Speedvision and
ESPN.
Sirius is live, dynamic entertainment, completely
focused on listeners. Every minute of every day
of every week will be different. All 50 commercial-free music channels are created in-house
and hosted by DJs who know and love the music. Do you like Reggae? How about Classic
Rock or New Rock? Sirius has an array of
choices spanning a vast range of musical tastes
including the hits of the 50’s, 60’s, 70’s, & 80’s
as well as Jazz, Country, Blues, Pop, Rap, R&B,
Bluegrass, Alternative, Classical, Heavy Metal,
Dance and many others...
From its state-of-the-art, digital broadcasting facility in Rockefeller Center, New York City, Sirius
will deliver the broadest, deepest mix of radio
entertainment from coast to coast.
Sirius will bring you music and entertainment
programming that is simply not available on traditional radio in any market across the country.
It’s radio like you’ve never heard before.
So Get Sirius and Listen Up! For more information, visit siriusradio.com.
Page 9
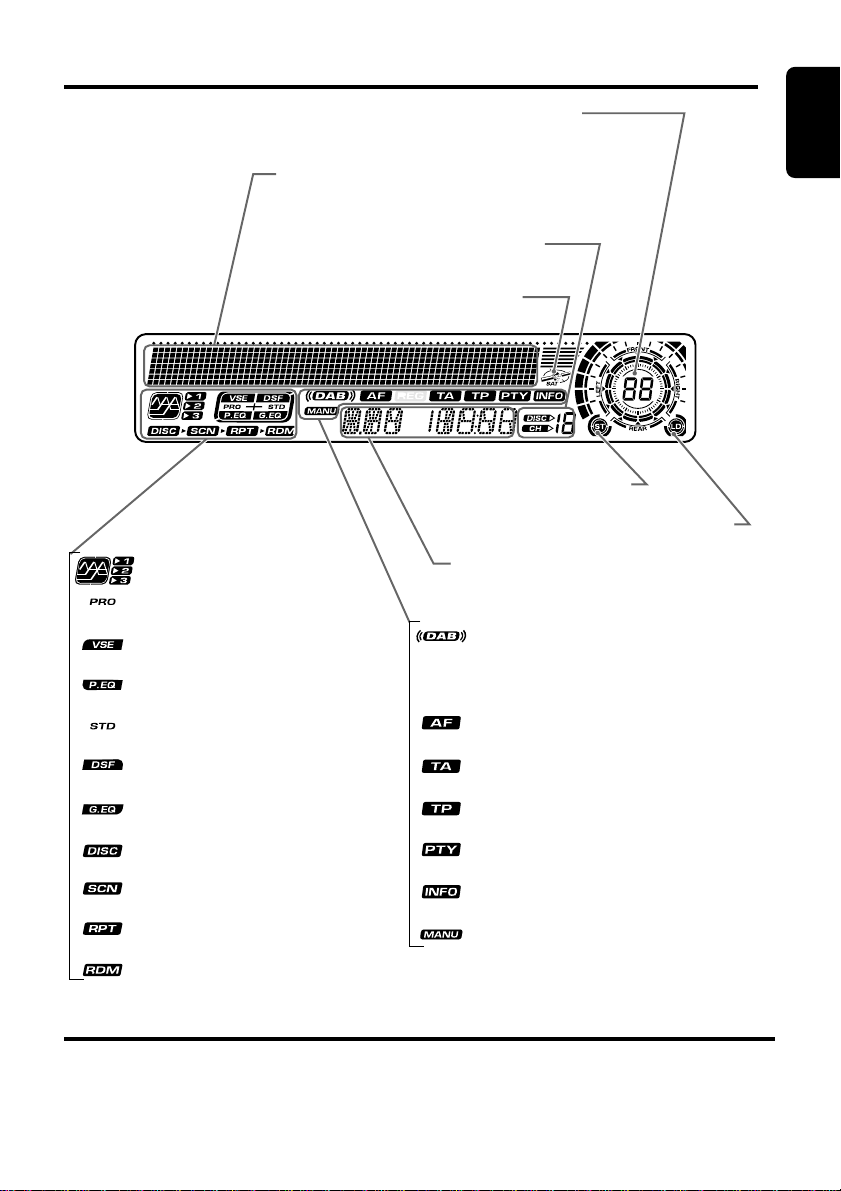
Display Items
English
Clock (Clock indication) etc.
(Audio mode, FADER, BALANCE,
etc. indications)
Operation status indication
Titles, PS names, PTYs, Clock, etc.
are displays.
Preset channel indication (1 to 6)
Disc number indication (1 to 12)
SIRIUS indication
Stereo indication
Loudness indication
: BEQ indication
(BEQ:Beat EQ)
: Professional mode indication
: VSE indication
(VSE:Virtual Space Enhancer)
: Parametric egualizer indication
: STD mode indication
(STD:Standard)
: DSF indication
(DSF:Digital Sound Field)
: Graphic egualizer indication
: Disc indication
: Scan indication
: Repeat indication
: Random indication
Function mode indication
• The names of modes being selected,
etc. are displayed.
: DAB indication
✻A Digital Radio (DAB) program can
be received only in Canada.
: Alternative freguency indication
: Traffic announcement indication
: Traffic programme indication
: Programme type indication
: Infomation indication
: Manual indication
LCD Screen
In extreme cold, the screen movement may slow down and the screen may darken, but this is normal.
The screen will recover when it returns to normal temperature.
DXZ825 9
Page 10

English
5.REMOTE CONTROL
Remote control unit
[
]
FUNC
[
],[ ]
[
]
ISR
[
]
MUTE
[
]
SCN
[
]
RPT
Receiver for remote control unit
Operating range: 30˚ in all directions
Signal transmitter
[
]
[
],[ ]
[
]
BAND
[
]
DISP
[
]
RDM
Inserting the Batteries
1.Turn the remote control unit over, then slide the
rear cover in the direction of the arrow.
2.Insert the AA (SUM-3, IECR-6/1.5V) batteries
that came with the remote control unit facing in
the directions shown in the figure, then close the
rear cover.
Notes:
Using batteries improperly can cause them to
explode. Take note of the following points:
• When replacing batteries, replace both batteries
with new ones.
• Do not short-circuit, disassemble or heat batteries.
• Do not dispose of batteries into fire or flames.
• Dispose of spent batteries properly.
10 DXZ825
AA (SUM-3, IECR-6/1.5V)
Batteries
Rear cover
Rear side
Page 11
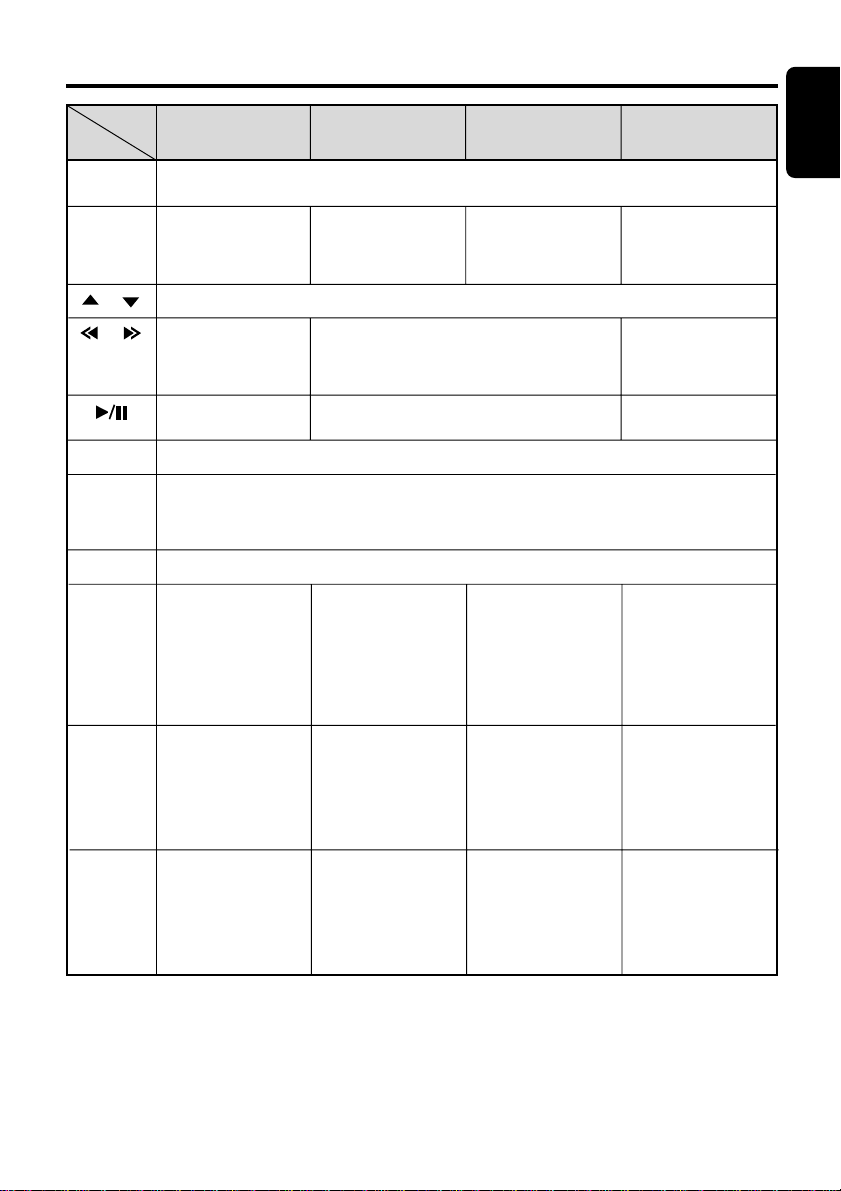
Functions of Remote Control Unit Buttons
English
Mode
Button
[FUNC]
[BAND]
[ ] , [ ]
[ ] , [ ]
[ ]
[MUTE]
[ISR]
[DISP]
[SCN]
Radio (DAB) CD
Switches among radio, DAB, CD, DVD deck, CD/MD changer, DVD changer, TV, and
AUX.
Switches reception
band.
Increases and decreases volume (in all modes).
Moves preset
channels up and
down.
No function.
Turns mute on and off.
Recalls ISR radio station in memory.
Press and hold for 2 seconds or longer: Stores current station into ISR memory
(radio mode only).
TA on and off(DAB mode)
Switches among main display, clock display.
Preset scan.
When pressed and
held for 2 seconds:
Auto store.
Plays the first track.
Top play.
Moves tracks up and down.
When pressed and held for 1 second:
Fast-forward/fast-backward.
Switches between playback and pause.
Scan play.
CD/MD changer
DVD changer
Moves the next disc
in increasing order.
Scan play.
When pressed and
held for 1 second:
Disc scan play.
TV
Switches reception
band.
Moves preset
channels up and
down.
No function.
Preset scan.
When pressed and
held for 2 seconds:
Auto store.
[RPT]
[RDM]
∗ Some of the corresponding buttons on the main unit and remote control unit have different functions.
∗ A Digital Radio (DAB) program can be received only in Canada.
AF function on and
off. (DAB mode)
PTY standby mode
on and off.(DAB
mode)
Repeat play.
Random play.
Repeat play.
When pressed and
held for 1 second:
Disc repeat play.
Random play.
When pressed and
held for 1 second:
Disc random play.
No function.
Switches between TV
and VTR.
DXZ825 11
Page 12
English
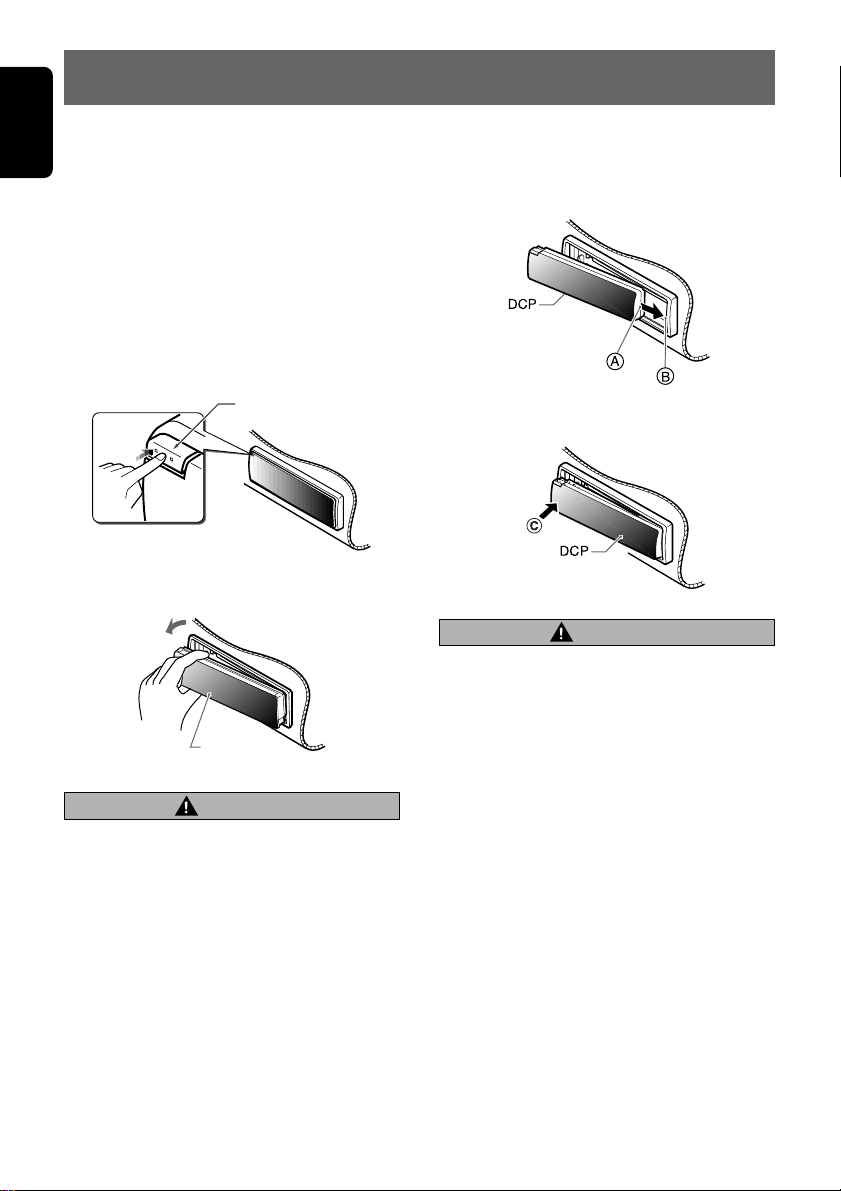
6.DCP
The control panel can be detached to prevent
theft. When detaching the control panel, store it
in the DCP (DETACHABLE CONTROL PANEL)
case to prevent scratches.
We recommend taking the DCP with you when
leaving the car.
Removing the DCP
1. With the MOTORIZED FACE closed, turn off
the power.
2. Press the [RELEASE] button to open the
DCP.
[
RELEASE] button
3. Pull the DCP toward you and remove it.
DCP
CAUTION
• Always close the MOTORIZED FACE before
removing the DCP.
• If you remove the DCP with the MOTOR-
IZED FACE open, the sloping console
closes immediately. Be careful not to get
your fingers caught.
Attaching the DCP
1. Insert the DCP so that the A section on the
right side of the DCP catches on the hook B
on the unit.
2. Press the left side C of the DCP carefully to
fit it in place.
CAUTION
• Be sure to follow the procedures described
in the section “Attaching the DCP” when
installing the DCP.
• The DCP can easily be damaged by
shocks. After removing it, be careful not to
drop it or subject it to strong shocks.
• If the [RELEASE] button is pressed and the
DCP is not locked into place, it may fall out
from vibration of the car. This can break
the DCP, so after removing it, either install
it on the unit or put it in its DCP case.
• The connector connecting the unit and the
DCP is an extremely important part. Be
careful not to damage it by pressing on it
with fingernails, screwdrivers, etc.
12 DXZ825
Note:
• If the DCP is dirty, wipe off the dirt with a soft, dry
cloth only.
Page 13
7.OPERATIONS
Basic Operations
English
Note:Be sure to read this chapter referring to the front diagrams of
chapter “3. CONTROLS” on page 5 (unfold).
CAUTION
Be sure to lower the volume before switching off the unit power or the ignition key. The
unit remembers its last volume setting. If you
switch the power off with the volume up,
when you switch the power back on, the sudden loud volume may hurt your hearing and
damage the unit.
Turning on/off the power
Note:
Be careful about using this unit for a long time with-
•
out running the engine. If you drain the car’s battery
too far, you may not be able to start the engine and
this can reduce the service life of the battery.
1. Press the [FNC] button.
2. The illumination and display on the unit light
up. The unit automatically remembers its last
operation mode and will automatically switch
to display that mode.
3. Press and hold the [FNC] button for 1 second
or longer to turn off the power for the unit.
Note:
• System check
The first time this unit is turned on after the wire
connections are completed, it must check what
equipment is connected. When the power is
turned on, “SYSTEM CHCK” and “Push POWER”
appear in the display alternately, so press the
[FNC] button. The system check starts within the
unit. When the system check is complete, the
power is turned off, so press the [FNC] button
again.
Selecting a mode
1. Press the [FNC] button to change the operation mode.
2.
Each time you press the [FNC] button, the operation mode changes in the following order:
Radio mode ➜ DAB mode ➜ SIRIUS mode
➜ CD mode ➜ DVD deck mode ➜ CD
changer mode ➜ MD changer mode ➜ DVD
changer mode ➜ TV mode ➜ AUX mode ➜
Radio mode...
∗ External equipment not connected with
CeNET is not displayed.
∗ A Digital Radio (DAB) program can be re-
ceived only in Canada.
∗ The SIRIUS mode can be also switched using
the [SAT] button.
Adjusting the volume
1. Press the front part of the knob to adjust. The
knob will pop up.
2. Turning the [ROTARY] knob clockwise in-
creases the volume; turning it counterclockwise decreases the volume.
∗ The volume level is from 0 (minimum) to 33
(maximum).
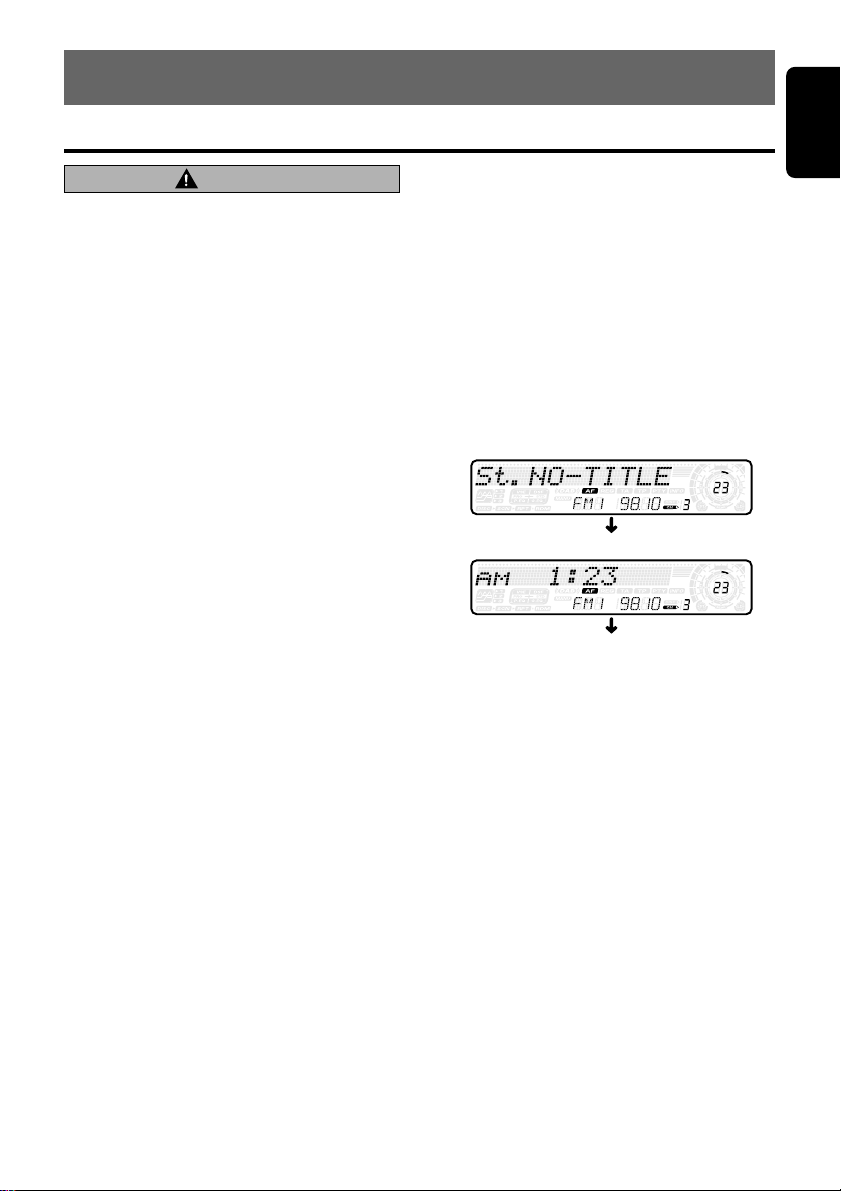
Switching the display
Press the [D] button to select the desired display.
Each time you press the [D] button, the display
switches in the following order:
Main display
Clock display
Main display
∗ Once selected, the preferred display becomes
the display default. When a function adjustment such as volume is made, the screen will
momentarily switch to that function’s display,
then revert back to the preferred display several seconds after the adjustment.
∗ When you have entered a title in a CD/MD, it
appears in the main display. If you have not
entered a title, “D NO-TITLE” or “T NO-
TITLE” appears in the title display instead. For
information on how to enter a title, refer to the
subsection “Entering titles” in section “Op-
erations Common to Each Mode ”.
DXZ825 13
Page 14

Basic Operations
English
Setting the Beat EQ
This unit are provided with 5 types of sound tone effects stored in memory . Select the one you prefer.
∗ The factory default setting is “USER CUSTOM”.
Each time you press the [BEQ] button, the tone
effect changes in the following order:
“BASS BOOST” ➜ “IMP A CT” ➜ “EXCITE” ➜
“USER CUSTOM” ➜ “TONE BYP ASS” ➜
“BASS BOOST” ...
• BASS BOOST : bass emphasized
• IMPACT : bass and treble empha-
• EXCITE : bass and treble empha-
• USER CUSTOM : user custom
• TONE BYPASS : no sound effect
sized
sized mid de-emphasized
Adjusting the tone
Press the [A] button and select the item to adjust. Each time you press the [A] button, the
item changes in the following order:
●When “BASS BOOST” is set
“NON-FAD V OL ” ➜ “BASS BOOST” ➜
“BALANCE” ➜ “F ADER” ➜ Last function
mode.
●When “IMPACT” is set
“NON-FAD V OL ” ➜ “IMPACT” ➜ “BAL-
ANCE” ➜ “FADER” ➜ Last function mode.
●When “EXCITE” is set
“NON-FAD V OL ” ➜ “EXCITE” ➜ “BAL-
ANCE” ➜ “FADER” ➜ Last function mode.
●When “USER CUSTOM” is set
“NON-FAD V OL ” ➜ “BASS <GAIN>” ➜ “MID
<GAIN>” ➜ “TREB<GAIN>” ➜ “B ALANCE”
➜ “FADER” ➜ Last function mode.
●When “TONE BYPASS” is set
“NON-FAD V OL ” ➜ “BALANCE” ➜ “FADER”
➜ Last function mode.
∗ Pressing the [BEQ] button for 1 second or longer
while in “USER CUSTOM” sets flat, and displays
a “BEQ FLAT” message.
Note:
• When the separately-sold digital sound processor
(DPH910) is used, the bass and treble tone adjustments cannot be made. To adjust the tone, refer to the section “DSP Operations”.
Adjusting the non fader output
volume
You can adjust the volume output from the unit’s
non fader output terminal.
1. Press the [A] button and select “NON-FAD
VOL”.
2. Turning the [ROTARY] knob clockwise in-
creases the output volume; turning it counterclockwise decreases the output volume.
∗ The factory default setting is “0”. (Setting
range: –6 to 6)
3. When the adjustment is complete, press the
[A] button several times until the function
mode is reached.
Adjusting the bass
The bass gain, bass F (center frequency) and
bass Q can be adjusted as follows.
1. Press the [A] button and select “BASS
<GAIN>”.
2. Press the [a] or [d] button and select from
“BASS <GAIN>” ➜ “BASS <F 50>” ➜
“BASS <Q 1>” ➜ “BASS <GAIN>”.
3. Turn the [ROTARY] knob clockwise or coun-
terclockwise as needed and adjust the gain,
the F (center frequency) and the Q.
BASS GAIN : –6 to 8 (The factory default
setting is “0”)
BASS F : 50Hz/80Hz/120Hz (The fac-
tory default setting is “50”)
BASS Q : 1/1.25/1.5/2 (The factory de-
fault setting is “1”)
4. When the adjustment is complete, press the
[A] button several times until the function
mode is reached.
Adjusting the MID
The MID gain, MID F (center frequency) and
MID Q can be adjusted as follows.
1. Press the [A] button and select “MID
<GAIN>“.
2. Press the [a] or [d] button and select from
“MID <GAIN>” ➜ “MID <F 1k>” ➜ “MID <Q
2>” ➜ “MID <GAIN>”.
3. Turn the [ROTARY] knob clockwise or counterclockwise as needed and adjust the gain,
the F (center frequency) and the Q.
MID GAIN : –6 to 6 (The factory default
setting is “0”)
14 DXZ825
Page 15

MID F : 700Hz/1KHz/2KHz (The fac-
tory default setting is “1k”)
MID Q : 1.5/2 (The factory default set-
ting is “2”)
4. When the adfustment is complete, press the
[A] button several times until the function
mode is reached.
Adjusting the TREBLE
The treble gain and treble F (center frequency)
can be adjusted as follows.
1. Press the [A] button and select “TREB
<GAIN>”.
2. Press the [a] or [d] button and select from
“TREB <GAIN>” ➜ “TREB <F 12K>” ➜
“TREB <GAIN>”.
3. Turn the [ROTARY] knob clockwise or counterclockwise as needed and adjust the gain
and the F (center frequency).
TREB GAIN : –6 to 6 (The factory default
setting is “0”)
TREB F : 8KHz/12KHz (The Factory
default setting is “12K”)
4. When the adjustment is complete, press the
[A] button several times until the function
mode is reached.
Adjusting the balance
1. Press the [A] button and select “BALANCE”.
2. Turning the [ROTARY] knob clockwise emphasizes the sound from the right speaker;
turning it counterclockwise emphasizes the
sound from the left speaker.
∗ The factory default setting is “0”. (Adjustment
range: L13 to R13)
3. When the adjustment is complete, press the
[A] button several times until the function
mode is reached.
Basic Operations
Adjusting the Beat EQ
1. Press the [BEQ] button and select the Beat
EQ mode (1 to 3) to adjust.
2. Press the [A] button and select “BASS
BOOST or IMPACT or EXCITE”.
3. Turning the [RO TARY] knob clockwise ad-
justs in the + direction; turning it counterclockwise adjusts in the – direction.
∗ When BASS BOOST is selected, you can ad-
just the bass in the range of –3 to 3.
∗ When IMPACT and EXCITE is selected, you
can adjust the bass and treble in the range of
–3 to 3.
4. When the adjustment is complete, press the
[A] button several times until the function
mode is reached.
Turning on/off the loudness
The loudness effect emphasizes the bass to
create a natural sound tone. When you are listening to music at a low volume, it is recommended to use the loudness effect.
1. Press and hold the [A] button for 1 second or
longer to turn on the loudness effect. When
the loudness effect is turned on, “LD” lights
in the display.
2. Press and hold the [A] button for 1 second or
longer to turn off the loudness effect. “LD”
goes off in the display.
Note:
• When using a sold separately digital sound pro-
cessor (DPH910), a feature called auto loudness
is selected. This function is different from the
loudness effect. For further details on the auto
loudness feature, refer to the subsection “Output
adjustment of auto loudness, subwoofer and
playback band” in section “DSP Operations”.
English
Adjusting the fader
1. Press the [A] button and select “FADER”.
2. Turning the [ROTARY] knob clockwise emphasizes the sound from the front speakers;
turning it counterclockwise emphasizes the
sound from the rear speakers.
∗ The factory default setting is “0”. (Adjustment
range: F12 to R12)
3. When the adjustment is complete, press the
[A] button several times until the function
mode is reached.
DXZ825 15
Page 16

Radio Operations
English
FM reception
For enhanced FM performance the
tuner includes signal actuated stereo control,
Enhanced Multi AGC, Impulse noise reduction
curcuits and Multipath noise reduction circuits.
Changing the reception area
This unit is initially set to USA frequency intervals
of 10kHz for AM and 200kHz for FM. When using it
outside the USA, the frequency reception range
can be switched to the intervals below.
●Setting the reception area
1. Press the [BND] button and select the desired radio band (FM or AM).
2. While pressing the [D] button, each time you
press and hold the number “6” of the [DI-
RECT] buttons for 2 seconds or longer, the
reception area switches from inside the USA
to outside the USA or from outside the USA
to inside the USA.
∗ Any station preset memories are lost when the
reception area is changed.
Listening to the radio
1. Press the [FNC] button and select the radio
mode. The frequency or PS appears in the
display.
∗ PS: Programme service name
∗ A Digital Radio (DAB) program can be re-
ceived only in Canada.
2. Press the [BND] button and select the radio
band. Each time the button is pressed, the r adio reception band changes in the following
order:
FM1 ➜ FM2 ➜ FM3 ➜ AM ➜ FM1...
3. Press the [a] or [d] button to tune in the
desired station.
Tuning
There are 3 types of tuning mode available, seek
tuning, manual tuning and preset tuning.
Seek tuning
®
1. Press the [BND] button and select the desired band (FM or AM).
∗ If “MANU” is lit in the display, press and hold
the [BND] button for 1 second or longer .
“MANU” in the display goes off and seek tuning is now available.
2. Press the [a] or [d] button to automatically
seek a station.
When the [d] button is pressed, the station is
sought in the direction of higher frequencies; if
the [a] button is pressed, the station is sought
in the direction of lower frequencies.
Manual tuning
There are 2 ways available: Quick tuning and
step tuning.
When you are in the step tuning mode, the frequency changes one step at a time. In the quick
tuning mode, you can quickly tune the desired
frequency.
1. Press the [BND] button and select the desired band (FM or AM).
∗ If “MANU” is not lit in the display, press and
hold the [BND] button for 1 second or longer.
“MANU” is lit in the display and manual tuning
is now available.
2. Tune into a station.
●Quick tuning:
Press and hold the [a] or [d] button for 1
second or longer to tune in a station.
●Step tuning:
Press the [a] or [d] button to manually
tune in a station.
Recalling a preset station
A total of 24 preset positions (6-FM1, 6-FM2, 6FM3, 6-AM) exists to store individual radio stations in memory. Pressing the corresponding
[DIRECT] button recalls the stored radio frequency automatically.
1. Press the [BND] button and select the desired band (FM or AM).
2. Press the corresponding [DIRECT] button to
recall the stored station.
∗ Press and hold one of the [DIRECT] buttons
for 2 seconds or longer to store that station
into preset memory.
16 DXZ825
Page 17

Radio Operations
Manual memory
1. Select the desired station with seek tuning,
manual tuning or preset tuning.
2. Press and hold one of the [DIRECT] buttons
for 2 seconds or longer to store the current
station into preset memory.
Auto store
Auto store is a function for storing up to 6 stations that are automatically tuned in sequentially.
If 6 receivable stations cannot be received, a
previously stored station remains unoverwritten
at the memory position.
1. Press the [BND] button and select the desired band (FM or AM).
Press and hold the [SC] button for 2 seconds or
2.
longer. The stations with good reception are
stored automatically to the preset channels.
∗ If auto store is performed in the FM bands, the
stations are stored in FM3 even if FM1 or FM2
was chosen for storing stations.
Preset scan
Preset scan receives the stations stored in preset memory in order. This function is useful
when searching for a desired station in memory.
1. Press the [SC] button.
2. When a desired station is tuned in, press the
[SC] button again to continue receiving that
station.
Note:
• Be careful not to press and hold the [SC] button
for 2 seconds or longer, otherwise the auto store
function is engaged and the unit starts storing
stations.
Instant station recall (ISR)
Instant station recall is a special radio preset
that instantly accesses a favorite radio station at
a touch of a button. The ISR function even operates with the unit in other modes.
●ISR memory
1. Select the station that you wish to store in ISR
memory.
2. Press and hold the [ I ] button for 2 seconds
or longer.
●Recalling a station with ISR
In any mode, press the [ I ] button to turn on the
radio function and tune the selected radio station. “ISR” appears in the display. Press the [ I ]
button again to return to the previous mode.
CD Operations
Loading a CD
1. Press the [Q] button. The MOTORIZED
FACE opens.
CAUTION
Be careful not to get your fingers caught
when opening and closing the MOTORIZED
FACE.
2. Insert a CD into the center of the insertion
slot with the label side facing up. The CD
plays automatically after loading.
Notes:
• Never insert foreign objects into the CD insertion
slot.
• If the CD is not inserted easily, there may be an-
other CD in the mechanism or the unit may require service.
• Discs not bearing the
CD-ROMs cannot be played by this unit.
Loading 8 cm compact discs
∗ No adapter is required to play an 8 cm CD.
∗ Insert the 8 cm CD into the centre of the inser-
tion slot.
3. After loading a CD, the MOTORIZED FACE
closes automatically.
Notes:
• Note that MOTORIZED FACE closes immediately
after a CD is inserted into CD insertion slot.
• If no CD is loaded in the MOTORIZED FACE, it
closes after 30 seconds.
Listening to a CD already inserted
Press the [FNC] button to select the CD mode.
Play starts automatically. If no CD is loaded in
the unit, “NO DISC” appears in the display.
Pausing play
1. Press the [ ] button to pause play.
“PAUSE” appears in the display.
2. To resume CD play, press the [
again.
or mark and
] button
English
DXZ825 17
Page 18

CD Operations
English
Ejecting a CD
1. Press the [Q] button. The MOTORIZED
FACE opens and a CD ejects. “EJECT” appears in the display.
CAUTION
Be careful not to get your fingers caught
when opening and closing the MOTORIZED
FACE.
2. Remove the CD and press the [Q] button to
close the MOTORIZED FACE.
Notes:
• Be sure to close the MOTORIZED FACE after re-
moving the CD.
• The MOTORIZED FACE closes automatically 30
seconds after removing the CD.
∗ If a CD (12 cm) is left in the ejected position for
15 seconds, the CD is automatically reloaded.
(Auto reload)
∗ 8 cm CDs are not auto reloaded. Be sure to re-
move it when ejected.
Note:
• If you force a CD into before auto reloading, this
can damage the CD.
Selecting a track
●T rack-up
1. Press the [d] button to move ahead to the
beginning of the next track.
2. Each time you press the [d] button, the
track advances ahead to the beginning of the
next track.
●T rack-down
1. Press the [a] button to move back to the
beginning of the current track.
2. Press the [a] button twice to move to the
beginning of the previous track.
Scan play
The scan play locates and plays the first 10 seconds of each track on a disc automatically. This
function continues on the disc until it is cancelled.
∗ The scan play is useful when you want to select a
desired track.
1. Press the [SC] button to start scan play. “SCN”
lights in the display.
2. To cancel the scan play, press the [SC] button again. “SCN” goes off from the display
and the current track continues to play.
Repeat play
The repeat play continuously plays the current
track. This function continues automatically until
it is cancelled.
1. Press the [RP] button. “RPT” lights in the display and the current track is repeated.
2. T o cancel the repeat play, press the [RP] button again. “RPT” goes off from the displa y and
normal play resumes.
Random play
The random play selects and plays individual trac ks
on a disc in no particular order. This function continues automatically until it is cancelled.
1. Press the [RD] button. “RDM” lights in the display, an individual track is selected randomly
and play begins.
2. T o cancel the random play, press the [RD] button again. “RDM” goes off and normal play
resumes.
Fast-forward/fast-backward
●Fast-forward
Press and hold the [d] button for 1 second or
longer.
●Fast-backward
Press and hold the [a] button for 1 second or
longer.
Top function
The top function resets the CD player to the first
track of the disc. Press the [BND] button to play
the first track (track No. 1) on the disc.
18 DXZ825
Page 19

Operations Common to Each Mode
Entering titles
Titles up to 10 characters long can be stored in
memory and displayed for CD, CD changer and
TV stations. The number of titles that can be entered for each mode are as follows.
Mode Number of titles
CD mode 50 titles
TV mode 15 titles
CD changer mode Number of titles
DCZ625 connected 100 titles
CDC1255z connected 50 titles
1. Press the [FNC] button to select the mode
you want to enter a title (CD, CD changer or
TV).
2. Select and play a CD in the CD changer or
tune in to a TV station for which you want to
enter the title.
3. Press the [D] button and display the main.
4. Press the [T] button. “TTL ” appears in the display and the cursor position flashes.
5. Press the [a] or [d] button to move the
cursor.
6. Press the [D] button to select a character.
Each time you press the [D] button, the character changes in the following order:
Capital letters ➜ Small letters ➜ Numbers
and Symbols ➜ Umlaut ➜ Capital letters...
7. Turn the [ROTARY] knob to select the desired character. Turning the [ROT AR Y] knob
clockwise moves the cursor to the next character; turning it counterclockwise moves the
cursor to the previous character.
8. Repeat steps 5 to 7 to enter up to 10 characters for the title.
9. Press and hold the [
onds or longer to store the title into memory
and cancel title input mode.
] button for 2 sec-
Clearing titles
1. Select and play a CD in the CD changer or
tune in to a TV station for which you want to
clear the title.
2. Press the [D] button and display the main.
3. Press the [T] button. “TTL” appears in the display and the display switches to the title input
display.
4. Press the [BND] button.
5. Press and hold the [ ] button for 2 seconds or longer to clear the title and cancel
title input mode.
Turning the external output
adjustment display on/off
When not using the external output, you can
turn off the “NON-FADER” display.
∗ The factory default setting is “ON”.
∗ Even if the level adjustment display is set to “OF”,
signals can be output from the external output.
1. Press and hold [T] button for 1 second or
longer to switch to the adjustment selection
display.
2. Press the [a] or [d] button to select “NON-
FADER”.
3. Turn the [ROTARY] knob clockwise to set
“ON” or counterclockwise to set “OF”.
● ON:
When you press the [A] button, the “NONFAD V OL” item is display ed.
∗ The output level can be adjusted.
● OF:
Even when you press [A] button, the “NONFAD V OL” item is not display ed.
∗ The output level cannot be adjusted.
4.
Press [T] button to return to the previous mode.
Adjusting the dimmer level
You can adjust the reduced illumination level of
the dimmer.
∗ The factory default setting is “3”.
∗
To use the dimmer, set the dimmer setting to 1 to 5.
1. Press and hold the [T] button for 1 second or
longer to switch to the adjustment selection
display.
2. Press the [a] or [d] button to select “DIM-
MER LV”.
3. Turn the [ROTARY] knob clockwise or coun-
terclockwise to adjust the reduced illumination level of the dimmer.
● 1 to 5:
The dimmer operation is performed depending on the set level 1 to 5.
● OF:
No dimmer operation is performed.
4. Press the [T] button to return to the previous
mode.
English
DXZ825 19
Page 20

Operations Common to Each Mode
English
Adjusting the display contrast
You can adjust the display contrast to match the
angle of installation of the unit.
∗ The factory default setting is “8”. (Adjustment
level: 1 to 18)
1. Press and hold the [T] button for 1 second or
longer to switch to the adjustment selection
display.
2. Press the [a] or [d] button to select “CON-
TRAST”.
3. Turn the [ROT ARY] knob clockwise or counterclockwise to adjust the contrast.
4. Press the [T] button to return to the previous
mode.
Setting the button illumination
∗ The factory default setting is “ILLM GREEN”.
1. Press and hold the [T] button for 1 second or
longer to switch to the adjustment selection
display.
2. Press the [a] or [d] button and select
“KEY ILLUMI”.
3. Turn the [ROT ARY] knob clockwise or counterclockwise as needed and select from
“ILLM GREEN” and “ILLM RED”.
4. Press the [T] button to return the previous
mode.
Switching the screen saver
∗ The factory default setting is “RANDOM”.
1. Press and hold the [T] button for 1 second or
longer to switch to the adjustment selection
display.
2. Press the [a] or [d] button and select
“AUTO SS”.
3. Press the [
4. Turn the [ROT ARY] knob clockwise or counterclockwise as needed to switch to “SS
RANDOM”.
“SS RANDOM” ↔ “SS Ptn3” ↔ “SS Ptn2” ↔
“SS Ptn1” ↔ “SS OFF”.
5. Press the [T] button to return the previous
mode.
] button.
Message display
When the unit is powered on or off, a message
is displayed. The user can turn this message
display ON or OFF.
∗ The factory default setting is “ON”.
1. Press and hold the [T] button for 1 second or
longer to switch to the adjustment selection
display.
2. Press the [a] or [d] button to select “MES-
SAGE”.
3. Turn the [ROTARY] knob clockwise or coun-
terclockwise to set the message display ON
or OFF.
4. Press the [T] button to return to the previous
mode.
Setting the method for Ttitle scroll
Set how to scroll in CD-TEXT or MD.
∗ The factory default setting is “ON”.
1. Press and hold the [T] button for 1 second or
longer to switch to the adjustment selection
display.
2. Press the [a] or [d] button and select
“AUTO SCROLL”.
3. Turn the [ROTARY] knob clockwise or coun-
terclockwise and select “ON” or “OF”.
● ON:
To scroll automatically.
● OF:
To scroll just 1 time when the title was
changed or the title key was pressed.
4. Press the [T] button to return the previous
mode.
20 DXZ825
Page 21

AUX function
This system has an external input jack so you
can listen to sounds and music from external
devices connected to this unit.
Selecting AUX IN sensitivity
Make the following settings to select the sensitivity when sounds from external devices connected to this unit are difficult to hear even after
adjusting the volume.
∗ The factory default setting is “SENS MID”.
1. Press and hold the [T] button for 1 second or
longer to switch to the adjustment selection
display.
2. Press the [a] or [d] button and select
“AUX SENS”.
3. Turn the [ROTARY] knob clockwise or counterclockwise as needed and select from
“SENS HIGH”, “SENS MID” or “SENS LOW”.
4. Press the [T] button to return to the previous
mode.
Setting the clock
1. Press and hold the [T] button for 1 second or
longer to switch to the adjustment selection
display.
2. Press the [a] or [d] button to select
“CLOCK”.
3. Press the [
4. Press the [a] or [d] button to select the
hour or the minute.
5. Turn the [ROTARY] knob clockwise or counterclockwise to set the correct time.
∗ The clock is displayed in 12-hour format.
6. Press the [ ] button to store the time into
memory.
7. Press the [T] button to return to the previous
mode.
Note:
• You cannot set the clock when it is displayed with
only the ignition on. If you drain or remove the
car’s battery or take out this unit, the clock is reset. While setting the clock, if another button or
operation is selected, the clock set mode is canceled.
] button.
Operations Common to Each Mode
Triggered audio mute for cellular
telepones
This unit requires special wiring to mute the audio signal automatically when a cellular telephone rings in the car.
∗ This function is not compatible with all cellular
telephones. Contact your local authorized Clarion
dealer for information on proper installation and
compatibility.
English
DXZ825 21
Page 22

English
8.OPERATIONS OF ACCESSORIES
CD/MD Changer Operations
CD/MD changer functions
When an optional CD/MD changer is connected
through the CeNET cable, this unit controls all
CD/MD changer functions. This unit can control
a total of 2 changers (MD and/or CD).
Press the [FNC] button and select the CD(MD)
changer mode to start play. If 2 CD(MD) changers are connected, press the [FNC] button to select the CD(MD) changer for play.
∗
If “NO MAGAZINE” appears in the display, insert
the magazine into the CD changer. “DISC CHECK”
appears in the display while the player loads
(checks) the magazine.
∗ If “NO DISC” appears in the display, eject the
magazine and insert discs into each slot. Then,
reinsert the magazine back into the CD changer.
∗ If “NO DISC” appears in the display, load MDs
into the MD changer.
CAUTION
CD-ROM discs cannot be played in the CD
changer.
Pausing play
1. Press the [ ] button to pause play.
“PAUSE” appears in the display.
To resume play, press the [ ] button again.
2.
Displaying CD titles
This unit can display title data for CD-text CDs
and user titles input with this unit.
1. Press the [D] button to display the title.
2. Each time you press and hold the [D] button
for 1 second or longer, the title display
changes in the following order:
User title (disc) ➜ CD-text title (disc) ➜ Artist
name ➜ CD-text title (track) ➜ user title
(disc)...
Note:
• If the CD playing is not a CD-text CD or no user
title has been input, “NO-TITLE” appears in the
display.
Switching disc titles and track
titles(MD)
This unit can display disc titles and track titles already entered on MDs. Titles up to 128 characters
long can be displayed by scrolling the titles.
∗ Titles cannot be entered for MDs with this unit.
1. Press the [D] button to display the title. The
disc title or track title is displayed.
2. Each time you press and hold the [D] button
for 1 second or longer, the display toggles
between the disc title and the track title.
Procedure to scroll a title
Set “AUT O SCR OLL” to “ON” or “OF”. (The fac-
tory default setting is “ON”. Refer to the subsection “Setting the method for Title scroll” in
section “Operation common to each mode”.)
● When set to “ON”
The title is automatically kept scrolling.
● When set to “OF”
Press the [T] button to scroll the title.
Selecting a CD
Each [DIRECT] button corresponds to a disc
loaded into the magazine.
●Selecting a disc from 1 to 6
Press the corresponding [DIRECT] button (1 to
6) to select the desired disc.
●Selecting a disc from 7 to 12 (only when a
12 disc CD changer is used.)
Press and hold the [DIRECT] button (1 to 6) for
1 second or longer to select the desired disc.
∗ If a CD is not loaded in a slot of magazine, press-
ing the [DIRECT] button corresponding to its disc
number is invalid.
Selecting an MD
Each [DIRECT] button corresponds to an MD
loaded into the MD changer. Press the corresponding [DIRECT] button (1 to 6) to select the
desired disc.
∗ If an MD is not loaded in a slot of MD changer,
pressing the [DIRECT] button corresponding to its
disc number is invalid.
22 DXZ825
Page 23

Selecting a track
●Track-up
1. Press the [d] button to move ahead to the
beginning of the next track.
2. Each time you press the [d] button, the
track advances ahead to the beginning of the
next track.
●Track-down
1. Press the [a] button to move back to the
beginning of the current track.
2. Press the [a] button twice to move to the
beginning of the previous track.
Fast-forward/fast-backward
●Fast-forward
Press and hold the [d] button for 1 second or
longer.
●Fast-backward
Press and hold the [a] button for 1 second or
longer.
Top function(CD)
The top function plays from the first track (track
No. 1) of the disc.
●When playing a disc 1 to 6
Press the [DIRECT] button (1 to 6) with the
same number as the CD playing.
●When playing a disc 7 to 12 (only when a
12 disc CD changer is used.)
Press and hold for 1 second or longer the [DIRECT] button (1 to 6) with the same number as
the CD playing.
∗ If a CD is not loaded in a slot of magazine, press-
ing the [DIRECT] button corresponding to its disc
number is invalid.
CD/MD Changer Operations
Scan play
Scan play locates and plays the first 10 seconds
of each track on a disc automatically. This function continues on the disc until it is cancelled.
∗ The scan play is useful when you want to select a
desired track.
1. Press the [SC] button to start track scanning.
“SCN” lights in the display.
2. To cancel the scan play, press the [SC] button again. “SCN” goes off from the display
and the current track continues to play.
Disc scan play
Disc scan play locates and plays the first 10
seconds of the first track on each disc in the currently selected CD (MD) changer. This function
continues automatically until it is cancelled.
∗ Disc scan play is useful when you want to select a
desired CD (MD).
1. Press and hold the [SC] button for 1 second
or longer. “DISC” and “SCN” light in the display and disc scan play starts.
2. To cancel disc scan play, press the [SC] button again. “DISC” and “SCN” go off from the
display and the current track continues to
play.
Repeat play
Repeat play continuously plays the current track.
This function continues automatically until it is
cancelled.
1. Press the [RP] button. “RPT” lights in the display and the current track is repeated.
2. To cancel repeat play, press the [RP] button
again. “RPT” goes off from the display and
normal play resumes.
English
Top function(MD)
The top function plays from the first track (track
No. 1) of the disc. Press the [DIRECT] button (1
to 6) with the same number as the MD playing.
∗ If an MD is not loaded in a slot of MD changer,
pressing the [DIRECT] button corresponding to its
disc number is invalid.
Disc repeat play
After all the tracks on the current disc have been
played, disc repeat play automatically replays
the current disc over from the first track. This
function continues automatically until it is cancelled.
1. Press and hold the [RP] button for 1 second
or longer. “DISC” and “RPT” light in the display and disc repeat play starts.
2. To cancel disc repeat play, press the [RP]
button again. “DISC” and “RPT” go off from
the display and normal play resumes on the
current track.
DXZ825 23
Page 24

CD/MD Changer Operations
English
Random play
Random play selects and plays individual tracks
on the disc in no particular order. This function
continues automatically until it is cancelled.
1. Press the [RD] button. “RDM” lights in the
display and random play begins.
2. To cancel random play, press the [RD] button
again. “RDM” goes off from the display and
normal play resumes.
Disc random play
The disc random play selects and plays individual tracks or discs automatically in no particular order. This function continues automatically until it is cancelled.
1. Press and hold the [RD] button for 1 second
or longer. “DISC” and “RDM” light in the display and disc random play starts.
2. To cancel disc random play, press the [RD]
button again. “DISC” and “RDM” go off from
the display and normal play resumes from
the current track.
TV Operations
TV tuner functions
When an optional TV tuner is connected through
the CeNET cable, this unit controls all TV tuner
functions. To watch TV requires a TV tuner and
monitor.
Watching a TV
1. Press the [FNC] button and select the TV
mode.
2. Press the [BND] button to select the desired
TV band (TV1 or TV2). Each time the button
is pressed, the input selection toggles between TV1 and TV2.
3. Press the [a] or [d] button to tune in the
desired TV station.
Watching a video
The TV tuner has a VTR input terminal to which
1 external device can be connected. Connect a
12 V video cassette player (VCP) or video cassette recorder (VCR) to the TV tuner input terminal.
1. Press the [RD] button to select VTR.
2. To return to the TV broadcast, press the [RD]
button.
24 DXZ825
Tuning
There are 3 types of tuning mode available,
Seek tuning, manual tuning and preset tuning.
Seek tuning
1. Press the [BND] button and select the desired TV band (TV1 or TV2).
∗ If “MANU” is lit in the display, press and hold
the [BND] button for 1 second or longer .
“MANU” in the display goes off and seek tuning is now available.
2. Press the [a] or [d] button to automatically
seek a station.
Press the [d] button to automatically tune
up the frequency band to the next available
TV station; press the [a] button to automatically tune down.
Manual tuning
There are 2 ways available: Quick tuning and
step tuning.
When you are in the step tuning mode, the frequency changes one step at a time. In the quick
tuning mode, you can quickly tune the desired
frequency.
Page 25

1. Press the [BND] button and select the desired band (TV1 or TV2).
∗ If “MANU” is not lit in the display, press and
hold the [BND] button for 1 second or longer.
“MANU” lights in the display and manual tuning is now available.
2. Tune into a station.
●Quick tuning:
Press and hold the [a] or [d] button for 1
second or longer to tune in a station.
●Step tuning:
Press the [a] or [d] button to manually
tune in a station.
TV Operations
Preset scan
Preset scan allows the user to view each preset
position before it automatically advances to the
next preset. This function is useful for searching
for a desired TV station in memory.
1. Press the [SC] button.
2. When the desired station is found, press the
[SC] button again to remain tuned to that station.
Note:
• Do not press and hold the [SC] button for 2 sec-
onds or longer. Doing so will trigger the auto store
function and start storing stations into memory.
English
Recalling a preset station
A total of 12 TV stations can be stored (6-TV1
and 6-TV2). This allows you to select your favorite TV stations and store them in memory for
later recall.
1. Press the [BND] button and select the desired TV band (TV1 or TV2).
2. To recall a stored TV station, press the desired [DIRECT] button to select that station.
∗ Press and hold one of the [DIRECT] buttons
for 2 seconds or longer to store the current
station into preset memory.
Manual memory
1. Select the desired station with seek tuning,
manual tuning or preset tuning.
2. Press and hold one of the [DIRECT] buttons
for 2 seconds or longer to store the current
station into preset memory.
Auto store
Auto store selects 6 TV stations automatically
and stores each one into preset memory.
If there are not 6 stations with good reception,
stations previously stored in memory remain
and only the strong stations are stored into
memory.
1. Press the [BND] button and select the desired TV band (TV1 or TV2).
2. Press and hold the [SC] button for 2 seconds
or longer. The stations with good reception
are stored automatically to the preset channels.
Setting the TV area
When you select the TV area (TV reception
area), the TV tuner area setting changes.
1. Press and hold the [T] button for 1 second or
longer to switch to the adjustment selection
display.
2. Press the [a] or [d] button to select “TV
AREA”.
3. Press the [
4. Turn the [ROTARY] knob clockwise or coun-
terclockwise to select the reception area.
5. Press the [
6. Press the [T] button to return to the previous
mode.
] button.
] button.
Setting the TV diver
You can change the reception setting for the TV
antenna connected to the TV tuner.
1.
Press and hold the [T] button for 1 second or longer
to switch to the adjustment selection display.
2. Press the [a] or [d] button to select “TV
DIVER”.
3. Turn the [ROTARY] knob clockwise to set to
“ON” or counterclockwise to set to “OF”.
● ON:
Sets reception emphasizing the visual.
● OF:
Sets the diver setting to OFF.
4. Press the [T] button to return to the previous
mode.
DXZ825 25
Page 26

DSP Operations
English
DSP control function
If the DSP (DPH910), sold separately, is connected to this unit using the CeNET cable, all
the functions of the DSP can be controlled.
6. Pressing the [
justment selection display.
7. Press the [T] button to return to the previous
mode.
] button returns to the ad-
DSF functions
There are 2 modes available in DPH910, STD
mode and professional mode. Choose one of
them and adjust the sound field and the sound
quality.
∗ STD mode: Standard mode
●Functions common to each mode:
Auto loudness, etc.
●Standard mode:
Adjustment using the graphic equalizer function
and the DSF function.
●Professional mode:
Adjustment using the VSE function and the
parametric equalizer function.
∗ When the STD mode is selected, adjustment for
the professional mode cannot be made. On the
contrary, when the professional mode is selected,
adjustment for the STD mode cannot be made.
∗ For details on functions of each mode, refer to
the owner’s manual supplied with the DPH910.
∗ Hereafter the graphic equalizer is referred to as a
G.EQ, the space equalizer referred to as VSE and
the parametric equalizer referred to as P.EQ.
Operations common to each mode
Output adjustment of auto
loudness, subwoofer and playback
band
1. Press and hold the [T] button for 1 second or
longer to switch to the adjustment selection
display.
2. Press the [a] or [d] button to select
“SOUND”.
3. Press the [
4. Press the [a] or [d] button to select the
adjustment item.
There are “A. LD LEVEL”, “W OOFER OUT”,
“WOOFER LPF”, “HPF” and “TEST TONE”
available for the adjustment items.
∗ For details on each adjustment item, refer to
the owner’s manual supplied with the
DPH910.
5. Turn the [ROT ARY] knob clockwise or counterclockwise to make the adjustment.
] button.
26 DXZ825
Selecting the easy mode or the
professional mode
∗ The factory default setting is “STD”.
1. Press and hold the [T] button for 1 second or
longer to switch to the adjustment selection
display.
2. Press the [a] or [d] button to select “AC-P
SEL”.
3. Turn the [ROTARY] knob clockwise or coun-
terclockwise to set the mode to “STD” or
“PRO”.
4. Press the [T] button to return to the previous
mode.
Entering titles
You can give a title to the user memory of the
DSF, G.EQ, VSE and P.EQ that you have adjusted yourself.
1. Press the [A] button to select the adjustment
mode in which you want to give a title.
2. Press the [BND] button to select “USR”.
“USR” will be displayed in the function mode
indication.
3. Press one of the [DIRECT] buttons to select
the user memory to which you want to give a
title.
4. Press the [T] button.
5. Press the [a] or [d] button to move the
cursor.
6. Press the [D] button to select the character
fonts.
There are capital letters, small letters, numbers, symbols and umlaut available for the
character.
7. Turn the [ROTARY] knob clockwise or coun-
terclockwise to select the character you want
to input.
8. Repeat steps 5 to 7 to input the title.
9. Press and hold the [
onds or longer to put the title into memory .
The title input mode is cancelled.
] button for 2 sec-
Page 27

STD mode/G.EQ operations
Note:
• The adjustment made in standard mode is not reflected in the adjustment in professional mode.
On the contrary, the adjustment made in professional mode is not reflected in the adjustment in
easy mode.
G.EQ effect ON/OFF
While the “G.EQ” indication is lit in the display,
the G.EQ effect is set to “ON”.
∗ The factory default setting is “ON”.
1. Press the [A] button and select “G.EQ”.
While “G.EQ” is selected, “G.EQ” blinks in
the display.
2. Press the [D] button. “G.EQ” in the display lit
or unlit.
∗ When “G.EQ” is unlit, the G.EQ effect is set to
OFF.
Note:
• If the G.EQ effect is set to OFF, the adjustment
made in “G.EQ operations” is not reflected in the
music source.
Selecting a G.EQ menu
1. Press the [A] button and select “G.EQ”.
2. Press the [BND] button to select “BASC” (ba-
sic). “B ASC” is displayed in the function
mode indication.
3. Press one of the [DIRECT] buttons and se-
lect the desired G.EQ menu.
∗ To select the user memory, press the [BND]
button to select “USR” and press one of the
[DIRECT] buttons.
Editing/storing a G.EQ menu (User
memory)
1. Select a G.EQ menu which you want to edit
on the basis of.
2. Press and hold the [T] button for 1 second or
longer.
3. Press the [a] or [d] button to select the
frequency to be adjusted.
There are 50Hz, 100Hz, 200Hz, 400Hz,
1kHz, 3kHz and 12kHz available for the adjustment frequency.
∗ For details on each adjustment item, refer to
the owner’s manual supplied with the
DPH910.
DSP Operations
4. Turn the [ROTARY] knob clockwise or
counterclockwise to make the adjustment.
The adjustment range is from –6 to 6.
5. Repeat steps 3 to 4 to complete the adjustment and press the [T] button.
6. Press and hold one of the [DIRECT] buttons
for 2 seconds or longer to store the edited
contents.
∗ You can give a title to the user memory. For
the inputting method of titles, refer to the subsection “Entering titles” in section “Opera-
tions common to each mode”.
STD mode/DSF operations
DSF effect ON/OFF
When the “DSF” indication is lit in the display,
the DSP effect is set to “ON”.
∗ The factory default setting is “ON”.
1. Press the [A] button and select “DSF”.
2. Press the [D] button. “DSF” in the display lit
or unlit.
∗ When “DSF” is unlit, the DSF effect is set to
OFF.
Note:
• If the DSF effect is set to OFF, the adjustment
made in “DSF operations” is not reflected in the
music source.
Setting the listening position menu
1. Press the [A] button and select “DSF”.
2. Press the [a] or [d] button to set the listening position type.
There are FULL SEAT, FRONT-R, FRONT-L,
FRONT (only front seats), REAR (only rear
seats) and PASS available for the listening
position types.
∗ The factory default setting is “FULL SEAT”.
Making fine adjustment of the
listening position
1. Upon completion of setting the listening position, press the [
2. Press the [a] or [d] button to select “BAL-
ANCE” or “FADER”. The selected item blinks.
3. Turn the [ROTARY] knob clockwise or
counterclockwise to adjust the balance and
the fader.
4. Press the [
mode.
] button.
] button to return to the DSF
English
DXZ825 27
Page 28

DSP Operations
English
Selecting a sound field menu
1. Press the [A] button and select “DSF”. “DSF”
blinks in the display.
2. Press the [BND] button to select “BSC1” (basic-1) or “BSC2” (basic-2). “BSC1” or “BSC2”
is displayed in the function mode indication in
the display.
3. Press one of the [DIRECT] buttons and select the desired sound field menu.
∗ To select the user memory, press the
[BND] button to select “USR” and press
one of the [DIRECT] buttons.
Editing/storing a sound field menu
(User memory)
1. Select a sound field menu which you want to
edit on the basis of.
2. Press and hold the [T] button for 1 second or
longer.
3. Press the [a] or [d] button to select the
item to be adjusted.
There are “EFFECT”, “DELAY”, “REAR MIX”,
“REV.TIME” or “ROOM SIZE” and “HIGH” or
“LIVENESS” available for the items to be ad-
justed.
∗ For details on each adjustment item, refer to
the owner’s manual supplied with the
DPH910.
4. Turn the [ROT ARY] knob clockwise or counterclockwise to make the adjustment.
5. Repeat steps 3 to 4 to complete the adjustment and press the [T] button.
6. Press and hold one of the [DIRECT] buttons
for 2 seconds or longer to store the edited
contents.
∗ You can give a title to the user memory. For
the inputting method of titles, refer to the subsection “Entering titles” in section “Opera-
tions common to each mode”.
Professional mode/VSE operations
Note:
• The adjustment made in professional mode is not
reflected in the adjustment in standard mode. On
the contrary, the adjustment made in standard
mode is not reflected in the adjustment in professional mode.
VSE effect ON/OFF
While the “VSE” indication is lit in the display,
the VSE effect is set to “ON”.
∗ The factory default setting is “ON”.
1. Press the [A] button and select “VSE”.
2. Press the [D] button. “VSE” in the displa y lit or
unlit.
∗ When “VSE” is unlit, the VSE effect is set to
OFF.
Note:
• If the VSE effect is set to OFF, the adjustment
made in “VSE operations” is not reflected in the
music source.
Selecting an VSE menu
1. Press the [A] button and select “VSE”.
2. Press the [BND] button to select “BASC” (basic). “B ASC” is displayed in the function
mode indication in the display.
3. Press one of the [DIRECT] buttons and select the desired VSE menu.
∗ To select the user memory, press the [BND]
button to select “USR” and press one of the
[DIRECT] buttons.
Editing/storing an VSE menu (User
memory)
1. Select an VSE menu which you want to edit
on the basis of.
2.
Press and hold the [T] button f or 1 second or longer.
3. Press the [a] or [d] button to select the
item to be adjusted.
There are “DIFFUSE”, “CAR WIDTH” and
“CAR LENG” available for the items to be ad-
justed.
∗ For details on each adjustment item, refer to
the owner’s manual supplied with the
DPH910.
4. Turn the [ROTARY] knob clockwise or
counterclockwise to make the adjustment.
The adjustment range is from 1 to 10 for
each item.
5. Repeat steps 3 to 4 to complete the adjustment and press the [T] button.
6. Press and hold one of the [DIRECT] buttons
for 2 seconds or longer to store the edited
contents.
∗ You can give a title to the user memory. For
the inputting method of titles, refer to the subsection “Entering titles” in section “Opera-
tions common to each mode”.
28 DXZ825
Page 29

DSP Operations
Professional mode/P.EQ operations
P.EQ effect ON/OFF
While the “P.EQ” indication is lit in the display,
the P.EQ effect is set to “ON”.
∗ The factory default setting is “ON”.
1. Press the [A] button and select “P.EQ”.
2. Press the [D] button. “P.EQ” in the display is
changed from blinking to lit or unlit.
∗ When “P.EQ” is unlit, the P.EQ effect is set to OFF.
Note:
• If the P.EQ effect is set to OFF, the adjustment
made in “P.EQ operations” is not reflected in the
music source.
Selecting a P.EQ menu
1. Press the [A] button and select “P.EQ”.
“P.EQ” blinks in the display.
2. Press the [BND] button to select “BASC” (basic). “B ASC” is displayed in the function
mode indication in the display.
3. Press one of the [DIRECT] buttons and select the desired P.EQ menu.
∗ To select the user memory, press the [BND] but-
ton to select “USR” and press one of the [DI-
RECT] buttons.
Digital Radio / DAB Operations
DAB control function
When a CeNET cable is used to connect a DAB
(DAH913 or DAH9500z) (sold separately), all
functions can be operated.
∗ A Digital Radio (DAB) program can be received
only in Canada.
Listening to the DAB station
1. Press the [FNC] button to select the DAB
mode.
2. When the unit receives a DAB station, the
display changes in the following order:
Frequency channel ➜ service label
Switching displays
Press the [D] button for 1 second during the
Main (service label) display to select Main (service label) or Sub (PTY).
Note:
• The display shown in the normal reception mode
and the preset reception mode is the same when
a DAB station is received.
English
Editing/storing a P.EQ menu (User
memory)
1. Select a P.EQ menu which you want to edit
on the basis of.
2.
Press and hold the [T] button f or 1 second or longer .
3. Press the [a] or [d] button to select the
item to be adjusted.
There are correction channel, correction
band, selection of the center frequency, gain
adjustment and selection of the Q-curve
available for the items to be adjusted.
∗ For details on each adjustment item, refer to
the owner’s manual supplied with the DPH910.
4. Turn the [ROTARY] knob clockwise or
counterclockwise to make the adjustment.
5. Repeat steps 3 to 4 to complete the adjustment and press the [T] button.
6. Press and hold one of the [DIRECT] buttons
for 2 seconds or longer to store the edited
contents.
∗ You can give a title to the user memory. For
the inputting method of titles, refer to the subsection “Entering titles” in section “Opera-
tions common to each mode”.
3. When the unit does not receive a DAB station, the display changes in the following order:
–Normal reception mode–
–Preset reception mode–
Notes:
• The number of programmes and broadcasting
times depend on the DAB stations.
• When the strength of DAB signals is weak, audio
output is muted.
DXZ825 29
Page 30

Digital Radio / DAB Operations
English
Seek tuning
1.
Press the [FNC] button to select the DAB mode.
2. Press and hold the [a] or [d] button for 1
second or longer.
∗ “SEARCHING” appears in the display.
3. “DAB” lights up in the display when the main
unit receives a DAB station.
* The main unit stops the seek tuning when it
cannot find a DAB station. The display returns
to the previous mode.
Manual tuning
1.
Press the [FNC] button to the select the DAB
mode.
2. Press and hold the [BND] button for 1 second
or longer. “MANU” lights up in the display.
3. Press the [a ] or [d] button to select a station.
∗ If no operation is performed for more than 7
seconds, manual tuning is cancelled and the
display returns to the previous mode.
Switching programmes
1.
Press the [FNC] button to receive a DAB station.
2. Press the [a] or [d] button to switch
programmes in the DAB station.
Note:
• The programme name may be the same depend-
ing on DAB programmes.
Programme scan
This function scans through each receivable
programme in a DAB station being received for
10 seconds sequentially. This is useful when you
want to search for a desired programme.
Press the [FNC] button to receive a DAB station.
1.
2. Perform the following operation depending
on the connected model.
Press the [SC] button. “SERVICE SCN” lights
up and the unit starts scanning each
programme for 10 seconds sequentially.
Each time the main unit scans, the
programme name is shown in the display.
3. To stop programme scan when a desired
programme is tuned in.
Press the [SC] button.
Manual memory
The main unit has a manual memory function for
DAB programmes. Up to 18 programmes (6
programmes each) can be preset in the preset
buttons.
[M1], [M2] and [M3]
1. Press the [FNC] button to select DAB mode.
2. Press the [BND] button to select any one
shown above.
3. Press the [a] or [d] button to select a desired programme.
4. Press and hold one of the [DIRECT] buttons
(1 to 6) for 2 seconds or longer to store the
programme.
Note:
• The interrupt programme (PTY or INFO) cannot
be written into a manual memory.
Recalling a preset programme
1.
Press the [FNC] button to select the DAB mode.
2. Press the [BND] button. Each time you press
the [BND] button, the display changes in the
following order:
[M1] ➜ [M2] ➜ [M3] ➜ [M1]...
3. Press one of the [DIRECT] buttons to recall a
preset programme.
Note:
• Press and hold the [DIRECT] button for 2 sec-
onds or longer to store the programme currently
being received. (Manual memory)
AF function
The AF function switches to a different frequency on the same network in order to maintain optimum reception.
∗ The factory default setting is “ON”
● Switching OFF the AF function
Press the [RP] button. “AF” in the display goes
off and the AF function turns off.
● Switching ON the AF function
Press the [RP] button. “AF” in the display lights
and the AF function turns on.
∗ If the reception of the current broadcast station
deteriorates, “SEARCHING SAME STATION” or
“SEARCH” appears in the display and the radio
searches for the same programme on another frequency.
30 DXZ825
Page 31

INFO (Announcement)
In the INFO standby mode, when the selected
announcement programme starts, the main unit
switches to the selected announcement
programme automatically.
Digital Radio / DAB Operations
T urn the [ROTARY] knob clockwise or
counterclock wise to set the information item
for ON or OFF.
5. Press the [T] button to return to the previous
display.
English
● Setting the INFO standby mode
If you press and hold the [ I ] button for 1 second
or longer, “INFO” lights in the display and the
main unit is set into the INFO standby mode until
the selected announcement is broadcast. When
the selected announcement broadcast starts, the
announcement item appears in the display. If you
press and hold the [ I ] button for 1 second or
longer while the selected announcement broadcast is being received, the selected announcement broadcast reception is cancelled and the
main unit goes into the INFO standby mode.
●Cancelling INFO standby mode
To cancel the INFO standby mode, press and
hold the [ I ] button for 1 second or longer.
●Information select
This is a function for selecting INFORMATION
ON or OFF in the Information interrupt mode.
You can set ON up to 6 information items.
You can select any of the 6 items below:
INFORMATION item
ENGLISH Contents
Travel Transport flash
Warning Warning / Service
News News flash
Weather Area weather flash
Event Event announcement
Special Special event
1. Perform the following operation depending
on the connected model.
Press and hold the [T] button for 1 second or longer.
2. Press the [a] or [d] button to select “INFO
SEL”, then press the [
“INFO SEL” mode.
3. Press the [a] or [d] button to select an information item. You can select any of 6 items:
Travel ➜ Warning ➜ News ➜ Weather ➜
Event ➜ Special ➜ T ra vel ...
4. Perform the following operation depending
on the connected model.
] button to enter
Switching the PTY and INFO display
language
You can select one of 2 languages (English or
French) for the PTY and INFO shown in the display.
∗ The factory default setting is “ENGLISH”.
1. Press and hold the [T] button for 1 second or
longer to switch to the adjustment selection
display.
2. Press the [a] or [d] button and select
“LANGUAGE”.
3. Press the [
4. Turn the [ROTARY] knob clockwise or coun-
terclockwise to select the desired language.
5. Press the [T] button to return to the previous
mode.
] button.
TA (Traffic Announcement)
In the TA standby mode, when a traffic announcement broadcast starts, the traffic announcement
broadcast is received as top priority regardless of
the function mode. Traffic programme (TP) automatic tuning is also possible.
∗ This function can only be used when “TP” is lit in
the display . When “TP” is lit, this means that the
DAB broadcast station being received has traffic
announcement programmes.
● Setting TA standby mode
If you press the [ I ] button when only “TP” is lit
in the display, “TP” and “TA” light in the display
and the unit is set into TA standby mode until a
traffic announcement is broadcast. When a traffic announcement broadcast starts, “TRA INFO”
appears in the display. If you press the [ I ] button while a traffic announcement broadcast is
being received, the traffic announcement broadcast reception is cancelled and the unit goes
into TA standby mode.
● Cancelling TA standby mode
With “TP” and “TA” lit in the display, press the [ I ]
button. The “TA” in the display goes off and TA
standby mode is cancelled.
∗ If “TP” is not lit, pressing [ I ] button searches for a
TP station.
DXZ825 31
Page 32

Digital Radio / DAB Operations
English
● Searching for a TP station
When “TP” is not lit, if you press the [ I ] button,
“TA” in the display lights and the unit automatically receives a TP station.
Note:
• If a TP station is not received, the unit continues
the search operation. Pressing the [ I ] button
again goes off “TA” in the display and stops TP
station searching.
PTY
This function enables you to listen to the selected programme type, irrespective of the function mode.
∗ PTY broadcasts are not yet available in all coun-
tries.
∗ In the INFO standby mode, INFO stations have
priority over PTY stations.
∗ In the TA standby mode, TP stations have priority
over PTY stations.
PTY item
ENGLISH Contents
News News
Inform information
Sports sports
Talk talk
Rock rock
Cls Rock Classic Rock
Adlt Hit Adult Hits
Soft Rck Soft Rock
TOP 40 Top 40
Country Country music
Oldies Oldies
Soft Soft music
Nostalga Nostalgia
Jazz Jazz
Classicl Classical
R & B Rhythm and Blues
Soft R&B Soft Rhythm and Blues
Language language
Rel Musc religious music
Rel Talk religious talk
Persnlty personality
Public public
College college
Weather weather
● Setting PTY standby mode
When you press the [RD] button, “PTY” lights in
the display and the PTY standby mode is turned
on. When the selected PTY broadcast starts, the
PTY item name appears in the display.
● Cancelling PTY standby mode
When you press and hold the [RD] button for 1
second or longer, “PTY” goes off in the display
and PTY standby mode is cancelled.
● Cancelling a PTY interrupt broadcast
Press the [RD] button during the PTY interrupt
broadcast, the PTY interrupt is cancelled and
the unit returns to PTY standby mode.
Selecting PTY
1. When you press the [RD] button, the unit
goes into PTY select mode.
2. Press any one of the [DIRECT] buttons. Alternatively, turn the [ROTARY] knob clock-
wise or counterclockwise to select the desired PTY.
∗ Below are the factory default settings stored
for the [DIRECT] buttons.
Preset
number
1 News News
2 Sports Sports
3 Country Country music
4 Talk Talk
5 Jazz Jazz
6 Soft Soft music
3. The PTY select mode is cancelled automatically 7 seconds after a PTY is selected.
ENGLISH Contents
PTY item
PTY seek
1. When you press the [RD] button, the PTY select mode is turned on.
2. Select PTY.
3. Press the [a] or [d] button. If you press
the [d] button, the unit seeks a PTY broadcast moving up the frequencies; if you press
the [a] button, it seeks moving down the
frequencies.
∗ If no station with the selected PTY broadcast
can be received, the unit returns to PTY select
mode.
32 DXZ825
Page 33

Digital Radio / DAB Operations
PTY preset memory
1. When you press the [RD] button, the PTY select mode is turned on.
2. Turn the [ROTARY] knob clockwise or counterclockwise to select the desired PTY.
The 24 types of PTY below can be selected.
3. If you press and hold any one of the [DI-
RECT] buttons for 2 seconds or longer, the
selected PTY is stored into that preset channel memory.
Emergency broadcast
When an emergency broadcast is received, all
the function mode operations are stopped.
“ALARM” appears in the display and the emergency broadcast can be heard.
● Cancelling an emergency broadcast
If you press [RP] button, emergency broadcast
reception is cancelled.
Volume setting of TA, INFO ,
emergency broadcast (ALARM) and
PTY
The volume for TA, INFO, ALARM and PTY interrupts can be set during TA, INFO, ALARM
and PTY interrupt. Perform the following operation depending on the connected model.
∗ The factory default setting is “15”.
During a TA, INFO, ALARM or PTY interrupt,
turn the [ROTAR Y] knob clockwise or counterclockwise to set the volume to a desired level (0
to 33).
∗ When the TA, INFO, ALARM or PTY interrupt
ends, the volume returns to the level it had before
the interrupt.
DVD Operations
Operation
●Play/Still operation
Press the [
mode (play, still (pause)).
Each time the button is pressed, the mode
changes cyclically.
●Chapter up/down operation (FF/FB opera-
tion)
Press the [d] button for 1 second or shorter to
increment chapters.
Hold down the [d] button for 1 second or longer
to fast forward.
Press the [a] button for 1 second or shorter to
decrement chapters.
Hold down the [a] button for 1 second or longer
to fast backward.
] button to select the desired
English
DXZ825 33
Page 34

English
9. IN CASE OF DIFFICULTY
Problem
Power does not turn
on.
(No sound is produced.)
No sound output
when operating the
unit with amplifiers or
power antenna
attached.
Nothing happens
General
when buttons are
pressed.
Display is not accurate.
Compact disc cannot
be loaded.
Sound skips or is noisy.
Sound is bad directly
CD
after power is turned
on.
Poor sound quality The equalizer levels are too
DSP
Fuse is blown.
Incorrect wiring.
Power antenna lead is shor-
ted to ground or excessive
current is required for
remote-on the amplifiers or
power antenna.
The microprocessor has
malfunctioned due to noise,
etc.
DCP or main unit connectors are dirty.
Another compact disc is
already loaded.
Compact disc is dirty.
Compact disc is heavily
scratched or warped.
Water droplets may form on
the internal lens when the
car is parked in a humid
place.
high.
Cause Measure
Replace with a fuse of the same amperage. If
the fuse blows again, consult your store of purchase.
Consult your store of purchase.
1. Turn the unit off.
2. Remove all wires attached to the power antenna lead. Check each wire for a possible short
to ground using an ohm meter.
3. Turn the unit back on.
4. Reconnect each amplifier remote wire to the
power antenna lead one by one. If the amplifiers turn off before all wires are attached, use
an external relay to provide remote-on voltage
(excessive current required).
Turn off the power, then
press the [RELEASE]
button and remove the
DCP.
Press the reset button
with a thin rod.
Wipe the dirt off with a soft cloth moistened with
cleaning alcohol.
Eject the compact disc before loading the new
one.
Clean the compact disc with a soft cloth.
Replace with a compact disc with no scratches.
Let dry for about 1 hour with the power on.
If the equalizer levels are too high, the sound
may distort. Lower the equalizer levels.
Reset button
34 DXZ825
Page 35

10. ERROR DISPLAYS
If an error occurs, one of the following displays is displayed.
Take the measures described below to eliminate the problem.
Error Display
ERROR 2
CD
ERROR 3
ERROR 6
A CD is caught inside the CD deck and is
not ejected.
A CD cannot be played due to scratches,
etc.
A CD is loaded upside-down inside the
CD deck and does not play.
Cause
Measure
This is a failure of CD deck’s mechanism
and consult your store of purchase.
Replace with a non-scratched,
non-warped-disc.
Eject the disc then reload it properly.
English
ERROR 2
ERROR 3
CD changer
ERROR 6
ERROR H
ERROR 2
ERROR 3
MD changer
ERROR 6
A CD inside the CD changer is not
loaded.
A CD inside the CD changer cannot be
played due to scratches, etc.
A CD inside the CD changer cannot be
played because it is loaded upside-down.
Displayed when the temperature in the
MD changer is too high and playback has
been stopped automatically.
An MD inside the MD changer is not
loaded.
An MD inside the MD changer cannot be
played due to scratches, etc.
An MD inside the MD changer cannot be
played because it is loaded upside-down.
Displayed when a non-recorded MD is
loaded in the MD changer.
This is a failure of CD changer’s
mechanism and consult your store of
purchase.
Replace with a non-scratched, nonwarped disc.
Eject the disc then reload it properly.
Lower the surrounding temperature and
wait for a while to cool off MD changer.
This is a failure of MD changer’s
mechanism and consult your store of
purchase.
Replace with a non-scratched, nonwarped disc.
Eject the disc then reload it properly.
Load a pre-recorded MD in the MD
changer.
If an error display other than the ones described above appears, press the reset button. If the problem
persists, turn off the power and consult your store of purchase.
DXZ825 35
Page 36

36 DXZ825
Page 37

11. SPECIFICATIONS
English
FM T uner
Frequency Range:
87.9 MHz to 107.9 MHz
Usable Sensitivity:
9 dBf
50dB Quieting Sensitivity:
15 dBf
Alternate Channel Selectivity:
70 dB
Stereo Separation (1 kHz):
35 dB
Frequency Response (±3 dB):
30 Hz to 15 kHz
AM T uner
Frequency Range:
530 kHz to 1710 kHz
Usable Sensitivity:
25 µV
CD Player
System:
Compact disc digital audio system
Usable Discs:
Compact disc
Frequency Response (±1 dB):
5 Hz to 20 kHz
Signal to Noise Ratio (1 kHz):
100 dB
Dynamic Range (1 kHz):
95 dB
Harmonic Distortion:
0.01%
Audio
Maximum Power Output:
200 W (50 W ✕ 4 ch)
Continuous Average Power Output:
18 W ✕ 4, into 4 Ω, 20 Hz to 20 kHz, 1%THD
Bass Control Action (30 Hz):
+15 dB/-12dB
MID Control Action (1kHz):
±12dB
Treble Control Action (10 kHz):
±12 dB
Line Output Level (CD 1 kHz):
4 V
General
Power Supply Voltage:
14.4 V DC (10.8 to 15.6 V allowable), negative
ground
Current Consumption:
Less than 15 A
Speaker Impedance:
4 Ω (4 Ω to 8 Ω allowable)
Weight / Source unit:
3.53 lb. (1.6 kg)
Weight / Remote control unit:
1 oz. (30 g) (including battery)
Dimensions / Source unit:
7" (Width) ✕ 2" (Height) ✕ 6-1/8" (Depth)
[178 (W) ✕ 50 (H) ✕ 155 (D) mm]
Dimensions / Remote control unit:
1-3/4" (Width) ✕ 4-5/16" (Height) ✕ 1-1/8"
(Depth)
[44 (W) ✕ 110 (H) ✕ 27 (D) mm]
Notes:
• Specifications and design are subject to change without notice for further improvement.
DXZ825 109
Page 38

2002/3 (D·C)
Clarion Co., Ltd.
All Rights Reserved. Copyright © 2002: Clarion Co., Ltd.
Printed in China / Imprimé en Chine / Impreso en China
PE-2523B
280-7779-00
Page 39

pdnled in China / tmpnmd en Ch!ne I lmpreso en China 2CQ2~3 (D.C)
Manuel d’installation et de connexion
Guia de instalaciBn/conexitn de cables
-1. BEFORE STARTING / PREPARATiFS / ANTES DE COMENZAR
CAUThNS ON INSTALLATION I ~~~CAUTIDNS AU SUJET DE ~~NSTALLATION / PRECAUCIONES PARA LA INSTALACION
1. Prepare all arttdes necessary for installing the eource unit before
stafling.
2. Install the unit wlthin 30” of the horizontal plane. (Figure 2)
3. If yw have to do any work on the car body, euch as drilling holes.
conwlt your car dealer beforehand.
4. use the enclosed Screws to, instatlatlon. “sing other screwe la”
cause damage. (Figure 3)
1
Max 30’ i
,a* .n
Man 30’ I
Mvx SlB’,B “ml
/, A,, * 3ih ::iv
Max W6’l8 “ml)
i
Figure 2 I FIgwr I I Flgm 2
-3.
INSTALLING THE SOURCE UNIT / INSTALLATION DE CAPPAREIL PlLOTE I INSTALACION DE LA UNIDAD FUENTE
m Universal Mount
1. Place the universal mounting bracket in,” the instrument panel,
uee a screwddver to bend each stopper of the ~ntver~at mountmg
bracket inward, then secure the stopper es shown in Figure 4.
2. Wire a8 shown in Section 6.
3. ;zr the source unit into the univereel mounting bracket until it
4. Take care of the top end bolt”“, of the “tier eecutcheon and
mount n so that all the hooks are locked. (Figure 5)
Fig”,* 3, FIq”r* I, Figura 3
_- -.--- .- -
Page 40

e Fixed Mount
(TOYOTA, NISSAN and othw I.SODIN equipped vehicles)
Nob? 1: In mne MSSS, the center panel may reqwe some modtti-
cation (frrmmmg, Wng, etc.).
Note 2: If a hook on the installation brackef interferes with the untt,
bend and It&ten it wtth a nipper or a similar twl
I Montage fire
(TOYOTA. NISSAN et autres v&hicules Bquip& ISOiDIN)
n
Montaje fijo
(Autombviles TOYOTA, NISSAW, y otros provistas de nomas ISORIIN)
REMOVAL OF THE SOURCE UNIT / REPOSE DE ~AF~A~~l~ PiLQTE / DESMONTAJE DE LA UNIDAD FUENTE
1, When removi”g the source unit. dtsassemble !t in the reverse of
the order in Section “3. INSTALLING THE SOURCE UNIT
2. Press the outer escutcheon upward and remove il. (Flgure 7)
3. Insert and lock the hook plates. (Figure 8)
4. Pull the hook plates to remove the source unit.
f Pera desmontar Ie unidad tuenre, realice et procedimierXt0 inver-
so al de la Seccid” “3. INSTALACl6N DE LA UNIDAD FUENTE”.
2. Pres~one (a pleza ornamental exterior hacia afuera y extr&gala.
(Figura 7)
3 lnserte y bloquee las placas de engenche. (Figura a)
4. Twe de (as places de engenche para extreer I8 unidad luente.
alID,
-5. CAUTIDN~WIRING I ~~~C~~~~DN~ A” SUJET DES C~~N~XIDNS / PRECAUCIONES PARA LA CONEXldN DE CABLES
1. Be sure to turn the power off when wiring.
2. Be particularly cerelul where you route the wres.
Keep lhem well away from the engine, exhaust p!pe. etc Heat
may damage the wires.
3. If the fuse should blow, check that the wring is correct
If it is, replace the fuse wth B new one wth the same amperage
rabnq as the oriqlnal one.
4. To re lace the fose. open the lock on the source unit side. remove
the s - d fuse and inserf the new one. (Figure 9)
* There are various types of fuse cases. Do not let (he battery
side terminal touch other metal perts.
5. Connect the CeNET extension cable (ully and securely onlil I(
locks. When the CeNET extension cable 1s pulled. hold Ihe skde
cap part and pull it towards you.
* When the &NET extension cable IS Mended or branches,
uss extension cable CCA-520 (8 feet [ZSm]) or CCA-521 (2
feel [0.6m]). or Y-adapter CCA-519 (each of them fs sold
seperate ).
* Use the 2 eNET extension cable made by Clanon.
t Antes de hater 18s consxionss. esegtirese de dssconeotar Is ali-
mentaM” de la unidad.
2. Sea especialmeote cuidadoso al dir. ir y fijar lo6 cables.
manUn slos alsiados del motor tu
puede &Aer los cables. ’
3. SI 81 fusible ss ueme. revise Ias conaxiones.
mismo valor de amperaje que al original.
4. Pare rsemplazar sl fusible, abre 18 tapa de la unidad fuents, retire
el fusible antiguo e instale otro nuevo. (Fi
* ss. no permits que al
5. Conscts el cable prolonpador CeNET oompleta y seguraments
haste que chasquee. Fwa desconectar el cable. sujete la parte
de la tape deslizable y tire hacia usted
* Psra prolonger 0 ramifkar sl cable prolongedor CeNET, utilke
* Utilics u” cab% prolongador &NET febrkedo par Clarion.
9 Si eata quema 0. reemplacs d l~hlbk p-x otm noeva co” sl
Exists” distintos tipos de @as de tusl
terminal dsl lado de la bateria weds en contecto co” otras
partes mettilicas.
u” cable prolongador CCA-520 (2S m) o CCA-521 (0,s m). o
un adaptsdor en Y CCA-519 (vend&as apart&
de sscepe. etc. El calor
ure 9)
%
Page 41

. WIRE CONNECTIONS / CONNECTIQUE / CONEXION DE CABLES
RCA connection using LINE-IN
Comcexion RCA utilisant la borne d’entde de ligne (LINE-IN)
Conexi6~ RCA utilizando LINE-IN
Page 42

-7.
SAMPLEiTEMS / EXEMPLES DE SYSTtiMES I EJEMPLOS DE SISTEMAS
m Example of the system using an internal amplifier. (AUDIO)
* Exempfe de sysf&ne utilieant un amplificateltl infwne jAUDlO)
n Ejemplo de eletema utilizando on smpiificsdor interno. (AUDIO)
in 2 Cambismles d* dtscos OV” dd 5cl(wn8
L.--.--.-.-.-.-.-.
I Example of the system uelng se external amplifier. (AUDIO,VISUAL)
@ Exemple de syst&ne utilleent tm amplificeteur axwriri:c IAILIXO, VISUELI
. E/emplo de eistems ulilizando on amplificsdor externo. (AUDIO. ViDEO)
l Example of the system using sn external amplifier. (AUDIO)
II Exemple de systcime utilissnl !.#I ernpliticsteur exi&leur. (AUDIO)
I Ejemplo de eietems utilirsndo on amplificador externo. (AUDIO)
GENERAL CAUTIONS I ~~~~A~}~-~~~~ ~~~~~~ LES / PRECAUCIONES GENERALES
-8.
1. Do no, open the CBSB. There are no ueer ser”,cesble parts ,nsrde.
II you drop anythg into Ihe und during mstallation. consul1 your
dealer or a” aulhonzed CLARION ser”,ce cenfer.
2. “se a soft dry cloth 10 clean the case. Never “se hard c%oth, Ihlnner, benzen. alcohol. etc For tough dirt, apply a IMIle cold or warm
wafer lo a SOR cloth and wioe off the d~rr aentr”
IMPORTANT:
lmpropet ,n~fallst,on may cause damage 1” your tin,, or car. II o”
do not have the approprtate expwence, c”,,s”,, d Y qua,, led
installer. Cutting chassis wire leads voids the warranty.
1 NO abra la ca@. En el inferior no hsy piezss que pueds repsrer el
ususno. Si dentro de la unidad entm algo durante la insldsci6n.
consulte a su proveedor o a un centm de serwcio aulorizedo par
CLARION.
2 Pars limpiar la cafe. utillce on pain suave y seco. no use ounce
un pmio dur?, diluidor de pmtum. benceno, alcohol. etc. pars Is
sucaedad rewtente, aplique un poco de ague fris o csliente s on
patio wave y hole suavemente la part* sucis.
IMPORTANTE:
La mstalac~5n mspropmda puede csussr dsnos en su unidsd o so
autombv~l. 9 usfed no posee la experisnoa apropisda. consuite s
“11 mslslador cualilicodo. El torte de 10s conductores de ooeets s
mass (carroceria) anulad la garsntia.
I
Clarion Co., Ltd.
Page 43

Clariofi
Registration
CAI AilAlA 0 AtYenB
Product
for USA and Canada only
IMPORTANT:
1. Detach this section of the card and keep it with your records,
2. Retain your sales receipt to validate warranty service.
3. If you purchased a Clarion ADX Series, Pro Video or Pro Audio
product. be sure to complete the box on the last page of this form.
Information on Clarion authorized Warranty Centers
may be obtamed by writing Clarion Corporation at the address below
In
USA:
Clarion sales corporation
Warranty Serwce Mter
661 West Redonda Beach Blvd.
Gardena. CA 90247
(3101327-9100
or by calling
I-800-GO-CLARION.
In Canada
Clarion Canada, Inc
Warranty Serwce Center
2239 Wmton Park Drive
Oakville, Ontario L6H SRl
(905)829-4600
www.clarionmultimedia.com
Page 44

TEAR THIS PAGE OFF AND KEEP IT WITH YOUR RECEIPT!
This product is warranted against all defects in material workmanship for a period of
one year from the date of original purchase. The condihons of this warranty and the
extent of the responsibility of Clanon Corporation under this warranty are as follows:
1. PROOF OF DATE OF PURCHASE WILL BE REWIRED FOR WARRANTY SERVICE OF THIS
PRODUCT. INFORMATION ABOUT CLARION AUTHORIZED WARRANTY SERVICE CENTERS MAY
ALSO BE OBTAINED BY CONTACTING OR WRlTlNG CLARION CORPORATfON AT THE ADDRESS
LISTED ON THE FRONT OF THIS CARD.
2. This warranty wdl become void d serwe performed by
Warranty Serwe Center results
3 This warranty does nol apply to any product which has been subfect to misuse. neglect or
accident. or which has had the serral number altered, defaced or removed. or whrch has been
connected, msfalled. adjusted or reparred, other than in accordance with the ~nStruci!orls
furnished by Clanon Corporahon.
4. Thrs warranty does not cover car stabc or other electrical mmterferences. tape head clearring or
adjustments, or labor costs for the removal or reinstallation ot the und for raparr
5 The sole responsibility of Clarion Coraoration under Mis Warranty shall be lhmded lo the repair or
replacement thereof. at the sole discretion of Clarion Corporation.
6 If rt becomes necessary 10 send the product or any defectwe pati to Clarron Corporation or an
authorized warranty ~erw? station, the product must be shipped in its angloal carton or
equivalent carton. fully insured. wth sfvppmg charges prepaid. Clarion Corporabon will not
assume any responsibddy for soy loss or damage mcurred m shippmg.
7 ALL IMPLIED WARRAN-llES EXCEPT TO THE EXTENT PROHIBITED BY APPLICABLE LAW SHALL
HAVE NO GREATER DURATION THAN THE WARRANTY PERIOD SET FORTH ABOVE. UNDER NO
CIRCUMSTANCES SHALL CLARION CORPORATION BE LfABLE FOR ANY LOSS OR DAMAGE. DIRECT
OR CONSE(lUENTIAl. ARISING OUT OF THE USE OR INABILITY TO USE THE PRODUCT. BECAUSE
SOME STATES 00 NOT ALLOW LIMITATIONS ON HOW LONG AN IMPUEO WARRANTY LASTS OR
EXCLUSIONS OR LIMITATIONS OF INCIDENTAL OR CONSEQUENTIAl DAMAGES. THE ABOVELIMITATIONS OR EXCLUSIONS MAY NOT APPLY TO YOU.
8. THIS WARRANTY GIVES YOU SPECIFIC LEGAL RIGHTS. AND YOU MAY ALSO HAVE OTHER RfGHTS
WHICH VARY FROM STATE TO STATE.
9. Should you have any dffffco~ies wim the periormance of this product during warranty, or with any
Clarion authorized service centers, you may contact the Clarion National Service Managers at the
address listed on the front of this card or call 1-800-GO-CLARION for a listina of Autborrzed
Warranty Service Centers in your area.
in damaqe to producl
anyone other
than
an approved
Clarion
281-0607-00
mPROi:Ci
Tlvank you for selecfmg a high-quahty product from Clarion. We hope you are completely s&stied
with your purchase We’d lkke to help serva you better by frrding out more about your reasons for
choosing Clarion. Please take a few momems to fill out the registrabon information on thus card and
answer a few questcons about yourself and your product. Then. return the card to Clarlan wdhin IO
days of purchase Your answers wrll be kepl ~!rrctly conrldential. We appreciate yot!r response’
Uii,,“” L:l,,ada 8°C warranty serice cenw. 2219 wnst”!~ PII oll”S i)ak”,lla mwm I.bH b”i
q
.Mr. MS. ‘Mrs. .Miss
q
what is the name of the store where you pwchased this product?
m . -, 1
I carwa. PIz+ccc I% cam I” an enve,lPe am mati 1”
i E G I ST R A T I 0 N C A R D
,
f I I i ‘“T-T.1
r-r-n
Page 45

You’ve just purchased a Sirius satellite Radio receiver that’s going
to plug you into 60 original music channels, from taday’s hits to
R&B oldies to classical masterpieces. From authentic ~~oMn~ry and
real bluegrass to 609l jazz, hot l&in, reggae and rctcit, Plus 40
channels of world-class sports, news and ert~er~airlrnen~, like ESPM,
Radio Disney, E! ~n~er~ain~l~n~ Radio, CNBC, Fox News and
Discovery Radio.
fi? “!. irta, the emphasis is on the music and et~~er~airtmen~ you
want. From new on, it’s just you, the road and the music.
If you haven’t already activated your Sirius receiver, here’s how:
‘1 , Centact us at siri~sradio.~om or call toll-free
~-~~~~~~~~~l~l~~ (7474).
2. Have 3 items on hand:
~3 A valid credit card or ~rar~d~d debit card
c Sirius ID or Electronic Serial ~~t~~er (check on
the receiver box or your display con&o1 window)
Cl Your vehicle identi~fkatiort t~Ltt~~~~ar (VIN)
F
,w-.?*
@ 100 channels of digital entertainment, ~oas~~~~-~o~~~
@ 60 original music flannels, all ~~rnrn~r~ial~~r~~
@ 40 world-class sports, news and en~er~a~nrn~r~~ channels
* S>PLEX technology for superior sound resolutictn
Page 46

I Top40 Hits
2 Adult Contemporary
3 Alt Pop Mix
4 Love songs
5 The Best of the 5Os/6Os
7 The Best of the 705
8 The Best of the 80s
9 The Best of the 90s
17 Eclectic Rock
20 Rock Hits
2 1 Modern Rock
22 Mainstream Rock
23 Ckwic Rock I
24 Classic Rock II
25 Classic Alternative
26 Alterrlative I
27 Altemativ@ I
29 Hard Rock
002 Sirius Salellite Radio Inc
30 Country Hits
31 Today’s Country
32 Country Mix
35 Classic Country
36 AIt Coun?ry
37 Bluegr,ss
40 R&B Hits
42 Today’s R&E
43 Soul Ballads
44 Classic Soul
45 R&B Oldies
47 Rap Hits
48 Today’s Rap
49 Classic Rap
50 Dance Hits
60 Classic lezr
61 Latin Jazz
62 cantcmp‘awy Jazz
63 Smooth Jazz
65 Standards
66 Swing
67 Broadway’s Best
70 Latin Hit.5
71 Latin Pop Mix
72 Rock en Espairol
74 Mexicana
77 Tejano
80 Symphonic
62 Chamber Works
85 Classical Voices
90 Blues
St Reggae
93 Goq~l
94 Christian Hits
95 World Music
9G New Age
99 Kids
100 Specialty Shnwcase
101 CNEX
102 FOX News Channel
$04 CNN Headline News
105 Bkmlberg
107 NPR Now
108 NPR Talk
109 PRl’s Public Radio Channel
11 I World Radio Network
1 12 BBC World Service News
I I4 C-SPAN Radio
i 15 The Weather Channel
Radio Network
1 16 Sirius Talk
1 17 Real Sirius
119 ABC News & .Talk
120 ESPN Radio Network
121 ESPNews
123 Sports Byline USA
124 Speedvision
125 OLN Adventure Radio
‘I 40 BBC Mundo
142 ILa Red Hispana
‘I 44 Radio Deporiivo
146 Radio Mujer
147 Radio Armgo
150 Radio Disney
151 Discovery Radio
i 52 E! Entertainment Radio
154 A&E Satellite Radio
156 Radio Classics
15B SCI FI
I59 Sirius Entertainment
i 60 Sirius Comedv
161 Sirius Arts
164 Personal Achievement
I65 Wisdom Radio
167 African American Talk
i 68 The Scandal Channel
172 Women’s Talk
175 Guy Talk
180 Trucker Ctwmel
184 Preview Channel
 Loading...