

Page 1
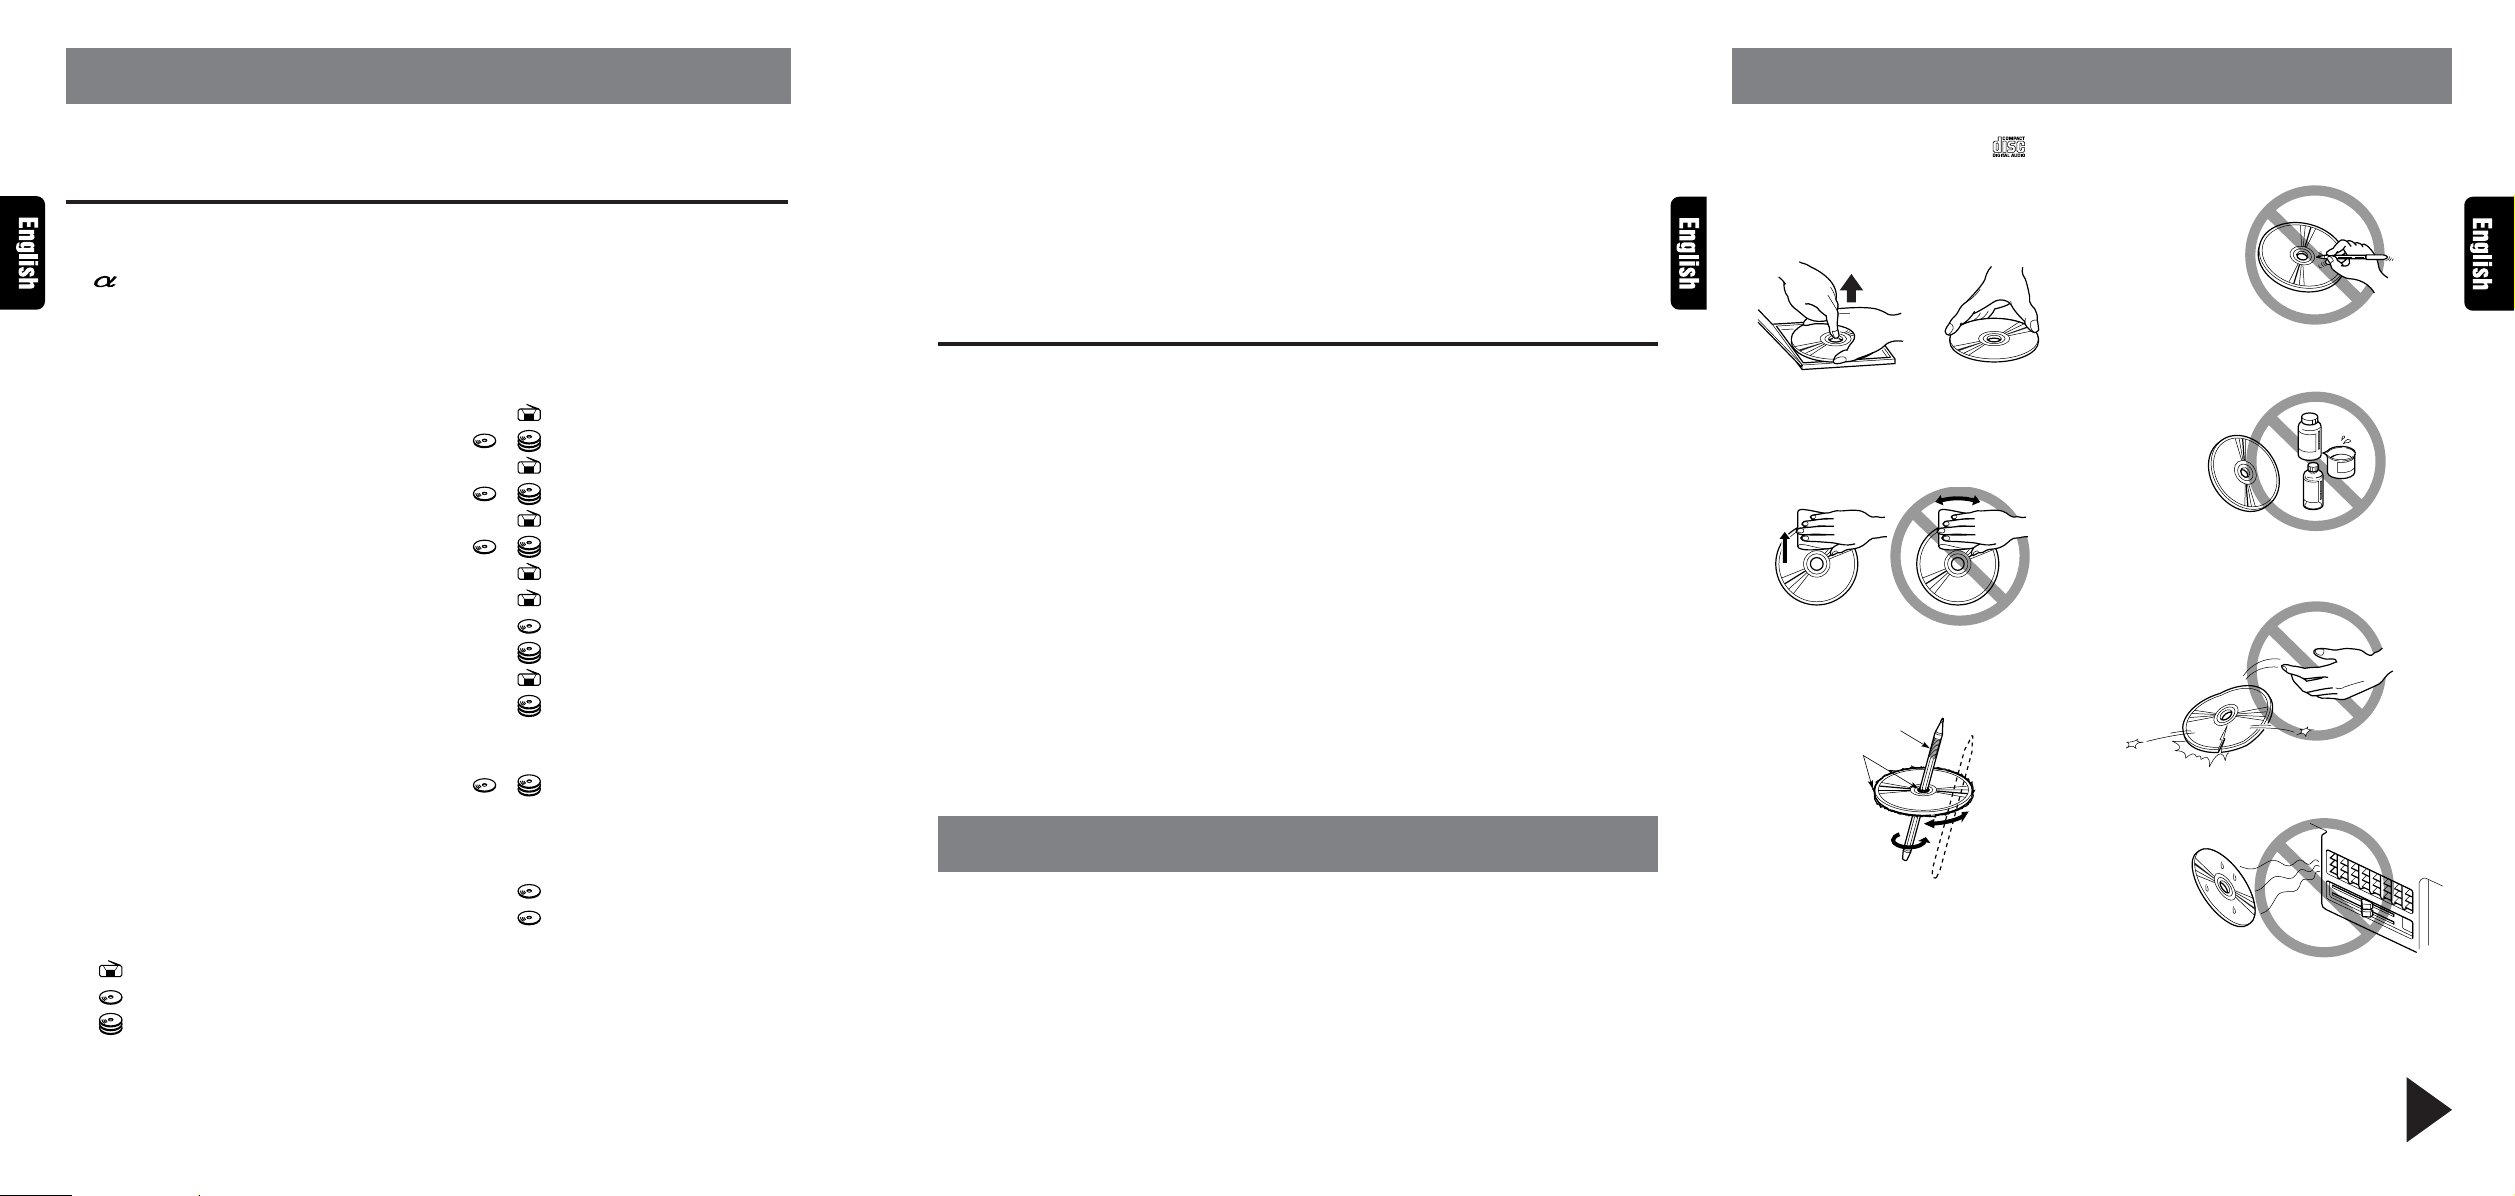
Proper way to hold
the compact disc
Removing the disc
N
6. BUTTON TERMINOLOGY
Note:
•
Be sure to read this chapter referring to the front diagrams of chapter “3. CONTROLS” on page 5 (unfold).
Names of Buttons
1 POWER button
FUNC (function) button
2 -selector (ALPHA-TOUCH CONTROLLER)
3 Release button
4 DCP/SLOPING CONSOLE
5 Display
6 DISP (display) button
7 PS/AS (preset scan/auto store) button ............................... [ ]
SCN (scan) button ..................................................... [ ], [ ]
8 AF (alternative frequencies) button .................................... [ ]
RPT (repeat) button .................................................. [ ], [ ]
9 PTY (programme type) button ............................................ [ ]
RDM (random) button ............................................... [ ], [ ]
0 TA (traffic announcement) button ........................................ [ ]
! BAND button ....................................................................... [ ]
TOP button ..........................................................................[ ]
MAG (magazine) button ...................................................... [ ]
@ Preset buttons (1 to 6) ........................................................ [ ]
Direct buttons (1 to 6) ......................................................... [ ]
# A-M (audio mode) button
LOUD (loudness) button
$ TITLE button............................................................. [ ], [ ]
% ADJ (adjust) button
¥ DSP (digital sound processor) button
& EQ (equalizer) button
* OPEN/Eject button ..............................................................[ ]
( CD insertion slot .................................................................. [ ]
[ ]: In the radio (RDS) mode
[ ]: In the CD mode
[ ]: In the CD changer mode
8 DRX9375R/DRX9375RW
Thank you for purchasing the Clarion DRX9375R/DRX9375RW.
* This owner’s manual is for both the DRX9375R and the DRX9375RW. The only difference between
these models is the colour of the front panel. The operating methods are the same.
* Please read this owner’s manual in its entirety before operating this equipment.
* After reading this manual, be sure to keep it in a handy place (e.g., glove compartment).
* Check the contents of the enclosed warranty card and keep it carefully with this manual.
* This manual includes the operating procedures of the CD changer that is connected via the C-BUS
cable, of the Digital Sound Processor (DSP) and of the Equalizer (EQ). The CD changer, DSP or
Equalizer has its own owner’s manual, but no explanations for operating it are described.
Contents
1. PRECAUTIONS ............................................................................................................................. 3
2. HANDLING COMPACT DISCS ..................................................................................................... 4
3. CONTROLS ................................................................................................................................... 5
4. DCP ................................................................................................................................................ 6
5. SLOPING CONSOLE .................................................................................................................... 7
6. BUTTON TERMINOLOGY ............................................................................................................ 8
Names of Buttons ........................................................................................................................... 8
α-Selector Operation ...................................................................................................................... 9
7. REMOTE CONTROL ................................................................................................................... 10
Inserting the Battery ..................................................................................................................... 10
Functions of Remote Control Unit Buttons .................................................................................. 11
8. OPERATION ................................................................................................................................12
Basic Operations .......................................................................................................................... 12
Radio Operations ......................................................................................................................... 14
RDS Operations ........................................................................................................................... 16
CD Operations ............................................................................................................................. 20
CD Changer Operations .............................................................................................................. 22
Other Handy Functions ................................................................................................................ 24
DSP and Equalizer Operations ....................................................................................................26
9. IN CASE OF DIFFICULTY ........................................................................................................... 30
10. ERROR DISPLAYS...................................................................................................................... 31
11. SPECIFICATIONS ..................................................................................................................... 200
1. PRECAUTIONS
1. When the inside of the car is very cold and
the player is used soon after switching on the
heater, dew may form on the disc or the optical parts of the player and proper playback
may not be possible. If dew forms on the disc,
wipe it with a soft cloth. If dew forms on the
optical parts of the player, do not use the
player for about one hour and the condensation will disappear naturally to allow normal
operation.
2. Driving on bumpy roads which cause severe
vibration may cause the sound skip.
2. HANDLING COMPACT DISCS
This unit has been designed specifically for playback of compact discs bearing the mark.
No other discs can be played.
To remove the compact disc from its storage
case, press down on the centre of the case and
lift the disc out, holding it carefully by the edges.
Always handle the compact disc by the edges.
Never touch the surface.
To remove fingermarks and dust, use a soft cloth,
and wipe in a straight line from the centre of the
compact disc to the circumference.
o
New discs may have some roughness around the
edges. The unit may not work or the sound may
skip if such discs are used. Use a ball-point pen,
etc. to remove roughness from the edge of the disc.
Ball-point pen
Roughness
Note:
•
Do not use commercially available CD protection sheets or discs equipped with stabiliz ers, etc. These may
get caught in the internal mechanism and damage the disc.
Be sure to unfold and read the next page. / Veuillez déplier et vous référer à la page suivante.
Bitte ausbreiten und die nächste Seite lesen. / Assicurarsi di aprire e leggere la pagina successiva.
Volgende pagina uitvouwen en doorlezen a.u.b. / Cerciórese de desplegar y de leer la página siguiente.
Note on Compact Discs
Never stick labels on the surface of the compact
disc or mark the surface with a pencil or pen.
No
Do not use any solvents such as commercially
available cleaners, anti-static spray, or thinner to
clean compact discs.
No
Do not use compact discs that have large scratches,
are misshapen, or cracked, etc. Use of such discs
will cause misoperation or damage.
No
Do not expose compact discs to direct sunlight
or any heat source.
No
Glöm inte att vika ut och läsa nästa sida.
DRX9375R/DRX9375RW 4DRX9375R/DRX9375RW 3
Page 2
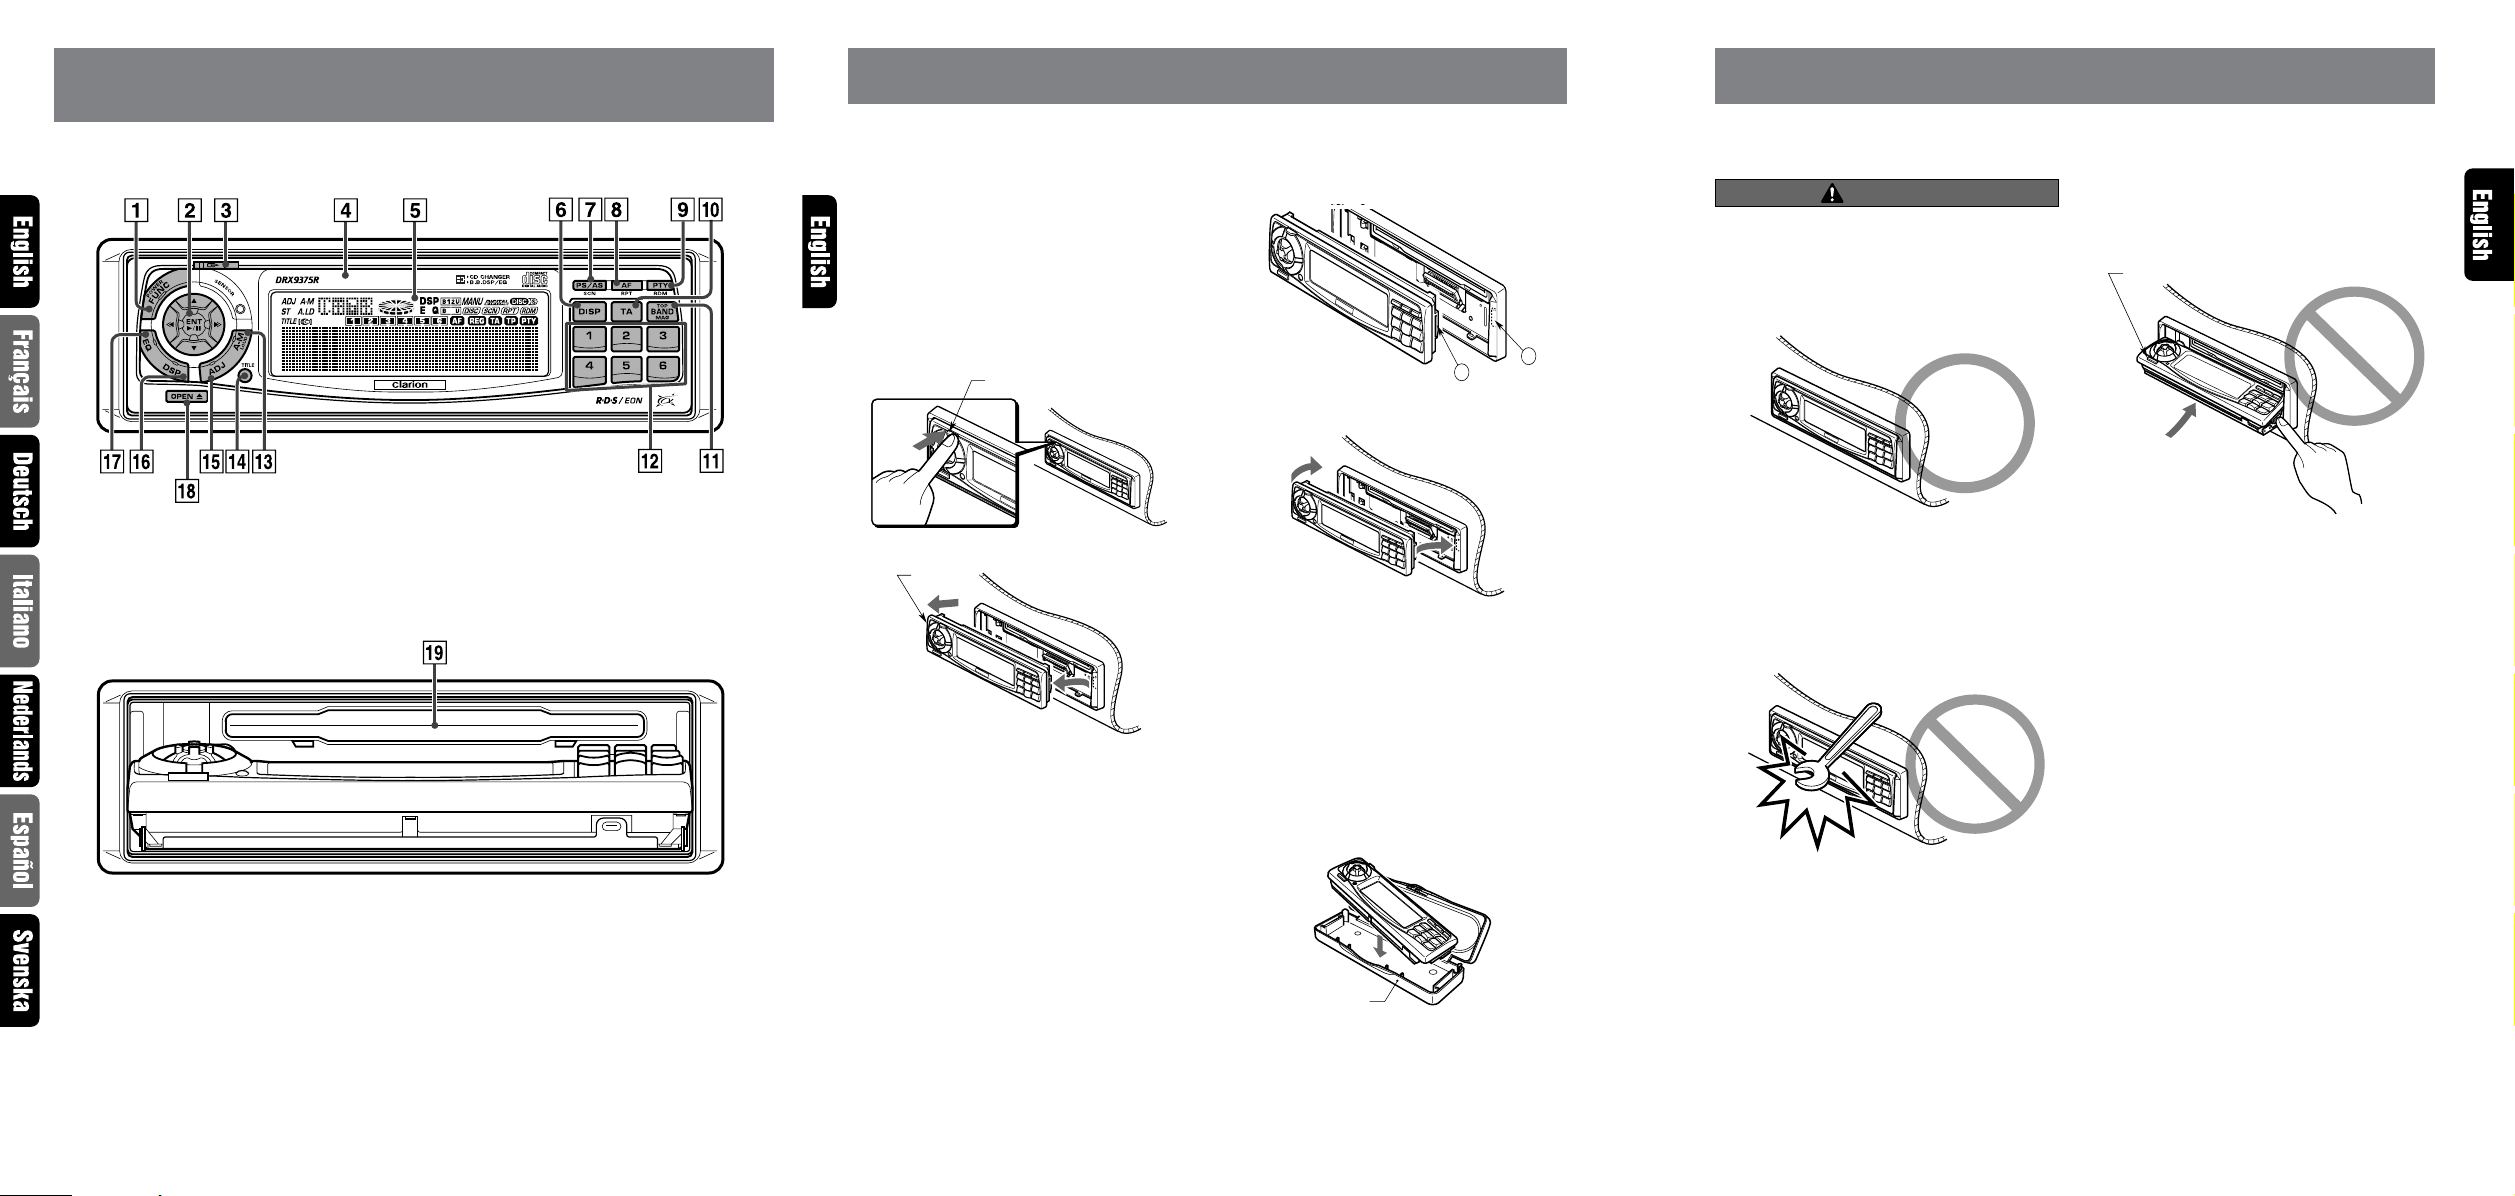
CONTROLS / LES COMMANDES / REGLER / CONTROLLI
Rel
3.
REGELAARS / CONTROLES / KONTROLLER
Main unit / Appareil principal / Hauptgerät / Apparecchio principale
Hoofdtoestel / Unidad principal / Huvudenhet
4. DCP
The control panel can be detached to prevent
theft. When detaching the control panel, store it
in the DCP (DETACHABLE CONTROL PANEL)
case to prevent scratches.
We recommend taking the DCP with you when
leaving the car.
Removing the DCP
1. Tu rn off the power with the SLOPING CONSOLE closed.
2. Deeply push in the Release button and open
the DCP.
ease button
Attaching the DCP
1. Insert so that the A part on the right side of
the DCP engages into the tab B on the main
unit.
A
2. Press the left side of the DCP gently to snap
it into place.
B
5. SLOPING CONSOLE
The DRX9375R and the DRX9375RW use a sloping console structure that makes possible large-size
displays.
CAUTION
When opening and closing the SLOPING
CONSOLE, be careful not to catch your fingers. They could be injured.
Always use the DRX9375R and the DRX9375RW
1.
with the SLOPING CONSOLE closed.
Good
5. The SLOPING CONSOLE has been designed
to close automatically. When it does, be careful not to get your fingers and any foreign
matter caught in the SLOPING CONSOLE.
OPEN button
No
CLOSE
With the SLOPING CONSOLE opened / Ouvrez le PANNEAU RABATTABLE
ÖFFNUNG DER KLAPPSCHALTTAFEL / Apertura del PANNELLO APRIBILE
Met het NEERKLAPBARE PANEEL geopend / Apertura del PANEL ABATIBLE
DEN NEDFÄLLBARA PANELEN öppen
Note: Be sure to unfold this page and refer to the front diagrams as you read each chapter.
Remarque: Veuillez déplier cette page et vous référer aux schémas quand vous lisez chaque chapitre.
Hinweis: Bitte diese Seite ausfalten und beim Lesen der einzelnen Kapitel die Frontdiagramme beachten.
Nota:
Assicurarsi di aprire questa pagina e fare riferimento a questi diagrammi quando si legge ciascun capitolo.
Opmerking:
Nota: Cuando lea los capítulos, despliegue esta página y consulte los diagramas.
Observera:
Vouw deze pagina uit en zie tevens de afbeeldingen van het v oorpaneel tijdens het doorlezen van de volgende hoofdstukken.
Vik ut denna sida för att kunna se figurerna över bilstereons framsida medan du läser de olika kapitlen.
5 DRX9375R/DRX9375RW
3. Pull the DCP toward you and remove it.
DCP
• Be sure to close the SLOPING CONSOLE
before removing the DCP.
• Removing the DCP with the SLOPING CONSOLE open will cause it to close too quickly.
6 DRX9375R/DRX9375RW
• The DCP can easily be damaged by shocks.
After removing it, be careful not to drop it
or subject it to strong shocks.
• If the release button is pressd and the DCP
is disengaged from the lock, it may drop due
to vibration of the car.
After you have removed the DCP, attach it
to the main unit or store it in the DCP case
to prevent it from being damaged.
(See figure below.)
DCP case
• The connector connecting the main unit and
the DCP is an extremely important part. Be
careful not to damage it by pressing on it
with fingernails, screwdrivers, etc.
Note:
•
If the DCP is dirty, wipe off the dirt with a soft, dry
cloth only.
2. Do not force operations or use this device abnormally when opening or closing the SLOPING CONSOLE.
3. When closing the SLOPING CONSOLE, do
not press the OPEN button.
4. Strong impacts to the operating or display section can cause damage or deformation.
No
When your fingers, or any foreign matter, obstruct the closing of the SLOPING CONSOLE,
the safety mechanism stops the closing. To
open the SLOPING CONSOLE again, remove
the obstruction and press the OPEN button.
DRX9375R/DRX9375RW 7
Page 3

-Selector Operation
(ALPHA-TOUCH CONTROLLER)
* The ALPHA-TOUCH CONTROLLER is called “
The α-selector enables you to operate main functions of each mode with a single finger.
Read through the operating procedures of the α-
selector first and then read the operating explanations for each mode.
1. Put your index finger on the α-selector.
2. To select the up/down direction (w, z) or
the left/right direction (a, d), move the α-
selector to the corresponding direction.
This α-selector’s operation is mainly used when
operating the below:
• Adjusting the volume
• Selection of radio stations
• Tune selection of a CD or CD changer
• Item selection of each setting
Select up
αα
α-selector” in this owner’s manual.
αα
3. To select the centre ( ), push in the α-selector to the centre.
This α-selector’s operation is mainly used when
operating the below:
• Mute operation in radio mode
• Play/pause operation of a CD or CD changer
• Decision operation of each setting item
Push in
Note:
•
If you try to rotate the α-selector forcibly or apply
more than needed strength to it, this results in
damage or breakdown.
Select left
Select right
Select down
DRX9375R/DRX9375RW 9
Page 4
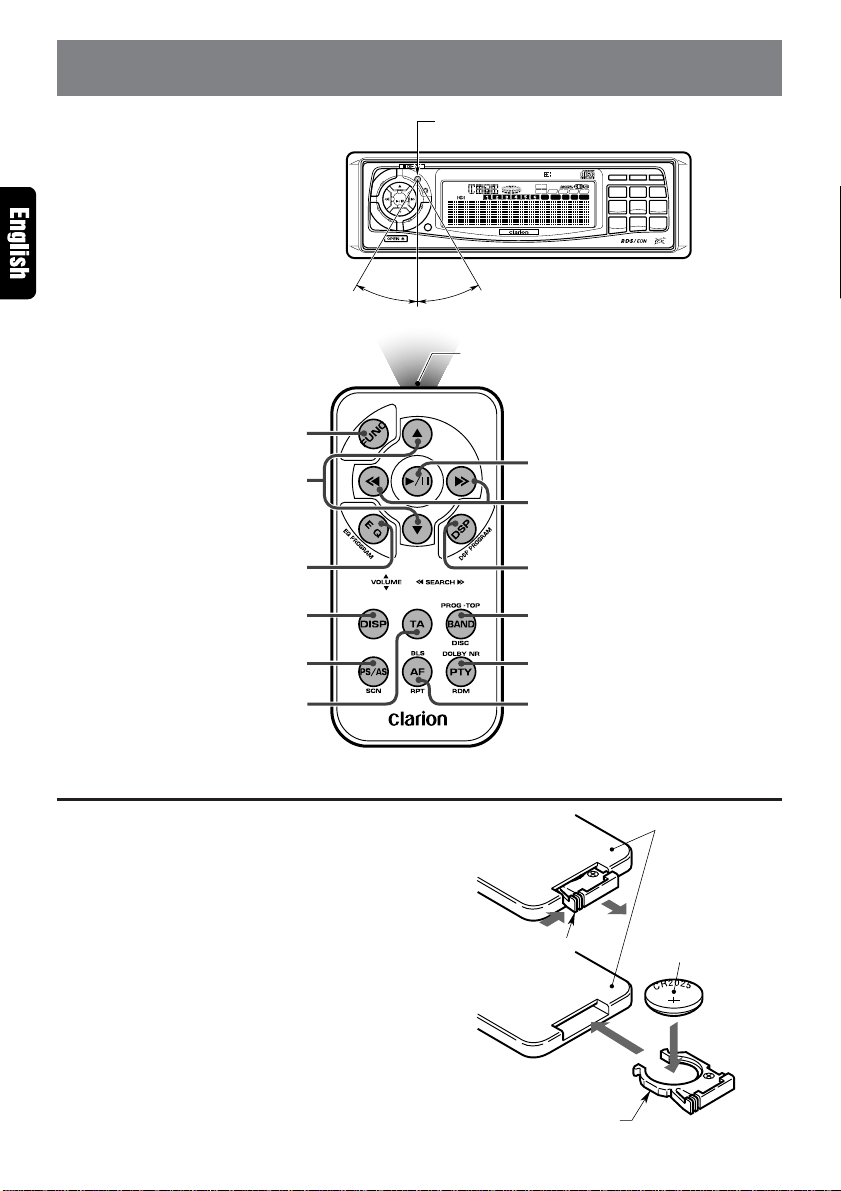
7. REMOTE CONTROL
Receiver for remote control unit
Remote control unit
)
™
¶
∞
•
⁄
S
DRX9375R
E
R
N
E
S
C
O
W
R
N
O
P
U
F
E
Q
D
S
ADJ A-M
A.LD
ST
TITLE
ENT
D
M
U
-
O
L
A
TITLE
J
D
P
A
Operating range:
CD CHANGER
B.B.DSP/EQ
B12U
DSP
MANU
BU
DISC
SCN
RPT
EQ
AF TA TPREG PTY
30˚ in all directions
RDM
PS/AS AF PTY
SCN RPT RDM
DISP
TA
123
456
TOP
BAND
MAG
Signal transmitter
¢
£
§
¡
ª
º
Inserting the Battery
1. Tu rn the remote control unit upside down,
push the lock in the direction of the arrow, and
pull out the battery holder.
2. Insert the enclosed battery (CR2025) with the
“+” side facing up.
3. Push the battery holder back in securely until
a click is heard.
Notes:
Using batteries improperly can cause them to explode. Take note of the following points:
•
When replacing the battery, be sure to set the ne w
battery with the “+” side facing up.
•
Do not short-circuit, disassemble or heat batteries.
•
Do not dispose of batteries in flames.
•
Dispose of spent batteries in the proper place.
10 DRX9375R/DRX9375RW
Rear side
Lock
Battery holder
Remote control unit
1.
3.
Enclosed battery
(CR2025)
2.
Page 5
Functions of Remote Control Unit Buttons
Button
Mode
) FUNC
¡ BAND
TOP
DISC
™ VOLUME (zw)
£
SEARCH
(ad)
¢ ( )
∞ DISP
§ DSP PROGRAM
¶ EQ PROGRAM
• PS/AS
SCAN
ª PTY
RDM
º AF
RPT
⁄ TA
Radio (RDS) CD CD changer
Switches between radio, CD and CD changer.
Switches reception band. Plays the first track. Moves the next disc in
Increases and decreases volume (in all modes).
Moves preset channels up
and down.
Tu r ns mute on and off.
Switches between main display, sub display, character display and clock (CT) display.
Moves the DSP programme up (in all modes).
Moves the equalizer programme up (in all modes).
Preset scan.
When pressed and held for
2 seconds: Auto store.
PTY standby mode on and
off.
AF function on and off.
When pressed and held for
2 seconds: REG function
on and off.
TA on/off (in all modes).
Moves tracks up and down.
When pressed and held for
1 second: Fast-forward/fastbackward.
Switches between playback
and pause.
Scan play.
Random play.
Repeat play.
increasing order.
Moves tracks up and down.
When pressed and held for
1 second: Fast-forward/fastbackward.
Switches between playback
and pause.
Scan play.
When pressed and held for
2 seconds: Disc scan play.
Random play.
When pressed and held for
2 seconds: Disc random
play.
Repeat play.
When pressed and held for
2 seconds: Disc repeat
play.
* Some of the corresponding buttons on the main unit and remote control unit have different functions.
DRX9375R/DRX9375RW 11
Page 6
8. OPERATION
Basic Operations
Note: Be sure to read this chapter referring to the front diagrams of
chapter “3. CONTROLS” on page 5 (unfold).
CAUTION
Be sure to set the volume to the minimum
level before turning off the power to the unit.
Loud sounds when turning on the power may
impair your hearings or cause damage to the
unit.
Turning on the power
Note:
•
Be sure to start the engine before using the unit to
prevent the battery from running down.
1. Press POWER button 1.
2. The illumination and display on the unit light
up. The unit starts in the function mode it was
in when the power was turned off last.
3. Press and hold POWER button 1 for 1 second or longer to turn off the power.
Selecting a mode
1. Press FUNC button 1 to select a function
mode.
2. The function mode changes in the following
order:
Radio ➜ CD ➜ CD changer ➜ Radio …
* If the CD changer is not connected, the CD
changer mode cannot be selected.
Adjusting the volume
Select up or down to increase or decrease using
α-selector 2.
3
* Selecting up or down and holding for 1 second or
longer on the α-selector 2 continuously increases
or decreases the volume respectively.
* The volume level (step 0 to 33) appears in the dis-
play.
Adjusting audio mode (use -selector)
Press A-M button # to select an item to be adjusted.
Each time you press the button, the item changes
in the following order:
Bass/Treble ➜ Balance/Fader ➜ Mode display …
* The display returns to the previous mode 7 sec-
onds after the adjustment.
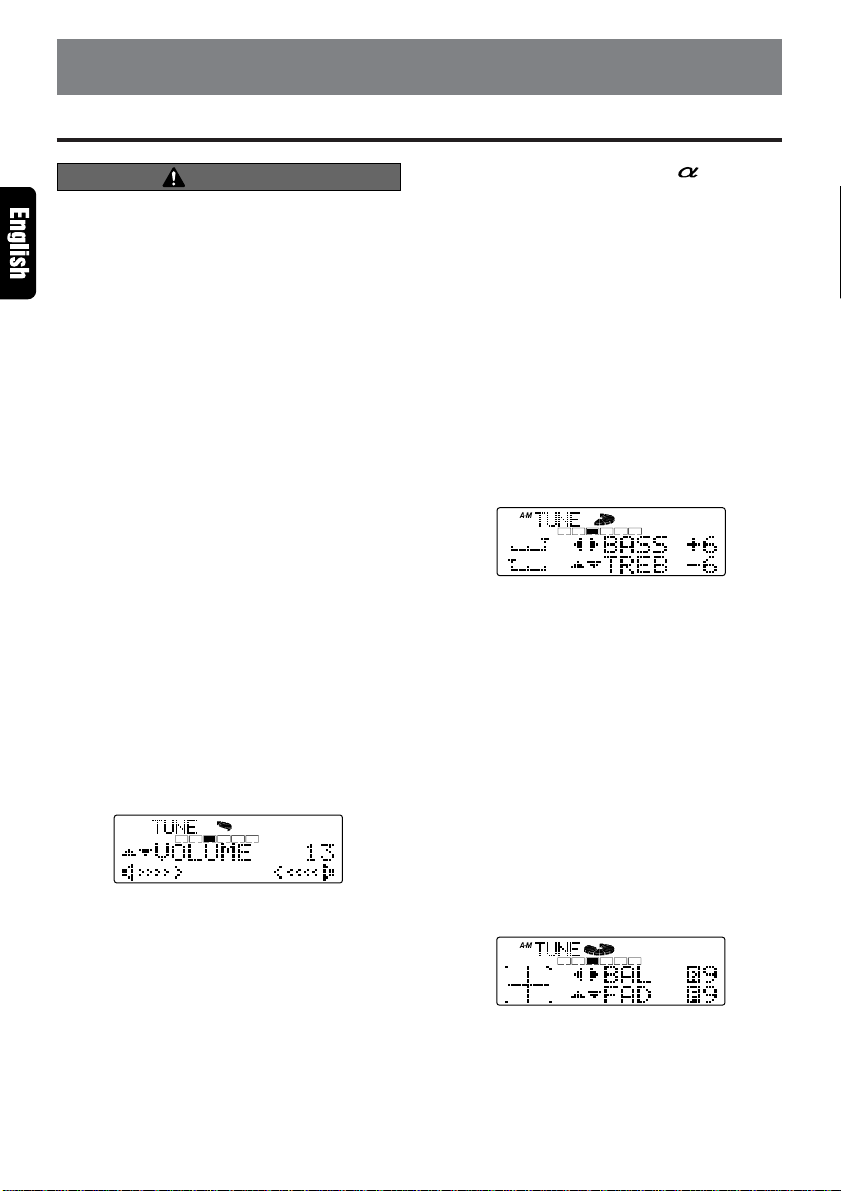
Adjusting the tone
Select “BASS/TREB” (bass/treble) in the display.
● BASS adjustment (step –6 to +6)
Select right or left to increase or decrease.
● TREBLE adjustment (step –6 to +6)
Select up or down to increase or decrease.
3
Note:
•
When the expand DSP (Digital Sound Processor)
or EQ (Equalizer), sold separately, is connected
to the unit, the tone adjustment mode cannot be
selected. To adjust the tone, see the section
“DSP and Equalizer Operations”.
Adjusting the balance (step L9 to R9)
1. Select “BAL/FAD” (balance/fader) adjustment
in the display.
2. Select right or left to balance the right or left
sound level.
Adjusting the fader (step F9 to R9)
1. Select “BAL/FAD” (balance/fader) adjustment.
2. Select up or down to balance the sound toward the front or rear of the vehicle.
3
12 DRX9375R/DRX9375RW
Page 7
Basic Operations
Loudness
The loudness effect emphasizes the bass and
treble to create a natural sound tone.
When you are listening to music at a low volume,
it is recommended to use the loudness effect.
● Turning on and off the Loudness Effect
Pressing and holding LOUD button # for 2 seconds or longer turns the loudness effect on and
off. When the loudness effect is turned on, “LD”
appears in the display.
When the DPH9100/DPH9300 are connected,
the Auto Loudness effect (high grade type) becomes available instead of the loudness effect
(ordinary type).
For further detail of the Auto Loudness, see the
subsection “Turning the auto loudness func-
tion on and off”.
Switching display
Press DISP button 6 to select the display.
Each time you press the button, the display
switches in the following order:
Main ➜ Sub ➜ Character ➜ Clock (CT) ➜ Main …
3
When you have entered a CD’s title, it appears
in the display. If not, “–––––” appears in the
display instead. For entering a title, see the subsection “Entering titles”.
When no CT data is received, “CT––:––”
appears in the display.
Switching the character display
Press and hold DISP button 6 for 1 second or
longer in the character display mode.
* There are 10 characters available.
Changing the display characters
While you press and hold DSP button ¥, press
DISP button 6 . The display characters are
switched over.
3
* Among display characters, you can only change
alphabetical letters and figures.
3
3
3
* If the display is changed by other button operation
when the clock (CT) is displayed, the clock display returns automatically after the operation.
* The example shows the display in radio mode.
DRX9375R/DRX9375RW 13
Page 8
Radio Operations
Å@
Radio mode
Function mode indication
Stereo indication (FM)
Listening to the radio
1. Press FUNC button 1 to select radio mode.
The frequency or PS appears in the display.
* PS: Programme Service Name
3
2. Press BAND button ! to select a band. The
band changes in the following order:
FM1 ➜ FM2 ➜ FM3 ➜ AM (MW/LW) ➜ FM1 …
3. Select left or right to tune in to a desired sta-
tion using α-selector 2.
Mute
Push in α-selector 2 to mute the sound.
“MUTE” appears in the display.
Push in α-selector 2 again to return to the pre-
vious sound level.
Preset channel indication
Reception sensitivity indication (FM)
3
Manual tuning indication
TP indication
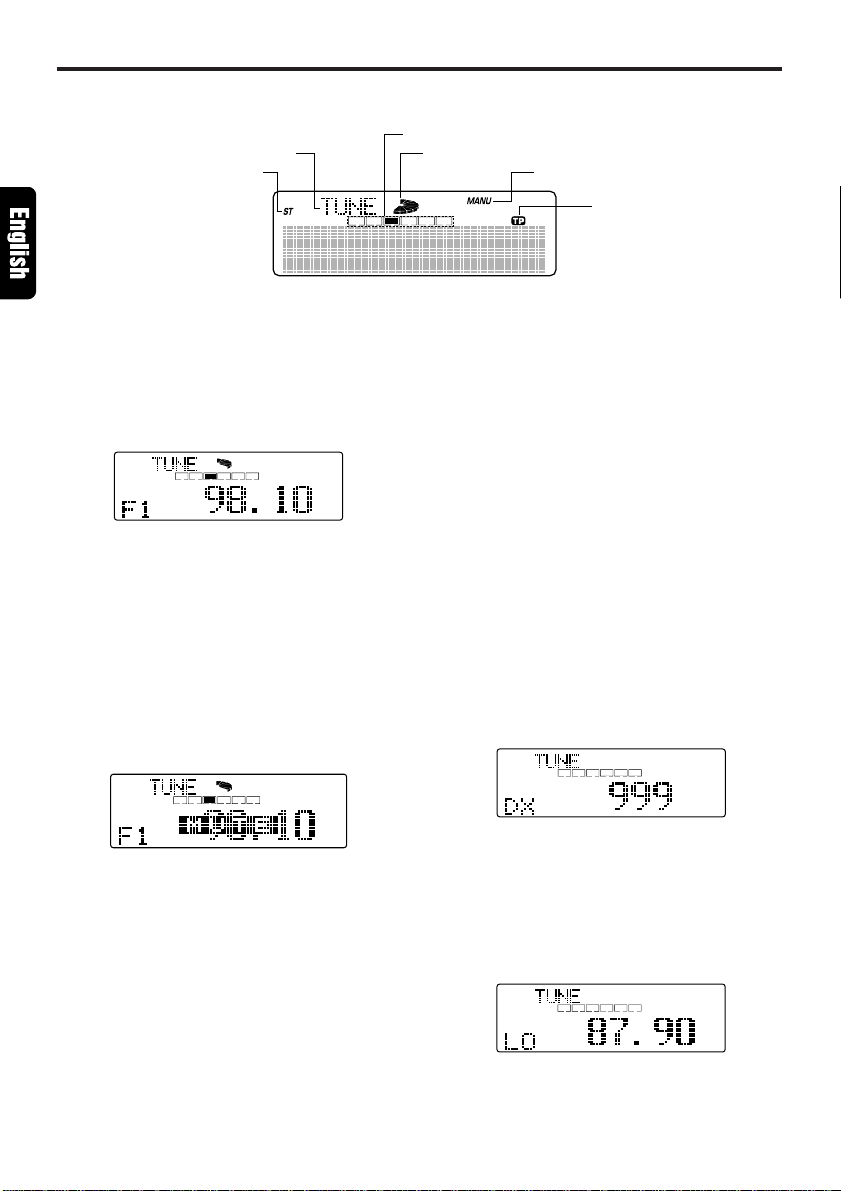
Seek tuning
Tw o seek tuning modes are available: DX SEEK
for all stations, and LOCAL SEEK for stations
with strong signal.
1. Press BAND button ! to select a band.
2. When “MANU” is not lit in the display, seek
tuning is available.
If “MANU” is lit in the display, press and hold
BAND button ! for 2 seconds or longer to
turn it off.
3. DX SEEK
Select left or right to tune in to automatically
a station using α-selector 2.
While selecting left or right, the station is
sought in the direction of higher or lower frequency channel.
When a station is being sought for, “DX” ap-
pears in the display.
3
Tuning
Three tuning modes are available: seek tuning,
manual tuning, and preset tuning.
14 DRX9375R/DRX9375RW
4. LOCAL SEEK
Press left or right and hold α-selector 2 for 1
second or longer to activate LOCAL SEEK
tuning. When a station with good reception is
found, it is automatically tuned in.
When a station is being sought for, “LO” ap-
pears in the display.
Page 9

Å@
Manual tuning
There are two ways available: quick tuning and
step tuning.
While you are in step tuning mode, the channel
is sought for step by step; while you are in quick
tuning mode, the channel is rapidly sought for.
1. Press BAND button ! to select a band.
2. When “MANU” is lit in the display, manual tun-
ing is available.
If “MANU” is not lit in the display, press and
hold BAND button ! for 2 seconds or longer
to light it up.
3. Tune in to a station.
● Quick tuning:
Press left or right and hold α-selector 2 for 1
second or longer.
● Step tuning:
Press left or right.
* “MANU” disappears from the display 7 seconds
after manual tuning, and seek tuning becomes
available.
Recalling a preset station
Preset tuning is a function for storing stations to
Preset buttons (1 to 6) which enables you to select a station by pressing the corresponding preset button.
1. Press BAND button ! to select a band.
2. Press one of Preset buttons @ to select a
stored station.
Note:
•
Press and hold Preset button @ for 2 seconds or
longer to store the station currently being received
(preset memory).
Manual memory
Up to 24 stations (6 each for the FM1, FM2, FM3
and AM (MW/LW) stations) can be preset in the
Preset buttons.
1. Press BAND button ! to select a band.
2. Select left or right to tune in to a desired sta-
tion using α-selector 2.
3. Press and hold one of Preset buttons @ for 2
seconds or longer to store the station currently
being received.
Radio Operations
Auto store
Auto store is a function for storing up to 6 stations that are automatically tuned in sequentially.
Notes:
•
The only FM band that can store stations is FM3.
If you try to store stations in FM1 or FM2, the stations will automatically be stored in FM3.
•
When the auto store is performed, the station previously stored in the memory at that position is
overwritten.
•
If there are fewer than 6 stations with good reception, the stations previously stored at the remaining Preset buttons are not overwritten.
•
A station already stored in one of Preset buttons
cannot be stored in another Preset buttons.
1. Press BAND button ! to select a band (FM3
or AM) of the desired station.
2. Press and hold AS button 7 for 2 seconds or
longer. The stations with good reception are
stored automatically to Preset buttons @.
Preset scan
This function scans through each preset station
for 7 seconds sequentially.
This is useful when you want to search for a desired station.
Note:
•
Take note that if you press and hold PS button
for 2 seconds or longer, the auto store function
goes into effect and the unit starts storing stations.
1. Press PS button 7.
2. When a station that you want to listen to is
tuned in, press PS button 7 again or the corresponding Preset button @ to stop preset
scan.
* A station that cannot be tuned in to is skipped
and the next preset station is tuned in.
7
DRX9375R/DRX9375RW 15
Page 10

RDS Operations
RDS mode
Function mode indication
Stereo indication (FM)
RDS (Radio Data System)
This unit incorporates an RDS system decoder
for use with stations broadcasting RDS data.
This system enables the radio to display the name
of the station being received (PS), and also to
automatically switch to a better frequency when
one is available while you are traveling great distances (AF switching).
It can also interrupt a CD or tape with traffic information or the programme type broadcast by
an RDS station.
Additionally, if EON information is received, this
information enables automatic switching of other
preset stations on the same network and interruption of the station being received with traffic
information from other stations (TP). This function may not work in some regions.
To use the RDS function, be sure to set the radio
to FM mode.
•AF: Alternative Frequencies
•PS: Programme Service Name
•PTY: Programme Type
•EON: Enhanced Other Network
•TP:Traffic Programme
* If an RDS station can no longer be received clearly
(at the current location), “AF” flashes in the display. When reception is restored, “AF” stops flashing.
3
AF function
The AF function enables the unit to maintain optimum reception by switching to different frequencies on the same network.
* The factory setting is “on”.
Preset channel indication
Reception sensitivity indication (FM)
3
Manual tuning indication
TP indication
PTY indication
TA indication
REG indication
AF indication
● Turning AF function off
When “AF” is lit or flashing in the display, press AF
button 8. “AF” in the display goes off and AF turns off.
● Turning AF function on
When “AF” is not lit in the display, press AF button
8 again. “AF” lights in the display and AF turns on.
If the receiving condition of a station being tuned
is getting worse, “AF” starts flashing and the unit
tries to switch to an alternative frequency. If
switching cannot be performed, the display
switches to “SEARCH” and the unit searches for
the same programme.
REG (Regional Programme) function
When REG function is on, regional station reception is optimized.
If this function is off, the unit switches in to the
regional station in the next local area when you
enter the next area while receiving the regional
station in the previous local area.
* The factory setting is “off”.
Notes:
•
This function is ineffective when a national station
such as BBC 2 FM is being received.
•
The on/off setting of REG is effective when AF is on.
● Turning REG function on
When “REG” is not lit in the display, pressing and
holding AF button 8 for 2 seconds or longer.
“REG” lights in the display.
● Turning REG function off
Pressing and holding AF button 8 for 2 seconds
or longer again. “REG” in the display goes off.
16 DRX9375R/DRX9375RW
Page 11

RDS Operations
Manual tuning of related regional
stations
1. This function works when AF is on and REG
is off.
Note:
•
This function is effective when related regional stations are received.
2. Press one of the Preset buttons @ to recall a
regional station.
3. If the receiving condition of a recalled station
is bad, press the same Preset button @. The
unit switches to a related regional station.
TA (Traffic Announcement)
When the unit is in the TA standby mode, you
can listen to traffic announcements preferentially
when they start, irrespective of the function mode.
You can also tune in to TP (traffic programme)
stations automatically.
● To set the TA standby mode
If you press TA button 0 when only “TP” is lit in
the display, “TP” and “TA” light in the display and
the unit is set to the TA standby mode until traffic
announcements start.
When traffic announcements start, “TRA INFO”
appears in the display, and then PS (Programme
Service Name) appears.
Auto store function for TP stations
● Auto storing while “TA” is lit:
Only TP stations are auto stored.
* Refer to PS/AS function in radio mode.
PTY
This function enables you to listen to selected
programme type, irrespective of the function mode.
PTY broadcasts are not yet available in all countries.
In TA standby mode, TP stations have priority over
PTY broadcasting stations.
* Emergency messages interrupt all modes of op-
eration. They can only be received from RDS stations. “ALARM” appears in the display and message can be heard.
Press AF button 8 to cancel the ALARM broadcasts.
Selecting PTY
1. When you press PTY button 9, “PTY” lights
and PTY appears in the display. The unit enters PTY select mode.
3
If you press TA button 0 while traffic announcements are being broadcast, they are cancelled
and the unit enters TA standby mode.
● Cancelling the TA standby mode
If you press TA button 0 when “TP” and “TA ” are
lit in the display, “TA” in the display goes off and
the TA standby mode is cancelled.
● Setting the auto tuning mode for TP stations
If you press TA button 0 when only “TP” is lit or
“TP” and “TA ” are not lit in the display, “TA ” lights
and the unit automatically tunes in to TP stations.
Note:
•
The unit continues to tune in automatically if no
TP station is received. Press TA button 0 again
to stop auto tuning.
If the control is idle for 7 seconds after the PTY
select mode has been entered, the display automatically returns to radio mode display and
the unit enters the PTY standby mode.
2. Select a PTY.
Press one of Preset buttons @ to select the
desired PTY or select up or down to obtain a
desired PTY using α-selector 2.
3
DRX9375R/DRX9375RW 17
Page 12

RDS Operations
* The following stored already into the preset but-
tons for your convenience.
Preset No.
1
2
3
4
5
6
ENGLISH (English)
NEWS
INFO
POP M
SPORT
CLASSICS
M, O, R, M
PTY
(News)
(Information)
(Popular music)
(Sports)
(Classic Music)
(Middle of the Road Music)
3. Press PTY button 9 again to enter standby
mode for the selected PTY.
When a selected PTY broadcast starts, the
selected PTY appears in the display.
If you press PTY button 9 during PTY broad-
casts, PTY broadcasts are temporarily cancelled and the unit enters PTY standby mode.
● Cancelling PTY standby mode
Press and hold PTY button 9 for 2 seconds or
longer to turn off “PTY” in the display.
Preset memory of PTYs
1. Press PTY button 9 to enter PTY select mode.
If the control is idle for 7 seconds after the PTY
select mode has been entered, the display automatically returns to radio mode display and
the unit enters the PTY standby mode.
2. Select up or down to get obtain a desired PTY
using α-selector 2.
The following 15 PTYs are selectable.
PTY Display
ENGLISH (English)
NEWS
AFFAIRS
INFO
SPORT
EDUCATE
DRAMA
CULTURE
SCIENCE
VARIED
POP M
ROCK M
M, O, R, M
LIGHT M
CLASSICS
OTHER M
(News)
(Affairs)
(Information)
(Sports)
(Education)
(Drama)
(Culture)
(Science)
(Variety)
(Popular music)
(Rock music)
(Middle of the Road Music)
(Light music)
(Classic music)
(Other music)
18 DRX9375R/DRX9375RW
3. Press and hold one of the Preset buttons 1 to
6 for 2 seconds or longer to put it into memory.
After PTYs are stored in memory, “PTY
MEMO” appears in the display.
3
Seek tuning of PTYs
1. Press PTY button 9 to enter PTY select mode.
2. Select a PTY.
3. Select left or right using α-selector 2, when
a receivable and desired PTY is found. It is
automatically tuned in. If you select left or right,
the PTY is sought in the direction of a higher
or lower frequency channel.
If no stations broadcasting selected a PTY,
seek tuning stops at the previous station and
the unit stays in PTY standby mode.
Page 13

RDS Operations
Switching PTY display language
The PTY characters shown in the display can be
selected from 4 languages (English, German,
Swedish, French).
* The factory setting is “ENGLISH”.
1. Press ADJ button %.
2. Select left or right until “PTY LANG” is dis-
played using α-selector 2.
3
3. Select up or down to select the desired lan-
guage using α-selector 2.
3
4. Press ADJ button % to return to radio mode.
Volume setting of TA, emergency
(ALARM) and PTY
You can set the volume of TA, ALARM and PTY
to a desired level.
* The factory setting is “TA VOL 9”.
1. Press and hold TA button 0 for 2 seconds or
longer to enter TA VOL ADJ mode.
If the control is idle for 7 seconds after the TA
VOL ADJ mode has been entered, the display returns to radio mode display automatically.
2. Select up or down to set the volume level us-
ing α-selector 2.
3
* The volume remains unchanged if the volume
before the TA, ALARM and PTY broadcasts are
received is higher than the previously set volume.
If it is lower, the volume changes to the level
set in TA VOL ADJ mode.
3. Press TA button 0 to complete volume setting.
M/S (Music/Speech) function
While receiving speech programme with speech
data and this function is on, this enables you to
set the bass/treble to a constant level so that you
can listen to the speech programme clearly.
When speech is finished, the sound returns to
the original bass/treble adjustment.
* The factory setting is off.
1. Press ADJ button %.
2. Select left or right until “M/S ACT” is displayed
using α-selector 2.
3
3. Select up or down to turn “on” or “off” using
α-selector 2.
3
4. Press ADJ button % again to return to radio
mode display.
Note:
•
When you receive speech data with the M/S function set to “on” while a DSP/EQ such as DPH9300,
DPH7300 and EQH5100 etc. is connected to this
unit, the unit invalidates the DSP/EQ adjustments.
* When receipt of speech data has finished, the
sound quality returns to the original bass/treble
adjustment level or the sound level set on the DSP/
Equalizer.
CT (Clock Time) function
The CT function enables you to display clock time
only when CT data is received.
Press DISP button 6 to switch the display to the
CT indication.
* When CT data is not received, “CT––:––” is dis-
played.
Note:
•
There are some countries and stations where clock
time data are not transmitted. In some areas, the
CT may not be displayed correctly.
DRX9375R/DRX9375RW 19
Page 14

CD Operations
CD mode
Function mode indication Disc in indication
Title indication
Loading a CD
1. Press OPEN button * to open the SLOPING
CONSOLE.
Note:
•
When opening and closing SLOPING CONSOLE,
be careful not to let your hand or fingers get caught
in the panel.
2. Insert a CD into the center of the CD insertion slot with the labeled side facing up.
“LOADING” appears in the display, the CD
enters into the slot, and the play starts.
For CD (12cm) For single CD (8cm)
OPEN/Eject
button
CD insertion
slot
3. The SLOPING CONSOLE closes automatically when a CD is inserted.
4. Each time you press DISP button 6, the display changes in the following order:
Main ➜ Sub ➜ Character ➜ Clock (CT) ➜
Main...
OPEN/Eject
button
CD insertion
slot
Circle indication
Single disc indication
Random indication
Repeat indication
Scan indication
Notes:
•
Note that SLOPING CONSOLE closes immediately after a CD is inserted into the CD insertion
slot.
•
Do not put your hand, fingers, or foreign objects
into the CD insertion slot.
•
If a CD has already been loaded, another CD can-
not be inserted. Do not insert another one forcefully.
•
The SLOPING CONSOLE closes if no CD is loaded
for 30 seconds.
•
Discs not bearing the mark cannot be played
with the unit. CD-ROMs cannot be played.
•
Single CDs (8 cm) shall be loaded without adapter
into the right side of the slot. “ ” lights in
the display.
Listening to a CD already loaded
Press FUNC button 1 and select CD mode. Play
starts automatically.
If no CD is loaded, “NO DISC” appears in the
display.
* “NO DISC” appears in the display for 4 seconds
and the mode changes to the next function mode
automatically.
Pausing play
1. Push in α-selector 2 to pause play. “PAUSE”
appears in the display.
20 DRX9375R/DRX9375RW
2. To resume play, push in α-selector 2 again.
Page 15

CD Operations
Ejecting a CD
1. Press Eject button *. The SLOPING CONSOLE opens and the CD is ejected. “EJECT”
appears in the display.
* The radio mode is set automatically 4 seconds
after Eject button * is pressed.
Notes:
•
If a CD is left in the ejected position for 15 seconds, “LOADING” appears in the display, the CD
is automatically reloaded, and the SLOPING CONSOLE closes. (Auto reload)
•
Single CDs (8 cm) are not reloaded. Be sure to
remove them when ejected.
2. Take out the CD and press OPEN button * to
close SLOPING CONSOLE.
Notes:
•
The SLOPING CONSOLE closes 30 seconds after CD is taken out.
•
When opening and closing the SLOPING CONSOLE, be careful not to let your hand or fingers
get caught in the panel.
When you eject a CD, you must take out the
ejected CD or push it forward with your finger
immediately to be sit in. Otherwise, the CD may
be damaged.
Selecting a track
● Next track:
Select right α-selector 2.
● Current track:
Select left α-selector 2.
● Previous track:
Select left α-selector 2, do the same again.
* Each time you select left or right using α-selector
2, the track is skipped accordingly.
Top function
The top function allows the first track of the current CD to be played.
Press TOP button ! to play the first track (track
No. 1) of CD.
Scan play
The scan play allows the first 10 seconds of all
the tracks on the CD to be played.
* The scan play is useful when you want to select a
desired track.
1. Press SCN button 7. “SCN” lights in the dis-
play.
2. To cancel the scan play, press SCN button 7
again. “SCN” goes off from the display and
the normal play resumes.
Repeat play
The repeat play allows the selected track to be
played repeatedly.
1. Press RPT button 8. “RPT” lights in the dis-
play.
2. To cancel the repeat play, press RPT button
8 again. “RPT” goes off from the display and
the normal play resumes.
Random play
The random play allows all the tracks on the current CD to be played randomly.
1. Press RDM button 9. “RDM” lights in the dis-
play.
2. To cancel the random play, press RDM but-
ton 9 again. “RDM” goes off from the display
and the normal play resumes.
Fast-forward/fast-backward (FF/FB)
● Fast-forward:
Press right and hold for 1 second or longer using
α-selector 2.
● Fast-backward:
Press left and hold for 1 second or longer using
α-selector 2.
* Press left or right and hold α-selector 2 for 3 sec-
onds or longer to increase the speed.
DRX9375R/DRX9375RW 21
Page 16

CD Changer Operations
CD changer mode
Magazine lock indication Disc indication
Title indication
Disc number indication
Circle indicationFunction mode indication
Random indication
Repeat indication
Scan indication
Listening to a CD in the CD changer
When a separately sold CD changer is connected
to the DRX9375R/DRX9375RW, you can listen
to CD.
1. Press FUNC button 1 and select CD changer
mode to start play.
* The CD Nos. of magazine where CDs are
loaded light in the display.
2. Each time you press DISP button 6, the display changes in the following order:
Main ➜ Sub ➜ Character ➜ Clock (CT) ➜
Main …
3. When a magazine is not set in the CD
changer, “NO MAGAZINE” appears in the dis-
play.
* If a magazine is set while “NO MAGAZINE” is
being displayed, “LOADING” appears in the
display for a moment, “PA USE” appears in the
display, and the operation pauses for a moment.
4. When a CD is not set in the magazine,
“NO DISC” appears in the display.
* Insert a CD into the magazine and set the
magazine in the CD changer.
Pausing play
1. Push in α-selector 2 to pause play. “PAUSE”
appears in the display.
2. To resume play, push in α-selector 2 again.
Selecting a CD
Press Direct button @ to select a CD. The CD
No. of magazine is the same as that of the Direct
button.
* Only the Direct buttons corresponding to the CD
Nos. of the magazine where CDs are loaded can
be selected.
Selecting a track
● Next track:
Select right α-selector 2.
● Current track:
Select left α-selector 2.
● Previous track:
Select left α-selector 2, do the same again.
* Each time you select left or right using α-selector
2, the track is skipped accordingly.
CAUTION
CD-ROMs cannot be played with CD changer.
Note:
•
When a CD changer is connected, be sure to turn
off the main unit and turn it again.
22 DRX9375R/DRX9375RW
Page 17

CD Changer Operations
Fast-forward/fast-backward (FF/FB)
● Fast-forward:
Press right and hold α-selector 2 for 1 second
or longer.
● Fast-backward:
Press left and hold α-selector 2 for 1 second or
longer.
* Press left or right and hold α-selector 2 for 3 sec-
onds or longer to increase the speed of fast-forwarding or fast-backwarding.
Selecting a magazine
● Next magazine:
Press MAG button !.
The selected magazine No. appears in the dis-
play.
Magazine lock
The magazine lock allows only the CDs in the
locked magazine to be played.
1. Press and hold MAG button ! for 2 seconds
or longer. “ ” lights in the display.
2. To cancel the magazine lock, press and hold
MAG button ! again for 2 seconds or longer.
“ ” goes off from the display.
* Even when the magazine is locked, pressing
MAG button ! switches magazine. The new
one is locked.
Note:
•
These functions (“Selecting a magazine” and
“Magazine lock”) are available only when a 12 or
18 disc CD changer is connected.
Scan play
The scan play allows the first 10 seconds of all
the tracks on the CD to be played.
* The scan play is useful when you want to select a
desired track.
1. Press SCN button 7. “SCN” lights in the dis-
play.
2. To cancel the scan play, press SCN button 7
again. “SCN” goes off from the display and
the normal play resumes.
Disc scan play
The disc scan play allows the first 10 seconds of
the first tracks on all the CDs in the CD changer
to be played.
* The disc scan play is useful when you want to se-
lect a desirable CD.
1. Press and hold SCN button 7 for 2 seconds
or longer. “DISC” and “SCN” light in the display.
2. To cancel the disc scan play, press SCN but-
ton 7 again. “DISC” and “SCN” go off from
the display and the normal play resumes.
Repeat play
The repeat play allows the selected track to be
played repeatedly.
1. Press RPT button 8. “RPT” lights in the dis-
play.
2. To cancel the repeat play, press RPT button
8 again. “RPT” goes off from the display and
the normal play resumes.
Disc repeat play
The disc repeat play allows the current CD to be
played repeatedly.
1. Press and hold RPT button 8 for 2 seconds
or longer. “DISC” and “RPT” light in the display.
2. To cancel the disc repeat play, press RPT but-
ton 8 again. “DISC” and “RPT” go off from
the display and the normal play resumes.
Random play
The random play allows all the tracks on the current CD to be played randomly.
1. Press RDM button 9. “RDM” lights in the dis-
play.
2. To cancel the random play, press RDM but-
ton 9 again. “RDM” goes off from the display
and the normal play resumes.
Disc random play
The disc random play allows all the tracks on all
the CDs in the CD changer to be played randomly.
1. Press and hold RDM button 9 for 2 seconds
or longer. “DISC” and “RDM” light in the display.
2. To cancel the disc random play, press RDM
button 9 again. “DISC” and “RDM” go off from
the display and the normal play resumes.
DRX9375R/DRX9375RW 23
Page 18

Other Handy Functions
Anti-theft indicator
The red Anti-Theft Indicator is a mean of preventing theft. This indicator can be flashed when
DCP is removed from the unit.
* The factory setting is “off”.
1. Press ADJ button %.
2. Select left or right to until “BLINK-LED” is displayed using α-selector 2.
3. Select up or down to select “on” or “off” using
α-selector 2.
4. Press ADJ button % to return to the previous
display.
Dimmer function
This function dims the display illumination when
the car’s instrument panel illumination is turned
on or when inside the car gets dark at night.
* The dimmer level of the display illumination can
be set by “Setting the dimmer level”.
Each time you press No.1 of the Direct buttons @
while pressing and holding DISP button 6, the dimmer toggles between “auto”, “off” and “on”.
* The factory setting is “auto”.
● auto:
The dimmer is turned on according to the brightness inside the car.
● on:
The dimmer is turned on when the car’s instrument panel illumination is turned on.
● off:
The dimmer is turned off and the display is illuminated at the usual level.
* When the dimmer level is set to “on”, connect the
illumination lead of the unit and that of the car.
Setting the dimmer level
The dimmer level of the display illumination can
be set.
* The dimmer level can be set from 1 to 5 and the
factory setting is 3.
1. Press ADJ button %.
2. Select left or right to select until “DIMM LEVEL”
is displayed using α-selector 2.
3. Select up or down to set a level from 1 to 5
using α-selector 2.
4. Press ADJ button % to return to the previous
mode display.
Contrast setting
The contrast of the display can be set.
* The contrast level can be set from 1 to 11 and the
factory setting is 6.
1. Press ADJ button %.
2. Select left or right to select until “CONTRAST”
is displayed using α-selector 2.
3. Select up or down to set a level from 1 to 11
using α-selector 2.
4. Press ADJ button % to return to the previous
mode display.
24 DRX9375R/DRX9375RW
Page 19

Other Handy Functions
Cellular input
When the unit is connected to a cellular telephone
via cable sold separately, the voice from the telephone can be heard from the speaker of unit.
Each time you press No.5 of the Direct buttons
@ while holding down BAND button !, the cellular input toggles between “TEL SP R”, “TEL
SP L”, “TEL MUTE”, and “TEL off”.
* The factory setting is “TEL off”.
● TEL SP-R:
Even if the power is turned on or off to the main
unit, sound is heard from the front right speaker.
● TEL SP-L:
Even if the power is turned on or off to the main
unit, sound is heard from the front left speaker.
● TEL MUTE:
The sound of the unit is muted when the telephone is used.
● TEL off:
The sound of the unit is not muted when the telephone is used.
Note:
•
This function is available only when the phone mute
lead of the unit is connected to the specified lead
of the cellular telephone.
Entering titles
Titles can be given to CDs.
* Up to 100 titles can be entered.
1. Play the CD to which you want to give a title
and press TITLE button $.
to store the title. The previous mode display
returns after the title is stored.
Clearing titles
1. Select the corresponding function mode for
the title you want to clear and press and hold
TITLE button $ for 2 seconds or longer. (In
CD or CD changer)
2. Select up or down to select a title to be cleared
using α-selector 2.
3. Push in α-selector 2 for 2 seconds or longer
to clear the title. The next title appears. If you
want to clear the next title too, repeat steps 2
and 3.
* When all the stored titles are cleared,
“NO TITLE” appears in the display.
4. After clearing the title, press TITLE button $
to return to the previous mode display.
2. Select left or right to move the cursor using
α-selector 2.
* Up to 11 characters can be entered.
3. Press DISP button 6 to select a character
list used to enter characters. Each time you
press this button, the character list changes
as follows:
Capital letters ➜ Numbers ➜ Umlauts and
accented letters ➜ Small letters ➜ Symbols
➜ Capital letters...
4. Select up or down to select the characters us-
ing α-selector 2.
5. Repeat steps 2, 3 and 4 to enter a title.
* When more than the specified number of titles are
entered, “TITLE FULL” appears in the display.
6. Push in α-selector 2 for 2 seconds or longer
DRX9375R/DRX9375RW 25
Page 20

DSP and Equalizer Operations
DSP and equalizer mode
Auto loudness indication
Loudness indication
Title indication
321
When a separately sold expanded graphic digital sound processor (DSP) or expanded graphic
equalizer (EQ) is connected, the functions described below can be controlled from the
DRX9375R/DRX9375RW.
* If you buy the DPH9300 or DPH9100, or DPH7300
or DPH7100, the function and operation method
are the same. In this section, DPH9300 and
DPH7300 will be used to explain the operation.
Fine-adjustment of the listening
position
(when the DPH9300 or DPH7300 is connected)
The time required from when the sound leaves
the speaker until it reaches you can be fine-adjusted to create a natural sound field, no matter
what seat you are sitting in.
Numerous preset sound fields
(when the DPH9300 or DPH7300 is connected)
The most common sound fields are already
stored in the memory. In addition, 6 other sound
field settings adjusted by the user can also be
stored in the memory (only when the DPH9300
is connected).
Six preset equalizer settings
(when the DPH9300, DPH7300 or EQH5100
is connected)
Six equalizer settings are preset, offering a choice
of the settings for various types of music. In addition, 6 other settings adjusted by the user can
also be stored in the memory.
Giving titles
(only when the DPH9300 is connected)
Titles can be given to the user-adjusted sound
fields and equalizer settings and displayed when
they are selected.
DSP mode indication
BU12
BU
654
Equalizer mode indication
Digital in indication
DSP Functions
Turning the DSP effect on and off
Press and hold DSP button ¥ for 2 seconds or
longer to turn the DSP effect on and off.
* When the DSP effect is on, “DSP B1”, “DSP B2”
(only when the DPH9300 is connected) or “DSP U”
lights in the display.
Fine-adjusting the listening position
1. Press A-M button # to set the listening posi-
tion adjustment display.
2. Push in α-selector 2 to select the position to
be adjusted. The position switches as follows
each time α-selector 2 is pressed:
“FULL SEAT” ➜ “ FRONT-R” ➜ “FRONT-L” ➜
“FRONT” ➜ “REAR” ➜ “PASS” ➜ “FULL
SEAT” …
3. Select up or down to adjust the fader using
α-selector 2.
4. Select left or right to adjust the balance using
α-selector 2.
Selecting the DSP sound field
1. Press FUNC button 1 to select the desired
mode.
2. Press DSP button ¥ so that “DSP” flashes in
the display.
3. Press BAND button ! and select the group
including the desired sound field. The group
changes as follows each time BAND button
! is pressed:
“DSP B1” (BASIC-1) ➜ “DSP B2” (BASIC-2)
➜ “DSP U” (USER) ➜ “DSP B1” (BASIC-1) …
* When the DPH7300 is connected, only “DSP
BASIC” can be selected.
4. Use Direct buttons @ to select the desired
sound field.
26 DRX9375R/DRX9375RW
Page 21

DSP and Equalizer Operations
● Sound fields
<DSP BASIC 1 (when the DPH9300 or DPH7300
is connected)>
B1-1. HALL: Sound of a large concert hall ( )
B1-2. CHURCH: Sound of a church with a very
high ceiling ( )
B1-3. STADIUM: Sound of a large stadium with
no ceiling or walls ( )
B1-4. LIVEHOUSE: Sound of a live performance
hall, somewhat larger than a jazz club ( )
B1-5. DISCO: Sound of a disco with strong bass
( )
B1-6. JAZZCLUB: Sound of a jazz club with a
low ceiling ( )
<DSP BASIC 2 (only when the DPH9300 is connected)>
B2-1. DOME: Sound of an indoor sports arena
( )
B2-2. CHAMBER: Sound of a large hall in a pal-
ace ( )
B2-3. PARK: Sound of a spacious outdoor area
( )
B2-4. THEATRE: Sound of a movie or drama
theatre ( )
B2-5. STUDIO: Sound of a listening room in a
home ( )
B2-6. BGM: Sound with the vocals cut (★)
* ( )-Reverberation type sound fields
( )-Early reflection type sound fields
( ★ )-“BGM” (background music) type sound field
Editing DSP sound field settings
1. Select the preset sound field to sense as a
base.
2. Press DSP button ¥. “DSP” flashes in the display.
3. Press ADJ button %.
4. Select up or down using α-selector 2 to select “DSP EDlT”, then push in α-selector 2.
5. Select left or right using α-selector 2 to se-
lect the parameter to be adjusted.
6. Select up or down to adjust the setting using
α-selector 2.
7. To store a setting in the memory, press and
hold one of Direct buttons @ for 2 seconds or
longer. (only when the DPH9300 is connected)
8. Press ADJ button %.
● Parameters which can be adjusted in the
“DSP EDIT” mode
• EFFECT: Percentage of reflected sound (0%
to 100%)
• INITIAL DLY: Sense of distance between sound
source and walls (1 ms to 100 ms)
• REVERBTIME: Length of reverberations (0.3 s
to 10.0 s)
• ROOM-SIZE: Sense of expansion (0.1 to 4.0)
• HIGH: Sense of high frequencies in reverbera-
tions (0.1 to 1.0)
• LIVENESS: Sense of dynamism (0 to10)
* For details on the parameters, refer to the DSP
unit’s operating instructions.
* When the DPH7300 is connected, only the
“EFFECT” parameter can be edited.
* For some sound fields, not all the parameters can
be adjusted.
• For reverberation type sound fields ( ):
The “ROOM-SIZE” and “LIVENESS” pa-
rameters cannot be adjusted.
• For early reflection type sound fields ( ):
The “REVERBTIME” and “HIGH” param-
eters cannot be adjusted.
• For the BGM type sound field (★):
Only the “EFFECT” parameter can be adjusted.
Giving titles to DSP and equalizer
settings
1. Press DSP ¥ or EQ & button so that “DSP”
or “EQ” flashes in the display.
2. Press BAND button ! to select “DSP USER”
or “EQ USER”.
3. Use Direct buttons @ to select the number of
the user setting (U-1 to U-6) to which you want
to give a title.
4. Press TITLE button $.
5. Select left or right to select the cursor posi-
tion, then select up or down to select and input the characters using α-selector 2.
* You can change the input characters type by
* Up to 11 characters can be set.
6. Push in α-selector 2 for 2 seconds or longer
to store the title in the memory.
(only when the DPH9300 is connected)
pressing DISP button 6.
DRX9375R/DRX9375RW 27
Page 22

DSP and Equalizer Operations
Turning the auto loudness function
on and off
(only when the DPH9300 is connected)
Press and hold LOUD button # for 2 seconds or
longer. “A. LD” lights in the display, and the auto
loudness function is turned on. Press and hold
LOUD button # again for 2 seconds or longer to
turn the auto loudness function off.
● Adjusting the auto loudness function
The amount of compression can be adjusted (between 0 to 10) without changing the loudness.
1. Press DSP button ¥ so that “DSP” flashes in
the display.
2. Press ADJ button %.
3. Select up or down using α-selector 2 to se-
lect “A. LD ADJ”, then push in α-selector 2.
4. Select up or down to adjust the setting using
α-selector 2.
5. Press ADJ button %.
Equalizer Functions
Turning the equalizer effect on and
off
Press and hold EQ button & for 2 seconds or
longer to turn the equalizer effect on and off.
When the equalizer effect is on, “EQ B” or “EQ U”
lights in the display.
Selecting the equalizer setting
1. Press FUNC button 1 to select the desired
mode.
2. Press EQ button & so that “EQ” flashes in
the display.
3. Press BAND button ! and select the group
including the desired sound. The group
changes as follows each time BAND button
! is pressed:
“EQ B” (BASIC) ➜ “EQ U” (USER) ➜ “EQ B”
(BASIC) …
4. Use Direct buttons @ to select the desired
equalizer setting.
<Equalizer settings>
B-1. BASS BOOST: Low frequencies empha-
sized
B-2. HIGH BOOST: Medium and high frequen-
cies emphasized
B-3. ACOUSTICAL: Medium frequencies (vo-
cals) emphasized
B-4. IMPACT: Low and high frequencies empha-
sized
B-5. SMOOTH: Soft, relaxed sound
B-6. FLAT: The original sound
28 DRX9375R/DRX9375RW
Editing the equalizer settings
1. Select the preset equalizer setting to serve
as a base.
2. Press EQ button & so that “EQ” flashes in
the display.
3. Press ADJ button %.
4. Select up or down to select the desired ad-
justment using α-selector 2, then push in α-
selector 2.
5. When “EQ EDIT”, “EQ MIN FREQ”, “SUB
WOOFER” or “P. EQ ” has been selected, select left or right using α-selector 2 to select
the parameter to be adjusted.
6. Select up or down to adjust the setting using
α-selector 2.
Page 23

DSP and Equalizer Operations
7. To store a setting in the memory, press and
hold one of Direct buttons @ for 2 seconds
or longer.
8. Press ADJ button %.
* For details on the parameters, refer to the
equalizer manual.
● Equalizer adjustments
<EQ EDIT>
Use this to adjust the levels of the various fre-
quencies.
<EQ MIN FREQ (when the DPH9300 or
DPH7300 is connected)>
This function allows you to switch the minimum
adjustment frequency between 30 Hz and 50 Hz.
<Parameters which can be adjusted in the
“SUB WOOFER” mode>
1. STEREO/MONO: Switch this according to the
number of speakers being used. (OFF, MONO
or STEREO)
2. WOOFER VOL: Sets the woofer’s volume. (0
to 14)
3. LPF: Sets the low-pass filter’s frequency.
(50 Hz, 80 Hz or 120 Hz)
4. LPF SLOPE: Sets the low-pass filter’s slope.
(12 dB/oct, 18 dB/oct or 24 dB/oct)
5. HPF: Sets the high-pass filter’s frequency.
(Through - 50 Hz, 80 Hz or 120 Hz)
6. HPF SLOPE: Sets the high-pass filter’s slope.
(12 dB/oct, 18 dB/oct or 24 dB/oct)
7. TEST TONE: Used for testing the speaker wir-
ing.
* When the “STEREO/MONO” setting is turned
OFF, parameters 2, 3 and 4 and parameter 7
“WOOFER-L” and “WOOFER-R” cannot be adjusted.
* Parameters 4 and 6 can only be adjusted when
the DPH9300 is connected.
* Parameter 7 cannot be adjusted when the
EQH5100 is connected.
<Parameters which can be adjusted in the “P. EQ”
mode (only when the DPH9300 is connected)>
• P. EQ F/R: Switches between the front and rear.
(off, REAR or FRONT)
• F PRESET: Selects one of 6 types of param-
eters according to car type. (TYPE 1 to
TYPE 6)
• R PRESET: Selects one of 7 types of param-
eters according to car type. (TYPE 1 to
TYPE 7)
• BAND: Selects the band to be adjusted. (1 to
4: 1 and 2 are for low frequencies, 3 and 4
for medium and high frequencies)
• FREQUENCY: Selects the centre frequency for
the adjustment. (1 and 2: 20 Hz to 500 Hz,
3 and 4: 630 Hz to 20 kHz)
• GAIN: Adjusts the level. (–12 dB to +12 dB)
• Q: Adjusts the sharpness of the frequency
curve. (1, 3, 5, 7 and 20)
* Parameters 2 to 7 cannot be adjusted when the
“P. EQ F/R” parameter is turned off.
<PINK NOISE>
Pink noise (adjustment sounds) can be emitted
in the order shown below by pressing and holding DISP button 6 for 2 seconds or longer while
in the parametric equalizer adjustment mode.
Front ➜ Rear ➜ All ➜ off ➜ Front ...
<SURROUND (only when the EQH5100 is connected)>
The surround effect can be turned on and off.
* For details on the adjustment items see the DSP
or equalizer manual.
Note:
•
When the DSP979E or 900SEQ is connected, the
corresponding mode must be set.
<Setting the DSP mode>
1. Set the DSP unit’s volume to the minimum
and the main unit’s volume to the maximum.
2. Press Direct button @ number “2” while hold-
ing in DISP button 6. “DSP connect” appears
in the display, and the DSP mode is set.
3. To cancel the DSP mode, once again press
Direct button @ number “2” while holding in
DISP button 6. “DSP no conn” appears in
the display, and the DSP mode is cancelled.
<Setting the equalizer mode>
1. Press Direct button @ number “3” while hold-
ing in DISP button 6. “EQ connect” appears
in the display, and the equalizer mode is set.
2. To cancel the equalizer mode, once again
press Direct button @ number “3” while holding in DISP button 6. “EQ no conn” appears
in the display, and the equalizer mode is cancelled.
* For operations, refer to the DSP or equalizer
manual.
DRX9375R/DRX9375RW 29
Page 24

9. IN CASE OF DIFFICULTY
Problem Cause Solution
Power does not turn on.
(No sound is produced.)
Compact disc cannot be
loaded.
Sound skips or is noisy.
Sound is bad directly after
power is turned on.
A compact disc is not
loaded.
Nothing happens when
buttons are pressed.
Display is not accurate.
Fuse is blown.
Incorrect wiring.
Another compact disc is
already loaded.
Compact disc is dirty.
Compact disc is heaviiy
scratched or warped.
Water droplets may form on
the internal lens when the car
is parked in a humid place.
A disc other than a compact
disc or foreign matter is
inserted.
Microprocessor has
malfunctioned due to noise,
etc.
Replace with a fuse of the same amperage. If
the fuse blows again, consult your store of
purchase.
Consult your store of purchase.
Eject the compact disc before loading the new
one.
Clean the compact disc with a soft cloth.
Replace with a compact disc with no scratches.
Let dry for about 1 hour with the power on.
Put the unit in the CD mode and press one of
the direct buttons (1 to 6). The foreign matter will
be ejected forcibly.
Tu rn off the power, then press the DCP release
button and remove the DCP.
Press the reset button for about 2 seconds with
a thin rod.
Reset button
DSP or equalizer does not
operate.
30 DRX9375R/DRX9375RW
DCP or main unit connectors
are dirty.
Microprocessor has
malfunctioned due to noise,
etc.
Wipe the dirt off with a soft cloth moistened with
cleaning alcohol.
Press Direct button 1 (for more than 2 seconds)
while holding in the DSP button, then turn the
power back on.
Page 25

10. ERROR DISPLAYS
If an error occurs, one of the following displays is displayed.
Ta ke the measures described below to eliminate the problem.
Error Display Cause Measure
CD ERROR2
CD ERROR3
CD ERROR6
CDAC ERROR2
CDAC ERROR3
CDAC ERROR6
EQ ERROR99
If an error display other than the ones described above appears, press the reset button. If the problem
persists, turn off the power and consult your store of purchase.
A CD is caught inside the CD deck and is
not ejected.
A CD cannot be played due to scratches,
etc.
A CD is loaded upside-down inside the
CD deck and does not play.
Disc inside the CD changer is not loaded.
A CD inside the CD changer cannot be
played due to scratches, etc.
A CD inside the CD changer cannot be
played because it is loaded upside-down.
Communication error between main unit
and expanded DSP/EQ.
This is a failure of CD deck’s mechanism
and consult your store of purchase.
Replace with a non-scratched, nonwarped-disc.
Eject the disc then reload it properly.
This is a failure of CD changer’s mechanism and consult your store of purchase.
Replace with a non-scratched, nonwarped-disc.
Eject the disc then reload it properly.
Connect the expanded DSP/EQ connecting cable securely.
DRX9375R/DRX9375RW 31
 Loading...