

Page 1
CNtDS
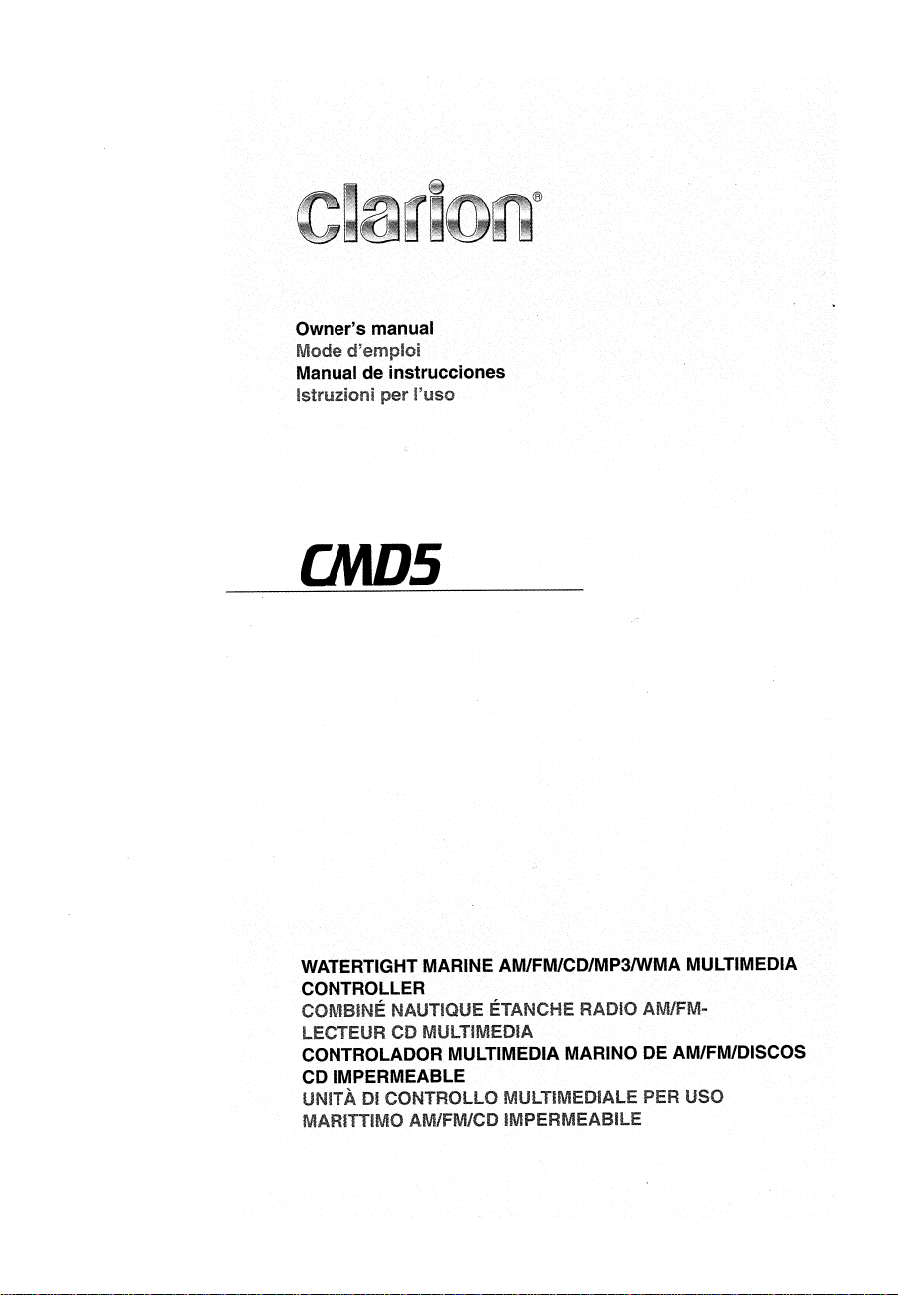
WATERTIGHTMARINEAM/FM/CD/MP3IWMAMULTIMEDIA
CONTROLLER
COMBINENAUT~QUEETANCHE
LECTEUR CD MULTIMEDIA
CONTROLADOR MULTIMEDIA
CD IMPERMEABLE
UNITA
MARITTiMO AM/FM/CD
D~
CONTROLlON1ULTIMEDIALE PER usa
~MPERMEABILE
RADIOAM/FM
MARINO DE AM/FM/DISCOS
...
Page 2
This appliance contains a laser system and
is classified as a "CLASS 1 LASER
PRODUCT".
To
use this model properly, read
this Owner's Manual carefully and keep this
manual for your future reference.
In
case of
any trouble with this player, please contact
your nearest "AUTHORIZED service station".
To
prevent direct exposure to the laser
beam, do not try to open the enclosure.
USE OF CONTROLS OR ADJUSTMENTS OR
PERFORMANCE OF PROCEDURES OTHER
THAN THOSE SPECIFIED
MANUAL MAY RESULT
IN
THE OWNER'S
IN
HAZARDOUS
RADIATION EXPOSURE.
Denne
mc:erking
er anbragt udvendigt pa
apparatet og indikerer, at apparatet arbejder
med laserstraler af klasse 1, hvilket betyder,
at der anvendes laserstraler af svageste
klasse, og at man ikke pa apparatets
yderside kan blive udsat for utilladelig
kraftig straling.
APPARATET
B0R
KUN ABNES AF FAGFOLK
MED StERLIGT KENDSKAB TIL APPARATER
MED LASERSTRALERI
Indvendigt i apparatet er anbragt den her
gengivne advarselsmc:ekning, som advarer
imod at foretage sadanne indgreb i
apparatet, at man kan komme til at
udsac:ette
sig for laserstraling.
lmmI
Apparaten innehaller laserkomponenten
som avger laserstralning overstigande
gransen for laserklass 1.
Suojakoteloa si saa avata. Laite sisaltaa
laserdiodin, joka lahettaa nakymatonta
silmille vaarallista lasersateilya.
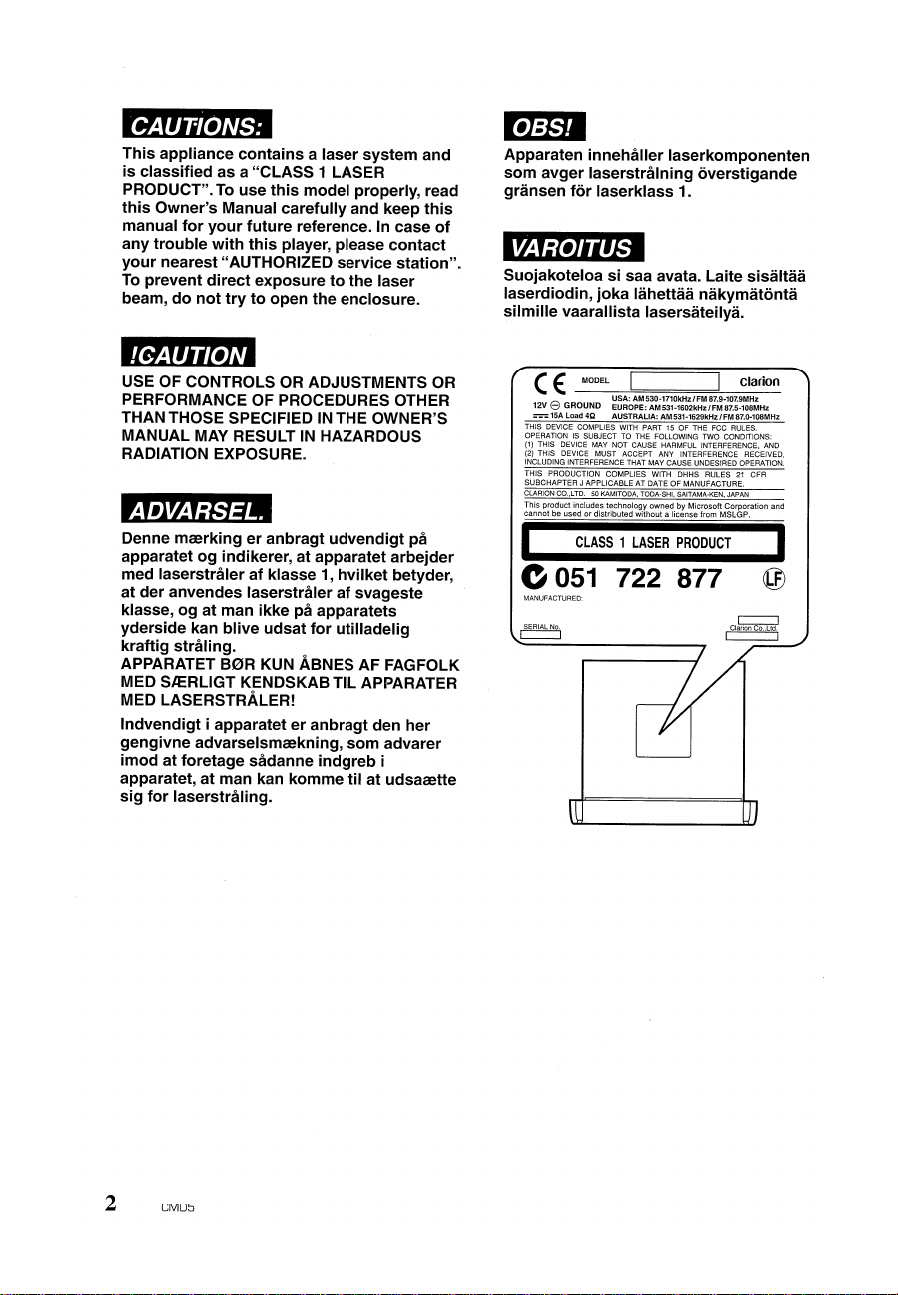
(E
MODEL
12V
8 GROUND
==
15A Load 4Q AUSTRALIA: AM 531-1629kHzlFM87.0-108MHz
THIS DEVICE COMPLIES WITH PART 15 OF THE FCC RULES.
OPERATIONISSUBJECT TO THE FOLLOWING TWO CONDITIONS:
(1)
THIS DEVICE MAY NOT CAUSE HARMFUL INTERFERENCE, AND
(2) THIS DEVICE MUST ACCEPT ANY INTERFERENCE RECEIVED,
INCLUDING INTERFERENCE THAT MAY CAUSE UNDESIRED OPERATION.
THIS
PRODUCTION
SUBCHAPTER
CLARION
This product includes technology owned by Microsoft Corporation and
cannot be used or distributed without a license from MSLGP.
I
0051
SERIAL
No.
c:==J
~~~~~~~:~~~~~~~~~~~~;~~~~~1~~~HZ
COMPLIES
J APPLICABLEATDATEOFMANUFACTURE.
CO.,LTD.50KAMITODA,
CLASS1LASER
WITH DHHS RULES21CFR
TODA-SHI,
SAITAMA-KEN,
PRODUCT
722
877
Clarion
JAPAN
c:==J
Clarion Co.,Ltd.
c===J
I
@
2
CMD5
Page 3
( \
I
I
~
~
~
I Congratulations on your purchase of a Clarion mobile electronic product.
CLARION
Dear Customer:
PRODUCTREGISTRATION INFORMATION I
For
USA
and
www.clarion.com
Canada
only I
We
are I
Iconfident that you'll enjoy your Clarion experience.
~ ~
~
There are many benefits to registering your product. We invite you to visit our website at
~
www.clarion.com to register your Clarion product.
~ ~
~
We have made product registration simple with our easy to use website. The registration
~
form is short and easy to complete. Once you're registered, we can keep you informed of
Iimportant product information. I
l Register at www.clarion.com - it's easy to keep your Clarion product up to date.
Contents
1.
FEATURES 3
2.
PRECAUTIONS 4
Handling Compact Discs 5
Front Panel 5
3.
CONTROLS 6
Names of the Buttons and their Functions 7
Major button operations when external equipment is connected to this unit. 8
Display Items 9
Display Screen : 9
Optional Wired Remote Control Unit Operations 10
Wireless Remote Control Unit Operations 12
4.
OPERATIONS 14
Basic Operations 14
Radio Operations 15
CD/MP3IWMA Operations 17
Common Operations
5.
ACCESSORIES
Sirius Satellite Operations 25
iPod Operations 28
CD Changer Operations 30
TV Operations
6.
TROUBLESHOOTING
7.
ERROR
8.
SPECIFICATIONS
DiSPLAyS
~
~
~
~
~
~
~
~
\\\\\~
21
25
32
33
35
36
~NET
•
iPod@
& Satellite Radio Ready + Aux Input
• Engineered Watertight
• Wireless Remote Control Included
&Corrosion Proof
CMD5
3
Page 4
When it is very cold, the disc and the optical
components may become fogged and not
operate properly. Wipe fogged discs with a
soft cloth. Fogged optical components will
is
naturally return to normal when the unit
left
for about one hour, after which it will operate
normally.
This equipment has been tested and found to
comply with the limits for a Class B digital device,
pursuant to Part 15 of the FCC Rules.
These limits are designed to provide reasonable
in
protection against harmful interference
a
residential installation.
This equipment generates, uses, and can radiate
radio frequency energy and, if not installed and
in
accordance with the instructions, may
used
cause harmful interference to radio
communications. However, there
that interference will not occur
is
no guarantee
in
a particular
installation.
If this equipment does cause harmful
interference to radio or television reception,
which can be determined by turning the
is
equipment off and on, the user
an
consult the dealer or
experienced radio/TV
encouraged to
technician for help.
2.
When the boat is underwayinrough water,
the CD may skip as a result of intense
vibrations and shock.
3.
This unit uses a precision mechanism. Even
in
the event that trouble arises, never open
the case, disassemble the unit, or lubricate
the rotating parts.
USE OF CONTROLS, ADJUSTMENTS, OR
PERFORMANCE OF PROCEDURES OTHER
THAN THOSE SPECIFIED HEREIN, MAY
RESULT
IN
HAZARDOUS RADIATION
EXPOSURE.
THE COMPACT DISC PLAYER and MINI DISC
PLAYER SHOULD NOT BE ADJUSTED OR
REPAIRED BY ANYONE EXCEPT PROPERLY
QUALIFIED SERVICE PERSONNEL.
CHANGES OR MODIFICATIONS NOT
EXPRESSLY APPROVED BY THE
MANUFACTURER FOR COMPLIANCE
COULD VOID THE
USER1S
AUTHORITY TO
OPERATE THE EQUIPMENT.
IINFORMATION FOR USERS:I
CHANGES OR MODIFICATIONS TO THIS
PRODUCT NOT APPROVED BY THE
MANUFACTURER WILL VOID THE
WARRANTY AND WILL VIOLATE FCC
APPROVAL.
(E
MODEL I I clarion
12V8GROUND
= 15A Load 4Q AUSTRALIA: AM 531-1629kHzIFM 87.0-108MHz
THIS DEVICE COMPLIES WITH PART15OF THE
OPERATIONISSUBJECT TO THE FOLLOWING TWO CONDITIONS:
(1)
THIS DEVICE MAY NOT CAUSE HARMFUL INTERFERENCE, AND
(2) THIS DEVICE MUST ACCEPT ANY INTERFERENCE RECEIVED,
INCLUDING INTERFERENCE THAT MAY CAUSE UNDESIRED OPERATION.
THIS PRODUCTION COMPLIES WITH DHHS RULES
SUBCHAPTER J APPLICABLE
CLARION
This product includes technology ownedbyMicrosoft Corporation and
cannot be used or distributed without a license from MSLGP.
USA: AM530-1710kHz/FM 87.9-107.9MHz
EUROPE: AM 531-1602kHz
CO.,LTD.50KAMITODA,
AT
DATE OF MANUFACTURE.
TODA·SHI,
SAITAMA-KEN,
IFM
FCC
87.5-108MHz
RULES.
21
CFR
JAPAN
8------0
J1
c=:=:J
SERIAL
No
c=:=:J
4
CM05
ClarionCo.,Ltd.
c:===::J
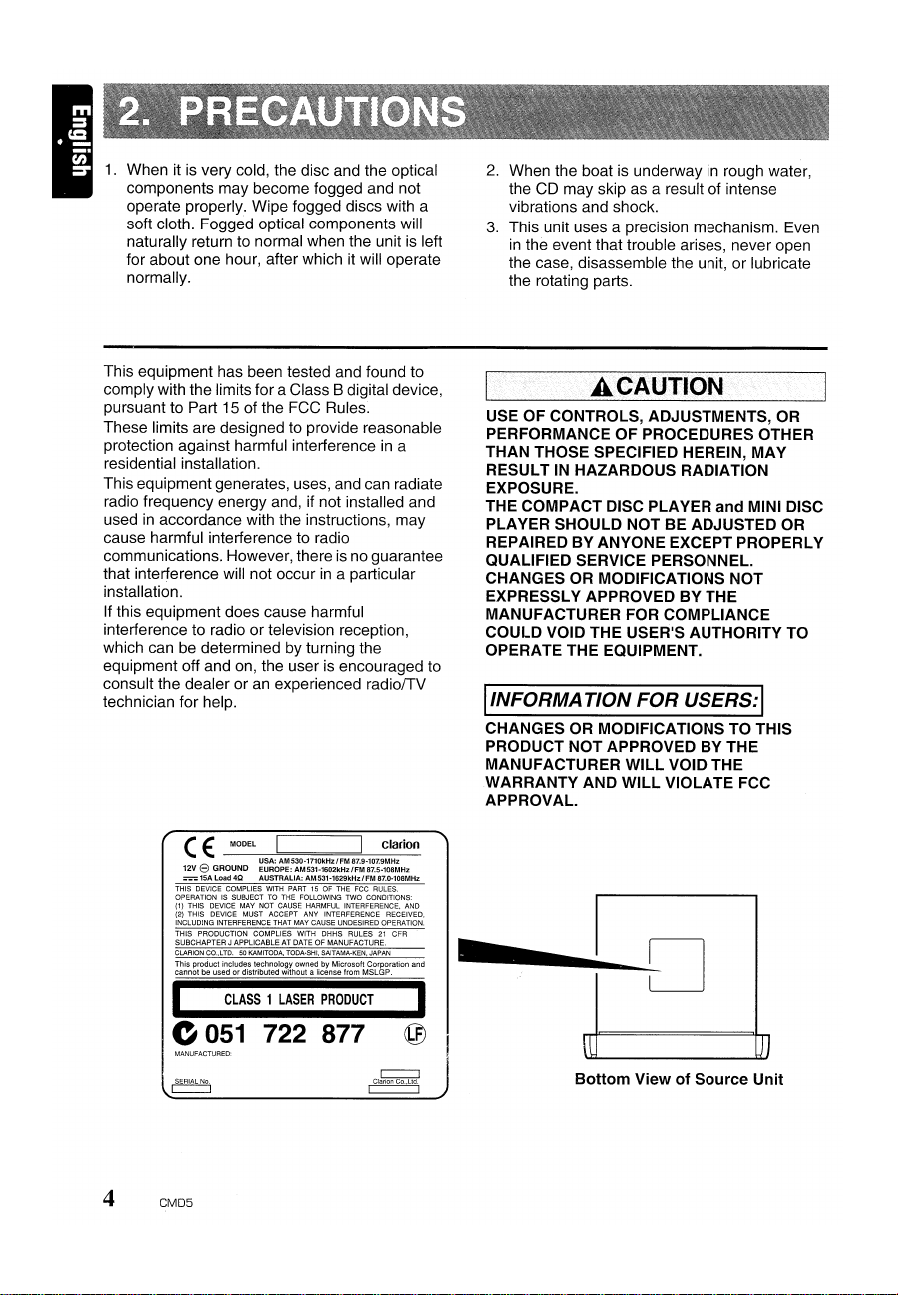
Bottom View of Source Unit
Page 5
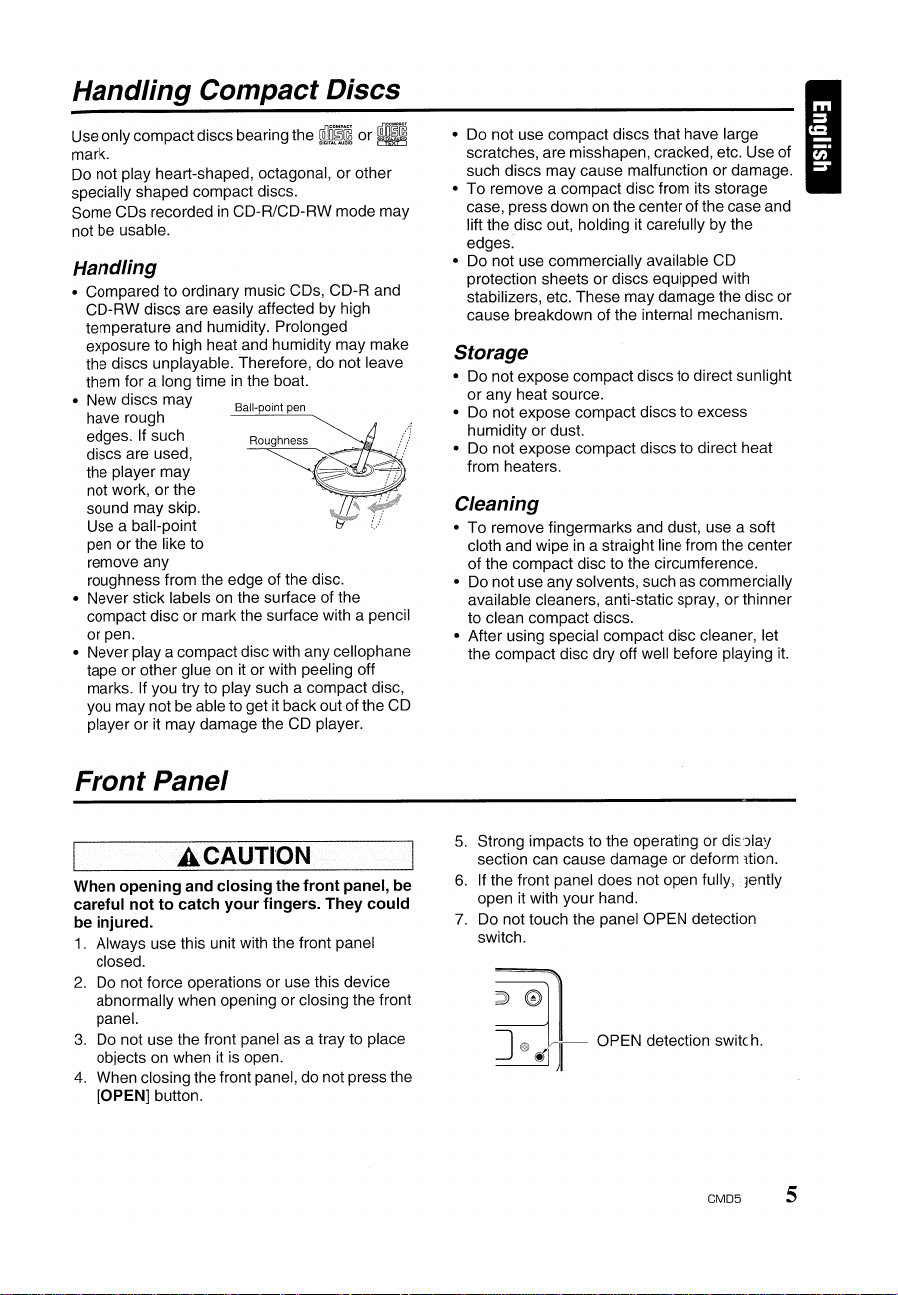
Handling Compact Discs
Use only compact discs bearing the
mark.
Do
not play heart-shaped, octagonal, or other
specially shaped compact discs.
Some CDs recorded
not
be
usable.
in
CD-R/CD-RW mode may
~Q~~
or U
Handling
• Compared to ordinary music CDs, CD-R and
CD-RW discs are easily affected by high
temperature and humidity. Prolonged
exposure to high heat and humidity may make
the discs unplayable. Therefore, do not leave
them for a long time
• New discs may
have rough
edges. If such
discs are used,
the player may
not work, or the
sound may skip.
Use a ball-point
pen or the like to
remove any
roughness from the edge of the disc.
• Never stick labels
compact disc or mark the surface with a pencil
or pen.
• Never
playa
tape or other glue
marks. If you try to play such a compact disc,
you may not be able to get
player or it may damage the CD player.
in
the boat.
Ball-point pen
Roughness
on
the surface of the
compact disc with any cellophane
onitor with peeling off
it
back out of the CD
• Do not use compact discs that have large
scratches, are misshapen, cracked, etc. Use of
such discs may cause malfunction or damage.
• To remove a compact disc from its storage
case, press down
lift the disc out, holding it carefully by the
edges.
• Do not use commercially available CD
protection sheets or discs equipped with
stabilizers, etc. These may damage the disc or
cause breakdown of the internal mechanism.
on
the center of the case and
Storage
• Do not expose compact discs to direct sunlight
or any heat source.
•
Do
not expose compact discs to excess
humidity or dust.
• Do not expose compact discs to direct heat
from heaters.
Cleaning
• To remove fingermarks and dust, use a soft
cloth and wipe
of the compact disc to the circumference.
• Do not use any solvents, such as commercially
available cleaners, anti-static spray, or thinner
to clean compact discs.
• After using special compact disc cleaner, let
the compact disc dry off well before playing
in
a straight line from the center
it.
Front Panel
Jl..CiAUTlON
When opening and closing the front panel, be
careful not to catch your fingers. They could
be injured.
1.
Always use this unit with the front panel
closed.
2.Donot force operations or use this device
abnormally when opening or closing the front
panel.
3.Donot use the front panel as a tray to place
objects on when
4.
When closing the front panel, do not press the
[OPEN]
button.
itisopen.
5.
Strong impacts to the operating or dis'Jlay
section can cause damage or deform ltion.
6.
If the front panel does not open fully,..Jently
open it with your hand.
7.
Do not touch the panel OPEN detection
switch.
~
~I-
OPEN detection
..
sWitch.
CMD5
5
Page 6
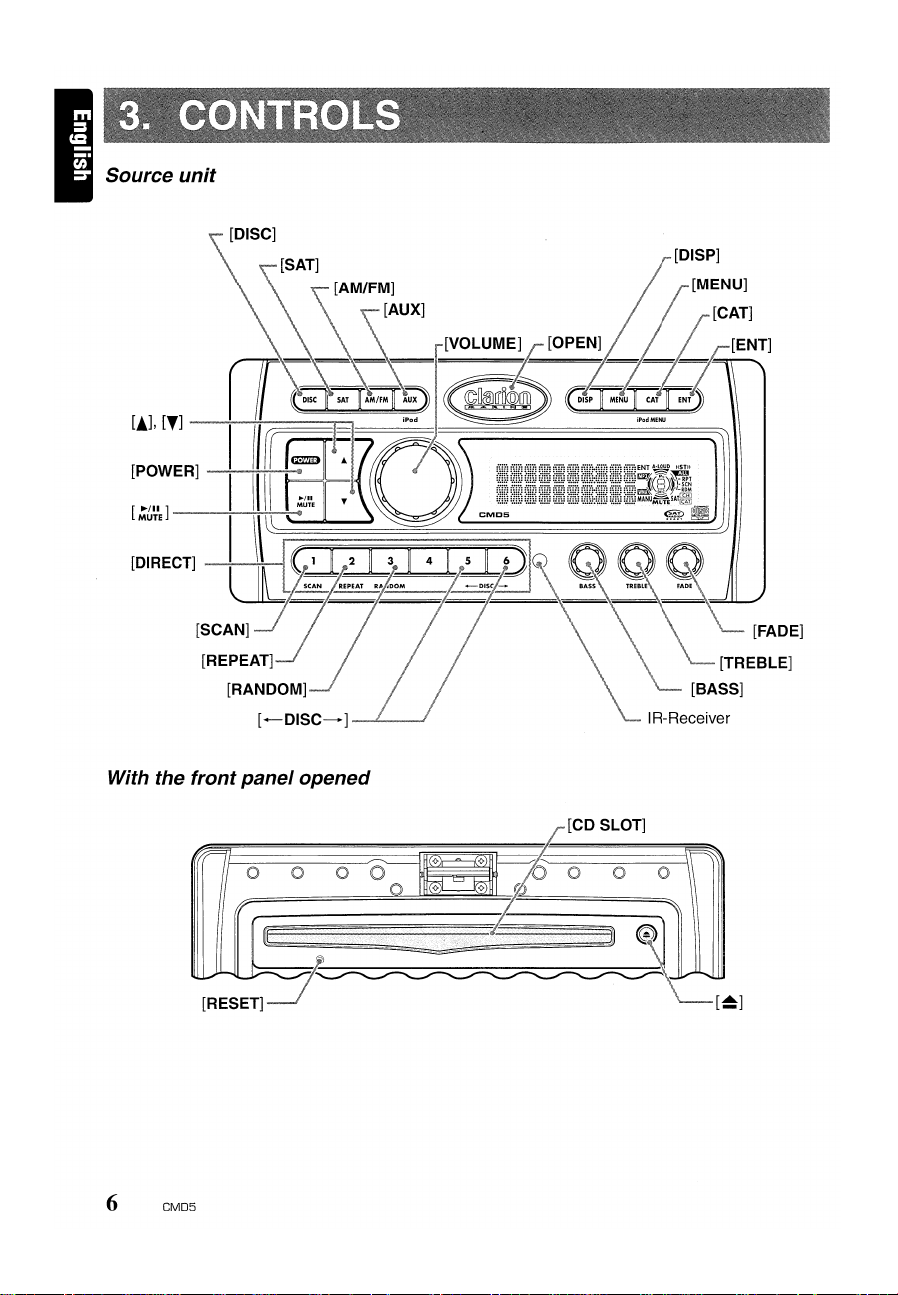
With the front panel opened
&~~~~~~~~~~~~~~~;",\;",l~\""
000
_-----------:.\l~\\\\\\l\\~""\\~fJ:::;:;;:;\\,\\\l~~~~
6
CMD5
/,.,.
[CD SLOT]
=====~~
l600
o
Page 7
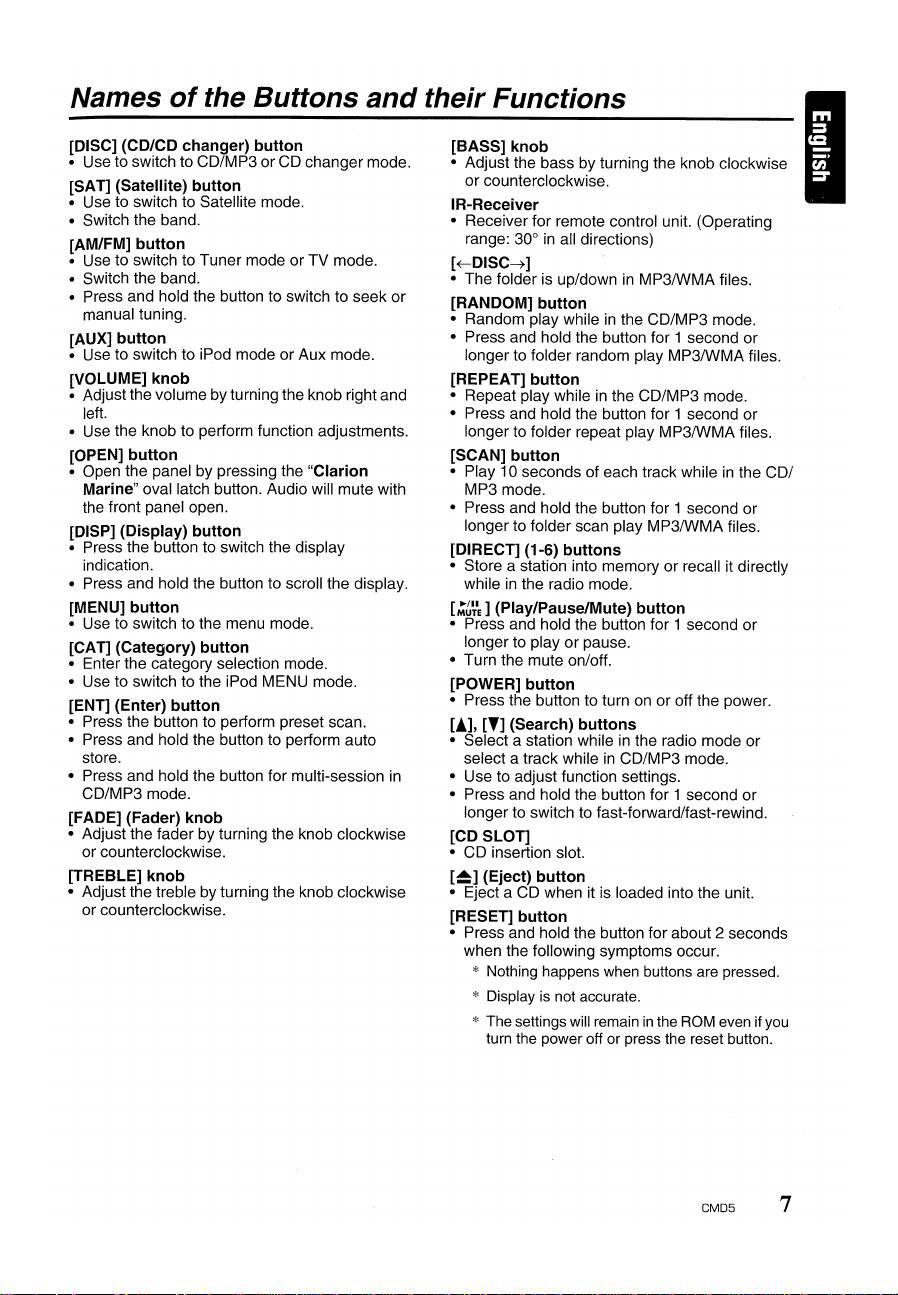
Names
of
the Buttons
and
their Functions
[DISC] (CD/CD changer) button
• Use to switch to CO/MP3 or CD changer mode.
[SAT] (Satellite) button
• Use to switch to Satellite mode.
• Switch the band.
[AM/FM] button
• Use to switch to Tuner mode or TV mode.
• Switch the band.
• Press and hold the button to switch to seek or
manual tuning.
[AUX] button
• Use to switch to iPod mode or Aux mode.
[VOLUME] knob
• Adjust the volume by turning the knob right and
left.
• Use the knob to perform function adjustments.
[OPEN] button
• Open the panel by pressing the "Clarion
Marine" oval latch button. Audio will mute with
the front panel open.
[DISP] (Display) button
• Press the button to switch the display
indication.
• Press and hold the button to scroll the display.
[MENU] button
• Use to switch to the menu mode.
[CAT] (Category) button
• Enter the category selection mode.
• Use to switch to the iPod MENU mode.
[ENT] (Enter) button
• Press the button to perform preset scan.
• Press and hold the button to perform auto
store.
• Press and hold the button for multi-session
CO/MP3 mode.
[FADE] (Fader) knob
• Adjust the fader by turning the knob clockwise
or counterclockwise.
[TREBLE] knob
• Adjust the treble by turning the knob clockwise
or counterclockwise.
in
[BASS] knob
• Adjust the bass by turning the knob clockwise
or counterclockwise.
IR-Receiver
• Receiver for remote control unit. (Operating
range: '30
[~DISC~]
• The folder is up/downinMP3IWMA files.
[RANDOM] button
• Random play while
• Press and hold the button for 1 second or
longer to folder random play MP3IWMA files.
[REPEAT] button
• Repeat play while
• Press and hold the button for 1 second or
longer to folder repeat play MP3IWMA files.
[SCAN] button
• Play 10 seconds of each track while
MP3 mode.
• Press and hold the button for 1 second or
longer to folder scan play MP3IWMA files.
[DIRECT] (1-6) buttons
• Store a station into memory or recall it directly
while
[,:~~~
• Press and hold the button for 1 second or
longer to play or pause.
• Turn the mute
[POWER] button
• Press the button to turn
[!],
• Select a station while
select a track while
• Use to adjust function settings.
• Press and hold the button for 1 second or
longer to switch to fast-forward/fast-rewind.
[CD SLOT]
• CD insertion slot.
[~]
• Eject
[RESET] button
• Press and hold the button for about 2 seconds
when the following symptoms occur.
0
in
all directions)
in
the CO/MP3 mode.
in
the CO/MP3 mode.
in
the radio mode.
] (Play/Pause/Mute) button
on/off.
on
or off the power.
[T] (Search) buttons
in
the radio mode or
in
CO/MP3 mode.
(Eject) button
a CD when it is loaded into the unit.
in
the COl
* Nothing happens when buttons are pressed.
* Display is not accurate.
* The settings will remain
turn the power off or press the reset button.
in
the ROM evenifyou
CM05
7
Page 8
Major
button
connected
operations when external
to
this
unit
equipment
is
• When
the
Sirius
Satellite Reveiver
is
connected
* For details, see the section "Sirius Satellite
Operations".
[SAT] (Satellite)
• Use to switch to Satellite mode.
• Switch the band.
[VOLUME]
• Select the categoryincategory selection mode.
[DISP] (Display)
• Press the button to switch the display indication.
• Press and hold the button to scroll the display.
[CAT] (Category)
• Enter the category selection mode.
[ENT] (Enter)
• Press the button to perform category scan.
• Press and hold the button to perform preset
scan.
[!],
[l]
(Search)
• Select a station.
[DIRECT] (1-6)
• Store a station into memory or recallItdirectly.
• When
* For details, see the section
Operations".
[DISC] (CD/CD changer)
• Use to switch to the CD changer mode.
[DISP] (Display)
• Press the button to switch the display indication.
• Press and hold the button to scroll the display.
[~DI.SC.----*]
• Select the desired CD In the CD changer.
[RANDOM]
• Perform random play.
• Press and hold the button for 1 second or
longer to perform disc random play.
[REPEAT]
• Perform repeat play.
• Press and hold the button for 1 second or
longer to perform disc repeat play.
[SCAN]
button
• Perform scan play for 10 seconds of each track.
• Press and hold the button for 1 second or
longer to perform disc scan play.
[,:~~~]
(Play/Pause/Mute)
• Press and hold the button for 1 second or
longer to play or pause.
• Turn the mute on/off.
[!],
[l]
(Search)
• Select a track when listening to a disc.
• Press and hold the button for 1 second
longer to switch to fast-forward/fast-rewind.
button
knob
button
button
button
buttons
buttons
. .
theCDchangerisconnected
"CD
Changer
button
button
(Disc up/do'!"n)
button
button
buttons
buttons
button
or
• When
theTVis
connected
* For details, see the selection "TV Operations".
[AM/FM]
• Use to 'switch to TV mode
• Press and hold the button to switch between
[ENT] (Enter)
• Perform preset scan.
• Press and hold the button to perform auto store.
[DIRECT] (1-6)
• Store a station into memory or recallItdirectly.
[!],
• Select a station.
• When
[AUX]
• Use to switch to the iPod mode.
[VOLUME]
• Use to select menus in the iPod MENU mode.
[DISP] (Display)
• Press the button to switch the display indication.
• Press and hold the button to scroll the display.
[CAT] (iPod MENU)
• Use to switch to the iPod MENU mode.
[SCAN]/[DIRECT] (1)
• Use to select the
[REPEAT]/[DIRECT] (2)
• Use to select the ARTISTS menu in the iPod
[RANDOM]/[DIRECT] (3)
• Use to select the ALBUMS menu in the iPod
[DIRECT] (4)
• Use to select the SONGS menuinthe iPod
[DIRECT] (5)
• Use to select the GENRES menu in the iPod
[DIRECT] (6)
• Use to select the COMPOSERS menuinthe
[':~~IE]
• Press and hold the button for 1 second or
• Turn the mute on/off.
[!],
• Perform the Track up or down operation.
• Press and hold the button for 1 second or
• Use to proceed to the next menuinthe iPod
button
seek or manual tuning.
button
button
[l]
(Search)
* For details,
button
MENU mode.
MENU mode.
MENU mode.
MENU mode.
MENU mode.
iPod MENU mode.
(Play/Pause/Mute)
longer to play or pause.
[l]
(Search)
longer to switch to fast-forward/fast-rewind.
MENU mode.
buttons
the
iPodisconnected
see
the section "iPod Operations".
knob
button
PLA
button
button
button
buttons
..
button
button
YLISTS menu
button
button
button
. .
in
the iPod
8 CMD5
Page 9
Page 10
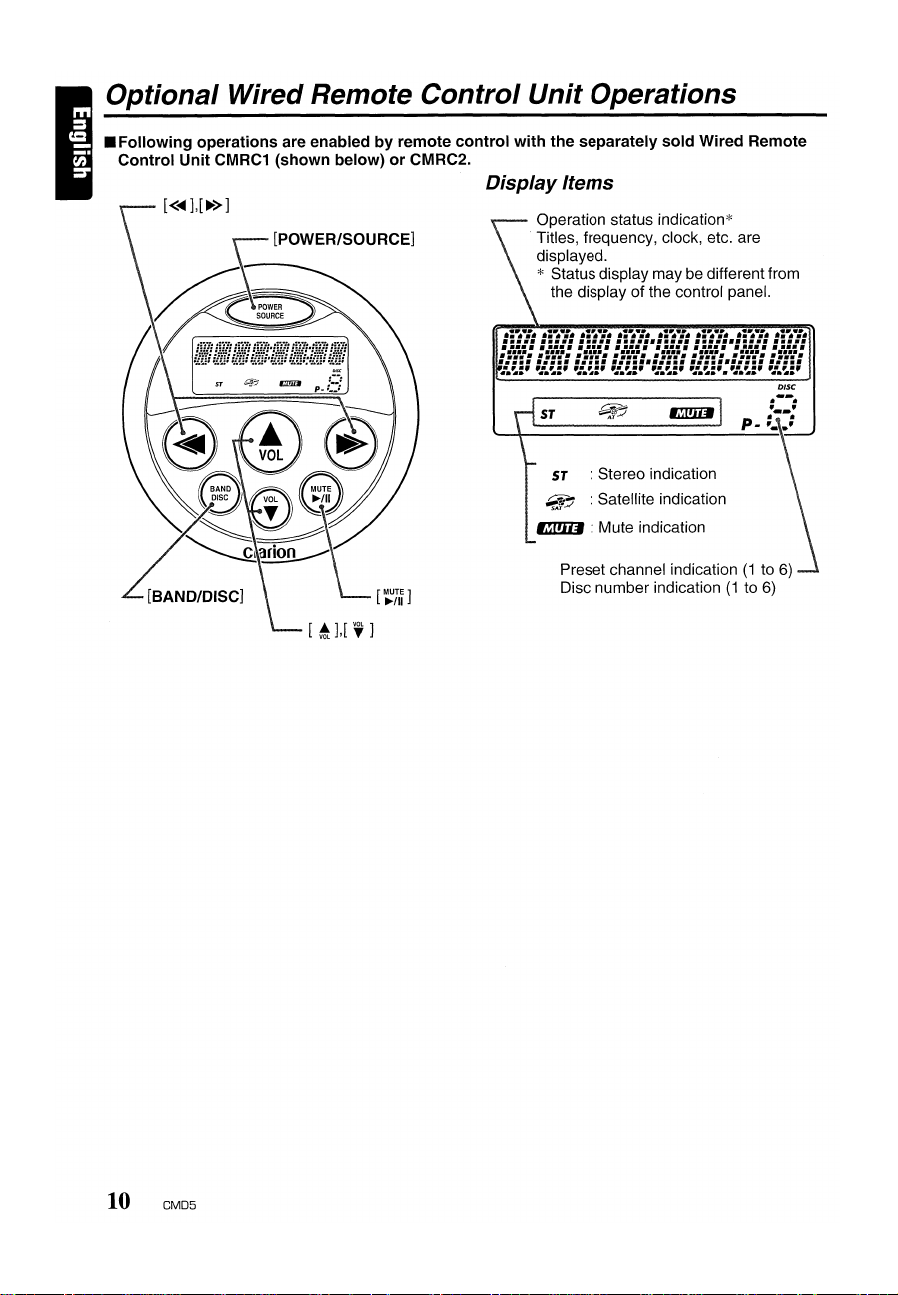
Optional Wired Remote Control Unit Operations
• Following operations are enabled by remote control with the separately sold Wired Remote
Control Unit CMRC1 (shown below) or CMRC2.
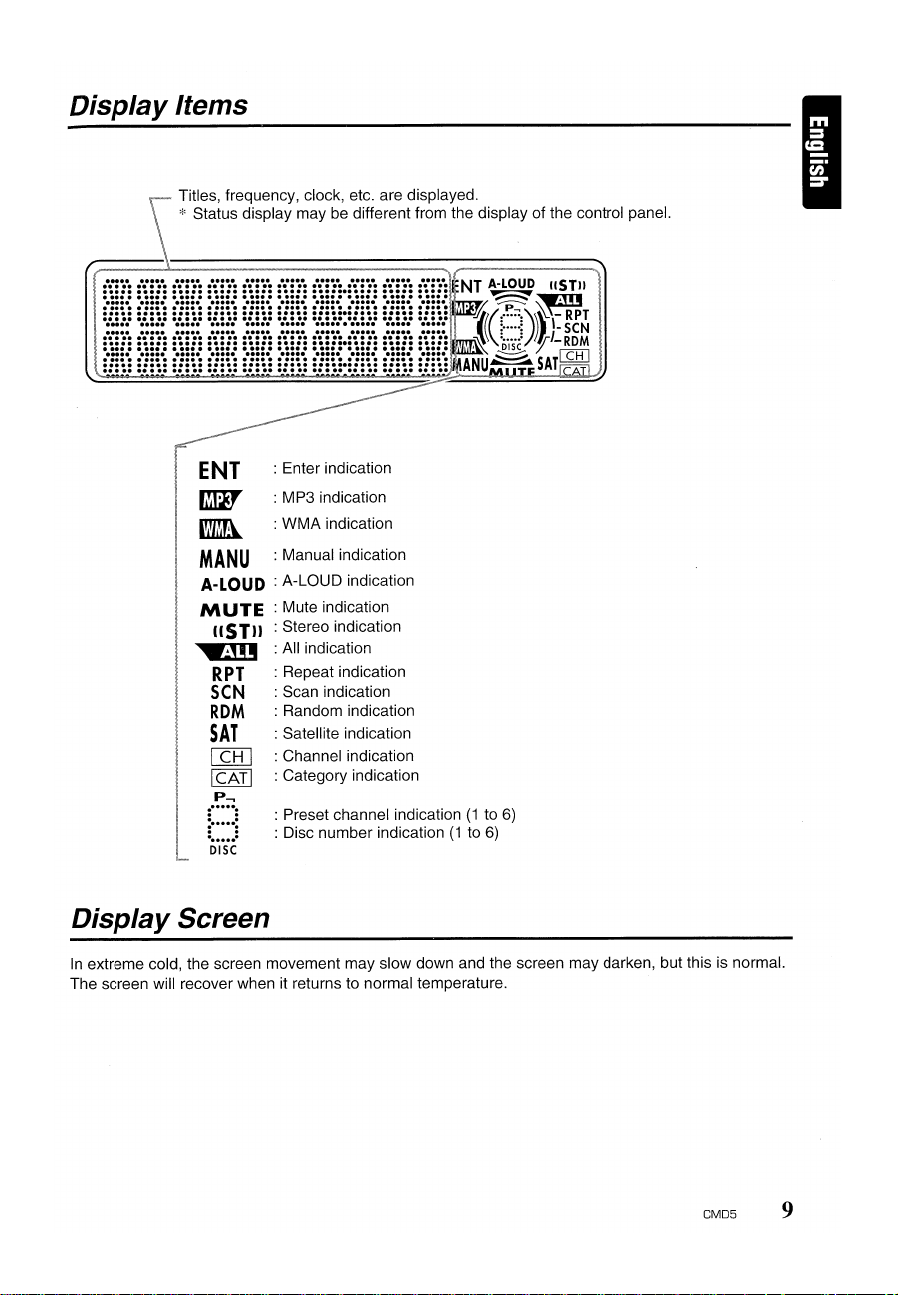
Display Items
Operation status indication*
Titles, frequency, clock, etc. are
displayed.
* Status display may be different from
the display of the control panel.
S1
51
: Stereo indication
~
: Satellite indication
IJI!11J : Mute indication
[
!],[i]
Preset channel indication
Disc number indication(1to
(1to6)
6)
10
CMD5
Page 11
Optional Wired Remote
Lower
the
source
last
volume
powered
source
loud
volume
damage
volume
unit
off
unitispowered
the
level before
off. The
source
setting.Ifthe
with
the
volume
may
harm
sou
rce unit.
source
back
your
Control
powering
unit
stores
up, when
on,
the
hearing
unit
Unit
the
the
is
the
sudden
and/or
A WARNING
When
the
front
produced, and
remote
disabled.
changing
control
Always
the
source
unit
CD.
unit
operations
shut
the
controls
are
front
panel
EXPOSING THE UNIT TO WATER WITH THE
FRONT PANEL OPEN WILL CAUSE
panelisopen,nosound
DAMAGE
[POWER/SOURCE]
Turningonand
Press the [SOURCE] button to turn the power on
and press and hold it for 1 second or longer to
turn the power off.
Changing
Each time the [SOURCE] button is pressed, the
mode switches
Radio
mode-.iPod
TV
Note:
• If the above equipment is notconnected,
corresponding mode cannot be selected.
[!],
Adjusting
Press the [A] button to increase the volume and
press the
[BAND/DISC]
Changing
Each time the [BAND] button is pressed, the
band switches
OR
UNIT MALFUNCTIONI
the
operation
in
mode-.Satellite
mode-.AUX
[T]
buttons
the
volume
[~]
button to decrease the volume.
button
the
band (in Radio mode)
in
button
off
the
power
mode
the following order:
mode-.CD/MP3
mode-.CD
changer
mode-.Radio
the following order:
FM1-.FM2-.FM3-.AM-.FM1
the
Changing
Each time the [BAND] button is pressed, the
band switches
SR1-.SR2-.SR3-.SR1
Changing
Each time the [BAND] button is pressed, the
band switches
TV1-.TV2-.TV1
band (in Satellite mode)
in
the following order:
.....
the
band (in TV mode)
in
the following order:
.....
and
mode
mode
.....
is
after
.....
Operations
Tuning
(in Radio
Press and hold the [BAND] button for 1 second
or longer to switch between seek tuning and
manual tuning.
Top
function
Press the [BAND] button, then the CD will start
from the first track of the folder.
Changing
Each time the [BAND] button is pressed, the disc
switches in the following order:
1-.2-.3-.4-.5-.6-.1
[:'~~IE]
button
Press the [MUTE] button. The sound is muted
immediately. To cancel, press the [MUTE] button
again.
Press and hold the button for 1 second or longer
to play or pause
changer mode.
[<
.....
],
[~>]
Selecting
MP3
modeoriPod mode)
Press the
beginning of the following track. Press the
button to start playback from the beginning of the
currenttrack. If pressed again, the track moves to
the previous one.
Fast-forward and fast-rewind (in CD
mode, CD/MP3
Press and hold the
-.
disc. Press and hold the
rewind the disc.
* Pressing and holding the
second or longer will move forward or backward
faster than normal play, and pressing and holding
it for 3 seconds orlongerwill do the operation even
faster.
Selecting
Satellite
Press the
for seek tuning or manual tuning (Radio mode/TV
mode only).
modeorTV mode)
modeorTV mode)
(in CD/MP3 mode)
the
disc
(in CD
changer
in
CD/MP3, iPod, and CD
buttons
tracks
(in CD
changer
[~>]
button to start playback from the
modeoriPod mode)
[~>]
button to fast-forward the
[<
.....
] button to fast-
[<
.....
]or
desired
[<
.....
] or
stations
[~>]
(in Radio mode,
button to tuneina station
.....
mode, CD/
[~>]
mode)
[<
.....
changer
button for 1
]
CMD5
11
Page 12
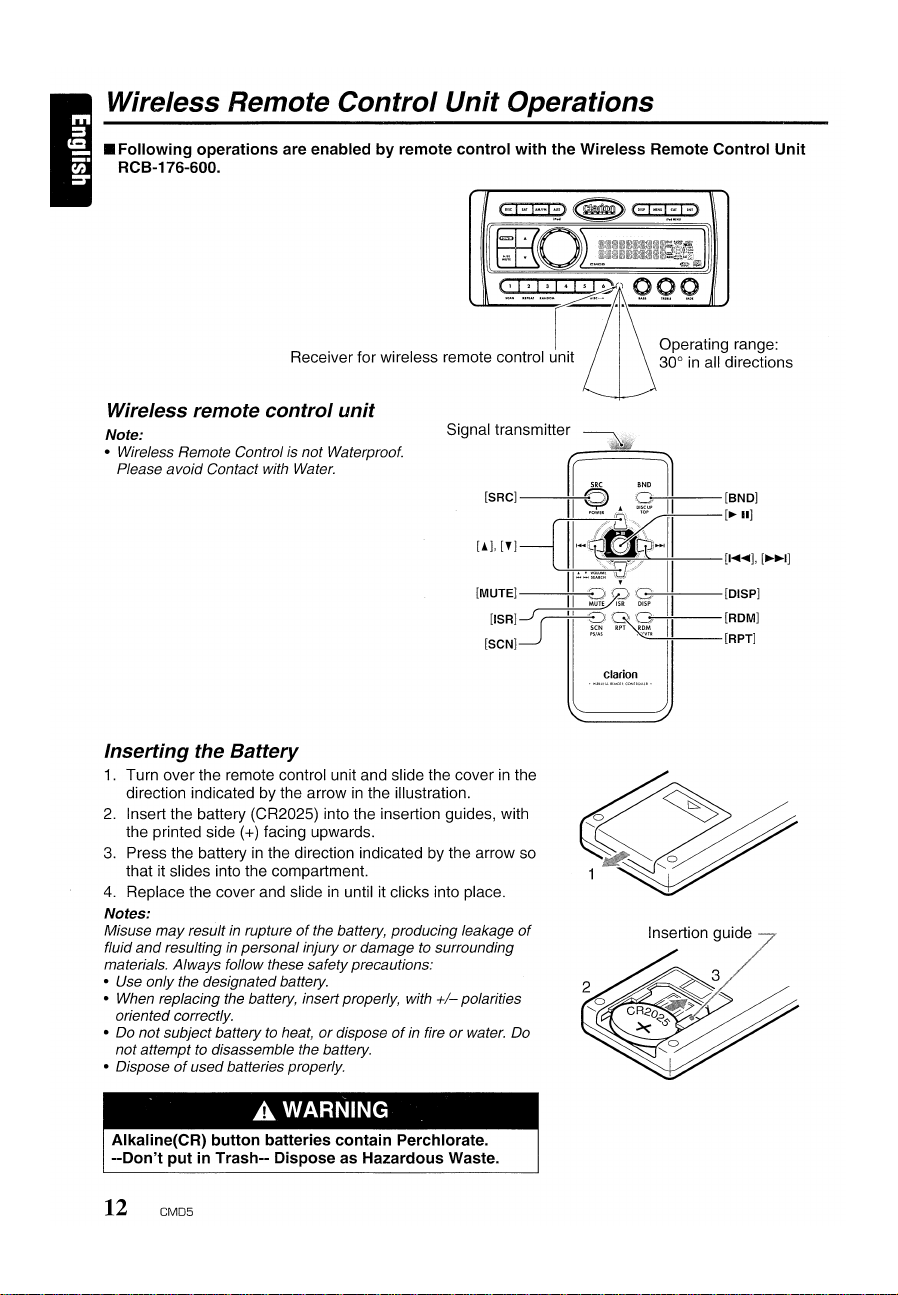
Wireless Remote Control Unit Operations
• Following operations are enabled by remote control with the Wireless Remote Control Unit
RCB-176-600.
Wireless remote control unit
Note:
• Wireless Remote Control is not Waterproof.
Please avoid Contact with Water.
Signal transmitter
Inserting the Battery
1.
Turn over the remote control unit and slide the coverinthe
direction indicated by the arrow
2.
Insert the battery (CR2025) into the insertion guides, with
the printed side
3.
Press the batteryinthe direction indicated by the arrow so
that it slides into the compartment.
4.
Replace the cover and slideinuntil it clicks into place.
Notes:
Misuse
may
fluid
and
materials. Always follow these safety precautions:
• Use only the designated battery.
• When replacing the battery, insert properly, with
•
• Dispose
resultinginpersonal injuryordamage to surrounding
oriented correctly.
00
notsubject batterytoheat,ordisposeofin fireorwater.
notattempttodisassemble the battery.
of
(+) facing upwards.
resultinruptureofthe battery, producing leakage
usedbatteries properly.
in
the illustration.
+/-
polarities
~,
~5RC-.BND.l
[SRC]
[!],[f]
[MUTE]---I:-:-I~~~)
[ISR]J
[SCN]~II~s7~
II
[11,_rcfj.rJ.n.r?J
II'
~8)
of
00
~.B..~
\'~.'.·','.8.
./vmUM'\"
Clarion
II
...•••
~
...
i
...
,,··.~-11
">.:.;
".
II
:~,
II
'~'g;
II
RPT
~~R
Insertion guide
~:~~]
[I
........
],
[~~I]
[OISP]
[ROM]
[RPT]
""";;;'11"
Alkaline(CR) button batteries contain Perchlorate.
--Don't put
12
in
Trash-- Dispose as Hazardous Waste.
CM05
Page 13
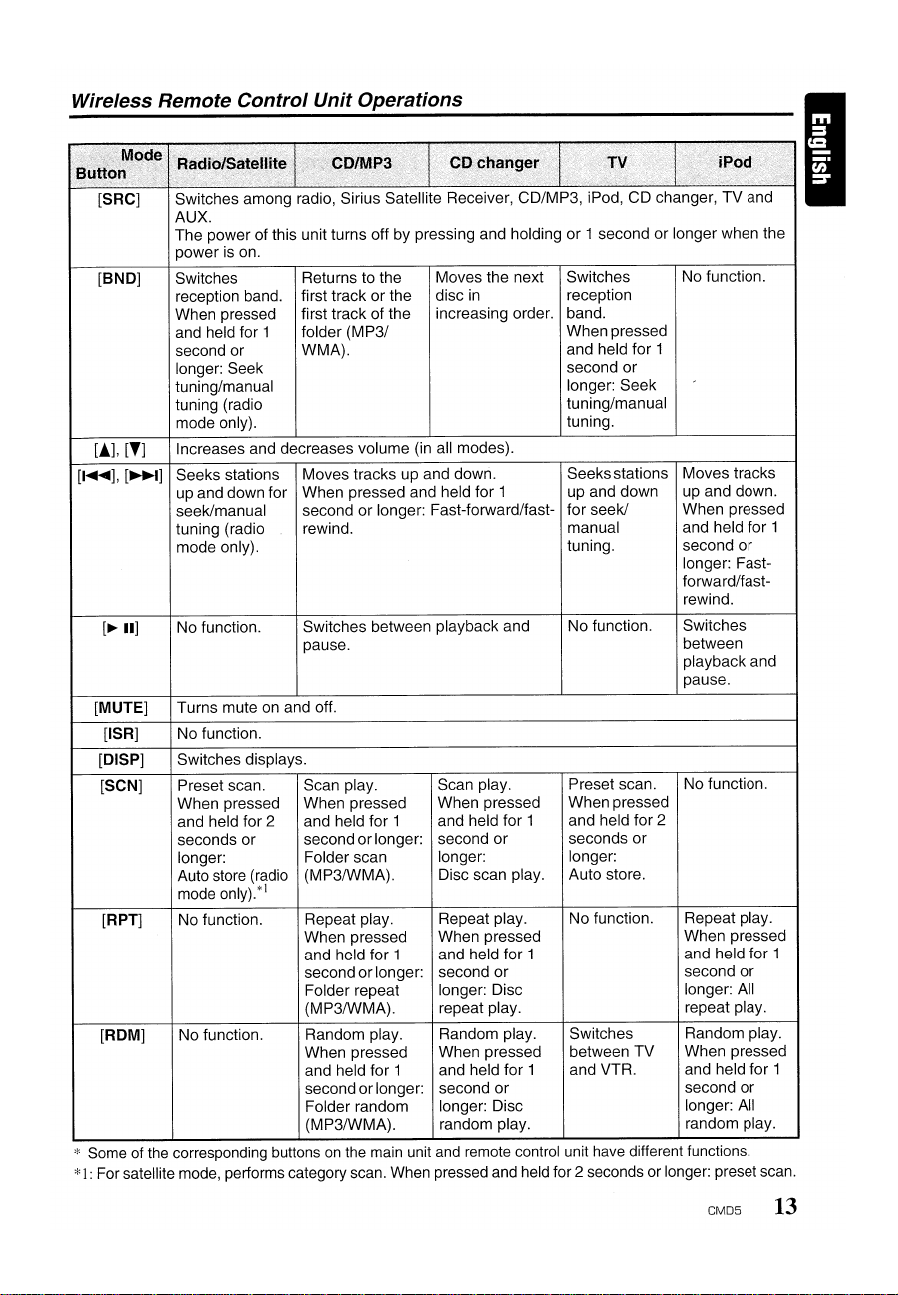
Wireless Remote Control Unit Operations
Switches among radio, Sirius Satellite Receiver, CD/MP3, iPod, CD changer, TV and
AUX.
The power of this unit turns off by pressing and holding or 1 second or longer when the
power is on.
[BND]
[i],[l]
[I
..........
],[~~I]
[~
[MUTE]
[ISR]
[DISP]
[SeN] Preset scan.
[RPT] No function.
[ROM]
Switches
reception band.
When pressed
and held for 1
second or
longer: Seek
tuning/manual
tuning (radio
mode only).
Increases and decreases volume (in all modes).
Seeks stations Moves tracks up and down.
up and down for When pressed and held for 1
seek/manual second or longer: Fast-forward/fasttuning (radio rewind.
mode only).
No function. Switches between playback and
II]
Turns mute
No function.
Switches displays.
When pressed
and held for 2 and held for 1 and held for 1 and held for 2
seconds or second or longer: second or
longer: Folder scan longer: longer:
Auto store (radio (MP3/WMA). Disc scan play.
mode only).*l
No function. Random play. Random play.
* Some of the corresponding buttons
*1: For satellite mode, performs category scan. When pressed and held for 2 seconds or longer: preset scan.
Returns to the
first track or the
first track of the
folder (MP3/
WMA).
pause.
on
and off.
Scan play. Scan play.
When pressed
Repeat play.
When pressed When pressed
and held for 1 and held for 1 and held for 1
second or longer: second or
Folder repeat longer: Disc longer: All
(MP3/WMA). repeat play.
When pressed When pressed
and held for 1 and held for 1 and VTR.
second or longer: second or
Folder random longer: Disc longer: All
(MP3/WMA). random play.
on
the main unit and remote control unit have different functions.
Moves the next
disc
in
increasing order.
When pressed When pressed
Repeat play.
Switches
reception
band.
When pressed
and held for 1
second or
longer: Seek
tuning/manual
tuning.
Seeksstations
up and down
for seek/
manual
tuning.
No function. Switches
Preset scan. No function.
seconds or
Auto store.
No function. Repeat play.
Switches Random play.
between TV When pressed
No function.
Moves tracks
up and down.
When pressed
and held for 1
second or
longer: Fastforward/fastrewind.
between
playback and
pause.
When pressed
second or
repeat play.
and held for 1
second or
random play.
CM05
13
Page 14
Basic
Operations
Note:
• Be
sure to read this chapter referring to the front
diagrams
Lower
source
last
powered
source
loud
damage
of
chapter
the
volume
unit
off. The
volume
setting.Ifthe
off
with
unitispowered
volume
may
the
source
"3.
CONTROLS"on page
level before
source
unit
harm
unit.
source
volume
back
your
up, when
on,
hearing
the
powering
stores
unit
is
the
sudden
and/or
the
the
A WARNING
When
the
front
produced,
remote
disabled.
changing
EXPOSING THE UNITTOWATER WITH THE
FRONT PANEL OPEN WILL CAUSE
DAMAGE OR UNIT MALFUNCTIONl
Turning
1.
Press the [POWER] button.
2.
The illumination and displayonthe unit light
up.
The unit automatically remembers its last
operation mode and will automatically switch
to display that mode.
3.
Press the [POWER] button to turn off the
power for the unit.
Note:
• System check
During the initial
through a system check procedure. This
procedure verifies
GeNET.
into the unitafter the initial
system checkprocedure. The system checkstarts
automatically within the unit.
panelisopen,nosound
and
source
unit
control
unit
Always
shut
the
CD.
on/off
Any
the
powerupof
any
additional GeNET devices plugged
controls
operations
the
are
front
power
this unit, it will
devices connected through
power
up will initiate the
panel
and
after
go
the
is
Adjusting
Turning the [VOLUME] knob clockwise increases
6.
the volume; turning it counterclockwise
decreases the volume.
the volume
* The volume level is from 0 (minimum) to 33
(maximum).
Switching
Press the [DISP] button to select the desired
display.
The display changes each time you press the
[DISP] button.
the
display
* The display status varies depending on the mode
you selected. For more information, refer to
chapters of the each operation mode.
Adjusting
Turning the [BASS] knob clockwise emphasizes
the bass; turning
the bass.
* Adjustment range:
Adjusting
Turning the [TREBLE] knob clockwise
emphasizes the treble; turning it
counterclockwise attenuates the treble.
* Adjustment range:
Adjusting
Turning the [FADE] knob clockwise emphasizes
the sound from the front speakers; turning
counterclockwise emphasizes the sound from
the rear speakers. The fader adjusts both the
source unit RCA and speaker outputs.
the
bass
it
counterclockwise attenuates
-8
to +8 dB
the treble
-7
to +7 dB
the fader
* Adjustment range: F12 (full front) to R12 (full rear)
it
Selectingamode
Press the [DISC], [SAT], [AM/FM] or [AUX]
button to change the operation mode.
* External equipment not connected with CeNET is
not displayed.
14
CM05
Page 15

Radio Operations
Changing
This unit is initially set to USA frequency intervals
10kHz
of
using
range can be switched to the intervals below.
Frequency
spacing
~
«
Frequency
range 1,710 kHz 1,629 kHz 1,602 kHz
Frequency
spacing
~
u..
Frequency 87.9 to 87.0 to 87.5 to
range 107.9MHz
Setting
the reception area
forAMand 200 kHz for
it
outside the USA, the frequency reception
u.s.
standard
10 kHz
530 to
200 kHz'
the
reception area
FM.
When
Other
countries
9 kHz 9 kHz
531
50 kHz 50 kHz
108 MHz
Europe
standard
to
531
108 MHz
to
* All station preset memories are lost when the
reception area is changed.
1.
Press the [AM/FM] button and select the
desired radio band (FM or AM).
• U.S.
standard
2.
While pressing the [DISP] button, press and
hold the number "1" of the [DIRECT] buttons
for 2 seconds or longer.
• Other
3.
countries
While pressing the [DISP] button, press and
hold the number "2" of the [DIRECT] buttons
for 2 seconds or longer.
• Europe
(initial
standard
setting
(new setting)
(initial
setting
for
US model)
for
Europe
model)
4.
While pressing the [DISP] button, press and
hold the number "3" of the [DIRECT] buttons
for 2 seconds or longer.
Listeningtothe radio
1.
Press the [AM/FM] button to select the radio
mode. The frequency appears
2.
Press the [AM/FM] button to select the radio
band. Each time the button
radio reception band changes
order:
FM1~FM2~FM3~AM~FM1
3.
Press the
desired station.
[!]
or
[,]
button to tuneinthe
on
the display.
is
pressed, the
in
the following
...
Mute
Use this function to turn off the sound
immediately.
1.
Press the
and
2.
Press the
mute mode.
[':~~IE]
button. The sound turns off
"MUTE" appears on the display.
[':~~IE
] button again to cancel the
Tuning
There are 3 types of tuning modes available,
seek tuning, manual tuning and preset tuning.
Seek
tuning
1.
Press the [AM/FM] button and select the
desired band (FM or AM).
* If "MANU" is lit
the [AM/FM] button. "MANU"
goes off, and seek tuning is now available.
2.
Press the
seek a station.
When the
sought
in
[,]
if the
soughtinthe direction of lower frequencies.
Manual
There are 2 manual tuning methods available:
Quick tuning and step tuning.
When you are
frequency changes one step at a time.
quick tuning mode, you can quickly tune the
desired frequency.
1.
tuning
Press the [AM/FM] button and select the
desired band (FM or AM).
* If "MANU" is not lit
hold the [AM/FM] button. "MANU"
display and manual tuningisnow available.
2.
Tuneina station.
•
Quick
Press and hold the
or longer to tune
• Step'
Press the
station.
tuning
tuning
[!]
on
the display, press and hold
[!]
or
[,]
button to automatically
[!]
button is pressed, the station is
the direction of higher frequencies;
buttonispressed, the station
in
the step tuning mode, the
on
[!]
or
in
a station.
or
[,]
button to manually tuneina
on
the display
is
In
the
the display, press and
[,]
button for 1 second
is
litonthe
CM05
15
Page 16

Radio Operations
Recalling a preset station
A total of 24 preset positions (6-FM1, 6-FM2, 6-
FM3, 6-AM) exist to store individual radio stations
in
memory. Pressing the corresponding
[DIRECT] button recalls the stored radio
frequency automatically.
1.
Press the [AM/FM] button and select the
desired band (FM or AM).
2. Press the corresponding [DIRECT] button to
recall the stored station.
* Press and hold one of the [DIRECT] buttons for
2 seconds or longerto store the current station
into preset memory.
Manual memory
1.
Select the desired station with seek tuning,
manual tuning or preset tuning.
2.
Press and hold one of the [DIRECT] buttons
for 2 seconds or longer to store the current
station into preset memory.
Auto store
Auto store is a function for storing up to 6 stations
that are automatically tuned
receivable stations cannotbereceived, a
previously stored stations remain at the memory
position.
1.
Press the [AM/FM] button and select the
desired band (FM or AM).
2.
Press and hold the [ENT] button for 2 seconds
or longer. The stations with good reception
are stored automatically to the preset
channels.
in
sequentially. If 6
Preset scan
Presetscan receives the stations storedinpreset
memory
searching for a desired station
1.
2.
Note:
• Be careful nottopress and hold the [ENT] button
16
in
order. This function is useful when
Press the [ENT] button.
When a desired station is tuned in, press the
[ENT] button again to continue receiving that
station.
2 seconds
for
function is engaged
stations.
CMD5
or
longer, otherwise the auto store
and
in
memory.
the unit starts storing
Page 17

CDIMP3IWMA Operations
MP3IWMA
WhatisMP3?
MP3isan
classified into audio layer 3 of MPEG standards.
This audio compression method has penetrated
into
This MP3 features the original audio data
compression to about 10 percent of its initial size
with a high sound quality. This means that about
10 music CDs can be recorded
CD-RW disc to allow a long listening time without
having to change CDs.
WhatisWMA?
WMAisthe abbreviation of Windows Media
Audio,
Microsoft Corporation.
Notes:
• If you
Management) for
output (The
• Windows Media
trademarks,
Corporation in the United States and/orother
countries.
• To
1.
2.
audio compression method and
PC
users and become a standard format.
on
a CD-R disc or
an
audio file format developed by
playa
file with DRM (Digital Rights
WMA
disable
WMA
or
remaining
indicator blinks).
TM,
and
the Windows® logo are
registered trademarksofMicrosoft
DRM (Digital Rights
ON,
no audio is
Management)
When using Windows Media Player9,click
TOOL ...
then under Recording settings, uncheck the
Check box for RECORD PROTECTED
MUSIC. Then, reconstruct files.
Personally constructed WMA files are used at
your own responsibility.
When using Windows Media Player 10, click
on
then under RIP SETTINGS, uncheck the
Check box for COPY PROTECT MUSIC.
Then, reconstruct files.
Personally constructed WMA files are used at
your own responsibility.
OPTIONS'"
TOOLS'"
MUSIC RECORD tab,
OPTIONS'"
RIP MUSIC tab,
on
Precautions when
WMA
files
• Usable
• MP3: Sampling rate 11.025 kHz-48 kHz,
Bit rate 8 kbps-320 kbps
• WMA: Bit rate 48 kbps-1
• File
• Always add a file extension ".MP3" or ".WMA"
to MP3 or WMAfile by using single byte letters.
If
or forget to add the file extension, the file
cannot be played.
• Files without MP3IWMA data will not play. The
indication "--:--" appears
display if you attempt to play files without
WMA data.
• Logical
• When writing MP3IWMA fileona CD-R disc or
CD-RW disc, please select "1509660 level 1, 2
or
format. Normal play may not
disc is recorded
• The folder name and file name can be
displayed as the title during MP3IWMA play but
the title must
alphabetical letters and numerals (including
extension).
•Donot affix a name to a file inside a folder
having the same name.
• Folder
• A disc with a folder having more than 8
hierarchical levels will be impossible.
•
Numberoffilesorfolders
•Upto 255 files can be recognized per folder.
Up
• Tracks are playedinthe order that they were
recorded onto a disc (Tracks might not always
be
• Some noise may occur depending
of encoder software used while recording.
sampling
extensions
you add a file extension other than specified
format
JOLIETorRomeo" as the writing software
be
structure
to 512 files can be played.
playedinthe order displayedonthe PC).
creating
rates and
MP31
bit
I VBR
92
kbps
in
the play time
(File system)
be
on
another format.
within 128 single byte
possible if the
on
rates
MP31
an
the type
CMD5
17
Page 18

CDIMP3IWMA Operations
Multi-session
When a disc contains both normal CD type tracks
and
MP3IWMA
type of the recorded tracks to play.
•
Switching
Each time you press and hold the [ENT] button
for 1 second
switched between
SESS
MP3.
• Types of recording that can be played are as
follows:
Setting Set
Disc (Default value)
with
Mixed
and MP3IWMA Play CD
type
tracks
CD
type
track
only
MP3IWMA
type
track
• After making these settings, remove the disc
and then reinsert it.
Notes:
• When playing a CCCD (Copy Control CD),
settingtoCD type. When thisissettoMP3IWMA
type, the CD cannot be played normally
cases.
• When playing the disc (contains CD tracks
MP3IWMA type tracks), there is no sound for MP3
type tracks
selected. Press the
another type.
Loading
function
type tracks, you can select which
mixed mode
or
longer, the mixed mode is
MUL
TI-SESS CD and
to
MULTI-SESS
CD
CD
Play CD Play CD
Play MP3IWMA
only
if
the setting "MUL TI-SESS CD"is
[!]or[T]
Set
MULTI-SESS
MP3
Play
WMA
Play
WMA
button to select
a CD
For CD (12 cm)
CD
MUL
to
MP31
MP31
set
in
some
and
SLOT
the
Notes: '
• Never insert foreign objects into the CD SLOT.
•
If
the CD is not inserted easily, there
another CD in the mechanismorthe unit
require service.
• Discs
not
ROMs cannot be playedbythis unit.
• Some CDs recordedinCD-R/CD-RWmode
TI-
notbe usable.
Backup
Just pressing the
if the
Press the
ejected.
• Do
CD SLOT.
into
• Do
out
or
or
bearing the
Eject
power
to the unit was not turned on.
[~]
not
trytoput
Also
the
slot.
not
insert
from
cellophanetapeorrental CD label,
discs
with
rental CD labels were removed. It may be
,,{lCOM.ACT
~~\¥,Jor~
function
[~]
button ejects the disc even
button and remove it when
your
handorfingersinthe
never
insert
discs
where adhesive comes
marks where cellophane tape
impossibletoextract these
unit
and
they
may cause the
down.
Listening
the
Press the [DISC] button to select the CD/MP3
mode.
When the unit enters the CD/MP3 mode, play
starts automatically.
unit
to a
disc
already
* If there is no disc loaded, "NO DISC" appears on
the display.
Pausing
Press and hold--the
"PAUSE" appears on the display.
To resume CD play, press and hold the
button again.
play
[':~~E]
button to pause play.
may
[Q]m~~
mark
foreign
objects
discs
from
unittobreak
loaded
[':~~IE]
be
may
and
CD-
may
the
in
Insert a CD into the center of the CD
with the label side facing up. While loading,
"FILE READ" appears on the display; then the
CD plays automatically.
18 CMD5
SLOT
Page 19

CDIMP3IWMA Operations
Displaying titles
This unit can display title data for CD-text/MP3/
WMA disc with this unit.
Each time you press the [DISP] button, the
display changesinthe following order:
• CD-text disc
TRACK (Track name) and
Play time)
title)'"
T01
...
DISC (Disc title) and ARTIST (Artist
Clock
00:00 (Track No.lPlay time)
Display'"
T01
00:00 (Track
TRACK (Track title) and
...
No.1
• MP3IWMA disc
TRACK (File name) and
Play time)
00:00 (Folder
and ALBUM (Album TAG)-+ARTIST (Artist
TAG)'"
and
Notes:
•
If
input, "NO TITLE" appears on the display.
If
•
appears on the display.
• For MP3, supports 103 Tags V2.3
• Tag displays give prioritytoV2.3
•Inthe caseofalbum Tags for
information written into the extension header is
displayed.
• Only ASCII characters can be displayed in Tags.
...
FOLDER (Folder name) and
No.lPlaytime)'"
Clock
T01
the CD playing is nota CO-text CO has been
MP3IWMA disc is not input
Display'"
00:00 (Track No.lPlay time)
T01
00:00 (Track
TITLE (Title TAG)
TRACK (File name)
TAG,
WMA,
...
"NO TITLE"
/2.2/1.1
/2.2.
the
No.1
F01
/
1.0.
Selecting a track
• Track-up
1.
Press the
beginning of the next track.
2.
Each time you press the
advances ahead to the beginning of the next
track.
• Track-down
1.
Press the
beginning of the current track.
2.
Press the
beginning of the previous track.
[!]
button to move ahead to the
[!]
button, the track
[T]
button to move back to the
[T]
button twice to move to the
Fast-forwardlfast-rewind
• Fast-forward
Press and hold the
longer.
[!]
button for 1 second or
• Fast-rewind
Press and hold the
longer.
* For MP3IWMA discs,
start of searching and between tracks.
the playing time may have a margin of error.
[T]
button for 1 second or
it
takes some time until the
In
addition,
Folder select
This function allows you to select a folder
containing MP3IWMA files and start playing from
the first trackinthe folder.
1.
Press the [5]or[6] button.
Press the [6] button to move to the next folder.
Press the [5] button to move to the previous
folder.
* Press the [6] button while
shift to the first folder.
* Folder without
selectable.
2. To select a track, press the
Scan
play
This function allows you to locate and play the
first 10 seconds of all the tracks recorded on a
CD.
1.
Press the [SCAN] button.
an
in
the final folder to
MP3IWMA fileisnot
[!]or[T]
button.
* Scan play starts from the next track after the
track currently being played back.
2.
To cancel scan play, press the [SCAN] button
again.
Folder scan
This function allows you to locate and play the
first 10 seconds of the first track of all the folders
on an MP3IWMA disc.
1.
Press and hold the [SCAN] button for 1
second or longer.
play
* Folder scan play starts from the nexttrack after
the track currently being played back.
2.
To cancel folder scan play, press the [SCAN]
button again.
CMD5
19
Page 20

CDIMP3IWMA Operations
Repeat
This function allows you to play the current track
repeatedly.
1.
2.
play
Press the [REPEAT] button.
To cancel repeat play, press the [REPEAT]
button again.
Folder repeat play
This function allows you to
folder currently being played back
WMA disc repeatedly.
1.
Press and hold the [REPEAT] button for 1
second or longer.
2.
To cancel folder repeat play, press the
[REPEAT] button again.
Random
This function allows you to play all tracks
recorded
(currently being played back
disc)
1.
Press the [RANDOM] button.
2.
To cancel random play, press the [RANDOM]
button again.
play
on
a CD; and all tracksinthe folder
in
a random order.
playa
trackinthe
in
in
the MP3IWMA
the MP3/
Folder random play
Thisfunction allows you to play all tracks of all the
folders recorded
random order.
1.
Press and hold the [RANDOM] button for 1
second or longer.
2.
To cancel folder random play, press the
[RANDOM] button again.
onanMP3IWMA discina
20
CMD5
Page 21

Common Operations
AUX
function
.This system has rear RCA cables so you can
listen to sounds and music from an external
device connected to this unit.
Cellular telephone mute
This unit requires special wiring to mutethe audio
signal automatically when a cellular telephone
rings.
* This function is not compatible with all cellular
telephones. Contact your local authorized Clarion
dealer for information
compatibility.
Changing the adjustment setting
1.
Press the [MENU] button to switch to the
adjustment selection display.
2.
Press the
[!]or[T]
adjustment item.
Each time you press the
adjustment item changes as following order:
"DIMMER"
VOL"
~
.1~~~lE.it\"
'IS~D
<III\\I1\\'-
"TV
"CONTRAST"~"SCROLL"~"A-CANCEL"
~
"TEL-SEL"~"TEL-SP"~"TEL-SW"
"RESET"~"SYSTEM CHECK"
"DIMMER"
3.
Turn the [VOLUME] knob to adjust the
...
selected setting.
* When "ENT" is blinking
the [ENT] button to adjust the setting value.
4.
After. the adjustment is complete, press the
[MENU] button to return to the previous mode.
Notes:
• The adjustment setting is canceled when
operating for more than 10 seconds (except Clock
and
Sirius10setting).
• When each mode is selected, the item shown in
grey will be displayed.
on
proper installation and
button to select the
[!]or[T]
~
"CLOCK"~"LOUD"~"NF
D~SP'1
""\~~
,ITVlVTR"
D~VER'l
,\\1\\1),
on
button, the
'\\IU~-
"AUX SENS
~
the display, press
"T\l
not
l
'
~
~
Dimmer Control
You can set the dimmer control.
* The factory default setting
1.
Press
the
[MENU] button to switch to the
is
"OFF".
menu mode.
2.
Press the
[!]or[T]
button to select
"DIMMER".
3.
Turn the [VOLUME] knob to select "ON" or
"OFF".
4.
Press the [MENU] button to return to the
previous mode.
Setting the clock
1.
Press the [MENU] button to switch to the
menu mode.
2.
Press the
3.
Press the [ENT] button.
4.
Press the
[!]or[T]
[!]or[T]
button to select "CLOCK".
button to select the hour
or the minute.
5.
Turn the [VOLUME] knob to set the correct
time.
* The clock is displayed
6.
Press the [ENT] button to store the time into
in
12-hour format.
memory.
7.
Press the [MENU] button to return to the
previous mode.
Note:
•
You
cannot set the clock when it is displayed with
only the ignition
boars
batteryortake out this unit, the clock is
reset. While setting the clock,
operation is selected, the clock setmode is
canceled.
on.Ifyou drainorremove the
if
anotherbutton
Setting the loudness
* The factory default setting
1.
Press the
menu mode.
2.
Press the
3.
Turn the [VOLUME] knob to select "ON" or
"OFF".
4.
Press the [MENU] button to return to the
previous mode.
[MENU]
[!]or[T]
is
"ON".
button to switch to the
button to select "LOUD".
or
CMD5
21
Page 22

Common
Operations
Adjusting
* The factory default setting
(Adjustment range:-6to
1.
Press the [MENU] button to switch to the
menu mode.
2.
Press the
3.
Turn the [VOLUME] knob to adjust the
nonfader volume.
4.
Press the [MENU] button to return to the
previous mode.
Verifying
mode
1.
Press the [MENU] button to switch to the
menu mode.
2.
Press the
DISP".
3.
Press the [ENT] button.
The source unit displays the high-order 6
digits of the SIRIUS
information.
4.
Turn the [VOLUME] knob clockwise to change
the low-order 6 digits of the SIRIUS
To display the high-order 6 digits of the
SIRIUS
counterclockwise.
5.
Press the [ENT] button.
6.
Press the [MENU] button to return to the
previous mode.
Switching
the non-fade volume
is
"NFVOL
+6)
[!]or[T]
your
button to select "NF VOL".
SIRIUS ID (Sirius
only)
[!]or[T]
10
again, turn the [VOLUME] knob
TVNTR
button to select "SID
10inthe Operation status
mode
(TV
+6".
10.
mode
only)
This function switches TV to VTR.
1.
Press the [MENU] button to switch to the
menu mode.
2.
Press the
3.
Press and hold the [ENT] button to select TV
or VTR.
Setting
The TV tuner area setting changes by the TV
area you selected.
1.
Press the [MENU] button to switch to the
menu mode.
2.
Press the
3.
Turn the [VOLUME] knob to select the
reception area.
4.
Press the [MENU] button to return to the
previous mode.
The above operations are required when a TV
tuner other than TTX7501 z is connected.
[!]or[T]
the TV area (TV
[!]
button to select "TVNTR".
mode
or [T] buttontoselect "TV AREA".
only)
Setting
You can change the reception setting for the TV
antenna connected
1.
2.
3.
4.
Selecting
mode
Make the following settings to select the
sensitivity when sounds from external devices
connected to this unit are difficult to hear even
after adjusting the volume.
* The factory default setting
1.
2.
3.
4.
Note:
• For telephone interrupt,
"MID".
Adjusting
You can adjust the display contrast to match the
angle of installation of the unit.
* The factory default setting
level:
1.
2.
3.
4.
the TV
Press the.[MENU] button to switch to the
menu mode.
Press the
DIVER".
Turn the [VOLUME] knob to set the setting to
"ON" or "OFF".
eON:
Sets reception emphasizing the visual.
eOFF:
Sets the diver setting to OFF.
Press the [MENU] button to return to the
previous mode.
diver
(TV
mode
to
the TV tuner.
[!]or[T]
button to select "TV
AUXINsensitivity
only)
(AUX
only)
is
"MID".
Press the [MENU] buttontoswitch to the
menu mode.
Press the
SENS".
Turn the [VOLUME] knob to select from
"HIGH", "MID" or "LOW".
Press the [MENU] button to return to the
previous mode.
Press the [MENU] button to switch to the
menu mode.
Press the
"CONTRAST".
Turn the [VOLUME] knob to adjust the
contrast.
Press the [MENU] button to return to the
previous mode.
1
to
8)
[!]or[T]
the
display
[!]or[T]
button to select "AUX
AUX
SENS is always
contrast
is
"4". (Adjustment
button to select
22
CMD5
Page 23

Common
Operations
Setting
Set how to scrollinCD-text, MP3IWMA title.
* The factory default setting
1.
2.
3.
4.
Amplifier
Set the internal amplifier onoroff.
* The factory default setting
1.
2.
3. Turn the [VOLUME] knob to set the setting to
4.
Selecting
* The factory default setting
1.
2. Press the
3. Turn the [VOLUME] knob to select "AUX"
4.
the
method.for
Press the [MENU] button to switch to the
menu mode.
Press the
"SCROLL".
Turn the [VOLUME] knob to set the setting to
"ON"or"OFF".
eON:
Scrolls automatically.
eOFF:
Scrolls just 1 time when the title was changed.
Press the [MENU] button to return to the
previous mode.
Press the [MENU] button to switch to the
menu mode.
Press the
CANCEL".
"ON"or"OFF".
eON:
Amplifier is turned-off.
eOFF:
Amplifier is turned-on.
Press the [MENU] button to return to the
previous mode.
[!]
or
cancel
[!]
or
[,]
setting
[,]
title
scroll
is
"ON".
button to select
is
"OFF".
button to select "A-
AUx/CeNET
is
"AUX".
Press the [MENU] button to switch to the
menu mode.
[!]
or
[,]
SEL".
"CENET".
eAUX:
You can listen to telephone calls from the
AUX
input.
(with Bluetooth. BB (BLT370) connected)
eCENET:
You can listen to telephone calls from the
CeNET
input.
(with Bluetooth BB (BLT433) connected)
Press the [MENU] button to return to the
previous mode.
button to select "TEL-
or
Setting
cellular
BB
* The factory default setting
the
speaker
phone
(Optional
(BLT370/433))
output
Bluetooth
is
"RIGHT".
for
the
* To output the telephone calls, set the cellular
phone interrupt to
1.
Press the [MENU] button to switch to the
menu mode.
2. Press the
3.
Turn the [VOLUME] knob to select "RIGHT" or
"LEFT".
eRIGHT:
Telephone calls can be heard on the front
right speaker connected to this unit.
eLEFT:
Telephone calls can be heard on the front left
speaker connected to this unit.
4.
Press the [MENU] button to return to the
previous mode.
Cellular
If you connect this unit and your cellular phone
with a separately sold unit (Bluetooth BB
(BL
T370/433))
calls on your speakers.
* The factory default setting
1.
Press the [MENU] button to switch to the
menu mode.
2. Press the
SW".
3.
Turn the [VOLUME] knob to select "OFF",
"ON"or"MUTE".
eOFF:
Cellular phone interrupt does not work.
eON:
You can listen to
speakers connected to this unit.
Notes:
•
If
connecting Bluetooth BB (BL T3701433),
please ensure the setting is
telephone audio through the system.
• When listening to
you can adjust the volume
knob.
eMUTE:
The sound from this unit is muted during
telephone calls.
4.
Press the [MENU] button to return to the
previous mode.
ON.
[!]
or
[,]
button to select "TEL-SP".
phone
interrupt
, you can listen to your telephone
[!]
or
[,]
button to select
your
your
setting
is
"OFF".
telephone calls from the
ON
to receive the
calls on
your
by
speakers,
the [VOLUME]
"TEL-
CMD5
23
Page 24

Common Operations
Performing memory reset
This function allows you to reset adjusted
settings
The stored settings like preset channels,
adjusted areas, ISR memories, adjust mode
settings and sound mode settings can be
formatted by this function.
• The settings will remain in the ROM evenifyou
2.
3.
in
the ROM.
Note:
turn the
power
offorpress the reset button.
1.
Press the [MENU] button to switch to the
menu mode.
Press the
Press and hold the [ENT] button.
The power will
[!]
or
[,]
button to select "RESET".
be
turned off automatically.
Performing a system check
This function verifies the devices hooked up
through CeNET.
1.
Press the [MENU] button to switch to the
menu mode.
2.
Press the
CHECK".
3.
Press and hold the [ENT] button for 1 second
or longer.
CeNET connection configuration is
automatically checked.
When the system check is complete, the
display returns to the previous mode.
[!]
or
[,]
button to select "SYSTEM
24
CMD5
Page 25

Sirius
Satellite Operations
• Requires
What
Sirius is radio the way it was meant to be: Up to
100 new channels of digital quality programming
delivered to listeners coast to coast via satellite.
That means 50 channels of completely
commercial-free music. Plus up to 50 more
channels of news, sports, and entertainment
from names like CNBC, Discovery, SCI-FI
Channel, A&E, House of Blues,
Speedvision and ESPN.
Sirius is live, dynamic entertainment, completely
focused on listeners. Every minute of every day
of every week will be different. All 50 ·commercialfree music channels are created inhouse and
hosted by DJs who know and love the music. Do
you like Reggae? How about Classic Rock or
New Rock? Sirius has an array of choices
spanning a vast range of musical tastes including
the hits of the 50's, 60's, 70's, & 80's as well as
Jazz, Country, Blues, Pop, Rap, R&B, Bluegrass,
Alternative, Classical, Heavy Metal, Dance and
many others...
From its state-of-the-art, digital broadcasting
facility
Sirius will deliver the broadest, deepest mix of
radio entertainment from coast to coast.
Sirius will bring you music and entertainment
programming that is simply not available on
traditional radio
Ifs
So Get Sirius and Listen Up! For more
information, visit siriusradio.com.
To receive
additional
is Sirius Satellite? SIRIUS'"
in
Rockefeller Center, New York City,
radio like you·ve never heard before.
Sirius
SIR-CL3M CeNET module.
REA
D Y
E!,
NPR,
in
any market acrossthe country.
Satelliteonthis
receiver
This receiver contains a SIRIUS10for user
identification. All you have to do to obtain a
subscriber contract and enable reception of
Sirius Satellite is to call the Sirius Service Center
(1-888-539-SIRIUS (7474), online at
siriusradio.com) and inform us of your SIRIUS
and a few other details.
Selecting Satellite
Press the [SAT] button to select the Satellite
mode.
The Satellite indication lights entering the mode
that was engaged when the unit was turned off
last time.
Selecting a
Press the [SAT] button to select a band.
Each press of the button changes the display as
shown below.
SR1-+SR2-+SR3-+SR1
band
mode
...
* The currently received band is displayed
function mode indication.
* Models without a function mode indication display
he band name and channel number
Operation status indication.
• Information displayed
reception
The following information is displayedinthe
Operation status indication when Sirius Satellite
cannot be received normally.
• UPDATING : when the receiver is turned
• ACQUIRING : when a channel is being
• INVALID
•
"CALL
888"
~
"539-SIRI"
• ANTENNA
10
• SUB UPDT
on
reset.
tuned
received), or an antenna
issue exists.
: a channel without a
CH
broadcast has been selected,
or the receiver may not be
activated.
: a channel not covered by
your contract.
Call Sirius Service Center (1888-539-SIRIUS (7474)).
Online at siriusradio.com
: when the antenna is
disconnected.
: when the subscription of a
channel covered by your
contract is being updated.
during
the first time or after a
in
(no signal is yet
in
the
in
the
CMD5 25
Page 26

Sirius
Satellite Operations
Switching
Each
changesasfollowing order:
Channel name and band/channel
...
number'"
and band/channel
time
you press
category
the
name
title
display
the
[DISP] button,
and
and
artist
number'"
band/channel
number
name'"
radio
clock
the
item
text
display
... channel name and band/channel
number
...
Notes:
• The Operation status indicationofthe source unit
displays the abbreviated channel name for 2
seconds when a station is selected before
returning to the previous display mode.
• Scrolling starts when the channel name
text has been displayed for
scrolling finishes, the first text display appears.
start scrolling again, press
button for
Channel
Channels
1second
selection
are selected with the following buttons.
The
[!]
or
•
•
The
The
•
[,]
[DIRECT] buttons
[CAT] button
or
longer.
button
2 seconds. When
and
or
other
hold the [DISPJ
To
* For details, see the following operation
descriptions.
Note:
• The audio outputismuted
operations are not accepted during channel
selection.
and
otherbutton
Tuning
There
are 2
seek
tuning
Seek
tuning
Only
channels
while
channels
not
coveredbythe
skipped.
1. Press
seeks
above
2.
Press
receiver
above
found
available
seeking
is found.
typesoftuning
and
preset
that canbereceived
without
the
[!]
or
the
next
the
and
the
when
available channel
current
hold
the
movestoseek
current channel. If the channel
either button is released is
that
channel is received. Otherwise,
continues
modes
The
[,]
button.
channels
available,
are
selected
and
channels
receiver
below
The
below
tuning.
broadcasts
contract are automatically
[,]
button.
channel.
[!]
or
until an available channel
or
or
Recalling a
A totalof18
SR1,
6-SR2
select
your
theminmemory
1. Press
SIRIUS
To
recall a stored
2.
desired [DIRECT] button to
channel.
preset
SIRIUS
and
favorite
the
[SAT] button and select
band
channel
channels canbestored (6-
6-SR3). This allows you to
SIRIUS
for
later recall.
(SR1,
SR2orSR3)
SIRIUS
channels
and
store
the
desired
.
qhannel, press the
select
that
* Press and hold one of the [DIRECT] buttons for
2 seconds or longer to store the current
channel into preset memory.
Manual
1.
2. Press and hold
Notes:
• When the name
changed
may
storedname.
• A channel stored in memory maybe discontinued
at
Category
Sirius Satellite allows
channel
Receiving
memory
Select
the
desired
preset
tuning.
for2secondsorlonger
channel into
by
showa channel name that differs from the
the optionofthe broadcasting channel.
channel with
oneofthe
preset
memory.
of
a channel stored in memory is
a broadcasting channel, the display
selection
category
you
(contents).
channels
seek
[DIRECT] buttons
to store
the
function
to select
broadcast
selected
tuning
current
by
category
This
starts
seek
that
meet
The
"CAT" indicator is displayed during
category
1. Press
selection mode.
2. Turn
counterclockwise
press
preset.
tuning and
the
specified
selection mode.
the
[CAT] button to
the
[VOLUME]
a [DIRECT] button if the
broadcast
category
enter
knob
clockwise
to select a category. Or,
channels
are selected.
the
the
category
or
category
is
* When 1 second has passed after selecting the
category, UP SEEK is automatically
performed, and a channel of the selected
category is received. You can also perform
seeking by using the
3. Press
the
[CAT] button again
[!]
or
[T]
button.
to
cancel.
or
26
CMD5
Page 27

Sirius Satellite Operations
Notes:
• When the categoryselection mode is entered, the
category
of
first.
• The category selection mode is canceled when no
channel with the selected category can be found.
• Press the
channel has been
channels upordown. The category selection
modeis canceled
if
no operation is performed for 7 seconds.
Presetting a
A
category
categories in
desired
corresponding
1. Press the
mode.
2.
Turn
counterclockwise
3.
Press
for2secondsorlonger
category
the last received channel is displayed
[!]
or
[T]
button within 7seconds aftera
set
to continue seeking
and
normal reception is resumed
category
can be
presetbyregistering specific
[DIRECT]
category
[CAT]
the
[VOLUME]
and
hold
into
[DIRECT]
buttons 1 to 6.
can be recalledbypressing
button.
button to enter
knob clockwise
to select a category.
oneofthe
preset
memory.
the
[DIRECT] buttons
to store the
Then
the
the
category
or
current
Notes:
• When the nameofa channel stored in memory is
changed
by
may
storedname.
• A channel stored in memory
at
the optionofthe broadcasting channel.
a broadcasting channel, the display
show
a channel name that differs from the
may
be discontinued
• Preset scan
A
preset
scan
channels) stored in the
every
1.
Press
or
2. Press
the
To
verify
For
more
SIRIUS10(Sirius
Operations"
scans
10 seconds.
and
hold
longer
to start a
the
[CAT]
[!]or[T]
your
information,
.
the
button, a
button to cancel a
SIRIUS ID
mode
the
channels
preset
memory
[ENT] button
preset
scan.
[DIRECT]
see
"Verifying
only)"in"Common
(up to 18
about
for2seconds
button,
preset
scan.
your
Scan
function
There
are 2
scan
and a
preset
During scanning,
abbreviated form and
be switched .
modes: a category scan
scan
mode.
channels
are displayed in
the
display
mode
• Category scan
In a
category
same
selected
1. Press
scan.
2. Press
the
scan.
Note:
• Category scanning is
category is defined for the current channel.
scan, broadcast channels in
categoryasthe
about
the
[ENT] button to start a
the
[CAT]
[!]or[T]
current channel are
every
10 seconds.
button, a [DIRECT] button,
button to cancel a
not
category
available when no
mode
cannot
the
category
CM05
27
Page 28

iPod
Connecting the iPod CeNET Interface (additional
EA12768 CeNET interface required) allows you
to operate your iPod from the operation panel of
this unit. This unit has the iPod MENU mode
which allows you to operate by the same feeling
as operating on the iPod.
In
tracks stored
selecting tracks or playing them back. To search
tracks by the album title orthe artist name by the
similar operations from the Music menu of the
iPod, see
mode".
Notesonusing
You can connect the following iPods:
• iPod G3 Ver. 2.3 or higher
• iPod G4 Ver.
• iPod Photo Ver. 1.2 or higher
• iPod mini Ver. 1.4 or higher
• iPod nano Ver. 1.0 or higher
Notes:
• iPodshuffle cannot be connected.
• When the iPod is connected, the operations on the
• The characters that can be displayed are
Selecting
Press the [AUX] button to select the iPod mode.
Note:
• When "NO
Switching
Press the [DISP] button to select the desired
display.
Each time you press the
display switches
Operations
the iPod mode, this system considers all the
(Images cannot be displayed.)
iPodare prohibited.
alphanumeric characters only. 2-byte characters
cannot
connectors
are correctly connected.
in
the iPodasone album when
"Selecting
tracksinthe
iPod
3.1
or higher
be
displayed.
iPod
mode
IPOD"
is displayed, check whether the
of
the iPod
and
iPod
the
display
[DISP] button, the
in
the following order:
iPod MENU
CeNET
Controller
Song
name and
display
The song name, the current track number, and
the play time are displayed.
Album/Artist
The album title and artist name are displayed.
Clock
Display
The current timeisdisplayed.
Song name and
display
Note:
• Title characters which cannot be displayedbythis
unit are displayed with
Pausing
1.
Press and hold the
or longer to pause playback.
appearsonthe display.
2.
To resume playback, press and hold the
button for 1 second or longer again.
display
play
Track
Track
number/Play
~
J,
~
number/Play
"*".
[':~~E
] button for 1 second
"PAUSE"
time
time
[':~~E]
Selectingatrack
• Track-up
1.
Press the
ahead to the beginning of the next track.
•
Track-down
1.
Press the
back to the beginning of the current track.
2.
Press the
afterthe beginning of the track to move to the
beginning of the previous track.
[!]
button during playback to move
[T]
button during playback to move
[T]
button again within2 seconds
Fast-forward/fast-rewind
• Fast-forward
Press and hold the
longer during playback.
• Fast-rewind
Press and hold the [T] button for 1 second or
longer during playback.
[!]
button for 1 second or
28
CMD5
Page 29

iPod
Operations
Repeat
This repeat playback of the track currently played
back. It corresponds to the iPod operation of
selecting "Settings" ... "Repeat (one)" from the
menu of the iPod.
1.
2.
All
This repeat playback of the all tracks. It
corresponds to the iPod operation of selecting
"Settings" ... "Repeat (ALL)" from the menu of
the iPod.
1.
2.
Random
This specifies random playback of the tracks
included
operation of selecting "Settings" ...
(Albums)" from the menu of the iPod.
1.
2.
play
Press the [REPEAT] button.
To cancel repeat playback, press the
[REPEAT] button again.
repeat
Press and hold the [REPEAT] button for 1
second or longer.
To cancel All repeat playback, press the
[REPEAT] button again.
play
.
play
in
the album. It corresponds to the iPod
Press the [RANDOM] button.
To cancel random playback, press the
[RANDOM] button again.
"Shuffle
1.
Press the [CAT] button.
* The "CAT" indicator is lit when the system
entersinthe iPod MENU mode.
Press the [CAT] button again to return to the
iPod mode.
2.
Turn the [VOLUME] knob to select the menu,
then press the
the [DIRECT]
[DIRECT] (1) "PLAYLISTS"
[DIRECT]
[DIRECT] (3) "ALBUMS"
[DIRECT]
[DIRECT]
[DIRECT]
3.
Turn the [VOLUME] knob to select the menu,
then press the
repeating this operation.
Notes:
• The numberofrepeating operation is differ
depending
•
To
return to the previous list, press the
However, you cannot return
step
2. Perform the operation from the step 1
again.
[l]
button. Or, press either of
(1to6)
button.
(2)
"ARTISTS"
(4)
"SONGS"
(5)
"GENRES"
(6)
"COMPOSERS"
[l]
button. Select tracks by
to
the selected menu.
to
[!]
the menuofthe
button.
All
random
This specifies random playback of all the tracks.
It
corresponds to the iPod operation of selecting
"Settings" ...
of the iPod.
1.
Press and hold the [RANDOM] button for 1
second or longer.
2.
To cancel the All random playback, press the
[RANDOM] button again.
Selecting tracksinthe
play
"Shuffle
(Songs)" from the menu
iPod
MENU
mode
In
the iPod mode, you can select tracks by the
album title or artist name by the similar
operations on the iPod as well as the iPod Music
menu.
Note:
•Inthe iPod MENU mode, you cannot specify the
fast-forward, fast-backward, repeat
playback.
and
random
CMD5 29
Page 30

CD Changer Operations
CD
changer
Whenanoptional CD changer (additional
DCZ625 CeNET changer required)
through the CeNET cable, this unit controls all
CD changer functions. This unit can control a
total of 2 changers.
Press the [DISC] button to select the CD changer
mode to start play. If 2 CD changers are
connected, press the [DISC] button to select the
CD changer for play.
* If "NO
MAG"
magazine into the CD changer. "D-CHECK"
appears on the display while the player loads
(checks) the magazine.
* If "NO DISC" appears on the display, eject the
magazine and insert discs into each slot. Then,
reinsert the magazine back into the CD changer.
Note:
• Some CDs recorded in CD-R/CD-RW mode
notbe usable.
Dependingonthe
discs
may
Pausing
1.
Press and hold the
or longer to pause play. "PAUSE" appears
the display.
2.
To resume CD play, press and hold the
button for 1 second or longer again.
Selectingatrack
• Track-up
1.
Press the
beginning of the next track.
2.
Each time you press the
advances ahead to the beginning of the next
track.
• Track-down
1.
Press the
beginning of the current track.
2.
Press the
beginning of the previous track.
Fast-forward/fast-rewind
• Fast-forward
Press and hold the
longer.
• Fast-rewind
Press and hold the
longer.
30
CM05
functions
is
appears on the display, insert the
ACAUTION
recording
not
play
properly.
play
[!]
button to move ahead to the
[T]
button to move back to the
[T]
button twice to move to the
[!]
[T]
format, CD-ROM
[':~~IE
] button for 1 second
[!]
button, the track
button for 1 second or
button for 1 second or
connected
may
[':~~IE]
Selecting
1.
Press the
desired disc.
* If a CD is not loaded
Scan
Scan play locates and plays the first 10 seconds
of each track on a disc automatically. This
function continues on the disc until it
a CD
[~DISC~]
pressing the
play
button to select the
in
[~DISC--*]
a slot of magazine,
button can not work.
* The scan play is useful when you want to select a
desired track.
1.
Press the [SCAN] button.
2.
To cancel the scan play, press the [SCAN]
button again.
Disc
scan
play
Disc scan play locates and plays the first 10
seconds of the first track
currently selected CD changer. This function
continues automatically until it
on
each discinthe
* Disc scan play is useful when you want to select a
desired CD.
1.
Press and hold the [SCAN] button for 1
second or longer.
2.
To cancel disc scan play, press the [SCAN]
on
button again.
Repeat
Repeat play continuously plays the current track.
This function continues automatically until it
canceled.
1.
2.
Disc
After all the tracksonthe current disc have been
played, disc repeat play automatically replays the
current disc over from the first track. This function
continues automatically until it
1.
2.
play
Press the [REPEAT] button.
To cancel repeat play, press the [REPEAT]
button again.
repeat
Press and hold the [REPEAT] button for 1
second or longer.
To cancel disc repeat play, press the
[REPEAT] button again.
play
is
canceled.
is
canceled.
is
canceled.
is
Page 31

CD Changer Operations
Random
Random play selects and plays individual tracks
on
the discinno particular order. This function
continues automatically until it is canceled.
1.
Press the [RANDOM] button.
2.
To cancel random play, press the [RANDOM]
button again.
Disc random
The disc random play selects and plays
individual tracks or discs automatically
particular order. This function continues
automatically until it is canceled.
1.
Press and hold the [RANDOM] button for 1
second or longer.
2.
To cancel disc random play, press the
[RANDOM] button again.
play
play
in
no
CMD5
31
Page 32

TV Operations
TV
tuner
functions
Whenanoptional TVtuner (additional TTX7501 Z
CeNET module required)
the CeNET cable, this unit controls all TV tuner
functions. To watch TV requires a TV tuner and
monitor.
is
connected through
Watching a TV
1.
Press the [AM/FM] button and select the TV
mode.
2.
Press the [AM/FM] button to select the
desired TV band
button
is
between
3.
Press the
desired TV station.
(TV1
pressed, the input selection toggles
TV1
and TV2.
[!]
or
orTV2). Each time the
[l]
button to tuneinthe
Tuning
There are 3 types of tuning modes available,
seek tuning, manual tuning and preset tuning.
Seek
tuning
1.
Press the [AM/FM] button and select the
desired TV band
(TV1
or TV2).
* If "MANU" is lit on the display, press and hold
the [AM/FM] button for 1 second or longer.
"MANU" on the display goes off, and seek
tuning is now available.
2.
Press the
seek a station. Press the
automatically tune up the frequency band to
the next available TV station; press the
button to automatically tune down.
Manual
There are 2 manual tuning methods available:
Quick tuning and step tuning.
When you are
frequency changes one step at a time.
quick tuning mode, you can quickly tune the
desired frequency.
1.
Press the [AM/FM] button and select the
desired band
* If
2.
Tuneina station.
•
Quick
Press and hold the
or longer to tune
[!]
or
[l]
button to automatically
[!]
button to
tuning
in
the step tuning mode, the
(TV1
or TV2).
"MANU"
hold the [AM/FM] button for 1 second
longer. "MANU" lights on the display and
manual tuning is now available.
is not lit on the display, press and
tuning
[!]
or
[l]
in
a station.
button for 1 second
In
or
[l]
the
• Step
Press the
station.
A total of 12 TV stations can be stored (6and 6-TV2). This allows you to select your
favorite TV stations and store them
later recall.
1.
2.
tuning
[!]
or
[l]
button to manually tuneina
Recalling a
Press the [AM/FM] button and select the
desired TV band
To recall a stored TV station, press the
desired [DIRECT] button.
preset
(TV1
station
in
or TV2).
TV1
memoryfor
* Press and hold one ofthe [DIRECT] buttons for
2 seconds
into preset memory.
Manual
1.
Select the desired station with seek tuning,
manual tuning or preset tuning.
2.
Press and hold one of the [DIRECT] buttons
for 2 seconds or longer to store the current
station into preset memory.
Auto
Auto store selects 6 TV stations automatically
and stores each one into preset memory.
If there are not 6 stations with good reception,
stations previously stored
only the strong stations are stored into memory.
1.
Press the [AM/FM] button and select the
desired TV band
2.
Press and hold the [ENT] button for 2 seconds
or longer. The stations with good reception are
stored automatically to the preset channels.
memory
store
or
longerto store the current station
in
memory remain and
(TV1
or TV2).
Presetscan
Preset scan allows the user to view each preset
position before it automatically advances to the
next preset. This function is useful for searching
for a desired TV station
1.
Press the [ENT] button.
2.
When the desired stationisfound, press the
[ENT] button again to remain tuned to that
station.
Note:
• Do
not
press
secondsorlonger. Doing so will trigger the auto
store function
and
and
Setting TVNTR
To switch TV to VTR, to select the TV area, and
to set the TV diver, see
in
memory.
hold
the
[ENT]
button for 2
start
storingstations into
andTVdiver
"Common Operations".
memory
.
32
CMD5
Page 33

Power does not
turn on.
(No sound
produced.)
No sound output
when operating the
unit with amplifiers.
The settings
ROM are not
stored properly.
Disc does not start. The unitisnot turned on. Turn the power on.
is
Incorrect wiring.
Amplifier turn-on lead is
shorted to ground or
excessive current
required.
The microprocessor has
malfunctioned due to
noise, etc.
The speaker protection
circuit is operating.
in
the
ROM
failure.
There is a disc other than Press the
a compact disc or foreign
matter already
MP3IWMA files are
in
absent
Files are not recognized Use MP3IWMA files encoded properly.
as
an
MP3IWMA file.
File system
Disc is dirty.
is
heavily scratched
Disc
or warped.
is
in
place.
a disc.
is
not correct. Use
Replace with a fuse of the same amperage. If the
fuse blows again, consult your store of purchase.
Consult your store of purchase.
Turn the unit off and check each wire for a
possible short. If the amplifier turn-on lead shorts
out, cover it with insulation such as tape.
Open the front panel
by pressing the
[OPEN] button. Press
the reset button for
about 2 seconds with a
thin rod.
The settings will
in
remain
even if you press the
reset button.
1.
2.
3.
If the error persists, consult your store of
purchase.
Write MP3IWMA files onto the disc properly.
system.
Clean the disc with a soft cloth.
Replace with a disc with no scratches.
the ROM
Check the speaker connection.
Turn down sound volume. Function can also
be restored by turning the power off and
again.
If the soundismuted again, consult your store
of purchase.
[~]
button to eject.
1809660
level 1,2or JOLIET or Romeo file
Reset
button
on
CM05
33
Page 34

Sound
is
out or skipping.
Noise
or noise
with sound.
Source selection The microprocessor has
does not recognize not stored the proper
GeNET source GeNET information.
connection. The GeNET cable
cutting
is
generated
is
mixed
Water droplets may form Let dry for about 1 hour with the power on.
on
the internal lensina
humid place.
File systemisnot correct. Use IS09660 level 1,2or JOLIET or Romeo file
is
not
connected properly.
system.
Perform a system check. See
Operations",
Ensure the GeNET cables are properly
connected.
performing a system check section.
"Common
34
CMD5
Page 35

Ifanerror occurs, one of the following displays is displayed.
Take the measures described below to eliminate the problem.
is
A DISC
the CD deck and is not
ejected.
A DISC cannot be played
due to scratches, etc.
A DISC is loaded upsidedown inside the CD deck
and does not play.
A communication error
occu
and the iPod CeNET
Controller.
A CD inside the CD
changer
ACD
changercannotbe played
due to scratches, etc.
A CD inside the CD
changercannotbe played
because it is loaded
upside-down.
The speaker protection
circuit
During this operation, if
any volume operation is
performed, the display
shows "AMP GUARD".
"AMP GUARD"
sometimes functions
when special test signals
are used.
an
error display other than the ones described above appears, press the reset button. If the problem
If
persists, turn off the power and consult your store of purchase.
caught inside
rs
between the iPod
is
not loaded.
inside the CD
is
operating.
This is a failure of CD deck's mechanism and
consult your store of purchase.
Replace with a non-scratched, non-warped-disc.
Eject the disc then reload it properly.
Disconnect the iPod, then connect it again.
This
is
a failure of CD changer's mechanism.
Consult your store of purchase.
Replace with a non-scratched, non-warped disc.
Eject the disc, then reload it properly.
1.
Turn down sound volume. Function can also
be restored by turning the power off and on
again.
(Speaker volume
when the speaker protection circuit operates.)
2.
If the soundismuted again, consult our
service department.
is
reduced automatically
CMD5
35
Page 36

Source unit harness wire
connections
Wire Color
Yellow +12 V DC Constant
Red +12 V DC Switch Lead/
Black Ground
Blue/White
Grey
Grey/Black
White Left Front Speaker (+)
White/Black
Purple
Purple/Black
Green
Green/Black
Brown
Function
Power Source/Memory
Accessory
Amplifier Remote Turn-on
Right Front Speaker (+)
Right Front Speaker
Left Front Speaker
Right Rear Speaker (+)
Right Rear Speaker
Left Rear Speaker (+)
Left Rear Speaker
Phone Mute
(-)
(-)
(-)
(-)
Alternate Channel Selectivity:
Stereo Separation
Frequency Response (±3 dB): 30 Hz to 15 kHz
AM
Tuner
Frequency Range:
U.S.A: 530 kHz to
Europe:
Australia:
Usable Sensitivity: 25
(1
kHz): 35 dB
531
kHz to 1602 kHz
531
kHz to 1629 kHz
1710kHz
/.l
V
70
dB
CD Player
System: Compact disc digital audio system
Usable Discs: Compact disc
Frequency Response
Signal to Noise Ratio
Dynamic Range
Harmonic Distortion:
(±1
(1
(1
kHz): 95 dB
0.02%
dB):
10Hz
kHz): 100 dB
to 20 kHz
Audio
Maximum Power Output: 200 W (50 W x 4 ch)
Bass Control Action (60 Hz): ±14 dB
Treble Control Action
Line Output Level (CD 1 kHz): 2 V
(10kHz):
±14 dB
RCA Connections
Wire Color
Grey/Red
Grey/White
Black/Red
BlacklWhite
Purple/Red
Purple/White
Red/Red
Red/White
Function
Right Front Line Level
Output (Full range)
Left Front Line Level
Output (Full range)
Right Rear Line Level
Output (Full range)
Left Rear Line Level
Output (Full range)
Right Non-Fade Line
Level Output (Full range)
Left Non-Fade Line Level
Output (Full range)
Right Auxiliary Input
Left Auxiliary Input
FMTuner
Frequency Range:
U.S.A: 87.9 MHz to 107.9 MHz
Europe: 87.5 MHz to 108.0 MHz
Australia: 87.0 MHz to 108.0 MHz
Usable Sensitivity: 9 dBf
50 dB Quieting Sensitivity: 15 dBf
36
CMD5
General
PoWer Supply Voltage:
14.4 V DC (10.8 to 15.6 V allowable),
negative ground
Current Consumption: Less than 15 A
Speaker Impedance: 4
Weight / Source unit: 4.62 lb.
Weight / Remote control unit:
1.41 oz. (40 g) (including battery)
Dimensions / Source unit:
7-1/8" (Width)
[180.4 (W)
Dimensions / Remote control unit:
1-3/4" (Width) x 4-7/16" (Height) x 1/2"
(Depth) [44 (W) x 113 (H) x 13 (D) mm]
Escutcheon section:
7-7/8" (Width)
(Depth) [199.4 (W)
Power Output:
21
W RMS x 4 Channels at 4 Q
and 1 % THD+N
Signal to Noise Ratio: C
91
dBA
(reference: 1 W into 4 Q)
Note:
• Specifications
without notice for further improvement.
Q (4 Q to 8 Q allowable)
(2.1
kg)
x 2" (Height) x 7-7/10" (Depth)
x 51.2 (H) x 195.5 (D) mm]
x 3-5/8" (Height) x 1-7/8"
x 91.9 (H) x 47 (D) mm]
and
design are subject to change
Page 37

CE
DECLARATION
under
OUI
no
resJxmsibiJily
nl'l,mVt!:
Al\'1tFtU BroadCtlst Receh1fr vritb
:::::'~jDj}:~j:;:~2K(I);~::::':::::::::::::::~::::::::::::::::::::::::::::::::::~
.
J?ntcJ.J!.~Lf&(.h~.:__l?l'~;.2JO
~n
w§lic!J
~1Jmdafdis\
i!lppl&~:<:lbl"'·.1
!~!!~~t\~~:t.J::.,.m!tt
.n.fI.~h~.J;~~~!!,ilMl!t.l'.iiJ1~.l.~L.,:~.Mlr~l.5;;~1~~.B.!!!Ji:Q
P.i1It';,~.~u:~.~.J:r.i.n!.Jm~.JJ$.~,.fl?r
OF
lJH.~~
Pfl)d~l~~!
CD
...
q.l.l.b:,
•.
~kc;:t~1~lj.Q'
CONFORMITY
Ph''''N-:
, _
...
,ti.~JLf:tLt~!M~~~!:"'
..
;t,~,.J):f
PrintedinPhilippines / Imprime aux Philippines / Impreso en Filipinas / Stampato ne!!e Filippine
2006/12
284-0977
-00
..
-1.
1.
Read the instructions carefully.
2.
This unit is designed for use in
applications with a 12V
ground.
3.
Be
terminal
istoprevent short-circuiting. (Figure 1)
Prepare
4.
source
5. Install the unit within 30° of the horizontal
plane. (Figure 2)
6. To avoid liquid
components, take caution in selecting an
appropriate mounting location.
cup holders and those in contact with
splash must be avoided.
7. If any modification to the
as drilling holes, etc., consult your
or
8. Use the included screws for installation.
other screws can result in damage. (Figure 3)
BEFORE STARTING I
sure
to
disconnect the battery's "8"
before beginning the installation.
all articles
unit before beginning.
damage
manufacturer beforehand.
11III
power
necessary
to the internal
boat
marine
supply,
negative
for installing
Areas
below
direct
is required,
boat
This
the
such
dealer
Using
InstallationlWire Connection
Gufa
P}Fl~=Ptt~~~=it\'='h«~'Mtf'~'>"'tr-'21
L~appareil
rnarines
negative.
Fiaccordez bien la
avantdeproceder
but d'eviter les
PreparEH"
I'installation de l'appareil pilote avant
conlnlenCEJr.
5,
lnstallez I'appareil un rayon
rrraxirnurn par
2)
6,
Pour
cornposants
selection
Evitez les
et celles en contact avec les
directes.
VallS devez nl0difierIebateau}
7. Si
en pergant
prealable
bateau.
8, Utilisez les vis fOUl'flies
Lutilisation
dornmages. (Figure 3)
de
instalacion/conexion
con~~u
aVl3C
tOLlS
eviter
de
zones
Ie
tout dornrnago
des
d~autres
pour
dlirllentationde1 V
borne
El
l'installation.
courts~circuits.
les articlt3S necessaires
rapport
arhorizontale,
internes~
I'ernplacenlentdenlontage.
revendeur ou
faites
situees SallS les porte-,verrE;
trous~
etc.j consultez au
vis risque crentralner
I ANTES DE COMENZAR I
applications
El
f11aSSE}
de
la
batteriE3
de
par
pour
-j)
c
30
,
(Fi£lun3
des
lars
de
eX81Tlplt3
du
des
(Figure
par
liquiclo
i::1ttention
E~cla.boussLlres
Ie
l\ibricant
pour
I'installation.
Guide
de
1. Lea cuidadosamente las instrucciones.
2. Esta unidad
en embarcaCiones con fuente
de
12 V con negativo
3.
Antesdecomenzar
desconectar
de
es
Esto
4. Antes
artfculos necesarios
unidad
5.
Instale la unidad
inclinaci6nde30° del plano horizontal. (Figura
I
cables
ha
para evitar cortocircuitos. (Figura 1)
de
comenzar, prepare
Iuente.
I
n_<,,,,,;_jq"',;_-,,'Hn
sido
disenada
la instalaci6n, cerci6rese
el terminal "8"
para
dentrodeun
para
de
amasa.
alimentaci6n
de
todos
la instalaci6ndela
angulo
utilizarse
la baterfa.
los
de
2)
6.
Para evitar el
Ifquidos en los
cuidado al elegir la ubicaci6ndemontaje
apropiada. Evite lugares
portavasos y expuestos a salpicaduras.
7.
Si es necesario realizar
en la embarcaci6n,
consulte con antelaci6n al
fabricante
8.
Para la instalaci6n, utilice los tornillos
suministrados. La utilizaci6n
resultar en danos. (Figura 3)
dano
componentes
de
la misma.
que
podrfan provocar los
internos,
situados
cualquier
como
taladro, etc.,
proveedor
de
otros
debajo
modificaci6n
a al
podrfa
tenga
de
'1
"
LJ=3ggere
I\ssicurarsi di
!Jrirna
di
evitare cortocircuiti. (FigurE! -')
!·-},·c:;n';)i!"SlI'·C
I'installazione dell'unita di fante prirna
5. Installare
(FifJura
6. Per ovitare
Iiquicli} fare attenzione nel
di rnontaggio appropriata. Le
quelle in
trapanatura
ofabbricante
Usare
8.
altre
tutti gli f3lelllenti
11unita
entro
2)
danni
contatto
501"10 necessarie nlodifiche barca,
viti
eli
forL ece., consultare
della
Ie
viti
in
dotazione
pub
causare
il
tnl'nll,--j':ll'r:':'1
I'irlstallazione.
ne(:::eE:;saJI
30° dal
ai cornponenti internl
>J
....
',\.J~_''--'l
con spruzzi diretti
barca.
per
l'instaHazione.
danni. (Figura 3)
eli
COlnlll!CIi:~JlI'()"
"c.,,
'-_
prirYlEt
il
Yl\!I:'),'\"Il!';'\!,'{:J
eli
..
Max.
30°
30°/30-::
max.!
como
maximal Mass. 30'
Figure 2 /
11III
/ Figura
2/
Figura
Figure 1 / Figure 1 / Figura 1 / Figura 1
Chassis
I Chassis I Chassis I Chassis
Boat battery
de
Batterie
Baterfa del autom6vil
Batteria dell'automobile
voiture
Max.
5/16" (8 mm)
Max. 5/-16" (8 mm)
5/16" (8 mm)
Max.
Massimo. 5/'16"
Chassis
(8
mrn)
Figure 3 / Figure / Figura 3 /
I Chassis / Chassis I Chassis
Damage
EndollllT13Qe
Danado
Danno
-2.
1.
Do not open
serviceable
into the unit during installation,
store of purchase.
Use
2.
use hard cloth, thinner, benzene, alcohol, etc.
For tough dirt,
to a soft cloth and
IMPORTANT:
Improper installation may cause
unit
experience,
chassis wire leads voids the warranty.
GENERAL
the
case.
parts
inside. If you
a soft,
dry
cloth to clean the case. Never
apply
a little coldorwarm
wipe
or
boat. If youdonot have
consult
a qualified installer. Cutting
CAUTIONS
There
are no
drop
consult
off
the
dirt
gently.
damage
the
appropriate
user
anything
your
water
to your
I
CAlJTIONS
-I.Nepas
2. UtiliseI' un chiffon
Une installation incarn:::cte
I'apparel! ouIevehicule.
les
irlstallateur qualifie.
annule
ouvrirIecoffret.
reparables
I'apparei!. un est
I'
apparc-3i1
rTlagasin
ne utiliseI' un
du de
salete
la
froicle au
essuyer
doucernent
connaissances
la garantie.
GiENE
i~utilisatellr
tiede
II
doux8tsec
tenace
..
GIJ~JII~uvl
sur
un
la salf3te.
I
,-,'-JiUI
....
"'-_d.
COLlper
t0l11be
dans
consulter Ie
I
PRECAUCIONES
1.Noabra
que
dentrodela unidad durante la instalaci6n,
consulte al establecimiento
adquisici6n.
2.
Para Iimpiar la caja, utilice un
seco.
pintura, benceno, alcohol, etc. Para la
suciedad resistente, aplique un
frfa 0 caliente a un
suavementelaparte
IMPORTANTE:
La instalaci6n inapropiada puede causar danos
en su unidad
la experiencia apropiada, consulte a un
instalador cualificado.
conductores
anulara la garantfa.
la caja. En el interior no hay
pueda
reparar el usuario. Si cae algo
no
use
nuncaunpano
pano
sucia.
0 su autom6vil. Si usted no posee
puesta
EI
amasa
de
GENERALES
donde
hizo la
pano
suave y
duro, diluidor
pocodeagua
suave y frote
corte de los
(carrocerfa)
piezas
I
de
Qaranzia.
Page 39

...
-3.
INSTALLING THE SOURCE UNIT I
INSTALACION DE LA UNlOAD FUENTE I
• Marine stereo mounting dimensions
Use the supplied template to cut and drill the
holes. (Figure
4)
_I_
I--
L{)
co
(V)
~
-
Hole/Trou/Orificiol
-
• Dimensiones de montaje en una
embarcacion
Utilice la plantilla suministrada para marcar las
posiciones de los orificios y efectuarlos.
(Figura 4)
182
179
60
-
I
Fo_ri-
I
- - -
_
Utilizzare
....
la fllC1.scherina in
e
praticare
i fori. (Figura 4)
dryf""'71r.I~H--';
•
C\l
u)
-
C\l
Q)
C\l
r\
1.
Insert the source unit into the cutout hole.
(Figure 5)
2.
Use the supplied screws (4 x 30) to secure the
source unit. (Figure
3.
Use the supplied strap and M5 nut to secure
the source unit. (Figure 5)
4.
Attach the side covers to the source unit.
(Figure 5)
5)
Figure 4 /
1.
Inserez I'appareil pilote dans Ie trou decoupe.
(Figure 5)
2.
Utilisez les vis fournies (4
l'appareil pilote. (Figure
3.
Utilisez la patte et IJecrou M5 fournis pour fixer
I'appareil pilote. (Figure
><
30) pour fixer
5)
5)
4. Fixez les couvercles lateraux sur l'appareil
pilote. (Figure
5)
185
/ Figura 4 /
s (6x) / Trous (6) / Orificios (6x) / Fori (x6)
Hole
I CAUTION I
Drill appropriately prepared holes at the 6 places for fixing the screws depending
on the materials and plate thickness of the panel.
Forez de fagon adequate les trous prepares aux 6 endroits pour la fixation des vis,
en tenant conlpte des materiaux
I PRECAUCION I
Perfore los orificios preparados apropiadamente en 6 lugares para fijar los tornillos,
dependiendo de los materiales y del espesor de la chapa del panel.
Trapanare i fori nei sei punti predisposti per
spessore del pannello.
1.
Inserte la unidad fuente enelorificio.
(Figura 5)
2.
Utilice los tornillos suministrados (4 x 30) para
fijar la unidad fuente. (Figura 5)
3.
Utilice el tirante suministrado y la tuerca M5
suministrada para fijar la unidad fuente.
(Figura
5)
4.
Fije las cubiertas laterales a la unidad fuente.
(Figura 5)
et
de I'epaisseur de la plaque du panneau.
Ie
viti a seconda del
111ateriale
1. Inserire I'unita di fonte nei fori praticati.
(Figura
5)
2. Utilizzare
fissare l'unita di fonte. (Figura
3.
Utilizzare la cinghia eildado M5 in dotazione
per fissare I'unita di fonte. (Figura
Ie
vitiindotazione (4 x 30) per
5)
5)
4. Applicare i coperchi laterali all'unita di fonte.
(Figura
5)
della
x
30
Screws/Vis 4
4
Tornillos 4 x 30/Viti 4 30
30/
/
/
/
/
Rubber
Gasket/,Joint en
Empaquetaduradegoma/Guarnizione
4 x
30
Screws/Vis 30/
Side Covers/Couvercles lateraux/
Cubiertas
laterales/Coperchi laterali
· Be sure to open the control panel before removing the side covers, pull
back
by grasping the center. Do
· Be sure to reinstall the side covers straight on pins after installing source unit.
0.
Veil
1HZflouvrirIepannet::lU de
:-;;lI;-;I;-;:-j(~/'<IH;-;
lat(~rau;<.
i\]'oubliez pas de
l'aPIJareil pilote,
Aseguresedeabrir el paneldecontrol antesdeextraer las cubiertas laterales y tire
·
elias
Aseguresedevolver a
·
una
/\ccertarsidiaprireiIpannello
tirarli afferraneloli al centro. Non (Lloial'f; i
Assicurarsi
parIecentre 8t d'un
hacia
atras
vez instalada la unidad fuente.
eli
reinstallaJe i cOfK:rchi laterali
Tornillos 4 x 30/Viti
not
twist the side covers.
Gornnlande
r(:~installer
asiendolas
les couvercles
por
c%car
el centro. No
las
cubiertas
eli
controllo prirTld laterali, quirKJi
11
30
avant de
coup
copc)t'chi
retirer
vers les cOLlvereles
lat(jrCU1X
tuerza
las cubiertas laterales.
latera/esdemodo
laterali.
SLJi
perni
caoutchouc/
les coulferc!es puis
que
tapen los
them
straight
avoir mont6
conectores
Source
unit/
Appareil pilote/
Unidad
fuente/
Unita di fonte
/
~t.1
\ Stud
Goujon
q
lIe
Perno prisionero/
Prigioniero
gasket
in
Note:
Confirm that the rubber
/A~,.""I
111-'
/·'1/(11I·....
Support
Strap/
Pattedesupport!
Tirantedesoporte/
~
Cinghia
di sostegno
~'1IB\1
B
'-
M5
Nut!
Ecrou
Boltl
filetE;/
Tuerca
Dado
fv15/
M5/
iv15
is fastened securely to the base panel.
de base.
Nota:
Confirme quelaempaquetadura de
goma
este fijada con
seguridadalpanel
de la base.
de
Control/are
in gornn7a sia ferrnata
eli
Figure 5 /
/ Figura 5 /
Page 40

..
-4.
CAUTIONS ON WIRING I
PRECAUCIONES PARA LA CONEXION DE CABLES I
1.
Be sure to turn the power off when wiring.
Be
particularly careful where you route the
2.
wires.
them
Keep
exhaust pipe, etc. Heat may
wires.
3. If the fuse should blow, check that the wiring is
correct.
If it is, replace the fuse with a new one with
the
4. To replace the fuse, open the lock on the
source
insert
*
There
not
metal parts.
5. Remove the sticker before connecting a
CeNET
well away from the engine,
same
amperage rating as the original one.
unit side, remove the old fuse and
the
new
one. (Figure 6)
are various types of fuse cases. Do
let the battery side terminal touch other
device. (Figure 7)
damage
the
~'J::2}1
FiE:({~;J\l~r~r~()i\lS~
rnetalliqu()s.
tt\lwJ)
~E;i~,j,J
1.
Antes de hacer las conexiones, asegurese
desconectar la alimentaci6n de la unidad.
2. Sea especialmente cuidadoso al dirigir y fijar
los cables.
mantengalos alejados del motor, tubo
escape, etc.EIcalor puede
3.
Si el fusible se quema, revise las conexiones.
Si esta quemado, reemplace el fusible
nuevo con el mismo valor de amperaje
original.
4.
Para reemplazar el fusible, abra la
unidad fuente, retire el fusible antiguo e instale
otro nuevo. (Figura 6)
* Existen distintos tipos de cajas de fusibles.
no permita que el terminal del lado
baterfa quede en contacto con otras partes
metalicas.
5.
Retire la etiqueta adhesiva antesdeconectar
un dispositivo CeNET. (Figura 7)
danar
de
los cables.
por
que
tapa
de la
de
la
de
otro
el
fill.
..
-5.
II1II
SAMPLE SYSTEMS I
rr~~
6
[~
G
Fuse case
Bo'itiet"
afusible
Gaja de fusible
Port a fusibile
Figure 6 / / Figura
6/
Fuse
Fusible
Fusible
Fusibile
Figure
7/
Source unit
CD
RCA extension cable (sold separately)
®
4-Channel power amplifier
®
@
Front speakers
Rear speakers
®
CeNET extension cable
®
(j)
Wired remote control unit
Sirius Satellite Receiver
®
CeNET Bluetooth BB (BLT433)
®
@)
iPod BB (EA1276B)
@
CD changer
@
TV tuner module
@
Monitor
@
AUX Bluetooth BB (BLT370)/External unit
@
V-adapter (sold separately)
Sticker
Etiquette
Etiqueta adhesiva
/\desivo
/ Figura
7/
~~
~
@
Note:
• Use a GeNET extension cable that is less than 20 m in length. (including the V-adapter GGA-519.)
GeNET
Bluetooth BB (BLT433) is available for European models only.
•
CeNET
Bluetooth disponible pour les rnodEjles
Nota:
• Utilice un cable prolongador
GeNET
Bluetooth BB (BLT433)
•
eli
prolunga
(BLr4~33)
inferieur 20
GeNETdemenos de 20 m de longitud (incluyendo el adaptador en Y GGA-519).
s610
esta disponible para modelos europeos.
eli
lun~lhezza
e disponibile solo per i rnoelelli per !'Europa,
m lonq (ell comptant aussi l'adaptatEjlJr Y
inferiore 20 rnetri (inc!uso l'aclattatore a Y CC,1\-5'19),
europE3ens
uniquement.
Unidad fuente
CD
Cable de extension RCA(se vende por separado)
®
Amplificador de potencia de 4 canales
®
@
Altavoces
delanteros
Altavoces traseros
®
Cable prolongador CeNET
®
(j)
Unidad de control remoto alambrica
Receptor vfa Satelite Sirius
®
CeNET Bluetooth BB (BLT433)
®
@)
iPod BB (EA1276B)
@
Cambiador de discos compactos
@
Modulo sintonizador de television
@
Monitor
@
Aux Bluetooth BB (BLT370)/Unidad externa
@
Adaptador en V (vendido aparte)
Page 41

-6.
WIRE CONNECTIONS I
• Disposici6n trasera
@
@
®
®
DIN
CORD
Connecttoexternal
CCJF,D01\1
CABLE
Conecteloalcontrolador
raccorde
DIN
DIN
DIl\]
(11a
t(~1(3cornrnande
al
telecomando
To
external amplifier
*1
Leave
the
CAUTION: Please make sure when connecting external power amplifiers, that they
Hacia el amplificador externo
:;:1Deje
PRECAUCION: Cuando conecte amplificadores de potencia externos, asegurese de que esten bien
wired
protective
el c,apuch6n
Remote
remoto
capsonwire
grounded. If this
protectorenlos
conectados a tierra.
Control
Unit
fiI
alambrico
externo
terminals
is
not done, severe damage to the source unit may happen.
cables
which
are
not
connected.
quenoesten
Si
no10hiciese,launidad fuente podrfa danarse seriamente.
conectados.
are
properly
Wi
16-Pin Connector Extension Lead
Front Right
,1\vant
Front Left
Avant
£tauGilE:~
sinistnJ
Rear Right
t\rriere
Rear Left
{law:;he
sinistro
droit
destro
droit
c!(-}sIro
Delantero derecho
l\ntHriore
Delantero izquierdo
J',nterion:::
Trasero derecho
F~osterjore
/\rriere
Trasero izcluierdo
Posteriore
EBGrey/EB(3ris/EBGris
EBWhiteIEBE\!af'iC
8White/BIack/(:)bl;:111(;lllC)lr
(:)
!3ianco,!~,joro
EBGreen I
8Green/Black/8Vert/noir/
(:=>Verde/f\lero
I EBBlanco /
/ EBPurpura I (JJ\/iola
(-::.lfJourOI'O/llOlr/8Purpuralnegro
CDVert
I
EBVerde
/
8Gris/negro
8Blanco/negro
/
8Verde/negro
(attached to the source unit)
Cable prolongador de 16 contactos
(fijado a la unidad fuente)
I
Yellow wire
Fl!
jaune
Conductor
Filo Diallo (Cavo di rnenlori;])
/
/
I
Fuse (15A)
FusiblEj
Fusible (15 A)
Fusibik~
Red wire (Switched power lead)
Fil roufj(3 (Fil de puissance cornmutee)
Conductor rojo (Cable
Fila rosso (Cavo di alirnentazione a c01Tlmutazione)
Fuse (1A)
Fusible
Fusible(1A)
FLlsibilc:
j
prcdoriqa
teur-C()rHl:6c1:eur 16
(Memory
(Fil
lead)
mernoin=j)
amarillo (Conductordela memoria)
Connect
Brancher directernent
Conectelo directamente a la baterfa.
(15/\)
(15
(1
J\)
(-\
,!'.,)
A)
de
contacto)
Collegme
AccessoryEB12 V
Accessoire(~rI12
AccesorioEB12 V
r'\ccessorioC±)12
directly to battery.
direttanlEmte alia batteria.
ala batterie,
V
V
or
o
o
EBGrey
I ij)Gris I
EBGris
Right
Droit
Derecho
D{"}s'tro
Left
Gauche
Izquierdo
Sinistro
8Grey/BIack
CJGrigio/[\Jero
EBWhite/CDBlanc
8White/BIack/()Blanc/noir
(jBianco/Nero
EBPurple / (jjPourpre / EBPurpura /
8Purpie/BIack
()
Viola/Nero
/ (i)GrifJio
I
(~~X;risilloir
18Gris/negro
I EBBlanco I
I
()
Pourpro/noir18Purpura/negro I
CBE3ianco
18Blanco/negro
(fNiola
I
/
Blue/White wire (Amplifier turn-on lead)
Fil bleulblanc
Conductor azul/blanco (Conductor de conexi6n de la alimentaci6n del amplificador)
Filo blu/bianco (cavo di accensione amplificatore)
Black wire (Ground lead)
Fil nair (til de terre)
Conductor
Fila nero (fila di rnassa)
(til de rnise sous tension teleconlmandable de I'amplificateur)
Connect
to remote turn-on lead of amplifier.
til de mise sous tension
Conecteloalconductordeconexi6n
alimentaci6n del amplificador.
Col!e~Jare
negro (Conductordepuesta
al cavo di accensione
amasa)
Connect to battery or distribution block ground.
f3rancher
a
13
Conectelo a una parte metalica de la baterfa 0 del bloque de distribuci6n.
Colle9are alia batteria 0 alia rnassa del bloeeo di distribuzione.
masse delabatterie
t1:'~I(~comrnandable
automaticadela
toleconmndata
ou
elu
doll'amplificatore.
reartitem.
No.
ANTENNA
CD
CeNET
®
@
@
®
®
0
®
®
@)
input
FRONT
RIGHT Grey (Red)
FRONT
LEFT Grey (White)
REAR RIGHT Black (Red)
REAR LEFT Black (White)
NON FADER RIGHT Purple (Red)
NON FADER LEFT Purple (White)
AUX
INPUT
AUX INPUT LEFT Red (White)
RIGHT Red (Red)
'-----
Description
-----
EBGreen /
G3Vert/EBVerde/;JjVercle
Not used.
Insulate each wire.
Inutilise.
Isoler
chaque
No se utiliza. '
~~~e
todos los conductores. J
-----
-----
-----
8Green/BIack
(:;:Verde/Nero
-----
I E:':Nert/noirl
-----
8Verde/negro
------
Brown wire (Phone mute lead)
Fil
fTlarmn
(fildesourdine
Conductor marr6n (Conductor de silenciamiento de telefono)
I
No. Descripci6n
CD
®
@
@
®
®
0
®
®
@)
Filo malmlle (cavo disattivazione audio telefono)
ANTENA
Entrada de
DELANTERO
DELANTERO IZQUIERDA Gris (Blanco)
TRASERO
TRASERO IZQUIERDA Negro (Blanco)
SIN BALANCE DELANTERO-TRASERO
DERECHO Purpura (Rojo)
SIN BALANCE DELANTERO-TRASERO
IZQUIERDO Purpura (Blanco)
Entrada auxiliar (AUX INPUT) del canal derecha
(Rojo)
Entrada auxiliar (AUX INPUT) del canal izquierda
(Blancmo)
CeNET
DERECHO
DERECHO
de
tt.~lephone)
Connect to cellular phone mute lead.
Bfc-llleher au
Conecteloalconductor de silenciamiento del telefono modular.
Collegan-:;aleavo
Gris (Raja)
Negro (Rajo)
fjl
de
sourdinedutelephone mobile.
per
la disattivazione dell'audio del telefono cellulare.
Clarion Co., Ltd.
Page 42

Drill appropriately prepared holes at the 6 places for fixing the screw depending
on the materials and plate thickness of the panel.
INSTALLATION
TEMPLATE
Page 43

..
II
CLARION PRODUCT REGISTRATION INFORMATION
For USA and Canada only
www.clarion.com
Dear Customer:
Congratulations
that you'll enjoy your Clarion experience.
There are many benefits to registering your product.
www.clarion.com to register your Clarion product.
We have made product registration simple with our easy
is
short and easy to complete. Once you're registered, we can keep you informed of important
product information.
Register at
on
your purchase
www.clarion.com - it's easy to keep your Clarion product up to date.
-of
a Clarion mobile electronic products. We are confident
We
invite you to visit our website at
to
use website. The registration form
..
II
INFORMATIONS
Pour les Etas Unis etIeCanada seulement
Cher client:
Nous vous remercions d'avoir achete
confiants que vous apprecierez votre experience Clarion.
II
y a beaucoup d'avantage aenregistrer votre produits. Nous vous invitons avisiter notre site
www.clarion.com pour enregistrer votre produit Clarion.
Web
Nous avons facilite la tache d'enregistrement de produit simple et facile grace
Web.
Le
enregistrer, nous pouvons vous tenir informe des informations important de produits.
Enregistrer
formulaire d'enregistrement est court et facile acompleter. Lorsque vous etes
awww.clarion.com - c'est facile de mettre ajour votre produit Clarion
DE
L'ENREG/STREMENT
www.clarion.com
ce
produit electronique mobile Clarion. Nous sommes
DE
PRODUITS CLARION
anotre site
GID
II
INFORMACION DEL REGISTRO
Para USA y Canada nomas
Querido Cliente:
su
Felicitadones por
usted gozara de
Hay muchas ventajas
internet
Hemos hecho
de
producto.
Registrese en
www.clarion.com para registrar
completar~
compra de producto electr6nico m6vil de Clarion. Estamos seguros que
su
experiencia conelproducto de Clarion.
al
registrarsuproducto.Leinvitamos a que visite nuestro sitio en
el
registro de producto facil en nuestro sitio. La forma de registro es corta y facil
Una vez que10registre, podremos proporcionarle la informacion de
www.clarion.com - es facil mantener
DE
PRODUCTO
www.clarion.com
su
producto de Clarion.
su
DE
CLARION
su
producto de Clarion actualizado.
285-2017
-00
Page 44

281-0632-03 2007/1
Clarion~
Except as noted, Clarion products purchased from an authorized Clarion dealer are warranted against all defects in
materials and workmanship for a period of one (1) year from the date of original purchase.
The following Clarion products noted below ** are warranted against all defects in materials and workmanship for a two
(2) year period from
** DRZ9255 DXZ775USB DXZ675USB DXZ575USB DFZ675MC DPX11500 DPX1800 DPX2250
All Clarion cables, wires and other accessories if purchased from an authorized Clarion dealer are warranted against
all defects in materials and workmanship for ninety (90) days from the date
ALL
PURCHASESOFCLARION
TO FURTHER
The conditions
underthis Limited Warranty are as follows:
1.PROOF OF DATE
WARRANTY SERVICE OF THIS
CLARION PRODUCTS NOTED ABOVE, PROOF OF
AUTHORIZED CLARION DEALER IS REQUIRED. INFORMATION ABOUT CLARION AUTHORIZED WARRANTY
SERVICE CENTERS MAY BE OBTAINED BY CONTACTING CLARION AT THE ADDRESS LISTED BELOW.
2. This Limited Warranty will become void if service performed by anyone other than an approved Clarion Warranty
Service Center results in damage to the products.
3. This Limited Warranty does not apply
or
which has had the serial number altered, defacedorremoved,orwhich has been connected, installed,
adjusted
4.
This Limited Warranty does not cover car staticorother electrical interferences, tape headorlaser pick-up
cleaning
5. The sole responsibility
replacement
6. Product must be shipped in its original carton
Clarion will not assume any responsibility for any loss
7. CLARION PRODUCTS PURCHASED FROM A SOURCE OTHER THAN
INCLUDING
CLARION DEALER,
ALLOWED
ELIMINATION
PERIOD
the
dateoforiginal purchase when purchased from AND installed by an authorized Clarion dealer.
WARRANTY
of
this Limited Warranty and the extent of responsibility of Clarion CorporationofAmerica ("Clarion")
OF
PURCHASE FROM AN AUTHORIZED CLARION DEALER
or
repaired, other thaninaccordance with the instructions furnished by Clarion.
or
adjustments,orlabor costs for the removal or reinstallation of the unit for repair.
of
ANY
BY
SHALLBEDEEMED TOBEFIFTEEN (15) DAYS FROM THE DATE OF ORIGINAL PURCHASE.
of
the product, at the sole discretion of Clarion.
AND
SHALL
APPLICABLE
OF
WARRANTIES UNDER THESE CIRCUMSTANCES, THE
CLARION 2007 LIMITED WARRANTY
For
USA
and
Canada
only
of
original purchase.
PRODUCTS FROM NON-AUTHORIZED
RESTRICTIONSASDESCRIBED BELOW.
P~ODUCT.
Clarion under this Limited Warranty shall be limited to the repa'ifofthe products or
ALL
PURCHASES
NOTBECOVEREDBYANY CLARION LIMITED WARRANTY TO THE EXTENT
LAW. IN THE EVENT
IN THE CASE OF THE TWO (2) YEAR LIMITED WARRANTY FOR THE
DATE
OF PURCHASE AND PROOF OF INSTALLATION BY AN
to
any product which has been subject to misuse, neglectoraccident,
or
equivalent carton, fully insured, with shipping charges prepaid.
or
damage incurred in shipping.
VIA
THE INTERNET FROM A NON INTERNET AUTHORIZED
AND
TO THE EXTENT
CLARION
AN
DEALERS
WILL
AUTHORIZED CLARION DEALER,
APPLICABLE
APPLICABLE
ARE
BE REQUIRED FOR
LAW
PROHIBITS
LIMITED WARRANTY
SUBJECT
8.
ALL
IMPLIED WARRANTIES EXCEPTTO THE EXTENT PROHIBITEDBYAPPLICABLE
GREATER DURATION THAN THE WARRANTY PERIOD SET FORTH ABOVE. UNDER NO CIRCUMSTANCES
SHALL
CLARIONBELIABLE
OF THE USE OR INABILITY TO USE THE PRODUCT. BECAUSE SOME STATES DO NOT
ON HOW LONG
CONSEQUENTIAL DAMAGES, THE ABOVE LIMITATIONS OR EXCLUSIONS MAY NOT APPLY TO YOU.
9. THIS LIMITED WARRANTY GIVES
WHICH VARY FROM STATE TO STATE.
10.The laws
11. Should you have any difficulties with the performance of this product during the warranty period, please call Clarion
or
visit our web site for a listing of Authorized Warranty Service Centers in your area.
Clarion Customer Service at the address listed below for any service help you may need with Clarion products.
AN
IMPLIED WARRANTY LASTS OR EXCLUSIONS OR LIMITATIONS OF INCIDENTAL OR
of
the StateofCalifornia shall govern and control this limited warranty, its interpretation and enforcement.
In USA:
Clarion Corporation of America
Attn:Customer Service Manager
Gateway Drive
6200
Cypress, CA.
1-800-GO-CLARION
www.clarion.com
FOR
90630
ANY
LOSS OR DAMAGE, DIRECT OR CONSEQUENTIAL, ARISING OUT
YOU
SPECIFIC LEGAL RIGHTS, AND
YOU
MAY ALSO HAVE OTHER RIGHTS
In
Canada:
Clarion Canada Inc.
Warranty Service Center
2239 Winston Park Drive
Oakville, Ontario L6H
(905) 829-4600
www.clarioncanada.com
LAW
SHALL
ALLOW
You
may also contact the
5R1
HAVE NO
LIMITATIONS
 Loading...