

Page 1

NaviDrive
Page 2
W
1
2
4
5
6
3
Y
V
A
B
C
U
TSR
QW PNOM
D
E
XFG
H
I
L'
JK
L
Z
NAVIDRIVE
ITH
CD
CHANGER
*
* According to version or option
Page 3

CONTENTS
NAVIDRIVE
Button controls...............................................................................................................................................................................................2 - 3
Controls at the steering wheel............................................................................................................................................................................4
Additional telematic control.................................................................................................................................................................................5
Operation - General............................................................................................................................................................................................6
Main Menu - Menu structure........................................................................................................................................................................7 - 12
Voice commands.......................................................................................................................................................................................13 - 17
Navigation - Traffic information..................................................................................................................................................................18 - 24
Audio (Radio, CD player, CD changer, MP3)............................................................................................................................................25 - 33
Trip computer....................................................................................................................................................................................................34
Directory.....................................................................................................................................................................................................35 - 36
Telephone and Telematic Services............................................................................................................................................................37 - 42
Configuration.....................................................................................................................................................................................................43
Map............................................................................................................................................................................................................44 - 46
Video.................................................................................................................................................................................................................47
Index NaviDrive.................................................................................................................................................................................................48
The equipment and operation modes are dependent on vehicle version and options, on country of marketing and on the service contract subscription.
1
Page 4
2
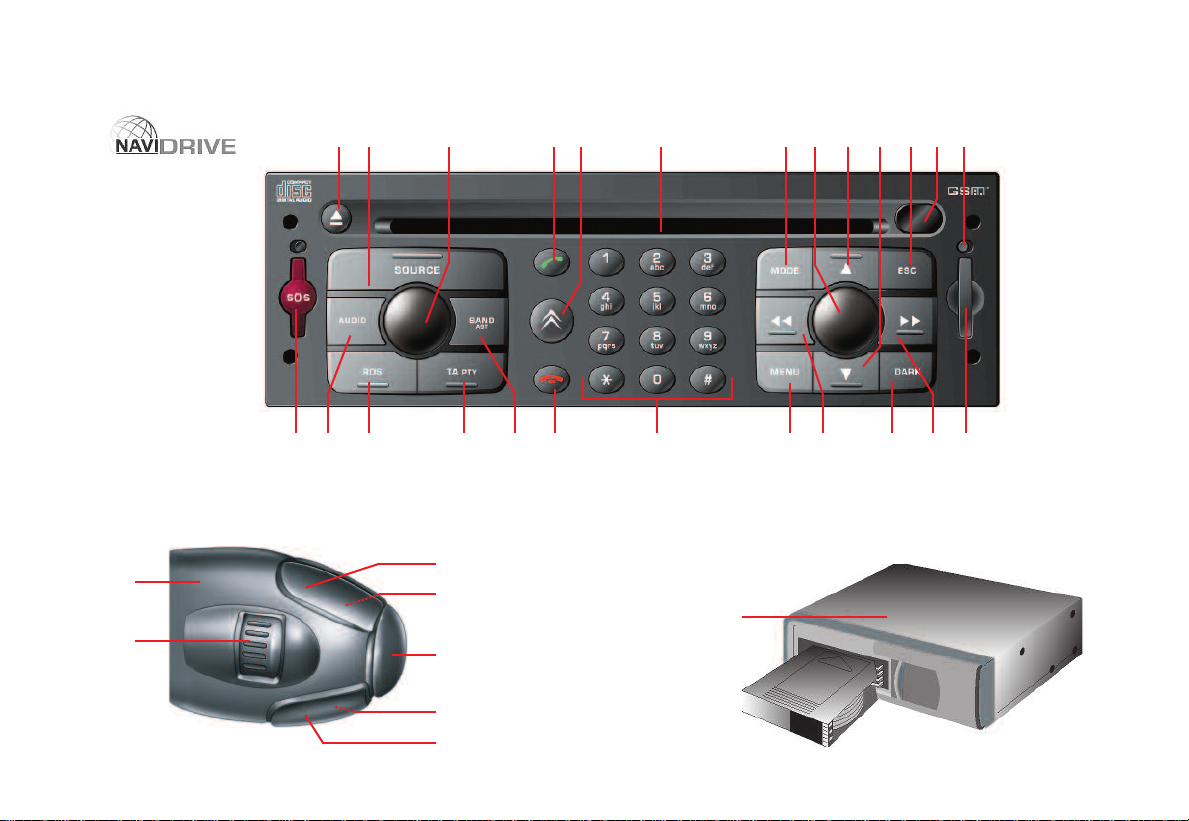
BUTTON CONTROLS
A
B SOURCE Short press:
C Press:
D Short press:
E Short press:
F MODE
G
CD eject.
CD CHANGER and MP3) or Audio/Video auxiliary input (video is available if the vehicle is moving at less
than 5 km/h).
On/off.
Rotate:
Long press:
service.
Selection of type of information displayed on the right
of the screen (Radio, Navigation, etc.).
•
•
Volume adjust.
If you rotate it, the control allows you:
-
To move
a parameter or a value.
-
To decrease
-
To scroll down
-
To modify
If you press it, the control allows you:
-
To access
tain choices of the function displayed on the right).
-
To validate
ified.
-
To select
be able to modify it.
To activate/deactivate
-
Selection of audio source (RADIO, CD,
Answer call. Display of telephone menu.
Access to the CITROËN services menu.
Direct call to the CITROËN assistance
around the screen to choose a function,
or
to increase
the list of elements to be selected.
the scale of the map on the display
the contextual menu (short-cut to cer-
the function chosen or the value mod-
a parameter such as "
an adjustment value.
adjust
a function.
" or "
list
.
" to
H Radio source:
CD/MP3 changer source:
previous CD-cover.
Other sources:
I Radio source:
CD/MP3 changer source:
next CD-cover.
Other sources:
J ESC Short press:
K
L
L’
M Radio source:
superimposed display.
Infrared port.
SIM card slot.
SIM card eject button.
•
Short press:
cy.
CD and CD changer source:
•
Short press:
•
Long press:
MP3 source:
•
Short press:
•
Long press:
Other sources:
Manual search of higher frequencies.
Selection of previous CD /
Move in the menus.
Manual search of lower frequencies.
Selection of the next CD /
Move in the menus.
Cancel the current operation or delete a
Automatic search of a higher frequen-
Search of the next track.
Fast forward with accelerated sound.
Search of the next track.
Rapid scrolling of following tracks.
Moving within the menus.
Page 5
BUTTON CONTROLS
3
N Radio source:
O DARK Short successive presses:
P MENU Short press:
Q
R BAND/
AST
•
Short press:
cies.
CD and CD changer source:
•
Short press:
•
Long press:
sound.
MP3 source:
•
Short press:
•
Long press:
Other sources:
•
One press:
mains lit.
•
Two presses:
•
Three presses:
Long press (More than 10 seconds):
Re-initialisation of the system.
Long press:
commands, to the description of your equipment, to
the demonstration of Navigation and to the status of
services.
In certain countries, this control is deactivated while
the vehicle is moving.
Call in progress:
•
Short press:
Short press:
memory banks.
Long press:
(Autostore).
Automatic search of lower frequen-
Search of previous track.
Rapid reverse with accelerated
Search of previous track.
Rapid scrolling of previous tracks.
Moving within the menus.
Only the top part of the display re-
Display off (blank display).
Return to the standard display.
Access to the Main Menu.
Access to the Help Menu for voice
End a call.
Selection of frequency bands and
Automatic memorisation of FM stations
S TA/PTY Short press:
Long press:
T RDS Short press:
Long press:
U AUDIO Call-up of audio adjustment functions:
V SOS
W Radio source:
X
Z
Buttons
move respectively up or down, right or left on the map
Sound ambiences, bass, treble, loudness, fade,
balance, speed-sensitive volume.
Long press (2 to 8 seconds):
Emergency call.
Short press:
Long press:
CD changer source:
Other sources:
Any alphanumeric entry (telephone, address,
adjustment of date/time, etc.).
Rapid selection of a name commencing with the
letter chosen, in the directory and in the SIM
card.
CD aperture.
CD changer.
H, M, I
and N allow you, in "
Traffic information on/off.
PTY function on/off.
On/Off for the RDS function.
PTY function on/off.
Recall of pre-set stations
Pre-setting of stations.
Selecting a CD.
Select - Move on Map
.
", to
.
Page 6

4
CONTROLS AT THE STEERING WHEEL
1 Radio source:
2 Radio source:
3 Radio source:
•
Scrolling of pre-set stations.
CD changer source:
•
Selection of next or previous CD.
MP3 source:
•
Selection of the next or previous CD-cover.
Other sources:
•
Selection of the next or previous elements of a
menu in a screen, a list, an alphabet.
•
Short press:
quency.
CD and CD changer source:
•
Short press:
•
Long press:
sound.
MP3 source:
•
Short press:
•
Long press:
•
Short press:
cies.
CD and CD changer source:
•
Short press:
•
Long press:
sound.
MP3 source:
•
Short press:
•
Long press:
Automatic search of a higher fre-
Search of the next track.
Fast forward with accelerated
Search of the next track.
Rapid scrolling of following tracks.
Automatic search of lower frequen-
Search of previous track.
Rapid reverse with accelerated
Search of previous track.
Rapid scrolling of previous tracks.
4
5 SRC Incoming call, telephone communication:
6
4+6 Simultaneous press on both buttons:
Volume increase.
•
Short press:
In a menu, a list, an alphabet:
•
Short presses:
ement or the value chosen.
Other cases:
•
Short press:
CD, CD CHANGER, MP3, audio/video auxiliary
input).
•
Long press:
al menu (excluding numbers).
Volume decrease.
(temporary sound pause).
Answer call, end call.
Validation of the function, the el-
Change of audio source (RADIO,
Display of the telephone contextu-
MUTE
Page 7
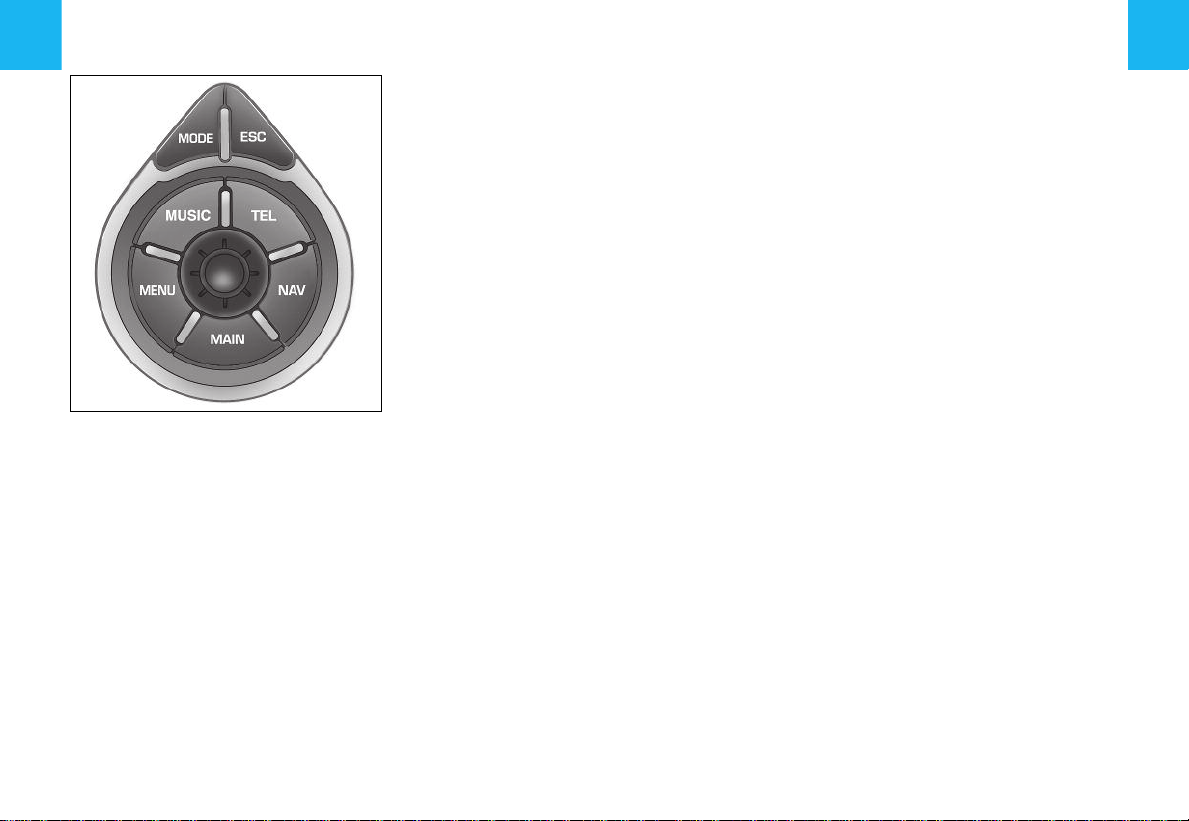
ADDITIONAL TELEMATIC CONTROL
It allows access to certain functions, without you having to use the NaviDrive buttons, also to the contextual menus for
certain functions.
The control
This control has two functions:
•
Rotate:
-
To move
choose a function, a parameter or a
value.
To decrease
justment value.
-
To scroll down
be selected.
To modify
the screen.
around the screen to
or
to increase
the list of elements to
the scale of the map on
an ad-
•
Press:
-
To access
(shortcut to certain functions of the
application displayed on the right of
the screen).
-
To validate
the value modified.
-
To select
just
" or "
The "MODE" button
•
Short press:
formation to be displayed on the right of
the screen (radio, navigation, etc.).
•
Long press:
mation.
The "ESC" button
•
Short press:
ation or delete a superimposed display.
•
Long press:
display.
The "MENU" button
•
Short press:
Main menu.
•
Long press:
Help menu.
To comply with legislation in certain
countries, the "
vated while the vehicle is moving.
the contextual menu
the function chosen or
a parameter such as "
list
" to be able to modify it.
To select the type of in-
To display general infor-
Cancel the current oper-
Return to the permanent
At any time, access to the
At any time, access to the
MENU
" button is deacti-
ad-
The "MUSIC" button
Short press:
menu for the current audio source.
The "TEL" button
Short press:
menu for the telephone function, and
pick-up for an incoming call.
The "NAV" button
Short press:
menu for the navigation/guidance function.
To comply with legislation in certain
countries, the "
ed while the vehicle is moving.
The "MAIN" button
Short press:
tion.
Display of the contextual
Display of the contextual
Display of the contextual
NAV
" button is deactivat-
To display general informa-
5
Page 8

6
ON/O
FF
With the ignition key in Drive position (M),
press on the control (
dio part on or off.
Note:
•
If the audio part of NaviDrive was on
before you last switched off the ignition,
it will resume automatically when you
switch on the ignition again.
•
The source selected when NaviDrive
stopped is memorised and will resume
when you switch on the ignition again.
•
After the ignition is switched off, with or
without the key being present, the NaviDrive can operate for a maximum of 30
minutes following a press on any of the
controls (
tion of a CD in the CD player.
D
ESCRIPTION
A long press on (P) gives you access to a
technical description of your equipment.
S
), (V), (D), (E) or the inser-
C
) to switch the au-
OPERATION - GENERAL
SIM
CARD
•
Open the slot (L) by pressing with a
ballpoint on the opening situated just
above it (
in the slot, then reclose it.
•
The SIM card should only be removed
from its location (
stopped (key in position
lock) and display off).
•
Its presence is obligatory for certain
functions to operate correctly.
RE-
In the event of NaviDrive malfunctioning,
you can re-initialise it with a long press
(more than 10 seconds) on button (
A
NTI-THEFT SYSTEM
This NaviDrive is coded in such a way
that it will function only on your vehicle.
It cannot be used on any other vehicle.
Note:
The anti-theft system is automatic and requires no action on your part.
L’
). Next, insert your SIM card
INITIALISATION
L
) after NaviDrive has
S
(steering
O
).
T
Your NaviDrive has:
•
•
•
•
•
•
ECHNICAL SPECIFICATIONS
3 wave bands (MW/LW/FM).
A dual tuner (if colour display) with RDS
EON PTY, display of name (PS), Radio
TEXT, programme search (RDS), traffic info (TA), Traffic Information (TMC),
24 preselections (18 FM - 6 MW/LW),
automatic memorisation of the strongest stations (AST).
A CD player compatible with MP3.
A GSM dual band telephone phase 2
(900MHz/1800MHz), 2 Watts with
voice commands and PIN code memorisation.
A voice synthesiser for the purposes of
navigation, reading of text messages
(SMS) and RDS - TMC information.
An audio power of 4X35 W.
Page 9

D
ISPLAY
Depending on your choices, it displays
the information for the Navigation functions - Traffic Information, Audio, Directory, Telephone and Telematic Services,
Configuration, Map and Video.
It is possible to modify the information
displayed on the right of your screen either by pressing on control (
voice commands.
The information on the left and at the top
of the display depends on the choice
made on the right.
Certain types of information and certain
actions (alert, adjustments, contextual
menu) are signalled by the temporary
opening of a window on the display.
F
) or by using
MAIN MENU
M
OVING WITHIN THE MENUS
Buttons (G), (H), (I), (M), (N) and button
(
1
) at the steering wheel enable movement in the menus and a press on button
(
G
) validates your choices.
You are recommended not to use the
NaviDrive controls during driving. In certain countries, certain controls can be deactivated (to comply with national legislation).
M
AINTENANCE
To keep the screen in good condition,
you are recommended to use a nonabrasive cloth and a computer screen
cleaning product.
M
AIN MENU
A press on button (P) gives you access to
all the functions that are available on your
NaviDrive:
•
Navigation - Traffic information.
•
Audio.
•
Trip computer.
•
Directory.
•
Telephone and Telematic Services.
•
Configuration of your display.
•
Map (if colour display).
•
Video (if colour display).
These are described on the following
pages. Certain choices appear only if you
have subscribed to a specific contract.
C
ONTEXTUAL MENU
A press on button (G) gives you access to
certain choices that are available for the
function displayed on the right of your
screen.
7
Page 10

8
NA
V
MENU STRUCTURE
NAVIGATION - TRAFFIC INFORMATION
Page
20
20
21
21
21
C
HOOSING A DESTINATION
P
AGE
20
Enter an address
NaviDrive Services
Choice of a Centre of interest
Directory
Choice of one of the last twenty destinations
................................................................................................................
..............................................................................................................
................................................................................................
...........................................................................................................................
.............................................................................
Add a stage
Sort/delete stages
S
TAGES AND ITINERARIES
P
AGE
21
M
ODIFYING THE GUIDANCE OPTIONS
P
AGE
21
T
RAFFIC INFORMATIO N
P
AGE
21
S
TOP/RESUME GUIDANCE
C
ONTEXTUAL MENU FOR NAVIGATION
- TMC
... . . ........................................ ............................................ . . ...................................... . . . . .
- T
RAFFIC INFORMATION
Diversion of itinerary
Destination chosen (to change it)
Define the criteria for calculating the itinerary
Adjust the voice synthesiser
Activate/deactivate the pronunciation of the name of the street
View the navigation CD-ROM information
Delete the last destinations
Consulting of messages
Filtering TMC information Filtering by incident
Adjust the voice synthesiser
Activate/deactivate the showing of messages
.......................................................................................................................
...............................................................................................................
............................................................................................................
...........................................................................................
............................................................................
..................................................................................................
......................................................
.................................................................................
...................................................................................................
.......................................................................................................
Activate/Deactivate filter on itinerary
...................
.........................................
Geographical filter
Choice of the TMC station
..........................................
................................
.................................................................................................
............................................................................
... . . ........................................ ............................................ . . ...
22
22
22
22
22
22
22
22
22
24
24
24
24
24
22
22
18
19
Page 11
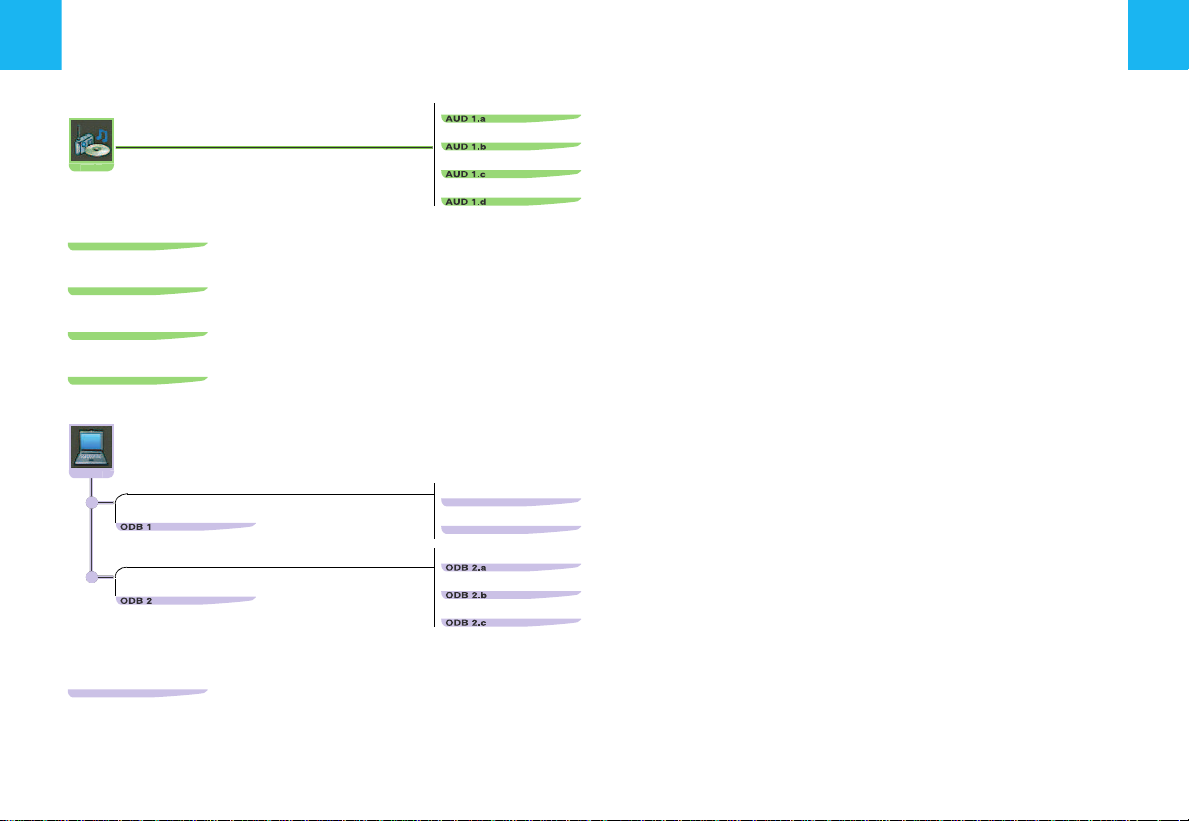
R
AU
D
ODB
ADIO SOURCE CONTEXTUAL MENU
CD S
OURCE CONTEXTUAL MENU
MP3
CONTEXTUAL MENU
CD C
HANGER CONTEXTUAL MENU
... . . . . . . . . . .. . ............................................ . ........................................ .. ............................... .. ........
MENU STRUCTURES
AUDIO AND TRIP COMPUTER
Activate/deactivate the RDS search function in FM
Activate/deactivate the regional search mode in FM
Activate/deactivate the display of Radio Text
Activate/deactivate the display of CD/MP3 detail
... . . . . . . . . . . . . ............................................ . ........................................ .. ...........................
... . ............................................ . . ....................................... . ........................................ ...
... ............................................. . ........................................ .. ...................................... . . .
....... . ............................................ . . . .
... . . . . . . . . . . . . ........................................
... . . . . . . . . . .. . ............................................ . ..
... ............................................. . .........
9
Page
26
26
26
26
26
32
32
33
T
RIP COMPUTER CONFIGURATION
P
AGE
34
D
IAGNOSIS
P
AGE
34
T
RIP COMPUTER CONTEXTUAL MENU
Enter a distance to destination
Modify the units
..................................................................................................................
Display the log of alerts
Display the charge level of the reserve battery
Display the status of the GPS coverage
... . . ........................................ ............................................ . . . . . . . . . . . . . ... .......................
...............................................................................................
........................................................................................................
...........................................................................
...................................................................................
34
34
34
34
34
34
Page 12
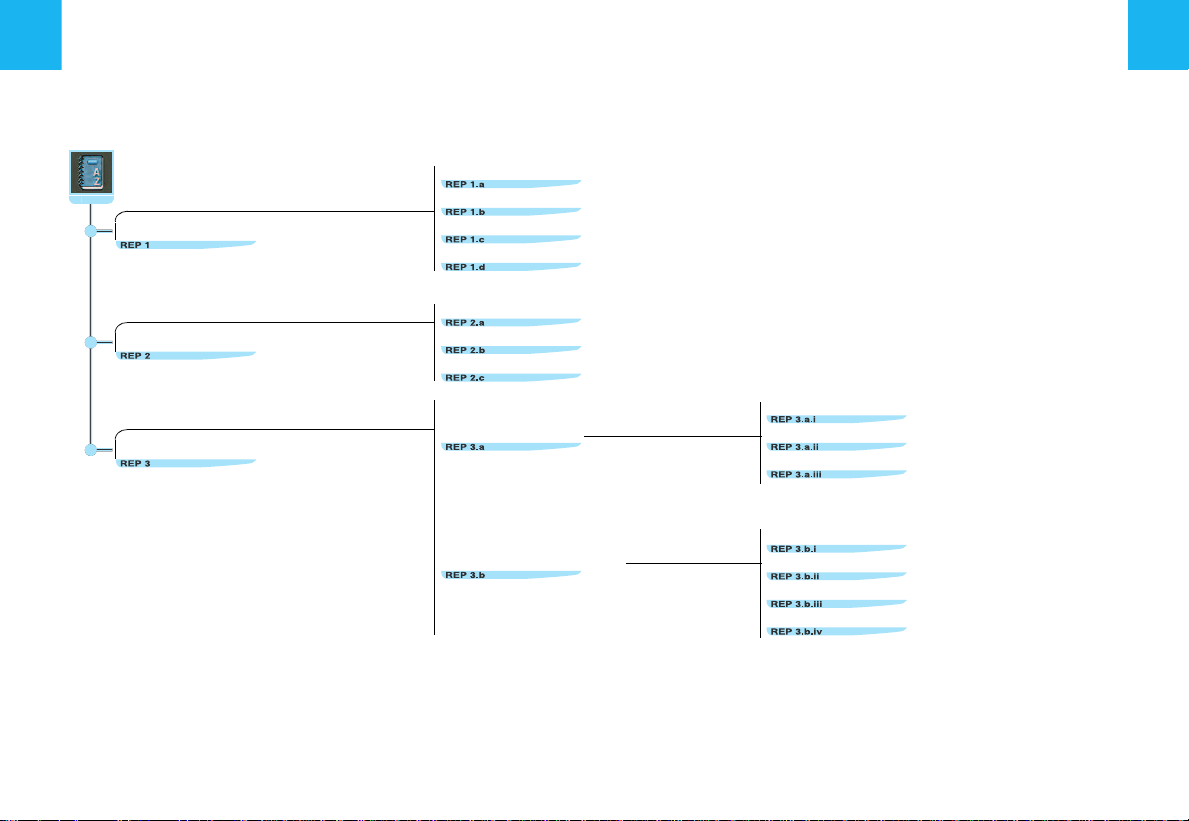
10
REP
M
ANAGING DIRECTORY FILES
P
AGE
35
MENU STRUCTURE
DIRECTORY
Consult or modify a file
Add a file
Delete a file
Delete all the files
..........................................................................................................................
......................................................................................................................
.........................................................................................................
...............................................................................................................
Page
35
35
35
35
C
ONFIGURATION
P
AGE
35
F
ILE TRANSFER
P
AGE
36
Selection of directory
Name the directory
Choose the starting directory
Exchange by infrared
Exchange with the SIM card
...........................................................................................................
..............................................................................................................
.................................................................................................
Send all the files
Send a file
Receive by infrared
Send all the files to SIM
Send a file to SIM
Receive all the files from SIM
Receive a file from SIM
.............................................
....................................................
.........................................
...................................
...........................................
............................
....................................
35
35
35
36
36
36
36
36
36
36
Page 13

MENU STRUCTURE
TEL
TELEPHONE AND TELEMATIC SERVICES
11
C
ALL
... . ............................................ . . . . . . . . . . . . .... ........................................ ........................................ .. ..............
S
ERVICES
P
AGE
40
T
ELEPHONE FUNCTIONS
P
AGE
41
T
EXT MESSAGING
P
AGE
41
(SM S)
CITROËN on line
CITROËN Assistance
NaviDrive Services
Messages received
Network
Length of calls
Managing the PIN code
Call options
Read SMS messages
Send SMS messages
Edit an SMS message
Delete the list of SMS messages
................................................................................................................
..........................................................................................................
..............................................................................................................
.............................................................................................................
............................................................................................................................
....................................................................................................................
........................................................................................................
Configure the calls
Ring tone options for voice calls
Voice call return no. for SMS messages
Delete the list and calls and SMS messages
..........................................
.........................
..........................................................................................................
..........................................................................................................
..........................................................................................................
............................................................................................
...............
.........
Page
39
40
40
40
40
41
41
41
41
41
41
41
41
41
41
41
C
ONTEXTUAL MENU FOR TELEPHONE AND TELEMATIC SERVICES
... ............................................. . ........................................ .. .
38
Page 14

12
CFG
CAR
VID
D
ISPLAY CONFIGURATION
P
AGE
M
OVING THE MAP
MAP
P
AGE
C
ENTRE AROUND THE VEHICLE
MAP
M
EMORISING THE CURRENT POSITION
MAP
CONTEXTUAL MENU
43
ORIENTATION
45
DETAILS
... . . . . . . . . . . . . ............................................ . ........................................ .. ............................... .. ..............
MENU STRUCTURES
CONFIGURATION - MAP - VIDEO
Choosing colours
Adjusting brightness and brilliance
Sound
..............................................................................................................................
International parameters (time and date)
Choice of language
....... . ........................................ ............................................. . . .................................. . . ... . .........
Map oriented to North
Map oriented to the vehicle
... . ............................................ . . . . . . . . . . . . .... ........................................ .......................
... ............................................. . . ....................................... . .............................
..............................................................................................................................................................................
................................................................................................................
..........................................................................................
..................................................................................
.............................................................................................................
..........................................................................................................
...................................................................................................
Page
43
43
43
43
43
45
45
45
45
45
45
45
V
IDEO CONTEXTUAL MENU
Activate/deactivate video mode
Video parameters
... . . ........................................ ............................................ . . . . . . . . . . . . . ... ................................ . ...
... ............................................. . ........................................ ..
....... . ........................................ ............................
47
47
47
Page 15
G
ENERAL
Voice commands can control a certain
number of functions:
•
Using a label recorded by the user, for
example: "
hance the recognition of these labels,
you are recommended to record them
using different intonations.
•
Using pre-recorded words and expressions, for example: "
The voice commands function in a logical
sequence. A word voiced at one level
must be recognised before another word
at the next level can be recognised.
Office
" or "
Radio
Home
", "
". To en-
Help
".
VOICE COMMANDS
S
TART/STOP OF VOICE RECOGNITION
Give a long press on the end of the lighting control stalk to activate this function.
Activation of the function is confirmed by
a beep and by the opening of a window
on the display. The system is then listening. If the word pronounced is understood
by the system, then it is displayed in the
window and a beep is heard. If not, the
system says "
say the word again.
Voice commands are deactivated automatically and the system emits a double
beep, when an action has been completed using voice commands.
If no voice commands are given, this
function is deactivated after a few seconds and the system says "
ognition
A press on the end of the lighting control
stalk, or on (
Sorry
". You then have to
".
J
), deactivates the function.
End of rec-
Example:
•
To obtain pre-set radio station no. 3,
you must: pronounce the word "
wait for the system to reply with a beep,
then pronounce the word "
wait for the system to reply with a beep,
then end with the word "
After the double beep, the desired action
is performed.
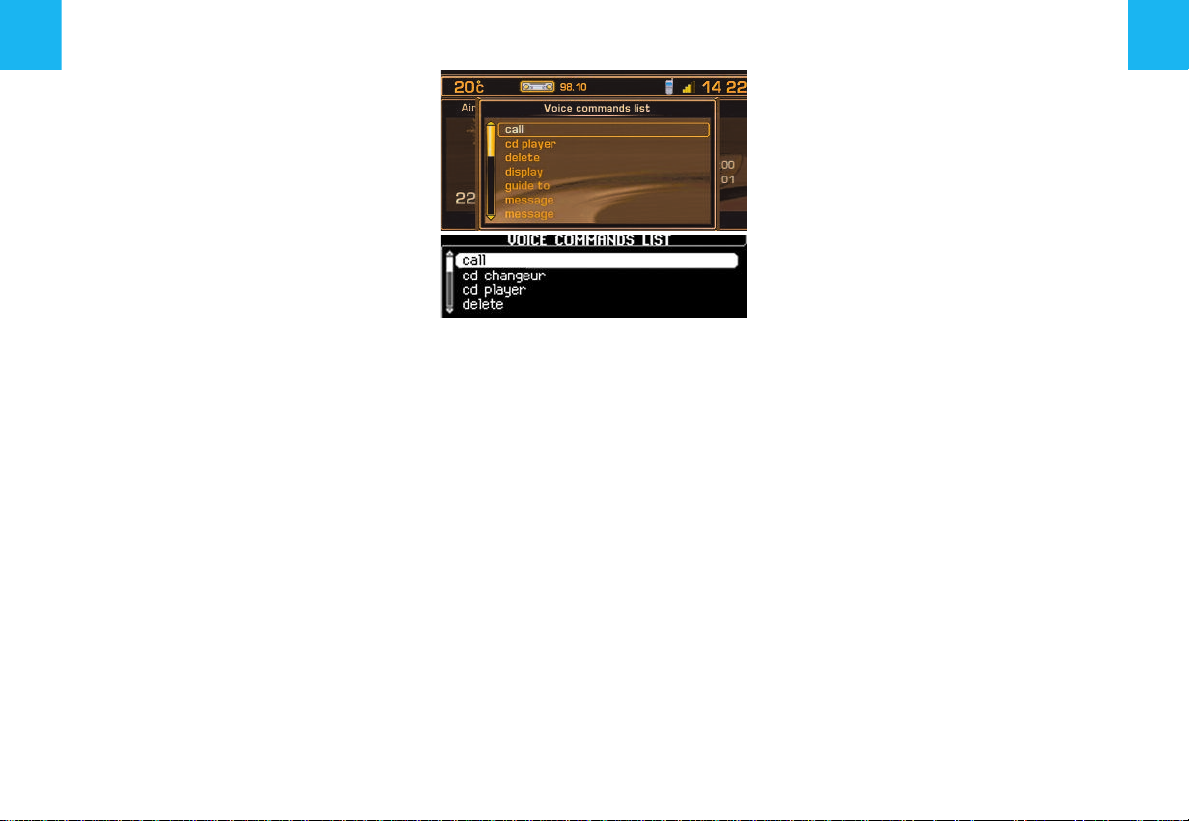
Saying the word "
play of all the commands that are available at the moment of the request.
Say the key words that correspond to the
action that you wish carried out.
If you have lost your way in the voice
command structure, saying the word
"
Cancel
in the voice command structure.
However careful the user may be, the
pre-recorded words or expressions will
always be more easily recognised than
words recorded by the user.
" returns you to the previous level
Help
" brings up the dis-
3
".
Radio
Memory
13
",
",
Page 16

14
LIST AND STRUCTURE OF VOICE COMMANDS
Audio Displays the information on the current audio source in the right hand part of the screen
Air conditioning Displays the information relatiing to air conditioning
Guidance Displays the information on navigation/guidance in the right hand part of the screen
Display
Call "Pre-recorded label" Starts a telephone call to the first number on the record associated with the voice label pronounced
Stop Stops voice commands
Changer Changes to CD changer audio source
Changer
Navigation Displays the information on navigation/guidance in the right hand part of the screen
Trip computer Displays the information on the trip computer in the right hand part of the screen
Telephone Displays the telephone information in the right hand part of the screen
Cancel Returns to the first level of the voice commands structure
Help Displays the voice commands possible at this level
What can I say Displays the voice commands possible at this level
1
6
to
Disc number
Previous disc Changes to playback of the previous CD in the changer
Next disc Changes to playback of the next CD in the changer
Random playback Activates, or deactivates, random playback of the current CD
List Displays the list of the tracks on the CD currently being played
Track number
Previous track Changes to the previous track of the current CD
Next track Changes to the next track of the current CD
Repeat Activates, or deactivates, repetition of playback of the current CD
Scan Activates, or deactivates, playback of the start of tracks of the current CD
Cancel Returns to the first level of the voice commands structure
Help Displays the voice commands possible at this level
What can I say Displays the voice commands possible at this level
Cancel Returns to the first level of the voice commands structure
Help Displays the voice commands possible at this level
What can I say Displays the voice commands possible at this level
1
20
to
Cancel Returns to the first level of the voice commands structure
Help Displays the voice commands possible at this level
What can I say Displays the voice commands possible at this level
Changes to CD changer playback for the number given
Changes to playback of the track, of the current CD, for the number given
Page 17

LIST AND STRUCTURE OF VOICE COMMANDS
Stop Stops the current guidance
Directory "Pre-recorded label"
Restart Resumes guidance towards the last destination selected
Guidance
Guide to "Pre-recorded label" Starts guidance towards the address contained in the record associated with the voice label pronounced
Traffic info
CD player Change to CD audio source
CD player
See
Zoom in Enlarges the zone represented on the map
Zoom out Reduces the zone represented on the map
Cancel Returns to the first level of the voice commands structure
Help Displays the voice commands possible at this level
What can I say Displays the voice commands possible at this level
Display Displays the list of traffic information (TMC) messages
Read Reads the message in the list of TMC messages or reads the last message selected
Cancel Returns to the first level of the voice commands structure
Help Displays the voice commands possible at this level
What can I say Displays the voice commands possible at this level
Random playback Activates, or deactivates, random playback of the CD
List Displays the list of the tracks on the CD currently being played
Track number
Previous track Changes to the previous track of the CD
Next track Changes to the next track of the CD
Scan Activates, or deactivates, playback of the start of tracks of the CD
Cancel Returns to the first level of the voice commands structure
Help Displays the voice commands possible at this level
What can I say Displays the voice commands possible at this level
Directory
Destination Centres the map on the current or previous destination
Vehicle Centres the map around the vehicle
Cancel Returns to the first level of the voice commands structure
Help Displays the voice commands possible at this level
What can I say Displays the voice commands possible at this level
1
20
to
Cancel Returns to the first level of the voice commands structure
Help Displays the voice commands possible at this level
What can I say Displays the voice commands possible at this level
Repeat Activates or deactivates repetition of playback of the current CD-cover
Next Goes to the next CD-cover
Previous Goes to the previous CD-cover
Cancel Returns to the first level of the voice commands structure
Help Displays the voice commands possible at this level
What can I say Displays the voice commands possible at this level
Starts guidance towards the address contained in the record associated with the voice label pronounced
Changes to playback of the track for the number given
15
Page 18

16
LIST AND STRUCTURE OF VOICE COMMANDS
Display Displays the list of SMS messages
Message
Navigation
No Cancels a request to delete an SMS message
Yes Confirms a request to delete an SMS message
Previous Changes to the previous radio station, or previous CD/CDC track. If an SMS is being read, reads the previous SMS message
Radio Changes to Radio audio source
Radio
Read Reads the last SMS message received or the SMS selected in the list of messages
Cancel Returns to the first level of the voice commands structure
Help Displays the voice commands possible at this level
What can I say Displays the voice commands possible at this level
Stop Stops the current guidance
Directory "Pre-recorded label"
Restart Resumes guidance towards the last destination selected
See
Zoom in Enlarges the zone represented on the map
Zoom out Reduces the zone represented on the map
Cancel Returns to the first level of the voice commands structure
Help Displays the voice commands possible at this level
What can I say Displays the voice commands possible at this level
Autostore Memorises the 6 strongest FM stations that can be received where the vehicle is
List Displays a list of the stations that can be received where the vehicle is
Memory
Previous Starts an automatic search for the previous radio station
Next Starts an automatic search for the next radio station
Cancel Returns to the first level of the voice commands structure
Help Displays the voice commands possible at this level
What can I say Displays the voice commands possible at this level
Destination Centres the map on the current or previous destination
Vehicle Centres the map around the vehicle
Cancel Returns to the first level of the voice commands structure
Help Displays the voice commands possible at this level
What can I say Displays the voice commands possible at this level
1
6
to
Cancel Returns to the first level of the voice commands structure
Help Displays the voice commands possible at this level
What can I say Displays the voice commands possible at this level
Starts guidance towards the address contained in the record associated with the voice label pronounced
Selects the station corresponding to the memory bank number given
Page 19

LIST AND STRUCTURE OF VOICE COMMANDS
Display Displays the list of SMS messages
SMS
Stop Stops the reading of SMS messages. Stops voice commands
Next Changes to the next radio station, or next CD/CDC track. If an SMS is being read, reads the next SMS message
Delete Requests deletion of the SMS message currently being read
Telephone
Help Displays the voice commands possible at the first level
Read Reads the last SMS message received or the SMS selected in the list of messages
Cancel Returns to the first level of the voice commands structure
Help Displays the voice commands possible at this level
What can I say Displays the voice commands possible at this level
Mail box Starts a telephone call to the user's mail box
Last number Starts a telephone call to the most recent number figuring in the user's calls list
Voice messaging Starts a telephone call to the user's mail box
Directory "Pre-recorded label"
Cancel Returns to the first level of the voice commands structure
Help Displays the voice commands possible at this level
What can I say Displays the voice commands possible at this level
Starts a telephone call to the first number on the record associated with the voice label pronounced
17
What can I
say
Displays the voice commands possible at the first level
Page 20

18
When navigation is to be used for the
first time, or when the battery has
been disconnected for any reason, the
navigation system has to be initialised.
For this operation the vehicle must be
parked outdoors so that it can pick up
satellite signals. Turn the ignition to
position M (see vehicle Handbook)
and leave for at least fifteen minutes.
I
NTRODUCTION
The on-board navigation system uses audible and visual indications to guide you
towards the destination of your choice.
The system uses a cartographic database
stored on CD-ROM, and GPS (Global Positioning System).
The latter enables your position to be plotted via contact with a number of satellites.
The on-board navigation system is composed of the following elements:
•
A CD-ROM reader.
•
A button for recall of the last voice message - during navigation, a long press
on the end of the lighting control stalk repeats the most recent voice information.
•
Cartographic data in the form of a CDROM that has to be inserted, printed
side up, in the aperture (
•
A synthesised voice for enunciating
guidance instructions during navigation.
•
A display screen.
•
A GPS aerial.
•
Controls on the dashboard and at the
steering wheel.
NAVIGATION - TRAFFIC INFORMATION
X
Specific functions or services may
vary depending on the CD-ROM version or the country where the system
is to be used.
GPS satellite reception or guidance
calculation may be affected temporarily (for example under bridges or in
underground car parks, etc.) by where
the vehicle is located.
TMC
TRAFFIC INFORMATION
In some countries, traffic information
messages are transmitted by radio FM
stations. Such information, broadcast by
the RDS system, can be received and decoded by NaviDrive. See the description
of this function from page 22.
V
OLUME FOR VOICE INSTRUCTIONS
When receiving voice instructions, you
can adjust the volume using buttons (
(
4
) and (6).
You can deactivate voice instructions via
the menu "Configuration" - "Display" "Sound".
).
C
),
M
AIN MENUNAVIGATION
INFORMATION
Press on (P) then use the control (G) to
select the icon Navigation - Traffic information to access the following choices:
•
Selecting a destination
•
Stages and Itineraries
•
Guidance options
•
TMC traffic information
•
Stop/resume guidance
After the start of a guidance, a display
cautions you concerning the use of navigation. If you accept its content, press on
G
. Respect the road regulations that are
in force.
- T
RAFFIC
.
.
.
.
.
Page 21

NAVIGATION - TRAFFIC INFORMATION
1 23
87
6
4
5
1
2
34
765
During navigation, provided the navigation CD-ROM is present, the display indicates
the manoeuvres to be made:
1
In navigation: manoeuvre to be made or, momentarily, direction to follow. Not under
guidance: representation of a compass.
2
Next manoeuvre to be made.
3
Next road to be taken and name of town.
4
Road currently being taken and name of town.
5
Symbol concerning Traffic information or the services that are in proximity (colour
display).
6
Estimated time of arrival at destination (based on flowing traffic).
7
Distance to final destination.
8
Distance to the next manoeuvre.
Remark:
Depending on the situation of the vehicle and the reception of the GPS information, this
information may temporarily be absent from the screen.
Tip:
When Navigation is being displayed, a long press on the "Menu" button activates a demonstration of the Navigation function of your NaviDrive.
Next select a destination by means of the Navigation Menu. After entering it, start Navigation for a simulation of the movements of your vehicle. The point of departure will be
either the place where the vehicle is now, or the last known location. It is possible to enter a different point of departure via the demonstration menu. This demonstration can let
you see a route that you wish to take in the future.
C
ONTEXTUAL MENU
RAFFIC INFORMATION
T
A press on (G) during navigation, brings
up a display on the right of the screen,
permitting you to:
•
Modify the display of the map:
screen or right hand side (colour screen
only).
•
Alter the route.
function lets you modify your original
route. Enter the distance of the desired
diversion then select the function "
and validate.
•
Memorise the position of the vehicle
This will be saved in the current directory, under a label for name of town and
street (if available on the Navigation CDROM ). Otherwise the label corresponds
to GPS coordinates.
•
Modify the guidance criteria for your
itinerary
•
Stop/resume guidance
.
: N
AVIGATION
During guidance this
.
-
full
OK
19
"
.
Page 22

20
C
HOOSING A DESTINATION
This menu allows you to:
•
Enter an address.
•
Access
have subscribed to a specific contract
(assistance and entry of a destination).
•
Choose a centre of interest available
in a town (restaurant, airport, hotel, cinema, theatre, etc.).
•
Choose a destination stored in a directory.
•
Choose one of the last twenty destinations.
NAVIGATION - TRAFFIC INFORMATION
NaviDrive Services
if you
E
NTER AN ADDRESS
The last guidance address is displayed.
1 Enter a town name
- To enter the name of a town, select
"
Town
" then validate. Next, select
then validate letter by letter or enter
them using the alphanumeric keypad.
If you make an error, press "
to delete the last letter entered.
Remark:
After the first letter has been validated,
only those letters that can complete an
existing name in the database will be displayed.
Correct
-"
List
" tells you, as you begin to enter
the name of the town, how many
towns start with or include the same
letters.
Select "
List
" to choose one of them.
- Up to 6 names will be displayed automatically.
Select a town, then validate.
When the complete name of the town
is displayed, select it then validate
"
OK
".
2 Enter the name of the street
Enter the street name in the same way as
you entered the town name.
Note:
Do not enter the type of road
(street, avenue, etc.).
3 Validation
When the complete name of the street is
displayed, select it then validate "
Tips:
•
"
If you enter only the name of the town
and then validate immediately "
you will go directly to the town centre.
•
The function "
address displayed into a file of the current directory.
•
The selection "
plays the current address.
•
The selection "
coordinates.
Store
" memorises the
Present location
GPS
" brings up the GPS
OK
".
OK
" dis-
",
Page 23

NAVIGATION - TRAFFIC INFORMATION
4 Enter a street no. or the name of an
intersecting street
You can enter the desired street name
using either the control (
numeric keypad.
Select then validate "
Remark:
bers are displayed.
You can also select a street from the list
of "
not have to enter the street no.
Remark:
numbers, the list of street intersections is
automatically displayed.
The complete destination is then displayed.
Select then validate "
guidance.
Follow the action instructions.
The first and last street num-
Intersections
If the street selected has no
G
) or the alpha-
OK
".
", which means you do
OK
", to start the
C
HOOSING A CENTRE OF INTEREST
If you desire to be directed to a centre of
interest, select the type of centre of interest and validate.
The list of centres of interest of the type
selected appears. Select then validate
the centre of interest desired, in order to
access the menu "
The last-entered address is displayed.
There are 3 possibilities for defining the
location close to which you desire to find
a centre of interest:
•
Take the last address entered by validating the function "
•
Enter the name of a different town then
enter the street name (optional).
•
Bring up the name of the place you are
currently at, via the function "
location
".
Choice of location
OK
".
Present
".
Remark:
If the centre of interest selected is not
available at the programmed location, a
message informs you of this.
After validation of the location, the centre
of interest closest to your location appears. The distance indicated is the distance in a straight line from this location.
A message in the strip (X/n) tells you if
there is more than one establishment (n
= maximum) offering a similar centre of
interest within a radius 50 km in a straight
line from the location selected.
Use the functions "
study the list on offer.
When the establishment of your choice
appears, you can choose:
•"OK
" to activate guidance to this centre
of interest.
•"Store
•"Contact
S
This allows you to start guidance towards
a location that is stored on a file, with the
Navigation CD-ROM present.
S
DESTINATIONS
You can start guidance towards one of
the last twenty destinations that have
been automatically stored by your installation.
" to add it to your directory.
" to make a call to this centre
of interest.
ELECTION FROM THE DIRECTORY
ELECTING FROM YOUR MOST RECENT
<<
", ">>" or "<", ">" to
21
Page 24

22
S
TAGES AND ITINERARIES
This menu enables you to:
•
To add a stage onto your itinerary
ter guidance has started.
•
To sort or delete stages.
•
To change your route
cate the number of kilometres you wish
to leave out in order to permit calculation of a new route.
•
To select the destination chosen initially
in order to modify it.
Remark:
navigation system will still try to go that
way unless it has already been passed or
deleted.
NAVIGATION - TRAFFIC INFORMATION
. You can indi-
if a stage is programmed, the
af-
RDS-TMC
G
UIDANCE OPTIONS
This menu enables you to:
•
To define the criteria for calculating
your itinerary
quickest or the shortest, taking account
of traffic information etc. The last criteria selected are displayed.
•
To adjust the volume of the voice
synthesiser for guidance purposes.
•
To activate/deactivate pronunciation
of the name of the street
command requirements.
•
To show the information from the
Navigation CD-ROM.
•
To delete the last destinations.
so that it will be the
in the voice
TMC T
This menu enables you to:
•
•
•
•
RAFFIC INFORMATION
To consult the Traffic Information
messages.
To filter the traffic information.
To adjust the volume of the voice
synthesiser for the reading of the information.
To activate/deactivate the showing
of messages.
played on the map.
The symbols remain dis-
Page 25

RDS-TMC TRAFFIC INFORMATION
As opposed to the road information flashes broadcast by an FM station during its
normal programming (see the TA function in RDS), the TMC (Traffic Message
Channel) messages are coded and not
audible. TMC filters the information that
is of interest to you and broadcasts it in
the language selected in your NaviDrive,
even in a foreign country where the language of the local radio is not your own.
The availability of such information depends on the country and on the region
where you are travelling.
This information is displayed in a superimposed window, using symbols on the
map (colour screen). Messages can then
be read to you by the voice synthesiser.
Remark:
siser can be adjusted in the menu "TMC
Traffic Information" and by moving control (
is being heard.
The messages contain for example: a
date and time of transmission, the nature
of the traffic incident, its location, plus the
name and direction of the traffic artery
concerned.
They are classed according to the distance of the incident from your vehicle.
This list is updated approximately every
15 minutes.
the volume of the voice synthe-
C
) while the TMC traffic information
•
To receive and view this traffic information, it is necessary to insert the navigation CD-ROM , to activate traffic information (TMC), to select a type of incident and a type of geographical filtering.
•
Selection of an FM radio station broadcasting RDS-TMC traffic information is
automatic. If you want to select a different station, you must use the menu "
tering TMC information
"
Choice of TMC station
Remarks:
•
The multifunction screen displays the
symbol "
broadcasting TMC information is being
received.
•
When the FM station selected is not
able to broadcast TMC information, the
symbol "
ochrome display and shaded on a colour display.
•
Depending on the station selected, the
traffic information may be more or less
complete and precise, or cover a larger
or smaller area. Each radio station is individually responsible for the quality of
the information that it broadcasts.
TMC
" as soon as a station
TMC
" will be barred on a mon-
" then
".
23
List of TMC symbols on the colour
display
Traffic bottlenecks and queues
Road closures and restrictions
Fil-
Vehicle size restrictions
Road conditions and dangers
Weather and visibility
Parking restrictions
Restrictions on public transport
Demonstrations
These symbols may be accompanied by
an arrow indicating in which traffic direction they are situated.
Page 26

24
C
ONSULTING OF MESSAGES
This menu gives you access to the
messages
Note:
•
Certain of these messages may offer
you a diversion from your route, depending on the TMC information received (it is necessary for you to have
selected the "traffic info" guidance option). If you accept one of these messages, then the NaviDrive offers you a
diversion and recalculates your itinerary. You can then choose whether or
not to accept the offer.
•
A message is sent to you when the incident is imminent. You are informed
again when you are approaching the incident.
Tip:
It is possible to consult a message by selecting a symbol present on the map. For
this, in the menu "Map" select "Move the
map", then the symbol.
.
RDS-TMC TRAFFIC INFORMATION
list of
F
ILTERING
This menu gives you access to:
•
Activation/deactivation of the itinerary filter
lect only those incidents that are located on the guidance itinerary and in the
relevant traffic direction.
•
Filtering by incident
to select only certain types of incident
(all selected by default).
•
Geographical filter
lect only the incidents that have occurred around the vehicle or around a
specific location.
Remark:
mulative.
•
Choice of the TMC station
lows you to select another station that
broadcasts RDS-TMC information.
TMC
INFORMATION
. In navigation, it lets you se-
. This allows you
. This lets you se-
The different filters can be cu-
. This al-
F
ILTERING BY INCIDENT
This choice lets you select the nature of
the incidents of which you wish to be informed:
•
Those to do with roads, such as traffic
conditions, roads closed or vehicle size
restrictions, and/or
•
Those concerning the town where you
are, such as parking, public transport or
demonstrations.
Whether you are able to access this information depends on its availability.
Remark:
you will not receive any TMC traffic information.
G
EOGRAPHICAL FILTER
This choice lets you select a zone for incidents (radius of 3 to 200 km) of which
you wish to be informed:
•
Those happening around your vehicle
•
Those at a location to be selected.
The two filters can be cumulative. The radius value is then common to both.
if you do not select an incident,
Page 27

S
ELECTION OF SOURCE
Press on button (B) or (5) to select the
audio source : RADIO, CD, CD CHANGER, MP3 or audio/video auxiliary input.
Remark:
auxiliary input in the menu "Configuration"
then "Sound".
V
OLUME ADJUSTMENT
Rotate the control (C) to increase or decrease the sound volume.
You can also increase or decrease the
volume by using controls (4) and (6) at the
steering wheel.
Note:
•
The sound volume when you switch off
NaviDrive will be the same when you
switch it on again.
•
The sound volume is automatically corrected according to vehicle speed if the
function "
active.
•
The sound volume adjustment operates
independently for each audio source.
Thus volume can be varied according to
the sound source.
T
EMPORARY SOUND PAUSE
Press simultaneously on buttons (4) and
(
6
) at the steering wheel to activate this
function.
The sound will be paused, regardless of
the source selected. The permanent audio sources (radio, CD, CD changer,
MP3, auxiliary input) will be cut, but not
the others (guidance data for example).
To resume sound, press any of the buttons on the dashboard.
it is necessary to activate the
speed-sensitive volume
" is
AUDIO
S
OUND ADJUSTMENTS
Each press on button (U) displays the parameter to be adjusted: These are the
pre-defined ambiences: bass, treble,
loudness, fade (front/rear sound distribution), balance (left/right sound distribution), and speed-sensitive volume.
Control (
ues of the parameters displayed.
Note:
•
•
•
•
G
) allows you to modify the val-
The value chosen is automatically accepted, without any need for validation.
The selection of a particular sound ambience automatically adjusts the bass
and treble.
Adjustment of bass and treble is available only if you have selected the sound
ambience "
Adjustment of loudness, as well as of
bass and treble, when they are available.
None
".
P
RINCIPAL AUDIO MENU
Press on (P) then use the control (G) to
select the Audio icon in order to access
the following choices:
•
Activate/deactivate the RDS search
function in FM.
•
Activate/deactivate the regional
search mode in FM.
•
Activate/deactivate the display of
Radio Text
tion if available ("RT" displays at the
bottom of the screen).
•
Activate/deactivate the display of
CD MP3 detail.
You change from one source to another
by pressing the button (
the steering wheel.
, broadcast by the radio sta-
B
) or control (5) at
25
Page 28

26
R
ADIO SOURCE CONTEXTUAL MENU
A press on (G) while listening to the radio
permits you to:
•
Enter the frequency desired.
•
Display the list of stations.
•
Update the list of stations.
•
Display Radio Text information
broadcast by the radio station if it is
available ("RT" displays at the bottom
of the screen).
RADIO SOURCE
N
OTES ON RADIO RECEPTION
Your Navidrive system will be subject to
phenomena not encountered by your
equipment you have at home. The reception of AM and FM signals may suffer
from interference, which is caused by the
nature and propagation of the signals
,
and does not reflect on the quality of your
radio installation.
In AM, the reception may be affected
when passing under power lines or bridges, or when travelling through tunnels.
In FM mode, the reception may be affected by the distance from the station transmitter, the reflecting of signals off obstacles (mountains, hills, tower blocks) and
radio blackspots (no coverage from the
station transmitter).
S
ELECTION OF FREQUENCIES AND
MEMORY BANKS
By successive presses on button (R), the
NaviDrive changes successively between the memory banks FM1, FM2 and
FMast, corresponding to FM frequencies,
and to the memory bank MW/LW, corresponding to the AM frequencies.
M
ANUAL SEARCH
A short press on one of the buttons (H) or
(
I
) will respectively increase or decrease
the displayed frequency.
By keeping button (
will be able to scroll through the waveband. Scrolling stops as soon as a station
is found. NaviDrive remains on the frequency displayed.
M
ANUAL PRE-SETTING
Select the waveband and memory bank
required using button (
Select a station using either automatic or
manual search.
Keep pressing for more than two seconds on one of the preselection buttons"
1
" to "6" (W).
A window opens on the screen, the station is memorised as it is displayed on the
memory number you have given it.
H
) or (I) pressed, you
R
).
Page 29

S
EARCH FOR A STATION IN A SORTED
LIST
To search for a station in a sorted list,
your installation periodically updates the
list of the stations received around your
vehicle. It shows you what stations are
available, first in alphabetical order, then
by frequency in ascending order if the
names are not known.
To access this list, press on (
play the list.
This list is updated automatically every
10 minutes.
You can update this list at any time by
pressing button (
date.
G
) and selecting the up-
G
) and dis-
RADIO SOURCE
A
UTOMATIC SEARCH
A short press on one of the buttons (M) or
(
N
) will tune into higher or lower radio stations respectively, within the chosen
waveband.
By keeping button (
you will be able to scroll through the
waveband. The scrolling will stop at the
first station it finds once the button is released.
You can also do this by means of buttons
(
2
) and (3) at the steering wheel.
If NaviDrive did not manage to capture a
station on a frequency known to you (reception very weak), you can perform a
manual search for this station.
T
UNING SENSITIVITY
Automatic searches can be carried out
according to two levels of sensitivity:
•
To capture the most powerful transmitters, choose the local search mode
"
LO
" (default option).
•
To capture the weakest or most distant
transmitters, choose the sensitive
search mode "
Search for a station is done first in "LO"
(local) sensitivity, then in "
sensitivity.
To search immediately in "
sensitivity, press twice in succession on
one of the buttons (
M
) or (N) pressed,
DX
".
M
) or (N).
DX
" (distant)
DX
" (distant)
A
UTOMATIC PRE-SETTING OF
STATIONS
(A
UTOSTORE FUNCTION
In FM, if you keep pressing for more than
two seconds on button (
Drive will automatically memorise the
strongest transmitters on the FMast
memory bank.
NaviDrive memorises the 6 strongest
transmitters by deleting the 6 previously
memorised.
After the memorisation, NaviDrive goes
immediately to memory 1 of the FMast
memory bank.
Note:
•
If the traffic information function has
been activated (see RDS SYSTEM),
the stations offering this facility will be
memorised as priority.
•
If it is unable to memorise any new stations, the system will retain the previously memorised stations.
If the system is unable to find 6 stations,
the unfilled memory slots will remain unchanged.
)
R
), your Navi-
27
6
Page 30

28
R
ECALL OF PRE-SET STATIONS
A short press on one of the preselection
buttons "
sponding memorised station.
If an RDS station is selected, the station's
frequency will appear on the display a
few seconds before the station's name.
For RDS stations, recall a station may
prompt a search of the frequency corresponding to the region where you are located.
This operation can also be performed using control (
U
SYSTEM) FUNCTION ON THE
WAVEBAND
The majority of FM radio stations use the
RDS system.
This system permit these stations to
transmit non-audible data in addition to
the broadcasting of their programmes.
The data provides access to various
functions described in this chapter, such
as: intermittent traffic information flashes,
display of the station name and automatic station scanning.
RDS enables you to continue listening to
your chosen radio station, regardless of
the different frequencies it uses in the regions through which you are travelling.
1
SING THE
" to "6" (W) recalls the corre-
1
) at the steering wheel.
RDS (
RADIO DATA
RADIO SOURCE - RDS SYSTEM
S
FM
CANNING FOR
NaviDrive keeps the best possible reception.
It continuously looks for any other frequencies on which the selected radio station is broadcast, automatically choosing
the frequency offering the best reception
(if the station broadcasts on more than
one transmitter or frequency).
Activation or deactivation of the function
can be accessed via the main "
menu or with a short press on (
The display will indicate:
•"RDS
", if the function is active and
available for the station chosen.
•"RDS
" barred on the monochrome display or "
play, when the function is active but not
available on the station.
If the station you have selected does not
broadcast on different frequencies in the
areas in which you are travelling, it is possible to deactivate the automatic RDS
transmission scanning function.
RDS
STATIONS
RDS
" shaded on the colour dis-
AUDIO
T
).
R
EGIONAL SEARCH MODE
Some stations when they are organised
in a network in the different regions that
they serve, transmit programmes that are
different at certain times and the same at
other times.
It is possible to search:
•
Either for a regional station only.
•
Or across the whole network in order to
"
find a different programme.
Activation or deactivation of the function
can be accessed via the main "
menu or with a long press on (
Note:
•
If the function is active, NaviDrive will
not change from one regional station to
another.
•
If the function is non-active, NaviDrive
will choose the strongest frequency of
different stations.
AUDIO
T
).
"
Page 31

TA
TRAFFIC INFORMATION (TRAFFIC
ANNOUNCEMENTS
Some stations allow broadcasting of
these messages thanks to the "
tion.
You can activate this function by pressing
on button "
Your system allows you to receive traffic
information flashes from an FM station
which broadcasts them, even though you
are listening to another radio programme
not itself providing traffic information, or
to another audio source.
The display will indicate "
tion is active and the station is compatible
with these messages ; "
barred on the monochrome display and
shaded on the colour display, if the station is not compatible.
While traffic announcements are being
broadcast, the original radio programme,
or audio source being played, is paused.
When the messages are finished, your
NaviDrive will revert automatically to the
musical programme originally being listened to.
TA/PTY
)
" (S).
TA
" if the func-
TA
" will be
TA
" func-
RDS SYSTEM
Note:
•
You should be in FM wave band.
•
During station search phases or automatic memorisation phases, if the "
function is active, the transmitters that
are compatible with the broadcasting of
these messages will be captured or
memorised first.
•
The station being listened to should indicate via the RDS system that it broadcasts traffic information.
•
Stations organised in a network (EON)
have regional transmitters sending
their own programmes: while listening
to one of these stations the system will
switch automatically to any station on
the network that is broadcasting traffic
information.
During the broadcast of a message you
can stop listening to it by pressing the
"
TA/PTY
remains active.
" button (S), the "TA" function
TA
S
OUND VOLUME ADJUSTMENT FOR
TRAFFIC INFORMATION
The sound volume for traffic information
operates separately from that for the rest
"
of the system, and can be adjusted independently.
Rotate button (
tion message is being broadcast.
This volume adjustment is memorised.
R
ADIO TEXT VIA CONTEXTUAL MENU
If you are in radio source, a press on the
control (
textual menu to select "
dio Text
station about the programme being listened to) (for example : name of singer,
title of song, etc.).
C
) while a traffic informa-
G
) lets you call up the Radio con-
" (information broadcast by the
29
Reading of Ra-
Page 32

30
S
ELECTING A PROGRAMME TYPE
Certain stations allow you to choose to
listen to a particular type of programme
selected from the available list, for example as below:
NEWS SCIENCE
CURRENT AFFAIRS VARIOUS
SERVICES POP MUSIC
SPORT ROCK MUSIC
EDUCATION FOLK MUSIC
FICTION LIGHT MUSIC
CULTURE OTHER MUSIC
WEATHER LEISURE
ECONOMY JAZZ
CHILDREN COUNTRY
SOCIAL AFFAIRS NATIONAL
RELIGION OLD FAVOURITES
DISCUSSION TRADITIONAL
TRAVEL DOCUMENTARY
Press for more than two seconds on the
"
TA/PTY
Rotate control (
programme type.
" button (S).
G
) to select the required
RDS SYSTEM
S
EARCHING FOR A STATION
BROADCASTING THIS PROGRAMME
TYPE
Once you have selected the programme
type, validate to start a search.
NaviDrive will settle on the first transmitter broadcasting this type of programme.
If none can be found, the system will return to the station it was originally tuned
to, and will quit the PTY function.
PRE-
SETTING A STATION
BROADCASTING THIS PROGRAMME
TYPE
Search to select a station.
While it is broadcasting, keep one of the
pre-selection buttons "
1
" to "6" (W)
pressed for more than two seconds.
To recall the pre-set programme type,
press the corresponding button.
Q
UITTING THE
PTY
FUNCTION
To quit this function, press on the
"
TA/PTY
" button (S) for more than two
seconds, then NaviDrive will revert to
normal mode.
Page 33

S
AFETY PRECAUTIONS
Do not use the CD changer if the interior
temperature is higher than +60°C or lower than -10°C.
If the temperature becomes too high, an
automatic safety device will prevent the
CD changer from working until an acceptable temperature is restored.
H
ANDLING COMPACT DISCS
Do not drop them. Store the CDs so that
they are kept of dust. Avoid touching the
disc surface as any scratches may adversely affect the sound quality. Do not
attach any stickers to the discs. Do not
write on them. Do not use damaged or
deformed discs. Do not expose them to
heat or direct sunlight.
Note:
some cut CDs cannot be read by
your equipment (quality, speed of recording, etc.).
If the surface of the compact disc is dirty,
it can be wiped with a soft, clean cloth. Always wipe from the centre of the disc outwards.
CD SOURCE
S
ELECTING
After inserting a CD, with the printed side
facing upwards, the player will start playing the CD automatically.
If there is a CD already inserted, press on
button (
require.
You can also do this by means of control
(
5
) at the steering wheel.
Remark:
•
Before inserting a CD, check that no
CD is already there, with a press on
(
A
•
If the navigation CD-ROM is inserted, it
is not possible to listen to a CD
source
CD
SOURCE
B
) until you have the source you
).
.
in CD
E
JECTING A
Press on button (A) to eject the CD, the
NaviDrive changes automatically to radio
source.
If the CD is not removed within 10 to 15
seconds of being ejected, it will automatically be taken back into the CD player,
although it will not be played.
F
AST FORWARD AND RAPID REVERSE
WITH ACCELERATED SOUND
To move swiftly through the CD, press
and keep pressed button (
spectively for fast forward or rapid reverse with accelerated sound.
Play resumes as normal when the button
is released.
CD
M
) or (N), re-
31
Page 34

32
CD
SOURCE CONTEXTUAL MENU
If you are in CD source, a press on control (
G
) allows you to call up the contextual menu, for activating or deactivating the
following functions:
•
Playback of the start of each track.
•
Random playback.
•
Programming of a sequence for
playback of tracks.
•
List of tracks.
S
ELECTING A TRACK
Press button (M) once to play the next
track.
Press button (
ginning of the track currently being
played, press a second time to go back to
the start of the previous track.
Press the buttons successively to skip
several tracks at a time.
You can display the list of tracks by
pressing on control (
track with a press on (
You can also do this by means of the controls (
2
N
) once to return to the be-
G
) then select the
H
) or (I).
) and (3) at the steering wheel.
CD SOURCE
P
LAYBACK OF
After inserting a CD MP3, the playback
of the first song of the first CD-cover
commences. You can select the track
you wish to listen to via (
desired CD-cover via (
If CD MP3 is already inserted, press on
button (
quired.
Remark:
it is not possible to listen to a CD MP3
CD source
S
ELECTION OF THE
You can display the list of CD-covers by
pressing on (
with a press on (
This equipment enables you to listen to music which is usually rights-protected according to national and international conventions. Please consult these and respect
them.
This equipment is MP3-compatible in accordance with ISO 9660 and formats MP3,
MPEG 1, MPEG 2 and MPEG 2.5 layer 3. It can handle transmission speeds of 32 to
320 kbits/s and playback of 8 to 48 kHz.
CD MP3
M
) or (N), or the
H
) or (I).
B
) until you reach the source re-
if the navigation CD is present,
.
CD-
COVER
G
) then select the CD-cover
H
) or (I).
MP3
CONTEXTUAL MENU
When you are in MP3 source, a press on
the control (
deactivate the following functions:
•
Playback of the start of each CD
track.
•
Random playback.
•
Repetition of tracks.
•
List of CD-covers.
in
G
) allows you to activate or
Page 35

CD CHANGER SOURCE
CD C
HANGER
This equipment, if present, comprises: a
CD changer (
glovebox, with a magazine holding 6
CDs.
I
NSERT/REMOVE A
1 Remove the magazine from the CD
changer
- Open the sliding door of the changer.
- Press on the "
the magazine partially.
- Remove it carefully.
- Close the sliding door.
2 Remove a compartment
Take out just one drawer at a time.
3 Insert/remove a CD
- Insert a single CD, printed side upwards. Otherwise the CD changer will
not operate.
- Pull out the CD by pulling on the part
that is showing.
4 Reposition the compartment
Refit the drawer by pushing it into the
magazine. Do not push directly on the
CD.
5 Repositioning the magazine
- Open the sliding door.
- Hold the magazine, narrow side towards the opening of the CD changer.
- Push it gently into the aperture of the
changer until there is a click.
- Reclose the sliding door to prevent
entry of dust or of foreign bodies.
Z
), located in the vehicle
CD
EJECT
" button to eject
For handling of CDs and user precautions, proceed as for CD Source
(page 31).
S
ELECTING
Press successively on button (B), until
the desired source is obtained.
You can also do this by means of control
(
5
) at the steering wheel.
S
ELECTING A
Press on one of the preselection buttons
(
W
) "1" to "6" to choose the CD that you
wish to listen to.
Press button (
or button (
The CD will start to play automatically.
This operation can also be performed using control (
After each change of source, on return to
CD changer source, playback will
resume at the same point where it had
been interrupted.
F
AST FORWARD AND RAPID REVERSE
WITH ACCELERATED SOUND
To move swiftly through the CD, press
and keep pressed button (
spectively for fast forward or rapid reverse with accelerated sound. Play
resumes as normal when the button is released.
CD
CHANGER SOURCE
CD
H
) to play the previous CD,
I
) to play the next CD.
1
) at the steering wheel.
M
) or (N), re-
33
C
ONTEXTUAL MENU
If you are in CD source, a press on control (
G
) allows you to call up the contextual menu, for activating or deactivating the
following functions:
•
Random playback.
•
Playback of the start of each track.
•
Repetition of the current CD.
•
Display of the list of tracks on the
CD.
S
ELECTING A TRACK
Press button (M) once to play the next
track.
Press button (
ginning of the track currently being
played, press a second time to go back to
the start of the previous track.
Press the buttons successively to skip
several tracks at a time.
You can display the list of the tracks on
the CD currently being played by pressing on button (
with a press on (
You can also do this by means of the controls (
2
N
) once to return to the be-
G
) then select the track
H
) or (I).
) and (3) at the steering wheel.
Page 36

34
T
RIP COMPUTER MAIN MENU
Press on (P) then, using control (G), select the TRIP COMPUTER icon and validate to have access to the following
choices:
•
Trip computer configuration.
•
Diagnosis.
C
ONTEXTUAL MENU
When any type of trip computer information is visible on the multifunction screen,
a press on the control (
access to the functions:
•
Log of alerts.
•
Distance to destination.
G
) gives you direct
TRIP COMPUTER
T
RIP COMPUTER CONFIGURATION
This menu allows you to:
•
Enter a distance to a destination
no guidance has been activated (otherwise this information is given by the
navigation system.
•
Modify the units
tres or miles and gallons).
(°C or °F, km and li-
, if
D
IAGNOSIS
This menu allows you to:
•
Display the log of alerts.
you a list of the most recent alerts which
have been signalled to you, by a message on the screen, whether or not accompanied by the lighting of one of the
alert warning lamps.
•
Display the level of charge of the system back-up battery
bles you to make an emergency call
should there be a disconnection of the
vehicle's main battery.
•
Display the status of the GPS coverage.
This enables you to see how many
satellites are available, as well as the
status of the location of your vehicle.
Remarks:
The back-up battery has a life of 4 years.
It must be disposed of by a specialist operator, never thrown into the public
refuse.
National regulations should be consulted
and complied with.
This gives
. The latter ena-
Page 37

DIRECTORY
35
The directory can contain up to 396 files
distributed over 4 independent sub-directories ("
"
On delivery of the system, the current directory is by default the directory
"
One file can contain:
The address is entered by inputting the
town and the street.
Note:
sence of the navigation CD-ROM, you
will not be able to use this address for
navigation.
User 1
", "
User 2
", "
User 3
User 4
").
User 4
".
- An address.
-5 telephone nos.
-5 E-mails.
- One note.
- A voice label for use in voice commands.
if you enter the address in the ab-
" and
M
AIN DIRECTORY MENU
Press on (P) then, using control (G) select the DIRECTORY icon and validate to
have access to the following choices:
•
Directory file management
you to consult, modify, add a file, or to
delete one file or all of them.
•
Directory configuration
lect a directory, define the starting directory (current directory ) and to name
the directories.
•
File transfer
- To move, by infrared, files in Navidrive Vcard format to and from nomad
equipment.
- To exchange information with a SIM
card inserted in the Navidrive.
, this allows you:
allows
lets you se-
M
ANAGING DIRECTORY FILES
This menu allows you to:
•
Consult or modify a file
file you wish to consult or edit.
•
Add a file
new file, select on the file the short version you wish to use, then validate and
enter the information.
•
Delete a file
to delete.
•
Delete all the files in a directory.
Tip:
To be able to use the content of a file in
navigation, create this by entering the address or the stored information via the
Navigation function.
, to enter the name for the
, to select the file you wish
, to select the
Page 38

36
a
a
When they are created, the files are
stored in the current directory, notably for
use in voice commands.
V
OICE LABEL
You can record a voice label linked to a
file by selecting and validating the icon
"
a
", then pronouncing the voice label 2
times.
Next, the voice label can be used in voice
commands for the telephone (say "
then the voice label) or for navigation
(say "
guide to
vided that the address entered in the file
has been entered in conjunction with the
navigation CD-ROM and is in the current
directory.
" then the voice label), pro-
call
DIRECTORY
F
ILE TRANSFER
This menu enables you to:
•
Exchange by infrared
NaviDrive and nomad equipment by
means of an infrared port, of all or some
of the files in the current directory.
•
Exchange between the SIM card
serted in the NaviDrive) and the NaviDrive, of all or only one of the files it contains.
E
"
XCHANGE OF A FILE BY INFRARED
After selection of the menu "
fer
" and of the direction of this transfer,
you must initiate the exchange by showing simultaneously in front of the infrared
port the nomad equipment on which you
have started the transfer (refer to the instructions for this equipment). A message confirms to you that the exchange
can gone through correctly.
between the
(in-
File trans-
E
XCHANGE WITH THE
This menu enables you to:
•
To send all the files to the SIM card,
from the current directory of your NaviDrive.
•
To send one file to the SIM card, from
the current directory of your NaviDrive.
•
To receive all the files from the SIM card
into the current directory of your NaviDrive.
•
To receive one file from the SIM card
into the current directory of your NaviDrive.
Reminder:
the NaviDrive to the SIM card, only the
first number on the file is recorded.
Remark:
The SIM card represents an independent
source of information: the telephone nos.
can be consulted in the current directory.
when you transfer a file from
SIM
CARD
Page 39

TELEPHONE AND TELEMATIC SERVICES
W
HAT IS THE TELEPHONE FUNCTION
This function consists of a GSM telephone incorporated in NaviDrive.
It has a "
by a microphone located in the front interior lamp and controls at the steering
wheel giving you access to most of the
functions.
Remark:
As with any mobile telephone, your vehicle telephone operates on the existing
cellular and terrestrial networks, and so a
connection cannot be guaranteed on every occasion.
Priority on safety:
Do not allow yourself to be distracted
while you are driving. Observe the national legislation currently in force. We
recommend the driver to stop the vehicle
to continue a telephone conversation or
to perform certain actions (selecting a
number manually, for example).
I
NSERTING AND RETRIEVING THE
CARD
Open the slot (L) by pressing with a ballpoint on the opening situated just above it
(
L’
as indicated, then close the aperture
again.
Remarks:
•
You should only remove the SIM card
after NaviDrive has stopped (key in position S (Steering lock) and display
switched off).
•
If you have a twin card, from first installation or to update your directory you
have to insert the SIM card of your mobile telephone then transfer its informa-
hands free
" function, provided
SIM
). Insert your SIM card into the aperture
tion into the directory of the NaviDrive see the Directory main menu.
E
NTERING THE
NaviDrive can definitively memorise the
PIN
code of a SIM card. Having memorised it on the first entry, the system will
not require it to be entered again.
Enter your
the keypad (
control (
the keypad (
Remark:
•
After three errors in trying to enter the
code, your telephone will be blocked.
You will then have to enter your deblocking code (PUK code).
The PUK code is supplied with your SIM
card by your service provider. The PUK
code tolerates 10 successive errors. After this the SIM card will be un-usable.
Remark:
•
All the essential types of information
associated with a "
can be viewed on the multifunction
screen.
PIN
CODE
PIN
code using the buttons on
W
), then validate by pressing
G
) or alternatively button (#) on
W
).
mobile telephone
M
ULTIFUNCTION SCREEN DISPLAY
When you are not engaged on a telephone call, the display tells you if you
have voice messages or text messages
(SMS) incoming, the length of connection
since the last reset to zero and the status
of your telephone.
During a telephone call, it tells you the
time that has elapsed since the start of
the call, as well as the number (if this op-
"
tion and service is available) or the name
(if recorded in the directory) of the person
you are speaking with, and the status of
your telephone.
37
Page 40

38
U
SING THE KEYPAD
TELEPHONE AND TELEMATIC SERVICES
Press successively on any one of the buttons (
W
•
) of the keypad to:
Select a name commencing with the
letter chosen, either in the directory or
the SIM card.
•
Scroll down the characters, until you
reach the one you need.
1 or space by short press to enter text
[1]
(SMS)
2 or A B C 2 or a b c 2
[2]
3 or D E F 3 or d e f 3
[3]
4 or G H I 4 or g h i 4
[4]
5 or J K L 5 or j k l 5
[5]
6 or M N O 6 or m n o 6
[6]
7 or P Q R S 7 or p q r s 7
[7]
8 or T U V 8 or t u v 8
[8]
9 or W X Y Z 9 or w x y z 9
[9]
To enter text (SMS)
[0]
Short press: Space then 0
Long press:Space
In dialling
Short press: 0
Long press:+
In dialling
[#]
Short press: #
To enter text (SMS)
[]
Short press: Deletion of the last character
Long press: Progressive deletion of the
complete line
In dialling
Short press:
Long press: Deletion of the last character
M
AIN MENU FOR TELEPHONE AND
T
ELEMATIC SERVICES
Press on (P) then use the control (G) to
select the TELEPHONE AND TELEMATIC SERVICES icon and validate to have
access to the following choices:
•
Call.
•
Services
, for access to NaviDrive and
CITROËN services.
•
Telephone functions
, for adjustment
of all the telephone functions.
•
Text messages (SMS)
, to enable you
to manage all the text messaging functions (SMS).
C
ONTEXTUAL MENU
Making a call
Press on button (
D
) to display the tele-
phone contextual menu.
This menu allows you to:
•
Access the calls list.
•
Enter a number.
•
Access the directory.
•
Access to your voicemail
(messaging
from your GSM operator).
Remark:
A long press on button (5) at the steering
wheel brings up a contextual menu with
the calls list, the current directory and the
voicemail.
Page 41

TELEPHONE AND TELEMATIC SERVICES
C
ALL A NUMBER
To call a number, carry out one of the following actions:
•
Select "
Call
AND TELEMATIC SERVICES then
compose the number with the keyboard
(
W
).
•
Press on button (D) to start the dialling,
or select the function "
•
Say "
file that includes a telephone number.
•
Use the current directory
A long press on button (5) at the steering wheel brings up a contextual menu
with the calls list, the current directory
and the voicemail.
•
With Telephone and Telematic Services
displayed, press on button (
access to the calls list.
" in the menu TELEPHONE
OK
Call
" then the voice label from a
".
.
G
) to have
M
AKING A CALL TO A STORED NUMBER
Select the function giving you access to
your directory or to the calls list (the 20
most recent incoming or outgoing calls).
These only figure in the calls list if the
person calling does not withhold the
number.
After selecting the number you wish to
call, press on either button (
(
G
) to connect the call.
Reminder:
In the directory there are two groups of
memorised numbers accessible, one
from the current directory of NaviDrive
and one from the SIM card. The numbers
contained in the latter are preceded by a
"SIM card" symbol.
D
) or control
R
ECEIVING A CALL
When receiving a call, announced by a
ringing tone, you can choose:
•
To accept the call by pressing control
(
D
) or control (5) at the steering wheel
or validating the function "
menu "
Respond
•
To refuse the call by pressing button
(
Q
) or by selecting and validating the
function "
If you have accepted the call, when you
finish the call press button (
(
5
) at the steering wheel, to end the call.
".
NO
" in the menu "
YES
" in the
Respond
Q
), or control
39
".
Page 42

40
THE
SERVICES
This menu, depending on the contracts
subscribed to, allows you to choose one
of the following services:
•
CITROËN on line
contact with the Customer Contact
Centre CITROËN and access to the
services on offer (such a call will be
overridden if an emergency or breakdown call is made).
•
CITROËN Assistance
rect contact with the Call Centre handling the CITROËN breakdown service,
for the fastest possible recovery.
You have a few seconds to cancel this
call once it has been made. This call
can also be made by giving a long
press on button (
assistance call, it is impossible to make
other calls apart from an emergency
call. If you have subscribed to a specific
Services contract, your GPS position is
relayed to the assistance centre.
TELEPHONE AND TELEMATIC SERVICES
, giving you direct
, giving you di-
E
). While making an
•
NaviDrive Services
list of telematic services from
CITROËN (e.g.: Customer Service,
choice of a destination, fuel consumption monitoring, sport, current affairs, finance, weather, horoscope, travel,
games, etc.) depending on availability.
•
Messages received
ing to the benefits of your specific Service Contract.
E
MERGENCY CALL
In the absence of a subscription to the
CITROËN Emergency service, the
button (V) is configured for making calls to
the number
reserved by the European GSM network
for emergency calls.
For this call, a valid SIM card must be
present, permitting the sending and
receiving of telephone calls and SMS
messages. You also need to be in an
area that has GSM coverage.
T
WIN
For better peace of mind, offers of twin
SIM cards (available in some countries
and from some service operators) give
you two SIM cards with a standard price,
a single number and single messaging.
Calls arrive as priority on your principal
line. In the absence of a reply, the calls
are transferred automatically to the equipment that is using the second SIM card.
SIM
112
CARD
, for access to the
, messages relat-
SOS
, being a standard number
Note:
•
This transfer necessitates a callback
(consult your telephone service operator).
•
For optimum operation of services, it
may be necessary to insert the principal
SIM card into the NaviDrive.
If you have a special Service Contract,
refer to the general conditions described
in the contract.
A green diode flashes on the NaviDrive
control panel as soon as you commence
the emergency call procedure, then it
comes on permanently when the call is
picked up by the emergency services.
The same warning lamp flashes or illuminates permanently in orange should it detect a malfunction in the telephone's
emergency calls function.
Remarks:
•
If you are subscribed to a Service Contract, the services can then be localised
by means of GPS. You can check the
activation of this localisation wih a long
press on (
"Configuration of services". If the emergency services appear activated, you
can then be localised. Otherwise, you
are not localised.
•
If the emergency services appear activated but you have not subscribed to a
Services contract and do not wish to be
localised, make contact with your usual
CITROËN dealer.
P
) followed by selection of
Page 43

TELEPHONE AND TELEMATIC SERVICES
T
ELEPHONE FUNCTIONS
This menu gives you access to the following functions:
•
Network
mode and to view the networks available.
•
Length of calls
length counters and the reset to zero.
•
Managing the SIM card
the PIN code and deleting the list of
calls and SMS messages.
•
Call options
whether or not you withhold your
number, for hanging up automatically
after X rings, for defining ring tones and
callback for SMS and for deleting the
calls list.
, to select the network search
, to consult the call
, for modifying
, for configuring calls by
T
EXT MESSAGING
This menu allows you to read, send, and
edit SMS messages and to delete the list
of them.
Normally, your server centre number is
configured automatically depending on
your network operator.
To modify it, select the menu "
and Telematic Services
messages (SMS)
server centre
the latter.
Any text message composed prior to the
recording of this number, will be deleted
and not sent.
(SMS)
Telephone
", then "
" and "
" for entering and recording
Text-
Number of
S
ENDING A TEXT MESSAGE
In the menu "
validate the function "
SMS
", and enter your SMS via the key-
pad.
You can then:
•
Either record the message for later use
by vaidating in the "
•
Or send it by validating in the "
function.
Then compose the destination number or
select it either in the directory or in the
calls list. Then send it.
Text-messages (SMS)
(SMS)
Production of an
OK
" function.
Send
41
",
"
Page 44

42
R
ECEIVING AN
A sound signal (if the ringing option for
SMS messages is active) and a superimposed window tell you of the arrival of an
SMS.
You can then:
•
Either read the SMS by selecting and
validating "
•
Or defer reading it by selecting and validating "
or by waiting for the superimposed window to disappear.
TELEPHONE AND TELEMATIC SERVICES
SMS
YES
".
NO
" or by pressing button (J)
Note:
•
SMS messages that have been stored
or deferred can be consulted at any
time.
To gain access, press on button (
select "
Services
messages
"
Reading of SMS messages re-
ceived
able to select and validate the message
you wish to read. The number of SMS
messages unread is indicated.
•
If the voice synthesiser function is active, as soon as the message is displayed, it will be read out by the voice
synthesiser.
Telephone and Telematic
" then the function "
and validate the function
". Then move in the list to be
SMS text-
R
EPLYING TO AN
After reading a text message, you can:
•
Reply directly to the sender by selecting "
P
),
Respond
matically to return your message.
•
Record the number of the SMS sender
into your current directory, by selecting
"
Record
SMS
". A screen appears auto-
".
Page 45

C
ONFIGURATION MAIN MENU
Press on (P) then use the control (G) to
select the CONFIGURATION icon and
validate to access the following choices:
•
Choose colours
choose one of the colours available for
the display.
•
Adjust brightness
ness and sharpness and video display.
(colour screen), to
, to adjust bright-
CONFIGURATION
•
Sound
, for adjusting the voice synthesis (for the feminine/masculine voice
parameter), and activation/deactivation
of voice commands and audio/video
auxiliary input.
•
International parameters
the date and time (12 or 24 hour format,
adjusting the minutes on GPS) and adjusting the units (metric or imperial system).
•
Choose language
guage for the voice synthesiser and
displays.
, to choose the lan-
, for setting
43
Page 46

44
G
ENERAL
When the map is displayed, you can use
either of two functioning modes: The
mode "
Follow vehicle on map
shows you the movement of the vehicle
on the map, and the mode "
Move on map
fine a particular spot by moving a pointer.
The map can be displayed either on the
right of the screen as in the other applications, or full screen enlarged.
Remarks:
•
By default, the map displays in mode
"
Follow vehicle on map
•
The change of the mode "
cle on map
map
" is made via the Map main menu
or using the Navigation contextual
menu by means of a press on the control (
G
•
The change the other way is made using the Contextual Menu for the mode
"
Move on map
", which allows you to de-
".
" to the mode "
).
".
", which
Select -
Follow vehi-
Move on
MAP
M
ODE
"F
OLLOW VEHICLE ON MAP
This mode enables you to view the vehicle centred on the map, whether or not
guidance is active.
The map has a zoom function which can
alter the scale of the map. To vary the
scale between 50 m / cm to 200 km / cm,
rotate control (
Remark:
•
In this mode, a validation on control (G)
brings up the display of the Navigation
contextual menu.
•
The more precise scale allows you to
see one-way systems.
G
).
"
M
ODE
"S
ELECT
- M
OVE ON MAP
This mode enables you:
•
To move on the map in all four directions: North, South, East, West via buttons (
H
), (M), (I) and (N). The movement can be speeded up by keeping
the appropriate button pressed down.
•
To select a point on the map by moving
the latter in order, after a press on (
to be guided towards this point, to have
information on it, or to memorise it.
Remarks:
•
In this mode, the zoom is also available
and the map is always full screen, oriented to North.
•
In this mode, a validation on the control
(
G
) displays the Map contextual menu.
•
In this mode, the symbol for the nearest
Point of Interest is displayed.
"
G
),
Page 47

MAP
MAIN MENU
Press on (P) then use the control (G) to
select the Map icon and validate to have
access to the following choices:
•
Move the map
"
Select - Move on map
•
Orientation of the map
the map either to the direction the vehicle is travelling in, or to North.
•
Centre around the vehicle
tre the map on the vehicle if it no longer
appears on the map.
•
Details of the map
points of interest to be displayed using
symbols on the map (see next page).
•
Memorise the current position
display the panel for entering a label for
recording the vehicle's current position
in a file in the current directory.
, to change to the mode
".
, for orienting
, to recen-
, for selecting the
, to
MAP
Tip:
Among the details of the map, you can
select (depending on the country where
the vehicle was marketed and on the
availability of the service) the display of
radar zones or high-accident zones.
C
ONTEXTUAL MENU
This contextual menu displays in mode
"
Select - Move on map
•
Information on this location
the information on the point of the map
selected by the cursor.
•
Choose as destination/stage
you select the location which is pinpointed as a destination or stage if a
guidance is already in progress.
•
Memorise this location
the point selected by the cursor in a file
in the current directory.
•
Exit map mode
back to the mode "
map
".
".
, to view
, lets
, to memorise
, changes the map
Follow vehicle on
45
Page 48

46
Public authorities and security Sports and open air centres
City hall, City centre Sports centres and complexes
Universities, Colleges, Schools Golf courses
Hospital Skating, Bowling
SYMBOLS FOR CENTRES OF INTEREST
Hotels, restaurants, business and retail parks
Hotels Parks, gardens
Restaurants Public attractions
Vineyards
Supermakets, Shopping malls Airports, flying clubs
Business centre Rail stations, bus stations
Culture, tourism, entertainment
Culture, museums and theatres Car parks, rest areas
Tourism, historic monuments Ferry terminals, port areas
Casinos and night life Service stations, garages
Cinemas
Shows, exhibitions CITROËN Dealer or Repairer
Winter sports
Transport and motoring
Car hire
Radar zones/High-accident zones (display depends on the
country where the vehicle was marketed and on the availability of the service)
Page 49

V
IDEO CONTEXTUAL MENU
The contextual menu gives you access to
the following functions:
•
Display format.
lect the display format:
16/9 or 4/3.
•
Brightness adjustment.
•
Contrast adjustment.
•
Deactivate Video mode.
This allows you to se-
VIDEO
V
IDEO MAIN MENU
Press on (P) then use the control (G) to
select the VIDEO icon and validate to
have access to the following choices:
•
Activate/deactivate Video mode.
•
Video parameters.
This application is displayed full screen.
Remarks:
•
If a piece of equipment is connected to
accessory Video-Audio sockets (located in the glovebox) then the activation
of Video mode cuts the Audio source
currently being listened to. You can reactivate any of the other Audio sources
with a short press on the "
ton.
•
It is possible to view the images on
equipment that is connected provided
that it is emitting a signal and the vehicle is stationary. While the vehicle is
moving, only the sound is available.
Source
" but-
V
IDEO PARAMETERS
This menu permits you to choose display
formats and to individually adjust brightness, colours and contrast for the Video
image.
47
Page 50

48
INDEX NAVIDRIVE
A
Address - entry ................................
Address - memorisation...................
Assistance .......................................
Audio ...............................................
Auxiliary input (activation)................
20-21
20-35
40
25
43
C
Calls list...........................................
CD - CD changer.............................
CD, CD changer and radio sources .......
CD-ROM..........................................
Centre of interest.............................
CITROËN Assistance......................
Contextual menu ............................. 19-26
39-40
31 33
26 28
31-32
33
18
21-46
40
31-32
33-37
45-47
D
Destination selected ........................
Directory file.....................................
Directory ..........................................
Display.............................................
Diversion (modification of itinerary)........
18-20
35-36
35-36
7
19-22
E
Exchange between Directory and
SIM card ..........................................
36
F
Filtering TMC incidents.................... 24
G
Guidance criteria ..............................
Guidance options .............................
Guidance.......................................... 18-19
19
22
22
I
Infrared.............................................
36
K
Keypad.............................................
38
L
Last calls ..........................................
Last destinations ..............................
List of radio stations available..........
Location - memorisation...................
Location - point on map....................
Log of alerts......................................
39
20 22
27
46
46
34
M
Main Menu........................................
Map - display - orientation................
Map - traffic information....................
Memorising a radio station ...............
Memorising the PIN code.................
MP3..................................................
7
44-45
19
26
37
32
N
Navigation ........................................
Notebook of contacts and addresses ....
18 22
35-36
R
RDS system .....................................
RDS-TA Traffic Information..............
RDS-TMC Traffic Information........... 22 24
28 30
29-30
S
Scale of map....................................
SIM card...........................................
SMS ................................................. 38-41
44
36-37
42
T
Telephone and Telematic Services .......
Telephone call..................................
Text-Message (SMS) .......................
37
38-39
41-42
V
Video................................................
Voice commands .............................
Voice label on a file..........................
Voice volume adjustments ...............
47
13 17
36-39
18-43
Page 51

The descriptions and data in this guide are given without obligation.
AUTOMOBILES CITROËN reserves the right to modify its models and associated equipment without necessarily being
Création COMIDOC - Automobiles CITROËN - RCS PARIS 642 050 199 - Edition ALTAVIA/PRODITY - Imp. en UE
bound to update the present handbook.
Page 52

ART-V3-GB-45/0
Edition 07/2005
 Loading...