

CITIZEN QUARTZ
Racing Chrono
Model No. JNOXXX
Caliber No. C310
• Instruction Manual
CTZ-B6770
Thank you for purchasing a CITIZEN QUARTZ
Watch. To ensure correct use, please read these
instructions carefully. Please confirm that the
CITIZEN International Guarantee Card is included
for your possible claim.
A. Five Features
1. Lap time, lap number are displayed.
2. By setting the distance of one lap around a race
circuit, the speed is displayed.
3. When the racing ends, the race’s
• Best lap time, the lap number, and speed
• Average lap time and average speed
• Total time and total laps can be displayed.
4. There is a “hand retractor function” that prevents
the analog hand from covering parts of the display.
5. The timer can be selected from “analog (hand)
display” or “digital display” (You can use both at
the same time).
B. Name of Parts
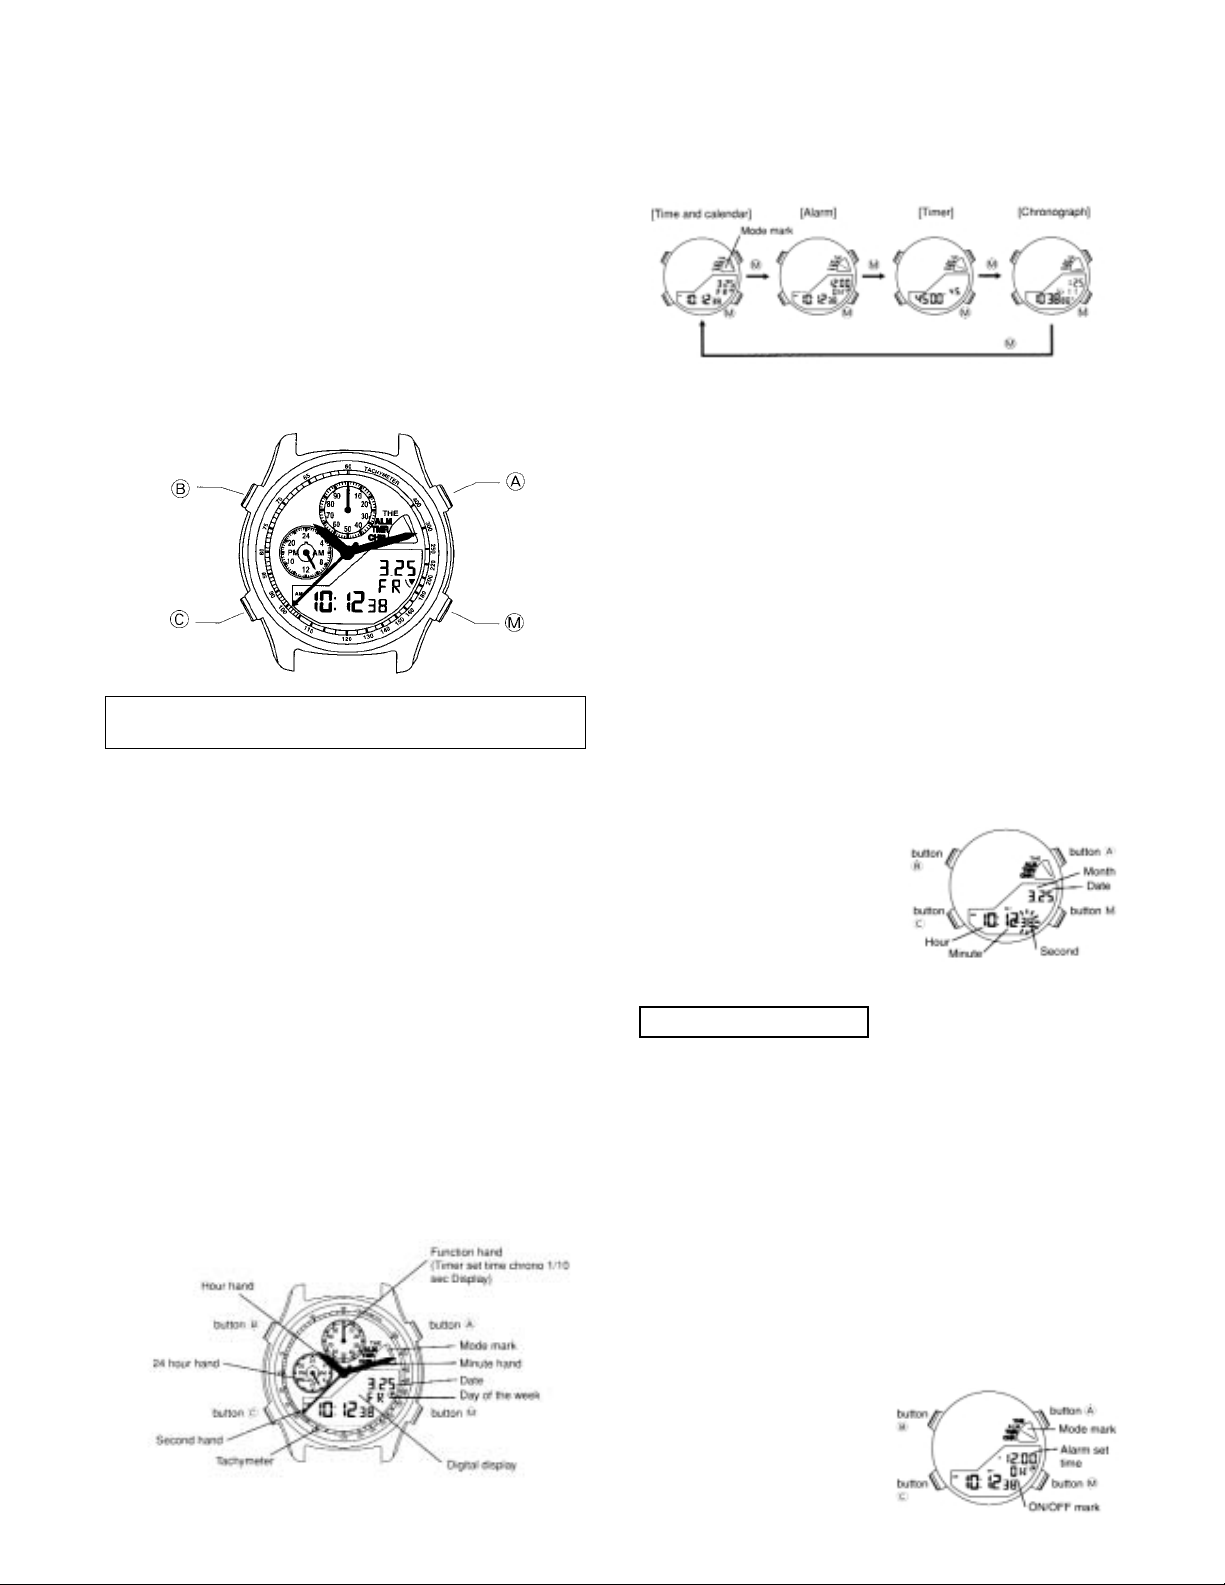
C. Switching the Mode
This watch has the following 4 main functions
(modes) can be switched by pressing button
嘷M.
<Note>
When changing modes, make sure you have
pressed button
嘷M in properly to change modes.
D. Adjusting the Time and Calendar
1. Set the mode to (Time/Calendar) mode by
pressing button
嘷M.
2. Pull out button
嘷M.
• The second hand will return to the “0” position.
2. • The day of the week will disappear and the
seconds will flash in the digital display.
2. • “SET” will appear in the digital display.
* At the time, if the second hand does not return to
the “0” position, please refer “Hands standard
position” on page 17, and perform operation.
3. Press button
嘷A to select the flashing digit you
wish to adjust,
4. Adjust the flashing digit of the time with button
嘷M.
5. Push back button 嘷M to the normal position after
completing the time adjustment.
5. • All hands will move to the adjusted time
automatically.
5. • The digital display will return to the normal display.
The analogue time and the
digital time in this watch are
synchronised. If you adjust
the digital time, the analogue
time is adjusted automatically.
E. Alarm Function
1. Press button
嘷M to set the digital mode mark to
(ALM) mode.
2. Pull out button
嘷M. The hour digit in the digital
display will flash for the alarm set time ‘Set’ will
appear in the digital display.
3. Press button
嘷A to select the digit (hour/minute).
4. Press button
嘷C to set the alarm time.
5. Push back button
嘷M to the normal position after
complete adjustment.
✽ Press any button to stop the alarm sound.
<Note>
The alarm sound may sometimes start and stop.
This is because when the watch hands move, the
alarm sound is momentarily adjusted.
Switching the alarm ‘ON/
OFF’ with button
嘷C
.
The alarm time and normal
time (12/24 hour system)
are synchronised. When
A/P is displayed, make sure AM/PM are set correctly.
This is a combination watch which can conveniently
display data while watching races (car, bike, etc.)
Setting the alarm time
F.Timer Function
This timer can be set to the maximum of 60 minutes
in minute.
For the timer, by pressing button
嘷C you can select
between “analogue display” or “digital display”. (You
can not use both at the same time).
Both the analogue and digital settings are the same
way.
1. Press button
嘷M to set the mode mark to (TMR)
mode.
2. Pull out button
嘷M.
2. • The timer setting time will flash in the digital
display.
2. • “SET” will appear in the digital display.
3. Press button
嘷C to set the time.
• When using the analogue hands for the timer,
the function hand (a small hand on the 12 o’clock
direction) will move
according to the timer
setting time.
4. Push back the button
嘷M
to the normal position.
1. Start/Stop
• By pressing button
嘷A, the timer will start and stop.
2. Reset
• When the timer is stop, press button
嘷C to return
the timer to the set time.
3. Time up
• Alarm will ring for 5 seconds
• While the alarm sounds, press any button
(
嘷M, 嘷A , 嘷B , 嘷C ) to stop.
4. Timer restart
When the timer is timing, press button
嘷C to return
the timer to set time and the timer will restart
timing again.
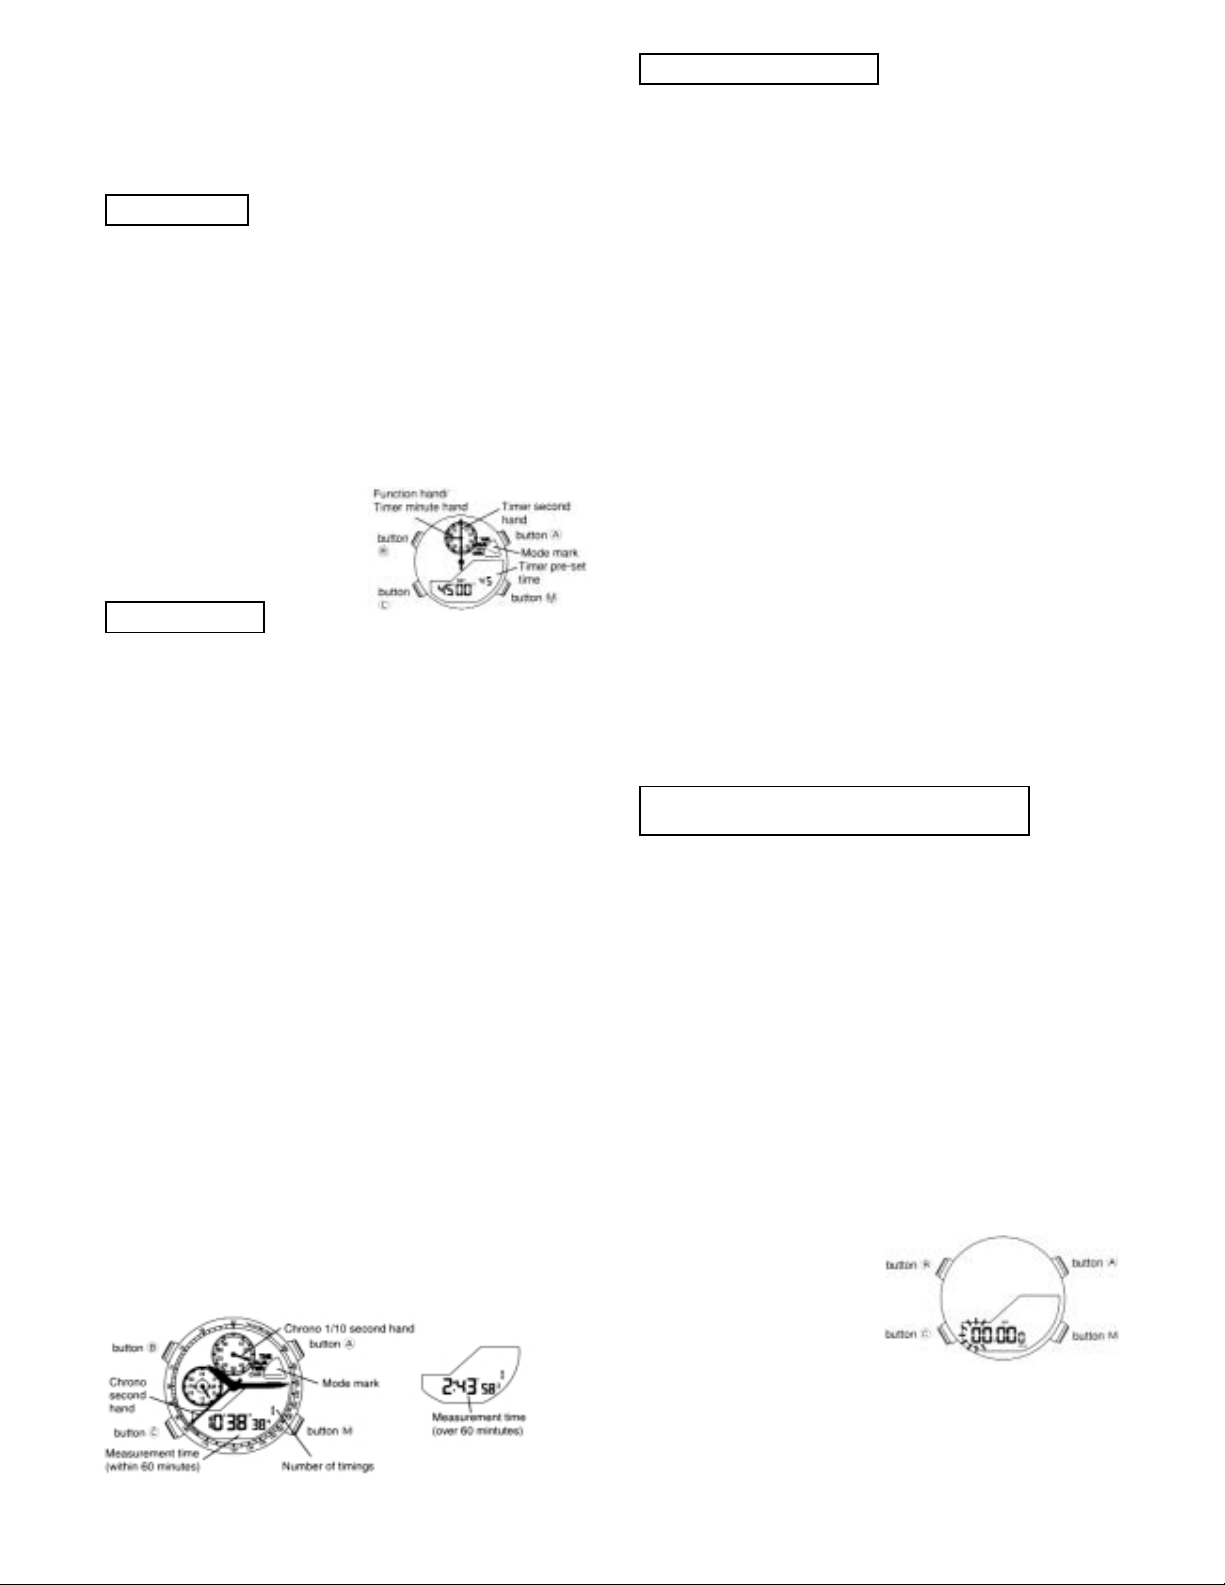
G. Chronograph Function 1
This chronograph can measure up to 99 hours, 59
minutes, 59 seconds, 9. After that it will stop at 0
hours, 00 minutes, 00 seconds, 000. Measurement
time will display in the digital display. The analogue
hands will also show “Seconds” “1/10 seconds”
hand will display only when the chronograph has
been stopped. (While the chronograph is stopped
or while checking the lap time) 1/10 second hand
will stop at the 0 second position after 1 minute of
timing. After that, it will point to the correct 1/10
second time when the chronograph has stopped.
The chronograph has stopped. The chronograph
will measurement in 1/1000 sec. units up till 60
minutes, and in 1/10 sec. units from 60 minutes on.
Press button
嘷M to set the digital mode mark to the
(CHR) mode.
1. Press button
嘷A to start timing.
• The chronograph’s number of timing display
changes from “0” to “1”.
2. While timing press button
嘷A to stop.
“BEST LAP” etc. will appear in the digital display,
however it is not required when operating the
standard measurement.
3. Press button
嘷A again to restart the chronograph
from “0 hour, 00 minute, 00.000 sec”.
• The chronograph number of timing display
changes from “1” to “2”.
4. In that way with button
嘷A it is possible to repeat
the start/stop operation.
4. • The chronograph display gains “1” every time,
until it reaches a maximum of “99”. After that it
will repeat from “0”.
4. • The chronograph starts from “0 hour, 00 minute,
00.000 sec” every time it is started.
5. Press button
嘷C to reset after measurement.
The time and the number of timing will reset to “0”.
<Note>
When the alarm sounds, the hands may stop, but
they will revert to the correct timing after the alarm
sounds stop. The digital display continues timing
correctly.
H. Chronograph Function 2 (Racing Chronograph)
When using the racing chronograph, in order to
calculate the km per hour of the car, the distance
of one lap around the race circuit must be input.
So before you start timing, set the lap distance.
1. Reset the chronograph and then depressing
button
嘷A for 2 seconds or more.
• The chronograph will initially start, however
after 2 seconds the display will switch to the
lap distance setting display.
2. Distance setting
• Setting range is “00.000” km – “99.999” km
(1 metre) units.
• Select the digit you wish to to set with button
嘷A, set the distance with button 嘷C .
• Press button
嘷A to select “0.001” km digit then
by pressing button
嘷A again, you can return
from distance setting to the reset condition.
Timer setting
Using the Timer
Standard measurement
Setting the distance of one lap around
the race circuit

1. Press button 嘷A to start timing
2. When the car you are timing completes one lap,
press button
嘷A to stop timing.
2. • In the digital display “BEST LAP” will appear.
2. • km an hour of the lap will display. Only between
“0.0 – 999.9” km per hour can be displayed.
2. • Over 1000 km per hour “---.-” will display.
3. After several laps, to time other cars, press button
嘷A again. The watch will start timing from “0” again.
4. When the car you are timing completes the lap
press button
嘷A.
• If the timing of the lap is faster than previous
times “BEST LAP” in the digital display will
appear. If the lap is slower, just “LAP” will appear.
5. Press button
嘷A you can repeat the start/stop
function.
• The number of timings display is up to “99”.
After that it will continue from “0” again.
6. When one race has finished and you wish to
time the next race, press button
嘷C to reset the
chronograph.
• The time, and number of timings will be reset to
“0”.
1. Press button
嘷A to start timing.
2. Press button
嘷C to measure the lap time of the
present lap.
2. • The lap time will display. (The watch automatically
starts timing the next lap.)
2. • “BEST LAP” will display.
2. • km an hour of this lap will display.
2. • After displaying this data for 10 seconds, it will
automatically change to the next lap timing
display.
2. • At that time, the number of timings display will
change from “1” to “2”.
3. Repeat this operation for every lap.
(Press button
嘷C to measure the lap time.)
3. • When the lap is the fastest yet “BEST LAP” in
the digital will appear, in other cases “LAP” will
appear.
3. • The number of timings display is up to “99”
after that it will continue counting from “0”.
4. When the last lap of the race ends press button
嘷
A to complete timing.
5. When you wish to measure time the next race,
press button
嘷C to reset the chronograph.
Until the chronograph is used
again, the memory data can be
retrieved. The memorised items
are as follows:
• Best lap display
• Average lap time display
• Total time display
<Note>
If you reset the chronograph,
then start timing all memorised
data will be deleted. So if the
data is needed, it would pay to
make a memo. Calling up to
chronograph memo.
1. Press button
嘷C to reset the chronograph.
• All displays change to “0”.
2. Press button
嘷C again
• It changes to the best lap display
3. Press button
嘷C
• It changes to the average lap time display
4. Press button
嘷C
• It changes to the total time display.
5. Press button
嘷C again to return to the reset
mode.
I. Convenient Function to Note
When the display is difficult to read due to the
analogue hands converting the display.
In that case, it is possible to move the hands using
the “Hands retractor function”. Pressing button
嘷B
for 2 seconds or more, hour, minute, second hands
will continue to retract until the 12 o’clock position.
If you press button
嘷B while the hand will stop at
that position, and be in the hand retractor condition.
[Cancellation of the hands retractor function]
Press button
嘷B, The hands retractor function will
cancel. The hour, minute hands will fast forward to
the correct time.
<Note>
When using the chronograph while the hands retractor
function is operating, all hands are stationary.
Using the dual time
Setting the local time (to another city).
1. Set the watch to (Time/Calendar) mode.
2. Depress button 嘷
A for 2 seconds or more.
• The hour and minute hands advance only 30
minutes. (The time difference between countries
around the world are in 30 minute intervals.)
3. Depress button 嘷
C for 2 seconds or more.
• The hour, minute hands will backward for 30
minutes.
4. Perform these operations (2 or 3) to adjust the
local time.
[Cancellation of the local time]
Cancellation of the local time,
press button
嘷A and 嘷C
simultaneously.
When timing one lap
When you time continuous laps
Retrieving memorised data
Calling up to
chronograph memo

L. Precautions
Water resistance
J.When the Watch’s Display is Abnormal
After replacing the batteries, or when the watch
receives a strong shock due to being accidentally
dropped, etc., the watch may show unusual
characteristics (display disappears, alarm continues
sounding etc.). In that case perform these three
operations in this order.
1. All reset
2. Hands standard position setting
3. Time setting
[All reset]
1. Pull out button
嘷M.
2. Depress the buttons
嘷A, 嘷B, 嘷C simultaneously
for 2 seconds or more.
All digital segments
will appear.
3. Push back button
嘷M
to the normal position
• An alarm sound will
ring twice, and the
watch will start.
[Hands standard position setting]
1. Press button
嘷M to set the watch to the (CHR) mode
2. Pull out button
嘷M
3. Press button 嘷A
or button 嘷Cto set the function
hand to on the 12 o’clock position.
4. Press button
嘷B
The display in the digital display will change from
“F.H” to “H.R”.
5. Press button
嘷A or button 嘷C to set the hour, minute
hands, and 24 hour hand to the 12 o’clock position.
6. Press button
嘷B once
• The display in the digital display will change
from “H.R” to “SEC”.
7. Press button
嘷A or button 嘷C to set the second
hand to the 12 o’clock position.
8. Push back button
嘷M to it’s normal position.
<Note>
The hands standard position setting is different from
time adjustment. Set the time after this operation.
K.Tachymeter
Tachymeter is a function that measures the speed of
a car, etc. With this watch depending on the amount
of seconds it takes to travel 1 km (measuring range
is within 60 sec.) the approximate average speed
over that distance can be measured.
Start the chronograph when you start measuring.
When 1 km has been progressed stop the chronograph.
When you stop the chronograph after progressing 1
km, the approximate average speed over that distance
can be determined with the present position of the
second hand. If you progress 1 km in 45 seconds, the
average speed over that distance is approximately 80.
WATERRESIST
(ANT)
Reinforced water
resistant for daily
life
WATERRESIST
WR***/**bar
5 bar water
resistant watch
Dial
Classification
Case back
OK OK NO NO NO
Swimming and
general washing
work (Kitchen
work/car washing,
etc.)
Water sports and
skin diving
(without air tank)
Scuba diving
(with air tank)
Pulling out the
crown when the
watch is wet
Specification
10 bar/20 bar water
resistant watch
Washing face or
getting wet in the
rain (When
splashed over it
and no water
pressure is
applied to it)
OK
OK OK NO NO
Water-related use
Indication
“WATER RESISTANT” may sometimes be abbreviated as “WATERRESIST” *Always set the crown in the normal position

Water Resistance
• To prevent water coming into contact with the
internal mechanism of the watch, the crown
should under no circumstances be pulled out
while the watch is wet,
• If watches designed for sports or working in the
water are exposed to salt water or significant
amounts of sweat, they should be rinsed in fresh
water and dried thoroughly.
• Exposure to water may affect the durability of
some types of leather bands.
• Because the internal watch parts may hold some
moisture, if the external temperature is lower than
that inside the watch, the glass covering the
watch face may fog up. If this fogging up is only
temporary it causes no problem, however, if it
persists over a long period of time you should
discuss the matter with a salesperson at the shop
where you purchased the watch or at a Citizen
Service Centre.
Temperature
Avoid exposing the watch to direct sunlight or
leaving it in extremely hot or cold locations for a
long period of time.
• This will cause malfunctioning and shorten the life
of the battery.
• This may cause your watch to gain or lose time
and affect its other functions
Shock
• This watch will withstand the bumps and jars
normally incurred in daily use and while playing
such non-contact sports as golf, etc.
• Dropping the watch on the floor or otherwise
imparting severe shock to it may cause
malfunctioning or damage.
Magnetic Fields
This watch is antimagnetic up to 60 gauss and not
affected by the magnetic fields produced by normal
household electric appliances. If used in the
immediate vicinity of strong magnetism, however,
the watch’s functions may be affected.
Static Electricity
The integrated circuits used in the watch are sensitive
to static electricity. If exposed to intense static
electricity, the watch’s display may lose its accuracy.
Chemicals and Gases
Avoid wearing the watch in the presence of strong
chemicals or gases. If the watch comes in contact
with such solvents such as thinner and benzine or
products containing materials such as gasoline,
polish, detergent or adhesive, its components may
discolour, dissolve or crack. Be especially careful to
avoid chemicals. The watchcase or band may
discolour if they come in contact with mercury from
a broken thermometer or other equipment.
Keep Your Watch Clean
Wipe off soil and moisture from the glass with a
soft, dry cloth. If you wear the watch with the back
side of the case and the watch is soiled they may
cause a skin rash as they come in direct contact
with the skin. Keep your watch clean to avoid
staining your cuffs. How to clean the watchband:
• Metal band – Wash soiled parts with a toothbrush
in mild, soapy water.
• Plastic or rubber band – Wash in water. Do not
use solvent.
• Leather band – Rub lightly on the front side with a
soft cloth. Use a cloth moisturised with alcohol to
clean the under side.
Periodic Inspection
Getting your watch checked once every year or two
is recommended to ensure long use and troublefree operation.
Be sure to keep the batteries out of reach of
infants and small children.
Should accidental ingestion occur, consult a
doctor at once.
• Refer to the diagram on “water resistance”
M. Specifications
1. Type: Combination (Analogue + Digital) quartz
watch
2. Time accuracy: (when worn at 5°C – 35°C/41°F
– 95°F) within +
20 seconds per
month
3. Operating Temperature Range: 0°C-50°C
(35°F-122°F)
4. Functions:
• Time/Calendar: (hour, minute, second)/
(month, date, day of the week)
4. • Alarm: Hour, minute, ON/OFF.
4. •• Racing:
100 Hour Chronograph in 1/1000
second increment (less than 60 minutes)
Lap time display
Lap number display 0 – 99
Speed calculation: 0.0 – 999.9 (km an
hour)
5. Battery Number: 280-44 (SR927W)
6. Battery Life: Approximately 2 years (after
installing a new battery under normal use)
* Specifications are subject to change without
notice.
 Loading...