


English
J280 Abbreviated instruction
• This watch is solar-powered. Expose the dial to light and use it sufficiently charged.
• To see details of charging time, specifications and operations, refer to the instruction manual:
• Click
Video
in articles to see video instructions of operation.
Component identification
J280 instruction manual
When showing time/using compass
Scale
)
0
1
-
Button
Hour hand
Power reserve
Indication hand
Button
Second hand
A
B
(
0
9
(-10)
90
)
0
2
-
(
7
(-20)
8
0
6
8
W
)
0
3
-
(
9
5
80
10
x 1000 m
4
3
(-30)
2
0
70
1
+
7
0
(-40)
)
0
60
4
-
(
0
6
Compass hand
m
1
m
0
0
(
-
9
10
0
)
(-90)
m
0
-
50
(-50)
)
0
5
S
)
-
(
20
200
800
0
(-80)
W
400
600
30
E
(-70)
)
40
(-60)
4
0
(
-
6
0
)
(
+
5
2
0
(
-
8
0
)
E
3
0
(
-
7
0
Scale rotation crown
Minute hand
Date indication
Crown
Crown's position
When measuring altitude
Scale
A
Button
Hour hand
Atmospheric pressure
sensor
1 000 m hand
Button
Second hand
B
100 m hand
-
(
0
9
(-10)
90
)
0
2
-
(
7
(-20)
8
0
6
8
W
)
0
3
-
(
9
5
80
10
x 1000 m
4
3
(-30)
-
2
0
70
1
+
7
0
(-40)
)
0
60
4
-
(
0
6
)
0
5
1
m
0
0
(
-
9
10
0
)
(-90)
m
0
50
(-50)
S
)
-
(
20
200
800
0
(-80)
W
400
600
30
E
(-70)
40
(-60)
4
0
(
-
6
0
)
(
+
5
2
0
(
-
8
0
)
E
3
0
(
-
7
0
)
Scale rotation crown
Minute hand
Date indication
Crown
m
)
0
1
2.5 m hand
• Actual appearance may differ from the illustration. Some
models are not equipped with the scale and the scale rotation
crown.
• The crown has two positions when pulling it out.
• Rotate the screw down crown counterclockwise until it
0
1
2
• After operation, with pressing it to the case, rotate the crown clockwise to
tighten it firmly.
• Refer also to our web page for detail of usage of the scale and bezel on the watch.
(
http://www.citizenwatch-global.com/support/pdf/enhanced/e.pdf
releases from the case before operating it.
• Read the instruction manual thoroughly and take sufficient care for safety use when using the altitude measurement and compass functions of this watch.
)
Checking the power reserve
• Power reserve level is not indicated during measurement or calibration of
altitude.
Level 3 2 1 0
Indication
Duration
(approx.)
Meaning
340 ‒ 280 days 280 ‒ 180 days 180 ‒ 4 days
Power reserve is
sufficient.
Power reserve is
OK.
Power reserve is
get tin g low.
OK for normal use Charge immediately.
• You cannot use measurement functions while the power reserve level is in "0".
However, you can see the current time.
Frequent use of measurement functions makes power duration shorter.
4 days or
shorter
Insufficient
charge warning
has started.
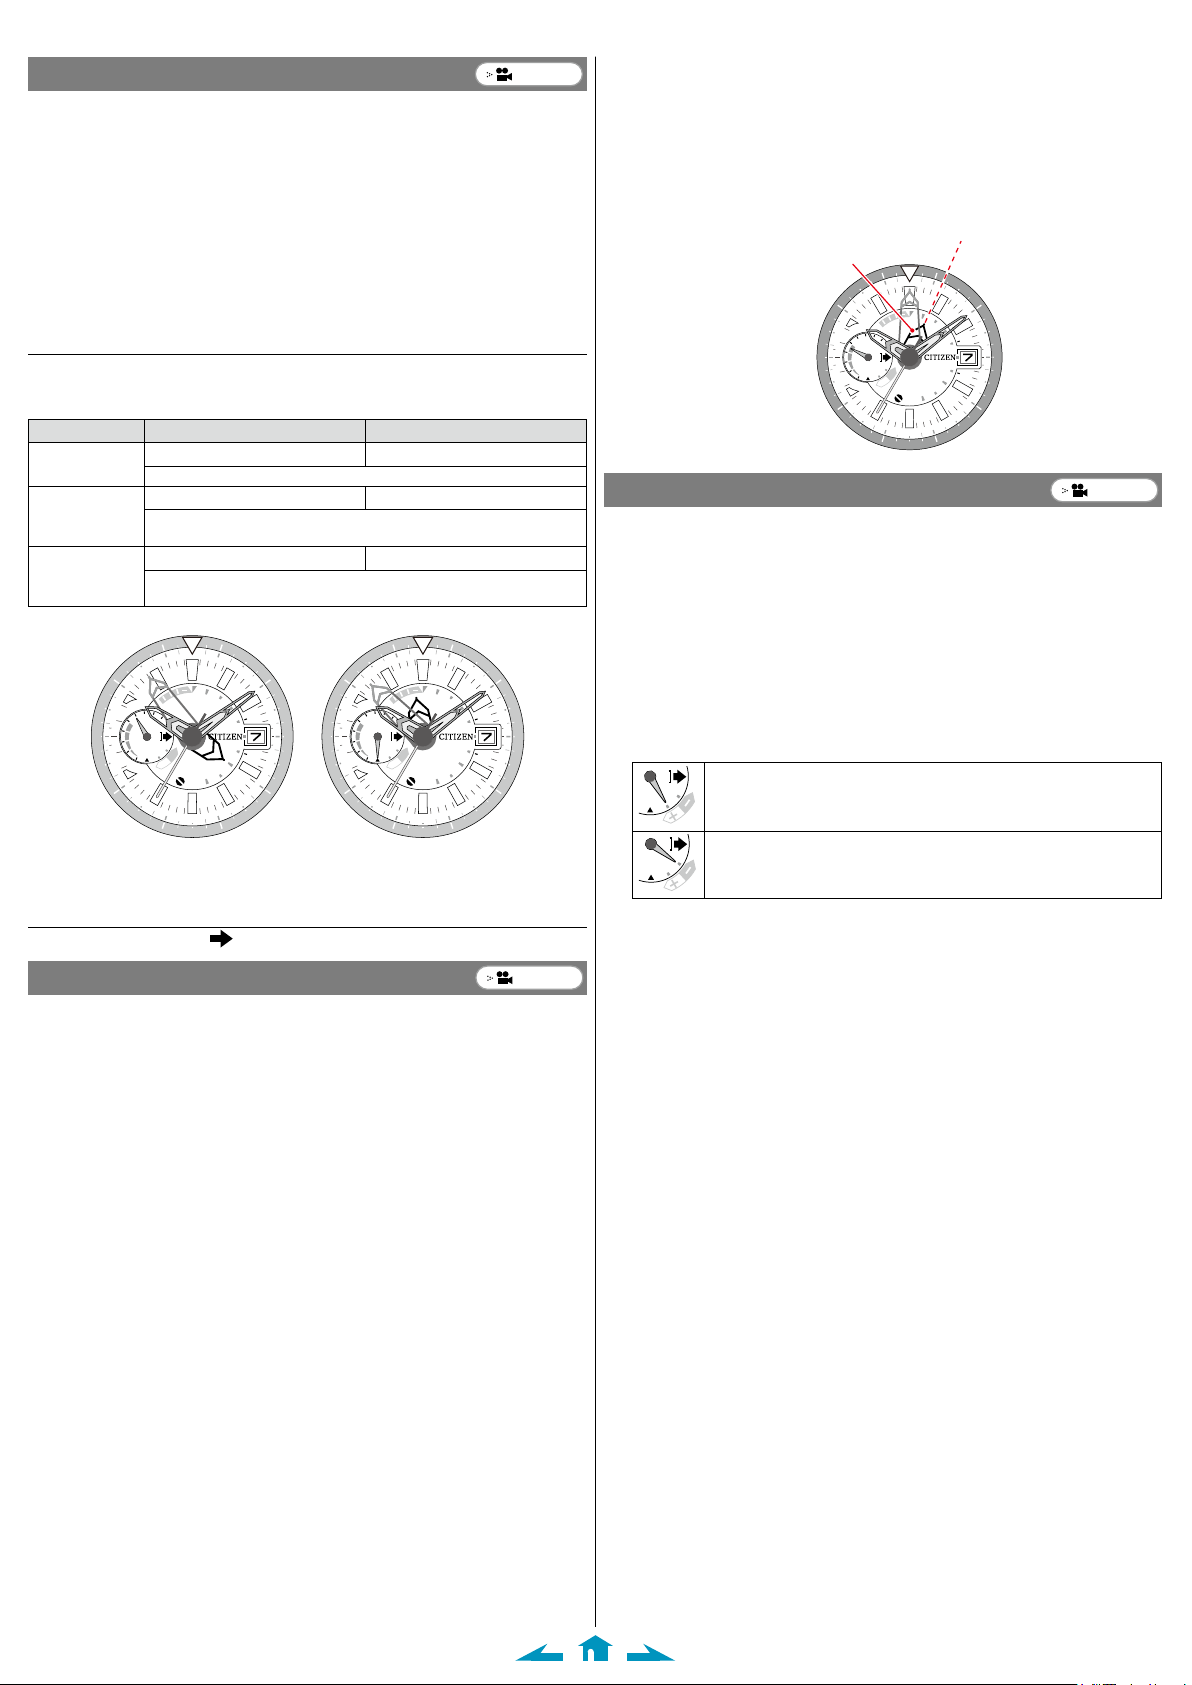
Setting the time
Pull the crown out to position 2 when the second hand points
1.
0 second.
Rotate the crown to set the time.
2.
• Take care the time set is AM or PM.
• Date indication starts to change to the next as the setting passes 10:00 PM.
Rotating the crown counterclockwise does not turn back date indication.
Push the crown in to position 0 in accordance with a reliable
3.
time source to finish the procedure.
Setting the date indication
• Do not adjust the date indication while the watch shows 10:00 PM ‒ 0:00 AM.
Otherwise, the date indication may change incorrectly thereafter.
• Date indication adjustment is required on the first days of March, May, July,
October and December.
Pull the crown out to position 1.
1.
Rotate the crown clockwise to set the date indication.
2.
Push the crown in to position 0 to finish the procedure.
3.
1/4
J280 Abbreviated instruction
Measuring altitude
Video
• Confirm the power reserve is in level “2” or higher before measurement.
• This watch continuously measures altitude during the first 5 minutes of
measurement.
After that, measurement occurs every 3 minutes for up to 12 hours.
Press and release the lower left button B.
1.
Altitude is indicated.
A
• If you press button
indicates compass direction. Press button
After finishing measurement, press and release the lower left
2.
button
B
to finish the procedure.
while indicating altitude, the 100 m hand temporarily
A
to return to altitude indication.
How to read altitude indication
Altitude is indicated by the 3 hands, the 1 000 m, 100 m and 2.5 m hands. Sum up
the values they indicate.
Measurable range: −300 m to 10 000 m
Hand Indication range Unit
1 000 m hand
100 m hand
2.5 m hand
Altitude indication examples:
-
(
0
9
90
)
0
2
-
(
7
(-20)
0
6
8
5
80
x 1000 m
4
W
)
3
0
3
-
(-30)
(
2
0
70
1
7
0
(-40)
)
0
4
-
(
0
Measured altitude: 6790.0 m Measured altitude: −12.5 m
1 000 to 10 000 m 1000 m
• It points “0” when measured altitude is lower than 1 000 m.
−300 to 900 m 100 m
• It points “0” when measured altitude is 0 − 100 m.
• It points “−” when measured altitude is −100 − 0 m.
−97.5 m to 97.5 m 2.5 m
• Use figures in parentheses when altitude is −97.5 to 0 m.
• Measured altitude is indicated in 5 m increments when it is higher than 6 000 m.
1
(-10)
8
9
10 10
-
+
60
6
)
0
5
1
m
0
0
(
-
9
10
0
)
(-90)
m
0
200
800
50
(-50)
+
5
0
S
)
-
(
2
20
0
(-80)
W
400
600
30
E
0
(-70)
(
-
7
0
)
40
(-60)
4
0
(
-
6
0
)
(
)
0
2
-
(
0
(
-
8
8
0
)
E
4
W
)
3
0
3
3
-
(
0
7
m
)
0
1
-
(
0
9
90
7
(-20)
6
5
80
x 1000 m
(-30)
2
70
1
0
(-40)
)
0
4
-
(
0
6
m
)
0
(-10)
8
9
-
+
60
)
0
5
1
m
0
0
(
-
9
10
0
)
(-90)
m
0
200
800
50
(-50)
+
5
0
S
)
-
(
2
20
0
(
-
(-80)
8
W
0
400
600
(
)
E
30
3
E
0
(-70)
(
-
7
0
)
40
(-60)
4
0
(
-
6
0
)
After finishing measurement, press and release the upper left
2.
button
A
to finish the procedure.
• The indication is automatically finished in about 30 seconds without
pressing the button.
Measurement example:
North
Compass hand
m
)
0
1
-
(
0
9
90
)
0
2
-
(
7
(-20)
0
6
8
5
80
x 1000 m
4
W
3
)
0
3
-
(-30)
(
2
0
70
1
7
0
(-40)
)
0
4
-
(
0
6
Calibrating altitude indication
(-10)
8
9
+
60
)
1
m
0
0
(
-
9
10
0
)
(-90)
m
0
200
-
800
50
(-50)
0
0
5
S
)
-
(
2
20
0
(
-
(-80)
8
W
0
400
600
(
+
5
)
E
30
3
E
0
(-70)
(
-
7
0
)
40
(-60)
4
0
(
-
6
0
)
Video
You can calibrate altitude indication measured by the watch when you know the
actual height from a map, sign or other sources.
• You can calibrate the value in the range of ±1 000 m of currently measured
altitude.
Press and release the lower left button B.
1.
The measured altitude is indicated.
• Wait until movement of the hands stop.
Press and hold the lower left button B for 3 seconds or more.
2.
The 1 000 m hand points “+” and calibration of altitude indication becomes
available.
Press and release the lower left button B to choose + or ‒.
3.
Choose this when the actual altitude is higher than the measured one.
Choose this when the actual altitude is lower than the measured one.
When the measured altitude cannot be indicated
The 1 000 m hand points “ ” (3 o'clock position) and stops.
Using the compass
• Confirm the power reserve is in level “2” or higher before measurement.
Press and release the upper left button A while keeping the
1.
watch's dial level.
The compass function starts and the compass hand points north.
• Wait until movement of the hand stops.
Video
• Each time you press the button, “+” and “‒” changes alternately.
• Repeat steps 3 and 4 to control the altitude value after calibration.
Press and release the upper left button A to correct the
4.
indication to the actual altitude.
Move the 100 m and 2.5 m hands to indicate an approximate value of the
altitude.
• Indication keeps changing while you are pressing and holding the button.
A
• Press buttons
Press and hold the lower left button B for 3 seconds or more.
5.
and B at the same time to reset the calibration value.
The corrected altitude is set as the current one and the hands return to
measured altitude indication.
• The corrected altitude is set as the current one and the hands return to
measured altitude indication in 1 minute without any operation.
Press and release the lower left button B to finish the
6.
procedure.
2/4

J280 Abbreviated instruction
E
Calibrating compass indication
You can use 2 methods to calibrate the compass of this watch: 2 point correction
and declination correction.
-
+
Video
W
E
Executing 2 point correction
• When executing 2 point correction, you must turn the watch just 180° while
keeping it level. take enough care of surrounding conditions before starting
correction.
• Confirm you are not near any item with strong magnetism (electric equipment,
magnets, etc.) before starting correction.
Press and release the upper left button A.
1.
Compass function starts.
• Wait until movement of the hand stops.
Press and hold the upper left button A for 3 seconds or more.
2.
The compass hand points the 3 o'clock position.
Press and release the lower left button B.
3.
The first surrounding environment data is stored and the compass hand turns
180° to point the 9 o'clock position.
Turn the watch by 180°.
4.
Press and release the lower left button B.
5.
The second surrounding environment data is stored
and the compass hand turns 180° to point the 12 o'clock
position.
• If the compass hand returns to the 3 o'clock position,
try again from step 3.
• Press and hold button
cancel the correction. When canceled, no correction
is executed and the previous correction result remains
effective.
• Pressing buttons
the values of 2 point correction and declination correction and the watch
returns to compass function.
Press and release the upper left button A to finish the
6.
A
for 3 seconds or more to
A
and B at the same time before finishing step 5 resets
procedure.
Executing declination correction
• On this watch, declination of 0° to 59° east and west can be set by 1°.
Press and release the upper left button A.
1.
Compass function starts.
• Wait until movement of the hand stops.
Press and hold the upper left button A for 3 seconds or more.
2.
The compass hand points the 3 o'clock position.
Press and hold the lower left button B for 3 seconds or more.
3.
The compass hand points the direction of declination (east or west) and the 2.5
m hand shows the degree of declination by pointing a second tick mark.
Press and release the lower left button B to choose east or
4.
west.
W
400
600
400
600
• Each time you press the button, “E” and “W” changes alternately.
Press and release the upper left button A to set the degree of
5.
Choose this when the direction of declination is west (W).
W
Choose this when the direction of declination is east (E).
E
declination.
• For example, as the declination in Tokyo is “7° W”, set
it as shown in the picture.
• Indication keeps changing while you are pressing and
holding the button.
• Pressing buttons
finishing step 5 resets the values of 2 point correction
and declination correction and the watch returns to
compass function.
Press and hold the lower left button B for 3
6.
A
and B at the same time before
200
400
600
seconds or more.
Declination correction completes and compass function starts.
• Wait until movement of the hands stop.
Press and release the upper left button A to finish the
7.
procedure.
Video
(-90)
W
E
3/4

J280 Abbreviated instruction
+
800
400
600
1
W
E
(-70)
(-80)
(-90)
30
70
20
10
1
0
(
-
9
0
)
E
2
0
(
-
8
0
)
3
0
(
Checking the reference position
Stop measurement and check the power reserve indication.
1.
• Charge if the power reserve level is lower than “2”.
Pull the crown out to position 2.
2.
The watch stops and the hands move to their current reference position.
Check the reference position.
3.
Correct reference positions:
1 000 m hand: 0 m (6:00)
100 m hand: 0 m (12:00)
2.5 m hand: 0 m (12:00)
When the current reference position is different
from the correct one, adjust the position following
the steps of “Correcting the reference position”.
Push the crown in to position 0 to finish
4.
0
8
W
)
0
3
-
(
0
)
0
1
-
(
0
9
(-10)
90
)
0
2
-
(
7
(-20)
8
6
9
5
80
x 1000 m
4
3
(-30)
2
the procedure.
Correcting the reference position
Stop measurement and check the power reserve indication.
1.
• Charge if the power reserve level is lower than “2”.
Pull the crown out to position 2.
2.
The watch stops and the hands move to their current reference position.
Press and hold lower left button B for 2 seconds or more.
3.
The 100 m hand (compass hand) becomes adjustable.
• The 100 m hand (compass hand and 2.5 m hand move to the left when
other hands are adjusted.
Press and release the upper left button A.
4.
• Each time you press the button, the hand moves by 1 step. The hand moves
continuously while you are pressing and holding the button.
Press and release the lower left button B to change the hand
5.
to be corrected.
• Each time you press the button, the target hand moves slightly to indicate it
is adjustable.
100 m hand (compass hand) → 2.5 m hand → 1 000 m hand → (back to the top)
Repeat steps 4 and 5 to correct the reference positions of all the
6.
hands.
Push the crown in to position 0 to finish the procedure.
7.
m
0
m
0
-
Video
Resetting the watch - All Reset
• After resetting the watch, calibration value of altitude and correction values of 2
point and declination correction are returns to the initial status.
Stop measurement and check the power reserve indication.
1.
• Charge if the power reserve level is lower than “2”.
Pull the crown out to position 2.
2.
m
200
The watch stops and the 1 000 m, 100 m (compass) and 2.5 m hands move to
their current reference position.
Press and hold the upper left button A and lower left button
3.
B
at the same time for 4 seconds or more.
As you release the buttons, the hands move slightly to indicate that reset is
completed.
After All Reset
After All Reset, adjust the reference position and set the time and date.
4/4
 Loading...