

Page 1

Auto-Cutter CL-S6621
User’s Manual
Page 2

Contents
Notice ............................................................................................ 3
SAFETY SIGNS that must be strictly observed! ..................... 4
1. Function ............................................................................... 6
2. Main specications of auto-cutter .................................. 6
3. Checking items inside the accessory box ...................... 7
4. Auto-cutter settings ........................................................... 8
5. Cut position ....................................................................... 10
6. Cut settings ........................................................................11
7. Auto cut-length detection .............................................. 12
8. User maintenance ............................................................13
9. Troubleshooting ............................................................... 14
CITIZEN is a registered trademark of CITIZEN WATCH CO., Japan.
CITIZEN es una marca registrada de CITIZEN WATCH CO., Japón.
Company names and product names in this manual are trademarks or registered
trademarks of relevant companies.
Copyright ©2016 by CITIZEN SYSTEMS JAPAN CO., LTD.
-2-
Page 3

Notice
1. Before use, be sure to read this manual and understand. And keep
it handy for reference when needed.
2. Do not handle, disassemble or repair any parts other than those
specied in this manual.
3. The contents of this manual may be changed without prior notice.
4. Reproduction, transfer or transmission of the contents of this
manual without prior consent is strictly prohibited.
5. We are not liable for any damage resulting from the use of this
manual, regardless of omissions, errors or misprints.
6. We are not liable for any problems resulting from the use of
optional products or consumable supplies other than those
specied in this manual.
7. Please contact us if there are any mistakes or ambiguities within
this manual.
8. If there are missing or incorrectly collated pages in this manual,
contact us to obtain a new manual.
-3-
Page 4
SAFETY SIGNS
ARNING
UTION
ARNING
that must be strictly observed!
To prevent personal injury or property damage, the following must be strictly
observed.
z The degree of possible injury and damage due to incorrect use or
improperly following instructions specied is described below.
Indicates a situation which, if not observed
W
CA
This is a mark to call attention to the reader.
and handled properly, could result in death or
serious injury.
Indicates a situation which, if not observed
and handled properly, could result in personal
injury or property damage.
W
Do not perform the following. If ignored, these may cause damage to
the auto-cutter, breakdown, overheating, smoke, re or electric shock.
If the auto-cutter is damaged or breaks down, turn o the power to the
printer and remove the power cord from the outlet and then consult your
supplier.
z Do not open the auto-cutter during operation.
The cutting blade can be very dangerous. Also, this can cause damage.
z Prevent foreign matter from entering small openings of the
auto-cutter
Inserting your nger or other foreign matter in the small openings of the
auto-cutter can be extremely dangerous and can damage the cutter.
z The user should never install or remove the auto cutter.
-4-
Page 5

CA
UTION
z Avoid the following conditions to ensure proper operation of the
auto-cutter.
The cutting blade can be very dangerous. Also, this can cause
damage.
Room temperature is less than 5°C or more than 40°C.
Humidity is less than 30% or more than 80%.
Dusty
Direct sunlight
Chemicals
Vibrations or impacts
z When cutting media (paper)
Do not operate auto-cutter without loading paper. This can cause
damage to the cutter.
Use the standard media (paper). Otherwise, problems such as
paper jams may occur.
Remove any dust or particles from the paper guide and path
periodically.
{ When auto-cutter is cleaned, turn o the power to the printer
and remove the power cord from the outlet beforehand.
{ Clean the main body of the auto-cutter with a soft cloth that
is soaked in a thinned neutral detergent. Do not use volatile
solvent such as benzene and thinner, which can cause
discoloration.
{ When the cutter blade becomes dirty, contact your supplier
or a service representative.
-5-
Page 6
1. Function
Note
Note
Note
UTION
The auto-cutter units are designed to cut various media such as labels, tickets
and tags precisely and accurately as the setting cut length.
2. Main specications of auto-cutter
Cutting method: Guillotine cutter
Maximum cut paper thickness: 0.25 mm (0.01”)
Minimum cut paper length: 25.4 mm (1”)
Cut paper width: Maximum: 177.8 mm (7”)
Minimum: 50 mm (1.97”)
Durability:
Number of cuts:
(for a paper thickness of 60 to 150 µm)
Minimum 200,000 times
(for a paper thickness of 150 to 250 µm)
z Media with adhesive substance may be excluded from the number of cuts.
z The number of cuts can vary according to the quality of the paper.
Media and paper types:
Roll or label (continuous, die-cut, fanfold, tag and ticket).
However, the following paper cannot be used:
z Paper with thickness of 0.06 mm (0.0024”) or less
z Roll paper with paper core diameter of 50 mm (2”) or less
Using paper other than the specied types may cause problems such as
paper jams, so the paper specication must be checked before use.
Minimum 500,000 times
Cut accuracy:
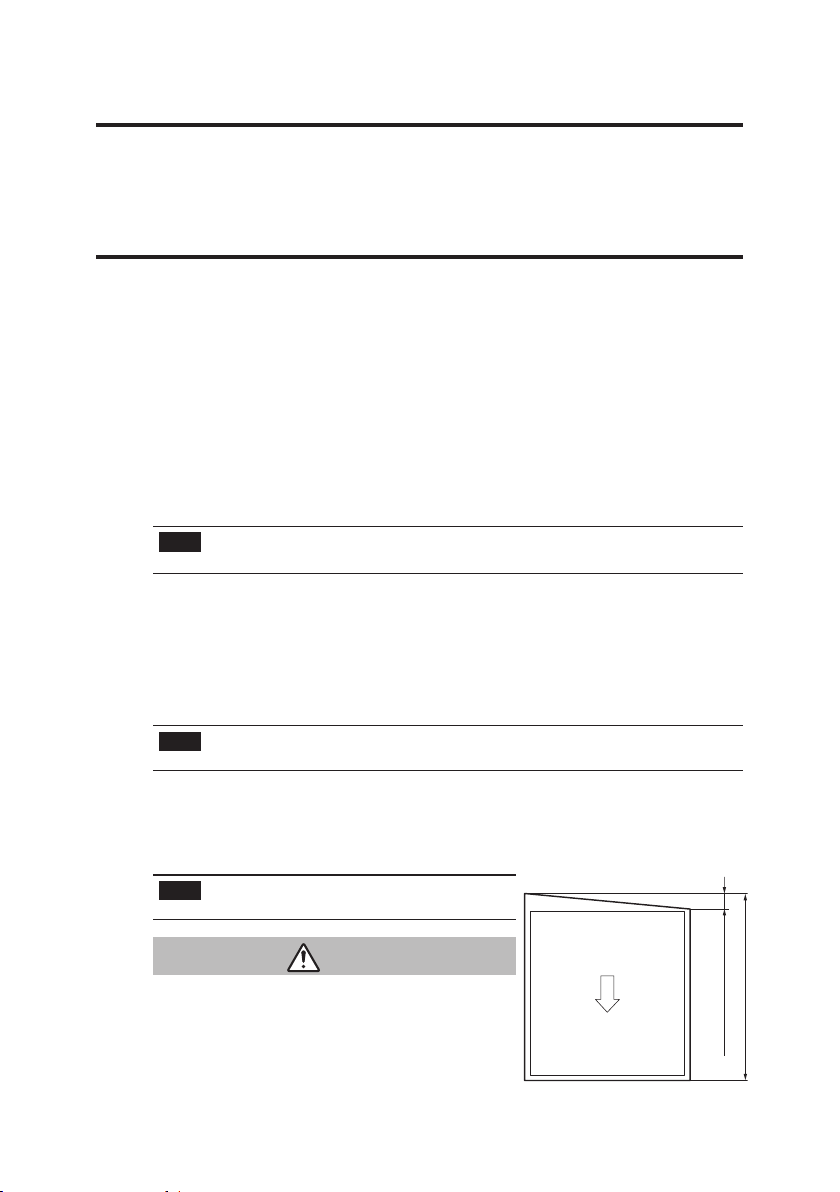
z Cut length tolerance: ±1.5 mm or less
z Left and right cut tolerance: ±1.5 mm
Cutting position can be adjusted using
printer commands (see page 11).
CA
z When using adhesive media, dot not cut
labels itself. Adjust the printer to cut the
liner only. If label glue sticks to the cutter
blades, irregular cutting will occur.
-6-
Direction of paper feed
Left and right cut tolerance:
±1.0 mm or less
Cut length tolerance: ±1.0 mm or less
Page 7
3. Checking items inside the accessory box
Note
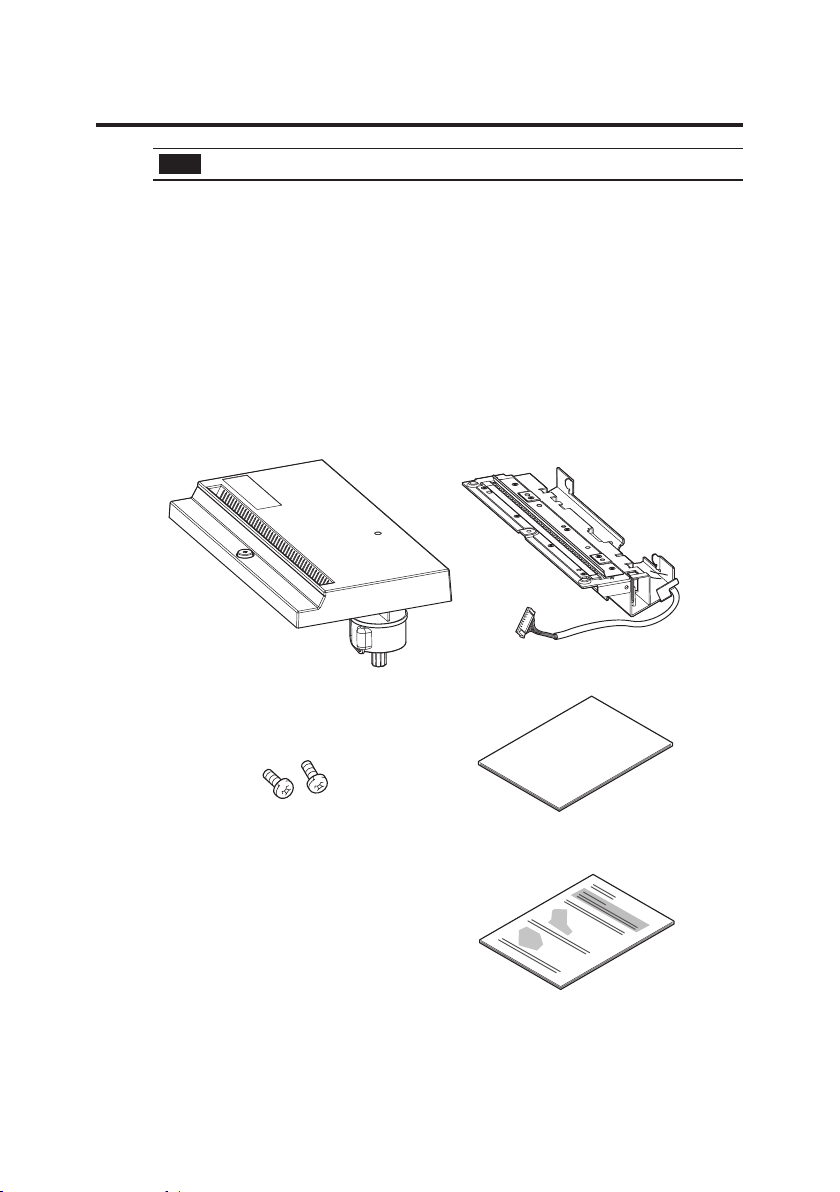
Cutter Stand UnitCutter Unit
Auto-cutter is not available for the printer with the peeler.
You should check that all of the following items are inside the accessory box.
If any are missing, please contact your supplier.
Cutter Stand Unit ...................................................................................... 1 piece
Cutter Unit .................................................................................................. 1 piece
Screws ......................................................................................................... 2 pieces
User’s Manual.............................................................................................. 1 piece
Manual for service personnel ............................................................... 1 piece
Screws (2) User’s Manual
Manual for service personnel
-7-
Page 8
4. Auto-cutter settings
Note
“Cut On” menu will be selected automatically when the auto-cutter is
installed; thus, the printer can be used without adjustment. However, some
printers may not have the “AutoCongure” function. In this case, select the
“After Print” menu of the menu setup mode, and the “Cut On” menu on the
“Function Select” menu. If the printer has the “AutoCongure” function, the
“AutoCongure” menu will be printed out in front of “Function Select” menu
when you print the “Current Setup”.
See the printer’s User’s Manual (CD-ROM) for details on “Print Menu Settings”.
Loading Media
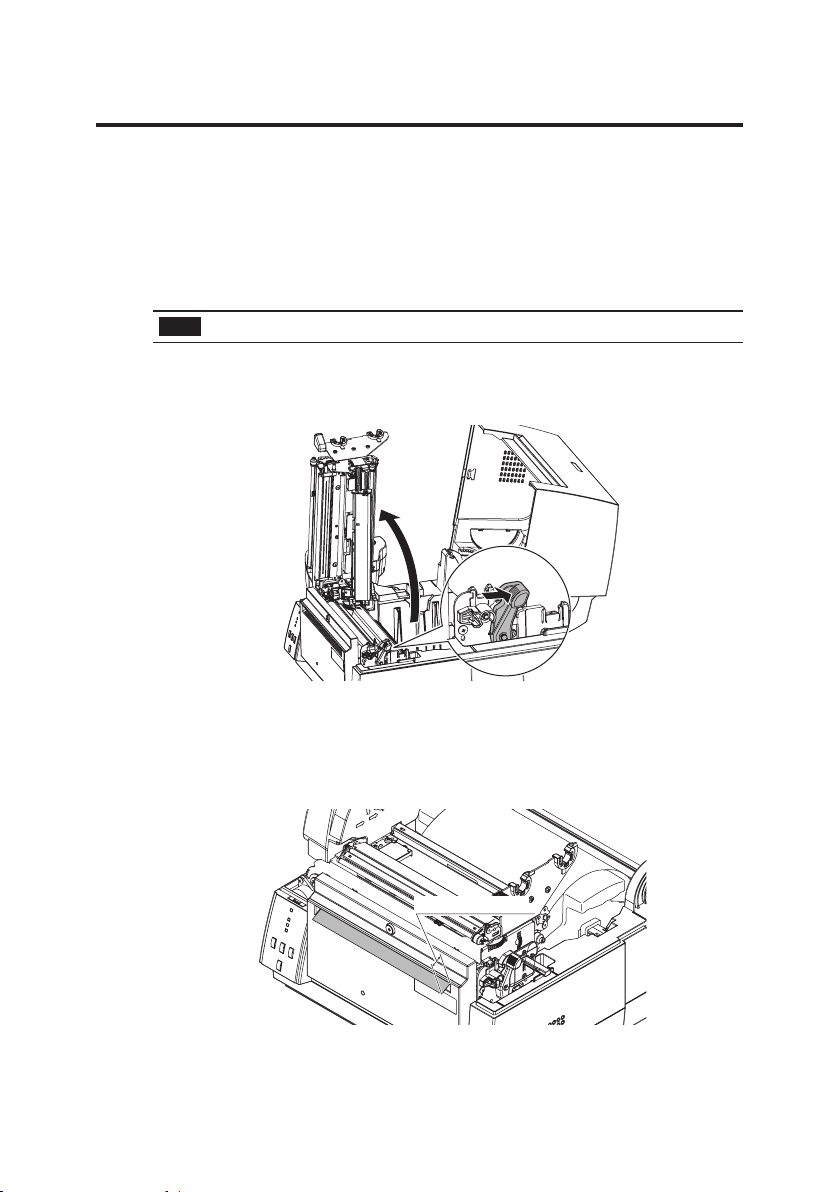
(1) Press the printhead lever, and then open the head unit and sensor arm.
Printhead lever
(2) With scissors, cut the end of the media loaded in the media holder.
(3) Feed the end of the media through the cutter assembly until the end
extends 10 mm past the cutter cover.
(4) Close the head unit and sensor arm.
Approx. 10 mm
(5) The cutter will operate one time when the FEED key is pressed.
-8-
Page 9

CA
UTION
z When a paper jam has occurred, or when the auto cutter has
malfunctioned, your supplier or your service representative. Never
attempt to repair the auto cutter yourself, it could result in a risk of
injury.
-9-
Page 10
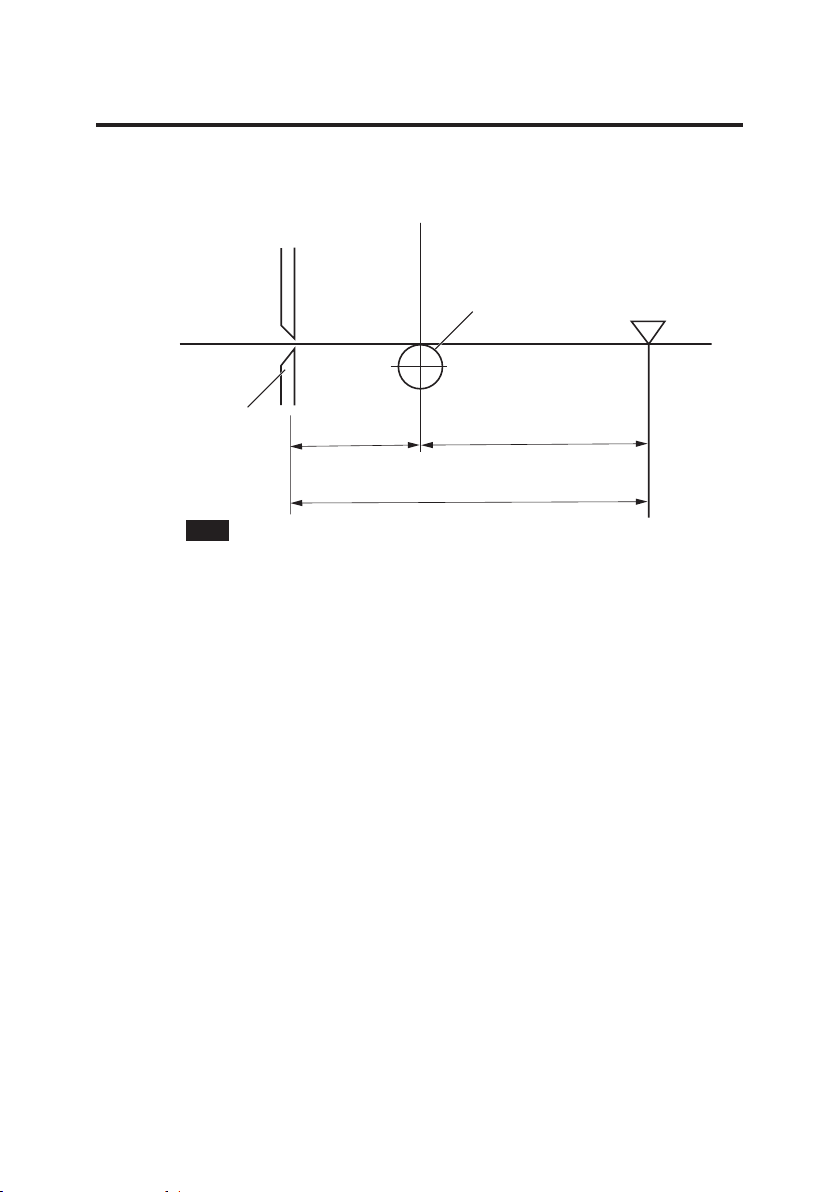
5. Cut position
The following diagram gives the distance from the media sensor and the
thermal printhead to the cutter blade.
Printhead position
Media cut position
Platen
Cutter blade
Note
The measurements shown here are approximate.
30.58 mm (1.2") 25.6 mm (1.01")
56.18 mm (2.21")
Sensor position
-10-
Page 11

6. Cut settings
Note
Two-digit data method
Four-digit data method
ST
c10
E
The auto-cutter-related commands are described below. See the Command
Reference manual for more details.
The following commands set the cut position and number of operations.
Cut-position setup command STX fnnn
This command species the distance between the sensor and the media cut
position.
Media-cut command STX o
This command executes one media-cut operation.
Software-switch setup command STX Vn
z This command temporarily selects the on/o state of the auto cutter or
the peeler, which are normally set in memory.
Examples:
n = 1: The auto cutter is set in the on state
n = 0: The auto cutter is set in the o state
See the Command Reference manual for a detailed description of the
parameter n of the command.
Sheet-cutting interval command cnn (two-digit entry method)
:nnnn (four-digit entry method)
This command instructs the printer to cut the media after a specied number
of sheets have been printed.
Example: To set the sheet-cutting interval to 10 sheets
X L
(Other label format commands) (Other label format commands)
STX L
:0010
E
-11-
Page 12
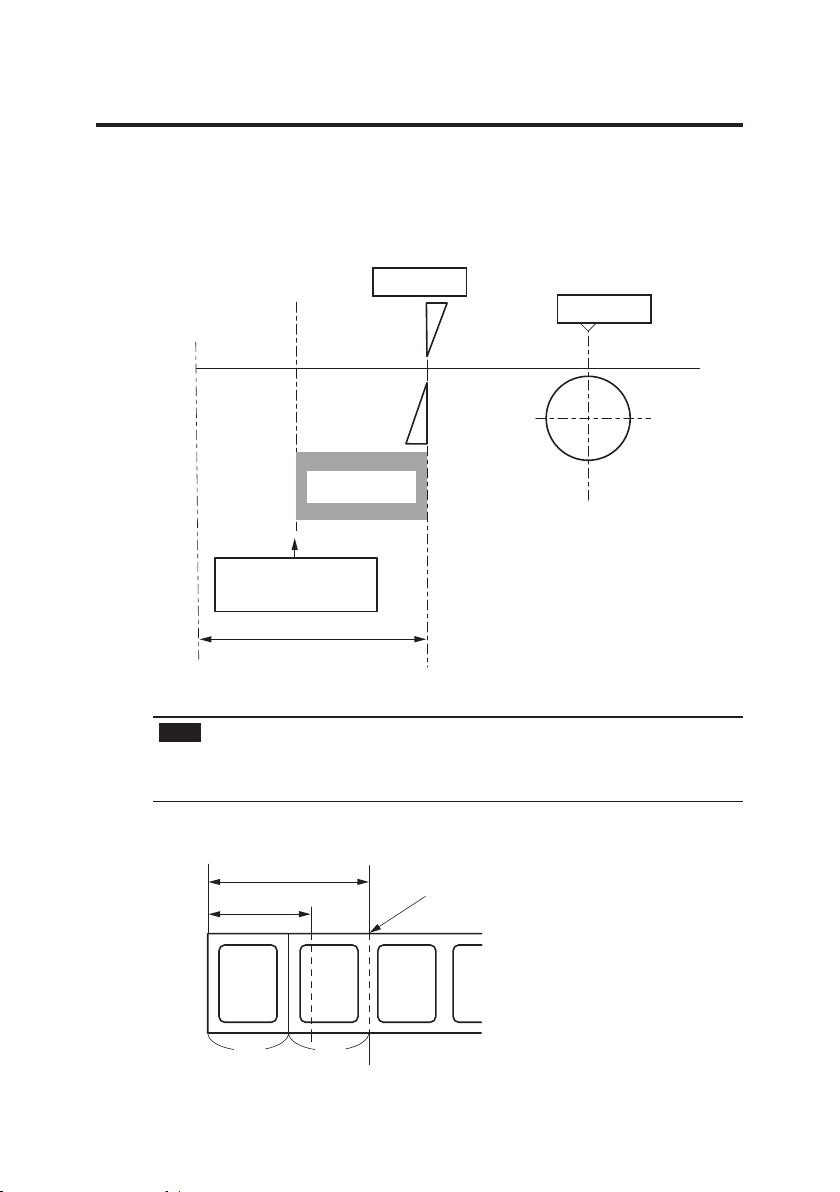
7. Auto cut-length detection
Note
Example:
If media with a cut length shorter than the minimum cut length of 25.4 mm
(1.0 in) is used, the cut media may remain in the cutter unit and cause paper
jams. To prevent this, when the printer detects a cut length shorter than the
minimum, it feeds the media without operating the cutter. Therefore, use a cut
length of 25.4 mm (1.0 in) or longer when setting the media cut length.
Cutter
Printhead
Cut prohibition
Minimum cut length:
25.4 mm (1.00")
Cut length Lc
Media is fed and not cut when its media cut length is 12.7 mm (0.5 in) or
less. However, if the total length of several labels (for example, two or more)
on one label sheet is more than 12.7 mm (0.5 in), the media can be cut in
intervals of multiple labels (for example, every two or more labels).
20 mm (0.78")
12.7 mm (0.5")
Cut
Lc > 25.4 mm (1.00")
Lc = 10 mm (0.39")
Lc Lc
-12-
Page 13
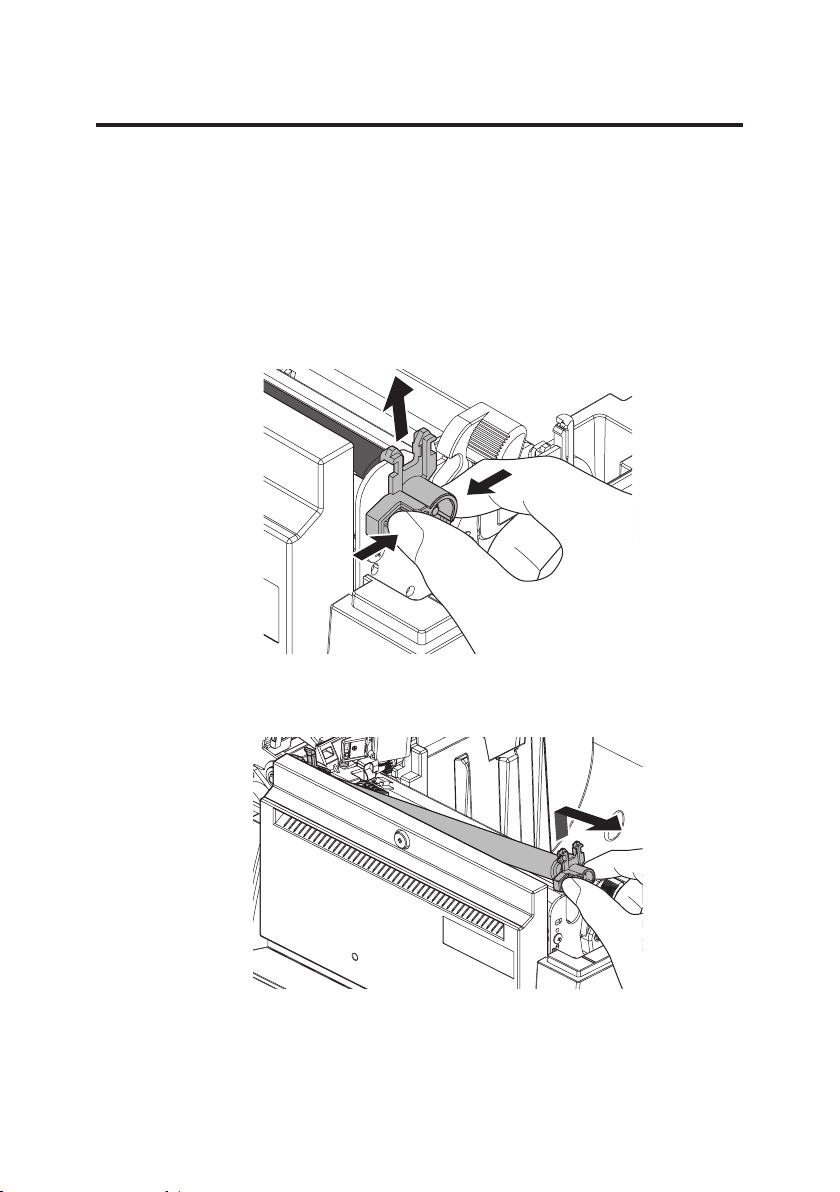
8. User maintenance
If the platen of the printer becomes dirty, the cutter may perform defective
cutting even if the auto cutter does not malfunction. Therefore, clean the
platen regularly. (See the printer user’s manual)
Remove the platen
(1) Push the head open lever downwards to open the head unit and sensor
arm.
(2) Grasp the mounting device of the platen and lift it up as shown in the
gure.
(3) Remove the gear side of the platen, and remove the platen while pulling
the mounting device of the platen toward you.
(4) Remove dirt from the platen with a soft cloth or cotton swab containing
a small quantity of ethyl alcohol. (See the printer user’s manual)
-13-
Page 14
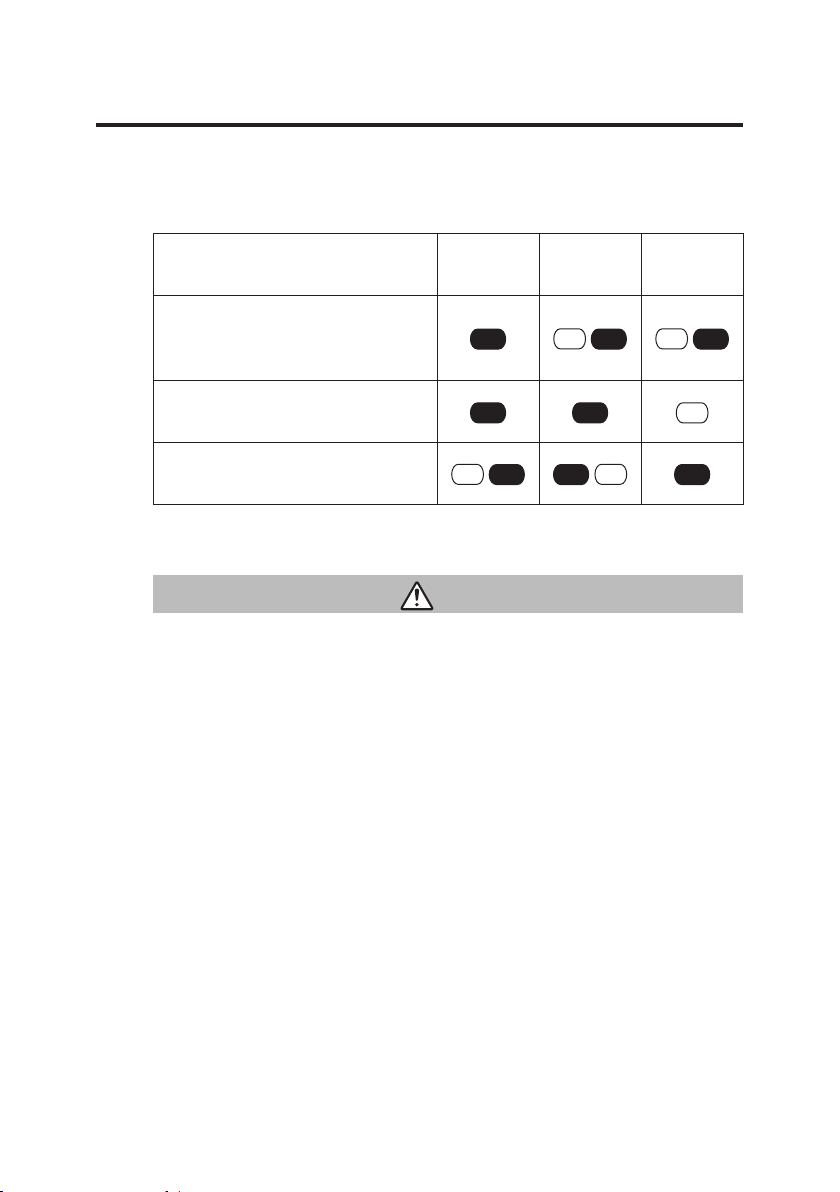
9. Troubleshooting
OFF
OFFONOFF
ON
OFF
OFF
ON
OFF
ON
OFFONOFF
UTION
If an error is detected, an alarm will sound and an LED on the control panel will
display the nature of the error.
List of error displays
Error
Media Out
(media location cannot be
detected)
Auto Cutter Abnormality
(such as blade jamming)
Abnormal auto-cutter
temperature
Print
LED
CA
Contact your supplier or service representative, if the following conditions
are observed.
z The cutter does not cut the media well.
The blade of the cutter may be worn out or covered by a label glue.
z Above error condition is occurred.
Condition
LED
Error
LED
-14-
Page 15

Page 16

363 V
an Ness Way, Suite 404
T
T
Fax:
http://www
Otto-Hirsch-Brücken 17
70329 Stuttgar
Ger
T
Fax:
http://www
6-1-12, T
T
T
Fax:
http://www
orrance, CA 90501. USA
el: (310) 781-1460
(310) 781-9152
.citizen-systems.com
many United Kingdom
el: +49 (0) 711 49032-0 Tel: +44 (0) 20 8893 1900
+49 (0) 711 49032-45 Fax: +44 (0) 20 8893 0080
anashi-cho, Nishi-Tokyo-shi
okyo, 188-8511. Japan
el: +81 (0) 42 468 4608
+81 (0) 42 468 4687
Elizabeth House, 56-60 London Road
t Staines-Upon-Thames, TW18 4HF
.citizen-europe.com
.citizen-systems.co.jp
PXZ00093-10
PMC-1609
 Loading...