

Page 1
CITIZEN QUARTZ
ALARM CHRONOGRAPH
Model No. AI3XXX
Cal. No. 6870
• INSTRUCTION MANUAL
CTZ-B6813
Thank you for purchasing a CITIZEN QUARTZ
Watch. To ensure correct use, please read these
instructions carefully. Please confirm that the
CITIZEN International Guarantee Card is included
for your possible claim.
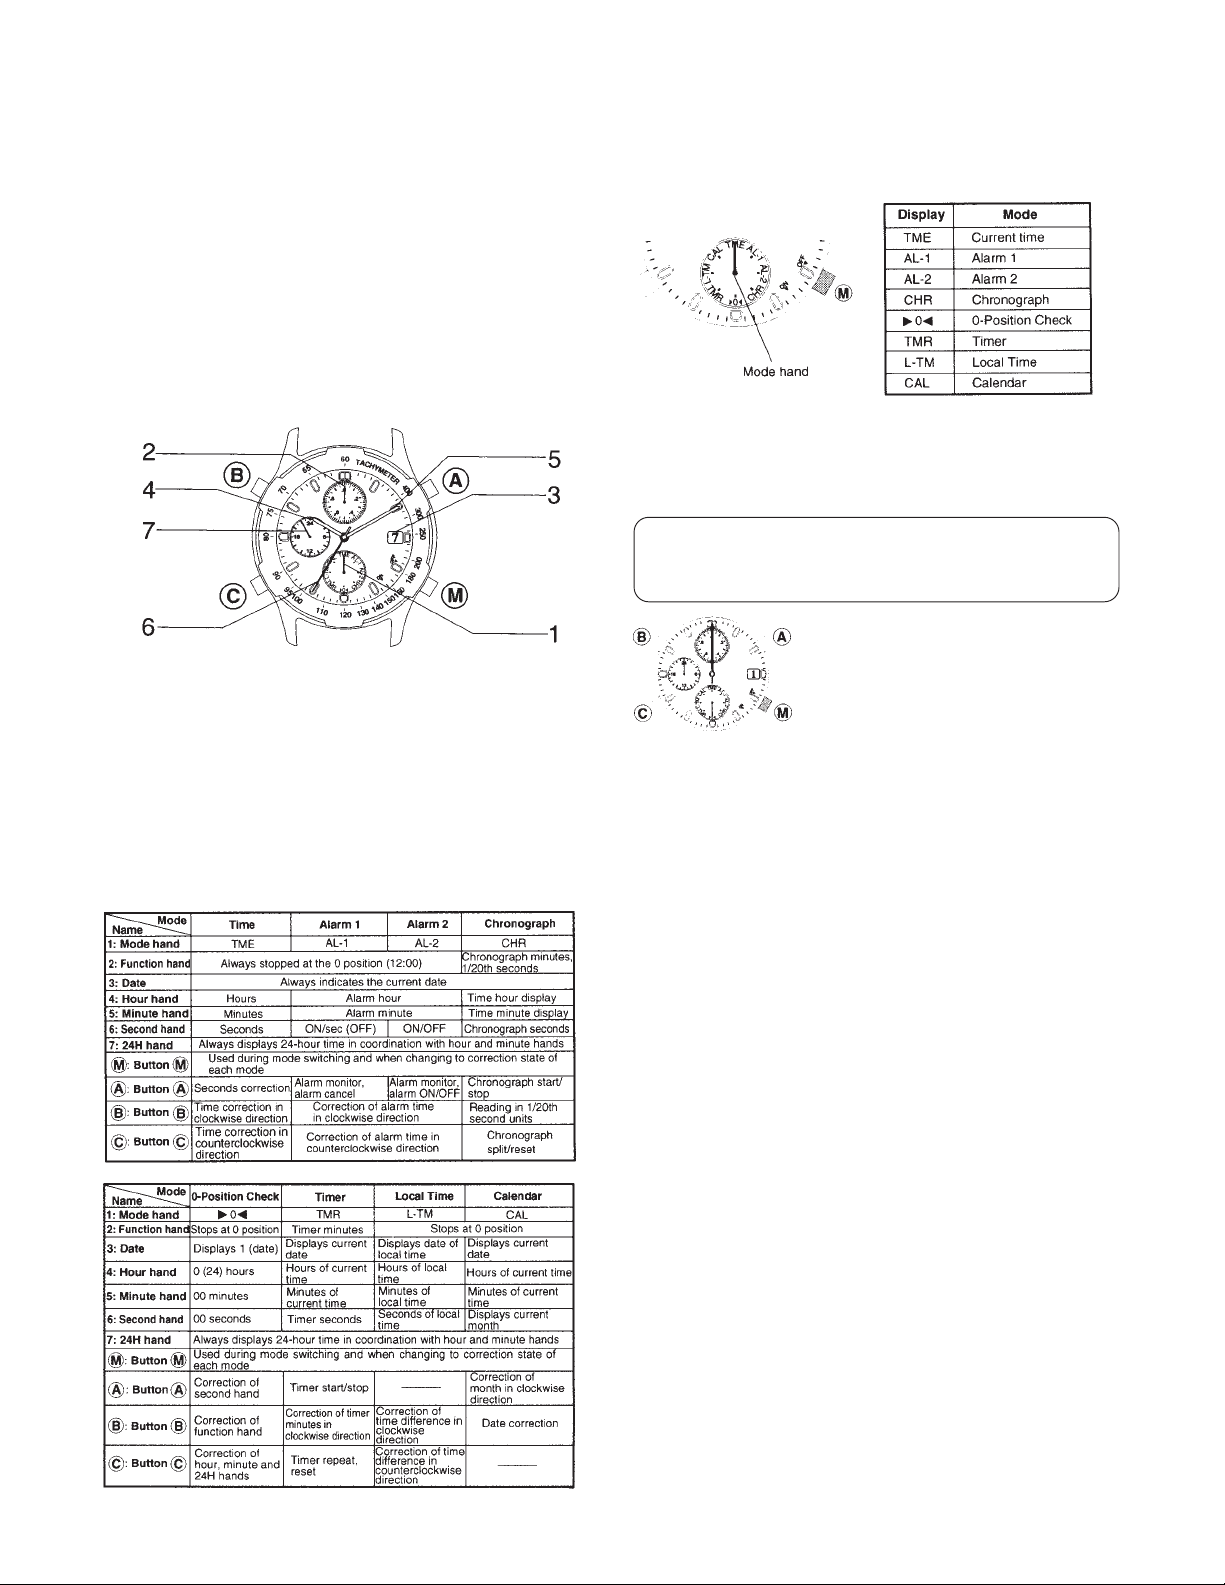
1. Name of Components
Refer to diagram of the watch when reading this
section on components. The design may differ
depending on the model.
2. Mode (Display Function) Switching
This watch is equipped with 8 modes consisting of
time, alarm 1, alarm 2, chronograph, 0-position check,
timer, local time and calendar modes. The mode
changes each time the 嘷
M button is pressed. The
current mode can be confirmed with the mode hand.
3. Before Using
Before using your watch, check that the functions of
the watch operate properly by following procedure
(0-position check).
1. Press button 嘷
M to switch the
watch to the 0-position check
mode [䊳0䊴]. The hour hand,
minute hand, 24H hand,
second hand, date and function
hand will advance rapidly to
the 0-position (base position).
Hour, minute and 24H hands .......... 00:00 (24:00)
Second hand ................................... 00 seconds
Date ................................................. 1st
Function hand .................................. 0-position
(12:00 position)
* Perform the “0-Position Correction” procedure when
any hand is not at the 0-position. If this 0-position is
not correct, the hands will not show the correct
position (such as not returning to “00” when
resetting the chronograph).
✩ When one button 嘷
A , 嘷B or 嘷C is pressed while in
the 0-position check mode, the hour, minute,
second and function hands will move to the left
and right following a demonstration program.
<0-Position Correction Procedure>
1. Pull button 嘷
M out while in the 0-position check mode.
2. Press buttons 嘷
A , 嘷B or 嘷C to correct the 0-position
of each hand.
The second hand can be corrected by pressing
button 嘷
A .
The date and function hand can be corrected by
pressing button 嘷
B .
* The date will be corrected by one day when the
function hand completes 4 revolutions. The 12:00
position, immediately after the date has changed
to “1”, is the 0-position.
The hour, minute and 24H hands can be
corrected by pressing button 嘷
C .
Corrections can be made rapidly by holding down
any of the buttons.
3. Push button 嘷
M in to the normal position.
* After correcting the 0-position of each hand,
switch to each mode to reset the time, calendar,
alarms and so forth.
0-Position: This refers to the base position
of each hand that enables the watch
to function properly.
Page 2
4. Setting the Time [TME]
Press button 嘷
M to switch to the time mode [TME].
1. Pull button 嘷
M out.
2. Press button 嘷
A to reset
seconds.
Simultaneous to pressing
button 嘷
A , the second hand
will return to the 0 seconds
position and then start to
move.
3. Press button 嘷
B or 嘷C to correct the hour, minute
and 24H hands.
Corrections can be made one minute at a time in
the clockwise direction each time button 嘷
B is
pressed.
Corrections can be made one minute at a time in
the counterclockwise direction each time button
嘷
C is pressed.
Corrections can be made rapidly by holding
button 嘷
B or 嘷C down.
Correct the time by moving the hands in the
closest direction to the correct time.
4. Push in button 嘷
M to the normal position.
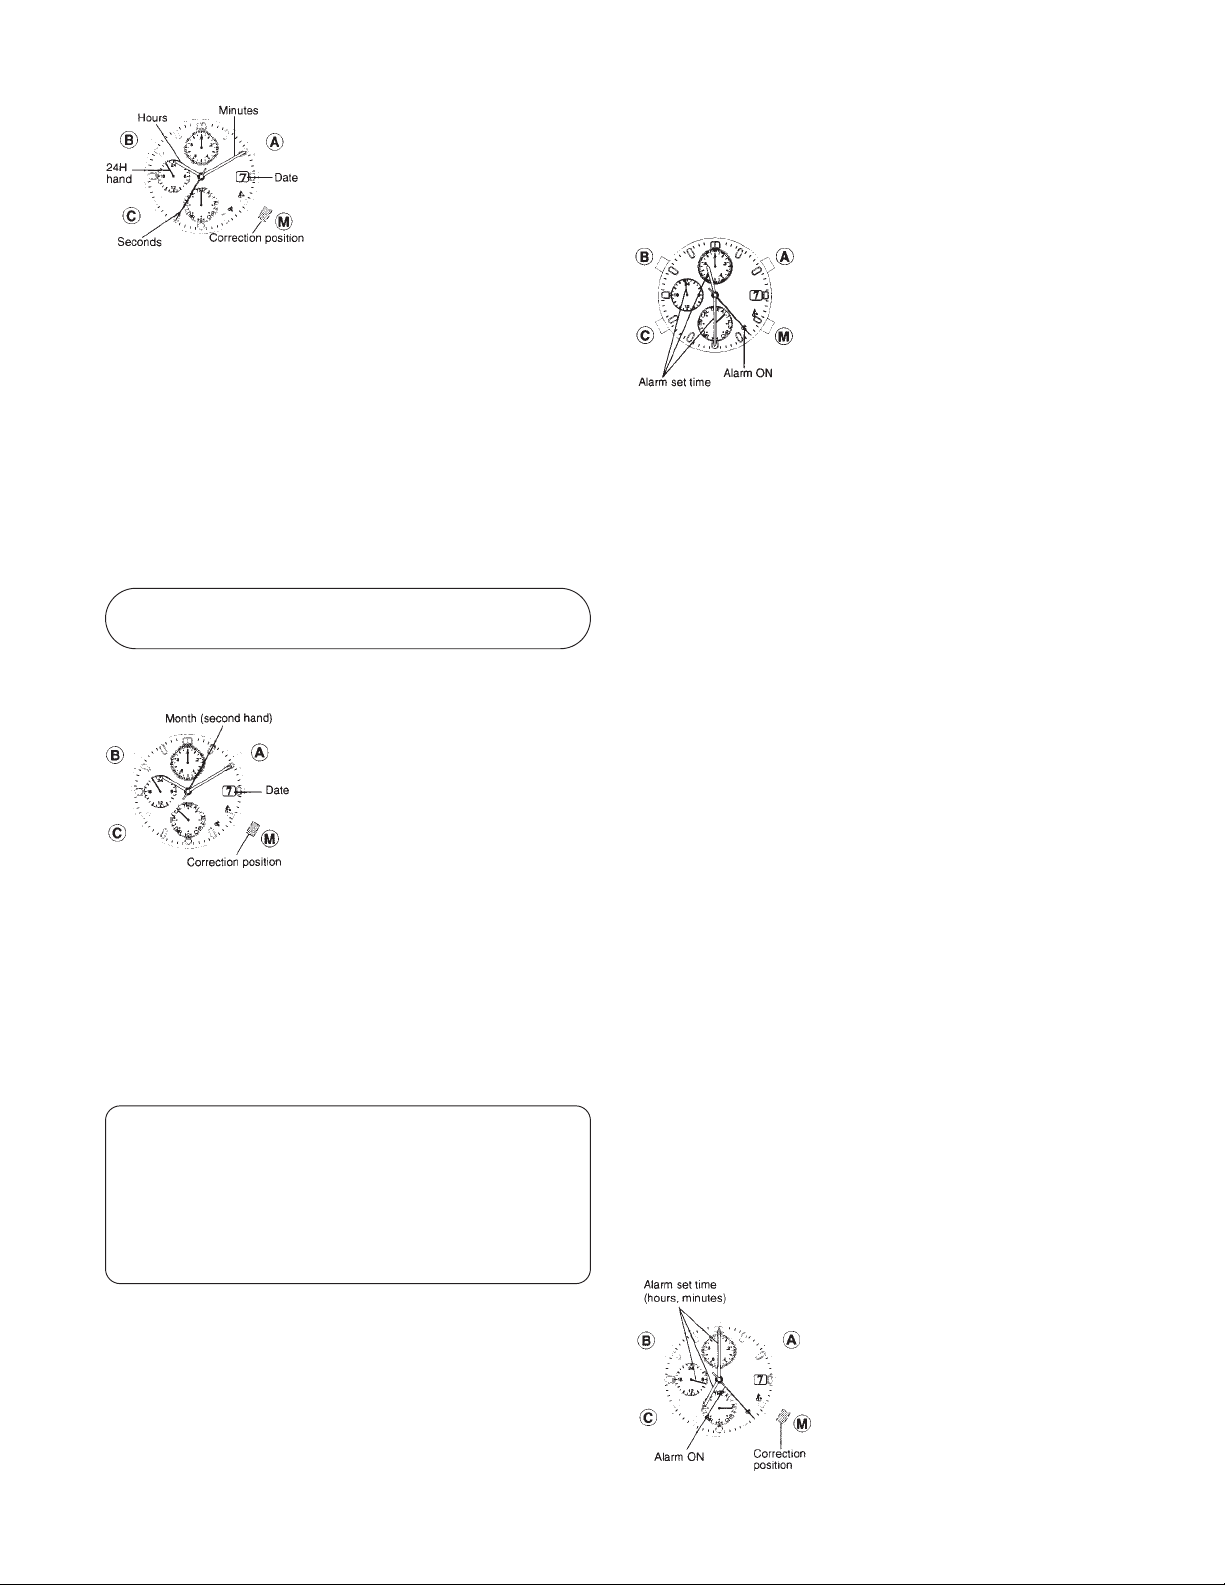
5. Setting the Calendar [CAL]
Press button 嘷
M to switch to the calendar mode [CAL]
1. Pull button 嘷
M out.
2. Press button 嘷
A to correct
the month number.
Correction can be made by
advancing one month each
time button 嘷
A is pressed.
The month number can be
read directly from the
normal hour positions.
2. (Example: 3:00 ➞ March, 1:00 ➞ January)
Correction can be made rapidly by holding button
嘷
A down.
3. Press button 嘷
B to correct the date.
Correction can be made by advancing one day
each time button 嘷
B is pressed. Correction can be
made rapidly by holding button 嘷
B down.
4. Push button 嘷
M in to the normal position.
6. Use of Quick Set Alarm [AL-1]
The quick set alarm function uses a 24-hour clock.
When the alarm set time is reached, an alarm sounds
for 10 seconds. Once the alarm has stopped
sounding, the alarm set time is cancelled
automatically (alarm off). The alarm can be stopped
by pressing any of buttons 嘷
A , 嘷B or 嘷C .
<Quick Set Alarm ON Display>
Press button 嘷
M to switch to the
alarm-1 [AL-1] mode.
• When the second hand is
stopped at the ON position (23
second position), it indicates that
the alarm is set (alarm ON). The
hour, minute and 24H hands
indicate the alarm set time.
• When the second hand is moving, it indicates that
the alarm has been cancelled (alarm OFF). The
hour, minute and 24H hands indicate the time of
the TME mode.
<Setting the Alarm Time>
Press button 嘷
B or 嘷C to move the hour, minute and
24H hands to the time at which the alarm is desired
to be set.
• Correction can be made one minute at a time, in the
clockwise direction, each time button 嘷
B is pressed.
• Correction can be made one minute at a time, in the
counterclockwise direction, each time button 嘷
C is
pressed.
Correction can be made rapidly by holding button
嘷
B or 嘷C down.
Correct the alarm set time by moving the hands in
the closest direction to the desired alarm time.
* When setting the alarm time, be careful that AM and
PM are set correctly by referring to the 24H hand.
<Cancelling Alarm Set Time>
The alarm set time is cancelled by pressing button
嘷
A when the alarm is ON.
<Alarm Monitor>
The alarm sound can be monitored by pressing
button 嘷
A in the Alarm 1 mode when the alarm is OFF.
7. Use of Daily Alarm [AL-2]
The daily alarm also uses a 24-hour clock. Once the
alarm is set, the alarm sounds for 15 seconds at the
alarm set time, once a day. The alarm sound can be
stopped by pressing any of buttons 嘷
A , 嘷B or 嘷C .
<Daily Alarm ON Display>
Press button 嘷
M to switch to the
alarm 2 (AL-2) mode.
The second hand will indicate
either ON (23 second position)
or OFF (19 second position). In
both cases, the hour, minute
and 24H hand will indicate the
alarm set time.
* When setting the time, be careful that AM and
PM are set correctly by referring to the 24H hand.
* Since the date and function hand are
synchronised with each other, the function hand
will turn at when correcting the date.
* Date correction at the end of each month is not
required. However, since February is set at 28
days, date correction must be performed for
February only in leap years.
Page 3
<Setting the Alarm Time>
1. Pull button 嘷
M out.
The second hand will indicate the ON position.
2. Press button 嘷
B or 嘷C to move the hour, minute
and 24H hands to the time at which the alarm is
desired to be set.
• Correction can be made one minute at a time, in
the clockwise direction, each time button 嘷
B is
pressed.
2. • Correction can be made one minute at a time, in
the counterclockwise direction, each time button
嘷
C is pressed.
Correction can be made rapidly by holding
button 嘷
B or 嘷C down.
Correct the alarm set time by moving the hands
in the closest direction to the desired alarm time.
3. Push button 嘷
M in to the normal position.
* When setting the alarm time, be careful that AM
and PM are set correctly by referring to the 24H
hand.
<Switching Between Alarm ON and OFF>
The alarm will switch between ON and OFF each
time button 嘷
A is pressed with button 嘷M pulled out.
<Alarm Monitor>
The alarm sound can be monitored by pressing
button 嘷
A in the alarm 2 mode when button 嘷M is in
the normal position.
8. Use of Chronograph [CHR]
The chronograph is able to measure time up to a
maximum of 59 minutes, 59 and 19/20th seconds in
1/20th increments after which the chronograph
returns to the chronograph reset display and stops.
This chronograph is also able to measure split time.
In the chronograph mode, the hour, minute and 24H
hand as well as date indicate the current time and date.
<Explanation of Display>
Chronograph minutes: Read the function hand.
Chronograph seconds: Read the second hand.
Chronograph 1/20 seconds: The function hand will
change to the 1/20th second display when button 嘷
B
is pressed during the stop or split display. The value
for 1/20th seconds is read at every time.
<Use of Accumulated Elapsed Time Measurement>
1. The chronograph is started and stopped by
pressing button 嘷
A . (Starting and stopping the
chronograph can be repeated as many times as
desired.)
2. The chronograph is started and stopped by
pressing button 嘷
C when it is stopped.
✩ A confirmation beep will sound when either the
start, stop or split operation is selected.
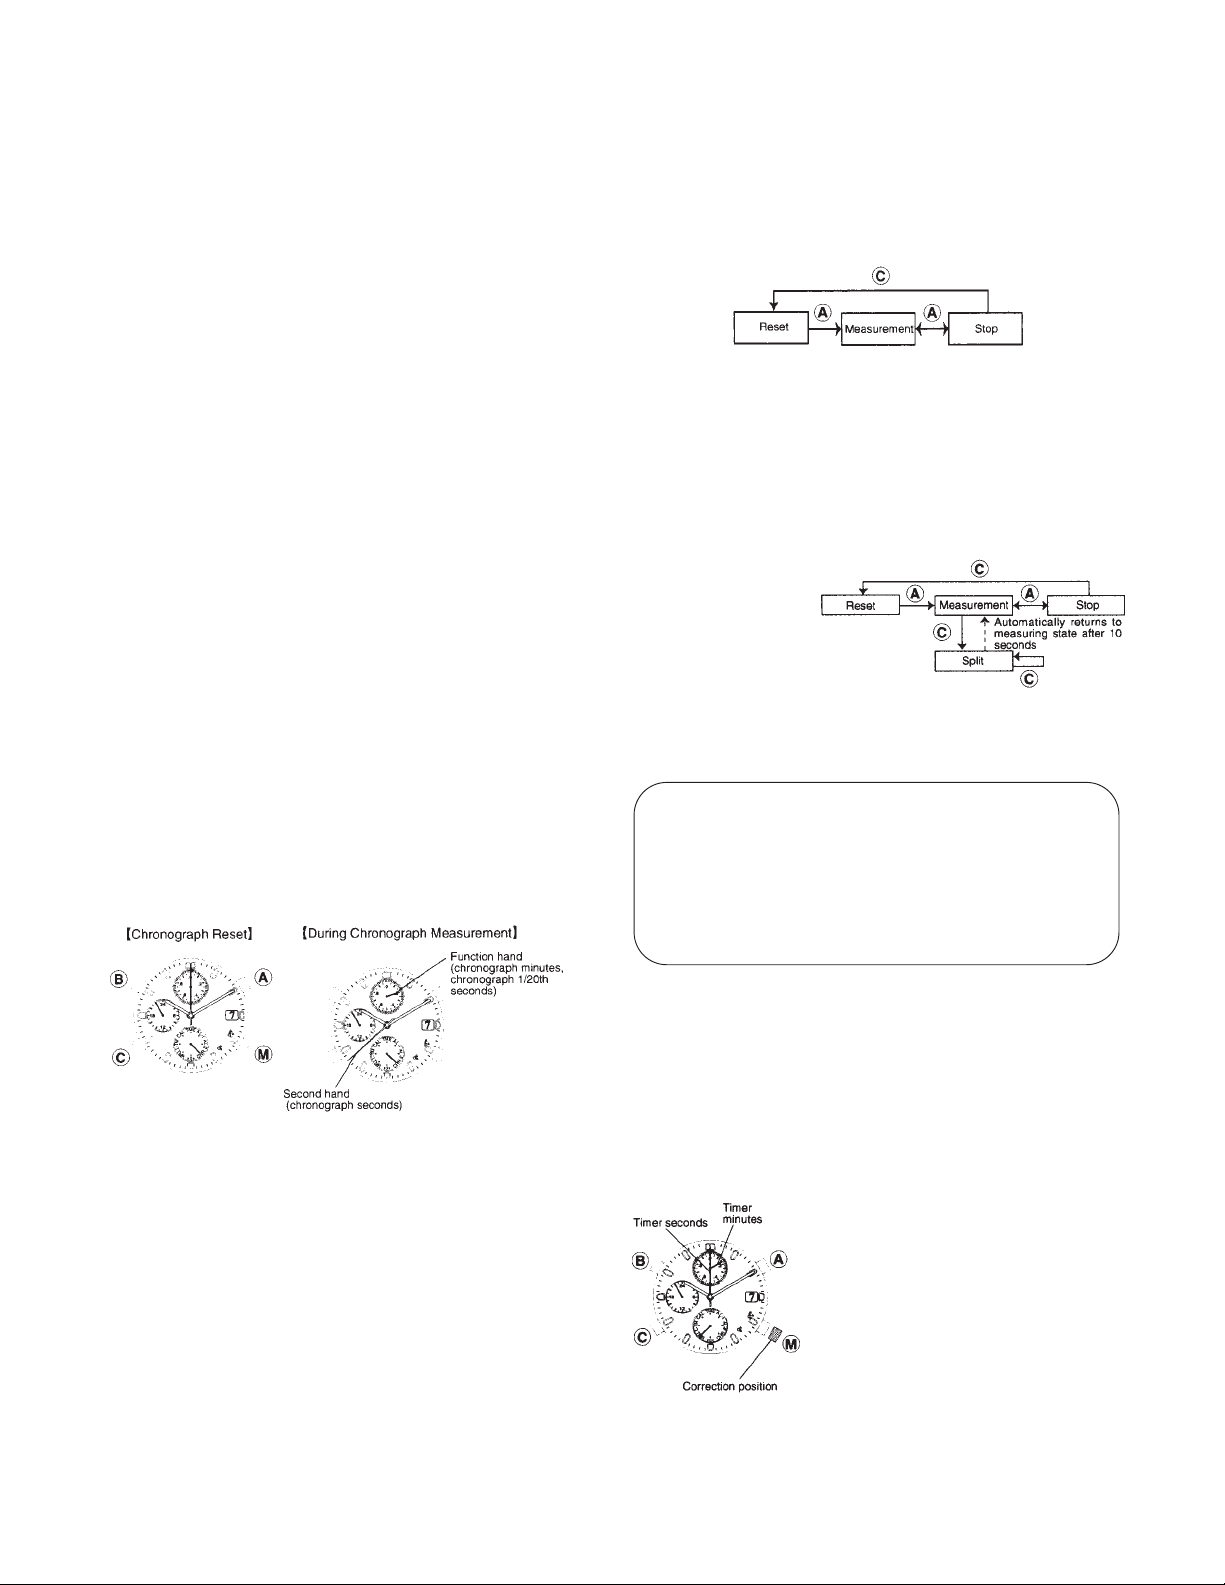
<Use of Split Time Measurement>
1. The chronograph is started and stopped by
pressing button 嘷
A .
2. Pressing button 嘷
C during measurement displays
the split time for 10 seconds. The next split time
is displayed when button 嘷
C is pressed again
during display of split time.
3. The chronograph is reset by pressing button 嘷
C
when it is
stopped.
* The chronograph
automatically
returns to the
measuring state
after displaying
the split time for 10 seconds.
✩ A confirmation beep tone will sound when either
the start, stop or split operation is selected.
9. Use of Timer [TME]
The timer can be set over a range of 1 to 59 minutes
in 1 minute increments. When measurement of the
set time is completed, the watch beeps for 5 seconds
indicating that the time is up. After the set time has
elapsed, the timer will automatically return to the
same set time. In the timer mode, the hour, minute
and 24H hands as well as the date indicate the
current time and date.
<Timer Setting Procedure>
Press button 嘷
M to switch to the
timer mode [TMR].
1. Pull button 嘷
M out.
2. Press button 嘷
B or 嘷C to set
the timer to the desired time.
Correction can be made one
minute at a time in the
clockwise direction each time
button 嘷
B is pressed.
Correction can be made one minute at a time in the
counterclockwise direction each time button 嘷
C is
pressed.
The hands can be advanced rapidly by holding
button 嘷
B or 嘷C down.
3. Push button 嘷
M in to the normal position.
* Measurement will continue internally even
when the watch is switched to a different
mode during chronograph measurement.
Measurement will be shown continuing when
the watch is again returned to the chronograph
mode. However, it returns to the reset display
when 60 minutes have elapsed.
Page 4

<Measuring Procedure>
1. The timer is started and stopped by pressing
button 嘷
A . When button 嘷A is pressed after the
timer is stopped, timer measurement will continue
from the time remaining on the timer when it was
stopped.
2. Pressing button 嘷
C when the timer is stopped,
returns to the set time.
✩ When button 嘷
C is pressed during timer
measurement, the timer returns to the set time
and restarts (timer flyback (restart) function).
✩ A confirmation beep will sound when each of the
timer start, stop, reset and repeat operations is
selected.
10. Setting Local Time [L-TM]
The local time function enables the time in a different
time zone to be set separately from the current time.
Local time is set by performing a time difference
correction on 1 hour units based on the current time
(time of the TME mode). The minute and second
hands move in coordination with the current time.
<Time Difference Correction>
Press button 嘷
M to switch to the
local time mode [L-TM].
1. Press button 嘷
M out.
2. Press button 嘷
B or 嘷C to
correct the time difference.
• Correction can be made one hour at a time in the
clockwise direction each time button 嘷
B is pressed.
• Correction can be made one hour at a time in the
counterclockwise direction each time button 嘷
C is
pressed.
Correction can be made rapidly by holding button
嘷
B or 嘷C down.
3. Push button 嘷
M in to the normal position.
* The range over which the time difference can be
corrected is from +23 hours to –23 hours based
on the current time (time of the TME mode).
11. What to do when the following occur
[The hands do not indicate the correct positions
in each mode]
• The hand base positions may shift after the watch
has been subjected to a strong impact and so forth.
When this happens, refer to [3. Before Using] and
perform the “0-Position Correction” procedure.
[The watch exhibits an abnormal display or
operation]
• In extremely rare situations, the watch may exhibit
an abnormal display or erroneous operation (such
as the alarm continuing to sound, or the hands
turning continuously) as a result of being subjected
to the effects of static electricity or strong impact
and so forth. When this happens, perform the “AllReset” procedure while reffering to the following page.
[After Replacing the Battery]
• After the battery has been replaced, always make
sure to perform the “All-Reset” procedure
described previously. The watch may not run
properly if this operation in not performed.
[All-Reset Procedure]
The all-reset procedure can be
performed in any mode.
1. Pull button 嘷
M out.
2. Simultaneously press button
嘷
A , 嘷B and 嘷C . (The confirmation
sounds at this time.)
3. Return button 嘷
M to the
normal position.
* After performing the all-reset procedure, always
make sure to perform the “0-position correction”
procedure while referring to [3. Before Using]
before resetting the watch to the correct time.
12. Use of the Rotating Bezel
Some watches are not equipped with a bezel,
depending on the model.
1. Tachymeter (non-rotating bezel type)
2. Directional (rotating bezel type)
1. Tachymeter
If your watch is provided with a
tachymeter:
The tachymeter is a feature that
measures the speed of an automobile.
Measuring how many seconds a car
travels over a distance of 1 km
enables the tachymeter scale to show
the approximate average speed per hour during a
journey (if this 1km is covered within a maximum of
60 seconds.)
If the chronograph is started at the beginning of the
distance measurement, and stopped after 1 km, the
average speed per hour can be determined by the
position of the chronograph second hand. If 1km is
covered in 45 seconds, the average speed will be
about 80km/h.
Page 5

2. Directional rotating bezel
(Northern hemisphere)
If your watch is provided
with a compass bezel:
The compass feature on
this watch is based on the
position of the sun. This
compass should only be
used as an approximate
direction finder. Changes
in laitude and the seasons
may also cause directional
misreadings.
One of the features of this watch is a directional
rotating bezel for use in the Northern Hemisphere.
By aligning the hour hand with the position of the
sun in the sky, the point halfway between this
position and 12 o’clock will be south. Align the “S”
mark on the rotating bezel with this halfway point to
determine all other points of the compass.
13. Precautions and Long Term Use
1. Water resistance
Check the chart to determine the water-resistant
properties of this watch.
* Always set the crown in the normal position.
WATER RESISTANT may sometimes be
abbreviated as WATER RESIST.
2. Avoid extreme temperatures
Avoid leaving your watch in extremely warm or
cold locations for a long period of time.
3. Avoid strong shocks
4. Avoid strong magnetic fields
5. Avoid chemicals and corrosive gases
Avoid wearing this watch in the presence of
chemicals and corrosive gases. If mercury or any
chemical (such as fuel gasoline, thinner, alcohol,
spray liquids of cosmetics or the like), makes
contact with the watch, discolouration, deterioration
or damage to the case, band or other components
may occur.
6. Avoid static electricity
The intergrated circuits used in this watch are
sensitive to static electricity. If exposed to intense
static electricity, the watch’s display may lose it’s
accuracy.
7. Keep the watch clean
It may become difficult to pull the crown out due
to dirt and dust getting caught between the crown
and the case when the watch is worn for long
periods of time. To prevent this from happening,
turn the crown freely back and forth occasionally
while it is in the normal position. Any dirt left on the
case or band may cause skin rash. A watchband
will easily become soiled with dust and
perspiration because it is in direct contact with
the skin. Even a stainless or gold-plated band
may begin to corrode if it has not been cleaned
for a long period of time.
8. Periodic Inspection
Getting your watch checked once every two or
three years is recommended to ensure long use
and trouble-free operation.
9. Be sure to keep the battery away from infants
or small children:
Should accidental ingestion occur, consult a
doctor at once.
Page 6

14. Specifications
1. Type: Multi-hand, analog quartz watch
2. Accuracy: Within ±20 seconds per month at
normal temperatures (5°C-35°C/41°F-95°F)
3. Operating Temperature Range: –10°C to +60°C
(14°F to 140°F)
4. Functions:
• Time...............Hours, minutes, seconds,
24-hour clock
4. • Alarm..............Quick set alarm (alarm duration:
approx. 10 seconds)
Daily alarm (alarm duration:
approx. 15 seconds)
4. • Chronograph. 60 minute measurement, 1/20th
second increments, split time
measurement function
4. • Timer............. 1 minute increments, can be set
to a maximum of 59 minutes
4. • Local time .....Time difference correction in
1 hour units
4. • Calendar ........Month, date
5. Battery: 280-44 (SR927W)
6. Battery Life: Approx. 2 years
This battery life is based on the following
conditions of use.
6. • Alarm 1: 10 seconds/day
6. • Alarm 2: 15 seconds/day
6. • Chronograph measurement: 1 hour/day
6. • Timer measurement: 59 minutes/day
• Product specifications are subject to change
without notice.
Page 7

Water Resistance
The water-resistant quality of our timepieces is offered in varying degrees depending on the model. This
ranges from non-water resistant models to those suitable for SCUBA diving. Water resistance of our
timepieces is measured in BAR or Barometric Pressure. Each BAR of pressure is equal to 14.5 pounds per
square inch of pressure.
Water resistance is measured when the watch is at a static, or motionless state. As the watch is moved in
water, such as from the motion of swimming, pressure is added from velocity. While you may be swimming in
a pool at surface level, the watch may be experiencing forces equal to that of 100 feet of water pressure
(3 BAR). Diving into a pool can cause forces on the watch to exceed those pressures. As such, you
should always allow a margin of safety when exposing your watch to moisture. Never "push the limit" of
the degree of water resistance of your timepiece.
A primary factor to keep in mind about water resistance is that periodic maintenance is needed to
maintain original factory specifications for water resistance. When a watch is new, it meets
specifications for water resistance as indicated on the case back. However, as the watch ages, the
gaskets that seal the watch become dry and brittle, diminishing its water resistant quality. Exposure to
environments such as chlorinated pools, salt water or soaps from showering can accelerate drying of the
gaskets. We recommend that the gaskets be changed at least every 18 to 24 months to maintain the water
resistant quality of your timepiece. If the watch is frequently exposed to chlorinated pools, soaps salt
water, etc., we recommend that the gaskets be changed on a yearly basis.
From time to time, you may notice condensation that appears then goes away after a short period of time.
This is a normal occurrence and happens primarily from sudden temperature changes. When there are sudden
temperature changes such as entering a cool building from the hot out of doors, or jumping into pool on a
hot day the watch may fog. Conversely, if you go to the cold outdoors from a warm building, fogging may
occur. As long as the fogging clears in a short period of time, there is no need for concern.
Be sure the crown is completely pushed in prior to any contact with moisture. If your model is equipped
with a screw down crown, be sure it is properly seated against the case. Do not operate the crown or any
push button when the watch is wet as this may allow the entrance of moisture. . If at anytime, you notice
moisture in your timepiece that does not clear in a short period of time, you should send your timepiece
as soon as possible to the nearest Authorized Service Center for inspection.
You can determine the level of water resistance of our watches from the markings on your case-back.
Additionally, models that are water resistant to 100 or 200 meters have an indication on the dial as
well. The case-backs and dials are normally marked as follows:
The case back has no indication of water resistance
This indicates the watch is a non water-resistant model and is not designed for contact with moisture at
all. Caution should be exercised to avoid any contact with moisture, such as when washing your hands or
from a rainstorm.
“Water Resist”
This watch is designed to withstand water from accidental splashing, such as from washing your hands or
rain. Any submersion into water may result in the entrance of moisture.
“Water Resist 10BAR” or “W.R. 10BAR”, Dial marked “WR100”
This watch is designed to withstand water pressure up to 333 feet. This includes water exposure from
accidental splashing and rain, but also from showering, swimming in a pool and snorkeling. Be sure to
rinse the watch with fresh water after exposure to a chlorinated pool, salt water, soaps, etc. After
rinsing with fresh water, be sure to dry the exterior with a soft cloth.
“Water Resist 20BAR” or “W.R. 20BAR”, Dial marked “WR200”
This watch is designed to withstand water pressure up to 666 feet. This includes all exposure to water up
to and including recreational SCUBA diving. Be sure to rinse the watch with fresh water after exposure to
a chlorinated pool, salt water, soaps, etc. After rinsing with fresh water, be sure to dry the exterior
with a soft cloth.
Special Note about Jacuzzis and Hot Tubs
The various components used in the manufacture and assembly of your watch expand at various rates. This
results in a loss of the sealing capabilities of gaskets, which may allow moisture to enter. In addition,
heat from these sources can cause deformation of certain materials leading to mechanical failures. For
these reasons, you should remove your watch before entering a hot tub or Jacuzzi.
 Loading...