


VPN 3000 Series Concentrator
Getting Started
Release 3.6
August 2002
Corporate Headquarters
Cisco Systems, Inc.
170 West Tasman Drive
San Jose, CA 95134-1706
USA
http://www.cisco.com
Tel: 408 526-4000
800 553-NETS (6387)
Fax: 408 526-4100
Customer Order Number: DOC-7814740=
Text Part Number: 78-14740-01

THE SPECIFICATIONS AND INFORMATION REGARDING THE PRODUCTS IN THIS MANUAL ARE SUBJECT TO CHANGE WITHOUT
NOTICE. ALL STATEMENTS, INFORMATION, AND RECOMMENDATIONS IN THIS MANUAL ARE BELIEVED TO BE ACCURATE BUT ARE
PRESENTED WITHOUT WARRANTY OF ANY KIND, EXPRESS OR IMPLIED. USERS MUST TAKE FULL RESPONSIBILITY FOR THEIR
APPLICATION OF ANY PRODUCTS.
THE SOFTWARE LICENSE AND LIMITED WARRANTY FOR THE ACCOMPANYING PRODUCT ARE SET FORTH IN THE INFORMATION
PACKET THAT SHIPPED WITH THE PRODUCT AND ARE INCORPORATED HEREIN BY THIS REFERENCE. IF YOU ARE UNABLE TO
LOCATE THE SOFTWARE LICENSE OR LIMITED WARRANTY, CONTACT YOUR CISCO REPRESENTATIVE FOR A COPY.
The following information is for FCC compliance of Class A devices: This equipment has been tested and found to comply with the limits for a Class A
digital device, pursuant to part 15 of the FCC rules. These limits are designed to provide reasonable protection against harmful interference when the
equipment is operated in a commercial environment. This equipment generates, uses, and can radiate radio-frequency energy and, if not installed and used
in accordance with the instruction manual, may cause harmful interference to radio communications. Operation of this equipment in a residential area is
likely to cause harmful interference, in which case users will be required to correct the interference at their own expense.
The following information is for FCC compliance of Class B devices: The equipment described in this manual generates and may radiate radio-frequency
energy. If it is not installed in accordance with Cisco’s installation instructions, it may cause interference with radio and television reception. This
equipment has been tested and found to comply with the limits for a Class B digital device in accordance with the specifications in part 15 of the FCC rules.
These specifications are designed to provide reasonable protection against such interference in a residential installation. However, there is no guarantee
that interference will not occur in a particular installation.
Modifying the equipment without Cisco’s written authorization may result in the equipment no longer complying with FCC requirements for Class A or
Class B digital devices. In that event, your right to use the equipment may be limited by FCC regulations, and you may be required to correct any
interference to radio or television communications at your own expense.
You can determine whether your equipment is causing interference by turning it off. If the interference stops, it was probably caused by the Cisco equipment
or one of its peripheral devices. If the equipment causes interference to radio or television reception, try to correct the interference by using one or more
of the following measures:
• Turn the television or radio antenna until the interference stops.
• Move the equipment to one side or the other of the television or radio.
• Move the equipment farther away from the television or radio.
• Plug the equipment into an outlet that is on a different circuit from the television or radio. (That is, make certain the equipment and the television or radio
are on circuits controlled by different circuit breakers or fuses.)
Modifications to this product not authorized by Cisco Systems, Inc. could void the FCC approval and negate your authority to operate the product.
The Cisco implementation of TCP header compression is an adaptation of a program developed by the University of California, Berkeley (UCB) as part of
UCB’s public domain version of the UNIX operating system. All rights reserved. Copyright © 1981, Regents of the University of California.
NOTWITHSTANDING ANY OTHER WARRANTY HEREIN, ALL DOCUMENT FILES AND SOFTWARE OF THESE SUPPLIERS ARE PROVIDED
“AS IS” WITH ALL FAULTS. CISCO AND THE ABOVE-NAMED SUPPLIERS DISCLAIM ALL WARRANTIES, EXPRESSED OR IMPLIED,
INCLUDING, WITHOUT LIMITATION, THOSE OF MERCHANTABILITY, FITNESS FOR A PARTICULAR PURPOSE AND
NONINFRINGEMENT OR ARISING FROM A COURSE OF DEALING, USAGE, OR TRADE PRACTICE.
IN NO EVENT SHALL CISCO OR ITS SUPPLIERS BE LIABLE FOR ANY INDIRECT, SPECIAL, CONSEQUENTIAL, OR INCIDENTAL
DAMAGES, INCLUDING, WITHOUT LIMITATION, LOST PROFITS OR LOSS OR DAMAGE TO DATA ARISING OUT OF THE USE OR
INABILITY TO USE THIS MANUAL, EVEN IF CISCO OR ITS SUPPLIERS HAVE BEEN ADVISED OF THE POSSIBILITY OF SUCH DAMAGES.
CCIP, the Cisco Arrow logo, the Cisco Powered Network mark, the Cisco Systems Verified logo, Cisco Unity, Follow Me Browsing, FormShare, Internet
Quotient, iQ Breakthrough, iQ Expertise, iQ FastTrack, the iQ Logo, iQ Net Readiness Scorecard, Networking Academy, ScriptShare, SMARTnet,
TransPath, and Voice LAN are trademarks of Cisco Systems, Inc.; Changing the Way We Work, Live, Play, and Learn, Discover All That’s Possible, The
Fastest Way to Increase Your Internet Quotient, and iQuick Study are service marks of Cisco Systems, Inc.; and Aironet, ASIST, BPX, Catalyst, CCDA,
CCDP, CCIE, CCNA, CCNP, Cisco, the Cisco Certified Internetwork Expert logo, Cisco IOS, the Cisco IOS logo, Cisco Press, Cisco Systems, Cisco
Systems Capital, the Cisco Systems logo, Empowering the Internet Generation, Enterprise/Solver, EtherChannel, EtherSwitch, Fast Step, GigaStack, IOS,
IP/TV, LightStream, MGX, MICA, the Networkers logo, Network Registrar, Packet, PIX, Post-Routing, Pre-Routing, RateMUX, Registrar, SlideCast,
StrataView Plus, Stratm, SwitchProbe, TeleRouter, and VCO are registered trademarks of Cisco Systems, Inc. and/or its affiliates in the U.S. and certain
other countries.
All other trademarks mentioned in this document or Web site are the property of their respective owners. The use of the word partner does not imply a
partnership relationship between Cisco and any other company. (0206R)
VPN 3000 Series Concentrator Getting Started
Copyright © 2002, Cisco Systems, Inc.
All rights reserved.

Preface v
Audience v
Organization v
Related Documentation vi
Conventions viii
Obtaining Documentation x
Obtaining Technical Assistance xi
CONTENTS
CHAPTER
CHAPTER
CHAPTER
1 Understanding the VPN 3000 Concentrator 1-1
Hardware Features 1-2
Software Features 1-4
How the VPN Concentrator Works 1-7
Where the VPN Concentrator Fits in Your Network 1-8
Physical Specifications 1-9
2 Installing and Powering Up the VPN Concentrator 2-1
Preparing to Install 2-1
Unpacking 2-4
Installing the VPN Concentrator Hardware 2-5
Connecting Hardware 2-8
Powering Up 2-11
Beginning Quick Configuration 2-12
3 Using the VPN Concentrator Manager for Quick Configuration 3-1
Logging in to the VPN Concentrator Manager 3-2
78-14740-01
Starting Quick Configuration 3-3
Configuring IP Interfaces 3-4
Configuring System Information 3-8
Configuring Tunneling Protocols and Options 3-10
Configuring Address Assignment 3-11
Configuring Authentication 3-12
Configuring Internal Server User Database 3-16
VPN 3000 Series Concentrator Getting Started
iii

Contents
Configuring the IPSec Group 3-17
Changing Admin Password 3-18
Finishing Quick Configuration 3-19
Saving the Active Configuration 3-20
What Next? 3-20
Using Other VPN Concentrator Manager Functions 3-21
Understanding the VPN Concentrator Manager Window 3-22
CHAPTER
CHAPTER
4 Using the Command-Line Interface for Quick Configuration 4-1
Configuring Ethernet Interfaces 4-2
Configuring System Information 4-5
Configuring Tunneling Protocols and Options 4-6
Configuring Address Assignment 4-8
Configuring Authentication 4-10
Configuring the IPSec Group 4-16
Changing the Admin Password 4-17
Completing Quick Configuration 4-18
Saving the Active Configuration 4-18
Exiting the CLI 4-18
What Next? 4-19
5 Testing the VPN Concentrator 5-1
VPN Concentrator Configuration Settings 5-1
Windows 95 PC Client Configuration 5-2
Testing the VPN Connection 5-3
APPENDIX
APPENDIX
I
NDEX
iv
A Troubleshooting and System Errors A-1
Files for Troubleshooting A-1
VPN Concentrator Manager Errors A-2
Command-line Interface Errors A-5
LED Indicators A-6
B Copyrights, Licenses, and Notices B-1
Index
VPN 3000 Series Concentrator Getting Started
78-14740-01

Audience
Preface
VPN 3000 Series Concentrator Getting Started provides information to take you from unpacking and
installing the VPN 3000 Concentrator through quick configuration (configuring the minimal parameters
to make it operational). You can perform quick configuration from a console with the menu-based
command-line interface, or you can use the HTML-based VPN Concentrator Manager with a browser.
This guide describes both methods, and we recommend the latter for ease of use.
We assume you are an experienced system administrator or network administrator with appropriate
education and training, who knows how to install, configure, and manage internetworking systems.
However, virtual private networks and VPN devices might be new to you. You should be familiar with
Windows system configuration and management, and you should be familiar with Microsoft Internet
Explorer or Netscape Navigator or Communicator browsers.
Organization
This guide is organized as follows:
Chapter Title Description
Chapter 1 Understanding the VPN 3000
Chapter 2 Installing and Powering Up
Chapter 3 Using the VPN Concentrator
Chapter 4 Using the Command-Line
Concentrator
the VPN Concentrator
Manager for Quick
Configuration
Interface for Quick
Configuration
Summarizes the hardware and software features
and operation. If you are familiar with VPN
devices, you can skip this chapter.
Explains how to prepare for, unpack, install, and
power up the VPN Concentrator, and how to begin
quick configuration. Once you have completed the
steps in this chapter, you can use either Chapter 3
or Chapter 4 to complete quick configuration.
Explains how to complete quick configuration of
the system using the VPN Concentrator Manager
with a browser. We recommend this method.
Explains how to complete quick configuration of
the system using the command-line interface from
the console or a Telnet session.
78-14740-01
VPN 3000 Series Concentrator Getting Started
v

Related Documentation
Chapter Title Description
Chapter 5 Testing the VPN
Concentrator
Appendix A Troubleshooting and System
Errors
Explains how to test the system by using Microsoft
Dial-Up Networking on a PC with a modem, to
connect to an ISP and use PPTP to create a VPN
tunnel to your private corporate network.
Describes common errors that might occur while
configuring or using the system, and how to
correct them. It also describes all LED indicators
on the VPN Concentrator and its expansion
modules.
Related Documentation
Refer to the following documents for further information about Cisco VPN applications and products.
VPN 3000 Series Concentrator Documentation
Preface
The VPN 3000 Series Concentrator Reference Volume I: Configuration explains how to start and use the
VPN Concentrator Manager. It details the Configuration screens and explains how to configure your
device beyond the minimal parameters you set during quick configuration.
The VPN 3000 Series Concentrator Reference Volume II: Administration and Monitoring provides
guidelines for administering and monitoring the VPN Concentrator. It explains and defines all functions
available in the Administration and Monitoring screens of the VPN Concentrator Manager. Appendixes
to this manual provide troubleshooting guidance and explain how to access and use the alternate
command-line interface.
The VPN Concentrator Manager also includes context oriented online help that you can access by
clicking the Help icon on the toolbar in the Manager window.
VPN Client Documentation
The VPN Client User Guide explains how to install, configure, and use the VPN Client, which lets a
remote client use the IPSec tunneling protocol for secure connection to a private network through the
VPN Concentrator.
The VPN Client Administrator Guide tells how to configure a VPN 3000 Concentrator for remote user
connections using the VPN Client, how to automate remote user profiles, how to use the VPN Client
command-line interface, and how to get troubleshooting information.
vi
VPN 3000 Series Concentrator Getting Started
78-14740-01

Preface
VPN 3002 Hardware Client Documentation
The VPN 3002 Hardware Client Reference provides details on all the functions available in the
VPN 3002 Hardware Client Manager. This manual is online only.
The VPN 3002 Hardware Client Getting Started manual provides information to take you from
unpacking and installing the VPN 3002, through configuring the minimal parameters to make it
operational (called Quick Configuration). This manual is available only online.
The VPN 3002 Hardware Client Quick Start Card summarizes the information for quick configuration.
This quick reference card is provided with the VPN 3002 and is also available online.
The VPN 3002 Hardware Client Basic Information sticky label summarizes information for quick
configuration. It is provided with the VPN 3002 and you can also print it from the online version; you
can affix the label to the VPN 3002.
Documentation on VPN Software Distribution CDs
The VPN 3000 Series Concentrator and VPN 3002 Hardware Client documentation are provided on the
VPN 3000 Concentrator software distribution CD-ROM in PDF format. The VPN Client documentation
is included on the VPN Client software distribution CD-ROM, also in PDF format. To view the latest
versions on the Cisco web site, click the Support icon on the toolbar at the top of the VPN Concentrator
Manager, Hardware Client Manager, or Client window. To open the documentation, you need Acrobat
Reader 3.0 or later; version 4.5 is included on the Cisco VPN 3000 Concentrator software distribution
CD-ROM and on the VPN Client software distribution CD-ROM.
Related Documentation
Other References
Other useful references include:
• Cisco Systems, Dictionary of Internetworking Terms and Acronyms. Cisco Press: 2001.
• Virtual Private Networking: An Overview. Microsoft Corporation: 1999. (Available from Microsoft
• www.ietf.org for Internet Engineering Task Force (IETF) Working Group drafts on IP Security
• www.whatis.com, a web reference site with definitions for computer, networking, and data
website.)
Protocol (IPSec).
communication terms.
78-14740-01
VPN 3000 Series Concentrator Getting Started
vii

Conventions
Conventions
This document uses the following conventions:
Convention Description
boldface font Commands and keywords are in boldface.
italic font Arguments for which you supply values are in italics.
screen font Terminal sessions and information the system displays
screen font.
are in
boldface screen
font
^ The symbol ^ represents the key labeled Control—for
Information you must enter is in boldface screen
font.
example, the key combination ^D in a screen display
means hold down the Control key while you press the D
key.
Preface
Notes use the following conventions:
Note Means reader take note. Notes contain helpful suggestions or references to material not
covered in the publication.
Tips use the following conventions:
Tip s Means the following are useful tips.
Cautions use the following conventions:
Caution Means reader be careful. Cautions alert you to actions or conditions that could result in
equipment damage or loss of data.
Warnings use the following conventions:
Warning
This warning symbol means danger. You are in a situation that could cause bodily injury. Before you
work on any equipment, you must be aware of the hazards involved with electrical circuitry and
familiar with standard practices for preventing accidents.
viii
VPN 3000 Series Concentrator Getting Started
78-14740-01

Preface
Data Formats
Conventions
As you configure and manage the system, enter data in the following formats unless the instructions
indicate otherwise:
Type of Data Format
IP Addresses IP addresses use 4-byte dotted decimal notation (for example, 192.168.12.34);
as the example indicates, you can omit leading zeros in a byte position.
Subnet Masks and
Wildcard Masks
MAC Addresses MAC addresses use 6-byte hexadecimal notation (for example,
Hostnames Hostnames use legitimate network hostname or end-system name notation (for
Text Strings Text strings use upper- and lower-case alphanumeric characters. Most text
Filenames Filenames on the VPN Concentrator follow the DOS 8.3 naming convention:
Port Numbers Port numbers use decimal numbers from 0 to 65535. No commas or spaces are
Subnet masks use 4-byte dotted decimal notation (for example,
255.255.255.0). Wildcard masks use the same notation (for example,
0.0.0.255); as the example illustrates, you can omit leading zeros in a byte
position.
00.10.5A.1F.4F.07).
example, VPN01). Spaces are not allowed. A hostname must uniquely identify
a specific system on a network.
strings are case-sensitive (for example, simon and Simon represent different
usernames). In most cases, the maximum length of text strings is 48
characters.
a maximum of eight characters for the name, plus a maximum of three
characters for an extension. For example, LOG00007.TXT is a legitimate
filename. The VPN Concentrator always stores filenames in uppercase.
permitted in a number.
78-14740-01
VPN 3000 Series Concentrator Getting Started
ix

Obtaining Documentation
Obtaining Documentation
These sections explain how to obtain documentation from Cisco Systems.
World Wide Web
You can access the most current Cisco documentation on the World Wide Web at this URL:
http://www.cisco.com
Translated documentation is available at this URL:
http://www.cisco.com/public/countries_languages.shtml
Documentation CD-ROM
Cisco documentation and additional literature are available in a Cisco Documentation CD-ROM
package, which is shipped with your product. The Documentation CD-ROM is updated monthly and may
be more current than printed documentation. The CD-ROM package is available as a single unit or
through an annual subscription.
Preface
Ordering Documentation
You can order Cisco documentation in these ways:
• Registered Cisco.com users (Cisco direct customers) can order Cisco product documentation from
the Networking Products MarketPlace:
http://www.cisco.com/cgi-bin/order/order_root.pl
• Registered Cisco.com users can order the Documentation CD-ROM through the online Subscription
Store:
http://www.cisco.com/go/subscription
• Nonregistered Cisco.com users can order documentation through a local account representative by
calling Cisco Systems Corporate Headquarters (California, U.S.A.) at 408 526-7208 or, elsewhere
in North America, by calling 800 553-NETS (6387).
Documentation Feedback
You can submit comments electronically on Cisco.com. In the Cisco Documentation home page, click
the Fax or Email option in the “Leave Feedback” section at the bottom of the page.
You can e-mail your comments to bug-doc@cisco.com.
You can submit your comments by mail by using the response card behind the front cover of your
document or by writing to the following address:
Cisco Systems; Attn: Document Resource Connection
170 West Tasman Drive
San Jose, CA 95134-9883
We appreciate your comments.
VPN 3000 Series Concentrator Getting Started
x
78-14740-01

Preface
Obtaining Technical Assistance
Cisco provides Cisco.com as a starting point for all technical assistance. Customers and partners can
obtain online documentation, troubleshooting tips, and sample configurations from online tools by using
the Cisco Technical Assistance Center (TAC) Web Site. Cisco.com registered users have complete access
to the technical support resources on the Cisco TAC Web Site.
Cisco.com
Cisco.com is the foundation of a suite of interactive, networked services that provides immediate, open
access to Cisco information, networking solutions, services, programs, and resources at any time, from
anywhere in the world.
Cisco.com is a highly integrated Internet application and a powerful, easy-to-use tool that provides a
broad range of features and services to help you with these tasks:
• Streamline business processes and improve productivity
• Resolve technical issues with online support
Obtaining Technical Assistance
• Download and test software packages
• Order Cisco learning materials and merchandise
• Register for online skill assessment, training, and certification programs
If you want to obtain customized information and service, you can self-register on Cisco.com. To access
Cisco.com, go to this URL:
http://www.cisco.com
Technical Assistance Center
The Cisco Technical Assistance Center (TAC) is available to all customers who need technical assistance
with a Cisco product, technology, or solution. Two levels of support are available: the Cisco TAC
Web Site and the Cisco TAC Escalation Center.
Cisco TAC inquiries are categorized according to the urgency of the issue:
• Priority level 4 (P4)—You need information or assistance concerning Cisco product capabilities,
product installation, or basic product configuration.
• Priority level 3 (P3)—Your network performance is degraded. Network functionality is noticeably
impaired, but most business operations continue.
• Priority level 2 (P2)—Your production network is severely degraded, affecting significant aspects
of business operations. No workaround is available.
• Priority level 1 (P1)—Your production network is down, and a critical impact to business operations
will occur if service is not restored quickly. No workaround is available.
The Cisco TAC resource that you choose is based on the priority of the problem and the conditions of
service contracts, when applicable.
78-14740-01
VPN 3000 Series Concentrator Getting Started
xi

Obtaining Technical Assistance
Cisco TAC Web Site
You can use the Cisco TAC Web Site to resolve P3 and P4 issues yourself, saving both cost and time.
The site provides around-the-clock access to online tools, knowledge bases, and software. To access the
Cisco TAC Web Site, go to this URL:
http://www.cisco.com/tac
All customers, partners, and resellers who have a valid Cisco service contract have complete access to
the technical support resources on the Cisco TAC Web Site. The Cisco TAC Web Site requires a
Cisco.com login ID and password. If you have a valid service contract but do not have a login ID or
password, go to this URL to register:
http://www.cisco.com/register/
If you are a Cisco.com registered user, and you cannot resolve your technical issues by using the Cisco
TAC Web Site, you can open a case online by using the TAC Case Open tool at this URL:
http://www.cisco.com/tac/caseopen
If you have Internet access, we recommend that you open P3 and P4 cases through the Cisco TAC
Web Site .
Preface
Cisco TAC Escalation Center
The Cisco TAC Escalation Center addresses priority level 1 or priority level 2 issues. These
classifications are assigned when severe network degradation significantly impacts business operations.
When you contact the TAC Escalation Center with a P1 or P2 problem, a Cisco TAC engineer
automatically opens a case.
To obtain a directory of toll-free Cisco TAC telephone numbers for your country, go to this URL:
http://www.cisco.com/warp/public/687/Directory/DirTAC.shtml
Before calling, please check with your network operations center to determine the level of Cisco support
services to which your company is entitled: for example, SMARTnet, SMARTnet Onsite, or Network
Supported Accounts (NSA). When you call the center, please have available your service agreement
number and your product serial number.
xii
VPN 3000 Series Concentrator Getting Started
78-14740-01
CHAPTER
1
Understanding the VPN 3000 Concentrator
The VPN 3000 Concentrator (also known as the VPN Concentrator) creates a virtual private network by
creating a secure connection across a TCP/IP network (such as the Internet) that users see as a private
connection. The VPN Concentrator can create single-user-to-LAN connections and LAN-to-LAN
connections.
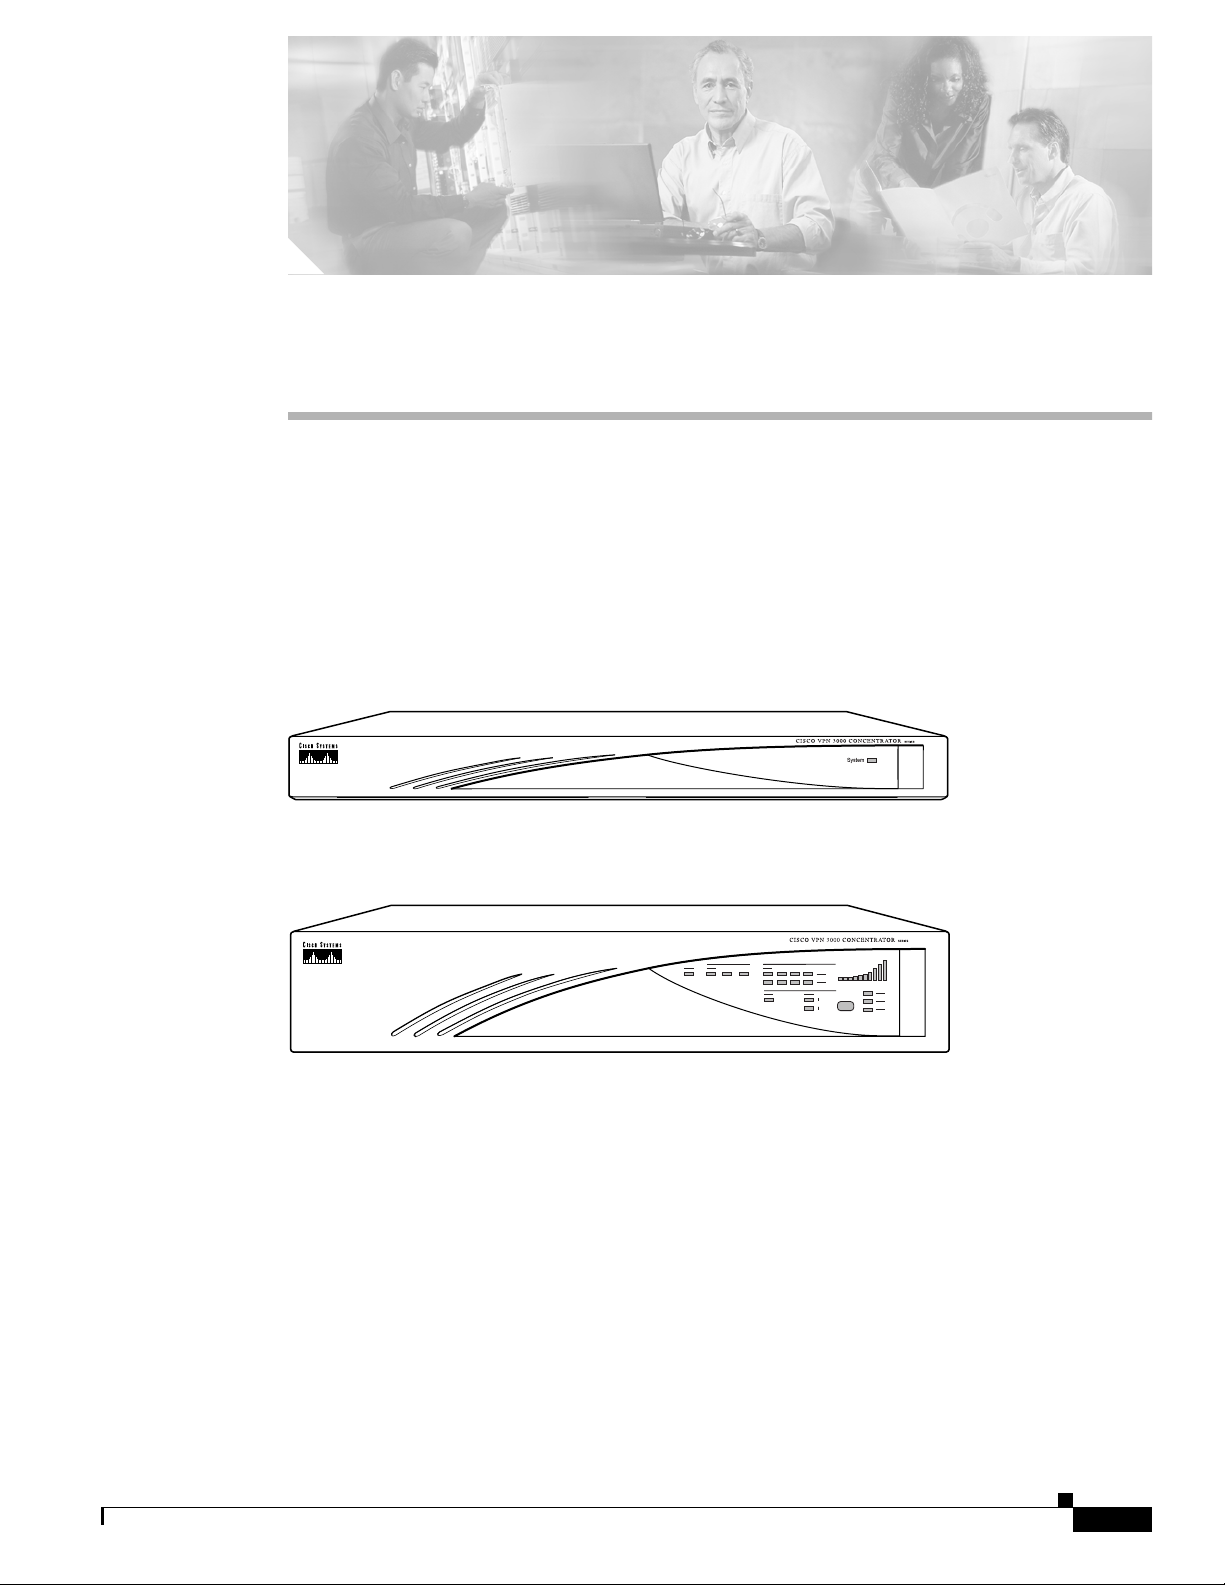
Figure 1-1 The Cisco VPN 3000 Concentrator
Model 3005
63794
Model 3015 to 3080
63795
78-14740-01
VPN 3000 Series Concentrator Getting Started
1-1

Hardware Features
Hardware Features
Current VPN Concentrator Models: 3005, 3015, 3030, 3060, and 3080.
Previous VPN Concentrator Models: C10, C20, and C50.
All systems feature:
• 10/100Base-T Ethernet interfaces (autosensing)
–
3005: Two interfaces
–
3015–3080: Three interfaces
• Motorola® PowerPC CPU
• SDRAM memory for normal operation
• Nonvolatile memory for critical system parameters
• Flash memory for file management
Chapter 1 Understanding the VPN 3000 Concentrator
1-2
VPN 3000 Series Concentrator Getting Started
78-14740-01

Chapter 1 Understanding the VPN 3000 Concentrator
In addition, individual models have the following hardware features:
VPN Concentrator Model Hardware Features
Model 3005
Model 3015
Model 3030
Hardware Features
• Software-based encryption
• Single power supply
• Software-based encryption
• Single power supply
• Expansion capabilities:
–
Up to four Cisco Scalable Encryption
Processing modules for maximum
system throughput and redundancy
–
Optional redundant power supply
• One Scalable Encryption Processing module
for hardware-based encryption
• Single power supply
Models 3060 and 3080
• Expansion capabilities:
–
One additional SEP module for
maximum system throughput and
redundancy
–
Optional redundant power supply
• Two Scalable Encryption Processing modules
for hardware-based encryption at maximum
system throughput
• Dual redundant power supplies
• Expansion capabilities:
–
Up to two additional SEP modules for
maximum system redundancy
78-14740-01
VPN 3000 Series Concentrator Getting Started
1-3

Software Features
Software Features
The VPN Concentrator incorporates the following virtual private networking software features:
VPN Feature Description
Management
Interfaces
Chapter 1 Understanding the VPN 3000 Concentrator
The VPN Concentrator offers multiple management interfaces. Each interface
provides complete capabilities and can be used to fully configure, administer,
and monitor the device.
• The VPN Concentrator Manager is an HTML-based interface that lets you
manage the system remotely with a standard web browser using either of
the following:
–
HTTP connections
–
HTTPS (HTTP over SSL) secure connections
• The VPN Concentrator command-line interface is a menu- and
command-line based interface that you can use with the local system
console or remotely using any of the following:
Tunneling Protocols
Encryption Algorithms
Authentication
Algorithms
Key Management
–
Telnet connections
–
Telnet over SSL secure connections
–
SSH (Secure Shell), including SCP (Secure Copy)
• IPSec (IP Security) Protocol
–
Remote access, using Cisco VPN Client or other select IPSec
protocol-compliant clients
–
LAN-to-LAN, between peer VPN Concentrators or between a VPN
Concentrator and another IPSec protocol-compliant secure gateway
• L2TP over IPSec (for native Windows 2000 and Windows XP client
compatibility)
• PPTP (Point-to-Point Tunneling Protocol) with encryption
• L2TP (Layer 2 Tunneling Protocol)
• 56-bit DES (Data Encryption Standard)
• 168-bit Triple DES
• Microsoft Encryption (MPPE): 40- and 128-bit RC4
• 128-, 192-, and 256-bit AES
• MD5 (Message Digest 5)
• SHA-1 (Secure Hash Algorithm)
• HMAC (Hashed Message Authentication Coding) with MD5
• HMAC with SHA-1
• IKE (Internet Key Exchange), formerly called ISAKMP/Oakley, with
Diffie-Hellman key technique
• Diffie-Hellman Group 1, Group 2, Group 5, and Group 7 (ECC)
1-4
• Perfect Forward Secrecy (PFS)
VPN 3000 Series Concentrator Getting Started
78-14740-01

Chapter 1 Understanding the VPN 3000 Concentrator
VPN Feature Description
Network Addressing
Support
Authentication and
Accounting Servers
• DNS (Domain Name System)
• Client address assignment:
–
DHCP (Dynamic Host Configuration Protocol), including DDNS host
name population
–
Internally configured client IP address pools
–
RADIUS
• Internal authentication server
• Support for external authentication servers:
–
RADIUS
–
RADIUS with Password Expiration (MSCHAPv2)
–
NT Domain
–
RSA Security SecurID
–
TACACS (administrator only)
• Authentication server testing
Software Features
Certificate Authorities
Security Management
Routing Protocols
• X.509 Digital Certificates
• RADIUS accounting
• Entrust
• Ve ri Si g n
• Microsoft Windows 2000
• RSA Keon
• Netscape
• Baltimore
• Group and user profiles
• Data traffic management, by means of:
–
Filters and rules
–
IPSec Security Associations
–
NAT (Network Address Translation), many-to-one, also called PAT
(Port Address Translation)
–
Network lists
• IP
• RIP v1, RIP v2
• OSPF
78-14740-01
• Static routes
• Private network autodiscovery for LAN-to-LAN connections
• Reverse Route Injection (RRI) allows client, LAN-to-LAN, and network
extension networks to be announced via RIPv2/OSPF
VPN 3000 Series Concentrator Getting Started
1-5

Software Features
VPN Feature Description
Clustering • Load Balancing
• System redundancy via VRRP
System Administration
Monitoring
• Session monitoring and management
• Software image update
• File upload
• System reset and reboot
• Ping
• Configurable system administrator profiles
• File management, including SCP and TFTP transfer
• Digital certificate enrollment and management
• Session limit setting
• Event logging and notification via system console, syslog, SNMP traps,
and email
Chapter 1 Understanding the VPN 3000 Concentrator
Client Software
Compatibility
Other Features
• FTP backup of event logs
• SNMP MIB-II support
• System status
• Session data
• Extensive statistics
• Cisco VPN Client (IPSec):
–
Windows® 95 (OSR 2 or greater), Windows 98, and Windows ME
–
Windows NT® 4.0, Windows 2000, and Windows XP
–
Linux Intel v2.2/v2.4 kernels, Solaris ULTRASparc 32-bit,
MAC OS X (command-line interfaces only)
• Microsoft VPN Clients:
–
Windows 95, Windows 98, and Windows ME (PPTP)
–
Windows NT 4.0 (PPTP)
–
Windows® 2000 and Windows XP (PPTP, L2TP over IPSec)
• Certicom movianVPN Client (ECC, handheld)
• Software data compression
• Split tunneling
• Bandwidth management
1-6
VPN 3000 Series Concentrator Getting Started
78-14740-01

Chapter 1 Understanding the VPN 3000 Concentrator
How the VPN Concentrator Works
The VPN Concentrator creates a virtual private network by creating a secure connection across a TCP/IP
network (such as the Internet) that users see as a private connection. It can create single-user-to-LAN
connections and LAN-to-LAN connections.
The secure connection is called a tunnel, and the VPN Concentrator uses tunneling protocols to negotiate
security parameters, create and manage tunnels, encapsulate packets, transmit or receive them through
the tunnel, and unencapsulate them. The VPN Concentrator functions as a bidirectional tunnel endpoint:
it can receive plain packets, encapsulate them, and send them to the other end of the tunnel where they
are unencapsulated and sent to their final destination. It can also receive encapsulated packets,
unencapsulate them, and send them to their final destination.
The VPN Concentrator performs the following functions:
• Establishes tunnels
• Negotiates tunnel parameters
• Authenticates users
• Assigns user addresses
How the VPN Concentrator Works
• Encrypts and decrypts data
• Manages security keys
• Manages data transfer across the tunnel
• Manages data transfer inbound and outbound as a tunnel endpoint or router
The VPN Concentrator invokes various standard protocols to accomplish these functions.
78-14740-01
VPN 3000 Series Concentrator Getting Started
1-7
Chapter 1 Understanding the VPN 3000 Concentrator
Where the VPN Concentrator Fits in Your Network
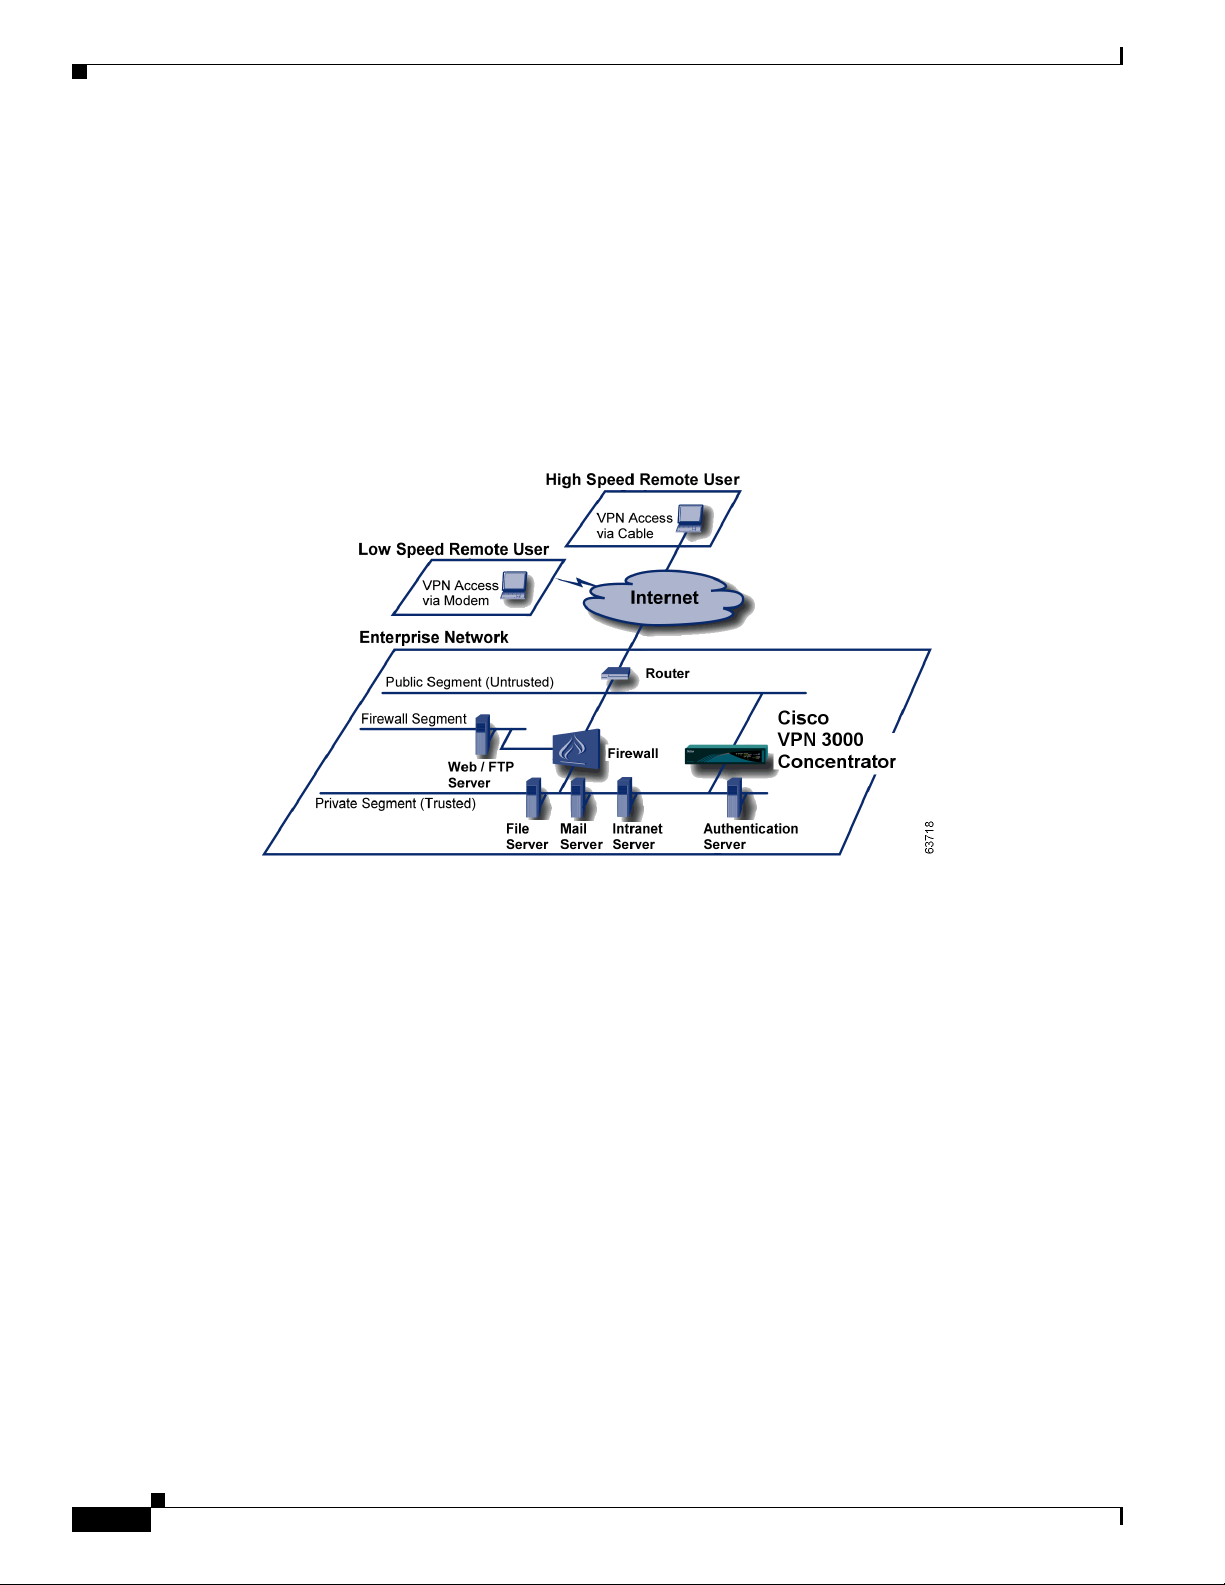
Where the VPN Concentrator Fits in Your Network
Enterprise network configurations vary widely, but the VPN Concentrator is flexible and functional
enough to satisfy most applications. Figure 1-2 shows a typical installation, with the VPN Concentrator
configured in parallel with a firewall, and supporting both low-speed and high-speed remote users. In
some cases, the VPN Concentrator may be deployed behind the firewall; such a configuration is
firewall-vendor dependent and might require additional firewall configuration.
LAN-to-LAN or branch office applications are also supported by placing a second VPN Concentrator,
or other IPSec protocol-compliant secure gateway, at the remote office.
Figure 1-2 A Typical VPN Concentrator Network Installation
1-8
VPN 3000 Series Concentrator Getting Started
78-14740-01

Chapter 1 Understanding the VPN 3000 Concentrator
Physical Specifications
The VPN Concentrator has the following physical specifications:
Width 17.25 inches (43.8 cm); 19-inch (48.26-cm), rack mountable
Depth
Height
Weight
Cooling Normal operating environment, 32
Power 100 to 240 VAC at 50/60 Hz (autosensing)
Physical Specifications
• 3005 = 11.75 inches (29.85 cm)
• 3015–3080 = 17 inches (43.2 cm)
• 3005 = 1.75 inches (4.45 cm); 1U high form factor
• 3015–3080 = 3.5 inches (8.89 cm); 2 U high form factor
• 3005 = 8.5 lbs (3.9 kg)
• 3015–3080 = 27 to 33 lbs (12.25 to 15 kg), depending on model and
options
o
to 122oF (0o to 50oC)
• 3005 = maximum 25 W (0.2A @ 120 VAC)
• 3015–3080 = maximum 50 W (0.42A @ 120 VAC)
Cabling distances from an
Approx. 328 feet (100 meters)
active network device
UL approved Electrical, mechanical, and construction
Standards compliance FCC, E.U., and VCCI Class A compliance
78-14740-01
VPN 3000 Series Concentrator Getting Started
1-9

Physical Specifications
Chapter 1 Understanding the VPN 3000 Concentrator
1-10
VPN 3000 Series Concentrator Getting Started
78-14740-01

Installing and Powering Up the VPN Concentrator
This chapter tells you how to prepare for, unpack, install, and power up the VPN Concentrator, and how
to begin quick configuration.
Preparing to Install
Before you begin, ensure that you have the requisite skill set and that your physical environment and
software preferences are properly set, as described in the following sections.
User or Administrator Skills
CHAPTER
2
We assume you are an experienced system administrator or network administrator with appropriate
education and training, who knows how to install, configure, and manage internetworking systems.
However, virtual private networks and VPN devices may be new to you. You should be familiar with
Windows 95/98 or Windows NT system configuration and management and with Microsoft Internet
Explorer or Netscape Navigator browsers.
78-14740-01
VPN 3000 Series Concentrator Getting Started
2-1

Preparing to Install
Physical Site Requirements
The VPN Concentrator requires a normal computing-equipment environment.
Power The VPN Concentrator requires only normal computing-equipment power. For
maximum protection, we recommend connecting it to a conditioned power source
or UPS (uninterruptible power supply). Be sure that the power source provides a
reliable earth ground.
Cooling In the VPN 3005, cooling intake vents are on the front, and fans are on the rear of
the chassis. In the VPN 3015–3080, cooling intake vents are on the left side, and
fans on the right side, of the chassis (looking at the front). Allow at least 3 inches
(75 mm) of unobstructed space on all sides. If you install the device in an equipment
rack, be sure there is adequate airflow.
Access The VPN Concentrator requires access only to the front and back.
Chapter 2 Installing and Powering Up the VPN Concentrator
Cables and
Connectors
The VPN Concentrator uses the following cables and connectors:
• The VPN Concentrator Ethernet interfaces take standard UTP/STP twisted-pair
network cables, Category 5, with RJ-45 8-pin modular connectors. Cisco
supplies two with the system.
• The console port takes a standard straight-through RS-232 serial cable with a
female DB-9 connector, which Cisco supplies with the system.
Console and PC / Telnet / Browser Requirements
The VPN Concentrator requires a console by which you enter initial configuration parameters. You can
also completely configure and manage the VPN Concentrator via the CLI from the console or a Telnet
client. However, for easiest use, we strongly recommend using the VPN Concentrator Manager, which
is HTML-based, from a PC and browser.
The PC must be able to run the recommended browser. The console can be the same PC that runs the
browser.
Browser Requirements
The VPN Concentrator Manager requires either Microsoft Internet Explorer version 4.0 or higher, or
Netscape Navigator version 4.5-4.7 or 6.0. For best results, we recommend Internet Explorer. Whatever
browser and version you use, install the latest patches and service packs for it.
2-2
VPN 3000 Series Concentrator Getting Started
78-14740-01

Chapter 2 Installing and Powering Up the VPN Concentrator
Preparing to Install
JavaScript and Cookies
Be sure JavaScript and Cookies are enabled in the browser. Check these settings.
Browser JavaScript Cookies
Internet Explorer 4.0
1. On the View menu, choose Internet Options.
1. On the View menu, choose Internet Options.
Internet Explorer 5.0
Netscape Navigator
4.5-4.7
Netscape Navigator
6.0
2. On the Security tab, click Custom (for expert
users) then click Settings.
3. In the Security Settings window, scroll down
to Scripting.
4. Click Enable under Scripting of Java applets.
5. Click Enable under Active scripting.
1. On the Tools menu, choose Internet Options.
2. On the Security tab, click Custom Level.
3. In the Security Settings window, scroll down
to Scripting.
4. Click Enable under Active scripting.
5. Click Enable under Scripting of Java applets.
1. On the Edit menu, choose Preferences.
2. On the Advanced screen, check the Enable
JavaScript check box.
1. On the Edit menu, choose Preferences.
2. On the Advanced screen, check the Enable
JavaScript for Navigator check box.
2. On the Advanced tab, scroll down to Security
then Cookies.
3. Click Always accept cookies.
1. On the Tools menu, choose Internet Options.
2. On the Security tab, click Custom Level.
3. In the Security Settings window, scroll down
to Cookies.
4. Click Enable under Allow cookies that are
stored on your computer.
5. Click Enable under Allow per-session
cookies (not stored).
1. On the Edit menu, choose Preferences.
2. On the Advanced screen, click one of the
Accept... cookies choices, and do not check
the Warn me before accepting a cookie
check box.
1. On the Edit menu, choose Preferences.
2. Under the Advanced category, choose
Cookies.
3. On the Cookies screen, choose Enable All
Cookies. Do not check the Warn me before
storing a cookie check box.
Navigation Toolbar
Do not use the browser navigation toolbar buttons Back, Forward, or Refresh / Reload with the VPN
Concentrator Manager unless instructed to do so. To protect access security, clicking Refresh / Reload
automatically logs out the Manager session. Clicking Back or Forward may display stale Manager
screens with incorrect data or settings.
We recommend that you hide the browser navigation toolbar to prevent mistakes while using the VPN
Concentrator Manager.
78-14740-01
VPN 3000 Series Concentrator Getting Started
2-3

Unpacking
Recommended PC Monitor / Display Settings
For best legibility and ease of use, we recommend setting your monitor or display as follows:
• Desktop area = 1024 x 768 pixels or greater. Minimum = 800 x 600 pixels.
• Color palette = 256 colors or higher.
Unpacking
The VPN Concentrator ships with these items. Carefully unpack your device and check your contents
against the list in Table 2-1. Save the packing material in case you need to repack theunit.
Table 2-1 VPN Concentrator Packing List
Check Quantity Item
1 VPN 3000 Series Concentrator
2 Rack-mounting kits—one for model 3005; one for models
3015-3080
1 RS-232 straight-through serial console cable with DB-9
female connectors on both ends
2 UTP network cables with RJ-45 8-pin modular connectors
1 or 2 Power cords
1 Cisco VPN 3000 Series Concentrator CD
1 Cisco VPN Software Client CD
1 Evalutation copy of Zone Labs firewall software CD
1 Cisco AVVID Solutions CD
1 VPN 3000 Series Concentrator Getting Started (this manual)
1 Release Notes for Cisco VPN 3000 Series Concentrator
1 VPN 3000 Series Concentrator Software License Agreement
1 Release Notes for Cisco VPN Client
1 Cisco VPN Client Software License Agreement
1 Export Compliance document
1 Cisco Product Warranty and Information packet
1 Documentation Ordering Instructions
Chapter 2 Installing and Powering Up the VPN Concentrator
2-4
VPN 3000 Series Concentrator Getting Started
78-14740-01
Chapter 2 Installing and Powering Up the VPN Concentrator
Installing the VPN Concentrator Hardware
You can install the VPN Concentrator in a standard 19-inch equipment rack, or just place it on a table or
shelf.
Tools Required
• No. 1 Phillips screwdriver (if you install the rubber feet on the device).
• No. 2 Phillips screwdriver (if you rack-mount the device).
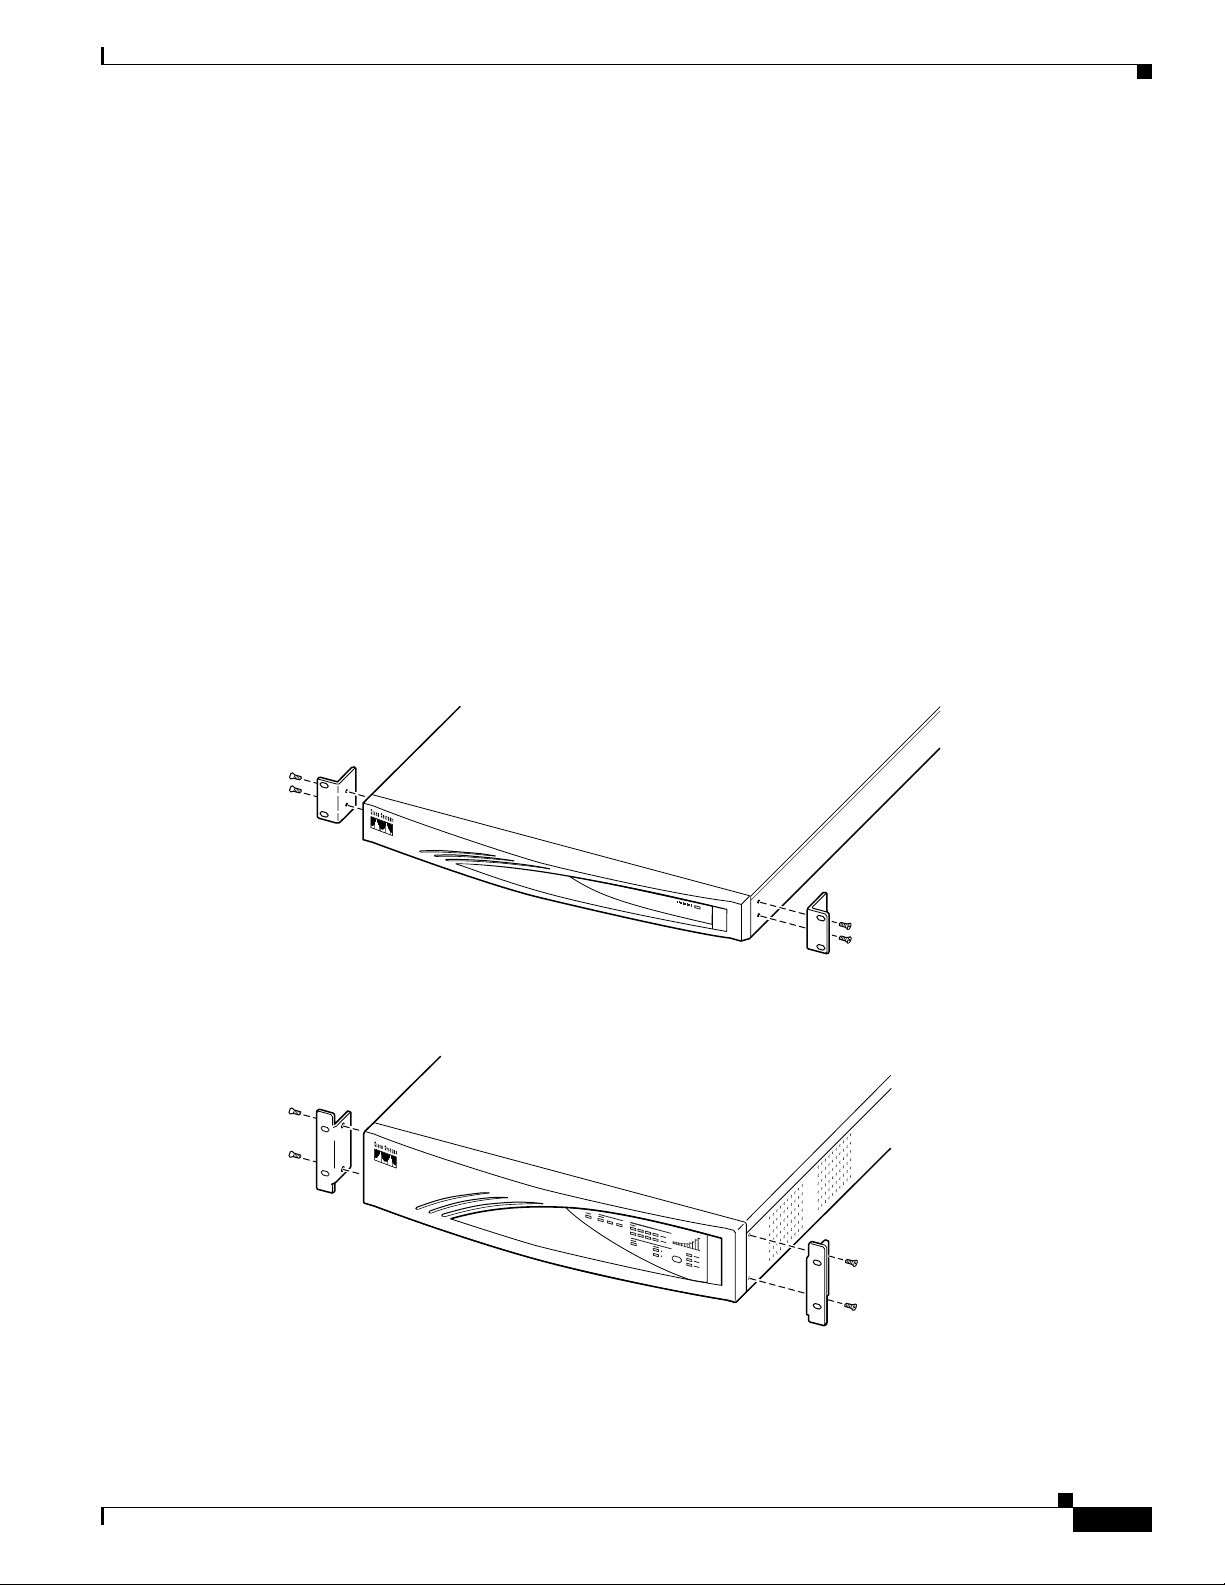
Rack Mounting
Attach the rack-mounting brackets with 10-32 screws in the holes on the front left and right sides. Be
sure to orient the brackets as shown in Figure 2-1.
Figure 2-1 Attaching Rack-Mounting Brackets
Installing the VPN Concentrator Hardware
Model 3005
Models 3015 to 3080
63796
78-14740-01
63797
VPN 3000 Series Concentrator Getting Started
2-5
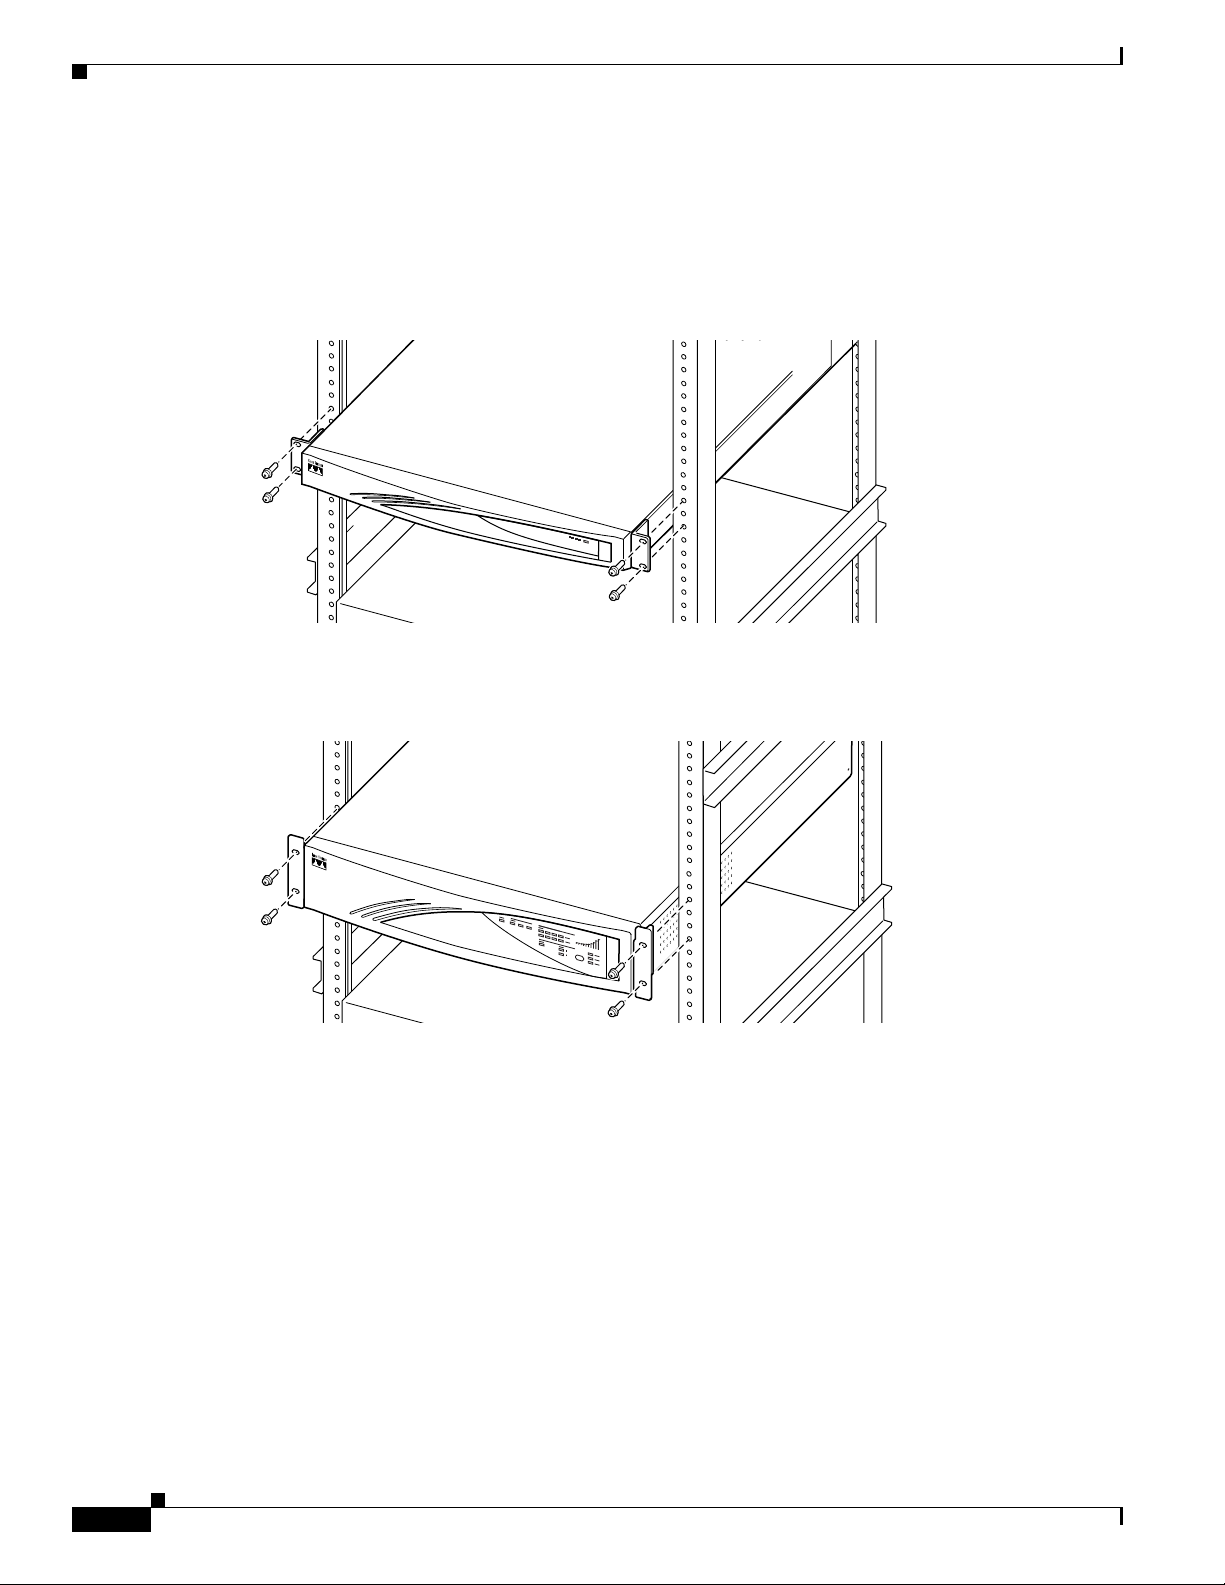
Installing the VPN Concentrator Hardware
Mount the VPN Concentrator in the rack as shown in Figure 2-2. Use screws or fasteners appropriate for
your equipment rack.
Figure 2-2 Rack Mounting a VPN Concentrator
Model 3005
Chapter 2 Installing and Powering Up the VPN Concentrator
63798
Models 3015 through 3080
63799
2-6
VPN 3000 Series Concentrator Getting Started
78-14740-01
Chapter 2 Installing and Powering Up the VPN Concentrator
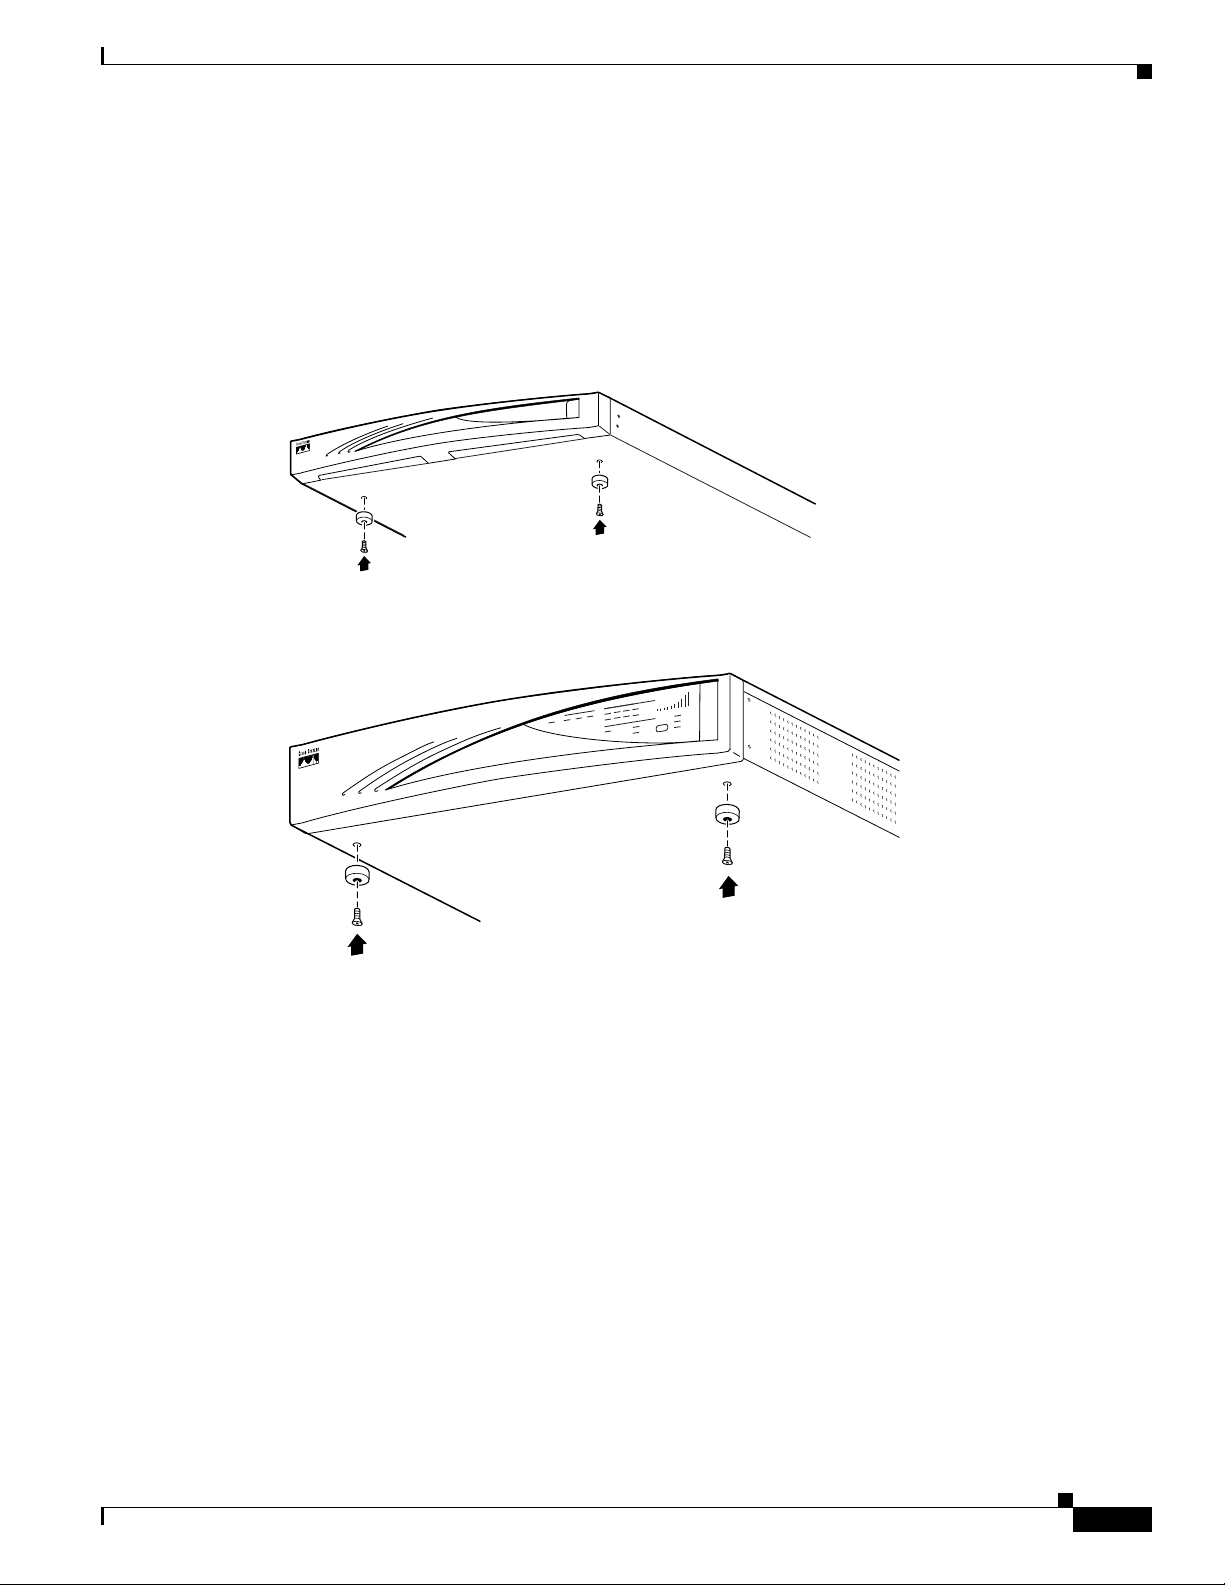
Installing Rubber Feet
To place the VPN Concentrator on a table or shelf, attach the four rubber feet with screws on the bottom
of the chassis. See Figure 2-3.
Figure 2-3 Installing Rubber Feet
Model 3005
Model 3015 through 3080
Installing the VPN Concentrator Hardware
63800
78-14740-01
63801
VPN 3000 Series Concentrator Getting Started
2-7
Connecting Hardware
Connecting Hardware
Chapter 2 Installing and Powering Up the VPN Concentrator
Warning
Be sure the console/PC is turned off before you connect cables to it. Do not connect power cables to
the VPN Concentrator until instructed.
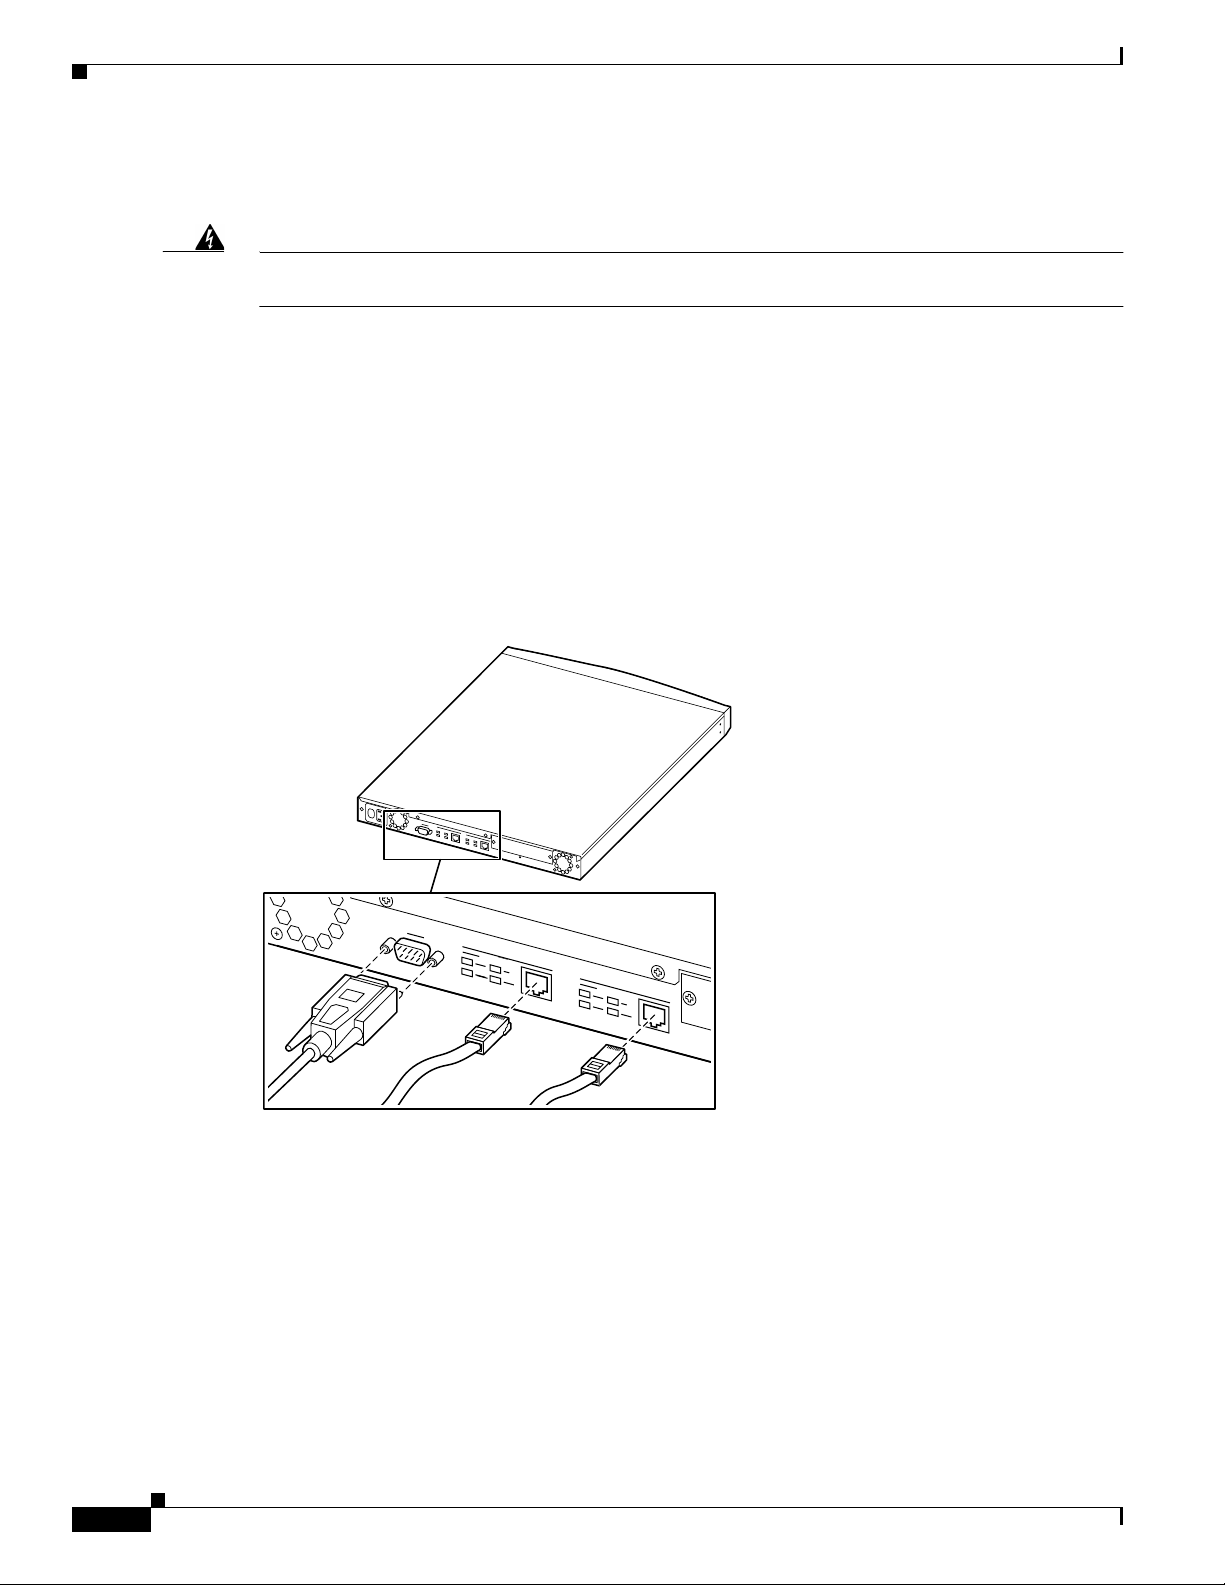
Connecting the Console/PC
Connect the RS-232 straight-through serial cable between the Console port on the back of the VPN
Concentrator and the COM1 or serial port on the console/PC. See Figure 2-4.
If you are using a PC with a browser to manage the VPN Concentrator, be sure the PC is connected to
the same private LAN as the VPN Concentrator.
Figure 2-4 Connecting the Console and Network Cables
Model 3005
2-8
63792
VPN 3000 Series Concentrator Getting Started
78-14740-01

Chapter 2 Installing and Powering Up the VPN Concentrator
Model 3015 through 3080
Connecting Hardware
Connecting Network Cables
Connect network patch cables between the Ethernet interface jacks on the back of the VPN Concentrator
and your network patch panel or device. See Figure 2-4.
The interfaces are (left to right):
Private Ethernet 1 VPN Concentrator interface to your private network (internal LAN)
Public Ethernet 2 VPN Concentrator interface to the public network
External Ethernet 3 VPN Concentrator interface to an additional LAN
To make the VPN Concentrator operational, you must connect at least two interfaces, usually Ethernet 1
and Ethernet 2.
63802
(present only on models 3015 – 3080)
78-14740-01
VPN 3000 Series Concentrator Getting Started
2-9

Connecting Hardware
Connecting Power Cable(s)
Chapter 2 Installing and Powering Up the VPN Concentrator
Warning
Be sure the VPN Concentrator power switch is OFF (O depressed) before you connect a power cable.
The power switch is on the power module, on the back of the VPN Concentrator.
Connect the power cable(s) between the VPN Concentrator and an appropriate power outlet. Be sure the
power outlet provides a reliable earth ground. See Figure 2-5.
Figure 2-5 Connecting Power Cable(s)
Model 3005
Model 3015 through 3080
63793
63803
2-10
VPN 3000 Series Concentrator Getting Started
78-14740-01

Chapter 2 Installing and Powering Up the VPN Concentrator
Powering Up
Power up the devices in this sequence:
Step 1 Power up the console / PC.
Step 2 Start a terminal emulator (e.g., HyperTerminal) on the console/PC. Configure a connection to COM1,
with port settings of:
• 9600 bits per second
• 8 data bits
• No parity
• 1 stop bit
• Hardware flow control.
Set the emulator for VT100 emulation, or let it auto-detect the emulation type.
Step 3 Power up the VPN Concentrator by pressing ON ( I ) on the power switch on the back.
The LED(s) on the front panel will blink and change color as the system executes diagnostics. Watch for
these LEDs (if present) on the VPN Concentrator front panel to stabilize and display:
Powering Up
• System = green (This is the only front-panel LED on the Model 3005.)
• Ethernet Link Status 1 2 3 = green for the Ethernet interfaces to which you connected patch cables
• Expansion Modules 1 2 3 4
–
Insertion Status = green for the number of SEP modules in your device
Run Status = green for the number of SEP modules in your device
–
Fan Status = green
• Power Supplies A B = green for the number of power supplies in your device
Ignore any other LEDs on the front panel.
Step 4 Watch for the following LEDs on the back of the device to display:
• Private / Public / External Interfaces
Link = green for the interfaces connected to networks
• SEP Modules (if installed): Power = green
Ignore any other LEDs on the back.
If LEDs that should be green are amber, red, or off, please see Appendix A, “Troubleshooting and
System Errors.”
Step 5 The console displays initialization and boot messages such as:
Boot-ROM Initializing...
Boot configured 128Mb of RAM.
Image Loader Initializing...
Decompressing & loading image ............
Verifying image checksum ...........
Active image loaded and verified...
Starting loaded image...
Starting power-up diagnostics...
Initializing VPN Concentrator ...
Initialization Complete...Waiting for Network...
Login: _
78-14740-01
VPN 3000 Series Concentrator Getting Started
2-11

Beginning Quick Configuration
Beginning Quick Configuration
You are now ready to begin quick configuration; that is, accepting default values when possible and
configuring minimal parameters to make the VPN 3000 Concentrator operational.
Note You can go through the steps of quick configuration only once, unless you reboot the system with the
Reboot with Factory/Default configuration option. In that case, you can and must go through all the steps
again. See Administration | System Reboot in the VPN 3000 Concentrator Series User Guide.
Quick configuration consists of the following steps:
Step 1 Set the system time, date, and time zone, from the console.
Step 2 Configure the VPN Concentrator Ethernet 1 interface to your private network, from the console.
At this point you can use a browser to complete Quick Configuration with the VPN Concentrator
Manager (see Chapter 3, “Using the VPN Concentrator Manager for Quick Configuration”). While you
can continue with the console instead (see Chapter 4, “Using the Command-Line Interface for Quick
Configuration”), we recommend using a browser.
Chapter 2 Installing and Powering Up the VPN Concentrator
Step 3 Configure the other Ethernet interfaces that are connected to a public network or an additional external
network.
Step 4 Enter system identification information: system name, date, time, DNS, domain name, and default
gateway.
Step 5 Specify tunneling protocols and encryption options.
Step 6 Specify methods for assigning IP addresses to clients as a tunnel is established.
Step 7 Choose and identify the user authentication server: the internal server, RADIUS, NT Domain, or SDI.
Step 8 If using the internal authentication server, populate the internal user database.
Step 9 If using IPSec tunneling protocol, assign a name and password to the IPSec tunnel group.
Step 10 Change the admin password for security.
Step 11 Save the configuration file. When you complete this step, quick configuration is done.
2-12
VPN 3000 Series Concentrator Getting Started
78-14740-01

Chapter 2 Installing and Powering Up the VPN Concentrator
Beginning Quick Configuration
Quick Configuration Using Non-default Values
Although you can choose to accept the default values, where applicable, for many of the quick
configuration parameters, you can instead specify particular values for one or more of these parameters.
Table 2- 2 lists the parameters you need for quick configuration and provides space for you to record the
values you enter. Write those values here now to save time as you enter data.
Table 2-2 Quick Configuration Parameters
Screen | Parameter Name Parameter Description and Use Your Entry
IP Interfaces | Ethernet 1 (Private) Specify the IP address and subnet mask, speed, and duplex
mode for the VPN Concentrator interface to your private
network.
IP Interfaces | Ethernet 2 (Public) Specifies the IP address and subnet mask, speed, and duplex
mode for the VPN Concentrator interface to the public
network.
IP Interfaces | Ethernet 3 (External) (For models 3015–3080 only) If so connected, specify the IP
address and subnet mask, speed, and duplex mode for the
VPN Concentrator interface to an additional external
network.
System Info | System Name Specify a device or system name for the VPN Concentrator
(for example, VPN01).
System Info | DNS Server Specify the IP address of your local DNS (Domain Name
System) server.
System Info | Domain Specify the registered Internet domain name to use with
DNS (for example, cisco.com).
System Info | Default Gateway Specify the IP address or hostname of the default gateway
for packets not otherwise routed.
Address Assignment | DHCP | Server If you use DHCP (Dynamic Host Configuration Protocol)
for remote address assignment, specify the IP address or
hostname of the DHCP server.
Address Assignment |
Configured Pool |
Range Start and Range End
If you use the VPN Concentrator to assign addresses,
specify the starting and ending IP addresses in its initial
configured pool.
78-14740-01
VPN 3000 Series Concentrator Getting Started
2-13

Chapter 2 Installing and Powering Up the VPN Concentrator
Beginning Quick Configuration
Table 2-2 Quick Configuration Parameters (continued)
Screen | Parameter Name Parameter Description and Use Your Entry
Authentication Your choice here determines the parameters you see in the
following screen. Possible values are:
• Internal Server
–
Choosing Internal Server, means using the internal
VPN Concentrator user authentication server. On
the User Database screen, specify the username and
password for each user.
–
Additionally, if you specify per-user address
assignment, specify the IP address and subnet mask
for each user.
• RADIUS
If you use an external RADIUS user authentication
server, specify its IP address or hostname, port number,
and server secret or password.
User Database | Group Name,
Password, Verify
• NT Domain
If you use an external Windows NT Domain user
authentication server, specify its IP address, port
number, and Primary Domain Controller hostname.
• SDI
If you use an external SDI user authentication server,
specify its IP address and port number.
If you enable the IPSec tunneling protocol, specify a name
and password for the IPSec tunnel group.
2-14
VPN 3000 Series Concentrator Getting Started
78-14740-01

Chapter 2 Installing and Powering Up the VPN Concentrator
Using the Console
You must use the console for the first part of quick configuration—setting the system time and date, and
configuring the private Ethernet interface, as described in the following steps. Then you can use the
HTML-based VPN Concentrator Manager from a browser to complete quick configuration. Refer to the
data you recorded in Table 2-2.
Step 1 You started the terminal emulator window on the console in the “Powering Up” section on page 2-11; if
not, start it now and press
password prompt and other messages as you press
Login: _
Step 2 At the cursor, enter the default login name: admin. At the password prompt, enter the default password:
admin.
Login: admin
Password: admin
Step 3 The system displays the opening message and prompts you to set the time on the VPN Concentrator. The
correct time is very important, so that logging and accounting entries are accurate, and so that the system
can create a valid security certificate. The time in brackets is the current device time.
Welcome to
Cisco Systems
VPN 3000 Concentrator Series
Command Line Interface
Copyright (C) 1998-2001 Cisco Systems, Inc.
Beginning Quick Configuration
Enter on the console keyboard until you see the login prompt. (You may see a
Enter. Ignore them and stop at the login prompt.)
-- : Set the time on your device. ...
> Time
Quick -> [ 15:46:41 ] _
At the cursor, enter the correct device time in the format HH:MM:SS, using 24-hour notation. For
example, enter 4:24 p.m. as 16:24:00.
Step 4 The system prompts you to set the date. The number in brackets is the current device date.
-- : Enter the date ...
> Date
Quick -> [ 03/26/2001 ] _
At the cursor, enter the correct date in the format MM/DD/YYYY. Use four digits to enter the year. For
example, enter June 12, 2000 as 06/12/2001.
78-14740-01
VPN 3000 Series Concentrator Getting Started
2-15

Beginning Quick Configuration
Step 5 The system prompts you to set the time zone. The time zone selections are offsets in hours relative to
GMT (Greenwich Mean Time), which is the basis for Internet time synchronization. The number in
brackets is the current time zone offset.
-- : Set the time zone on your device. ...
-- : Enter the time zone using the hour offset from GMT: ...
> Time Zone
Quick -> [ 0 ] _
At the cursor, enter the time zone offset in the format +/–NN. For example, enter -5 for U.S. Eastern
Standard Time.
Step 6 The system prompts you with a menu to enable DST (Daylight-Saving Time) support. During DST,
clocks are set one hour ahead of standard time. Enabling DST support means that the VPN Concentrator
automatically adjusts the time zone for DST or standard time. If your system is in a time zone that uses
DST, you must enable DST support.
1) Enable Daylight Savings Time Support
2) Disable Daylight Savings Time Support
Chapter 2 Installing and Powering Up the VPN Concentrator
Quick -> [ 2 ] _
At the cursor, enter 2 to disable DST support, or enter 1 to enable DST support.
Step 7 The system prompts you to enter an IP address for Ethernet 1, which is the VPN Concentrator interface
to your private network (internal LAN). Be sure no other device is using this address on your private
network. You must enter this address to continue quick configuration.
This table shows current IP addresses.
Interface IP Address/Subnet Mask MAC Address
--------------------------------------------------------------| Ethernet 1 - Private | 0.0.0.0/0.0.0.0 |
| Ethernet 2 - Public | 0.0.0.0/0.0.0.0 |
| Ethernet 3 - External | 0.0.0.0/0.0.0.0 |
---------------------------------------------------------------
** An address is required for the private interface. **
> Enter IP Address
Quick Ethernet 1 -> [ 0.0.0.0 ] _
At the cursor, enter the IP address using dotted decimal notation; for example, 10.10.4.6.
Note Ethernet 3 appears only on Models 3015 – 3080.
2-16
Step 8 The system initializes its network subsystems, which takes a few seconds. It then prompts you for the
subnet mask for the Ethernet 1 (Private) interface. The entry in brackets is the standard subnet mask for
the IP address you just entered. For example, an IP address of 10.10.4.6 is a Class A address, and the
standard subnet mask is 255.0.0.0.
> Enter Subnet Mask
Quick Ethernet 1 -> [ 255.0.0.0 ] _
At the cursor, enter the subnet mask appropriate for your private network addressing scheme, using
dotted decimal notation; for example, 255.255.0.0. To accept the default, press
VPN 3000 Series Concentrator Getting Started
Enter.
78-14740-01

Chapter 2 Installing and Powering Up the VPN Concentrator
Step 9 The system prompts you with a menu to set the speed for the Ethernet 1 interface. You can let the VPN
Concentrator automatically detect and set the appropriate speed (the default), or you can set fixed speeds
of 10 or 100 Mbps (for 10BASE-T or 100BASE-T networks). If you accept the default, be sure that the
port on the active network device (hub, switch, or router) to which you connect this interface is also set
to automatically negotiate the speed. Otherwise, select the appropriate fixed speed.
1) Ethernet Speed 10 Mbps
2) Ethernet Speed 100 Mbps
3) Ethernet Speed 10/100 Mbps Auto Detect
Quick -> [ 3 ] _
At the cursor, enter the menu number for your selection; for example, 1. To accept the default (3), press
Enter.
Step 10 The system prompts you with a menu to set the transmission mode for the Ethernet 1 interface. You can
let the VPN Concentrator automatically detect and set the appropriate mode (the default), or you can
configure the interface for full duplex (transmission in both directions at the same time) or half duplex
(transmission in only one direction at a time). If you accept the default, be sure that the port on the active
network device (hub, switch, or router) to which you connect this interface is also set to automatically
negotiate the transmission mode. Otherwise, select the appropriate fixed mode.
1) Enter Duplex - Half/Full/Auto
2) Enter Duplex - Full Duplex
3) Enter Duplex - Half Duplex
Beginning Quick Configuration
Quick -> [ 1 ] _
At the cursor, enter the menu number for your selection; for example, 2. To accept the default (1), press
Enter.
Step 11 The system now has enough information so that you can exit the CLI and continue configuring with a
browser. the system displays one of the following menus, depending on the model of the Concentrator
being configured:
Model 3005 menu
1) Modify Ethernet 1 IP Address (Private)
2) Modify Ethernet 2 IP Address (Public)
3) Configure Expansion Cards
4) Save changes to Config file
5) Continue
6) Exit
Quick -> _
Model 3015–3080 menu
1) Modify Ethernet 1 IP Address (Private)
2) Modify Ethernet 2 IP Address (Public)
3) Modify Ethernet 3 IP Address (External)
4) Configure Expansion Cards
5) Save changes to Config file
6) Continue
7) Exit
78-14740-01
Quick -> _
VPN 3000 Series Concentrator Getting Started
2-17

Beginning Quick Configuration
First, we recommend that you save your entries to the configuration file. At the cursor, enter the number
for Save changes to Config file. The system redisplays the same menu.
• For easiest use, we recommend exiting and using the Manager. To do so, enter the number for Exit
• To continue using the CLI for quick configuration, enter the number for Continue at the cursor and
Step 12 We assume you chose Exit. The system displays:
Done
Continue quick configuration with the VPN Concentrator Manager in Chapter 3.
Chapter 2 Installing and Powering Up the VPN Concentrator
at the cursor and continue with the next step.
see Chapter 4.
2-18
VPN 3000 Series Concentrator Getting Started
78-14740-01

CHAPTER
3
Using the VPN Concentrator Manager for Quick Configuration
This chapter tells you how to complete quick configuration of the system using the VPN Concentrator
Manager.
Quick configuration supplies the minimal parameters needed to make the VPN Concentrator operational,
while the Main menu lets you configure all the features of the VPN 3000 Concentrator. For example, a
configured remote user with a PC and modem can use Microsoft PPTP (point-to-point tunneling
protocol) and a local ISP to connect securely—in a VPN tunnel through the Internet—with resources on
a private, internal corporate network.
The VPN Concentrator Manager is an HTML-based configuration, administration, and monitoring
system built into the VPN Concentrator. To use it, you need only to connect to the VPN Concentrator
using a PC and browser on the same private network with the VPN Concentrator.
Before beginning the procedures in this section, you should have completed Steps 1 through 12 under
Using the Console, page 2-15. As you proceed, refer to the data you recorded in the table of Quick
Configuration Parameters, page 2-13.
The figures that follow show only the main frame of the Manager window. To use features in the other
frames, see Understanding the VPN Concentrator Manager Window, page 3-22.
Note You can go through the steps of quick configuration only once, unless you reboot the system with the
Reboot ignoring the configuration file option.
78-14740-01
VPN 3000 Series Concentrator Getting Started
3-1

Chapter 3 Using the VPN Concentrator Manager for Quick Configuration
Logging in to the VPN Concentrator Manager
Logging in to the VPN Concentrator Manager
To access and log in to the VPN Concentrator Manager, follow these steps:
Step 1 Start the browser. See Browser Requirements, page 2-2. We recommend Microsoft Internet Explorer for
best results. Maximize the browser window for easiest reading.
Step 2 With the browser, connect to the IP address of the VPN Concentrator on your private network (the
address you entered in Step 7 under Using the Console, page 2-15). You can just enter the IP address (for
example, 10.10.4.6) in the Address or Location field. The browser displays the login screen.
Figure 3-1 VPN Concentrator Manager Login Screen
3-2
Step 3
Log in. Entries are case-sensitive, so type them exactly as shown. With Microsoft Internet Explorer, you
can press the Tab key to move from field to field; with other browsers, you might have to change fields
with the mouse. If you make a mistake, click Clear and start over.
a. Click in the Login field and type admin. (Do not press Enter.)
b. Click in the Password field and type admin. (The field shows *****.)
c. Click Login.
VPN 3000 Series Concentrator Getting Started
78-14740-01

Chapter 3 Using the VPN Concentrator Manager for Quick Configuration
Starting Quick Configuration
The VPN Concentrator Manager displays the initial configuration screen (see Figure 3-2).
Figure 3-2 VPN Concentrator Manager Initial Configuration Screen
To start quick configuration, click the highlighted link that says click here to start Quick Configuration.
Starting Quick Configuration
Note This screen appears only once—and you can go through the steps of quick configuration only
once—unless you reboot the system with the Reboot ignoring the configuration file option. You cannot
return to this screen if you click the highlighted link that says click here to go to the Main Menu.
Text entries are case-sensitive; for example, admin and ADMIN are different passwords.
After you make an entry in a field, do not press Enter. Just move the cursor from field to field. With
Microsoft Internet Explorer, you can press Tab to move from field to field; other browsers may work
differently.
On any screen where it appears, click Back to return to the previous screen.
Configuration entries take effect as soon as you click Apply or Continue, and they constitute the active
or running configuration. To save the active configuration and make it the boot configuration, click the
Save Needed icon on the Manager toolbar in the top frame of the browser window. To remind you to
save your settings, the icon changes from Save to Save Needed as soon as the active configuration differs
from the boot configuration.
If you make a mistake and see an Error screen with the message, “An error has occurred while attempting
to perform the operation,” and you return to the screen where you were working, carefully check all your
previous entries on that screen. The Manager attempts to retain valid entries, but invalid entries are lost.
See Appendix A, “Troubleshooting and System Errors” for more details.
Caution Do not use the browser navigation toolbar buttons Back, Forward, or Refresh / Reload with the VPN
Concentrator Manager unless instructed to do so. To protect access security, clicking Refresh / Reload
automatically logs out the Manager session. Clicking Back or Forward might display stale Manager
screens with incorrect data or settings. To prevent mistakes while using the VPN Concentrator Manager,
we recommend that you hide the browser navigation toolbar.
78-14740-01
VPN 3000 Series Concentrator Getting Started
3-3

Configuring IP Interfaces
Configuring IP Interfaces
The Manager displays the Configuration | Quick | IP Interfaces screen appropriate to the model you are
configuring.
Figure 3-3 Configuration | Quick | IP Interfaces Screen
Model 3005
Chapter 3 Using the VPN Concentrator Manager for Quick Configuration
Models 3015 through 3080
This screen lets you configure the VPN Concentrator Ethernet interfaces.
3-4
VPN 3000 Series Concentrator Getting Started
78-14740-01

Chapter 3 Using the VPN Concentrator Manager for Quick Configuration
Model 3005 comes with two Ethernet interfaces. Models 3015–3080 come with three Ethernet
interfaces.
• Ethernet 1 (Private) is the interface to your private network (internal LAN).
• Ethernet 2 (Public) is the interface to the public network.
• Ethernet 3 (External), if present, is the interface to an additional LAN.
For the VPN Concentrator to become fully operational, you must configure the two interfaces you
physically connected to your network under Connecting Network Cables, page 2-9.
The screen displays the current configuration settings. You entered the IP address and subnet mask for
Ethernet 1 in Step 7 and Step 8 under Using the Console, page 2-15. We assume that is the interface you
are using to connect to the device and configure it.
Caution If you modify any parameters of the interface that you are currently using to connect to the VPN
Concentrator, you will break the connection, and you will have to restart the Manager and quick
configuration from the login screen.
Step 1 To enter or modify parameters for an interface, click on the interface and continue, using the directions
in the following section.
Configuring IP Interfaces
If you are not modifying an interface, click Continue to proceed, and skip to Configuring Tunneling
Protocols and Options, page 3-10.
78-14740-01
VPN 3000 Series Concentrator Getting Started
3-5

Chapter 3 Using the VPN Concentrator Manager for Quick Configuration
Configuring IP Interfaces
Modifying Ethernet Interface Configuration Parameters
When you click on an Ethernet interface, the Manager displays the Configuration | Quick | IP Interfaces |
Ethernet 1 2 3 screen for the interface you selected (see Figure 3-4).
Figure 3-4 Configuration | Quick | IP Interfaces | Ethernet 1 2 3 Screen
3-6
The screen displays the current parameters, if any, for an Ethernet interface. If you are modifying
Ethernet 1, the Manager also displays a caution message. To configure parameters for an Ethernet
interface, follow these steps:
Step 1 Choose one of the following options:
• If you want to disable this interface, click the Disabled radio button. If disabled, the interface is
offline; this state lets you retain or change its configuration parameters while it is offline.
• If you want to enable this interface and use DHCP to obtain an IP address, click the DHCP Client
radio button.
–
In the System Name field, enter a name (such as VPN01) for the VPN Concentrator. This name
must uniquely identify this device on your network.
• If you want to enable this interface and set a static IP address for it, click the Static IP Addressing
radio button.
–
In the IP Address field, enter the IP address for this interface, using dotted decimal notation (for
example, 192.168.12.34). Be sure no other device is using this address on the network.
VPN 3000 Series Concentrator Getting Started
78-14740-01

Chapter 3 Using the VPN Concentrator Manager for Quick Configuration
–
In the Subnet Mask field, enter the subnet mask for this interface, using dotted decimal notation
(for example, 255.255.255.0). The Manager automatically supplies a standard subnet mask
appropriate for the IP address you just entered. For instance, an IP address of 192.168.12.34 is
a Class C address, and the standard subnet mask is 255.255.255.0. You can accept this entry or
change it.
Step 2 To make this interface a public interface, check the Public Interface check box. A public interface is an
interface to a public network, such as the Internet. You should designate only one VPN Concentrator
interface as a public interface.
Step 3 The MAC Address is the unique hardware MAC (Medium Access Control) address for this interface, in
6-byte hexadecimal notation. The screen shows this address only after you first configure an interface,
and you cannot change it.
Step 4 In the Filter field, click the drop-down menu button and select the filter that applies to this interface. The
filter rules govern the handling of data packets through this interface—whether to forward or drop,
according to configured criteria. You can customize filters under regular system configuration on the
Configuration | Policy Management | Traffic Management screens. Cisco supplies the following default
filters with the VPN Concentrator:
• 1. Private (Default)—Allow all packets except source-routed IP packets. (This is the default filter
for the private Ethernet interface.)
Configuring IP Interfaces
• 2. Public (Default)—Allow inbound and outbound tunneling protocols plus ICMP and VRRP. Allow
fragmented IP packets. Drop everything else, including source-routed packets. (This is the default
filter for the public Ethernet interface.)
• 3. External (Default —No rules applied to this filter. Drop all packets. (This is the default filter for
the external Ethernet interface.)
• None—No filter applied to the interface, which means there are no restrictions on data packets.
Step 5 In the Speed field, click the drop-down menu button and select the interface speed:
• 10 Mbps—Fix the speed at 10 Mbps (10BASE-T networks)
• 100 Mbps—Fix the speed at 100 Mbps per second (100BASE-T networks)
• 10/100 auto—Let the VPN Concentrator automatically detect and set the appropriate speed, either
10 or 100 Mbps (default). If you accept the default, be sure that the port on the active network device
(hub, switch, router, etc.) to which you connect this interface is also set to automatically negotiate
the speed. Otherwise, select the appropriate fixed speed.
Step 6 In the Duplex field, click the drop-down menu button and select one of the following interface
transmission modes:
• Auto—Let the VPN Concentrator automatically detect and set the appropriate transmission mode,
either full or half duplex (default). If you accept the default, be sure that the port on the active
network device (hub, switch, or router) to which you connect this interface is also set to
automatically negotiate the transmission mode. Otherwise, select the appropriate fixed mode.
• Full-Duplex—Fix the transmission mode as full duplex—transmission in both directions at the same
time.
78-14740-01
• Half-Duplex—Fix the transmission mode as half duplex—transmission in only one direction at a
time.
Step 7 In the MTU field, either accept the default value, 1500, as the maximum transmission unit (in bytes) or
specify a value in the range 68 to 1500. The standard MTU for Ethernet is 1500 bytes.
Step 8 Click Apply to apply your choices to the interface. Click Cancel to discard your choices.
VPN 3000 Series Concentrator Getting Started
3-7

Configuring System Information
The Manager returns to the Configuration | Quick | IP Interfaces screen. If you have entered new
parameters for an interface, the screen displays your entries.
Step 9 If you want to modify another Ethernet interface, click on the interface and continue.
If you do not want to modify another interface, click Continue to proceed, and skip to Configuring
System Information, page 3-8.
Configuring System Information
The Manager displays the Configuration | Quick | System Info screen.
Figure 3-5 Configuration | Quick | System Info Screen
Chapter 3 Using the VPN Concentrator Manager for Quick Configuration
3-8
To configure basic information that identifies your VPN Concentrator on the network, refer to the data
you recorded in Table 2-2 as you follow these steps:
Step 1 In the System Name field, enter a name (such as VPN01) for the VPN Concentrator. This name must
uniquely identify this device on your network.
The system name you entered earlier appears in the System Name field. If no system name appears, enter
a name (such as
network.
Step 2 You previously set the time and date on the VPN Concentrator under Using the Console, page 2-15, but
you can change them here if you want. The screen shows the current date and time on the device. The
values shown in the New Time fields are the time on the browser PC, but any entries you make apply to
the VPN Concentrator.
In the appropriate fields, make any changes. The fields are, in order: Hour : Minute : Second Month /
Day / Year Time Zone. Click the drop-down menu buttons to select Month and Time Zone. The time
zone selections are offsets in hours relative to Greenwich Mean Time (GMT), which is the basis for
Internet time synchronization. Enter the Year as a four-digit number.
VPN 3000 Series Concentrator Getting Started
VPN01) for the VPN Concentrator. This name must uniquely identify this device on your
78-14740-01

Chapter 3 Using the VPN Concentrator Manager for Quick Configuration
To Enable DST Support, check the box. During DST (Daylight-Saving Time), clocks are set one hour
ahead of standard time. Enabling DST support means that the VPN Concentrator automatically adjusts
the time zone for DST or standard time. If your system is in a time zone that uses DST, you must enable
DST support.
Step 3 In the DNS Server field, enter the IP address of your local DNS (Domain Name System) server, using
dotted decimal notation (for example, 10.10.0.11).
Specifying a DNS server lets you enter Internet hostnames (for example, mail01) rather than IP
addresses for servers as you configure and manage the VPN Concentrator. While hostnames are easier
to remember, using IP addresses avoids problems that might arise with the DNS server offline,
congested, or similarly indisposed.
Step 4 In the Domain field, enter the registered domain in which the VPN Concentrator is located (for example,
cisco.com), sometimes called the domain name suffix or subdomain.
Step 5 In the Default Gateway field, enter the IP address or hostname of the system to which the VPN
Concentrator should route packets that are not explicitly routed. In other words, if the VPN Concentrator
has no IP routing parameters (such as RIP, OSPF, or static routes) that specify where to send packets, it
will send them to this gateway. (When you first start the VPN Concentrator, it has no IP routing
configuration parameters.) This address must not be the same as the IP address configured on any VPN
Concentrator interface. To specify no default gateway, leave the field at 0.0.0.0, which means the VPN
Concentrator drops unrouted packets.
Configuring System Information
You can configure IP routing with regular system configuration. For RIP and interface-specific OSPF,
see the Configuration | Interfaces screens. For global OSPF and static routes, see the Configuration |
System | IP Routing screens. See the VPN 3000 Series Concentrator Reference Volume I: Configuration
for more information.
Step 6 Click Continue to proceed.
78-14740-01
VPN 3000 Series Concentrator Getting Started
3-9

Chapter 3 Using the VPN Concentrator Manager for Quick Configuration
Configuring Tunneling Protocols and Options
Configuring Tunneling Protocols and Options
The Manager displays the Configuration | Quick | Protocols screen.
Figure 3-6 Configuration | Quick | Protocols Screen
You must enable at least one of these protocols for the device to function as a VPN device. PPTP and
L2TP are popular with Microsoft Windows-based clients, and the VPN 3000 Client uses IPSec. To
enable, disable, and configure virtual private network tunneling protocols and encryption options on the
VPN Concentrator, follow these steps:
Step 1 Check PPTP to enable Point-to-Point Tunneling Protocol. (This box is checked by default.)
Step 2 If you enable PPTP, click one of the radio buttons to select the encryption option:
• Require Encryption—PPTP connections must use Microsoft encryption to encrypt data. This option
requires MS-CHAP (Microsoft Challenge-Handshake Authentication Protocol) and provides
maximum security. During connection setup, clients must agree to use encryption or they will not
be connected.
• Don’t Require Encryption—PPTP connections may use Microsoft encryption to encrypt data (the
default). During connection setup, clients may or may not agree to use Microsoft encryption; they
will be connected in either case.
Step 3 Check L2TP to enable Layer 2 Tunneling Protocol. (This box is checked by default.)
Step 4 If you enable L2TP, click one of the radio buttons to select the encryption option:
• Require Encryption—L2TP connections must use Microsoft encryption to encrypt data. This option
requires MS-CHAP (Microsoft Challenge-Handshake Authentication Protocol) and provides
maximum security. During connection setup, clients must agree to use encryption or they will not
be connected.
• Don’t Require Encryption—L2TP connections may use Microsoft encryption to encrypt data (the
default). During connection setup, clients may or may not agree to use Microsoft encryption; they
will be connected in either case.
Step 5 Check IPSec to enable remote-access user connections using Internet Protocol Security protocol. (This
box is checked by default.) This option supports only remote-access IPSec connections from the VPN
3000 Client or a similar protocol-compliant client. To configure IPSec LAN-to-LAN connections, see
Configuration | System | Tunneling Protocols | IPSec LAN-to-LAN under regular system configuration.
3-10
Step 6 Click Continue to proceed.
VPN 3000 Series Concentrator Getting Started
78-14740-01

Chapter 3 Using the VPN Concentrator Manager for Quick Configuration
If you enable none of the protocols, skip to the section on Changing Admin Password, page 3-18.
If you enable at least one protocol, continue to the next section.
Configuring Address Assignment
The Manager displays the Configuration | Quick | Address Assignment screen. This screen appears only
when you enable at least one tunneling protocol.
Figure 3-7 Configuration | Quick | Address Assignment Screen
Configuring Address Assignment
You can select prioritized methods for assigning IP addresses to clients as a tunnel is established. The
methods are tried in the order listed. You must select at least one method. You can select any and all
methods. There are no default methods.
To select a method, follow these steps.
Step 1 Check Client Specified to enable this method, which lets the client specify its own IP address. Do not
check only this box if you use IPSec, since IPSec does not allow client-specified IP addresses.
Step 2 Check Per User to enable this method, which assigns IP addresses on a per-user basis. If you use an
authentication server that has IP addresses configured, we recommend using this method. You configure
an authentication server on the next screen.
Step 3 Check DHCP (Dynamic Host Configuration Protocol) to enable this method, which uses a DHCP server
to assign IP addresses.
Step 4 If you enable DHCP, enter the DHCP server hostname or IP address in the Specify Server field. (If you
configured a DNS server, you can enter a hostname in this field; otherwise, enter an IP address.)
Step 5 Check Configured Pool to enable this method, which uses the VPN Concentrator to assign IP addresses
from an internally configured pool.
Step 6 If you enable Configured Pool, enter the starting and ending IP addresses available in the initial pool, in
the Range Start and Range End fields. Enter these addresses in dotted decimal notation; for example,
10.10.147.77.
Step 7 Click Continue to proceed.
78-14740-01
VPN 3000 Series Concentrator Getting Started
3-11

Configuring Authentication
Configuring Authentication
The Manager displays the Configuration | Quick | Authentication screen. This screen appears only when
you enable at least one tunneling protocol.
Figure 3-8 Configuration | Quick | Authentication Screen, Internal Server
You can choose how to authenticate users. You can select the VPN Concentrator internal server or one
of three external server types. You must select one server type. You can configure additional
authentication servers on the Configuration | System | Servers | Authentication screen using regular
system configuration.
Chapter 3 Using the VPN Concentrator Manager for Quick Configuration
Click the drop-down menu button and select the Server Type. The screen and its configurable fields
change depending on the Server Type. Choose one of the following:
• Internal Server—The internal VPN Concentrator authentication server. (This is the default
selection.)
• RADIUS—An external Remote Authentication Dial-In User Service server.
• NT Domain—An external Windows NT Domain server.
• SDI—An external RSA Security Inc. SecurID server.
Before you configure an external server here, be sure that the external server you reference is itself
properly configured and that you know how to access it (IP address or hostname, TCP/UDP port,
secret/password, and so forth). The VPN Concentrator functions as the client of these servers.
Find your selected Server Type in the following sections and follow the configuration instructions there.
Internal Server Server Type
The VPN Concentrator internal authentication server lets you enter a maximum of 100 groups and users
(combined) in its database, which is adequate for a small user base. For larger numbers of users, we
recommend using a RADIUS authentication server. See the Configuration | User Management screens
under regular System Configuration.
The internal server has no configurable parameters.
Click Continue to proceed.
3-12
Skip to the section Configuring Internal Server User Database, page 3-16.
VPN 3000 Series Concentrator Getting Started
78-14740-01

Chapter 3 Using the VPN Concentrator Manager for Quick Configuration
RADIUS Server Type
External RADIUS servers can return group and user authentication parameters that match those on the
VPN Concentrator; other authentication servers do not. The VPN 3000 software CD-ROM includes a
trial copy of the CiscoSecure ACS RADIUS authentication server and instructions for using it with the
VPN Concentrator.
Figure 3-9 Configuration | Quick | Authentication Screen, RADIUS Server
Configuring Authentication
We suggest you accept the default values. To configure these parameters for a RADIUS (Remote
Authentication Dial-In User Service) authentication server, follow these steps:
Step 1 In the Authentication Server field, enter the hostname or IP address of the external RADIUS server.
Maximum 32 characters. (If you configured a DNS server, you can enter a hostname in this field;
otherwise, enter an IP address.)
Step 2 In the Server Port field, enter the UDP port number by which you access the server. Enter 0 to have the
system supply the default port number, 1645.
Step 3 In the Timeout field, enter the time in seconds to wait after sending a query to the server and receiving
no response, before trying again. Minimum is 1 second, default is 4 seconds, maximum is 30 seconds.
Step 4 In the Retries field, enter the number of times to retry sending a query to the server after the timeout
period. If there is still no response after this number of retries, the VPN Concentrator declares this server
inoperative. Minimum is 0, default is 2, maximum is 10 retries.
Step 5 In the Server Secret field, enter the RADIUS server secret (also called the shared secret); for example,
C8z077f. The maximum is 64 characters. The field shows only asterisks.
Step 6 In the Verify field, re-enter the RADIUS server secret to verify it. The field shows only asterisks.
Step 7 Click Continue to proceed.
If you selected the IPSec tunneling protocol, skip to the section Configuring the IPSec Group, page 3-17.
Otherwise, skip to the section Changing Admin Password, page 3-18.
78-14740-01
VPN 3000 Series Concentrator Getting Started
3-13

Configuring Authentication
NT Domain Server Type
Configure these parameters for an external Windows NT Domain authentication server. We suggest you
accept the default values. (See Figure 3-10.)
Figure 3-10 Configuration | Quick | Authentication Screen, NT Domain Server
Chapter 3 Using the VPN Concentrator Manager for Quick Configuration
To configure the parameters for the NT authentication server, follow these steps:
Step 1 In the Authentication Server Address field, enter the IP address of the NT Domain authentication server;
for example, 192.168.12.34. Use dotted decimal notation.
Step 2 In the Server Port field, enter the TCP port number by which you access the server. Enter 0 (the default)
to have the system supply the default port number, 139.
Step 3 In the Timeout field, enter the time in seconds to wait after sending a query to the server and receiving
no response, before trying again. The minimum is 1 second, default is 4 seconds, maximum is 30
seconds.
Step 4 In the Retries field, enter the number of times to retry sending a query to the server after the timeout
period. If there is still no response after this number of retries, the VPN Concentrator declares this server
inoperative. The minimum is 0, default is 2, maximum is 10 retries.
Step 5 In the Domain Controller Name field, enter the NT Primary Domain Controller hostname for this server;
for example, PDC01.The maximum is 16 characters. You must enter this name, and it must be the correct
hostname for the server whose IP address you entered in Authentication Server Address above; if it is
incorrect, authentication will fail.
Step 6 Click Continue to proceed.
If you selected the IPSec tunneling protocol, skip to the section Configuring the IPSec Group, page 3-17.
Otherwise, skip to the section Changing Admin Password, page 3-18.
3-14
VPN 3000 Series Concentrator Getting Started
78-14740-01

Chapter 3 Using the VPN Concentrator Manager for Quick Configuration
SDI Server Type
Configure these parameters for an external SDI (RSA Security Inc. SecurID) authentication server. We
suggest you accept the defaults.
Figure 3-11 Configuration | Quick | Authentication Screen, SDI Server
Configuring Authentication
To configure the parameters for the SDI authentication server, follow these steps:
Step 1 In the Authentication Server field, enter the hostname or IP address of the external SDI server. The
maximum is 32 characters. (If you configured a DNS server, you can enter a hostname in this field;
otherwise, enter an IP address.)
Step 2 In the Server Port field, enter the UDP port number by which you access the server. Enter 0 (the default)
to have the system supply the default port number, 5500.
Step 3 In the Timeout field, enter the time in seconds to wait after sending a query to the server and receiving
no response, before trying again. The minimum is 1 second, default is 4 seconds, maximum is 30
seconds.
Step 4 In the Retries field, enter the number of times to retry sending a query to the server after the timeout
period. If there is still no response after this number of retries, the VPN Concentrator declares this server
inoperative. The minimum is 0, default is 2, maximum is 10 retries.
Step 5 Click Continue to proceed.
If you selected the IPSec tunneling protocol, skip to the section Configuring the IPSec Group, page 3-17.
Otherwise, skip to the section Changing Admin Password, page 3-18.
78-14740-01
VPN 3000 Series Concentrator Getting Started
3-15

Chapter 3 Using the VPN Concentrator Manager for Quick Configuration
Configuring Internal Server User Database
Configuring Internal Server User Database
The Manager displays the Configuration | Quick | User Database screen. This screen displays only when
you select the internal authentication server.
Figure 3-12 Configuration | Quick | User Database Screen
This screen lets you add and remove users in the internal authentication server database. When you first
do quick configuration, the Current Users list is empty. To use the internal server, you must add at least
one user to the database. As you add or remove users, the system updates and refreshes the screen with
the appropriate entries in the Current Users list.
You can change user parameters on the regular Configuration | User Management | Users screens, but on
this quick configuration screen, you can only add and remove users. Follow these steps to add or remove
a user:
Step 1 Under User to Add:
a. Type a unique name in the User Name field. Maximum is 32 characters, case-sensitive. To be
authenticated, the user must log in from the client using this name.
b. Move to the Password field and type the password. The password must be at least 8 characters long;
maximum is 32 characters, case-sensitive. The field shows only asterisks. To be authenticated, the
user must log in from the client using this password. Each user name / password combination must
be unique.
c. Move to the Verify field and retype the password. The field shows only asterisks.
d. If you selected per-user address assignment:
• Move to the IP Address field and enter the user IP address in dotted decimal notation; for
example, 10.10.1.35. This is the IP address assigned to this user as a client. This field is not
present if you selected other address assignment methods.
• Move to the Subnet Mask field and enter the user subnet mask in dotted decimal notation; for
example, 255.255.0.0. This is the subnet mask assigned to this user as a client. This field is not
present if you selected other address assignment methods.
3-16
VPN 3000 Series Concentrator Getting Started
78-14740-01

Chapter 3 Using the VPN Concentrator Manager for Quick Configuration
Step 2 Click << Add.
Step 3 Repeat Steps 1 and 2 for each user. The screen refreshes each time you add a user.
Step 4 To remove a user, select the user in the Current Users list and click Remove >>. The screen refreshes
each time you remove a user. There is no confirmation or undo; to reinstate a user, enter the data in
Step 1.
Step 5 When you have finished entering users, click Continue to proceed.
If you selected the IPSec tunneling protocol, proceed to the section “Configuring the IPSec Group”
below. Otherwise, skip to the section Changing Admin Password, page 3-18.
Configuring the IPSec Group
The Manager displays the Configuration | Quick | IPSec Group screen. This screen appears only when
you select the IPSec tunneling protocol, and you must configure these parameters to complete quick
configuration.
Configuring the IPSec Group
The remote-access IPSec client connects to the VPN Concentrator using this group name and password,
which are automatically configured on the internal authentication server. This is the IPSec group that
creates the tunnel. Users then log in, and are authenticated, through their usernames and passwords. (See
Figure 3-13.)
Figure 3-13 Configuration | Quick | IPSec Group Screen
Step 1 In the Group Name field, enter a unique name for this group. The maximum field length is 32 characters.
Entries are case-sensitive.
Step 2 In the Password field, enter a unique password for this group. The minimum field length is 4 characters.
The maximum length is 32 characters. Entries are case-sensitive. The field displays only asterisks.
Step 3 In the Verify field, reenter the group password to verify it. The field displays only asterisks.
78-14740-01
Step 4 Click Continue to proceed. You must configure these parameters before you can proceed.
VPN 3000 Series Concentrator Getting Started
3-17

Changing Admin Password
Changing Admin Password
The Manager displays the Configuration | Quick | Admin Password screen.
Figure 3-14 Configuration | Quick | Admin Password Screen
This screen lets you change the password for the admin administrator user. For ease of use during
startup, the default admin password supplied with the VPN Concentrator is also
user has full access to all management and administration functions on the device, we strongly
recommend you change this password to improve device security. You can further configure all
administrator users on the regular Administration | Access Rights | Administrators Manager screen.
Chapter 3 Using the VPN Concentrator Manager for Quick Configuration
admin. Since the admin
To change the password for the admin administrator user, follow these steps:
Step 1 In the Password field, enter a new password. For maximum security, the password should be at least 8
characters long, a mixture of upper- and lower-case alphabetic and numeric characters, and not easily
guessed; for example, W8j9Haq3. (The field shows only asterisks.)
Step 2 In the Verify field, re-enter the new password to verify it.
Step 3 Click Continue to proceed.
3-18
VPN 3000 Series Concentrator Getting Started
78-14740-01

Chapter 3 Using the VPN Concentrator Manager for Quick Configuration
Finishing Quick Configuration
The Manager displays the Configuration | Quick | Done screen.
Figure 3-15 Configuration | Quick | Done Screen
Finishing Quick Configuration
You have finished quick configuration, and your entries constitute the active or running configuration.
The VPN Concentrator now has enough information, and it is operational. For example, a configured
remote user with a PC and modem can use Microsoft PPTP and a local ISP to connect securely—in a
VPN tunnel through the Internet—with resources on a private, internal corporate network.
We strongly recommend that you save the active configuration before you proceed.
78-14740-01
VPN 3000 Series Concentrator Getting Started
3-19

Saving the Active Configuration
Saving the Active Configuration
As you make configuration entries, they take effect immediately and are included in the active, or
running, configuration. However, if you reboot the VPN Concentrator without saving the active
configuration, any configuration changes are lost.
To remind you to save your settings, the Save icon on the Manager toolbar at the top of the Manager
screen changes to Save Needed as soon as the active configuration differs from the boot configuration.
Click either icon to save the active configuration as the boot configuration. A pop-up window displays
a status message.
Figure 3-16 Save Configuration Window
Chapter 3 Using the VPN Concentrator Manager for Quick Configuration
What Next?
Click OK to close the window. Should you need to restart the VPN Concentrator, it will then boot with
your configured parameters.
We strongly recommend that, as you configure the VPN Concentrator, you make it a habit to click Save
Needed
Now that the VPN Concentrator is operational, you can proceed to the following functions:
whenever you finish setting parameters on a Manager screen.
• Test its operation by following the procedures under Chapter 5, “Testing the VPN Concentrator”.
• Explore the Manager window and other VPN Concentrator functions. See the section “Using Other
VPN Concentrator Manager Functions”.
• Read a more detailed and complete system configuration. See the VPN 3000 Series Concentrator
Reference Volumen I: Configuration for assistance.
3-20
VPN 3000 Series Concentrator Getting Started
78-14740-01

Chapter 3 Using the VPN Concentrator Manager for Quick Configuration
Using Other VPN Concentrator Manager Functions
Using Other VPN Concentrator Manager Functions
To use other VPN Concentrator Manager functions, listed below, click the topic in the left frame of the
Manager window or on the Manager toolbar in the top frame of the Manager window.
• Configuration—Configure all the features of the VPN Concentrator.
• Administration—Control administrative functions of this device.
• Monitoring—View status, statistics, and event logs on this device.
• Save, Save Needed—Save the active configuration and make it the boot configuration.
• Main—Return to the main Manager screen.
• Help—Open another browser window and view online help for the current Manager screen.
• Support—Open a Manager screen with links to Cisco support and documentation resources.
• Logout—Log out of this Manager session and return to the login screen.
For details on the frames, functions, and icons in the Manager window, see the following section,
“Understanding the VPN Concentrator Manager Window”.
For details on the VPN Concentrator hardware, all the functions available in the VPN Concentrator
Manager, or using the CLI, see the VPN 3000 Concentrator Series User Guide.
78-14740-01
VPN 3000 Series Concentrator Getting Started
3-21

Chapter 3 Using the VPN Concentrator Manager for Quick Configuration
Understanding the VPN Concentrator Manager Window
Understanding the VPN Concentrator Manager Window
The VPN Concentrator Manager window on your browser consists of three frames—top, left, and
main—and it provides helpful messages and tips as you move the mouse pointer over window items. The
title bar and status bar also provide useful information.
Figure 3-17 VPN Concentrator Manager Window
Title bar
Top frame
(Manager toolbar)
Left frame
(Table of contents)
Main frame
(Manager screen)
Status bar
Title bar The title bar at the top of the browser window includes the VPN
Concentrator device name or IP address in brackets, for example,
[10.10.4.6].
67623
3-22
Status bar The status bar at the bottom of the browser window displays Manager
activity and explanatory messages for some items.
VPN 3000 Series Concentrator Getting Started
78-14740-01

Chapter 3 Using the VPN Concentrator Manager for Quick Configuration
Mouse pointer and tips As you move the mouse pointer over an active area, the pointer
changes shape and icons change color. A description also appears in
the status bar area. If you momentarily rest the pointer on an icon, a
descriptive tip appears for that icon.
Understanding the VPN Concentrator Manager Window
Top f ram e
(Manager toolbar)
The Manager toolbar in the top frame provides quick access to
Manager features. These include the following icons:
Click on the Main tab to go to the main Manager screen, and to close
all subordinate sections and titles in the left frame.
Click on the Help tab to open context-sensitive online help. Help
opens in a separate browser window that yo can move or resize as you
want. Close the help window when you are finished.
Click on the Support tab to open a Manager screen with links to Cisco
support and documentation resources.
Click on the Logout tab to log out of the Manager and return to the
login screen.
Logged in: [username] The administrator username you used to log in to this Manager session.
Click on the Configuration tab to go to the main Configuration
screen, to open the first level of subordinate Configuration pages in the
left frame if they are not already open, and to close any open
Administration or Monitoring pages in the left frame.
78-14740-01
Click on the Administration tab to go to the main Administration
screen, to open the first level of subordinate Administration pages in
the left frame if they are not already open, and to close any open
Configuration or Monitoring pages in the left frame.
Click on the Monitoring tab to go to the main Monitoring screen, to
open the first level of subordinate Monitoring pages in the left frame
if they are not already open, and to close any open Configuration or
Administration pages in the left frame.
Save Click on the Save icon to save the active configuration and make it the
boot configuration. In this state, the reminder indicates that the active
configuration is the same as the boot configuration, but you can save
it anyway. When you change the configuration, the reminder changes
to Save Needed.
VPN 3000 Series Concentrator Getting Started
3-23

Understanding the VPN Concentrator Manager Window
Save Needed This reminder indicates that yo have changed the active configuration.
Refresh Click on the Refresh icon to refresh (update) the screen contents on
Reset Click on the Reset icon to reset, or start anew, the screen contents on
Restore Click on the Restore icon to restore the screen contents to their status
Chapter 3 Using the VPN Concentrator Manager for Quick Configuration
Click on the Save Needed icon to save the active configuration and
make it the boot configuration. As you make configuration entries,
they take effect immediately and are included in the active, or running,
configuration. However, if you reboot the VPN Concentrator without
saving the active configuration, and configuration changes are lost.
Clicking on this reminder saves the active configuration as the boot
configuration and restores the Save reminder.
screens where it appears (mostly in the Monitoring section). The date
and time above this reminder indicate when the screen was last
updated.
screens where it appears (mostly in the Monitoring section).
prior to when you last clicked the Reset icon.
Click on the Cisco Systems logo to open a browser and go to the
Cisco.com web site, www.cisco.com
Left frame
(Table of Contents)
On Manager screens, the left frame provides a table of contents. The
table of contents uses the familiar Windows Explorer metaphor of
collapsed and expanded entries.
Main section titles
(Configuration,
Click on a title to open subordinate sections and titles, and to go to that
Manager screen in the main frame.
Administration, Monitoring
Closed or collapsed Click on the closed/collapsed icon to open subordinate sections and
titles. Clicking on this icon does not change the screen in the main
frame.
Open or expanded Click on the open/expanded icon to close subordinate sections and
titles. Clicking on this icon does not change the screen in the main
frame.
Main frame
(Manager screen)
The main frame displays the current VPN Concentrator Manager
screen.
3-24
Many screens include a bullet list of links and descriptions of
subordinate sections and titles. you can click on a link to go to that
Manager screen, and open subordinate sections and titles in the table
of contents.
VPN 3000 Series Concentrator Getting Started
78-14740-01

CHAPTER
4
Using the Command-Line Interface for Quick Configuration
This chapter tells you how to complete quick configuration of the system using the VPN 3000 Series
command-line interface (CLI).
Quick configuration supplies the minimal parameters needed to make the VPN Concentrator operational.
For example, a configured remote user with a PC and modem can use Microsoft PPTP and a local ISP
to connect securely—in a VPN tunnel through the Internet—with resources on a private, internal
corporate network.
The CLI is a menu-based configuration, administration, and monitoring system built into the VPN
Concentrator. You can use it from the console or in a Telnet session. To use a Telnet session, connect to
the IP address of the private Ethernet interface.
Before beginning the procedures in this section, you should have completed Steps 1 through 11 in the
“Using the Console” section on page 2-15. As you proceed, refer to the data you recorded in Table 2-2
on page 2-13.
About Quick Configuration
The CLI has the following characteristics:
• These quick configuration menus appear only once—and you can go through the steps of quick
configuration only once—unless you reboot the system with the Reboot with Factory/Default
configuration option.
• Entries are case-sensitive; for example, admin and ADMIN are different passwords.
• The system displays more tips and examples than appear in the dialogue here.
• The system shows current or default entries in brackets; for example, [ 10.10.4.6 ].
• After each entry, press the Enter key on the console keyboard.
• Configuration entries take effect as soon as you enter them, and they constitute the active, or
running, configuration. Many quick configuration menus let you save the active configuration to the
config file, and thus make it the boot configuration. We suggest you do so.
• If you make a mistake, the system displays an Error message and repeats the previous prompt. You
can often enter a correct value and proceed, but in some cases you may need to restart the section to
correct an earlier error. See Appendix A, “Troubleshooting and System Errors” for more details.
78-14740-01
VPN 3000 Series Concentrator Getting Started
4-1

Configuring Ethernet Interfaces
Configuring Ethernet Interfaces
This section describes how to configure the VPN Concentrator Ethernet interfaces.
• Ethernet 1 (Private) is the interface to your private network (internal LAN).
• Ethernet 2 (Public) is the interface to the public network.
• Ethernet 3 (External), if present, is the interface to an additional LAN.
For the VPN Concentrator to become fully operational, you must configure the two interfaces you
physically connected to your network in the “Connecting Network Cables” section on page 2-9.
To configure the VPN Concentrator Ethernet Interfaces, follow these steps:
Step 1 The system prompts you to configure the VPN Concentrator interfaces.
Model 3005 Menu
1) Modify Ethernet 1 IP Address (Private)
2) Modify Ethernet 2 IP Address (Public)
3) Configure Expansion Cards
4) Save changes to Config file
5) Continue
6) Exit
Chapter 4 Using the Command-Line Interface for Quick Configuration
Quick -> _
Model 3015–3080 Menu
1) Modify Ethernet 1 IP Address (Private)
2) Modify Ethernet 2 IP Address (Public)
3) Modify Ethernet 3 IP Address (External)
4) Configure Expansion Cards
5) Save changes to Config file
6) Continue
7) Exit
Quick -> _
You entered values for Ethernet 1 under “Using the Console” section on page 2-15. You can change them
now if you want; to do so, enter 1 at the cursor. To configure another interface, enter its number at the
cursor.
Step 2 We assume you enter 2 to configure Ethernet 2. The CLI displays a table with the current IP addresses
and subnet masks for all three Ethernet interfaces.
This table shows current IP addresses.
Interface IP Address/Subnet Mask MAC Address
----------------------------------------------------------------Ethernet 1 - Private | 10.10.4.6/255.255.0.0 | 00.10.5A.1F.4F.07
Ethernet 2 - Public | 0.0.0.0/0.0.0.0 |
Ethernet 3 - External | 0.0.0.0/0.0.0.0 |
-----------------------------------------------------------------
4-2
> Enter IP Address for Ethernet 2 (Public)
Quick -> [ 0.0.0.0 ]
_
VPN 3000 Series Concentrator Getting Started
78-14740-01

Chapter 4 Using the Command-Line Interface for Quick Configuration
At the cursor, enter the IP address for the VPN Concentrator Ethernet 2 (Public) interface, using dotted
decimal notation; for example, 192.168.12.34. Be sure no other device is using this address on the
network. (Note that Ethernet 3 appears on models 3015-3080 only.)
Step 3 The system prompts you for the subnet mask for the Ethernet 2 (Public) interface. The entry in brackets
is the standard subnet mask for the IP address you entered above. For example, an IP address of
192.168.12.34 is a Class C address, and the standard subnet mask is 255.255.255.0.
> Enter Subnet Mask for Ethernet 2
Quick -> [ 255.255.255.0 ] _
At the cursor, enter the subnet mask for Ethernet 2, using dotted decimal notation; for example,
255.255.255.0. To accept the default, press Enter.
Step 4 The system prompts with a menu to set the speed for the Ethernet 2 interface. You can let the VPN
Concentrator automatically detect and set the appropriate speed (the default), or you can set fixed speeds
of 10 or 100 Mbps per second (for 10BASE-T or 100BASE-T networks). If you accept the default, be
sure that the port on the active network device (hub, switch, or router) to which you connect this interface
is also set to automatically negotiate the speed. Otherwise, select the appropriate fixed speed.
1) Ethernet Speed 10 Mbps
2) Ethernet Speed 100 Mbps
3) Ethernet Speed 10/100 Mbps Auto Detect
Configuring Ethernet Interfaces
Quick -> [ 3 ]
At the cursor, enter the menu number for your selection; for example, 1. To accept the default (3), press
Enter.
Step 5 The system prompts with a menu to set the transmission mode for the Ethernet 2 interface. You can let
the VPN Concentrator automatically detect and set the appropriate mode (the default), or you can
configure the interface for full duplex (transmission in both directions at the same time) or half duplex
(transmission in only one direction at a time). If you accept the default, be sure that the port on the active
network device (hub, switch, or router) to which you connect this interface is also set to automatically
negotiate the transmission mode. Otherwise, select the appropriate fixed mode.
1) Enter Duplex - Half/Full/Auto
2) Enter Duplex - Full Duplex
3) Enter Duplex - Half Duplex
Quick -> [ 1 ] _
At the cursor, enter the menu number for your selection; for example, 2. To accept the default (1), press
Enter.
78-14740-01
VPN 3000 Series Concentrator Getting Started
4-3

Configuring Ethernet Interfaces
Step 6 The system prompts with a menu giving choices for proceeding. You can configure other interfaces, save
your current entries, continue on to other quick configuration parameters, or exit the CLI. We
recommend that you save first.
Model 3005 Menu
1) Modify Ethernet 1 IP Address (Private)
2) Modify Ethernet 2 IP Address (Public)
3) Configure Expansion Cards
4) Save changes to Config file
5) Continue
6) Exit
Quick -> _
Model 3015–3080 Menu
1) Modify Ethernet 1 IP Address (Private)
2) Modify Ethernet 2 IP Address (Public)
3) Modify Ethernet 3 IP Address (External)
4) Configure Expansion Cards
5) Save changes to Config file
6) Continue
7) Exit
Chapter 4 Using the Command-Line Interface for Quick Configuration
Quick -> _
At the cursor, enter the number for Save changes to Config file.
4-4
VPN 3000 Series Concentrator Getting Started
78-14740-01

Chapter 4 Using the Command-Line Interface for Quick Configuration
Configuring System Information
To configure basic information that identifies your VPN Concentrator on the network, follow these steps:
Step 1 The system prompts you to assign a system name to the VPN Concentrator.
-- : Assign a system name to this device.
> System Name
Quick -> _
At the cursor, enter a name such as VPN01. This name must uniquely identify this device on your
network.
Step 2 The system prompts you to specify a local DNS (Domain Name System) server, which lets you enter
Internet hostnames (for example, mail01) rather than IP addresses for servers as you configure and
manage the VPN Concentrator. While hostnames are easier to remember, using IP addresses avoids
problems that might arise with the DNS server offline, congested, or otherwise indisposed.
-- : Specify a local DNS server, ...
Configuring System Information
> DNS Server
Quick -> [ 0.0.0.0 ]
At the cursor, enter the IP address of your local DNS server in dotted decimal notation; for example,
10.10.0.11.
Step 3 The system prompts you to enter the registered Internet domain name in which the VPN Concentrator is
located (sometimes called the domain name suffix or subdomain).
-- : Enter your Internet domain name; ...
> Domain
Quick -> _
At the cursor, enter your domain name; for example, cisco.com.
Step 4 The system prompts you to specify a default gateway, which is the system to which the VPN
Concentrator routes packets that are not explicitly routed. In other words, if the VPN Concentrator has
no IP routing parameters (RIP, OSPF, static routes) that specify where to send packets, it will send them
to this gateway. (And when you first start the VPN Concentrator, it has no IP routing parameters.)
> Default Gateway
Quick -> _
At the cursor, enter the IP address of the default gateway (for example, 10.10.0.1). This address must not
be the same as the IP address configured on any VPN Concentrator interface. To specify no default
gateway—which means the VPN Concentrator drops unrouted packets—leave this entry blank.
78-14740-01
VPN 3000 Series Concentrator Getting Started
4-5

Chapter 4 Using the Command-Line Interface for Quick Configuration
Configuring Tunneling Protocols and Options
Configuring Tunneling Protocols and Options
This section describes how to enable, disable, and configure virtual private network tunneling protocols
and encryption options on the VPN Concentrator. You must enable at least one of the following protocols
for the device to function as a VPN device. The protocol choices are PPTP (Point-to-Point Tunneling
Protocol) and L2TP (Layer 2 Tunneling Protocol), with or without Microsoft encryption required; and
IPSec (IP Security protocol). PPTP and L2TP are popular with Microsoft Windows-based clients, and
the Cisco VPN Client uses IPSec.
To enable, disable, and configure virtual private network tunneling protocols and encryption options on
the VPN Concentrator, follow these steps:
Step 1 The system shows default settings for PPTP and L2TP—both enabled, both with no encryption required.
It then prompts you to enable or disable PPTP.
-- : Configure protocols and encryption options.
-- : This table shows current protocol settings
--------------------------------------------| Enabled | Enabled |
| No Encryption Req | No Encryption Req |
---------------------------------------------
1) Enable PPTP
2) Disable PPTP
Quick -> [ 1 ]
PPTP | L2TP |
At the cursor, enter 2 to disable PPTP, or press Enter to accept the default (1), which enables PPTP.
Step 2 If you enable PPTP, the system prompts you to select the encryption option.
• PPTP Encryption Required—PPTP connections must use Microsoft encryption to encrypt data. This
option requires MS-CHAP (Microsoft Challenge-Handshake Authentication Protocol) and provides
maximum security. During connection setup, clients must agree to use encryption or they will not
be connected.
• No Encryption Required—PPTP connections may use Microsoft encryption to encrypt data. During
connection setup, clients might or might not agree to use Microsoft encryption; they will be
connected in either case.
1) PPTP Encryption Required
2) No Encryption Required
Quick -> [ 2 ]
At the cursor, enter 1 to require encryption, or press Enter to accept the default (2), which does not
require encryption. Accept the default if you disabled PPTP.
4-6
Step 3 The system prompts you to enable or disable L2TP.
1) Enable L2TP
2) Disable L2TP
Quick -> [ 1 ]
At the cursor, enter 2 to disable L2TP, or press Enter to accept the default (1), which enables L2TP.
VPN 3000 Series Concentrator Getting Started
78-14740-01

Chapter 4 Using the Command-Line Interface for Quick Configuration
Step 4 If you enable L2TP, the system prompts you to select the encryption option.
• L2TP Encryption Required—L2TP connections must use Microsoft encryption to encrypt data. This
option requires MS-CHAP (Microsoft Challenge-Handshake Authentication Protocol) and provides
maximum security. During connection setup, clients must agree to use encryption or they will not
be connected.
• No Encryption Required—L2TP connections may use Microsoft encryption to encrypt data. During
connection setup, clients might or might not agree to use Microsoft encryption; they will be
connected in either case.
1) L2TP Encryption Required
2) No Encryption Required
Quick -> [ 2 ] _
At the cursor, enter 1 to require encryption, or press Enter to accept the default (2), which does not
require encryption.
Step 5 The system prompts you to enable or disable IPSec.
1) Enable IPSec
2) Disable IPSec
Configuring Tunneling Protocols and Options
Quick -> [ 1 ] _
At the cursor, enter 2 to disable IPSec, or press Enter to accept the default (1), which enables IPSec.
78-14740-01
VPN 3000 Series Concentrator Getting Started
4-7

Configuring Address Assignment
Configuring Address Assignment
Configuring address assignment applies, and its menus appear, only when you enable at least one
tunneling protocol. If you disabled all protocols, skip to the “Configuring Authentication” section on
page 4-10.
This section lets you configure prioritized methods for assigning IP addresses to clients as a tunnel is
established. The methods are configured, and used, in this order:
• Client specified—the client specifies its own IP address.
• Per user—a server assigns IP addresses on a per-user basis. If you are using an authentication server
that has IP addresses configured, we recommend using this method. (You configure an
authentication server in the next section.)
• DHCP (Dynamic Host Configuration Protocol)—a DHCP server assigns IP addresses.
• Configured pool—the VPN Concentrator assigns IP addresses from an internally configured pool of
addresses.
Yo u must enable at least one method. You can enable any and all methods. By default, no method is
enabled.
Chapter 4 Using the Command-Line Interface for Quick Configuration
To configure address assignment, follow these steps:
Step 1 The system prompts you to enable or disable client-specified address assignment. If you enable IPSec,
do not enable only this method; IPSec does not allow client-specified IP addresses.
-- : Configure address assignment for PPTP, L2TP and IPSec.
1) Enable Client Specified Address Assignment
2) Disable Client Specified Address Assignment
Quick -> [ 2 ]
At the cursor, enter 1 to enable client-specified address assignment, or press Enter to accept the default
(2), disabled.
Step 2 The system prompts you to enable or disable per-user address assignment.
1) Enable Per User Address Assignment
2) Disable Per User Address Assignment
Quick -> [ 2 ] _
At the cursor, enter 1 to enable per-user address assignment, or press Enter to accept the default (2),
disabled.
Step 3 The system prompts you to enable or disable DHCP address assignment.
1) Enable DHCP Address Assignment
2) Disable DHCP Address Assignment
4-8
Quick -> [ 2 ] _
At the cursor, enter 1 to enable DHCP address assignment, or press Enter to accept the default (2),
disabled. If you enable DHCP, continue with the next step. If you disable DHCP, skip the next step.
VPN 3000 Series Concentrator Getting Started
78-14740-01

Chapter 4 Using the Command-Line Interface for Quick Configuration
Step 4 If you enable DHCP address assignment, the system prompts for the server address. If you disable
DHCP, this prompt does not appear.
> DHCP Server
Quick -> _
At the cursor, enter the IP address or hostname of the DHCP server.
Step 5 The system prompts you to enable or disable configured pool address assignment.
1) Enable Configured Pool Address Assignment
2) Disable Configured Pool Address Assignment
Quick -> [ 2 ] _
At the cursor, enter 1 to enable configured pool assignment, or press Enter to accept the default (2),
disabled. If you enable configured pool, continue with the next two steps; otherwise, skip them.
Step 6 If you enable configured pool address assignment, the system prompts for the starting IP address
available in the initial pool.
> Configured Pool Range Start Address
Quick -> _
Configuring Address Assignment
At the cursor, enter the starting IP address available in the initial configured pool. Use dotted decimal
notation; for example, 10.10.1.77.
Step 7 If you enable configured pool address assignment, the system prompts for the ending IP address
available in the initial pool.
> Configured Pool Range End Address
Quick -> [ 0.0.0.0 ] _
At the cursor, enter the ending IP address available in the initial configured pool. Use dotted decimal
notation; for example, 10.10.1.177.
78-14740-01
VPN 3000 Series Concentrator Getting Started
4-9

Configuring Authentication
Configuring Authentication
You can choose and configure one of four types of servers to authenticate users:
• The internal VPN Concentrator authentication server
• An external RADIUS (Remote Authentication Dial-In User Service) server
• An external NT (Windows NT) Domain server
• An external SDI (RSA Security Inc. SecurID) server
You must select one authentication server type; there is no default. You can configure additional
authentication servers on regular Configuration menus.
Before you configure an external server here, be sure that the external server you reference is itself
properly configured and that you know how to access it (IP address or hostname, TCP/UDP port,
secret/password, and so forth.). The VPN Concentrator functions as the client of these servers.
The system prompts you to select an authentication server type.
-- : Specify how to authenticate users.
1) Internal Authentication Server
2) RADIUS Authentication Server
3) NT Domain Authentication Server
4) SDI Authentication Server
5) Continue
Chapter 4 Using the Command-Line Interface for Quick Configuration
Quick -> _
Step 1 At the cursor, enter the menu number for your selection; for example, 1, and skip to the step in the
following section that describes your authentication server selection.
To bypass this step and continue quick configuration, enter 5. If you enabled IPSec tunneling protocol,
skip to the “Configuring the IPSec Group” section on page 4-16; otherwise skip to the “Changing the
Admin Password” section on page 4-17.
4-10
VPN 3000 Series Concentrator Getting Started
78-14740-01

Chapter 4 Using the Command-Line Interface for Quick Configuration
Configuring Internal Authentication Server and User Database
The VPN Concentrator internal authentication server lets you enter a maximum of 100 groups and users
(combined) in its database, which is adequate for a small user base. For larger numbers of users, we
recommend using a RADIUS authentication server.
To use the internal server, you must create a database with at least one user, each with a user name and
password, and—if you specified per-user address assignment—an IP address and subnet mask. To do so,
follow these steps:
Step 1 You selected the VPN concentrator internal authentication server, and the system prompts you to add
users to the internal authentication server database. When you start quick configuration, the user
database is empty.
Current Users
------------------------------------------------------------------------ No Users
-------------------------------------------------------------------------
1) Add a User
2) Delete a User
3) Continue
Configuring Authentication
Quick -> _
At the cursor, enter 1 to add a user.
Step 2 The system prompts you to enter the user name. To be authenticated, the user must log in from the client
using this name.
> User Name
Quick -> _
At the cursor, enter a unique user name; for example, simonz. The maximum is 32 characters,
case-sensitive.
Step 3 The system prompts you to enter the password for this user. To be authenticated, the user must log in
from the client using this password. Each user name and password combination must be unique.
> Password
Quick -> _
At the cursor, enter the user password; for example, 9se7pt14. It must be at least 8 characters long; the
maximum is 32 characters, case-sensitive. The system displays only asterisks.
Step 4 The system prompts you to verify the password for this user.
Verify -> _
At the cursor, re-enter the user password. The system displays only asterisks.
If you specified per-user address assignment, continue with the next two steps. Otherwise, skip them.
78-14740-01
VPN 3000 Series Concentrator Getting Started
4-11

Configuring Authentication
Step 5 If you specified per-user address assignment, the system prompts you to enter the IP address for this user.
This is the IP address assigned to this user as a client.
> User IP Address
Quick -> [ 0.0.0.0 ]
At the cursor, enter the user IP address in dotted decimal notation; for example, 10.10.1.35.
Step 6 If you specified per-user address assignment, the system prompts you to enter the subnet mask for this
user. This is the subnet mask assigned to this user as a client.
> User Subnet Mask
Quick -> [ 0.0.0.0 ]
At the cursor, enter the user subnet mask in dotted decimal notation; for example, 255.255.0.0.
Step 7 The system redisplays the user database with the new user added. You can add more users, delete users,
or continue with quick configuration.
Quick -> [ 0.0.0.0 ] 255.255.0.0
Current Users
------------------------------------------------------------------------| 1. simonz | |
-------------------------------------------------------------------------
1) Add a User
2) Delete a User
3) Continue
Chapter 4 Using the Command-Line Interface for Quick Configuration
Quick -> _
At the cursor, enter the menu number for your selection; for example, 1. To add more users, repeat Step 1
through Step 6 in this section. To delete a user (2), see the next step. To continue (3), skip to the
“Configuring the IPSec Group” section on page 4-16 or the “Changing the Admin Password” section on
page 4-17.
Step 8 If you choose to delete a user from the internal database, the system prompts you to enter the name of
the user to delete.
> User to Delete
Quick -> _
At the cursor, enter the name of the existing user you want to delete; for example, simonz. You must
enter the name exactly as listed in the table. After deleting the user, the system redisplays the user
database as in the previous step, but without the deleted user.
4-12
VPN 3000 Series Concentrator Getting Started
78-14740-01

Chapter 4 Using the Command-Line Interface for Quick Configuration
Configuring RADIUS Authentication Server
External RADIUS servers can return group and user authentication parameters that match those on the
VPN Concentrator; other authentication servers do not. The VPN Concentrator software CD-ROM
includes a trial copy of the CiscoSecure ACS RADIUS authentication server and instructions for using
it with the VPN Concentrator.
To configure an external RADIUS user authentication server, follow these steps to supply the required
server IP address or hostname, server secret, and port number:
Step 1 You selected the external RADIUS authentication server, and the system prompts you to enter its
hostname or IP address.
> RADIUS Server (Name/IP Address)
Quick ->
At the cursor, enter the RADIUS server hostname or IP address; for example, 192.168.56.78. The
maximum length is 32 characters.
Step 2 The system prompts you to enter the RADIUS server secret, also called the shared secret, that allows
access to the server.
> RADIUS Server Secret
Configuring Authentication
Quick -> _
At the cursor, enter the RADIUS server secret; for example, B8y077E. The maximum length is
64 characters. The system displays only asterisks.
Step 3 The system prompts you to reenter the RADIUS server secret to verify it.
Verify -> _
At the cursor, reenter the RADIUS server secret. The system displays only asterisks.
Step 4 The system prompts you to enter the UDP port number by which you access the RADIUS server.
> RADIUS Server Port
Quick -> [ 0 ] _
At the cursor, enter the RADIUS port number; for example, 1645. To have the system supply the default
port number (1645), press Enter to accept 0 (the default).
To continue quick configuration, skip to the “Configuring the IPSec Group” section on page 16 or the
“Changing the Admin Password” section on page 4-17.
78-14740-01
VPN 3000 Series Concentrator Getting Started
4-13

Chapter 4 Using the Command-Line Interface for Quick Configuration
Configuring Authentication
Configuring NT Domain Authentication Server
To configure an external Windows NT Domain user authentication server, follow these steps:
Step 1 You selected the external Windows NT Domain authentication server, and the system prompts you to
enter its IP address.
> NT Domain Server Address
Quick -> _
At the cursor, enter the NT Domain server IP address in dotted decimal notation; for example,
192.168.56.78.
Step 2 The system prompts you to enter the NT Primary Domain Controller hostname for this server. You must
enter this name, and it must be the correct hostname for the server whose IP address you entered in
Step 1; if it is incorrect, authentication will fail.
> Primary Domain Controller
Quick -> _
At the cursor, enter the NT Primary Domain Controller hostname for this server; for example, PDC01.
The maximum length is 16 characters.
Step 3 The system prompts you to enter the TCP port number by which you access the NT Domain server.
> NT Domain Server Port
Quick -> [ 0 ]
At the cursor, enter the NT Domain port number; for example, 139. To have the system supply the default
port number (139), press Enter to accept 0 (the default).
To continue quick configuration, skip to the “Configuring the IPSec Group” section on page 4-16 or the
“Changing the Admin Password” section on page 17.
4-14
VPN 3000 Series Concentrator Getting Started
78-14740-01

Chapter 4 Using the Command-Line Interface for Quick Configuration
Configuring SDI Authentication Server
To configure an external SDI (RSA Security Inc. SecurID) user authentication server, follow these steps:
Step 1 You selected the external SDI authentication server, and the system prompts you to enter its hostname
or IP address.
> SDI Server Name
Quick -> _
At the cursor, enter the SDI server hostname or IP address; for example, 192.168.56.78. The maximum
length is 32 characters.
Step 2 The system prompts you to enter the UDP port number by which you access the SDI server.
> SDI Server Port
Quick -> [ 0 ] _
At the cursor, enter the SDI port number; for example, 5500. To have the system supply the default port
number (5500), press Enter to accept 0 (the default).
Configuring Authentication
To continue quick configuration, proceed to the next section, “Configuring the IPSec Group,” or to the
“Changing the Admin Password” section on page 4-17.
78-14740-01
VPN 3000 Series Concentrator Getting Started
4-15

Configuring the IPSec Group
Configuring the IPSec Group
This section appears only if you enable the IPSec tunneling protocol.
The remote-access IPSec client connects to the VPN Concentrator via this group name and password,
which are automatically configured on the internal authentication server. This is the IPSec group that
creates the tunnel. Users then log in, and are authenticated, by means of their usernames and passwords.
To configure the IPSec group name and password, follow these steps:
Step 1 The system prompts you to enter the IPSec group name.
> IPSec Group Name
Quick -> _
At the cursor, enter a unique name for this group. Maximum is 32 characters, case-sensitive; for example,
Group1.
Step 2 The system prompts you to enter the group password.
> IPSec Group Password
Chapter 4 Using the Command-Line Interface for Quick Configuration
Quick -> _
At the cursor, enter a unique password for this group. The minimum is 4, and the maximum is 32
characters, case-sensitive. The system displays only asterisks.
Step 3 The system prompts you to reenter the group password to verify it.
Verify -> _
At the cursor, reenter the group password. The system displays only asterisks.
4-16
VPN 3000 Series Concentrator Getting Started
78-14740-01

Chapter 4 Using the Command-Line Interface for Quick Configuration
Changing the Admin Password
You can change the password for the admin administrator user. For ease of use during startup, the default
admin password supplied with the VPN Concentrator is also admin. Since the admin user has full access
to all management and administration functions on the device, we strongly recommend you change this
password to improve device security. You can further configure all administrators with the regular
Administration menus.
Step 1 The system prompts you to change the admin password.
-- : We strongly recommend that you change the password ...
> Reset Admin Password
Quick -> [ ***** ] _
At the cursor, enter a new password for admin. Remember that entries are case sensitive. For maximum
security, the password should be at least 8 characters long, a mixture of upper- and lower-case alphabetic
and numeric characters, and not easily guessed; for example, W8j9Haq3. The system displays only
asterisks. To keep the default, press Enter.
Step 2 The system prompts you to re-enter the password to verify it.
Verify -> _
Changing the Admin Password
At the cursor, reenter the new password. The system displays only asterisks. To keep the default, press
Enter.
78-14740-01
VPN 3000 Series Concentrator Getting Started
4-17

Completing Quick Configuration
Completing Quick Configuration
You have finished quick configuration, and your entries constitute the active or running configuration.
The VPN Concentrator now has enough information, and it is operational. For example, a configured
remote user with a PC and modem can use Microsoft PPTP and a local ISP to connect securely—in a
VPN tunnel through the Internet—with resources on a private, internal corporate network.
We strongly recommend that you save the active configuration before you exit. Should you need to restart
the VPN Concentrator, it will then boot with your configured parameters.
Saving the Active Configuration
The system displays the final quick configuration menu.
1) Goto Main Configuration Menu
2) Save changes to Config file
3) Exit
Quick -> 2
Chapter 4 Using the Command-Line Interface for Quick Configuration
At the cursor, enter 2 to save the active configuration in the system config file.
Exiting the CLI
You are now ready to exit the CLI.
Step 1 The system redisplays the final quick configuration menu.
1) Goto Main Configuration Menu
2) Save changes to Config file
3) Exit
Quick -> 3
At the cursor, enter 3 to exit the CLI.
Step 2 The system displays:
Done
If you wish to use the CLI for other functions, enter 1 at the cursor in Step 1 above. For information on
using the CLI, see the VPN 3000 Concentrator Series User Guide.
4-18
VPN 3000 Series Concentrator Getting Started
78-14740-01

Chapter 4 Using the Command-Line Interface for Quick Configuration
What Next?
Now that the VPN Concentrator is operational, you can do the following:
• Test its operation by following the procedures in Chapter 5, “Testing the VPN Concentrator.”
• Explore the command-line interface. The menus follow the same order, and let you perform the same
functions, as the VPN Concentrator Manager. See Appendix A, “Using the Command Line
Interface,” in the VPN 3000 Series Concentrator Reference Volume II: Administration and
Monitoring for explanations of parameters and entries.
• Explore the VPN Concentrator Manager window and other VPN Concentrator functions. See
Chapter 1, “Using the VPN 3000 Concentrator Series Manager,” in the VPN 3000 Series
Concentrator Reference Volume I: Configuration.
• Proceed to a more detailed and complete system configuration. See the VPN 3000 Series
Concentrator Reference Volume I: Configuration.
What Next?
78-14740-01
VPN 3000 Series Concentrator Getting Started
4-19

What Next?
Chapter 4 Using the Command-Line Interface for Quick Configuration
4-20
VPN 3000 Series Concentrator Getting Started
78-14740-01

Testing the VPN Concentrator
You can test the VPN Concentrator by using Microsoft Dial-Up Networking under Windows 95 on a
remote PC with a modem. You can also connect to an ISP and use PPTP to create a VPN tunnel to a
private corporate Windows NT network.
We first describe the necessary VPN Concentrator configuration settings, then the PC settings, and
finally the steps in the test.
Note These instructions in its labs describe a typical installation. Please consult your ISP and your network
system administrator for specific settings and instructions.
VPN Concentrator Configuration Settings
Configure the VPN Concentrator with the following settings:
CHAPTER
5
• Ethernet 2 (Public) interface with appropriate IP address (for example, 192.168.12.34) and default
public filter.
• Appropriate DNS server, domain name, and default gateway.
• PPTP tunneling protocol with encryption required (MSCHAP).
• Address assignment from an appropriate configured pool of IP addresses.
• User authentication from the internal server.
• Client username (for example, simonz) and password (for example, 9se7pt14) added to the internal
server user database.
78-14740-01
VPN 3000 Series Concentrator Getting Started
5-1

Windows 95 PC Client Configuration
Windows 95 PC Client Configuration
Configure the remote Windows 95 PC and modem with the following settings:
• Install and set up Microsoft Dial-Up Networking (DUN) 1.3 according to Microsoft instructions.
(DUN 1.3 is available as a free download from the Microsoft website, www.microsoft.com.
Windows 98 Dial-Up Networking includes the DUN 1.3 functions; an update is not necessary.)
• Configure Dial-Up Networking according to Microsoft instructions.
–
Set up a connection to the Internet through your ISP. Be sure you can use PPP on your ISP
account. Configure this connection to use TCP/IP, and configure appropriate IP address
assignment and name server addresses according to instructions from your ISP.
–
Set up a second connection to the VPN Concentrator using the Microsoft VPN Adapter. Connect
to the IP address on the VPN Concentrator public interface (for example, 192.168.12.34).
Configure Server Types to Log on to network, Enable software compression, and Allow TCP/IP.
Configure TCP/IP Settings with Server assigned IP address, Specify name server addresses, and
Primary WINS IP address (from your network administrator).
• Configure Network Neighborhood > Properties and configure the Client for Microsoft Networks >
Properties > General: check Log on to Windows NT domain, and enter your domain name in
Windows NT domain field (for example, BigCo).
Chapter 5 Testing the VPN Concentrator
5-2
VPN 3000 Series Concentrator Getting Started
78-14740-01

Chapter 5 Testing the VPN Concentrator
Testing the VPN Connection
Now make the network connections and examine their status. To verify that you are connected to the
private corporate network, follow these steps:
Step 1 Use the ISP connection in Dial-Up Networking and connect to your ISP with a PPP connection.
Step 2 Use the VPN connection in Dial-Up Networking and connect to the VPN Concentrator with your
username (for example, simonz) and password (for example, 9se7pt14).
Step 3 When the NT Domain login window appears, enter your NT username, password, and domain (for
example, BigCo).
Step 4 Examine the status of your ISP connection. You should see a window similar to Figure 5-1:
Figure 5-1 Connected to ISP Screen
Testing the VPN Connection
Step 5 Examine the status of your VPN connection. You should a window similar to Figure 5-2:
Figure 5-2 Connected to VPN Screen
Step 6
Use Windows Explorer to open Network Neighborhood. You should see and be able to access network
nodes, folders, and files as if you were in the office and using Explorer on your usual system.
78-14740-01
VPN 3000 Series Concentrator Getting Started
5-3

Testing the VPN Connection
Chapter 5 Testing the VPN Concentrator
5-4
VPN 3000 Series Concentrator Getting Started
78-14740-01

Troubleshooting and System Errors
Appendix A describes common errors that can occur while configuring and using the system, and how
to correct them. It also describes LED indicators on the system and its expansion modules.
Files for Troubleshooting
The VPN 3000 Concentrator creates several files that you can examine and that can assist Cisco support
engineers when troubleshooting errors and problems:
• Event log
• SAVELOG.TXT—Event log that is automatically saved when the system crashes and when it is
rebooted
• CRSHDUMP.TXT—Internal system data file that is written when the system crashes
• CONFIG, CONFIG.BAK—Normal configuration file used to boot the system, and backup
configuration file
APPENDIX
A
Event Logs
The VPN Concentrator records system events in the event log, which is stored in nonvolatile memory
(NVRAM). To troubleshoot operational problems, we recommend that you start by examining the event
log. See Configuration | System | Events and Monitor | Event Log.
The VPN Concentrator automatically saves the event log to a file in flash memory if it crashes, and when
it is rebooted. This log file is named SAVELOG.TXT, and it overwrites any existing file with that name.
The SAVELOG.TXT file is useful for debugging. See Configuration | System | Events and
Administration | File Management | Files.
Crash Dump File
If the VPN Concentrator crashes during operation, it saves internal system data in nonvolatile memory
(NVRAM), and then automatically writes this data to a CRSHDUMP.TXT file in flash memory when it
is rebooted. This file contains the crash date and time, software version, tasks, stack, registers, memory,
buffers, and timers., which are helpful to Cisco support engineers. In case of a crash, we ask that you
send this file when you contact Technical Assistance Center (TAC) for assistance. See Administration |
File Management | Files for information on managing files in flash memory.
78-14740-01
VPN 3000 Series Concentrator Getting Started
A-1

VPN Concentrator Manager Errors
Configuration Files
The VPN Concentrator saves the current boot configuration file (CONFIG) and its predecessor
(CONFIG.BAK) as files in flash memory. These files may be useful for troubleshooting. See
Administration | File Management | Files for information on managing files in flash memory.
VPN Concentrator Manager Errors
Table A-1 lists errors that might occur while using the HTML-based VPN Concentrator Manager with a
browser.
Table A-1 VPN Concentrator Manager Errors
Symptom Problem Possible Cause Solution
Browser Refresh or
Reload Button Logs Out
the Manager.
Browser Back or
Forward Button
displays an Incorrect
Screen or Incorrect
Data.
The Manager displays
the Invalid Login or
Session Timeout screen.
You clicked the Refresh
or Reload button on the
browser navigation
toolbar, and the
Manager logged out.
The main login screen
appears.
You clicked the Back or
Forward button on the
browser navigation
toolbar, and the
Manager displayed the
wrong screen or
incorrect data.
You entered an invalid
administrator login
name and password
combination.
To protect access
security, clicking
Refresh / Reload on the
browser toolbar
automatically logs out
the Manager session.
To protect security and
the integrity of data
entries, clicking Back
or Forward on the
browser toolbar deletes
pointers and values
within the Manager.
• Typing error
• Invalid
(unrecognized)
login name or
password.
Do not use the browser navigation toolbar
buttons with the VPN Concentrator Manager.
Use only the Manager Refresh button where it
appears on a screen.
We recommend that you hide the browser
navigation toolbar to prevent mistakes.
Do not use the browser navigation toolbar
buttons with the VPN Concentrator Manager.
Navigate using the location bar at the top of the
Manager window, the table of contents in the
left frame, or links on Manager screens.
We recommend that you hide the browser
navigation toolbar to prevent mistakes.
Reenter the login name and password and click
Login. Use a valid login name and password.
type carefully.
Appendix A Troubleshooting and System Errors
A-2
VPN 3000 Series Concentrator Getting Started
78-14740-01

Appendix A Troubleshooting and System Errors
Table A-1 VPN Concentrator Manager Errors (continued)
Symptom Problem Possible Cause Solution
The Manager displays
the Invalid Login or
Session Timeout screen.
The Manager session
has been idle longer
than the configured
timeout interval.
• No activity for
(interval) seconds.
The Manager resets
the inactivity timer
only when you
click an action
button (such as
Apply, Add, or
Cancel) or a link on
a screen—that is,
when you invoke a
different screen.
Entering values or
setting parameters
on a given screen
does not reset the
timer.
• Default timeout
interval is 600
seconds (10
minutes).
On the Administration | Access Rights | Access
Settings screen, change the Session Timeout
interval to a larger value and click Apply.
VPN Concentrator Manager Errors
The Manager displays a
screen with the
message, “Error/ An
error has occurred while
attempting to perform
the operation. An
additional error
message describes the
erroneous operation.
The Manager displays a
screen with the
message, “You are using
an old browser or have
disabled JavaScript...”
You tried to perform
some operation that is
not allowed.
The VPN Concentrator
Manager cannot work
with the browser that
you have invoked.
• Timeout interval set
too low for normal
use.
The screen displays a
message that describes
the cause.
• You are using the
Manager with an
unsupported
browser.
• You are using the
Manager with an
obsolete browser.
• You are using a
browser that does
not have JavaScript
enabled.
Click Retry the operation to return to the
screen where you were working and correct the
mistake. Carefully check all your previous
entries on that screen. The Manager attempts to
retain valid entries, but invalid entries are lost.
Click Go to main menu to go to the main
Manager screen.
Use Microsoft Internet Explorer version 4.0 or
higher.
Use Netscape Navigator version 4.5 or higher.
Be sure JavaScript is enabled in the browser.
(See the “Browser Requirements” section on
page 2-2 of this manual.)
78-14740-01
VPN 3000 Series Concentrator Getting Started
A-3

VPN Concentrator Manager Errors
Table A-1 VPN Concentrator Manager Errors (continued)
Symptom Problem Possible Cause Solution
The Manager displays a
screen with the
message, “Not
Allowed/You do not
have sufficient
authorization to access
the specified page.”
The Manager displays a
screen with the
message, “Not Found /
An error has occurred
while attempting to
access the specified
page.” The screen
includes additional
information that
identifies system
activity and parameters.
Microsoft Internet
Explorer displays a
Script Error dialog box
that includes the error
message, “No such
interface supported.”
You tried to access an
area of the Manager that
you do not have
authorization to access.
The Manager could not
find a screen.
While using a Manager
function that opens
another browser
window (such as Save
Needed, Help, or
Software Update),
Internet Explorer
cannot open the window
and displays the error
dialog box.
• You logged in using
an administrator
login name that has
limited privileges.
• You logged in from
a workstation that
has limited access
privileges.
• You updated the
software image and
did not clear the
browser’s cache.
• There is an internal
Manager error.
A bug in the Internet
Explorer JavaScript
interpreter.
Log in using the system administrator login
name and password. (Defaults are
admin/admin.)
Log in from a workstation with greater access
privileges.
Have the system administrator change your
privileges on the Administration |
Access Rights | Administrators screen.
Have the system administrator change the
privileges of your workstation on the
Administration | Access Rights |
Access Control List screen.
Clear the browser cache: delete its temporary
internet files, history files, and location bar
references. Then try again.
Please note the system information on the
screen and contact TAC for assistance.
1. Click No on the error dialog box.
2. Log out of the Manager.
3. Close Internet Explorer.
4. Reinstall Internet Explorer.
Appendix A Troubleshooting and System Errors
A-4
VPN 3000 Series Concentrator Getting Started
78-14740-01

Appendix A Troubleshooting and System Errors
Command-line Interface Errors
Table A-2 lists errors that might occur while using the menu-based Command-line Interface from a
console or Telnet session.
Table A-2 VPN 3000 Concentrator Command-Line Interface Errors
Console Message Problem Possible Cause Solution
ERROR:-- Bad IP
Address/Subnet
Mask/Wildcard
Mask/Area ID.
The system expected a
valid 4-byte dotted
decimal entry, and the
entry wasn’t in that
format.
• Yo u e n t e r e d
something other
than a 4-byte dotted
decimal number.
You might have
omitted a byte
position, or entered
a number greater
than 255 in a byte
position.
At the prompt, reenter a valid 4-byte dotted
decimal number.
Command-line Interface Errors
ERROR:-- Out of
Range Value Entered.
Try Again.
ERROR:-- The
Passwords Do Not
Match. Please Try
Again.
The system expected a
number within a certain
range, and the entry was
outside that range.
The entry for a
password and the entry
to verify the password
do not match.
• Yo u e n t e r e d
0.0.0.0 instead of
an appropriate
address.
• You entered a letter
instead of a
number.
• Yo u e n t e r e d a
number greater than
the possible menu
numbers.
• You mistyped an
entry.
• You entered either a
password or verify
entry, but not the
other.
At the prompt, reenter a number in the
appropriate range.
At the Verify prompt, re-enter the password. If
the original password is incorrect, press Enter
and re-enter both the password and the
verification at the prompts.
78-14740-01
VPN 3000 Series Concentrator Getting Started
A-5

LED Indicators
LED Indicators
LED indicators on the VPN Concentrator and its expansion modules are normally green. The usage
gauge LEDs are normally blue. LEDs that are amber or off might indicate an error condition. NA means
not applicable; that is, the LED does not have that state.
Contact TAC if any LED indicates an error condition.
VPN Concentrator (front) LEDs
The LEDs on the front of the VPN 3000 Concentrator are as follows:
LED Indicator Green Amber Off
System Power on. Normal
The LEDs below exist only on Models 3015–3080
Ethernet Link Status
1 2 3
Expansion Modules
Insertion Status
1 2 3 4
Expansion Modules
Run Status
1 2 3 4
Fan Status Operating normally. Not running or RPM
Power Supplies
A B
CPU Utilization This statistic selected
Active Sessions This statistic selected
Throughput This statistic selected
Blinking Green (Model
3005 only)—System is
in a shutdown (halted)
state, ready to power
off.
Connected to network
and enabled.
Blinking
Green—Connected to
network and
configured, but
disabled.
SEP module installed in
system.
SEP module
operational.
Installed and operating
normally.
for usage gauge display.
for usage gauge display.
for usage gauge display.
Appendix A Troubleshooting and System Errors
System has crashed and
halted. Error.
NA Not connected to
NA Module not installed in
Module failed during
operation. Error.
below normal range.
Error.
Voltage(s) outside of
normal ranges. Error.
NA Not selected.
NA Not selected.
NA Not selected.
Power off. (All other
LEDs are also off.)
network or not enabled.
system.
If installed, module
failed diagnostics or
encryption code is not
running. Error.
NA
Not installed.
A-6
VPN 3000 Series Concentrator Getting Started
78-14740-01

Appendix A Troubleshooting and System Errors
Usage Gauge LEDs
(Models 3015–3080 only) Steady or Intermittent Blue Blinking Blue
Left to right sequential
segments, varying number
All 10 segments NA VPN Concentrator is in a
VPN Concentrator Rear LEDs
The LEDs on the rear of the VPN 3000 Concentrator are as follows:
LED Indicator Green Amber Off
Private / Public / External
Ethernet Interfaces
(connected to network)
Link Carrier detected.
Tx Transmitting data.
Coll NA Data collisions
100 Speed set at
Normal operation. NA
NA No carrier detected.
Normal.
NA Not transmitting data.
Normal. Intermittent
on.
detected.
NA Speed set at
100 Mbps.
LED Indicators
shutdown (halted) state, ready to
power off.
Error.
Idle. Intermittent off.
No collisions. Normal.
10 Mbps.
SEP Module LEDs
SEP (Scalable Encryption Processing) module LEDs are present only on models 3015 through 3080 and
are visible from the rear of the VPN Concentrator.
SEP Module LED Green Amber Off
Power Power on. Normal. NA Power is not reaching
Status Encryption code is
78-14740-01
running. Normal.
the module. It might not
be seated correctly.
Error.
Module failed during
operation. Error.
VPN 3000 Series Concentrator Getting Started
Module failed
diagnostics or
encryption code is not
running. Error.
A-7

LED Indicators
Appendix A Troubleshooting and System Errors
A-8
VPN 3000 Series Concentrator Getting Started
78-14740-01

APPENDIX
Copyrights, Licenses, and Notices
Software License Agreement of Cisco Systems, Inc.
CISCO SYSTEMS, INC. IS WILLING TO LICENSE TO YOU THE SOFTWARE CONTAINED IN
THE ACCOMPANYING CISCO PRODUCT ONLY IF YOU ACCEPT ALL OF THE TERMS AND
CONDITIONS IN THIS LICENSE AGREEMENT. PLEASE READ THIS AGREEMENT
CAREFULLY BEFORE YOU OPEN THE PACKAGE BECAUSE, BY OPENING THE SEALED
PACKAGE, YOU ARE AGREEING TO BE BOUND BY THE TERMS AND CONDITIONS OF THIS
AGREEMENT. IF YOU DO NOT AGREE TO THESE TERMS AND CONDITIONS, CISCO
SYSTEMS WILL NOT LICENSE THIS SOFTWARE TO YOU. IN THAT CASE YOU SHOULD
RETURN THE PRODUCT PROMPTLY, INCLUDING THE PACKAGING, THE UNOPENED
PACKAGE, ALL ACCOMPANYING HARDWARE, AND ALL WRITTEN MATERIALS, TO THE
PLACE OF PURCHASE FOR A FULL REFUND.
B
Ownership of the Software
1. The software contained in the accompanying Cisco product (“the Software”) and any accompanying
written materials are owned or licensed by Cisco Systems and are protected by United States copyright
laws, laws of other nations, and/or international treaties.
Grant of License
2. Cisco Systems hereby grants to you the right to use the Software with the Cisco VPN 3000
Concentrator product. To this end, the Software contains both operator software for use by the network
administrator and client software for use by clients at remote network nodes. You may transfer the client
software, or portions thereof, only to prospective nodes on the network, and to no one else. You may not
transfer the operator software.
Restrictions on Use and Transfer
3. You may not otherwise copy the Software, except that you may make one copy of the Software solely
for backup or archival purposes. To this end, you may transfer the Software to a single disk provided you
keep the disk solely for backup or archival purposes. You may not copy the written materials and you
may not use the backup or archival copy of the Software except in conjunction with the accompanying
Cisco product.
78-14740-01
VPN 3000 Series Concentrator Getting Started
B-1

Software License Agreement of Cisco Systems, Inc.
4. You may permanently transfer the Software and accompanying written materials (including the most
recent update and all prior versions) only in conjunction with a transfer of the entire Cisco product, and
only if you retain no copies and the transferee agrees to be bound by the terms of this Agreement. Any
transfer terminates your license. You may not rent or lease the Software or otherwise transfer or assign
the right to use the Software, except as stated in this paragraph.
5. You may not export the Software, even as part of the Cisco product, to any country for which the
United States requires any export license or other governmental approval at the time of export without
first obtaining the requisite license and/or approval. Furthermore, you may not export the Software, even
as part of the Cisco product, in violation of any export control laws of the United States or any other
country.
6. You may not modify, translate, decompile, disassemble, use for any competitive analysis, reverse
engineer, distribute, or create derivative works from, the Software or accompanying documentation or
any copy thereof, in whole or in part.
7. The subject license will terminate immediately if you do not comply with any and all of the terms and
conditions set forth herein. Upon termination for any reason, you (the licensee) must immediately
destroy, or return to Cisco Systems, the Software and accompanying documentation and all copies
thereof. Cisco Systems is not liable to you for damages in any form solely by reason of termination of
this license.
8. You may not remove or alter any copyright, trade secret, patent, trademark, trade name, logo, product
designation or other proprietary and/or other legal notices contained in or on the Software and
accompanying documentation. These legal notices must be retained on any copies of the Software and
accompanying documentation made pursuant to paragraphs 2 and 3 hereof.
Appendix B Copyrights, Licenses, and Notices
9. You shall acquire no rights of any kind to any copyright, trade secret, patent, trademark, trade name,
logo, or product designation contained in, or relating to, the Software or accompanying documentation
and shall not make use thereof except as expressly authorized herein or otherwise authorized in writing
by Cisco Systems.
10. Any notice, demand, or request with respect to this Agreement shall be in writing and shall be
effective only if it is delivered by hand or mailed, certified or registered mail, postage prepaid, return
receipt requested, addressed to Cisco Systems, whose address is set forth below. Such communications
shall be effective when they are received by Cisco Systems.
Limited Warranty
11. Cisco Systems warrants that the Software will perform substantially in accordance with the
accompanying written materials for a period of 90 days from the date of your receipt of the Software.
Any implied warranties on the Software are limited to 90 days. Some states do not allow limitations on
duration of an implied warranty, so the above limitation may not apply to you.
12. CISCO SYSTEMS DISCLAIMS ALL OTHER WARRANTIES, EITHER EXPRESS OR IMPLIED,
INCLUDING, BUT NOT LIMITED TO, IMPLIED WARRANTIES OF MERCHANTABILITY,
FITNESS FOR A PARTICULAR PURPOSE, AND NON-INFRINGEMENT, WITH RESPECT TO THE
SOFTWARE, THE ACCOMPANYING WRITTEN MATERIALS, AND THE ACCOMPANYING
HARDWARE. This limited warranty gives you specific legal rights. You may have others, which vary
from state to state.
13. CISCO SYSTEMS' ENTIRE LIABILITY AND YOUR EXCLUSIVE REMEDY SHALL BE, AT
CISCO SYSTEMS' CHOICE, EITHER (A) RETURN OF THE PRICE PAID OR (B) REPLACEMENT
OF THE SOFTWARE THAT DOES NOT MEET CISCO SYSTEMS' LIMITED WARRANTY AND
B-2
VPN 3000 Series Concentrator Getting Started
78-14740-01

Appendix B Copyrights, Licenses, and Notices
WHICH IS RETURNED TO CISCO SYSTEMS TOGETHER WITH A COPY OF YOUR RECEIPT.
Any replacement Software will be warranted for the remainder of the original warranty period or 30
days, whichever is longer. These remedies are not available outside the United States of America.
14. This Limited Warranty is void if failure of the Software has resulted from modification, accident,
abuse, or misapplication.
15. IN NO EVENT WILL CISCO SYSTEMS BE LIABLE TO YOU FOR DAMAGES, INCLUDING
ANY LOSS OF PROFITS, LOST SAVINGS, OR OTHER INCIDENTAL OR CONSEQUENTIAL
DAMAGES ARISING OUT OF YOUR USE OR INABILITY TO USE THE SOFTWARE. Because
some states do not allow the exclusion or limitation of liability for consequential or incidental damages,
the above limitation may not apply to you.
16. This Agreement is governed by the laws of the State of Massachusetts.
17. If you have any questions concerning this Agreement or wish to contact Cisco Systems for any
reason, please call (508) 541-7300, or write to
Cisco Systems, Inc.
124 Grove Street, Suite 205
Franklin, Massachusetts 02038.
18. U.S. Government Restricted Rights. The Software and accompanying documentation are provided
with Restricted Rights. Use, duplication, or disclosure by the Government is subject to restrictions set
forth in subparagraph (c)(1) of The Rights in Technical Data and Computer Software clause at DFARS
252.227-7013 or subparagraphs (c)(1)(ii) and (2) of Commercial Computer Software - Restricted Rights
at 48 CFR 52.227-19, as applicable. Supplier is Cisco Systems, Inc., 124 Grove Street, Suite 205,
Franklin, Massachusetts 02038.
19. This Agreement constitutes the entire agreement between Cisco Systems and the licensee. There are
no understandings, agreements, representations, or warranties, expressed or implied, not specified herein
regarding this Agreement or the Software licensed hereunder. Only the terms and conditions contained
in this Agreement shall govern the transaction contemplated hereunder, notwithstanding any additional,
different, or conflicting terms which may be contained in any purchase order or other documents
pertaining to the subject transaction.
Other Licenses
Other Licenses
The VPN 3000 Concentrator Series contains and uses software from other firms, under license. Relevant
copyright and license notices follow.
BSD Software
Copyright © 1990, 1993
The Regents of the University of California. All rights reserved.
Redistribution and use in source and binary forms, with or without modification, are permitted provided
that the following conditions are met:
1. Redistributions of source code must retain the above copyright notice, this list of conditions and the
following disclaimer.
2. Redistributions in binary form must reproduce the above copyright notice, this list of conditions and
the following disclaimer in the documentation and/or other materials provided with the distribution.
78-14740-01
VPN 3000 Series Concentrator Getting Started
B-3

Other Licenses
Appendix B Copyrights, Licenses, and Notices
3. All advertising materials mentioning features or use of this software must display the following
acknowledgement:
This product includes software developed by the University of California, Berkeley and its contributors.
4. Neither the name of the University nor the names of its contributors may be used to endorse or promote
products derived from this software without specific prior written permission.
THIS SOFTWARE IS PROVIDED BY THE REGENTS AND CONTRIBUTORS “AS IS” AND ANY
EXPRESS OR IMPLIED WARRANTIES, INCLUDING, BUT NOT LIMITED TO, THE IMPLIED
WARRANTIES OF MERCHANTABILITY AND FITNESS FOR A PARTICULAR PURPOSE ARE
DISCLAIMED. IN NO EVENT SHALL THE REGENTS OR CONTRIBUTORS BE LIABLE FOR
ANY DIRECT, INDIRECT, INCIDENTAL, SPECIAL, EXEMPLARY, OR CONSEQUENTIAL
DAMAGES (INCLUDING, BUT NOT LIMITED TO, PROCUREMENT OF SUBSTITUTE GOODS
OR SERVICES; LOSS OF USE, DATA, OR PROFITS; OR BUSINESS INTERRUPTION) HOWEVER
CAUSED AND ON ANY THEORY OF LIABILITY, WHETHER IN CONTRACT, STRICT
LIABILITY, OR TORT (INCLUDING NEGLIGENCE OR OTHERWISE) ARISING IN ANY WAY
OUT OF THE USE OF THIS SOFTWARE, EVEN IF ADVISED OF THE POSSIBILITY OF SUCH
DAMAGE.
DHCP Client
Copyright © 1995, 1996, 1997 The Internet Software Consortium.
All rights reserved.
Redistribution and use in source and binary forms, with or without modification, are permitted provided
that the following conditions are met:
1. Redistributions of source code must retain the above copyright notice, this list of conditions and the
following disclaimer.
2. Redistributions in binary form must reproduce the above copyright notice, this list of conditions and
the following disclaimer in the documentation and/or other materials provided with the distribution.
3. Neither the name of The Internet Software Consortium nor the names of its contributors may be used
to endorse or promote products derived from this software without specific prior written permission.
THIS SOFTWARE IS PROVIDED BY THE INTERNET SOFTWARE CONSORTIUM AND
CONTRIBUTORS “AS IS” AND ANY EXPRESS OR IMPLIED WARRANTIES, INCLUDING, BUT
NOT LIMITED TO, THE IMPLIED WARRANTIES OF MERCHANTABILITY AND FITNESS FOR
A PARTICULAR PURPOSE ARE DISCLAIMED. IN NO EVENT SHALL THE INTERNET
SOFTWARE CONSORTIUM OR CONTRIBUTORS BE LIABLE FOR ANY DIRECT, INDIRECT,
INCIDENTAL, SPECIAL, EXEMPLARY, OR CONSEQUENTIAL DAMAGES (INCLUDING, BUT
NOT LIMITED TO, PROCUREMENT OF SUBSTITUTE GOODS OR SERVICES; LOSS OF USE,
DATA, OR PROFITS; OR BUSINESS INTERRUPTION) HOWEVER CAUSED AND ON ANY
THEORY OF LIABILITY, WHETHER IN CONTRACT, STRICT LIABILITY, OR TORT
(INCLUDING NEGLIGENCE OR OTHERWISE) ARISING IN ANY WAY OUT OF THE USE OF
THIS SOFTWARE, EVEN IF ADVISED OF THE POSSIBILITY OF SUCH DAMAGE.
DNS Resolver (Client)
DNS Resolver / BSD / DEC / Internet Software Consortium
Copyright © 1988, 1993
The Regents of the University of California. All rights reserved.
VPN 3000 Series Concentrator Getting Started
B-4
78-14740-01
 Loading...