

Page 1
Cisco SPA-500 Series User’s Guide
V1.2
10/07/2013
Page 2

Contents
Cisco SPA-500 Series Overview ..................................................................................................................... 3
Using the Call Features of the Cisco SPA-500 Series ..................................................................................... 4
Placing a Call ............................................................................................................................................. 4
Answering a Call ........................................................................................................................................ 4
Ending a Call .............................................................................................................................................. 4
Do Not Disturb .......................................................................................................................................... 4
Call Forwarding ......................................................................................................................................... 4
Blind Transferring ...................................................................................................................................... 4
Warm Transferring .................................................................................................................................... 4
Placing a Call on Hold ................................................................................................................................ 5
Placing a Conference Call .......................................................................................................................... 5
Conferencing a Held Call with an Active Call ............................................................................................ 5
Softkey Button Quick Reference ................................................................................................................... 6
Using the Voice Mail Features of the Cisco SPA-500 Series.......................................................................... 7
Accessing Voice Mail ................................................................................................................................. 7
Recording Your Message........................................................................................................................... 7
Fast-Forwarding or Rewinding Messages ................................................................................................. 7
Voice Mail Prompt Menu .......................................................................................................................... 7
Accessing Voice Mail from Another Location ........................................................................................... 7
Technical Support ......................................................................................................................................... 8
How to Contact Us .................................................................................................................................... 8
9-1-1 – Emergency Access .......................................................................................................................... 9
vTone/PBX VoIP 9-1-1 Service Limitations ................................................................................................ 9
Limitation of Liability ................................................................................................................................ 9
User tips to remember when placing a 9-1-1 call from a vTone phone line: ........................................... 9
Page 2
Page 3
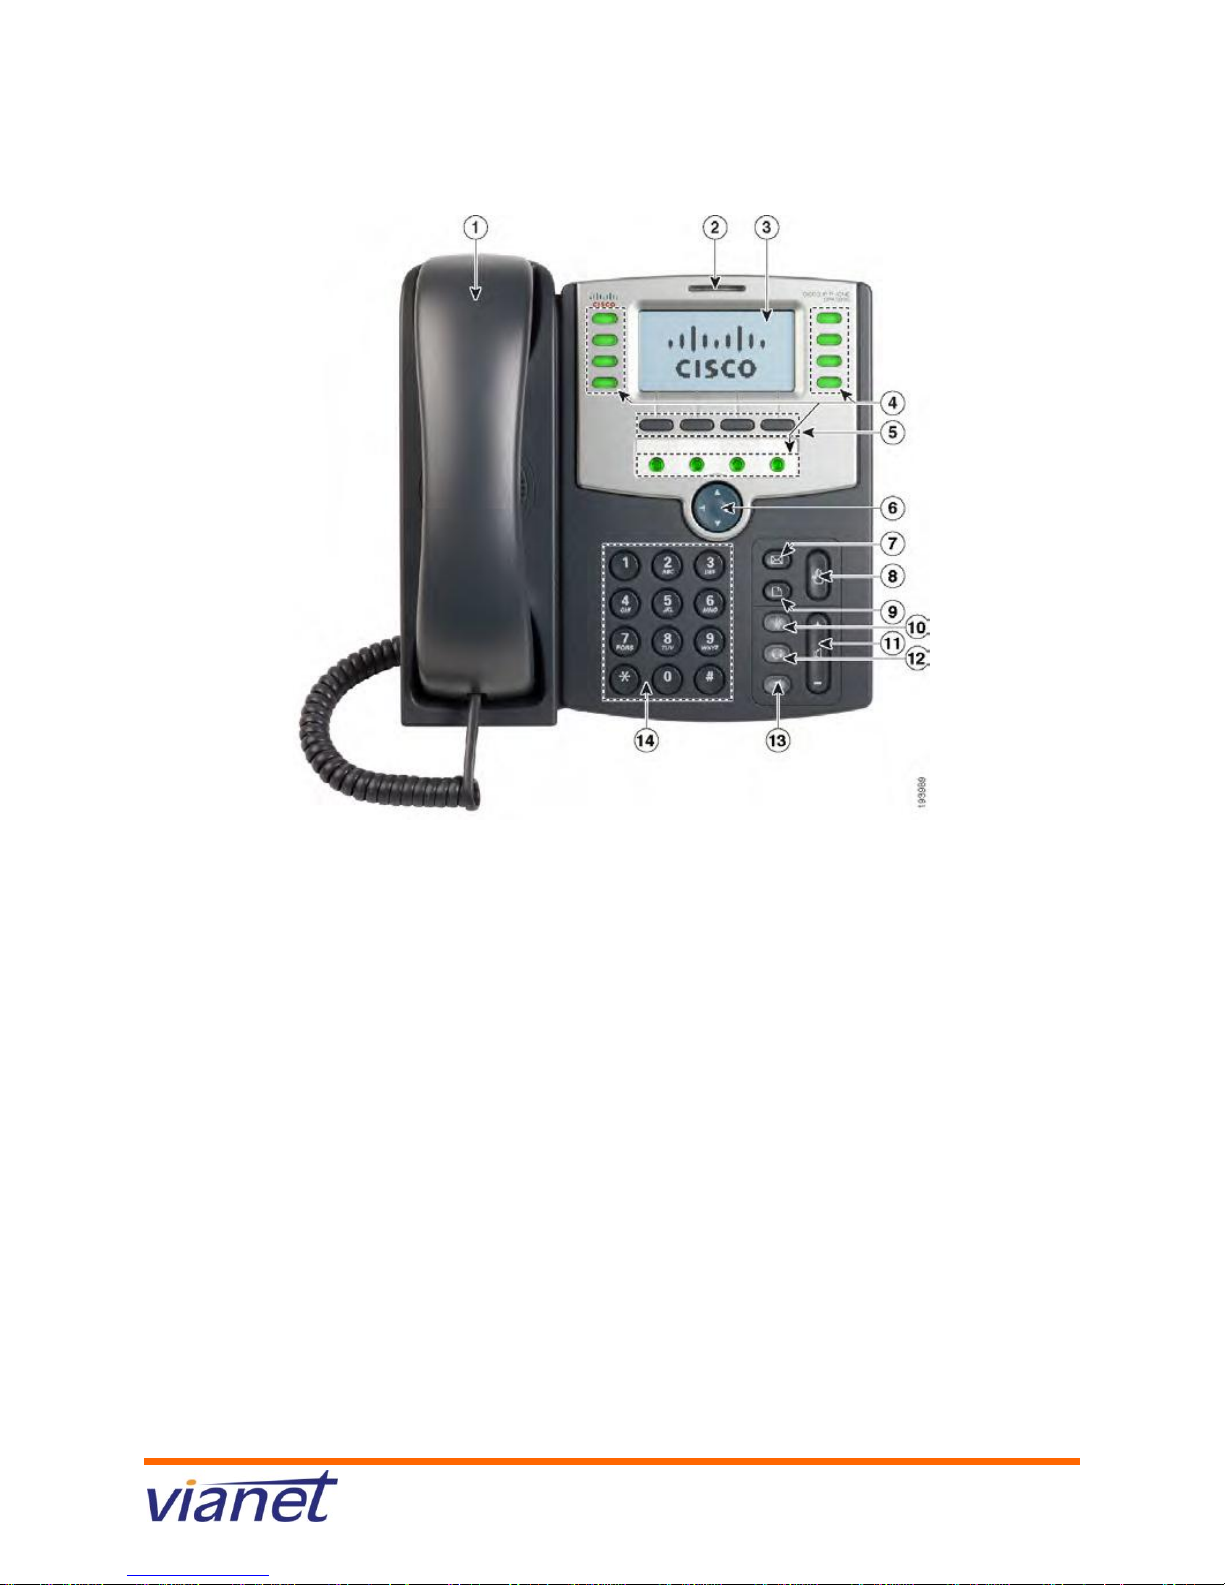
Cisco SPA-500 Series Overview
The following list highlights some of the features that are available with your Cisco SPA-500 series
VoIP phone.
1. Handset
2. Voice Mail indicator light, blinks when the phone is ringing and remains lit to indicate
new voice messages.
3. LCD screen which displays time, date, your phone number, caller ID, call status, and
soft key tabs.
4. Lines – Shows the lines available to dial from.
5. Soft keys: Enables you to activate any functions displayed along the bottom of
the LCD. Keys change depending on status of phone
6. Navigation button
7. Mailbox button – Allows you to check your voice messages
8. Hold button: Places the active call on hold, resumes a call on hold, and
switches between an active call and an incoming call or an active call and a
call on hold.
9. Setup button: Displays a menu that provides access to phone logs, directories,
settings, and services.
10. Mute button – mutes the microphone on your phone so the receiving party cannot
hear you.
11. Volume button: Increases or decreases volume for the handset and speaker. Also
controls the ringer volume (if on-hook).
12. Headset button – allows for the use of a headset
13. Speaker button – activates speakerphone
14. Keypad: Works exactly like the keypad on a traditional telephone
Page 3
Page 4

Using the Call Features of the Cisco SPA-500 Series
Placing a Call
There are 3 options available to place a call using either another extension, or local/long distance
number:
Lift the handset, dial the number and press the “dial” soft key.
Dial the number and press the “dial” soft key to use the speaker phone.
Press the headset (if using a headset), dial the number and press the “dial” soft key.
Answering a Call
There are 3 options available to answer a call.
Lift the handset.
Press the “Speakerphone” key.
Press the “headset” key if using a
headset.
Ending a Call
Hang up the Handset.
Press the active Line (usually in Red)
Do Not Disturb
To enable Do Not Disturb hit the “dnd” soft key
To disable Do Not Disturb hit the “-dnd” soft key
Call Forwarding
To start forwarding:
Press the “cfwd” soft key and enter the number you would like to forward to and press “dial”.
To stop forwarding:
Press the “-cfwd” soft key.
Blind Transferring
This feature allows you to transfer a call without speaking to the person you are transferring to.
While on the call, press the “right navigation” button then press the “bxfer” key (this
will place the caller on hold).
Dial the 4 digit extension or the local/long distance number to which you want to
transfer the call.
Press the “dial” soft key to transfer the call.
Warm Transferring
This allows you to speak to the person you are transferring to prior to transferring the call.
While on the call, press the “xfer” key (This will place the caller on hold).
Dial the 4 digit extension or the local/long distance number to which you want to
transfer the call and press “dial”.
When the second line rings, wait for the party to answer the call, announce the caller
press “xfer” again to connect the two parties.
Hang up or end the call.
Page 4
Page 5

Placing a Call on Hold
While on the call:
Press the “hold” button
To return to the call, press the “hold” button again.
Placing a Conference Call
To establish a conference call for an existing call:
Press the “Conf” soft key (this will automatically select a new line and place the other
party on hold).
Dial the 4 digit extension or the local or long distance number of the second party and press
“dial”.
When the second party answers, press the “Conf” soft key again and the first party will
be joined to the call.
Repeat steps 1 through 3 to add additional parties to the conference call.
Conferencing a Held Call with an Active Call
If you have a call on hold and an active call, you can create a conference call
between the active call, the call on hold, and you.
With an active call and one or more calls on hold, press the “confLx” softkey.
If you have only one call on hold, the conference call is created between the
three of you the same as the “Conf” button works.
If you have more than one call on hold, choose the held call you want to
conference in by pressing the line button of the call on hold.
Page 5
Page 6

Softkey Button Quick Reference
Button
Function
<< or >>
Move left or right through an entry without deleting characters.
activ
Activates screen saver mode.
add
Add an entry.
bXfer
Performs a blind call transfer (transferring a call without speaking to the
party to whom you are transferring the call.)
cancel
Cancels any changes you have made (press before ok or save).
cfwd
Forwards all calls coming to your phone to a specified number.
-cfwd
Clears call forwarding.
conf
Initiates a conference call.
confLx
Conferences active lines on the phone together.
delChr
Deletes the last number or letter.
delete
Deletes an entire item (for example, a number from the Call History list).
dial
Dials a number.
dir
Provides access to phone directories.
dnd
Do Not Disturb; prevents incoming calls from ringing your phone.
-dnd
Clears Do Not Disturb.
edit
Opens an item so that you can edit numbers or letters, or enable or
disable a feature.
ignore
Ignores an incoming call.
lcr
Dials the Last Call Received.
miss
Shows the Missed Calls list.
redial
Displays a list of recently dialed numbers.
resume
Resumes a call that is on hold.
save
Saves your changes.
select
Selects the highlighted item on the LCD screen.
xfer
Performs a call transfer.
xferLx
Transfers an active line on the phone to a called number.
y/n
Enters a submenu and when pressed, toggles between Yes or No to
enable or disable an option.
*Buttons dependant on your individual setup.
Page 6
Page 7

Using the Voice Mail Features of the Cisco SPA-500 Series
Accessing Voice Mail
Press (envelope button)
Enter your mailbox number which is your extension number.
Enter your temporary password which is your extension number.
At this time you may reset your password. Press 0 for Mailbox Options, then 5 and
follow the prompts.
Recording Your Message
Press the “messages” key below the LCD display.
Enter your extension number.
Enter your temporary password which is your extension number or last 4 digits of your
phone number.
At this time you may record your greeting. Press 0 for Mailbox Options, then 1 to record
your Unavailable message, press 2 to record your Busy message.
Fast-Forwarding or Rewinding Messages
To fast-forward a message while it is playing, press the pound (#) key. This will fast forward
your message in 3 second intervals.
To rewind a message while it is playing, press the star (*) key. This will rewind the
message in 3 second intervals.
Voice Mail Prompt Menu
Press 1 for new messages. After your message has played you may press:
5 to repeat the current message
6 to listen to the next message
7 to delete this message
8 to forward this message to another user
9 to save this message
Press 2 to change folders. Your folder options include pressing:
0 for new messages
1 for old messages
2 for work messages
3 for family messages
4 for friends messages
# to cancel
Press 3 for advanced options (currently not available).
Press 0 for mailbox options. Your options include:
1 to record your unavailable greeting
2 to record your busy greeting.
3 to record your name.
4 to record a temporary greeting.
5 to change your password.
* to return to the main menu.
Accessing Voice Mail from Another Location
Dial your office telephone number.
Enter 8500 at any time during the greeting message.
Enter your mailbox number which is your extension number.
Enter your password.
Page 7
Page 8

Technical Support
How to Contact Us
Technical support can be reached by calling us at:
Direct from your PBX – Dial 611
Local and toll Free Numbers:
Atikokan 807-590-9996
Barrie 705-393-9996
Bracebridge 705-640-9996
Chapleau 705-860-9996
Elliot Lake 705-847-9996
Fort Frances 807-270-9996
Haileybury 705-680-9996
Huntsville 705-224-9996
Kapuskasing 705-319-9996
Kirkland Lake 705-572-9996
Little Current 705-370-9996
Marathon 807-230-9996
Nipigon 807-880-9996
North Bay 705-223-9996
Parry Sound 705-751-9996
Peterborough 705-926-9996
Sault Ste Marie 705-251-9996
Sudbury 705-222-9996
Thunder Bay 807-333-9996
Timmins 705-269-9996
Toronto 416-853-9996
Wawa 705-850-9996
Toll Free 1-800-788-0363
Or by email by visiting - http://www.vianet.ca/contact.php
Page 8
Page 9

9-1-1 – Emergency Access
vTone/PBX VoIP 9-1-1 Service Limitations
Vianet provides VoIP 9-1-1 service to every vTone/PBX subscriber. VoIP 9-1-1 service is different from
Enhanced 9-1-1 service (service provided on a traditional phone line). VoIP 9-1-1 service limitations
include the following:
VoIP 9-1-1 service may not be available in an electrical power outage and will not be available during a
broadband Internet outage.
VoIP 9-1-1 calls are sent to a call centre for screening and routing to the correct emergency response
center (also known as the Public Safety Answering Point or PSAP). This is different from Enhanced 9-1-1
service where the call is sent directly to the appropriate PSAP. Due to the “nomadic” nature of vTone/PBX
service (service can be moved to any location with broadband Internet access), a caller must identify
his/her location to the 9-1-1 call taker in order for the call to be routed to the correct PSAP and for
emergency services to be dispatched to the correct location.
Subscribers of Vianet’s vTone/PBX service are required to ensure that all potential users of the VoIP
service understand the 9-1-1 service limitations identified in this notice.
Limitation of Liability
Neither Vianet Internet Solutions nor their employees shall be held liable for any claims, losses, damages,
penalties, fines and expenses and you hereby waive any and all such claims or causes of action arising
from the absence, outage or failure of the VoIP service, including the inability to be able to dial 9-1-1 to
access emergency personnel.
You agree to defend, indemnify and hold harmless, Vianet Internet Solutions and its employees and any
other third party service provider who furnishes service to you or to Vianet in connection with VoIP
services, including 9-1-1 service from and against any claims, losses, damages, penalties, fines and
expenses (including, without limitation, legal fees and expenses), by or on behalf of you or any third
party or user of your VoIP local line service relating to the absence, outage, failure or degradation of
voice quality of the VoIP service, including the inability to be able to dial 9-1-1 to access emergency
services, the inability to complete a 9-1-1 call, the inability to correctly route a 9-1-1 call to the
appropriate PSAP or to correctly dispatch emergency services to the location from which the 9-1-1 call
originated
User tips to remember when placing a 9-1-1 call from a vTone phone line:
1. As identified above, a VoIP 9-1-1 call is not routed directly to a PSAP. A VoIP 9-1-1 call is first sent to a
call center for screening before it is routed to the correct PSAP.
2. When you dial 9-1-1, you must be prepared to provide your location and callback number to the call
taker.
3. In the event you cannot speak, the call taker may assume you are located at the address you
registered with Vianet. It is important to ensure this information is updated if you move your VoIP phone.
Subscribers can call Vianet to update their address information.
4. Do not hang up unless told to do so, call back if you get disconnected.
5. vTone/PBX service and VoIP 9-1-1 service may not be available in an electrical power outage and will
not be available during a broadband Internet outage.
6. Ensure that you understand the 9-1-1 limitations of your VoIP service and inform all potential users of
your VoIP service of these limitations.
Page 9
 Loading...