

Page 1
Operating Instructions for the IP Phone 7965
Dear Members of Staff,
We have a highly efficient telephone system.
These brief operating instructions are intended to explain the numerous
functions of the telephone to you and make everyday communication easier for
you.
Page 1
Page 2
Cisco IP Telephone 7965
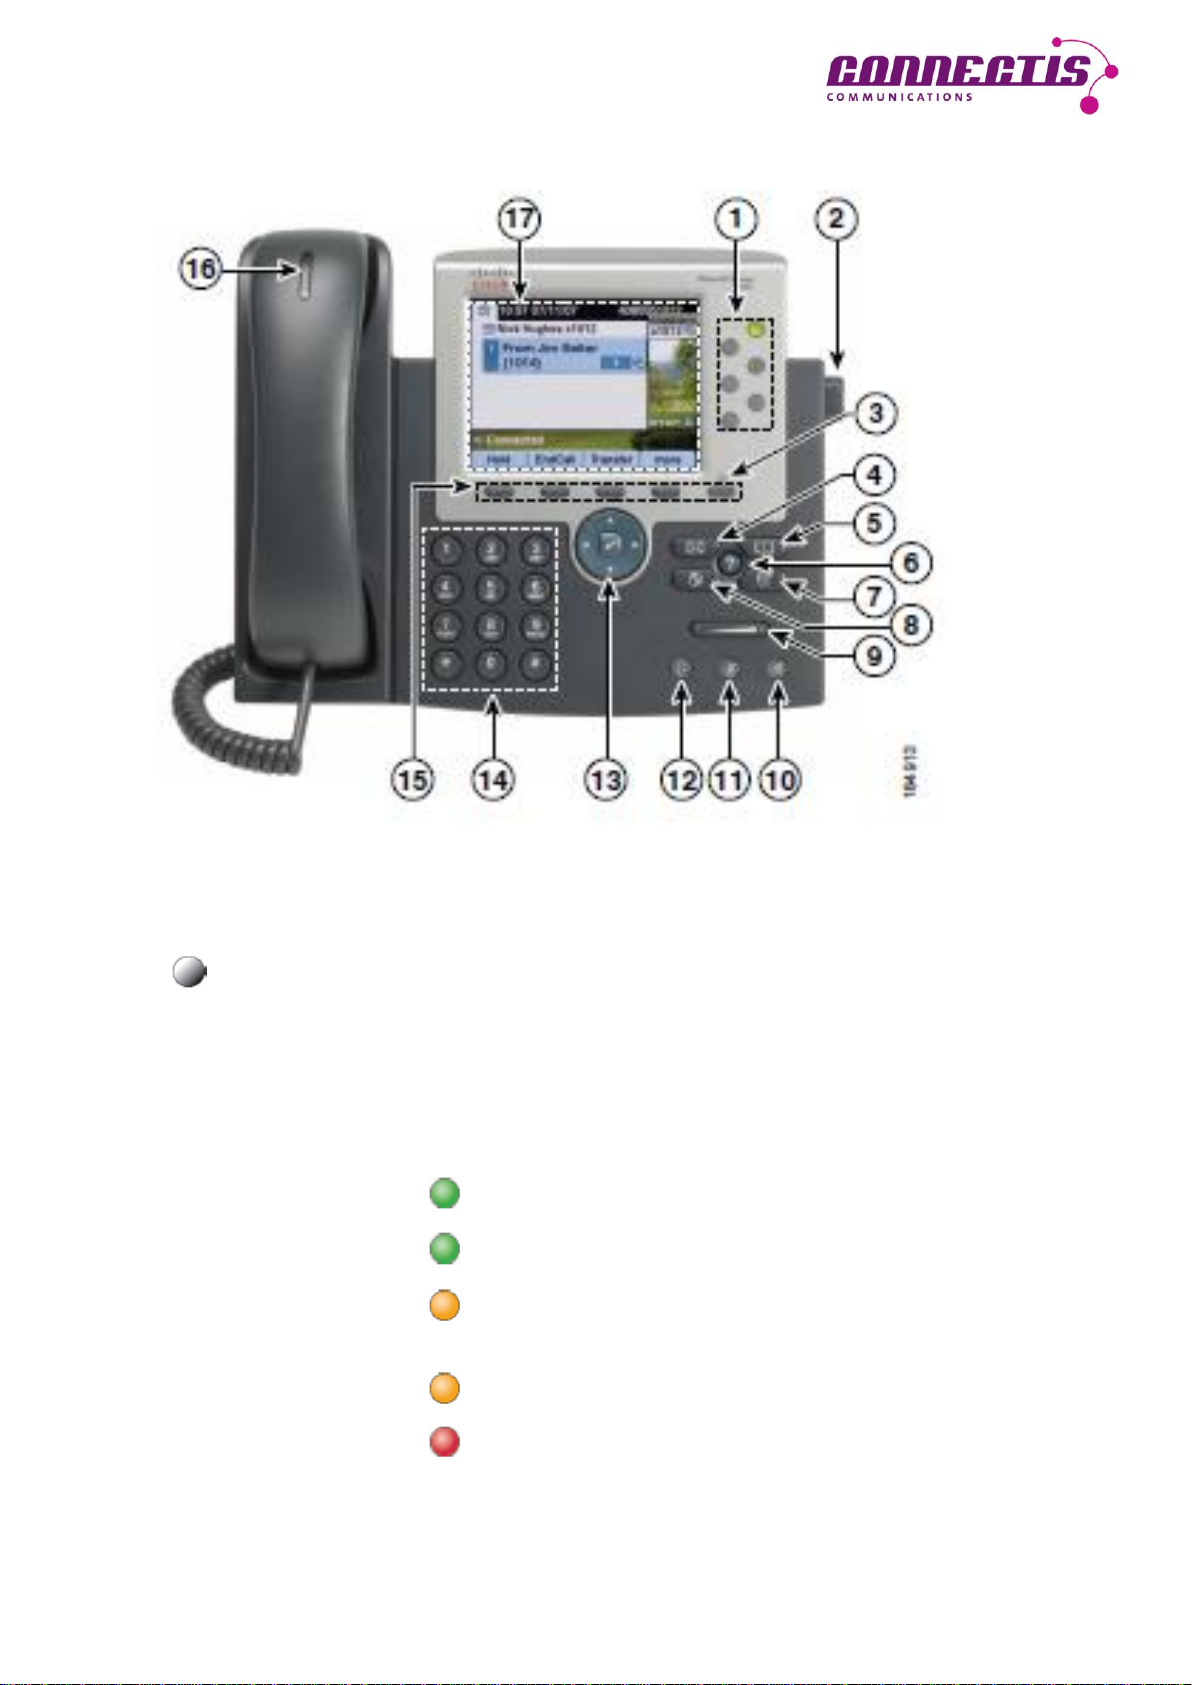
1 Programmable keys Depending on the configuration, these keys
can have the following function:
- telephone line (personal line),
- telephone line (shared line),
- speed dial keys.
The keys light up in colour in order to indicate the
following statuses of the telephone lines:
green, permanent: active call;
green, winking: call held;
yellow, permanent: call ON/OFF activated or
registered with a hunt group;
yellow, winking: incoming or returning call;
red, permanent: shared line occupied.
Page 2
Page 3

2 Telephone support button To adjust the angle of the telephone on the desktop.
3 Display key Activates the telephone display after the energy saver
mode.
4 News key Access to the voicemail box.
5 Directory key This key enables you to access the call log, your
personal directory and the firm’s directory.
6 Help key Activates the help menu.
7 Settings key The settings menu enables you to adjust the settings
of the telephone display and to change the ring tunes.
8 Service key To access services you may have subscribed to.
9 Volume key To adjust the receiver, headset and loudspeaker
volume (when handset is lifted) and the ring tone
volume (when the handset is replaced).
10 Loudspeaker key Switches the loudspeaker on/off.
11 Muting key Switches the microphone on/off. When the microphone
is off, the key is lit up.
12 Headset key When you use the telephone with a headset, use this
key to take the call.
13 Navigation key Enables you to navigate through menus and directories.
14 Keypad To dial numbers and browse through directories.
15 Softkeys Their functions are indicated on the display.
16 LED on the receiver Provides information about incoming calls and new
voicemails.
17 Telephone display Information about calls and functions.
Page 3
Page 4

Telephone functions
Calling with receiver Lift receiver – dial number.
with loudspeaker Press – dial number.
with headset Press – dial number.
Putting through a call Press Transfer softkey – dial number.
- Addressee Press Transfer softkey again.
- Addressee does NOT answer Press EndCall softkey.
Press Resume softkey to return to caller.
Holding a call Press Hold softkey; line key is winking.
Bringing back from hold Press Resume softkey or winking key.
Addressee does not answer
Activating return call Press CallBack softkey.
The relevant information about the return call thus
initiated will display.
Answering return call As soon as the addressee is free, you will receive a
message to that effect on the display.
Press Dial softkey.
Redialling Press Redial softkey to redial the last number,
or
press navigation key to display the numbers
selected earier.
Conference Press Confrn softkey.
up to 6 participants You may have to press the more softkey for
Confrn to display.
Dial the participant’s number.
Wait until the participant answers the call.
Then redial Confrn to add the participant to the
conference. Further conference participants can only
be added by the conference chair (initiator).
Displaying conference participants Press ConfList softkey.
You may have to press the more softkey for
ConfList to display.
All the conference participants are listed.
The participant with an * is the initiator of the conference.
Removing conference participants Highlight the participant’s name in the conference list
and then press Remove.
Depending on the configuration, only the initiator is
permitted to use this function.
Page 4
Page 5

Telephone functions
Redirecting Press CFwdALL softkey.
Dial number of your choice.
Redirection only applies to the telephone line in question.
If your set has several lines, you will have to activate
redirection for all the lines.
The addressee’s number for the redirected call can be
seen on the telephone display.
Taking over a call Press PickUp key.
Within the configured group The call is now ringing on your set.
Press Answer softkey.
Taking over with BLF Press BLF key when a call is coming in.
Call logs Press directory key.
100 entries Missed Calls
per list Received Calls
Placed Calls
Displaying details Highlight entry of your choice.
Press Details softkey.
Deleting entry Highlight entry of your choice.
Press Remove softkey.
Deleting entire list Highlight list of your choice.
Press Clear softkey.
You may have to press the more softkey for
Clear to display.
Personal telephone directory User ID: like Windows login name
PIN: must first be defined through the web.
Entries into the personal telephone directory are made
through the web (cf. chapter on “Website for user options).
With Sign Out, your telephone directory will again be
password-protected.
BLF function A BLF key enables you to see the status of the monitored
lines (for instance, your boss’s line). If a call is coming in
on this line, you can answer it by pressing the BLF key.
At the same time, the BLF key only serves as a speed dial
key, which you can also use to call one of the extensions
or put a call through to it.
A BLF key must be set up by the Administrator.
Page 5
Page 6

Call redirection is activated. In addition, the
redirection addressee displays on the status
bar.
Call has been placed on hold.
In addition, the line key is winking.
Incoming call.
In addition, the line key is winking yellow.
Receiver has been lifted.
Receiver has been replaced.
Shared line is active.
Message is waiting.
Speed dial, call log or directory entry:
line busy (BLF function).
Speed dial, call log or directory entry:
line free (BLF function).
Speed dial, call log or directory entry:
line status unknown (BLF function).
Ring tone is deactivated for this line
(BLF function).
Telephone functions
Register/deregister in Press HLog softkey.
exchange line group
Muting the telephone Press DND softkey.
You may have to press the more softkey for
DND to display.
Icons on the telephone display
Page 6
Page 7

Website for user options
http://voip.unisg.ch/ccmuser
Log in here with your user name and password
(same log-in as Windows).
Speed dial keys – defining speed dial keys
Open the Benutzeroptionen menu,
and click on Gerät
and then on Kurzwahleinträge.
Depending on the configuration of
your telephone, the keys still freely
available will display here.
Under Einstellung für
Kurzwahlcodes
you can enter up to 199 speed dial
numbers.
TIP: Do not forget to prefix the 0 required for external numbers!
Making a call through a speed dial code
Type in the relevant speed dial code on the telephone keypad, then press the AbbrDial softkey.
Page 7
Page 8

Subscribing to services
Click on Telefondienste.
You can subscribe to the following services:
- Extension Mobility
- MUT
- VisualVoicemail
Extension Mobility
This service enables you to register on a different telephone, which means that your entire
configuration, including extension number, is transferred to the other set.
This service needs to be configured by the System Administrator.
MUT
If you subscribe to this service, one key on your telephone will be configured with MUT.
This key serves to trigger off a mute alarm.
This service needs to be configured by the System Administrator.
VisualVoicemail
This service has already been subscribed to as a standard for all the users and is available
on sets of the 7965 type. It enables you to display and play voicemails on the telephone
display.
Setting up call forwarding
Click on Leitungseinstellungen.
Here you are able to set up call
forwarding options for each line
yourself.
Call forwarding when line is busy:
If your telephone line is already busy, the call will be
put through directly to the number defined by you.
Call forwarding when the receiver has not been
lifted means that the call will first ring on your set
four times and then be put through to the addressee
defined by you.
You can define various addressees for external and
internal calls.
Page 8
Page 9

Personal directory
Open the Benutzeroptionen menu, click on Persönliches Adressbuch,
then click on Neue hinzufügen.
Spitzname is a compulsory field.
You can register up to 3 different telephone
numbers and an e-mail address under each
individual entry.
Using the telephone directory on your set:
Your personal directory is protected. You have to log in with your user name (Windows log-
in) and a PIN.
Define the PIN as described in the next chapter before you use the telephone directory on
your set for the first time.
You will remain logged into your telephone directory until you reblock it by pressing Log Out.
Looking for entries: Log into the telephone directory and type in 2-3 letters
in the Last Name, First Name or Nickname fields, then
press the Submit softkey. Select the name of your
choice and press the Dial softkey.
If you have input several numbers for this name, you
can now select the number to be dialled and press the
Dial softkey once more.
Page 9
Page 10

Changing your PIN
Open the Benutzeroptionen menu and click on Benutzereinstellungen.
Now define a PIN for your personal telephone directory.
The current PIN is 12345.
Changing the language setting of your set
Open the Benutzeroptionen menu and click on Gerät.
You can now change the
language setting here.
This is where you will also
find the complete User
Manual for downloading.
Important
If you change the language setting, you will not only have to click on Speichern, but
also on Konfiguration übernehmen and then confirm the next window with OK.
Page 10
Page 11

Mobility settings
These settings enable you to have your desktop set and your mobile phone ring at the same
time.
Open the Benutzeroptionen, click on
Mobilitätseinstellungen and then on
Remote-Ziele.
Under Remote-Ziel-Profil, you can
select the profile generated for you
by the System Administrator.
If you have no selection, you will first
have to apply for a profile.
Then input the number which you
want to ring in parallel with your
desktop set.
Please note: external number with
the prefix 0.
Then save your entries.
Now place a under
Leitungszuordnung, and
activate Mobiltelefon and
Mobile Verbindung.
Click on Speichern.
Now you will be able to switch mobility on your set on/off with the Mobility softkey.
A call that is ringing in parallel can be answered both on your mobile phone and on your desk
set. Also, you will be able to change from one device to the other.
Page 11
Page 12

Unity (voicemail box) access no: internal: 2828 / external: 071 224 28 28
Accessing the voicemail box:
Dial the access number and press the key.
Type in your PIN and press #. Default PIN = 1245
If you do not call from your own set, you will have to press * in order to be able to type in your
ID (your internal telephone number).
The first time round you will hear a system message that tells you that you have not recorded
a name and salutation yet.
You will also be requested to change your PIN.
Listening to voicemails: during playback or when listening to the voicemail summary:
Restart playback
New voicemails Save voicemail
Old voicemails Delete voicemail
Reply to voicemail
Forward voicemail
Accessing SetUp options:
Managing salutations
Configuring voicemail settings
Configuring personal settings
Managing salutations
Re-recording current salutation
Alternative salutation on/off
Editing salutations
Recording standard salutation
Recording alternative salutation
Configuring voicemail settings
Setting up notification
You can have the system send you a notification by means of a text message
whenever a new voicemail has come in.
Settings through the web: cf. chapter on “Website for voicemail”.
Configuring personal settings
Changing your PIN
Changing recorded name
Page 12
Page 13
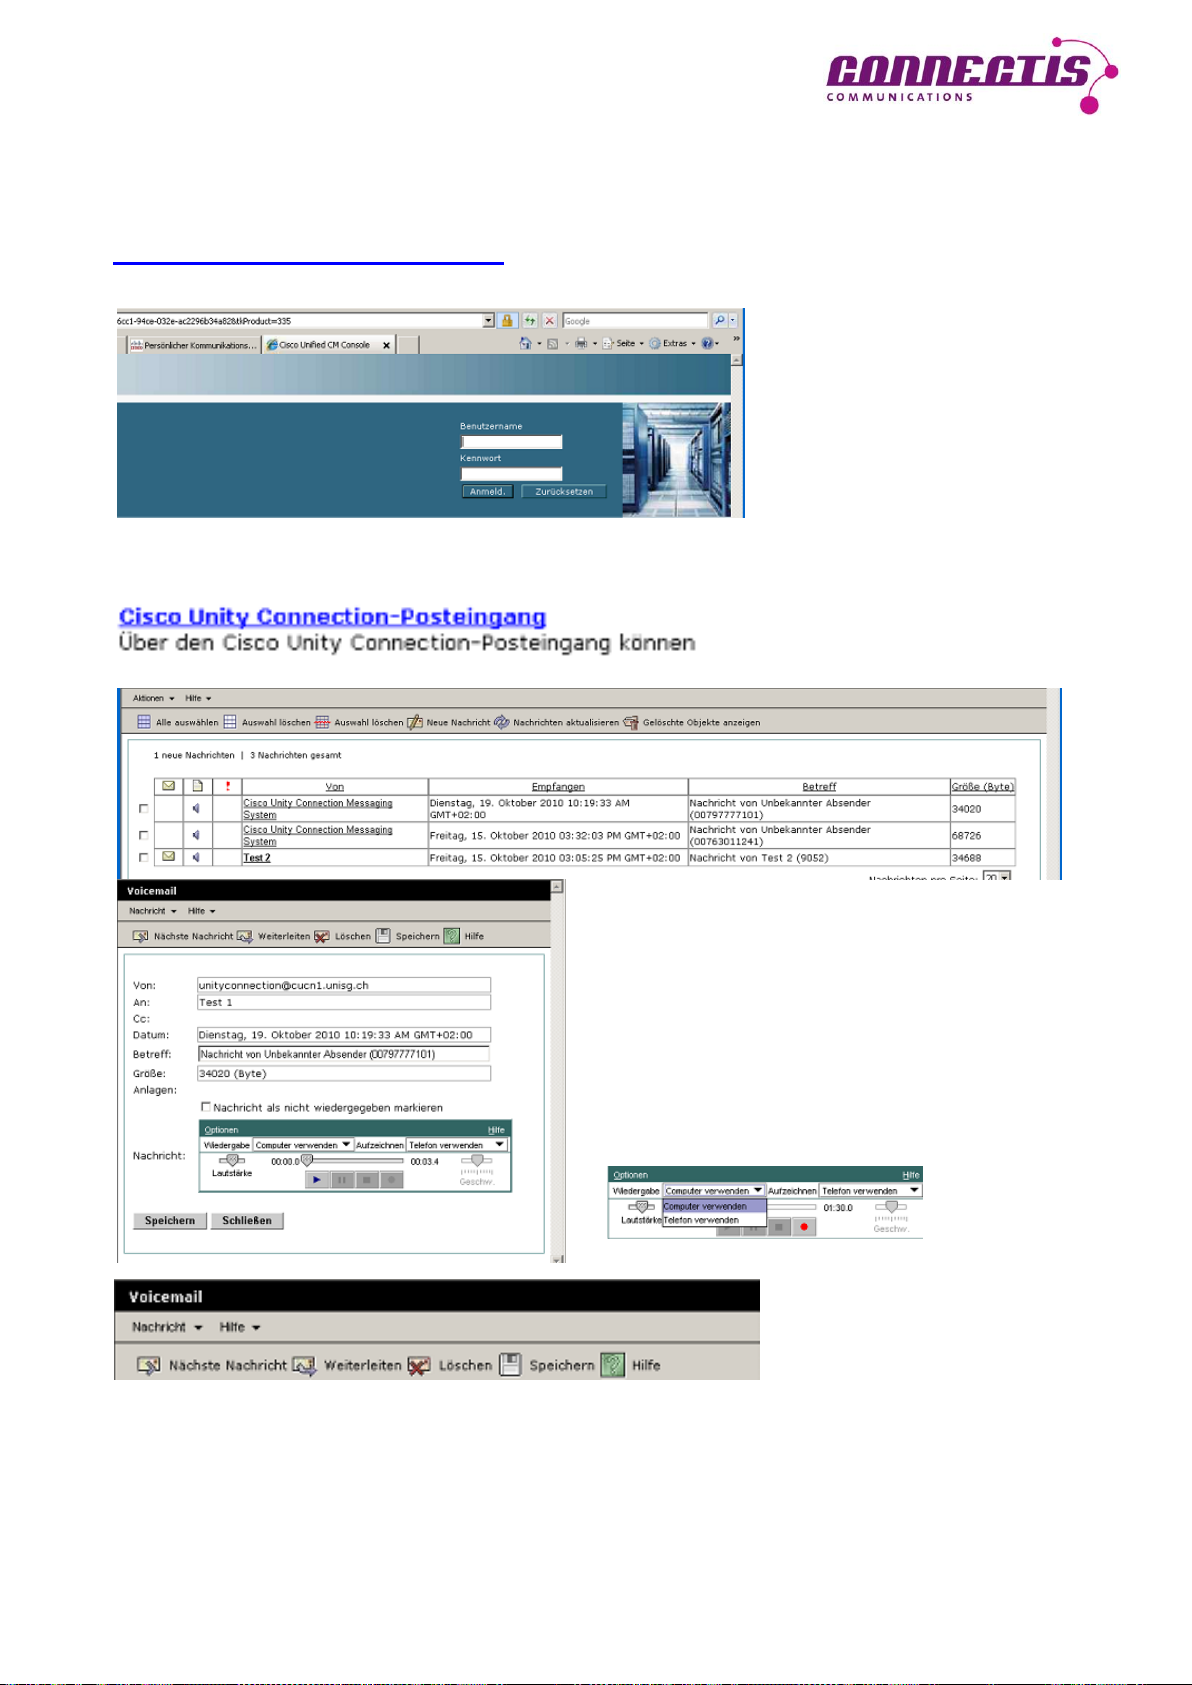
Website for voicemail
You can also access your voicemails and make personal settings through the web.
http://voicemail.unisg.ch/ciscopca
Log in with the same login that
you use for the
Benutzeroption.
Listening to / managing voicemails
Click here to go to your voicemail
box.
Double-click on the voicemail to open the
window for listening.
Define whether playback should be effected
through the telephone or the computer (if
equipped for the purpose).
Of course you can also delete, save or, if need be, forward voicemails here.
Page 13
Page 14

Recording / activating /deactivating salutation texts
Click here to go to your personal communication
assistant.
Select Begrüssungen.
This is where you are able to activate or deactivate
a salutation (provided you have recorded one).
Salutations can be recorded through the web /
telephone, or there is a possibility of uploading a
WAVE file.
Please note: Begrüssung Geschlossen and
Feiertag cannot be used. They need to be
configured by the System Administrator.
When the alternative salutation is activated, all the other salutations are switched off.
Example of voicemail salutations
Standard salutation
This is the voicemail box of Jane Smith, University of St.Gallen. Hello. I’m not available at the
moment. Please leave a message for me after the beep and I’ll call you back as soon as
possible. Thank you very much for your call and good-bye.
Alternative salutation
This is the voicemail box of Jane Smith, University of St.Gallen. Hello. I’ll be out of office up
to and including [day and date]. Please leave a message for me and I’ll call you back when I
return. Thank you very much for your call and good-bye.
Page 14
Page 15
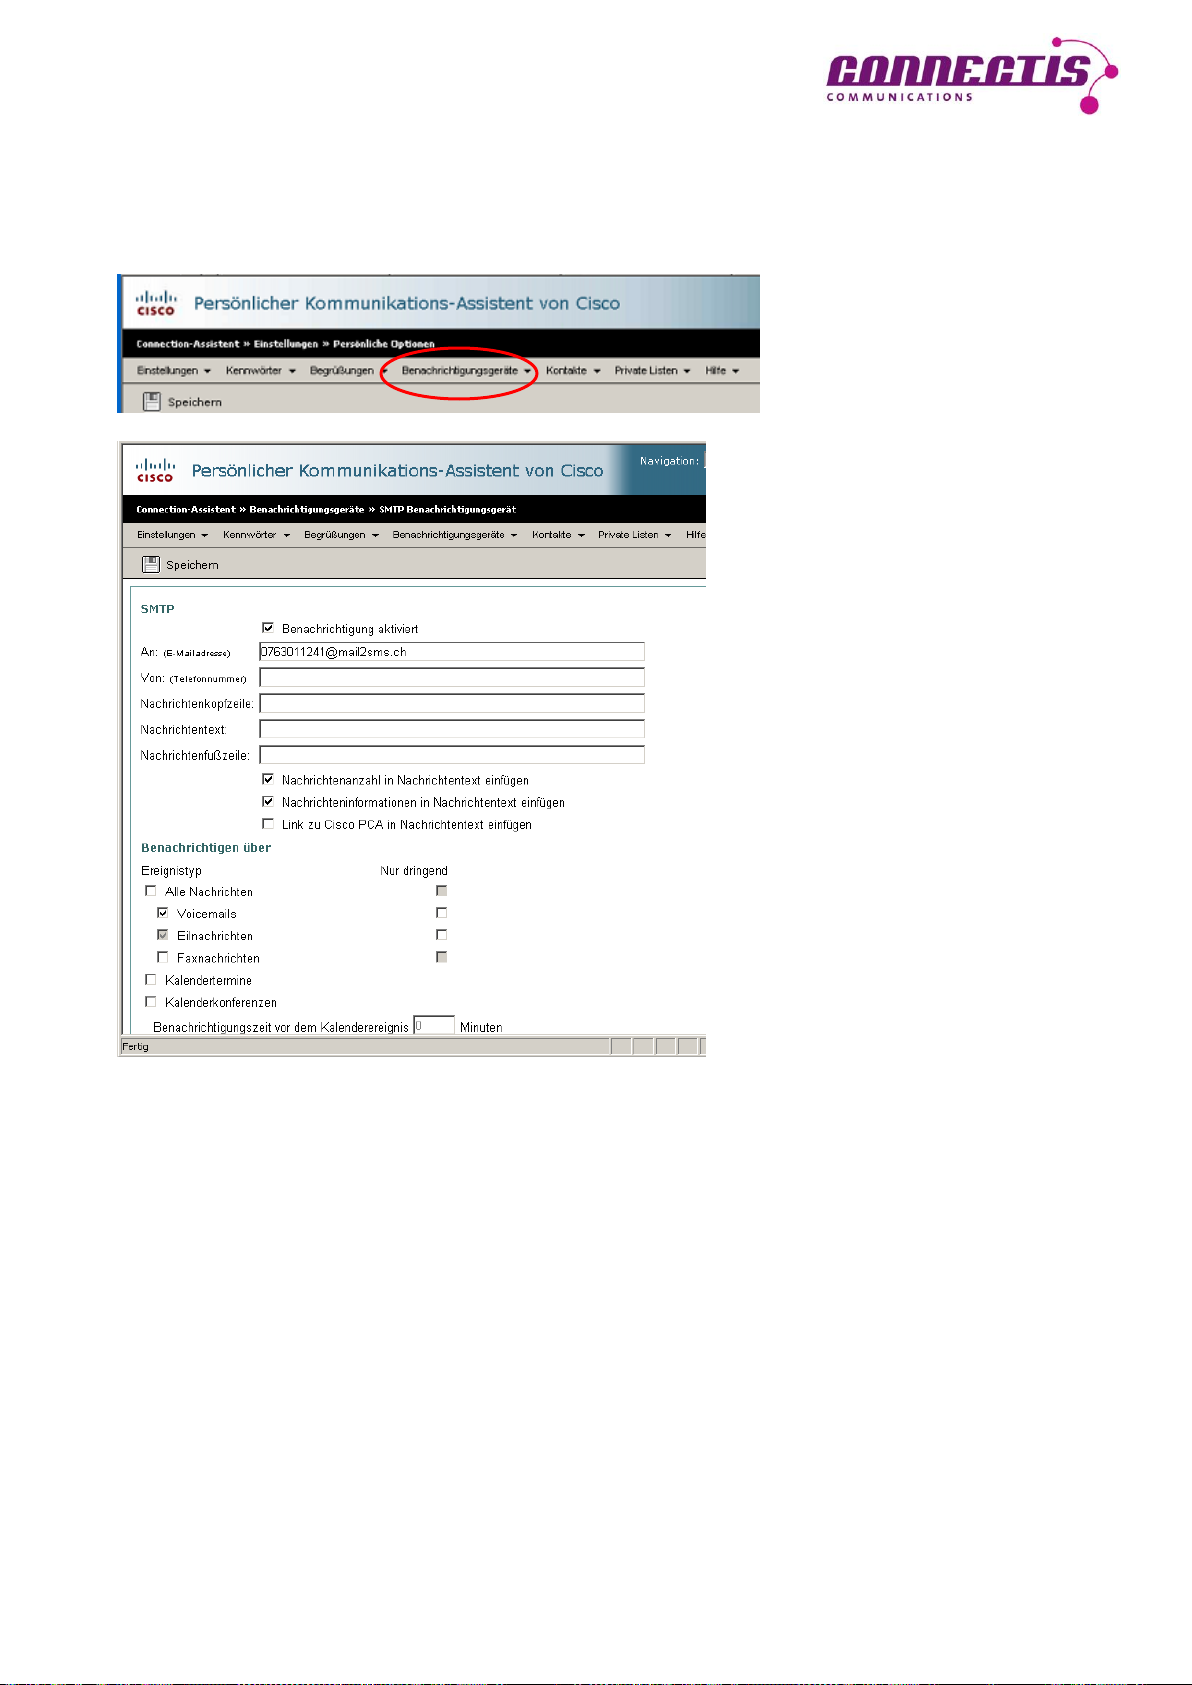
Setting up remote notification
If you are out of office a great deal and do not continually want to call your voicemail box to
find out whether you have received any voicemails, you can set up remote notification.
The system will then send you a text message every time a voicemail has come in.
Click on
Benachrichtigungsgeräte
and select SMTP.
Enter your mobile telephone
number here (WITHOUT the zero
for external calls), followed by
@mail2sms.ch:
Then place the relevant ticks
and save your inputs.
Notes
_________________________________________________________________________
_________________________________________________________________________
_________________________________________________________________________
_________________________________________________________________________
_________________________________________________________________________
Page 15
Page 16

Important numbers
If you require help or want to submit an application for the
configuration of your set to be changed:
Service Desk 2900
servicedesk@unisg.ch
Access number to your voicemail box:
2828 or
071 224 28 28 from external telephones
Direct redirection to voicemail: 2828
Internal emergency call: 3333
© 2010 by connectis AG
Page 16
 Loading...