

Page 1

Cisco IP Phone 7960 and 7940
Series User Guide
Corporate Headquarters
Cisco Systems, Inc.
170 West Tasman Drive
San Jose, CA 95134-1706
USA
http://www.cisco.com
Tel: 408 526-4000
800 553-NETS (6387)
Fax: 408 526-4100
Customer Order Number: DOC-7810182=
Text Part Number: 78-10182-08
Page 2

THE SPECIFICATIONS AND INFORMATION REGARDING THE PRODUCTS IN THIS MANUAL ARE SUBJECT TO CHANGE WITHO UT
NOTICE. ALL STATEMENTS, INFORMATION, AND RECOMMENDATIONS IN THIS MANUAL ARE BELIEVED TO BE ACCURATE BUT
ARE PRESENTED WITHOUT WARRANTY OF ANY KIND, EXPRESS OR IMPLIED. USERS MUST TAKE FULL RESPONSIBILITY FOR
THEIR APPLICATION OF ANY PRODUCTS.
THE SOFTW ARE LICENSE AND LIMITED WARRANTY FOR THE ACCOMP ANYING PRODUCT ARE SET FOR TH IN THE INFORMATION
PACKET THAT SHIPPED WITH THE PRODUCT AND ARE INCORPORATED HEREIN BY THIS REFERENCE. IF YOU ARE UNABLE TO
LOCATE THE SOFTWARE LICENSE OR LIMITED WARRANTY, CONTACT YOUR CISCO REPRESENTATIVE FOR A COPY.
The following information is for FCC compliance of Class A devices: This equipment has been tested and found to comply wit h the limits for a Class
A digital device, pursuant to part 15 of the FCC rules. These limits are designed to provide reasonable protection against harmful interference when
the equipment is operated in a commercial environment. Th is equipment generates, uses, and can radi ate radio- frequen c y ener gy and, if not instal led
and used in accordance with the instruction manual, may cause harmful interference to radio communications. Operation of this equipment in a
residential area is likely to cause harmful interference, in which case users will be required to correct the interference at their own expense.
The following information is for FCC compliance of Class B devices: The equipment described in this manual generates and may radiate
radio-frequency energy. If it is not installed in accordance with Cisco’s installation instructions, it may cause interference with radio and television
reception. This equipment has been tested and found to comply with the limits for a Class B digital device in accordance with the specifications in
part 15 of the FCC rules. These specifications are designed to provide reasonable protection against such interference in a residential installation.
However, there is no guarantee that interference will not occur in a particular installation.
Modifying the equipment without Cisco’s written authorization may result in the equipment no longer complying with FCC requirements for Class
A or Class B digital devices. In that event, your right to use the equipment may be limited by FCC regulations, and you may be required to correct
any interference to radio or television communications at your own expense.
You can determine whether your equipment is causing interference by turning it off. If the interference stops, it was probably caused by the Cisco
equipment or one of its peripheral devices. If the equipment causes interference to radio or television reception, try to correct the interference by
using one or more of the following measures:
• Turn the television or radio antenna until the interference stops.
• Move the equipment to one side or the other of the television or radio.
• Move the equipment farther away from the television or radio.
• Plug the equipment into an outlet that is on a different circuit from the television or radio. (That is, make certain the equipment and the television
or radio are on circuits controlled by different circuit breakers or fuses.)
Modifications to this product not authorized by Cisco Systems, Inc. could void the FCC approval and negate your authority to operate the product.
The Cisco implementation of TCP header compression is an adaptation of a program developed by the University of California, Berkeley (UCB) as
part of UCB’s public domain version of the UNIX operating system. All rights reserved. Copyright © 1981, Regents of the University of California.
NOTWITHSTANDING ANY OTHER WARRANTY HEREIN, ALL DOCUMENT FILES AND SOFTWARE OF THESE SUPPLIERS ARE
PROVIDED “AS IS” WITH ALL FAULTS. CISCO AND THE ABOVE-NAMED SUPPLIERS DISCLAI M ALL WARRANTIES, EXPRESSED
OR
IMPLIED, INCLUDING, WITHOUT LIMITATION, THOSE OF M ERCHANTABILITY, FITNESS FOR A PARTICULAR PURPOSE AND
NONINFRINGEMENT OR ARISING FROM A COURSE OF DEALING, USAGE, OR TRADE PRACTICE.
IN NO EVENT SHALL CISCO OR ITS SUPPLIERS BE LI ABLE F OR ANY IN DIRECT, SPECIAL, CONSEQUENTIAL, OR INCIDENTAL
DAMAGES, INCLUDING, WITHOUT LIMITATION, LOST PROFITS OR LOSS OR DAMAGE TO DATA ARISING OUT OF THE USE OR
INABILITY TO USE THIS MANUAL, EVEN IF CISCO OR ITS SUPPLIERS HAVE BEEN ADVISED OF THE POSSIBILITY OF SUCH
DAMAGES.
CCIP, the Cisco Arrow logo, the Cisco Powered Network mark, the Cisco Systems Verified logo, Cisco Unity, Follow Me Browsing, FormShare,
iQ Breakthrough, iQ Expertise, iQ FastTrack, the iQ Logo, iQ Net Readiness Scorecard, Networking Academy, ScriptShare, SMARTnet, TransPath,
and Voice LAN are trademarks of Cisco Systems, Inc.; Changing the Way We Work, Live, Play, and Learn, Discover All That’s Possible, The Fastest
Way to Increase Your Internet Quotient, and iQuick Study are service marks of Cisco Systems, Inc.; and Aironet, ASIST, BPX, Catalyst, CCDA,
CCDP, CCIE, CCNA, CCNP, Cisco, the Cisco Certified Internetwork Expert logo, Cisco IOS, the Cisco IOS logo, Cisco Press, Cisco Systems, Cisco
Systems Capital, the Cisco Systems logo, Empowering the Internet Generation, Enterpri se/Solver, EtherChan nel, EtherSwitch, Fast Step, GigaStack,
Internet Quotient, IOS, IP/TV, LightStream, MGX, MIC A, the Netwo rkers logo , Network Reg istrar, Packet, PIX, Post-Routing, Pre-Routing,
RateMUX, Registrar, SlideCast, Strata View Plus, Stratm, SwitchProbe, TeleRouter, and VCO are registered trademarks of Cisco Systems, Inc. and/or
its affiliates in t h e U .S. and cert ain other coun tries.
Page 3

All other trademarks mentioned in this documen t or Web sit e ar e the property of thei r respective owners. The use of the word partner does not imply
a partnership relationship between Cisco and any other company. (0208R)
Cisco IP Phone 7960 and 7940 Series User Guide
Copyright © 2000-2002, Cisc o Syst ems, I nc.
All rights reserved.
Page 4

Page 5

CONTENTS
CHAPTER
78-10182-08
1 Introducing Your Cisco IP Phone 1-1
Connecting Your Cisco IP Phone 1-2
Auto-Registering Your Phone Using TAPS 1-5
A Road Map to Your Cisco IP Phone 1-6
Using the Feature Buttons 1-10
Navigating on Your Phone 1-11
Using the Handset, Headset, and Speakerphone 1-12
Using the Handset 1-12
Adjusting the Handset Rest 1-12
Cisco IP Phone 7960 and 7940 Series User Guide
v
Page 6

Contents
Using the Speakerphone 1-14
Using the Headset 1-14
Customizing Your Phone From the User Options Web Pages 1-15
Logging In to the User Options Web Pages 1-16
Changing the Default Language for the User Options Web Pages 1-17
Establishing Cisco IP Phone Services 1-18
Subscribing to Services 1-19
How to Change or End Subscriptions 1-20
CHAPTER
CHAPTER
2 Customizing Phone Settings 2-1
Adjusting the Handset, Speakerphone, and Headset Volume 2-1
Adjusting the Ringer Volume 2-2
Personalizing the Ringer Sound 2-3
Adjusting the Message Waiting Indicator Light 2-4
Changing the LCD Screen Contrast 2-5
Changing the Language for the Phone LCD Screen 2-6
3 Placing a Call and Other Basic Phone Tasks 3-1
Making Telephone Calls 3-1
Placing a Call 3-2
Answering a Call 3-4
Ending a Call 3-4
Muting a Call 3-5
Putting a Call on Hold 3-6
Transferring a Call to Another Extension 3-7
Redialing the Last Number Dialed 3-8
How to Get Notified When a Busy Line is Available Using Cisco Call Back 3-8
Storing and Retrieving a Call Using Call Park 3-9
vi
Cisco IP Phone 7960 and 7940 Series User Guide
78-10182-08
Page 7

Answering Calls on Another Extension Using Call Pickup 3-10
How to Pick Up Calls Within Your Group 3-11
How to Pick Up Calls Outside of Your Group 3-11
Using Speed Dial 3-12
Forwarding Calls to Another Extension 3-14
Setting Up Call Forwarding on Your Phone 3-14
Setting Up Call Forwarding When Not at Your Phone 3-15
Canceling Call Forwarding 3-16
Making Conference Calls 3-17
Placing a Conference Call 3-18
Using Meet-Me Conferences 3-18
Establishing a Meet-Me Conference 3-19
Joining a Meet-Me Conference 3-19
Conferencing by Barging in on Established Conversations 3-20
Using Voice Mail 3-21
Contents
CHAPTER
78-10182-08
Viewing and Dialing from the Phone Logs 3-21
Searching and Dialing from the Phone Directory 3-23
4 Logging Into Your Extension from Any Phone Using the Cisco CallManager
Extension Mobility Feature 4-1
Logging in to Cisco CallManager Extension Mobility 4-2
Logging Out of Cisco CallManager Extension Mobility 4-4
Changing Your Cisco CallManager Extension Mobility PIN 4-5
Cisco IP Phone 7960 and 7940 Series User Guide
vii
Page 8

Contents
APPENDIX
viii
A FAQ A-1
How do I access voice mail? A-2
How do I set speed dials? A-2
How do I list my missed calls? A-2
I don’t see a Hold button—how do I put someone on hold? A-3
How do I change the contrast on the phone LCD screen? A-3
Cisco IP Phone 7960 and 7940 Series User Guide
78-10182-08
Page 9

Contents
How do I change the settings for my Cisco CallManager Extension Mobility
line? A-3
How do I forward calls? A-4
How do I store numbers of friends and colleagues that I want to call often? A-4
I’ve used up all my speed dial lines, can I add more? A-5
If I cannot answer a call that I have forwarded to another number, will the call get
re-routed to my voice mail system? A-5
Can I use call forwarding to send my calls directly to voice mail, without ringing
my desk top phone? A-6
Why don’t I get a dial tone after dialing an access code? A-6
78-10182-08
Cisco IP Phone 7960 and 7940 Series User Guide
ix
Page 10

Document Conventions
Preface
Aviso
¡Advertencia!
Varning!
Este símbolo de aviso indica perigo. Encontra-se numa situação que lhe
poderá causar danos físicos. Antes de começar a trabalhar com qualquer
equipamento, familiarize-se com os perigos relacionados com circuitos
eléctricos, e com quaisquer práticas comuns que possam prevenir possíveis
acidentes. Para ver as traduções dos avisos que constam desta publicação,
consulte o documento Regulatory Compliance and Safety Information
(Informação de Segurança e Disposições Reguladoras) que acompanha este
dispositivo.
Este símbolo de aviso significa peligro. Existe riesgo para su integridad física.
Antes de manipular cualquier equipo, considerar los riesgos que entraña la
corriente eléctrica y familiarizarse con los procedimientos estándar de
prevención de accidentes. Para ver una traducción de las advertencias que
aparecen en esta publicación, consultar el documento titulado Regulatory
Compliance and Safety Information (Información sobre seguridad y
conformidad con las disposiciones reglamentarias) que se acompaña con
este dispositivo.
Denna varningssymbol signalerar fara. Du befinner dig i en situation som kan
leda till personskada. Innan du utför arbete på någon utrustning måste du vara
medveten om farorna med elkretsar och känna till vanligt förfarande för att
förebygga skador. Se förklaringar av de varningar som förkommer i denna
publikation i dokumentet Regulatory Compliance and Safety Information
(Efterrättelse av föreskrifter och säkerhetsinformation), vilket medföljer
denna anordning.
xx
Cisco IP Phone 7960 and 7940 Series User Guide
78-10182-08
Page 11

CHAPTER
1
Introducing Your Cisco IP Phone
A Cisco IP Phone is a full-feature telephone that provides voice communication
over the same data network that your computer uses. This phone functions much
like a traditional analog phone, allo wing you to place and recei v e telephone calls.
It also supports features that you have come to expect from a telephone—such as
speed dialing, redial, call transfer, conference calling, and voice mail access.
Your Cisco IP Phone offers features that might surprise you. Because it is part of
an IP network, your Cisco IP Phone can provide not only telephony services, but
data services, too—including up-to-the-minute informat ion and services from the
network. In a nutshell, your Cisco IP Phone provides a whole range of
communication features that you could not expect from a traditional telephone.
This guide helps you learn to use the various features and services available on
your phone. Not all of the features described in this book are available by
default—your administrator may not add them for you. You access some phone
features and services on the phone itself, while you customize others on a
convenient web page. For information about the User Options web page, see
Customizing Your Phone From the User Options Web Pages, page 1-15.
This chapter contains the following sections:
78-10182-08
• Connecting Your Cisco IP Phone, page 1-2
• A Road Map to Your Cisco IP Phone, page 1-6
• Using the Feature Buttons, page 1-10
• Navigating on Your Phone, page 1-11
• Using the Handset, Headset, and Speakerphone, page 1-12
• Customizing Your Phone From the User Options Web Pages, page 1-15
Cisco IP Phone 7960 and 7940 Series User Guide
1-1
Page 12

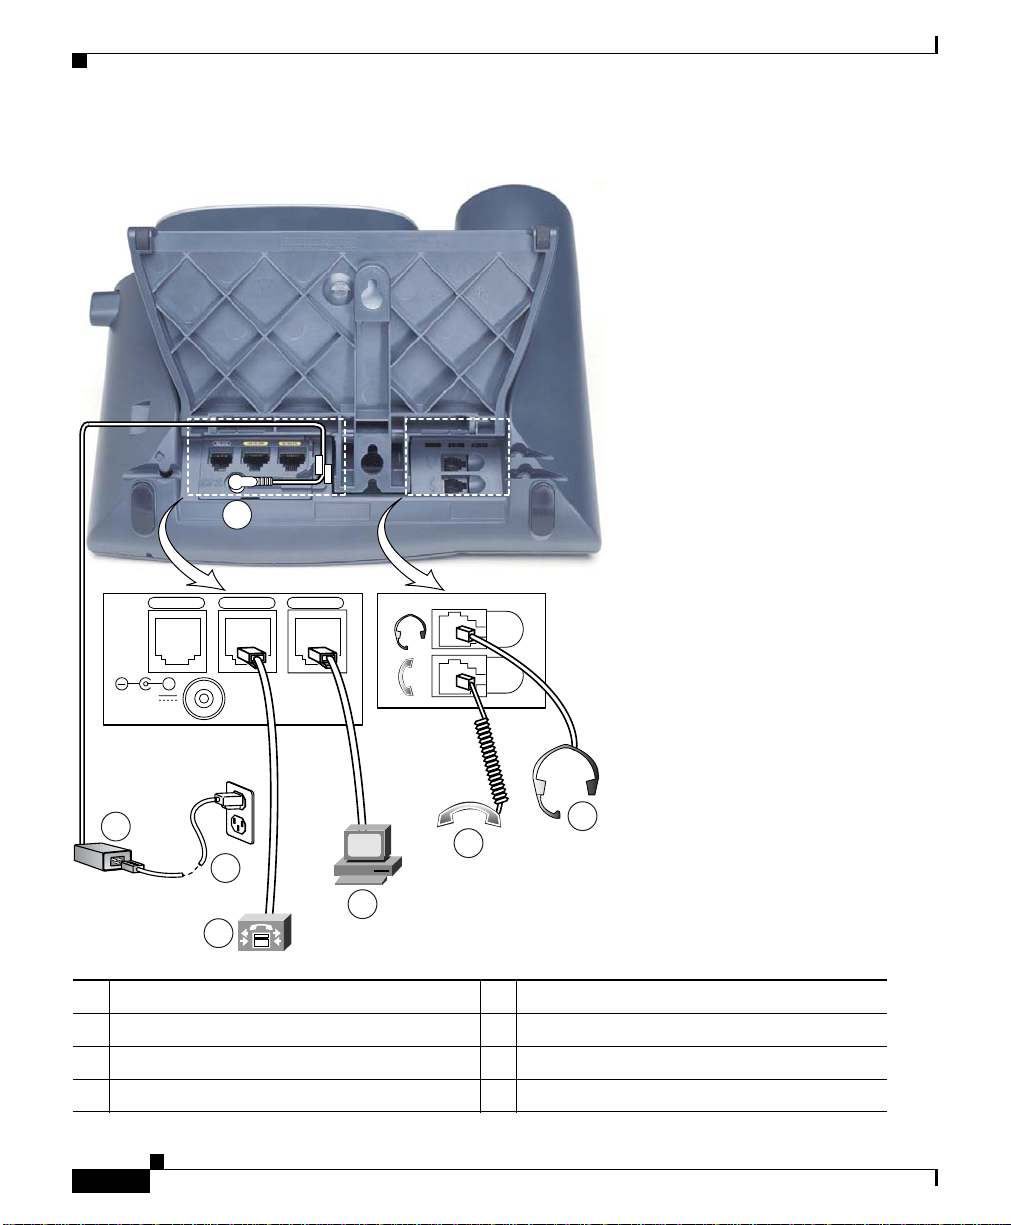
Connecting Your Cisco IP Phone
Connecting Your Cisco IP Phone
Chances are, your system administrator or a technician will connect your new
Cisco IP Phone to the corporate IP telephony network. If that is not the case,
connecting your phone is easy.
Follow the steps below. Refer to to locate ports on the back of your phone.
Before You Begin
Verify that your system administrator is ready for you to connect your
Cisco
IP Phone to the network.
Chapter 1 Introducing Your Cisco IP Phone
Warning
Step 1 Connect your Cisco IP Phone to the corporate IP telephony network. You can do
Be sure to read Appendix B, “Safety Notices,” before connecting or using your
phone.
this in one of two ways, depending on how your workspace is set up. See your
system administrator if you are not sure which method to choose:
• Direct network connection—For this method, you need at least one a vailable
Ethernet port in your workspace. Use the Ethernet cable included with your
phone to connect the network port on the back of your phone to the Ethernet
port in your workspace.
• Shared network connection—Use this method if you have a single Ethernet
port in your workspace with your desktop computer already connected to it.
First, disconnect the Ethernet cable from the computer and attach it to the
network port on the back of your phone. Ne xt, use the Ethernet cable included
with your phone to connect the access port on the back of your phone to your
desktop computer. Your Cisco
IP Phone now shares a network connection
with your computer.
Step 2 Connect the handset to the handset port. Ensure that the end of the cord with the
longer uncoiled section is connected to the body of the phone.
1-2
Cisco IP Phone 7960 and 7940 Series User Guide
78-10182-08
Page 13

Chapter 1 Introducing Your Cisco IP Phone
Step 3 If your system administrator deliv ered you r Cisco IP Phone with a power supply,
connect the power supply plug to the DC48V AC adapter port on the back of the
phone.
If your system administrator delivered your phone without a power supply, your
phone probably receives power through the Ethernet connection.
Step 4 Use the power cable to connect the power supply to a standard power outlet in
your workspace.
Step 5 To adjust the footstand height, release the footstand by pressing the footstand
adjustment knob and gently pull the footstand away from the body of the phone.
See the “Adjusting the Handset Rest” section on page 1-12 for information on
adjusting the handset rest to make sure the receiver will sit securely in the crad le.
Once you connect the Cisco IP Phone to its power source, a start-up process
begins. After sev eral minutes, th e phone’s LCD screen displays a neutral “ready”
screen. The details on your screen might vary, but a ready screen typically
displays the date and time, your extension number, and available soft keys.
Startup is complete and your phone is ready to use.
Connecting Your Cisco IP Phone
78-10182-08
Tip Soft keys point to feature options displayed al ong the bottom of your LCD screen.
Soft keys are flexible—they change depending on the status of your phone. For
example, you can see one set of soft key options when you pick up the handset,
and another set when the phone is not in use.
Cisco IP Phone 7960 and 7940 Series User Guide
1-3
Page 14
Connecting Your Cisco IP Phone
Ta b l e 1-1 Cisco IP Phone cable connections
1
Chapter 1 Introducing Your Cisco IP Phone
RS232
DC48V
2
10/100 SW 10/100 PC
+
7
6
3
5
4
58670
1 DC adapter port (DC48V) 5 Access port (10/100 PC)
2 Power supply with AC adapter port plug 6 Handset port
3 Power cable with wall socket plug 7 Headset port
4 Network port (10/100 SW)
Cisco IP Phone 7960 and 7940 Series User Guide
1-4
78-10182-08
Page 15

Chapter 1 Introducing Your Cisco IP Phone
Auto-Registering Your Phone Using TAPS
Related Topics
• Auto-Registering Your Phone Using TAPS, page 1-5
• A Road Map to Your Cisco IP Phone, page 1-6
• Using the Handset, Headset, and Speakerphone, page 1-12
Auto-Registering Your Phone Using TAPS
Y our ad ministrator may ask you to auto-register your Cisco IP Phone using TAPS,
the Tool for Auto-Registered Phones Support. TAPS might be used either for a
new phone or to replace an existing phone.
Note You should follow this procedure only if your phone administrator asks you to.
Procedure
Step 1 If the phone is not already installed, follow the installation instructions available
in the
“Connecting Your Cisco IP Phone” section on page 1-2.
After you plug the phone into a port, the phone automatically registers and
displays a number.
Step 2 Dial the TAPS extension provided by your system administrator.
78-10182-08
Step 3 A voice prompt asks you to select the language that you want to use. Choose
appropriately.
Step 4 Dial your personal extension number (provided by your system administrator),
then press the # key.
Note You may be instructed to enter the complete tel ephone number (including
area code).
Cisco IP Phone 7960 and 7940 Series User Guide
1-5
Page 16

Chapter 1 Introducing Your Cisco IP Phone
A Road Map to Your Cisco IP Phone
Step 5 To confirm, enter your personal extension number again, followed by the # key.
The phone displays a confirmation message.
Step 6 Hang up the phone.
The phone resets and displays your extension number.
Related Topics
• Connecting Your Cisco IP Phone, page 1-2
• A Road Map to Your Cisco IP Phone, page 1-6
• Using the Feature Buttons, page 1-10
• Navigating on Your Phone, page 1-11
• Using the Handset, Headset, and Speakerphone, page 1-12
A Road Map to Your Cisco IP Phone
1-6
Refer to the following illustrations and table to identify the buttons and parts on
your Cisco IP Phone and to find a description of related features.
Cisco IP Phone 7960 and 7940 Series User Guide
78-10182-08
Page 17

Chapter 1 Introducing Your Cisco IP Phone
Figure 1-1 Cisco IP Phone 7960
A Road Map to Your Cisco IP Phone
2
1
1617
15
Figure 1-2 Cisco IP Phone 7940
2
1
3
4
5
6
7
8
9
121314
3
1011
68561
4
78-10182-08
5
6
7
8
9
10111617 12131415
Cisco IP Phone 7960 and 7940 Series User Guide
68562
1-7
Page 18

A Road Map to Your Cisco IP Phone
1
Handset with
indicator light
2
LCD screen Displays features such as the time, date, your phone
3
Cisco IP Phone
model type
4
Line or speed
dial button
5
Footstand
adjustment
6
Directories
button
Chapter 1 Introducing Your Cisco IP Phone
Functions like a traditional handset. The light strip at the
top of the handset blinks when the phone rings and can be
set to remain lit when you receive a voice mail message.
For more information on working with the handset, refer
to the
“ Adjusting the Handset, Speakerphone, and Headset
Volume” section on page 2-1.
number, caller ID, line/call status and softkey tabs.
Indicates your Cisco IP Phone model.
Opens a new line or speed dials the number on the LCD
screen. Phones in the Cisco IP Phone 7960 series ha v e six
line or speed dial buttons and phones in the 7940 series
have two.
Allows you to adjust the angle of the phone base.
Provides access to call histories and directories (see the
“Using the Feature Buttons” section on page 1-10.)
1-8
7
? butt o n Displays help on your LCD screen for a phone button or
function (see the
page 1-10.)
8
Settings button Provides access to phone settings such as contrast and ring
sound, network configur ation, and status in formation (see
the
“Using the Feature Buttons” section on page 1-10.)
9
Speaker button Toggles the speaker on or off.
10
Mute button Toggles the mute on or off.
11
Headset button Toggles the headset on or off.
For more information on working with the headset, refer
to the
Cisco IP Phone 7960 and 7940 Series User Guide
“Using the Feature Buttons” section on
“Using the Headset” section on page 1-14.
78-10182-08
Page 19

Chapter 1 Introducing Your Cisco IP Phone
12
Volume button Increases or decreases volume for the handset, headset, or
13
Services button Provides access to any available phone services (see the
14
Messages
button
15
Navigation
button
A Road Map to Your Cisco IP Phone
speakerphone (depending upon which is currently acti ve).
Also controls the ringer volume (if the handset is in its
cradle), and the LCD screen contrast.
For more information on adjusting the volume, refer to the
“Adjusting the Handset, Speakerphone, and Headset
Volume” section on page 2-1 and the “Adjusting the
Ringer Volume” section on page 2-2.
“Using the Feature Buttons” section on page 1-10.)
Provides access to a message system, if available (see the
“Using the Feature Buttons” section on page 1-10.)
Enables you to scroll through text and select features
displayed on the LCD screen (see the
Phone” section on page 1-11.).
“Navigating on Y our
78-10182-08
16
Dial pad Works exactly like the dial pad on a traditional telephone.
17
Softkeys Enable you to engage any of the functions displayed on the
corresponding LCD screen tabs. Softkeys point to feature
options displayed along the bottom of your LCD screen.
Softkeys change depending on the status of your phone.
For example, you can see one set of softke y opt ions when
you pick up the handset, and another set when the phone
is not in use.
Related Topics
• Using the Feature Buttons, page 1-10
• Navigating on Your Phone, page 1-11
Cisco IP Phone 7960 and 7940 Series User Guide
1-9
Page 20

Using the Feature Buttons
Using the Feature Buttons
Your Cisco IP Phone has five feature buttons:
• Services button—Displays services on your phone’s LCD screen. These are
services to which you have already subscribed using the Cisco CallManager
User Options web pages. Your system administrator determines the services
that are available to you. For more information, see the
IP Phone Services” section on page 1-18.
• Messages button—Provides access to your voice mail message system. For
more information, see the
• Settings button—Displays network settings on your phone’s LCD screen,
plus options for adjusting your phone’s ringer sound and LCD screen
contrast.
• Directories button—Displays various directories on your phone’s LCD
screen, including missed, received, and placed calls. You can use each of
these directories to locate phone numbers and you can dial those numbers
from the directories. For more information, see the
from the Phone Logs” section on page 3-21 and the “Searching and Dialing
from the Phone Directory” section on page 3-23.
• ? button—Displays helpful information about buttons and features.
For help with:
Chapter 1 Introducing Your Cisco IP Phone
“Establishing Cisco
“Using Voice Mail” section on page 3-21.
“Viewing and Dialing
1-10
–
A specific button or softkey—Press the ? button once, then press the
button or softkey to display information about that button or key.
–
A specific feature—First press the Directories, Settings, or Services
buttons to display a list of available features. Use the Navigation button
to scroll through the list and select a feature. Press the ? button twice
quickly to display information about the selected feature.
–
The ? button feature itself—Press the ? button twice quickly (without
first selecting a feature). This brings up help about using the ? button.
–
Viewing network statistics about a call you are actively on—Press the ?
button twice quickly during the call.
Related Topics
• A Road Map to Your Cisco IP Phone, page 1-6
• Navigating on Your Phone, page 1-11
Cisco IP Phone 7960 and 7940 Series User Guide
78-10182-08
Page 21

Chapter 1 Introducing Your Cisco IP Phone
• Personalizing the Ringer Sound, page 2-3
• Changing the LCD Screen Contrast, page 2-5
• Accessing Network Configuration Data, page C-1
• Accessing Status Data, page C-2
Navigating on Your Phone
Navigating on your Cisco IP Phone is easy. You use the Navigation button, the
softkeys, and the key pad to make your selections:
• Softkeys correspond to the option tabs displayed along the bottom of your
LCD screen. Softkeys change depending on the status of your phone. For
example, you can see one set o f softkey optio ns when you pick up the handset,
and another set when the phone is not in use.
• The >> softkey allows you to re-position your cursor. The << softkey allows
you to delete a character or digit in an entry. Press the << softkey or the
Delete softkey if you make a mistake or need to edit an entry. The Delete
softkey allows you to edit a character or digit—it does not delete the entire
entry.
• You can choose menu items on your Cisco IP Phone in more than one way:
–
Using the Navigation button—Press the Navigation button (this is the
button with the up and do wn arro ws) to select (or highl ight) a menu item.
Then press the Select softkey.
Navigating on Your Phone
78-10182-08
–
Using an Item Number—You can press the number key on your phone’s
key pad that corresponds to the item number displayed on the LCD
screen. Use this method to select any menu item that has an item number
to the left of it
• To enter any letter on your LCD screen, use a corresponding number key.
Press the key one or more times to display a particular letter. For example,
press the 2 key one time for “a,” twice quickly for “b,” and three times
quickly for “c.” After you pause, the cursor automatically advances to allow
you to enter the next letter. Press the << softkey if you make a mistake.
Cisco IP Phone 7960 and 7940 Series User Guide
1-11
Page 22

Chapter 1 Introducing Your Cisco IP Phone
Using the Handset, Headset, and Speakerphone
Related Topics
• A Road Map to Your Cisco IP Phone, page 1-6
• Using the Feature Buttons, page 1-10
Using the Handset, Headset, and Speakerphone
Your Cisco IP Phone works with a handset, headset, or speakerphone.
For information on using each of these, refer to the following sections:
• Using the Handset, page 1-12
• Adjusting the Handset Rest, page 1-12
• Using the Speakerphone, page 1-14
• Using the Headset, page 1-14
Using the Handset
The handset on your Cisco IP Phone functions in the same way as a handset on a
traditional phone:
• To place and answer calls with the handset, simply lift the handset.
• To hang up, place the handset back in its cradle.
• T o switch from the handset to the speakerphone, press the Speaker button on
the front of your phone during a call, then ha ng up the ha ndset.
Related Topics
• Adjusting the Handset Rest, page 1-12
• Adjusting the Handset, Speakerphone, and Headset Volume, page 2-1
Adjusting the Handset Rest
If you mount your Cisco IP Phone on the wall or use the footstand on the phone,
you can adjust the handset rest to ensure the receiver will not slip out of the cradle.
To adjust the handset rest, follow the steps and refer to Figure 1-3.
Cisco IP Phone 7960 and 7940 Series User Guide
1-12
78-10182-08
Page 23

Chapter 1 Introducing Your Cisco IP Phone
Figure 1-3 Using the Handset Rest
1 2 3
Using the Handset, Headset, and Speakerphone
77354
78-10182-08
1
Set the handset aside and use your thumb and finger to grasp and pull out
the square plastic tab in the handset rest.
2
Rotate the tab 180 degrees.
3
Slide the tab back into the handset rest with the extension protruding from
the top of the tab.
Replace the handset in the rest. The tab hooks into a slot in the handset to
ensure that the handset will not slip out of the rest.
Related Topics
• Using the Handset, page 1-12
Cisco IP Phone 7960 and 7940 Series User Guide
1-13
Page 24

Using the Handset, Headset, and Speakerphone
Using the Speakerphone
You can use the speakerphone in conjunction with all of the features on your
Cisco
IP Phone.
To place and answer calls using the speakerphone, press the Speaker bu t t o n .
To switch from speakerphone to handset during a call, simply lift the handset.
Related Topics
• Adjusting the Handset, Speakerphone, and Headset Volume, page 2-1
Using the Headset
You can use the headset in conjunction with all of the features on your
Cisco
IP Phone, including the Volume and Mute buttons. Use these buttons to
adjust the volume to the ear piece and to mute the speech path from the headset
microphone.
T o place and answer calls using a headset, plug an approved headset into the back
of the phone base and press the Headset button on the front of your phone.
Chapter 1 Introducing Your Cisco IP Phone
1-14
Your phone supports four- or six-wire headset jacks. For information about
purchasing headsets, see the following URLs:
• http://cisco.getheadsets.com
• http://vxicorp.com/cisco
Caution Use only Cisco-approved headsets.
Warning
Cisco IP Phone 7960 and 7940 Series User Guide
This product relies on the building's installation for short-circuit (overcurrent)
protection. Ensure that a fuse or circuit breaker no larger than 120 VAC, 15A U.S.
(240 VAC, 10A international) is used on the phase conductors (all
current-carrying conductors).
78-10182-08
Page 25

Chapter 1 Introducing Your Cisco IP Phone
Customizing Your Phone From the User Options Web Pages
Warning
To avoid electric shock, do not connect safety extra-low voltage (SELV) circuits
to telephone-network voltage (TNV) circuits. LAN ports contain SELV circuits,
and WAN ports contain TNV circuits. Some LAN and WAN ports both use RJ-45
connectors. Use caution when connecting cables.
on page 1-4 illustrates the headset port and other cable connection ports on your
phone.
Related Topics
• Adjusting the Handset, Speakerphone, and Headset Volume, page 2-1
Customizing Your Phone From the User Options Web
Pages
You can use the Cisco CallManage r User Opti ons web pa ges to su bscribe t o
services. Services include web-based information and special phone features.
In addition to subscribing to services, you can use the Cisco CallManager User
Options web pages to:
• set up call forwarding rules—Forwarding Calls to Another Extension,
page 3-14
• change the language in which you view phone information—Changing the
Language for the Phone LCD Screen, page 2-6
• specify a policy for the message waiting indicator light on your phone’s
handset—
Adjusting the Message Waiting Indicator Light, page 2-4
78-10182-08
• assign speed dial buttons for your Cisco IP Phone—Using Speed Dial,
page 3-12
• manage personal contacts—, page 4-5
Note If you use the Cisco CallManager Extension Mobility service, changes that you
make from the User Options web pages are maintained in your device profile. .
Cisco IP Phone 7960 and 7940 Series User Guide
1-15
Page 26

Customizing Your Phone From the User Options Web Pages
Y ou can also ge t a copy of the documentation a vailable for your phone on the User
Options Pages.
This section covers the following topics:
• Logging In to the User Options Web Pages, page 1-16
• Changing the Default Language for the User Options Web Pages, page 1-17
• Establishing Cisco IP Phone Services, page 1-18
Logging In to the User Options Web Pages
Follow these instructions to log on and to access the main menu.
Procedure
Step 1 Use your Web browser to access the URL provided by your system administrator.
The Cisco CallManager User Options Log O n page app ears.
Step 2 Enter your user ID and your password and click Log On. Your user ID and
password are provided by your system administrator.
The Cisco CallManager User Options Me nu page ap pears.
Chapter 1 Introducing Your Cisco IP Phone
1-16
Step 3 Select your phone or, if applicable, your Cisco CallManager Extension Mobility
device profile from the “Select a device to configure” drop-down list.
The menu is context-sensitive and displays options appropriate for the device or
device profile that you have selected.
Related Topics
• Changing the Default Language for the User Options Web Pages, page 1-17
• Establishing Cisco IP Phone Services, page 1-18
Cisco IP Phone 7960 and 7940 Series User Guide
78-10182-08
Page 27

Chapter 1 Introducing Your Cisco IP Phone
Customizing Your Phone From the User Options Web Pages
Changing the Default Language for the User Options Web Pages
Use this procedure to change the default language (French or English, for
example) in which information is displa yed on the Ci sco CallM anager Use r
Options web pages.
If you use the Cisco CallManager Extension Mobility service, follow this
procedure to change the default language for both your device profile and your
User Options web pages.
To temporarily change the language for the User Options web pages, click the
“View page in” drop-down list located at the bottom of each web page. This
changes the language displayed for the current web session. The next time that
you log on, the User Options web pages will display in the default language.
Before You Begin
Log in to the User Options web page. For information on the User Options web
page and how to access it, see the
section on page 1-16.
“Logging In to the User Options Web Pages”
78-10182-08
Procedure
Step 1 From the User Options main menu, select your phone or, if applicable, your
Cisco
CallManager Extension Mobility device profile from the Select a device to
configure drop-down list.
The menu is context-sensitive and displays options appropriate for the device or
device profile that you have selected.
Step 2 The next step depends upon your selection from t he Select a d e vice to configure
drop-down list:
a. If you selected your phone (and not a device profile), click Change the
Locale for these web pages.
b. If you selected a device profile, click Change the Locale for your device
profile(s) and these web pages.
Note You will not have access to a device profile unless you use the
Cisco CallManager Extension Mobility service.
Cisco IP Phone 7960 and 7940 Series User Guide
1-17
Page 28

Customizing Your Phone From the User Options Web Pages
Step 3 Select the language that you want to use as the default language from the “User
Locale” drop-down list and click Update.
The language that you have selected now serves as the default langua ge fo r each
of the User Options web pages in the current web session and in future sessions.
If you use Cisco
CallManager Extension Mobility, the default language will
display on the LCD screen the next time you log on to a Cisco IP Phone.
Step 4 When you are finished, click Return to the Menu or Log Off at the bottom of the
page.
Related Topics
• Changing the Language for the Phone LCD Screen, page 2-6
• Logging In to the User Options Web Pages, page 1-16
• Establishing Cisco IP Phone Services, page 1-18
Establishing Cisco IP Phone Services
Chapter 1 Introducing Your Cisco IP Phone
1-18
You can access information services, such as weather, stock quotes, and other
services available at your company, using your Cisco IP Phone’s LCD display.
Before accessing these services on your phone, your system administrator must
customize them and make them av ailable to you. Additionally, you must subscribe
to the services that you want to appear on your phone.
To view services that you have subscribed to, press the Services button on your
Cisco IP Phone. Use the Navigation button to select the desired service, then press
the Select softkey to display information about that service. When you are
finished, press the services button to exit the Services menu.
Y ou can subscribe to the same service multiple times and gi ve each instance of the
same service a unique name. For example, if you want to subscribe to a weather
service for several regions, you can rename each version.
The following topics describe how to establish services with the User Options
web pages:
• Subscribing to Services, page 1-19
• How to Change or End Subscriptions, page 1-20
Cisco IP Phone 7960 and 7940 Series User Guide
78-10182-08
Page 29

Chapter 1 Introducing Your Cisco IP Phone
Related Topics
• Logging In to the User Options Web Pages, page 1-16
• Changing the Default Language for the User Options Web Pages, page 1-17
Subscribing to Services
Follow these steps to subscribe to services.
Before You Begin
Log in to the User Options web page. For information on the User Options web
page and how to access it, see the
section on page 1-16.
Procedure
Step 1 From the User Options main menu, click Configure your Cisco IP Phone
Services.
The Subscribe/Unsubscribe IP Phone Services page appears.
Step 2 Select the service you want to add to your phone from the “Available Services”
drop-down list.
Customizing Your Phone From the User Options Web Pages
“Logging In to the User Options Web Pages”
78-10182-08
Step 3 Click Continue.
Step 4 Enter any required information. For example, if the service is “movie times,” you
might need to enter your zip code to enable th e service to display movies in your
location.
Step 5 When you are done, click Subscribe to save your settings. To restore your
previous settings, click Back.
Note If your phone uses Cisco CallManager Extension Mobility, you will need
to log out and then log back in to the extension mobility service on your
IP Phone before the changes take effect.
Cisco IP Phone 7960 and 7940 Series User Guide
1-19
Page 30

Customizing Your Phone From the User Options Web Pages
Step 6 To subscribe to another service, click New Subscription in the Subscribed
Services pane.
To exit, click Return to the Menu or Log Off at the bottom of the page.
Related Topics
• Establishing Cisco IP Phone Services, page 1-18
• How to Change or End Subscriptions, page 1-20
How to Change or End Subscriptions
You can change or end your current subscriptions at any time. To do so, follow
these steps.
Before You Begin
Log in to the User Options web page. For information on the User Options web
page and how to access it, see the
section on page 1-16.
Chapter 1 Introducing Your Cisco IP Phone
“Logging In to the User Options Web Pages”
1-20
Procedure
Step 1 From the User Options main menu, click Configure your Cisco IP Phone
Services.
The Subscribe/Unsubscribe IP Phone Services page appears.
Step 2 In the Y our Subscribed Services pane, click on the service that you want to change
or end.
Step 3 If you want to change your subscription, change the information in the desired
fields and click Update. Or, click Unsubscribe to end your subscription to the
service.
Note If your phone uses Cisco CallManager Extension Mobility, you will need
to log out and then log back in to the extension mobility service on your
IP Phone before the changes take effect.
Cisco IP Phone 7960 and 7940 Series User Guide
78-10182-08
Page 31

Chapter 1 Introducing Your Cisco IP Phone
Step 4 When you are finished, click Return to the Menu or Log Off at the bottom of the
page.
Related Topics
• Subscribing to Services, page 1-19
• Establishing Cisco IP Phone Services, page 1-18
Customizing Your Phone From the User Options Web Pages
78-10182-08
Cisco IP Phone 7960 and 7940 Series User Guide
1-21
Page 32

Customizing Your Phone From the User Options Web Pages
Chapter 1 Introducing Your Cisco IP Phone
1-22
Cisco IP Phone 7960 and 7940 Series User Guide
78-10182-08
Page 33

CHAPTER
2
Customizing Phone Settings
These procedures help you personalize settings for your C isco IP Phone:
• Adjusting the Handset, Speakerphone, and Headset Volume, page 2-1
• Adjusting the Ringer Volume, page 2-2
• Personalizing the Ringer Sound, page 2-3
• Adjusting the Message Waiting Indicator Light, page 2-4
• Changing the LCD Screen Contrast, page 2-5
• Changing the Language for the Phone LCD Screen, page 2-6
Adjusting the Handset, Speakerphone, and Headset Volume
Step 1 Press the up or down Volume butto n when the hand set, speaker phone, or head set
78-10182-08
Y ou can adjust the volume of the caller for the handset, speakerphone, and headset
individually. When you change the volume for one, the others are not effected.
Follow these steps to adjust the v ol ume on t he handset, speak er phone, or h eadset.
Procedure
is in use.
Cisco IP Phone 7960 and 7940 Series User Guide
2-1
Page 34

Adjusting the Ringer Volume
Note If you press the Volume button when none of these are in use, you are
Step 2 To save this volume setting for future calls, press the Save softkey.
If you adjust the volume duri ng a call without pressing Save, you are changing the
volume lev e l only for the duration of that particular call; on subsequent calls, the
volume level will revert to the previously saved setting.
Related Topics
• Adjusting the Ringer Volume, page 2-2
• Personalizing the Ringer Sound, page 2-3
• Changing the LCD Screen Contrast, page 2-5
Chapter 2 Customizing Phone Settings
adjusting the ringer volume. For details, see the
Volume” section on page 2-2.
“Adjusting the Ringer
Adjusting the Ringer Volume
To change the volume used by the ringer, press the up or down Volume button
while the handset is in its cradle. Continue to press the Volume button to hear
sample rings and to adjust the volume to the desired level. The ringer volume is
automatically saved.
Related Topics
• Adjusting the Handset, Speakerphone, and Headset Volume, page 2-1
• Personalizing the Ringer Sound, page 2-3
• Changing the LCD Screen Contrast, page 2-5
Cisco IP Phone 7960 and 7940 Series User Guide
2-2
78-10182-08
Page 35

Chapter 2 Customizing Phone Settings
Personalizing the Ringer Sound
You can change the sound your phone makes when it rings to suit your tastes an d
to help you differentiate between your phone ringing and another nearby phone,
or to differentiate between different lines on your own phone.
Follow these steps to change the sound used by the ringer.
Procedure
Step 1 Press the Settings butto n .
Step 2 From the Settings menu, use the Navigation b ut ton to select Ring Type and press
the Select softkey.
Step 3 If you have multiple lines, use the Navigation button to scroll through the list of
your lines. When you find the line you want to conf igure, press the Select softke y.
Note You can only use six different ring tones on your pho ne, If you ha ve mo re
than six lines, some of your lines must share a ring tone.
Personalizing the Ringer Sound
78-10182-08
Step 4 Use the Navigation button to scroll through the list of ring types and press the
Play softkey to hear the selected ring type.
Step 5 When you find the ring you want, press the Select softkey to check the
corresponding check box.
To set the ring tone back to the default ring tone, select Default from the list.
Step 6 Press the OK softkey to accept and save your ringer selection.
Step 7 Press the Save softkey to save all of your settings and to exit the Settings menu.
Related Topics
• Adjusting the Handset, Speakerphone, and Headset Volume, page 2-1
• Adjusting the Ringer Volume, page 2-2
• Changing the LCD Screen Contrast, page 2-5
Cisco IP Phone 7960 and 7940 Series User Guide
2-3
Page 36

Chapter 2 Customizing Phone Settings
Adjusting the Message Waiting Indicator Light
Adjusting the Message Waiting Indicator Light
You can change the behavior policy of the message waiting indicator light (or
“lamp”) for each line appearance on your Cisco IP Phone. The message waiting
indicator is the red strip on your phone’s handset that blinks when you receive an
incoming call. In its default state, the message waiting indicator light is usually
configured to remain lit when you receive a new voice mail message. However,
the default policy is determined by your system administrator.
Follow these steps to specify the message waiting indicator light policy (on, off,
or default) for one or more of your phone lines.
Before You Begin
Log in to the User Options web page. For information on the User Options web
page and how to access it, see the
section on page 1-16.
Procedure
“Logging In to the User Options Web Pages”
2-4
Step 1 From the User Options web page, click Change the Message Waiting Lamp
policy for your phone.
The Change Your Message Waiting Lamp Policy page appears.
Step 2 Click the drop-down list that corresponds to the line that you want to change.
Choose Use System Policy, Always light, or Never light.
Step 3 Click Update.
Step 4 When you are finished, click Return to the Menu or Log Off at the bottom of the
page.
Related Topics
• Using Voice Mail, page 3-21.
Cisco IP Phone 7960 and 7940 Series User Guide
78-10182-08
Page 37

Chapter 2 Customizing Phone Settings
Changing the LCD Screen Contrast
To improve the readability of the LCD screen, follow these steps to adjust the
contrast.
Procedure
Step 1 Press the Settings butto n .
Step 2 From the Settings menu, use the Navigation button to select Contrast.
Step 3 Perform one of the following:
• To set the desired contrast level—press the Up or Down softkeys (or the
Volume buttons).
• T o restore your prev iously saved contrast setting—press the more softkey and
then the Restore softkey.
• To restore the factory default contrast setting—press the more softkey and
then the Factory softkey.
Changing the LCD Screen Contrast
78-10182-08
Step 4 Press the OK softkey to accept and save your changes.
Related Topics
• Adjusting the Handset, Speakerphone, and Headset Volume, page 2-1
• Adjusting the Ringer Volume, page 2-2
• Personalizing the Ringer Sound, page 2-3
• Adjusting the Message Waiting Indicator Light, page 2-4
Cisco IP Phone 7960 and 7940 Series User Guide
2-5
Page 38

Chapter 2 Customizing Phone Settings
Changing the Language for the Phone LCD Screen
Changing the Language for the Phone LCD Screen
Use this procedure to change the default language in which information is
displayed on the Cisco IP Phone’s LCD screen.
Note If you use the Cisco CallManager Extension Mobility service, follow the
procedure described in the
Web Pages” section on page 1-17. This procedure allows you to change the
default language for your device profile.
Before You Begin
Log in to the User Options web page. For information on the User Options web
page and how to access it, see the
section on page 1-16.
Procedure
“Changing the Default Language for the User Opti ons
“Logging In to the User Options Web Pages”
2-6
Step 1 From the User Options main menu, select your phone from the “Select a device
to configure” drop-down list.
Step 2 Click Change the Locale for this phone.
The Select a User Locale for your Phone page appears.
Step 3 Select the language that you want to use as the default language from the “User
Locale for this phone” drop-down list and click Update.
The language that you have selected now serves as the default language for your
Cisco IP Phone LCD screen.
If you change the default language for your phone’s LCD screen while you are on
an active call, the phone waits for you to end the call before updating the LCD
screen.
Step 4 When you are finished, click Return to the Menu or Log Off at the bottom of the
page.
Cisco IP Phone 7960 and 7940 Series User Guide
78-10182-08
Page 39

Chapter 2 Customizing Phone Settings
Related Topics
• Changing the LCD Screen Contrast, page 2-5
• Changing the Default Language for the User Options Web Pages, page 1-17
Changing the Language for the Phone LCD Screen
78-10182-08
Cisco IP Phone 7960 and 7940 Series User Guide
2-7
Page 40

Changing the Language for the Phone LCD Screen
Chapter 2 Customizing Phone Settings
2-8
Cisco IP Phone 7960 and 7940 Series User Guide
78-10182-08
Page 41

CHAPTER
3
Placing a Call and Other Basic Phone
Tasks
Basic phone tasks include placing, receiving and forwarding calls. The following
sections describe how to perform these basic tas ks on your C isco IP Phone :
• Making Telephone Calls, page 3-1
• Using Speed Dial, page 3-12
• Forwarding Calls to Another Extension, page 3-14
• Making Conference Calls, page 3-17
• Using Voice Mail, page 3-21
• Viewing and Dialing from the Phon e Logs, pag e 3-21
• Searching and Dialing from the Phone Directory, page 3-23
Caution Using a cell or mobile phone in close proximity to a Cisco IP Phone might cause
interference.
Making Telephone Calls
These sections describe how you can place, answer, or otherwise manage a
telephone call:
• Placing a Call, page 3-2
• Answering a Call, page 3-4
78-10182-08
Cisco IP Phone 7960 and 7940 Series User Guide
3-1
Page 42

Making Telephone Calls
• Ending a Call, page 3-4
• Muting a Call, page 3-5
• Putting a Call on Hold, page 3-6
• Transferring a Call to Another Extension, page 3-7
• Redialing the Last Number Dialed, page 3-8
• How to Get Notified When a Busy Line is Available Using Cisco Call Back,
page 3-8
• Storing and Retrieving a Call Using Call Park, page 3-9
• Answering Calls on Another Extension Using Call Pickup, page 3-10
Placing a Call
Table 3-1 lists the different ways you can place a call with your Cisco IP Phone.
Ta b l e 3-1 Placing calls on your Cisco IP Phone
Chapter 3 Placing a Call and Other Basic Phone Tasks
If you want to... Then...
use the receiver Lift the handset and dial the number.
dial from one of your multiple
lines
make a new call on the current
Press the line button that corresponds with your extension and dial
the number that you want to reach.
Press the NewCall softkey and dial the number.
line
dial with the phone on hook From the main screen, dial the number and press the Dial softkey.
The phone will not produce a dial tone until after you press th e Dial
softkey.
You can also press a line button, the Headset button, the Speaker
button, or lift the receiver to place the call.
Note If you are dialing with the phone on hook, you canno t use *
or # as the leading digit. If you need to use these keys, dial
with the phone off hook.
use a headset Press the Headset button and dial the number.
use the speakerphone Press the Speaker button and dial the number.
Cisco IP Phone 7960 and 7940 Series User Guide
3-2
78-10182-08
Page 43

Chapter 3 Placing a Call and Other Basic Phone Tasks
Making Telephone Calls
Table 3-1 Placing calls on your Cisco IP Phone (continued)
If you want to... Then...
redial the most recently dialed
number
use speed dial numbers Press a Speed dial button to place a call to the corresponding
use a directory Select a number from one of the directories, then press the Dial
dial a Personal Address Book
entry
dial a Personal Fast Dial number Refer to the “Dialing a Personal Fast Dials Entry” section on
Press the Redial softkey.
number.
See the “Using Speed Dial” section on page 3-12 for details.
softkey.
See the “Viewing and Dialing from the Phone Logs” section on
page 3-21 for details.
Refer to the “Dialing a Personal Address Book Entry” section on
page 5-9.
page 5-20.
78-10182-08
Tip If you receive a busy tone or a ring with no answer when you call another
extension, you can use the Cisco
extension is available. See the
Call Back feature to get an alert when the
“How to Get Notified When a Busy Line is
Available Using Cisco Call Back” section on page 3-8.
Related Topics
• A Road Map to Your Cisco IP Phone, page 1-6
• Answering a Call, page 3-4
• Ending a Call, page 3-4
• How to Get Notified When a Busy Line is Available Using Cisco Call Back,
page 3-8
• Redialing the Last Number Dialed, page 3-8
• Using Speed Dial, page 3-12
• Making Conference Calls, page 3-17
Cisco IP Phone 7960 and 7940 Series User Guide
3-3
Page 44

Chapter 3 Placing a Call and Other Basic Phone Tasks
Making Telephone Calls
Answering a Call
Table 3-2 lists ways to answer an incoming call:
Ta b l e 3-2 Answering a Call
If you want to... Then...
use the handset Lift the handset.
use a headset If the Headset button:
• is not lit, then press it.
• is lit, then press the Answer softkey or the line button of the
incoming call.
use the speakerphone Press the Answer softkey or the Speaker button.
use the AutoAnswer feature The phone will automatically answer the call when your phone
receives it, if your administrator turned AutoAnswer on for your
extension.
Related Topics
• Placing a Call, page 3-2
• Ending a Call, page 3-4
• Muting a Call, page 3-5
• Putting a Call on Hold, page 3-6
• Answering Calls on Another Extension Using Call Pickup, page 3-10
Ending a Call
Table 3-3 lists ways to end a call:
Ta b l e 3-3 Ending a Call
If you are using... Then...
the handset Hang up the handset.
Cisco IP Phone 7960 and 7940 Series User Guide
3-4
78-10182-08
Page 45

Chapter 3 Placing a Call and Other Basic Phone Tasks
Making Telephone Calls
Table 3-3 Ending a Call (continued)
If you are using... Then...
a headset Press the Headset button or the EndCall softkey.
the speakerphone Press the Speaker button or the EndCall softkey.
Related Topics
• Placing a Call, page 3-2
• Answering a Call, page 3-4
• Transferring a Call to Another Extension, page 3-7
• Forwarding Calls to Another Extension, page 3-14
Muting a Call
You can mute the handset, headset, or speakerphone during a call. The mute
feature temporarily disables your phone’ s microphone. Mute pre vents the party or
parties on the other end of the line from hearing you, but does not interfere with
your ability to hear them.
To mute a call, pre ss the Mute button. To disengage mute, press Mute again.
78-10182-08
Related Topics
• Placing a Call, page 3-2
• Answering a Call, page 3-4
• Ending a Call, page 3-4
• Putting a Call on Hold, page 3-6
Cisco IP Phone 7960 and 7940 Series User Guide
3-5
Page 46

Chapter 3 Placing a Call and Other Basic Phone Tasks
Making Telephone Calls
Putting a Call on Hold
When you put a call on hold, the call remains active even though you and the other
party cannot hear one anothe r. You can answer other call s w hil e a cal l is on hol d.
Note Engaging the Hold feature generates music or a beeping tone. For this reason,
avoid putting a conference call on hold.
Table 3-4 lists ways to use the Hold feature:
Ta b l e 3-4 Putting a Call on Hold
If you... Then...
want to put a call on hold Press the Hold softkey.
want to resume a call on hold Press the Resume softkey.
have multiple calls on hold Use the Navigation b utton to select the desired call befo re you press
Resume.
have multiple calls on multiple
lines on hold
Press the line button for the line to which you want to switch and
use the Navigation button to select the desired call. Press Resume.
If you cannot use the Navigation button because only one line
displays on your phone’s LCD screen, press the line button next to
the call that you want to resume.
3-6
If your phone opens a new line when you press the l ine button, press
the EndCall softkey to return to the desired call.
Tip If you are using multiple lines, to see the phone number for
a call you have on hold, press the ? button followed by the
line button of the call on hold.
Related Topics
• Placing a Call, page 3-2
• Answering a Call, page 3-4
• Ending a Call, page 3-4
• Muting a Call, page 3-5
• Transferring a Call to Another Extension, page 3-7
Cisco IP Phone 7960 and 7940 Series User Guide
78-10182-08
Page 47

Chapter 3 Placing a Call and Other Basic Phone Tasks
Transferring a Call to Another Extension
Follow these steps to transfer a call to another phone.
Procedure
Step 1 During a call, press the Trnsfer softkey. This puts the call on hold.
Step 2 Dial the number or office extension to which you want to transfer the call.
Step 3 When it rings on the other end, press Trnsfer again. Or, when the party answers,
announce the call and then press Trnsfer.
Step 4 If you are using a handset, hang up.
If the party refuses the call, press the Resume softkey to return to the original call.
Related Topics
• Placing a Call, page 3-2
Making Telephone Calls
78-10182-08
• Answering a Call, page 3-4
• Ending a Call, page 3-4
• Storing and Retrieving a Call Using Call Park, page 3-9
• Forwarding Calls to Another Extension, page 3-14
Cisco IP Phone 7960 and 7940 Series User Guide
3-7
Page 48

Chapter 3 Placing a Call and Other Basic Phone Tasks
Making Telephone Calls
Redialing the Last Number Dialed
To redial the most recently dialed number, press the Redial softkey. Doing so
without lifting the handset activates the speakerphone or headset.
T o redial a number from a line other th an your primary line, select the desired line
button and then press Redial.
Related Topics
• Placing a Call, page 3-2
• Ending a Call, page 3-4
• How to Get Notified When a Busy Line is Available Using Cisco Call Back,
page 3-8
How to Get Notified When a Busy Line is Available Using Cisco
Call Back
3-8
If you call an extension and the line is busy or the call goes unanswered, you can
use the Cisco
take a call.
Procedure
Step 1 Call an extension. While you hear the busy tone or ringing tone, press the
CallBack softkey.
A CallBack activation confirmation message displays.
Note Y ou cannot acti vate call back notification if the called party has for warded
Step 2 Press the Exit softkey to close the confirmati on screen or press the Cancel softkey
to cancel the call back notification.
Cisco IP Phone 7960 and 7940 Series User Guide
Call Back feature to be notified when the extension is available to
all calls to another extension.
78-10182-08
Page 49

Chapter 3 Placing a Call and Other Basic Phone Tasks
Step 3 T o verify t he status of the call back notif ication, press the CallBack softkey while
your phone is idle.
A confirmation message displays.
Press the Exit softkey to close the confirmati on screen or press the Cancel softkey
to cancel call back notification.
Step 4 When the extension you called is available to receive a call, you receive an audio
and visual alert from your phone. Press Dial to dial the number.
Related Topics
• Placing a Call, page 3-2
• Answering a Call, page 3-4
• Ending a Call, page 3-4
• Redialing the Last Number Dialed, page 3-8
Making Telephone Calls
Storing and Retrieving a Call Using Call Park
Park a call when you want to store the call before retrie ving it f rom another phone
in the Cisco CallManager system (for example, a phone in someone else’s office
or in a conference room). Call park numbers are pre-configured for this purpose
by your system administrator.
Procedure
Step 1 During an active call, press the more softkey until you see the Park tab.
Step 2 Press Park. The LCD screen displays the special call park number at which the
call is stored. If the screen does not display a call park number, the call park
feature is not available to you.
Step 3 Make a note of the call park number, then hang up. Th e call is pa rked at that
number, allowing you to retrieve it from another phone.
Cisco IP Phone 7960 and 7940 Series User Guide
78-10182-08
3-9
Page 50

Chapter 3 Placing a Call and Other Basic Phone Tasks
Making Telephone Calls
Step 4 T o retrieve the parked call from any phone in the Cisco CallManager system, dial
the call park number at which the call is parked.
Note You have a limited amount of time to retrieve the parked call before it
reverts to ringing at its original destination. See your system
administrator for this time limit.
Related Topics
• Placing a Call, page 3-2
• Answering a Call, page 3-4
• Ending a Call, page 3-4
• Transferring a Call to Another Extension, page 3-7
Answering Calls on Another Extension Using Call Pickup
3-10
You can answer an incoming call that is ringing on a telephone extension other
than your own by using the call pickup feature.
There are two types of call pickup available on the Cisco IP Phone, as described
in these topics:
• How to Pick Up Calls Within Your Group, page 3-11
• How to Pick Up Calls Outside of Your Group, page 3-11
Note Call pickup and group call pickup are optional features conf igured by your system
administrator; your phone does not support these features by default.
Related Topics
• Placing a Call, page 3-2
• Answering a Call, page 3-4
• Ending a Call, page 3-4
Cisco IP Phone 7960 and 7940 Series User Guide
78-10182-08
Page 51

Chapter 3 Placing a Call and Other Basic Phone Tasks
• Putting a Call on Hold, page 3-6
• Redialing the Last Number Dialed, page 3-8
How to Pick Up Calls Within Your Group
Call pickup allows you to pick up incoming calls within your own group. A
“group” in this sense is any consolidation of Cisco IP Phone extensions, as
defined by your system administrator. For example, your group might contain
co-workers in neighboring offices or cubes.
Activate call pickup so that an incoming call delivered to another extension in
your group rings on your extension.
Procedure
Step 1 Press any available line button on your Cisco IP Phone.
Step 2 Press the PickUp softkey. The call now rings on your phone.
Step 3 Answer the incoming call.
Making Telephone Calls
Tip If there is more than one incoming call involved when you activate call pickup,
the first unanswered call will ring at your phone.
Related Topics
• Storing and Retrieving a Call Using Call Park, page 3-9
• How to Pick Up Calls Outside of Your Group, page 3-11
How to Pick Up Calls Outside of Your Group
Group call pickup allows y ou to pick up incoming calls withi n your o wn group or
in other groups. A “group” might contain co-workers in neighboring offices or
cubes.
You must dial the appropriate call pickup group number when using this feature.
A call pickup group number is provided to you by your system administrator.
Cisco IP Phone 7960 and 7940 Series User Guide
78-10182-08
3-11
Page 52

Using Speed Dial
Step 1 Press any available line button.
Step 2 Press the GPickUp softkey.
Step 3 Dial the required call pickup group number.
Step 4 Answer the incoming call that is redirected to your phone.
Step 5 To pick up a call usin g a different call pick up grou p numbe r, hang up and begin
Tip If there is more than one incoming call involved when you activate group call
Chapter 3 Placing a Call and Other Basic Phone Tasks
Procedure
again at Step 1.
pickup, you receive the f irst unanswered cal l. If there is no u nanswered call in the
group, or if you dial an invalid group number, you receive a fast busy tone.
Related Topics
• Storing and Retrieving a Call Using Call Park, page 3-9
• How to Pick Up Calls Within Your Group, page 3-11
Using Speed Dial
The buttons to the right of the LCD screen on your Cisco IP Phone can be used as
phone lines or as speed dial buttons, as determined by your system admin istrator.
You can assign phone numbers and text labels to speed di al buttons using the
Cisco CallManager User Options web pages.
Unlike the Fast Dial feature (see the “Using Fast Dials” section on page 5-12),
Speed Dial does not require subscribing to or using a service.
Note If you are using one or more Cisco IP Phone 7914 Expansion Modules, you can
access extra speed dial or line buttons. To configure speed dial buttons for your
Expansion Module, follow the steps in the procedure below.
Cisco IP Phone 7960 and 7940 Series User Guide
3-12
78-10182-08
Page 53

Chapter 3 Placing a Call and Other Basic Phone Tasks
Follow these instructions to set up your speed dial buttons.
Before You Begin
Log in to the User Options web page. For information on the User Options web
page and how to access it, see the
section on page 1-16.
Procedure
Step 1 From the User Options web page, click Add/Update your Speed Dials.
The Add/Update Your Speed Dials page appears. You will see a section for setting
speed dials on your phone. If you hav e one or mo re Expansion Modul es, you will
see another section for setting speed dials for each of your Expansion
Step 2 In an available Speed Dial box, enter a phone number or extension that you want
to associate to one of your speed dial buttons.
Note Be sure to enter the number exactly as you would if you were to call that
number. For example, include an access code such as 9 or the area code,
if necessary.
Using Speed Dial
“Logging In to the User Options Web Pages”
Modules.
78-10182-08
Step 3 In each corresponding Display T e xt box, enter a text label that you want displayed
on your phone’ s LCD screen. Y ou can enter a maximum of 30 characters for phone
base text and 14 characters for Expansion Module text.
Step 4 Click Update to activate new speed dial buttons and to display the corresponding
text on your phone’s LCD screen. Your LCD screen(s) and lighted buttons will
reset.
Step 5 When you are finished, click Return to the Menu or Log Off at the bottom of the
page.
Note If your phone uses Cisco CallManager Extension Mobility, you will need
to log out and back in to the extension mobility service on your phone
before the changes take effect.
Cisco IP Phone 7960 and 7940 Series User Guide
3-13
Page 54

Chapter 3 Placing a Call and Other Basic Phone Tasks
Forwarding Calls to Another Extension
Related Topics
• Using Fast Dials, page 5-12
• Making Telephone Calls, page 3-1
Forwarding Calls to Another Extension
Call forwarding allows you to redirect all incoming calls from your
Cisco
IP Phone to another number.
Use call forwarding to:
• Send incoming calls to another number where you can answer the calls (for
example, if you are going to be working in an alternate office).
• Send incoming calls directly to voice mail. Your desk phone does not ring
when calls are routed to your voice mail through the call forwarding feature.
Call forwarding can send your calls to another IP Phone or to a traditional analog
phone.
If there is no answer at the forwarded number, either a person or voice mail, the
call will be sent back to your voice mail system.
Related Topics
• Setting Up Call Forwarding on Your Phone, page 3-14
• Setting Up Call Forwarding When Not at Your Phone, page 3-15
• Canceling Call Forwarding, page 3-16
Setting Up Call Forwarding on Your Phone
Follow these steps to set up call forwarding on your phone.
Procedure
Step 1 Press the CFwdAll softkey. You should hear two beeps.
Step 2 Enter the number to which you want to forward all of your calls, exactly as you
would if you were placing a call to that number.
Cisco IP Phone 7960 and 7940 Series User Guide
3-14
78-10182-08
Page 55

Chapter 3 Placing a Call and Other Basic Phone Tasks
For example, enter an access code such as 9 or the area code, if necessary. Your
system administrator might restrict the call forwarding feature to n umbers wit hin
your company.
After you enter the number, an animated phone icon with a flashing right arrow
appears in the upper-right corner of the LCD screen. The LCD screen also
displays a message confirming the number or extension to which your calls are
being forwarded.
Step 3 To cancel call forwarding, press the CFwdAll softkey.
Tips
• To set up call forwarding when not at your phone, see the “Setting Up Call
Forwarding When Not at Your Phone” section on page 3-15.
• To use call forwarding to send all of your incoming calls directly to your
voice mail without causing your desk phone to ring, see the
Forwarding When Not at Your Phone” section on page 3-15.
Related Topics
• Forwarding Calls to Another Extension, page 3-14
• Setting Up Call Forwarding When Not at Your Phone, page 3-15
• Canceling Call Forwarding, page 3-16
Forwarding Calls to Another Extension
“Setting Up Call
Setting Up Call Forwarding When Not at Your Phone
If you are away from your phone, use the Cisco CallManager User Options web
pages to set up call forwarding.
Before You Begin
Log in to the User Options web page. For information on the User Options web
page and how to access it, see the
section on page 1-16.
78-10182-08
“Logging In to the User Options Web Pages”
Cisco IP Phone 7960 and 7940 Series User Guide
3-15
Page 56

Forwarding Calls to Another Extension
Procedure
Step 1 From the User Options web page, click Forward al l calls to a differ ent number.
The Forward Your Cal ls page appea rs.
Step 2 Check the check box next to the line from which you want your incoming calls
forwarded.
Step 3 Choose where to send calls:
• To send calls directly to voice mail, and not ring your phone, choose
Voice
• To send calls to a specific number, choose this number and enter the phone
number or extension in the box provided.
Be sure to enter the number exactly as you would if you were to call that
number. For example, enter an access code such as 9 or the area code, if
necessary. Your system administrator might restrict the call forwarding
feature to numbers within your company.
Step 4 Click Update.
Chapter 3 Placing a Call and Other Basic Phone Tasks
Mail.
Related Topics
• Forwarding Calls to Another Extension, page 3-14
• Setting Up Call Forwarding on Your Phone, page 3-14
• Canceling Call Forwarding, page 3-16
Canceling Call Forwarding
You can cancel call forwarding from either your phone or on the web.
To cancel call forwarding from your phone, press the CFwAll softkey.
To cancel call forwarding when you are away from your phone, perform the
following procedure.
Cisco IP Phone 7960 and 7940 Series User Guide
3-16
78-10182-08
Page 57

Chapter 3 Placing a Call and Other Basic Phone Tasks
Before You Begin
Log in to the User Options web page. For information on the User Options web
page and how to access it, see the
section on page 1-16.
Procedure
Step 1 From the User Options web page, click Forward al l calls to a differ ent number.
The Forward Your Cal ls page appea rs.
Step 2 Clear the checkbox next to the line for which you want to cancel call forwarding.
Step 3 Click Update.
Related Topics
• Forwarding Calls to Another Extension, page 3-14
• Setting Up Call Forwarding on Your Phone, page 3-14
• Setting Up Call Forwarding When Not at Your Phone, page 3-15
Making Conference Calls
“Logging In to the User Options Web Pages”
Making Conference Calls
Your Cisco IP Phone supports conference calls, enabling you to talk with multiple
parties at the same time. When you are on a conference call, you can use regular
phone features such as Mute, Hold, Transfer, and speakerphone.
This section covers the following topics:
• Placing a Conference Call, page 3-18
• Using Meet-Me Conferences, page 3-18
• Conferencing by Barging in on Established Conversations, page 3-20
78-10182-08
Cisco IP Phone 7960 and 7940 Series User Guide
3-17
Page 58

Making Conference Calls
Placing a Conference Call
Follow these steps to turn a call into a conference call.
Procedure
Step 1 During a call, press the more softkey and then the Confrn softkey. Doing so
automatically activates a new line and puts the first party on hold.
Step 2 Place a call to another number or extension.
Step 3 When the call connects, press Confrn again to add the new party to the conference
call.
Repeat these steps to add parties to the conference call.
Once the conference call initiator disconnects, no additional parties can be added.
You can drop the last party added by pressing the RmLstC softkey.
Chapter 3 Placing a Call and Other Basic Phone Tasks
Related Topics
• Making Conference Calls, page 3-17
• Using Meet-Me Conferences, page 3-18
• Conferencing by Barging in on Established Conversations, page 3-20
Using Meet-Me Conferences
Your Cisco IP Phone supports Meet-Me conferences. A Meet-Me conference
allows other callers to dial into the conference call. A Meet-Me conference
requires a special conference number which is pre-configured for this purpose by
your system administrator.
This section covers these topics:
• Establishing a Meet-Me Conference, page 3-19
• Joining a Meet-Me Conference, page 3-19
Cisco IP Phone 7960 and 7940 Series User Guide
3-18
78-10182-08
Page 59

Chapter 3 Placing a Call and Other Basic Phone Tasks
Establishing a Meet-Me Conference
Follow these steps to establish a Meet-Me conference call.
Before You Begin
Contact your system administrator for the necessary Meet-Me conference number
or numbers.
Procedure
Step 1 Press the more softkey twice to display the Meet-Me tab.
Step 2 Press the Meet-Me softkey.
Step 3 Dial the Meet-Me conference number.
Step 4 Follow the voice instructions to establish the Meet-Me conference.
Related Topics
• Making Conference Calls, page 3-17
Making Conference Calls
• Placing a Conference Call, page 3-18
• Using Meet-Me Conferences, page 3-18
• Conferencing by Barging in on Established Conversations, page 3-20
• Joining a Meet-Me Conference, page 3-19
Joining a Meet-Me Conference
To join a Meet-Me conference, simply dial the Meet-Me conference number
provided by the Meet-Me conference initiator. You are connected to the
conference once the conference initiator has dialed in and e stabli shed the
conference. You do not need to press the Meet-Me softkey on your
Cisco
IP Phone.
Related Topics
• Making Conference Calls, page 3-17
• Placing a Conference Call, page 3-18
78-10182-08
Cisco IP Phone 7960 and 7940 Series User Guide
3-19
Page 60

Chapter 3 Placing a Call and Other Basic Phone Tasks
Making Conference Calls
• Using Meet-Me Conferences, page 3-18
• Conferencing by Barging in on Established Conversations, page 3-20
• Establishing a Meet-Me Conference, page 3-19
Conferencing by Barging in on Established Conversations
The Barge feature lets you add yourself to a call in progress on a shared line
appearance.
If the party whose call you barged put s the call on hold, puts it in a co nference, or
transfers it, you are disconnected from the call .
Note You cannot be on two barged calls at the same time. You cannot put a barged call
on hold and resume the call. You cannot answer a second line while on a barged
call.
Procedure
3-20
Step 1 Select an active call on one of your shared lines.
Step 2 Press the Barge softkey.
The phone creates a conference call and sends a beep tone to all the members of
the conference to indicate that the barge occurred and that the conference started.
Step 3 To end the conference, hang up.
When you hang up, the remaining parties receive a disconnect tone, and the
original call continues.
Related Topics
• Making Conference Calls, page 3-17
• Placing a Conference Call, page 3-18
• Using Meet-Me Conferences, page 3-18
Cisco IP Phone 7960 and 7940 Series User Guide
78-10182-08
Page 61

Chapter 3 Placing a Call and Other Basic Phone Tasks
Using Voice Mail
Y our ph one administrator chooses the v oice mail system that your phone uses. Fo r
information on how to use your v oice mail system, refer to the d ocumentation that
came with it. For example, if your admini strator conf igured your pho ne system to
work with Cisco Unity, you would refer to the Cisco Unity documentation about
working with your voice mail.
Your Ci sco IP Phone indicates that you have one or more new voice mail
messages by providing the following cues:
• The red light on your handset remains lit. (Thi s indicator can v ary, depending
on the how the message waiting indicator lamp is configured. See the
“Adjusting the Message Waiting Indicator Light” section on page 2-4.)
• A flashing envelope icon displays next to the appropriate line appearance on
the LCD screen.
• A text message on the LCD screen displays.
To set up voice mail, press the Messages button on your Cisco IP Phone and
follow the voice instructions. Your system administrator will provide you with a
default password. For security reaso ns, you should chan ge your defaul t password
as soon as possible.
T o access voice mail, press the Messages button and follow the voice instructions.
Using Voice Mail
Related Topics:
• A Road Map to Your Cisco IP Phone, page 1-6
• Using the Feature Buttons, page 1-10
Viewing and Dialing from the Phone Logs
If your phone display indicates that you hav e missed calls, you can use the Missed
Calls option on the Directory menu to view your call history and to call back the
person whose call you missed. Likewise, you can view call histories and place
calls from the Received Calls and Placed Calls directories.
If the network shuts down or is reset, you might lose your call history records. If
you use Cisco CallManager Extensio n Mobili ty
Cisco IP Phone 7960 and 7940 Series User Guide
78-10182-08
3-21
Page 62

Viewing and Dialing from the Phone Logs
Chapter 3 Placing a Call and Other Basic Phone Tasks
(see the “Logging Into Your Extension from Any Phone Using the Cisco
CallManager Extension Mobility Feature” section on page 4-1), the call history is
only available for times you are logged into the phone. Also, there is a limit on
the number of call history records that can be stored. Your system administrator
can provide information on this limit.
Yo u can delete all records in the Missed, Received, or Placed directories. From
the Directories menu, use the Navigation button to select the directory that you
want to delete and press the Clear softkey.
Follow these steps to view or dial from a call log on your phone:
Procedure
Step 1 Press the Directories button.
Step 2 Use the Navigation button to select the desired directory from the Directories
menu, then press the Select softkey.
Step 3 To place a call from any directory, use the Navigation button to select the record,
then press the Dial softkey.
Note You might need to use the EditDial softkey to add digits to the front of
the number. For example, if the call was from an outside, long-distance
caller, you might need to add the digits 9-1 to the front of the number.
Then, press the Dial softkey.
3-22
Step 4 Press the Exit softkey twice to exit the Directory menu.
Related Topics
• Searching and Dialing from the Phone Directory, page 3-23
• Making Telephone Calls, page 3-1
• Using Fast Dials, page 5-12
Cisco IP Phone 7960 and 7940 Series User Guide
78-10182-08
Page 63

Chapter 3 Placing a Call and Other Basic Phone Tasks
Searching and Dialing from the Phone Directory
Searching and Dialing from the Phone Directory
Your phone may come configured with a corporate or local phone directory. This
directory is searchable and allows you to find and dial phone numbers of
colleagues easily.
Follow these steps to view or dial from a directory in your company.
Procedure
Step 1 Press the Directories button.
Step 2 Use the Navigation button to select the desired directory from the Directories
menu, then press the Select softkey.
Step 3 Enter search criteria to retrieve a record (see the “Navigating on Your Phone”
section on page 1-11 for information on entering characters into your phone.)
Step 4 To place a call from any directory, use the Navigation button to select the record,
then press the Dial softkey.
78-10182-08
Note You might need to use the EditDial softkey to add digits to the front of
the number. For example, if the call was from an outside, long-distance
caller, you might need to add the digits 9-1 to the front of the number.
Then, press the Dial softkey.
Step 5 Press the Exit softkey twice to exit the Directory menu.
Related Topics
• Viewing and Dialing from the Phon e Logs, pag e 3-21
• Making Telephone Calls, page 3-1
• Using Fast Dials, page 5-12
Cisco IP Phone 7960 and 7940 Series User Guide
3-23
Page 64

How to Get More Information
Chapter 6 Using the Cisco IP Phone 7914 Expansion Module
6-4
Cisco IP Phone 7960 and 7940 Series User Guide
78-10182-08
Page 65

APPENDIX
A
FAQ
This Frequently Asked Questions section contains the following information:
• How do I access voice mail?, page A-2
• How do I set speed dials?, page A-2
• How do I list my missed calls?, page A-2
• I don’t see a Hold button—how do I put someone on hold?, page A-3
• How do I change the contrast on the phone LCD screen?, page A-3
• How do I change the settings for my Cisco CallManager Extension Mobility
line?, page A-3
• How do I forward calls?, page A-4
• How do I store numbers of friends and colleagues that I want to call often?,
page A-4
• I’ve used up all my speed dial lines, can I add more?, page A-5
78-10182-08
• If I cannot answer a call that I hav e forwarded to another number , will the call
get re-routed to my voice mail system?, page A-5
• Can I use call forwarding to send my calls directly to voice mail, without
ringing my desk top phone?, page A-6
• Why don’t I get a dial tone after dialing an access code?, page A-6
Cisco IP Phone 7960 and 7940 Series User Guide
A-1
Page 66

How do I access voice mail?
How do I access voice mail?
You can access your voice mail easily, just using the Messages button on your
phone.
For information about setting up and accessing voice mail, refer to the “Using
Voice Mail” section on page 3-21.
Related Topics
• Using the Feature Buttons, page 1-10
How do I set speed dials?
You add, modify, and delete speed dials on the User Opti ons web page.
To set up your speed dials, refer to the “Using Speed Dial” section on page 3-12.
Related Topics
• Logging In to the User Options Web Pages, page 1-16
• Managing Your Contacts, page 5-1
Appendix A FAQ
How do I list my missed calls?
You can list the missed calls, placed calls, and received calls on your phone.
For more information, refer to the “Viewing and Dialing from the Phone Logs”
section on page 3-21.
Related Topics
• Searching and Dialing from the Phone Directory, page 3-23
Cisco IP Phone 7960 and 7940 Series User Guide
A-2
78-10182-08
Page 67

Appendix A FAQ
I don’t see a Hold button—how do I put someone on hold?
I don’t see a Hold button—how do I put someone on
hold?
Some of the features and functions on your phone are accessed through softkeys.
T o put someone on hold, refer to the “Putting a Call on Hold” section on page 3-6.
Related Topics
• Navigating on Your Phone, page 1-11
How do I change the contrast on the phone LCD screen?
You can make it easier to read the text on your phone LCD screen by adjusting the
contrast.
To adjust the contrast, refer to the “Changing the LCD Screen Contrast” section
on page 2-5.
Related Topics
• Customizing Phone Settings, page 2-1
How do I change the settings for my
Cisco
78-10182-08
CallManager Extension Mobility line?
Yo u change the settings for your Cisco CallManager Extension Mobility line the
same way that you change them for a regular line. When you want to change any
settings that are in the User Options web page, make sure to select the device
profile for your extension mobility extension. The Cisco
Extension
as “EM”.
Mobility device profile usually has identifying text in the name, such
Cisco IP Phone 7960 and 7940 Series User Guide
CallManager
A-3
Page 68

Appendix A FAQ
How do I forward calls?
Related Topics
• Logging Into Your Extension from Any Phone Using the Cisco CallManager
Extension Mobility Feature, pa ge 4-1
How do I forward calls?
You can forward calls either from your phone or from the User Options web page.
Yo u can either forward calls to another extension, or to voice mail.
For more information, refer to the “Forwarding Calls to Another Extension”
section on page 3-14.
Related Topics
• Logging In to the User Options Web Pages, page 1-16
How do I store numbers of friends and colleagues that I want to call often?
You can store the numbers of other people easily, using either the phone or the
User Options web pages.
If you have the Personal Directory service a v ailable on your phone, yo u can enter
numbers using that service (see the
Your Phone” section on page 5-6.)
You can also enter numbers into the Personal Address Book on the User Options
A-4
web pages (see the
page 5-4.)
T o phone these numbers quickly, you can set them up as either speed dials, which
appear directly on your phone (see the
or you can set them up as Fast Dials, if the phone service is available to you, (see
the
“Using Fast Dials” section on page 5-12.)
Related Topics
• Managing Your Contacts, page 5-1
Cisco IP Phone 7960 and 7940 Series User Guide
“Creating a New Address Book Entry on the Web” section on
“Searching Personal Address Book Entries on
“Using Speed Dial” section on page 3-12)
78-10182-08
Page 69

Appendix A FAQ
I’ve used up all my speed dial lines, can I add more?
I’ve used up all my speed dial lines, can I add more?
If you assigned numbers to all of the speed dial buttons on your phone, there are
two ways to store numbers for fast retrieval:
• Add a Cisco IP Phone 7914 Expansion Module to your phone, and get an
additional 14 speed dial lines (see
Cisco IP Phone 7914 Expansion Module.”)
• Use Fast Dials to store the rest of your phone numbers (see the “Using Fast
Dials” section on page 5-12.)
Related Topics
• Managing Your Contacts, page 5-1
Chapter 6, “Using the
If I cannot answer a call that I have forwarded to another number, will the call get re-routed to my voice mail system?
Yes—as long as the forwarded call is not picked up by a person or a mechanical
answering machine. Although call forwarding sends an incoming call intended for
your Cisco IP Phone to another number, your Cisco IP Phone does not relinquish
the forwarded call unless the call is answered (in other words, picked up by a
person or a mechanical answering machine). Your Cisco IP Phone considers a
forwarded call “unanswered” after a certain number of rings. Unanswered,
forwarded calls are redirected to your voice mail system (if one is available).
Related Topics
• Using Voice Mail, page 3-21
78-10182-08
Cisco IP Phone 7960 and 7940 Series User Guide
A-5
Page 70

Appendix A FAQ
Can I use call forwarding to send my calls directly to voice mail, without ringing my desk top phone?
Can I use call forwarding to send my calls directly to
voice mail, without ringing my desk top phone?
Yes. Follow the procedure in the “Setting Up Call Forwarding on Your Phone”
section on page 3-14 and choose the Voice Mail option.
Related Topics
• Using Voice Mail, page 3-21
Why don’t I get a dial tone after dialing an access code?
If you use an access code, such as 9, to make external calls, your Cisco IP Phone
might not make a dial tone. Continue dialing your call.
Related Topics
• Making Telephone Calls, page 3-1
A-6
Cisco IP Phone 7960 and 7940 Series User Guide
78-10182-08
Page 71

Warning
Warning
APPENDIX
B
Safety Notices
Read the following safety notices before installing or using your Cisco IP Phone:
These safety notices apply to phones in the Cisco IP Phone 7960 and 7940 series.
This warning symbol means danger. You are in a situation that could cause
bodily injury. Before you work on any equipment, be aware of the hazards
involved with electrical circuitry and be familiar with standard practices for
preventing accidents.
Read the installation instructions before you connect the system to its power
source.
78-10182-08
Warning
Warning
Warning
Ultimate disposal of this product should be handled according to all national
laws and regulations.
The plug-socket combination must be accessible at all times because it serves
as the main disconnecting device.
Do not work on the system or connect or disconnect cables during periods of
lightning activity.
Cisco IP Phone 7960 and 7940 Series User Guide
B-1
 Loading...