

Page 1

Using Your Hub Software
This chapter describes procedures for configuring the Cisco Micro Hub, and contains the
following sections:
• Preparing for Configuration
• Configuring the Hub
• Command Summary
Preparing for Configuration
To configure any Cisco Micro Hubs in a stack, the stack must include at least one
Micro Hub 1503. You can connect to the Micro Hub 1503 to configure it in one of two
ways:
CHAPTER
3
• Direct Connection through the CONSOLE Port
• Connection Using Telnet
Direct Connection through the CONSOLE Port
You can configure the Micro Hub 1503, by connecting a terminal or a PC directly to the
hub’s CONSOLE port as described in the section “Connecting the CONSOLE Port” in the
chapter “Installing Your Hub.”
Using Your Hub Software 3-1
Page 2

Preparing for Configuration
Connection Using Telnet
If the hub is correctly connected to a network, you can access the hub by using Telnet from
anywhere on that network and can use the configuration program to communicate with the
hub. Before making a Telnet connection to the hub, you must configure the hub with a valid
IP address, subnet mask, and default gateway using the configuration program.
Configuration Using a PC
If you are configuring the hub with a PC (not a dumb terminal), you need a type of
communication software called terminal emulation software to send commands to the hub.
Table 3-1 Common Terminal Emulation Software Programs
PC Operating System Software
Windows 3.x or
Windows NT 3.5x
Windows 95 or
Windows NT 4.x
Macintosh ProComm, VersaTerm, ZTerm (supplied separately)
Terminal (included with the Windows software)
HyperTerm (included with the Windows software)
3-2
Terminal emulation software has changeable settings. To enable your PC to communicate
to the hub, specify the port used by your PC (for example, COM 1), and then configure the
software settings to the following:
• Terminal emulation type: ANSI
• Baud: 9600
• Data bit: 8
• Parity: None
• Stop bits: 1
• Flow control: None
Cisco Micro Hub User Guide
Page 3

Command Conventions
This section describes some things you might need to know before using the commands to
configure the hub. If you are familiar with these conventions, you can skip this section.
• Enter commands by typing the text of the command at the configuration prompt and
then pressing the Return key.
• There are two configuration prompt levels:
— The guest-level prompt is the device name followed by an angle bracket (>):
Hub>
— The administrator-level prompt is the device name followed by a pound sign (#). To
reach this prompt, the user (usually the system administrator) must enter a password
with the enable command:
Hub>
Hub> enable
Password: ******
Hub#
• There are two editing modes provided by the configuration program—normal and
enhanced. For more information about the enhanced editing mode, refer to the
terminal editing command in the section “Editing Commands” later in this chapter.
The following editing commands can be used on the command line in either editing
mode:
Command Conventions
—Backspace erases characters to the left of the cursor.
— Delete erases characters to the right of the cursor (this may be different, depending
on the terminal emulation software that you are using).
—Ctrl-C cancels a command prior to pressing the Return key.
—Tab or Ctrl-I completes a command name based on partial input.
Using Your Hub Software 3-3
Page 4

Preparing for Configuration
• You can abbreviate commands to the fewest letters that make them unique. For example,
for the show history command, you can enter:
Hub> show his
• Certain commands display multiple screens with this prompt between screens:
--More--
Press the space bar to see more output from the command or press Return to display
the next line. Press any other key to return to the prompt.
Configuration Modes
You configure the Micro Hub 1503 (or the attached stack) with the configuration program
that is a part of the hub’s firmware. There are two configuration modes: guest mode and
administrator mode (also called privileged mode). The commands available in guest mode
are a subset of those available in administrator mode.
When you first connect to the hub, the configuration program is set to guest mode. If you
are connecting to the hub using Telnet, you must also enter a Telnet session password. To
enter administrator mode, use the enable command and enter the administrator password.
You will then be prompted to enter the enable password, as shown below:
Hub> enable
Password: <enable_password>
Setting the Administrator Password
Some commands require the user to enter a password before they can be entered. This is an
important feature because it prevents accidental or unauthorized changes to your hub
settings and to your network.
Set the password using the password command, as shown below:
Hub# password
Old Password: <old_password>
New Password: <new_password>
Hub#
3-4
Cisco Micro Hub User Guide
Page 5

Forgot Your Password?
The <password> field can contain from 0 to 80 uppercase and lowercase alphanumeric
characters. Spaces are not allowed. The first character cannot be a number. Passwords are
case sensitive.
An example of a valid password is
Forgot Your Password?
If you forget the password that provides access to administrator-level commands or if you
forget the password required for Telnet sessions, you can bypass the password requirement
and set a new password. You must be connected to the hub through the CONSOLE port to
perform these steps.
Take the following steps:
Step 1 Turn the hub OFF, and wait 60 seconds before going to Step 2.
Step 2 Turn the hub ON, and wait while the following messages are displayed on the
terminal:
Starting the system...
Boot option : bootp get ip
Enter BOOTP phase, wait or press Ctrl-C to break...
.....
Bootup Error: Timeout, no response from BOOTP server.
Press RETURN to start a new session
Step 3 Press Ctrl-C.
Step 4 When the following prompt appears, enter a new administrator password:
New administrator password: <new_password>
mypassword1.
Step 5 When the following prompt appears, re-enter the new password:
Confirm administrator password: <new_password>
Step 6 You are then prompted to enter and confirm a new Telnet session password, as
follows:
New telnet-session password: <new_telnet-session_password>
Confirm telnet-session password: <new_telnet-session_password>
Using Your Hub Software 3-5
Page 6

Configuring the Hub
Step 7 The following message appears, confirming that your new passwords have been
accepted:
Administrator and telnet passwords are modified.
Welcome to Cisco hub model 150x
Configuring the Hub
This section describes basic hub configuration.
Before you configure a Micro Hub 1503, have the following information available:
• IP address and IP subnet mask that you will assign to the hub if you are accessing the
configuration program using Telnet or SNMP.
• IP address for the TFTP server if you want to use TFTP bootup feature.
• IP address for the BOOTP server if you want to use the BOOTP feature.
• IP address of the hub’s gateway if you want to use Telnet or SNMP.
• IP addresses for authorized Trap Managers, if you want management stations to receive
trap messages generated by the hub.
Note If you do not have this information, you might need to get it from your system
administrator or from your network plan before you can complete your hub configuration.
Hub ID Numbers
This section describes how to determine the hub ID number of a particular Micro Hub in a
stack of Micro Hubs. Before configuring the hub, you should understand how hubs in a
stack are identified.
You cannot manually assign a hub ID number to a hub in a stack. The hub ID number is
assigned based on how the hubs are cabled together.
Note The physical location of a hub in a stack does not determine a hub’s ID number.
3-6
Cisco Micro Hub User Guide
Page 7
Hub ID Numbers
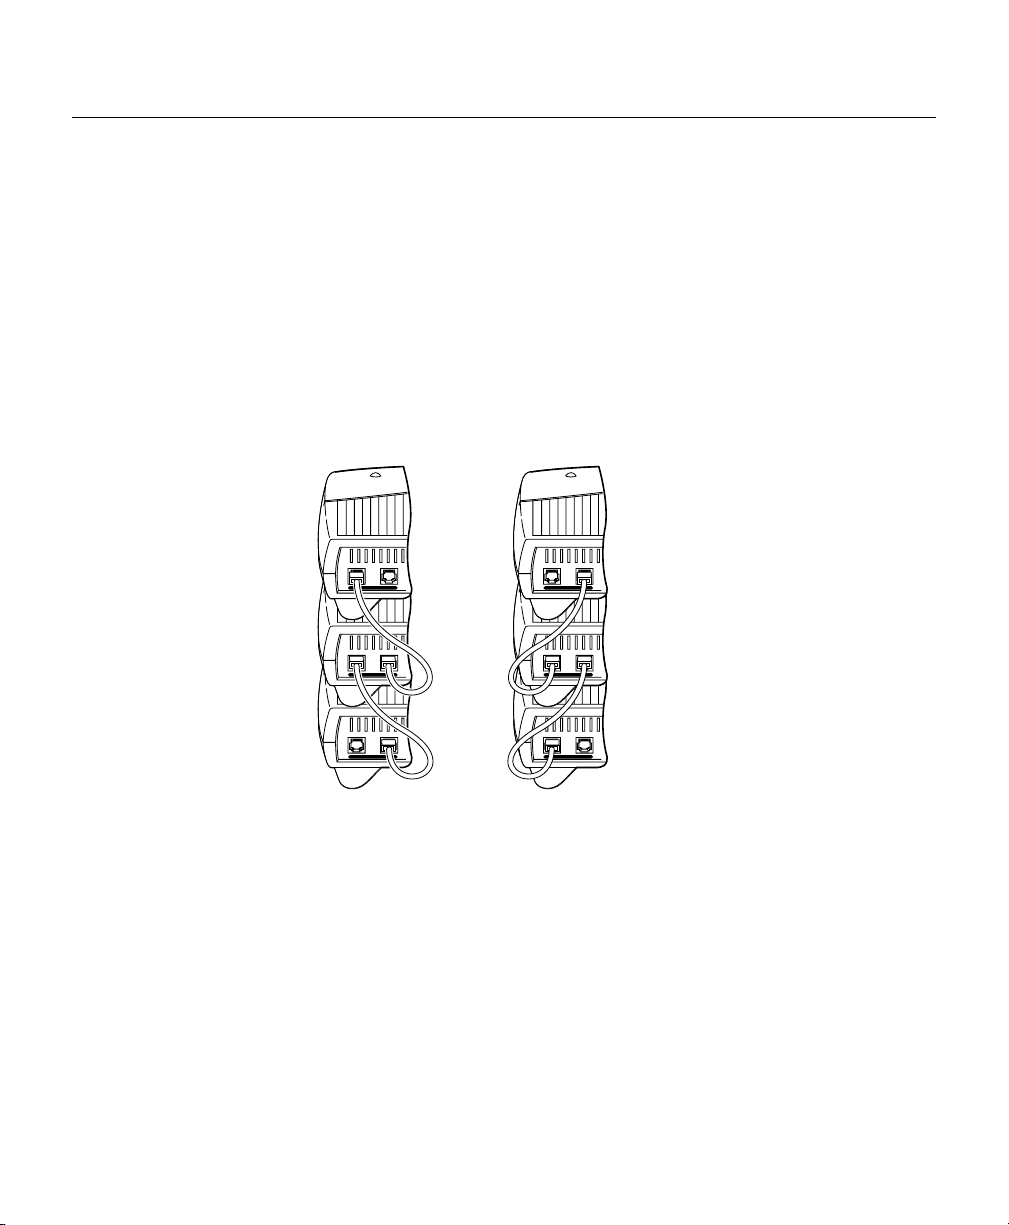
Here are two rules that determine hub ID numbers in a stack of hubs:
1 The lowest hub ID number in a stack (1) is always assigned to the hub with another hub
connected to its OUT port and with no hub connected to its IN port.
2 The highest hub ID number in a stack (any number from 2 to 5) is always assigned to
the hub with no hub connected to its OUT port and with another hub connected to its IN
port.
Figure 3-1 illustrates these rules.
Figure 3-1 Hub ID Numbers for Stacked Hubs
Hub ID = 1
Hub ID = 2
Hub ID = 3
OUT STACKCONNECT IN
OUT STACKCONNECT IN
OUT STACKCONNECT IN
OUT STACKCONNECT IN
OUT STACKCONNECT IN
OUT STACKCONNECT IN
Hub ID = 3
Hub ID = 2
Hub ID = 1
H11447
Using Your Hub Software 3-7
Page 8

Configuring the Hub
Configuring the hub takes place in three major steps:
1 Entering Administrator Mode
2 Configuring IP and SNMP Parameters
3 Configuring the SNMP Management Station
All of the commands used in the configuration steps are fully explained in the section
“Command Summary” later in this chapter.
Entering Administrator Mode
Step 1 Connect a console by following the instructions in the section “Connecting the
CONSOLE Port” in the chapter “Installing Your Hub” or start a Telnet session
with the hub.
Step 2 Turn the hub ON by setting the power switch to the ON ( | ) position.
Step 3 After a few seconds, you will see the user prompt. Use the enable command to
enter administrator mode:
Hub> enable
3-8
Step 4 After entering the command, you will be prompted to enter the administrator
password. If the administrator password has not been set, you can enter
administrator mode by pressing the Return key, as shown below:
Hub> enable
Password: <Return>
Hub#
Note If the administrator password has not been set, you should set it following
the steps in the section “Setting the Administrator Password” earlier in this
chapter. Record the password in a secure location.
The pound sign (#) after the prompt indicates that you are in administrator mode
and can enter the commands to configure the hub for IP and SNMP parameters.
Cisco Micro Hub User Guide
Page 9
Configuring IP and SNMP Parameters
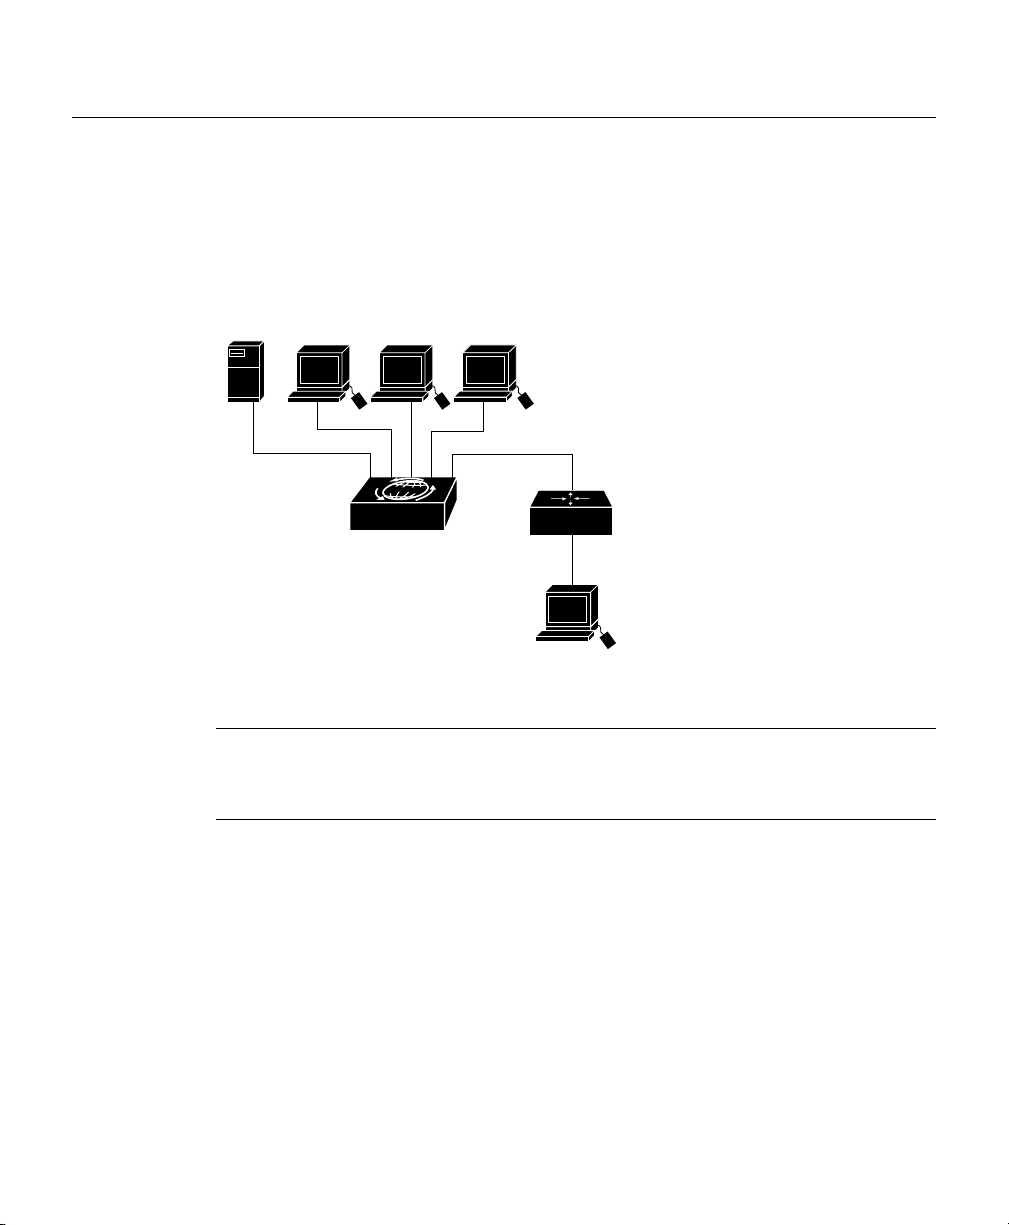
The illustration below shows the network that is being configured in this section:
Figure 3-2 Example Network
Configuring IP and SNMP Parameters
Server PC PC
Micro Hub 1503
PC
E0
Router A
E1
SNMP network
management station
S6280
Note The network addresses used in the steps below are examples only; they will not work
for your network. You should substitute them with the IP addresses that apply to your
network devices.
Step 1 Use the ip address command to configure the hub’s IP address, subnet mask,
and gateway address:
Hub# ip address 172.16.10.2 255.255.255.0 172.16.10.1
Step 2 Use the snmp community command to configure the SNMP communities and
their options:
Hub# snmp community 1 private rw
Using Your Hub Software 3-9
Page 10

Configuring the Hub
Step 3 Use the ip trap-manager command to configure the IP address of the SNMP
management station:
Hub# ip trap-manager 1 172.16.20.2
Basic IP and SNMP configuration is now complete. To return to guest mode, enter exit.
Enter exit a second time to close the current terminal session:
Hub# exit
Hub> exit
>
Configuring the SNMP Management Station
Make sure that the SNMP management station receives traps from the Micro Hub 1503
(and any Micro Hubs connected to it in a stack) by configuring the management station as
follows:
• Make sure the management station has entries for all the Micro Hubs in the stack.
• The entries for the Micro Hubs should have Get Community and Set Community
configured as private.
• The management station should be able to read SNMP information from the
Micro Hubs, such as port status and traffic counts.
3-10
• The management station should be able to control and manage the Micro Hubs,
including enabling and disabling ports and changing contact information.
Cisco Micro Hub User Guide
Page 11

Command Summary
This section provides a summary of the commands used to configure the Micro Hub 1503.
The configuration commands are organized into the following categories:
• System Help Commands
• User Interface Commands
• Firmware Load and Restart Commands
• System Information Commands
• Management Configuration Commands
• Hub Configuration Command
• Port Configuration Commands
• Statistics Commands
• Chassis Information Commands
Command Summary
Using Your Hub Software 3-11
Page 12

Command Summary
Commands are defined and described in the format shown below:
show hub information
Syntax: show hub information [hub id]
Mode: Guest
Description: Displays information about one or more hubs in a stack.
Definitions of
keywords used in
the command
syntax.
Example of a
command display.
How the command is entered.
Keywords in [square brackets] are
optional. Keywords in {curly brackets}
The name of the command.
What command mode you must be in to enter the command.
Command Keyword Definition
• hub id — (Optional) The number of the hub in the stack. An integer
between 1 and 5. To determine the number of the hub, use the position
of the hub in the order from first to last hub connected through the rear
panel IN and OUT ports. If no number is entered, information about
all hubs in the stack will be displayed.
The display appears as follows:
hub> show hub info
Hub ID Type H/W ver F/W ver SNMP-Agent
------------------------------------------1 1503 1.0 1.01 Active
2 1502 1.0 1.01 No
3 1503 1.0 1.01 Inactive
are required. Enter keywords shown in
bold exactly as they appear. Keywords
shown in italics are values that are
provided by you.
Describes the
command. Some
commands may not
require all of the
information shown
here.
Definitions of fields
that are shown in
command displays.
3-12
Cisco Micro Hub User Guide
Command Display Definitions
• Hub ID—Number of the hub in the stack, from top to bottom.
• Type—Model number of the hub: 1502 or 1503.
• H/W ver—Hardware version of the hub.
• F/W ver—Firmware version of the hub.
• Agent—Whether or not the hub contains an SNMP.
S5974
Page 13

System Help Commands
Use the commands in this section to obtain system help when configuring the hub.
help
Syntax: help
Mode: Guest
Description: Lists a brief description of the context-sensitive help system.
?
Syntax: ?
Mode: Guest
Description: Use this command in the following ways:
• At anytime to list all commands available in the current command mode
(guest or administrator).
• After an abbreviated command to list commands that start with that
particular character set.
• In a command, in place of a keyword or argument, to list the command’s
keywords or arguments.
System Help Commands
Using Your Hub Software 3-13
Page 14

Command Summary
User Interface Commands
Use the commands in this section to configure the user interface for the hub software.
Command Mode Access Commands
Use the commands in this section to change configuration mode for the hub:
disable
Syntax: disable
Mode: Guest
Description: Exits administrator mode and returns the user to guest mode.
enable
Syntax: enable
3-14
Mode: Guest
Description: Use this command to enter administrator mode. If you forgot your
administrator password, follow the process described in the section “Forgot
Your Password?” earlier in this chapter.
After entering enable, you will be prompted for the administrator password, as
shown below:
Hub> enable
Password: <password>
Hub#
Cisco Micro Hub User Guide
Page 15

exit
Syntax: exit
Mode: Guest
Description: Exits any command mode or closes an active terminal session.
help
Syntax: help
Mode: Guest
Description: Refer to the previous section “System Help Commands” for more information
Console Access Commands
Use the commands in this section to control console access to the hub configuration.
User Interface Commands
on the help command.
show console lockout info
Syntax: show console-lockout info
Mode: Guest
Description: Displays information about the console lockout settings. The following
information is displayed:
• Status—Whether console lockout is enabled or disabled.
• Delay time—Length of time of no keyboard activity until console access to
the hub is locked.
Using Your Hub Software 3-15
Page 16

Command Summary
console-lockout
no console lockout
console-lockout time
Syntax: console-lockout
Mode: Administrator
Description: Sets the console access to locked after a designated period of no keyboard
activity.
Syntax: no console-lockout
Mode: Administrator
Description: Disables the console lockout feature.
Syntax: console-lockout time <minutes>
3-16
Mode: Administrator
Description: Configures the amount of time of no keyboard activity before console access is
locked.
minutes—Integer between 1 and 20.
Cisco Micro Hub User Guide
Page 17

Administrator Password Commands
Use the commands in this section to configure hub passwords.
password
Syntax: password
Mode: Administrator
Description: Configures the password used to enter administrator mode.
After entering the command, you will be prompted to enter the current
password and then the new password. You will then be prompted to confirm the
new password. Password characters are represented by asterisks on the screen
when you enter them, as shown below:
Hub# password
Old password: ********
New password: *******
Re-type new password: *******
Passwords can:
• Contain up to 14 characters.
• Contains any combination of alphanumeric characters, including uppercase
and lowercase letters.
• Use spaces as valid characters.
User Interface Commands
no password
Syntax: no password
Mode: Administrator
Description: Deletes any password that has been set with the password command.
Using Your Hub Software 3-17
Page 18

Command Summary
telnet-session password
no telnet-session password
telnet-session
Syntax: telnet-session password
Mode: Administrator
Description: Configures the hub with the password that is required to start a Telnet session
with the hub.
Syntax: no telnet-session password
Mode: Administrator
Description: Clears any password that was entered with the telnet-session password
command.
Syntax: telnet-session {enable | disable}
3-18
Mode: Administrator
Description: Configures the hub for allowing Telnet sessions.
Command Keyword Definitions
• enable—Configures the hub to allow Telnet sessions.
• disable—Configures the hub to prevent Telnet sessions.
Cisco Micro Hub User Guide
Page 19

History Commands
Use these commands in this section to configure how the hub stores and displays command
input history.
show history
Syntax: show history
Mode: Guest
Description: Displays the commands that are stored in the history buffer.
terminal history
Syntax: terminal history
Mode: Guest
Description: Enables the terminal history feature, which configures the hub to retain
User Interface Commands
commands in working memory. The number of commands retained is
configured with the terminal history size command. The commands are not
saved after the hub is rebooted with the restart command.
terminal no history
Syntax: terminal no history
Mode: Guest
Description: Disables the terminal history feature (the hub retains past commands in
memory).
Using Your Hub Software 3-19
Page 20

Command Summary
terminal history size
Syntax: terminal history size <size>
Mode: Guest
Description: Sets the number of commands kept in the history buffer.
Editing Commands
Use the commands in this section to configure the hub for terminal editing.
Note Command-line editing features are described in the appendix “Terminal Editing
Command Reference.”
terminal editing
Command Keyword Definition
size—Integer value between 1 and 64.
3-20
Syntax: terminal editing
Mode: Guest
Description: Configures the hub for enhanced editing. Enhanced editing enables you to use
the key sequences listed in the appendix “Terminal Editing Command
Reference.” This is the default configuration.
terminal no editing
Syntax: terminal no editing
Mode: Guest
Description: Disables enhanced editing.
Cisco Micro Hub User Guide
Page 21

Firmware Load and Restart Commands
Use the commands in this section to configure how the hub loads and copies firmware.
Bootup Option Commands
Use the commands in this section to configure how the hub gets the firmware and IP address
when it is first powered up.
bootup-option
Syntax: bootup-option {normal | tftp-download | bootp-get-ip | bootp-download}
Mode: Administrator
Description: Configures how the hub will obtain an IP address when it is first turned on.
This setting is stored in the hub Flash read-only memory.
Command Keyword Definitions
• normal—Default setting for the Micro Hub 1502. The hub uses the IP
address stored in the onboard firmware.
• tftp-download—Downloads firmware from a TFTP server. The download
process is repeated every time the hub is rebooted.
• bootp-get-ip—Default setting for the Micro Hub 1503. The hub obtains the
IP address from the local BOOTP server.
• bootp-download—The hub obtains the IP address and firmware from a
local BOOTP server. The firmware is then saved in Flash memory.
Firmware Load and Restart Commands
no bootup-option
Syntax: no bootup-option
Mode: Administrator
Description: Resets the hub to the default bootup option, which is to use the onboard ROM
code and the default IP address (normal).
Using Your Hub Software 3-21
Page 22

Command Summary
TFTP Download Commands
Use the commands in this section to configure how the hub downloads firmware from a
TFTP server. Use a server that has been configured to provide the firmware for your hub.
show tftp-download information
Syntax: show tftp-download information
Mode: Guest
Description: Displays download information for TFTP, including the TFTP server address
tftp-download
Syntax: tftp-download {server-ip-address} [filename]
and firmware filename, for example:
Hub> show tftp-download info
ServerIP: 10.10.10.1
Filename: 1503R01.bin
3-22
Mode: Administrator
Description: Sets the IP address of the TFTP server that supports the hub.
Command Keyword Definitions
• server-ip-address—IP address of the server where the firmware file is stored.
Should be in the format xxx.xxx.xxx.xxx, where xxx is a value between 0
and 255.
The default value for this field is 255.255.255.255. The default value will
work only if the TFTP server is not on the same local network segment as the
hub.
• filename—Filename of the firmware file. The filename is case sensitive and
contains between 1 and 28 alphanumeric characters. The default file name
for firmware c1500.bin. You can use different names for hub firmware files
but the file name must end in .bin.
Cisco Micro Hub User Guide
Page 23

start tftp-download
Syntax: start tftp-download
Mode: Administrator
Description: Starts the firmware download process. In order to use this command, the hub
Xmodem Download Command
Use this command to download firmware to the hub with the Xmodem protocol.
start xmodem-download
Syntax: start xmodem-download
Firmware Load and Restart Commands
and the TFTP server must be connected to the same Ethernet LAN segment.
To test whether or not both devices are connected to the same network segment,
send a ping command from the TFTP server to the hub. If the ping command is
unsuccessful, confirm that you have configured the hub with an IP address
using the ip-address command.
Mode: Administrator
Description: Downloads firmware updates to the hub with the Xmodem protocol.
Using Terminal Emulation Software
After entering this command, open the file transfer function in your terminal
emulation software. The software must support the Xmodem protocol. Specify
the firmware filename, and start the file transfer, being sure to specify “Send”
or “Upload” for the firmware file.
The default file name for firmware c1500.bin. You can use different names for
hub firmware files but the file name must end in .bin.
Download Status
The status of the firmware download is shown at the bottom of the terminal or
PC screen. After downloading firmware, you will have to log into the
configuration program again.
Using Your Hub Software 3-23
Page 24

Command Summary
Restart Command
Use this command to reset the hub.
restart
Syntax: restart
Mode: Administrator
Description: Performs a firmware reset for the hub using the bootup option selected with the
bootup-option command. (See the section “Bootup Option Commands” earlier
in this chapter for a description.)
The hub, ports, and statistic configurations are saved during a firmware reset.
3-24
Cisco Micro Hub User Guide
Page 25

System Information Commands
Use the commands in this section to display general information about the hub and the stack
of hubs.
show system information
Syntax: show system information
Mode: Guest
Description: Displays system information as shown below:
Hub> show system information
System description: Cisco Stackable Ethernet Hub
System up time: hour, 56 minutes
System name: Stack 1
System contact: Mike
System location: Software Group
Command Display Definitions
• System description—Hub model.
• System up time—Length of time that the management agent inside the hub
has been running.
• System name—Name of the hub, configured with the system name
command.
• System contact—Name of the person responsible for the hub, configured
with the system contact command.
• System location—Where the hub is located, configured with the
system location command.
System Information Commands
Using Your Hub Software 3-25
Page 26

Command Summary
system name
no system name
Syntax: system name <string>
Mode: Administrator
Description: Configures the hub with a descriptive name.
Command Keyword Definition
string—String containing 1 to 255 alphanumeric characters, which can be any
combination of uppercase and lowercase. Spaces are valid characters, but
leading spaces are ignored. If nothing is entered for this option, the default
(“hub”) is used.
Syntax: no system name
Mode: Administrator
Description: Resets the hub’s system name to the default system name (“hub”).
3-26
system contact
Syntax: system contact <string>
Mode: Administrator
Description: Configures the hub with the name of the person responsible for the hub.
Command Keyword Definition
string—String containing 1 to 255 alphanumeric characters, which can be any
combination of uppercase and lowercase. A number cannot be the first
character. Spaces are valid characters, but leading spaces are ignored. If
nothing is entered for this option, the default (“system administrator”) is used.
Cisco Micro Hub User Guide
Page 27

System Information Commands
no system contact
Syntax: no system contact
Mode: Administrator
Description: Resets the hub’s system contact to the default system contact (“system
administrator”).
system location
Syntax: system location <string>
Mode: Administrator
Description: Configures the hub with the name of the hub location.
Command Keyword Definition
string—String containing 1 to 255 alphanumeric characters, which can be any
combination of uppercase and lowercase. A number cannot be the first
character. Spaces are valid characters, but leading spaces are ignored. If
nothing is entered for this option, the default (“headquarters”) is used.
no system location
Syntax: no system location
Mode: Administrator
Description: Resets the hub’s system location to the default system location
(“headquarters”).
Using Your Hub Software 3-27
Page 28

Command Summary
show management information
Syntax: show management information
Mode: Guest
Description: Displays information about the network management hub as follows:
Hub> show management information
Hub id: 1
H/W version : 1.
F/W version: 1.01
Bootup option : normal
Physical address: 00-00-12-34-56-78
Command Display Definitions
• Hub id—Number used to identify the hub in a stack. An integer between 1
and 5. Read the section “Hub ID Numbers” earlier in this chapter for
information about how to determine hub ID numbers.
• H/W version—Hardware version of the hub.
• F/W version—Firmware version of the hub.
• Bootup option—Bootup option configured with the bootup-option
command as described in the section “Bootup Option Commands” earlier in
this chapter.
• Physical address—Hardware address (also called the MAC address or the
Ethernet address) of the hub. This address is assigned by the device’s
manufacturer and usually appears somewhere on the device itself.
3-28
Cisco Micro Hub User Guide
Page 29

Management Configuration Commands
Use the commands in this section to configure community strings and trap managers, which
are required when using SNMP.
IP Parameter Commands
Use the commands in this section to configure the Micro Hub 1503 with IP parameters. The
hub must be configured with IP parameters to use SNMP, Telnet, and TFTP functions.
show ip configuration
Syntax: show ip configuration
Mode: Guest
Description: Shows the current configuration for IP, as shown below:
Hub> show ip configuration
IP address: 10.10.10.10
Subnet mask : 255.255.255.0
Gateway IP: 10.10.10.254
Management Configuration Commands
Command Display Definitions
• IP address—Hub’s IP address.
• Subnet mask—Hub’s subnet mask (the host address bits used for routing
traffic to the subnet).
• Gateway IP—Gateway used to pass trap messages from the hub to the
management stations, for example, the IP address of a router on the same
LAN as the hub.
Using Your Hub Software 3-29
Page 30

Command Summary
ip address
no ip address
Syntax: ip address {ip-address} [subnet mask] [gateway ip]
Mode: Administrator
Description: Configures the IP parameters for the hub.
Command Keyword Definitions
• ip-address—IP address of the hub. The default value is 0.0.0.0.
• subnet-mask—IP subnet mask of the hub. The default value is
255.255.255.0.
• gateway-ip—IP address of the gateway used by the hub. The default value is
xxx.xxx.xxx.254, where xxx.xxx.xxx are the same fields as the first three
fields of the ip-address field. The gateway address is usually the IP address
of a router on the same LAN as the hub.
Syntax: no ip address
Mode: Administrator
3-30
Description: Resets the hub with the default IP address (0.0.0.0), the default subnet mask
(255.255.255.0), and the default gateway address (0.0.0.0).
Cisco Micro Hub User Guide
Page 31

SNMP Communities Commands
Use the commands in this section to configure the SNMP community strings. These strings
are used by the network management software to access the Micro Hub 1503.
show snmp communities
Syntax: show snmp communities
Mode: Administrator
Description: Displays information about all of the configured community strings. Following
is example output from this command.
Command Display Definitions
• Index—Index number of the community string.
• Community Name—Name used for management access. Can be up to 20
• Access Right—Management access setting: either read/write or read only.
• Status—Community string status: either enabled or disabled.
Management Configuration Commands
Hub> show snmp communities
Index Community Name Access Right Status
-------------------------------------------1 public read/write enabled
2 private read only enabled
3 read only disabled
4 read only disabled
alphanumeric characters.
Using Your Hub Software 3-31
Page 32

Command Summary
snmp community
snmp community disable
Syntax: snmp community {index} {string} [ro | rw]
Mode: Administrator
Description: Creates or modifies community strings or associated access rights. All new
entries are enabled by default. To disable an entry, use the
snmp community disable command.
Command Keyword Definitions
• index—Index of one of the community table entries. An integer from 1 to 5.
• string—Community name. An alphanumeric string that contains from 1 to
20 characters. A number cannot be the first character. Spaces are not valid
characters.
• ro—(Optional) Sets the community for read-only access. This is the default
value.
• rw—(Optional) Sets the community for read-write access.
3-32
Syntax: snmp community disable [index]
Mode: Administrator
Description: Disables a community string.
Command Keyword Definition
index—(Optional) Index of an entry in the community table. An integer
between 1 and 5. If no value is entered, all community strings are disabled.
Cisco Micro Hub User Guide
Page 33

Management Configuration Commands
snmp community enable
Syntax: snmp community enable {index}
Mode: Administrator
Description: Enables a community string.
Command Keyword Definition
index—Index of an entry in the community table. An integer between 1 and 5.
snmp trap-authentication
Syntax: snmp trap-authentication
Mode: Administrator
Description: Enables trap message authentication. Trap message sent from the hub are
authenticated by the SNMP community string.
no snmp trap-authentication
Syntax: no snmp trap-authentication
Mode: Administrator
Description: Disables trap message authentication.
Using Your Hub Software 3-33
Page 34

Command Summary
Configuring Trap Managers
Use the commands in this section to configure the Micro Hub 1503 trap information. Trap
information enables the hub to send information to connected network devices. These
messages notify network devices about events on the network.
show ip trap-managers
Syntax: show ip trap-managers
Mode: Guest
Description: Displays information about authorized trap managers as shown in the following
example:
Hub> show ip trap-managers
Index IP Address Community Name Status
----------------------------------------------1 222.222.222.222 public enabled
2 11.11.11.11 public disabled
3 0.0.0.0 public disabled
4 0.0.0.0 public disabled
5 0.0.0.0 public disabled
3-34
Command Display Definitions
• IP Address—IP address of the network management station.
• Community Name—Name used to identify an SNMP community.
• Status—Whether or not the community is enabled or disabled.
Cisco Micro Hub User Guide
Page 35

Management Configuration Commands
ip trap-manager
Syntax: ip trap-manager {index} {ip-address} [community name]
Mode: Administrator
Description: Configures trap manager information.
Command Keyword Definitions
• index—Index of an entry in the trap manager table. An integer from 1 to 5.
• ip-address—IP address of the trap receiver, in the following format:
xxx.xxx.xxx.xxx
• community name—Community string that is required for trap access.
ip trap-manager enable
Syntax: ip trap-manager enable {index}
Mode: Administrator
Description: Enables a trap manager entry.
Command Keyword Definition
index—Index of a trap manager table entry. An integer between 1 and 5.
ip trap-manager disable
Syntax: ip trap-manager disable [index]
Mode: Administrator
Description: Disables a trap manager entry.
Command Keyword Definition
index—Index of a trap manger table entry. An integer between 1 and 5.
Using Your Hub Software 3-35
Page 36

Command Summary
Hub Configuration Command
Use the commands in this section to display information about hubs in a stack.
show hub information
Syntax: show hub information [hub id]
Mode: Guest
Description: Displays information about one or more hubs in a stack.
Command Keyword Definition
• hub id—(Optional) Number used to identify the hub in a stack. An integer
between 1 and 5. Read the section “Hub ID Numbers” earlier in this chapter
for information about how to determine hub ID numbers. If no number is
entered, information about all hubs in the stack will be displayed.
The display appears as follows:
Hub> show hub information
Hub ID Type H/W ver F/W ver SNMP-Agent
----------------------------------------1 1503 1.0 1.01 Yes
2 1502 1.0 1.01 No
3 1503 1.0 1.01 No
3-36
Command Display Definitions
• Hub ID—Number used to identify the hub in a stack. An integer between 1
and 5. Read the section “Hub ID Numbers” earlier in this chapter for
information about how to determine hub ID numbers.
• Type—Model number of the hub: 1502 or 1503.
• H/W ver—Hub’s hardware version.
• F/W ver—Hub’s firmware version.
• Agent—Whether or not the hub contains an active SNMP agent.
Cisco Micro Hub User Guide
Page 37

Port Configuration Commands
Use the commands in this section to display or edit information about any port in the stack.
show port information
Syntax: show port information [hub id]
Mode: Guest
Description: Displays information about all the network ports on the selected hub.
Command Keyword Definition
• hub id—(Optional) Number used to identify the hub in a stack. An integer
between 1 and 5. Read the section “Hub ID Numbers” earlier in this chapter
for information about how to determine hub ID numbers.
Information is displayed as follows:
Hub> show port information 1
Hub id: 1
Port ID Admin Status Link Status Partition Status
-----------------------------------------------------1 enabled Not connected not partitioned
2 enabled Not connected not partitioned
3 enabled Connected not partitioned
4 enabled Not connected not partitioned
5 enabled Not connected not partitioned
6 enabled Connected not partitioned
7 enabled Not connected not partitioned
8 enabled Not connected not partitioned
Port Configuration Commands
Command Display Definitions
• Hub ID—Number used to identify the hub in a stack. An integer between 1
and 5. Read the section “Hub ID Numbers” earlier in this chapter for
information about how to determine hub ID numbers.
• Port ID—Number (1 through 8) of one of the yellow network station ports.
• Admin status—Whether or not the port has been manually disabled.
• Oper status—Whether or not the device connected to this port has a valid
connection to the hub.
• Partition status—Whether or not the port has been partitioned by the hub,
which usually happens as a result of a network loop.
Using Your Hub Software 3-37
Page 38

Command Summary
port operation
Syntax: port-operation {hub id} {port id} {enable | disable}
Mode: Administrator
Description: Enables or disables any port on any hub in the stack.
Command Keyword Definitions
• hub id—Number used to identify the hub in a stack. An integer between 1
and 5. Read the section “Hub ID Numbers” earlier in this chapter for
information about how to determine hub ID numbers.
• port id—Number of the port on the hub, based on the yellow label on the
rear panel of the hub. A number from 1 to 8.
• enable—Enables the port.
• disable—Disables the port.
3-38
Cisco Micro Hub User Guide
Page 39

Statistics Commands
Use the commands in this section to display statistics for a stack, a specific hub in a stack,
or a specific port in a stack since a restart or since the counter was last cleared.
show system statistics
Syntax: show system statistics
Mode: Guest
Description: Displays statistics for the entire stack.
Statistics Commands
Statistics are displayed in the following format:
Hub> show system statistics
Frames: 9755
Bytes: 78040
Collisions: 671
Alignment errors: 45
CRC errors: 33
Total errors: 867
Command Display Definitions
• Frames—Number of frames (packets) passing through the hub.
• Bytes—Number of bytes passing through the hub.
• Collisions—Number of times that network devices attached to any one of the
hubs in the stack have attempted to send data simultaneously.
• Alignment errors—Number of mis-synchronized data packets.
• CRC errors—Number of cyclic redundancy check (CRC) errors.
• Total errors—Total number of errors of the following types: frame control
sequence, alignment, frames-too-long, short events, late events, jabber, and
data rate mismatches.
Using Your Hub Software 3-39
Page 40

Command Summary
show hub statistics
Syntax: show hub statistics [hub id]
Mode: Guest
Description: Displays statistics for the specified hub since the last time the clear-counter or
restart command was entered.
Command Keyword Definition
• hub id—(Optional) Number used to identify the hub in a stack. An integer
between 1 and 5. Read the section “Hub ID Numbers” earlier in this chapter
for information about how to determine hub ID numbers.
Statistics are displayed in the following format:
Hub> show hub statistics 1
Hub ID Frames Bytes Collisions Errors Errors Errors
-------------------------------------------------------------1 1039 29354 264 23 12 486
Command Display Definitions
Alignment CRC Total
• Hub ID—Position of the hub in the stack, from top to bottom.
• Frames—Number of frames (packets) passing through the hub.
• Bytes—Number of bytes passing through the hub.
• Collisions—Number of times that network devices attached to any one of the
hubs in the stack have attempted to send data simultaneously.
• Alignment errors—Number of mis-synchronized data packets.
• CRC errors—Number of CRC errors.
• Total errors—Total number of errors, including the following types: frame
control sequence, alignment, frames-too-long, short events, late events,
jabber, and data rate mismatches.
3-40
Cisco Micro Hub User Guide
Page 41

Statistics Commands
show port statistics
Syntax: show port statistics {hub id} {port id}
Mode: Guest
Description: Displays statistics for the specified port on the specified hub since the last time
the clear-counters or restart command was entered.
Command Keyword Definitions
• hub id—(Optional) Number used to identify the hub in a stack. An integer
between 1 and 5. Read the section “Hub ID Numbers” earlier in this chapter
for information about how to determine hub ID numbers.
• port id—(Optional) Number of the network device port (yellow). This
number is shown on the rear panel. A number from 1 to 8. If no value is
entered, statistics for all ports are displayed.
Statistics are displayed in the following format:
Hub> show port statistics 1 5
Hub id:1 Port id:5
Readable frames:78040 Readable bytes:2360
CRC errors:671 Alignment errors:16
Frames too long:16 Short events:45
Runts:12 Collisions:33
Late events:32 Data rate mismatches:867
Auto partitions:0 Total errors:124
LSA changes:0 Last source address:0000000093AE
Command Display Definitions
• Hub id—Number used to identify the hub in a stack. An integer between 1
and 5. Read the section “Hub ID Numbers” earlier in this chapter for
information about how to determine hub ID numbers.
• Port id—Port number, shown on the rear panel of the hub.
• Readable frames—Number of valid frames (packets) passing through the
hub.
• Readable bytes—Number of valid bytes passing through the hub.
• CRC errors—Number of Ethernet CRC errors detected by this device.
• Alignment errors—Number of mis-synchronized data packets detected by
this device.
Using Your Hub Software 3-41
Page 42

Command Summary
• Frames too long—Number of times that the frame length has exceeded the
maximum allowable size (1518 bytes).
• Short events—Number of short packet fragments.
• Runts—Number of fragments that were too long to qualify as short events.
• Collisions—Number of times network devices attached to the stack have
attempted to transmit data simultaneously.
• Late events—Number of frames that experienced a collision late in
transmission.
• Data rate mismatches—Number of frames for which the data rate does not
match the local frequency.
• Auto partition—Number of times this port has been automatically
partitioned due to a network loop.
• Total errors—Total number of errors, including the following types: frame
control sequence, alignment, frames too long, short events, late events,
jabber, and data rate mismatches.
• LSA changes—Number of times the source address has changed.
• Last source address—Last source address that passed through this port.
3-42
Cisco Micro Hub User Guide
Page 43

Statistics Commands
clear counters
Syntax: clear counters {stack | hub [hub id]|port [hub id] [port id]}
Mode: Administrator
Description: Clears all accrued statistics for the specified stack, hub, or port, or a
combination of these.
Command Keyword Definitions
• stack—Clears statistics for all ports on all hubs in the stack.
• hub—Clears statistic for the specified hub. If no hub is specified, statistics
are cleared for all hubs in the stack.
• port—Clears statistics for the specified port on the specified hub. If no port
is specified, statistic are cleared for all ports in the stack.
• hub id—(Optional) Number used to identify the hub in a stack. An integer
between 1 and 5. Read the section “Hub ID Numbers” earlier in this chapter
for information about how to determine hub ID numbers.
• port id—(Optional) Port number that is shown on the rear panel of the hub.
A value from 1 to 8.
Using Your Hub Software 3-43
Page 44

Command Summary
Chassis Information Commands
Use the commands in this section to display chassis information for the Cisco Micro Hub.
show chassis information
Syntax: show chassis information
Mode: Guest
Description: Displays general information about the hub’s hardware and software.
Information is shown in the following format:
Hub> show chassis information
Chassis type: c1500(72)
Chassis version: 1.0
Chassis ID:
ROM system software version:: 1.0
Bytes of RAM available to CPU: 2048K Bytes
System up time at last chassis change: 2 days, 10 hours,
56 minutes
3-44
Cisco Micro Hub User Guide
Page 45

Chassis Information Commands
show card table
Syntax: show card table
Mode: Guest
Description: Displays information about the hardware and firmware in the hub.
Information is shown in the following format:
Hub> show card table
Card index: 2
Function type of this card: cpu-1503(38)
Card serial number: 0
Hardware version : 1.0
Firmware version : 1.0
Slot number relative to the containing card: 2
Operational status of this card: up
Number of slots on this card: 0
Using Your Hub Software 3-45
Page 46

Command Summary
show stack information
Syntax: show stack information
Mode: Guest
Description: Displays a description of hubs in a stack.
Information is displayed as follows:
Hub> show stack information
Stack name: Marketing
Index IP address
--------------------------1 123.34.18.5
2 123.34.18.17
3 123.34.18.32
4 123.34.18.25
Command Display Definitions
• Stack name—Name of the stack.
• Index—Location of hub in the stack, from top to bottom.
• IP address—IP address of the hub.
3-46
stack name
Syntax: stack name {name}
Mode: Administrator
Description: Configures the Micro Hub 1503 with a name for the stack.
Command Keyword Definition
name—(Optional) String of 1 to 32 alphanumeric characters. Characters can be
any combination of uppercase and lowercase. A number cannot be the first
character. Spaces are valid characters, but leading spaces are ignored.
Cisco Micro Hub User Guide
Page 47

Chassis Information Commands
stack ip address
Syntax: stack ip address {ip address}
Mode: Administrator
Description: Configures a Micro Hub 1503 that is a part of a stack with an IP address.
Command Keyword Definition
ip address—IP address of the stack. Must be in the format xxx.xxx.xxx.xxx.
clear stack table
Syntax: clear stack table
Mode: Administrator
Description: Clears all general stack information from the stack table.
Using Your Hub Software 3-47
Page 48

Command Summary
3-48
Cisco Micro Hub User Guide
 Loading...