

Page 1

Cisco BTS 10200 Softswitch Operations
and Maintenance Guide
Release 6.0.1
February 18, 2010
Americas Headquarters
Cisco Systems, Inc.
170 West Tasman Drive
San Jose, CA 95134-1706
USA
http://www.cisco.com
Tel: 408 526-4000
800 553-NETS (6387)
Fax: 408 527-0883
Text Part Number: OL-16000-07
Page 2

THE SPECIFICATIONS AND INFORMATION REGARDING THE PRODUCTS IN THIS MANUAL ARE SUBJECT TO CHANGE WITHOUT NOTICE. ALL
STATEMENTS, INFORMATION, AND RECOMMENDATIONS IN THIS MANUAL ARE BELIEVED TO BE ACCURATE BUT ARE PRESENTED WITHOUT
WARRANTY OF ANY KIND, EXPRESS OR IMPLIED. USERS MUST TAKE FULL RESPONSIBILITY FOR THEIR APPLICATION OF ANY PRODUCTS.
THE SOFTWARE LICENSE AND LIMITED WARRANTY FOR THE ACCOMPANYING PRODUCT ARE SET FORTH IN THE INFORMATION PACKET THAT
SHIPPED WITH THE PRODUCT AND ARE INCORPORATED HEREIN BY THIS REFERENCE. IF YOU ARE UNABLE TO LOCATE THE SOFTWARE LICENSE
OR LIMITED WARRANTY, CONTACT YOUR CISCO REPRESENTATIVE FOR A COPY.
The Cisco implementation of TCP header compression is an adaptation of a program developed by the University of California, Berkeley (UCB) as part of UCB’s public
domain version of the UNIX operating system. All rights reserved. Copyright © 1981, Regents of the University of California.
NOTWITHSTANDING ANY OTHER WARRANTY HEREIN, ALL DOCUMENT FILES AND SOFTWARE OF THESE SUPPLIERS ARE PROVIDED “AS IS” WITH
ALL FAULTS. CISCO AND THE ABOVE-NAMED SUPPLIERS DISCLAIM ALL WARRANTIES, EXPRESSED OR IMPLIED, INCLUDING, WITHOUT
LIMITATION, THOSE OF MERCHANTABILITY, FITNESS FOR A PARTICULAR PURPOSE AND NONINFRINGEMENT OR ARISING FROM A COURSE OF
DEALING, USAGE, OR TRADE PRACTICE.
IN NO EVENT SHALL CISCO OR ITS SUPPLIERS BE LIABLE FOR ANY INDIRECT, SPECIAL, CONSEQUENTIAL, OR INCIDENTAL DAMAGES, INCLUDING,
WITHOUT LIMITATION, LOST PROFITS OR LOSS OR DAMAGE TO DATA ARISING OUT OF THE USE OR INABILITY TO USE THIS MANUAL, EVEN IF CISCO
OR ITS SUPPLIERS HAVE BEEN ADVISED OF THE POSSIBILITY OF SUCH DAMAGES.
Cisco and the Cisco Logo are trademarks of Cisco Systems, Inc. and/or its affiliates in the U.S. and other countries. A listing of Cisco's trademarks can be found at
www.cisco.com/go/trademarks. Third party trademarks mentioned are the property of their respective owners. The use of the word partner does not imply a partnership
relationship between Cisco and any other company. (1005R)
Cisco BTS 10200 Softswitch Operations and Maintenance Guide
Copyright © 2010, Cisco Systems, Inc.
All rights reserved.
Page 3

Preface ix
Introduction iii-ix
CONTENTS
CHAPTER
CHAPTER
1 Starting and Shutting Down the BTS 1-1
Introduction 1-1
Meeting Power Requirements 1-1
Starting BTS Hardware 1-1
Shutting Down BTS Hardware 1-2
Starting BTS Software 1-2
2 Managing BTS Users and Commands Using EMS 2-1
Introduction 2-1
Logging into the EMS Using CLI 2-1
Managing Users 2-2
Managing Commands 2-5
Adapter and User Security 2-6
Solaris OS Security and BTShard Package 2-7
Operator Interface 2-10
Vulnerabilities in H.323 Message Processing 2-11
Authentication, Authorization and Accounting Support 2-11
Pluggable Authentication Module Support 2-12
User Security Account Management 2-12
OL-16000-06
Sun Microsystems Configurations 2-12
Solaris OS Patches 2-14
Trace Normal Forms (TNF) Support 2-14
XML Libraries 2-15
Device GLM Patch 2-15
Security CE Patch 2-15
Security Bad_Trap Patch 2-15
Java SDK Patches 2-15
Cisco BTS 10200 Softswitch Operations and Maintenance Guide, Release 6.0.x
iii
Page 4

Contents
CHAPTER
3 Monitoring and Backing Up the BTS 3-1
Introduction 3-1
Detecting and Preventing BTS Congestion 3-1
Monitoring BTS Hardware 3-1
Checking BTS System Health 3-2
Using BTS System-Health Reports 3-3
Checking BTS System Time 3-4
Checking the OS Log of Each Host Machine 3-4
Checking Disk Mirroring on Each Host Machine 3-5
CA/FS Side A 3-5
CA/FS Side B 3-5
EMS Side A 3-6
EMS Side B 3-6
Auditing Databases and Tables 3-7
Exporting Provisioned Data 3-8
Limitations 3-10
Creating Numbering Resource Utilization/Forecast (NRUF) Reports 3-10
Creating Reports for Nonrural Primary and Intermediate Carriers 3-11
Creating Reports for Rural Primary and Intermediate Carriers 3-12
Backing Up the Software Image 3-15
Full Database Auditing 3-16
Checking Shared Memory 3-16
From CA/FS Side A 3-16
From CA/FS Side B 3-17
Backing Up the Full BTS 3-18
Backing Up the CA/FS 3-18
Backing up the EMS/BDMS 3-19
Backing up the EMS Database 3-20
Using FTP to Setup File Transfer 3-21
Using SFTP to Setup File Transfer 3-22
iv
Archiving Your Database 3-24
Examining Heap Usage 3-25
Checking the DNS Server 3-25
Log Archive Facility (LAF) 3-26
Secure Transfer of Files 3-26
Other Capabilities 3-27
Provisioning LAF 3-27
Enabling LAF Process 3-27
Setup Non-Interactive SSH Login to External Archive Server 3-28
Cisco BTS 10200 Softswitch Operations and Maintenance Guide, Release 6.0.x
OL-16000-06
Page 5

LAF Alarm Information 3-29
Moving Core Files 3-29
Contents
CHAPTER
CHAPTER
4 Operating the BTS 4-1
Introduction 4-1
Managing Subscribers 4-2
Viewing Calls 4-6
Using Status and Control Commands 4-7
Using Show and Change Commmands 4-9
Using ERAC Commands 4-9
Managing Transactions 4-12
Scheduling Commands 4-13
Limitations 4-13
5 Managing External Resources 5-1
Introduction 5-1
Viewing BTS System-Wide Status 5-1
Managing Trunk Groups and Trunks 5-3
Managing Subscriber Terminations 5-12
Managing Gateways 5-16
CHAPTER
Managing Other External Resources 5-18
Learning External Resource Dependencies 5-20
GigE Support 5-28
Prerequisites 5-28
Provisioning the GigE Interface 5-28
6 Using BTS Measurements 6-1
Introduction 6-1
Using Measurements 6-1
Learning the Measurement Types 6-2
ISDN Measurements 6-2
Call Processing Measurements 6-5
MGCP Adapter Measurements 6-12
DQoS Measurements 6-13
SIP Measurements 6-13
Service Interaction Manager Measurements 6-16
POTS Local FS Measurements 6-16
OL-16000-06
Cisco BTS 10200 Softswitch Operations and Maintenance Guide, Release 6.0.x
v
Page 6

Contents
POTS Application Server Measurements 6-22
POTS Miscellaneous FS Measurements 6-22
POTS Class of Service FS Measurements 6-24
POTS Screen List Editing FS Measurements 6-25
POTS Customer Originated Trace FS Measurements 6-25
POTS Automatic Callback, Recall, and Call Return Measurements 6-26
POTS Limited Call Duration (Prepaid/Postpaid) with RADIUS Interface to AAA Measurements 6-28
POTS Call Forwarding Combination Measurements 6-28
AIN Services FS Measurements 6-29
SCCP Protocol Measurements 6-31
TCAP Protocol Measurements 6-33
SUA Measurements 6-37
M3UA Protocol Measurements 6-39
SCTP Measurements 6-41
IUA Measurements 6-44
ISUP MeasurementsI 6-46
ISUP (ANSI) Measurements 6-52
ISUP (France) Measurements 6-55
ISUP (Poland) Measurements 6-55
ISUP (ITU-China) Measurements 6-55
ISUP (ITU-Mexico) Measurements 6-58
ISUP (ITU-HongKong) Measurements 6-60
Audit Measurements 6-62
SIP Interface Adapter Measurements 6-62
Call Detail Block Measurements 6-64
Event Messaging Measurements 6-66
Dynamic QoS Measurements 6-66
PCMM Measurements 6-67
SNMP Protocol Measurements 6-67
Trunk Group Usage Measurements 6-68
Announcement Measurements 6-71
H.323 Protocol Measurements 6-71
Call Tools Measurements 6-75
AIN Tools Measurements 6-75
PCT Tools Measurements 6-75
CPU Usage Measurements 6-76
Memory Usage Measurements 6-76
Network I/O Usage Measurements 6-76
Disk Usage Measurements 6-76
System Load Usage Measurements 6-78
vi
Cisco BTS 10200 Softswitch Operations and Maintenance Guide, Release 6.0.x
OL-16000-06
Page 7

Disk I/O Usage Measurements 6-78
ENUM Measurements 6-78
Diameter Message Counters 6-79
Single Number Reach Counters 6-80
Contents
CHAPTER
APPENDIX
APPENDIX
7 Using the BTS SNMP Agent 7-1
Introduction 7-1
Managing User Access to the SNMP Agent 7-1
Viewing SNMP Trap Reports 7-2
Viewing and Managing BTS Components 7-4
Querying the SNMP Agent 7-6
Enabling NMS to Query/Poll Solaris SNMP Agent 7-6
A Feature Tones A-1
Introduction A-1
Tones per Feature A-1
Tone Frequencies and Cadences A-6
B FIM/XML B-1
Understanding the Configurable FIM/XML Feature B-1
Advantages of the FIM/XML Tool B-2
Tool Requirements B-2
OL-16000-06
Writing an External FIM/XML File B-3
Defining Features B-3
Elements in the External FIM/XML File B-3
Define Element B-4
Precedence-Exception Element B-4
Inhibit Others Element B-5
Inhibit Me Element B-5
Response Profile Element B-5
Installing the FIM/XML File Using the Offline FIM/XML Tool B-7
FIM/XML File and Shared iFC File B-9
Features Defined in FIM/XML and Shared iFC B-9
Provisioning iFC B-10
Defining a New feature as the Originating Feature B-10
Defining a VSC B-10
Defining the SIP Trigger Profile B-10
Cisco BTS 10200 Softswitch Operations and Maintenance Guide, Release 6.0.x
vii
Page 8

Contents
Feature Configuration B-10
Subscriber-Sip-Trigger-Profile B-11
Service-Id B-11
Subscriber-Service-Profile B-11
Feature Restrictions and Limitations B-11
viii
Cisco BTS 10200 Softswitch Operations and Maintenance Guide, Release 6.0.x
OL-16000-06
Page 9

Introduction
Preface
Revised: February 18, 2010, OL-16000-07
This document is the Operations and Maintenance Guide for the Cisco BTS 10200 Softswitch, Release
6.0.1.
Organization
This guide has the following chapters:
• Chapter 1, “Starting and Shutting Down the BTS”—Tells you how to start up and shut down the BTS
• Chapter 2, “Managing BTS Users and Commands Using EMS”—Describes operator interfaces to
• Chapter 3, “Monitoring and Backing Up the BTS”—Includes overall BTS maintenance strategies
• Chapter 4, “Operating the BTS”—Tells you how to operate the BTS
• Chapter 5, “Managing External Resources”—Tells you how to manage external resources
• Chapter 6, “Using BTS Measurements”—Describes BTS traffic measurements and tells you how to
• Chapter 7, “Using the BTS SNMP Agent”—Explains how to use the Simple Network Management
• Appendix A, “Feature Tones”—Explains special tones the BTS supports for subscriber and operator
• Appendix B, “FIM/XML”—Explains the Feature Interaction Module/Extensible Markup Language
the BTS and how to manage access and users
provisioned on the BTS using administrative (ADM) commands
use them
Protocol (SNMP) agent
features
(FIM/XML) feature.
OL-16000-07
Cisco BTS 10200 Softswitch Operations and Maintenance Guide, Release 6.0.x
ix
Page 10

Introduction
Document Change History
This table provides the revision history for the Cisco BTS 10200 Softswitch Operations and Maintenance
Guide, Release 6.0.x.
Table 1 Revision History
Version Number Issue Date Status Reason for Change
OL-16000-01 31 Mar 2008 Initial Initial document for Release 6.0
OL-16000-02 31 July 2008 Updated Added Change Number instructions for
OL-16000-03 18 Nov 2008 Revised Added keepalive note to Chapter 5 and
OL-16000-04 11 Dec 2008 Revised Updated the “Managing Trunk Groups and
OL-16000-05 21 July 2009 Revised Added the “Enabling NMS to Query/Poll
OL-16000-06 25 Sep 2009 Revised
Preface
subscribers.
updated the change announcement and
change subscriber directory number
information in Chapter 4.
Trunks” section on page 5-3.
Solaris SNMP Agent” section on page 7-6.
• Added the “Log Archive Facility (LAF)”
section on page 3-26.
• Added a note in Chapter 2.
• Changed all the references of workgroup
to work-group in all CLI examples.
• Updated the “Returnable Operational
States” Table in “Managing External
Resources” chapter.
OL-16000-07 18 Feb 2010 Revised
• Added the “Log Archive Facility (LAF)”
section on page 3-26.
• Added following commands in the
chapter “Managing External
Resources”:
–
report aggr
–
report mgw
• Added the following command in the
chapter “Operating the BTS”
–
report subscriber
Obtaining Documentation and Submitting a Service Request
For information on obtaining documentation, submitting a service request, and gathering additional
information, see the monthly What’s New in Cisco Product Documentation, which also lists all new and
revised Cisco technical documentation, at:
http://www.cisco.com/en/US/docs/general/whatsnew/whatsnew.html
Cisco BTS 10200 Softswitch Operations and Maintenance Guide, Release 6.0.x
x
OL-16000-07
Page 11

Preface
Introduction
Subscribe to the What’s New in Cisco Product Documentation as a Really Simple Syndication (RSS) feed
and set content to be delivered directly to your desktop using a reader application. The RSS feeds are a free
service and Cisco currently supports RSS version 2.0.
OL-16000-07
Cisco BTS 10200 Softswitch Operations and Maintenance Guide, Release 6.0.x
xi
Page 12

Introduction
Preface
xii
Cisco BTS 10200 Softswitch Operations and Maintenance Guide, Release 6.0.x
OL-16000-07
Page 13

Starting and Shutting Down the BTS
Revised: February 18, 2010, OL-16000-07
Introduction
This chapter tells you how to start up and shut down the BTS.
Meeting Power Requirements
To meet high availability requirements:
• Do not have common parts in the power feeds to the redundant hardware that could be a common
single point of failure.
• Use uninterruptible power supply (UPS) for both AC and DC systems. It must be designed to support
system operation through any possible power interruption. Power must have battery backup to
maintain service in the event of commercial power failure (both power supplies of the redundant pair
must be able to do this).
CHAP T ER
1
• For AC-powered installations have two separate (redundant) circuits. Source AC circuits from
separate transformer phases on separate breakers so a single breaker trip does not disable both.
• For DC-powered installations have power from two separate dedicated DC branches (redundant A
and B feeds) for each DC-powered BTS.
Starting BTS Hardware
The time it takes to complete this procedure varies with system type and database size. System types
include:
• EMS—Element Management System
• BDMS—Bulk Data Management System
• CA—Call Agent
• FS—Feature Server
Step 1 Ensure all power cables connect to the correct ports.
OL-16000-07
Cisco BTS 10200 Softswitch Operations and Maintenance Guide, Release 6.0.x
1-1
Page 14

Shutting Down BTS Hardware
Step 2 Plug in Catalyst switch routers.
Step 3 Power on EMS/BDMS hosts A and B.
Step 4 Power on CA/FS hosts A and B.
Shutting Down BTS Hardware
Step 1 Ensure CA side A and EMS side A are active.
Step 2 Ensure CA side B and EMS side B EMS are standby.
Step 3 Log into CA side A and B and EMS side A and B using Secure Shell (SSH).
Step 4 Shut down the system in order:
1. EMS side B
2. CA side B
3. CA side A
4. EMS side A
Step 5 To begin platform shutdown:
>platform stop all
Chapter 1 Starting and Shutting Down the BTS
Step 6 When #> returns, enter nodestat to ensure the operating system is ready for shutdown.
Step 7 To shut down the servers, enter one of the following commands for each node (Sun Microsystems
recommends both as graceful shutdowns).
>shutdown -i5 -g0 -y
Or:
>sync;sync; init5
Step 8 To power off primary and secondary CAs and FSs find the switch to the left of the LEDs and flip it to
OFF.
Step 9 When the fans stop, release the switch to neutral.
Step 10 To power off primary and secondary EMSs find the switch to the left of the LEDs and flip it to OFF.
Step 11 When the fans stop, release the switch to neutral.
Step 12 To power off the side, unplug them.
Starting BTS Software
BTS automatically starts when you power on the server. Repeat this procedure for each server.
1-2
Step 1 Enter nodestat.
Step 2 Log in as root.
Step 3 Enter platform start.
Cisco BTS 10200 Softswitch Operations and Maintenance Guide, Release 6.0.x
OL-16000-07
Page 15

Chapter 1 Starting and Shutting Down the BTS
Step 4 Once all components start, enter nodestat to ensure proper startup.
Starting BTS Software
OL-16000-07
Cisco BTS 10200 Softswitch Operations and Maintenance Guide, Release 6.0.x
1-3
Page 16

Starting BTS Software
Chapter 1 Starting and Shutting Down the BTS
1-4
Cisco BTS 10200 Softswitch Operations and Maintenance Guide, Release 6.0.x
OL-16000-07
Page 17

Introduction
CHAP T ER
2
Managing BTS Users and Commands Using EMS
Revised: February 18, 2010, OL-16000-07
This chapter describes operator interfaces to the BTS and how to manage access and users.
The Element Management System (EMS) database holds up to 256 logins and up to 50 active user
sessions.Using the command line interface (CLI) you can locally connect to the EMS in an interactive
session.The EMS system administrator can:
• Add a new user.
• Assign a user’s privilege level—10 is for the system administrator. BTS has predefined user
accounts:
Username Permission
btsadmin btsadmin like MAINT shell user—MAINT shell is an enhanced CLI
interface and does not log off an idle user)
secadmin secadmin like MAINT shell user
btsuser btsuser lower access permissions than btsadmin and secadmin, good for
generic provisioning access
• Reset a user’s password.
• Enter a description for each security class and privilege level.
• Manage security log reporting.
Logging into the EMS Using CLI
SSH is a way to access the BTS CLI or maintenance (MAINT) modes. SSH provides encrypted
communication between a remote machine and the EMS/CA for executing CLI or MAINT commands.
The SSH server runs on EMSs and CAs. To connect the client and server sides run the secure shell
daemon (SSHD). With SSH, new users must enter a new password and reenter that password during the
first login. In future logins they are prompted once for a password only.
OL-16000-07
Cisco BTS 10200 Softswitch Operations and Maintenance Guide, Release 6.0.x
2-1
Page 18

Managing Users
Chapter 2 Managing BTS Users and Commands Using EMS
The “ciscouser” login is a high-level security login for TAC and other BTS support personnel that
restricts access to certain commands. Anyone else trying to execute such commands receives an error
message.
After installation, on the EMS, the system prompts you to change the passwords of root, btsadmin,
btsuser and calea if they have default passwords. On the CA, the system prompts you to change the
passwords of root if it has default password. There are no default passwords for Operations,
Administration and Maintenance applications.
When logging in for the first time system administrators log in as
btsadmin). Change the password.
Step 1 To log in from the client side for the first time: ssh btsadmin@<ipaddress>.
Note If you are logged in to the system as root, enter: btsadmin@0
btsadmin (the default password is
On the first SSH login from the client side, expect a message like this:
The authenticity of host [hostname] can't be established.
Key fingerprint is 1024 5f:a0:0b:65:d3:82:df:ab:42:62:6d:98:9c:fe:e9:52.
Are you sure you want to continue connecting (yes/no)?
Step 2 Enter yes.
The password prompt appears, now all communications are encrypted.
Step 3 Enter your password.
The system responds with a CLI> prompt. You can now send commands to the EMS.
Step 4 Enter provisioning commands.
Step 5 To log off, enter exit .
Managing Users
You must have a user privilege level of 9 or higher to add, show, change, or delete a user.
Caution Do not add, change, or delete username root, this prevents proper EMS access.
Table 2-1 Managing Users
Task Sample Command
Adding a user
Viewing a user show user name=UserABC;
Cisco BTS 10200 Softswitch Operations and Maintenance Guide, Release 6.0.x
2-2
1. add user name=UserABC; command-level=9; warn=10;
days-valid=30; work-groups=somegroup;
2. Supply a default password:
reset password name=<user name>; new-password=<user
password>;
OL-16000-07
Page 19

Chapter 2 Managing BTS Users and Commands Using EMS
Table 2-1 Managing Users (continued)
Task Sample Command
Viewing user activity show ems;
Changing a user change user name=UserABC; command-level=1;
Deleting a user delete user name=UserABC;
Changing a user’s password
Managing Users
work-groups=somegroup;
You cannot delete optiuser.
reset password name=username; days-valid=<number of days the
new password will be valid>; warn=<number of days before
password expiration to warn user>;
reset password name=username; days-valid=30; warn=4;
A password must:
• Have 6-8 characters
• Have at least two alphabetic characters
• Have at least one numeric or special character
• Differ from the user's login name and any combination of the
login name
• Differ from the old password by at least three characters
Adding a new work-group
Adding a user to a work-group
Removing a user from a
work-group
Viewing all currently active
users
Viewing an active user
Change the password for user
change command-table noun=mgw; verb=add; work-groups=latex;
change user name=trs80nut; work-groups=+rubber;
change user name=trs80nut; work-groups=-latex;
show session
show session terminal
optiuser on each BTS.
OL-16000-07
Cisco BTS 10200 Softswitch Operations and Maintenance Guide, Release 6.0.x
2-3
Page 20

Managing Users
Chapter 2 Managing BTS Users and Commands Using EMS
Table 2-1 Managing Users (continued)
Task Sample Command
Blocking an active user 1. Select operation mode:
• MAINTENANCE—(default) for regular maintenance
• UPGRADE—for upgrades
2. block session terminal=USR16;
Note You cannot block the session of a user with higher privileges
than yours.
Prevent BTS provisioning during an upgrade or maintenance window
from the following interfaces:
• CLI
• FTP
• CORBA
• SNMP
Note The software will support blocking HTTP interfaces in a
future release.
If you block provisioning before performing an SMG restart or EMS
reboot, blocking is still enforced when these applications return to
in-service state.
There are two levels of blocking:
• PROVISION—Prevents all provisioning commands from
executing
• COMPLETE—Prevents all commands from executing
Only terminal type MNT users can use these blocking and unblocking
commands. MNT users are never blocked. MNT users issue these
commands from either active or standby EMS.
A blocking command applies to all non-MNT users on terminals on
either active or standby EMS. Commands do not execute for:
• Logged-in users
• Users who login after the block command
Commands are not queued for execution after unblock. The CLI user
prompt changes when blocked, notifying the user their commands will
not execute.
Unblocking a user
unblock session terminal=USR16;
Note You cannot unblock the session of a user with higher
privileges.
Resetting a user’s idle time Idle time is how many minutes (1-30) a user can be idle before being
logged off the BTS.
change session idle-time=30;
Stopping a user’s session
stop session terminal=USR16;
2-4
Cisco BTS 10200 Softswitch Operations and Maintenance Guide, Release 6.0.x
OL-16000-07
Page 21

Chapter 2 Managing BTS Users and Commands Using EMS
Note All commands should be assigned to a work-group. If a command is not assigned to a work-group, a user
will able to execute that command, which is not recommended. You can also assign users and the
commands to multiple work-groups.
Managing Commands
Each command (verb-noun combination) has a security class of 1-10; 1 is lowest, 10 is highest. Each
time a user enters a command, the system compares the user’s privilege level to the command’s security
class. EMS denies the command if the user level is less than the command level.
The Command Level (command-level) table shows the 10 command security classes. BTS has the
following presets:
• 1 (lowest level)
• 5 (mid-level)
• 10 (highest level)—These commands require a system administrator with a security level of 10 to
execute.
Managing Commands
Table 2-2 Managing Commands
Task Sample Command
Viewing a command’s security class
Adding a description to a command’s
security class
show command-level id=10;
change command-level id=10; description=This is
the highest level administration access;
Changing a command’s privilege level change command-table noun=mgw; verb=add;
sec-level=9;
Resetting a command’s privilege level reset command-table noun=mgw; verb=add;
Viewing all executed commands
Sending all executed commands to a
report file
Viewing the report of all executed
commands
Viewing a security summary
show history;
report history;
Note Results may take a few minutes to display.
1. In a web browser enter http://server name.
2. Click Reports.
3. Click history.html.
report security-summary start-time=2002-09-26
00:00:00; end-time=2002-09-27 00:00:00; source=all;
Note Results may take a few minutes to display.
Viewing security summary reports In a web browser enter https:// <ems ip addr>.
OL-16000-07
This chapter details the behaviors and attributes of the various security packages in the BTS 10200. The
sources for the items are derived from many dynamic sources. Included in these sources are security
bulletins from third-party vendors to the BTS 10200 as well as security agencies and open source
organizations.
Cisco BTS 10200 Softswitch Operations and Maintenance Guide, Release 6.0.x
2-5
Page 22
Adapter and User Security
104705
Cisco BTS 10200
Kernel parameter tuning
User password control and
command authorization
UNIX services
(for example
Apache and SSH)
User authentication and authorization
BTS applications and third-party software
Solaris kernel and IP stack
OSS Network
NMS/NOC User Access for OAM&P
VoIP Network
Gateway Access for IAD or PSTN
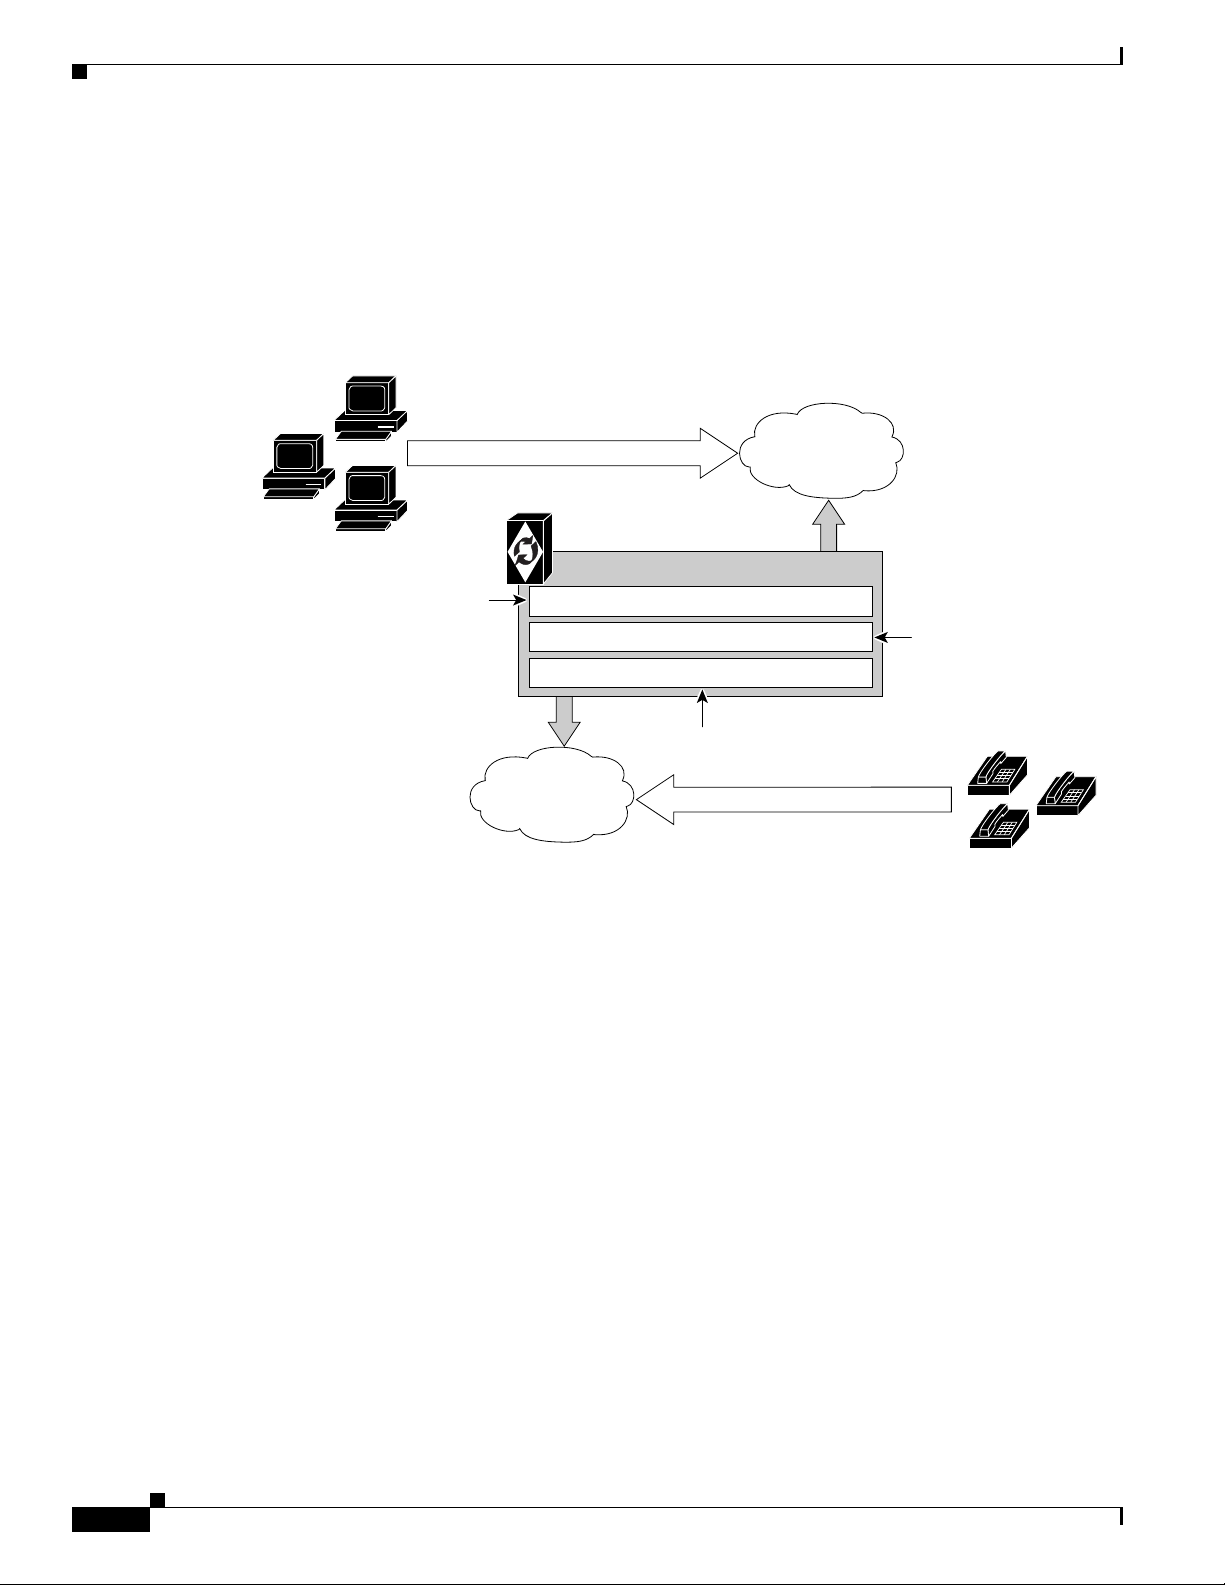
Security is an important part of the BTS 10200. The BTS 10200 has interfaces to customer premise
equipment (CPE) as well as northbound Operations Support System (OSS) interfaces. All of these
interfaces are subject to attacks. In addition, users who are allowed onto the BTS 10200 can also find
ways to exploit applications that can lead to service-affecting situations. Therefore, many precautions
are taken to ensure the solidity of the BTS 10200 defenses while avoiding a system that is difficult to
manage.
Figure 2-1 BTS 10200 Access and Related Security
Chapter 2 Managing BTS Users and Commands Using EMS
Adapter and User Security
Cisco BTS 10200 Softswitch Operations and Maintenance Guide, Release 6.0.x
2-6
This section describes requirements that generally involve adapter and user level of security. In the BTS
10200, adapters are any external, northbound interfaces of the BTS 10200. However, some extrapolated
requirements involve adapter technology based on the current deployment:
• Support termination of a session once a provisionable inactivity timeout has occurred. An event
report is issued upon each timeout expiry. The inactivity time ranges from 10 to 30 minutes.
• Restrict access as “root” to the BTS 10200 in all cases except Cisco TAC and customer
“administrator”. This is a broad statement that includes the addition of command-line interface
(CLI) commands to help manage the system. In addition, UNIX services are restricted to harden the
operating system (OS). The service restriction is listed in the Solaris OS Security and BTShard
Package section. The process of restricting root access is an ongoing process.
• Use of “sudo" is acceptable and the formal Sun-built and packaged version is located in
/opt/sfw/bin/.
OL-16000-07
Page 23

Chapter 2 Managing BTS Users and Commands Using EMS
Solaris OS Security and BTShard Package
This section details the security packages for the BTS 10200 OS. These packages are automatically
installed at installation. These packages are derived from both Sun Microsystems security bulletins and
Cisco internal policies for safety of the OS and its applications. All services can be reactivated for the
lifetime of the current kernel instance. All settings are reset on reboot of the kernel. These settings are
contained in the BTShard Solaris package delivered with the BTS 10200.
• Remove unnecessary UNIX systems services. These services are listed below. Management of these
facilities must allow for each service to be enabled or disabled on an individual basis. This service
management must also be accomplished through the BTS 10200 adapter interface.
–
FTP—FTP server is disabled and SFTP (Secure FTP) should be used. This impacts the Bulk
Data Provisioning interface. It does not impact the Billing Bulk Data transfer. The FTP client
code will still be available on the EMS node.
–
Telnet—This terminal protocol is disabled and SSH (Secure Shell) should be used. The telnet
server and client code are still available on the EMS node.
–
Echo—This service is to be disabled. This capability has been replaced with Internet Control
Message Protocol (ICMP) “ping” facilities.
–
Discard—This service is to be disabled.
Solaris OS Security and BTShard Package
–
Printer—This service is to be disabled. No printer services are supplied in the BTS 10200
product description.
–
Daytime—This service is to be disabled.
–
Chargen—This service is to be disabled.
–
SMTP—This service is to be disabled.
–
Time—This service is to be disabled.
–
Finger—This service is to be disabled. No network user facilities are required. The BTS 10200
tracks users internally and on a single BTS basis.
–
Sun RPC—This service is to be disabled. This may be enabled in a lab environment for Tooltalk
usage in debugging application programs.
–
Exec—This service is to be disabled.
–
Login—This service is to be disabled.
–
Shell—This service is to be disabled. This may be required for some lab activity; however, there
is no field usage for rlogin, rcp, and rsh facilities.
–
UUCP—This service is to be disabled.
–
NFS—This service is to be disabled.
–
Lockd—This service is to be disabled.
–
X11—This service is available for the near term only.
–
DTSCP—This service is to be disabled.
–
Font-services—This service is to be disabled.
–
HTTP—This service is to be enabled. This is used by the BTS 10200 to offer results of report
generation. This will migrate to HTTPS.
OL-16000-07
Cisco BTS 10200 Softswitch Operations and Maintenance Guide, Release 6.0.x
2-7
Page 24

Solaris OS Security and BTShard Package
• The following UNIX accounts are to be LOCKED but not removed from the system: lp, uucp, nuucp,
nobody, listen, and any other Cisco support accounts not used in the normal course of field
operation. Services managed by root are the only accounts allowed to utilize one of these identities.
This is the default behavior.
• Modifications to the Solaris kernel parameters were made to close potential breeches in the OS.
These types of security precautions are most often geared toward “denial of service” attacks. These
types of attacks create situations that degrade the performance of a system and as a result, prohibit
the critical applications from delivering the service they are designed to provide.
• The TCP protocol uses random initial sequence numbers.
• All failed login attempts are logged.
• The following users are not allowed direct FTP access to the machine: root, daemon, bin, sys, adm,
nobody, and noaccess.
• A root user cannot telnet directly to the machine. Direct root user access is granted to the console
only. A user who wants to access the root account must use the su command from a nonprivileged
account.
• The break key (<STOP> <A>) on the keyboard is disabled.
• IP_FORWARD_DIRECTED_BROADCASTS—This option determines whether to forward
broadcast packets directed to a specific net or subnet, if that net or subnet is directly connected to
the machine. If the system is acting as a router, this option can be exploited to generate a great deal
of broadcast network traffic. Turning this option off helps prevent broadcast traffic attacks. The
Solaris default value is 1 (True). For example:
ip_forward_directed_broadcasts=0
Chapter 2 Managing BTS Users and Commands Using EMS
• IP_FORWARD_SRC_ROUTED—This option determines whether to forward packets that are
source routed. These packets define the path the packet should take instead of allowing network
routers to define the path. The Solaris default value is 1 (True). For example:
ip_forward_src_routed=0
• IP_IGNORE_REDIRECT—This option determines whether to ignore the ICMP packets that define
new routes. If the system is acting as a router, an attacker may send redirect messages to alter routing
tables as part of sophisticated attack (man-in-the-middle attack) or a simple denial of service. The
Solaris default value is 0 (False). For example:
ip_ignore_redirect=1
• IP_IRE_FLUSH_INTERVAL—This option determines the period of time at which a specific route
will be kept, even if currently in use. Address Resolution Protocol (ARP) attacks may be effective
with the default interval. Shortening the time interval may reduce the effectiveness of attacks. The
default interval is 1200000 milliseconds (20 minutes). For example:
ip_ire_flush_interval=60000
• IP_RESPOND_TO_ADDRESS_MASK_BROADCAST—This option determines whether to
respond to ICMP netmask requests, typically sent by diskless clients when booting. An attacker may
use the netmask information for determining network topology or the broadcast address for the
subnet. The default value is 0 (False). For example:
ip_respond_to_address_mask_broadcast=0
2-8
Cisco BTS 10200 Softswitch Operations and Maintenance Guide, Release 6.0.x
OL-16000-07
Page 25

Chapter 2 Managing BTS Users and Commands Using EMS
• IP_RESPOND_TO_ECHO_BROADCAST—This option determines whether to respond to ICMP
broadcast echo requests (ping). An attacker may try to create a denial of service attack on subnets
by sending many broadcast echo requests to which all systems will respond. This also provides
information on systems that are available on the network. The Solaris default value is 1 (True). For
example:
ip_respond_to_echo_broadcast=1
• IP_RESPOND_TO_TIMESTAMP—This option determines whether to respond to ICMP timestamp
requests, that some systems use to discover the time on a remote system. An attacker may use the
time information to schedule an attack at a period of time when the system may run a cron job (or
other time-based event) or otherwise be busy. It may also be possible predict ID or sequence
numbers that are based on the time of day for spoofing services. The Solaris default value is 1 (True).
For example:
ip_respond_to_timestamp=0
• IP_RESPOND_TO_TIMESTAMP_BROADCAST—This option determines whether to respond to
ICMP broadcast timestamp requests, that are used to discover the time on all systems in the
broadcast range. This option is dangerous for the same reasons as responding to a single timestamp
request. Additionally, an attacker may try to create a denial of service attack by generating many
broadcast timestamp requests. The default value is 1 (True). For example:
ip_respond_to_timestamp_broadcast=0
Solaris OS Security and BTShard Package
• IP_SEND_REDIRECTS—This option determines whether to send ICMP redirect messages, that
can introduce changes into the routing table of the remote system. It should only be used on systems
that act as routers. The Solaris default value is 1 (True). For example:
ip_send_redirects=0
• IP_STRICT_DST_MULTIHOMING—This option determines whether to enable strict destination
multihoming. If this is set to 1 and ip_forwarding is set to 0, then a packet sent to an interface from
which it did not arrive will be dropped. This setting prevents an attacker from passing packets across
a machine with multiple interfaces that is not acting a router. The default value is 0 (False). For
example:
ip_strict_dst_multihoming=1
• TCP_CONN_REQ_MAX_Q0—This option determines the size of the queue containing half-open
connections. This setting provides protection from SYN flood attacks. Solaris 2.6 and 7 (and 2.5.1
with patch 103582-12 and higher) include protection from these attacks. The queue size default is
adequate for most systems but should be increased for busy web servers. The default value is 1024.
For example:
tcp_conn_req_max_q0=4096
• The following startup files are removed from the level “3” runtime environment of the BTS 10200.
These services can still be started manually if required in laboratory circumstances. They are not
required for field operations.
–
S71rpc
–
S73cachefs.daemon
–
S73nfs.client
OL-16000-07
–
S74autofs
–
S80lp
–
S80spc
Cisco BTS 10200 Softswitch Operations and Maintenance Guide, Release 6.0.x
2-9
Page 26

Chapter 2 Managing BTS Users and Commands Using EMS
Solaris OS Security and BTShard Package
–
S88sendmail
–
S93cacheos.finish
–
S99dtlogin
Operator Interface
Additional commands have been added to manage the UNIX services in the BTS 10200. These
commands are available from the CLI/MAINT interface. In addition, these same commands are also
available from the CORBA and bulk-provisioning interface. There are no schemas and tables associated
with these commands. They directly control the UNIX services. These services are only enabled for the
lifetime of the current kernel instance. They are reset to the installed defaults when a kernel reboot is
performed.
Table 2-3 describes the system services available using the node command.
Table 2-3 Node Command for UNIX Services
Noun Verb Options Description
Node Change SERVICE [Required]
Defines the service to change.
Must be one of the
following: FTP,
TELNET, ECHO,
DISCARD, PRINTER,
DAYTIME, CHARGEN,
SMTP, TIME, FINGER,
SUNRPC, EXEC,
LOGIN, SHELL, UUCP,
NFS, LOCKD, X11,
DTSCP,
FONT-SERVICES,
HTTP.
Node Change ENABLE [Required] A Boolean flag [Y/N] that indicates whether to turn
this service on or off.
Node Change NODE [Required] The node name in the BTS 10200 where the service
is managed.
2-10
Cisco BTS 10200 Softswitch Operations and Maintenance Guide, Release 6.0.x
OL-16000-07
Page 27

Chapter 2 Managing BTS Users and Commands Using EMS
Solaris OS Security and BTShard Package
Table 2-3 Node Command for UNIX Services (continued)
Noun Verb Options Description
Node Show SERVICE [Required]
Must be one of the
following: FTP,
TELNET, ECHO,
DISCARD, PRINTER,
DAYTIME, CHARGEN,
SMTP, TIME, FINGER,
SUNRPC, EXEC,
LOGIN, SHELL, UUCP,
NFS, LOCKD, X11,
DTSCP,
FONT-SERVICES,
HTTP.
Node Show Node [Required] Defines the node to display for the state of the
Defines the service to display.
service.
Vulnerabilities in H.323 Message Processing
During 2002 the University of Oulu Security Programming Group (OUSPG) discovered a number of
implementation-specific vulnerabilities in the Simple Network Management Protocol (SNMP).
Subsequent to this discovery, the National Infrastructure Security Coordination Centre (NISCC)
performed and commissioned further work on identifying implementation specific vulnerabilities in
related protocols that are critical to the United Kingdom Critical National Infrastructure. One of these
protocols is H.225, that is part of the H.323 family and is commonly implemented as a component of
multimedia applications such as Voice over IP (VoIP).
OUSPG produced a test suite for H.225 and employed it to validate their findings against a number of
products from different vendors. The test results have been confirmed by testing performed by NISCC
and the affected vendors contacted with the test results. These vendors' product lines cover a great deal
of the existing critical information infrastructure worldwide and have therefore been addressed as a
priority. However, the NISCC has subsequently contacted other vendors whose products employ H.323
and provided them with tools with which to test these implementations.
Authentication, Authorization and Accounting Support
These extensions represent modifications to the current scheme of user account management on the
system. It includes support for the following two protocols; these protocols are not required to be
mutually inclusive.
• Radius Protocol
• Lightweight Directory Access Protocol (LDAP)
OL-16000-07
Prior to Release 4.4, user account management for the BTS 10200 used the standard Solaris password
management facilities without the use of the Authentication Dial-In User Service Network Information
Service (NIS). All accounts are stored locally and referenced locally. This security feature begins
support for a complete AAA model for user account management. This model impacts several internal
subsystems of the BTS 10200 Element Management System (EMS) application. It also impacts the core
login support on the other nodes of the BTS 10200.
Cisco BTS 10200 Softswitch Operations and Maintenance Guide, Release 6.0.x
2-11
Page 28

Sun Microsystems Configurations
Pluggable Authentication Module Support
The BTS 10200 deploys a Secure Shell (SSH) package with Pluggable Authentication Module (PAM)
support. The package includes the PAM support required to utilize the Radius and LDAP servers.
The supporting configuration allows local accounts to fall through if the Radius and LDAP servers are
not available. These default local accounts for the BTS 10200 are the btsuser, btsadmin and secadmin
accounts. These are the standard default accounts provided in the base product and use the native
password management.
A UNIX-based user provides access to the operating system on all nodes. The oamp user is defined for
package management purposes. The account is locked and no password is available. However, to grant
UNIX access to all nodes of the BTS 10200, a default password is provided.
When PAM support is used, SSH transfers the control of authentication to the PAM library, that then
loads the modules specified in the PAM configuration file. Finally, the PAM library tells SSH whether
the authentication was successful. SSH is not aware of the details of the actual authentication method
employed by PAM. Only the final result is of interest.
User Security Account Management
Chapter 2 Managing BTS Users and Commands Using EMS
The BTS 10200 EMS contains an application program known as User Security Management (USM).
This program determines if an account is local or off-board. Password management facilities are disabled
for all accounts on the BTS 10200 when an AAA deployment is configured. The AAA deployment
transfers the responsibility for these existing facilities to the end-user AAA servers. These facilities
include the following attributes:
• Password aging, warning, and expiration
• Password reset and automatic account locking
• Local account management (password and shadow files) for new accounts
Sun Microsystems Configurations
Table 2-4 lists the Solaris 10 architecture-specific or hardware specific packages for certain Sun
Microsystems configurations.
Table 2-4 Solaris Architectural- or Hardware-Specific Optional Package List
Package Description Type Status
SMEvplr SME platform links SYSTEM —
SMEvplu SME usr/platform links SYSTEM —
SUNWaudd Audio drivers SYSTEM —
SUNWauddx Audio drivers (64-bit) SYSTEM —
SUNWced Sun GigaSwift Ethernet Adapter (32-bit driver) SYSTEM —
SUNWcedx Sun GigaSwift Ethernet Adapter (64-bit driver) SYSTEM —
SUNWcg6 GX (cg6) device driver SYSTEM —
SUNWcg6x GX (cg6) device driver (64-bit) SYSTEM —
SUNWcsd Core Solaris devices SYSTEM —
2-12
Cisco BTS 10200 Softswitch Operations and Maintenance Guide, Release 6.0.x
OL-16000-07
Page 29

Chapter 2 Managing BTS Users and Commands Using EMS
Table 2-4 Solaris Architectural- or Hardware-Specific Optional Package List (continued)
Package Description Type Status
SUNWdfb Dumb Frame Buffer device drivers SYSTEM —
SUNWensqr Ensoniq ES1370/1371/1373 Audio device driver
(32-bit) (Root)
SUNWensqx Ensoniq ES1370/1371/1373 Audio device driver
(64-bit) (Root)
SUNWeridx Sun RIO 10/100 Mb Ethernet drivers (64-bit) SYSTEM —
SUNWfcip Sun FCIP IP/ARP over FibreChannel device
driver
SUNWfcipx Sun FCIP IP/ARP over FibreChannel device
driver (64-bit)
SUNWfcp Sun FCP SCSI device driver SYSTEM —
SUNWfcpx Sun FCP SCSI device driver (64-bit) SYSTEM —
SUNWfctl Sun Fibre Channel Transport layer SYSTEM —
SUNWfctlx Sun Fibre Channel Transport layer (64-bit) SYSTEM —
SUNWfruid FRU ID prtfru Command and libfru library SYSTEM —
SUNWfruip FRU ID Platform Data module and Access
libraries
SUNWfruix FRU ID library (64-bit) SYSTEM —
SUNWged Sun Gigabit Ethernet Adapter driver SYSTEM —
SUNWglmr rasctrl environment monitoring driver for i2c
(Root) (32-bit)
SUNWglmx rasctrl environment monitoring driver for i2c
(Root) (64-bit)
SUNWi2cr device drivers for I2C devices (Root, 32-bit) SYSTEM —
SUNWi2cx device drivers for I2C devices (Root, 64-bit) SYSTEM —
SUNWidecr IDE device drivers SYSTEM —
SUNWidecx IDE device drivers (Root) (64bit) SYSTEM —
SUNWider IDE device driver (Root) SYSTEM —
SUNWkmp2r PS/2 Keyboard and Mouse device drivers (Root(
(32-bit)
SUNWkmp2x PS/2 Keyboard and Mouse device drivers (Root)
(64-bit)
SUNWmdr Solstice DiskSuite drivers SYSTEM Required by the
SUNWmdx Solstice DiskSuite drivers(64-bit) SYSTEM Required by the
SUNWmdi Sun Multipath I/O drivers SYSTEM —
SUNWmdix Sun Multipath I/O drivers (64-bit) SYSTEM —
SUNWpd PCI drivers SYSTEM —
Sun Microsystems Configurations
SYSTEM —
SYSTEM —
SYSTEM —
SYSTEM —
SYSTEM —
SYSTEM —
SYSTEM —
SYSTEM —
SYSTEM —
BTS 10200
BTS 10200
OL-16000-07
Cisco BTS 10200 Softswitch Operations and Maintenance Guide, Release 6.0.x
2-13
Page 30

Solaris OS Patches
Chapter 2 Managing BTS Users and Commands Using EMS
Table 2-4 Solaris Architectural- or Hardware-Specific Optional Package List (continued)
Package Description Type Status
SUNWpdx PCI drivers (64-bit) SYSTEM —
SUNWpiclh PICL Header files SYSTEM —
SUNWpiclr PICL Framework (Root) SYSTEM —
SUNWpiclu PICL libraries and Plugin modules (Usr) SYSTEM —
SUNWpiclx PICL libraries (64-bit) SYSTEM —
SUNWqfed Sun Quad FastEthernet Adapter driver SYSTEM —
SUNWqfedx Sun Quad FastEthernet Adapter driver (64-bit) SYSTEM —
SUNWqlc Qlogic ISP 2200/2202 Fiber Channel device
driver
SUNWqlcx Qlogic ISP 2200/2202 Fiber Channel device
driver (64-bit)
SUNWses SCSI Enclosure Services device driver SYSTEM —
SUNWsesx SCSI Enclosure Services device driver (64-bit) SYSTEM —
SUNWsior SuperIO 307 (plug-n-play) device drivers (Root) SYSTEM —
SUNWsiox SuperIO 307 (plug-n-play) device drivers (Root)
(64-bit)
SUNWssad SPARCstorage Array drivers SYSTEM —
SUNWssadx SPARCstorage Array drivers (64-bit) SYSTEM —
SUNWssaop Administration Utilities and Firmware for
SPARCStorage Array
SUNWuaud USB Audio drivers SYSTEM —
SUNWuaudx USB Audio drivers (64-bit) SYSTEM —
SUNWusb USB device drivers SYSTEM —
SUNWusbx USB device drivers (64-bit) SYSTEM —
SUNWxwdv X Windows System Window drivers SYSTEM —
SUNWxwdvx X Windows System Window drivers (64-bit) SYSTEM —
SYSTEM —
SYSTEM —
SYSTEM —
SYSTEM —
Solaris OS Patches
This chapter describes the BTS 10200 Solaris OS patches.
Trace Normal Forms (TNF) Support
The TNF package provides the Solaris tool suite with enhanced debugging capabilities of applications
as they execute in the target environment. TNF supports program execution traces at both the user and
kernel level The package includes the following:
• SUNWtnfc—Utilities needed to enable probe points, in the kernel and in applications, that can
generate TNF records in a trace file.
Cisco BTS 10200 Softswitch Operations and Maintenance Guide, Release 6.0.x
2-14
OL-16000-07
Page 31

Chapter 2 Managing BTS Users and Commands Using EMS
• SUNWtnfd—Utilities needed by developers using TNF facilities.
• SUNWtnfx—The 64-bit utilities needed to enable probe points, in the kernel and in applications,
that can generate TNF records in a trace file.
XML Libraries
The Sun VTS software requires the use of the XML libraries on the BTS 10200. These are in the
supplemental part of the Solaris distribution with the VTS packages. These XML libraries and tools for
32 and 64 bit usage are listed as follows:
• SUNWxmlS
• SUNWlxml
• SUNWlxmlx
Device GLM Patch
The 109885-16 patch corrects several open bug reports on the SCSI device driver GLM in the Solaris OS.
Solaris OS Patches
Security CE Patch
The 111883-24 patch corrects Sun GigaSwift Ethernet 1.0 driver.
Security Bad_Trap Patch
The 117000-05 patch is a new generic kernel patch that cumulates many kernel level bug fixes into a
single patch. This supersedes the older generic patch 108528-29.
Java SDK Patches
The upgraded version of Java requires some additional patches to the kernel and system libraries to
support the required functionality. The patches are listed below. These are the relevant patches from the
recommended cluster of patches as produced by Sun Microsystems.
• 109147-30—The SunOS 5.8: linker patch.
• 111308-05—The SunOS 5.8: /usr/lib/libmtmalloc.so.1 patch.
• 112438-03—The SunOS 5.8: /kernel/drv/random patch.
• 108434-17—The SunOS 5.8: 32-Bit Shared library patch for C++.
Note 108435-17 is the corresponding 64-bit patch.
OL-16000-07
• 108435-17—The SunOS 5.8: 64-Bit Shared library patch for C++ Note: 108434-17 is the
corresponding 32-bit patch.
• 111111-04—The SunOS 5.8: /usr/bin/nawk patch.
Cisco BTS 10200 Softswitch Operations and Maintenance Guide, Release 6.0.x
2-15
Page 32

Solaris OS Patches
Chapter 2 Managing BTS Users and Commands Using EMS
• 108993-38—The SunOS 5.8: LDAP2 client, libc, libthread and libnsl libraries patch.
• 109326-16—The SunOS 5.8: libresolv.so.2 and in.named patch.
• 110615-13—The SunOS 5.8: sendmail patch.
2-16
Cisco BTS 10200 Softswitch Operations and Maintenance Guide, Release 6.0.x
OL-16000-07
Page 33

CHAP T ER
Monitoring and Backing Up the BTS
Revised: February 18, 2010, OL-16000-07
Introduction
This chapter includes overall BTS maintenance strategies.
Detecting and Preventing BTS Congestion
When congested the BTS automatically does the following:
• Detects internal messaging congestion caused by traffic overload or other extraordinary events.
• Takes preventive action to avoid system failure (including shedding of traffic).
3
• Generates alarms when it detects internal messaging.
• Clears the alarms when congestion abates.
• Places the access control list (ACL) parameter (indicating congestion) into release messages sent to
the SS7 network when the BTS internal call processing engine is congested.
• Routes emergency messages. Exact digit strings for emergency calls differ, specify up to ten digit
strings (911 and 9911 are included by default). Contact Cisco TAC to do this, it involves a CA
restart.
• Generates a SS7 termination cause code 42 for billing.
• Generates the cable signaling stop event with cause code “resource unavailable” for billing.
See the Cisco BTS 10200 Softswitch Troubleshooting Guide, Release 6.0.1 for congestion alarms.
Monitoring BTS Hardware
BTS tracks devices and facilities that exceed their settings.
• A process exceeds 70 percent of the CPU.
• The Call Agent CPU is over 90 percent busy (10 percent idle).
• The load average exceeds 5 for at least a 5-minute interval.
• Memory is 95 percent exhausted and swap is over 50 percent consumed.
OL-16000-07
Cisco BTS 10200 Softswitch Operations and Maintenance Guide, Release 6.0.x
3-1
Page 34

Checking BTS System Health
• Partitions consumed:
Table 3-1 Managing Hardware
Task Sample Command
Running node reports
Viewing nodes
Rebooting the host machines
–
A partition 70 percent consumed generates a minor alarm.
–
A partition 80 percent consumed generates a major alarm.
–
A partition 90 percent consumed generates a critical alarm.
report node node=prica42;
Note Results may take a few minutes to display.
status node node=prica42;
control node node=prica42; action=REBOOT;
Caution Use this command with extreme caution.
Chapter 3 Monitoring and Backing Up the BTS
Setting the host machine for
control node node=prica42; action=HALT;
maintenance
Caution Use local consoleaccess or a power cycle to restart the
Checking BTS System Health
Do the following tasks as listed or more frequently if your system administrator recommends it.
.
Table 3-2 BTS System Health Checklist
Tasks Frequency
Moving Core Files as alarms are
Using BTS System-Health Reports Daily
Checking BTS System Time Daily
Checking Traffic Measurements
See Chapter 6, “Using Measurements.”
Checking Event and Alarm Reports
node.
receieved
Daily
Daily
3-2
See Cisco BTS 10200 Softswitch Troubleshooting Guide, Release 6.0.1.
Checking the OS Log of Each Host Machine Daily
Backing up the EMS Database Daily
Checking Disk Mirroring on Each Host Machine Weekly
Cisco BTS 10200 Softswitch Operations and Maintenance Guide, Release 6.0.x
OL-16000-07
Page 35

Chapter 3 Monitoring and Backing Up the BTS
Table 3-2 BTS System Health Checklist (continued)
Auditing Databases and Tables Monthly
Checking BTS System Health
Cleaning Filters
See equipment manufacturer’s documentation.
Archiving Your Database See your system
Backing Up the Software Image Monthly
Examining Heap Usage Quarterly
Running Diagnostic Procedures on Trunk Groups
See Chapter 5, “Managing External Resources”
Running Diagnostic Procedures on Subscriber Terminations
See Chapter 5, “Managing External Resources”
Running Network Loopback Tests for NCS/MGCP Endpoints
See equipment manufacturer’s documentation.
Creating Numbering Resource Utilization/Forecast (NRUF) Reports Biannually
Using BTS System-Health Reports
Monthly
administrator
Quarterly
Quarterly
Quarterly
The BTS allows you to gather data and create a report on its overall state. Use this data to find problems
like hardware failures or traffic congestion.
Table 3-3 Using BTS System-Health Reports
Task Sample Command
Viewing scheduled reports
Viewing reports by ID number
Scheduling reports
show scheduled-command verb=report; noun=system_health
show scheduled-command ID=1
add scheduled-command verb=report; noun=system_health;
start-time=2003-10-01 12:22:22; recurrence=DAILY;
keys=period; key-values=<1 ... 720>;
where:
start-time—When BTS creates report, yyyy-mm-dd hh:mm:ssss.
recurrence—How often to run report (none (only once), daily,
weekly, monthly
keys=period; key-values=<1 ... 720>;
—How many hours back to
collect data. If not specified, BTS uses default of 24 ( last 24 hours
worth of data).
Changing reports
change scheduled-command id=881958666704177006;
start-time=2003-10-01 14:14:14; recurrence=DAILY;
keys=period; key-values=24;
OL-16000-07
Cisco BTS 10200 Softswitch Operations and Maintenance Guide, Release 6.0.x
3-3
Page 36

Checking BTS System Health
Table 3-3 Using BTS System-Health Reports (continued)
Task Sample Command
Deleting reports
Viewing completed reports
Generating a report
immediately
Checking BTS System Time
BTS clocks must be accurate to 2 seconds.
Caution Do not change the date or time in your BTS host machines while CA, FS, EMS, and BDMS are running.
Instead allow the Solaris OS to get the time automatically through NTP services.
Chapter 3 Monitoring and Backing Up the BTS
delete scheduled-command id=881958666704177006;
In a web browser enter
FQDN>:/report/system_health
report system-health period=<1 ... 720>;
Note Results may take a few minutes to display.
https://<active EMS IP addr or
Step 1 Log in to the primary and secondary EMSs as root.
Step 2 Enter <hostname># date.
Step 3 On each EMS ensure the following are correct:
a. The time does not deviate more than +/- 2 seconds.
b. Day, month, year, time zone
Step 4 Log in to both the primary and secondary CA as root.
Step 5 Enter <hostname># date.
Step 6 On each CA ensure the following are correct:
a. The time is accurate to within +/-2 seconds of the correct time.
b. Day, month, year, time zone
Checking the OS Log of Each Host Machine
Monitor the OS logs on all four host machines (primary and secondary EMS, primary and secondary CA)
for errors or warnings. This report shows you recent messages like memory hits, disk errors, and frequent
process restarts.
3-4
Step 1 Log in as root.
Step 2 Enter dmesg.
Step 3 For more history edit the /var/adm/messages file.
Cisco BTS 10200 Softswitch Operations and Maintenance Guide, Release 6.0.x
OL-16000-07
Page 37

Chapter 3 Monitoring and Backing Up the BTS
Checking Disk Mirroring on Each Host Machine
Each procedure takes about 30 minutes.
CA/FS Side A
Before doing this procedure, ensure your BTS platform is connected to controller 1 or controller 0.
Step 1 Log in as root to CA/FS side A using telnet.
Step 2 Enter one of the following:
<hostname># metastat | grep c0
Or:
<hostname># metastat | grep c1
Step 3 Verify the return matches the following:
c1t0d0s1 0 No Okay Yes
c1t1d0s1 0 No Okay Yes
c1t0d0s5 0 No Okay Yes
c1t1d0s5 0 No Okay Yes
c1t0d0s6 0 No Okay Yes
c1t1d0s6 0 No Okay Yes
c1t0d0s0 0 No Okay Yes
c1t1d0s0 0 No Okay Yes
c1t0d0s3 0 No Okay Yes
c1t1d0s3 0 No Okay Yes
c1t1d0 Yes id1,sd@SSEAGATE_ST373307LSUN72G_3HZ9JG7800007518H8WV
c1t0d0 Yes id1,sd@SSEAGATE_ST373307LSUN72G_3HZ9JC9N00007518Y15K
If the results differ synchronize the disk mirroring:
<hostname># cd /opt/setup
<hostname># sync_mirror
Checking BTS System Health
Caution In case of a mismatch, synchronize once. If the mismatch continues, contact Cisco TAC.
CA/FS Side B
Step 1 Log in as root to CA/FS side B using telnet.
Step 2 Enter <hostname># metastat | grep c0.
Step 3 Verify the return matches the following:
OL-16000-07
Verify the results using Step 1 through Step 3.
c0t0d0s6 0 No Okay
c0t1d0s6 0 No Okay
c0t0d0s1 0 No Okay
c0t1d0s1 0 No Okay
c0t0d0s5 0 No Okay
c0t1d0s5 0 No Okay
Cisco BTS 10200 Softswitch Operations and Maintenance Guide, Release 6.0.x
3-5
Page 38

Checking BTS System Health
Caution In case of a mismatch, synchronize once. If the mismatch continues contact Cisco TAC.
EMS Side A
Chapter 3 Monitoring and Backing Up the BTS
c0t0d0s7 0 No Okay
c0t1d0s7 0 No Okay
c0t0d0s0 0 No Okay
c0t1d0s0 0 No Okay
c0t0d0s3 0 No Okay
c0t1d0s3 0 No Okay
If the results differ synchronize the disk mirroring:
<hostname># cd /opt/setup
<hostname># sync_mirror
Verify the results using Step 1 through Step 3.
Step 1 Log in as root to EMS side A using telnet.
Step 2 Enter <hostname># metastat | grep c0.
Step 3 Verify the return matches the following:
c0t0d0s6 0 No Okay
c0t1d0s6 0 No Okay
c0t0d0s1 0 No Okay
c0t1d0s1 0 No Okay
c0t0d0s5 0 No Okay
c0t1d0s5 0 No Okay
c0t0d0s7 0 No Okay
c0t1d0s7 0 No Okay
c0t0d0s0 0 No Okay
c0t1d0s0 0 No Okay
c0t0d0s3 0 No Okay
c0t1d0s3 0 No Okay
If the results differ synchronize the disk mirroring:
<hostname># cd /opt/setup
<hostname># sync_mirror
Verify the results using Step 1 through Step 3.
Caution In case of a mismatch, synchronize once. If the mismatch continues contact Cisco TAC.
EMS Side B
Step 1 Log in as root to EMS side B using telnet.
3-6
Cisco BTS 10200 Softswitch Operations and Maintenance Guide, Release 6.0.x
OL-16000-07
Page 39

Chapter 3 Monitoring and Backing Up the BTS
Step 2 Enter <hostname># metastat | grep c0.
Step 3 Verify the return result matches the following:
c0t0d0s6 0 No Okay
c0t1d0s6 0 No Okay
c0t0d0s1 0 No Okay
c0t1d0s1 0 No Okay
c0t0d0s5 0 No Okay
c0t1d0s5 0 No Okay
c0t0d0s7 0 No Okay
c0t1d0s7 0 No Okay
c0t0d0s0 0 No Okay
c0t1d0s0 0 No Okay
c0t0d0s3 0 No Okay
c0t1d0s3 0 No Okay
If the results differ synchronize the disk mirroring:
<hostname># cd /opt/setup
<hostname># sync_mirror
Verify the results using Step 1 through Step 3.
Checking BTS System Health
Caution In case of a mismatch, synchronize once. If the mismatch continues contact Cisco TAC.
Auditing Databases and Tables
Audit either the complete database or entries in every provisionable table in both the Oracle database
and shared memory. See the Cisco BTS 10200 Softswitch Troubleshooting Guide, Release 6.0.1.
Caution Audits are time-intensive. Do only during a maintenance window. Completion time varies with database
or table entries.
Table 3-4 Auditing Databases and Tables
Task Sample Command
Auditing individual tables
Auditing every entry in each
provisionable table
Auditing provisionable tables
based on type
Auditing provisionable tables
based on platform state
audit trunk type=row-count;
audit database;
audit database type=row-count;
Note type defaults to full
audit database platform-state=active;
Note platform-state defaults to active
OL-16000-07
Cisco BTS 10200 Softswitch Operations and Maintenance Guide, Release 6.0.x
3-7
Page 40

Exporting Provisioned Data
Table 3-4 Auditing Databases and Tables (continued)
Task Sample Command
Auditing mismatches across
network elements
Resolving mismatches across
network elements
Chapter 3 Monitoring and Backing Up the BTS
1. Log in as root.
2. Enter:
bts_audit -ems priems01 -ca prica01 -platforms
CA146,FSAIN205 -tables SUBSCRIBER,MGW_PROFILE
Note bts_audit cannot work in certain scenarios, for example, when
a termination record points to an invalid mgw
If a table references a missing row, the mismatch is not resolved. Only
synchronize data mismatches between active network elemens.
1. Audit mismatches using bts_audit.
2. Enter:
bts_sync /opt/ems/report/Audit_CA146_root.sql
bts_sync applies updates directly to the databases.
Exporting Provisioned Data
The CLI Native Data Export feature enables the export of all provisioning data from the BTS 10200
system by the use of a CLI command. Execution of the CLI command stores the exported data in a
user-named output file in text format in the export directory. The exported file contains all provisioning
data from the BTS 10200. The provisioning data is written into the export file using add and change
commands for all supported nouns.
The key attributes of the CLI Native Data Export feature are
• The user can run the CLI command to export the BTS 10200 provisioning data.
• The provisioning data for all the nouns, which enables the use of verbs as “add” and “change” is
exported in text format.
• The list of all the nouns related to provisioning is kept in an input file (xml format). Upon execution
of the export command, the xml input file reads the nouns and their corresponding verbs (operation
type, whether add or change), and exports the provisioning data from the BTS 10200.
The CLI export command is:
CLI > export database outfile = <whatever>
Where the noun is database and the verb is export. Execution of the command exports all of the
provisioning data from the BTS 10200. All of the exported data is written in the output file as specified
by the user. The output file contains all the add and change commands for the existing native data in the
BTS 10200. The exported output file is stored in the /opt/ems/export directory.
The result of the export command is a text file that contains add/change CLI commands. The following
is an example output text file:
# BTS Config Export
# EMS Server: priems26-ora
# User: optiuser
# Export Start Time : Tue Jan 22 17:23:54 CST 2008
3-8
#########################
##### Add clli_code #####
Cisco BTS 10200 Softswitch Operations and Maintenance Guide, Release 6.0.x
OL-16000-07
Page 41

Chapter 3 Monitoring and Backing Up the BTS
#########################
add clli_code ID=ABCD1234567;
##########################
##### Add call_agent #####
##########################
add call_agent id=CA146;tsap_addr=CA146.A.12345678901234567890123456789012345678
901234567890123456;mgw_monitoring_enabled=N;clli=ABCD1234567;
##############################
##### Add feature_server #####
##############################
add feature_server ID=FSAIN205;TSAP_ADDR=FSAIN.A.1234567890123456789012345678901
2345678901234567890123456;TYPE=AIN;DESCRIPTION=123456789012345678901234567890123
456789012345678901234567890ABCD;EXTERNAL_FEATURE_SERVER=N;
add feature_server ID=FSPTC235;TSAP_ADDR=FSPTC.A.1234567890123456789012345678901
2345678901234567890123456;TYPE=POTS;DESCRIPTION=12345678901234567890123456789012
3456789012345678901234567890ABCD;EXTERNAL_FEATURE_SERVER=N;
####################################
##### Change billing_acct_addr #####
####################################
Exporting Provisioned Data
################################
##### Change billing_alarm #####
################################
####################################
##### Change report_properties #####
####################################
change report_properties TYPE=EVENT_LOGSIZE;VALUE=30000;
change report_properties TYPE=ALARM_LOGSIZE;VALUE=30000;
change report_properties TYPE=EVENT_LEVEL;VALUE=INFO;
#############################
##### Change sup_config #####
#############################
change sup_config TYPE=refresh_rate;VALUE=86400;
change sup_config TYPE=priority;VALUE=5;
change sup_config TYPE=subterm_mgw_block;VALUE=5;
change sup_config TYPE=subterm_block_pause;VALUE=9000;
change sup_config TYPE=subterm_status_pause;VALUE=0;
change sup_config TYPE=trunkterm_tg_block;VALUE=5;
change sup_config TYPE=trunkterm_block_pause;VALUE=9000;
change sup_config TYPE=trunkterm_status_pause;VALUE=0;
change sup_config TYPE=trunkterm_range_block;VALUE=1000;
change sup_config TYPE=trunkterm_range_pause;VALUE=20000;
OL-16000-07
Cisco BTS 10200 Softswitch Operations and Maintenance Guide, Release 6.0.x
3-9
Page 42

Exporting Provisioned Data
Limitations
Chapter 3 Monitoring and Backing Up the BTS
#############################################
##### Change command_throttle_threshold #####
#############################################
change command_throttle_threshold SESSION_TYPE=CLI;THRESHOLD=100;ENABLE=Y;
change command_throttle_threshold SESSION_TYPE=CORBA;THRESHOLD=100;ENABLE=Y;
change command_throttle_threshold SESSION_TYPE=FTP;THRESHOLD=1000;ENABLE=Y;
change command_throttle_threshold SESSION_TYPE=MNT;THRESHOLD=100;ENABLE=Y;
change command_throttle_threshold SESSION_TYPE=SNMP;THRESHOLD=100;ENABLE=Y;
change command_throttle_threshold SESSION_TYPE=SOAP;THRESHOLD=100;ENABLE=Y;
##################################
##### Change config_interval #####
##################################
change config_interval CONFIG_TYPE=THROTTLE;INTERVAL=15;
# Export End Time : Tue Jan 22 17:24:14 CST 2008
Currently the export command is supported only from the CLI interface. The export command is
currently not supported from other interfaces such as CORBA and SOAP.
There is a limitation on the size of the /opt/ems/export directory. Currently the size of the export
directory is defined in /opt/ems/etc/bts.properties as 7500000 ~ 700 MB. During the first run of the
export command, if the size of the export file is beyond the threshold limit, a warning message is shown
to the user after export is finished. The warning message indicates that the export file size has exceeded
the threshold and that the user needs to clean up the export directory before running the command again.
During additional runs of the export command, if the export directory size is more then the threshold
size, a warning is shown to the user that the space of export directory is insufficient for the export and
that the user has to clear the export directory before rerunning the export command.
Creating Numbering Resource Utilization/Forecast (NRUF) Reports
The North American Numbering Plan Association (NANPA) collects, stores, and maintains how
telephone numbers are used by 19 countries. Companies, like carriers, that hold telephone numbers must
report to NANPA twice a year using the NRUF report. Go to http://www.nanpa.com for more
information and job aids on submitting reports.
The BTS creates an NRUF report using the Number Block table. This table:
• Is a single table that is the sole reference for NANPA audits
• Can be customized
• Can be updated from data imported from other tables, changes from office-code updates, or
manually
• Has the following fields:
–
Number Block: NPA to NPA-NXX-XXXX—For FCC-required NANPA audit compliance, the
report input is NPANXX. In markets outside of NANPA, the input can be based on either the
combination of the national destination code (NDC) and the exchange code (EC), or just the EC.
–
Code Holder = Y/N
3-10
–
Block Holder = Y/N
–
Native = Y/N
Cisco BTS 10200 Softswitch Operations and Maintenance Guide, Release 6.0.x
OL-16000-07
Page 43

Chapter 3 Monitoring and Backing Up the BTS
–
Non-Native = Y/N
To generate the following reports, use
report dn-summary:
• All DNs in NDC and EC
• Thousands group in NDC and EC
• Operating company number (OCN)
• Switch Common Language Location Identifier (CLLI) code
• OCN + CLLI code—entries must match LERG data
Creating Reports for Nonrural Primary and Intermediate Carriers
NRUF reporting for nonrural primary and intermediate carriers:
• Occurs at a thousands-block level (NPA-NXX-X)
• Applies only to NANP
The report returns the following based on the DN2SUBSCRIBER table’s STATUS token:
Table 3-5 NRUF Report Data for Nonrural Carriers
Exporting Provisioned Data
Data Groups Matching Data from the DN2SUBSCRIBER Table
Assigned DNs
• Individual DNs:
ndc=<npa>; ec=<nxx>; DN=[0-9][0-9][0-9]; (status=assigned)
AND ADMIN-DN=N
ndc=<npa>; ec=<nxx>; DN=[0-9][0-9][0-9]; (status=ported-out)
AND ADMIN-DN=N
• DID DNs:
ndc=<npa>; ec=<nxx>; DN=xxxx; (status=assigned) AND
ADMIN-DN=N; X 10000
ndc=<npa>; ec=<nxx>; DN=xxxx; (status=ported-out) AND
ADMIN-DN=N; X 10000
ndc=<npa>; ec=<nxx>; DN=[0-9]xxx; (status=assigned) AND
ADMIN-DN=N; X 1000
ndc=<npa>; ec=<nxx>; DN=[0-9]xxx; (status=ported-out) AND
ADMIN-DN=N; X 1000
ndc=<npa>; ec=<nxx>; DN=[0-9][0-9]xx; (status=assigned) AND
ADMIN-DN=N; X 100
ndc=<npa>; ec=<nxx>; DN=[0-9][0-9]xx; (status=ported-out)
AND ADMIN-DN=N; X 100
ndc=<npa>; ec=<nxx>; DN=[0-9][0-9][0-9]x; (status=assigned)
AND ADMIN-DN=N; X 10
ndc=<npa>; ec=<nxx>; DN=[0-9][0-9][0-9]x;
(status=ported-out) AND ADMIN-DN=N; X 10
OL-16000-07
Intermediate Telephone
Directory Numbers
Reserved DNs 0
• PORTED-OUT DNs
0
Cisco BTS 10200 Softswitch Operations and Maintenance Guide, Release 6.0.x
3-11
Page 44

Exporting Provisioned Data
Table 3-5 NRUF Report Data for Nonrural Carriers (continued)
Data Groups Matching Data from the DN2SUBSCRIBER Table
Aging DNs
Administrative DNs • Administrative DNs:
Chapter 3 Monitoring and Backing Up the BTS
• DISC DNs:
ndc=<npa>; ec=<nxx>; DN=[0-9][0-9][0-9][0-9]; (status=DISC)
• Changed Number DNs:
ndc=<npa>; ec=<nxx>; DN=[0-9][0-9][0-9][0-9]; (status=CN)
• DISC DID DNs:
ndc=<npa>; ec=<nxx>; DN=xxxx; (status=DISC) X 10000
ndc=<npa>; ec=<nxx>; DN=[0-9]xxx; (status=DISC) X 1000
ndc=<npa>; ec=<nxx>; DN=[0-9][0-9]xx; (status=DISC) X 100
ndc=<npa>; ec=<nxx>; DN=[0-9][0-9][0-9]x; (status=DISC) X 10
• Changed Number DID DNs:
ndc=<npa>; ec=<nxx>; DN=xxxx; (status=CN) X 10000
ndc=<npa>; ec=<nxx>; DN=[0-9]xxx; (status=CN) X 1000
ndc=<npa>; ec=<nxx>; DN=[0-9][0-9]xx; (status=CN) X 100
ndc=<npa>; ec=<nxx>; DN=[0-9][0-9][0-9]x; (status=CN) X 10
ndc=<npa>; ec=<nxx>; status=LRN;
ndc=<npa>; ec=<nxx>; status=CLRN
ndc=<npa>; ec=<nxx>; status=RACF-DN;
ndc=<npa>; ec=<nxx>; status=ANNC;
ndc=<npa>; ec=<nxx>; status=TEST-LINE;
ndc=<npa>; ec=<nxx>; (ADMIN-DN=Y AND (status=ASSIGNED))
ndc=<npa>; ec=<nxx>; (ADMIN-DN=Y AND (status=PORTED-OUT))
• Administrative DID DNs:
ndc=<npa>; ec=<nxx>; DN=xxxx; (ADMIN-DN=Y AND
(status=ASSIGNED)) X 10000
ndc=<npa>; ec=<nxx>; DN=xxxx; (ADMIN-DN=Y AND
(status=PORTED-OUT)) X 10000
ndc=<npa>; ec=<nxx>; DN=[0-9]xxx (ADMIN-DN=Y AND
(status=ASSIGNED)) X 1000
ndc=<npa>; ec=<nxx>; DN=[0-9]xxx (ADMIN-DN=Y AND
(status=PORTED-OUT)) X 1000
ndc=<npa>; ec=<nxx>; DN=[0-9][0-9]xx; (ADMIN-DN=Y AND
(status=ASSIGNED)) X 100
ndc=<npa>; ec=<nxx>; DN=[0-9][0-9]xx; (ADMIN-DN=Y AND
(status=PORTED-OUT)) X 100
ndc=<npa>; ec=<nxx>; DN=[0-9][0-9][0-9]x; (ADMIN-DN=Y AND
(status=ASSIGNED)) X 10
ndc=<npa>; ec=<nxx>; DN=[0-9][0-9][0-9]x; (ADMIN-DN=Y AND
(status=PORTED-OUT)) X 10
• Changed Number administrative DNs
Creating Reports for Rural Primary and Intermediate Carriers
This section identifies the DN information that is reported at the NPA-NXX level when the service
provider is a code holder. NRUF reporting at the “ndc, ec” level includes dn-groups of varying length.
Some countries might support dn-groups of length 1, 2, 3 or 4.
3-12
Cisco BTS 10200 Softswitch Operations and Maintenance Guide, Release 6.0.x
OL-16000-07
Page 45

Chapter 3 Monitoring and Backing Up the BTS
• The Rural Primary Carrier (U2 form) NPA-NXX report has:
–
NPA-NXX (input as ndc, ec)
–
Rate Center (read from LERG)
–
State (read from LERG)
–
Number of Assigned DNs
–
Number of Intermediate DNs
–
Number of Reserved DNs
–
Number of Aging DNs
–
Number of Administrative DNs
–
Donated to Pool (always 0)
• The Rural Intermediate Carrier (U4 form) report has:
–
NPA-NXX (input as ndc, ec)
–
Rate Center (read from LERG)
–
State (read from LERG)
Exporting Provisioned Data
–
Number of Assigned DNs
–
Number of Intermediate DNs
–
Number of Reserved DNs
–
Number of Aging DNs
–
Number of Administrative DNs
–
Numbers Received (always 0)
The report returns the following based on the DN2SUBSCRIBER table’s STATUS token:
OL-16000-07
Cisco BTS 10200 Softswitch Operations and Maintenance Guide, Release 6.0.x
3-13
Page 46

Exporting Provisioned Data
Table 3-6 NRUF Report Data for Rural Carriers
Data Groups Matching Data from the DN2SUBSCRIBER Table
Assigned DNs
Chapter 3 Monitoring and Backing Up the BTS
• Individual DNs:
ndc=<npa>; ec=<nxx>; DN=[0-9][0-9][0-9]; (status=assigned) AND
ADMIN-DN=N
ndc=<npa>; ec=<nxx>; DN=[0-9][0-9][0-9]; (status=ported-out)
AND ADMIN-DN=N
• DID DNs:
ndc=<npa>; ec=<nxx>; DN=xxxx; (status=assigned) AND
ADMIN-DN=N; X 10000
ndc=<npa>; ec=<nxx>; DN=xxxx; (status=ported-out) AND
ADMIN-DN=N; X 10000
ndc=<npa>; ec=<nxx>; DN=[0-9]xxx; (status=assigned) AND
ADMIN-DN=N; X 1000
ndc=<npa>; ec=<nxx>; DN=[0-9]xxx; (status=ported-out) AND
ADMIN-DN=N; X 1000
ndc=<npa>; ec=<nxx>; DN=[0-9][0-9]xx; (status=assigned) AND
ADMIN-DN=N; X 100
ndc=<npa>; ec=<nxx>; DN=[0-9][0-9]xx; (status=ported-out) AND
ADMIN-DN=N; X 100
Intermediate Telephone
Directory Numbers
Reserved DNs 0
ndc=<npa>; ec=<nxx>; DN=[0-9][0-9][0-9]x; (status=assigned)
AND ADMIN-DN=N; X 10
ndc=<npa>; ec=<nxx>; DN=[0-9][0-9][0-9]x; (status=ported-out)
AND ADMIN-DN=N; X 10
0
3-14
Cisco BTS 10200 Softswitch Operations and Maintenance Guide, Release 6.0.x
OL-16000-07
Page 47

Chapter 3 Monitoring and Backing Up the BTS
Table 3-6 NRUF Report Data for Rural Carriers (continued)
Data Groups Matching Data from the DN2SUBSCRIBER Table
Aging DNs
Administrative DNs • Administrative DNs:
Exporting Provisioned Data
• DISC DNs:
ndc=<npa>; ec=<nxx>; DN=[0-9][0-9][0-9][0-9]; (status=DISC)
• Changed Number DNs:
ndc=<npa>; ec=<nxx>; DN=[0-9][0-9][0-9][0-9]; (status=CN)
• DISC DID DNs:
ndc=<npa>; ec=<nxx>; DN=xxxx; (status=DISC) X 10000
ndc=<npa>; ec=<nxx>; DN=[0-9]xxx; (status=DISC) X 1000
ndc=<npa>; ec=<nxx>; DN=[0-9][0-9]xx; (status=DISC) X 100
ndc=<npa>; ec=<nxx>; DN=[0-9][0-9][0-9]x; (status=DISC) X 10
• Changed Number DID DNs:
ndc=<npa>; ec=<nxx>; DN=xxxx; (status=CN) X 10000
ndc=<npa>; ec=<nxx>; DN=[0-9]xxx; (status=CN) X 1000
ndc=<npa>; ec=<nxx>; DN=[0-9][0-9]xx; (status=CN) X 100
ndc=<npa>; ec=<nxx>; DN=[0-9][0-9][0-9]x; (status=CN) X 10
ndc=<npa>; ec=<nxx>; status=LRN;
ndc=<npa>; ec=<nxx>; status=CLRN
ndc=<npa>; ec=<nxx>; status=RACF-DN;
ndc=<npa>; ec=<nxx>; status=ANNC;
ndc=<npa>; ec=<nxx>; status=TEST-LINE;
• Administrative DID DNs:
Backing Up the Software Image
To back up the software image do the following three procedures:
1. Full Database Auditing, page 3-16
2. Checking Shared Memory, page 3-16
3. Backing Up the Full BTS, page 3-18
ndc=<npa>; ec=<nxx>; (ADMIN-DN=Y AND (status=ASSIGNED))
ndc=<npa>; ec=<nxx>; (ADMIN-DN=Y AND (status=PORTED-OUT))
ndc=<npa>; ec=<nxx>; DN=xxxx; (ADMIN-DN=Y AND
(status=ASSIGNED)) X 10000
ndc=<npa>; ec=<nxx>; DN=xxxx; (ADMIN-DN=Y AND
(status=PORTED-OUT)) X 10000
ndc=<npa>; ec=<nxx>; DN=[0-9]xxx (ADMIN-DN=Y AND
(status=ASSIGNED)) X 1000
ndc=<npa>; ec=<nxx>; DN=[0-9]xxx (ADMIN-DN=Y AND
(status=PORTED-OUT)) X 1000
ndc=<npa>; ec=<nxx>; DN=[0-9][0-9]xx; (ADMIN-DN=Y AND
(status=ASSIGNED)) X 100
ndc=<npa>; ec=<nxx>; DN=[0-9][0-9]xx; (ADMIN-DN=Y AND
(status=PORTED-OUT)) X 100
ndc=<npa>; ec=<nxx>; DN=[0-9][0-9][0-9]x; (ADMIN-DN=Y AND
(status=ASSIGNED)) X 10
ndc=<npa>; ec=<nxx>; DN=[0-9][0-9][0-9]x; (ADMIN-DN=Y AND
(status=PORTED-OUT)) X 10
OL-16000-07
Cisco BTS 10200 Softswitch Operations and Maintenance Guide, Release 6.0.x
3-15
Page 48

Exporting Provisioned Data
Full Database Auditing
Step 1 Log in as CLI user on EMS side A.
Step 2 Enter audit database type=full;.
Step 3 Check the audit report and verify that there is no mismatch or error. If errors are found, try to correct the
errors. If you cannot make the correction, contact Cisco TAC.
Checking Shared Memory
This task checks shared memory to detect potential data problems.
From CA/FS Side A
Step 1 Log in as root.
Step 2 Enter:
<hostname># cd /opt/OptiCall/CAxxx/bin
<hostname># ca_tiat data
Chapter 3 Monitoring and Backing Up the BTS
Press Enter.
The result should match the following:
All tables are OK.
For details, see ca_tiat.out
Caution If the result is not“All tables are OK”, stop and contact Cisco TAC. If the result is “All tables
Step 3 Enter:
<hostname># cd /opt/OptiCall/FSPTCzzz/bin <Return>
<hostname># potsctx_tiat data <Return>
Press Enter.
The result should match the following:
All tables are OK.
For detail, see potsctx_tiat.out
Caution If the result is not“All tables are OK”, stop and contact Cisco TAC. If the result is “All tables
Step 4 Enter:
<hostname>#cd /opt/OptiCall/FSAINyyy/bin
<hostname>#ain_tiat data
are OK”, go to Step 3.
are OK”, go to Step 4.
3-16
Step 5 Press Enter.
Cisco BTS 10200 Softswitch Operations and Maintenance Guide, Release 6.0.x
OL-16000-07
Page 49

Chapter 3 Monitoring and Backing Up the BTS
The result should match the following:
All tables are OK.
For detail, see ain_tiat.out
Caution If the result is not“All tables are OK”, stop and contact Cisco TAC.
From CA/FS Side B
Step 1 Log in as root.
Step 2 Enter:
<hostname>#cd /opt/OptiCall/CAxxx/bin
<hostname>#ca_tiat data
Step 3 Press Enter.
The result should match the following:
All tables are OK.
For detail, see ca_tiat.out
Exporting Provisioned Data
Caution If the result is not“All tables are OK”, stop and contact Cisco TAC. If the result is “All tables
are OK”, go to Step 3.
Step 4 Enter:
<hostname>#cd /opt/OptiCall/FSPTCzzz/bin
<hostname>#potsctx_tiat data
Step 5 Press Enter:
The result match the following:
All tables are OK.
For detail, see potsctx_tiat.out
Caution If the result is not“All tables are OK”, stop and contact Cisco TAC. If the result is “All tables
are OK”, go to Step 6.
Step 6 Enter:
<hostname>#cd /opt/OptiCall/FSAINyyy/bin
<hostname>#ain_tiat data
Step 7 Press Enter:
The result should match the following:
All tables are OK.
For detail, see ain_tiat.out
OL-16000-07
Cisco BTS 10200 Softswitch Operations and Maintenance Guide, Release 6.0.x
3-17
Page 50

Exporting Provisioned Data
Caution If the result is not“All tables are OK”, stop and contact Cisco TAC.
Backing Up the Full BTS
Do this before and after software upgrades or as routine, always during a maintenance window. Before
starting the provisioning process ensure you have the following:
Pre-Provisioning Checklist
NFS server hostname or ip address
Shared directory from NFS server
Root user access
Chapter 3 Monitoring and Backing Up the BTS
Provisioning blocked
Backing Up the CA/FS
Perform the following steps to back up the secondary CA/FS. Then repeat the procedure on the primary
CA/FS.
Step 1 Log in as root on the secondary CA/FS.
Step 2 Verify all platforms are in STANDBY mode, enter <hostname>#nodestat.
Step 3 Remove unnecessary files or directories like /opt/Build and application tar files.
Step 4 Mount the NFS server to the /mnt directory, enter <hostname>#mount <nfs server ip or
hostname>:/<share dire> /mnt
Step 5 Stop all platforms; enter <hostname>#platform stop all.
Step 6 Save all platforms data directory (shared memory) to nfs server
<hostname>#tar -cf - /opt/OptiCall/CAxxx/bin/data |gzip -fast - > /mnt/data.<hostname>.CA
<<hostname>#tar -cf - /opt/OptiCall/CAxxx/bin/data |gzip --fast - >
/mnt/data.<hostname>.CA.gz
<hostname>#tar -cf - /opt/OptiCall/FSAINxxx/bin/data |gzip --fast - >
/mnt/data.<hostname>.FSAIN.gz
<hostname>#tar -cf /opt/OptiCall/FSPTCxxx/bin/data |gzip --fast - >
/mnt/data.<hostname>.FSPTC.gz
.
3-18
where xxx is the instance number
Step 7 Start all platforms by entering <hostname>#platform start.
Step 8 Verify all platforms are in STANDBY mode, enter <hostname>#nodestat.
Step 9 Create an excluded directories file for the flash archive, enter:
<hostname>#vi /tmp/excluded_dir
/opt/OptiCall/CAxxx/bin/data
/opt/OptiCall/CAxxx/bin/logs
Cisco BTS 10200 Softswitch Operations and Maintenance Guide, Release 6.0.x
OL-16000-07
Page 51

Chapter 3 Monitoring and Backing Up the BTS
/opt/OptiCall/FSAINxxx/bin/data
/opt/OptiCall/FSAINxxx/bin/logs
/opt/OptiCall/FSPTCxxx/bin/data
/opt/OptiCall/FSPTCxxxx/bin/logs
where xxx is the instance number
Step 10 Back up the system, enter:
<hostname>#mv /bin/date /bin/date.archive
<hostname>#mv /bin/.date /bin/date
<hostname>#flarcreate -n <hostname> -X /tmp/excluded_dir -c /mnt/<hostname>.archive
<hostname>#mv /bin/date /bin/.date
<hostname>#mv /bin/date.archive /bin/date
Step 11 Unmount the NFS server, enter:
<hostname>#umount /mnt
Step 12 From the active EMS switch over all platforms, enter:
<hostname>#ssh optiuser@<hostname>
cli>control feature-server id=FSAINxxx;target-state=standby-active;
cli>control feature-server id=FSPTCxxx;target-state=standby-active;
cli>control call-agent id=CAxxx;target-state=standby-active;
where xxx is the instance number of each platform
Step 13 Repeat this procedure for the primary CA/FS.
Exporting Provisioned Data
Backing up the EMS/BDMS
Do the following to back up the STANDBY EMS/BDMS system.
Step 1 Log in as root.
Step 2 Verify all platforms are in STANDBY mode, enter <hostname>#nodestat.
Step 3 Remove unnecessary files or directories like /opt/Build and application tar files.
Step 4 Mount the NFS server to the /mnt directory, enter <hostname>#mount <nfs server ip or
hostname>:/<share dire> /mnt
Step 5 Stop all platforms, enter <hostname>#platform stop all.
Step 6 Save the Oracle database and MySQL directories, enter:
<hostname>#tar -cf - /data1/oradata |gzip --fast - >/mnt/oradata.<hostname>.gz
<hostname>#tar -cf - /opt/ems/db |gzip --fast - >/mnt/db.<hostname>.gz
Step 7 Create an excluded directories file for the flash archive, enter:
<hostname>#vi /tmp/excluded_dir
/data1/oradata
Step 8 Start all platforms <hostname>#platform start.
Step 9 Verify all platforms are in STANDBY mode, enter <hostname>#nodestat.
Step 10 Back up the system, enter:
<hostname>#mv /bin/date /bin/date.archive
<hostname>#mv /bin/.date /bin/date
.
OL-16000-07
Cisco BTS 10200 Softswitch Operations and Maintenance Guide, Release 6.0.x
3-19
Page 52

Exporting Provisioned Data
<hostname>#flarcreate -n <hostname> -X /tmp/excluded_dir -c /mnt/<hostname>.archive
<hostname>#mv /bin/date /bin/.date
<hostname>#mv /bin/date.archive /bin/date
Step 11 Unmount the NFS server, enter <hostname>#umount /mnt.
Step 12 From the active EMS switch over all platforms, enter:
<hostname>#ssh optiuser@<hostname>
cli>control bdms id=BDMS01;target-state=standby-active;
cli>control element-manager id=EM01;target-state=standby-active;
Step 13 Repeat the procedure starting with Step 3 to back up the PRIMARY EMS/BDMS.
Backing up the EMS Database
This procedure is for experienced UNIX users. It tells you how to save the provisioning database from
the EMS to a remote server. The remote server must be:
• Connected to a corporate LAN.
• Backed up daily by default, the daily hot backup is not turned on at installation
The back up processes:
Chapter 3 Monitoring and Backing Up the BTS
• ora_hot_backup.ks—Backs up database data files, control files, and archive logs
• ora_arch_backup.ksh—Backs up archive logs
The target backup directory on both primary and secondary EMS systems is /opt/oraback. Backup files
in /opt/oraback directory are later transferred to the /opt/backup directory in a remote archive site.
After the files are transferred, they are purged from /opt/oraback.
Step 1 Cross check the databases on the primary and secondary EMSs before backing up.
Caution Cross check before ora_hot_backup.ksh and ora_arch_backup.ksh are scheduled. This
validates database and archived log files for RMAN processes.
a. Log in as oracle, or su - oracle.
b. Enter dbadm -E backup_crosscheck..
c. Ensure the log file has no errors (except the “validation failed for archived log” messages). Ignore
these messages of the /data1/arch/opticalx_yyy.arc files because the validation directs RMAN not
to look for *.arc files. ora_purge_archlog.ksh purges *.arc files.
RMAN-06157: validation failed for archived log
RMAN-08514: archivelog filename=/data1/arch/optical1_25.arc recid=1 stamp=461878656
Step 2 Remove the archive log purge process and schedule the backup processes.
3-20
Note Do this on the primary and secondary EMSs.
a. Disable the ora_purge_archlog.ksh process.
b. Enable the ora_hot_backup.ksh process.
Cisco BTS 10200 Softswitch Operations and Maintenance Guide, Release 6.0.x
OL-16000-07
Page 53

Chapter 3 Monitoring and Backing Up the BTS
c. Optional: Enable the ora_arch_backup.ksh process.
d. Log in as oracle, or su - oracle.
e. Enter crontab –e.
f. Modify the crontab file as follows. This is on the primary EMS site, database name optical1.
# Daily Oracle Hot backup - this also include archive log backup
# Note: Set hot backup process to run at 2:00am every day.
#
0 2 * * * /opt/oracle/admin/scripts/ora_hot_backup.ksh optical1 > /opt/oracle/t
mp/ora_hot_backup.log 2>&1
#
# Oracle archive log backups, in addition to daily hot backup.
# Note: Set one additional archive log backup to run at 6:00pm every day.
#
0 18 * * * /opt/oracle/admin/scripts/ora_arch_backup.ksh optical1 > /opt/
oracle/tmp/ora_arch_backup.log 2>&1
#
# Purge archive log files
# Note: Delete or uncomment this line to stop purging archive log files.
#
#0 1,3,…,23 * * * /opt/oracle/admin/scripts/ora_purge_archlog.ksh optical1 >
/opt/oracle/tmp/ora_purge_archlog.log 2>&1
Exporting Provisioned Data
g. Repeat Step f by replacing optical1 with optical2 on the secondary EMS site.
Step 3 To setup daily file transfer to the remote archive site using FTP, see Using FTP to Setup File Transfer.
To setup daily file transfer to the remote archive site using SFTP, see Using SFTP to Setup File Transfer.
Using FTP to Setup File Transfer
Step 1 Configure the remote site.
a. Verify the oracle user access and create backup directory on FTP server site.
Primary EMS hostname: priems
Secondary EMS hostname: secems
FTP server hostname: ftpserver
FTP server Oracle password: ora00
FTP server backup directory: /opt/backup
First, test the connection to the remote FTP server using the oracle user access. If the password of
oracle is not ‘ora00’, update the ORA_PW variable in the /opt/oracle/admin/etc/dba.env file.
b. Do this on the primary and secondary EMSs:
telnet ftpserver
c. Log in as oracle and enter the password (in this case, ora00).
d. Create the /opt/backup directory. Ensure the oracle user has write permission to this directory.
mkdir /opt/backup
OL-16000-07
Note It is your responsibility to archive backup files from the ftp server /opt/backup directory to a
tape device or enterprise tape library.
Cisco BTS 10200 Softswitch Operations and Maintenance Guide, Release 6.0.x
3-21
Page 54

Exporting Provisioned Data
Step 2 Schedule the FTP process.
a. Do this on the primary and secondary EMSs:
Chapter 3 Monitoring and Backing Up the BTS
Log in as
b. Add the following line to the Oracle crontab on the primary EMS.
#
# FTP backup files from primary (optic
#
0 6 * * * /opt/oracle/admin/scripts/ora_ftp_backup.ksh optical1 ftpserver /opt/backup >
/opt/oracle/tmp/ora_ftp_backup.log 2>&1
c. Replace ftpserver with the correct host name of the remote FTP server. Replace /opt/backup with
oracle, or su – oracle and enter the following command: crontab –e
the correct target directory name, if they are different.
Note The 0 6 *** /opt/oracle/admin/scripts/ora_ftp_backup.ksh ………
ora_ftp_backup.log 2>&1 are all typed in the same line.
d. Edit the oracle crontab on secondary EMS site by replacing optical1 with optical2.
Step 3 Verify the backup files, enter:
cd /opt/oraback EMS systems
cd /opt/backup Remote FTP system
Using SFTP to Setup File Transfer
al1) to /opt/backup directory of ftpserver.
The following steps generate an SSH key from the primary EMS. Key files are copied to the secondary
EMS and remote SFTP server. On the remote SFTP server the "oracle" user is created for login.
Step 1 Generate SSH secure key from primary EMS:
a. Login to the primary EMS:
# su - oracle
# /opt/BTSossh/bin/ssh-keygen -t rsa
b. Generating public/private rsa key pair.
c. Enter file in which to save the key (/opt/orahome/.ssh/id_rsa).
d. Enter passphrase (empty for no passphrase).
e. Enter same passphrase.
Your identification has been saved in /opt/orahome/.ssh/id_rsa.
Your public key has been saved in /opt/orahome/.ssh/id_rsa.pub.
The key fingerprint is: d8:4f:b1:8b:f4:ac:2f:78:e9:56:a4:55:56:11:e1:40 oracle@priems79
f. Enter:
# ls -l /opt/orahome/.ssh
-rw-------1 oracleorainst1675 Mar 10 15:42 id_rsa
-rw-r--r--1 oracleorainst397 Mar 10 15:42 id_rsa.pub
Step 2 From the secondary EMS, sftp both "id_ssa" and "id_rsa.pub" files from the primary EMS to the
secondary EMS /opt/orahome/.ssh directory. Make the files with "oracle:orainst" ownership.
Step 3 Login to the secondary EMS:
3-22
Cisco BTS 10200 Softswitch Operations and Maintenance Guide, Release 6.0.x
OL-16000-07
Page 55

Chapter 3 Monitoring and Backing Up the BTS
# su - oracle
$ cd /opt/orahome/.ssh
$ sftp root@priems
sftp> cd /opt/orahome/.ssh
sftp> get id_rsa*
sftp> quit
$ ls -l /opt/orahome/.ssh/id_rsa*
-rw-------1 oracleorainst1675 Mar 10 15:42 id_rsa
-rw-r--r--1 oracleorainst397 Mar 10 15:42 id_rsa.pub
Now both primary and secondary EMSs have the same "id_rsa" and "id_rsa.pub" files in
/opt/orahome/.ssh directory.
Step 4 Create an oracle user and /opt/backup directory on the remote SFTP server.
a. Login to remote SFTP server as root.
b. Create a user "oracle" with group "orainst" and home directory "/opt/orahome".
c. Create a repository directory "/opt/backup".
# mkdir -p /opt/orahome
# groupadd orainst
# useradd -g orainst -d /opt/orahome -s /bin/ksh oracle
# chown oracle:orainst /opt/orahome
Exporting Provisioned Data
# passwd oracle
New Password: <Enter password>
Re-enter new Password: <Re-enter password>
# mkdir -p /opt/backup
# chown oracle:orainst /opt/backup
# su - oracle
$ mkdir -p /opt/orahome/.ssh
$ chmod 700 /opt/orahome/.ssh
$ chown oracle:orainst /opt/orahome/.ssh
Step 5 Sftp the "id_rsa" and "id_rsa.pub" files generated in Step 1 to remote SFTP server /opt/orahome/.ssh
directory. Make the file owned by "oracle:orainst" owner and group.
Login to remote SFTP server:
# su - oracle
$ cd .ssh
$ sftp root@priems
sftp> cd /opt/orahome/.ssh
sftp> get id_rsa*
sftp> quit
OL-16000-07
$ cat id_rsa.pub >> authorized_keys
$ chmod 600 id_rsa* authorized_keys
$ ls -l
-rw-------1 oraoragrp788 Mar 10 16:52 authorized_keys
-rw-------1 oraoragrp1675 Mar 10 16:48 id_rsa
Cisco BTS 10200 Softswitch Operations and Maintenance Guide, Release 6.0.x
3-23
Page 56

Archiving Your Database
Step 6 Sftp the "id_rsa" and "id_rsa.pub" files generated in Step 1 to remote SFTP server /opt/orahome/.ssh
Step 7 Test SSH and SFTP from both the primary and secondary EMSs to the remote SFTP server:
Note At the first login, the following message may display:"Warning: Permanently added the RSA host key
Step 8 To schedule the ora_sftp_backup.ksh process to execute at 5:30am every day in oracle crontab on both
Chapter 3 Monitoring and Backing Up the BTS
-rw-------1 oraoragrp394 Mar 10 16:48 id_rsa.pub
directory. Make the file owned by "oracle:orainst" owner and group.
a. From BTS primary EMS:
# su - oracle
$ sftp_ping oracle SFTPserverName
Connecting to SFTPserverName...
sftp> quit
SFTP_PING=OK
for IP address '10.xx.xxx.xxx' to the list of known hosts."
the primary and secondary EMS:
a. Log in as oracle, or su - oracle and enter the following:
crontab -e
b. Add the following line to the Oracle crontab on the primary EMS:
#
# SFTP backup files from primary (optical1) to /opt/backup directory of SFTPserver.
#
0 6 * * * /opt/oracle/admin/scripts/ora_sftp_backup.ksh optical1 oracle SFTPserver
/opt/backup > /opt/oracle/tmp/ora_sftp_backup.log 2>&1
Note Enter 0 6 *** /opt/oracle/admin/scripts/ora_sftp_backup.ksh…ora_sftp_backup.log 2>&1 in the same
line.
Step 9 Replace SFTPserver with the correct host name of the remote SFTP server.
Step 10 Replace /opt/backup with the correct target directory name, if different.
Step 11 Edit the oracle crontab on secondary EMS site by replacing optical1 with optical2.
Archiving Your Database
Step 1 Log in as root.
Step 2 Stop all platforms. If this is a primary node, use the CLI command to control the standby forced active.
Step 3 Verify that /var/yp exists. Enter ls -l /var/yp.
If the result is no such file or directory, enter mkdir -p /var/yp
3-24
Step 4 Mount the NFS server. Enter mount <nfsserver hostname/ip>:/<share directory> /mnt. Example:
mount 10.89.183.253:/opt/archive /mnt
Step 5 Back up all interfaces. Enter tar -cvf /mnt/<local_hostname>.tar host*. Example:
<hostname>#tar -cvf bts-prica.tar host.*
Cisco BTS 10200 Softswitch Operations and Maintenance Guide, Release 6.0.x
OL-16000-07
Page 57

Chapter 3 Monitoring and Backing Up the BTS
Step 6 Restore the Solaris “date” command to create the system Flash Archive. Enter:
mv /bin/date /bin/date.orig
mv /bin/.date /bin/date
Step 7 Create the archive. Enter <hostname>#flarcreate -n <archive name> -x /opt -S -c /mnt/<file
name>
Note Example archive name: flarcreate -n CCPU-EMS -x /opt -S -c /mnt/secems04.archive
Step 8 Back up the /opt directory. Enter tar -cvf - /opt/* |gzip -c >/opt/<hostname_release>.tar.gz
Step 9 Restore the original configuration. Enter:
mv /bin/date /bin/.date
mv /bin/date.orig /bin/date
Step 10 Unmount the NFS server. Enter umount /mnt
Archiving Your Database
Examining Heap Usage
Heap is memory BTS reserves for data it creates as its applications execute. BTS audits heap usage of
all the processes started by a platform, CA, AIN, POTS, EMS and BDMS. Heap auditing is added to the
ADP process.
When heap usage of a process goes beyond certain threshold level, BTS generates an alarm. The alarm
clears when heap usage goes below the threshold level.
Heap audit does the following:
• Monitors traces of heap usage in the last four periods for each process
• Measures heap usage of each process started by the platform once a day at 4 a.m
• Issues a minor alarm if the heap usage of a process exceeds 70% of its max heap size limit
• Clears a minor alarm if the heap usage of a process drops below 68% of its max heap size limit
• Issues a major alarm if the heap usage of a process exceeds 80% its max heap size limit
• Clears a major alarm if the heap usage of a process drops below 78% its max heap size limit
• Issues a critical alarm if the heap usage of a process exceeds 90% its max heap size limit
• Clears a critical alarm if the heap usage of a process drops below 88% its max heap size limit
• Reports, via trace logs, the last twenty heap measurements, including the time and the value for each
process
• Clears heap usage alarms when process restarts
Checking the DNS Server
To check the DNS server, do this for all nodes.
OL-16000-07
Cisco BTS 10200 Softswitch Operations and Maintenance Guide, Release 6.0.x
3-25
Page 58

Log Archive Facility (LAF)
Step 1 Log in as root on the active CA.
Step 2 Enter more /etc/resolv.conf.
Note nameserver <ip address>
Step 3 Enter nslookup
This defaults to the first DNS server.
Step 4 Enter a valid gateway name and press Enter.
An IP address associated to gateway appears.
Step 5 Enter server <second dns server ip>
Step 6 Enter a valid gateway name and press Enter.
An IP address associated to gateway appears.
Step 7 Enter exit to quit.
Chapter 3 Monitoring and Backing Up the BTS
Log Archive Facility (LAF)
The LAF process in Cisco BTS 10200 transports the trace log files to a remote archive server for storage.
LAF is a continuously running daemon process on all nodes (components) of the BTS 10200. It wakes
up every minute when active and checks if there are any new log files.
The service provider can specify the external archive system, the target directory, host directory, and the
disk quota for each trace log directory in the system. If any new log files are in these trace log directories,
LAF transfers them by Secure FTP (SFTP) to an external archive server specified by the service provider.
Secure Transfer of Files
BTS 10200 uses Secure FTP to transfer trace log files to the external server. LAF opens an SFTP
connection when its ready to transfer log file to the remote server. This connection is not closed even
after the transfer is complete. If for some reason the connection closes, the LAF process re-establishes
the connection during the next transfer. The connection is persistent till the LAF feature is disabled.
LAF operates on a single SFTP connection and transfer of files occurs one file at a time (using the SFTP
put operation). The same connection is used to transfer multiple files. When the LAF process detects a
bad connection, it terminates the SFTP session by closing the socket used to talk to the archive server.
The LAF process maintains a linked list for the files that need to be transferred. If the connection is lost
during a transfer, the LAF process moves the unsuccessfully transferred file to the end of the list and
raises Maintenance Alarm 108.
A re-attempt on a failed file depends on the number of files in the list and the time taken to transfer those
files. When there is no file to be transferred (i.e. the list is empty), then there is a gap of 30 seconds before
processing the list again.
The LAF process increments a counter, which is specifically used for the number of times the transfer
was attempted for this file. If a counter is more than three, the log file is deleted from the list. That is,
upon three failed attempts on the same file, the file entry is deleted from the list.
3-26
Cisco BTS 10200 Softswitch Operations and Maintenance Guide, Release 6.0.x
OL-16000-07
Page 59

Chapter 3 Monitoring and Backing Up the BTS
Other Capabilities
This section lists the additional capabilities of the LAF process.
• It performs disk space management when 90% of the disk space quota specified for the target
directory is reached.
• It gracefully recovers from any abnormal conditions and re-initiates the process to continue the
transfer of files.
• It generates alarms when any unsuccessful scenarios are encountered. These alarms are listed in the
Cisco BTS 10200 Troubleshooting Guide.
Provisioning LAF
Caution The values provided by the user for the following parameters will be written into /etc/opticall.cfg file
and transported to all the four BTS 10200 nodes.
Log Archive Facility (LAF)
Example 1
Example 2
Example 3
The following parameters are associated with the LAF process. If they are left blank, the LAF process
for a particular platform (such as, CA, FSPTC, FSAIN) is turned off.
To use this feature, you must provision the following parameters with the external archive system, the
target directory, and the disk quota (in GB) for each platform.
CAxxx_LAF_PARAMETER
FSPTCxxx_LAF_PARAMETER
FSAINxxx_LAF_PARAMETER
Note that xxx must be replaced with each platform’s instance number.
CA146_LAF_PARAMETER="yensid /CA146_trace_log 20"
FSPTC235_LAF_PARAMETER="yensid /FSPTC235_trace_log 20"
FSAIN205_LAF_PARAMETER="yensid /FSAIN205_trace_log 20"
To enable Log Archive Facility (LAF) process, refer to Enabling LAF Process section.
Enabling LAF Process
To enable the Log Archive Facility (LAF) feature, you must set up the authorization for non-interactive
SSH login to the external archive server for the Cisco BTS 10200 system to access and turn the LAF
processes to active state. (Immediately after the fresh installation and platform start, the LAF process is
in a dormant state).
OL-16000-07
Cisco BTS 10200 Softswitch Operations and Maintenance Guide, Release 6.0.x
3-27
Page 60

Log Archive Facility (LAF)
The steps to set up the authorization in external archive server and turn the LAF processes to active is
listed below:
Setup Non-Interactive SSH Login to External Archive Server
Note The external archive system is recommended to be located such that it can be accessed by the
management network. In such a case, the static routes in the CA system should be explicitly set so that
the traffic to the external archive system is routed through the management network see section (“Adding
Static Routes” section for more details). Otherwise, the traffic is routed through the default network (i.e.
signaling network) and may not be able to reach the external archive system.
Step 1 Log in to the Cisco BTS 10200 primary EMS as root.
Step 2 From the EMS, login to the external archive server via ssh to get the external archive server added to the
/.ssh/known_hosts file.
Step 3 Log off from the external archive server.
Step 4 While still logged in on the primary EMS as root, generate an SSH key.
a. Execute cd /opt/BTSossh/bin.
Chapter 3 Monitoring and Backing Up the BTS
b. Execute ssh-keygen -t rsa.
c. Press Enter to accept the default file name for the key (/.ssh/id_rsa).
d. Enter y if prompted to choose whether to overwrite the existing file.
e. Press Enter when prompted to enter a passphrase (i.e. no passphrase).
f. Transfer the resulting file (/.ssh/id_rsa.pub) to a temporary location on the external archive server.
Step 5 Set up the external archive server with the key generated in Step 4.
a. Login to the external archive system as root.
b. If a /.ssh/authorized_keys file does not exist on the external archive system, rename the id_rsa.pub
file (copied from the Cisco BTS 10200 EMS) to /.ssh/authorized_keys. If the file does exist, append
the id_rsa.pub file to it.
Step 6 On the primary EMS, execute
ssh root@abcd
where abcd is the IP address or fully-qualified domain name of the external archive server.
Step 7 Verify that login to the external archive server is successful and that no prompts for username or
password are issued.
Step 8 Run enableLAF in EMS platform directories (i.e. /opt/ems/bin and /opt/bdms/bin)
Step 9 Repeat Steps 1-8 for the secondary EMS, primary CA and secondary CA. (In CA, the platform
directories are /opt/OptiCall/CAxxx/bin, /opt/OptiCall/FSPTCyyy/bin, /opt/OptiCall/FSAINzzz/bin).
3-28
Note Billing has a similar mechanism/steps to SFTP their Call Detail Blocks (CDB) files to an external
machine. If the LAF and Billing use the same target machine, then in both EMS, perform Steps 1-7 only
once. You must still run Step 8 to enable LAF. And you must still run Steps 1 -9 in CA nodes.
Cisco BTS 10200 Softswitch Operations and Maintenance Guide, Release 6.0.x
OL-16000-07
Page 61

Chapter 3 Monitoring and Backing Up the BTS
Adding Static Routes
To add static routes to all Cisco BTS 10200 systems, perform the following steps:
Step 1 From the shell or window of the primary call agent, change directory to /opt/utils.
cd /opt/utils
Step 2 Edit S96StaticRoutes using an editor.
Step 3 Add the subnet of NTP server, DNS server, external archive server and any other machine to the file,
which user wants to have access to Cisco BTS 10200 system in the following format:
route add -net <destination network> <network gateway>
Note All NTP, DNS traffic, traffic to external archive server, and traffic from other machine to Cisco BTS
10200 system (eg. login), should all go through management networks. (i.e. network gateway in
management network). This is particularly important in CA system because CA has both management
and signaling network. If user does not specify explicitly in this file, those traffic will be directed to
signaling network, because signaling network is the default one in CA/FS.
Moving Core Files
Step 4 Make sure there is a soft link pointing from /etc/rc3.d/S96StaticRoutes to /opt/utils/S96StaticRoutes.
ls -l /etc/rc3.d/S96StaticRoutes
Step 5 After editing, close the file, and run S96StaticRoutes.
/etc/rc3.d/S96StaticRoutes
Step 6 Repeat Step 1 to Step 5 on the secondary CA.
Step 7 Verify the connectivity by pinging the DNS server, NTP server, external archive server, or any machine
that user just added in that file.
LAF Alarm Information
Refer to the following link to see the LAF alarm information.
Document Name Link to the Document
Cisco BTS 10200 Troubleshooting Guide http://www.cisco.com/en/US/docs/voice_ip_comm/bts/
6.0/troubleshooting/guide/07tg01.html#wp1938289
Moving Core Files
BTS creates and stores core files in the bin directory for the binary executable that generated the core.
Core files are large (2–4 GB) and eventually cause a disk full condition resulting in a switchover. When
a BTS platform system generates a core file, the BTS creates an alarm. The Core File Present—Audit 25
(major) alarm indicates a core is present in the BTS. The primary cause of this alarm is that a network
element process crashed.
OL-16000-07
Cisco BTS 10200 Softswitch Operations and Maintenance Guide, Release 6.0.x
3-29
Page 62

Moving Core Files
Chapter 3 Monitoring and Backing Up the BTS
The BTS automatically removes these core files when disk space is critically low or the core file has
aged beyond a maximum allowable time. However, to ensure proper BTS performance move these core
files off the BTS to another storage area as soon as they are generated. Refer to the Directory Containing
Core Files dataword for the location of the core file.
Use the settings in the cfm.cfg file to configure how to monitor and manage core files.
Table 3-7 Core File Monitor Configuration File Parameters and Conditions
Parameter Condition
CORE_FILE_MONITOR_DISABLE If set to true, the core file monitor audit is not
performed. Default setting is false.
CORE_FILE_ALARM_ENABLE If set to false, the core file monitor alarm is not
issued when a core file is found in the network
element bin directory. Default setting is true.
CORE_FILE_MINIMUM_SPACE This is the minimum free file space in megabytes
which will trigger the automatic deletion of the
oldest core files. Default is 5 GB.
CORE_FILE_AGE_TO_DELETE This is the maximum time in hours that a core file
can exist before it is automatically deleted.
Default is 72 hours.
CORE_FILE_AGE_DELETE_ENABLE If set to true, core files are deleted automatically
when their maximum age is reached. Default is
true.
CORE_FILE_SPACE_DELETE_ENABLE If set to to true, the oldest core files are deleted
when free file space is low. Default is true.
3-30
Cisco BTS 10200 Softswitch Operations and Maintenance Guide, Release 6.0.x
OL-16000-07
Page 63

Introduction
CHAP T ER
4
Operating the BTS
Revised: February 18, 2010, OL-16000-07
This chapter tells you how to operate the BTS. This chapter assumes the following are true:
• Connecting components have been correctly installed.
• Connecting components have been successfully started.
• You are a system administrator with past BTS experience.
OL-16000-07
Cisco BTS 10200 Softswitch Operations and Maintenance Guide, Release 6.0.x
4-1
Page 64

Managing Subscribers
Managing Subscribers
Table 4-1 Managing Subscribers
Task Sample Command
Activating
added
subscribers
Deactivating
subscribers
control subscriber-termination id=<subscriber id>; target-state=INS; mode=FORCED;
Ensure you specify mode=FORCED;; when assigning a DN to a ported-out subscriber.
Force the subscriber OOS:
control subscriber-termination target-state=oos; mode=forced; id=<subscriber id>;
Force the subscriber’s MTA OOS:
control mgw id=<mgw-id>; target-state=oos; mode=forced;
Disassociate the subscriber from VoIP service:
delete subscriber-service-profile sub-id=<subscriber id>; service-id=1;
Remove the subscriber from the BTS database:
delete subscriber id=<subscriber-id>;
Chapter 4 Operating the BTS
Bypassing LNP
queries for
ported-in
numbers
Ensuring LNP
queries for
ported-out
numbers
Assigning a
DN ported-out
status
Disconnecting
service to
ported
subscribers
Remove VoIP service from the subscriber’s MTA:
delete termination prefix=aaln/; port-start=1; port-end=2; mgw_id=<mgw-id>;
Remove the subscriber’s MTA from the BTS:
delete mgw id=<mgw-id>;
After activating a ported-in number, update the BTS so calls to this number from MTAs on the BTS directly
route to the MTA associated with the ported-in number:
change dn2subscriber office-code-index=
<office-code-index of ported TN’s NPA-NXX>;
dn=<XXXX of the ported TN>; lnp-trigger=N;
Update the BTS so calls to this number perform an LNP query:
change dn2subscriber office-code-index=
<office-code-index of ported TN’s NPA-NXX>;
dn=<XXXX of the ported TN>; lnp-trigger=y;
Note Wait for the CLEC to confirm the transfer before changing the DN status on the BTS. Initially, calls
to the DN may have to route to the porting-out subscriber’s MTA using LNP.
Ensure you specify
change dn2subscriber office-code-index=
<office-code-index of porting TN’s NPA-NXX>;
dn=<XXXX of the porting TN>; status=ported-out; sub-id=null;
1. Assign time and date to disconnect service.
2. Send service disconnection notice to NPAC SMS.
3. NPAC SMS broadcasts this to all service providers.
4. NPAC SMS removes the ported number from its database.
5. All service providers remove the number from their LNP databases.
6. Calls to the number route as if it was non-ported.
mode=FORCED; when assigning a DN to a ported out subscriber.
4-2
Cisco BTS 10200 Softswitch Operations and Maintenance Guide, Release 6.0.x
OL-16000-07
Page 65

Chapter 4 Operating the BTS
Table 4-1 Managing Subscribers (continued)
Task Sample Command
Viewing
status subscriber ID=278-222-1917
subscribers
voice mail
Note For MGCP subscribers only.
indicator
(VMI) status
Resetting
control subscriber ID=278-222-1917; mwi=on
subscribers
voice mail
waiting
or
control subscriber ID=278-222-1917; mwi=off
indicator
(VMWI)
Reporting all
report subscriber id=%; oper-status=qos-best-effort; aggr-id=aggr1; start_row=1; limit=5;
subscribers that
use “best
effort” (non
DQoS) calls in
the network
having or not
having a
Displays the output as CLI as the output-type has not been mentioned
or
report subscriber id=215-222-0502; oper-status=qos-best-effort; aggr-id=%;
output-type=xml; start_row=1; limit=5; output=report;
Displays the output in the specific format (CSV/XML) based on the output-tpye specified
specific aggr id
Note The output displays only NCS subscribers.
Changing
subscribers
ring and call
waiting tone
Deleting
subscribers
change dn2subscriber DN=4692553010; RING_TYPE=4; CWT_TYPE=4;
Note The CWT_TYPE has no effect on SIP subscribers. Their IP phones control how they receive call
waiting tones.
Delete one secondary DN for a subscriber:
delete dn2subscriber FDN=4692553010;
secondary DNs
Delete all secondary DNs for a subscriber:
delete dn2subscriber SUB_ID=SUBSCRIBER_1; VIRTUAL_DN=Y;
Managing Subscribers
OL-16000-07
Cisco BTS 10200 Softswitch Operations and Maintenance Guide, Release 6.0.x
4-3
Page 66

Managing Subscribers
Table 4-1 Managing Subscribers (continued)
Task Sample Command
Changing
subscribers
Delete the changed-number entry.
delete changed-number old-DN=<old-DN>;
announcements
Change the status of the old DN to DISC in the dn2subscriber table.
change dn2subscriber DN=<old-DN>; status=DISC;
Chapter 4 Operating the BTS
4-4
Cisco BTS 10200 Softswitch Operations and Maintenance Guide, Release 6.0.x
OL-16000-07
Page 67

Chapter 4 Operating the BTS
Table 4-1 Managing Subscribers (continued)
Task Sample Command
Changing
subscribers
Change the subscriber DN to the new DN.
change sub id=<id>; dn1=<new-DN>; CN-REFERRAL=Y;
DNs
Example:
change sub id=sub1; dn1=206-222-1841; CN-REFERRAL=Y;
The CN-REFERRAL token adds an entry in the changed-number table for the changed subscriber DN. By
default, the CN-REFERRAL token is set to Y. If the CN-REFERRAL token is set to N, the changed-number
table is not updated with the changed number information.
Use the show subscriber command to verify the new DN.
show sub id=<id>
Example:
show sub id=sub1;
Dn1 indicates 206-222-1841
Managing Subscribers
Verify that the changed number (old DN) of the subscriber is being tracked in the changed-number table.
show changed-number old-dn=<old-dn>
Example:
show changed-number OLD-DN=206-222-2345
Use the dn2subscriber table to verify that the old DN is in CN state and new DN is in assigned state. Check
if the status of the old DN is CN.
show dn2subscriber FDN=<old-DN>;
Example:
show dn2subscriber FDN=206-222-2345;
Check if the status of the new DN is assigned.
show dn2subscriber FDN=<new-DN>;
Example:
show dn2subscriber FDN=206-222-1841;
Place an incoming call to the new DN and verify the call is setup successfully.
Place an incoming call to the old DN and verify that the announcement played is "<old DN> has been
changed to <new DN>."
If an announcement is not played, do the following:
Verify if the release cause id maps to annc-id=118.
show release-cause id=22;
OL-16000-07
Verify if the announcement id maps to announcement-number 301.
show annc id=118;
Note If there is no referral number (that is, when CN-REFERRAL is set to N where the new number is
private), the BTS 10200 plays a generic announcement indicating that the number has changed. No
further information is provided on the new number.
Cisco BTS 10200 Softswitch Operations and Maintenance Guide, Release 6.0.x
4-5
Page 68

Viewing Calls
Viewing Calls
These tasks allows you to view information related to call forwarding features.
If A calls B and the call is forwarded to C:
• Querying A shows A is connected to C and provide C's information.
• Querying C shows C is connected to A and provide A's information.
• Querying B shows A is calling C and the call is forwarded through B.
• Even when the call is forwarded through B, B can originate another call. B can also forward multiple
When viewing Three-Way Call and Call Waiting calls remember the output shows both calls.
Table 4-2 Viewing Calls
Task Sample Command
Viewing active calls
Viewing call trace
summaries, started
when subscriber
presses *57
Chapter 4 Operating the BTS
calls.
query call-trace subscriberDN/FQDN/NPA-NXX-****/aaln/*@*
report call-trace-summary
Note The report appears on the screen andit does not generate in HTML.
4-6
Cisco BTS 10200 Softswitch Operations and Maintenance Guide, Release 6.0.x
OL-16000-07
Page 69

Chapter 4 Operating the BTS
Using Status and Control Commands
Table 4-3 Using Status and Control Commands
Task Sample Command
Viewing BTS system
status
Viewing component
states
status system;
status element-manager id=EM01;
Possible states:
• STARTUP—During platform startup, the two sides are communicating to
determine which side will come up active.
–
INIT-NORMAL—primary will be active, secondary will be standby;
switchover allowed.
–
INIT-FORCED—primary will be forced to active or standby,
secondary will be forced to standby or active; no switchover allowed.
• ACTIVE-NORMAL—primary is active, secondary is standby; switchover
allowed.
Using Status and Control Commands
• ACTIVE-FORCED—primary or secondary has been forced to active; no
switchover allowed.
• STANDBY-NORMAL—primary should be active, secondary should be
standby; switchover allowed.
• STANDBY-FORCED—primary or secondary has been forced to standby;
no switchover allowed.
• TRANSITION-TO-ACTIVE-NORMAL—primary is going to active,
secondary is going to standby; switchover allowed.
• TRANSITION-TO-ACTIVE-FORCED—primary has been forced to
active or standby; secondary has been forced to standby or active; no
switchover allowed.
• TRANSITION-TO-STANDBY-NORMAL—primary is going to standby,
secondary is going to standby; switchover allowed.
• TRANSITION-TO-STANDBY-FORCED—primary has been forced to
active or standby; secondary has been forced to standby or active; no
switchover allowed.
Tip Use status application for more detailed information.
OL-16000-07
Cisco BTS 10200 Softswitch Operations and Maintenance Guide, Release 6.0.x
4-7
Page 70

Using Status and Control Commands
Table 4-3 Using Status and Control Commands (continued)
Task Sample Command
Changing states of
component pairs
(EMS, BDMS, CA,
and FS)
Viewing component
application states
Changing
component
applications states
(in-service or OOS)
Activating media
gateways
Chapter 4 Operating the BTS
control call-agent id=CA146; target-state=FORCED-STANDBY-ACTIVE;
Possible states:
• ACTIVE_STANDBY
• STANDBY_ACTIVE
• NORMAL—Primary is active and secondary is standby.
• FORCED-ACTIVE-STANDBY—Primary has been forced to active and
secondary is standby.
• FORCED-STANDBY-ACTIVE—Primary has been forced to standby and
secondary is active.
status application id=CA146;
control application id=CA146; action=star;node=prica06
Caution This negatively impacts the performance of the BTS host.
Ensure the MG exists, then enter:
control mgw id=<mgw-id>; target-state=ins; mode=forced;
Setting subsystem
groups/OPC in or
OOS
Viewing subsystem
groups/OPC status
where
• mgw id—the voice port on the subscriber’s MTA (the voice port’s MAC
address without hyphens)
• target-state—ins to show in service for all activations
• mode—forced for all activations
control subsystem_grp id=CNAM; mode=forced; target_state=UOS;
This sets the state of the individual subsystems within the subsystem group as
well. If a subsystem/OPC combination is taken OOS individually, the state of
the subsystem group may be in service while some members of the group are
out of service.
status subsystem_grp id=CNAM
4-8
Cisco BTS 10200 Softswitch Operations and Maintenance Guide, Release 6.0.x
OL-16000-07
Page 71

Chapter 4 Operating the BTS
Using Show and Change Commmands
Table 4-4 Using Show and Change Commands
Task Sample Command
Viewing
subscriber-related
batch data:
subscribers,
terminations,
subscriber service
profiles
Viewing database
usage statistics
show subscriber limit=1000; start_row=<next page
value>;display=id,sub_service_profile; order=id;
Where
• limit—Page size for the maximum number of rows (or lines) to display
• start_row—Which page to display first
• display=id—Sorts data by id column
• order=id—Provides a key for ordering or sorting the data
show db-usage table-name=dial_plan;
Note Do not use hyphens in table names; instead use underscores.
Using Show and Change Commmands
Changing database
usage statistics
Using ERAC Commands
Using prepared SQL statements Extended Read Access Commands (ERAC) commands perform a
complex read against the BTS database. This SQL optimization and multitable and nested SELECT(s)
quickly return data that would otherwise take several database dips and a lot of back end data post
processing. Use the following interfaces to access ERAC:
• CLI and MAINT shells
• CORBA/XML adapters
• EPOM (uses CORBA/XML)
• SPA
Directory number (DN) and telephone number (TN) refer to the same BTS entity but with different
sources:
• TN—EC database value + the Office Code table’s NDC field
• DN—DN2 Subscriber table’s DN field
The TN/DN is a concatenation of 14 (or less) digits. Commands fail if a partial TN is supplied.
or
1. Go to http://www.cisco.com/iam/BTSCLI/BTS.html
.
2. From the first drop-list, select "Table Sizing Configuration".
change db-usage table-name=dial-plan;
minor-threshold=70;major-threshold=80; critical-threshold=95;
OL-16000-07
Note Commands allow for wild card support. When you enter a subscriber, subscriber account code, or DN ,
the value can have the wild card percent (%) search criteria.
Cisco BTS 10200 Softswitch Operations and Maintenance Guide, Release 6.0.x
4-9
Page 72

Using ERAC Commands
Chapter 4 Operating the BTS
These are standard commands and their parameters. Several are associated with BTS tables. However,
several parameters are derived from multiple sources and do not map directly to a table. They may have
real database representation but be modified for ease of use or readability.
Tasks Descriptions Examples
Viewing
account IDs
An account id can be assigned to one or more
subscribers. An account id is used only for
account-id=ABC123456789;
identification purposes. The account id is not
associated with feature grouping behavior
during call processing. The account id is
included in billing record. This is for
operational identification purpose only.
This is an optional field of 1-20 text
characters.
Viewing DNs The DN is the telephone number. This number
show 4692550529
is a derived value composed of the
office-code.ndc, office-code.ec and the
dn2subscriber.dn fields. It is a concatenation
to provide a consistent view of the primary
directory number for a subscriber. It is 1-14
numbers.
Viewing DNs
by subscriber
This command returns a list of all DNs
associated with a specified subscriber or
account id. In this command, the subscriber id
show sub-dn-list
sub_id=foo_123;
account-id=ABC123456789;
field or the new account-id field determines
the DN(s) to list. Each row of data represents
a DN entry. The additional data is supplied to
provide further information about the DN.
Viewing line
features by DN
This command returns a list of all features
associated with a specified DN. In this
command the DN is supplied to qualify the
data search.
show dn-line-feat
dn=4692550529;
sub-id=foo_123;
account-id=-ABC123456789;
The data returned is not in the form of
services and service packages. This query
dips into the service packages and finds the
actual features associated with each service
assigned to the DN and its subscriber.
Viewing feature
summaries by
DN
This command returns the list of all features
associated with a specified entity. In this
command the DN, Subscriber ID or Account
ID is supplied to qualify the data search. The
show dn-feat-list
dn=4692550529;
sub-id=foo_123;
account-id=ABC123456789;
command returns the list of all the services of
the associated subscriber or DN and all
features associated with each specific service
package. This also includes the service
profiles association.
4-10
Cisco BTS 10200 Softswitch Operations and Maintenance Guide, Release 6.0.x
OL-16000-07
Page 73

Chapter 4 Operating the BTS
Tasks Descriptions Examples
Viewing speed
dial settings by
DN
Viewing
domestic long
distance
blocking by
subscriber or
account id
Viewing
international
long distance
blocking
settings by
subscriber or
account id
Viewing DA
blocking by
subscriber or
account id
Viewing OA
blocking by
subscriber or
account id
Viewing call
hunt groups by
subscriber or
account id
Viewing
sequence by
hunt group
This command returns a list of all speed dial
telephone numbers by the specified DN or
primary subscriber directory number. All one
digit speed dial values are returned as well as
the feature state of speed dial. T Only a single
row is returned with the complete list of speed
dial numbers. If a number is not defined, it is
left blank.
This command returns the cos-restrict
information for a specified subscriber. In this
command the subscriber ID field or the new
account-id field determines the subscriber.
This command keys on the use of the Nature
of Dial (NOD) means for restricting
subscriber activity.
This command returns the COS_RESTRICT
information for all DN(s) associated with a
specified subscriber or account. In this
command the subscriber ID field or the new
ACCOUNT_ID field determines the
subscriber. This command keys on the use of
the NOD as the means for restricting
subscriber activity.
This command returns the cos-restrict
information a specified subscriber or account.
In this command the subscriber id field or the
new account_id field determines the
subscriber. This command keys on the use of
the NOD as the means for restricting
subscriber activity.
This command returns the Operator
assistance blocking information for a
specified subscriber or account. In this
command the subscriber ID field or the new
ACCOUNT_ID field determines the
subscriber. One row of data exists for each
actual BTS 10200 subscribers.
This command returns the list of one or more
hunt groups associated with a specified
subscriber. In this command the subscriber Id
field or the new account_id field determines
the subscriber. Each row of data represents a
hunt group membership.
This command returns the hunt sequence as a
list of telephone numbers (TNs) associated
with a specified Hunt Group. Each row of data
equates to a relative terminal in the hunt
group. This avoids static lists with a fixed
number of terminals.
Using ERAC Commands
show dn-sd-list dn=4692550529;
sub-id=foo_123;
account-id=ABC123456789;
show sub-id-block
sub-id=foo_123;
account-id=ABC123456789;
show sub-intl-block
sub-id=foo-123;
account-id=ABC123456789;
show sub-da-block
sub-id=foo-123;
account-id=ABC123456789;
show sub-oper-block
sub-id=foo-123;
account-id=ABC123456789;
show hg-dn-listdn=4692550529;
sub-id=foo-123;
account-id=ABC123456789;
show hg-sequence
mlhg-id=foo-123;
account-id=ABC123456789;
OL-16000-07
Cisco BTS 10200 Softswitch Operations and Maintenance Guide, Release 6.0.x
4-11
Page 74

Managing Transactions
Tasks Descriptions Examples
Viewing list
DNs that not in
a hunt group
This command returns a list of all DNs
associated with a specified subscriber and
that are not associated with a hunt group.
show sub-dn-find
account-id=ABC1234%;
sub-id=foo-123;
Under the present definition, the list can be
long. Each row of the data indicates a TN with
a free association. It is strongly recommended
that some qualifications are provided to
narrow the scope of the command. For
example, list all free DNs in a particular
account where the account ID is some specific
value.
Viewing
Outbound
Caller ID with
Name Value by
This command returns the caller ID and
NAME for a specified TN. Each row of data
represents a separate subscriber TN. The read
is based on the actual TN of a subscriber.
show sub-cid sub-id=foo-123;
account-id=ABC123456789;
DN
Chapter 4 Operating the BTS
Managing Transactions
The Transaction Queue tracks updates to EMS database, and the shared memory of the CAs andFSs.
Entries should remain in the transaction queue for a few seconds, unless an EMS, CA, or FS in an error
state. In case of an error state, the transaction queue to stores entries for later updates.
Table 4-5 Viewing and Deleting Transactions
Task Sample Command
Viewing transaction
queue entries
Deleting transaction
queue entries
show transaction-queue target=CA146; status=pending;
Following is an example of the system response to this command.
TRANSACTION_ID=901208641475967405
USER_ID=optiuser
TERMINAL_ID=USR1
SEQUENCE_NUM=0
TARGET=CA146
STATEMENT=INSERT INTO CARRIER (ID) VALUES ("3434")
TIMESTAMP=2006-11-10 11:36:41
ACTIVE_TARGET=Y
STATUS=PENDING
delete transaction-queue target=CA146
Caution This command causes a database inconsistency. Call TAC before
using it.
4-12
Viewing maximum
show queue-throttle
download capacity
for transaction
queuing
Cisco BTS 10200 Softswitch Operations and Maintenance Guide, Release 6.0.x
OL-16000-07
Page 75

Chapter 4 Operating the BTS
Table 4-5 Viewing and Deleting Transactions (continued)
Task Sample Command
Enabling/Disabling
queue throttling
Viewing number of
commands executed
from CLI, MNT,
FTP, CORBA,
SNMP, or SOAP
interfaces
Setting number of
commands executed
from CLI, MNT,
FTP, CORBA,
SNMP, or SOAP
interfaces
Scheduling Commands
1. Go to the bts.properties file.
/opt/ems/etc/bts.properties
2. To enable throttling, set throttleEnable to Y. To disable throttling, set
throttleEnable to N.
throttleEnable=Y
3. Restart the platform.
show config-interval;
change command-throttle-threshold session-type=CORBA;
threshold=2000;
change command-throttle-threshold session=CORBA; enable=N;
Scheduling Commands
The Hour and Minute Command Scheduling feature allows you to schedule command execution for a
specific hour and minute.
Using start-time and recurrence command tokens, schedule command time and frequency (hourly, daily,
weekly, monthly, etc.). You can remove the command at any time; if it is recurring and currently
executing, it completes and is removed.
Limitations
To prevent overload and subsequent EMS degradation, limit commands to 10, each taking less than a
minute.
If you schedule a command to execute, but an earlier occurence of that command is still executing, the
second might fail.
Table 4-6 Scheduling Commands
Task Sample Command
Adding scheduled
commands using
minutes
Adding scheduled
commands using
hours
add scheduled_command
verb=report;noun=system_health;keys=period;key_values=720;recurrenc
e=MINUTE;on_minute=3,10,25,59;start_time=2007-11-08 00:00:00;
add scheduled_command verb=report;
noun=system_health;start_time=2007-06-30 00:00:00;
key_values=720;keys=period; recurrence=HOURLY;
OL-16000-07
Cisco BTS 10200 Softswitch Operations and Maintenance Guide, Release 6.0.x
4-13
Page 76

Scheduling Commands
Table 4-6 Scheduling Commands (continued)
Task Sample Command
Viewing scheduled
show scheduled_command recurrence=HOURLY;key_values=720;
commands
Changing scheduled
commands
change scheduled_command
id=3871788758088233209;recurrence=MINUTE;on_minute=19;
Chapter 4 Operating the BTS
4-14
Cisco BTS 10200 Softswitch Operations and Maintenance Guide, Release 6.0.x
OL-16000-07
Page 77

Introduction
CHAP T ER
5
Managing External Resources
Revised: February 18, 2010, OL-16000-07
This chapter tells you how to manage external resources provisioned on the BTS using administrative
(ADM) commands. External resources have two service states:
• Administrative—State the BTS user provisions for the resource link
• Operational—Physical condition of the resource link or the resource)
The two types of service states are independent of each other, for example:
A user places an MGW link in-service; its administrative state is ADMIN_INS. But that link
between the BTS and MGW is lost. The MGW link’s operational state is MGW_STATUS_DOWN.
A query of the MGW returns both the administrative state and operational state.
Viewing BTS System-Wide Status
BTSSTAT runs on any BTS host. Any valid UNIX user can enter btsstat from a UNIX shell to initiate
it. This command returns the following for all BTS components:
• Component id
• Side
• Host name
• Ve rs i on
• Replication status
• Redundancy status
To run BTSSTAT from a non-BTS host, the configuration file needs the information in following table.
BTSSTAT ignores all other lines in the file.
Cisco BTS 10200 Softswitch Operations and Maintenance Guide, Release 6.0.x
OL-16000-07
5-1
Page 78

Viewing BTS System-Wide Status
Table 5-1 Using BTSSTAT
Task Sample Command
Viewing status of entire BTS
system (including components
not on the same host)
Viewing status of specific
components
Chapter 5 Managing External Resources
btsstat
CA
btsstat -caport
FSAIN
btsstat -fsainport
FSPTC
btsstat -fsptcport
EMS
btsstat -emsport
Running BTSSTAT from a
non-BTS host
(requires an SSL connection to
the BTS)
Viewing BTS software version
and installed patches
BDMS
btsstat -bdmsport
btsstat -f my_cfg_file
Specify BTS hosts in a configuration file:
• CA_SIDE_A_HN = prica11
CA_SIDE_B_HN = secca11
• FSAIN_SIDE_A_HN = prica11
FSAIN_SIDE_B_HN = secca11
• FSPTC_SIDE_A_HN = prica11
FSPTC_SIDE_B_HN = secca11
• EMS_SIDE_A_HN = priems11
EMS_SIDE_B_HN = secems11
• BDMS_SIDE_A_HN = priems11
BDMS_SIDE_B_HN = secems11
nodestat
5-2
Cisco BTS 10200 Softswitch Operations and Maintenance Guide, Release 6.0.x
OL-16000-07
Page 79

Chapter 5 Managing External Resources
Managing Trunk Groups and Trunks
Table 5-2 Managing Trunk Groups
Task Sample Command
Viewing TG status
status trunk-grp id=2;
Possible operational states:
• in-service
• out of service
• manually busy
• operate in wait state, operate in standby state
• restore session request normal, restore session request
switchover, restore session request maintenance, restore session
fail normal, restore session fail switch-over, restore session fail
maintenance, restore establish request normal, restore establish
request switchover, restore establish request maintenance, restore
establish fail normal, restore establish fail switchover, restore
establish fail maintenance
• in maintenance state
• down session set fail soft normal, down session set fail hard
normal, down session set fail soft maintenance, down session set
fail hard maintenance, down establish request soft normal, down
establish request hard normal, down establish request soft
maintenance, down establish request hard maintenance, down
establish request hard normal, down establish request soft
maintenance, down establish request hard maintenance, down
establish fail soft normal, down establish fail hard normal, down
establish fail soft maintenance, down establish fail hard
maintenance
Managing Trunk Groups and Trunks
OL-16000-07
Viewing TGs with ISDN D
channels
Switching ISDN D channels
Changing TGs states
Viewing trunk status
• delete graceful
• request remove release, request remove session set
• remove graceful in-service and maintenance state
• DPC is inaccessible
show isdn-dchan
control isdn-dchan tgn-id=1;
This switches the active D channel to standby, and the standby D
channel to active.
control trunk-grp tgn-id=129; mode=forced; target-state=oos;
Note Before bringing an ISDN trunk in-service, put the connected
media gateway in-service, see Changing media gateways
status.
status trunk-termination tgn-id=2; cic=8;
Cisco BTS 10200 Softswitch Operations and Maintenance Guide, Release 6.0.x
5-3
Page 80

Managing Trunk Groups and Trunks
Table 5-2 Managing Trunk Groups (continued)
Task Sample Command
Resetting trunks
Changing trunk states
Forcing MAINT state SS7 trunks
Chapter 5 Managing External Resources
reset trunk-termination tgn-id=13; cic=1-6;
Resetting does the following:
• Clears all manual and blocked states
• Clears active/transient calls on a trunk termination, with the
exception of SS7 trunk terminations.
• Brings trunks INS
control trunk-termination tgn-id=17; cic=1-23;
target-state=ins; mode=forced;
equip trunk-termination tgn-id=13; cic=all;
Changes trunks in UEQP to OOS
unequip subscriber-termination id=97_8@ipclab.cisco.com;
Changes OOS trunks to UEQP
control ss7-trunk-termination tgn-id=103; mode=forced;
target-state=maint;
Note Set COT on the terminating gateway or switch to perform
these tests. Otherwise, the test or tests fail.
ISDN trunks
control isdn-trunk-termination tgn-id=17; mode=forced;
target-state=maint;
CAS trunks
control cas-trunk-termination tgn-id=64; mode=forced;
target-state=maint;
Announcement trunks
control annc-trunk-termination tgn-id=13; mode=forced;
target-state=maint;
5-4
Cisco BTS 10200 Softswitch Operations and Maintenance Guide, Release 6.0.x
OL-16000-07
Page 81

Chapter 5 Managing External Resources
Table 5-2 Managing Trunk Groups (continued)
Task Sample Command
Viewing test menus SS7 trunks
Managing Trunk Groups and Trunks
diag ss7-trunk-termination test=<TAB>
diag ss7-trunk-termination test=<RETURN>
ISDN trunks
diag isdn-trunk-termination test=<TAB>
diag isdn-trunk-termination test=<RETURN>
CAS trunks
diag cas-trunk-termination test=<TAB>
diag cas-trunk-termination test=<RETURN>
Announcement trunks
diag annc-trunk-termination test=<TAB>
diag annc-trunk-termination test=<RETURN>
OL-16000-07
Cisco BTS 10200 Softswitch Operations and Maintenance Guide, Release 6.0.x
5-5
Page 82

Managing Trunk Groups and Trunks
Table 5-2 Managing Trunk Groups (continued)
Task Sample Command
Testing trunks
(place in MAINT state first)
Chapter 5 Managing External Resources
SS7 trunks
diag ss7-trunk-termination tgn-id=103; cic=13; test=1;
Test 1: SS7 MGCP Connectivity Test—tests if MGCP has access to
the SS7 trunk termination
Test 2: SS7 Termination Connection Test—tests if there is a path to the
device (ping).
Test 3: SS7 COT Test—tests the integrity of the SS7 Bearer Path.
Test 4: SS7 CQM Test—queries the SS7 circuit (or group of circuits)
status. A range of CICs can be specified (to a maximum of 24). Both
remote and local trunk states are displayed in the results.
Test 5: SS7 CVT Test—tests to ensure that each end of the circuit has
sufficient and consistent information for using the circuit in call
connections. CLLI names are included.
Test 6: SS7 CIC Audit—returns status of CICs
Test 0: ALL—performs tests 1 through 6.
ISDN trunks
diag isdn-trunk-termination test=1; tgn-id=17; cic=1;
1. Tests if MGCP has access to the ISDN termination
2. Tests if there is a path to the device (ping)
3. Performs tests 1 and 2
CAS trunks
diag cas-trunk-termination tgn-id=64;cic=1;test=1;
1. Tests if MGCP has access to the CAS termination
2. Tests if there is a path to the device (ping)
3. Performs tests 1 and 2
Announcement trunks
diag annc-trunk-termination;test=1;tgn-id=13;cic=1
1. Tests if MGCP has access to the ANC termination
2. Tests if there is a path to the device (ping)
3. Performs tests 1 and 2
Table 5-3 Valid Normal Trunk Termination States
State/Token ADMIN-STATE OPER-STATE STATIC-STATE DYNAMIC-STATE
UNEQP UNEQP ANY UEQP IDLE
MANUALLY OOS OOS ANY LBLK IDLE
MANUALLY MAIN MAINT IDLE LBLK IDLE
Cisco BTS 10200 Softswitch Operations and Maintenance Guide, Release 6.0.x
5-6
OL-16000-07
Page 83

Chapter 5 Managing External Resources
Managing Trunk Groups and Trunks
Table 5-3 Valid Normal Trunk Termination States (continued)
State/Token ADMIN-STATE OPER-STATE STATIC-STATE DYNAMIC-STATE
IDLE INS IDLE ACTV IDLE
ACTIVE INCOMING INS IDLE ACTV IDLE
ACTIVE OUTGOING INS ACTIVE ACTV OBSY
TRANSIENT
INS ACTIVE ACTV IBY-TRNS
INCOMING
TRANSIENT
INS BUSY ACTV OBSY-TRNS
OUTGOING
If a TG or trunk command fails, it can return one of the following generic failure reasons, as well as ones
specific to the command.
Table 5-4 Understanding Trunk Group and Trunk Generic Command Responses
Command
Entered
status
or
control
Command
Response Possible Conditions
Failure TG or trunk database was not found in shared memory.
Component is already in the requested state.
Graceful mode only. Appears when a command is executed and operation
is INS going OSS or INS going MAINT.
A required resource is not available.
For ISDN
–
A trunk cannot be added unless both the MGW and TG are
available.
–
A TG cannot be added unless the MGW is available, and vice
versa.
For SS7, CAS, Announcement
–
A trunk cannot be added unless both the MGW and TG are
available.
–
A TG does not require the MGW to be available, and vice versa.
An associated resource of the database cannot be found.
An assigned resource is not valid (supported).
OL-16000-07
Cisco BTS 10200 Softswitch Operations and Maintenance Guide, Release 6.0.x
5-7
Page 84

Managing Trunk Groups and Trunks
Table 5-4 Understanding Trunk Group and Trunk Generic Command Responses (continued)
Chapter 5 Managing External Resources
Command
Entered
Command
Response Possible Conditions
any Failure • Found no failure
• TG(s) cannot be found, trunk(s) cannot be found, no TG(s) found in
trunking gateway, no trunk(s) found in TG
• Fail while in termination table, fail while in TG table, fail while in
trunk table, fail while looking to find trunk index, fail while getting
TG administration state
• Failed to allocate IPC message(s), failed to dispatch IPC message(s)
• Operational state invalid, administration state invalid
• Trunk(s) state change and pending
• Found TG type invalid, found TG state invalid, found TG admin state
not ready
• Entity in desired state
• Not allow trunk to reset
• Change to out-of-service state required, change to request graceful
mode error
• Found entity unequipped in initial state
• Operation not allowed because D Channel(s) is down
• Found unknown failure reason(s)
5-8
Cisco BTS 10200 Softswitch Operations and Maintenance Guide, Release 6.0.x
OL-16000-07
Page 85

Chapter 5 Managing External Resources
Table 5-4 Understanding Trunk Group and Trunk Generic Command Responses (continued)
Managing Trunk Groups and Trunks
Command
Entered
Trunk
Termination
commands
Command
Response Possible Conditions
Failure • The transaction could not be executed due to a transient error, the
endpoint is unknown, the endpoint is not ready, endpoint does not
have enough resources available, a protocol error was detected, the
command contained an unrecognized extension, the endpoint is
restarting.
• Invalid conn identifier, invalid call ID.
• Unsupported mode or invalid mode, unsupported or unknown
package.
• Endpoint does not have a digit map, endpoint redirected to another
Call Agent, endpoint malfunctioning, endpoint taken out of service.
• No such event or signal.
• Unknown action or illegal combination of actions.
• Internal consistency in local connection options, unknown extensions
in local connection options, unsupported values on local connection
options.
• Insufficient bandwidth.
• Missing remote connection descriptor.
• Incompatible protocol version.
• Internal hardware failure.
• CAS signaling protocol error.
• Failure of a group of trunks.
• Response too big.
• Loss of lower connectivity.
• No fault reason available.
OL-16000-07
Cisco BTS 10200 Softswitch Operations and Maintenance Guide, Release 6.0.x
5-9
Page 86

Managing Trunk Groups and Trunks
Table 5-4 Understanding Trunk Group and Trunk Generic Command Responses (continued)
Chapter 5 Managing External Resources
Command
Entered
Trunk
commands
Command
Response Possible Conditions
Failure • NON-FAULTY—Not blocked, available for service.
• MAINT-OOS—Trunk-termination is manually controlled OOS.
• MAINT-BUSY—Trunk-termination is in maintenance state;
controlled to MAINT.
• TERM-FAULT—Bearer termination is in faulty condition.
• SIGNALLING-FAULT—Signaling link (for example, SS7 link, or
ISDN D channel) is faulty.
• MAINT-BLOCK—Trunk-termination is manually controlled OOS
(controlled mode=GRACE).
• HARDWARE-BLOCK—Trunk-termination is manually controlled
OOS (controlled mode=FORCED).
• OUTGOING_RESTRICTED—The outgoing call is not allowed
• DPC_INACCESSIBLE—The DPC is not accessible.
• ACL_CONGESTION_LEVEL_1—Automatic Congestion Level
(ACL) congestion is at level 1.
• ACL_CONGESTION_LEVEL_2—ACL congestion is at level 2.
• ACL_CONGESTION_LEVEL_3—ACL congestion is at level 2.
• TFC_CONGESTION_LEVEL_1—Transfer Controlled (TFC)
congestion is at level 1.
• TFC_CONGESTION_LEVEL_2—TFC congestion is at level 2.
• TFC_CONGESTION_LEVEL_3—TFC congestion is at level 3.
5-10
Cisco BTS 10200 Softswitch Operations and Maintenance Guide, Release 6.0.x
OL-16000-07
Page 87

Chapter 5 Managing External Resources
Table 5-4 Understanding Trunk Group and Trunk Generic Command Responses (continued)
Managing Trunk Groups and Trunks
Command
Entered
SS7 trunk
commands
Command
Response Possible Conditions
Failure • ACT_LOC_INIT_RESET—Reset circuit at startup.
• ACT_LOC_MML_RESET—Craft reset request.
• ACT_LOC_QUERY—Circuit query.
• ACT_LOC_UPU—Action to perform user part unavailable.
• ACT_LOC_VALIDATE—Circuit validation.
• ACT_LOC_COTTEST—COT test.
• ACT_LOC_STOP—Action to stop the call.
• BLK_LOC_UPU—Trunk is blocked because user part is unavailable.
• DES_LOC_GRACE—Local hardware RSIP graceful.
• DES_LOC_SIG—SS7 signaling fault (link fail).
• DES_LOC_FORCE—Local hardware RSIP forced.
• DES_LOC_MML—MML; also used for unsolicited blocks from
MDL due to circuit query reservation (CQR).
• DES_LOC_UPU—Trunk needs to be blocked because of user part
unavailability.
• JOB_PENDING—Ongoing job in progress.
• JOB_REC—Job was received by the MDL component and is being
processed.
• OPER_ACTIVE—Trunk is available for calls.
• REMOTE_GRACE—Trunk is blocked remotely because of a CLI
command on the remote switch.
• REMOTE_FORCE—Trunk is blocked remotely because of a
hardware failure on the remote switch.
• RESERVE_SPARE1—Reserved for future use.
• RESERVE_SPARE2—Reserved for future use.
• TERM_GRACE—Trunk is gracefully blocked because of an RSIP
graceful from the MGW.
OL-16000-07
Cisco BTS 10200 Softswitch Operations and Maintenance Guide, Release 6.0.x
5-11
Page 88

Managing Subscriber Terminations
Managing Subscriber Terminations
Table 5-5 Managing Subscriber Terminations
Task Sample Command
Checking subscriber
status
status subscriber-termination id=ubr204_1;
Possible states:
• ADMIN-UEQP—Unequipped.
–
Newly-provisioned subscriber terminations are UEQP
–
Place a subscriber termination in UEQP before deleting it
• ADMIN-INS—In-service
• ADMIN-OOS—Out of service
• ADMIN-MAINT—Maintenance Mode
• ADMIN-OOS-PENDING—Transitioning to out of service
Chapter 5 Managing External Resources
Checking subscriber
status in detail
• ADMIN-MAINT-PENDING—Transitioning to Maintenance Mode
status subscriber-termination id=*@ubr235; oper-state=FA;ISDN
Administrative and Operational Maintenance States for a Trunking
Gateway
For more information use one of the following for oper-state:
• FA— F a u l t y
• NF—Not faulty
• IDLE—Termination idle
• ACTIVE—Termination active
• DOWN—Termination down
• TERM-FA—Termination fault
• TEMP-DOWN—Termination temporarily down
• UNREACH—Termination unreachable
• INT-MAINT—Termination internal maintenance
• UEQP—Termination unequipped
• ALL—All states, same as executing command without oper-state token
5-12
Cisco BTS 10200 Softswitch Operations and Maintenance Guide, Release 6.0.x
OL-16000-07
Page 89

Chapter 5 Managing External Resources
Table 5-5 Managing Subscriber Terminations (continued)
Task Sample Command
Changing subscriber
termination states
Managing Subscriber Terminations
control subscriber-termination id=*@c3810_167; mode=forced; target-state=INS;
Possible states:
• INS—In-service
• OOS—Out of service
• MNT—Maintenance mode
control subscriber-termination id=sub2-ctx2; mode=forced;
target-state=maint;
Forces MAINT state, do this before testing
equip subscriber-termination id=97_8@ipclab.cisco.com;
Changes OOS subscriber terminations to UEQP
unequip subscriber-termination id=97_8@ipclab.cisco.com;
Changes INS subscriber terminations and puts them in UEQP, subscriber
terminations state must be UEQP before you can delete them.
Viewing test menus
Testing subscriber
terminations
(place subscriber
terminations in
MAINT state first)
diag subscriber-termination; test=<TAB>
diag subscriber-termination; test=<RETURN>
diag subscriber-termination id=sub-ubr3-1@cisco.com; test=3;
ring-duration=10;
Note Ring-duration values are 0–999 (Default = 5). Maximum ring time is
30 seconds regardless of whether the duration is set higher than or
equal to 31.
1. Tests if MGCP has access to the termination
2. Tests if there is a path to the device (ping)
3. Tests if the subscriber can be rung
4. Performs tests 1 through 3
If a subscriber termination command fails, it can return one of the following generic failure reasons, as
well as ones specific to the command.
OL-16000-07
Cisco BTS 10200 Softswitch Operations and Maintenance Guide, Release 6.0.x
5-13
Page 90

Managing Subscriber Terminations
Table 5-6 Understanding Subscriber Command Responses
Chapter 5 Managing External Resources
Command
Entered
status
or
control
Command
Response Possible Conditions
Failure • Subscriber database was not found in shared memory.
• Component is already in the requested state.
• Graceful mode only, this appears when a command is executed and
operation is INS going OSS or INS going MAINT.
• A required resource is not available. For example: The MGW for a
subscriber is down, the subscriber cannot be added.
• An associated resource of the database cannot be found.
• An assigned resource is not valid (supported). For example, a
subscriber is assigned to a PBX and the PBX is not supported.
5-14
Cisco BTS 10200 Softswitch Operations and Maintenance Guide, Release 6.0.x
OL-16000-07
Page 91

Chapter 5 Managing External Resources
Table 5-6 Understanding Subscriber Command Responses (continued)
Managing Subscriber Terminations
Command
Entered
Command
Response Possible Conditions
Any failure • Found no failure, subscriber category invalid, entity unequipped in
initial state, unknown failure reason(s).
• Subscriber(s) cannot be found, subscriber(s) state change and
pending.
• No termination(s) found in MGW.
• Fail while in termination table.
• Administration state invalid, operational state invalid.
• Failed to allocate IPC message(s), failed to dispatch IPC message(s).
• Entity in desired state.
• Not allow subscriber to reset.
• Change to out-of-service state required.
Subscriber
commands
Failure
• The media gateway is down, unreachable, in a faulty state,
transitioning to another state.
• The transaction could not be executed because the endpoint is
unknown, the endpoint is not ready, the endpoint does not have
enough resources available, the endpoint is restarting, the command
contained an unrecognized extension, the gateway is not equipped to
detect one of the requested events, the gateway is not equipped to
generate one of the requested signals, the gateway cannot send the
specified announcement.
• Invalid conn identifier, invalid call ID.
• Unsupported mode or invalid mode, unsupported or unknown
package.
• Endpoint does not have a digit map, endpoint redirected to another
Call Agent, endpoint malfunctioning, endpoint taken out of service.
• No such event or signal.
• Unknown action or illegal combination of actions.
• Internal consistency in local connection options, unknown extensions
in local connection options, unsupported values on local connection
options.
• Insufficient bandwidth.
• Missing remote connection descriptor.
• Incompatible protocol version.
• Response too big.
• Loss of lower connectivity.
• No fault reason available.
OL-16000-07
Cisco BTS 10200 Softswitch Operations and Maintenance Guide, Release 6.0.x
5-15
Page 92

Managing Gateways
Managing Gateways
Table 5-7 Managing Gateways
Task Sample Command
Viewing H.323 gateways
Setting the state of H.323
gateways
Viewing signaling gateway
processes (SGPs)
Viewing media gateways
status
Chapter 5 Managing External Resources
status h323-gw id=CHINA-1;
Possible RAS states:
• CCH323_RAS_STATE_NONE—operational state is ADMIN
OOS
• CCH323_RAS_STATE_GRQ—Gatekeeper Discovery state
• CCH323_RAS_STATE_RRQ—Gateway Registration state
• CCH323_RAS_STATE_IDLE—ready for calls
• CCH323_RAS_STATE_URQ—Un-registration state.
control h323-gw id=CHINA_1; target-state=INS;
status sgp id=sgp1;
status mgw id=c5300_197;
Possible states:
• ADMIN-INS—In-service
Reporting all MTAs that use
“best effort” (non DQoS) calls
in the network having or not
having a specific aggr id
• ADMIN-OOS—Out of service
• ADMIN-MAINT—Maintenance Mode
• ADMIN-OOS-PENDING—Transitioning to out of service
• ADMIN-MAINT-PENDING—Transitioning to Maintenance
Mode
report mgw id=%; oper-status=qos-best-effort; aggr-id=aggr1;
start_row=1; limit=5;
Displays the output as CLI as the output-type has not been mentioned
or
report mgw id=%; oper-status=qos-best-effort; aggr-id=%;
output-type=xml; start_row=1; limit=5; output=report;
Displays the output in the specific format (CSV/XML) based on the
output-tpye specified
Note The output displays only those mgws that use NCS variant.
5-16
Cisco BTS 10200 Softswitch Operations and Maintenance Guide, Release 6.0.x
OL-16000-07
Page 93

Chapter 5 Managing External Resources
Table 5-7 Managing Gateways (continued)
Task Sample Command
Changing media gateways
status
Viewing media gateway test
menus
Testing media gateways
(place gateways in MAINT
state first)
Managing Gateways
control mgw id=c5300_162; mode=forced; target-state=INS;
Modes can be forced or graceful. Forced tears down all calls
immediately; graceful allows calls in progress to complete before
teardown.
Note Rules for changing an MGW states are in Figure 5-1.
control mgw id=c2421.65; mode=forced; target-state=maint;
Forces MAINT state, do this before testing
diag mgw test= <TAB>
or
diag mgw test= <RETURN>
diag mgw id=ubr-03; test=1;
If a gateway command fails, you might receive one of the following generic failure reasons, or one
specific to the command.
OL-16000-07
Cisco BTS 10200 Softswitch Operations and Maintenance Guide, Release 6.0.x
5-17
Page 94

Managing Other External Resources
Table 5-8 Understanding Gateway Command Responses
Chapter 5 Managing External Resources
Command
Entered
status
Command
Response Possible Conditions
Failure • Media gateway database was not found in shared memory.
or
control
any Failure
• Component is already in the requested state.
• Graceful mode only. Appears when a command is executed and
operation is INS going OSS or INS going MAINT.
• A required resource is not available.
• An associated resource of the database cannot be found.
• An assigned resource is not valid (supported).
• Found no failure.
• MGW(s) cannot be found, no termination(s) found in MGW, MGW(s)
state change and pending, found MGW admin state not ready.
• No TG(s) found in trunking gateway.
• Fail while getting MGW administration state, fail while looking for
MGW index.
• Administration state invalid.
• Failed to allocate IPC message(s), failed to dispatch IPC message(s).
• Operational state invalid.
• Subscriber(s) state change and pending.
• Trunk(s) state change and pending.
• Found subscriber category invalid.
• Entity in desired state.
• Change to out-of-service state required.
• Change to request graceful mode error.
• Found entity unequipped in initial state.
• The H.323 Gateway was not found in DBM.
• Found unknown failure reason(s).
Managing Other External Resources
Table 5-9 Managing External Resources
Task Sample Command
Viewing SIP phones
Viewing aggregation router
status
status sip-reg-contact
aor-id=4695551885@SYS44CA146.boston3.com;
status aggr id=CMTS1
5-18
Cisco BTS 10200 Softswitch Operations and Maintenance Guide, Release 6.0.x
OL-16000-07
Page 95

Chapter 5 Managing External Resources
Table 5-9 Managing External Resources (continued)
Task Sample Command
Shows all CMTS (Aggr-ID)
that are not referred by any
Subnet.
Viewing destination point
codes (DPCs) status for
availability and congestion
Viewing Stream Control
Transmission Protocol (SCTP)
associations
Taking an SCTP association
OOS
Viewing subsystems
Viewing subsystems status
Changing subsystem status
Viewing CA/FS status
Changing CA/FS status
refresh rate
Changing NTP servers 1. Modify 'server' line(s) in /etc/ntp.conf.
Managing Other External Resources
report aggr subnet=NONE;
status dpc id=dpc1;
status sctp-assoc id=sctpassoc1;
control sctp-assoc id=sctpassoc1; target-state=INS;
mode=FORCED;
Modes can be forced or graceful. Forced tears down all calls
immediately; graceful allows calls in progress to complete before
teardown.
show subsystem;
status subsystem id=LNP_SSN; opc_id=opc;
control subsystem id=LNP_SSN; opc_id=opc; target-state=OOS;
mode=FORCED;
show sup-config
change sup-config type= refresh-rate; value=600
2. Modify 'NTP_SERVERS' in /etc/opticall.cfg
3. Restart daemon:
OL-16000-07
/etc/init.d/xntp stop
/etc/init.d/xntp start
4. Verify configuration change:
/opt/BTSxntp/bin/ntpq -c peers"
Cisco BTS 10200 Softswitch Operations and Maintenance Guide, Release 6.0.x
5-19
Page 96

Learning External Resource Dependencies
Table 5-9 Managing External Resources (continued)
Task Sample Command
Ensuring billing server
receives Call Detail Blocks
(CDBs)
Clearing billing directory
Chapter 5 Managing External Resources
1. On both the primary and secondary EMS enter:
CLI>show billing-acct-addr
2. Note the polling interval.
3. Log in to the billing server.
4. Ensure it receives billing files every XX minutes from the BTS,
where XX = polling interval.
Caution Remove only transferred or secondary files. Never remove
primary files, you need these to collect revenue.
1. Check the default format secondary files:
<billing-file-prefix>-<call-agent-id>-(0/1){+/-}HHMMSS
-yyyymmdd-hhmmss-<sequence-number>-<S>
where
S=secondary state
2. Check the PacketCable-specific format secondary files:
<billing-file-prefix>_yyyymmddhhmmss_<priority>_<1>_<c
ms-id>_<sequence-number>.ascii[.tmp]
where
1=secondary record-type
3. On the secondary EMS enter <hostname>#df –k
4. Ensure the /opt directory is not more than 70% full.
If the /opt directory is >70% full, remove obsolete scripting files
and other user-generated files. Also remove obsolete files from
the backup directory. For help call Cisco TAC.
Learning External Resource Dependencies
Table 5-10 RGW and Subscriber Termination States
RGW State Allowed Subscriber Termination States
OOS
• OOS
• UEQP
5-20
Cisco BTS 10200 Softswitch Operations and Maintenance Guide, Release 6.0.x
OL-16000-07
Page 97

Chapter 5 Managing External Resources
Table 5-10 RGW and Subscriber Termination States (continued)
RGW State Allowed Subscriber Termination States
INS
MAINT
Table 5-11 ISDN TGW/TG State Relationships
TGW State Allowed TG States
INS
Learning External Resource Dependencies
• OOS
• MAINT
• INS
• UEQP
• OOS
• MAINT
• UEQP
• OOS
• MAINT
• INS
MAINT
• OOS
• MAINT
This table lists the administrative states BTS returns.
Table 5-12 Returnable Administrative States
State Definition
ADMIN-INS In service.
ADMIN-OOS Out of service.
ADMIN-MAINT Maintenance Mode.
ADMIN-OOS-Pending Transitioning to out of service.
ADMIN-MAINT-Pending Transitioning to Maintenance Mode.
ACL Congestion is at level 1
ACL Congestion is at level 2
ACL Congestion is at level 3
TFC Congestion is at level 1
TFC Congestion is at level 2
TFC Congestion is at level 3
OL-16000-07
Cisco BTS 10200 Softswitch Operations and Maintenance Guide, Release 6.0.x
5-21
Page 98

Learning External Resource Dependencies
Table 5-13 ISDN TGW/TG State Relationships
TGW State Allowed TG States Allowed Trunk States
INS
• OOS
• MAINT
Chapter 5 Managing External Resources
• UEQP OOS
• UEQP OSS, MAINT
• INS
MAINT
Table 5-14 Valid Normal Trunk Termination States
• OOS
• MAINT
• UEQP OOS, MAINT, INS
• UEQP OOS
• UEQP OSS, MAINT
State/Token ADMIN-STATE OPER-STATE STATIC-STATE DYNAMIC-STATE
UNEQP UNEQP ANY UEQP IDLE
MANUALLY OOS OOS ANY LBLK IDLE
MANUALLY MAIN MAINT IDLE LBLK IDLE
IDLE INS IDLE ACTV IDLE
ACTIVE INCOMING INS IDLE ACTV IDLE
ACTIVE OUTGOING INS ACTIVE ACTV OBSY
TRANSIENT
INS ACTIVE ACTV IBY-TRNS
INCOMING
TRANSIENT
INS BUSY ACTV OBSY-TRNS
OUTGOING
5-22
Note If a call termination attempt is made on a termination for which gateway is unreachable, the termination
status will be updated as unreachable even if MGW keepalive is disabled.
Table 5-15 Returnable Operational States
State Definition
UNKNOWN
• The termination is not being audited for connectivity.
• Capabilities, termination, and connection are not being synchronized with
the termination.
• When KEEPALIVE-METHOD=NONE in MGW-PROFILE, the
termination status is UNKNOWN even if the transaction becomes
UNREACHABLE.
• Newly-provisioned terminations are in this state.
ACTIVE
• The termination is being audited for connectivity.
• Capabilities, termination, and connection are being synchronized with the
termination.
Cisco BTS 10200 Softswitch Operations and Maintenance Guide, Release 6.0.x
OL-16000-07
Page 99

Chapter 5 Managing External Resources
Table 5-15 Returnable Operational States (continued)
State Definition
UNREACHABLE • The termination is unreachable.
FAULTY
MTRANS
IDLE The termination is not involved in transient/active call
BUSY
CTRANS
Learning External Resource Dependencies
• This occurs when MGW KEEPALIVE declares an MGW unreachable.
• This changes to ACTIVE when MGW KEEPALIVE detects an MGW is
reachable or any termination previously UNREACHABLE starts sending
MGCP messages (NTFY, RSIP).
• The termination returneda permanent error code, making it unusable for
future calls.
Note The error code may occur only in certain circumstances
and re-audit/auto-recovery may succeed. This does not
mean the termination recovered from that condition.
• The flag MGCP-MAX-FAULT-COUNT controls how many times BTS
tries to recover the fault (performing re-audit/auto-recovery) before
putting it in this state.
• Maintenance Transient, the termination is in the middle of
anaudit/re-audit/auto-recovery.
• This state may go along with other states (MTRANS-UNREACH).
• The termination is involved in Active/Transient call.
• This state may go along with CTRANS state.
• Call Transient, the termination is involved in a Transient call.
• This state always goes with BUSY.
RESERVED The termination is reserved for a call during Busy Line Verification
SERV_EFFC_TEST The termination is in a Service Effecting Network loopback or Network
Continuity test.
DOWN This occurs when the MGW sends an RSIP down (graceful) message.
OL-16000-07
Cisco BTS 10200 Softswitch Operations and Maintenance Guide, Release 6.0.x
5-23
Page 100

Learning External Resource Dependencies
52077
P_INS (MGW)
MGW = NP
MGW = OOS
MGW = INS
P_MNT (MGW)
P_INS (MGW)
Add (MGW)
Del (MGW)
DISCOVER MGW, *
MGW = INS
P_MNT (MGW)
MGW = MNT
DISCOVER MGW, *
MGW = MNT
MGW = MNT
All (T = INS) = MNT
MGW = OOS
All T = OOS
MGW = INS
P_OOS (MGW)
P_OOS (MGW)
P_OOS = Place out of service
P_INS = Place in service
P_MNT = Place maintenance
NP = Not provisioned
* "Discover" means to establish MGCP communication with MGW
Source Token
Figure 5-1 Administrative and Operational Maintenance States for MGW
Chapter 5 Managing External Resources
5-24
Cisco BTS 10200 Softswitch Operations and Maintenance Guide, Release 6.0.x
OL-16000-07
 Loading...