

Page 1

Cisco 1003 and Cisco 1004
This publication provides procedures for installing and configuring the Cisco 1003 and
Cisco 1004 routers.
User Guide
Note All Cisco technical documentation and additional literature are available on
UniverCD, Cisco’ s online library of product information. UniverCD is updated and shipped
monthly, so it might be more up to date than printed documentation. Uni verCD is a vailable
both as a single CD and as an annual subscription. To order UniverCD, contact your local
sales representative or call Customer Service.
Throughout the text, “the router” means both the Cisco 1003 and Cisco 1004 routers,
unless indicated otherwise.
Cisco 1003 and Cisco 1004 User Guide 1
Page 2

Overview of the Cisco 1003 and Cisco 1004 Routers
H3864
Overview of the Cisco 1003 and Cisco 1004 Routers
The Cisco 1003 and Cisco 1004 routers provide Integrated Services Digital Network
(ISDN) capability in a small, desktop router. The routers connect small, remote sites with
Ethernet LANs to WANs.
The main difference between the two routers is that the Cisco 1004 router includes an
integrated network termination 1 (NT1) device and the Cisco 1003 router does not. The
ISDN service provider supplies the NT1 connection worldwide, except in North America,
where the NT1 device is supplied by the customer. Therefore, the Cisco 1004 router is for
use in North America, and the Cisco 1003 router is ideally suited for use elsewhere.
From the front, the outward appearance of the routers is the same.
2 Cisco 1003 and Cisco 1004 User Guide
Page 3

Overview of the Cisco 1003 and Cisco 1004 Routers
PCMCIA DC power
input
ISDN
(BRI)
10BaseT
Console
From the back, the routers are the same with the following exceptions:
• The ISDN BRI (RJ-45) port is labeled “ISDN S/T” on the Cisco 1003 router and
“ISDN U” on the Cisco 1004 router.
• The product name—Cisco 1003 or Cisco1004—is stamped on the chassis at the upper
left side (not shown).
Both routers include the following connectors:
• ISDN BRI (RJ-45)
• 10BaseT Ethernet (RJ-45)
• Console (RJ-45)
• PCMCIA (Flash memory card) slot
• 12 VDC power input
H2845
Cisco 1003 and Cisco 1004 User Guide 3
Page 4

System Specifications
°
System Specifications
Following are the specifications for the routers:
Description Specification
Dimensions (H x W x D) 1.75 x 8.0 x 8.3" (4.4 x 20.3 x 21.1 cm)
Weight 2.6 lb (1.2 kg)
Input voltage, frequency,
and power dissipation
Memory 4 MB DRAM (SIMM)
WAN interface 1 ISDN BRI (RJ-45)
Ethernet interface 1 10BaseT (RJ-45)
PCMCIA slot 1 Flash memory card (Type 2)
Console interface 1 asynchronous serial (RJ-45)
Operating environment 32 to 104
Operating humidity 10 to 90%, noncondensing
EMI compliance Cisco 1003 router: FCC Class B, VDE Class B, Canadian
Safety compliance Cisco 1003 router: UL 1950, CSA 22.2 No. 950,
1. NVRAM = nonvolatile random-access memory.
2. The ISDN BRI port is labeled “ISDN S/T” on the Cisco 1003 router and “ISDN U” on the Cisco 1004
router. The Cisco 1004 router includes an integrated NT1 device.
12 VDC output, minimum 0.5 A
Desktop external power supply: 100 to 240 VAC at
50 to 60 Hz, 1.0A input
Wall-mount external power supply: 120 VAC at 60 Hz input
1 MB boot PROM
8 KB NVRAM
DOC Class B, EN55022 Class B (CISPR22 B), VCCI Class 2
Cisco 1004 router: FCC Class B, Canadian DOC Class B
EN60950:1992
Cisco 1004 router: UL 1950, CSA 22.2 No. 950
1
2
F (0 to 40°C)
4 Cisco 1003 and Cisco 1004 User Guide
Page 5

Canadian Department of Communications Notice
Canadian Department of Communications Notice
The Canadian Department of Communications label identifies certified equipment. This
certification means that the equipment meets certain telecommunications network
protective operational and safety requirements. The Department does not guarantee the
equipment will operate to the user’s satisfaction.
Before installing the equipment, users should ensure that it is permissible to be connected
to the facilities of the local telecommunications company. The equipment must also be
installed using an acceptable method of connection. In some cases, the company’s inside
wiring associated with a single line individual service may be extended by means of a
certified connector assembly (telephone extension cord). The customer should be aware
that compliance with the above conditions may not prevent degradation of service in some
situations.
Repairs to certified equipment should be made by an authorized Canadian maintenance
facility designated by the supplier. Any repairs or alterations made by the user to this
equipment, or equipment malfunctions, may give the telecommunications company cause
to request the user to disconnect the equipment.
Users should ensure for their own protection that the electrical ground connections of the
power utility, telephone lines and internal metallic water pipe system, if present, are
connected together. This precaution may be particularly important in rural areas.
Caution Users should not attempt to make such connections themselves, but should
contact the appropriate electric inspection authority, or electrician, as appropriate.
Cisco 1003 and Cisco 1004 User Guide 5
Page 6

Preparing to Install Your Cisco 1003 or Cisco 1004 Router
Cisco
Preparing to Install Your Cisco 1003 or Cisco 1004 Router
It takes just a few simple steps to install your router. But before you install your router,
please read the safety information in this section.
Note Translations of the safety warnings in this document are available at the end of this
publication in the section “Translated Safety Warnings.” Additional guidelines related to
regulatory compliance and safety are available in the
Network Certification publication.
Safety Recommendations
1003 and Cisco 1004 Public
Warning The warning symbol means danger. You are in a situation that could cause
bodily injury. Before you work on any equipment, be aware of the hazards involved with
electrical circuitry and standard practices for preventing accidents. To see translated
versions of this warning, refer to the section “Translated Safety Warnings” at the end of this
publication.
Because any device that uses electricity must be treated with respect, follow these
guidelines to ensure general safety:
• Keep the area clear and dust-free during and after installation.
• Keep tools away from walk areas where you and others could trip over them.
• Wear safety glasses when working under any conditions that might be hazardous to your
eyes.
• Do not perform any action that creates a potential hazard to people or makes the
equipment unsafe.
6 Cisco 1003 and Cisco 1004 User Guide
Page 7

Preparing to Install Your Cisco 1003 or Cisco 1004 Router
Warning Before working on equipment that is connected to power lines, remove jewelry
(including rings, necklaces, and watches). Metal objects will heat up when connected to
power and ground and can cause serious burns or weld the metal object to the terminals. To
see translated versions of this warning, refer to the section “Translated Safety Warnings” at
the end of this publication.
• Locate the emergency power-off switch for the room in which you are working. Then,
if an electrical accident occurs, you can act quickly to shut off power.
• There are no user serviceable parts inside the router. Return the router if service is
required.
• Disconnect all power before doing the following:
— Installing or removing the router
— Working near power supplies
• Do not work alone if potentially hazardous conditions exist.
• Never assume that power is disconnected from a circuit. Always check.
• Look carefully for possible hazards in your work area, such as moist floors, ungrounded
power extension cables, and missing safety grounds.
• If an electrical accident occurs, proceed as follows:
— Use caution; do not become a victim yourself. Disconnect power to the router.
— If possible, send another person to get medical aid. Otherwise, assess the condition
of the victim and then call for help.
— Determine if the person needs rescue breathing or external cardiac compressions;
then take appropriate action.
Cisco 1003 and Cisco 1004 User Guide 7
Page 8

Preparing to Install Your Cisco 1003 or Cisco 1004 Router
Inspecting Your Router
Keep the router in the shipping container to prevent accidental damage until you have
determined where you want to install it; then proceed with unpacking it. Check the packing
list to ensure that you received the following items:
• Cisco 1003 or Cisco 1004 router
• Console cable (RJ-45-to-RJ-45)
• RJ-45-to-DB-25 adapter, for use with the console cable
• External power supply, desktop or wall-mount model
Note If your router ships with the desktop power supply, a 6-foot (1.8-meter) power cord
is included with the appropriate plug for the country to which the router is shipped.
• Label printed with the serial number and Media Access Control (MAC) address, which
is attached to the outside of the shipping container
• The warranty package, which includes the Product Registration form, service and
support information, and the Ordering Cisco Documentation publication.
Depending on the options you selected, your order might also include the following items:
• Optional PCMCIA Flash memory card
• Optional equipment (network connection cables)
• Optional companion publications
Inspect all items for shipping damage. If anything appears to be damaged or missing,
contact your system administrator or customer service representative.
8 Cisco 1003 and Cisco 1004 User Guide
Page 9

Installing Your Cisco 1003 or Cisco 1004 Router
POWER SYSTEMSERIAL SERIAL LAN LAN COLLISION LINK
OK TX RX TX RX OK
POWER
SYSTEM
SERIAL
SERIAL
LAN
LAN
COLLISION
LINK
OK
TX
RX
TX
RX
OK
OR
Inspect your router.
Decide where to put your router:
on a desktop or wall.
Connect the cables to your network.
Connect the desktop
power supply (shown)
or the wall-mount
power supply.
Test your router installation.
Configure your router, if not
preconfigured, using your
console terminal.
H4200
12VDC
Insert your Flash memory card
(if supplied).
12VDC
12VDC
Installing Your Cisco 1003 or Cisco 1004 Router
Installing the router is quick and simple.
Cisco 1003 and Cisco 1004 User Guide 9
Page 10

Installing Your Cisco 1003 or Cisco 1004 Router
Required Tools and Parts
Following are the tools and parts required to install your router:
• A 3/16-inch (0.476 cm) flat-blade screwdriver or socket screwdriver
• Wall-mount hardware, including screws, which you must provide
• A console cable (RJ-45-to-RJ-45)
• RJ-45-to-DB-25 adapter, for use with the console cable
• One interface cable for the LAN port (10BaseT Ethernet)
• One interface cable for the BRI ISDN (WAN) port
• An NT1 device for access to an ISDN through the BRI port (Cisco 1003 only)
The ISDN service provider provides the NT1 connection worldwide, except in North
America, where the NT1 device is supplied by the customer. The Cisco 1004 router
contains an integrated NT1 device. If you have a Cisco 1003 router, a separate NT1 device
is required.
The router can be placed on any flat surface or installed in any orientation, such as upside
down or on a vertical surface. The router is designed to allo w trouble-free operation without
cooling fans, special equipment closets, or racks.
To avoid the possibility of the cables becoming disconnected, install your router in a
manner that minimizes strain on the cables.
Setting Your Router on a Desktop
Caution If you place the router on a desk or table, do not place anything on top of it that
could restrict airflow around the router or weighs in excess of 10 pounds (4.5 kg). Excessive
weight on top of the router could cause damage.
10 Cisco 1003 and Cisco 1004 User Guide
Page 11

To place your router on a desktop, shelf, or other flat, secure surface, perform the following
Front
Plastic
foot (4)
H2560
steps:
Step 1 Check that the plastic “feet” on the bottom of the router are turned so that they are
completely under the unit.
Step 2 Set the router on a flat, secure surface, but place it so that you have access to the
rear panel. This orientation allows easy access to the connectors on the rear panel.
Mounting Your Router
To mount your router on a wall or other flat surface, perform the following steps:
Step 1 Locate the plastic feet on the bottom of the router and turn them out 90 degrees so
that the holes in the feet are exposed.
Installing Your Cisco 1003 or Cisco 1004 Router
Cisco 1003 and Cisco 1004 User Guide 11
Page 12

Installing Your Cisco 1003 or Cisco 1004 Router
POWER
SYSTEM
SERIAL
SERIAL
LAN
LAN
COLLISION
LINK
OK
TX
RX
TX
RX
OK
H2853
Step 2 Attach the router to a wall or other flat surface, using the screws that you must
provide. Mount the router so that:
• The front-panel LEDs face up and are easily visible. Later, you will use these
LEDs to verify that your router is w orking properly. Mounting the router with
the LEDs facing up will also reduce strain on the cable connections.
• The desktop power supply does not hang from its cable. The desktop power
supply will disconnect from its cable if it is not supported. The wall-mount
power supply does not require support. (The power supplies are illustrated in
the section “Connecting the Power Supply,” later in this publication.)
Caution We recommend that you align the plastic feet with a vertical wall stud. If the
screws are not properly anchored in the wallboard, drywall, or a vertical stud, cable strain
could pull the chassis from the wall.
12 Cisco 1003 and Cisco 1004 User Guide
Page 13

Installing the Flash Memory Card
H3124
12VDC
Tabs
This section explains how to install an optional PCMCIA Flash memory card. If a Flash
memory card did not come with your order, ignore this section and proceed with the next
section, “Making Network Connections.”
To install the optional Flash memory (PCMCIA) card, perform the following steps:
Step 1 While pressing down on the two tabs at the top of the door, rotate the top of the
door away from the rear panel. Then lift the door away from the rear panel.
Installing Your Cisco 1003 or Cisco 1004 Router
Cisco 1003 and Cisco 1004 User Guide 13
Page 14

Installing Your Cisco 1003 or Cisco 1004 Router
Flash card
Flash card
write protection
Flash card
shown with write
protection off
H2352
Step 2 Verify that the Flash memory card is set with write protection off. The
write-protect switch is located at the top edge of the card, when oriented with the
printed side up.
14 Cisco 1003 and Cisco 1004 User Guide
Page 15

Installing Your Cisco 1003 or Cisco 1004 Router
H2842
12VDC
Black plastic
eject button
Flash memory card
PCMCIA slot
Step 3 Insert the Flash memory card into the PCMCIA slot.
Cisco 1003 and Cisco 1004 User Guide 15
Page 16

Installing Your Cisco 1003 or Cisco 1004 Router
H3809
12VDC
Tabs
Step 4 Align the bottom of the door with the bottom of the PCMCIA slot. Then rotate the
top of the door toward the rear panel until the plastic tabs snap into place.
Replacing the door prevents dust from entering the chassis.
Note If you cannot close the door completely , the Flash memory card might not be firmly
seated in the connector (inside the router). Press the black plastic eject button at the right
side of the slot to eject the Flash memory card. Then reinsert the card and replace the door.
16 Cisco 1003 and Cisco 1004 User Guide
Page 17

Making Network Connections
H3596
12VDC
Ethernet cable
10BaseT port
You must provide interface cables to connect the router to the Ethernet and WAN lines.
Note Refer to the section “Pinouts” for cable specifications.
Warning Do not work on the system or connect or disconnect cables during periods of
lightning activity. (To see translated versions of this warning, refer to the section
“Translated Safety Warnings” at the end of this publication.)
To connect the cables to the router, perform the following steps:
Step 1 Connect an Ethernet cable (not provided) to the 10BaseT (Ethernet) port on the
router. You’ll need a straight-through Ethernet cable if you’re connecting to an
Ethernet concentrator (or hub). Or you’ll need a crossover Ethernet cable if you’ re
connecting to a personal computer (PC) Ethernet network interface card (NIC).
Installing Your Cisco 1003 or Cisco 1004 Router
Cisco 1003 and Cisco 1004 User Guide 17
Page 18

Installing Your Cisco 1003 or Cisco 1004 Router
H3585
AUI
8
7
1
10BaseT hub
Step 2 Connect the other end of the Ethernet cable to your Ethernet network.
You can connect the Ethernet port in either of the following ways:
Connect to an Ethernet concentrator (or hub) using a straight-through Ethernet
cable.
18 Cisco 1003 and Cisco 1004 User Guide
Page 19

Installing Your Cisco 1003 or Cisco 1004 Router
PC
AUX SER 0 ETH
OK
LAN
Ethernet
crossover
cable
Or, you can connect the router to a PC Ethernet NIC using an Ethernet crossover
cable.
H3586
Cisco 1003 and Cisco 1004 User Guide 19
Page 20

Installing Your Cisco 1003 or Cisco 1004 Router
H2843
12VDC
Straight-through
ISDN BRI port
Step 3 Connect a straight-through BRI cable (not provided) to the BRI port on the router .
20 Cisco 1003 and Cisco 1004 User Guide
Page 21

Installing Your Cisco 1003 or Cisco 1004 Router
H3813
NT1 device
Straight-through
BRI cable
S/T interface
Warning The ISDN connection is regarded as a source of voltage that should be
inaccessible to user contact. Users should not attempt to tamper with or open any public
telephone operator (PTO)–provided equipment or connection hardware. Any hardwired
connection (other than by nonremovable, connect-one-time-only lug) must be made only
by PTO staff or suitably trained engineers. (To see translated versions of this warning, refer
to the section “Translated Safety Warnings” at the end of this publication.)
Step 4 If you have a Cisco 1003 router, connect the other end of the straight-through BRI
cable to the S/T interface on your NT1 device.
Cisco 1003 and Cisco 1004 User Guide 21
Page 22

Installing Your Cisco 1003 or Cisco 1004 Router
Straight-through
BRI cable
Warning Network hazardous voltages are present in the BRI cable. If you detach the BRI
cable, detach the end away from the router first to avoid possible electric shock. Network
hazardous voltages also are present on the system card in the area of the BRI port (RJ-45
connector), regardless of when power is turned off. (To see a translated version of this
warning, refer to the section “Translated Safety Warnings” at the end of this publication.)
Step 5 If you have a Cisco 1004 router, connect the other end of the straight-through BRI
cable to your wall jack.
Wall jack
H3587
22 Cisco 1003 and Cisco 1004 User Guide
Page 23

Connecting a Console
H3865
12VDC
Roll-over
console cable
Console port
If your router is not already configured, use the console cable provided with your router to
connect a console (an ASCII terminal or PC running terminal emulation software). To
connect a console, follow these steps:
Step 1 Connect the supplied rollover console cable (RJ-45-to-RJ-45) to the console port
on the router.
Installing Your Cisco 1003 or Cisco 1004 Router
Step 2 Connect the other end of the console cable to a terminal or PC. The terminal or PC
port might require an RJ-45-to-DB-25 adapter.
Step 3 Set your terminal or PC terminal emulation software to 9600 baud, 8 data bits, no
parity, and 1 stop bit.
Connecting the Power Supply
Your router ships with either a desktop or wall-mount power supply. This section explains
how to connect both types of power supplies. The desktop po wer supply is approved for use
with both routers, but the wall-mount power supply is appro ved for use with the Cisco 1004
router only.
Cisco 1003 and Cisco 1004 User Guide 23
Page 24

Installing Your Cisco 1003 or Cisco 1004 Router
DC power input
H3811
12VDC
Desktop power supply
Power outlet
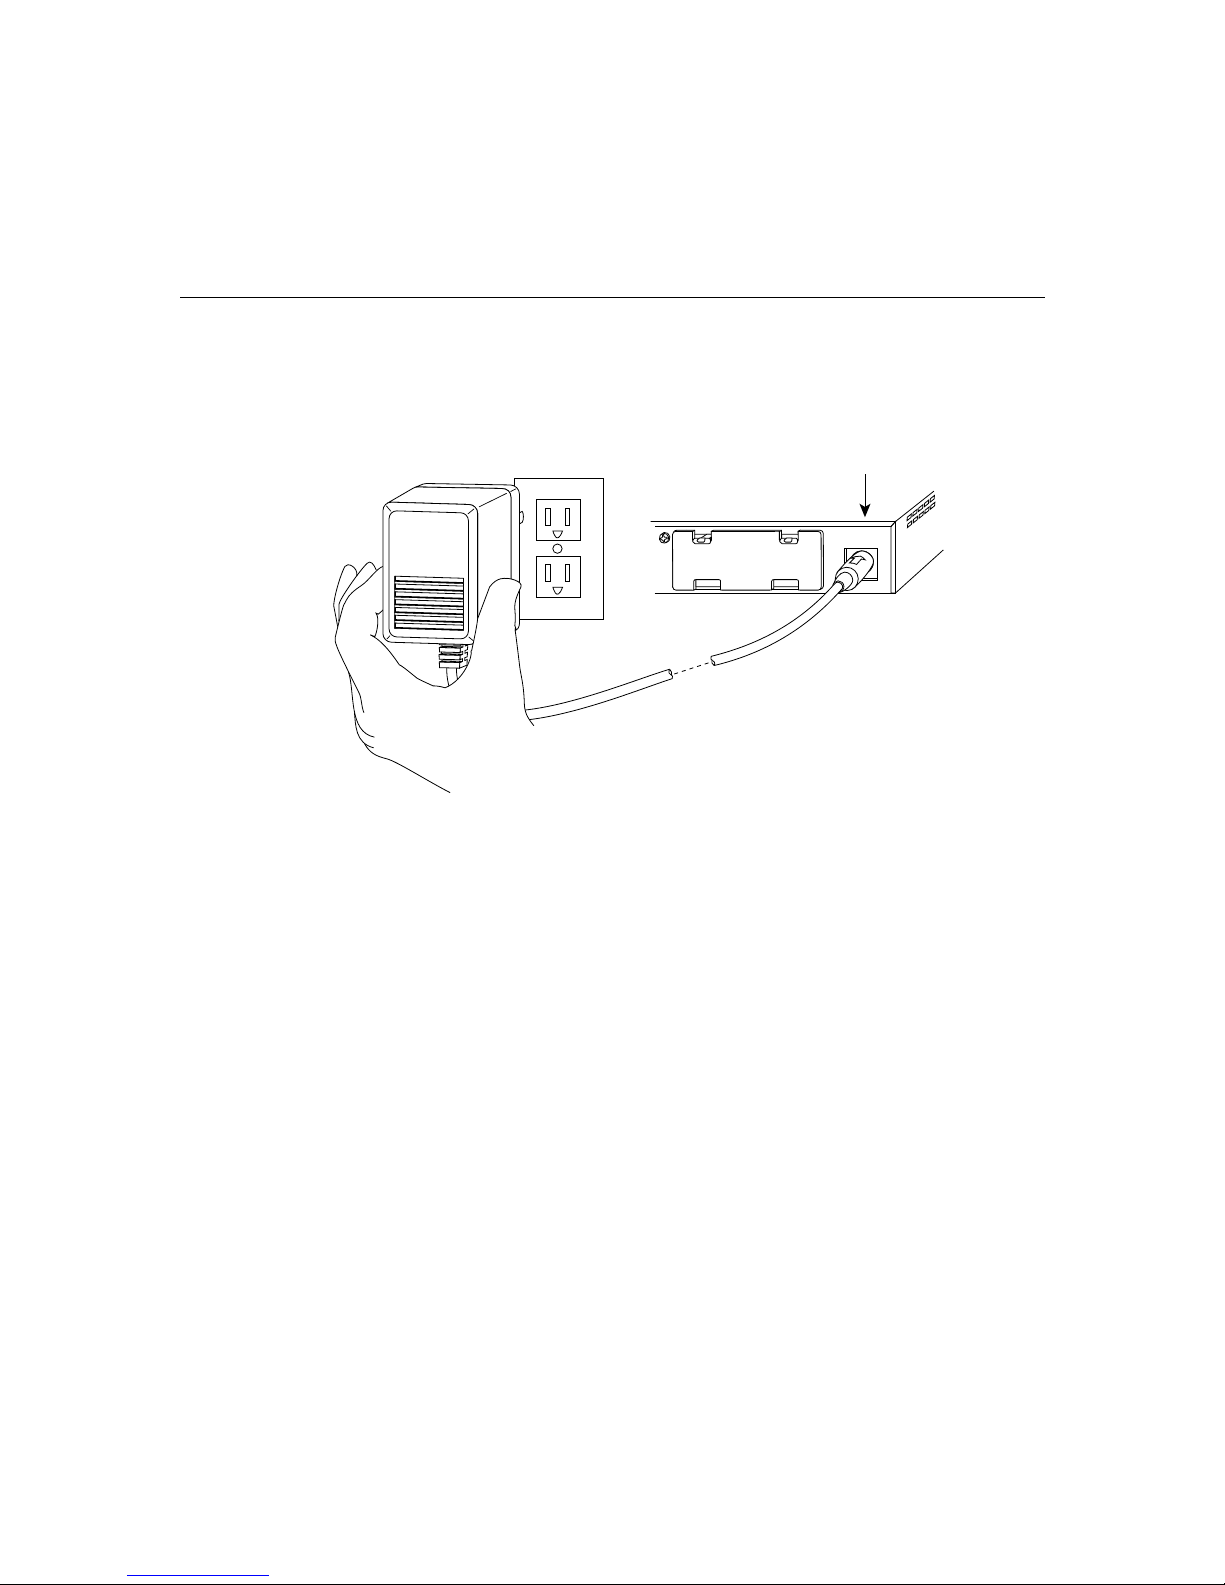
Connecting the Desktop Power Supply
To connect the desktop power supply, follow these steps:
Step 1 Connect the DC power cable from the power supply to the po wer connector on the
rear panel of the router.
24 Cisco 1003 and Cisco 1004 User Guide
Page 25

Installing Your Cisco 1003 or Cisco 1004 Router
DC power input
H3810
12VDC
Desktop power supply
Power outlet
Step 2 Connect the female end of the power cable to the male receptacle on the power
supply.
Note The desktop power supply includes an AC power cable that has the appropriate plug
for the country to which the router is shipped.
Cisco 1003 and Cisco 1004 User Guide 25
Page 26

Installing Your Cisco 1003 or Cisco 1004 Router
H3812
12VDC
Desktop power supply
Power outlet
Step 3 Connect the male end of the power cable to the power outlet. Plugging in the
power supply turns on power to the router.
DC power input
26 Cisco 1003 and Cisco 1004 User Guide
Page 27

Connecting the Wall-Mount Power Supply
DC power input
H3863
12VDC
Wall-mount
power supply
Power outlet
To connect the wall-mount power supply, follow these steps:
Step 1 Connect the DC power cable from the power supply to the po wer connector on the
rear panel of the router.
Installing Your Cisco 1003 or Cisco 1004 Router
Cisco 1003 and Cisco 1004 User Guide 27
Page 28
Installing Your Cisco 1003 or Cisco 1004 Router
DC power input
H3862
12VDC
Wall-mount
power supply
Power outlet
Step 2 Connect the power supply to the power outlet. Plugging in the po wer supply turns
on power to the router.
Checking the Router Installation
After you finish installing your router, attempt to send data and check the LEDs on the front
panel to verify that everything is working properly.
To verify that your router is working properly, follow these steps:
Step 1 Verify that the LED labeled POWER is on steadily, and the LED labeled SYSTEM
OK is on when the router is plugged into the power source. The SYSTEM OK
LED will be on or blinking depending on the boot state of the router. When these
LEDs are on, it indicates that the router is receiving power and that it has passed
internal diagnostic tests.
Step 2 Verify that the LEDs labeled LAN TX (Ethernet transmit) and LAN RX (Ethernet
receive) are flickering. This flickering indicates that there is Ethernet traf fic on the
LAN connection. A lack of flickering may indicate a problem with the unit, or may
indicate that there is no traffic on the LAN.
28 Cisco 1003 and Cisco 1004 User Guide
Page 29

Configuring Your Cisco 1003 or Cisco 1004 Router
Step 3 Verify that the LED labeled Link OK is on. This LED indicates that the router is
sensing the Ethernet link integrity signal.
If you do not see the correct LED signals, or if they blink once or twice per second instead
of flicker (not including the SYSTEM OK LED, which may blink depending on the monitor
or boot state), refer to the section “Troubleshooting the Cisco1003 or Cisco 1004 Router”
later in this publication for more information about the LEDs.
Configuring Your Cisco 1003 or Cisco 1004 Router
This section explains basic configuration for your router. This section contains the
following procedures:
• Using the Setup Program
• Configuring ISDN
The router can obtain its configuration from the following: NVRAM, Flash memory , TFTP
server, or manual configuration. The boot sequence is as follows:
1 If a configuration file is already resident in the NVRAM in your router, it will load the
configuration automatically from NVRAM when you turn on power to the router (by
plugging in the power cord).
2 If a configuration file is not present in the NVRAM, the system will check to see if a
Flash memory card is installed in the PCMCIA slot. If the Flash memory card is present,
and a configuration file with either the filename router-confg (for UNIX systems) or
ciscortr.cfg (for DOS systems) is stored on it, the system will load the configuration
automatically from the Flash memory card. After the configuration file has been loaded
from Flash memory, enter the copy running-config startup-config command in
enabled mode to save the configuration in NVRAM. The next time your router is
connected to power, it will load the configuration from NVRAM in the router.
Cisco 1003 and Cisco 1004 User Guide 29
Page 30

Configuring Your Cisco 1003 or Cisco 1004 Router
The system will boot from a configuration file only if:
— The configuration file is named router-confg(for UNIX systems) or ciscortr.cfg (for
DOS systems). Use the show flash command to check the configuration filename.
Note The router searches for the filename router-confg orciscortr.cfg. Do not preface the
filename with the path name (for example, /tftpboot/router-confg).
— The configuration register has been set properly. Use the show version command
to verify that the last digit in the configuration register is set to “2.” For example,
the factory-default value is 0x2102. Notice that the last digit (number) is “2.” If the
configuration register is not set correctly, refer to the Router Products
Configuration Guide for information about setting the configuration register.
3 If an optional Flash memory card is not installed, or the configuration file is not stored
on a Flash memory card, the router will check the LAN for a TFTP server with an
applicable configuration file. If an applicable configuration file is found, the router will
load the configuration from that server. After the configuration file has been used to
configure the router, enter the copy running-config startup-config command in
enabled mode to save the configuration in NVRAM. The next time your router is
connected to power, it will load the configuration from NVRAM in the router.
4 If a configuration file is not found at the three previously described sources, you must
manually configure the router using the setup program. For instructions on using the
setup program, proceed with the next section, “Using the Setup Program.”
30 Cisco 1003 and Cisco 1004 User Guide
Page 31

Using the Setup Program
Copyright (c) 1994-1995 by cisco Systems, Inc.
If a configuration file is not available for your router , you must enter the interface addresses
and global parameters using the setup program. Obtain the IP address and the number of
bits in the subnet field of the Ethernet and BRI port from your system administrator before
proceeding with the procedure described in this section.
The following procedure explains how to manually configure the router:
Step 1 Connect a console terminal to the console port on the rear panel of your router, and
connect the power to the power port on the rear panel.
Note The default parameters for the console port are 9600 baud, 8 data bits, no parity, and
1 stop bit.
Step 2 After about 30 seconds, the following information displays on the console screen.
When you see the following information, you have successfully booted your
router:
C1000 processor with 4096 Kbytes of main memory
Configuring Your Cisco 1003 or Cisco 1004 Router
program load complete, entry point: 0xXXXXX, size: 0xXXXXX
Notice: NVRAM invalid, possibly due to write erase.
program load complete, entry point: 0xXXXXXXX, size: 0xXXX
Uncompressing file:
###################################################################
###################################################################
###################################################################
###################################################################
###################################################################
################
program load complete, entry point: 0xXXXXXXX, size: 0xXXXXXX
Restricted Rights Legend
Use, duplication, or disclosure by the Government is
subject to restrictions as set forth in subparagraph
Cisco 1003 and Cisco 1004 User Guide 31
Page 32

Configuring Your Cisco 1003 or Cisco 1004 Router
(c) of the Commercial Computer Software - Restricted
Rights clause at FAR sec. 52.227-19 and subparagraph
(c) (1) (ii) of the Rights in Technical Data and Computer
Software clause at DFARS sec. 252.227-7013.
cisco Systems, Inc.
170 West Tasman Drive
San Jose, California 95134-1706
Cisco Internetwork Operating System Software
Cisco IOS (tm) 1000 Software (C1000-H-M), Version 10.3(15626) [enf
226]
Copyright (c) 1986-1995 by cisco Systems, Inc.
Compiled Mon 05-Jun-95 15:40 by enf
Image text-base: 0x02004000, data-base: 0x022568F8
cisco 1000 (68360) processor (revision 0x00) with 3584K/512K bytes of
memory.
Processor board serial number 01335805
Bridging software.
Basic Rate ISDN software, Version 1.0.
1 Ethernet/IEEE 802.3 interface.
1 ISDN Basic Rate interface.
Integrated NT1 for ISDN Basic Rate interface
8K bytes of non-volatile configuration memory.
2048K bytes of processor board PCMCIA flash (Read/Write)
Notice: NVRAM invalid, possibly due to write erase.
--- System Configuration Dialog ---
At any point you may enter a question mark '?' for help.
Refer to the 'Getting Started' Guide for additional help.
Use ctrl-c to abort configuration dialog at any prompt.
Default settings are in square brackets '[]'.
Would you like to enter the initial configuration dialog? [yes]:yes
First, would you like to see the current interface summary? [yes]: yes
Any interface listed with OK? value "NO" does not have a valid
configuration
32 Cisco 1003 and Cisco 1004 User Guide
Page 33

Configuring Your Cisco 1003 or Cisco 1004 Router
Interface IP-Address OK? Method Status Protocol
Ethernet0 unassigned NO not set up up
BRI0 unassigned NO not set up up
Note If you have a Cisco 1003 router, the following message is omitted from the display
because the router does not include an integrated NT1 device:
Integrated NT1 for ISDN Basic Rate Interface
Step 3 Configure the global parameters. Choose which protocols to support on the
Ethernet interface. For Internet Protocol (IP) installations, you can accept the
default values (enclosed in brackets) for most of the questions. A typical
configuration follows:
Configuring global parameters:
Enter host name [Router]: router1
Enter either an enable secret password or an enable password.
An enable secret password is a one-way encrypted password that is used instead
of the enable password. Enter an enable secret password as follows:
Enter enable secret: helen
The enable password is used when there is not an enable secret password:
Enter enable password: ron
Enter virtual terminal password: karen
Configure SNMP Network Management? [yes]:
Community string [public]:
Configure IP? [yes]:
Configure IGRP routing? [yes]:
Your IGRP autonomous system number [1]:
Configure AppleTalk? [no]:
Configure IPX? [no]:
Enter ISDN BRI Switch Type [none]: basic-NI1
Cisco 1003 and Cisco 1004 User Guide 33
Page 34

Configuring Your Cisco 1003 or Cisco 1004 Router
The ISDN switch type appropriate for your router depends on the ISDN provider’s
equipment. The following table lists the ISDN switch types:
ISDN Switch Type Description
none Switch type not defined
Australia
basic-ts013 Australian TS013 switches
Europe
basic-1tr6 German 1TR6 ISDN switches
basic-nwnet3 Norway NET3 ISDN switches (phase 1)
basic-net3 NET3 ISDN switches (UK and others)
vn2 French VN2 ISDN switches
vn3 French VN3 ISDN switches
Japan
ntt Japanese NTT ISDN switches
North America
basic-5ess AT&T basic rate switches
basic-dms100 NT DMS-100 basic rate switches
basic-ni1 National ISDN-1 switches
New Zealand
basic-nznet3 New Zealand NET3 switches
Step 4 Configure the Ethernet interface. Respond as follows to the setup prompts:
Configuring interface parameters:
Configuring interface Ethernet0:
Is this interface in use? [yes]:
34 Cisco 1003 and Cisco 1004 User Guide
IP address for this interface: 172.16.20.11
Number of bits in subnet field [0]:
Class B network is 172.16.0.0, 8 subnet bits; mask is 255.255.255.0
Page 35

Configuring Your Cisco 1003 or Cisco 1004 Router
Step 5 Configure the serial (BRI) port. Respond to the prompts as follows, substituting
the correct IP address in the appropriate location:
Configuring interface BRI0:
Is this interface in use? [yes]:
Configure IP on this interface? [yes]:
IP address for this interface: 172.16.21.15
Number of bits in subnet field [0]:
Class B network is 172.16.0.0, 8subnet bits; mask is 255.255.255.0
Step 6 At this point, the setup program displays the values you entered, and you are asked
if you want to use the displayed configuration. If you answer yes, this
configuration will be entered and saved in the configuration database and stored in
NVRAM. If you answer no, you can begin the configuration again and make any
changes you want.
The following configuration command script was created:
hostname router1
enable secret 5 $1$KL/H$AC/fCdkgU.WOBybZnUqPe/
enable password ron
line vty 0 4
password karen
snmp-server community public
!
ip routing
no appletalk routing
no ipx routing
isdn switch-type none
!
interface Ethernet0
ip address 172.16.20.11 255.255.255.0
!
interface BRI0
ip address 172.16.21.15 255.255.255.0
!
router igrp 1
network 172.16.0.0
!
end
Use this configuration? [yes/no]: yes
####
Cisco 1003 and Cisco 1004 User Guide 35
Page 36

Configuring Your Cisco 1003 or Cisco 1004 Router
use the enabled mode ‘configure’ command to modify this
configuration.
You have now completed the initial configuration.
Configuring ISDN
After you have completed the initial router configuration, configure the BRI port for ISDN.
This section explains typical ISDN configurations for a single B channel or two B channels.
In the examples that follow, the BRI port is configured for IP routing, Challenge Handshake
Authentication Protocol (CHAP), and point-to-point protocol (PPP) encapsulation.
Configure the router for a basic ISDN PPP connection on a single B channel or two
B channels by following the steps below, substituting the correct addresses and host names
in the appropriate locations:
Step 1 Enter enabled mode.
router> enable
password:
Step 2 Start the configure terminal program. Then enter the host name and password the
router will use for CHAP caller identification.
router# config term
router (config)# username
enablepassword
targetrouter
password
abc
Note The username and password must match the username and password already set on
the router to which the ISDN connection will be made. The username and password are
case sensitive, so make sure you use the correct case.
Step 3 Enter the ISDN switch type using the isdn switch-type command.
router (config)# isdn switch-type
Refer to the section “Using the Setup Program” earlier in this publication for a
complete list of ISDN switch types.
36 Cisco 1003 and Cisco 1004 User Guide
switch-type
Page 37

Configuring Your Cisco 1003 or Cisco 1004 Router
Step 4 Enter the BRI interface, encapsulation method (PPP), target router’s host name
and IP address, ISDN number to dial, and the dialer group.
router (config)# interface bri
router (config-if)# encapsulation ppp
router (config-if)# ppp authentication chap
router (config-if)# dialer map ip
targetrouter phonenumber
router (config-if)# dialer-group
Note Do not use periods or hyphens when entering dialing numbers.
Step 5 Some ISDN switch types such as Basic NI1, or DMS-100 switch service, require
port_number
targetrouter_ipaddress
groupnumber
name
you to configure a Service Profile Identifier (SPID). Enter the SPID information
as follows, substituting the appropriate entries for your installation:
router (config-if)# isdn spid1
router (config-if)# isdn spid2
Step 6 To set up a second B channel for bandwidth-on-demand, set the ISDN load
SPID_no phone_no
SPID_no phone_no
threshold using the load-threshold command. The load threshold determines the
percentage of network loading at which the second ISDN B channel is triggered.
The value ranges from 1 to 255 (100 percent).
router (config-if)# dialer load-threshold 128
In this example, a value of 128 has been chosen. This means that when the first
B channel reaches 50 percent of its bandwidth capacity (128 equals 50 percent of
255), the second B channel will be activated to assist with the bandwidth load.
Step 7 To configure the ISDN line to come up whenever IP packets are to be sent, enter
the access-list command.
router (config-if)# access-list
sourcerouter-subnetmask targetrouter-ipnetwork targetrouter-subnetmask
router (config)# dialer-list
access-list-number
groupnumber
list
permit ip
access-list-number
sourcerouter-ipnetwork
Cisco 1003 and Cisco 1004 User Guide 37
Page 38

Configuring Your Cisco 1003 or Cisco 1004 Router
Step 8 Configure a static route to allow connectivity to the target router’s local network.
Enter the network number of the target router’ s local IP network, subnet mask, and
IP address of the target router’s BRI port.
router (config)# ip route
targetBRIport_ipaddress
Step 9 Enter the exit command to exit configuration mode.
Step 10 Enter the copy running-config startup-config command to save the
configuration to NVRAM.
Specifying the Boot Method
You can enter multiple boot commands in the configuration in NVRAM to provide backup
methods for loading a system image onto the router. There are two ways to load a system
image—from Flash memory or from a network server:
1 Flash memory
Flash memory allows you to copy new system images. Information stored in Flash
memory is not vulnerable to network failures that might occur when you load system
images from servers. In the following example, replace filename with the filename of
the router software image:
Router> enable
password:
Router# configure terminal
Router (config)# boot system flash
Router (config)# Ctrl-Z
Router# copy running-config startup-config
enablepassword
targetrouter_ipnetwork subnetmask
filename
38 Cisco 1003 and Cisco 1004 User Guide
Page 39

2 Network server
If Flash memory is not available, or if Flash memory does not contain a valid system
image, you can specify a system image to be loaded from a TFTP server as a backup
boot method for the router. In the follo wing example, replacefilename with the filename
of the router software image and replace ipaddress with the IP address of the TFTP
server:
Router> enable
password:
Router# configure terminal
Router (config)# boot system tftp
Router (config)# Ctrl-Z
Router# copy running-config startup-config
If you enter multiple boot commands, the router executes them in the order they are entered.
The router boots using the first boot command that succeeds.
For more information about theconfigure terminal command, refer to theRouter Products
Command Summary publication.
Checking Your Settings
Use the show version command to check the software version and configuration register
setting:
Router# show version
Cisco Internetwork Operating System Software
Cisco IOS (tm) 1000 Software (C1000-H-M), Version 10.3(5)
Copyright (c) 1986-1995 by cisco Systems, Inc.
Compiled Fri 28-Apr-95 10:45 by [enf]
Image text-base: 0x02004000, data-base: 0x0224E4A4
Configuring Your Cisco 1003 or Cisco 1004 Router
enablepassword
filename ipaddress
ROM: System Bootstrap, Version 5.3 (15664) [enf 107]
ROM: 1000 Bootstrap Software (C1000-RBOOT-R), Version 10.3 (15626) [enf
100]
Router uptime is 36 minutes
System restarted by reload
System image file is “flash:[enf]/c1000-h-m.103.Z”, booted via flash
cisco 1000 (68360) processor (revision C) with 3584K/512K bytes of memory.
Processor board serial number 01234567
Cisco 1003 and Cisco 1004 User Guide 39
Page 40

Related Publications
Bridging software.
Basic Rate ISDN software, Version 1.0.
1 Ethernet/IEEE 802.3 interface.
1 ISDN Basic Rate interface.
Integrated NT1 for ISDN Basic Rate Interface
8K bytes of non-volatile configuration memory.
2048K bytes of processor board PCMCIA flash (Read/Write)
Configuration register is 0x2102
Note If you have a Cisco 1003, the following message is omitted from the display because
the Cisco 1003 does not include an integrated NT1 device:
Integrated NT1 for ISDN Basic Rate Interface
Related Publications
For more information on router software configuration, refer to the following publications
in print or on UniverCD:
Configuration Builder Getting Started Guide
Router Products Getting Started Guide
Router Products Configuration Guide
Router Products Command Reference
Troubleshooting Internetworking Systems (as needed)
For a complete list of Cisco documentation, refer to the publication Ordering Cisco
Documentation in your warranty package.
40 Cisco 1003 and Cisco 1004 User Guide
Page 41

Troubleshooting the Cisco 1003 or Cisco 1004 Router
POWER SYSTEMOKISDNB1ISDNB2LAN
TX
LANRXCOLLISION LINK
OK
H3819
Troubleshooting the Cisco 1003 or Cisco 1004 Router
This section describes how to troubleshoot the router by using the LEDs on the front panel.
The LEDs indicate the current operating condition of your router. Observe the LEDs, note
any fault conditions that the router is encountering, and then contact your system
administrator.
Cisco 1003 and Cisco 1004 User Guide 41
Page 42

Troubleshooting the Cisco 1003 or Cisco 1004 Router
The following table describes the LEDs.
LED State Description
Power On steadily 12 VDC is being supplied to the router and the internal
DC-to-DC converter is operational.
Off Power is not reaching the router . Verify that the power supply
is plugged into the wall receptacle, and that the cable from
the power supply to the router is connected. If the power
supply is working properly, the router might be defective.
System OK On steadily The router has passed the power-on diagnostic tests and is
working properly.
Blinking once
per second
Blinking six times
per second
Off An error condition has occurred. Disconnect the power cord;
ISDN B1 On steadily The call on the BRI B channel 1 line is connected.
ISDN B2 On steadily The call on the BRI B channel 2 line is connected.
LAN TX
and
LAN RX
Collision
(Ethernet)
Link OK
(Ethernet)
Flickering The Ethernet LAN connection is transmitting and receiving
On Data collisions are being detected. Occasional collisions are
On The router senses the Ethernet link integrity signal, indicating
The system LED blinks once per second when running
startup diagnostics or decompressing the software image. If
the system LED continues to blink after the startup sequence,
the router is in ROM monitor mode.
The system LED blinks six times per second when loading
the software image from Flash memory or a TFTP server.
then reconnect it to re-establish power to your router. If the
LED remains off, contact your system administrator.
data normally.
normal. If they happen often, contact your system
administrator.
normal operation.
For more complete network troubleshooting information, refer to the
Troubleshooting Internetworking Systems printed publication or UniverCD.
42 Cisco 1003 and Cisco 1004 User Guide
Page 43

Pinouts
The following tables list the pinouts for the cables that can be used with the router. The
pinouts apply to both the Cisco 1003 and Cisco 1004 routers, unless specified otherwise.
Ethernet Port and Cable Pinouts
10BaseT Ethernet Port
(RJ-45) Pinouts
1
Pin
1 TX+
2 TX–
3 RX+
4 –
5 –
6 RX–
7 –
8 –
1. Any pin not referenced is not connected.
Description
Pinouts
Cisco 1003 and Cisco 1004 User Guide 43
Page 44

Pinouts
RJ-45-to-RJ-45 Straight-Through Ethernet
Cable Pinouts
RJ-45
Pin Signal Direction
RJ-45
Pin
1 TX+ –> 1
2 TX– –> 2
3 RX+ <– 3
4 – – 4
5 – – 5
6 RX– <– 6
7 – – 7
8 – – 8
RJ-45-to-RJ-45 Crossover Ethernet Cable Pinouts
RJ-45
Pin Signal Direction
RJ-45
Pin Signal
1 TX+ –> 3 RX+
2 TX– –> 6 RX–
3 RX+ <– 1 TX+
4 – – 4 –
5 – – 5 –
6 RX– <– 2 TX–
7 – – 7 –
8 – – 8 –
44 Cisco 1003 and Cisco 1004 User Guide
Page 45

BRI Port and Cable Pinouts
BRI Port (RJ-45) Pinouts for the Cisco 1003
Router
8 Pin1TE
3 Transmit Receive +
4 Receive Transmit +
5 Receive Transmit –
6 Transmit Receive –
1. Pins 1, 2, 7, and 8 are not used.
2. TE refers to terminal terminating layer 1 aspects of TE1,
TA, and NT2 functional groups.
3. NT refers to network terminating layer 1 aspects of NT1
and NT2 functional groups.
BRI Cable (RJ-45-to-RJ-45)
Pinouts for the Cisco 1004 Router
1
NT
RJ-45
8 Pin
4 Tip 4
5 Ring 5
1. NT refers to the network terminating layer 1
aspects of NT1 and NT2 functional groups.
2. Pins 1, 2, 3, 6, 7, and 8 are not used.
3. LT refers to the line termination point (i.e., at
the wall jack).
2
2
Wire
NT
3
3
LT
RJ-45
8 Pin
Pinouts
Polarity
Cisco 1003 and Cisco 1004 User Guide 45
Page 46

Pinouts
BRI Cable Specifications
High-Capacitance
Specification
Resistance (@ 96 kHz
Capacitance (@ 1 kHz) 120 nF
Cable
1
) 160 ohms/km 160 ohms/km
2
/km 30 nF/km
Impedance (@ 96 kHz) 75 ohms 150 ohms
Wire diameter 0.024" (0.6 mm) 0.024" (0.6 mm)
Distance limitation 32.8' (10 m) 32.8' (10 m)
1. kHz = kilohertz.
2. nF = nanoFarad.
Console Port, Cable, and Adapter Pinouts
The console port is configured as data terminal equipment (DTE) and uses an RJ-45
connector. An RJ-45-to-DB-25 adapter is provided with the router for connection to
terminals or other external communications equipment, such as modems. The console port
is an asynchronous serial port.
Low-Capacitance
Cable
Console Port Pinouts
Pin
1
Signal Definition
1 – –
2 DTR Output
3 TxD Output
4 GND –
5 GND –
6 RxD Input
7 DSR Input
8 – –
1. Any pin not referenced is not connected.
46 Cisco 1003 and Cisco 1004 User Guide
Page 47

Pinouts
Pin 1
Pin 8
H3824
Pin 1 and pin 8
should be the
same color
RJ-45-to-RJ-45 Rollover Cable Pinouts
RJ-45
Pin Signal
RJ-45
Pin Signal
1 – 8 –
2 DTR 7 DSR
3 TxD 6 RxD
4 GND 5 GND
5 GND 4 GND
6 RxD 3 TxD
7 DSR 2 DTR
8 – 1 –
You can identify a rollover cable by comparing the two modular ends of the cable. Holding
the cables in your hand, side-by-side, with the tab at the back, the wire connected to the pin
on the outside of the left plug should be the same color as the pin on the outside of the right
plug. On Cisco cables, pin 1 is white on one connector, and pin 8 is white on the other
connector (a rollover cable reverses pins 1 and 8, 2 and 7, 3 and 6, and 4 and 5).
Cisco 1003 and Cisco 1004 User Guide 47
Page 48

Service and Support
RJ-45-to-DB-25 Adapter Pinouts
Adapter
RJ-45 Pins
1 4
2 20
3 2
4 7
5 7
6 3
7 6
8 5
1. The RJ-45-to-DB-25 adapter is labeled
“Terminal.”
2. A female data terminal equipment (FDTE)
adapter ships with your router.
DTE M/F Pins
DB-25 Pins
Service and Support
If you need additional assistance, refer to the service and support information that is
included in the warranty package that shipped with your order.
1
2
48 Cisco 1003 and Cisco 1004 User Guide
Page 49

Translated Safety Warnings
This section repeats in multiple languages the warnings in this publication.
Note Regulatory compliance and safety information is available in the Cisco 1003 and
Cisco 1004 Public Network Certification publication that accompanied your router.
Warning Definition
Warning This warning symbol means danger. You are in a situation that could cause
bodily injury. Before you work on any equipment, be aware of the hazards involved with
electrical circuitry and be familiar with standard practices for preventing accidents.
Waarschuwing Dit waarschuwingssymbool betekent gevaar. U verkeert in een situatie die
lichamelijk letsel kan veroorzaken. Voordat u aan enige apparatuur gaat werken, dient u
zich bewust te zijn van de bij elektrische schakelingen betrokken risico's en dient u op de
hoogte te zijn van standaard maatregelen om ongelukken te voorkomen.
Varoitus Tämä varoitusmerkki merkitsee vaaraa. Olet tilanteessa, joka voi johtaa
ruumiinvammaan. Ennen kuin työskentelet minkään laitteiston parissa, ota selvää
sähkökytkentöihin liittyvistä vaaroista ja tavanomaisista onnettomuuksien
ehkäisykeinoista.
Translated Safety Warnings
Attention Ce symbole d'avertissement indique un danger. Vous vous trouvez dans une
situation pouvant causer des blessures ou des dommages corporels. Avant de travailler sur
un équipement, soyez conscient des dangers posés par les circuits électriques et
familiarisez-vous avec les procédures couramment utilisées pour éviter les accidents.
Warnung Dieses Warnsymbol bedeutet Gef ahr. Sie befinden sich in einer Situation, die zu
einer Körperverletzung führen könnte. Bevor Sie mit der Arbeit an irgendeinem Gerät
beginnen, seien Sie sich der mit elektrischen Stromkreisen verbundenen Gefahren und der
Standardpraktiken zur Vermeidung von Unfällen bewußt.
Avvertenza Questo simbolo di avvertenza indica un pericolo. La situazione potrebbe
causare infortuni alle persone. Prima di lavorare su qualsiasi apparecchiatura, occorre
conoscere i pericoli relativi ai circuiti elettrici ed essere al corrente delle pratiche standard
per la prevenzione di incidenti.
Cisco 1003 and Cisco 1004 User Guide 49
Page 50

Translated Safety Warnings
Advarsel Dette varselsymbolet betyr fare. Du befinner deg i en situasjon som kan føre til
personskade. Før du utfører arbeid på utstyr, må du v are oppmerksom på de faremomentene
som elektriske kretser innebærer, samt gjøre deg kjent med vanlig praksis når det gjelder å
unngå ulykker.
Aviso Este símbolo de aviso indica perigo. Encontra-se numa situação que lhe poderá
causar danos físicos. Antes de começar a trabalhar com qualquer equipamento,
familiarize-se com os perigos relacionados com circuitos eléctricos, e com quaisquer
práticas comuns que possam prevenir possíveis acidentes.
¡Advertencia! Este símbolo de aviso significa peligro. Existe riesgo para su integridad
física. Antes de manipular cualquier equipo, considerar los riesgos que entraña la corriente
eléctrica y familiarizarse con los procedimientos estándar de prevención de accidentes.
Varning! Denna varningssymbol signalerar fara. Du befinner dig i en situation som kan
leda till personskada. Innan du utför arbete på någon utrustning måste du vara medveten om
farorna med elkretsar och känna till vanligt förfarande för att förebygga skador.
Jewelry Removal Warning
Warning Before working on equipment that is connected to power lines, remove jewelry
(including rings, necklaces, and watches). Metal objects will heat up when connected to
power and ground and can cause serious burns or weld the metal object to the terminals.
Waarschuwing Alvorens aan apparatuur te werken die met elektrische leidingen is
verbonden, sieraden (inclusief ringen, kettingen en horloges) verwijderen. Metalen
voorwerpen worden warm wanneer ze met stroom en aarde zijn verbonden, en kunnen
ernstige brandwonden veroorzaken of het metalen voorwerp aan de aansluitklemmen
lassen.
Varoitus Ennen kuin työskentelet voimavirtajohtoihin kytkettyjen laitteiden parissa, ota
pois kaikki korut (sormukset, kaulakorut ja kellot mukaan lukien). Metalliesineet
kuumenevat, kun ne ovat yhteydessä sähkövirran ja maan kanssa, ja ne voivat aiheuttaa
vakavia palovammoja tai hitsata metalliesineet kiinni liitäntänapoihin.
Attention Avant d’accéder à cet équipement connecté aux lignes électriques, ôter tout
bijou (anneaux, colliers et montres compris). Lorsqu’ils sont branchés à l’alimentation et
reliés à la terre, les objets métalliques chauffent, ce qui peut provoquer des blessures gra ves
ou souder l’objet métallique aux bornes.
50 Cisco 1003 and Cisco 1004 User Guide
Page 51

Translated Safety Warnings
Warnung Vor der Arbeit an Geräten, die an das Netz angeschlossen sind, jeglichen
Schmuck (einschließlich Ringe, Ketten und Uhren) abnehmen. Metallgegenstände erhitzen
sich, wenn sie an das Netz und die Erde angeschlossen werden, und können schwere
Verbrennungen verursachen oder an die Anschlußklemmen angeschweißt werden.
Avvertenza Prima di intervenire su apparecchiature collegate alle linee di alimentazione,
togliersi qualsiasi monile (inclusi anelli, collane, braccialetti ed orologi). Gli oggetti
metallici si riscaldano quando sono collegati tra punti di alimentazione e massa: possono
causare ustioni gravi oppure il metallo può saldarsi ai terminali.
Advarsel Fjern alle smykker (inkludert ringer, halskjeder og klokker) før du skal arbeide
på utstyr som er koblet til kraftledninger. Metallgjenstander som er k oblet til kraftledninger
og jord blir svært varme og kan forårsake alvorlige brannskader eller smelte fast til polene.
Aviso Antes de trabalhar em equipamento que esteja ligado a linhas de corrente, retire
todas as jóias que estiver a usar (incluindo anéis, fios e relógios). Os objectos metálicos
aquecerão em contacto com a corrente e em contacto com a ligação à terra, podendo causar
queimaduras graves ou ficarem soldados aos terminais.
¡Advertencia! Antes de operar sobre equipos conectados a líneas de alimentación,
quitarse las joyas (incluidos anillos, collares y relojes). Los objetos de metal se calientan
cuando se conectan a la alimentación y a tierra, lo que puede ocasionar quemaduras graves
o que los objetos metálicos queden soldados a los bornes.
Varning! Tag av alla smycken (inklusive ringar, halsband och armbandsur) innan du
arbetar på utrustning som är kopplad till kraftledningar. Metallobjekt hettas upp när de
kopplas ihop med ström och jord och kan förorsaka allvarliga brännskador; metallobjekt
kan också sammansvetsas med kontakterna.
Lightning Activity Warning
Warning Do not work on the system or connect or disconnect cables during periods of
lightning activity.
Waarschuwing Tijdens onweer dat gepaard gaat met bliksem, dient u niet aan het systeem
te werken of kabels aan te sluiten of te ontkoppelen.
Varoitus Älä työskentele järjestelmän parissa äläkä yhdistä tai irrota kaapeleita
ukkosilmalla.
Cisco 1003 and Cisco 1004 User Guide 51
Page 52

Translated Safety Warnings
Attention Ne pas travailler sur le système ni brancher ou débrancher les câbles pendant
un orage.
Warnung Arbeiten Sie nicht am System und schließen Sie keine Kabel an bzw. trennen
Sie keine ab, wenn es gewittert.
Avvertenza Non lavorare sul sistema o collegare oppure scollegare i cavi durante un
temporale con fulmini.
Advarsel Utfør aldri arbeid på systemet, eller koble kabler til eller fra systemet når det
tordner eller lyner.
Aviso Não trabalhe no sistema ou ligue e desligue cabos durante períodos de mau tempo
(trovoada).
¡Advertencia! No operar el sistema ni conectar o desconectar cables durante el transcurso
de descargas eléctricas en la atmósfera.
Varning! Vid åska skall du aldrig utföra arbete på systemet eller ansluta eller koppla loss
kablar.
ISDN Connection Warning
Warning The ISDN connection is regarded as a source of voltage that should be
inaccessible to user contact. Users should not attempt to tamper with or open any public
telephone operator (PTO)–provided equipment or connection hardware. Any hardwired
connection (other than by nonremovable, connect-one-time-only lug) must be made only
by PTO staff or suitably trained engineers.
Waarschuwing De verbinding met ISDN (Integrated Services Digital Network = Digitaal
netwerk met geïntegreerde faciliteiten) wordt beschouwd als een spanningsbron die
ontoegankelijk dient te zijn voor gebruikers. Gebruikers dienen geen poging te doen om
door de openbare telefoondienst (PTT) verstrekte apparatuur of aansluitingshardware te
openen of ermee te knoeien. Alle vastbedrade verbindingen (behalve die verbindingen die
gemaakt zijn door niet-verwijderbare, slechts eenmaal te verbinden aansluitpunten) dienen
slechts door PTT-personeel of door daartoe opgeleide ingenieurs gemaakt te worden.
52 Cisco 1003 and Cisco 1004 User Guide
Page 53

Translated Safety Warnings
Varoitus ISDN-liitäntää pidetään jännitelähteenä, jonka kanssa käyttäjän ei tulisi päästä
kosketuksiin. Käyttäjien ei tulisi yrittää peukaloida tai avata laitteita tai liittimiä, jotka
kuuluvat yleiselle puhelinlaitokselle (PTO). Ainoastaan yleisen puhelinlaitoksen
henkilökunnan tai ammattitaitoisten teknikoiden tulee tehdä kaapeliliitännät (lukuun
ottamatta kiinteitä kiinnityskorvia, jotka yhdistetään ainoastaan yhden kerran).
Attention La connexion du réseau numérique intégré (Integrated Services Digital
Network ou ISDN) constitue une source de tension qui ne doit pas être accessible à
l'utilisateur. Les utilisateurs ne doivent jamais tenter de modifier ni même d'ouvrir un
matériel fourni par une compagnie de téléphone public, ou le matériel de connexion. Toute
connexion câblée (autre que celles établies par cosse non démontable àconnexion unique)
ne doit être effectuée que par le personnel de la compagnie du téléphone ou par des
techniciens proprement formés.
Warnung Die ISDN-Verbindung (Integrated Services Digital Network =
diensteintegrierendes Digitalnetz) gilt als eine Spannungsquelle, die dem Anwender
unzugänglich sein sollte. Anwender sollten nicht versuchen, sich an der von den Anbietern
öffentlicher TK-Dienste gelieferten Ausstattung oder Verbindungs-Hardware zu schaffen
zu machen oder sie zu öffnen. Alle festverdrahteten Verbindungen (mit Ausnahme der mit
nicht entfernbaren, einmal anzuschließenden Kabelschuhen hergestellten) sind von
Mitarbeitern des TK-Anbieters oder von entsprechend ausgebildeten Technikern
herzustellen.
Avvertenza Il collegamento ISDN (Integrated Services Digital Network -Rete digitale a
servizi integrati) viene considerato come una fonte di tensione che dovrebbe essere
inaccessibile al contatto dell’utente. Gli utenti non devono manomettere o provare ad aprire
le apparecchiature o i componenti di collegamento forniti dalla società telefonica.
Qualsiasi collegamento cablato (ad eccezione di un conettore non rimovibile, da installare
una sola volta) deve essere eseguito esclusivamente da un dipendente della società
telefonica o da tecnici specializzati.
Advarsel ISDN-koblingen betraktes som en spenningskilde som bør være utilgjengelig
for brukeren. Brukere bør ikke klusse med eller åpne utstyr eller tilkoblingsmateriale som
er utstyrt av Telenor. Eventuelle faste installasjoner (bortsett fra koblinger som er foretatt
med kabelsko for engangsbruk og som ikke kan fjernes) må kun utføres av
Telenor-montører.
Cisco 1003 and Cisco 1004 User Guide 53
Page 54

Translated Safety Warnings
Aviso A conexão RDIS (Rede Digital com Integração de Serviços) é interpretada como
uma fonte de tensão que deverá ser inacessível ao utilizador. Os utilizadores não deverão
tentar violar qualquer equipamento ou conexão de serviço telefónico público. Qualquer
conexão de rede de fios (para além da estabelecida por terminais não-removíveis de ligação
única), deverá apenas ser efectuada por pessoal dos serviços telefónicos ou engenheiros
devidamente treinados.
¡Advertencia! La conexión al circuito RDSI (Red Digital de Servicios Integrados) se
considera como una fuente de voltaje con la cual el usuario no debe entrar en contacto. Los
usuarios deberán evitar manipular indebidamente, o abrir, los equipos o hardware de
conexión proporcionados por cualquier compañía operadora de la red pública de telefonía.
Las conexiones de cable rígido que sean necesarias (excepto las de lengüeta no
desmontable de un solo uso) deberán ser realizadas exclusivamente por personal de la
entidad operadora de la red pública de telefonía, o por personal técnico adecuadamente
capacitado.
Varning! ISDN-anslutningen betraktas som en spänningskälla och bör inte vara åtkomlig
för användaren (ISDN: Integrated Services Digital Network = digitalt flertjänstnät).
Användare får inte manipulera eller söka öppna utrustning eller anslutningsdon som
tillhandahållits av telefonbolag (PTO-produkter). Anslutning av ledningar (med undantag
av icke löstagbara kabelskor för engångsanslutning) får endast utföras av PTO-anställda
eller lämpligt utbildade tekniker.
BRI Cable Warning
Warning Network hazardous voltages are present in the BRI cable. If you detach the BRI
cable, detach the end away from the router first to avoid possible electric shock. Network
hazardous voltages also are present on the system card in the area of the BRI port (RJ-45
connector), regardless of when power is turned off.
Waarschuwing Gevaarlijke netwerkspanning is aanwezig in de BRI-kabel. Als u de
BRI-kabel losmaakt, maak dan eerst het einde dat bij de routeereenheid vandaan is, los om
een mogelijke elektrische schok te voorkomen. Gevaarlijke netwerkspanning is ook
aanwezig op de systeemkaart in de buurt van de BRI-poort (RJ-454 connector), zelfs als de
stroom uit staat.
54 Cisco 1003 and Cisco 1004 User Guide
Page 55

Translated Safety Warnings
Varoitus BRI-kaapelissa on vaarallinen verkkojännite. Jos irrotat BRI-kaapelin, irrota
ensiksi reittiohjaimesta kauempana oleva pää mahdollisen sähköiskun välttämiseksi.
Vaarallisia verkkojännitteitä esiintyy myös järjestelmäkortissa BRI-portin (RJ-45 -liitin)
alueella, vaikka virta olisi katkaistu.
Attention Le réseau comporte des tensions dangereuses au câble BRI. Pour déconnecter
ce câble, débrancher d’abord l’extrémité éloignée du routeur pour éviter tout risque
d’électrocution. Des tensions dangereuses existent également sur la carte système dans la
zone du port BRI (connecteur RJ-45), même si le réseau est hors tension.
Warnung Das BRI-Kabel führt gefährliche Netzspannungen. Um einen elektrischen
Schlag beim Entfernen des BRI-Kabels zu vermeiden, zuerst das vom Router am weitesten
entfernt befindliche Kabelende entfernen. Der Bereich des BRI-Anschlusses
(RJ-45-Anschluß) auf der Systemkarte steht ebenfalls unter gefährlicher Netzspannung,
unabhängig davon, wann der Strom ausgeschaltet wird.
Avvertenza Nel cavo BRI sono presenti tensioni di rete pericolose. Se si deve scollegare
il cavo BRI, scollegarne innanzitutto il terminale dal router per evitare scosse elettriche.
Tensioni di rete pericolose sono anche presenti sulla scheda di sistema nell'area della porta
BRI (connettore RJ-45), indipendentemente dal momento di scollegamento
dell'alimentazione.
Advarsel Det er livsfarlig nettverksspenning i BRI-kabelen. Hvis du løsner BRI-kabelen,
må du først løsne den enden som er lengst borte fra fordelingsenheten for å unngå elektrisk
støt. Det er også livsfarlig spenning på systemkortet i området rundt BRI-utgangen
(RJ-45-kontakten), uavhengig av når strømmen slås av.
Aviso Existem tensões de rede perigosas no cabo BRI (Interface de Ritmo Básico). Se
desligar o cabo BRI, desligue primeiro a extremidade do distribuidor para evitar possíveis
choques eléctricos. Existem também tensões de rede perigosas na placa do sistema,
nomeadamente, na área da porta BRI (conector RJ-45), independentemente do facto da
corrente estar ou não ligada.
Cisco 1003 and Cisco 1004 User Guide 55
Page 56

Translated Safety Warnings
¡Advertencia! Hay tensiones de red peligrosas en el cable BRI. Si desconecta el cable
BRI, desconecte primero el extremo que va al "router" para evitar la posible sacudida
eléctrica. Estas peligrosas tensiones de red se encuentran presentes también en la tarjeta del
sistema en el área del puerto BRI (conector RJ-45), sin importar cuándo se desconecte la
alimentación.
Varning! BRI-kabeln är under farlig nätspänning. Om du kopplar ifrån BRI-kabeln,
koppla först ifrån änden som är längst bort från routern för att undvika eventuell elektrisk
stöt. Farlig nätspänning finns också på systemkortet intill BRI-porten (kontaktdon RJ-45)
oavsett när strömmen slogs av.
Chassis Warning–Disconnecting Telephone-Network Cables
Warning Before opening the chassis, disconnect the telephone-network cables to avoid
contact with telephone-network voltages.
Waarschuwing Voordat u het frame opent, dient u de verbinding met het telefoonnetwerk
te verbreken door de kabels te ontkoppelen om zo contact met telefoonnetwerk-spanningen
te vermijden.
Varoitus Vältä joutumista kosketuksiin puhelinverkostojännitteiden kanssa irrottamalla
puhelinverkoston kaapelit ennen asennuspohjan aukaisemista.
Attention Avant d'ouvrir le châssis, débrancher les câbles du réseau téléphonique afin
d'éviter tout contact avec les tensions d'alimentation du réseau téléphonique.
Warnung Bevor Sie das Chassis öffnen, ziehen Sie die Telefonnetzkabel aus der
Verbindung, um Kontakt mit Telefonnetzspannungen zu vermeiden.
Avvertenza Prima di aprire il telaio, scollegare i cavi della rete telefonica per evitare di
entrare in contatto con la tensione di rete.
Advarsel Før kabinettet åpnes, skal kablene for telenettet kobles fra for å unngå å komme
i kontakt med spenningen i telenettet.
Aviso Antes de abrir o chassis, desligue os cabos da rede telefónica para evitar contacto
com a tensão da respectiva rede.
56 Cisco 1003 and Cisco 1004 User Guide
Page 57

¡Advertencia! Antes de abrir el chasis, desconectar el cableado dirigido a la red telefónica
para evitar contacto con voltajes de la propia red.
Varning! Koppla loss ledningarna till telefonnätet innan du öppnar chassit så att kontakten
med telefonnätsspänningen bryts.
TN Power Statement
Warning The device is designed to work with TN power systems.
Waarschuwing Het apparaat is ontworpen om te functioneren met TN energiesystemen.
Varoitus Koje on suunniteltu toimimaan TN-sähkövoimajärjestelmien yhteydessä.
Attention Ce dispositif a été conçu pour fonctionner avec des systèmes d'alimentation
TN.
Warnung Das Gerät ist für die Verwendung mit TN-Stromsystemen ausgelegt.
Avvertenza Il dispositivo è stato progettato per l’uso con sistemi di alimentazione TN.
Advarsel Utstyret er utfomet til bruk med TN-strømsystemer.
Aviso O dispositivo foi criado para operar com sistemas de corrente TN.
Translated Safety Warnings
¡Advertencia! El equipo está diseñado para trabajar con sistemas de alimentación tipo
TN.
Varning! Enheten är konstruerad för användning tillsammans med elkraftssystem av
TN-typ.
No On/Off Switch Warning
Warning Before you work on a system that does not have an on/off switch, unplug the
power cord.
Waarschuwing Voordat u aan een systeem werkt dat geen aan/uit schakelaar heeft, dient
u de stekker van het netsnoer uit het stopcontact te halen.
Varoitus Ennen kuin teet mitään sellaiselle järjestelmälle, jossa ei ole
kaksiasentokytkintä, kytke irti virtajohto.
Cisco 1003 and Cisco 1004 User Guide 57
Page 58

Translated Safety Warnings
Attention Avant de travailler sur un système non équipé d'un commutateur marche-arrêt,
débrancher le cordon d'alimentation.
Warnung Bevor Sie an einem System ohne Ein/Aus-Schalter arbeiten, ziehen Sie das
Netzkabel heraus.
Avvertenza Prima di lavorare su un sistema che non è dotato di un interruttore on/off,
scollegare il cavo di alimentazione.
Advarsel Før det skal utføres arbeid på et system som ikke har en av/på-bryter, skal
strømledningen trekkes ut.
Aviso Antes de começar a trabalhar num sistema que não possua um interruptor ON/OFF,
desligue o cabo de alimentação.
¡Advertencia! Antes de trabajar sobre cualquier sistema que carezca de interruptor de
Encendido/Apagado (ON/OFF), desenchufar el cable de alimentación.
Varning! Dra ur nätsladden innan du utför arbete på ett system utan strömbrytare.
Circuit Breaker (30A) Warning
Warning This product relies on the building’s installation for short-circuit (overcurrent)
protection. Ensure that a fuse or circuit breaker no larger than 120 VAC, 30A U.S.
(240 VAC, 20A international) is used on the phase conductors (all current-carrying
conductors).
Waarschuwing Dit produkt is afhankelijk van de installatie van het gebouw voor
kortsluit- (overstroom)beveiliging. Controleer of er een zekering of stroomverbreker van
niet meer dan 120 Volt wisselstroom, 30 A voor de V.S. (240 Volt wisselstroom, 20 A
internationaal) gebruikt wordt op de fasegeleiders (alle geleiders die stroom voeren).
Varoitus Tämä tuote on riippuvainen rakennukseen asennetusta oikosulkusuojauksesta
(ylivirtasuojauksesta). Varmista, että vaihevirtajohtimissa (kaikissa virroitetuissa
johtimissa) käytetään Yhdysvalloissa alle 120 voltin, 30 ampeerin ja monissa muissa
maissa 240 voltin, 20 ampeerin sulaketta tai suojakytkintä.
Attention Pour ce qui est de la protection contre les courts-circuits (surtension), ce produit
dépend de l'installation électrique du local. Vérifier qu'un fusible ou qu'un disjoncteur de
120 V alt., 30 A U.S. maximum (240 V alt., 20 A international) est utilisé sur les
conducteurs de phase (conducteurs de charge).
58 Cisco 1003 and Cisco 1004 User Guide
Page 59

Translated Safety Warnings
Warnung Dieses Produkt ist darauf angewiesen, daß im Gebäude ein Kurzschluß- bzw.
Überstromschutz installiert ist. Stellen Sie sicher, daß eine Sicherung oder ein Unterbrecher
von nicht mehr als 240 V Wechselstrom, 20 A (bzw. in den USA 120 V Wechselstrom,
30 A) an den Phasenleitern (allen stromführenden Leitern) verwendet wird.
Avvertenza Questo prodotto dipende dall’installazione dell’edificio per quanto riguarda
la protezione contro cortocircuiti (sovracorrente). Verificare che un fusibile o interruttore
automatico, non superiore a 120 VCA, 30 A U.S. (240 VCA, 20 A internazionale) sia stato
usato nei fili di fase (tutti i conduttori portatori di corrente).
Advarsel Dette produktet er avhengig av bygningens installasjoner av
kortslutningsbeskyttelse (overstrøm). Kontroller at det brukes en sikring eller strømbryter
som ikke er større enn 120 VAC, 30 A (USA) (240 VAC, 20 A internasjonalt) på
faselederne (alle strømførende ledere).
Aviso Este produto depende das instalações existentes de protecção contra curto-circuito
(sobrecarga). Assegure-se de que um fusível ou disjuntor não superior a 240 VAC, 20A é
utilizado nos condutores de fase (todos os condutores de transporte de corrente).
¡Advertencia! Este equipo utiliza el sistema de protección contra cortocircuitos (o
sobrecorrientes) del propio edificio. Asegurarse de que se utiliza un fusible o interruptor
automático de no más de 240 voltios en corriente alterna (VAC), 20 amperios del estándar
internacional (120 VAC, 30 amperios del estándar USA) en los hilos de fase (todos aquéllos
portadores de corriente).
Varning! Denna produkt är beroende av i byggnaden installerat kortslutningsskydd
(överströmsskydd). Kontrollera att säkring eller öv erspänningsskydd används på fasledarna
(samtliga strömförande ledare) ¥ för internationellt bruk max. 240 V växelström, 20 A
(iUSA max. 120V växelström, 30 A).
Cisco 1003 and Cisco 1004 User Guide 59
Page 60

Translated Safety Warnings
SELV Circuit Warning
Warning The ports labeled “10BaseT”, “Console”, and “PCMCIA” are safety extra-low
voltage (SELV) circuits. SELV circuits should only be connected to other SELV circuits.
Because the BRI circuits are treated like telephone-network voltage, avoid connecting the
SELV circuit to the telephone network voltage (TNV) circuits.
Waarschuwing De poorten die "10BaseT", "Console" en "PCMCIA" zijn gelabeld, zijn
veiligheidscircuits met extra lage spanning (genaamd SELV = Safety Extra-Low Voltage).
SELV-circuits mogen alleen met andere SELV-circuits verbonden worden. Omdat de
BRI-circuits op dezelfde manier als telefoonnetwerkspanning behandeld worden, mag het
SELV-circuit niet met de telefoonnetwerkspanning (TNV) circuits verbonden worden.
Varoitus Portit, joissa on nimet "10BaseT", "Console" ja "PCMCIA", ovat erityisen
pienen jännitteen omaavia turvallisuuspiirejä (SELV-piirejä). Tällaiset SELV-piirit tulee
yhdistää ainoastaan muihin SELV-piireihin. Koska perusluokan liitäntöjen (Basic Rate
Interface- eli BRI-liitännät) jännite vastaa puhelinverkoston jännitettä, vältä SELV-piirin
yhdistämistä puhelinverkoston jännitepiireihin (TNV-piireihin).
Attention Les ports étiquetés «10BaseT», «Console» et «PCMIA» sont des circuits de
sécurité basse tension (Safety Extra-Low Voltage ou SELV). Comme les circuits BRI sont
considérés comme des sources de tension de réseau téléphonique, éviter de connecter un
circuit SELV à un circuit de tension de réseau téléphonique (telephone network voltage ou
TNV).
Warnung Die mit "10BaseT", "Console" und "PCMCIA" beschrifteten Buchsen sind
Sicherheitskreise mit Sicherheitskleinspannung (Safety Extra-Low Voltage = SELV).
SELV-Kreise sollten ausschließlich an andere SELV-Kreise angeschlossen werden. Da
BRI-Kreise wie Telefonnetzspannungen behandelt werden, ist der SELV-Kreis nicht an
Telefonnetzspannungskreise (TNV) anzuschließen.
Avvertenza Le porte contrassegnate da "10BaseT", "Console" e "PCMCIA" sono circuiti
di sicurezza con tensione molto bassa (SEL V). I circuiti SELV devono essere collegati solo
ad altri circuiti SELV. Dato che i circuiti BRI vengono trattati come circuiti a tensione di
rete telefonica, evitare di collegare il circuito SELV ai circuiti in cui è presente la tensione
di rete telefonica (TNV).
Advarsel Utgangene merket "10BaseT", "Console" og "PCMCIA" er lavspentkretser
(SELV) for ekstra sikkerhet. SELV-kretser skal kun kobles til andre SELV-kretser. Da
BRI-kretsene håndteres som telenettspenning, bør du unngå å koble SELV-kretsen til
kretser for telenettspenning (TNV).
60 Cisco 1003 and Cisco 1004 User Guide
Page 61

Aviso As portas com as etiquetas "10BaseT", "Console" e "PCMCIA", são circuitos de
segurança de baixa tensão (SELV). Estes circuitos deverão ser ligados apenas a outros
circuitos SELV. Devido ao facto dos circuitos BRI (Interface de Ritmo Básico) serem
tratados como sendo de tensão equivalente à da rede telefónica, e vite ligar o circuito SELV
aos circuitos TNV (tensão de rede telefónica).
¡Advertencia! Los puertos "10BaseT", "Console" y "PCMCIA" son circuitos de muy baja
señal que garantizan ausencia de peligro (Safety Extra-Low Voltage = SELV). Estos
circuitos SELV deben ser conectados exclusivamente con otros también de tipo SELV.
Puesto que los circuitos tipo BRI se comportan como aquéllos con voltajes de red
telefónica, debe evitarse conectar circuitos SELV con circuitos de voltaje de red telefónica
(TNV).
Varning! De portar som är märkta "10BaseT", "Console" och "PCMCIA" är
SELV-kretsar, d.v.s. skyddskretsar med extra låg spänning (SELV: Safety Extra-Low
Voltage = skyddsklenspänning). SELV-kretsar får endast anslutas till andra SELV-kretsar.
Eftersom BRI-kretsar behandlas liksom telefonnätsspänning bör SELV-kretsen inte
anslutas till telefonnätsspänningskretsar (TNV-kretsar).
Warning Statement for Norway and Sweden
This statement applies only to Norway and Sweden. This statement is listed in the
following order:
Translated Safety Warnings
• Norway
• Sweden
Advarsel Apparatet skal kobles til en jordet stikkontakt.
Varning! Apparaten skall anslutas till jordat nätuttag.
Cisco 1003 and Cisco 1004 User Guide 61
Page 62

Translated Safety Warnings
Product Disposal Warning
Warning Ultimate disposal of this product should be handled according to all national
laws and regulations.
Waarschuwing Dit produkt dient volgens alle landelijke wetten en voorschriften te
worden afgedankt.
Varoitus Tämän tuotteen lopullisesta hävittämisestä tulee huolehtia kaikkia
valtakunnallisia lakeja ja säännöksiä noudattaen.
Attention La mise au rebut définitive de ce produit doit être effectuée conformément à
toutes les lois et réglementations en vigueur.
Warnung Dieses Produkt muß den geltenden Gesetzen und Vorschriften entsprechend
entsorgt werden.
Avvertenza L'eliminazione finale di questo prodotto deve essere eseguita osservando le
normative italiane vigenti in materia.
Advarsel Endelig disponering av dette produktet må skje i henhold til nasjonale lover og
forskrifter.
Aviso A descartagem final deste produto deverá ser efectuada de acordo com os
regulamentos e a legislação nacional.
¡Advertencia! El desecho final de este producto debe realizarse según todas las leyes y
regulaciones nacionales.
Varning! Slutlig kassering av denna produkt bör skötas i enlighet med landets alla lagar
och föreskrifter.
62 Cisco 1003 and Cisco 1004 User Guide
 Loading...