

Page 1

Black plate (1,1)
Chevrolet Corvette Owner Manual - 2012
2012 Chevrolet Corvette Owner Manual M
In Brief . . . . . . . . . .. . . . . . . . . . .. . . 1-1
Instrument Panel . . . . . . . . . . . . . . 1-2
Initial Drive Information . . . . . . . .1-4
Vehicle Features. . . . . . . . . . . . .1-17
Performance and
Maintenance . . . . . . . . . . . . . . . . 1-22
Keys, Doors, and
Windows . . . . . . . . . . . . . . . . . . . . 2-1
Keys and Locks . . . . . . . . . . . . . . .2-2
Doors . . . . . . . . . . . . . . . . . ..... . . . 2-11
Vehicle Security. . . . . . . . . . . . . . 2-14
Exterior Mirrors . . . . . . . . . . . . . . . 2-16
Interior Mirrors . . . . . . . . . . . . ... .2-17
Windows . . . . . . . . . . . . . . . . . . . . . 2-18
Roof . . . . . . . . . . . . . .. . . . . . . . . . . . 2-19
Seats and Restraints . . . . . . . . . 3-1
Head Restraints . . . . . . . . . . . . . . . 3-2
Front Seats . . . . . . . .. . . . . . . . .. . . 3-2
Safety Belts . . . . . . . . . . . . . . . . . . . . 3-8
Airbag System . . . . . . . . . . . . . . ..3-15
Child Restraints . . . . . . . . . . . . . . 3-29
Storage . . . . . . . . . . . . . .. . . . . . . . . 4-1
Storage Compartments . . . . . . . . 4-1
Additional Storage Features . . . 4-2
Instruments and Controls . . . . 5-1
Controls . . . . . . . . . . . . . . . . . . . . . . . 5-2
Warning Lights, Gauges, and
Indicators . . . . . . . . . . . . . . . . . . . . 5-8
Information Displays . . . . . . . .. . 5-26
Vehicle Messages.. . . . . . . . . . . 5-35
Vehicle Personalization.. . . . . . 5-54
Universal Remote System . . . . 5-62
Lighting . . . . . . . . . . . .. . . . . . . . . . . 6-1
Exterior Lighting . . . . . . . . . . . . . . . 6-1
Interior Lighting . . . . . . .. . . . . . .. . 6-6
Lighting Features . . . . . . . . . . . . . . 6-6
Infotainment System . . . . . . . . . 7-1
Introduction . . . . . . . . . .. . . . . . . . . . 7-1
Radio . . . . . . . . . . ... . . . . . . . . . . . ..7-5
Audio Players . . . . . . . . . . . . . . . . 7-11
Phone . . . . . . . . . .. . . . . . . . . .. . . . 7-16
Trademarks and License
Agreements . . . . . . . . . .. . . . . . . 7-24
Climate Controls . . . . . . . . . . . . . 8-1
Climate Control Systems . . . . . . 8-1
Air Vents.. . . . . . . . . . . . . . . . . . . . . . 8-6
Maintenance . . . . . . . . . . . ... . . . . . 8-7
Page 2

Black plate (2,1)
Chevrolet Corvette Owner Manual - 2012
2012 Chevrolet Corvette Owner Manual M
Driving and Operating . . . . . . . . 9-1
Driving Information . . . . . . . . . . . . . 9-2
Starting and Operating . . . . . . . 9-18
Engine Exhaust . . . . . . . . . . . . . . 9-26
Automatic Transmission . . . . . .9-27
Manual Transmission . . . . . . . . . 9-32
Brakes . . . . . . . . . . . . . . . . . . . . . . . 9-35
Ride Control Systems . . . . . . . .9-36
Cruise Control . . . . . . . .. . . . . . . . 9-45
Fuel . . . . . . . . . . . . . . . . . . . . . . . . . . 9-48
Towing . . . . . . . . . . . . . . . . . . . . . . . 9-54
Conversions and
Add-Ons . . . . . . . . . . . . . . . . . . . . 9-54
Vehicle Care . . . . . .. . . . . . . . .. . 10-1
General Information . . . . . . . . . .10-2
Vehicle Checks.. . . . . . . . . . . . . . 10-7
Headlamp Aiming . . . . . . . . . . . 10-44
Bulb Replacement . . . . . . . . . . 10-44
Electrical System . . . . . . . . . . . . 10-46
Wheels and Tires . . . . . . . . . . . 10-54
Jump Starting . . . . . . . . . . . . . . . 10-78
Towing . . . . . . . .. . . . . . . . . . . . . . 10-82
Appearance Care . . . . . . . . . . .10-82
Service and Maintenance . . . 11-1
General Information . . . . . . . . . . 11-1
Maintenance Schedule . . . . . . .11-3
Special Application
Services . . . . . . . . . . . . . . . . . . . . 11-8
Additional Maintenance
and Care . . . . . . . . .. . . . . . . . . . . 11-8
Recommended Fluids,
Lubricants, and Parts . . . . . . 11-12
Maintenance Records . . . . . . . 11-15
Technical Data . . . . . . ......... 12-1
Vehicle Identification.. . . . . . . . 12-1
Vehicle Data. . . . . . . . . . . . . . . . . . 12-2
Customer Information . . . . . . . 13-1
Customer Information . . . . . . . . 13-1
Reporting Safety Defects . . . . 13-19
Vehicle Data Recording and
Privacy . . .. . . . . . . . . . . . . . . . . 13-20
OnStar . . . . . . . . . . . . . . .. . . . . . . . 14-1
OnStar Overview.. . . . . . . . . . . . 14-1
OnStar Services . . . . . . . .. . . . . . 14-2
OnStar Additional
Information . . . . . . . . . . . . ... . . . 14-5
Index . . . . . . . . . . . . . . . . . . . . . i-1
Page 3
Black plate (3,1)
Chevrolet Corvette Owner Manual - 2012
Introduction iii
The names, logos, emblems,
slogans, vehicle model names,
and vehicle body designs appearing
in this manual including, but not
limited to, GM, the GM logo,
CHEVROLET, the CHEVROLET
Emblem, CORVETTE, CORVETTE
GRAND SPORT, Z06, and ZR1
are trademarks and/or service
marks of General Motors LLC, its
subsidiaries, affiliates, or licensors.
Litho in U.S.A.
Part No. 20905002 B Second Printing
This manual describes features that
may or may not be on your specific
vehicle either because they are
options that you did not purchase or
due to changes subsequent to the
printing of this owner manual.
Please refer to the purchase
documentation relating to your
specific vehicle to confirm each of
the features found on your vehicle.
For vehicles first sold in Canada,
substitute the name “General
Motors of Canada Limited” for
Chevrolet Motor Division wherever
it appears in this manual.
Keep this manual in the vehicle for
quick reference.
©
2011 General Motors LLC. All Rights Reserved.
Canadian Vehicle Owners
Propriétaires Canadiens
A French language copy of this
manual can be obtained from your
dealer or from:
On peut obtenir un exemplaire de
ce guide en français auprès du
concessionnaire ou à l'adresse
suivante:
Helm, Incorporated
P.O. Box 07130
Detroit, MI 48207
1-800-551-4123
Numéro de poste 6438 de langue
française
www.helminc.com
Page 4
Black plate (4,1)
Chevrolet Corvette Owner Manual - 2012
iv Introduction
Using this Manual
To quickly locate information about
the vehicle, use the Index in the
back of the manual. It is an
alphabetical list of what is in the
manual and the page number where
it can be found.
Danger, Warnings, and Cautions
Warning messages found on vehicle
labels and in this manual describe
hazards and what to do to avoid or
reduce them.
Danger indicates a hazard with a
high level of risk which will result in
serious injury or death.
Warning or Caution indicates a
hazard that could result in injury
or death.
WARNING
{
These mean there is something
that could hurt you or other
people.
Notice: This means there is
something that could result in
property or vehicle damage.
This would not be covered by
the vehicle's warranty.
A circle with a slash through it is
a safety symbol which means
“Do Not,” “Do not do this,” or
“Do not let this happen.”
Symbols
The vehicle has components and
labels that use symbols instead of
text. Symbols are shown along with
the text describing the operation or
information relating to a specific
component, control, message,
gauge, or indicator.
M : This symbol is shown when
you need to see your owner manual
for additional instructions or
information.
* : This symbol is shown when
you need to see a service manual
for additional instructions or
information.
Page 5

Black plate (5,1)
Chevrolet Corvette Owner Manual - 2012
Introduction v
Vehicle Symbol Chart
Here are some additional symbols
that may be found on the vehicle
and what they mean. For more
information on the symbol, refer to
the Index.
9 : Airbag Readiness Light
# : Air Conditioning
! : Antilock Brake System (ABS)
% : Audio Steering Wheel Controls
or OnStar
®
$ : Brake System Warning Light
" : Charging System
I : Cruise Control
B : Engine Coolant Temperature
O : Exterior Lamps
# : Fog Lamps
. : Fuel Gauge
+ : Fuses
3 : Headlamp High/Low-Beam
Changer
j : LATCH System Child
Restraints
* : Malfunction Indicator Lamp
: : Oil Pressure
} : Power
/ : Remote Vehicle Start
> : Safety Belt Reminders
7 : Tire Pressure Monitor
d : Traction Control/Active
Handling System
M : Windshield Washer Fluid
Page 6

Black plate (6,1)
Chevrolet Corvette Owner Manual - 2012
vi Introduction
2 NOTES
Page 7

Black plate (1,1)
Chevrolet Corvette Owner Manual - 2012
In Brief 1-1
In Brief
Instrument Panel
Instrument Panel . . . . . . .. . . . . . . 1-2
Initial Drive Information
Initial Drive Information . . . . . . . . 1-4
Remote Keyless Entry (RKE)
System . . . . . . .. . . . . . . . . . . . . . . 1-4
Door Locks . . . . . . . . . . . . . . . . . . . 1-5
Trunk Release . . . . . . . . . . . . . . . . 1-6
Windows . . . . . . . . . . . . . . . . . . . . .. 1-8
Seat Adjustment . . . . . . . . . . . . . . 1-8
Memory Features . . . . . . . . . . . . . 1-9
Safety Belts . . . . . . . . .. . . . . . . . . 1-11
Passenger Sensing
System . . . . . . . . . . . . . . . . .. . . . 1-11
Mirror Adjustment . . . . . . . . . . . . 1-12
Steering Wheel
Adjustment . . . . . . . . . . . . . . . . . 1-12
Interior Lighting . . . . . . . . . . . . . . 1-13
Exterior Lighting . . . . . . . . . . . . . 1-14
Windshield Wiper/Washer .... 1-14
Climate Controls . . . . . .. . . . . . . 1-15
Transmission . . . . . . . . . . . . . . . . 1-16
Vehicle Features
Radio(s) . . . . . .. . . . . . . . . . . . . . . 1-17
Satellite Radio . . . . . . . . . . . . . . . 1-18
Portable Audio Devices . . . . . . 1-18
Bluetooth
Steering Wheel Controls . . . . . 1-19
Cruise Control . . . . . . . . . . . . . . . 1-19
Navigation System . . . . . . . .. . . 1-20
Driver Information
Center (DIC) . . . . . . . . . . . . . . . 1-20
Power Outlets . . . . . . . . . . . . . . . 1-21
Roof Panel . . . . . . . . . . . . . . . . . . 1-21
Convertible . . . . . . . . . . . . . . . . . . 1-21
®
. . . . . . . . . . . . . . . . . . . 1-18
Performance and Maintenance
Traction Control
System (TCS) . . . . . . . . . . . . . . 1-22
Tire Pressure Monitor . . . . . . . . 1-22
Z06, Z16, and ZR1
Features . . . . . . . . . . . . . . . . . . . 1-23
Engine Oil Life System . . . . . . 1-24
Driving for Better Fuel
Economy .... . . . . . . . . . . . . . . . 1-24
Battery .... . . . . . . . . . . . . . . .. . . . 1-24
Roadside Assistance
Program . . . . . . . . . . .... . . . . . . 1-25
®
OnStar
. . . . . . . . . . . . . . . . . . . . . 1-25
Page 8
Black plate (2,1)
Chevrolet Corvette Owner Manual - 2012
1-2 In Brief
Instrument Panel
Page 9

Black plate (3,1)
Chevrolet Corvette Owner Manual - 2012
In Brief 1-3
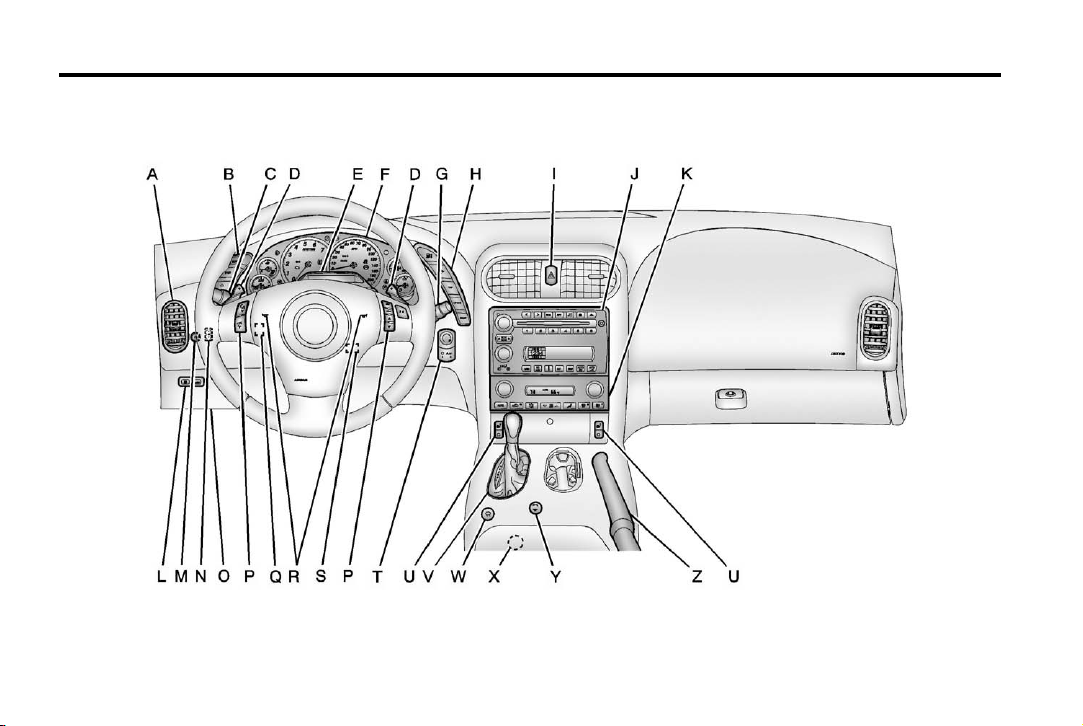
A. Air Vents on page 8‑6.
B. Head-Up Display Controls
(If Equipped). See Head-Up
Display (HUD) on page 5‑31.
C. Turn and Lane-Change Lever.
See Turn and Lane-Change
Signals on page 6‑4.
Cruise Control on page 9‑45.
Fog Lamps on page 6‑5.
Exterior Lamp Controls on
page 6‑1.
D. Manual Shift Paddles
(If Equipped). See Automatic
Transmission on page 9‑27.
E. Driver Information Center (DIC)
on page 5‑26.
F. Instrument Cluster on page 5‑9.
G. Windshield Wiper/Washer on
page 5‑4.
H. Driver Information Center (DIC)
Buttons. See Driver Information
Center (DIC) on page 5‑26.
I. Hazard Warning Flashers on
page 6‑4.
J. Infotainment on page 7‑1.
K. Dual Automatic Climate Control
System on page 8‑1.
L. Fuel Door Release Button.
See Filling the Tank on
page 9‑51.
Hatch/Trunk Release Button.
See “Hatch/Trunk Lid Release”
under Hatch on page 2‑11.
M. Instrument Panel Illumination
Control on page 6‑6.
N. Power Folding Top Switch
(If Equipped). See Convertible
Top on page 2‑24.
O. Data Link Connector (DLC)
(Out of View). See Malfunction
Indicator Lamp on page 5‑19.
P. Bluetooth Controls
(If Equipped). See Bluetooth on
page 7‑16.
Steering Wheel Controls on
page 5‑3 (If Equipped).
Q. Steering Wheel Adjustment on
page 5‑2.
R. Horn on page 5‑4.
S. Telescopic Steering Column
Control (If Equipped).
See Steering Wheel Adjustment
on page 5‑2.
T. Keyless Ignition. See Ignition
Positions on page 9‑20.
U. Heated Front Seats on page 3‑8
(If Equipped).
V. Shift Lever (Automatic Shown).
See Automatic Transmission on
page 9‑27 or Manual
Transmission on page 9‑32.
W. Active Handling System on
page 9‑38.
X. Power Outlets on page 5‑6.
Y. Selective Ride Control on
page 9‑43 (If Equipped).
Z. Parking Brake on page 9‑36.
Page 10
Black plate (4,1)
Chevrolet Corvette Owner Manual - 2012
1-4 In Brief
Initial Drive Information
This section provides a brief
overview about some of the
important features that may or may
not be on your specific vehicle.
For more detailed information,
refer to each of the features which
can be found later in this owner
manual.
Remote Keyless Entry (RKE) System
The RKE transmitter is used to lock
and unlock the doors from up to
30 m (100 ft) away from the vehicle.
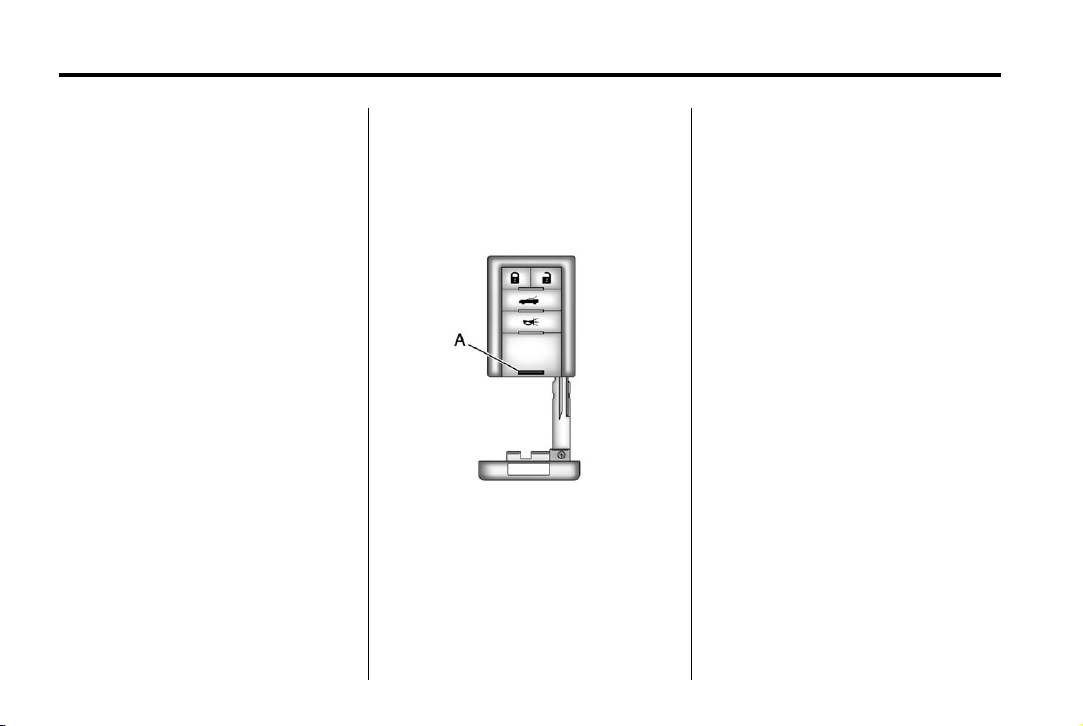
Press the button (A) to remove the
key. The key can be used to lock
and unlock the glove box and to
open the hatch/trunk lid if power to
the vehicle is lost. See Hatch on
page 2‑11 for more information.
K : Press to unlock the driver door.
Press again within five seconds to
unlock both doors.
Q : Press to lock all doors.
} : Press and hold for
approximately one second to open
the hatch/trunk.
L : Press to sound the horn.
Press any other button on the
RKE transmitter to stop it.
See Keys on page 2‑2 and Remote
Keyless Entry (RKE) System
Operation on page 2‑3.
Page 11
Black plate (5,1)
Chevrolet Corvette Owner Manual - 2012
In Brief 1-5
Door Locks
From the outside, press Q or K on
the Remote Keyless Entry (RKE)
transmitter.
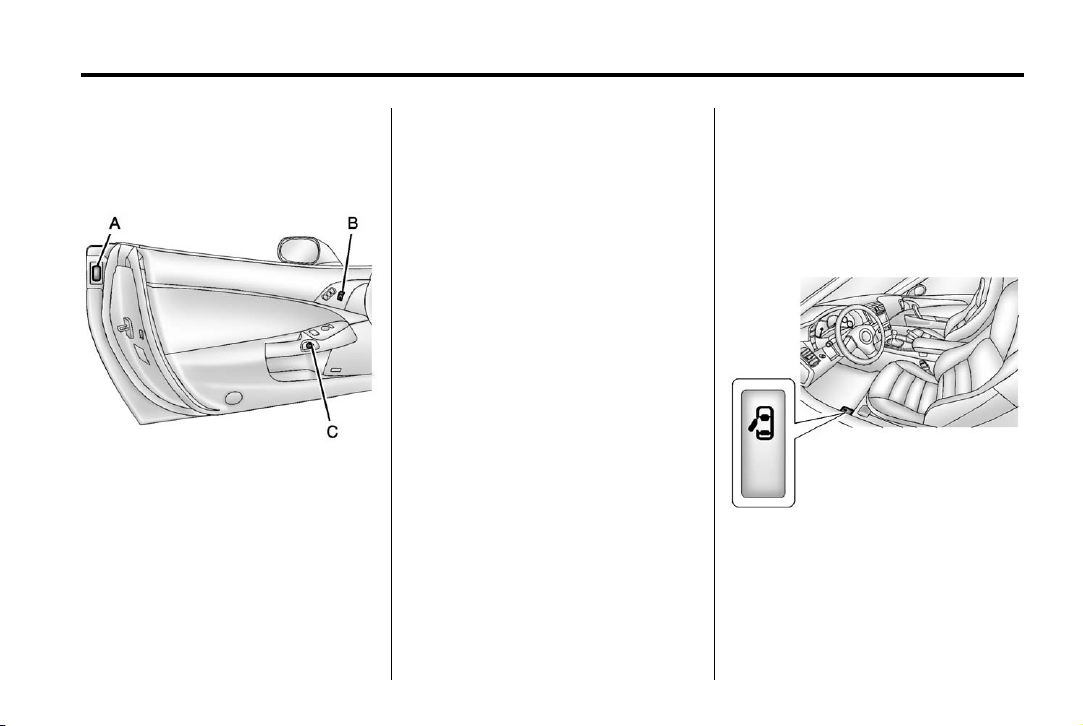
A. Door Handle Sensor
B. Power Door Lock Switch
C. Door Latch Button
With the RKE transmitter within
range, grip the door handle
sensor (A). See Remote Keyless
Entry (RKE) System Operation on
page 2‑3.
From the inside, use the power door
lock switch (B).
Q : Press to lock the doors.
K : Press to unlock the doors.
To open a door from the inside,
push the door latch button (C).
A tone will sound when the button is
pushed.
See Power Door Locks on
page 2‑10.
Loss of Vehicle Electrical
Power
If the vehicle has lost battery power,
the driver door can be opened
manually.
Inside the Vehicle
Pull the door release handle.
Page 12
Black plate (6,1)
Chevrolet Corvette Owner Manual - 2012
1-6 In Brief
Outside the Vehicle
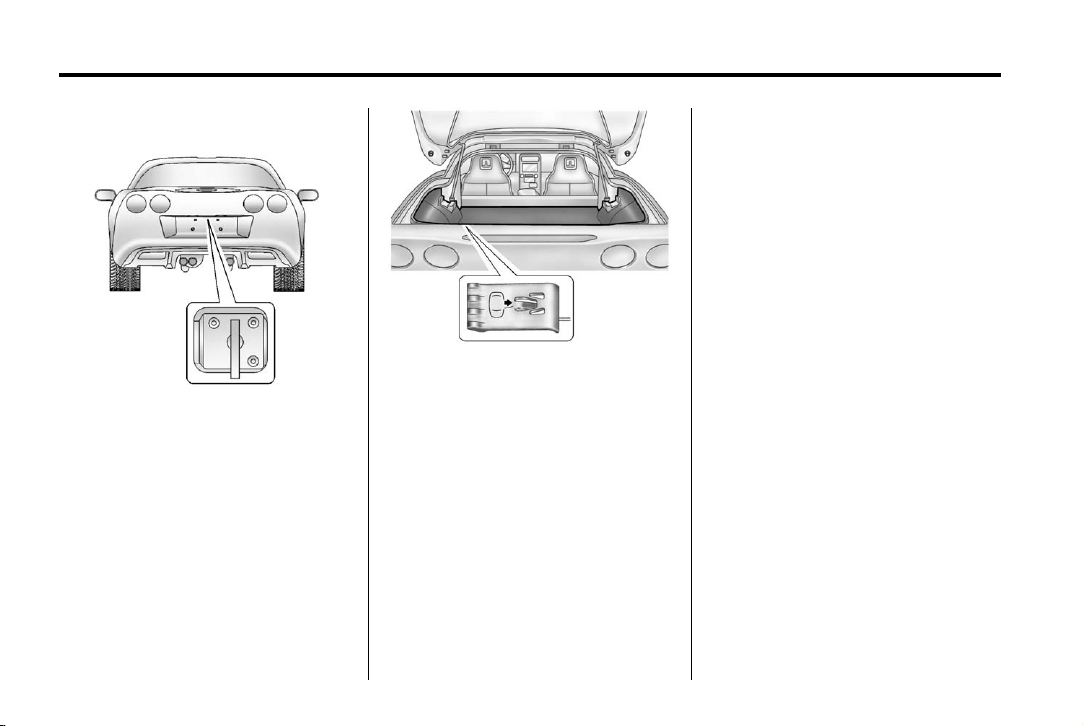
Use the key to open the hatch/trunk.
See Keys on page 2‑2.
Trunk Release
The vehicle must be in P (Park)
with an automatic transmission
and Neutral with a manual
transmission.
For manual transmission vehicles,
the parking brake must be set
when the engine is running
for the hatch/trunk release to
operate. See Parking Brake on
page 9‑36.
Then, pull the manual door release
handle.
Page 13
Black plate (7,1)
Chevrolet Corvette Owner Manual - 2012
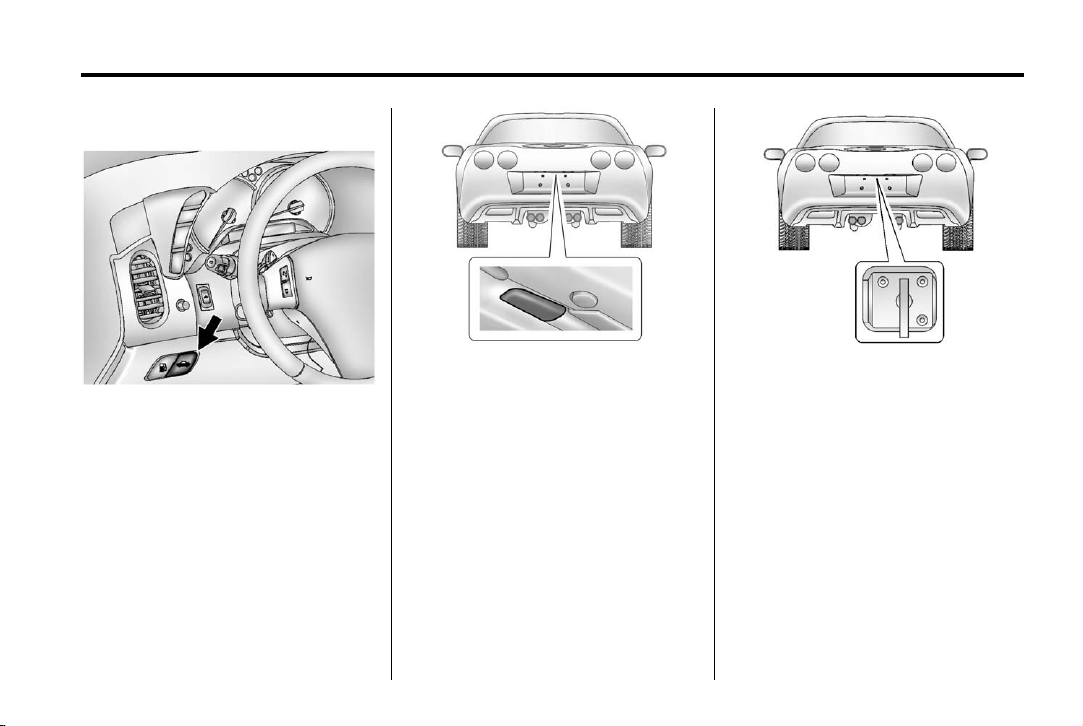
To release the hatch/trunk:
In Brief 1-7
.
Press V.
.
Press } on the keyless
entry transmitter. See Remote
Keyless Entry (RKE) System on
page 2‑3.
.
Push the hatch/trunk release
button with the keyless entry
transmitter within range. See
Remote Keyless Entry (RKE)
System on page 2‑3.
.
Use the vehicle key. See Keys
on page 2‑2.
For more information, see Hatch on
page 2‑11.
Page 14
Black plate (8,1)
Chevrolet Corvette Owner Manual - 2012
1-8 In Brief
Windows
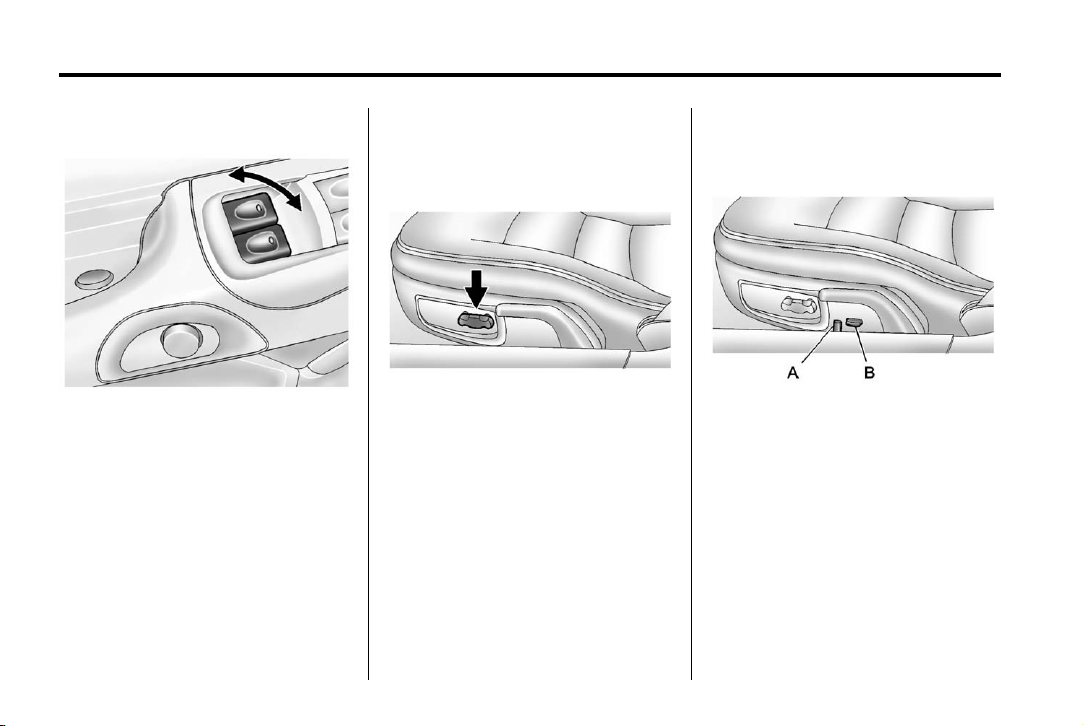
The power window switches are
located on each door.
Pull up or press down on the front
of the switch to raise or lower the
window.
For more information, see Power
Windows on page 2‑18.
Seat Adjustment
Power Seats
To adjust a power seat:
.
Move the seat forward or
rearward by sliding the control
forward or rearward.
.
Raise or lower the front or rear
part of the seat cushion by
moving the front or rear of the
control up or down.
See Power Seat Adjustment on
page 3‑2.
Power Lumbar and Side
Bolsters
A. Lumbar Support Control
B. Side Bolster Support Control
To adjust the support, if equipped:
.
Move control (A) forward or
rearward to adjust lumbar
support.
.
Move control (B) up or down to
adjust the side bolsters.
See Lumbar Adjustment on
page 3‑2.
Page 15
Black plate (9,1)
Chevrolet Corvette Owner Manual - 2012
In Brief 1-9
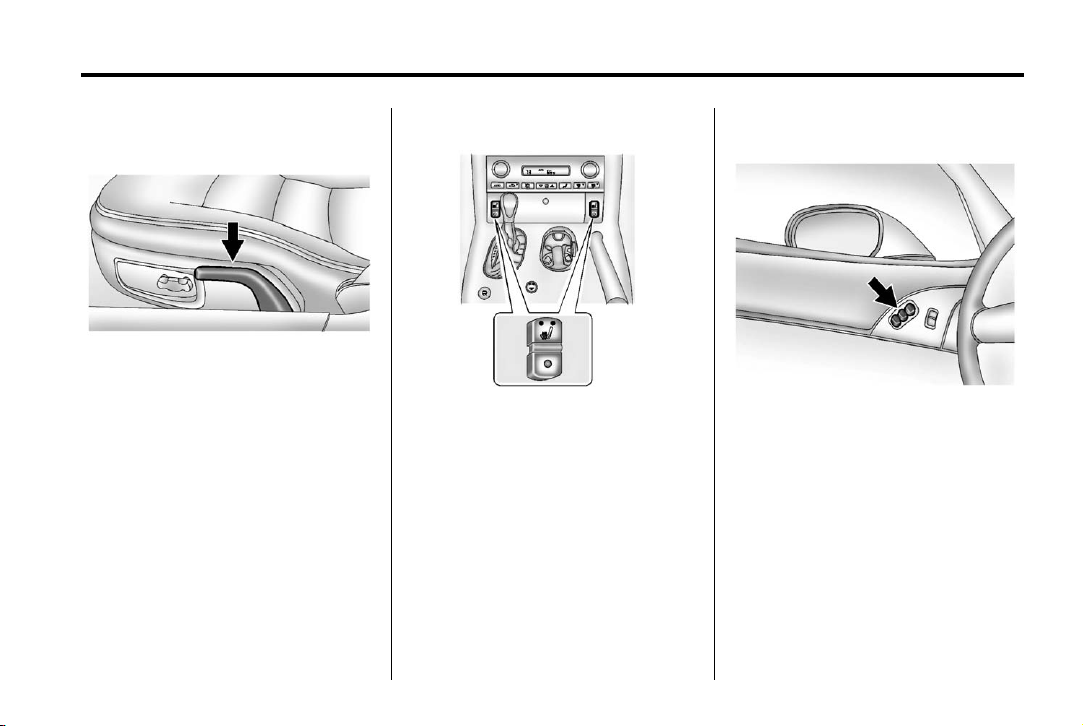
Reclining Seatbacks
To recline a manual seatback:
1. Lift the lever on the outboard
side of the seat.
2. Move the seatback to the
desired position, and then
release the lever to lock the
seatback in place.
3. Push and pull on the seatback to
make sure it is locked.
See Reclining Seatbacks on
page 3‑3.
Heated Seats
If available, the buttons are on the
center stack. The ignition must be
on for this feature to work.
L : Press to turn on the heated
seat at the high setting.
Press again to switch to the low
setting.
9 : Press to turn the system off.
See Heated Front Seats on
page 3‑8.
Memory Features
On vehicles with the memory
feature, the controls on the driver
door are used to program and recall
memory settings for the driver seat,
outside mirrors, and the telescopic
steering column.
Page 16

Black plate (10,1)
Chevrolet Corvette Owner Manual - 2012
1-10 In Brief
Storing Memory Positions
To save into memory:
1. Adjust the driver seat, both
outside mirrors, and the
telescopic steering column.
2. Press and hold “1” until
two beeps sound.
3. Repeat for a second driver
position using “2.”
To recall:
.
On vehicles with an automatic
transmission, press and
release “1” or “2.”
If the vehicle is in P (Park), a
single beep sounds and the
memory position is recalled after
a brief delay.
If the vehicle is not in P (Park),
three beeps sound and the
memory position is not recalled.
.
On vehicles with a manual
transmission, when the vehicle
is on, the parking brake must be
set to recall a memory position.
Press and release “1” or “2.”
A single beep sounds and the
memory position is recalled after
a brief delay.
If the vehicle is on and the
parking brake is not set,
three beeps sound and the
memory position is not recalled.
See Memory Seats on page 3‑4.
Easy Exit Driver Seat
This feature can move the seat
rearward and the telescopic steering
column out of the way to allow extra
room to exit the vehicle.
B : Press to save and recall the
easy exit seat position.
To save into memory:
1. Recall the desired driving
position by pressing “1.”
2. Adjust the seat and the
telescopic steering column
to the desired exit position.
3. Press and hold B until
two beeps sound.
4. Repeat for a second driver
position using “2.”
To recall, press and release B.
The vehicle must be in P (Park) for
an automatic transmission or the
parking brake must be set for a
manual transmission. A single beep
sounds. The seat and telescopic
steering column will move to the
position previously stored for the
identified driver.
See Memory Seats on page 3‑4.
Page 17
Black plate (11,1)
Chevrolet Corvette Owner Manual - 2012
Safety Belts
Refer to the following sections for
important information on how to use
safety belts properly.
.
Safety Belts on page 3‑8.
.
How to Wear Safety Belts
Properly on page 3‑10.
.
Lap-Shoulder Belt on page 3‑11.
.
Lower Anchors and Tethers for
Children (LATCH System)
(Z06 and ZR1 Models Only) on
page 3‑36 or Lower Anchors and
Tethers for Children (LATCH
System) (Coupe and Convertible
Models Only) on page 3‑35.
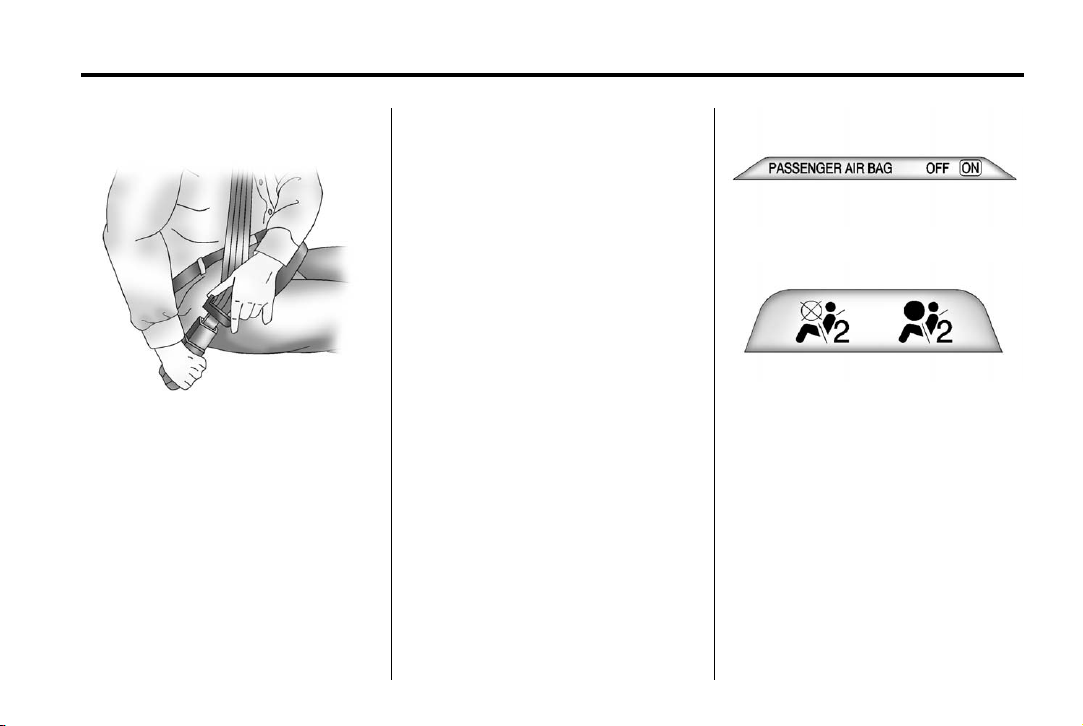
Passenger Sensing System
The passenger sensing system
will turn off the front outboard
passenger frontal airbag and
seat‐mounted side impact airbag
under certain conditions. No other
airbag is affected by the passenger
sensing system.
The passenger airbag status
indicator will be visible in the
rearview mirror when the vehicle
is started.
In Brief 1-11
United States
Canada and Mexico
See Passenger Sensing System on
page 3‑22 for important information.
Page 18
Black plate (12,1)
Chevrolet Corvette Owner Manual - 2012
1-12 In Brief
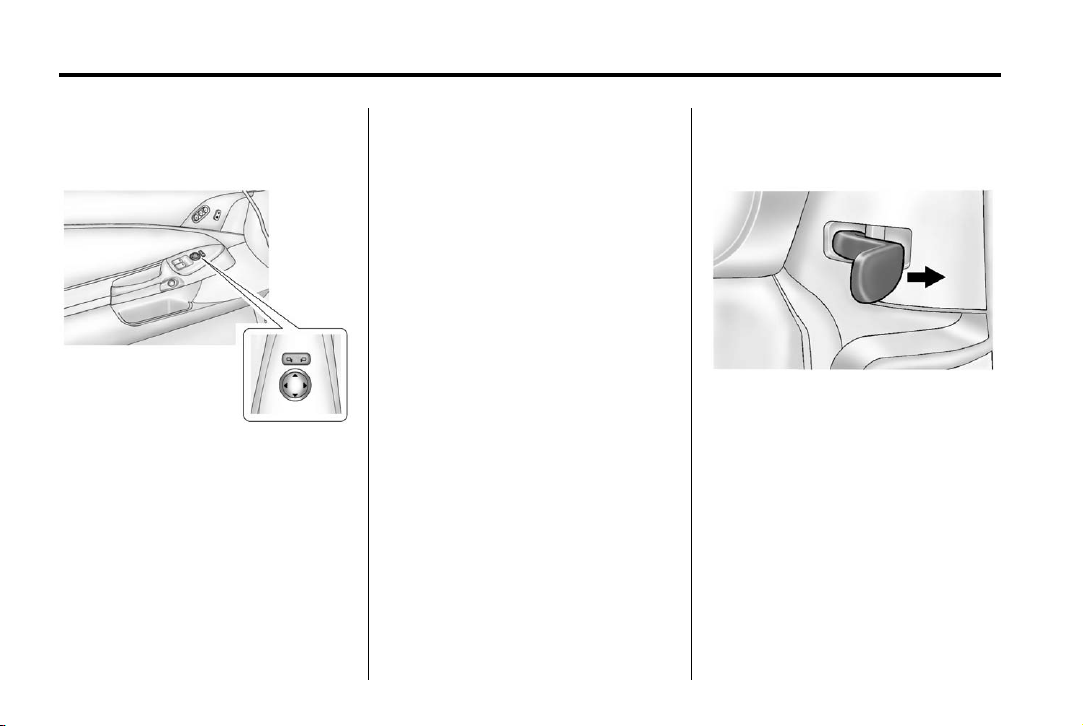
Mirror Adjustment
Exterior Mirrors
To adjust mirrors:
1. Press
2. Press the control pad to adjust
3. Return the switch to the center
See Power Mirrors on page 2‑16.
} or | to select a mirror.
the mirror.
to deselect the mirror.
If the vehicle has the memory
feature, a preferred mirror position
can be stored. See Power Seat
Adjustment on page 3‑2.
To fold, pull the mirror toward the
vehicle. Push the mirror outward,
to return it to the original position.
Interior Mirror
An automatic dimming rearview
mirror will automatically reduce
headlamp glare coming from
vehicles that are traveling
behind you.
See Automatic Dimming Rearview
Mirror on page 2‑17.
Steering Wheel Adjustment
The lever is located on the left side
of the steering column.
To adjust the steering wheel:
1. Pull the lever toward you.
2. Move the steering wheel up
or down.
3. Release the lever to lock the
steering wheel in place.
Page 19
Black plate (13,1)
Chevrolet Corvette Owner Manual - 2012
In Brief 1-13
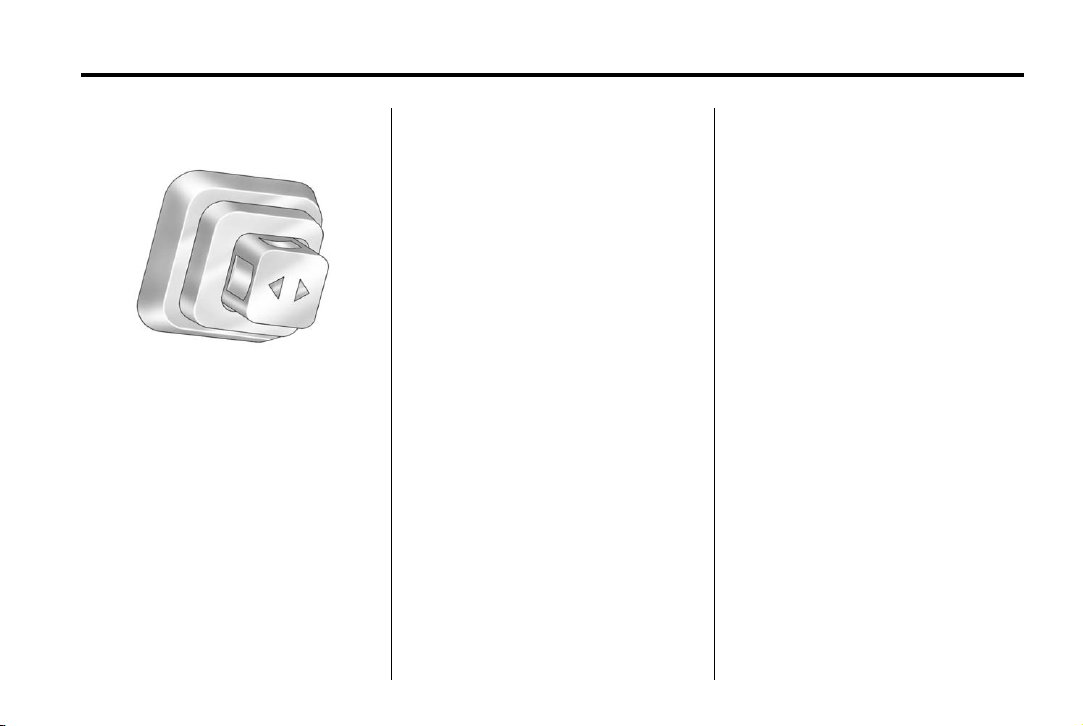
Telescopic Steering Column
For vehicles with this feature, the
telescopic steering column control
is located on the right side of the
steering column.
To adjust the telescopic steering
column:
1. Push the switch forward to move
the wheel away from you.
2. Pull the switch toward you to
move the wheel closer to you.
The telescopic steering column
position can be stored with your
memory settings. See “Memory
Seat, Mirrors, and Steering Wheel”
under Power Seat Adjustment on
page 3‑2 for more information.
Interior Lighting
Courtesy Lamps
When any door or the hatch/trunk lid
is opened, the interior lamps will go
on, unless it is bright outside.
The courtesy lamps can also be
turned on and off by pressing the
instrument panel brightness knob.
Reading Lamps
The inside rearview mirror includes
two reading lamps. The lamps go on
when a door is opened. When the
doors are closed, press the lamp
buttons to turn on each lamp.
Interior Light Control
To adjust the brightness of the
interior lights, turn and hold the
instrument panel brightness control
knob located on the left side of the
instrument panel. Push the knob in
to turn the lights on or off.
For more information on interior
lighting, see:
.
Instrument Panel Illumination
Control on page 6‑6.
.
Entry/Exit Lighting on page 6‑6.
Page 20
Black plate (14,1)
Chevrolet Corvette Owner Manual - 2012
1-14 In Brief
Exterior Lighting
Exterior Lamps
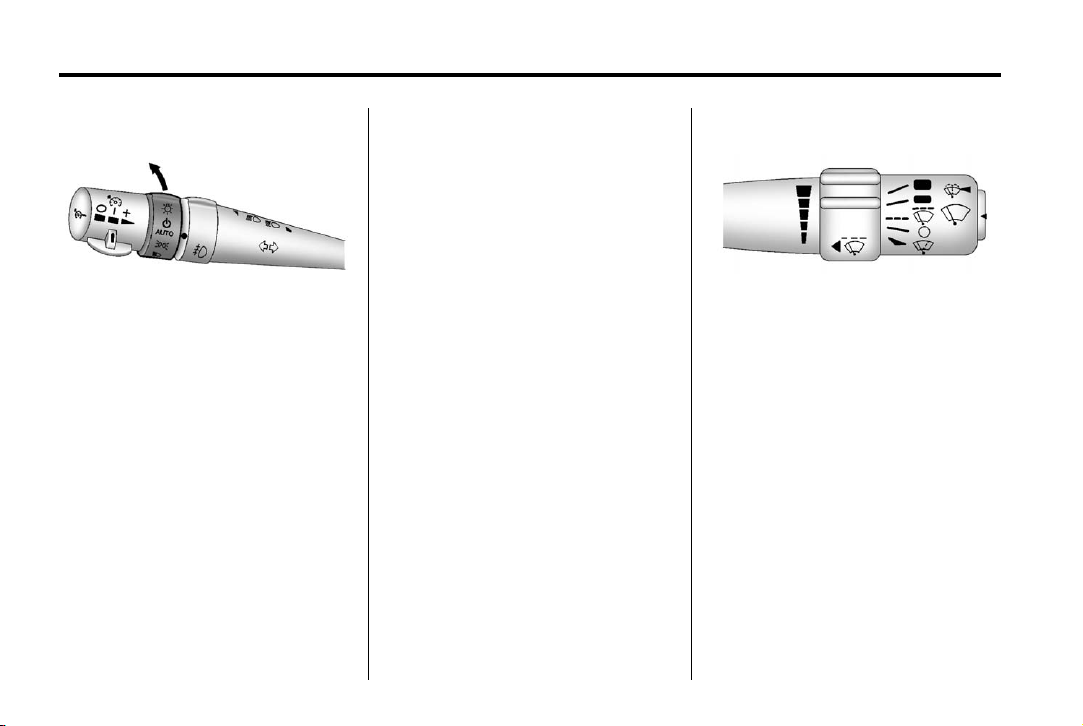
The exterior lamp control is located
to the left of the steering wheel,
on the multifunction lever.
O : Turn the band with this
symbol on it to operate the exterior
lamps.
O : Turns off all lamps.
AUTO: Sets the exterior lamps to
automatic mode. AUTO mode turns
the exterior lamps on and off
depending on how much light is
available outside the vehicle.
; : Turns on the parking lamps
together with the sidemarker lamps,
taillamps, license plate lamps, and
instrument panel lights.
5 : Turns on the headlamps
together with the parking lamps,
sidemarker lamps, taillamps,
license plate lamps, and instrument
panel lights.
For more information, see:
.
Exterior Lamp Controls on
page 6‑1.
.
Turn and Lane-Change Signals
on page 6‑4.
Windshield Wiper/Washer
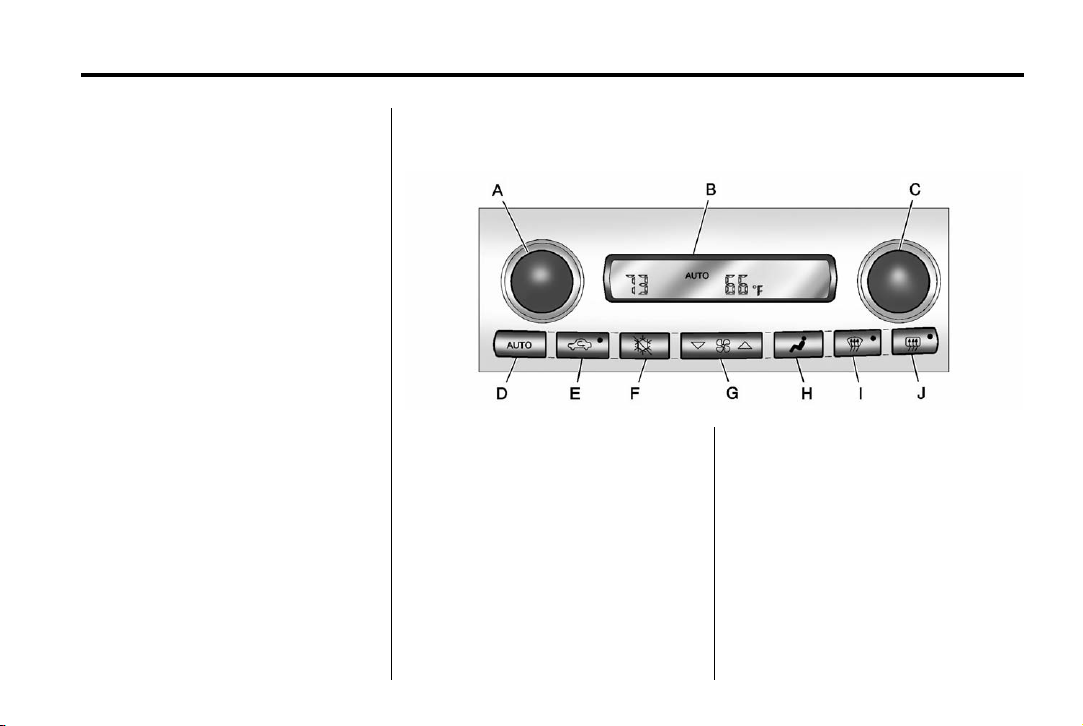
The windshield wiper/washer lever
is located on the right side of the
steering column.
1 : Use for fast wipes.
6 : Use for slow wipes.
3 : Use to set a delay between
wipes.
x : Use for a delayed wiping
cycle. Turn the intermittent adjust
band down for a longer delay or up
for a shorter delay.
Page 21
Black plate (15,1)
Chevrolet Corvette Owner Manual - 2012
In Brief 1-15
9 : Use to turn off the windshield
wipers.
8 : Use for a for a single wiping
cycle. For more wipes, hold the
band longer.
Windshield Washer: Press and
hold the button at the end of the
lever to spray washer fluid on the
windshield.
See Windshield Wiper/Washer on
page 5‑4.
Climate Controls
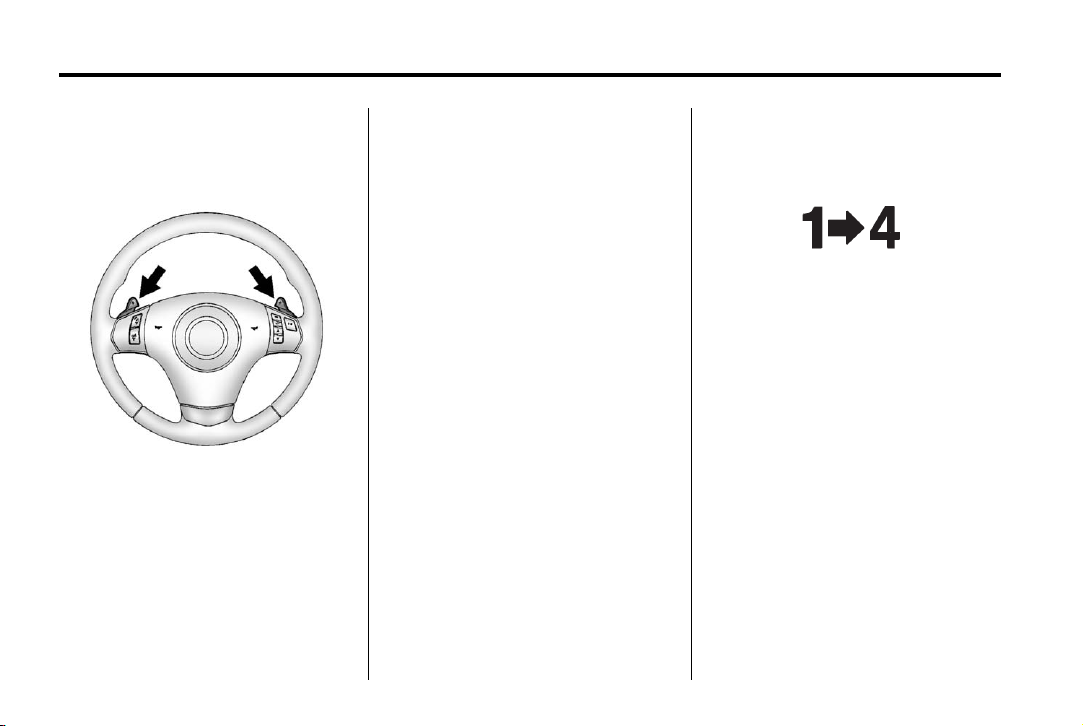
With this system, the heating, cooling, and ventilation can be controlled.
A. Driver Temperature Control
B. Display
C. Passenger Temperature Control
D. AUTO
E. Air Recirculation
F. Air Conditioning
G. Fan Control
H. Air Delivery Mode Control
I. Defrost
J. Rear Window Defogger
See Dual Automatic Climate Control
System on page 8‑1.
Page 22
Black plate (16,1)
Chevrolet Corvette Owner Manual - 2012
1-16 In Brief
Transmission
Manual Paddle Shift
(Automatic Transmission)
The Manual Paddle Shift system
can be used in D (Drive) or
S (Sport Mode). The system is
activated by pushing the paddle,
above the steering wheel spokes,
to manually up-shift to the next
gear, or pulling on the paddle,
behind the steering wheel
spokes to manually down-shift.
The current gear will be displayed
in the Driver Information (DIC),
or the Head-Up Display (HUD),
if the vehicle has either of these
features.
The Manual Paddle Shift system
can be deactivated by moving the
shift lever from S (Sport Mode)
back to D (Drive), or by holding
the up‐shift paddle for more than
one second. If the shift lever was in
D (Drive) when the system was
activated, the transmission will
return to automatic shifting after
10 seconds of cruising at a steady
speed and no manual shifts,
or when the vehicle comes to
a stop.
The Manual Paddle Shift system
will not allow either an up-shift or a
down-shift, if the vehicle speed is
too fast or too slow, nor will it
allow a start from 4 (Fourth) or
higher gear.
See Manual Mode on page 9‑29.
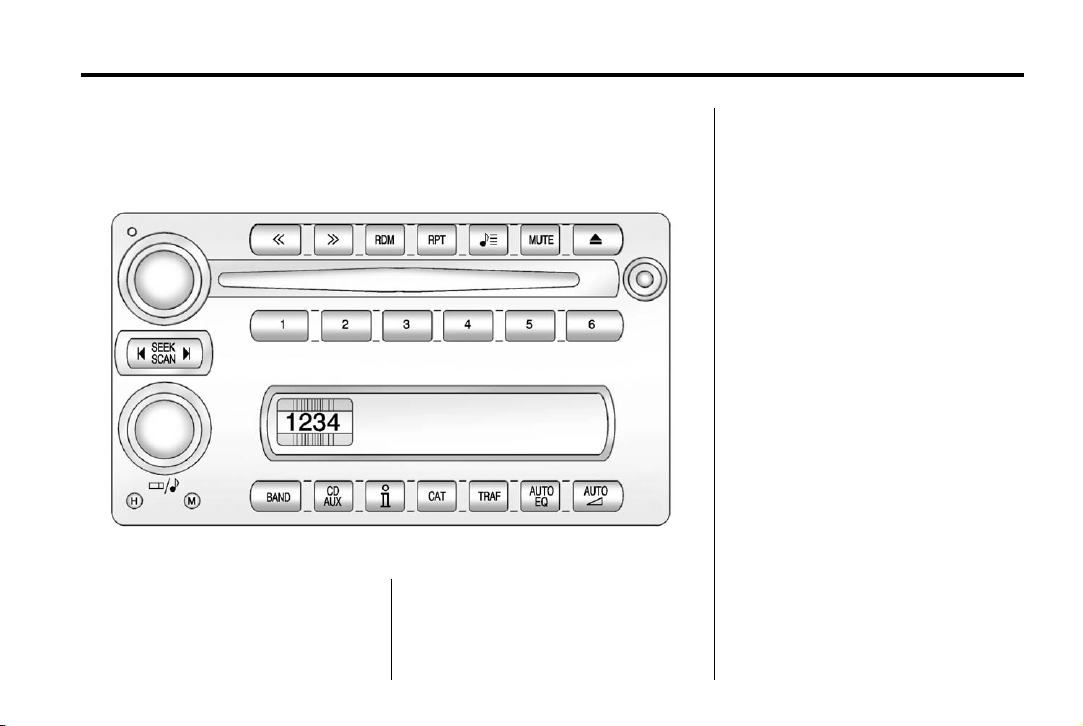
One to Four Shift Light
(Manual Transmission)
On vehicles with a manual
transmission, when this light
comes on, you can only shift
from 1 (First) to 4 (Fourth) instead
of 1 (First) to 2 (Second).
For more information about shifting
for the best fuel economy, see
Manual Transmission on page 9‑32.
Page 23
Black plate (17,1)
Chevrolet Corvette Owner Manual - 2012
In Brief 1-17
Vehicle Features
Radio(s)
Radio with CD, Six Disc Radio Similar
Top Knob: Press to turn the
system on and off. Turn to increase
or decrease the volume.
BAND: Press to switch between
FM1, FM2, AM, and if equipped,
XM1 and XM2.
O / e : Turn to select radio
stations.
t SEEK u : Press to seek
stations.
t SCAN u : Press and hold to
scan stations.
V : Press to change the information
that shows on the display while
listening to the radio.
For more information about these
and other radio features, see
Infotainment on page 7‑1 and
Operation on page 7‑2.
Setting Preset Stations
Up to 30 stations (six FM1, six FM2,
and six AM, and if equipped,
six XM1, and six XM2) can be
programmed.
To program presets:
1. Turn the radio on.
2. Press BAND to select FM1,
FM2, AM, XM1, or XM2.
3. Tune in the desired station.
Page 24

Black plate (18,1)
Chevrolet Corvette Owner Manual - 2012
1-18 In Brief
4. Press AUTO EQ to select the
equalization.
5. Press and hold one of the six
numbered pushbuttons until the
radio beeps once.
6. Repeat the steps for each
pushbutton.
See Operation on page 7‑2.
Setting the Clock
To set the clock:
1. Press and hold H until the
correct hour displays.
2. Press and hold M until the
correct minute displays.
See Clock on page 5‑6.
Satellite Radio
XM is a satellite radio service based
in the 48 contiguous United States
and 10 Canadian provinces.
XM satellite radio has a wide
variety of programming and
commercial-free music, coast to
coast, and in digital-quality sound.
A fee is required to receive the
XM service.
For more information, refer to:
.
www.xmradio.com or call
1-800-929-2100 (U.S.)
.
www.xmradio.ca or call
1-877-438-9677 (Canada)
See Satellite Radio on page 7‑7.
Portable Audio Devices
This vehicle may have an auxiliary
input jack, located on the audio
faceplate. External devices such as
iPod®, MP3 players, etc. can be
connected to the auxiliary input jack
using a 3.5 mm (1/8 in) input jack
cable.
See “Using the Auxiliary Input
Jack” under Auxiliary Devices on
page 7‑16.
Bluetooth
For vehicles with a Bluetooth
system, it allows users with a
Bluetooth‐enabled cell phone to
make and receive hands-free calls
using the vehicle’s audio system
and controls.
The Bluetooth‐enabled cell phone
must be paired with the Bluetooth
system before it can be used in the
vehicle. Not all phones will support
all functions. For more information,
visit www.gm.com/bluetooth.
For more information, see Bluetooth
on page 7‑16.
®
Page 25
Black plate (19,1)
Chevrolet Corvette Owner Manual - 2012
In Brief 1-19
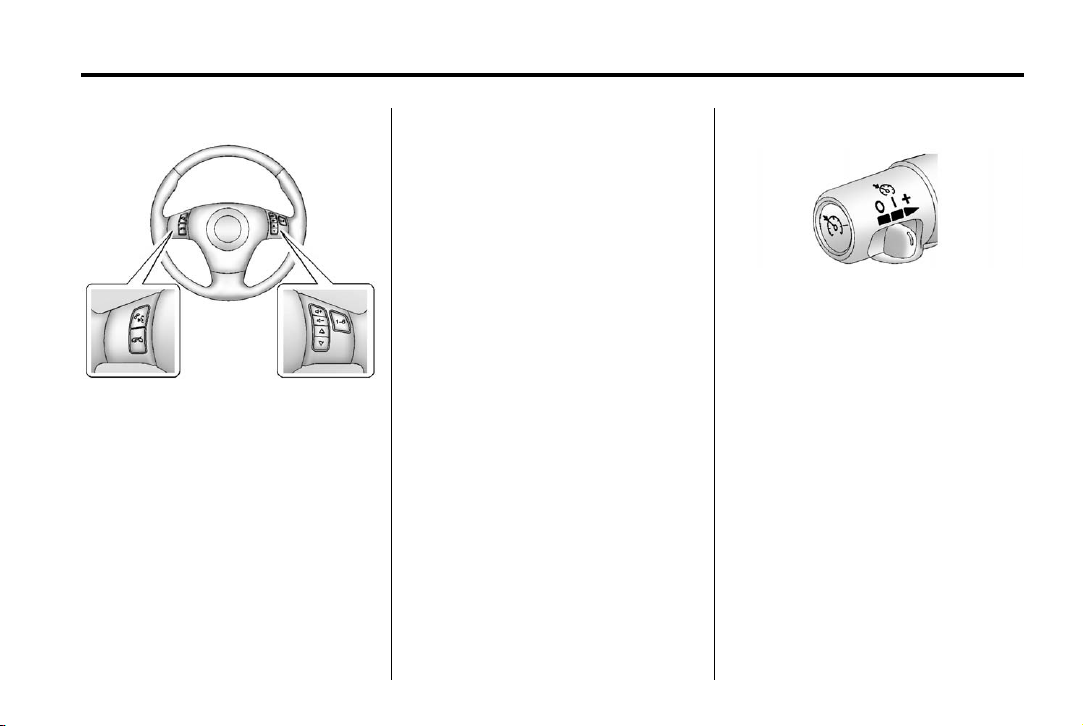
Steering Wheel Controls
For vehicles with steering wheel
controls, some audio controls can
be adjusted at the steering wheel.
b g : Press to turn on and off the
vehicle speakers. Press and hold
longer than two seconds to interact
with the OnStar
systems.
®
or Bluetooth
c : Press to reject an incoming
call, or to end a call.
e + / e −: Press to Increase or
decrease volume.
w / x : Press to change radio
stations or select tracks on a CD.
1 to 6: Press to play stations that
are programmed on the radio preset
pushbuttons.
For more information, see Steering
Wheel Controls on page 5‑3.
Cruise Control
The cruise controls are located at
the end of the multifunction lever.
9 : Turns the system off.
R : Turns the system on.
S : Makes the vehicle accelerate
or resume a previously set speed.
T : Press the button at the end of
the lever to set the speed.
See Cruise Control on page 9‑45.
Page 26
Black plate (20,1)
Chevrolet Corvette Owner Manual - 2012
1-20 In Brief
Navigation System
If the vehicle has a navigation
system, there is a separate
navigation system manual that
includes information on the radio,
audio players, and navigation
system.
The navigation system provides
detailed maps of most major
freeways and roads. After a
destination has been set, the
system provides turn-by-turn
instructions for reaching the
destination. In addition, the system
can help locate a variety of points of
interest (POIs), such as banks,
airports, restaurants, and more.
See the navigation system manual
for more information.
Driver Information Center (DIC)
The DIC display is located at the
bottom of the instrument panel
cluster. It shows the status of many
vehicle systems and enables
access to the personalization menu.
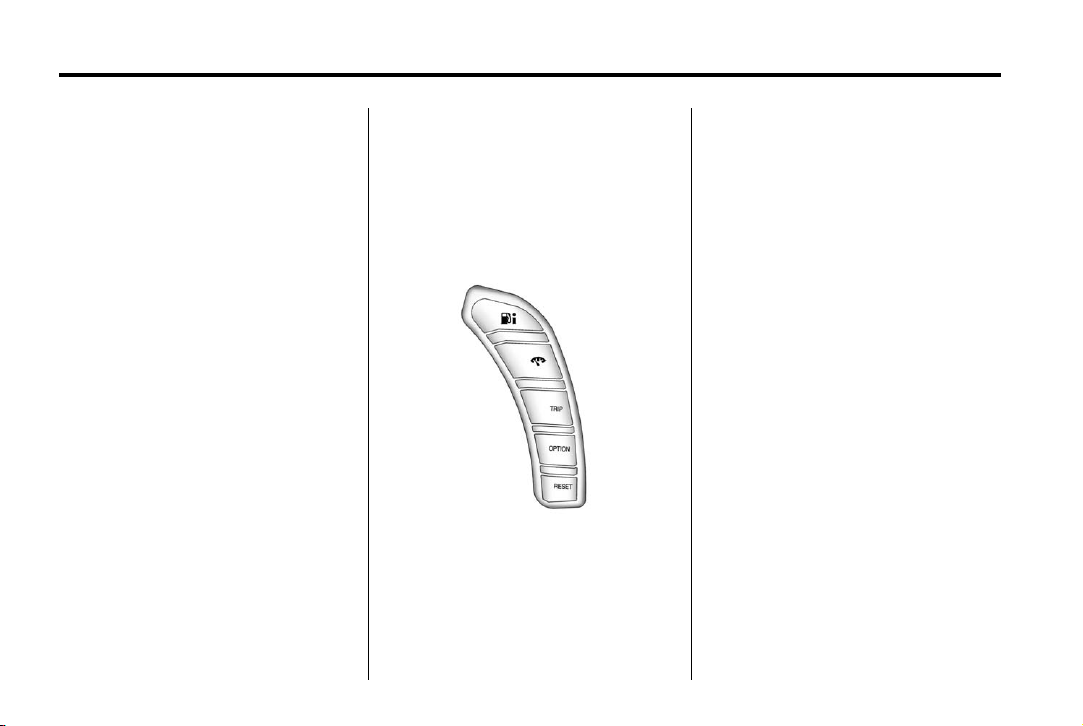
The DIC buttons are located on the
instrument panel to the right of the
instrument panel cluster.
. 4 : Press to display fuel
information such as fuel economy
and range.
2 : Press to display gauge
information like oil pressure and
temperature, coolant temperature,
automatic transmission fluid
temperature (if equipped), battery
voltage, and front/rear tire
pressures.
TRIP: Press to display your total
and trip distance driven, the elapsed
time function, your average speed,
and the engine oil life.
OPTION: Press to choose personal
options that are available on your
vehicle, depending on the options
your vehicle is equipped with, such
as door locks, easy entry seats, and
language.
RESET: Press, along with the other
buttons, to reset system functions,
select personal options, and turn off
or acknowledge messages on
the DIC.
For more information, see Driver
Information Center (DIC) on
page 5‑26.
Page 27

Black plate (21,1)
Chevrolet Corvette Owner Manual - 2012
In Brief 1-21
Vehicle Personalization
Some vehicle features can be
programmed by using the DIC
buttons located to the right of
the instrument panel cluster.
The features that can be
programmed include:
.
Units
.
Memory Features
.
Lighting Features
.
Lock and Unlock Feedback
.
Door Lock and Unlock Settings
.
Language
.
Personalization Name
See Vehicle Personalization on
page 5‑54.
Power Outlets
The accessory power outlet can be
used to plug in electrical equipment,
such as a cell phone or MP3 player.
The accessory power outlet is
located inside the center console
storage compartment, on the
forward left side.
Remove the cover to access and
replace when not in use.
See Power Outlets on page 5‑6.
Roof Panel
On vehicles with a removable roof
panel, there are three release
latches. Two are located on the front
of the roof panel and the other is
located on the back of the roof
panel. See “Removing the Roof
Panel” under Roof Panel on
page 2‑19.
Until you are sure you can remove
the roof panel by yourself, have
someone help you. Once removed,
the roof panel should always be
stored properly in the rear storage
compartment.
For more information:
.
See “Storing the Roof Panel”
under Roof Panel on page 2‑19.
.
See “Installing the Roof Panel”
under Roof Panel on page 2‑19.
Convertible
If equipped, the convertible top can
be lowered and stowed under the
tonneau cover behind the rear seat.
For step-by-step instructions, see
Convertible Top on page 2‑24.
Page 28
Black plate (22,1)
Chevrolet Corvette Owner Manual - 2012
1-22 In Brief
Performance and Maintenance
Traction Control System (TCS)
The traction control system limits
wheel spin. The system turns on
automatically every time the vehicle
is started.
.
To turn off traction control, press
and release the Active Handling
button located on the center
console.
appropriate DIC message
displays. See Ride Control
System Messages on page 5‑44.
.
Press and release the active
handling button again to turn on
traction control.
See Traction Control System (TCS)
on page 9‑36.
The vehicle has an Active Handling
System that helps maintain
directional control of the vehicle
i illuminates and the
in difficult driving conditions.
See Active Handling System on
page 9‑38.
The vehicle may have
Competitive Driving Mode
(except ZR1), Performance
Traction Management (Z06, ZR1),
and Launch Control systems
designed to allow increased
performance while accelerating
and cornering. See Competitive
Driving Mode on page 9‑39.
Tire Pressure Monitor
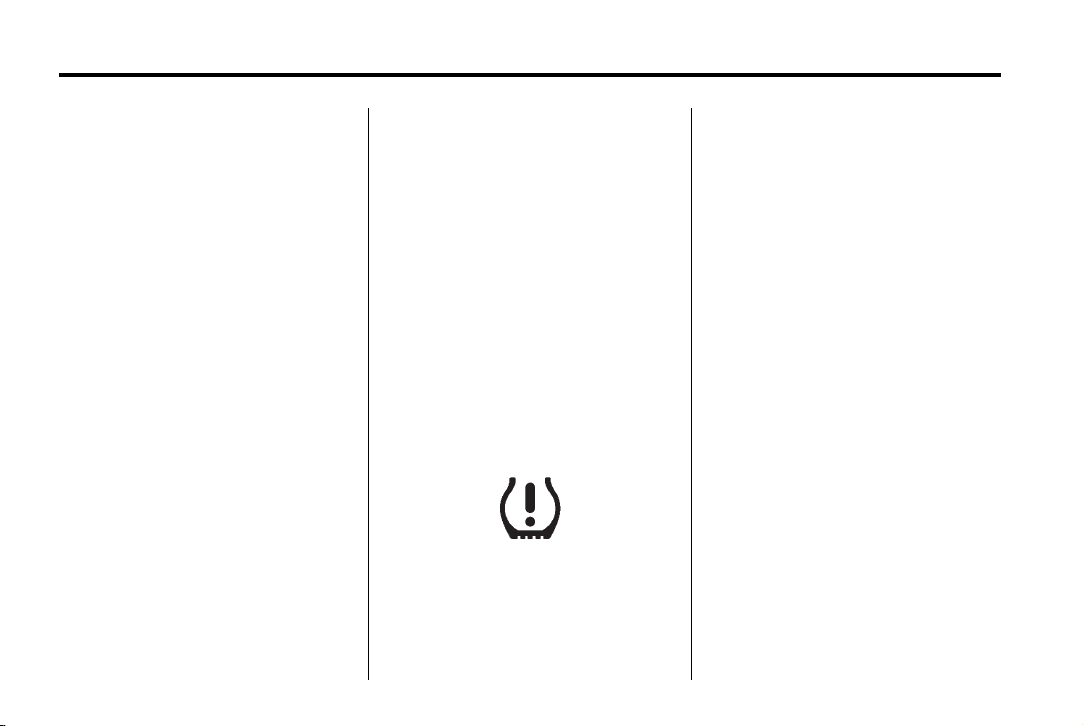
This vehicle may have a Tire
Pressure Monitor System (TPMS).
The TPMS warning light alerts you
to a significant loss in pressure
of one of the vehicle's tires.
If the warning light comes on, stop
as soon as possible and inflate the
tires to the recommended pressure
shown on the Tire and Loading
Information label. See Vehicle Load
Limits on page 9‑14. The warning
light will remain on until the tire
pressure is corrected.
During cooler conditions, the low tire
pressure warning light may appear
when the vehicle is first started and
then turn off. This may be an early
indicator that the tire pressures are
getting low and the tires need to be
inflated to the proper pressure.
The TPMS does not replace normal
monthly tire maintenance. It is the
driver’s responsibility to maintain
correct tire pressures.
See Tire Pressure Monitor System
on page 10‑64.
Page 29

Black plate (23,1)
Chevrolet Corvette Owner Manual - 2012
In Brief 1-23
Z06, Z16, and ZR1 Features
Checking Engine Oil
Z06, ZR1, and manual transmission
Z16 (Grand Sport) coupe models
have a high performance dry sump
lubrication system. This system
operates differently than a
standard engine lubrication system.
See Engine Oil on page 10‑14.
You should check the oil level
only after the engine has been
thoroughly warmed up and then
shut off for at least five minutes.
This ensures that the oil level
reading obtained will be accurate.
Jump Starting the Battery
The battery of Z06, ZR1, and
manual transmission Z16 (Grand
Sport) coupe models is in the rear
of the vehicle. You do not need to
access the battery for jump starting.
There are remote positive (+) and
negative (−) terminals under the
hood for this purpose. See Battery
on page 10‑40 and Jump Starting
on page 10‑78.
Brake Noise
Under certain weather or operating
conditions, occasional brake noise
might be heard with the vehicle's
performance braking system.
This brake system is designed for
superior fade resistance and
consistent operation using high
performance brake pads. Brake
noise is normal and does not affect
system performance. See Braking
on page 9‑4.
Car Wash Guidelines
Automatic car washes are not
recommended for this vehicle.
Some car washes cause damage to
the vehicle, the wheels, and the
convertible top, if the vehicle is so
equipped.
If you drive the vehicle through an
automatic car wash that does not
have enough clearance for the
undercarriage and/or wide rear tires
and wheels, you could damage the
vehicle. Verify with the manager of
the car wash that the vehicle will fit
before entering the car wash or use
a touchless car wash. See “Washing
Your Vehicle” under Exterior Care
on page 10‑82.
Page 30

Black plate (24,1)
Chevrolet Corvette Owner Manual - 2012
1-24 In Brief
Engine Oil Life System
The engine oil life system calculates
engine oil life based on vehicle use
and displays a DIC message when
it is necessary to change the engine
oil and filter. The oil life system
should be reset to 100% only
following an oil change.
Resetting the Oil Life System
1. Press the TRIP button so the
OIL LIFE percentage is
displayed.
2. Press RESET and hold for
two seconds. OIL LIFE
REMAINING 100% will appear.
See Engine Oil Life System on
page 10‑19.
Driving for Better Fuel Economy
Driving habits can affect fuel
mileage. Here are some driving tips
to get the best fuel economy
possible.
.
Avoid fast starts and accelerate
smoothly.
.
Brake gradually and avoid
abrupt stops.
.
Avoid idling the engine for long
periods of time.
.
When road and weather
conditions are appropriate,
use cruise control, if equipped.
.
Always follow posted speed
limits or drive more slowly when
conditions require.
.
Keep vehicle tires properly
inflated.
.
Combine several trips into a
single trip.
.
Replace the vehicle's tires with
the same TPC Spec number
molded into the tire's sidewall
near the size.
.
Follow recommended scheduled
maintenance.
Premium Fuel
This vehicle's engine was designed
to use premium unleaded gasoline.
See Recommended Fuel on
page 9‑48.
Battery
This vehicle has a maintenance free
battery. See Battery on page 10‑40
and Jump Starting on page 10‑78.
For Z06, ZR1, and manual
transmission Z16 (Grand Sport)
coupe models the battery is
located in the rear hatch/trunk
area. Access to the battery is
not necessary to jump start the
vehicle. There are positive (+) and
negative (−) terminals in the engine
compartment.
Page 31

Black plate (25,1)
Chevrolet Corvette Owner Manual - 2012
In Brief 1-25
Roadside Assistance Program
U.S.: 1-800-243-8872
TTY Users (U.S.): 1-888-889-2438
Canada: 1-800-268-6800
Mexico: 01-800-466-0800
As the owner of a new Chevrolet,
you are automatically enrolled in the
Roadside Assistance program.
See Roadside Assistance Program
(U.S. and Canada) on page 13‑8
or Roadside Assistance Program
(Mexico) on page 13‑10.
Roadside Assistance and OnStar
(U.S. and Canada)
If you have an active OnStar
subscription, press the
and the current GPS location will be
sent to an OnStar advisor who will
assess your problem, contact
Roadside Assistance, and relay
your exact location to get the help
you need.
Q button
Online Owner Center
(U.S. and Canada)
The Online Owner Center is a
complimentary service that includes
online service reminders, vehicle
maintenance tips, online owner
manual, special privileges,
and more.
Sign up today at:
U.S.: chevrolet.com (click on
“Owners,” then “Manage My
Chevrolet/Owners Login”)
Canada: chevroletowner.ca
OnStar
If equipped, this vehicle has a
comprehensive, in-vehicle system
that can connect to a live Advisor
for Emergency, Security, Navigation,
Connection, and Diagnostic
Services. See OnStar Overview on
page 14‑1 for more information.
®
Page 32

Black plate (26,1)
Chevrolet Corvette Owner Manual - 2012
1-26 In Brief
2 NOTES
Page 33

Black plate (1,1)
Chevrolet Corvette Owner Manual - 2012
Keys, Doors, and Windows 2-1
Keys, Doors, and Windows
Keys and Locks
Keys . . . . . . .. . . . . . . . . . .. . . . . . . . 2-2
Remote Keyless Entry (RKE)
System . . . . . . .. . . . . . . . . . . . . . . 2-3
Remote Keyless Entry (RKE)
System Operation . . . . . . . . . . . 2-3
Door Locks . . . . . . . . . . . . . . . . . . . 2-8
Power Door Locks . . . . . . . . . . . 2-10
Automatic Door Locks . . . . . . . 2-10
Lockout Protection . . . . . . . . . . . 2-11
Doors
Hatch . . . . . . .. . . . . . . . . . . . . . . . . 2-11
Vehicle Security
Vehicle Security . . . . . . . . ...... 2-14
Anti-theft Alarm System . . . . . . 2-14
Immobilizer . . . . . . . . . . . . . . . . . . 2-15
Immobilizer Operation . . . . . . . 2-15
Exterior Mirrors
Convex Mirrors . . . . . . . . . . . . . . 2-16
Power Mirrors . . . . . . . . . . . ..... 2-16
Folding Mirrors . . . . . . . . . . . . . . . 2-17
Heated Mirrors . . . . . . . . ... . . . . 2-17
Automatic Dimming Mirror . . . 2-17
Interior Mirrors
Automatic Dimming Rearview
Mirror . . . . . . . . . . . . . . . . . . . . . . . 2-17
Windows
Windows . . . . . . . . . . . . . . . ...... 2-18
Power Windows . . . . . . . . . . . . . 2-18
Sun Visors . . . . . . . . . ... . . . . . . . 2-19
Roof
Roof Panel . . . . . . . . . . . . . . . . . . 2-19
Convertible Top . . . . . . . . . . . . . . 2-24
Page 34
Black plate (2,1)
Chevrolet Corvette Owner Manual - 2012
2-2 Keys, Doors, and Windows
Keys and Locks
Keys
WARNING
{
Leaving children in a vehicle with
the Remote Keyless Entry (RKE)
transmitter is dangerous for many
reasons; children or others could
be badly injured or even killed.
They could operate the power
windows or other controls or
even make the vehicle move.
The windows will function with the
RKE transmitter in the vehicle
and they could be seriously
injured or killed if caught in the
path of a closing window. Do not
leave the RKE transmitter in a
vehicle with children.
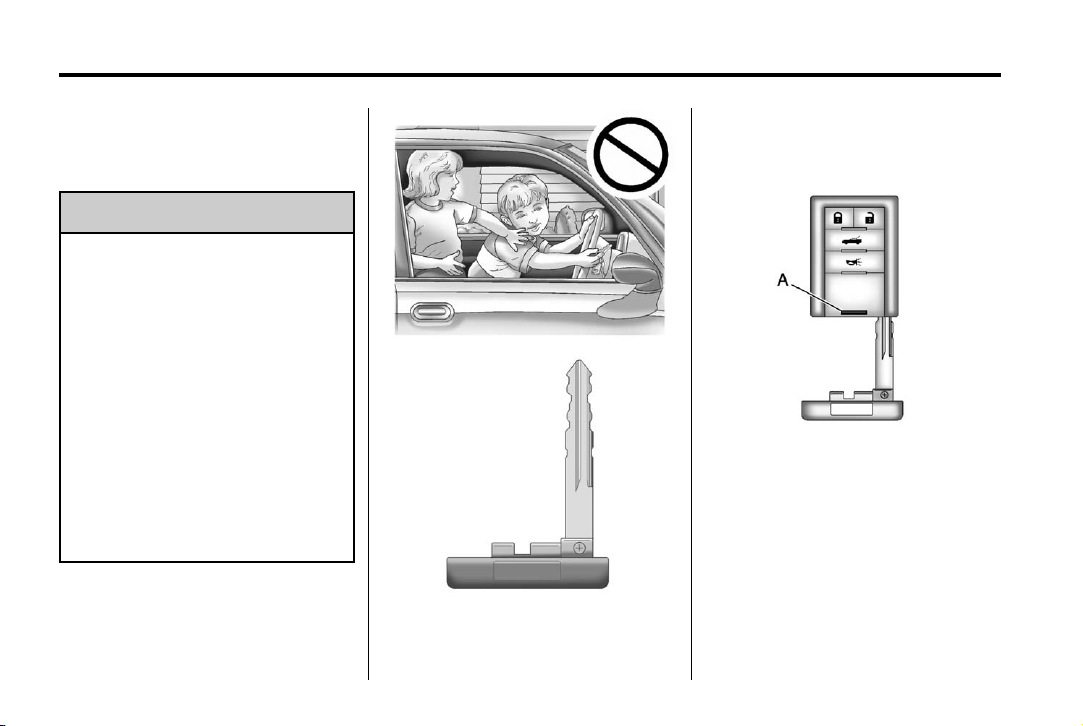
The key located inside the RKE
transmitter can be used to lock and
unlock the glove box and to open
the hatch/trunk lid if power to the
vehicle is lost. See Hatch on
page 2‑11 for more information.
Press the button (A) near the bottom
of the RKE transmitter to remove
the key. Never pull the key out
without pressing the button.
This vehicle has a keyless access
system with pushbutton start.
See Ignition Positions on page 9‑20
for information on starting the
vehicle.
Page 35

Black plate (3,1)
Chevrolet Corvette Owner Manual - 2012
Keys, Doors, and Windows 2-3
Notice: If you ever lose your
transmitter(s) and/or key, it could
be difficult to get into your
vehicle. You may even have to
damage your vehicle to get in.
Be sure you have a spare
transmitter and/or key.
If locked out of the vehicle, contact
Roadside Assistance. See Roadside
Assistance Program (U.S. and
Canada) on page 13‑8 or Roadside
Assistance Program (Mexico) on
page 13‑10.
With an active OnStar subscription,
an OnStar Advisor may remotely
unlock the vehicle. See OnStar
Overview on page 14‑1.
Remote Keyless Entry (RKE) System
See Radio Frequency Statement on
page 13‑21 for information
regarding Part 15 of the Federal
Communications Commission (FCC)
rules and Industry Canada
Standards RSS-GEN/210/220/310.
If there is a decrease in the RKE
operating range:
.
Check the distance.
The transmitter may be too
far from the vehicle.
.
Check the location. Other
vehicles or objects may be
blocking the signal.
.
Check the transmitter's battery.
See “Battery Replacement” later
in this section.
.
If the transmitter is still not
working correctly, see your
dealer or a qualified technician
for service.
Remote Keyless Entry (RKE) System Operation
The Remote Keyless Entry (RKE)
transmitter functions work up to
30 m (100 ft) away from the vehicle.
There are other conditions that
can affect the performance of the
transmitter. See Remote Keyless
Entry (RKE) System on page 2‑3.
The vehicle comes with
two transmitters. Each transmitter
will have a number on top of it,
“1” or “2.” These numbers
correspond to the driver of
the vehicle. For example, the
memory seat position for driver 1
will be recalled when using the
transmitter labeled “1,” if enabled
through the DIC. See Memory
Seats on page 3‑4 and Vehicle
Personalization on page 5‑54 for
more information.
Page 36
Black plate (4,1)
Chevrolet Corvette Owner Manual - 2012
2-4 Keys, Doors, and Windows
Keyless Unlocking
Press the door handle sensor to
unlock and open the doors if the
RKE transmitter is within range.
See Door Locks on page 2‑8 and
“Passive Door Unlock” under
Vehicle Personalization on
page 5‑54 for additional information.
Keyless Locking
The doors lock after several
seconds if all doors are closed and
at least one RKE transmitter has
been removed from the interior of
the vehicle. To customize whether
the doors automatically lock when
exiting the vehicle, see “Passive
Door Locking” under Vehicle
Personalization on page 5‑54 for
additional information.
Keyless Trunk Opening
Press the hatch/trunk release
button located on the rear of the
hatch/trunk lid above the license
plate to open the trunk if the
RKE transmitter is within range.
See Hatch on page 2‑11 for
additional information.
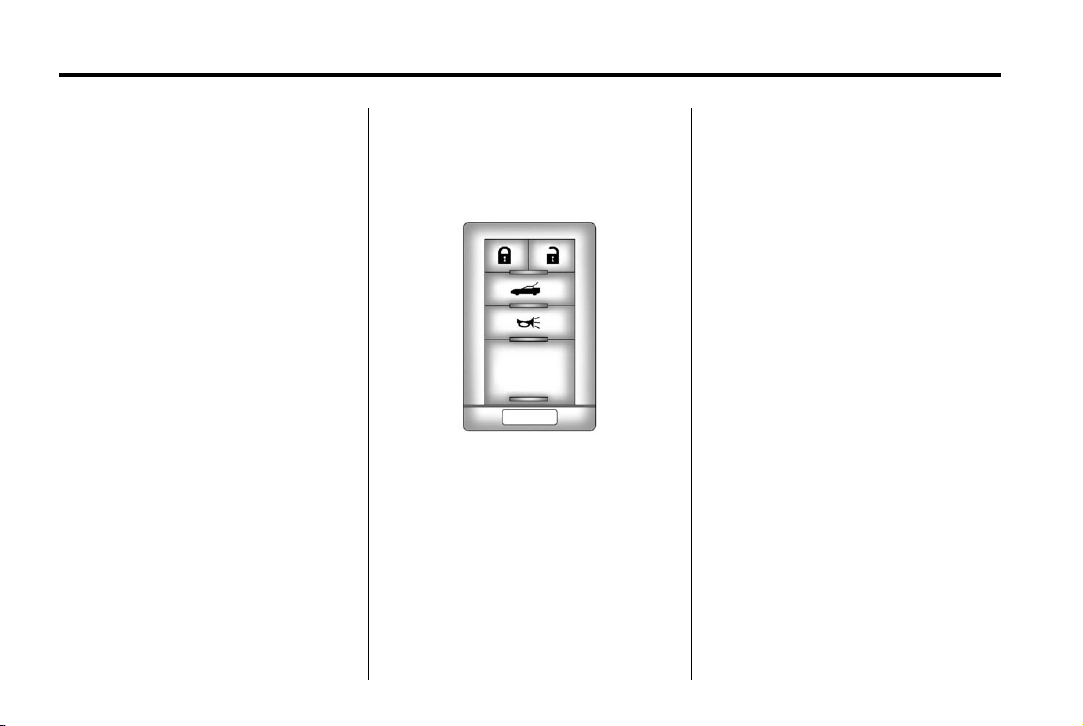
This vehicle comes with two
transmitters.
Q (Lock): Press once to lock the
doors. When
the lights flash and the horn sounds
to confirm locking.
Q is pressed twice,
K (Unlock): Press once to unlock
only the driver door. Press
within five seconds to unlock both
doors. The interior lamps may
come on.
Pressing
settings. See Memory Seats on
page 3‑4 for more information.
K also recalls the memory
K twice
} (Hatch/Trunk): Press and
hold for about one second to unlock
the hatch/trunk. If the engine is
running, the shift lever must be
in P (Park) for an automatic
transmission. For a manual
transmission, the shift lever must
be in N (Neutral) with the parking
brake set.
L (Panic): Press to sound the
horn. Press any other button on the
RKE transmitter to stop it.
Page 37
Black plate (5,1)
Chevrolet Corvette Owner Manual - 2012
Keys, Doors, and Windows 2-5
Programming Transmitters to
the Vehicle
Only RKE transmitters programmed
to this vehicle will work. If a
transmitter is lost or stolen, a
replacement can be purchased and
programmed through your dealer.
The vehicle can be reprogrammed
so that lost or stolen transmitters
no longer work. Each vehicle can
have up to four transmitters
programmed to it.
Programming with a Recognized
Transmitter
A new transmitter can be
programmed to the vehicle when
there is one recognized transmitter.
For vehicles sold in Canada, two
recognized transmitters are required
to program a new transmitter.
1. The vehicle must be off.
2. Both the recognized and new
transmitters must be with you.
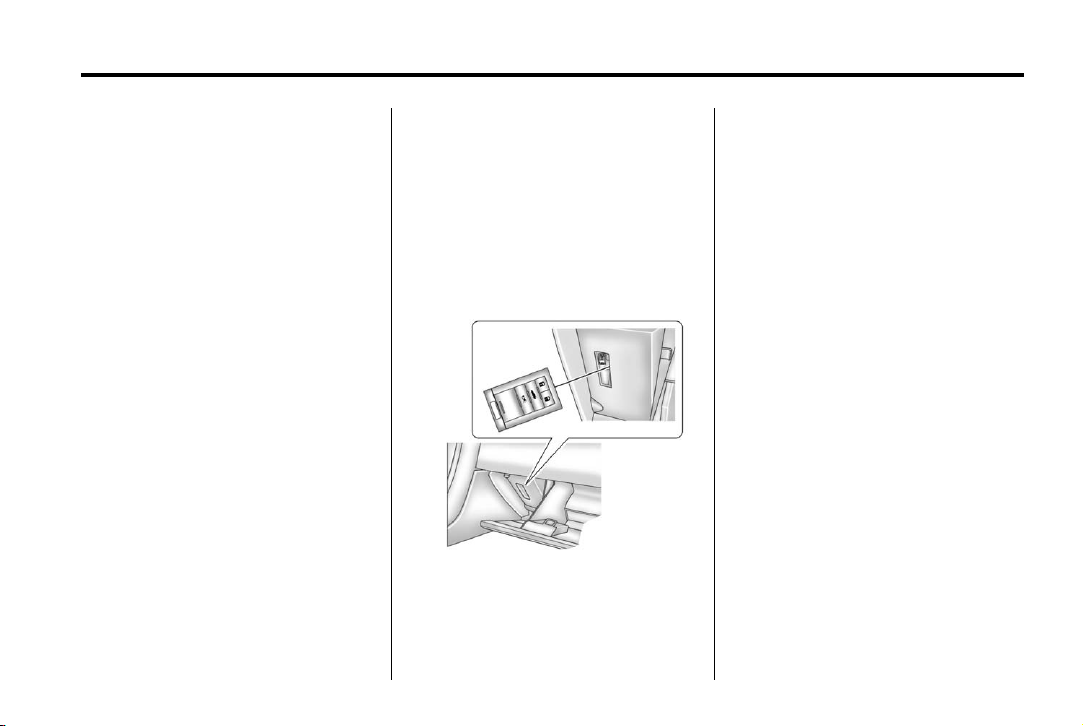
3. Insert the vehicle key into the
key cylinder located above the
license plate.
4. Open the hatch/trunk.
5. Turn the key five times within
five seconds.
6. The DIC displays READY FOR
FOB #2, 3 or 4.
7. Place the new transmitter in
the glove box transmitter pocket
with the buttons facing the
passenger side.
8. A beep sounds when
programming is complete.
The DIC displays READY FOR
#3 or 4, or MAXIMUM NUMBER
OF FOBS LEARNED.
9. To program additional
transmitters, repeat Step 7.
Press Acc. on the ignition switch
if programming is complete.
10. Press
K on each newly
programmed transmitter to
complete the process.
Page 38
Black plate (6,1)
Chevrolet Corvette Owner Manual - 2012
2-6 Keys, Doors, and Windows
Programming without a
Recognized Transmitter
This procedure requires three
10-minute cycles to complete the
programming process. United
States owners are permitted to
program a new transmitter to
their vehicle when a recognized
transmitter is not available.
The Canadian immobilizer
standard requires that Canadian
owners see their dealer for
programming new transmitters
when two recognized transmitters
are not available.
1. The vehicle must be off.
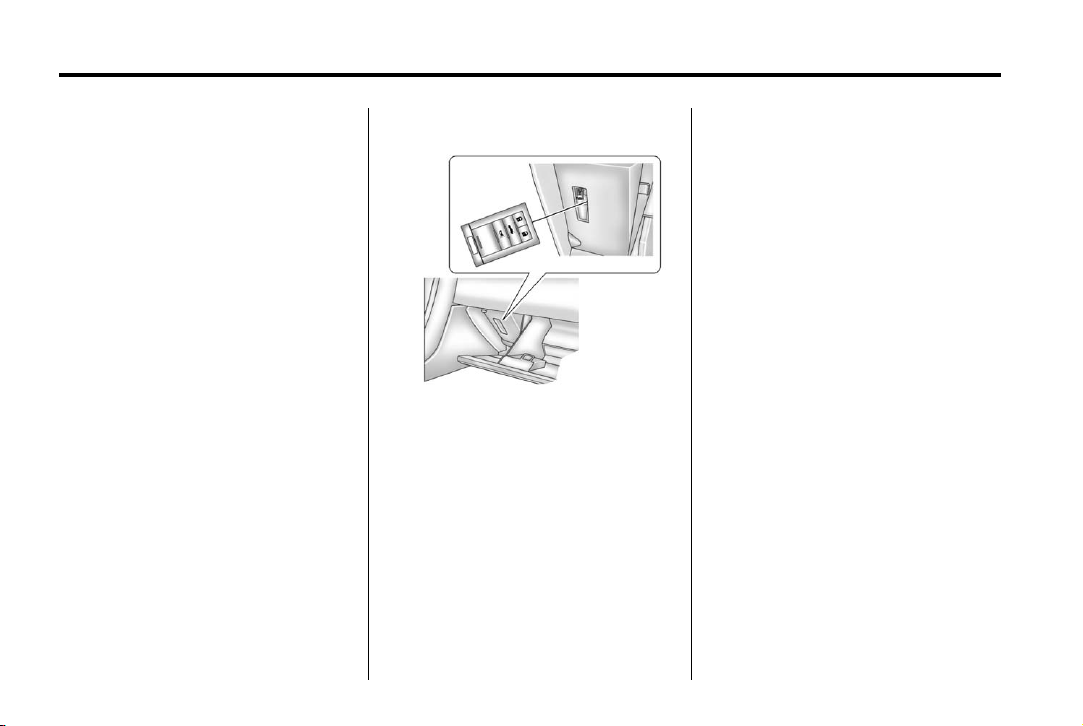
2. Place the new transmitter in
the glove box transmitter pocket
with the buttons facing the
passenger side.
3. Insert the vehicle key into the
key cylinder located above the
license plate.
4. Open the hatch/trunk.
5. Turn the key five times within
five seconds.
6. The DIC message displays
OFF-ACCESSORY TO
LEARN.
7. Press Acc. on the ignition
switch.
8. The DIC reads WAIT
10 MINUTES and counts
down to zero.
9. The DIC displays
OFF-ACCESSORY TO
LEARN again.
10. Press Acc. on the ignition
switch.
11. Steps 8, 9, and 10 will be
repeated two more times.
12. A beep sounds and the DIC
reads READY FOR FOB #1.
All previously known
transmitter programming has
been erased.
Page 39
Black plate (7,1)
Chevrolet Corvette Owner Manual - 2012
Keys, Doors, and Windows 2-7
13. A beep sounds once
programming in complete.
The DIC displays READY
FOR FOB #2.
To program additional
transmitters, take transmitter 1
out of the transmitter pocket
and place transmitter 2 in the
pocket. Up to four transmitters
can be programmed. The DIC
then displays MAXIMUM
NUMBER OF FOBS LEARNED
and exits the
programming mode.
Press Acc. on the ignition
switch to complete the process.
14. Press Acc. on the ignition
switch if programming is
complete.
15. Press
K on each newly
programmed transmitter to
complete the process.
Starting the Vehicle with a
Low Transmitter Battery
If the transmitter battery is weak,
the DIC may display NO FOBS
DETECTED when trying to start the
vehicle. To start the vehicle, place
the transmitter in the glove box
transmitter pocket with the buttons
facing the passenger side. Then,
with the vehicle in P (Park) for an
automatic transmission, press the
brake pedal and
has a manual transmission, press
the clutch and
transmitter battery as soon as
possible. Change the transmitter
battery if the DIC displays FOB
BATTERY LOW.
/. If the vehicle
/. Replace the
Battery Replacement
Notice: When replacing the
battery, do not touch any of the
circuitry on the transmitter.
Static from your body could
damage the transmitter.
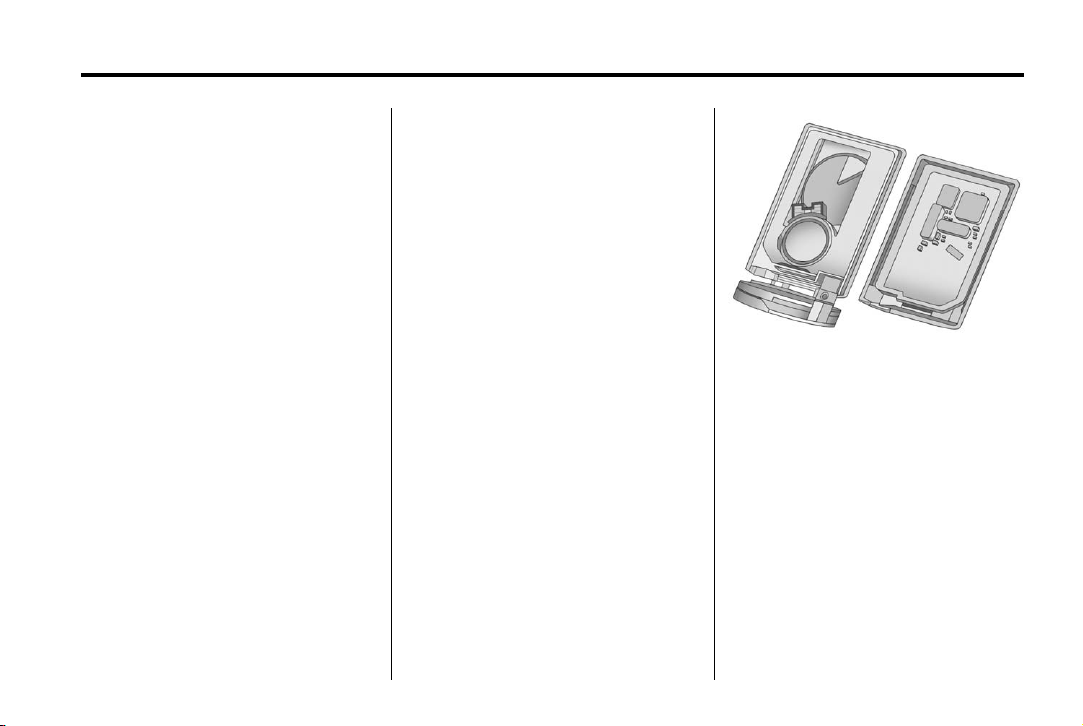
1. Separate the transmitter with a
flat, thin object inserted into the
slot on the side or back of the
transmitter.
2. Remove the old battery. Do not
use a metal object.
3. Insert the new battery, positive
side facing down. Replace with a
CR2032 or equivalent battery.
4. Reassemble the transmitter.
Page 40
Black plate (8,1)
Chevrolet Corvette Owner Manual - 2012
2-8 Keys, Doors, and Windows
Door Locks
WARNING
{
Unlocked doors can be
dangerous.
.
Passengers — especially
children — can easily open
the doors and fall out of a
moving vehicle. When a door
is locked it will not open.
You increase the chance of
being thrown out of the
vehicle in a crash if the doors
are not locked. So, wear
safety belts properly and lock
the doors whenever you
drive.
(Continued)
WARNING (Continued)
.
Young children who get into
unlocked vehicles may be
unable to get out. A child can
be overcome by extreme heat
and can suffer permanent
injuries or even death from
heat stroke. Always lock
your vehicle whenever you
leave it.
.
Outsiders can easily enter
through an unlocked door
when you slow down or stop
your vehicle. Locking your
doors can help prevent this
from happening.
From the outside, press
the Remote Keyless Entry (RKE)
transmitter.
Q or " on
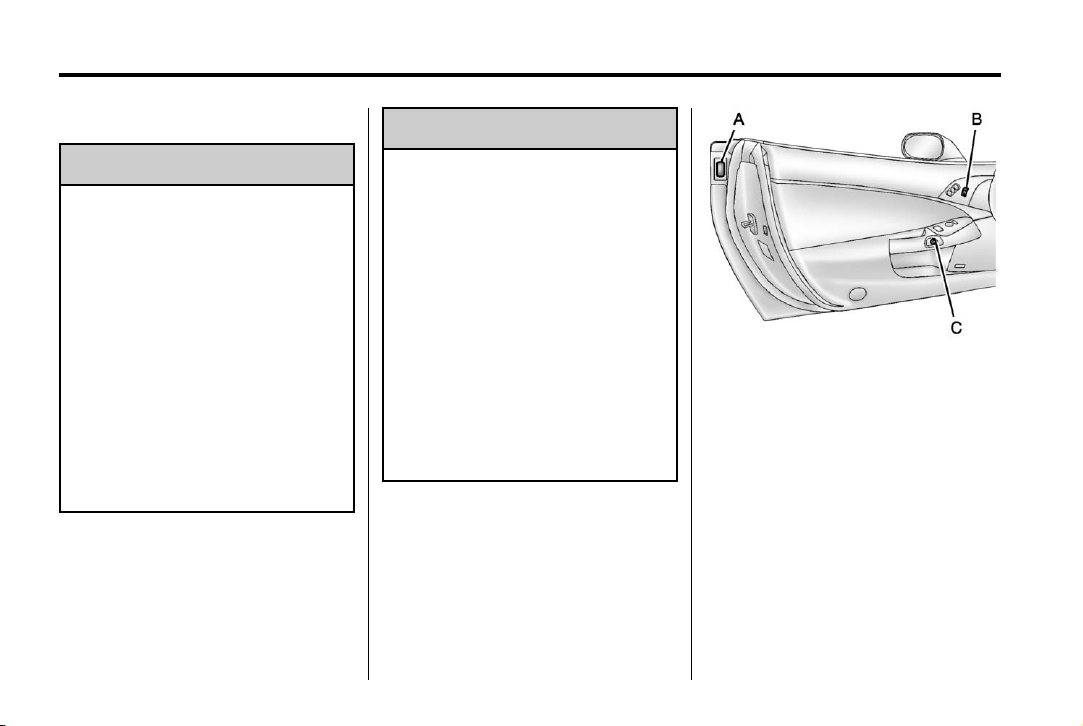
A. Door Handle Sensor
B. Power Door Lock Switch
C. Door Latch Button
With the RKE transmitter within
range, grip the door handle
sensor (A). See Remote Keyless
Entry (RKE) System Operation on
page 2‑3. When the passenger door
is opened first, the driver door will
also unlock.
From the inside, use the power door
lock switch (B). See Power Door
Locks on page 2‑10.
Page 41
Black plate (9,1)
Chevrolet Corvette Owner Manual - 2012
To open a door from the inside,
push the door latch button (C).
A tone will sound when the button
is pushed.
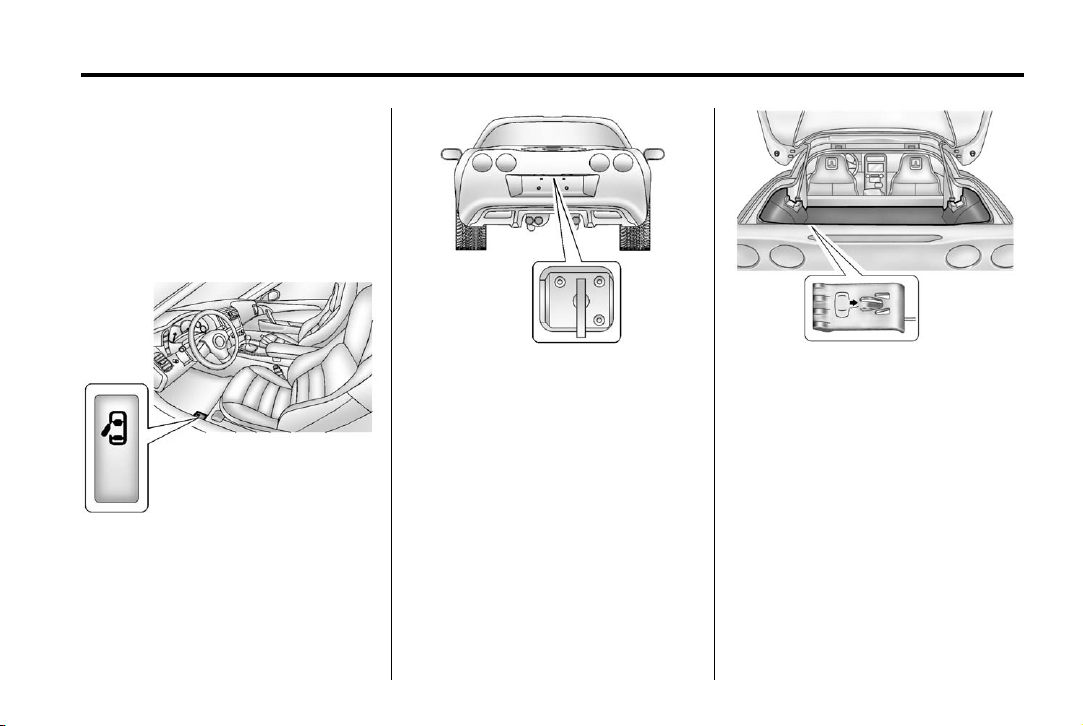
If the vehicle has lost battery power,
the driver door can be opened
manually.
.
From inside the vehicle, pull the
door release handle.
.
From outside the vehicle, use
the key to open the hatch/trunk.
See Keys on page 2‑2.
Keys, Doors, and Windows 2-9
Then, pull the manual door
release handle.
Page 42
Black plate (10,1)
Chevrolet Corvette Owner Manual - 2012
2-10 Keys, Doors, and Windows
Power Door Locks
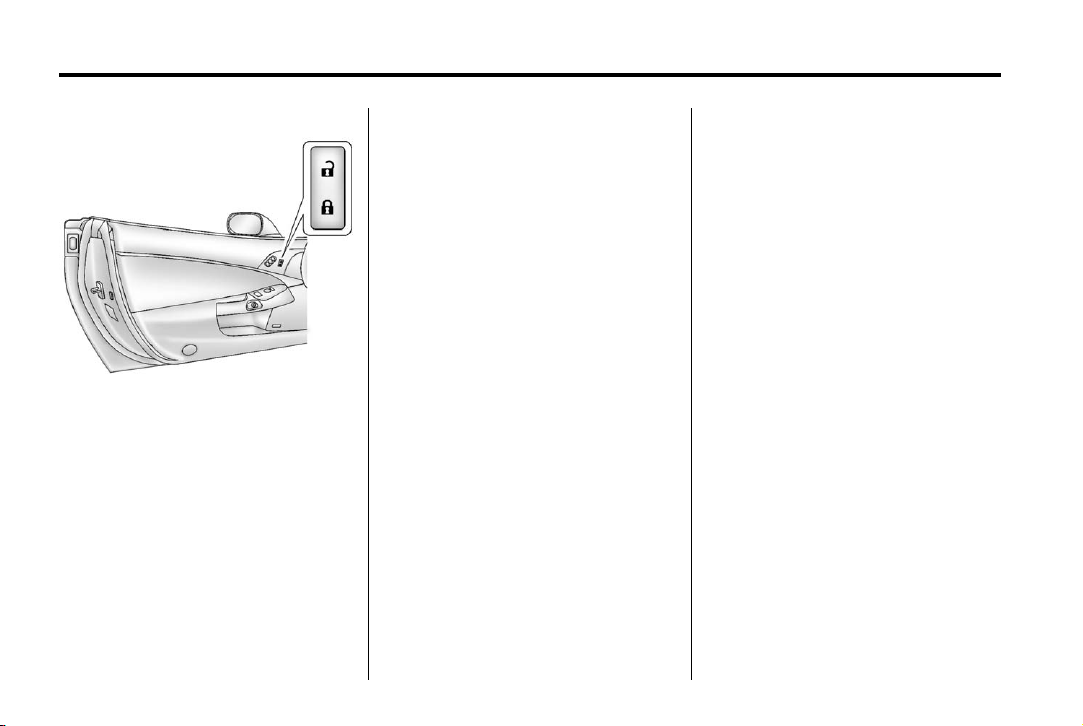
There is an indicator light on the
rear of the door near the window.
K (Unlock): Press to unlock the
doors.
When pressed, a beep sounds.
If the door is closed, the indicator
light flashes twice. If the door is
open, the indicator light flashes.
Q (Lock): Press to lock the doors.
When pressed, a beep sounds.
If the door is closed when pressed,
the indicator light comes on for a
few seconds, then turns off. If the
door is open when pressed, the
indicator light stays on.
Automatic Door Locks
The vehicle is programmed so that
when the doors are closed, the
ignition is on, and the shift lever is
moved out of P (Park) for automatic
transmissions, or when vehicle
speed becomes faster than 13 km/h
(8 mph) for manual transmissions,
both doors will lock.
Use the power door unlock switch
to unlock the door when the
vehicle is not in P (Park). When the
door is closed again, the doors will
lock either when your foot is
removed from the brake or the
vehicle speed becomes faster than
13 km/h (8 mph).
Automatic Door Unlock
The vehicle is programmed so
that when the shift lever is
moved into P (Park) for automatic
transmission vehicles or when
the ignition is turned off or is in
Retained Accessory Power (RAP)
for manual transmission vehicles,
both doors will unlock.
With the vehicle stopped and the
engine running, door unlocking
can be programmed through the
Driver Information Center (DIC).
This allows the driver to
choose various unlock settings.
For programming information,
see Vehicle Personalization on
page 5‑54.
Page 43
Black plate (11,1)
Chevrolet Corvette Owner Manual - 2012
Keys, Doors, and Windows 2-11
Lockout Protection
Your vehicle can be programmed to
sound the horn three times and
unlock the driver door when both
doors are closed and there is a
keyless access transmitter inside
the vehicle. When the driver door is
opened, a reminder chime will
sound continuously. The vehicle will
remain locked only when at least
one transmitter has been removed
from the vehicle and both doors are
closed. See Vehicle Personalization
on page 5‑54.
Doors
Hatch
WARNING
{
Exhaust gases can enter the
vehicle if it is driven with the
liftgate, trunk/hatch open, or with
any objects that pass through the
seal between the body and the
trunk/hatch or liftgate. Engine
exhaust contains carbon
monoxide (CO) which cannot be
seen or smelled. It can cause
unconsciousness and even death.
(Continued)
WARNING (Continued)
If the vehicle must be driven with
the liftgate, or trunk/hatch open:
.
Close all of the windows.
.
Fully open the air outlets on
or under the instrument
panel.
.
Adjust the Climate Control
System to a setting that
brings in only outside air and
set the fan speed to the
highest setting. See “Climate
Control Systems” in the
Index.
.
If the vehicle is equipped with
a power liftgate, disable the
power liftgate function.
For more information about
carbon monoxide, see Engine
Exhaust on page 9‑26.
Page 44
Black plate (12,1)
Chevrolet Corvette Owner Manual - 2012
2-12 Keys, Doors, and Windows
.
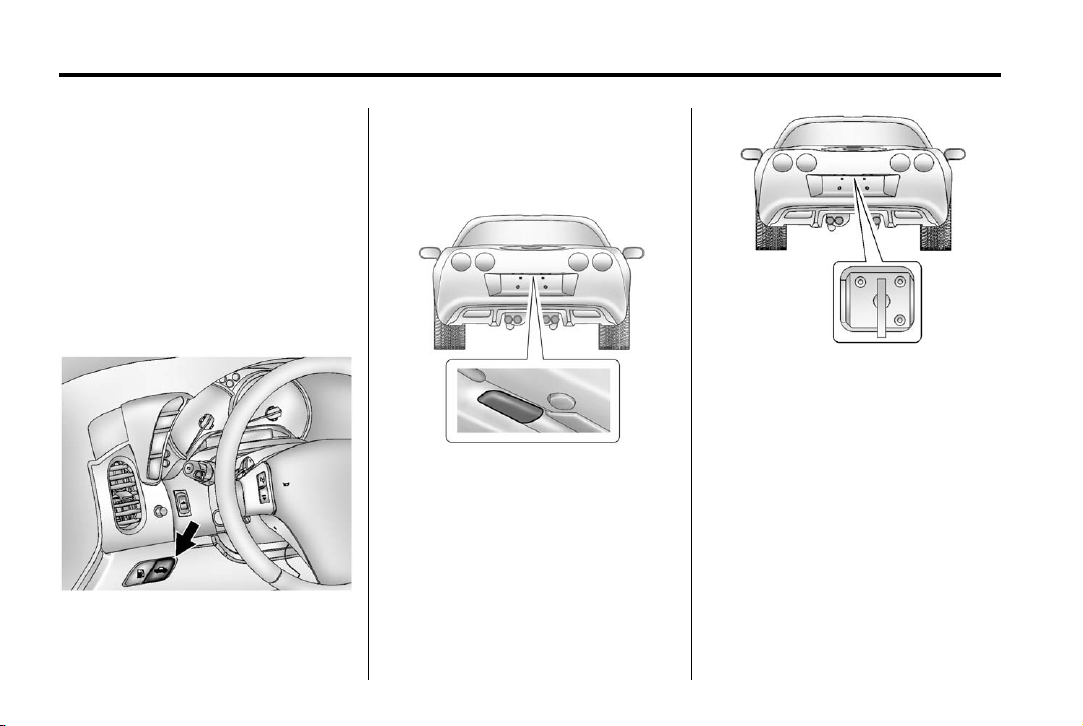
Hatch/Trunk Release
The vehicle must be in P (Park) with
an automatic transmission and
Neutral with a manual transmission.
For manual transmission vehicles,
the parking brake must be set
when the engine is running for the
hatch/trunk release to operate.
See Parking Brake on page 9‑36.
To release the hatch/trunk:
.
Press V.
Press } on the keyless
entry transmitter. See Remote
Keyless Entry (RKE) System on
page 2‑3.
.
Push the hatch/trunk release
button with the RKE transmitter
within range. See Remote
Keyless Entry (RKE) System on
page 2‑3.
.
Use the vehicle key. See Keys
on page 2‑2.
Page 45
Black plate (13,1)
Chevrolet Corvette Owner Manual - 2012
Keys, Doors, and Windows 2-13
Hatch/Trunk Closing (Coupe)
Notice: Closing the hatch/trunk
forcefully or from the sides can
cause damage to the glass, the
defogger or the weather stripping.
Be sure objects will fit in the
hatch/trunk area before closing
the hatch/trunk. When closing the
hatch/trunk, gently pull down
from the center.
Notice: Do not store heavy or
sharp objects in the rear storage
compartments located in the
hatch/trunk area. The objects
could damage the underbody.
Pull down from the center of the
hatch/trunk, closing it with light
force until the power latch feature
activates. The hatch/trunk will
close the rest of the way and latch
automatically.
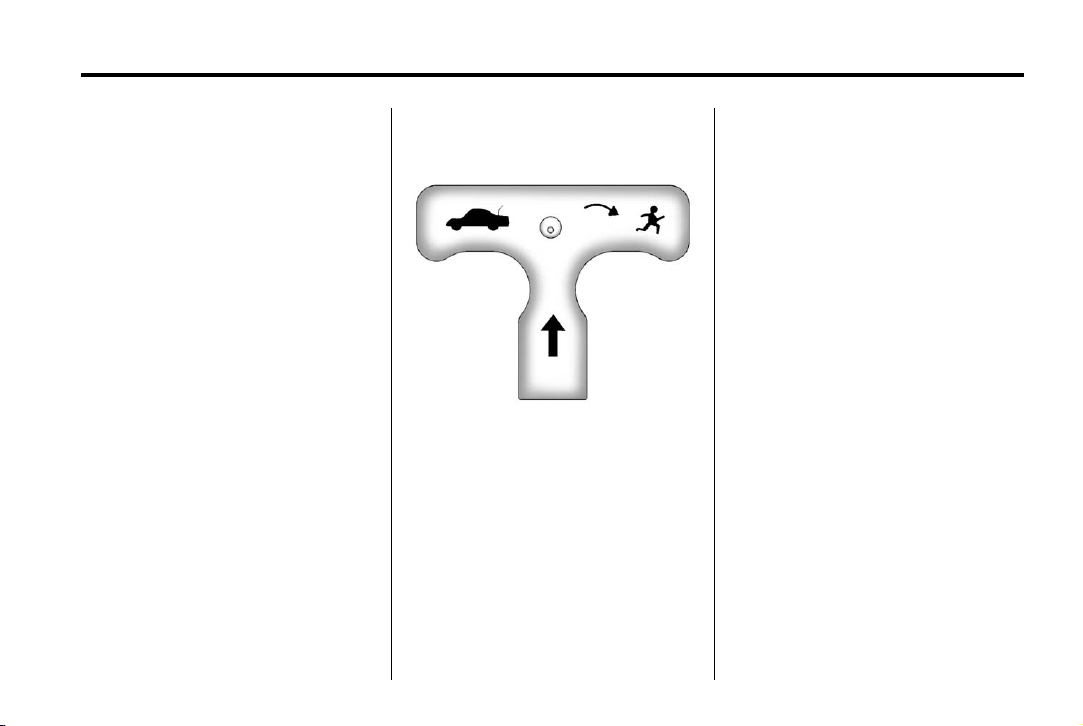
Emergency Trunk Release
Handle (Coupe)
Notice: Do not use the
emergency trunk release handle
as a tie-down or anchor point
when securing items in the trunk
as it could damage the handle.
The emergency trunk release
handle is only intended to aid a
person trapped in a latched trunk,
enabling them to open the trunk
from the inside.
There is a glow-in-the-dark
emergency trunk release handle
located on the rear wall of the trunk
below the latch. This handle will
glow following exposure to light.
Pull the release handle down to
open the trunk from the inside.
Page 46

Black plate (14,1)
Chevrolet Corvette Owner Manual - 2012
2-14 Keys, Doors, and Windows
Vehicle Security
This vehicle has theft-deterrent
features; however, they do not make
it impossible to steal.
Anti-theft Alarm System
This vehicle has a theft-deterrent
alarm system.
The security light flashes if a door is
open and locked with the power
door lock switch.
If this light stays on while the engine
is running, the vehicle needs
service.
Arming the System
To arm the system, press Q on the
RKE transmitter, or open the door
and lock the door with the power
door lock switch. The security light
should flash. Remove the RKE
transmitter from inside the vehicle
and close the door. The security
light stops flashing and stays on.
After 30 seconds, the light should
turn off.
The vehicle can be programmed to
automatically lock the doors and
arm the theft-deterrent system when
you exit the vehicle. See Vehicle
Personalization on page 5‑54.
If a door or the hatch/trunk is
opened without using the RKE
transmitter, the alarm goes off.
The horn sounds for two minutes,
then goes off to save battery power.
The vehicle will not start without a
RKE transmitter present.
The theft-deterrent system does not
arm if the driver door is locked with
the power door lock switch after the
doors are closed.
If the RKE transmitter is removed
from the vehicle while a passenger
is in it, have them lock the doors
after they are closed. The alarm will
not arm, so the passenger will not
set it off.
Testing the Alarm
To test the system use the following
procedure.
1. Make sure the trunk lid/hatch is
latched.
2. Lower the window on the
driver door.
3. Manually arm the system.
4. Close the doors and wait
30 seconds.
Page 47

Black plate (15,1)
Chevrolet Corvette Owner Manual - 2012
Keys, Doors, and Windows 2-15
5. Reach through the open window
and manually pull the release
lever on the floor.
6. Press the unlock button on the
transmitter to turn off the alarm.
If the alarm does not sound, check
to see if the horn works. The horn
fuse may be blown. See Fuses and
Circuit Breakers on page 10‑47.
If the horn works, but the alarm
does not go off, see your dealer.
Disarming the System
Press the unlock button on the RKE
transmitter or squeeze the door
handle sensor while the transmitter
is near the vehicle to unlock a door.
Unlocking a door any other way sets
off the alarm. If the alarm sounds,
press the unlock button on the RKE
transmitter to disarm it.
Do not leave the key or device
that disarms or deactivates the
theft-deterrent system in the vehicle.
Immobilizer
See Radio Frequency Statement on
page 13‑21 for information
regarding Part 15 of the Federal
Communications Commission (FCC)
rules and Industry Canada
Standards RSS-GEN/210/220/310.
Immobilizer Operation
The vehicle has a passive
theft-deterrent system.
The system is automatically armed
when the ignition is turned off.
The immobilization system is
disarmed when the ignition is turned
to OFF/ACCESSORY or START and
a valid transmitter is found in the
vehicle.
You do not have to manually arm or
disarm the system.
The security light comes on if there
is a problem with arming or
disarming the theft-deterrent
system.
The system has one or more RKE
transmitters that are matched to an
immobilizer control unit in the
vehicle. Only a correctly matched
RKE transmitter starts the vehicle.
The vehicle may not start if the RKE
transmitter is damaged.
If the engine does not start and the
security light comes on, there may
be a problem with the immobilizer
system. Press the START button
again.
If the vehicle does not start and
the RKE transmitter appears to
be undamaged, try another
RKE transmitter. Or, place the
transmitter in the transmitter pocket.
See “NO FOBS DETECTED”
under Key and Lock Messages on
page 5‑42 for additional information.
Check the fuse. See Fuses and
Circuit Breakers on page 10‑47.
Page 48
Black plate (16,1)
Chevrolet Corvette Owner Manual - 2012
2-16 Keys, Doors, and Windows
If the engine still does not start with
the other transmitter, the vehicle
needs service. If the engine does
start, the first transmitter may be
faulty. See your dealer or have a
new RKE transmitter programmed
to the vehicle.
The immobilizer system can
learn new or replacement RKE
transmitters. Up to four RKE
transmitters can be programmed
for the vehicle. To program
additional transmitters, see
“Matching transmitter(s) to Your
Vehicle” under Remote Keyless
Entry (RKE) System Operation on
page 2‑3.
Do not leave the key or device
that disarms or deactivates the
theft-deterrent system in the
vehicle.
Exterior Mirrors
Convex Mirrors
WARNING
{
A convex mirror can make things,
like other vehicles, look farther
away than they really are. If you
cut too sharply into the right lane,
you could hit a vehicle on the
right. Check the inside mirror or
glance over your shoulder before
changing lanes.
The passenger side mirror is convex
shaped. A convex mirror's surface is
curved so more can be seen from
the driver seat.
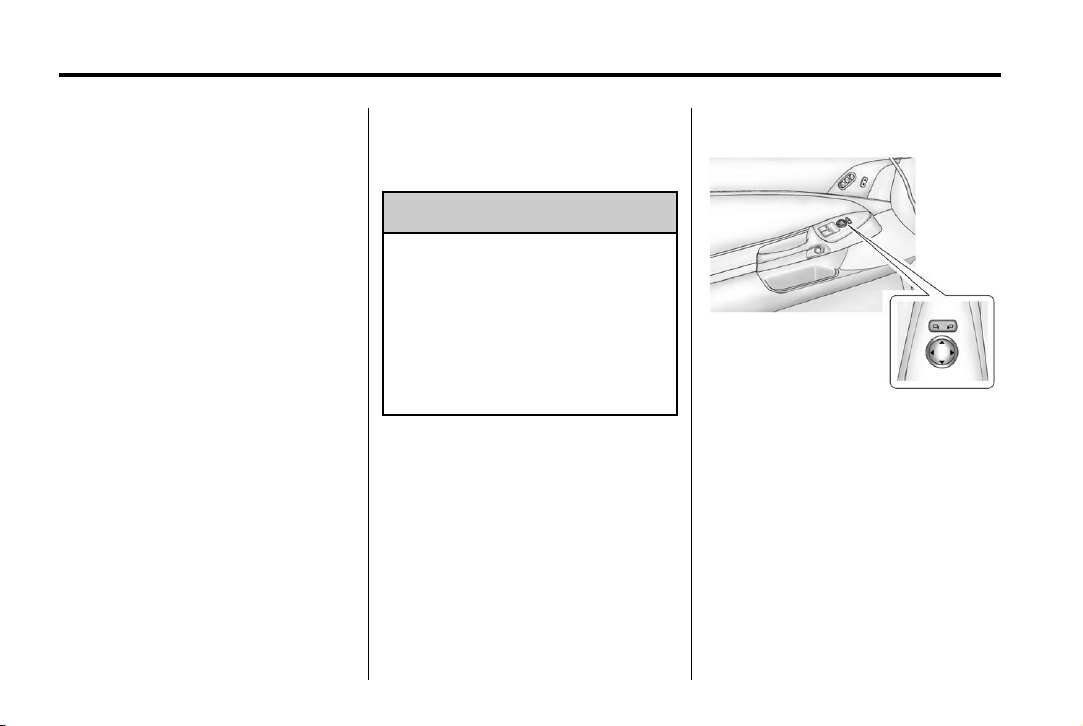
Power Mirrors
To adjust the mirrors:
1. Press
2. Press the control pad to adjust
3. Return the switch to the center
If the vehicle has the memory
feature, a preferred mirror position
can be stored. See Memory Seats
on page 3‑4.
} or | to select a mirror.
the mirror.
to deselect the mirror.
Page 49

Black plate (17,1)
Chevrolet Corvette Owner Manual - 2012
Keys, Doors, and Windows 2-17
Folding Mirrors
To fold, pull the mirror toward the
vehicle. Push the mirror outward to
return it to the original position.
Heated Mirrors
For vehicles with heated mirrors:
1 (Rear Window Defogger):
Press to heat the mirrors.
See “Rear Window Defogger” under
Dual Automatic Climate Control
System on page 8‑1 for more
information.
Automatic Dimming Mirror
If the vehicle has this feature, the
driver side outside mirror adjusts for
the glare of headlamps behind you.
This feature is controlled by the
on and off setting on the inside
rearview mirror.
Interior Mirrors
Automatic Dimming Rearview Mirror
An automatic dimming inside
rearview mirror will automatically
change to reduce glare from
headlamps behind you. A time delay
feature prevents rapid changing
from the day to night positions while
driving under lights and through
traffic.
®
If the vehicle has OnStar
additional control buttons located at
the bottom of the mirror. See OnStar
Overview on page 14‑1.
P (On/Off): The automatic
dimming feature is activated when
the vehicle is started. Press and
hold this button for up to
six seconds to turn this feature on
or off.
, there are
T (Indicator Light): This light turns
on when the automatic dimming
feature is active.
Map Lamps
If the mirror has map lamps, they
are located at the bottom of the
mirror. To manually turn the lamps
on or off, press the button next to
each lamp.
Cleaning the Mirror
Do not spray glass cleaner directly
on the mirror. Use a soft towel
dampened with water.
Page 50
Black plate (18,1)
Chevrolet Corvette Owner Manual - 2012
2-18 Keys, Doors, and Windows
Windows
WARNING
{
Leaving children, helpless adults,
or pets in a vehicle with the
windows closed is dangerous.
They can be overcome by the
extreme heat and suffer
permanent injuries or even death
from heat stroke. Never leave a
child, a helpless adult, or a pet
alone in a vehicle, especially with
the windows closed in warm or
hot weather.
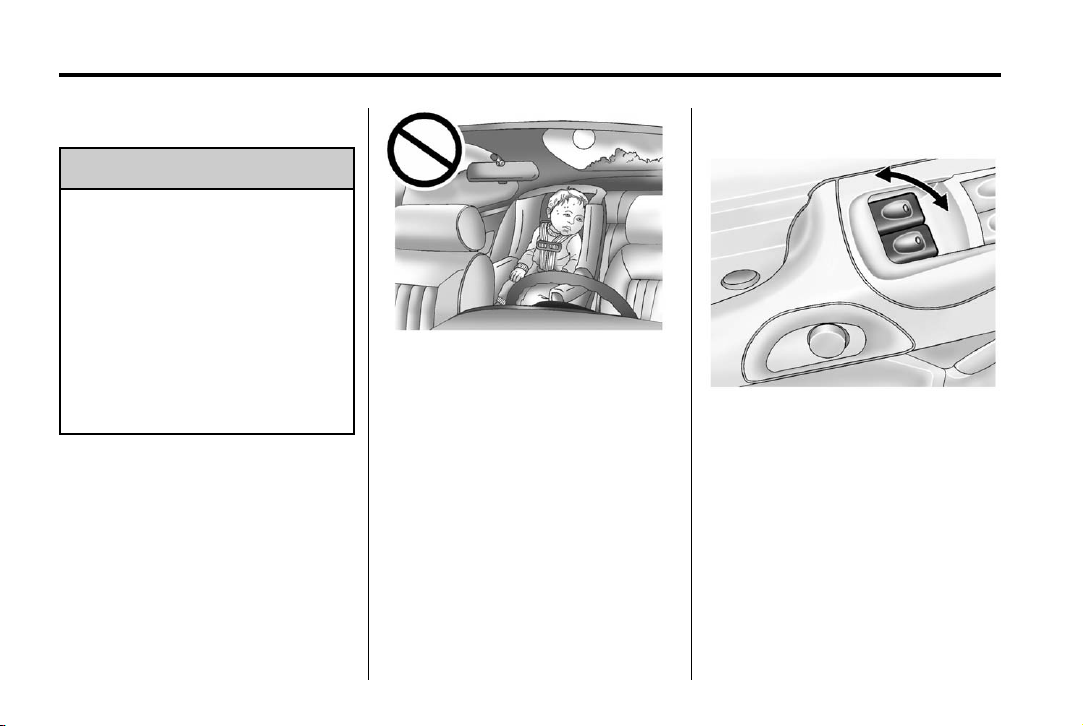
Power Windows
Pull up or press down on the front
of the switch to raise or lower the
window.
Retained Accessory Power (RAP)
allows you to use the power
windows when the ignition is off.
For more information, see Retained
Accessory Power (RAP) on
page 9‑24.
Page 51

Black plate (19,1)
Chevrolet Corvette Owner Manual - 2012
Keys, Doors, and Windows 2-19
Express-Down Window
Press the front of the switch to the
second position to activate the
express-down feature. To stop the
window as it is lowering, press the
switch again.
Window Indexing
This feature automatically lowers
the window a small amount when
the door is opened. When the door
is closed, the window will raise to its
full up position. If either window
does not index properly, it could be
due to loss of power. Before
returning to the dealer for service,
perform the power window initialize
procedure.
Power Window Initialize
After a power reconnect such as
battery replacement, the window
indexing feature and the power
convertible top (if equipped) will
not function until the system is
initialized.
Once power is restored:
1. Close the doors.
2. Raise the window and hold the
switch up for three seconds after
the window is closed.
3. Release the switch, then hold
the switch up again for
three seconds and release.
Sun Visors
Pull the visor toward you, or move it
to the side to help reduce glare.
To use the lighted mirror, lift the
cover.
Roof
Roof Panel
On vehicles with a removable roof
panel, follow the procedures when
removing or installing it.
Removing the Roof Panel
WARNING
{
Do not try to remove a roof panel
while the vehicle is moving.
Trying to remove the roof panel
while the vehicle is moving could
cause an accident. The panel
could fall into the vehicle and
cause you to lose control, or it
could fly off and strike another
vehicle. You or others could be
injured. Remove the roof panel
only when the vehicle is parked.
Page 52
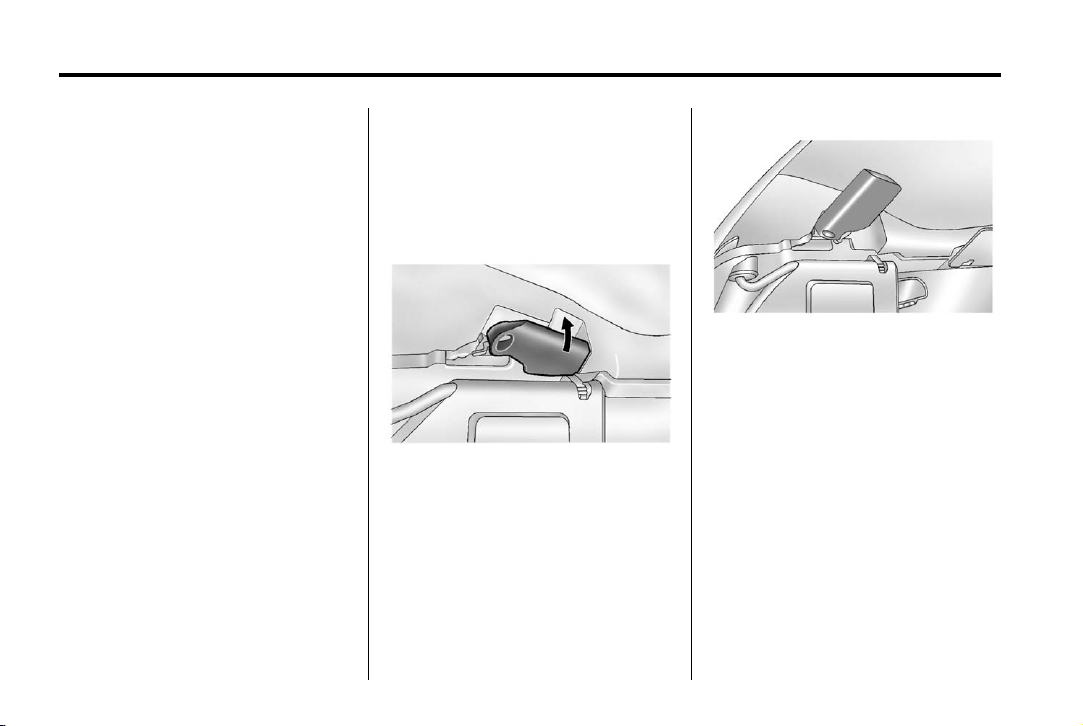
Black plate (20,1)
Chevrolet Corvette Owner Manual - 2012
2-20 Keys, Doors, and Windows
Until you are sure you can remove
the panel alone, have someone
help you.
Notice: If you drop or rest a roof
panel on its edges, the roof panel,
paint and/or weatherstripping
may be damaged. Always place
the roof panel in the stowage
receivers after removing it from
the vehicle.
1. Park on a level surface and set
the parking brake. Shift an
automatic transmission into
P (Park). Shift a manual
transmission into N (Neutral).
2. Make sure the ignition is off.
3. Lower both sun visors.
4. Open the rear hatch and remove
any items that may interfere with
proper storage of the roof panel.
5. Lower the windows.
There are two release latches on
the front of the roof panel and
one rear release latch on the
back of the roof panel.
The driver side handle moves
toward the driver door. The
passenger side handle moves
toward the passenger door.
6. To unlock the release latches on
the front of the roof panel, grasp
each handle and pull it outward.
Page 53
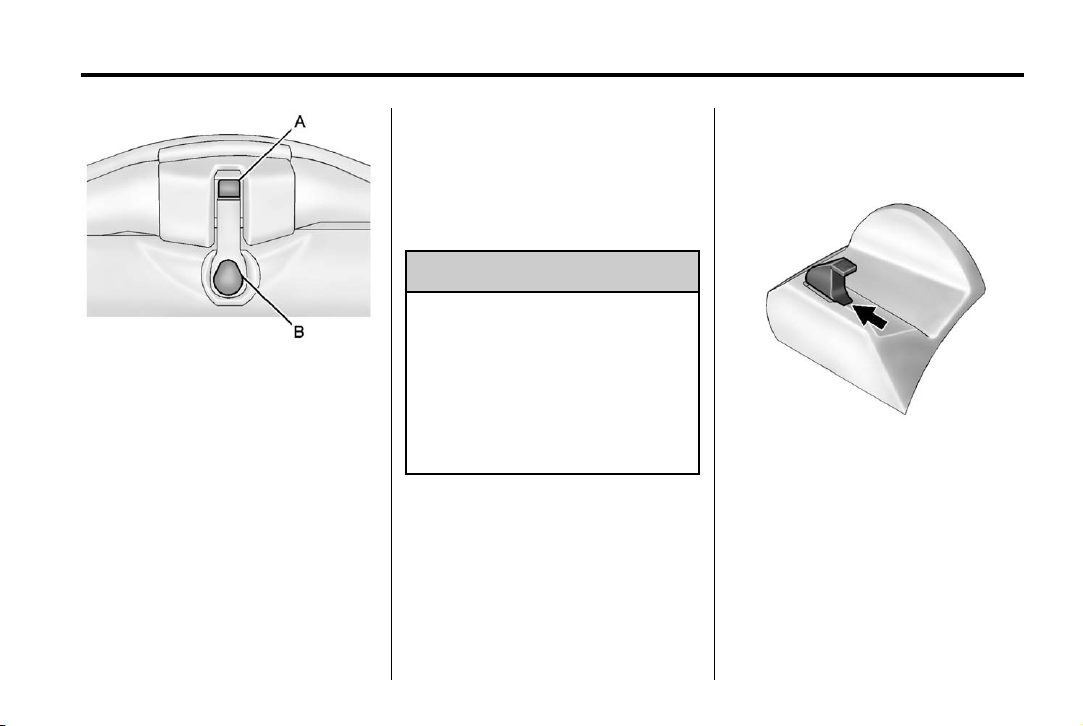
Black plate (21,1)
Chevrolet Corvette Owner Manual - 2012
Keys, Doors, and Windows 2-21
7. To unlock the rear of the roof
panel's rear release latch, press
the back of the release
handle (B). Then press the
button on the front of the release
handle (A).
Pull down the latch lever.
8. Stand on one side of the vehicle,
and if necessary, have someone
stand on the other side.
Together, carefully lift the front
edge of the roof panel up and
forward.
9. When the roof panel is loosened
from the vehicle, one person
should grasp the roof panel as
close to the center as possible
and lift it away from the vehicle.
Storing the Roof Panel
WARNING
{
If a roof panel is not stored
properly, it could be thrown about
the vehicle in a crash or sudden
maneuver. People in the vehicle
could be injured. Whenever you
store a roof panel in the vehicle,
always be sure that it is stored
securely in the proper location.
Notice: If you drop or rest a roof
panel on its edges, the roof panel,
paint and/or weatherstripping
may be damaged. Always place
the roof panel in the stowage
receivers after removing it from
the vehicle.
1. Turn the roof panel so that the
front edge of the panel is facing
the storage area.
2. Insert the roof panel so that the
outside front edges line up
between the receiver covers.
Push forward on the roof panel
until it stops.
Page 54
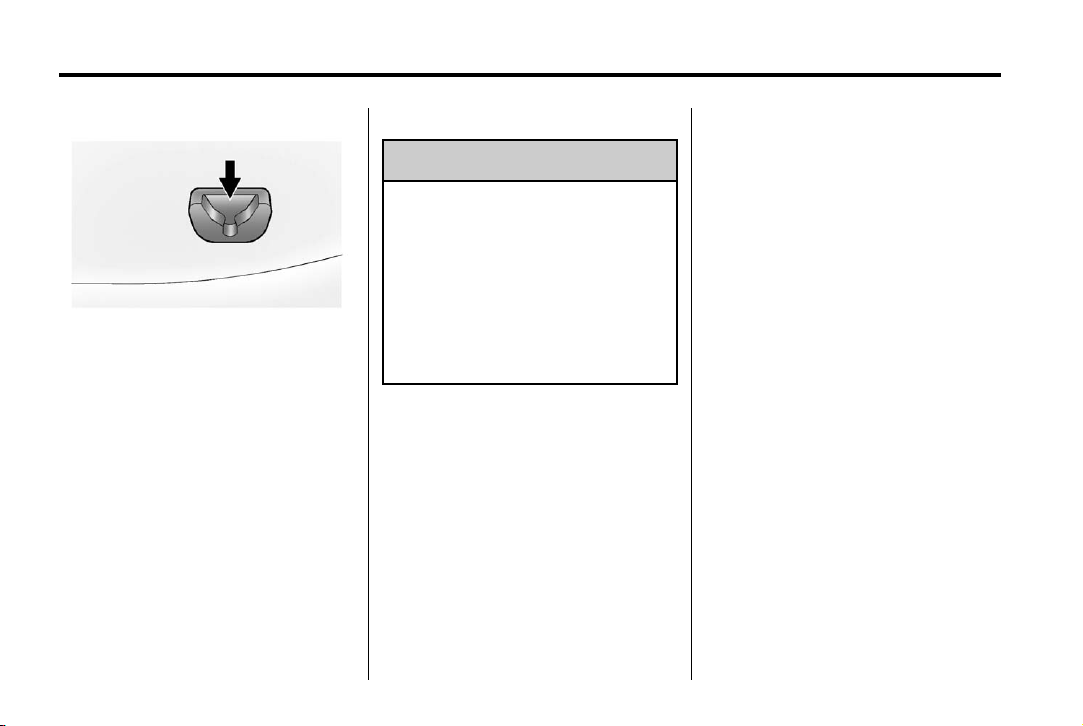
Black plate (22,1)
Chevrolet Corvette Owner Manual - 2012
2-22 Keys, Doors, and Windows
3. Gently place the roof panel
down so that the back pins on
the roof panel drop into the
receivers in the back of the
storage area.
Press down firmly to seat the pins in
the receivers.
Installing the Roof Panel
WARNING
{
An improperly attached roof panel
may fall into or fly off the vehicle.
You or others could be injured.
After installing the roof panel,
always check that it is firmly
attached by pushing up on the
underside of the panel. Check
now and then to be sure the roof
panel is firmly in place.
Notice: If you drop or rest a roof
panel on its edges, the roof panel,
paint and/or weatherstripping
may be damaged. Always place
the roof panel in the stowage
receivers after removing it from
the vehicle.
In most cases, it makes it easier if
two people install the roof panel.
1. Park on a level surface and set
the parking brake. Shift an
automatic transmission into
P (Park). Shift a manual
transmission into N (Neutral).
2. Check that the front release
latches and the rear release
latch on the vehicle's roof
opening are in their opened
positions before attempting to
install the roof panel.
3. To remove the roof panel from
the rear storage area of the
vehicle, pull up on the rear edge
and remove it from the
storage area.
4. Carefully place the roof panel
over the top of the vehicle.
5. Position the rear edge of the
roof panel to the weatherstrip on
the back of the roof opening.
Page 55
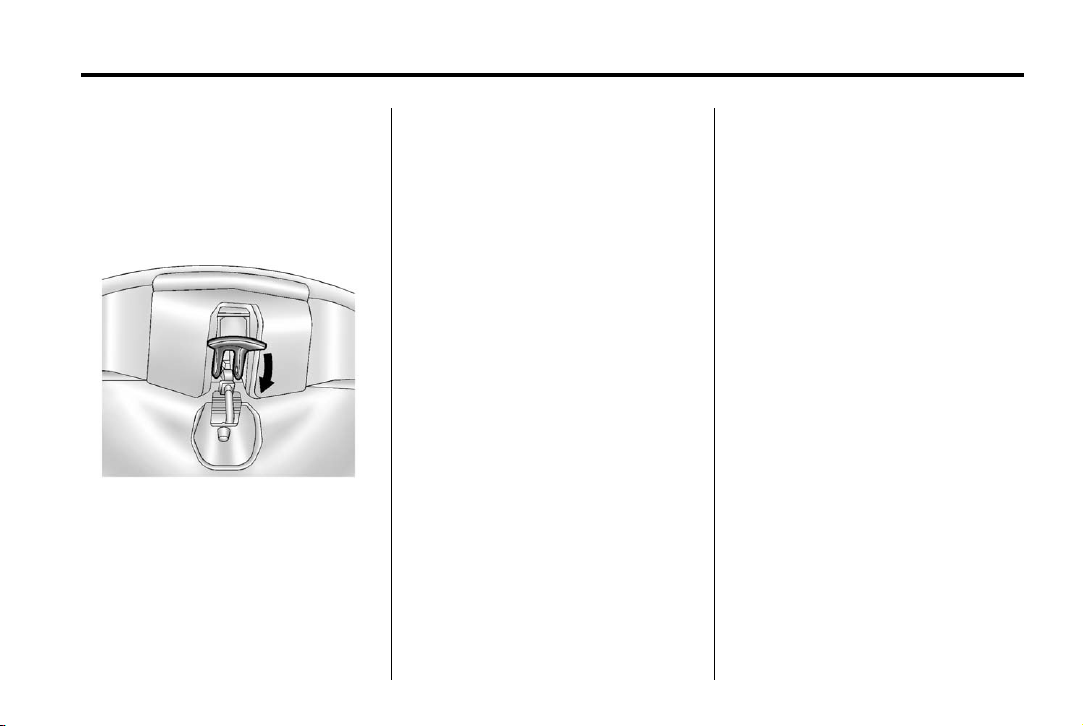
Black plate (23,1)
Chevrolet Corvette Owner Manual - 2012
Keys, Doors, and Windows 2-23
Then align and fit the pins at the
rear of the roof panel inside the
openings in the rear overhead
weatherstrip. Gently lower the
front edge of the roof panel to
the front of the roof opening.
6. Turn the front release handles
inward so that they latch to the
closed position.
7. Push up on the handle of the
rear roof release handle to latch
its hook in the closed position.
8. Push and pull the roof panel up
and down and side to side to
ensure the roof panel is securely
installed.
Removable Roof Panel
Notice: If you use a glass
treatment and/or conditioner that
contains ethyl sulfate on the roof
panel, you could damage the
panel. The repairs would not be
covered by your warranty. Only
use a GM-approved glass cleaner
on the roof panel.
Special care is necessary when
cleaning, removing, and/or storing
the roof panel.
.
Flush with water to remove dust
and dirt, then dry the panel.
.
Clean a transparent roof panel
with GM Glass Cleaner. Leave
the cleaner on the panel for
one minute, then wipe the panel
with a soft, lint-free cloth. Do not
use glass cleaner on a painted
roof panel.
.
Do not use abrasive cleaning
materials on either type of panel.
If water drops are frequently allowed
to dry on the roof panel, impurities
in the water will adhere to the top.
These impurities may etch or mar
the finish. When the panel gets wet,
dry it off.
Page 56
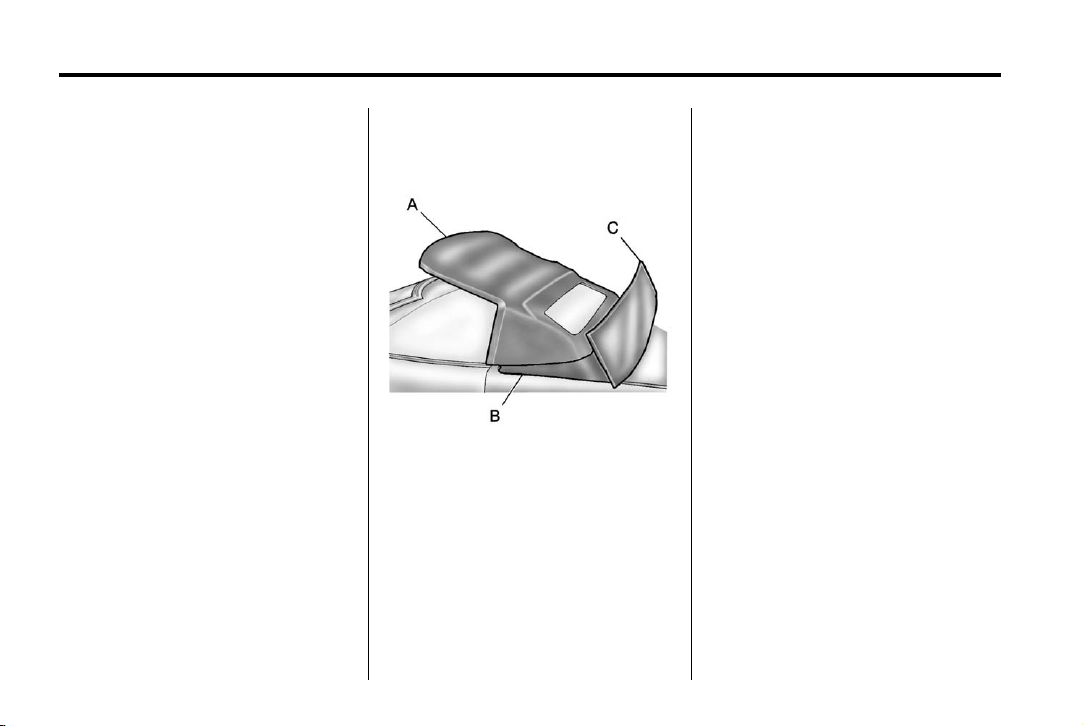
Black plate (24,1)
Chevrolet Corvette Owner Manual - 2012
2-24 Keys, Doors, and Windows
Convertible Top
After a power reconnect such as
battery replacement, the power
windows need to be initialized
for the convertible top to work.
See “Power Window Initialize” in
Power Windows on page 2‑18.
Manual Operation
For care and cleaning of the
convertible top, see “Cleaning the
Convertible Top” in this section.
High pressure car washes may
cause water to enter the vehicle.
If the vehicle has this feature, the
following procedures explain the
proper operation of the manual
convertible top.
The parts of the manual convertible
top that are used when lowering and
raising it are:
A. Front Edge of the
Convertible Top
B. Rear Edge of the
Convertible Top
C. Tonneau Cover
Notice: Leaving the convertible
top down and exposing the
interior of the vehicle to outdoor
conditions may cause damage.
Always close the convertible top
if leaving the vehicle outdoors.
Notice: Lowering the convertible
top when there are objects in the
storage area could damage it or
break the glass rear window.
Always verify that no objects are
in the storage area before
lowering the convertible top.
Notice: Lowering the convertible
top if it is damp, wet, or dirty
can cause stains, mildew, and
damage to the inside of the
vehicle. Dry off the convertible
top before lowering it.
Page 57
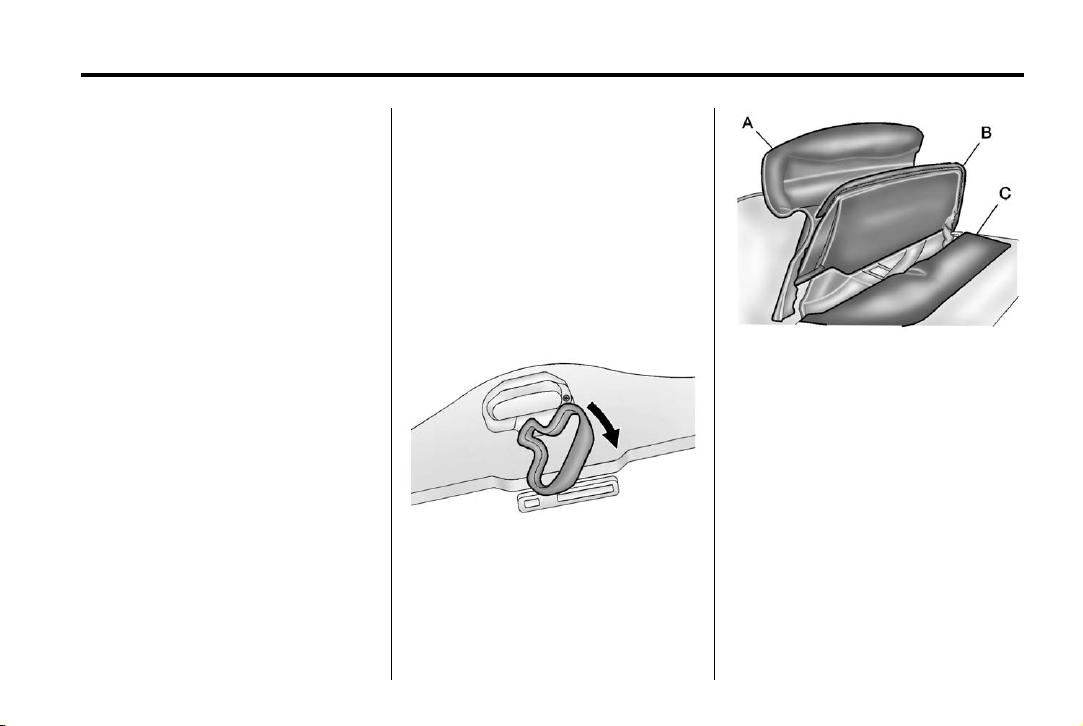
Black plate (25,1)
Chevrolet Corvette Owner Manual - 2012
Keys, Doors, and Windows 2-25
Notice: If you lower the
convertible top on the vehicle
in cold weather (0°C (32°F) or
lower), you may damage
convertible top components.
Do not lower the top in cold
weather.
Notice: If you raise or lower the
convertible top while the vehicle
is in motion, you could damage
the top or the top mechanism.
The repairs would not be covered
by the warranty. Always put an
automatic transmission in
P (Park) or a manual transmission
in Neutral before raising or
lowering the convertible top.
Lowering the Manual
Convertible Top
1. Park on a level surface.
Shift an automatic transmission
into P (Park) and set the
parking brake. Shift a manual
transmission into Neutral and set
the parking brake.
2. Make sure the ignition is off.
3. Make sure the trunk is closed.
4. Release the convertible top front
latch, located above the inside
rearview mirror, by pulling and
turning it clockwise.
5. Lift upward on the front edge (A)
of the convertible top to remove
it from the windshield frame.
Then lift upward on the rear
edge (B) of the convertible top
so it is vertical to the tonneau
cover (C). The front edge (A) and
rear edge (B) should be
straight up.
6. The convertible top front latch
must be turned and closed after
the top has been pushed up.
Failure to close the latch may
prevent the tonneau cover from
completely closing.
Page 58
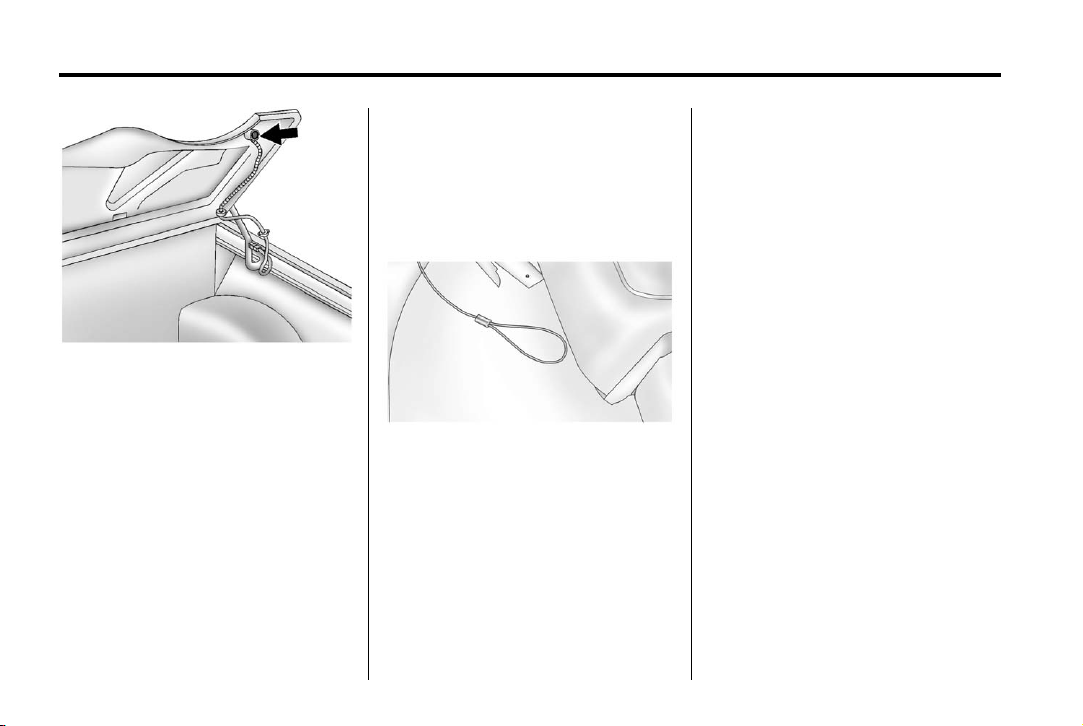
Black plate (26,1)
Chevrolet Corvette Owner Manual - 2012
2-26 Keys, Doors, and Windows
7. Tilt the driver seatback forward
and press the tonneau cover
release button located on the
underside of the tonneau
cover (C) behind the driver seat.
After pressing the release
button, the driver and passenger
door glass will retract to the
full-down position. Then raise
the tonneau cover (C).
If the tonneau cover does not
release and three chimes are
heard, check to make sure the
trunk lid is closed. Also, the
tonneau cover will not release if
the vehicle alarm is armed.
If battery power has not been
lost, continue to Step 9.
If battery power has been lost,
the tonneau cover (C) can be
opened using the manual
release cable.
The tonneau cover manual
release cable is located
underneath the carpeting behind
the passenger seat head
restraint, on the underside
forward edge of the tonneau
cover. To access the cable, lift
and pull back the carpeting.
Notice: If you lower the
convertible top into the storage
compartment and the rear edge of
the top is not in the full-down
position, you could damage the
top. Always verify that the rear
edge of the convertible top is in
the full-down position before
lowering the top into the storage
compartment.
8. Pull the cable to release the
tonneau cover, continue with
Step 9.
Page 59
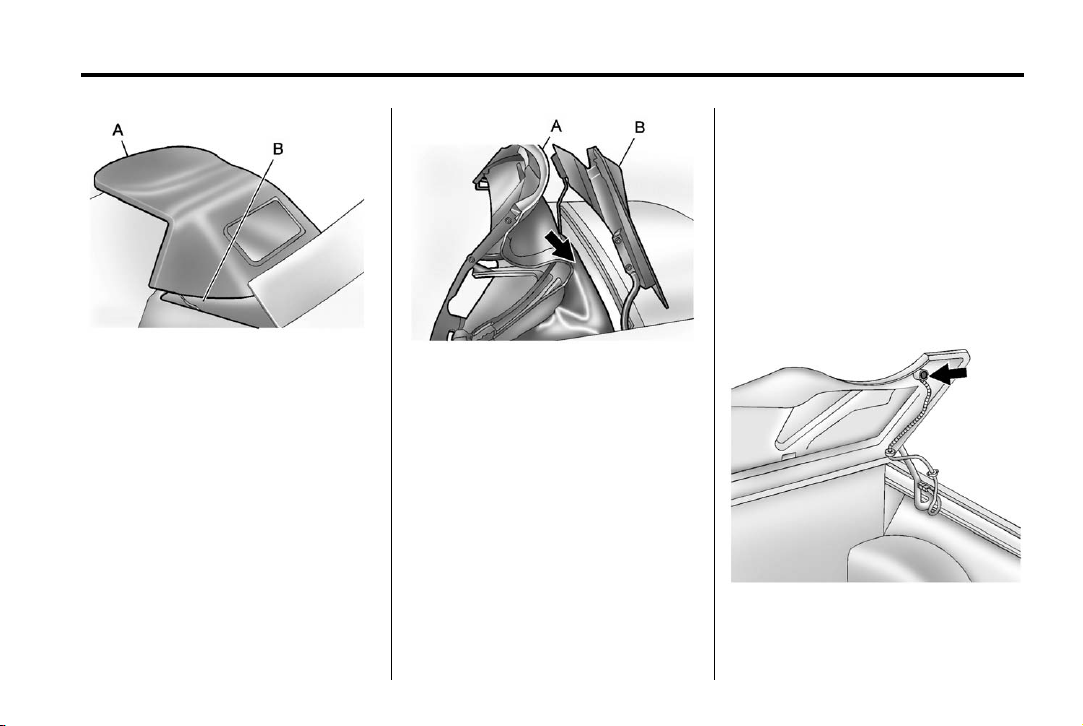
Black plate (27,1)
Chevrolet Corvette Owner Manual - 2012
Keys, Doors, and Windows 2-27
Raising the Manual
Convertible Top
1. Park on a level surface.
Shift an automatic transmission
into P (Park) and set the
parking brake. Shift a manual
transmission into Neutral and set
the parking brake.
2. Lower both windows.
3. Make sure the ignition is off.
9. Push forward on the front
edge (A) of the convertible top to
allow the rear edge (B) of the
convertible top to be moved to
its full-down position.
10. Then move the convertible top
rearward to its fully stored
position.
11. After the convertible top is
stored, apply one even push on
the center of the front edge (A)
of the convertible top to ensure
that the convertible top is fully
retracted.
12. Close the tonneau cover (B) by
pressing down on it with a
swift, firm motion.
4. Tilt the driver seat forward
and press the tonneau
cover release button.
Page 60
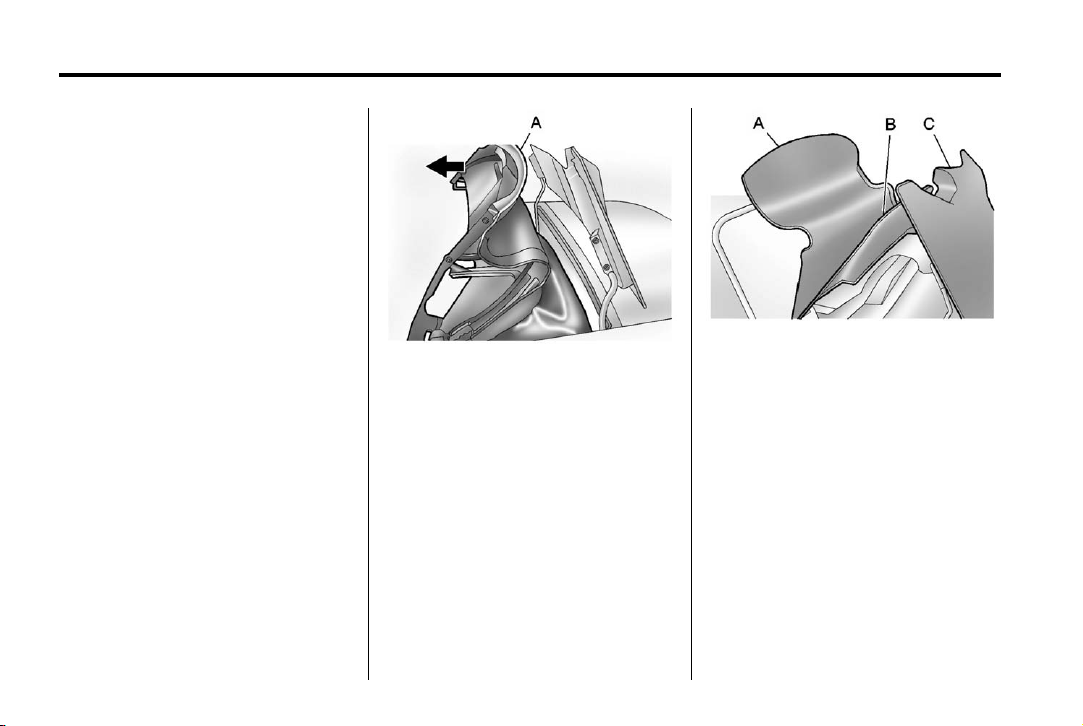
Black plate (28,1)
Chevrolet Corvette Owner Manual - 2012
2-28 Keys, Doors, and Windows
After pressing the release
button, the driver and passenger
door glass will retract to the
full-down position. If battery
power has been lost, see Step 7
under “Lowering the Manual
Convertible Top” in this section.
After pressing the release
button, the driver and passenger
door glass should retract to the
full-down position, if they have
not already been lowered.
5. Lift the tonneau cover.
6. Pull the convertible top up by
firmly gripping the front edge (A)
near the center and applying a
brisk upward and forward motion
to get the top in the full-up
position.
7. Lift the rear edge (B) of the
convertible top to its full-up
position by first raising the front
edge (A).
8. Close the tonneau cover (C) by
pushing it down with a swift, firm
motion.
9. Lower the rear edge (B) of the
convertible top by first slightly
pushing the front edge (A) of the
convertible top forward.
Page 61

Black plate (29,1)
Chevrolet Corvette Owner Manual - 2012
Keys, Doors, and Windows 2-29
10. Push the front edge (A) of the
convertible top down from the
outside of the vehicle, or pull
the front edge (A) of the
convertible top down from the
center pull-down handle
located in the inside of the
vehicle.
11. Pull the convertible top front
latch down and turn it
counterclockwise to lock the
convertible top.
Power Operation
For care and cleaning of the
convertible top see “Cleaning the
Convertible Top” in this section.
High pressure car washes may
cause water to enter the vehicle.
To operate the convertible top use
the following steps.
Notice: Leaving the convertible
top down and exposing the
interior of the vehicle to outdoor
conditions may cause damage.
Always close the convertible top
if leaving the vehicle outdoors.
Notice: Lowering the convertible
top when there are objects in the
storage area could damage it or
break the glass rear window.
Always verify that no objects
are in the storage area before
lowering the convertible top.
Notice: Lowering the convertible
top if it is damp, wet, or dirty
can cause stains, mildew, and
damage to the inside of the
vehicle. Dry off the convertible
top before lowering it.
Notice: If you lower the
convertible top on the vehicle
in cold weather (0°C (32°F) or
lower), you may damage
convertible top components.
Do not lower the top in cold
weather.
Notice: If you raise or lower the
convertible top while the vehicle
is in motion, you could damage
the top or the top mechanism.
The repairs would not be covered
by the warranty. Always put an
automatic transmission in
P (Park) or a manual transmission
in Neutral before raising or
lowering the convertible top.
Page 62
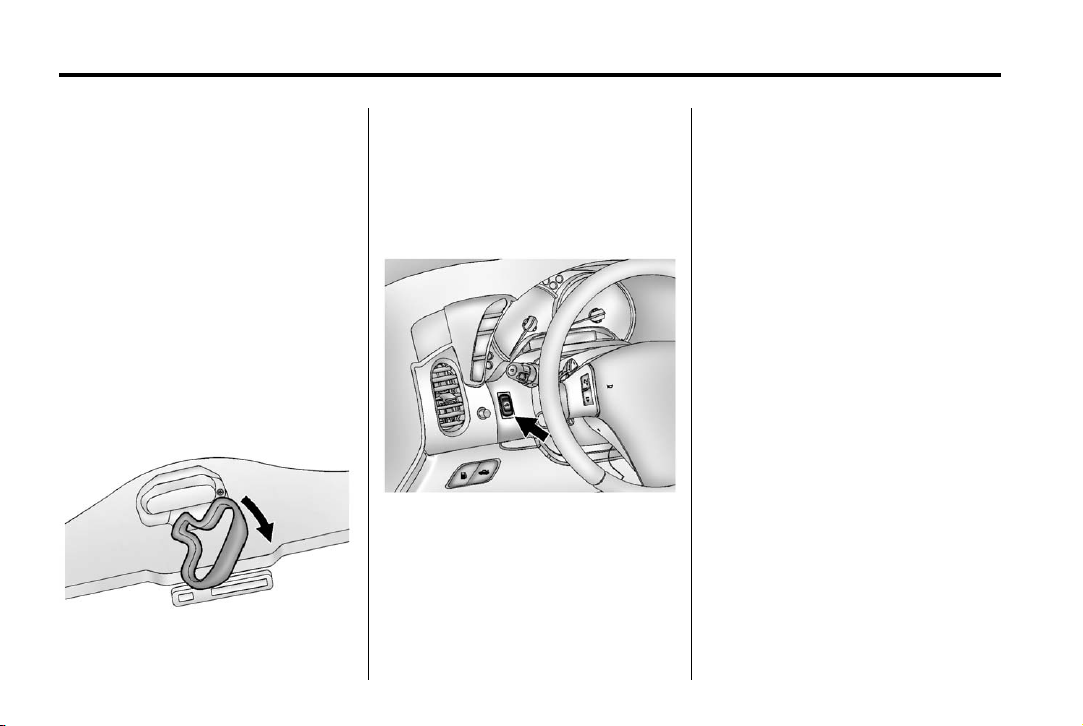
Black plate (30,1)
Chevrolet Corvette Owner Manual - 2012
2-30 Keys, Doors, and Windows
Lowering the Power
Convertible Top
1. Park on a level surface.
Start the engine. Shift an
automatic transmission into
P (Park) and set the parking
brake. Shift a manual
transmission into Neutral, and
set the parking brake.
2. Make sure the trunk is closed,
the rear trunk partition in the rear
storage area is in the fastened
upright position, and no objects
are forward of the divider.
See “Rear Trunk Partition” under
Rear Storage on page 4‑1.
3. Release the convertible top
front latch, located above
the inside rearview mirror,
by pulling and turning it
clockwise. Push upward on the
front edge. The windows will
automatically lower.
4. Return the convertible top front
latch to the closed position.
5. Push and hold ª on the
convertible top switch.
The convertible top will lower into
the rear of the vehicle. A chime will
sound when the convertible top has
lowered completely. If the radio is
on, the sound may be muted for a
brief time due to a new audio
system equalization being loaded.
If the convertible top is operated
multiple times, the engine should be
running to prevent drain on the
vehicle's battery. Under certain
conditions, the Driver Information
Center (DIC) may display a
message regarding the convertible
top. See Convertible Top Messages
on page 5‑37 for more information.
Page 63
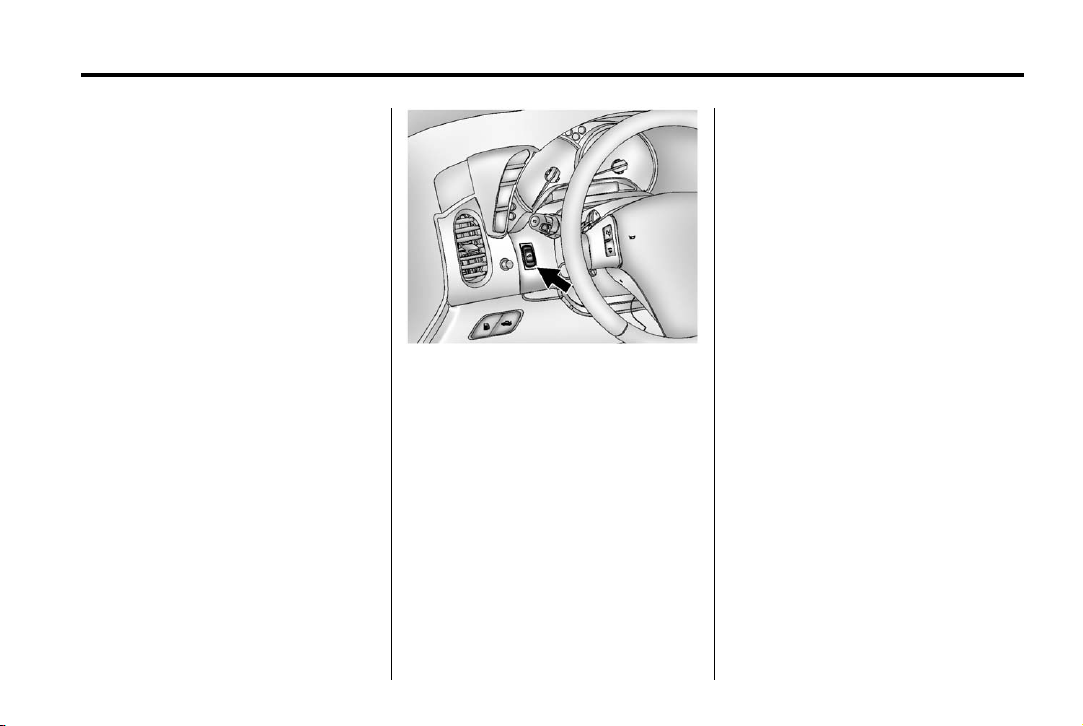
Black plate (31,1)
Chevrolet Corvette Owner Manual - 2012
Keys, Doors, and Windows 2-31
Raising the Power Convertible Top
Notice: If you raise or lower the
convertible top while the vehicle
is in motion, you could damage
the top or the top mechanism.
The repairs would not be covered
by the warranty. Always put an
automatic transmission in
P (Park) or a manual transmission
in Neutral before raising or
lowering the convertible top.
1. Park on a level surface. Start the
engine. Shift an automatic
transmission into P (Park) and
set the parking brake. Shift a
manual transmission into Neutral
and set the parking brake.
2. Make sure the trunk lid is closed,
the rear trunk partition in the rear
storage area is in the fastened
upright position, and no objects
are forward of the divider.
See “Rear Trunk Partition” under
Rear Storage on page 4‑1.
3. Push and hold « on the
convertible top switch. The
convertible top will raise and the
windows will lower if they were
in the raised position. A chime
will sound when the convertible
top is raised completely.
4. After the convertible top is
completely raised, release the
convertible top switch.
5. Pull the convertible top front
latch down and turn it
counterclockwise to lock the
convertible top.
If the radio is on, the sound may be
muted for a brief time due to a new
audio system equalization being
loaded.
If the vehicle has lost power, the
convertible top can still be raised by
releasing pressure on the hydraulic
pump, located under the passenger
side of the tonneau cover, using the
following steps. The carpet liner on
the passenger side must be pulled
back to access the hydraulic pump.
Never attempt to open or close the
convertible top manually without
releasing pressure first.
Manual operation of the convertible
top cannot be attempted for
five minutes after the last time the
convertible top switch was pressed
if the convertible top was not
opened completely and the tonneau
cover latched or closed completely
with the front latch locked in place
at the time the convertible top
switch was released.
Page 64
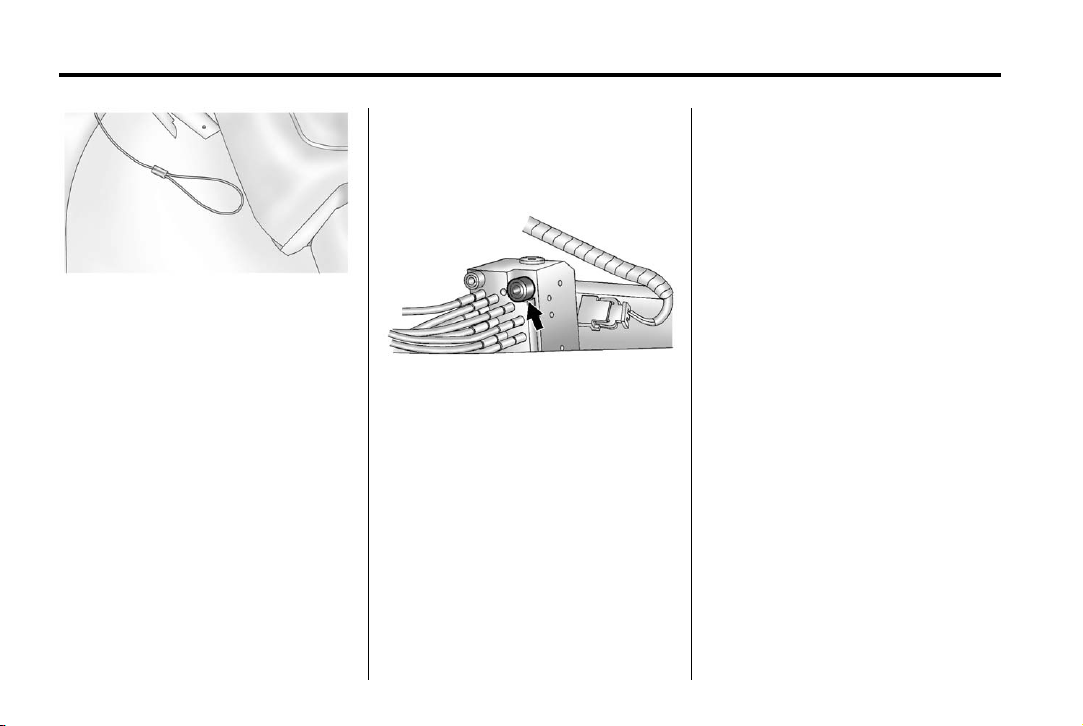
Black plate (32,1)
Chevrolet Corvette Owner Manual - 2012
2-32 Keys, Doors, and Windows
1. Open the tonneau cover by
pulling the manual release
cable.
The tonneau cover manual
release cable is located behind
the passenger seat head
restraint, on the underside
forward edge of the tonneau
cover.
Be careful when opening the
tonneau cover by hand. If the
tonneau cover is opened
quickly, damage can occur to
the hinging mechanism, which
can prevent proper operation of
the convertible top.
2. Pull back the carpet liner on
the passenger side to access
the hydraulic pump.
3. Locate the pressure release
bolt on the front side of the
hydraulic pump.
4. Use the wrench, located in
the center console, and turn
the pressure release bolt
counterclockwise one revolution,
to relieve pressure to the
hydraulic pump. This will allow
the manual raising of the
convertible top.
5. Then follow the steps under
raising the manual convertible
top. See “Manual Operation” or
“Power Operation” in this
section.
When power is restored to the
vehicle, the hydraulic bolt must be
tightened, by turning it clockwise.
The convertible top switch can
then be used to lower or raise the
convertible top.
If the convertible top is operated
multiple times, the engine should be
running to prevent drain on the
vehicle's battery. Under certain
conditions, the Driver Information
Center (DIC) may display a
message regarding the convertible
top. See Convertible Top Messages
on page 5‑37 for more information.
If the battery has been
disconnected, the power windows
must be initialized for the power
convertible top to operate. See
Power Windows on page 2‑18 for
more information.
Page 65

Black plate (33,1)
Chevrolet Corvette Owner Manual - 2012
Keys, Doors, and Windows 2-33
Cleaning the Convertible Top
The convertible top should be
cleaned often. However, high
pressure car washes may cause
water to enter the vehicle.
When hand washing the convertible
top, do it in partial shade. Use a
mild soap, lukewarm water, and a
soft sponge. A chamois or cloth may
leave lint on the top, and a brush
can chafe the threads in the top
fabric. Do not use detergents, harsh
cleaners, solvents, or bleaching
agents.
Wet the entire vehicle and wash the
top evenly to avoid spots or rings.
Let the soap remain on the fabric
for a few minutes. When the top is
really dirty, use a mild foam-type
cleaner. Thoroughly rinse the entire
vehicle, then let the top dry in direct
sunlight.
To protect the convertible top:
.
After washing the vehicle, make
sure the convertible top is
completely dry before lowering it.
.
Do not get any cleaner on the
vehicle's painted finish; it could
leave streaks.
Page 66

Black plate (34,1)
Chevrolet Corvette Owner Manual - 2012
2-34 Keys, Doors, and Windows
2 NOTES
Page 67

Black plate (1,1)
Chevrolet Corvette Owner Manual - 2012
Seats and Restraints 3-1
Seats and Restraints
Head Restraints
Head Restraints . . . . . . . . . .... . . 3-2
Front Seats
Power Seat Adjustment . . . . . . . 3-2
Lumbar Adjustment . . . . . . . . . . . 3-2
Reclining Seatbacks . . . . . . . . . . 3-3
Memory Seats . . . . . . . . . . . . . . . . 3-4
Seatback Latches . . . . . . . . . . . . . 3-7
Heated Front Seats . . . . . . . . . . . 3-8
Safety Belts
Safety Belts . . . . . . .. . . . . . . . . . . . 3-8
How to Wear Safety Belts
Properly .... . . . . . . . . . . . . . . .. 3-10
Lap-Shoulder Belt . . . . . . . . . . .. 3-11
Safety Belt Use During
Pregnancy .... . . . . . . . . . . . . . . 3-13
Safety Belt Extender . . . . . . . . . 3-13
Safety System Check . . . . . . . . 3-14
Safety Belt Care . . . . . . . . . . . . . 3-14
Replacing Safety Belt System
Parts after a Crash . . . . . . . . . 3-14
Airbag System
Airbag System . . . . . .. . . . . . . .. 3-15
Where Are the Airbags? . . . . . 3-17
When Should an Airbag
Inflate? . . . . . . . . . . . . . . . . . .. . . 3-18
What Makes an Airbag
Inflate? . . . . . . . . . . . . . . . . . .. . . 3-19
How Does an Airbag
Restrain? . . . . . . . . . . . . ..... . . 3-20
What Will You See after an
Airbag Inflates? . . . . . . . . . . . . 3-20
Passenger Sensing
System . . . . . . . . .. . . . . . . . . . . . 3-22
Servicing the Airbag-Equipped
Vehicle . . . . . . . . . . . . . . . . . . . . . 3-26
Adding Equipment to the
Airbag-Equipped Vehicle . . . 3-27
Airbag System Check . . . . . . . . 3-28
Replacing Airbag System
Parts after a Crash . . . . . . . . . 3-28
Child Restraints
Older Children . . . . . . . . . . . . . . . 3-29
Infants and Young
Children . . . . . . . . . . . . . . . . . .. . 3-31
Child Restraint Systems . . . . . 3-33
Lower Anchors and Tethers
for Children (LATCH System)
(Coupe and Convertible
Models Only) . . . . . .. . . . . . . . . 3-35
Lower Anchors and Tethers
for Children (LATCH System)
(Z06 and ZR1
Models Only) . . . . . .. . . . . . . . . 3-36
Replacing LATCH System
Parts After a Crash . . . . . . . . . 3-39
Securing Child Restraints . . . . 3-40
Page 68
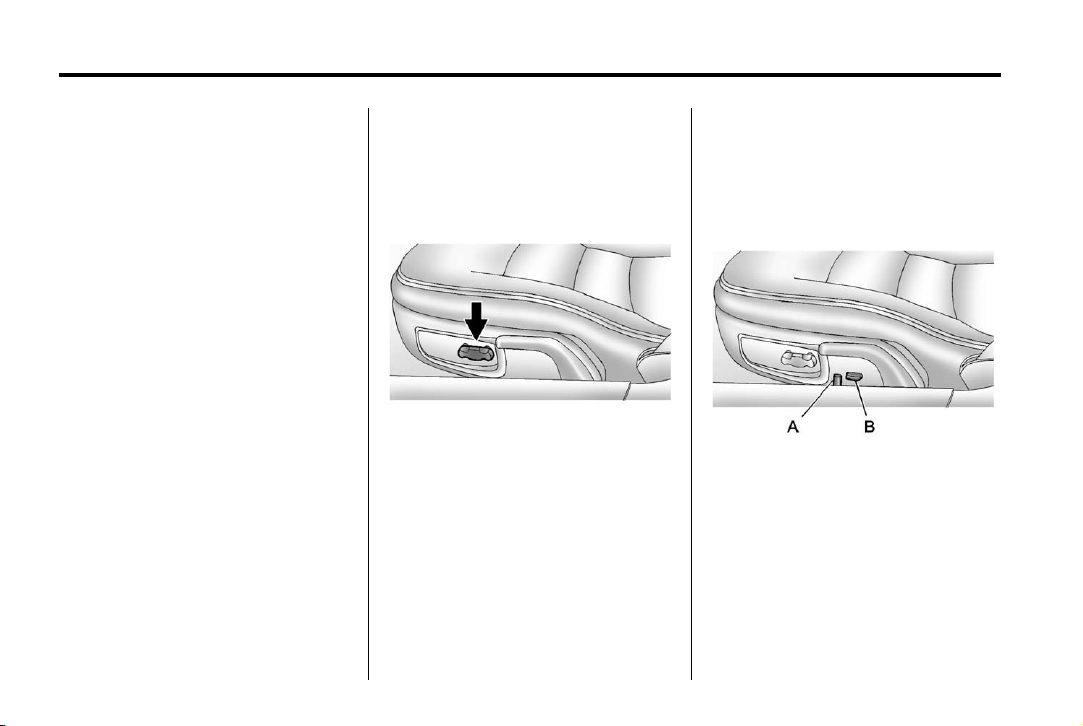
Black plate (2,1)
Chevrolet Corvette Owner Manual - 2012
3-2 Seats and Restraints
Head Restraints
The vehicle's front seats have head
restraints in the outboard seating
positions that cannot be adjusted.
The front seat outboard head
restraints are not designed to be
removed.
Front Seats
Power Seat Adjustment
To adjust a power seat:
.
Move the seat forward or
rearward by sliding the control
forward or rearward.
.
Raise or lower the front or rear
part of the seat cushion by
moving the front or rear of the
control up or down.
Lumbar Adjustment
Power Lumbar and Side
Bolsters
A. Lumbar Support Control
B. Side Bolster Support Control
To adjust the support, if equipped:
.
Move control (A) forward or
rearward to adjust lumbar
support.
.
Move control (B) up or down to
adjust the side bolsters.
Page 69
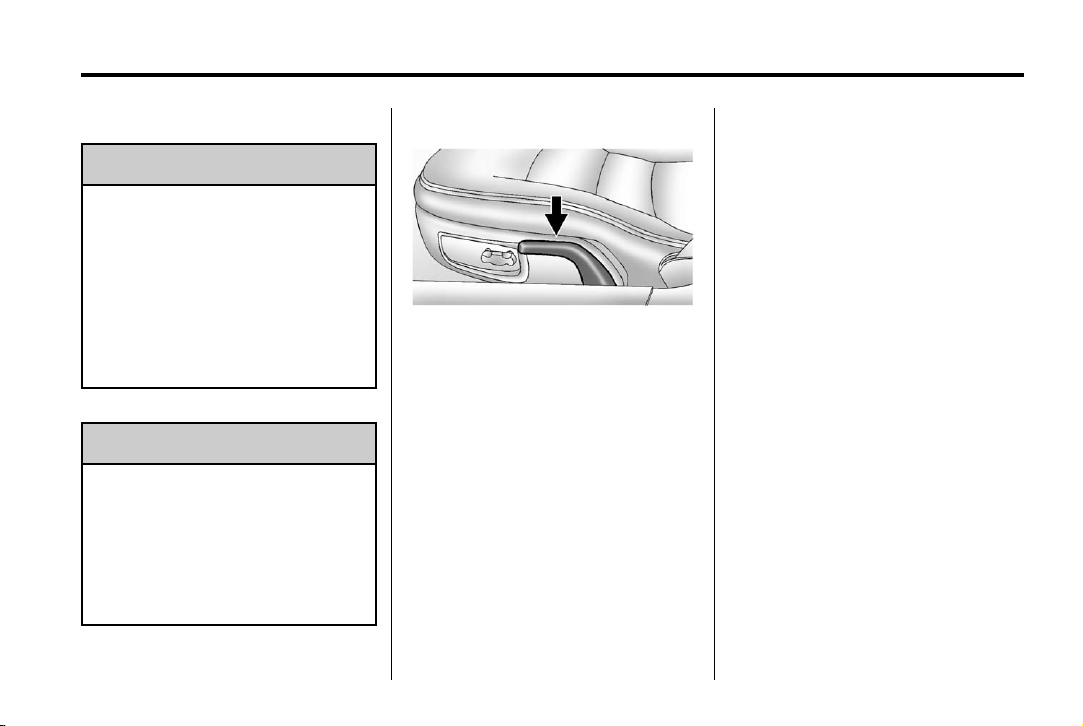
Black plate (3,1)
Chevrolet Corvette Owner Manual - 2012
Seats and Restraints 3-3
Reclining Seatbacks
WARNING
{
You can lose control of the
vehicle if you try to adjust a
manual driver seat while the
vehicle is moving. The sudden
movement could startle and
confuse you, or make you push a
pedal when you do not want to.
Adjust the driver seat only when
the vehicle is not moving.
WARNING
{
If either seatback is not locked, it
could move forward in a sudden
stop or crash. That could cause
injury to the person sitting there.
Always push and pull on the
seatbacks to be sure they are
locked.
To return the seatback to the upright
position:
1. Lift the lever fully without
applying pressure to the
seatback, and the seatback will
return to the upright position.
2. Push and pull on the seatback to
make sure it is locked.
To recline the seatback:
1. Lift the lever.
2. Move the seatback to the
desired position, and then
release the lever to lock the
seatback in place.
3. Push and pull on the seatback to
make sure it is locked.
Page 70
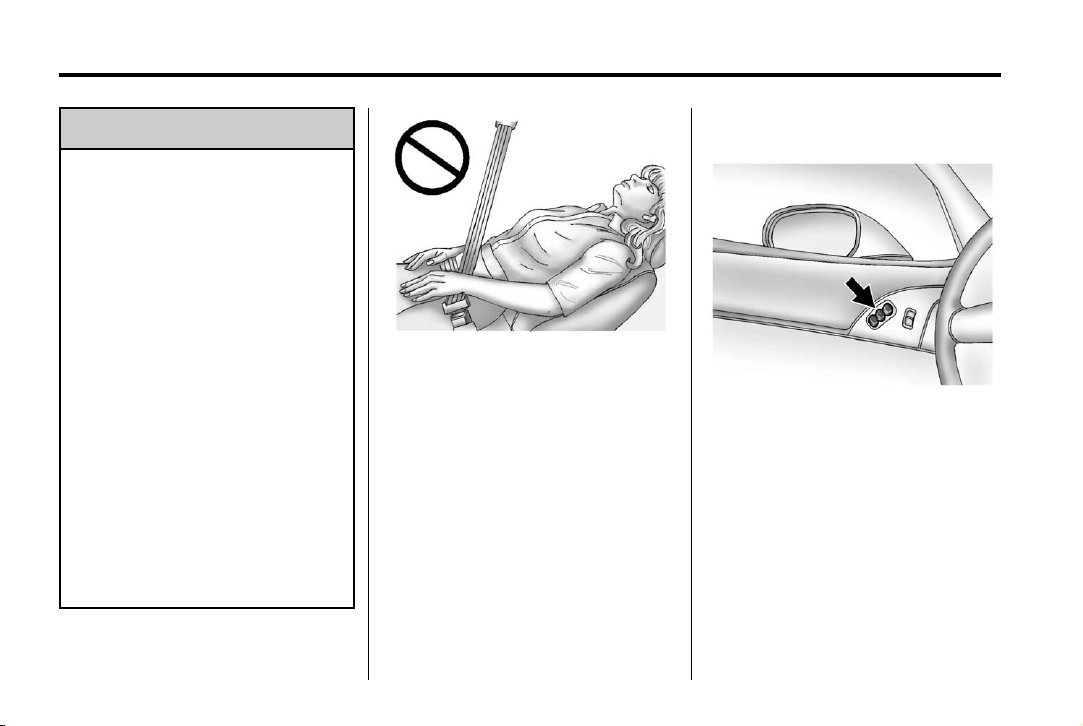
Black plate (4,1)
Chevrolet Corvette Owner Manual - 2012
3-4 Seats and Restraints
WARNING
{
Sitting in a reclined position when
the vehicle is in motion can be
dangerous. Even when buckled
up, the safety belts cannot do
their job.
The shoulder belt will not be
against your body. Instead, it will
be in front of you. In a crash, you
could go into it, receiving neck or
other injuries.
The lap belt could go up over
your abdomen. The belt forces
would be there, not at your pelvic
bones. This could cause serious
internal injuries.
For proper protection when the
vehicle is in motion, have the
seatback upright. Then sit well
back in the seat and wear the
safety belt properly.
Memory Seats
Do not have a seatback reclined if
the vehicle is moving.
On vehicles with the memory
feature, the controls on the driver
door are used to program and recall
memory settings for the driver seat,
outside mirrors, and the telescopic
steering column, if equipped.
The numbers on the back of the
Remote Keyless Entry (RKE)
transmitters correspond to the
numbers on the memory buttons.
Page 71

Black plate (5,1)
Chevrolet Corvette Owner Manual - 2012
Storing Memory Positions
To save into memory:
1. Adjust the driver seat, both
outside mirrors, and the
telescopic steering column,
if equipped.
2. Press and hold “1” until
two beeps sound.
3. Repeat for a second driver
position using “2.”
To recall a memory position:
.
On vehicles with an automatic
transmission, press and release
“1” or “2.”
If the vehicle is in P (Park), a
single beep sounds and the
memory position is recalled after
a brief delay.
If the vehicle is not in P (Park),
three beeps sound and the
memory position is not recalled.
.
On vehicles with a manual
transmission, when the vehicle
is on, the parking brake must be
set to recall a memory position.
Press and release “1” or “2.”
A single beep sounds and the
memory position is recalled after
a brief delay.
If the vehicle is on and the
parking brake is not set,
three beeps sound and the
memory position is not recalled.
Memory Remote Recall
(Automatic Transmission)
This feature can recall the driver
seat, outside mirrors, and telescopic
steering column, if equipped, to
stored positions when entering the
vehicle.
To activate, enter the vehicle and
start the engine. The driver seat,
outside mirrors, and telescopic
steering column will move to the
Seats and Restraints 3-5
memory position associated with
the transmitter used to unlock the
vehicle.
This feature is turned on or off using
the vehicle personalization menu.
See Vehicle Personalization on
page 5‑54.
To stop recall movement, press one
of the power seat controls, power
mirror or memory buttons, or the
telescopic steering column switch.
If something has blocked the driver
seat while recalling a memory
position, the recall may stop.
Remove the obstruction; then press
and hold the appropriate manual
control for the memory item that is
not recalling for two seconds.
Try recalling the memory position
again by pressing the appropriate
memory button. If the memory
position is still not recalling, see
your dealer for service.
Page 72

Black plate (6,1)
Chevrolet Corvette Owner Manual - 2012
3-6 Seats and Restraints
Easy Exit Driver Seat
This feature can move the seat
rearward and the telescopic steering
column, if equipped, out of the way
to allow extra room to exit the
vehicle.
B (Easy Exit Driver Seat): Press
to save and recall the easy exit seat
position.
To save into memory:
1. Recall the desired driving
position by pressing “1.”
2. Adjust the seat and the
telescopic steering column to the
desired exit position.
3. Press and hold
two beeps sound.
4. Repeat for a second driver
position using “2.”
B until
To recall, press and release
The vehicle must be in P (Park) for
an automatic transmission or the
parking brake must be set for a
manual transmission. A single beep
sounds. The seat and telescopic
steering column will move to the
position previously stored for the
identified driver.
If the easy exit seat feature is
programmed on in the vehicle
personalization menu, automatic
recall occurs when one of the
following conditions is met:
.
The vehicle is turned off, in
Retained Accessory
Power (RAP) or accessory
mode, and the driver door is
opened.
.
The vehicle is turned off, or in
RAP, and the unlock button on
the RKE transmitter is pressed.
B.
If something has blocked the driver
seat while recalling the exit position,
the recall may stop. Remove the
obstruction; then press and hold the
power seat control rearward for
two seconds. Try recalling the exit
position again. If the exit position is
still not recalling, see your dealer for
service.
See Vehicle Personalization on
page 5‑54.
Page 73
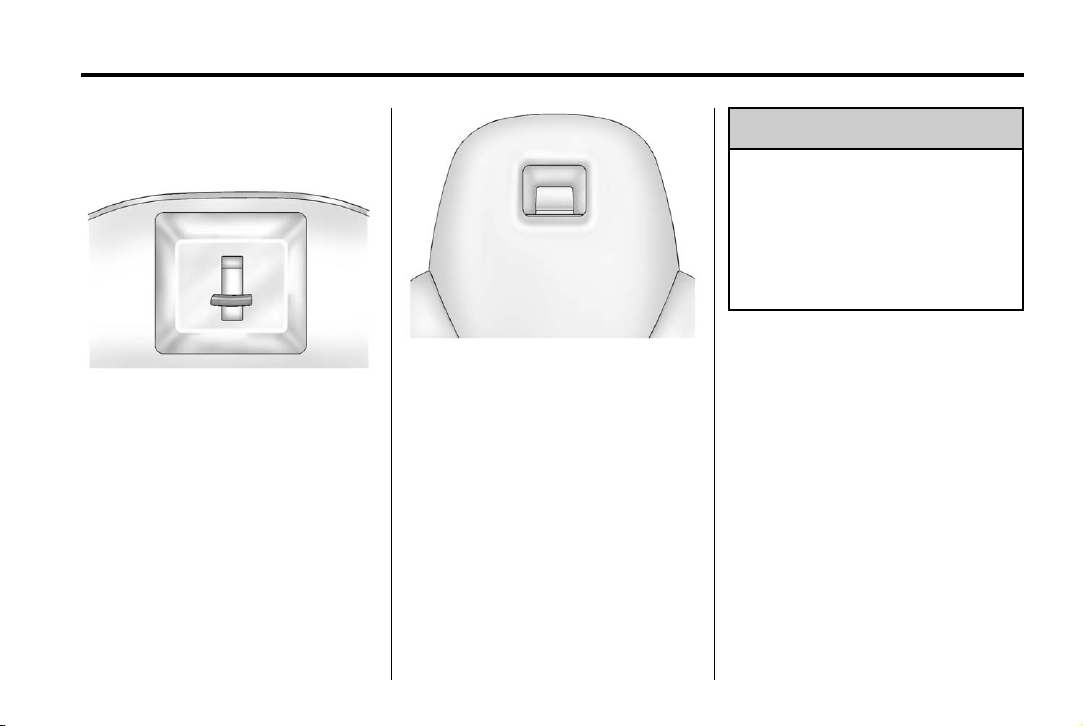
Black plate (7,1)
Chevrolet Corvette Owner Manual - 2012
Seats and Restraints 3-7
Seatback Latches
Some vehicles are equipped with
this seatback latch.
Some vehicles are equipped with
this seatback latch.
To fold a seatback forward, lift the
latch on top of the backside of the
seat. The seatback locks when
folded down.
WARNING
{
If either seatback is not locked, it
could move forward in a sudden
stop or crash. That could cause
injury to the person sitting there.
Always push and pull on the
seatbacks to be sure they are
locked.
To return a seatback to the sitting
position, lift up on the latch,
raise the seatback, and push the
seatback rearward. Push and pull
on the seatback to make sure it is
locked in place.
Page 74
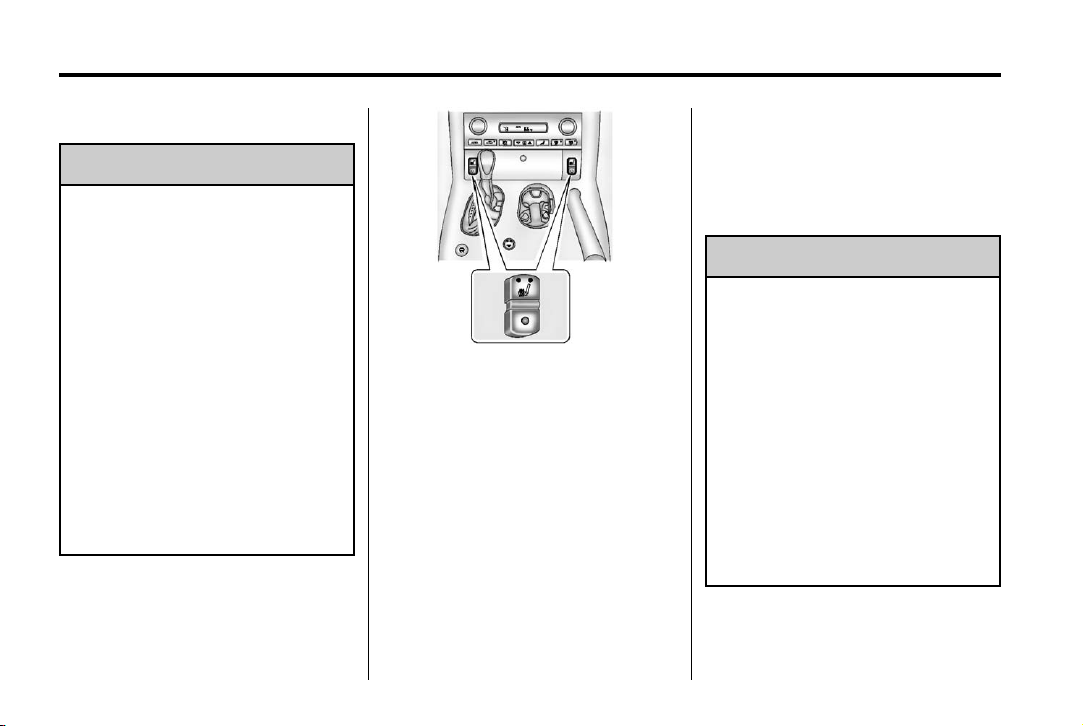
Black plate (8,1)
Chevrolet Corvette Owner Manual - 2012
3-8 Seats and Restraints
Heated Front Seats
WARNING
{
If you cannot feel temperature
change or pain to the skin, the
seat heater may cause burns
even at low temperatures.
To reduce the risk of burns,
people with such a condition
should use care when using the
seat heater, especially for long
periods of time. Do not place
anything on the seat that
insulates against heat, such as
a blanket, cushion, cover,
or similar item. This may cause
the seat heater to overheat.
An overheated seat heater may
cause a burn or may damage
the seat.
If available, the buttons are on the
center stack.
The ignition must be on for this
feature to work.
L (Heated Seat): Press to turn the
heated seat on at the high setting.
Press again to switch to the low
setting.
9 (Off): Press to turn the heated
seat off.
Safety Belts
This section of the manual
describes how to use safety belts
properly. It also describes some
things not to do with safety belts.
WARNING
{
Do not let anyone ride where a
safety belt cannot be worn
properly. In a crash, if you or your
passenger(s) are not wearing
safety belts, injuries can be much
worse than if you are wearing
safety belts. You can be seriously
injured or killed by hitting things
inside the vehicle harder or by
being ejected from the vehicle.
In addition, anyone who is not
buckled up can strike other
passengers in the vehicle.
(Continued)
Page 75
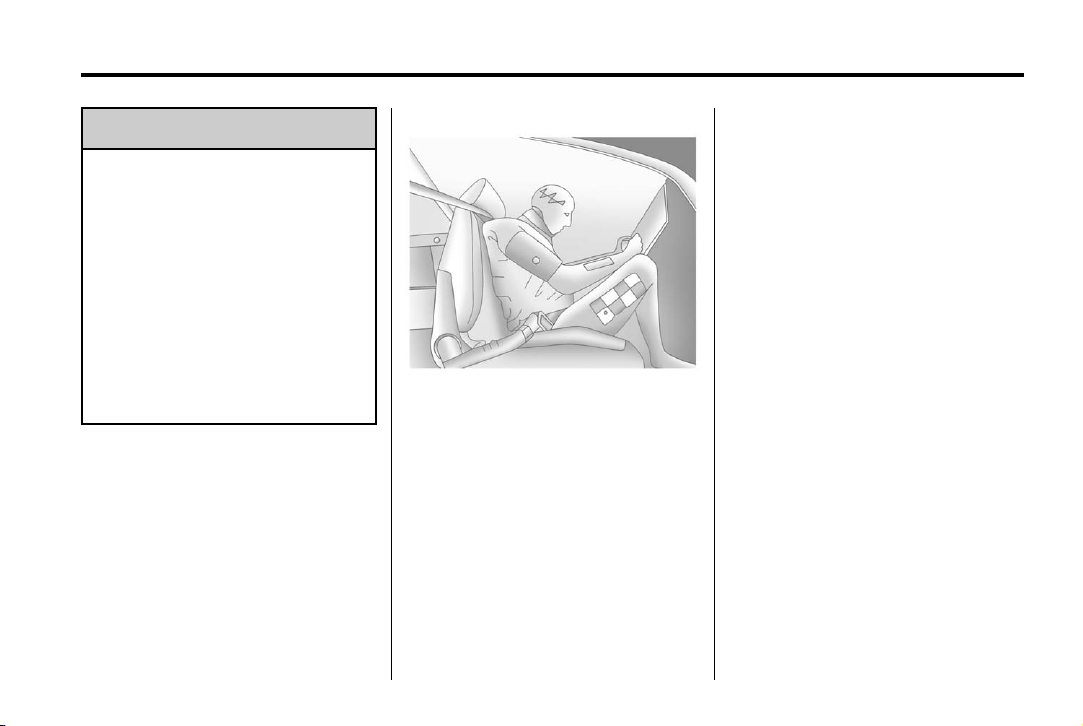
Black plate (9,1)
Chevrolet Corvette Owner Manual - 2012
Seats and Restraints 3-9
WARNING (Continued)
It is extremely dangerous to ride
in a cargo area, inside or outside
of a vehicle. In a collision,
passengers riding in these areas
are more likely to be seriously
injured or killed. Do not allow
passengers to ride in any area of
the vehicle that is not equipped
with seats and safety belts.
Always wear a safety belt, and
check that all passenger(s) are
restrained properly too.
This vehicle has indicators as a
reminder to buckle the safety belts.
See Safety Belt Reminders on
page 5‑17.
Why Safety Belts Work
When riding in a vehicle, you travel
as fast as the vehicle does. If the
vehicle stops suddenly, you keep
going until something stops you.
It could be the windshield, the
instrument panel, or the safety belts!
When you wear a safety belt, you
and the vehicle slow down together.
There is more time to stop because
you stop over a longer distance and,
when worn properly, your strongest
bones take the forces from the
safety belts. That is why wearing
safety belts makes such good
sense.
Questions and Answers About
Safety Belts
Q: Will I be trapped in the vehicle
after a crash if I am wearing a
safety belt?
A: You could be— whether you are
wearing a safety belt or not.
Your chance of being conscious
during and after a crash, so you
can unbuckle and get out, is
much greater if you are belted.
Q: If my vehicle has airbags,
why should I have to wear
safety belts?
A: Airbags are supplemental
systems only; so they work with
safety belts— not instead of
them. Whether or not an airbag
is provided, all occupants still
have to buckle up to get the
most protection.
Also, in nearly all states and in
all Canadian provinces, the law
requires wearing safety belts.
Page 76
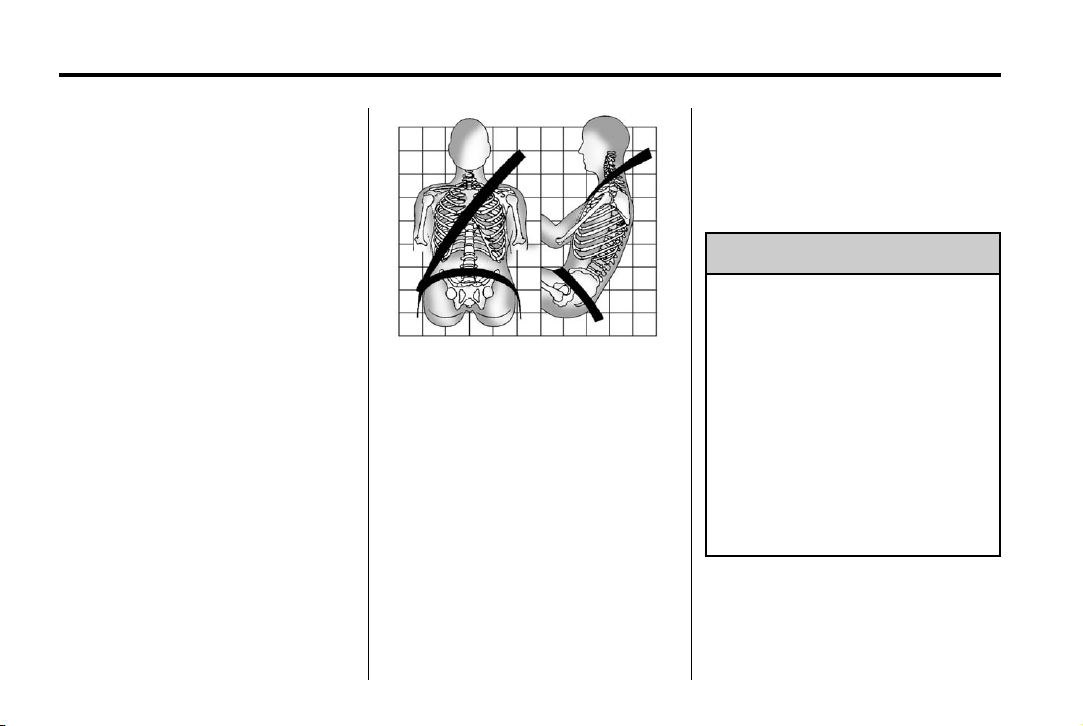
Black plate (10,1)
Chevrolet Corvette Owner Manual - 2012
3-10 Seats and Restraints
How to Wear Safety Belts Properly
This section is only for people of
adult size.
There are special things to know
about safety belts and children.
And there are different rules for
smaller children and infants. If a
child will be riding in the vehicle,
see Older Children on page 3‑29 or
Infants and Young Children on
page 3‑31. Follow those rules for
everyone's protection.
It is very important for all occupants
to buckle up. Statistics show that
unbelted people are hurt more often
in crashes than those who are
wearing safety belts.
There are important things to know
about wearing a safety belt properly.
.
Sit up straight and always keep
your feet on the floor in front
of you.
.
Always use the correct buckle
for your seating position.
.
Wear the lap part of the belt low
and snug on the hips, just
touching the thighs. In a crash,
this applies force to the strong
pelvic bones and you would be
less likely to slide under the lap
belt. If you slid under it, the belt
would apply force on your
abdomen. This could cause
serious or even fatal injuries.
.
Wear the shoulder belt over the
shoulder and across the chest.
These parts of the body are best
able to take belt restraining
forces. The shoulder belt locks if
there is a sudden stop or crash.
WARNING
{
You can be seriously injured,
or even killed, by not wearing
your safety belt properly.
.
Never allow the lap or
shoulder belt to become
loose or twisted.
.
Never wear the shoulder belt
under both arms or behind
your back.
.
Never route the lap or
shoulder belt over an
armrest.
Page 77
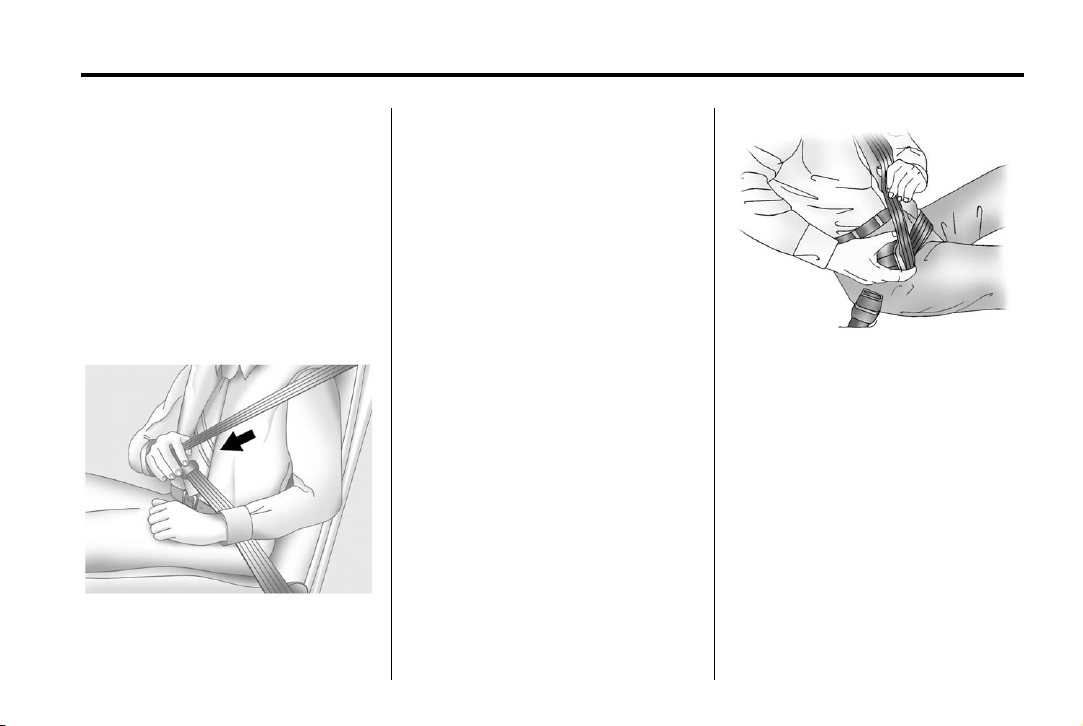
Black plate (11,1)
Chevrolet Corvette Owner Manual - 2012
Seats and Restraints 3-11
Lap-Shoulder Belt
All seating positions in the vehicle
have a lap-shoulder belt.
The following instructions explain
how to wear a lap-shoulder belt
properly.
1. Adjust the seat, if the seat is
adjustable, so you can sit up
straight. To see how, see “Seats”
in the Index.
2. Pick up the latch plate and pull
the belt across you. Do not let it
get twisted.
The lap-shoulder belt may lock if
you pull the belt across you very
quickly. If this happens, let the
belt go back slightly to unlock it.
Then pull the belt across you
more slowly.
If the shoulder portion of a
passenger belt is pulled out all
the way, the child restraint
locking feature may be engaged.
If this happens, let the belt go
back all the way and start again.
Engaging the child restraint
locking feature in the right front
seating position may affect the
passenger sensing system. See
Passenger Sensing System on
page 3‑22 for more information.
3. If the belt stops before it reaches
the buckle, tilt the latch plate and
keep pulling the safety belt until
it can be buckled.
Page 78
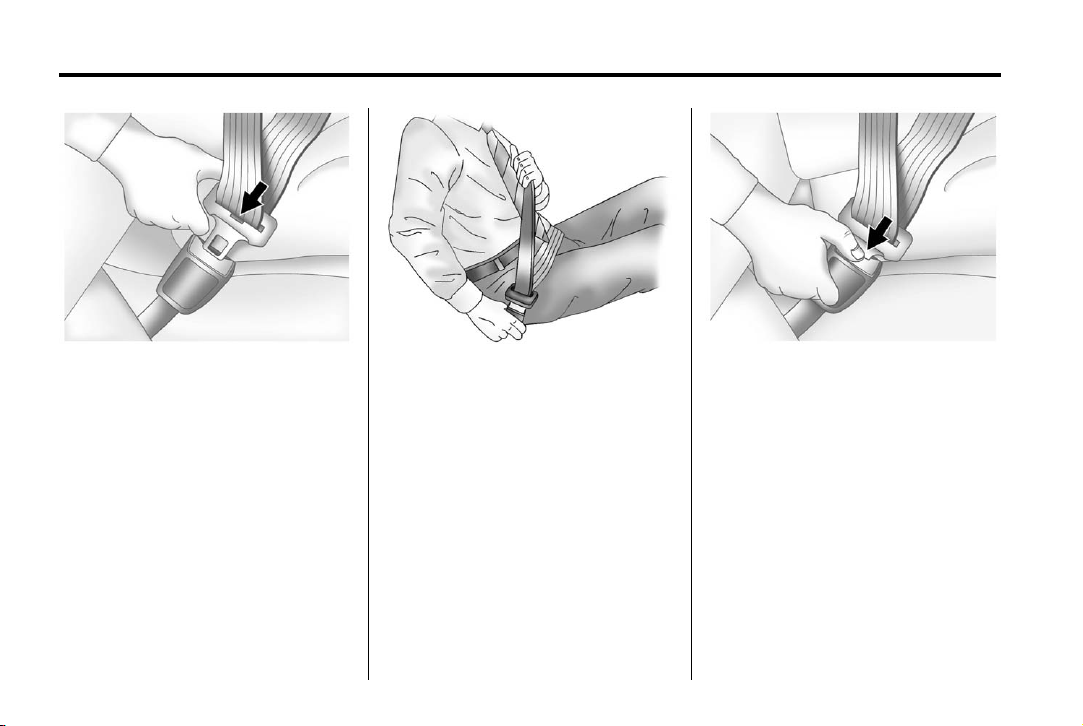
Black plate (12,1)
Chevrolet Corvette Owner Manual - 2012
3-12 Seats and Restraints
4. Push the latch plate into the
buckle until it clicks.
Pull up on the latch plate to
make sure it is secure. If the belt
is not long enough, see Safety
Belt Extender on page 3‑13.
Position the release button on
the buckle so that the safety belt
could be quickly unbuckled if
necessary.
5. To make the lap part tight, pull
up on the shoulder belt.
It may be necessary to pull
stitching on the safety belt
through the latch plate to fully
tighten the lap belt on smaller
occupants.
To unlatch the belt, push the button
on the buckle. The belt should
return to its stowed position.
Before a door is closed, be sure the
safety belt is out of the way. If a
door is slammed against a safety
belt, damage can occur to both the
safety belt and the vehicle.
Page 79
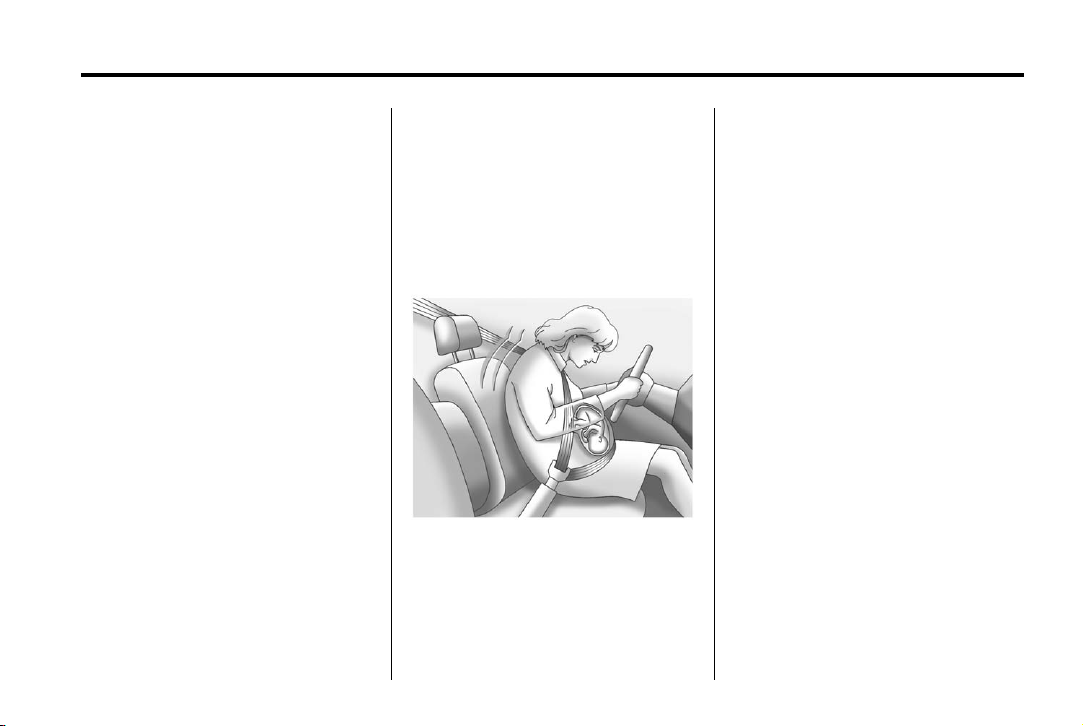
Black plate (13,1)
Chevrolet Corvette Owner Manual - 2012
Seats and Restraints 3-13
Safety Belt Pretensioners
This vehicle has safety belt
pretensioners for the front outboard
occupants. Although the safety belt
pretensioners cannot be seen, they
are part of the safety belt assembly.
They can help tighten the safety
belts during the early stages of a
moderate to severe frontal and
near frontal crash if the threshold
conditions for pretensioner
activation are met. And, for vehicles
with side impact airbags, safety belt
pretensioners can help tighten the
safety belts in a side crash.
Pretensioners work only once.
If the pretensioners activate in a
crash, they will need to be replaced,
and probably other new parts for
the vehicle's safety belt system.
See Replacing Safety Belt System
Parts after a Crash on page 3‑14.
Safety Belt Use During Pregnancy
Safety belts work for everyone,
including pregnant women. Like all
occupants, they are more likely to
be seriously injured if they do not
wear safety belts.
A pregnant woman should wear a
lap-shoulder belt, and the lap
portion should be worn as low as
possible, below the rounding,
throughout the pregnancy.
The best way to protect the fetus is
to protect the mother. When a safety
belt is worn properly, it is more likely
that the fetus will not be hurt in a
crash. For pregnant women, as for
anyone, the key to making safety
belts effective is wearing them
properly.
Safety Belt Extender
If the vehicle's safety belt will fasten
around you, you should use it.
But if a safety belt is not long
enough, your dealer will order you
an extender. When you go in to
order it, take the heaviest coat you
will wear, so the extender will be
long enough for you. To help avoid
personal injury, do not let someone
else use it, and use it only for the
seat it is made to fit. The extender
has been designed for adults. Never
use it for securing child seats. To
wear it, attach it to the regular safety
belt. For more information, see the
instruction sheet that comes with
the extender.
Page 80
Black plate (14,1)
Chevrolet Corvette Owner Manual - 2012
3-14 Seats and Restraints
Safety System Check
Now and then, check that the safety
belt reminder light, safety belts,
buckles, latch plates, retractors,
and anchorages are all working
properly. Look for any other loose or
damaged safety belt system parts
that might keep a safety belt system
from doing its job. See your dealer
to have it repaired. Torn or frayed
safety belts may not protect you in a
crash. They can rip apart under
impact forces. If a belt is torn or
frayed, get a new one right away.
Make sure the safety belt reminder
light is working. See Safety Belt
Reminders on page 5‑17.
Keep safety belts clean and dry.
See Safety Belt Care on page 3‑14.
Safety Belt Care
Keep belts clean and dry.
WARNING
{
Do not bleach or dye safety belts.
It may severely weaken them. In
a crash, they might not be able to
provide adequate protection.
Clean safety belts only with mild
soap and lukewarm water.
Replacing Safety Belt System Parts after a Crash
WARNING
{
A crash can damage the safety
belt system in the vehicle.
A damaged safety belt system
may not properly protect the
person using it, resulting in
serious injury or even death in a
crash. To help make sure the
safety belt systems are working
properly after a crash, have them
inspected and any necessary
replacements made as soon as
possible.
Page 81

Black plate (15,1)
Chevrolet Corvette Owner Manual - 2012
Seats and Restraints 3-15
After a minor crash, replacement of
safety belts may not be necessary.
But the safety belt assemblies that
were used during any crash may
have been stressed or damaged.
See your dealer to have the safety
belt assemblies inspected or
replaced.
New parts and repairs may be
necessary even if the safety belt
system was not being used at the
time of the crash.
Have the safety belt pretensioners
checked if the vehicle has been in a
crash, or if the airbag readiness light
stays on after you start the vehicle
or while you are driving. See Airbag
Readiness Light on page 5‑17.
Airbag System
The vehicle has the following
airbags:
.
A frontal airbag for the driver.
.
A frontal airbag for the front
outboard passenger.
.
A seat-mounted side impact
airbag for the driver.
.
A seat-mounted side impact
airbag for the front outboard
passenger.
All vehicle airbags have the word
AIRBAG on the trim or on a label
near the deployment opening.
For frontal airbags, the word
AIRBAG is on the center of the
steering wheel for the driver and on
the instrument panel for the front
outboard passenger.
For seat-mounted side impact
airbags, the word AIRBAG is on the
side of the seatback closest to
the door.
Airbags are designed to supplement
the protection provided by safety
belts. Even though today's airbags
are also designed to help reduce
the risk of injury from the force of an
inflating bag, all airbags must inflate
very quickly to do their job.
Page 82
Black plate (16,1)
Chevrolet Corvette Owner Manual - 2012
3-16 Seats and Restraints
Here are the most important things
to know about the airbag system:
WARNING
{
You can be severely injured or
killed in a crash if you are not
wearing your safety belt, even
with airbags. Airbags are
designed to work with safety
belts, not replace them. Also,
airbags are not designed to inflate
in every crash. In some crashes
safety belts are the only restraint.
See When Should an Airbag
Inflate? on page 3‑18.
Wearing your safety belt during a
crash helps reduce the chance of
hitting things inside the vehicle or
being ejected from it. Airbags are
“supplemental restraints” to the
safety belts. Everyone in the
vehicle should wear a safety belt
properly, whether or not there is
an airbag for that person.
WARNING
{
Because airbags inflate with great
force and faster than the blink of
an eye, anyone who is up
against, or very close to, any
airbag when it inflates can be
seriously injured or killed. Do not
sit unnecessarily close to any
airbag, as you would be if sitting
on the edge of the seat or leaning
forward. Safety belts help keep
you in position before and during
a crash. Always wear the safety
belt, even with airbags. The driver
should sit as far back as possible
while still maintaining control of
the vehicle.
Occupants should not lean on or
sleep against the door or side
windows in seating positions with
seat-mounted airbags.
WARNING
{
Children who are up against,
or very close to, any airbag
when it inflates can be seriously
injured or killed. Airbags plus
lap-shoulder belts offer protection
for adults and older children, but
not for young children and infants.
Neither the vehicle's safety belt
system nor its airbag system
is designed for them. Young
children and infants need the
protection that a child restraint
system can provide. Always
secure children properly in
the vehicle. To read how, see
Older Children on page 3‑29 or
Infants and Young Children on
page 3‑31.
Page 83
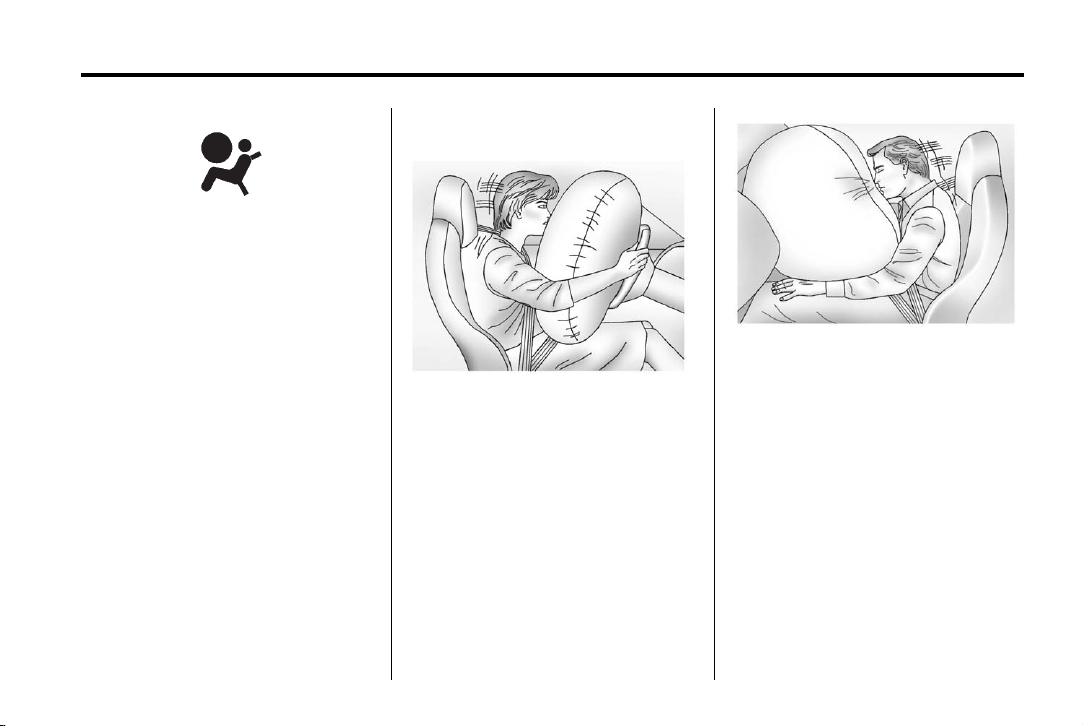
Black plate (17,1)
Chevrolet Corvette Owner Manual - 2012
There is an airbag readiness light
on the instrument panel, which
shows the airbag symbol.
The system checks the airbag
electrical system for malfunctions.
The light tells you if there is an
electrical problem. See Airbag
Readiness Light on page 5‑17
for more information.
Where Are the Airbags?
The driver frontal airbag is in the
center of the steering wheel.
Seats and Restraints 3-17
The front outboard passenger
frontal airbag is in the passenger
side instrument panel.
Page 84
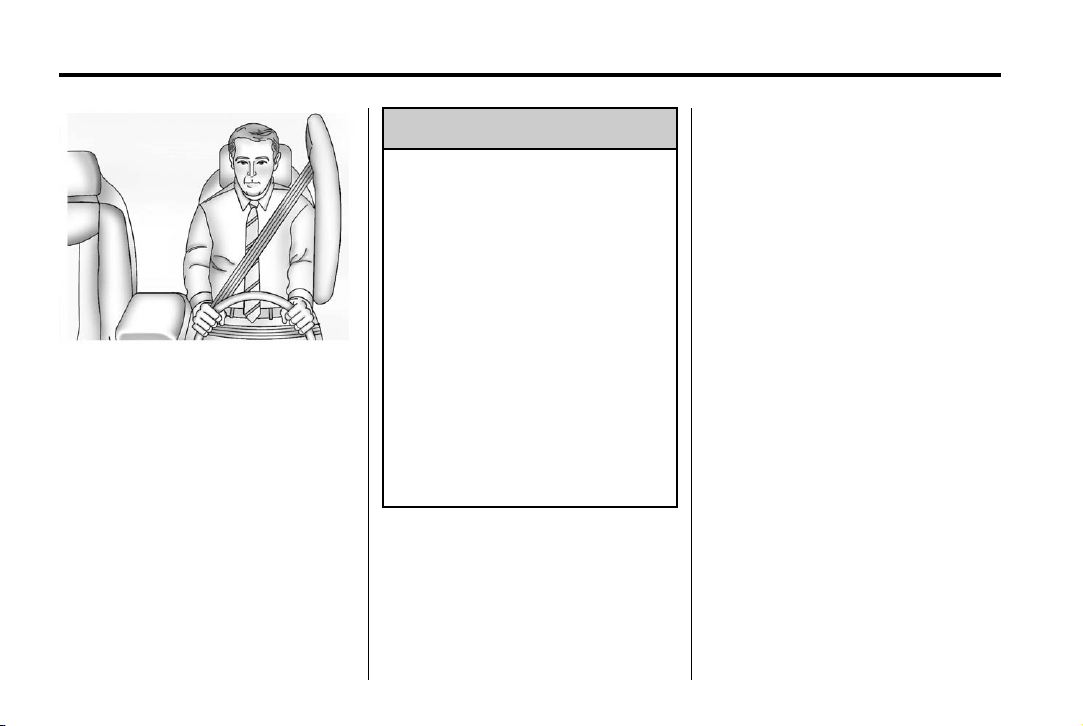
Black plate (18,1)
Chevrolet Corvette Owner Manual - 2012
3-18 Seats and Restraints
Driver Side Shown,
Passenger Side Similar
The driver and front outboard
passenger seat-mounted side
impact airbags are in the side of
the seatbacks closest to the door.
WARNING
{
If something is between an
occupant and an airbag, the
airbag might not inflate properly
or it might force the object into
that person causing severe injury
or even death. The path of an
inflating airbag must be kept
clear. Do not put anything
between an occupant and an
airbag, and do not attach or put
anything on the steering wheel
hub or on or near any other
airbag covering.
Do not use seat accessories that
block the inflation path of a
seat-mounted side impact airbag.
When Should an Airbag Inflate?
Frontal airbags are designed to
inflate in moderate to severe frontal
or near frontal crashes to help
reduce the potential for severe
injuries mainly to the driver's or
front outboard passenger's head
and chest. However, they are only
designed to inflate if the impact
exceeds a predetermined
deployment threshold. Deployment
thresholds are used to predict how
severe a crash is likely to be in time
for the airbags to inflate and help
restrain the occupants.
Whether the frontal airbags will or
should deploy is not based primarily
on how fast the vehicle is traveling.
It depends on what is hit, the
direction of the impact, and how
quickly the vehicle slows down.
Page 85

Black plate (19,1)
Chevrolet Corvette Owner Manual - 2012
Seats and Restraints 3-19
Frontal airbags may inflate at
different crash speeds depending on
whether the vehicle hits an object
straight on or at an angle, and
whether the object is fixed or
moving, rigid or deformable,
narrow or wide.
Thresholds can also vary with
specific vehicle design.
Frontal airbags are not intended to
inflate during vehicle rollovers, rear
impacts, or in many side impacts.
In addition, the vehicle has
dual-stage frontal airbags.
Dual-stage airbags adjust the
restraint according to crash severity.
The vehicle has electronic frontal
sensors, which help the sensing
system distinguish between a
moderate frontal impact and a more
severe frontal impact. For moderate
frontal impacts, dual-stage airbags
inflate at a level less than full
deployment. For more severe frontal
impacts, full deployment occurs.
Depending on the model, the
vehicle may have one or two seat
position sensors. The seat position
sensor(s) enable the sensing
system to monitor the position of the
driver seat (all models except Z06
and ZR1) and the front outboard
passenger seat (all models).
Seat position sensor(s) provide
information that is used in
determining whether the airbags
should inflate at a reduced or full
level.
The vehicle has seat-mounted side
impact airbags. See Airbag System
on page 3‑15. Seat-mounted side
impact airbags are intended to
inflate in moderate to severe side
crashes, depending on the location
of the impact. Seat-mounted side
impact airbags will inflate if the
crash severity is above the
system's designed threshold level.
The threshold level can vary with
specific vehicle design.
Seat-mounted side impact airbags
are not intended to inflate in
frontal impacts, near-frontal
impacts, rollovers, or rear impacts.
A seat-mounted side impact airbag
is intended to inflate on the side of
the vehicle that is struck.
In any particular crash, no one can
say whether an airbag should have
inflated simply because of the
vehicle damage or repair costs.
What Makes an Airbag Inflate?
In a deployment event, the sensing
system sends an electrical signal
triggering a release of gas from the
inflator. Gas from the inflator fills the
airbag causing the bag to break out
of the cover. The inflator, the airbag,
and related hardware are all part of
the airbag module.
For airbag location, see Where Are
the Airbags? on page 3‑17.
Page 86
Black plate (20,1)
Chevrolet Corvette Owner Manual - 2012
3-20 Seats and Restraints
How Does an Airbag Restrain?
In moderate to severe frontal or
near frontal collisions, even belted
occupants can contact the steering
wheel or the instrument panel.
In moderate to severe side
collisions, even belted occupants
can contact the inside of the
vehicle.
Airbags supplement the protection
provided by safety belts by
distributing the force of the
impact more evenly over the
occupant's body.
But airbags would not help in
many types of collisions, primarily
because the occupant's motion is
not toward those airbags. See When
Should an Airbag Inflate? on
page 3‑18 for more information.
Airbags should never be regarded
as anything more than a supplement
to safety belts.
What Will You See after an Airbag Inflates?
After the frontal and seat-mounted
side impact airbags inflate, they
quickly deflate, so quickly that some
people may not even realize the
airbags inflated. Some components
of the airbag module may be hot for
several minutes. For location of the
airbags, see Where Are the
Airbags? on page 3‑17.
The parts of the airbag that come
into contact with you may be warm,
but not too hot to touch. There may
be some smoke and dust coming
from the vents in the deflated
airbags. Airbag inflation does not
prevent the driver from seeing out of
the windshield or being able to steer
the vehicle, nor does it prevent
people from leaving the vehicle.
WARNING
{
When an airbag inflates, there
may be dust in the air. This dust
could cause breathing problems
for people with a history of
asthma or other breathing trouble.
To avoid this, everyone in the
vehicle should get out as soon as
it is safe to do so. If you have
breathing problems but cannot
get out of the vehicle after an
airbag inflates, then get fresh air
by opening a window or a door.
If you experience breathing
problems following an airbag
deployment, you should seek
medical attention.
The vehicle has a feature that may
automatically unlock the doors, turn
the interior lamps on, turn on the
hazard warning flashers, and shut
Page 87
Black plate (21,1)
Chevrolet Corvette Owner Manual - 2012
off the fuel system after the airbags
inflate. You can lock the doors, turn
the interior lamps off, and turn the
hazard warning flashers off by using
the controls for those features.
WARNING
{
A crash severe enough to inflate
the airbags may have also
damaged important functions in
the vehicle, such as the fuel
system, brake and steering
systems, etc. Even if the vehicle
appears to be drivable after a
moderate crash, there may be
concealed damage that could
make it difficult to safely operate
the vehicle.
Use caution if you should attempt
to restart the engine after a crash
has occurred.
In many crashes severe enough to
inflate the airbag, windshields are
broken by vehicle deformation.
Additional windshield breakage may
also occur from the front outboard
passenger airbag.
.
Airbags are designed to inflate
only once. After an airbag
inflates, you will need some
new parts for the airbag system.
If you do not get them, the
airbag system will not be there
to help protect you in another
crash. A new system will include
airbag modules and possibly
other parts. The service manual
for the vehicle covers the need
to replace other parts.
Seats and Restraints 3-21
.
The vehicle has a crash sensing
and diagnostic module which
records information after a
crash. See Vehicle Data
Recording and Privacy on
page 13‑20 and Event Data
Recorders on page 13‑20.
.
Let only qualified technicians
work on the airbag system.
Improper service can mean that
the airbag system will not work
properly. See your dealer for
service.
Page 88
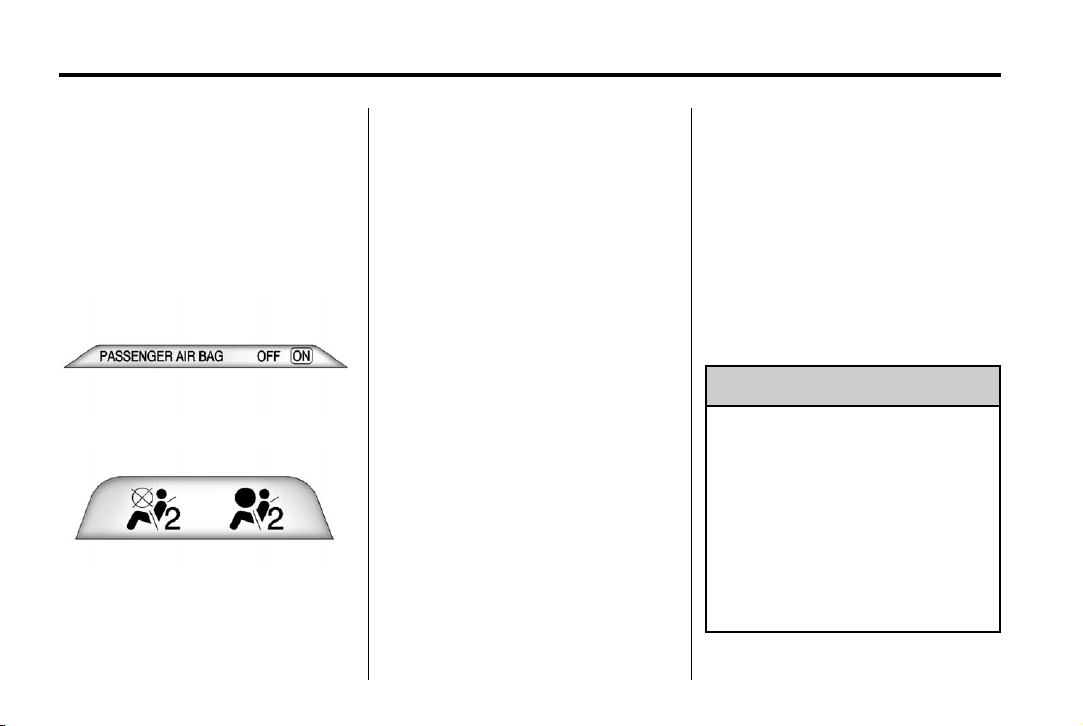
Black plate (22,1)
Chevrolet Corvette Owner Manual - 2012
3-22 Seats and Restraints
Passenger Sensing System
The vehicle has a passenger
sensing system for the front
outboard passenger position.
The passenger airbag status
indicator will light in the rearview
mirror when the vehicle is started.
United States
Canada and Mexico
The words ON and OFF, or the
symbol for on and off, will be visible
during the system check. When the
system check is complete, either the
word ON or OFF, or the symbol
for on or off, will be visible. See
Passenger Airbag Status Indicator
on page 5‑18.
The passenger sensing system
will turn off the front outboard
passenger frontal airbag and
seat-mounted side impact airbag
under certain conditions. No other
airbag is affected by the passenger
sensing system.
The passenger sensing system
works with sensors that are part of
the front outboard passenger seat.
The sensors are designed to detect
the presence of a properly-seated
occupant and determine if the front
outboard passenger frontal airbag
and seat-mounted side impact
airbag should be allowed to inflate
or not.
According to accident statistics,
children are safer when properly
secured in a rear seat in the correct
child restraint for their weight
and size. We recommend that
rear-facing child restraints not be
transported in the vehicle, even if
the airbags are off.
Never put a rear-facing child seat in
the front. This is because the risk to
the rear-facing child is so great,
if the airbag inflates.
WARNING
{
A child in a rear-facing child
restraint can be seriously injured
or killed if the passenger frontal
airbag inflates. This is because
the back of the rear-facing child
restraint would be very close to
the inflating airbag. A child in a
forward-facing child restraint can
be seriously injured or killed if the
(Continued)
Page 89
Black plate (23,1)
Chevrolet Corvette Owner Manual - 2012
WARNING (Continued)
passenger frontal airbag inflates
and the passenger seat is in a
forward position.
Even if the passenger sensing
system has turned off the front
outboard passenger airbag(s), no
system is fail-safe. No one can
guarantee that an airbag will not
inflate under some unusual
circumstance, even though the
airbag(s) are off.
Secure rear-facing child restraints
in a rear seat, even if the
airbag(s) are off. If you secure a
forward-facing child restraint in
the front outboard passenger
seat, always move the seat as far
back as it will go. It is better to
secure the child restraint in a
rear seat.
If the vehicle does not have a rear
seat that will accommodate a
rear-facing child restraint, a
rear-facing child restraint should not
be installed in the vehicle, even if
the airbags are off.
The passenger sensing system is
designed to turn off the front
outboard passenger frontal airbag
and seat-mounted side impact
airbag if:
.
The front outboard passenger
seat is unoccupied.
.
The system determines that an
infant is present in a rear-facing
infant seat.
.
The system determines that a
small child is present in a child
restraint.
.
The system determines that a
small child is present in a
booster seat.
Seats and Restraints 3-23
.
A front outboard passenger
takes his/her weight off of the
seat for a period of time.
.
The front outboard passenger
seat is occupied by a smaller
person, such as a child who has
outgrown child restraints.
.
There is a critical problem with
the airbag system or the
passenger sensing system.
When the passenger sensing
system has turned off the front
outboard passenger frontal airbag
and seat-mounted side impact
airbag, the off indicator will light
and stay lit as a reminder that the
airbags are off. See Passenger
Airbag Status Indicator on
page 5‑18.
Page 90
Black plate (24,1)
Chevrolet Corvette Owner Manual - 2012
3-24 Seats and Restraints
The passenger sensing system is
designed to turn on the front
outboard passenger frontal airbag
and seat-mounted side impact
airbag anytime the system senses
that a person of adult size is sitting
properly in the front outboard
passenger seat.
When the passenger sensing
system has allowed the airbags to
be enabled, the on indicator will light
and stay lit as a reminder that the
airbags are active.
For some children who have
outgrown child restraints and for
very small adults, the passenger
sensing system may or may not turn
off the front outboard passenger
frontal airbag and seat-mounted
side impact airbag, depending
upon the person's seating
posture and body build.
Everyone in the vehicle who
has outgrown child restraints
should wear a safety belt
properly — whether or not there is
an airbag for that person.
WARNING
{
If the airbag readiness light ever
comes on and stays on, it means
that something may be wrong
with the airbag system. To help
avoid injury to yourself or others,
have the vehicle serviced right
away. See Airbag Readiness
Light on page 5‑17 for more
information, including important
safety information.
If the On Indicator Is Lit for a
Child Restraint
If a child restraint has been installed
and the on indicator is lit:
1. Turn the vehicle off.
2. Remove the child restraint from
the vehicle.
3. Remove any additional items
from the seat such as blankets,
cushions, seat covers, seat
heaters, or seat massagers.
4. Reinstall the child restraint
following the directions
provided by the child restraint
manufacturer and refer to
Securing Child Restraints on
page 3‑40.
Page 91
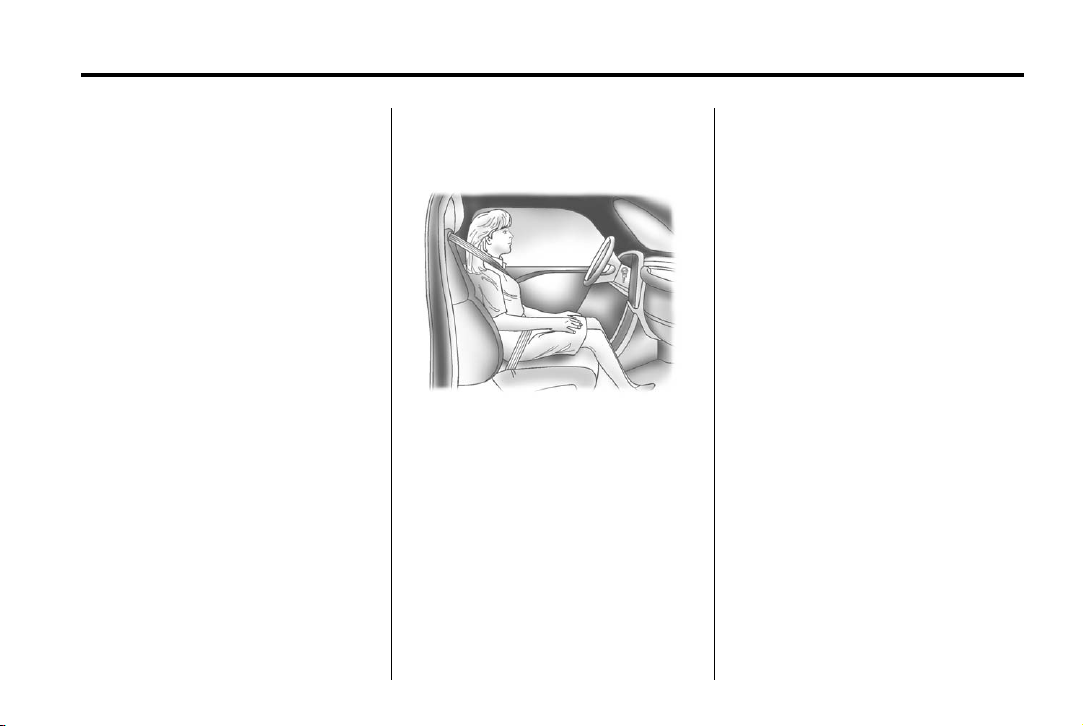
Black plate (25,1)
Chevrolet Corvette Owner Manual - 2012
Seats and Restraints 3-25
5. If, after reinstalling the child
restraint and restarting the
vehicle, the on indicator is still lit,
turn the vehicle off. Then slightly
recline the vehicle seatback
and adjust the seat cushion,
if adjustable, to make sure that
the vehicle seatback is not
pushing the child restraint into
the seat cushion.
6. Restart the vehicle.
If the on indicator is still lit, do
not install a child restraint in this
vehicle and check with your
dealer.
If the Off Indicator Is Lit for an
Adult-Size Occupant
If a person of adult-size is sitting
in the front outboard passenger
seat, but the off indicator is lit, it
could be because that person is
not sitting properly in the seat.
Use the following steps to allow the
system to detect that person and
enable the front outboard passenger
frontal airbag and seat-mounted
side impact airbag:
1. Turn the vehicle off.
2. Remove any additional material
from the seat, such as blankets,
cushions, seat covers, seat
heaters, or seat massagers.
3. Place the seatback in the fully
upright position.
4. Have the person sit upright in
the seat, centered on the seat
cushion, with legs comfortably
extended.
5. Restart the vehicle and have the
person remain in this position for
two to three minutes after the on
indicator is lit.
Page 92
Black plate (26,1)
Chevrolet Corvette Owner Manual - 2012
3-26 Seats and Restraints
Additional Factors Affecting
System Operation
Safety belts help keep the
passenger in position on the seat
during vehicle maneuvers and
braking, which helps the passenger
sensing system maintain the
passenger airbag status.
See “Safety Belts” and “Child
Restraints” in the Index for
additional information about the
importance of proper restraint use.
If the shoulder portion of the belt is
pulled out all the way, the child
restraint locking feature will be
engaged. This may unintentionally
cause the passenger sensing
system to turn the airbag(s) off for
some adult size occupants. If this
happens, let the belt go back
all the way and start again.
A thick layer of additional material,
such as a blanket or cushion,
or aftermarket equipment such as
seat covers, seat heaters, and seat
massagers can affect how well
the passenger sensing system
operates. We recommend that you
not use seat covers or other
aftermarket equipment except when
approved by GM for your specific
vehicle. See Adding Equipment to
the Airbag-Equipped Vehicle on
page 3‑27 for more information
about modifications that can affect
how the system operates.
WARNING
{
Stowing of articles under the
passenger seat or between the
passenger seat cushion and
seatback may interfere with the
proper operation of the passenger
sensing system.
Servicing the Airbag-Equipped Vehicle
Airbags affect how the vehicle
should be serviced. There are
parts of the airbag system in
several places around the vehicle.
Your dealer and the service manual
have information about servicing
the vehicle and the airbag system.
To purchase a service manual, see
Service Publications Ordering
Information on page 13‑18.
WARNING
{
For up to 10 seconds after the
vehicle is turned off and the
battery is disconnected, an airbag
can still inflate during improper
service. You can be injured if you
are close to an airbag when it
inflates. Avoid yellow connectors.
(Continued)
Page 93
Black plate (27,1)
Chevrolet Corvette Owner Manual - 2012
Seats and Restraints 3-27
WARNING (Continued)
They are probably part of the
airbag system. Be sure to follow
proper service procedures, and
make sure the person performing
work for you is qualified to do so.
Adding Equipment to the Airbag-Equipped Vehicle
Adding accessories that change the
vehicle's frame, bumper system,
height, front end or side sheet
metal, may keep the airbag
system from working properly.
The operation of the airbag system
can also be affected by changing or
moving any parts of the front seats,
safety belts, the airbag sensing and
diagnostic module, steering wheel,
instrument panel, inside rearview
mirror, front sensors, or airbag
wiring.
Your dealer and the service manual
have information about the location
of the airbag sensors, sensing and
diagnostic module, and airbag
wiring.
In addition, the vehicle has a
passenger sensing system for the
front outboard passenger position,
which includes sensors that are
part of the passenger seat.
The passenger sensing system may
not operate properly if the original
seat trim is replaced with non-GM
covers, upholstery or trim, or with
GM covers, upholstery or trim
designed for a different vehicle.
Any object, such as an aftermarket
seat heater or a comfort enhancing
pad or device, installed under or on
top of the seat fabric, could also
interfere with the operation of the
passenger sensing system.
This could either prevent proper
deployment of the passenger
airbag(s) or prevent the passenger
sensing system from properly
turning off the passenger airbag(s).
See Passenger Sensing System on
page 3‑22.
If you have to modify your vehicle
because you have a disability and
have questions about whether
the modifications will affect the
vehicle's airbag system, or if you
have questions about whether the
airbag system will be affected if the
vehicle is modified for any other
reason, call Customer Assistance.
See Customer Assistance Offices
(U.S. and Canada) on page 13‑5
or Customer Assistance Offices
(Mexico) on page 13‑6.
Page 94
Black plate (28,1)
Chevrolet Corvette Owner Manual - 2012
3-28 Seats and Restraints
Airbag System Check
The airbag system does not need
regularly scheduled maintenance
or replacement. Make sure the
airbag readiness light is working.
See Airbag Readiness Light on
page 5‑17.
Notice: If an airbag covering is
damaged, opened, or broken, the
airbag may not work properly.
Do not open or break the airbag
coverings. If there are any
opened or broken airbag covers,
have the airbag covering and/or
airbag module replaced. For the
location of the airbags, see
Where Are the Airbags? on
page 3‑17. See your dealer for
service.
Replacing Airbag System Parts after a Crash
WARNING
{
A crash can damage the
airbag systems in the vehicle.
A damaged airbag system may
not work properly and may
not protect you and your
passenger(s) in a crash, resulting
in serious injury or even death.
To help make sure the airbag
systems are working properly
after a crash, have them
inspected and any necessary
replacements made as soon as
possible.
If an airbag inflates, you will
need to replace airbag system
parts. See your dealer for service.
If the airbag readiness light stays on
after the vehicle is started or comes
on when you are driving, the airbag
system may not work properly.
Have the vehicle serviced right
away. See Airbag Readiness Light
on page 5‑17.
Page 95
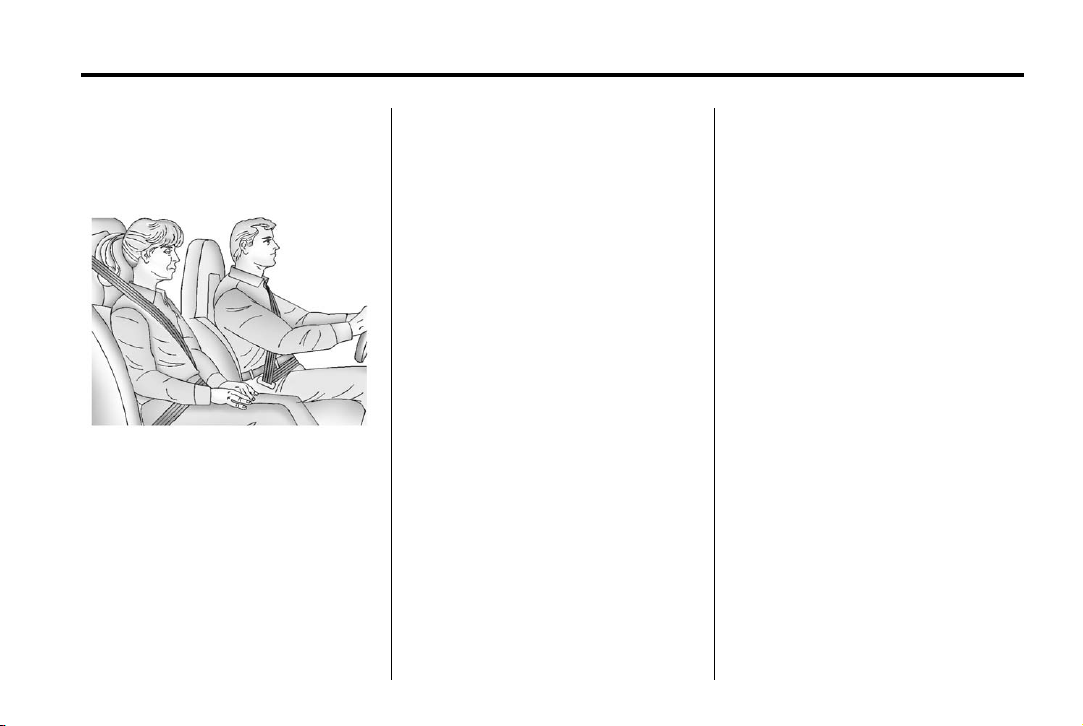
Black plate (29,1)
Chevrolet Corvette Owner Manual - 2012
Seats and Restraints 3-29
Child Restraints
Older Children
Older children who have outgrown
booster seats should wear the
vehicle's safety belts.
The manufacturer's instructions that
come with the booster seat, state
the weight and height limitations for
that booster. Use a booster seat
with a lap-shoulder belt until the
child passes the below fit test:
.
Sit all the way back on the seat.
Do the knees bend at the seat
edge? If yes, continue. If no,
return to the booster seat.
.
Buckle the lap-shoulder belt.
Does the shoulder belt rest on
the shoulder? If yes, continue.
If no, then return to the
booster seat.
.
Does the lap belt fit low and
snug on the hips, touching the
thighs? If yes, continue. If no,
return to the booster seat.
.
Can proper safety belt fit be
maintained for the length of the
trip? If yes, continue. If no,
return to the booster seat.
Q: What is the proper way to
wear safety belts?
A: An older child should wear a
lap-shoulder belt and get the
additional restraint a shoulder
belt can provide. The shoulder
belt should not cross the face or
neck. The lap belt should fit
snugly below the hips, just
touching the top of the thighs.
This applies belt force to the
child's pelvic bones in a crash.
It should never be worn over the
abdomen, which could cause
severe or even fatal internal
injuries in a crash.
According to accident statistics,
children and infants are safer
when properly restrained in a child
restraint system or infant restraint
system secured in a rear seating
position.
Page 96
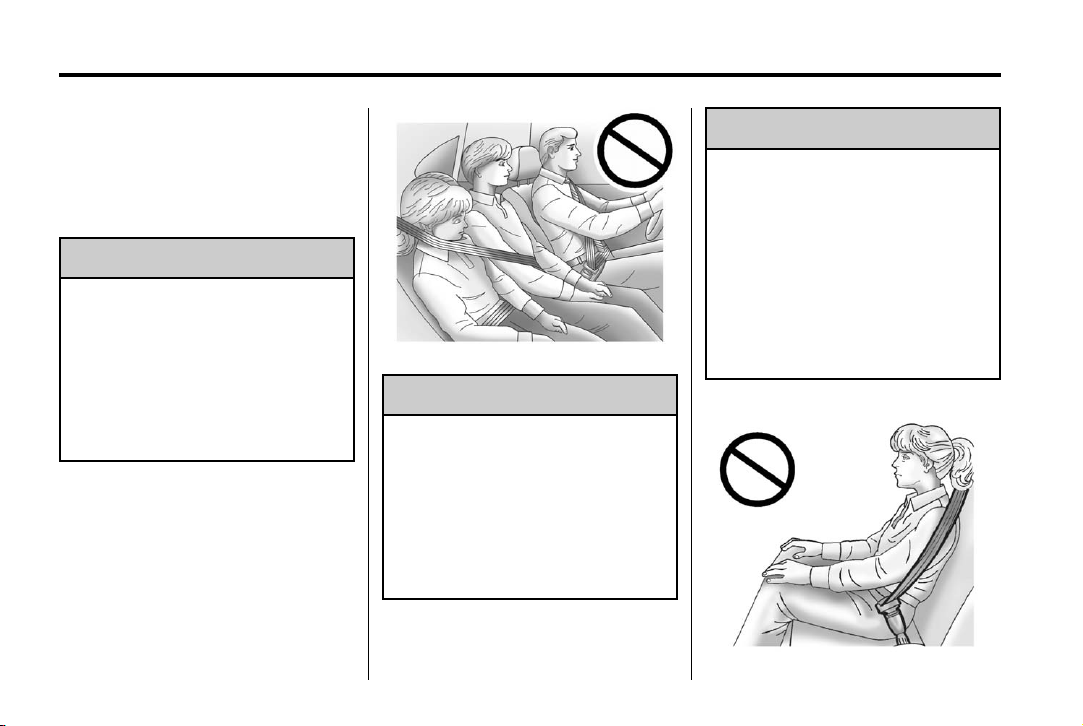
Black plate (30,1)
Chevrolet Corvette Owner Manual - 2012
3-30 Seats and Restraints
In a crash, children who are not
buckled up can strike other people
who are buckled up, or can be
thrown out of the vehicle. Older
children need to use safety belts
properly.
WARNING
{
Never allow more than one child
to wear the same safety belt.
The safety belt cannot properly
spread the impact forces. In a
crash, they can be crushed
together and seriously injured.
A safety belt must be used by
only one person at a time.
WARNING
{
Never allow a child to wear the
safety belt with the shoulder belt
behind their back. A child can be
seriously injured by not wearing
the lap-shoulder belt properly.
In a crash, the child would not be
restrained by the shoulder belt.
(Continued)
WARNING (Continued)
The child could move too far
forward increasing the chance of
head and neck injury. The child
might also slide under the lap
belt. The belt force would then be
applied right on the abdomen.
That could cause serious or fatal
injuries. The shoulder belt should
go over the shoulder and across
the chest.
Page 97
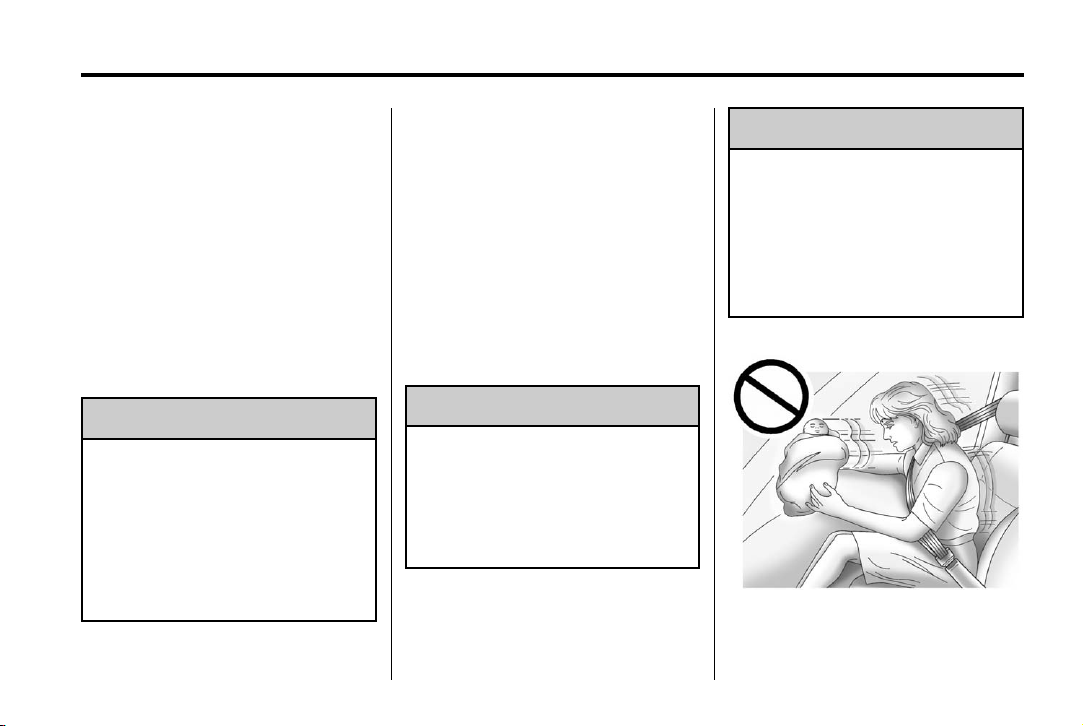
Black plate (31,1)
Chevrolet Corvette Owner Manual - 2012
Seats and Restraints 3-31
Infants and Young Children
Everyone in a vehicle needs
protection! This includes infants
and all other children. Neither the
distance traveled nor the age and
size of the traveler changes the
need, for everyone, to use safety
restraints. In fact, the law in every
state in the United States and in
every Canadian province says
children up to some age must be
restrained while in a vehicle.
WARNING
{
Children can be seriously injured
or strangled if a shoulder belt is
wrapped around their neck and
the safety belt continues to
tighten. Never leave children
unattended in a vehicle and never
allow children to play with the
safety belts.
Airbags plus lap‐shoulder belts offer
protection for adults and older
children, but not for young children
and infants. Neither the vehicle's
safety belt system nor its airbag
system is designed for them.
Every time infants and young
children ride in vehicles, they should
have the protection provided by
appropriate child restraints.
Children who are not restrained
properly can strike other people,
or can be thrown out of the vehicle.
WARNING
{
Never hold an infant or a child
while riding in a vehicle. Due to
crash forces, an infant or a child
will become so heavy it is not
possible to hold it during a crash.
(Continued)
WARNING (Continued)
For example, in a crash at only
40 km/h (25 mph), a 5.5 kg (12 lb)
infant will suddenly become a
110 kg (240 lb) force on a person's
arms. An infant should be
secured in an appropriate
restraint.
Page 98
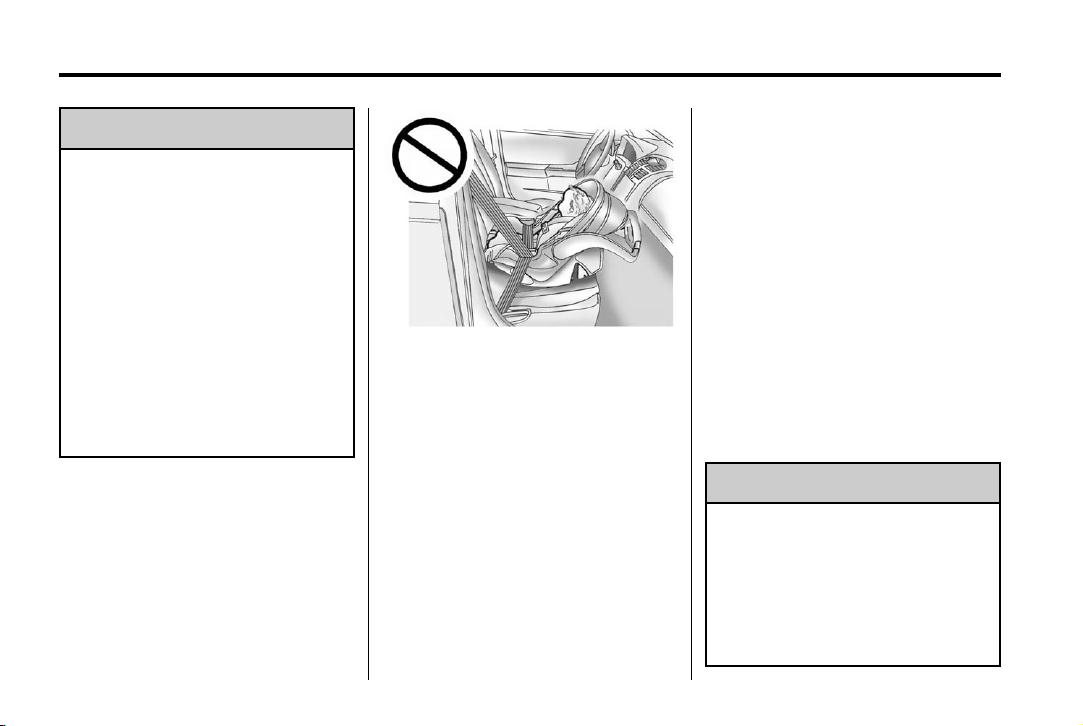
Black plate (32,1)
Chevrolet Corvette Owner Manual - 2012
3-32 Seats and Restraints
WARNING
{
Children who are up against,
or very close to, any airbag when
it inflates can be seriously injured
or killed. Never put a rear-facing
child restraint in the right front
seat. Secure a rear-facing child
restraint in a rear seat. It is also
better to secure a forward-facing
child restraint in a rear seat. If you
must secure a forward-facing
child restraint in the right front
seat, always move the front
passenger seat as far back as it
will go.
Q: What are the different types of
add-on child restraints?
A: Add-on child restraints, which
are purchased by the vehicle
owner, are available in four basic
types. Selection of a particular
restraint should take into
consideration not only the child's
weight, height, and age but also
whether or not the restraint will
be compatible with the motor
vehicle in which it will be used.
For most basic types of child
restraints, there are many
different models available.
When purchasing a child
restraint, be sure it is designed
to be used in a motor vehicle.
If it is, the restraint will have a
label saying that it meets federal
motor vehicle safety standards.
The restraint manufacturer's
instructions that come with the
restraint state the weight and
height limitations for a particular
child restraint. In addition, there
are many kinds of restraints
available for children with
special needs.
WARNING
{
To reduce the risk of neck and
head injury during a crash,
infants need complete support.
In a crash, if an infant is in a
rear-facing child restraint, the
crash forces can be distributed
(Continued)
Page 99
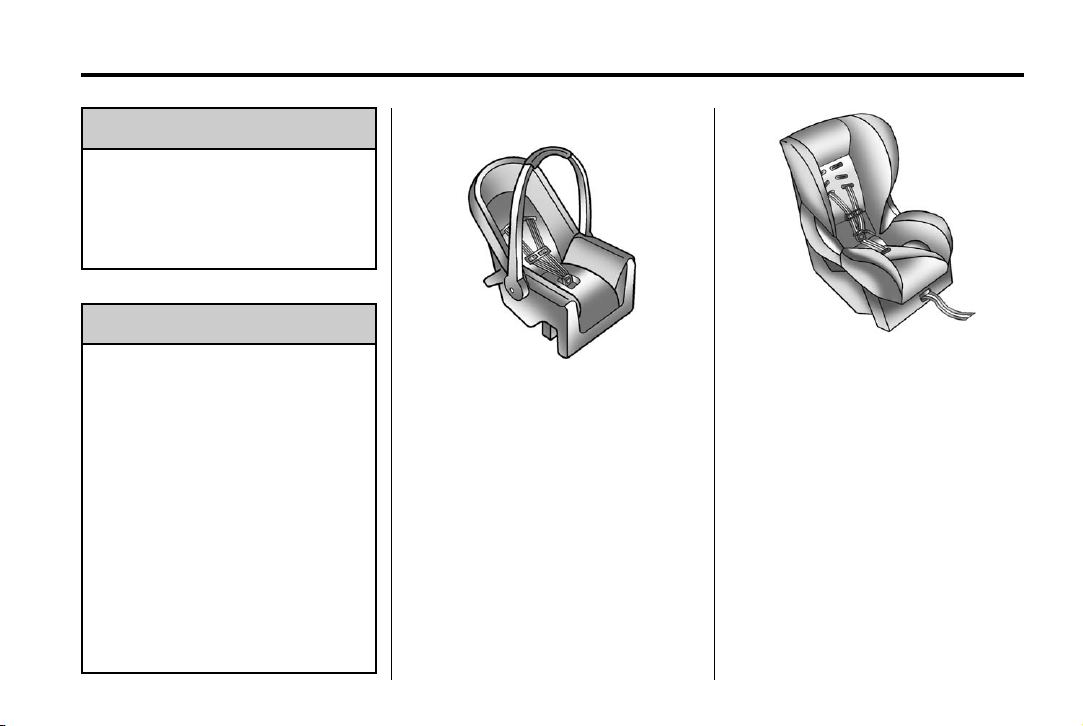
Black plate (33,1)
Chevrolet Corvette Owner Manual - 2012
Seats and Restraints 3-33
WARNING (Continued)
across the strongest part of an
infant's body, the back and
shoulders. Infants should always
be secured in rear-facing child
restraints.
WARNING
{
A young child's hip bones are still
so small that the vehicle's regular
safety belt may not remain low
on the hip bones, as it should.
Instead, it may settle up around
the child's abdomen. In a crash,
the belt would apply force on a
body area that is unprotected by
any bony structure. This alone
could cause serious or fatal
injuries. To reduce the risk of
serious or fatal injuries during a
crash, young children should
always be secured in appropriate
child restraints.
Child Restraint Systems
(A) Rear-Facing Infant Seat
A rear-facing infant seat (A)
provides restraint with the seating
surface against the back of the
infant.
The harness system holds the infant
in place and, in a crash, acts to
keep the infant positioned in the
restraint.
(B) Forward-Facing Child Seat
A forward-facing child seat (B)
provides restraint for the child's
body with the harness.
Page 100
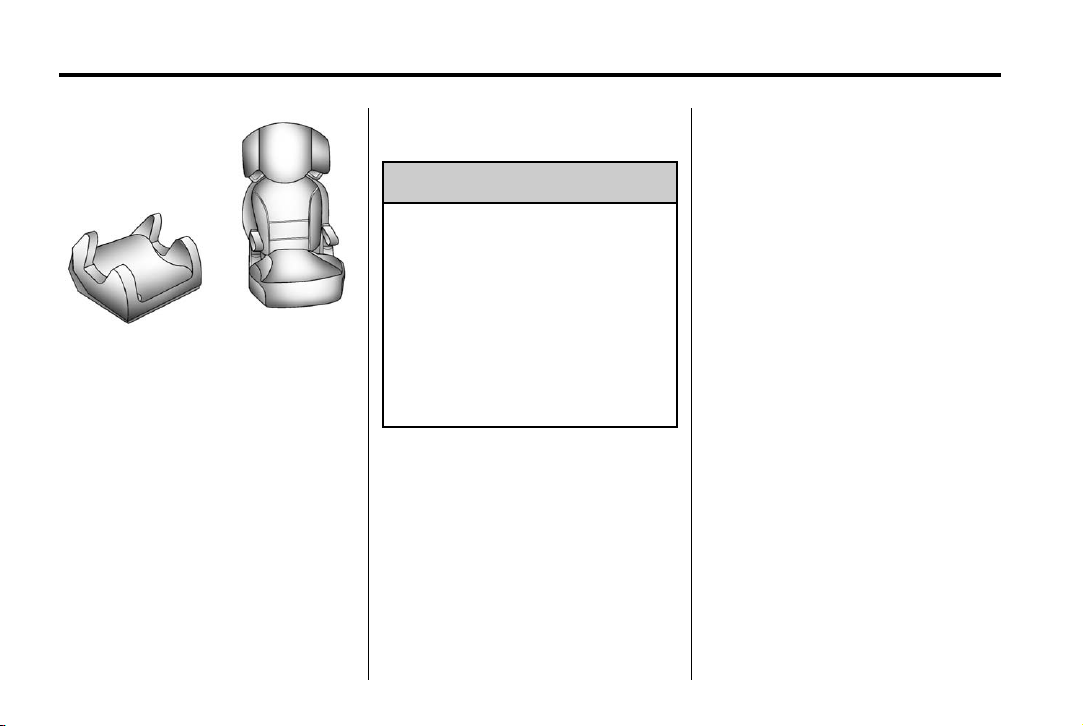
Black plate (34,1)
Chevrolet Corvette Owner Manual - 2012
3-34 Seats and Restraints
(C) Booster Seats
A booster seat (C) is a child
restraint designed to improve the fit
of the vehicle's safety belt system.
A booster seat can also help a child
to see out the window.
Securing an Add-On Child
Restraint in the Vehicle
WARNING
{
A child can be seriously injured
or killed in a crash if the child
restraint is not properly secured
in the vehicle. Secure the child
restraint properly in the vehicle
using the vehicle safety belt or
LATCH system, following the
instructions that came with that
child restraint and the instructions
in this manual.
To help reduce the chance of injury,
the child restraint must be secured
in the vehicle. Child restraint
systems must be secured in
vehicle seats by lap belts or the
lap belt portion of a lap-shoulder
belt, or by the LATCH system.
See Lower Anchors and Tethers for
Children (LATCH System) (Z06 and
ZR1 Models Only) on page 3‑36 or
Lower Anchors and Tethers for
Children (LATCH System) (Coupe
and Convertible Models Only) on
page 3‑35. Children can be
endangered in a crash if the child
restraint is not properly secured in
the vehicle.
When securing an add-on child
restraint, refer to the instructions
that come with the restraint which
may be on the restraint itself or in a
booklet, or both, and to this manual.
The child restraint instructions are
important, so if they are not
available, obtain a replacement
copy from the manufacturer.
Keep in mind that an unsecured
child restraint can move around in a
collision or sudden stop and injure
people in the vehicle. Be sure to
properly secure any child restraint in
the vehicle— even when no child
is in it.
 Loading...