

Page 1

User Manual
Page 2

TABLE OF CONTENTS
1. Before You Begin ..................................................................................................................................................... 4
What Is Included ................................................................................................................................................................................. 4
Unpacking Instructions ....................................................................................................................................................................... 4
Claims ............................................................................................................................................................................................ 4
Manual Conventions ........................................................................................................................................................................... 4
Symbols ............................................................................................................................................................................................... 4
Disclaimer ............................................................................................................................................................................................ 4
Product at a Glance ............................................................................................................................................................................ 5
Safety Notes ........................................................................................................................................................................................ 5
2. Introduction............................................................................................................................................................... 6
Overview .............................................................................................................................................................................................. 6
Dimensions .......................................................................................................................................................................................... 7
3. Setup .......................................................................................................................................................................... 8
AC Power ............................................................................................................................................................................................ 8
Fuse Replacement ........................................................................................................................................................................ 8
Fuse Replacement Diagram ................................................................................................................................................... 8
Power Linking ................................................................................................................................................................................ 9
Power Linking Diagram ........................................................................................................................................................... 9
Mounting ............................................................................................................................................................................................ 10
Orientation ................................................................................................................................................................................... 10
Rigging ......................................................................................................................................................................................... 10
Rigging Diagra m .................................................................................................................................................................... 10
DMX Linking ...................................................................................................................................................................................... 11
DMX Linking Diagram ................................................................................................................................................................. 11
4. Operation ................................................................................................................................................................. 12
Control Panel Description................................................................................................................................................................. 12
Menu Map .................................................................................................................................................................................... 12
DMX Configuration ........................................................................................................................................................................... 13
DMX Starting Address ................................................................................................................................................................ 13
DMX Personalities....................................................................................................................................................................... 13
DMX Channel Assignments and Values ................................................................................................................................... 14
12-CH ..................................................................................................................................................................................... 14
8-CH ....................................................................................................................................................................................... 14
6-CH ....................................................................................................................................................................................... 14
Standalone Configuration ................................................................................................................................................................. 15
Static Color Mode ........................................................................................................................................................................ 15
Auto Program Mode .................................................................................................................................................................... 15
Program Speed ........................................................................................................................................................................... 15
Sound-Active Mode..................................................................................................................................................................... 16
Custom Color Mode .................................................................................................................................................................... 16
Infrared (IR) Remote Control ...................................................................................................................................................... 17
IRC-6 Operation .................................................................................................................................................................... 17
Master/Slave Configuration .............................................................................................................................................................. 19
Configuring the Slaves ................................................................................................................................................................ 19
Configuring the Master ............................................................................................................................................................... 19
Settings Configuration ...................................................................................................................................................................... 20
Program Speed ........................................................................................................................................................................... 20
Sound Sensitivity ......................................................................................................................................................................... 20
Dimmer Mode .............................................................................................................................................................................. 20
SlimPAR™ HEX 6 IRC User Manual Rev. 3 Page 2 of 24
Page 3

5. Technical Information ............................................................................................................................................ 21
Product Maintenance........................................................................................................................................................................ 21
6. Technical Specifications ....................................................................................................................................... 22
Returns ........................................................................................................................................................................ 23
Contact Us ................................................................................................................................................................... 24
Page 3 of 24 SlimPAR™ HEX 6 IRC User Manual Rev. 3
Page 4
1. B
What Is
• SlimPAR™ HEX 6 IRC
Power Cord
• Warranty Card
Unpacking
Carefully unpack the SlimPAR™ HEX 6 IRC and check that all the parts are in the package, and are
Claims
If the box, or an y of the c ont ents, appe ar damaged from shipping, save all the packa ging and fil e a
Manual
Convention
Meaning
1—512
A range of values
50/60
A set of values
Settings
A menu option
Menu > Settings
A sequence of menu options
<Enter>
A button
Symbols
Convention
Meaning
Disclaimer
The information and specifications contained in this User Manual are subject to change without
be
M. Trouard
1/30/2015
A. Leon
2/11/2015
EFORE YOU BEGIN
Included
Instructions
Conventions
• Hanging Bracket with Mou nting Ha rdware
•
in good condition.
claim with th e carrier immediat ely. Failur e to report damag e to the carrier im mediatel y, or failure to
save all the p a ckagi ng, can invalidate a claim.
For other issues, such as missing components or parts, damage not related to shipping, or
concealed damage, file a claim with Chauvet within 7 days of delivery. See Contact Us
this manual.
Critical information. Ignoring it can cause malfunction, damage the product, or harm
the operator.
Important information. Ignoring it can cause the product to malfunction.
• Quick Reference Guide
at the end of
Useful information.
notice. Chauvet assum es no respons ibilit y or liabilit y for any error s or omissi ons, and reser ves the
right to revise or recreate this manual at any time. The latest version of this manual can
downloaded from http://www.chauvetlighting.com/product-manuals-literature/.
© Copyright 2015 Chauvet. All rights reserved.
Electronically published by Chauvet in the United States of America.
Author Date Editor Date
SlimPAR™ HEX 6 IRC User Manual Rev. 3 Page 4 of 24
Page 5
Product at a
x
P
x
P
P
P
P
x
P
Safety Notes
These notes include important information about the mounting, use, and maintenance of this
• Always connect the product to a grounded circuit to avoid the risk of electrocution.
• This product i s no t i nt ende d fo r pe r mane nt in stall ati on .
Keep this Us er Manua l for futur e referenc e. If you sell the pr oduct to another us er, be sur e to give
Use on Dimmer
Glance
Outdoor Use
Sound-Activated
DMX
Master/Slave
product. Read these notes before using the product.
• Make sure the power cord is not crimped or damaged.
• Always disconnect the product fr om the powe r sour ce before cl eaning it or replac ing the fuse.
• Never disconnect the product fr om the powe r source by pulling or tugging on the cord.
• If mounting the produc t overhead , alway s secure it with a safety cabl e.
• Make sure there are no flammable materials close to the product when it is operating.
• Avoid direct eye exposure to the light source while the product is on.
• Do not touch the product’s housing when the product is operating.
• The product is for indoor use only.
• Do not expose the prod uct to rai n or moistu re.
• Make sure that the voltage of the powe r source used for the product is within th e range stated on
the label, on the rear panel of the product, or Technical Specifications in this manual.
• Never connect the product to a dimmer or a rheostat.
• Make sure to replace the fuse with another fuse of the same type and rating.
• Always install th e p rodu ct in a lo c ati on with adequate ventilation , and l eav e at le a st 20 in (50 cm)
between the product and adjacent surfaces.
• Be sure that no ventilation slots on the product’s housing are blocked.
• Do not operate the product in an ambient temperature higher than 104 °F (40 °C).
• Always carry the product by the mounting bracket.
• In the event o f a seri ou s op era tin g p r oble m, sto p u sing t he p rodu c t i mmedi at ely .
• Never try to rep ai r the p roduc t . Re pai r s car ried o ut by un tr ai ned pe opl e can l ead t o damag e o r
malfunction.
• If repairs are requi red, contact the nearest authorized technical assistance center.
See Contact Us at the end of t hi s manual .
• To eliminate unnecessary wear and improve its lifespan, during periods of non-use completely
disconnect the prod uct from pow er via the b reake r o r by unplugging it.
Auto Program
Auto-Ranging Power Supply
Replaceable Fuse
User-Serviceable
this manual to the next ow ner.
Page 5 of 24 SlimPAR™ HEX 6 IRC User Manual Rev. 3
Page 6
2. I
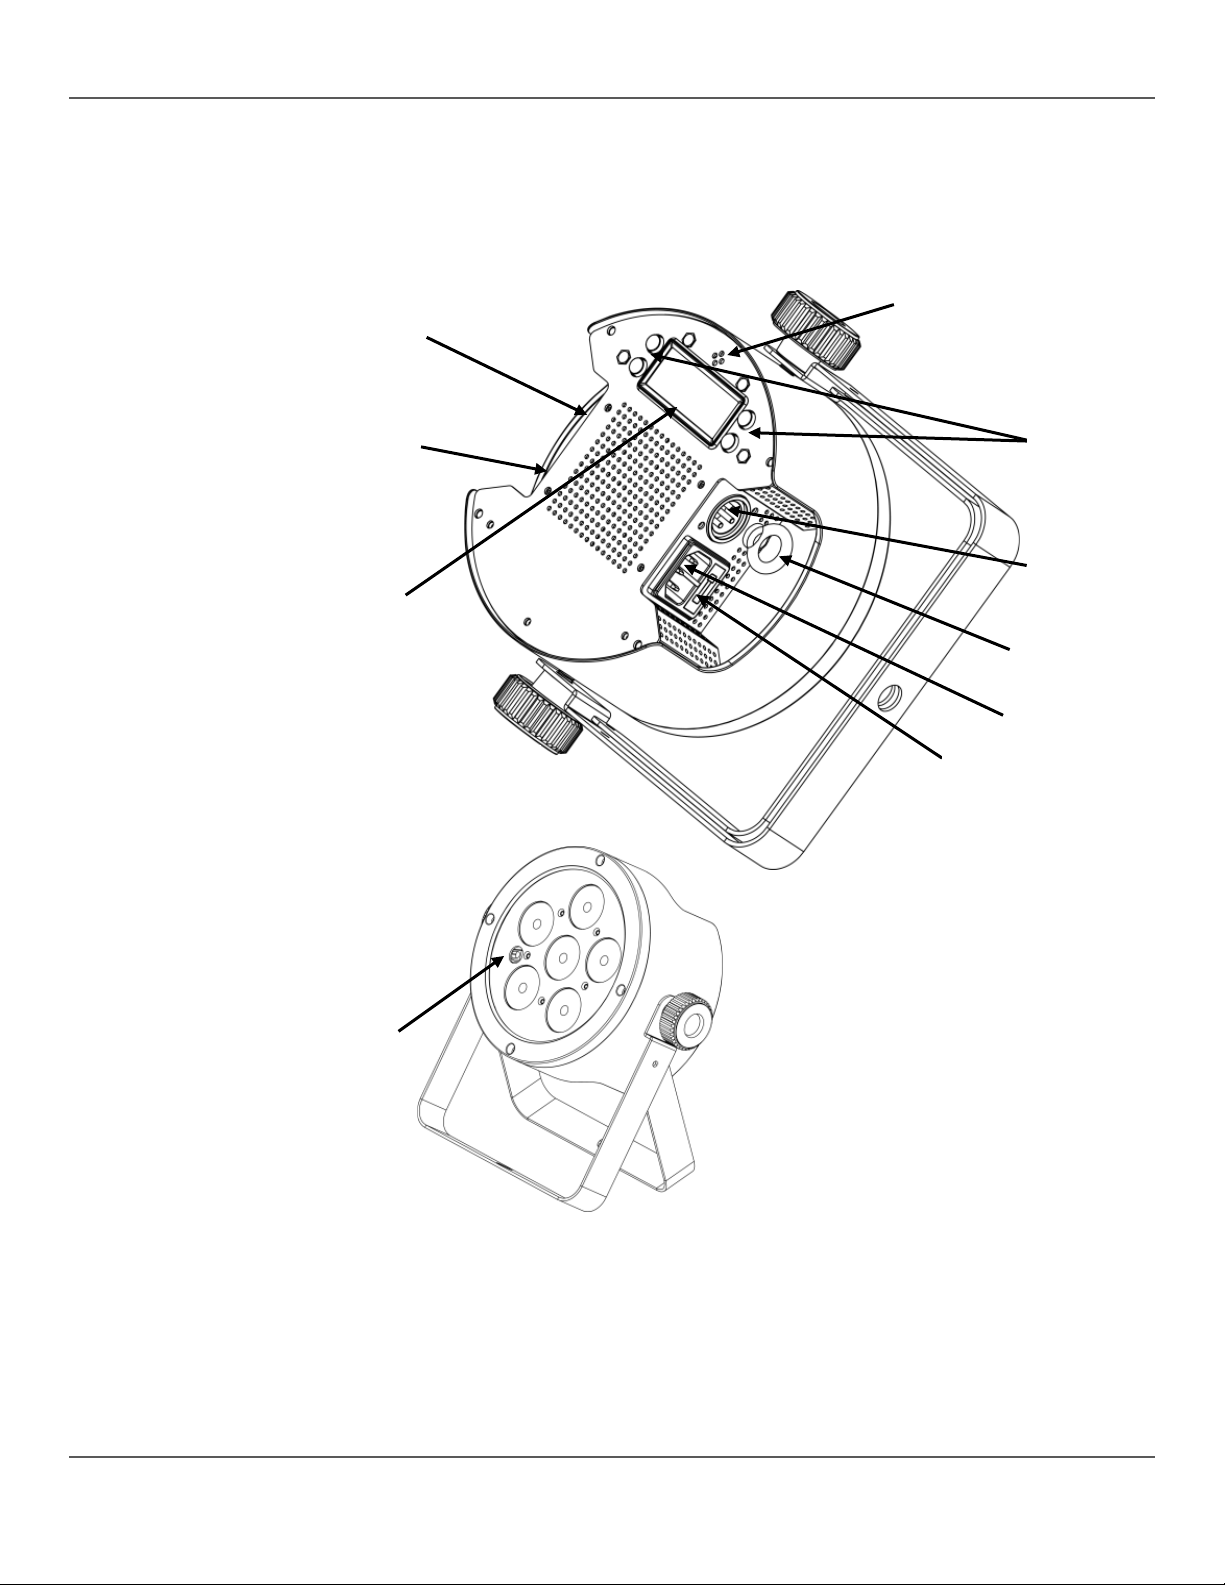
Overview
Back View
Safety Loop
Front View
NTRODUCTION
Microphone
DMX Out
Power Out
Display
Fuse Holder
Control
Buttons
DMX In
Power In
SlimPAR™ HEX 6 IRC User Manual Rev. 3 Page 6 of 24
IR Sensor
Page 7
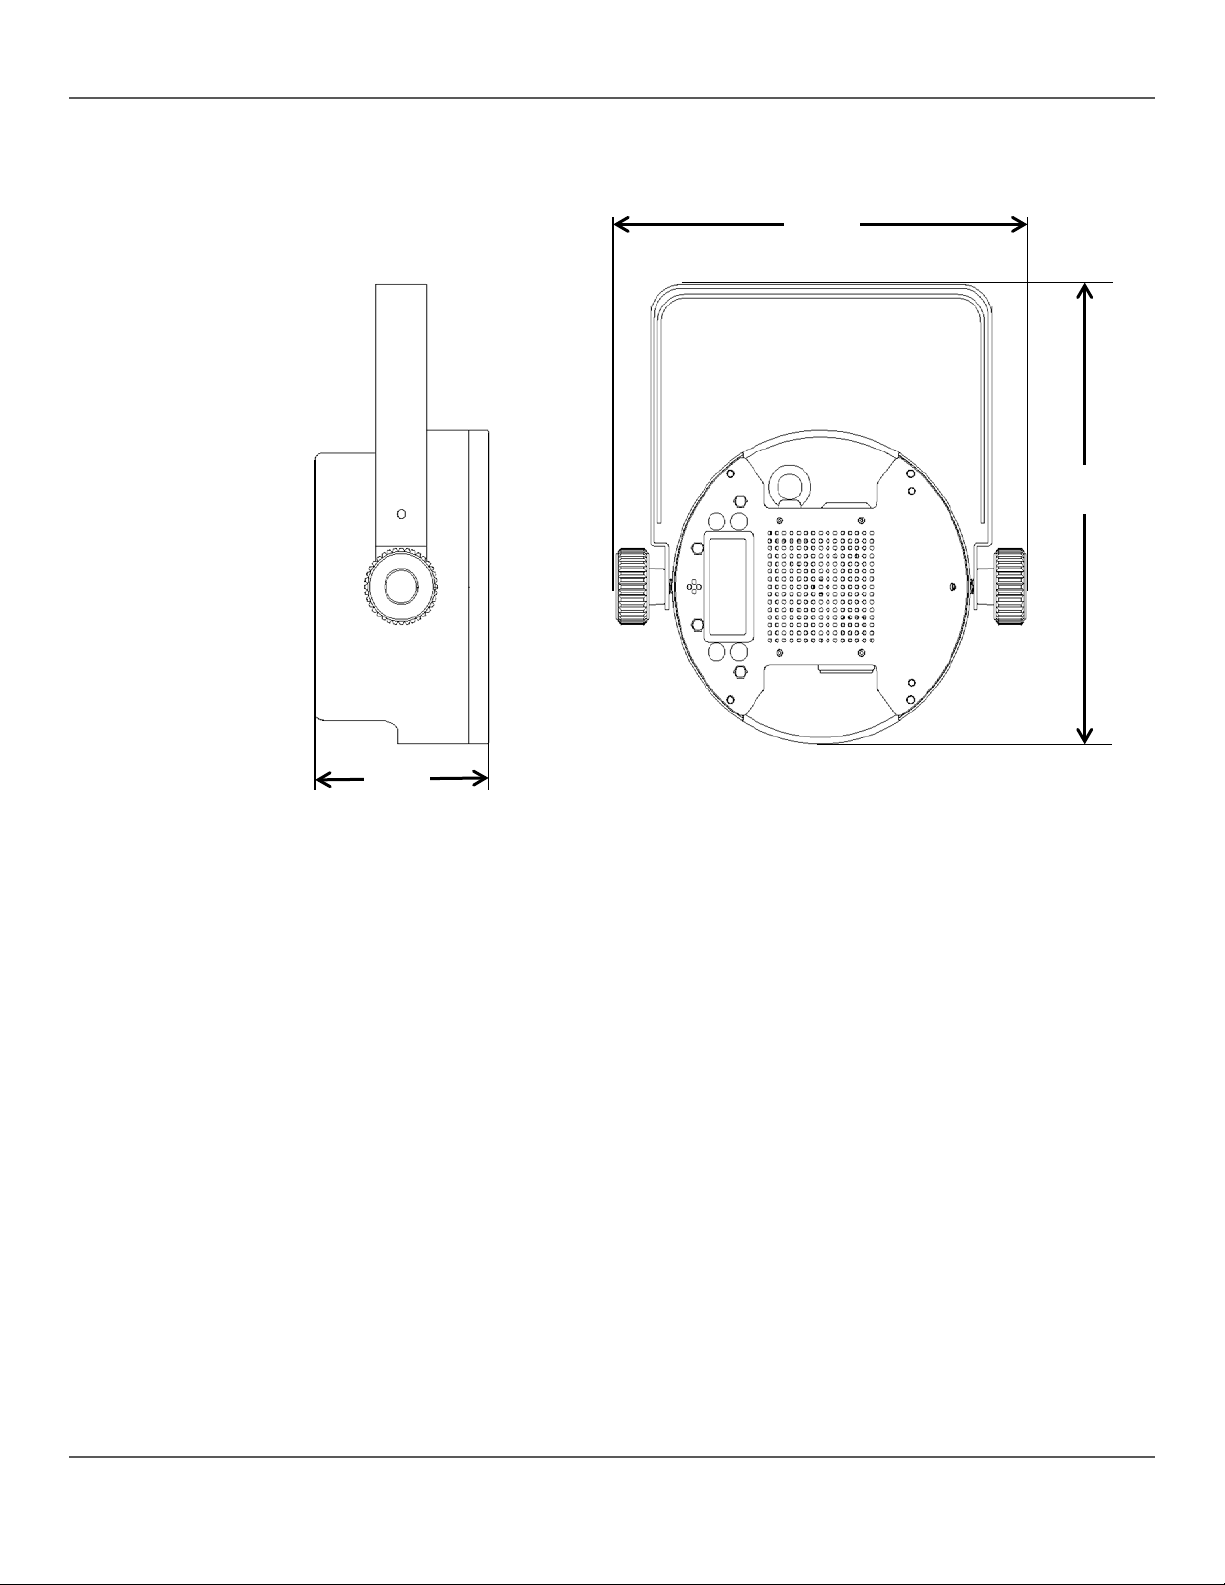
Dimensions
8.9 in
9.5 in
3.7 in
226 mm
241 mm
95 mm
Page 7 of 24 SlimPAR™ HEX 6 IRC User Manual Rev. 3
Page 8
3. S
AC Power
The SlimPAR™ HEX 6 IRC has an auto-ranging power supply that works with an input voltage
:
Always connect the product to a protect ed circuit (circuit b reaker or fuse). M ake sure the
a rheostat (variable resistor) or dimmer circuit, even if the
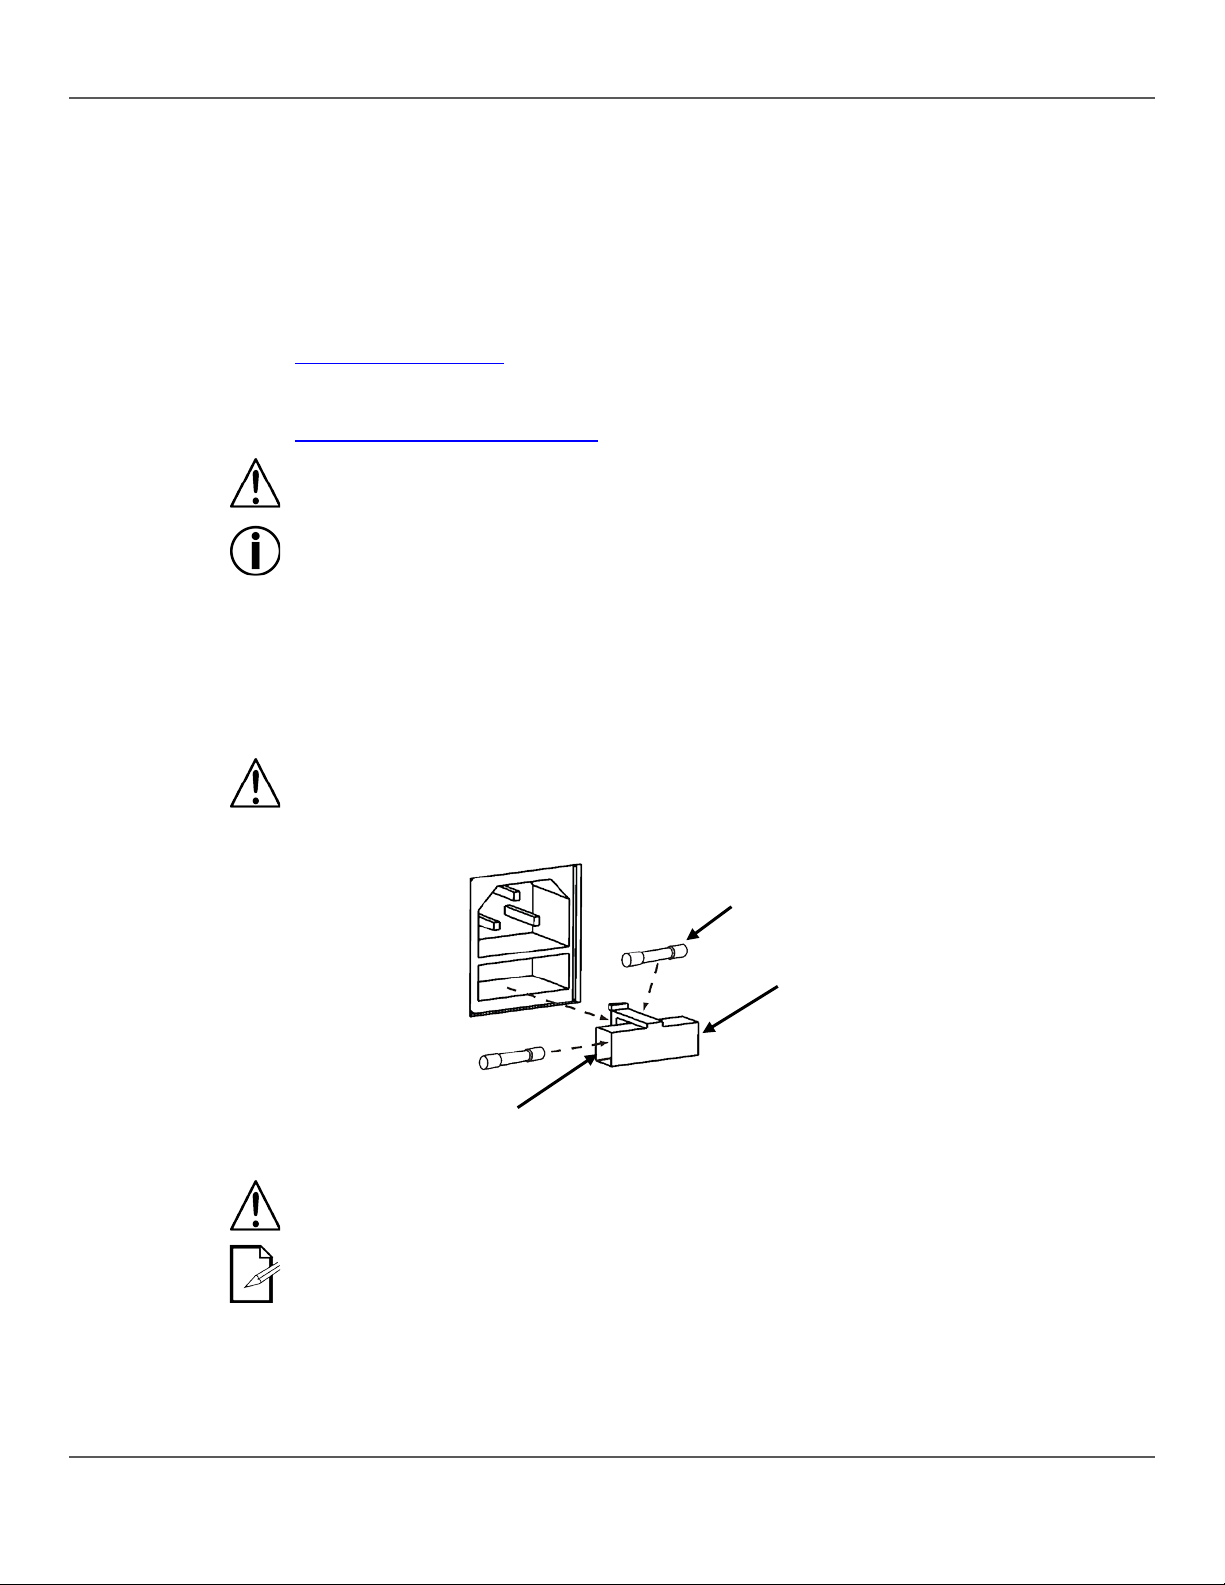
Fuse
1. Disconnect the product from power.
Fuse Replacement
Installed Fuse
(held by plastic clip)
Spare Fuse Holder
(inside safety cap)
Safety cap
ETUP
range of 100 to 240 VAC, 5 0/ 60 Hz .
To determin e the product’s power requir ements (circu it breaker, po wer outlet, and wiring), use t he
current value listed on the label affixed to the product’s back panel, or refer to the
Technical Specifications in this manual. The listed current rating indicates the product’s average
current draw under normal conditions.
For more information, you may download Sizing Circuit Breakers from the Chauvet website
www.chauvetlighting.com/download/.
product has an appropriate electrical ground to avoid the risk of electrocution or fire.
Never connect the product to
rheostat or dimmer channel is configured as a 0 to 100% switch .
Replacement
Diagram
2. Wedge the tip of a flat-head screwdriver into the slot of the fu se holder.
3. Pry the fuse holder out of the housing.
4. Remove the blown fuse from the holder.
5. Replace with a fuse of the exact same type and rating.
6. Insert the fuse holder back in place and reconnect power.
Disconnect the product from power before replacing the fuse.
Always replace a blown fuse with another of the same type and rating.
A spare fuse is not included; however, the safety cap has room for a spare.
SlimPAR™ HEX 6 IRC User Manual Rev. 3 Page 8 of 24
Page 9

Power Linking
Daisy chaining products together through their Power In and Power Out sockets, called power
1st Product
2nd Product
3rd Product
Additional Products
linking, allows many products to be powered from one power connection.
Up to 11 SlimPAR™ HEX 6 IRC products can be power linked at 120 V, and up to
21 SlimPAR™ HEX 6 IRC products can be power linked at 230 V.
The diagram below illustrates the power-linking process.
Power Linking
Diagram
• Do not power link more than 11 SlimPAR™ HEX 6 IRC products at 120 V.
• Do not power link more than 21 SlimPAR™ HEX 6 IRC products at 230 V.
• The power linking diagram shown above corresponds to the North American version of
the product ONLY! If using the product in other markets, you must consult with the local
CHAUVET® distributor as power linking connectors and requirements may differ in your
country or region.
Page 9 of 24 SlimPAR™ HEX 6 IRC User Manual Rev. 3
Page 10

Mounting
Before mounting the product, read and follow the safety recommendations indicated in
clamps, go to
Orientation
The SlimPAR™ HEX 6 IRC is designed to hang from a pipe or truss with the front lens at any angle.
Rigging
Rig the product from a structure or surface that can support the product’s weight. See the
djustment when aiming the product to the
Mounting
Bracket
Knobs (2x)
Double-Bracketed
Safety Cable
the Safety Notes above. For the CHAUVET® line of mounting
www.chauvetlighting.com/cables-clamps-main.html/.
Place the product so there is at least 20” of space around it. Be sure it is accessible for programming
and control panel oper ation.
Technical Specifications in this manual for the product’s weight.
When moun ting the product overhead, alwa ys use a m ounting c lamp and s afety cable. Mo unt the
product securely to a rigging point, such as a pipe or truss. The m ounting bracket (yoke) has a
13-mm hole. The CH-05 safety cable and the CLP-15 mounting clamp (both available from Chauvet)
are appropriate for this product.
The bracket adjustment knobs allow for directional a
desired ang le. Only loosen or t ighten the bracket k nobs manually. Us ing tools could dam age the
knobs.
Clamp
Yoke
Rigging Diagram
Adjustment
SlimPAR™ HEX 6 IRC User Manual Rev. 3 Page 10 of 24
Page 11

DMX Linking
When opera ting the SlimPAR™ HEX 6 IRC in D MX m ode, DMX linki ng in a daisy chain allows the
DMX Linking
, the DMX
DMX
In
DMX
Out
DMX
In
DMX
Out
2nd Product
3rd Product
Other
1st Product
DMX Controller
DMX controller to send DMX signals to all the products.
To DMX link a number of SlimPAR™ HEX 6 I R C products into a daisy chain, connect a DMX cable
from DMX Out of the DMX controller to DMX In of the first product in the daisy chain.
Then connec t an oth er D MX cab le f rom DMX Out of the first product i n the daisy chain to DMX In of
the next product.
Continue connectin g each subsequent product until all the products are part of the chain.
Diagram
Products
When DMX linking SlimPAR™ HEX 6 IRC products for Master/Slave operation
controller is not a part of the DMX daisy chain and the master is the first product in the chain.
See Master/Slave Configuration for details.
Page 11 of 24 SlimPAR™ HEX 6 IRC User Manual Rev. 3
Page 12

4. O
Control Panel
To access the control pan el fun ctions, use the fou r buttons und erne ath the display.
Button
Function
<MENU>
Enters or exits from a menu function
<UP>
Navigates up through a list or increases a numeric value
<DOWN>
Navigates down through a list or decreases a numeric value
<ENTER>
Enters into a menu function or sets the currently shown value
Menu Map
The menu map o utlines t he funct ions avai lable thr ough t he menu, the program ming le vels that can
Main Function
Programming Levels
Description
6-CH
8-CH
12CH
Static Color Mode
C--
C 1–C 63
Selects static color
Auto Program Mode
P--
P 1–P 4
Selects auto program
Program Speed
S--
S 1–S100
Selects auto program speed (slow to fast)
Snd1
Selects Sound-Active program (6-color)
Snd2
Selects Sound-Active program (63-color)
Sound Sensitivity
SenS
u 0–u100
Sets sound sensitivity
r 0–r255
Red (0–100%)
g 0–g255
Green (0–100%)
b 0–b255
Blue (0–100%)
A 0–A255
Amber (0–100%)
W 0–W255
White (0–100%)
P 0–P255
Ultraviolet (0–100%)
OFF
Dimmer, off
dIM1
Dimmer, fast speed
dIM2
Dimmer, medium speed
dIM3
Dimmer, slow speed
On
OFF
Description
PERATION
be entered, and a description for each function.
DMX Personalities and
Starting Address
Sound-Active Mode Snd
Custom Color Mode U--
Dimmer dIM
Infrared SET
d 1–d512
Selects DMX personality and
starting address
Turns infrared on or off
SlimPAR™ HEX 6 IRC User Manual Rev. 3 Page 12 of 24
Page 13

DMX
The SlimPAR™ HEX 6 IRC has 3 different DMX personalities, with different capabilities. In general if
website at
DMX Starting
When choosing a DMX starting address, consider the number of DMX channels in the DMX
DMX
The SlimPAR™ HEX 6 IRC has 3 DMX personalities: a 6-channel personality, an 8-channel
DMX personalities with more channels have more
Configuration
Address
Personalities
the DMX perso nali ty has m ore ch annels , it al lows for m ore c o ntro l functions. T he f ollo wing s ect ions
describe how to configure the SlimPAR™ HEX 6 for use with a DMX controller.
For more information about DMX, see the CHAUVET® DMX Primer, available at
http://www.chauvetlighting.com/downloads/DMX_Primer_Rev6_WO.pdf.
For information about CHAUVET® DMX controllers, see the Chauvet
http://www.chauvetlighting.com/controllers-main.html.
personality. Choosing a starting address that is too high can restrict access to some of the product’s
channels and their fun ction s.
The SlimPAR™ HEX 6 IRC uses 6, 8, or 12 channels of DMX, depending o n the pe r sonali ty.
• The highest DMX starting address in 6-channel personality is 507.
• The highest DMX starting address in 8-channel personality is 505.
• The highest DMX starting address in 12-channel personality is 501.
To set the DMX starting addres s, do the foll owing:
1. If the display shows d and a number from 1–512, go to step 3.
2. Press <MENU> repeatedly the display shows d and a number from 1–512.
3. Use <UP> or <DOWN> to change the DMX starting address.
4. Press <ENTER> to select the DMX starting address.
personality, and a 12-channel personality.
functions and provide more control options.
To set the DMX p ersona li ty , d o the fol lowi n g:
1. Press <MENU> repeatedly until the desired personality is shown.
2. Press <ENTER> to select the personality.
• 6-CH is for the 6-channel personality
• 8-CH is for the 8-channel personality
• 12CH is for the 12-channel personality
Page 13 of 24 SlimPAR™ HEX 6 IRC User Manual Rev. 3
Page 14

DMX Channel
Assignments and
The following tables show which DMX channels control which functions in each of the DMX
12-CH
Channel
Function
Value
Percent/Setting
1
Dimmer
000 ó 255
0–100%
2
Red
000 ó 255
0–100%
3
Green
000 ó 255
0–100%
4
Blue
000 ó 255
0–100%
5
Amber
000 ó 255
0–100%
6
White
000 ó 255
0–100%
7
Ultraviolet
000 ó 255
0–100%
8
Strobe
000 ó 010
No function
011 ó 255
Slow to fast
9
Color
000 ó 015
No function
016 ó 255
Color macros
10
Auto Programs
000 ó 010
No function
011 ó 050
Auto program 1
051 ó 100
Auto program 2
101 ó 150
Auto program 3
151 ó 200
Auto program 4
201 ó 225
Sound-Active mode (6-color)
226 ó 255
Sound-Active mode (63-color)
11
Speed
000 ó 255
Auto program speed (slow to fast)
12
Dim Mode
000 ó 051
Dimmer mode manually set in Menu Options
052 ó 101
Dimmer mode off
102 ó 152
Dimmer mode 1 (fast speed)
153 ó 203
Dimmer mode 2 (medium speed)
204 ó 255
Dimmer mode 3 (slow speed)
8-CH
Channel
Function
Value
Percent/Setting
1
Dimmer
000 ó 255
0–100%
2
Red
000 ó 255
0–100%
3
Green
000 ó 255
0–100%
4
Blue
000 ó 255
0–100%
5
Amber
000 ó 255
0–100%
6
White
000 ó 255
0–100%
7
Ultraviolet
000 ó 255
0–100%
000 ó 010
No function
011 ó 255
Slow to fast
6-CH
Channel
Function
Value
Percent/Setting
1
Red
000 ó 255
0–100%
2
Green
000 ó 255
0–100%
3
Blue
000 ó 255
0–100%
4
Amber
000 ó 255
0–100%
5
White
000 ó 255
0–100%
6
Ultraviolet
000 ó 255
0–100%
Values
personalities. It is im portant to un derstand these chann el assignm ents when operating the product
with a DMX controller.
8 Strobe
SlimPAR™ HEX 6 IRC User Manual Rev. 3 Page 14 of 24
Page 15

Standalone
Use standalone configurations to operate the product without a DMX controller. There are a var iety
, or
Static Color Mode
Static Color mode set s the pr o du ct t o one of 6 3 p r e set static colors.
Auto Program
Auto Program mode sets the product to 1 of 4 color change programs.
Program Speed
Program Speed sets the speed of the auto programs.
Configuration
Mode
of standalone modes and they are powerful t ool s for makin g e x citing l ooks.
Never connect a product operating in a standalone mode (Sound-Active, Auto Program
Infrared) to a DMX chain that includes a DMX controller. Products in a standalone mode can
transmit DMX signals that interfere with the DMX signals from the controller.
To select a preset stati c color, do the follow ing:
1. Press <MENU> repeatedly until C-- shows on the display .
2. Press <ENTER> and C 1–C 63 shows on the di splay.
3. Use <UP> or <DOWN> to select the desired preset color:
4. Press <ENTER>.
To enable the Auto Program mode, do the following:
1. Press <MENU> repeatedly until P-- shows on the display .
2. Press <ENTER> and P 1–P 4 shows on the display.
3. Use <UP> or <DOWN> to select the desired auto program:
• P 1 - 6-color snap
• P 2 - 6-color fade
• P 3 - 63-color snap
• P 4 - 63-color fade
4. Press <ENTER>.
To set the auto programs’ speed, follow the instru ction s below:
1. Press <MENU> repeatedly until S-- shows on the display .
2. Use <UP> or <DOWN> to select the desired auto program speed
S 1–S100 (slow to fast).
3. Press <ENTER>.
Page 15 of 24 SlimPAR™ HEX 6 IRC User Manual Rev. 3
Page 16

Sound-Active
Sound-Active mode sets the product to respond to sounds and music.
Custom Color
Custom Color mode sets a custom color by adjusting the individual colors in the product.
Mode
Mode
To enable the Sound-Active mode, do the following:
1. Press <MENU> repeatedly until Snd shows on the display.
2. Press <ENTER> and Snd1 (6-color) or Snd2 (63-color) shows on the display .
3. Use <UP> or <DOWN> to sele ct the desire d sound-active program.
4. Press <ENTER>.
The product will respond only to low frequencies of music (bass and drums).
If the product is not responding to sound, inc rease the s ensitivity. See Sound Sensitivity
more information.
1. Press <MENU> repeatedly until U-- shows on the display .
2. Press <ENTER> and one of the following show s on th e displ ay (where XXX is a nu mber
between 0 and 255:
• rXXX (red)
• gXXX (green)
• bXXX (blue)
• AXXX (amber)
• WXXX (white)
• PXXX (ultraviolet)
3. Press <ENTER> repeatedly to select a color.
4. Use <UP> or <DOWN> to find a value between 0–255.
NOTE: Selecting 0 will turn the color off.
5. Press <ENTER> to select the value.
6. Repeat steps 3 to 5 until the p r odu ct di splay s t he de sir ed col o r.
for
SlimPAR™ HEX 6 IRC User Manual Rev. 3 Page 16 of 24
Page 17

Infrared (IR)
Infrared functionality of the SlimPAR™ HEX 6 IRC allows the product to be controlled with an
IRC-6 Operation
The IRC-6 infrar ed rem ote c ontrol works only when it is pointed direc tly at the pr oduct and ther e is
the remot e
Auto Program Mode
Remote Control
infrared rem ote controller . The IRC-6 available from CHAUVET® can remotel y set the product t o
various modes, as well as adjust program speed and microphone sensitivity.
To turn on the infrared functionality, do the following:
1. Press <MENU> repeatedly until SET shows on the displ ay.
2. Press <ENTER> and On or OFF shows on the display.
3. Press <UP> or <DOWN> to select On (turns on IR functionality) or
OFF (turns off IR functionality).
4. Press <ENTER>.
nothing in bet ween the remote and the prod uct. If the products are space d far apart,
might need to be pointed at each product.
The next section describes how to use the IRC-6.
Auto Program mode enables the auto programs on the product.
To use Auto Program mode, do the following:
1. Press <AUTO> on the IRC-6.
2. Press <+> or <–> to choose an auto program.
To adjust the speed of the auto program, do the following:
1. Press <SPEED> on the IRC-6.
2. Press <+> or <–> to increase or decrease the speed of the auto program.
Sound-Active Mode
Sound-Active mode enables the sound-active programs.
To use Sound-Active mode, do the following:
1. Press <SOUND> on the IRC-6.
2. Press <+> or <–> to choose a sound-active program.
To adjust the sound sen sit ivity in Sound-Active mode, do the following:
1. Press <SENSITIVITY> on the IRC-6.
2. Press <+> or <–> to either increase or decrease sound sensitivity.
Manual Color Selection
Manual color control enables selection of the 9 colors preprogrammed into the IRC-6.
To choose a specific color with the IRC-6, do the following:
1. Press <MANUAL> on the IRC-6.
2. Press any number between <0> and <9> to choose a color.
Manual Color Control
Manual color control ena bles indiv idu al adjus tment for each color in the product.
To manually control the RGBAW+UV colors, do the following:
1. Press <MANUAL> on the IRC-6.
2. Press <R>, <G>, <B>, <A>, <UV>, or <W> (red, green, blue, amber, ultraviolet, or white) to
choose your color.
3. Press <+> or <–> to increase or decrease the amount of the color.
Page 17 of 24 SlimPAR™ HEX 6 IRC User Manual Rev. 3
Page 18

Strobe
Strobe enables a variable strobe. Any program or color can be made to strobe. The product will
IRC-6 Operation cont.
strobe as it goes through the Auto Program or Sound-Active modes.
To enable, and ad ju st t he rate o f, t he st robe, do t he followin g:
1. Press <STROBE> on the IRC-6.
2. Press <+> or <–> to increase or decrease the strobe rate.
To turn the strobe off, press <STROBE>.
Fade
Fade limits the Auto mode to the two programs that fade from color to color.
To enable fade, do the foll owing:
1. Press <FADE> on the IRC-6.
2. Press <+> or <–> to toggle betw een the tw o auto prog rams with fade.
To exit fade and return to snap with access to all auto programs, do the following:
1. Press <AUTO>.
2. Press <+> or <–> to select an auto program.
Blackout
Blackout stops the sign al from th e IRC-6 to the product causing the product to go dark.
To black out the product, press <BLACKOUT> on the IRC-6.
To bring the product back on, press <BLACKOUT> on the IRC-6.
The IRC-6 will not respond to any inputs when Black Out is activated.
If the remote does not respond when a button is pressed, try pressing <BL ACK OUT>. You
may have inadvertently activated Black Out.
SlimPAR™ HEX 6 IRC User Manual Rev. 3 Page 18 of 24
Page 19

Master/Slave
Master/Slave configuration allows a single SlimPAR™ HEX 6 IR C (the master) to control the actions
with the mas ter
an illustration of the
Configuring the
Configure t he slaves for Slave mode before or after they are put in posit ion, but bef ore they are
Configuring the
Configure the master after all the slaves are connected to it and configured into Slave mode.
Configuration
Slaves
Master
of one or more SlimPAR™ HEX 6 IRCs (the slaves) without a DMX controller.
In Master/Slave mode the master is se t to op erate in Auto Program, Sound-Active, or Infrared mode
and the slaves are set to opera te in Slave mode.
The master a nd slaves are daisy ch ained though their DMX In and Out sockets
being the first product at the beginning of the chain. See DMX Linking for
products in a d ai sy chai n.
Once set and connected, the slaves will operate in unison with the master.
• The mast er is t he fi rs t pr odu c t in t he DMX da is y c hain.
• Never connect more than 31 slaves to the master.
• Never connect a DMX controller to a DMX daisy chain of master and slaves.
• Configure all the slaves before connecting the master to the DMX daisy chain.
daisy chained to the master.
To configure a slave, do the followi ng:
1. Press <MENU> repeatedly until any DM X pe r sonali ty show s o n the di splay.
2. Press <ENTER>.
3. Use <UP> or <DOWN> to set the DMX address to d 1.
4. Press <ENTER>.
To configure the maste r, do the foll owing:
1. Make sure the product is connected to a power source and connected to all the slaves.
2. Use the control p anel t o set th e p rodu ct i nt o a ny o f th e standalone modes described in
Standalone Configu ration
.
Page 19 of 24 SlimPAR™ HEX 6 IRC User Manual Rev. 3
Page 20

Settings
The SlimPAR™ HEX 6 IRC can be custom ized with settin gs for program speed, sound sensiti vity
SlimPAR™
Program Speed
Program speed sets the speed of the auto programs.
Sound Sensitivity
Sound sensitivity sets the sensitivi ty level of the microphone.
Dimmer Mode
Dimmer mode sets the speed of the dimmer.
Configuration
and dimmer speed. Be low are instructi ons for configuring the settings available in the
HEX 6 IRC.
To set the auto program speed, follow the instructions below:
1. Press <MENU> repeatedly until S-- shows on the display .
2. Use <UP> or <DOWN> to select the desired program speed.
3. Press <ENTER>.
To set the sound sensi tivi ty , fol low the i ns tru cti ons bel ow :
1. Press <MENU> repeatedly until SenS shows o n the display.
2. Use <UP> or <DOWN> to sele ct the desire d sound sen sitivi ty level.
3. Press <ENTER>.
1. Press <MENU> repeatedly until dIM show s on the display.
2. Use <UP> or <DOWN> to sele ct the desire d Dimmer mode.
3. Press <ENTER>.
SlimPAR™ HEX 6 IRC User Manual Rev. 3 Page 20 of 24
Page 21

5. T
Product
Dust build-up reduces light output and can cause ove r h e at i ng . To maintain optimum performance in
In a dirty environment, clean the
ECHNICAL INFORMATION
Maintenance
a typical environment, clean the product at le ast twice a month .
product more often.
To clean the product, follow the instructions below:
1. Unplug the product fro m power.
2. Wait until the product is at room temperature.
3. Use a vacuum (or dry compressed air) and a soft brush to remove dust collected on the external
surfaces and fan vents.
4. Clean the gla ss p anel wi th a mi l d solu tion o f gla s s cleane r o r is op ropy l alcohol.
5. Apply the solution directly to a soft, lint-free cotton cloth or a lens cleaning tissue.
6. Softly wipe any dirt or grime to the outside edges of the glass.
7. Gently polish the g l a ss su r face un til t hey a re fre e o f haz e a nd lin t.
Always dry the glass sur faces car efully after cl eanin g them.
Page 21 of 24 SlimPAR™ HEX 6 IRC User Manual Rev. 3
Page 22

6. T
Dimensions and
Length
Width
Height
Weight
9.5 in (241 mm)
8.9 in (226 mm)
3.7 in (95 mm)
4.6 lb (2.2 kg)
Note: Dimensions in inches rounded to the nearest decimal digit.
Power
Input Voltage
Range
Voltage Selection
Switching (internal)
100–240 VAC, 50/60 Hz
Auto-ranging
Parameter
120 VAC, 60 Hz
230 VAC, 50 Hz
Consumption
49 W
47 W
Operating current
0.7 A
0.4 A
Power linking current (units)
8 A (11 units)
8 A (21 units)
Fuse
T 1 A, 250 V
T 1 A, 250 V
Power I/O
US/Canada
UK/Worldwide
Power input connector
IEC
IEC
Power output connector
Edison
N/A
Power cord plug
Edison (US)
Local plug
LED
Type
Power
Lifespan
LED
10 W
50,000 hours
Color
Quantity
Current
Hex-color (RGBAW+UV)
6
2.4 A
Photo Optic
Illuminance @ 2 m
1,760 lux
Field angle
41°
Beam angle
23°
Strobe rate
0 to 24 Hz
UV Wavelength
400 to 410 nm
Thermal
Maximum External Temp.
Cooling System
104 °F (40 °C)
Convection
DMX
I/O Connectors
Connector Type
Channel Range
3-pin XLR
Sockets
6, 8 or 12
Ordering
Product Name
Item Code
UPC Code
SlimPAR™ HEX 6 IRC
03030792
781462211400
ECHNICAL SPECIFICATIONS
Weight
Parameter
SlimPAR™ HEX 6 IRC User Manual Rev. 3 Page 22 of 24
Page 23

R
To return a product or reques t suppo rt:
contact your distributor of
Call the corresponding Chauvet Technical Support office and request a Return Merchandise
original packing and
Before sen ding th e product , clearl y write the foll owing inf ormation on a piec e of paper a nd place it
ETURNS
• In the U.S., conta ct Chauvet World Headquarters. (See Contact Us)
• In the UK or I rel an d, con ta ct Chauvet Europe Ltd. (See Contact Us)
• In Mexico, contact Chauvet Mexico. (See Contact Us)
• In any other country , DO NOT conta ct Chauvet. Contact your distributor. See
www.chauvetlighting.com
If you live outside the U.S., United Kingdom, Ireland, or M exico,
record and follow their instructions on how to retu rn CH AUVET ® p roduct s to t hem . V isit ou r
website for contact details.
Authorization (RMA) number before shipping the product. Be prepared to provide the model
number, serial number, and a brief description of the cause for the return.
You must send the merchandise prepaid, in its original box, and with its
accessories. Chauvet will not issue call tags.
Clearly lab el the package wit h the RMA number. Chauvet will refuse an y product r eturned without
an RMA number.
Write the RMA number on a properly affixed label. DO NOT write the RMA number directly on
the box.
inside the box:
• Your name
• Your address
• Your phone number
• RMA number
• A brief description of the problem
Be sure to pack the product properly. Any shipping damage resulting from inadequate packaging will
be your responsibility. FedEx packing or double-boxing are recommended.
for dist rib utor s o ut si de th e U.S ., U nit ed King do m, Irel and , or Mexico.
Chauvet reserves the right to use its own discretion to repair or replace returned product(s).
Page 23 of 24 SlimPAR™ HEX 6 IRC User Manual Rev. 3
Page 24

C
WORLD HEADQUA R TERS - Chauvet
General Information
Toll free: (800) 762-1084
Techni ca l S u pp o r t
World Wide Web www.chauvetlighting.com
UNITED KIN GDOM AND IRE LAND - Chauvet Europe Ltd.
General Information
Fax: +44 (0)1773 5111 10
Techni ca l S u pp o r t
MEXICO - Chauvet Mexico
General Information
Voice: +52 (728 ) 285-5000
Techni ca l S u pp o r t
Outside the U.S., United Kingdom, Ireland, or Mexic o, contact your dealer. Follow their instructions
ONTACT US
Address:5200 NW 108th Avenue
Sunrise, FL 33351
Voice: (954) 577 -4455
Fax: (954) 929-5560
Address:Unit 1C
Brookhill Road Industrial E state
Pinxton, Nottingham, UK
NG16 6NT
Voice: +44 (0)177 3 511115
Address:Av. Santa Ana 30
Parque Industrial Lerma
Lerma, Mexico C.P. 52000
Voice: (954) 577 -4455 (Press 4)
Fax: (954) 756-8015
Email: tech@chauvetlighting.com
Email: uktech@chauvetlighting.com
World Wide Web www.chauvetlighting.co.uk
Email: servicio@chauvet.com.mx
World Wide Web www.chauvet.com.mx
to request support or to return a product. Visit our website for contact details.
SlimPAR™ HEX 6 IRC User Manual Rev. 3 Page 24 of 24
 Loading...