

Page 1
Quick Reference Guide
Page 2
MotionOrb™ EXT QRG EN
About This Guide
The MotionOrb EXT Quick Reference Guide (QRG) has basic product
or the parent
Disclaimer
The information and specifications contained in this QRG are subject to change
Safety Notes
The following Safety Notes include important information about installation, use,
• The product is not intended for permanent installation.
Contact
• From outside the U.S., U.K, Ireland, or Mexico, contact the distributor of
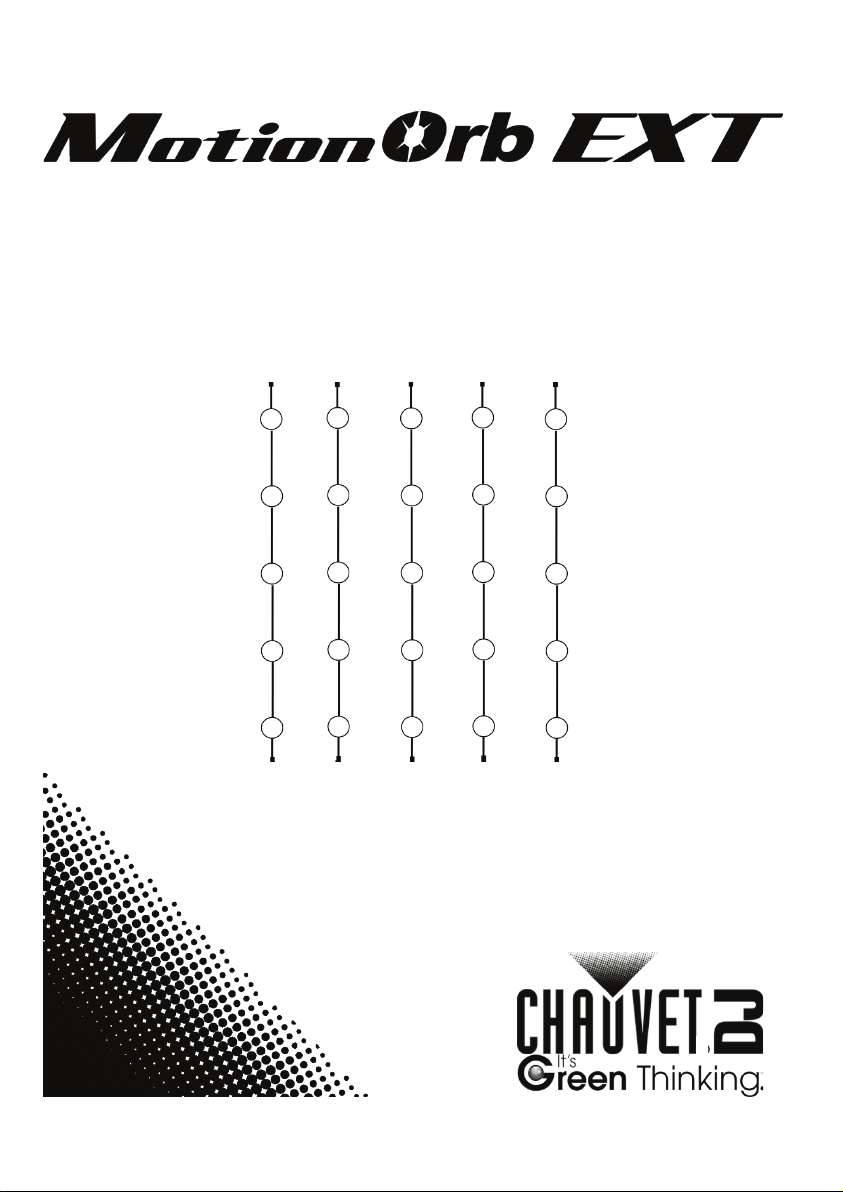
What Is Included
• 5 MotionOrb orb strings
• Warranty card
• Quick Reference Guide
To Begin
Carefully unpack the MotionOrb EXT and check that all the parts are in the
If the box, or any of the contents, appear damaged from shipping, or show signs
packaging and file a claim with the carrier
o the carrier
packaging available for inspection, could
For other issues, such as missing components or parts, damage not related to
within 7 days of
at the end of
Description
The MotionOrb EXT is a package of 5 standard MotionOrb orb strings that are
information. For more information about the MotionOrb EXT
product, MotionOrb, download the MotionOrb User Manual from the CHAUVET
website: http://www.chauvetlighting.com.
without notice.
and maintenance.
• Use the product indoors only.
• Do not expose the product to rain or moisture.
• Keep the product away from flammable materials.
• In the event of a serious operating problem, stop using the product
immediately.
• Never try to repair the product. Repairs carried out by untrained people can
lead to damage or malfunction.
• If repairs are required, contact the nearest authorized technical assistance
center.
record to request support or return a product.
• From inside the U.S., UK, Ireland, or Mexico, use the information in
Contact Us at the end of this QRG.
package, and are in good condition.
of mishandling, save all the
immediately, do not notify CHAUVET. Failure to report damage t
immediately, or failure to have all the
invalidate the claim.
shipping, or concealed damage, file a claim with CHAUVET
delivery. For information on contacting CHAUVET, see Contact Us
this QRG.
used to extend the length of the CHAUVET MotionOrb.
The MotionOrb can expand to include up to 2 MotionOrb EXT packages.
2
Page 3
MotionOrb™ EXT QRG EN
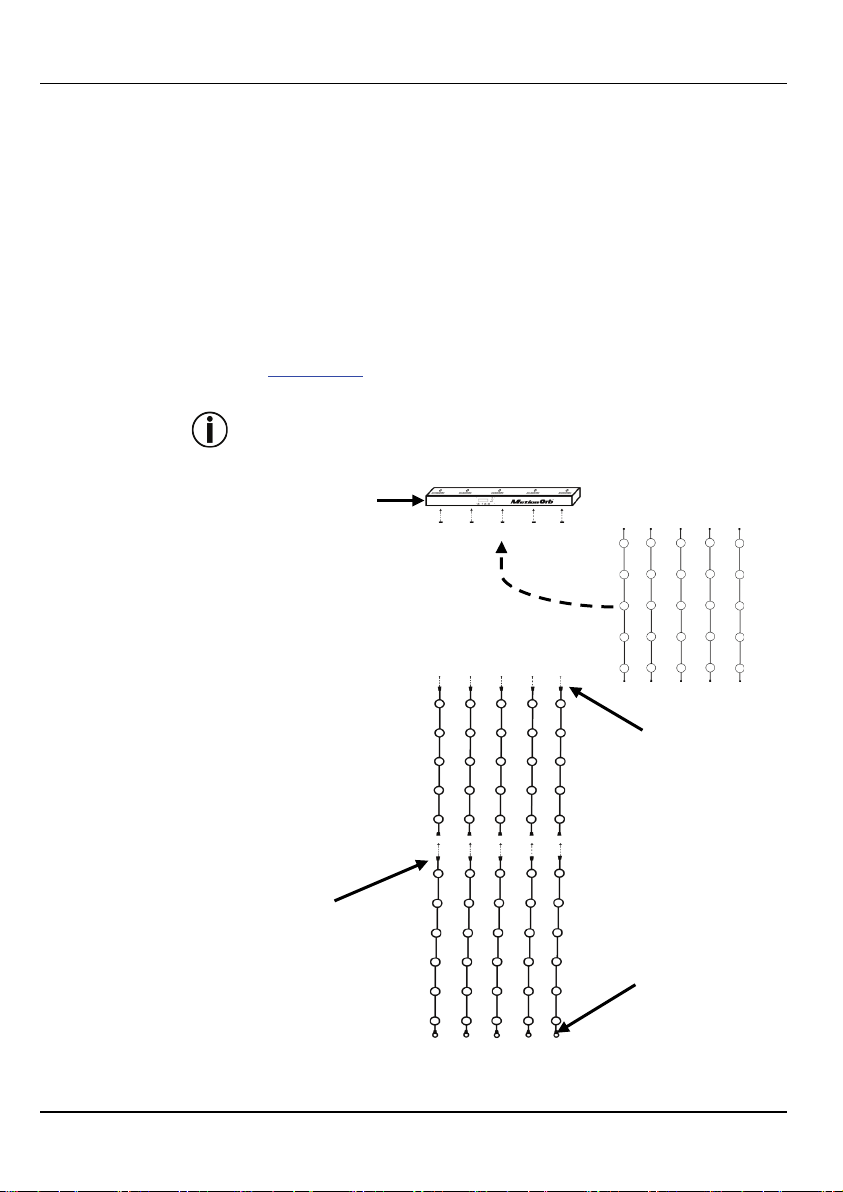
Installing
The MotionOrb EXT orb strings connect the MotionOrb top bar. Then the
The MotionOrb will not recognize the MotionOrb EXT until the Length
Step 2.
Orb Strings Into the Top Bar
Step 3.
Strings
Loops Are Always
Disconnect Standard
The Top Bar
MotionOrb standard orb strings are connected to the MotionOrb EXT orb strings.
To install the MotionOrb EXT, do the following:
1. Disconnect the standard orb strings from the top bar.
2. Attach the MotionOrb EXT orb strings directly to the top bar using the
female connector on the orb strings.
3. Attach the standard orb strings to the extension orb strings using the male
connector on the extension orb strings and female connector on the standard
orb strings.
4. Attach each of the bottom orb strings to the standard orb strings using the
male connector on the standard orb strings and female connector on the
bottom orb strings.
5. Make sure all the connections are finger tight.
6. Configure the Length setting on the MotionOrb. For more information, see
Length Setting.
7. Confirm settings by testing the MotionOrb.
setting is configured.
Step 1.
Orb Strings from
Attach MotionOrb EXT
Installation
Diagram
Attach MotionOrb Bottom
Step 4.
Orb Strings
At The Bottom
3
Attach MotionOrb Standard
Orb Strings
To The MotionOrb EXT Orb
At The Bottom
Page 4
MotionOrb™ EXT QRG EN
Length Setting
The MotionOrb comes standard in a 2-meter length, but MotionOrb EXT can be
Length Setting
The Length settings options in the MotionOrb menu are as follows:
Options
Required Extensions/Total Length
2M
For the standard MotionOrb with no orb string extensions,
2 m total length
3M
For the addition of 1 MotionOrb EXT package, 3 m total length
4M
For the addition of 2 MotionOrb E XT packages, 4 m total length
Pixel Mapping
There is a different pixel mapping DMX personality for each length of
Personality
Total Orbs Per String
3M mode - MotionOrb with extensions for a total of 16 orbs per string
string)
4M mode - MotionOrb with extensions for a total of 21 orbs per string
string)
To activate DMX mode and select the DMX personality, do the following:
added to make the MotionOrb up to 4 meters long. Each orb string extension is 1
meter long. The Length setting configures the MotionOrb EXT for the number of
orb strings attached.
To configure the MotionOrb EXT length, do the following:
1. Press <MENU> repeatedly until Length shows on the display.
2. Press <ENTER>. A length option (2M, 3M, 4M) shows on the display.
3. Press <UP> or <DOWN> until the desired length shows on the display.
4. Press <ENTER>.
5. Press <MENU>. The desired length stops showing on the display.
The MotionOrb functions correctly only if the Length setting matches the
total length of orb strings installed. For example, if the MotionOrb is set to
4M, but the actual length is only 2 meters long, the effects macros will not
display properly and the pixel mapping will not work.
Options
Personalities
MotionOrb, and those personalities are listed below.
DMX_165CH
DMX_240CH
DMX_315CH
Because MotionOrb EXT is not used with the DMX_165CH DMX personality,
this Pixel Mapping diagram is not shown in this QRG.
2M mode - MotionOrb with a total of 11 orbs per string
(1 standard orb string and 1 bottom orb string; no extensions)
(1 standard orb string plus 1 orb string extension, and 1 bottom orb
(1 standard orb string plus 2 orb string extensions, and 1 bottom orb
1. Press <MENU> until Dmx shows in the display.
2. Press <ENTER> until DMX Mode shows on the top line of the display.
3. Use <UP> and <DOWN> until the desired DMX mode shows on the bottom
line of the display.
4. Press <ENTER>. Dmx shows in the display.
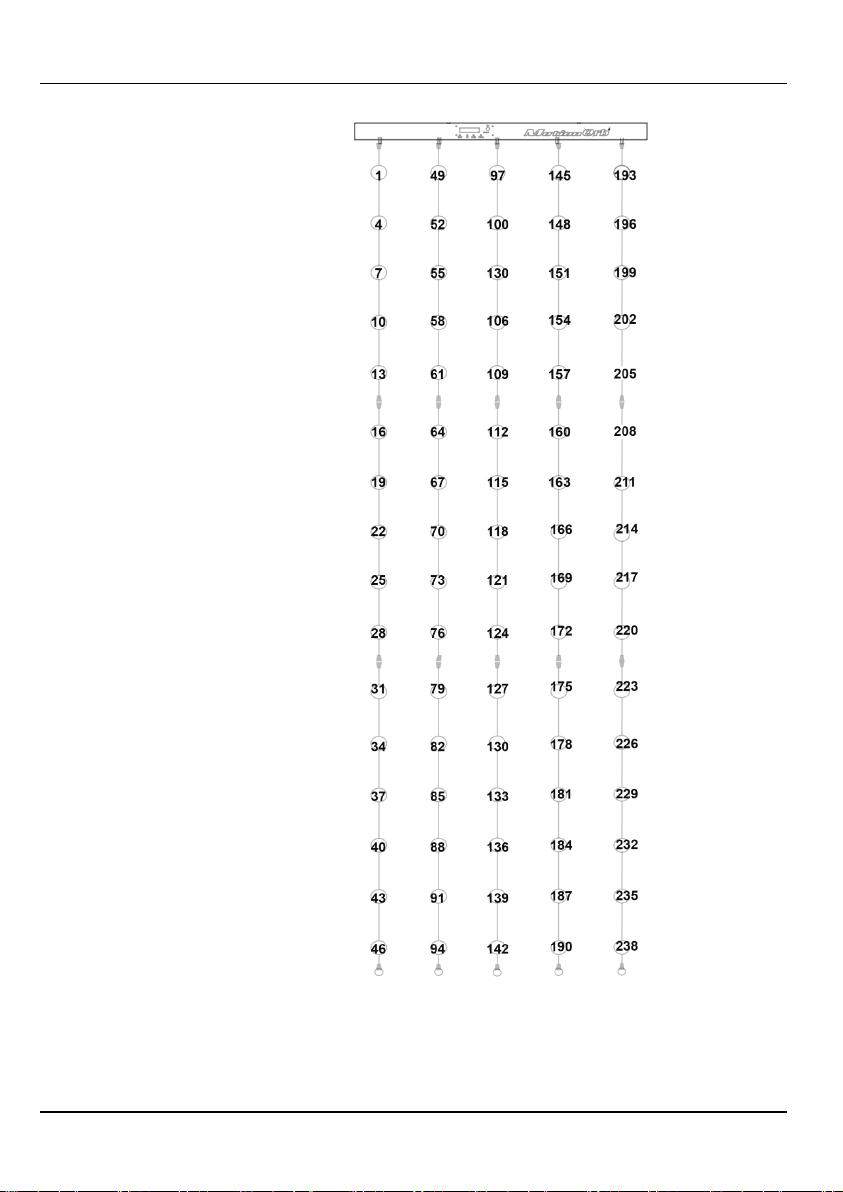
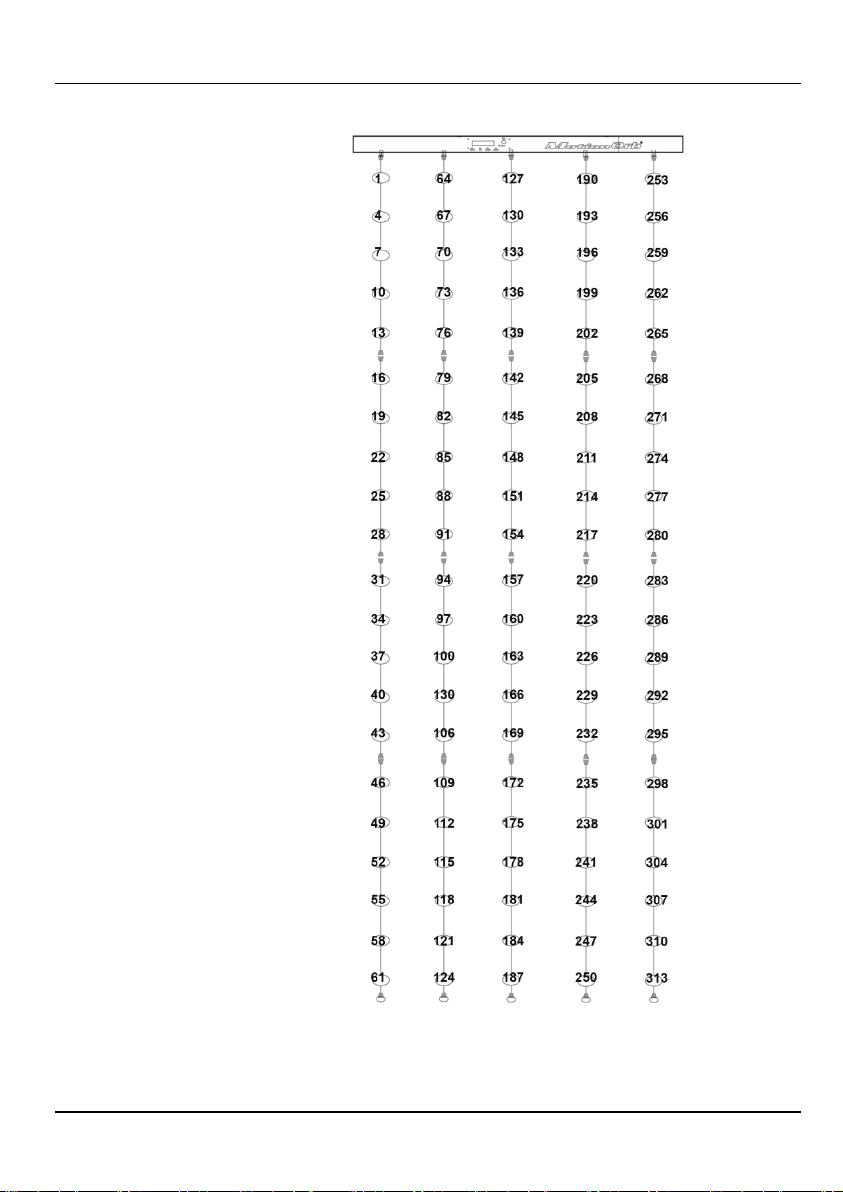
In pixel mapping mode there is a unique DMX address for each orb. The diagrams
on the next pages show these DMX addresses.
The Length setting must be set properly for pixel mapping to work. For
instructions about setting the length, see Length Setting.
4
Page 5
MotionOrb™ EXT QRG EN
Pixel Mapping
Diagram
DMX_240
5
Page 6
MotionOrb™ EXT QRG EN
Pixel Mapping
Diagram
DMX_315
.
6
Page 7
MotionOrb™ EXT GRR ES
Acerca de Esta
La Guía de referencia rápida (GRR) del MotionOrb EXT contiene información
o sobre el
Exención de
Responsabilidad
La información y especificaciones contenidas en esta GRR están sujetas a cambio
Notas de
Seguridad
Las siguientes notas de seguridad incluyen información importante sobre la
• El producto no está concebido para una instalación permanente.
Contacto
• Desde fuera de EE.UU, Reino Unido, Irlanda o México póngase en contacto
Qué va
Incluido
• 5 tiras MotionOrb
• Guía de referencia rápida
Para Empezar
con cuidado y compruebe que todas las piezas
Si la caja o alguno de los contenidos parecen dañados a causa del transporte, o
muestran signos de manipulación inadecuada, guarde todo el paquete y tramite
. Si no informa al transportista del daño inmediatamente o no dispone
Para otras incidencias, como componentes o piezas que falten, daños no
ños no evidentes, presente una reclamación a
en el plazo de 7 días de la entrega. Para información sobre cómo
Descripción
El MotionOrb EXT es un paquete de 5 tiras MotionOrb estándar que se usan para
básica del producto. Para más información sobre el MotionOrb EXT
Guía
producto matriz, MotionOrb, descargue el Manual del usuario de MotionOrb del
sitio web de CHAUVET: http://www.chauvetlighting.com.
sin previo aviso.
instalación, uso y mantenimiento.
• Utilice el producto solo en interiores.
• No exponga el producto a lluvia o humedad.
• Mantenga el producto alejado de materiales inflamables.
• En caso de un problema grave de funcionamiento, deje de usar el producto
inmediatamente.
• Nunca intente reparar el producto. Las reparaciones llevadas a cabo por
personal no cualificado pueden provocar averías o funcionamiento
defectuoso.
• Si necesita reparaciones, póngase en contacto con el centro de asistencia
técnica autorizado más cercano.
con su distribuidor oficial para solicitar asistencia o devolver el producto.
• Desde dentro de EE.UU, Reino Unido, Irlanda o México, utilice la
información de Contact Us (contacto) al final de esta GRR.
• Tarjeta de garantía
Desembale el MotionOrb EXT
están en el paquete y en buen estado.
una reclamación con el transportista inmediatamente. No lo notifique a
CHAUVET
todo el paquete para inspección podría quedar anulada su reclamación.
relacionados con el transporte o da
CHAUVET
contactar con CHAUVET, vea la sección Contact Us (contacto) de esta GRR.
ampliar la longitud del MotionOrb de CHAUVET.
El MotionOrb
se puede expandir para que contenga hasta 2 MotionOrb EXT.
7
Page 8

MotionOrb™ EXT GRR ES
Instalar
Las tiras de esferas del MotionOrb EXT se conectan a la barra superior del
se conectan a las
Paso 2.
las tiras en la barra superior
Acople las tiras estándar del
Los lazos quedan
Paso 1.
Desconecte las tiras de
la barra superior
MotionOrb. Luego, las tiras de esferas estándar del MotionOrb
tiras del MotionOrb EXT.
Para instalar el MotionOrb EXT, haga lo siguiente:
1. Desconecte las tiras de esferas estándar de la barra superior.
2. Acople las tiras del MotionOrb EXT directamente a la barra superior usando
los extremos hembra del conector de las tiras.
3. Acople las tiras de esferas estándar a las tiras de extensión usando el conector
macho de las tiras de extensión y el conector hembra de las tiras estándar.
4. Acople cada una de las tiras de esferas inferiores a las tiras estándar usando el
conector macho de las tiras estándar y el conector hembra de las tiras
inferiores.
5. Asegúrese de que las conexiones están bien apretadas con las manos.
6. Ajuste la configuración de longitud en el MotionOrb. Para más información,
vea Configuración de Longitud.
7. Confirme la configuración probando el MotionOrb.
El MotionOrb no reconocerá el MotionOrb EXT hasta que se haya ajustado
la configuración de longitud.
esferas estándar de
Diagrama de
Instalación
Paso 4.
Acople las tiras inferiores
del MotionOrb
a la parte inferior
Acople MotionOrb EXT
Paso 3.
MotionOrb
al MotionOrb™ EXT
siempre en la
parte inferior
8
Page 9
MotionOrb™ EXT GRR ES
Configuración de
El MotionOrb viene de serie con una longitud de 2 metros, pero se pueden añadir
llegue a los 4 metros de largo. Cada
configura el
Opciones de
Las opciones de configuración de longitud (Length) en el menú del MotionOrb
Opciones
Extensiones Requeridos/Longitud Total
2M
Para el MotionOrb estándar, sin extensiones, 2 m de longitud total
3M
Para añadir 1 MotionOrb EXT, 3 m de longitud total
4M
Para añadir 2 MotionOrb EXT, 4 m de longitud total
Personalidades
de Mapeo de
Hay una personalidad DMX de mapeo de píxeles distinta para cada longitud del
Personalidad
Total de Esferas Por Tira
Modo 2M: MotionOrb con un total de 11 esferas por tira
extensiones)
Modo 3M: MotionOrb con extensiones para un total de 16 esferas por
inferior)
Modo 4M: MotionOrb con extensiones para un total de 21 esferas por
inferior)
Como el MotionOrb EXT no se usa con la personalidad DMX_165CH DMX, este
Para activar el modo DMX y seleccionar la personalidad DMX, haga lo siguiente:
En el modo de mapeo de píxeles hay una dirección DMX única para cada esfera.
Longitud
Configuración de
Longitud
Píxeles
MotionOrb EXT para hacer que el MotionOrb
extensión tiene 1 metro de largo. El ajuste de la longitud (Length)
MotionOrb EXT para el número de tiras acopladas.
Para configurar la longitud del MotionOrb EXT, haga lo siguiente:
1. Pulse <MENU> repetidamente hasta que aparezca Length en la pantalla.
2. Pulse <ENTER>. Una opción de longitud (2M, 3M, 4M) aparece en la pantalla.
3. Pulse <UP> o <DOWN> hasta que la longitud deseada aparezca en la pantalla.
4. Pulse <ENTER>.
5. Pulse <MENU>. La longitud seleccionada deja de aparecer en la pantalla.
El MotionOrb
coincide con la longitud total de las tiras de esferas instaladas. Por ejemplo, si
el MotionOrb
los macros de efectos no se mostrarán adecuadamente y el mapeo de píxeles
no funcionará.
son las siguientes:
MotionOrb, como se ve a continuación:
DMX_165CH
DMX_240CH
solo funciona correctamente si la configuración de longitud
está configurado en 4M, pero su longitud es de solo 2 metros,
(1 tira de esferas estándar y una tira de esferas inferior; sin
tira (1 tira de esferas estándar más 1 extensión y 1 tira de esferas
DMX_315CH
diagrama de mapeo de píxeles no aparece en las secciones siguientes.
1. Pulse <MENU> hasta que aparezca Dmx en la pantalla.
2. Pulse <ENTER> hasta que aparezca DMX Mode en la línea superior de la
pantalla.
3. Utilice <UP> y <DOWN> hasta que el modo DMX deseado aparezca en la
línea inferior de la pantalla.
4. Pulse <ENTER>. Dmx aparece en la pantalla.
Los diagramas de las páginas siguientes muestran dichas direcciones DMX.
La configuración de longitud (Length) se debe ajustar adecuadamente para que funcione el mapeo de píxeles. Para instrucciones sobre la configuración de la longitud, vea Configuración de Longitud.
tira (1 tira de esferas estándar más 2 extensiones y 1 tira de esferas
9
Page 10

MotionOrb™ EXT GRR ES
Diagrama de Mapeo
de Píxeles
DMX_240
10
Page 11

MotionOrb™ EXT GRR ES
Diagrama de Mapeo
de Píxeles
DMX_315
.
11
Page 12

MotionOrb™ EXT MR FR
À Propos de ce
Le Manuel de Référence rapide (MR) du MotionOrb EXT regroupe des
MotionOrb™
ur
Clause de Non-
Responsabilité
Les informations et caractéristiques contenues dans ce MdR sont sujettes à
Consignes de
Sécurité
Les consignes de sécurité qui suivent contiennent des informations importantes en
• Cet appareil n'est pas adapté pour une installation permanente.
Contact
• En dehors des États-Unis, du Royaume-Uni, de l’Irlande et du Mexique,
Ce qui est
Inclus
• 5 guirlandes MotionOrb
• Manuel de référence
Débuter
avec précaution et vérifiez le contenu afin de vous
Si l'emballage ou un élément du contenu semble avoir été endommagé lors du
transport, ou présente de signes de manipulation sans précaution, veuillez dès
. Ne
pas signaler les dommages visibles au transporteur immédiatement ou ne pas
tion immédiate de l'état de l'emballage peut entraîner
livraison de pièces ou composants, des
dommages non en rapport avec la livraison ou des vices cachés, veuillez déposer
dans les 7 jours suivant la livraison. Pour
, veuillez consulter la
Description
Le MotionOrb EXT est un jeu de 5 guirlandes MotionOrb standard qui sont
Manuel
informations de base sur l'appareil. Pour plus d'informations sur le
EXT ou la famille de produits MotionOrb, téléchargez le manuel de l'utilisate
sur le site internet de CHAUVET : http://www.chauvetlighting.com/product-manuals-
literature/.
changement sans préavis.
matière d'installation, d'utilisation et d'entretien.
• Il doit uniquement être utilisé en intérieur.
• N'exposez l'appareil ni à la pluie, ni à l'humidité.
• Gardez l'appareil hors de portée des matériaux inflammables.
• En cas de sérieux problèmes de fonctionnement, arrêtez l'appareil
immédiatement.
• N'essayez jamais de réparer l'appareil vous-même. Toute réparation effectuée
par des personnes non agréées pourrait occasionner des dommages ou des
défaillances.
• Pour tous vos besoins de réparation, contactez le centre d'assistance technique
agréé le plus proche de chez vous.
contactez votre fournisseur si vous avez besoin d'assistance ou de retourner
un appareil.
• Depuis les États-Unis, le Royaume-Uni, l'Irlande et le Mexique, utilisez les
informations de la rubrique Contact Us (nous contacter) à la fin de ce MR.
• Fiche de garantie
Déballez le MotionOrb EXT
assurer que rien ne vous manque et que tout est en bon état.
réception en notifier immédiatement le transporteur. N'avisez pas CHAUVET
procéder à une vérifica
l'invalidation de toute réclamation future.
Pour tout autre problème comme la non-
votre réclamation auprès de CHAUVET
toute information sur les méthodes de contact de CHAUVET
rubrique Contact Us (nous contacter) de ce manuel.
utilisées pour augmenter la longueur du MotionOrb CHAUVET.
Le MotionOrb
peut être allongé au maximum avec deux MotionOrb EXT.
12
Page 13

MotionOrb™ EXT MR FR
Installation
Les guirlandes d'orbes MotionOrb EXT se branchent sur la barre supérieure d'un
standard sont branchées
Étape 2
Brancher les guirlandes du
Étape 3
MotionOrb EXT
Étape 1
standard de la barre
MotionOrb. Ensuite, les guirlandes d'orbes MotionOrb
aux guirlandes MotionOrb EXT.
Pour installer le MotionOrb EXT, procédez comme suit :
1. Déconnectez les guirlandes d'orbes standard de la barre supérieure.
2. Attachez les guirlandes du MotionOrb EXT directement à la barre supérieure
en utilisant le connecteur femelle des guirlandes.
3. Attachez les guirlandes d'orbes standard aux guirlandes d'extension en
utilisant le connecteur mâle des guirlandes d'extension et le connecteur
femelle des guirlandes standard.
4. Attachez chacune des guirlandes d'orbes inférieures aux guirlandes standard
en utilisant le connecteur mâle des guirlandes standard et le connecteur
femelle des guirlandes inférieures.
5. Assurez-vous de bien serrer à la main toutes les connexions.
6. Configurez le paramètre de longueur sur le MotionOrb. Pour plus
d'informations, veuillez consulter la rubrique Paramétrage de la longueur.
7. Validez les paramètres en testant le MotionOrb.
Le MotionOrb ne reconnaîtra pas le MotionOrb EXT tant que le paramètre
de longueur n'a pas été changé.
Débrancher les
guirlandes d'orbes
supérieure
Schéma
d'Installation
Étape 4
Brancher les guirlandes
inférieures du MotionOrb
en dernier
MotionOrb EXT
à la barre supérieure
Brancher les guirlandes
standard du MotionOrb au
Les anneaux
doivent toujours
être situés en bas
13
Page 14

MotionOrb™ EXT MR FR
Paramétrage de la
Le MotionOrb est livré en standard avec une longueur de 2 mètres mais le
ue extension est de 1 mètre. Le paramètre
en indiquant le
Options du
aramétrage de la
Les options du paramétrage de la longueur (Length) disponibles dans le menu du
Options
Extensions Obligatoires/Longueur Totale
Utilisé pour un MotionOrb standard sans extension, d'une longueur
totale de 2 mètres.
Lorsqu'un MotionOrb EXT est ajouté, pour une longueur totale de 3
mètres.
Lorsque deux MotionOrb EXT sont ajoutés, pour une longueur totale
de 4 mètres.
Longueur
P
MotionOrb EXT peut être utilisé pour allonger le MotionOrb jusqu'à une longueur
de 4 mètres. La longueur de chaq
Length (longueur) permet de configurer le MotionOrb EXT
nombre de guirlandes attachées.
Pour configurer la longueur du MotionOrb EXT, effectuez les actions suivantes :
1. Appuyez sur la touche <MENU> de manière répétée jusqu'à ce que
l'affichage indique Length.
2. Appuyez sur <ENTER>. Une valeur de longueur s'affiche (2M, 3M, 4M).
3. Utilisez les boutons <UP> ou <DOWN> jusqu'à ce que la longueur souhaitée
s'affiche.
4. Appuyez sur <ENTER>.
5. Appuyez sur <MENU>. La longueur souhaitée disparait de l'affichage.
Le MotionOrb
Length correspond à la longueur totale des guirlandes d'orbes installées. Par
exemple, si le MotionOrb
longueur réelle n'est que de deux mètres, les macros d'effets ne s'afficheront
pas correctement et le mappage de pixels ne fonctionnera pas.
MotionOrb sont les suivantes :
Longueur
2M
3M
4M
ne fonctionne correctement que si la valeur du paramètre
est paramétré sur une longueur de 4M, mais que la
14
Page 15

MotionOrb™ EXT MR FR
Personnalités de
Mappage de
Il existe une personnalité DMX de mappage de pixels différente pour chaque
Personnalité
Total des Orbes par Guirlande
MotionOrb en mode 2M avec un total de 11 orbes par guirlande.
sans extension).
MotionOrb en mode 3M, allongé jusqu'à un total de 16 orbes par
guirlande d'orbe inférieure).
MotionOrb en mode 4M, allongé jusqu'à un total de 21 orbes par
une guirlande d'orbe inférieure).
Pour activer le mode DMX et sélectionner la personnalité DMX, effectuez les
En mode mappage de pixels, il y a une adresse DMX unique pour chaque orbe.
longueur de MotionOrb. Ces personnalités sont les suivantes :
Pixels
DMX_165CH
DMX_240CH
DMX_315CH
(une guirlande d'orbes standard et une guirlande d'orbes inférieure,
guirlande (une guirlande d'orbe standard avec une extension et une
guirlande (une guirlande d'orbe standard avec deux extensions et
Étant donné que le MotionOrb EXT ne s'utilise pas avec la personnalité
DMX DMX-165CH, le schéma de mappage de pixel associé n'est pas affiché
dans les sections qui suivent.
actions suivantes :
1. Appuyez sur la touche <MENU> de manière répétée jusqu'à ce que
l'affichage indique Dmx.
2. Appuyez sur la touche <ENTER> jusqu'à ce que l'affichage indique DMX
Mode sur la ligne supérieure.
3. Utilisez les boutons <UP> ou <DOWN> jusqu'à ce que le mode DMX
souhaité s'affiche sur la ligne inférieure.
4. Appuyez sur <ENTER>. L'affichage indique Dmx.
Les schémas des pages suivantes indiquent ces adresses DMX.
Le paramètre Length (longueur) doit être correctement définit pour que le
mappage de pixel puisse fonctionner. Pour plus d'instructions sur le
paramétrage de la longueur, veuillez consulter la section Paramétrage de la
Longueur.
15
Page 16

MotionOrb™ EXT MR FR
Schéma de
Mappage de Pixels
DMX_240
16
Page 17

MotionOrb™ EXT MR FR
Schéma de
Mappage de Pixels
DMX_315
.
17
Page 18

MotionOrb™ EXT SAL DE
Über diese
In der Schnellanleitung des MotionOrb EXT finden Sie grundlegende
oder
, laden Sie sich bitte die
herunter:
Haftungs-
ausschluss
Die in dieser Anleitung aufgeführten Informationen und Spezifikationen können
Sicherheits-
hinweise
Die folgenden Sicherheitshinweise enthalten wichtige Informationen über die
• Dieses Produkt eignet sich nicht für eine permanente Installation.
Kontakt
• Kunden außerhalb der USA, GB, Irland oder Mexiko wenden sich an den
Packungsinhalt
• 5 MotionOrb-Lichterketten
• Garantiekarte
• Schnellanleitung
Start
überprüfen Sie, ob Sie alle
Wenn die Box oder die in der Verpackung befindlichen Teile beschädigt sind oder
Mängel durch nicht einwandfreie Behandlung aufweisen, sichern Sie alle
beim Transportunternehmen
. Eine Nichtbeachtung
dieser umgehenden Meldepflicht gegenüber dem Transportunternehmen oder
fehlende Verpackungsteile bei der Überprüfung des Anspruchs auf
Bei anderen Problemen wie etwa fehlende Komponenten oder Teile, Schäden, die
nicht durch den Transport entstanden sind, oder nicht offensichtliche Schäden,
von 7 Tagen ab
Beschreibung
Der MotionOrb EXT ist ein Paket mit 5 standardmäßigen MotionOrb-
vergrößert
Schnellan-leitung
Produktinformationen. Für weitere Informationen über den MotionOrb EXT
das übergeordnete Produkt, MotionOrb
Bedienungsanleitung des MotionOrb auf der Website von CHAUVET
http://www.chauvetlighting.com/product-manuals-literature/.
ohne vorherige Ankündigung geändert werden.
Montage, Verwendung und Wartung des Geräts.
• Dieses Gerät nur im Innenbereich verwenden.
• Das Gerät nicht Regen oder Feuchtigkeit aussetzen.
• Stellen Sie sicher, dass das Gerät mit einem Sicherheitsabstand zu
entzündlichen Materialien betrieben wird.
• Bei ernsthaften Betriebsproblemen stoppen Sie umgehend die Verwendung
des Geräts.
• Versuchen Sie nie selbst, dieses Gerät zu reparieren. Reparaturen müssen von
entsprechend geschultem Fachpersonal durchgeführt werden, da sonst
Schäden oder Fehlfunktionen auftreten können.
• Wenden Sie sich für erforderliche Reparaturen an den nächsten autorisierten
Technischen Support.
aufgeführten Lieferanten, um den Kundensupport in Anspruch zu nehmen
oder ein Produkt zurückzuschicken.
• Kunden innerhalb der USA, GB, Irland oder Mexiko verwenden bitte die
Informationen unter Contact Us (konakt) am Ende dieser Schnellanleitung.
Packen Sie der MotionOrb EXT vorsichtig aus und
Teile unbeschädigt erhalten haben.
Verpackungsteile und machen dies umgehend
geltend. Benachrichtigen Sie jedoch nicht CHAUVET
Mängelebeseitigung kann zu einem Erlischen dieses Anspruchs führen.
machen Sie Ihren Anspruch gegenüber CHAUVET innerhalb
Lieferung der Waren geltend. Hinweise zur Kontaktaufnahme mit CHAUVET
finden Sie unter dem Abschnitt Contact Us (Kontaktieren Sie uns) in dieser
Schnellanleitung.
Lichterketten, mit denen die Länge des MotionOrb von CHAUVET
werden kann.
Der MotionOrb kann um bis zu 2 MotionOrb EXT-Geräte verlängert werden.
18
Page 19

MotionOrb™ EXT SAL DE
Installation
Die MotionOrb EXT-Lichterketten werden an die obere Leiste des MotionOrb
Lichterketten mit
Der MotionOrb erkennt den MotionOrb EXT nicht, bis die
angeschlossen. Dann werden die standardmäßigen MotionOrbden MotionOrb EXT-Lichterketten verbunden.
Zur Installation des MotionOrb EXT gehen Sie wie folgt vor:
1. Trennen Sie die standardmäßigen MotionOrb-Lichterketten von der oberen
Leiste.
2. Befestigen Sie die MotionOrb EXT-Lichterketten mithilfe der an den
Lichterketten befindlichen Buchse direkt mit der oberen Leiste.
3. Befestigen Sie die standardmäßigen MotionOrb-Lichterketten mithilfe des an
den Verlängerungs-Lichterketten befindlichen Steckers und der an den
standardmäßigen Lichterketten befindlichen Buchse an die VerlängerungsLichterketten.
4. Befestigen Sie jede der unteren MotionOrb-Lichterketten mithilfe des an den
standardmäßigen Lichterketten befindlichen Steckers und der an den unteren
Lichterketten befindlichen Buchse an die standardmäßigen Lichterketten.
5. Vergewissern Sie sich, dass alle Verbindungen handfest sind.
6. Konfigurieren Sie die Längeneinstellung am MotionOrb. Weitere
Informationen sind im Abschnitt Längeneinstellung enthalten.
7. Prüfen Sie diese Einstellung, indem Sie den MotionOrb testweise in Betrieb
nehmen™.
Längeneinstellung konfiguriert ist.
19
Page 20

MotionOrb™ EXT SAL DE
unteren
Die Schleifen sind
Schritt 1.
Trennen Sie die
standardmäßigen
MotionOrbLichterketten von
der oberen Leiste
Installationsschema
Schritt 4.
Befestigen Sie die
MotionOrb-Lichterketten
an der Unterseite
Befestigen Sie die
MotionOrb EXT
Lichterketten an der
oberen Leiste
Befestigen Sie die
standardmäßigen
MotionOrb-Lichterketten
am MotionOrb EXT
Schritt 2.
Schritt 3.
immer unten
20
Page 21

MotionOrb™ EXT SAL DE
Längeneinstellung
Der MotionOrb ist standardmäßig 2 Meter lang, es kann jedoch ein MotionOrb
auf bis zu 4 Meter zu verlängern. Jede
Verlängerung ist 1 Meter lang. Die Längeneinstellung konfiguriert den
Optionen der
Die Optionen der Längeneinstellung im MotionOrb-Menü lauten wie folgt:
Optionen
Erforderliche Extensions/Gesamtlänge
Für das standardmäßige MotionOrb ohne Verlängerungen,
Gesamtlänge 2 m
3M
Für ein weiteres MotionOrb EXT, Gesamtlänge 3 m
4M
Für zwei weitere MotionOrb EXT, Gesamtlänge 4 m
EXT befestigt werden, um den MotionOrb
MotionOrb EXT für die Anzahl der angebrachten Lichterketten.
Um die MotionOrb EXT-Länge zu konfigurieren, gehen Sie wie folgt vor:
1. Betätigen Sie wiederholt <MENU, bis Length auf der Anzeige angezeigt
wird.
2. Betätigen Sie <ENTER>. Auf der Anzeige wird die Option „Length“
angezeigt (2M, 3M, 4M).
3. Betätigen Sie <UP> oder <DOWN>, bis auf der Anzeige die gewünschte
Länge angezeigt wird..
4. Betätigen Sie <ENTER>.
5. Betätigen Sie <MENU>. Die gewünschten Längenstopps werden auf der
Anzeige angezeigt.
Der MotionOrb funktioniert nur dann einwandfrei, wenn die
Längeneinstellung mit der Gesamtlänge der installierten MotionOrbLichterketten übereinstimmt. Wenn der MotionOrb zum Beispiel auf 4 m
eingestellt ist, die Länge aber nur 2 m beträgt, werden die Effekt-Makros
nicht richtig angezeigt und die Pixel-Zuordnung funktioniert nicht.
Längeneinstellung
2M
21
Page 22

MotionOrb™ EXT SAL DE
Eigenschaften der
Für jede Länge des MotionOrb sind unterschiedliche DMX-Eigenschaften der
Eigenschaften
Insgesamt Orbs pro Lichterkette
2M-Modus – MotionOrb mit insgesamt 11 Orbs pro Lichterkette
Lichterkette; keine Verlängerungen)
3M-Modus – MotionOrb mit Verlängerungen für insgesamt 16 Orbs
Verlängerung und eine untere Orb-Lichterkette)
4M-Modus – MotionOrb mit Verlängerungen für insgesamt 21 Orbs
Verlängerungen und eine untere Orb-Lichterkette)
Zum Aktivieren des DMX-Modus und Auswählen der DMX-Eigenschaft gehen
Pixel-Zuordnung
Pixel-Zuordnung vorhanden, wie unten aufgeführt.
DMX_165CH
DMX_240CH
DMX_315CH
(eine standardmäßige Orb-Lichterkette und eine untere Orb-
pro Lichterkette (eine standardmäßige Orb-Lichterkette plus eine
pro Lichterkette (eine standardmäßige Orb-Lichterkette plus zwei
Weil der MotionOrb EXT nicht mit der DMX-Eigenschaft DMX_165CH
verwendet wird, ist diese Darstellung der Pixel-Zuordnung nicht in den
folgenden Abschnitten abgebildet.
Sie wie folgt vor:
1. Drücken Sie auf <MENU>, bis auf der Anzeige Dmx angezeigt wird.
2. Drücken Sie auf <ENTER>, bis in der oberen Zeile der Anzeige DMX
Mode angezeigt wird.
3. Drücken Sie auf <UP> und <DOWN>, bis in der unteren Zeile der Anzeige
der gewünschte DMX-Modus angezeigt wird.
4. Betätigen Sie <ENTER>. Dmx wird angezeigt.
Im Pixel-Zuordnungs-Modus gibt es für jedes Orb eine eindeutige DMX-Adresse.
In den Diagrammen auf den nächsten Seiten werden diese DMX-Adressen
angezeigt.
Die Längeneinstellung muss exakt eingestellt sein, damit die PixelZuordnung funktioniert. Eine Anleitung zum Einstellen der Länge finden Sie
im Abschnitt Optionen der Längeneinstellung.
22
Page 23

MotionOrb™ EXT SAL DE
Darstellung der
Pixel-Zuordnung
DMX_240
23
Page 24

MotionOrb™ EXT SAL DE
Darstellung der
Pixel-Zuordnung
DMX_315
.
24
Page 25

MotionOrb™ EXT QRG IT
Informazioni sulla
La Guida Rapida di MotionOrb EXT contiene le informazioni di base sul
o sul prodotto
dal sito Web
Esclusione di
Responsabilità
Le informazioni e le specifiche contenute in questa guida possono essere
Note di Sicurezza
Le seguenti Note di Sicurezza includono informazioni importanti circa il
• L'apparecchiatura non è progettata per installazione permanente.
Contatti
• Per richiedere assistenza o restituire il prodotto, al di fuori di Stati Uniti,
Che Cosa è
Incluso
• 5 strisce MotionOrb™
• Guida Rapida
Per Iniziare
ricevuto tutti i
Se l'imballo o i materiali al suo interno appaiono danneggiati o in cattive
. La
, o la mancata disponibilità di
tutti i colli da ispezionare, possono invalidare la richiesta di indennizzo in
Per altri problemi quali componenti o parti mancanti, danni non correlati al
ntro sette (7) giorni
Descrizione
MotionOrb EXT è un pacchetto di 5 stringhe MotionOrb standard utilizzate per
Guida
prodotto. Per maggiori informazioni su MotionOrb EXT
capostipite, MotionOrb, scaricare il Manuale Utente MotionOrb
CHAUVET: http://www.chauvetlighting.com/product-manuals-literature/.
modificate senza preavviso.
montaggio, l'uso e la manutenzione.
• Utilizzare l'unità solo in interni.
• Non esporre l'unità alla pioggia o all'umidità.
• Tenere l'unità lontano da materiali infiammabili.
• In caso di gravi problemi di funzionamento sospendere immediatamente
l'utilizzo.
• Non tentare di riparare l'unità. Interventi eseguiti da personale non
specializzato possono causare danni o malfunzionamenti.
• In caso di necessità di riparazioni, rivolgersi al centro di assistenza tecnica
più vicino.
Regno Unito, Irlanda o Messico contattare il distributore locale
• All'interno di Stati Uniti, Regno Unito o Messico, utilizzare le informazioni
riportate in Contact Us (contatti) alla fine della presente Guida Rapida.
• Scheda di garanzia
Disimballare con attenzione MotionOrb EXT, accertarsi di aver
componenti e che questi siano integri.
condizioni, notificarlo immediatamente al trasportatore, non a CHAUVET
mancata tempestiva segnalazione al trasportatore
garanzia.
trasporto o danni occulti, presentare reclamo a CHAUVET e
dal ricevimento della merce. Per informazioni su come contattare CHAUVET,
fare riferimento alla sezione Contact Us (contatti) di questa Guida Rapida.
allungare MotionOrb di CHAUVET.
È possibile allungare MotionOrb fino ad includere 2 MotionOrb EXT.
25
Page 26

MotionOrb™ EXT QRG IT
Installazione
Le strisce orb MotionOrb EXT si collegano alla barra superiore di MotionOrb.
vengono collegate a quelle
MotionOrb non riconoscerà MotionOrb EXT fino a quando non sarà stata
Passaggio 2
barra superiore
Passaggio 3
a MotionOrb EXT
strisce Orb standard
dalla barra superiore
Successivamente le strisce Orb standard di MotionOrb
di MotionOrb EXT.
Per installare MotionOrb EXT, effettuare quanto segue:
1. Scollegare le strisce orb standard dalla barra superiore.
2. Fissare le strisce MotionOrb EXT direttamente alla barra superiore
utilizzando il connettore femmina delle strisce.
3. Fissare le strisce orb standard alle strisce di prolunga utilizzando il connettore
maschio di queste ultime e il connettore femmina delle strisce standard.
4. Fissare ciascuna striscia orb inferiore alle strisce standard utilizzando il
connettore maschio di queste ultime e il connettore femmina delle strisce
inferiori.
5. Assicurarsi di serrare a mano tutti i collegamenti.
6. Impostare la lunghezza (Length) su MotionOrb. Per maggiori informazioni,
fare riferimento a Impostazione della Lunghezza.
7. Confermare le impostazioni effettuando un test di MotionOrb.
impostata la lunghezza (Length).
Passaggio 1
Scollegamento
Schema di
Installazione
Passaggio 4
Fissaggio strisce inferiori
alla parte inferiore
MotionOrb
Fissaggio MotionOrb EXT
Inserimento strisce nella
Fissaggio strisce standard
MotionOrb
Gli anelli sono
sempre in basso
26
Page 27

MotionOrb™ EXT QRG IT
Impostazione
MotionOrb viene fornito in lunghezze standard di 2 metri, ma è possibile
in una unità di 4 metri.
consente
MotionOrb funziona correttamente solo se le impostazioni di lunghezza
Opzioni di
Impostazione della
Le opzioni di impostazione lunghezza (Length) nel menù MotionOrb sono:
Opzioni
Estensioni Richieste/Lunghezza Totale
2M
Per MotionOrb standard senza prolunghe, 2 m di lunghezza totale
3M
Per un ulteriore MotionOrb EXT, 3 m di lunghezza totale
4M
Per due ulteriori MotionOrb EXT, 4 m di lunghezza totale
Funzioni della
Esiste una diversa funzione DMX di mappatura pixel per ciascuna lunghezza di
Personalità
Totale Orbs Per Striscia
Modalità 2M - MotionOrb con un totale di 11 orb per striscia
prolunga)
Modalità 3M - MotionOrb con prolunghe per un totale di 16 orb per
in basso)
Modalità 4M - MotionOrb con prolunghe per un totale di 21 orb per
orb in basso)
Per attivare la modalità DMX e selezionare la funzione DMX, effettuare quanto segue:
In modalità mappatura pixel esiste un solo indirizzo DMX per ogni orb. Tali indirizzi
della Lunghezza
Lunghezza
Mappatura Pixel
aggiungere MotionOrb™ EXT per trasformare MotionOrb
Ogni prolunga è di un metro. L'impostazione della lunghezza (Length)
di configurare MotionOrb EXT in base al numero di strisce collegate.
Per configurare la lunghezza di MotionOrb EXT, effettuare quanto segue:
1. Premere ripetutamente <MENU> fino a visualizzare sul display Length
(lunghezza).
2. Premere <ENTER>. Sul display viene visualizzata un'opzione di lunghezza
(2M, 3M, 4M).
3. Premere <UP> oppure <DOWN> fino a visualizzare la lunghezza desiderata.
4. Premere <ENTER>.
5. Premere <MENU>. La lunghezza selezionata non compare più sul display.
concordano con la lunghezza totale delle strisce orb installate. Per esempio,
se MotionOrb è impostato su 4M, ma la lunghezza è solo due metri, le macro
effetti non verranno visualizzate correttamente e la mappatura pixel non
funzionerà.
MotionOrb; queste funzioni sono elencate di seguito.
DMX_165CH
DMX_240CH
(una striscia orb standard e una striscia orb in basso; nessuna
striscia (una striscia orb standard più una prolunga e una striscia orb
DMX_315CH
striscia (una striscia orb standard più due prolunghe e una striscia
Dato che MotionOrb EXT non viene utilizzato con la funzione DMX_165CH,
questo schema di mappatura pixel non viene mostrato nelle sezioni che
seguono.
1. Premere <MENU> fino a visualizzare sul display Dmx.
2. Premere <ENTER> fino a visualizzare sulla linea in alto nel display DMX Mode.
3. Utilizzare <UP> e <DOWN> fino a visualizzare la modalità DMX desiderata
sulla linea in basso nel display.
4. Premere <ENTER>. Sul display viene visualizzato Dmx.
vengono mostrati negli schemi delle pagine seguenti.
Affinché la mappatura pixel funzioni, è necessario impostare correttamente
la lunghezza (Length). Per le istruzioni al riguardo, fare riferimento a
Impostazione della Lunghezza.
27
Page 28

MotionOrb™ EXT QRG IT
Schema Mappatura
Pixel
DMX_240
28
Page 29

MotionOrb™ EXT QRG IT
Schema Mappatura
Pixel
DMX_315
.
29
Page 30

MotionOrb™ EXT QRG Multi-Language
Contact
WORLD HEADQUARTERS
General Information
Technical Support
www.chauvetlighting.com
EUROPE
Address: Stokstraat 18
Voice: +32 9 388 93 97
Technical Support
http://www.chauvetlighting.eu
General Information
Fax: +44 (0)1773 511110
Technical Support
MEXICO
General Information
Voice: +52 (728) 690-2010
Technical Support
www.chauvet.com.mx
Outside the U.S., United Kingdom, Ireland, or Mexico, contact the dealer of record and follow
website for contact
information.
MotionOrb EXT QRG Rev. 3 ML
Us
Address: 5200 NW 108th Avenue
Sunrise, FL 33351
Voice: (954) 577-4455
Fax: (954) 929-5560
Toll free: (800) 762-1084
Voice: (844) 393-7575
Fax: (954) 756-8015
Email:
Chauvetcs@chauvetlighting.com
World Wide Web
9770 Kruishoutem
Belgium
Address: Unit 1C
Brookhill Road Industrial Estate
Pinxton, Nottingham, UK
NG16 6NT
Voice: +44 (0)1773 511115
Address: Av. de las Partidas 34, 3-B
Zona Industrial Lerma
Lerma, Mexico C.P. 52000
their instructions to request support or to return a product. Visit our
Email: eutech@chauvetlighting.com
World Wide Web
Email: uktech@chauvetlighting.com
World Wide Web
www.chauvetlighting.co.uk
Email: servicio@chauvet.com.mx
World Wide Web
© Copyright 2017 CHAUVET
All rights reserved.
Printed in the P. R. C.
30
 Loading...