

Page 1
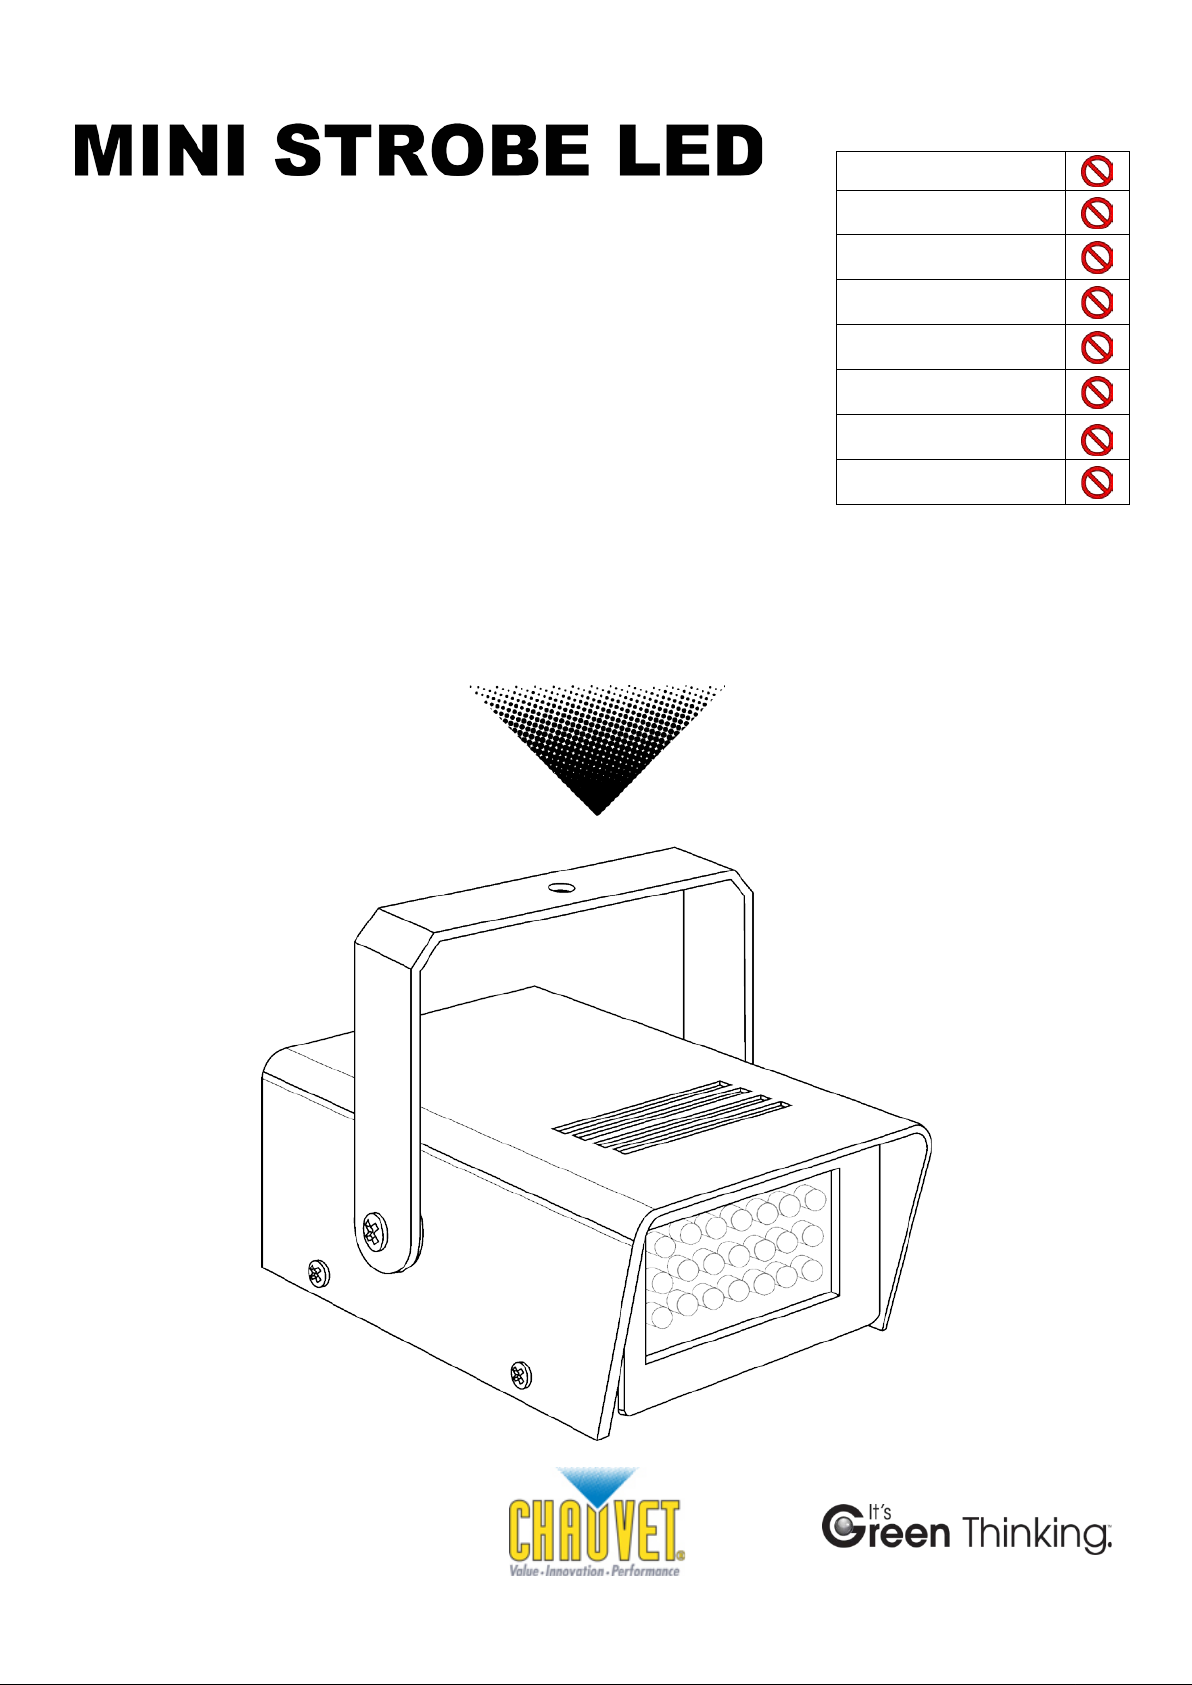
Snapshot
Use on Dimmer
Outdoor Use
Sound-Activated
DMX
Master/Slave
Voltage Switch
Replaceable Fuse
User-Serviceable
User Manual
5200 NW 108th Avenue, Sunrise, FL 33351 U.S.A.
(800) 762-1084 – (954) 577-4455
FAX (954) 929-5560
www.chauvetlighting.com
Page 2

TABLE OF CONTENTS
1. Before You Begin................................................................................................................................. 3
WHAT IS INCLUDED........................................................................................................................................................................... 3
UNPACKING INSTRUCTIONS ................................................................................................................................................................ 3
SAFETY INSTRUCTIONS ..................................................................................................................................................................... 3
2. Introduction ......................................................................................................................................... 4
FEATURES ...................................................................................................................................................................................... 4
PRODUCT OVERVIEW........................................................................................................................................................................ 4
3. Setu p .................................................................................................................................................... 5
AC POWER ..................................................................................................................................................................................... 5
MOUNTING ...................................................................................................................................................................................... 5
Orientation.......................................................................................................................................................................... 5
Rigging ............................................................................................................................................................................... 5
4. Appendix .............................................................................................................................................. 6
GENERAL MAINTENANCE ................................................................................................................................................................... 6
RETURN PROCEDURE ....................................................................................................................................................................... 6
CLAIMS .......................................................................................................................................................................................... 6
TECHNICAL SPECIFICATIONS .............................................................................................................................................................. 7
CONTACT US................................................................................................................................................................................... 7
Mini Strobe LED User Manual 2 Rev. 3
Page 3
1. BEFORE YOU BEGIN
Please read these instructions carefully, which includes important
information about the installation, usage and maintenance of this product.
What is Included
• 1 x Mini S trobe LED
• 1 x Warranty Card
• 1 x User Manual
Unpac ki ng Instru cti ons
Immediately upon receiving a fixture, carefully unpack the carton, check the contents to
ensure that all parts are present, and have been received in good condition. Notify the
shipper immediately and retain packing material for inspection if any parts appear damaged
from shipping or the carton itself shows signs of mishandling. Save the carton and all
packing materials. In the event that a fixture must be returned to the factory, it is important
that the fixture be returned in the original factory box and packing.
Safety Instructions
• Please keep this User Manual for future consultation. If you sell the unit to
another user, be sure that they also receive this instruction booklet.
• Always make sure that you are conn ec ting to the proper voltage, and that the line
voltage you are connecting to is not higher than that stated on the decal or rear
panel of the fixture.
• The unit must be installed in a location with adequate ventilation, at least 20 in
(50 cm) from adjacent surfaces. Be sure that no ventilation slots are blocked.
• Always di sc o nn ec t fr om pow er sour ce before servi ci ng or replacing lamp or fuse
and be sure to replace with same lamp source.
• Secure fixture to fastening device using a safety chain. Never carry the fixt ur e
solely by its head. Use its carrying handles.
• Maximum ambient temperature (Ta) is 104° F (40° C). Do not oper a te fixture at
temperatures higher than thi s .
• In the event of a serious operating problem, stop using the unit immediately.
Never try to repair the unit by yourself. Repairs carried out by unskilled people
can lead to damage or malfunction. Please contact the nearest authorized
technical as si s t ance center .
• Never c on nect the devic e t o a dim m er pac k.
• Make sure the power cord is never crimped or da m age d.
• Never disconnect the power cord by pulling or tugging on the cord.
• Avoid direct eye exposure to the light sourc e while it is on.
There are no user serviceable parts inside the unit. Do not open the housing or
attempt any repairs yourself. In the unlikely event your unit may require service,
please contact CHAUVET® at: 954-577-4455.
Mini Strobe LED User Manual 3 Rev. 3
Page 4

2. INTRODUCTION
Strobe Out put
Hanging Bracket
Power In
Strobe Sp ee d
Adjustment Knob
Features
• Ready to go out of the box
• Manually adjustable strobe rate
Product Overview
Mini Strobe LED User Manual 4 Rev. 3
Turn the strobe speed adjustment knob clockwise to increase the strobe speed.
Turning the speed adjustment fully counter-clockwise does NOT turn off the fixture. It
turns it to the l o we st setting. I t i s NOT possible to turn the strobe OFF when plugged
into power.
Page 5

3. SETUP
Hanging Clamp
AC Power
To determine the power requirements for a particular fixture, see the label affixed to the
back plate of the fixtur e or re fer to the fixture’s specifications chart. All fixtures must be
powered directly off a switched circuit and cannot be run off a rheostat (variable resistor)
or dimmer circuit, even if the rheostat or dimmer channel is used solely for a 0–100%
switch. Before applying power t o a fixture, check that the source voltage matches the
fixture’s requirement.
All fixtures must be connected to circuits with a suitable Earth Ground.
Mounting
Orientation
This fixture may be mounted in any safe position.
Rigging
The fixture includes a mounting yoke to which a rigging clamp can be attached.
You must make sure the clamp is capable of supporting the weight of this fixture.
You can order “C” and “O” clamps from any CHAUVET® dealer or dist r ibutor
(CLP-02, CLP-10 recommended).
There are 2 types of mounting options for this fixture: floor stand for up
lighting, and overhead use for down lighting. You must use at least one (1)
safety cable/chain for each fixture in addition to the mounting clamp.
If hanging the fixture for overhead use, please follow the steps below.
1. Block access bel ow th e wor k ar e a and use a suitable and stable platform
when installing or servicing fixture.
2. Safety cables must always be used. The safety cable must be capable of
holding 10 times the weight of the fixture.
3. Verify the structure can hold 10 times the weight of all to-be installed fixtures.
Sold separately
Hanging clamp sold separately.
Mini Strobe LED User Manual 5 Rev. 3
Page 6

4. APPENDIX
General Maintenance
To maintain optimum performance and minimize wear fixt ur es should be cleaned at least twice a
month frequentl y . Usage and env ironment are contributing factors in determining frequency. Dust
build-up reduces li ght output performanc e and can cause ov er heating, leading to reduced lamp
life and increased m ec hanic al wear. B e sure t o power off fixture before conducting maintenance.
Unplug fixtur e from power. Use a vacuum or air compressor and a soft brush to remov e dust
collected on external vents and internal components. Clean all glass when the fixture is cold with
a mild solution of gl ass cleaner or Isopropyl Alcohol and a soft lint free cotton cloth or lens tissue.
Apply solution to the cloth or tissue and drag dirt and grim e to t he outside of the lens. G ently
polish optical surfaces until they are free of haze and lint .
The cleaning of internal and external opti c al lenses and/or mi r r or s must be car ri ed out periodically
to optimize li ght out put. Cleaning frequency depends on the environment in which the fixt ur e
operates: damp, smoky or parti c ular ly dirty surrounding can cause greater ac c um ulation of dirt on
the unit’s optics. Clean with soft cloth using normal glass cleaning fluid. Always dry the parts
carefully. Clean the external optics at least ev er y 20 days. Cl ean the internal optics at least ev er y
30/60 days.
Return Procedure
Returned merc handise must be sent prepaid and in the ori ginal pac k ing, call tags will not be
issued. Package must be cl ear ly labeled with a Return Merchandise Aut hor ization Number (RMA
#). Products ret ur ned without an RMA # will be refused.
Call CHAUVET® and request an RMA # prior to shipping the fixture. Be prepar ed to prov ide the
model number, serial number and a brief descripti on of the cause f or the r eturn. Be sure to
properly pack fixture, any shipping damage r esul ting from inadequate packagi ng is the
customer’s responsibi lity. FedEx packi ng or double-boxing are recommended.
CHAUVET® reserves the ri ght to use its own discretion to repair or repl ac e pr oduc t(s).
Note: If you are given an RMA #, please include the following information on a piece of
Claims
Damage incurred in shipping is the responsibili ty of the shipper; therefore t he dam age m ust be
reported to the carrier upon receipt of merchandise. It is the customer's responsibility to notify and
submit claim s with the shipper in the event that a fixture is damaged due to shipping. Any other
claim for items such as missing component/part, dam age not related to shipping, and conc ealed
damage, must be made within seven (7) days of receiving merchandise.
paper inside the box:
1) Your name
2) Your address
3) Your phone number
4) RMA #
5) A brief descripti on of t he symptoms
Mini Strobe LED User Manual 6 Rev. 3
Page 7

Technical Specifications
WEIGHT & DIMENSIONS
Length ............................................................................................................................. 5.1 in (130 mm)
Width .................................................................................................................................. 4 in (102 mm)
Height ................................................................................................................................ 3.7 in (95 mm)
Weight .............................................................................................................................. 0.5 lbs (0.2 kg)
POWER
Non-switchable ................................................................................. 120 VAC, 60 Hz or 230 VAC, 50 Hz
Power consumption @ 120 V, 60 Hz .............................................................. 12 W (0.1 A), <0.1 A inrush
Power consumption @ 230 V, 50 Hz .............................................................. 12 W (0. 1 A), <0.1 A inrush
LIGHT SOURCE
LED ......................................................................................................................21 (white) 100,000 hrs.
THERMAL
Maximum ambient temperature .......................................................................................... 104° F (40° C)
ORDERING INFORMATION
Mini Strobe LED ........................................................................................................... MINISTROBELED
WARRANTY INFORMATION
Warranty ............................................................................................................... 1-year limited warranty
Contact Us
World Wide
General Informatio n CHAUVET®
5200 NW 108th Avenue
Sunrise, FL 33351
voice: 954.577.4455
fax: 954.929.5560
toll free: 800.762.1084
Technical Support CHAUVET®
5200 NW 108th Avenue
Sunrise, FL 33351
voice: 954.577.4455 (Press 4)
fax: 954.929.5560 (Attention: Service)
World Wide We b www.chauvetlighting.com
Mini Strobe LED User Manual 7 Rev. 3
 Loading...