

Page 1
Quick Reference Guide
Page 2
Mega Trix™ QRG EN
About This
Guide
Read ALL the disclaimers and Safety Notes in this document as well as those in the
These Safety Notes include important safety information about installation, usage,
• Always connect this product to a grounded circuit to avoid the risk of
Always disconnect from the power source before cleaning this product or replacing
• Do not touch this product’s housing when operating because it may be very hot
• Always make sure that the voltage of the outlet to which you are connecting this
The maximum ambient temperature is 104 °F (40 °C). Do not operate this product
disconnect from power via breaker or by unplugging it.
Contact
Outside the U.S., United Kingdom, Ireland, Mexico, or Benelux contact your
The Mega Tri x™ Quick Reference Guide (QRG) c ontain s the produ ct’s conn ection
and mounting information, as well as the menu options and the DMX values.
Disclaimer
Safety Notes
product’s User Manua l before installing, operating, or maintaining this product.
and maintenance.
electrocution.
•
the fuse.
• Avoid direct eye exposure to the light source while the product is on.
• Make sure the power cord is not crimped or damaged.
• If mounting this product overhead, always secure it to a fastening device using a
safety cable.
• Make sure there ar e no flammable materials cl o se to the unit wh ile operating.
product is within the range stated on the decal or rear panel of the product.
• Thi s product is for indoor use only! (IP20) To prevent risk of fir e or shock, do not
expose this product to rain or moistu re.
• Always install this product in a location with adequate ven tilation, at least 20 in
(50 cm) from adjacent surfaces.
• Be sure that no ventilation slot s on the unit’s housing are blocked.
• Never connect this pro duct to a dimm er.
• Make sure to replace the fuse with the same type and rating.
• Never c arry this product from the power cord or any moving part . Always use th e
hanging/mounting bracket or the handles.
•
at higher temperatures.
• In the event of a serious operating problem, stop using this product immediately.
• Never try to repair this product. Repairs performed by unauthorized technicians
can lead to damage or malfunction. Please contact the nearest authorized technical
assistance center.
• To eliminate wear and improve its lifespan, during periods of non-use completely
distributor to request support or return a product. Visit www.chauvetlighting.com for
contact information.
2
Page 3
Mega Trix™ QRG EN
What Is
Included
Mega Trix™
Warranty Card
Before You
Prior to using your Mega Trix™, ensure that you have received all part s indicated
above in good condition. If the container or material inside appear damaged or show
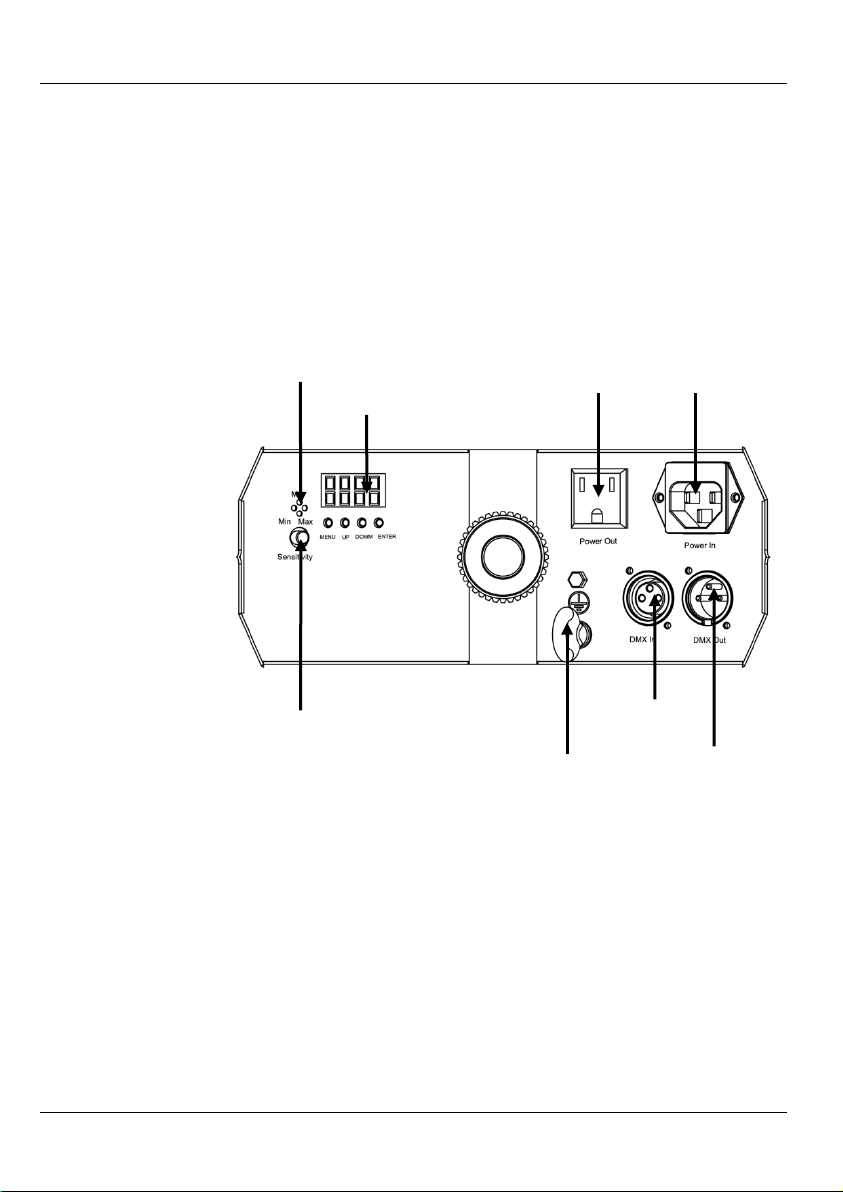
Product
The Mega Trix™ is a lightweight, animated DMX effect light. Super-crisp optics
pod with no
moving parts. Mounting easily to most tripods and speaker stands, the Mega Trix™
LED Display
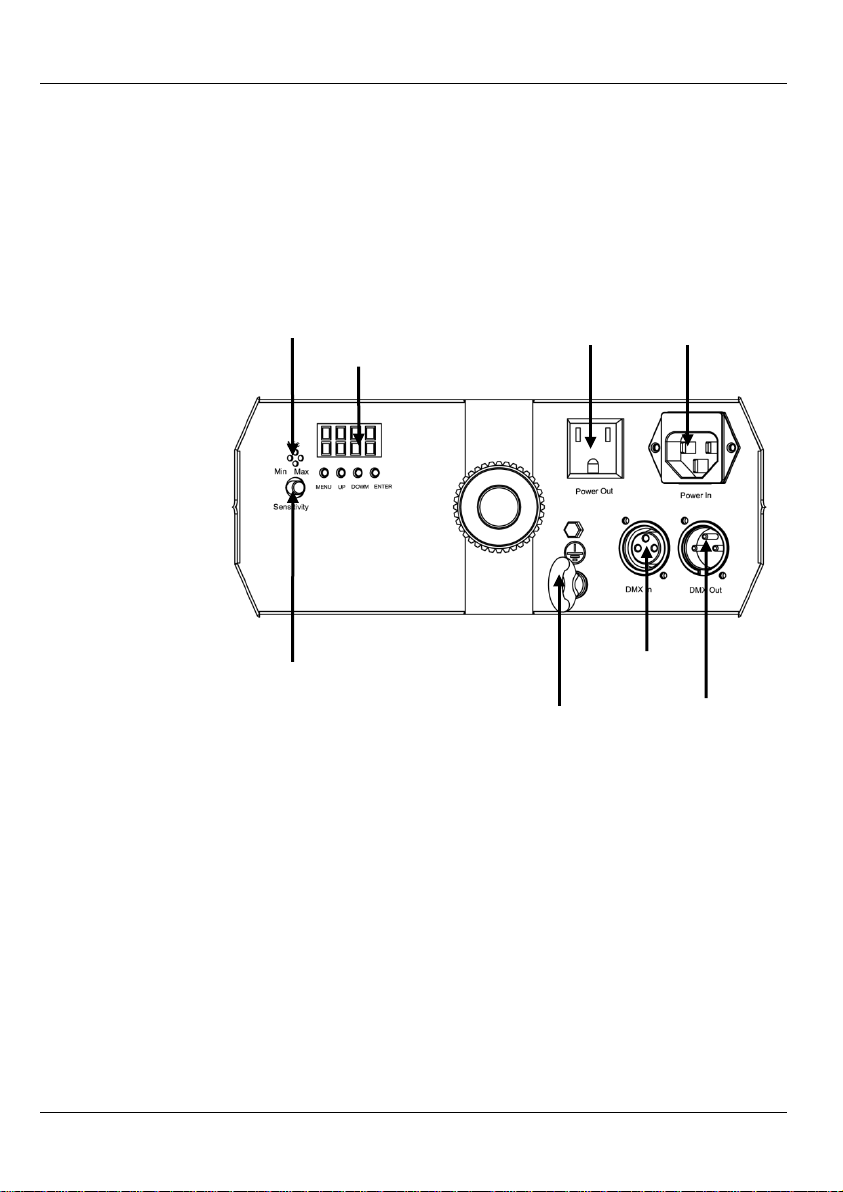
Microphone
Power Out
Power In
Sound Sensitivity Knob
DMX Out
DMX In
Safety Loop
Begin
Description
Product Overview
Power Cord
signs of mishandling, notify the carrier immediately, not Chauvet.
create sharp beams of light with flowing animations from pod-to-
also offers power linking to save time and clutter.
Quick Reference Guide
3
Page 4

Mega Trix™ QRG EN
AC Power
with an input voltage
To eliminate wear and improve its lifespan, during periods of non-use
completely disconnect from power via breaker or by unplugging it.
Power Linking
You can link up to 17 Mega Trix™ units at 120 VAC and 32 units at 230 VAC. You
Fuse Replacement
To replace the fuse in the Mega Trix™, use the following steps:
5. Insert the fuse holder back in place and reconnect p o wer.
DMX Address
d 1
001–512
Sets the DMX starting address
Auto Program
AUTO
Turns on auto program
Program Speed
S--
S 1–S100
Sets auto program speed
Sound Active
SND
Turns on sound active mode
Programming
For details on how to progr am this product, please refer to the product’s User Manual.
Control Panel
Button
Function
<MENU>
Exits from the current menu or function.
Enables the currently displayed menu or sets the currently selected
value into the selected function.
Navigates upwards through the menu list and increases the numeric
value when in a function.
Navigates downwards through the menu list and decreases the
numeric value when in a function.
This product has an auto-ranging power supply that works
range of 100–240 VAC, 50/60 Hz.
should never exceed this number.
1. Disconnect this product from the power outlet.
2. Wedge the tip of a flat head screwdriver into the slot of the fuse holder.
3. Pry the safety cap out of the housing pulling out the installed fuse.
4. Remove the b l own fuse from the safety cap and replace with a fuse of the exact
same type and rating.
Menu Options
Main Level Programming Levels Description
Description
<ENTER>
<UP>
<DOWN>
4
Page 5
Mega Trix™ QRG EN
DMX Linking
The Mega Trix™ can work with a DMX controller when linked using a regular DMX
DMX
The Mega Trix™ uses a regular DMX data connection for its DMX personalities.
chapter to lear n how
chapter to learn i n
Start Address
To ensure fu ll access t o all channel s in each DM X mode, the hi ghest recommen ded
Master/Slave
Connection
The Mega Trix™ uses the DMX data co nnection for its Master/Slave mode.
chapter to lear n how
chapter to lear n
3-CH
Function
Auto Programs
000 ó 249
Select auto program (1–50)
250 ó 255
Sound-Active mode
2
Program Speed
000 ó 255
0–100% (slow to fast)
3
Strobe
000 ó 255
0–100% (slow to fast)
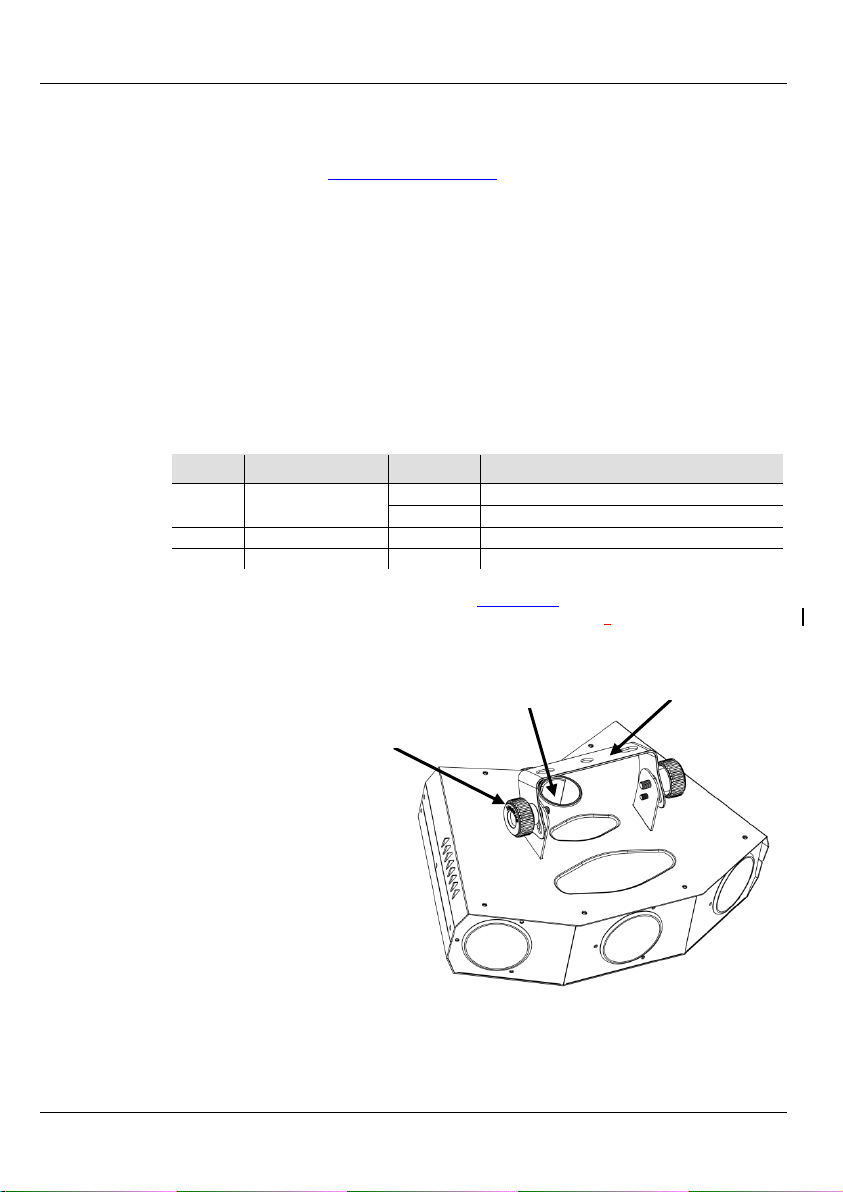
Mounting
Before mounting this product, read the Safety Notes at the beginnin g of this guid e and
Bracket Adjustment Knob
Mounting Bracket
Tripod Mounting Hole
serial con nection.
If you are not familiar with the DMX standard, please download the DMX Primer
document from www.chauvetlighting.com.
DMX Values
Connection
Channel
1
Product
Mounting
Diagram
Download the Mega Trix™ User Manual and refer t o the Setup
to connect this product for DMX operation, and the Operation
detail how to configure this product for DMX operation.
DMX address is 510.
Download the Mega Trix™ User Manual and refer t o the Setup
to connect t his product for Ma ster/ Slave o pera ti on, and th e Operation
in detail how to configure this product for Master/Slave operation.
Value Percent/Setting
in the product’s User Manual. The mounting instructions are provided in the Setup
chapter of t he User Manual.
5
Page 6
Mega Trix™ GRR ES
Acerca de esta
guía
La Guía de referencia rápida (GRR) del Mega Trix™ contiene la información de
Exención de
bilidad
La información y especifica ciones cont enidas en esta GRR están sujet as a cambio sin
Notas de
seguridad
Estas notas de seguridad incluyen información de seguridad importante sobre el
• Co necte siempre este producto a un circuito con toma de tierra para evitar el riesgo
estar muy caliente.
• Asegúrese siempre de que la tensión del enchufe al que conecte este producto está en
técnicos no
Para evitar un desgaste innecesario y alargar su vida útil, desconecte completamente
periodos en que no se use.
Contacto
Fuera de EE. UU., Reino Unido, Irlanda, México o Benelux póngase en contacto con su
ite
conexión y montaje del producto, así como las opciones de menú y los valores DMX.
responsa-
previo aviso.
montaje, uso y mantenimiento.
de electrocución.
• Desconecte siempre de la fuente de alimenta ción antes de limpiar este pr o d ucto o de
sustituir el fusible.
• Evite la exposición directa de los ojos a la fuente de luz mientras es producto esté
encendido.
• Aseg úrese de que el cable de ali mentación no es tá retorcido ni estropeado.
• Si m onta este producto en alto, asegúrelo siempre a un dispositivo de seguridad
usando un ca bl e de seguridad.
• Aseg úrese de que no hay materiales inflamables cerca de la unidad cuando esté en
funcionamiento.
• No toque la carcasa de este produ cto cuando esté en funcionamiento, porque podría
el rango establecido en el grabado o en el panel posterior d el producto.
• ¡Este producto es para uso en interiores solamente! (IP20) Para evitar r iesgos de
incendio o descarga, no exponga este producto a la lluvia o la humedad.
• Inst ale siempre este producto en una ubicación con venti lac ión adecuada, al menos a
20 in (50 cm) de superficies adyacentes.
• Asegúrese de que ninguna ranura de ventilación en la carcasa de la unidad queda
bloqueada.
• Nunca conecte este producto a un atenuador.
• Asegúr ese de sustituir el fusi ble con uno del mismo tipo y cat egoría.
• Nunca arrastre este product o agarrando por el cable de alimentación o por cualquier
parte móvil. Use siempre el so porte de montaje/colgar para el manej o .
• La temperatura ambiente máxima es de 104 °F (40 °C). No haga funcionar este
producto a temperat uras más alt as.
• En caso de un problema grave de funcionamiento, deje de usar este producto
inmediatamente.
• Nunca intente reparar este producto. Las reparaciones llevadas a cabo por
autorizados pueden provocar averías o funcionamiento defectuoso. Póngase en
contacto con el centro de asistencia técnica autorizado más cercano.
•
el producto de la alimentaci ó n mediante el interruptor o desenchufándolo durante
distribuidor para solicitar asistencia o devolver un producto. Vis
www.chauvetlighting.com para información de contacto.
6
Page 7
Mega Trix™ GRR ES
Qué va
incluido
Mega Trix™
Tarjeta d e g arantía
Antes de
Antes de utilizar su Mega Trix™, asegúrese de que ha recibido todas las partes
indicadas arriba en buen estado. Si la caja o los contenidos parecen dañados por el
transporte, o muestran signos de manejo incorrecto, notifíqueselo al transportista
Descripción
El Mega Trix™ es un efec to de lu z DMX an imad o, ligero. La ópt ica de gra n nit idez
crea haces definidos con animaciones que fluyen de unidad a unidad sin partes
Trix™ cuenta también con alimentación en cadena para ahorrar tiempo y
Pantalla LED
Micrófono
Salida de
alimentación
Entrada de
alimentación
Mando de sensibilidad
Salida DMX
Entrada
DMX
Lazo de
seguridad
Cable de alimentación
empezar
inmediatamente, no a Chauvet.
del producto
Visión general del
producto
móviles. Fácil de montar en la mayoría de los trípodes y pies de alta voz, el Mega
complicaciones.
Guía de referencia rápida
7
Page 8
Mega Trix™ GRR ES
Corriente
alterna
Para evitar un desgaste innecesario y alargar su vida útil, desconecte
completamente el producto de la alimentación mediante el interruptor o
Alimentación en
cadena
Para ver el máximo nú mero de unidades Mega Trix™ que se pueden aliment ar en
Sustitución del
Para sustituir el fusible del Mega Trix™, siga estos pasos:
Haga cuña con la punta de un destornillador plano en la ranura del portafusibles.
5. Vuelva a colocar el portafusibles en su sitio y con ecte de nuevo la alimentación.
Dirección DMX
d 1
001–512
Configura la dirección inicial DMX
Programa
automático
Velocidad de
programa
Configura la velocidad del programa
automático
Activo por Sonido
SND
Activa el modo activo por sonido
Programación
Para detalles sobre cóm o se program a este prod ucto, por favor consu lte el Manua l de
Descripción del
<MENU>
Sale del menú o función actual
Habilita el menú actualment e en pantalla o configura el val or
seleccionado actu almente dentro de la función seleccionada
Navega hacia arriba por la lista de menú y aumenta el valor
numérico cuando está en una función.
Navega hacia abajo po r la lista de menú y disminuye el valor
numérico cuando está en una función.
Este producto tiene una fuente de alim entación con detección automática que funciona
con un rango de tensión de entrada de 100–240 VCA, 50/60 Hz.
desenchufándolo durante periodos en que no se use.
cadena a 120 V o a 240 V, consulte el Manual de usuario o la etiqueta del producto.
fusible
1. Desconect e este producto de la toma de corriente.
2.
3. Saque la tapa de seguridad de la carcasa ex trayendo así el fusible instalado.
4. Quite el fusible fundido de la tapa de seguridad y sustituya con otro fusible del
mismo tipo y categoría.
Opciones de menú
Nivel principal Niveles de programación Descripción
AUTO
S-- S 1–S100
usuario del producto.
Botón Función
panel de control
<ENTER>
<UP>
<DOWN>
Activa el programa automático
8
Page 9
Mega Trix™ GRR ES
Enlace DMX
El Mega Trix™ puede funcionar con un controlador DMX cuando se enlaza usando
de
Conexión
El Mega Trix™ usa una conexión de datos DMX normal para sus personalidades
y consulte el capítulo Instalación
para saber cómo conectar este producto para funcionamiento DMX, y el capítulo
para aprender en detalle cómo configurar este producto para
Dirección de
inicio
tal a todos los canales en cada modo DMX, la dirección
Conexión
Maestro/Esclavo
El Mega Tri x™ usa la conexión de datos DMX para su modo Maestro/Esclavo.
y consulte el capítulo Instalación
para saber cómo conectar este producto para funcionamiento Maestro/Esclavo, y el
para aprender en detalle cómo configurar este producto para
3-C
Porcentaje/Configuración
Programas
000 ó 249
Seleccionar programa automático (1-50)
250 ó 255
Modo activo por sonido
Velocidad de
programa
3
Estroboscopio
000 ó 255
0-100% (lento a rápido)
Montaje
Antes de mon tar este p rod uct o, lea las Not as de segu rida d del principio de esta guía y
Mando de ajuste del
soporte
Soporte de montaje
una conexión serie DM X norm al.
Si no está familiarizado con el protocolo DMX, descargue el Manual DMX
www.chauvetlighting.com.
DMX.
DMX
Descargue el Manual de usuario del M ega Trix™
Funcionamiento
funcionamiento DMX.
Para asegurarse acceso to
DMX más recomendable es 510.
Descargue el Manual de usuario del M ega Trix™
capítulo Funcionamiento
funcionamiento Maestro/Esclavo.
Valores DMX
Canal Función Valor
1
automáticos
2
del Manual de usuario d el producto. Las in strucci ones de montaje se p roporcionan en
el capítulo Instalación del Manual de usuario.
Diagrama
de montaje
del producto
9
000 ó 255 0-100% (lento a rápido)
Agujero de montaje
del trípode
Page 10
Mega Trix™ MR FR
À Propos de ce
Manuel
R) du Mega Trix™ reprend les informations de montage et
Clause de Non
Lisez TOUTES les c lauses de non responsabilité ainsi que les consignes de sécurité
reprises dans ce document ainsi que celles dans le manuel d'utilisation de cet appareil
Consignes de
Sécurité
nnent d'importantes informations relatives à la sécurité
• Il est impératif de toujours connecter cet appareil à un ci rcuit relié à la terre afin
Déconnectez toujours de l'alimentation principale avant de procéder à tout entretien
s'avérer brûlant.
• Vei llez toujours à ce que la tension de la prise à l aquelle vous br anchez l'appareil soit
utilisation, pour éviter tout usure inutile et pour prolonger
l'alimentation électrique ou en coup an t le disjoncteur.
Nous contacter
En dehors des États-Unis, du Royaume-Uni, de l'Irlande, du Mexique ou du Benelux,
contactez votre fournisseur si vous avez besoin d'assistance ou pour retourner un
pour obtenir des
Le Manuel de Référence (M
de connexion de cet appareil ainsi que celles d'options de menu et de valeurs DMX.
Responsabilité
avant installation, mise en marche ou maintenance de celui-ci.
Les consign es de sécu rité rep re
lors de l'installation, l'utilisation et la maintenance de cet appareil.
d'éviter tout risque d'électrocution.
•
ou remplac ement le fusib l e.
• Évitez tout contact visuel direct avec la so urce lumineuse quand cet appareil est en
marche
• Assurez-vous que le cordon d'alimentation n' est ni tordu ni e ndo m magé.
• Lorsque vous montez cet appar eil en hauteur, utilisez tou jours un câble de sécurité
pour le sécuriser au dispositif de fixation.
• Ne laissez aucun produit inflammable près de l'appareil lorsque celui-ci fonctionne.
• Ne t o uchez pas le b o î tier de cet appareil lors de son f o nctionnement car il pourrait
comprise dans la plage indiquée sur l'étiquette ou l'arrière de l' appareil.
• Cet appareil do i t être utilisé en intérieur u n iquement ! (IP20). Afin d'éviter tout
risque d'i n cendie ou décharge électri que, veillez à n'exposer cet appareil ni à l a pluie
ni à l'humidité.
• Installez toujours cet appareil dans en endroit bien ventilé, à au moins 20 pouces
(50 cm) des su rfaces adjacentes.
• Assurez-vous qu'aucune fente de ventilation sur le boîtier ne soit obstruée.
• Ne c o nnectez ja mais cet appar eil à un gradateur.
• Vei l lez à remplacer le fusible avec un de même type et même ampérage.
• Ne t ransportez jamais cet appareil par son cordon d'alimentation ou tou te pièce
mobile. Utilisez toujo urs la lyre de suspension ou les poignées.
• La température ambiante maximale supportée par cet appareil est de 104 °F (40 °C).
Ne le faites p as fonctionner à des températures plus élevées.
• En cas de sérieux problèmes de fonctionnement, arrêtez le s ystème immédiatement.
• N'essayez jamais de réparer cet appareil. Toute réparation effectuée par un
technicien non agréé peut entraîner des dommages ou un mauvais fonctionnement d e
votre unit é. Mettez-vous en relation avec le centre d'assistance technique autor isé le
plus près de chez vous.
• Durant les périodes de non-
la durée de vie, déconnectez-entièrement l'appar eil en le débranchant de
appareil. Veuillez cons ulter le si te intern et www.chauvetlighting.com
10
informations pour nous contacter.
Page 11
Mega Trix™ MR FR
Ce qui est
Inclus
Avant de
Avant de met tre en m arche v otre Meg a Trix™ p our la première fois , assurez-vous
ci sont en bon état. Si
l'emballage ou le contenu semble avoir été endommagé ou s'il présente des signes
Description de
Le Mega Trix™ est un systèm e d'éclaira g e l éger à effet s DMX animés. Des optiques
animations flottantes d'unité en unité, sans pièce mobile. Facile à monter sur la
Vue d'Ensemble
Sortie
d'alimentation
Entrée
d'alimentation
Écran LED
Microphone
Molette de sensibilité
au son
Sortie DMX
Entrée DMX
Boucle de
sûreté
Mega Trix™
Cordon d'alimentation
Commencer
l'Appareil
du Produit
d'avoir reçu tous les éléments indiqués et que ceux-
de manipulation sans précaution, veuillez dès réception en notifier immédiatement
le transporteur et non Chauvet.
ultra-précis permettent la projection de faisceaux de lumière bien définis en
majorité des trépieds et pieds d'enceinte, le Mega Trix™ permet également le
montage d'alimentation en chaîne pour un gain de temps et d'espace.
Fiche de garantie
Manuel de référence
11
Page 12
Mega Trix™ MR FR
Alimentation
CA
Durant les périodes de non-utilisation, pour éviter tout usure inutile et pour
prolonger la durée de vie, éteignez complètement l'appareil en le débranchant ou
Connexion
électrique
VCA. Il e st
Remplacement
Pour rempla cer le fusible d u Mega Trix™, suivez les étapes suivantes :
5. Insérez à nouveau le porte -fusible à sa place et rebran chez l'appareil.
DMX Address
d 1
001–512
Configure l'adresse DMX de départ
Auto Program
AUTO
Active le programme automatique
Program Speed
S--
S 1–S100
Configure la vitesse du programme auto
Sound Active
SND
Active le mode musical
Programmation
Pour de plus amples informations sur la manière dont programmer l'appareil, veuillez
Description du
Tableau de
ommandes
<MENU>
Permet la sortie du menu ou de la fonction en cours.
Permet l’affichage du menu en cours ou permet de configur er
la valeur en cours dans la fonction sélectionnée.
Permet de parcouri r les l istes de menu vers le haut, dans une
fonction permet d'augmenter les val eurs numériques.
Permet de parcouri r les l istes de menu vers le bas, dan s une
fonction permet de diminuer les valeurs numériques.
Cet appareil est doté d'une alimentation universelle prenant en charge toute tension
d'entrée c o mprise entre 100 et 240 VCA, 50/60 Hz.
en coupant le disjoncteur.
Vous pouvez connect er jusqu'à 17 Mega Trix™ à 120 VCA et 32 à 230
recommandé de ne jamais dépasser ces indications.
du fusible
1. Débranchez l'appareil de la prise.
2. Insérez et calez la point e d'un tournevis à tête plate dans la fente du porte-fusible.
3. En faisant lev ier, faites sortir de son emplacement le c o uvercle de sécurité, puis
retirez le fusible.
4. Retirez le fusible obsolète du couvercle de sécurit é et remplacez-le par un fusible
équivalent.
Options du Menu
Niveau Principal Niveaux de Programmation Description
C
vous référer au manuel d'utilisation de celui-ci.
Bouton Fonction
<ENTER>
<UP>
<DOWN>
12
Page 13

Mega Trix™ MR FR
Raccordement
Le Mega Trix™ peut fonctionner avec un jeu d'orgues DMX quand raccordé par des
l'introduction au DMX
Connexion DMX
Le Mega Trix™ utilise une connexion de données DMX standard pour ses
et consultez le chapitre
pour découvrir comment connecter cet appareil pour un fonctionnement
pour des instructions détaillées
Adresse de Départ
Afin d'assurer un accès à tous les canaux dans chaque mode DMX, l'adresse DMX la
Connexion
Maître/Esclave
Le Mega Trix™ utilise une connexion de données DMX pour son mode maître/esclave.
et consultez le chapitre
pour découvrir comment connecter cet appareil pour un fonctionnement
pour des instructions
détaillées sur la manière de configurer cet appareil pour un bon fonctionnement
3 canaux
Pourcentage/Configuration
Programmes
000 ó 249
Sélectionnez le programme auto (1 à 50)
250 ó 255
Mode musical
Vitesse du
programme
0 à 100% (lent à rapide)
3
Stroboscope
000 ó 255
0 à 100% (lent à rapide)
Installation
Avant de mont er c et ap pa rei l, veu i lle z li re les consignes de sécurité reprises en début de
ce manuel ainsi que celles du manuel d'utilisation. Les instructions de montage sont
Schéma de
Montage
Molette de réglage de la
lyre
Lyre de suspension
Orifice de montage du
connexions DMX en série.
DMX
Si vous n'êtes pas familier avec le standard DMX, téléchargez
sur www.chauvetlighting.com.
personnalités DMX.
Téléchargez le manuel d'utilisation du Mega Trix™
Configuration
en DMX ; con sul tez en s u i t e le c hapitre Fonctionnement
sur la manière de configurer cet appareil pour un bon fonctionnement DMX.
plus élevée recommandée est 510.
Téléchargez le manuel d'utilisation du Mega Trix™
Configuration
en maître/ esclave ; c onsultez ens uite le cha pitre Fonctionnement
maître/esclave.
Valeurs DMX
Canal Fonction Valeur
1
automatiques
2
reprises d ans le chapitre Configuration du manuel d'utilisation.
de l'Appareil
13
000 ó 255
trépied
Page 14

Mega Trix™ SAL DE
• Schließen Sie dieses Gerät immer an die Masse an, um die Gefahr elektrischer Schläge zu
Versuchen Sie nie selbst, dieses Gerät zu repa rieren. Reparature n müssen von entspreche nd
entweder per Trennschalter oder durch Herausziehen des Steckers aus der Steckdose.
Kontakt
Staaten wen d en s ich
an ihren Lieferanten, um den Kundensupport in Anspruch zu nehmen oder ein Produkt
Über diese
Schnell-
anleitung
Haftungs-
ausschluss
Sicherheitshin
-weise
In der Schnellanleitung des Mega Trix™ finden Sie Informationen zum Anschließen,
der Montage , den Menüoptio nen und DMX-Werten des Geräts.
Die in dieser Anleitung aufgeführten Informationen und Spezifikationen können ohne
vorherige Ankündigung geändert werden.
Diese Sicherheitshinweise enthalten wichtige Informationen über die Montage,
Verwendung und Wartung des Geräts.
vermeiden.
• Trennen Sie das Gerät immer von der Stromquelle, bevor Sie es reinigen oder die
Sicherung auswechseln.
• Bei eingesc haltetem Gerät direkten A ugenko ntakt mit der L ichtquelle ver mei den.
• Stellen Sie sicher, dass das Netzkabel nicht gequetscht oder beschädigt ist.
• Sichern Sie bei der Montage des Geräts über Kopf dieses immer mit einem
ordnungsgemäßen Sicherhei tskabel.
• Stellen Sie sicher, dass das Gerät mit einem Sicherheitsabstand zu entzündlichen
Materialien betrieben wird.
• Niemals während des Betriebs das Gehäuse berühren, da dies sehr heiß wird.
• Die Spannung der S chukosteckdose, an die Sie das Gerät anschließen, m uss sich innerhalb
des Spannungsbereiches befinde n, der auf dem Hinweisschild ode r dem rückwärtigen
Bedienfeld des Geräts angegeben ist.
• Dieses Gerät darf nur im Innenbereich verwendet werden. (IP20) Um das Risiko von
Bränden oder elektrischen Schlägen z u vermeiden, dürfen Sie das Gerät nicht Regen oder
Feuchtigkeit aussetzen.
• Installieren Sie das Gerät immer an einem Ort mit ausreichender Belüftung und mit einem
Abstand von 50 cm zu den angrenzenden Oberflächen.
• Stellen Sie sicher, dass die Lüftungsöff nungen im Gehäuse des Geräts nicht verschlossen
sind.
• Schließen Sie dieses Gerät niemals an einen Dimmer an.
• Achten Sie beim Ausw echseln der Sicherung darauf, den gleic hen Typ mit den gleichen
Werten zu verwenden.
• Tragen Sie das Gerät niemals am Netzkabel oder einem beweglichen Geräteteil. Das Gerät
nur an den Hänge-/Befe stigungsbügel n oder Griffen trage n.
• Die maximal zulä ssige Umgebungstem peratur beträgt 40 °C . Nehmen Sie das Gerät nicht
bei höheren Temperaturen in Betrieb.
• Bei ernsthaften Be triebsproblemen sto ppen Sie umgehend die Verw endung dieses Geräts.
•
geschultem Fachpersonal durchgef ührt werden, da sonst Schä den oder Fehlfunktionen
auftreten können. Wenden Sie sich an den nächs ten autorisierte n Technischen Suppor t.
• Um unnötige n Ver schleiß z u verme iden und die L ebens dauer des G eräts z u verl änger n,
trennen Sie während l ängerer Perio den des Nichtgebrauchs das Gerät vom Stromnetz –
Kunden außerhalb der USA, GB, Irland, Mexiko oder der Benelux-
zurückzuschicken. Kontaktinformationen finden Sie unter www.chauvetlighting.com.
14
Page 15

Mega Trix™ SAL DE
Packungs-
inhalt
Mega Trix™™
Garantiekarte
Erste Schritte
Packen Sie Ihren Mega Trix™ aus und überprüfen Sie, ob Sie alle Teile
unbeschädigt erhalten haben. Wenn die Verpackung oder die in der Verpackung
befindlichen Teile beschädigt sind oder Mängel durch nicht einwandfreie
Beschreibung
Der Mega Trix™ ist ein leichter, animierter DMX-Effekt. Extr em scharfe Linsen
erzeugen dünne Lichtstrahlen mit fließenden Animationen von Strahler zu Strahler
anderen Bodenstative und Lautsprecherstative montieren, und mit der Option zur
LED-Anzeige
Mikrofon
Stromausgang
Stromzufuhr
Einstellknopf für
Musikempfindlichkeit
DMX-
Ausgang
DMX-
Eingang
Sicherheitsöse
Netzkabel
Behandlung aufweisen, machen dies umgehend beim Transportunternehmen
geltend, benachrichtigen Sie jedoch n icht Chauvet.
und ohne beweg liche Teile. Der Mega Trix™ lässt s ich bequem auf die meist en
Serienschaltung sparen Sie Zeit und vermeiden Kabelgewirr.
Produktübersicht
Schnellanleitung
15
Page 16

Mega Trix™ SAL DE
Wechselstrom
Um unnötigen Verschleiß zu vermeiden und die Lebensdauer des Geräts zu
gebrauchs das
entweder per Trennschalter oder durch Herausziehen
Serienschaltung
Informationen zur maximalen Anzahl der Mega Trix™-Geräte, die bei 120 V oder
können, finden Sie in der Bedienungsanleitung oder
Auswechseln der
Zum Auswechseln der Sicherung des Mega Trix™ gehen Sie wi e f o l g t vor:
Hebeln Sie die Sicherheitsabdeckung vom Gehäuse weg ab, und nehmen Sie den
Stromnetz an.
DMX-Adresse
d 1
001–512
Stellt die DMX-Startadresse ein
Auto-Programm
AUTO
Schaltet Auto-Programm ein
Programmgesch
windigkeit
Stellt die Ablaufgeschwindigkeit des AutoProgramms ein
Musiksteuerung:
SND
Schaltet den Musiksteuerungs-Modus ein
Programmierung
Details zur Programmierung dieses Geräts finden Sie in der Bedienungsanleitung
Beschreibung des
Taste
Funktion
<MENU>
Damit verlassen Sie das akt uelle Menü oder die Fun kt ion.
Damit wird das aktuell angezeigte Menü aktiviert oder der
aktuell ausgewählte Wert einer Funktion eingestellt.
Damit navigieren Sie sich durch die Menüpunkte nach oben
Funktionen.
Damit navigieren Sie sich durch die Menüpunkte nach unten
Funktionen.
Dieses Gerät verfügt über ein Vorschaltgerät, das automatisch die anliegende
Spannung erkennt, sobald der Netzstecker in di e Schukos teckd ose gesteck t wird, und
kann mit einer Eingangsspannung von 100~240 V AC, 50/60 Hz arbeiten.
verlängern, trennen Sie während längerer Perioden des Nicht
Gerät vom Stromnetz –
des Steckers aus der Steckdose.
der Geräte
Sicherung
240 V in Seri e gesc ha ltet werd en
auf dem Ty penschild am Ge r ät.
1. Trennen Sie das Gerät vom St r o mnetz.
2. Klemmen Sie d ie Spitze ein es Flachkopfschraubendrehers in den Schlitz des
Sicherungshalters.
3.
Sicherhei tshalter heraus.
4. Entfernen Sie die durchgebrannte Sicherung, und ersetzen Sie diese durch eine
Sicherung de s gleichen Typs und mit den gleichen Werten.
5. Setzen Sie d ie Sicherung wieder ein, und schließen Si e d as Gerät an das
Menüoptionen
Hauptebene Programmierebenen Beschreibung
S-- S 1–S100
Bedienfeldes
dieses Produkts.
<ENTER>
<UP>
<DOWN>
und erhöhen den numerischen Wert der entsprechenden
und verringern den numerischen Wert der entsprechenden
16
Page 17

Mega Trix™ SAL DE
DMX-
Controller betrieben werden, wenn eine
Eine
DMX-Anschluss
Der Mega Trix ™ n ut zt zu r Steu eru ng sei ner D MX-Eigenschaften eine konventionelle
herunter und lesen Sie das Kapitel
Betrieb
Startadresse
Modus zu
Master/Slave-
Schaltung
Der Mega Trix™ verwendet für seinen Master/Slave-Modus eine DMX-
herunter und lesen Sie das Kapitel
Betrieb
3 Kanäle
Prozent/Einstellung
Wählt die Geschwindigkeit des AutoProgramms aus (1-50)
250 ó 255
Musiksteuerungs-Modus
Programmgeschwi
ndigkeit
0~-100% (von langsam nach schnell)
3
Stroboskop
000 ó 255
0~-100% (von langsam nach schnell)
Montage
Lesen Sie vor der Montage des Geräts die am Beginn dieser Anleitung und in der
Die
Ansicht
Bügeleinstellknopf
Befestigungsbügel
Montagebohrung des
Stativs
Der Mega Trix™ kann mit einem DMX-
Verbindung
DMX-Serienschaltung zum Einsatz kommt.
Wenn Sie mit dem DMX-Standerd nicht vertraut sind, laden Sie DMX -
Einführung unter www.chauvetlighting.com herunter.
DMX-Datenverbindung.
Laden Sie das Mega Trix Benutzerhandbuch
Einrichten des Geräts, um zu erfahren, wie das Gerät für einen DMXangeschlossen wird, und das Kapitel Betrieb, um im Detail zu erfa hren , wie d as Gerä t
für einen DMX-Betrieb konf ig uriert wird.
Um einen vollständigen Zugang zu allen Kanälen in jedem DMXgewährleisten, beträgt die höchst e empfohlene DMX-Adresse 510.
Datenverbindung.
Laden Sie das Mega Trix™ Benutzerhandbuch
Einrichten des Geräts, um zu erfa hren, wie das Ger ät für einen M aster/ Slaveangeschlossen wird, und das Kapitel Betrieb, um im Detail zu erfa hren , wie d as Gerä t
für einen Ma ster/Slave-Betrieb konfiguriert wird.
DMX-Werte
Kanal Funktion Wert
ó 249
1 Auto-Programme
2
Bedienungsanleitung enthaltenen Sicherheitshinweise durch.
Befestigungsanweisungen finden Sie im Kapitel Einrichten der Bedienungsanleitung.
Gerätemontage
17
000
000 ó 255
Page 18

Mega Trix™ GRR PT
Sobre este
guia
O Guia de Referência Rápida (GRR) do Mega Trix™ contém as informações de
Exclusão de
responsabilidade
As informações e especificações contidas neste GRR estão sujeitas a alteração sem
Instruções de
segurança
Estas Instruções de Segurança incluem informações de segurança importantes sobre a
Instale sempre este produto num local com ventilação adequada, a pelo menos 50
Contacto
Fora dos E.U.A., Reino Unido, Irlanda, México ou Benelux, entre em contacto com o
seu distribuidor para solicitar assistência ou devolver um produto. Aceda a
ligação e montagem do produto, assim como as opções do menu e os valores DMX.
aviso prévio.
instalação, utilização e manutenção.
• Ligue sempre este p roduto a um circuito ligado à terra para evitar o risco de
electrocussão.
• Desligue-o sempre da fonte de alimentação an tes da limpeza do produto ou
substituição do fusível.
• Evite a exposição ocular directa à fonte de luz quando o produto está ligado.
• Certifique-se de que o cab o de alimentação n ão está desgas t ado nem danificado.
• Se montar este p r oduto em suspensão, fixe-o sempre através de um dispositivo de
aperto utilizando um cabo de segurança.
• Certifique-se de que não existem materiais inflamáveis junto da uni dade durante o
seu funcionamento.
• Não toque no corpo deste produto du rante o funcionamento porqu e pode estar
muito quente
• Certifique-se de que a tensão da tomada à qual irá ligar este produto deve e star no
intervalo indicado no autocolante ou painel p osterior do produto.
• Este produto destina-se apenas a ser utilizado no int erior! (IP20) Para evitar o risco
de incêndio ou choque eléct r ico, não exponha este produ to à chuva nem humidade.
•
cm (20 pol.) d as superfícies adjacentes .
• Certifique-se de que não estão obstruíd as quaisquer ranhuras de ventilação do
corpo da unidade.
• Nunca ligue este produto a um regulador da intensidade da luz.
• Certifique-se de que substitui o fusí vel por um do mesmo tipo e classificação.
• Nunca transporte este produto segurando no cabo de alimentação ou em qualquer
peça móvel. Utilize sempre as pegas ou suportes de montagem/suspensão.
• A temperatura má xima ambiente é 40 °C (104 °F). Não utilize este produto em
ambientes com temperaturas superiores.
• Em caso de um problem a de funcionamento grave, p are a utilização deste produto
imediatamente.
• Nunca tente reparar este produto. As reparações efectuadas por técnicos não
autorizados podem provocar danos ou avaria. Co ntacte o centro de assistência
técnica au torizado mais próximo.
• Para eliminar desgaste desn ecessário e aumentar a respec tiva vida úti l , durante os
períodos de n ão utilização deve desligar o produto da alimentação através de um
disjuntor o u de s c o nectando-o.
www.chauvetlighting.com para obter informações de contacto.
18
Page 19

Mega Trix™ GRR PT
Conteúdo
Mega Trix™
Cartão de garantia
Antes de
Antes de utilizar o Mega Trix™, certifique-se de que recebeu todas as peças
Descrição do
O Mega Trix™ é uma luz leve com efeitos DMX animados. As ópticas
ipés e suportes
para tripés, o Mega Trix™ também disponibiliza uma interligação de alimentação
Visor LED
Microfone
Saída alim.
Entrada
alim.
Botão de sensibilidade
sonora
Saída DMX
Entrada
DMX
Círculo de
segurança
Cabo de alim entação
começar
produto
Descrição geral do
produto
indicadas acima em boas condições. Se o recipiente ou o respectivo conteúdo
aparentarem estar danificados ou exibirem sinais de desalinhamento, notifique
imediatamente a transpo rtadora e não a Chauvet.
extremament e nítidas criam fei xes de luz precisos c om animações fluidas de pod
para pod sem peças móveis. Instalação simples para a maioria dos tr
para poupar tempo e evitar desordem.
Guia de referência rápida
19
Page 20

Mega Trix™ GRR PT
Alimentação
CA
Para eliminar desgaste desnecessário e aumentar a respectiva vida útil, durante
os períodos de não utilização deve desligar o produto da alimentação através de
Interligação de
Para conhecer o número de máximo de unidades Mega Trix™ que podem estar
ligadas à alimentação a 120 V ou a 240 V, consulte o Manua l do Utilizador ou a
Substituição do
Para substituir um fus ível no Mega Trix™, siga os seguintes passos:
alimentação.
Endereço DMX
d 1
001–512
Define o endereço de arranque de DMX
Programa
automático
Velocidade do
programa
Selecciona a velocidade do programa
automático
Activação de som
SND
Activa o modo de activação de som
Programação
Para obter detalhes sobre como programar este produto, consulte o manual do
Descrição do
painel de
<MENU>
Sai da função ou menu actual.
Activa o menu exibido act ualmente ou define o valor
seleccionado actu almente na função seleccionada.
Desloca-se para cima na lista de menus e aumenta o valor
numérico numa função.
Desloca-se para baixo na lista de menus e diminui o valor
numérico numa função.
Este produto pos sui uma fonte de alim entação de intervalo a utomático que func iona
num intervalo de tensão de entrada de 100 – 240 VCA, 50/60 Hz.
um disjuntor ou desconectando-o.
alimentação
fusível
etiqueta do produto.
1. Desligue este produto da tomada de alimentação.
2. Encaixe a p o nta de uma chave de fendas de cab eça chata na ranhura do suporte
de fusíveis.
3. Retire a tampa de segurança da estrutura removendo o fusível instalado.
4. Retire o fu sível queimado d a tampa de segura nça e substit ua por um fusível com
o mesmo tipo e classificação.
5. Introduza a parte post erior do suporte do fusível no sítio e volte a ligar a
Opções do menu
Nível principal Níveis de programação Descrição
AUTO
S-- S 1–S100
controlo
utilizador do produto.
Botão Função
<ENTER>
Activa o programa automático
<UP>
<DOWN>
20
Page 21

Mega Trix™ GRR PT
Interligação
Ligação
O Mega Trix™ utiliza uma ligação de dados DMX normal para as suas
Configuração
Funcionamento
Endereço inicial
Para garantir um acesso total a todos os canais em cada modo DMX, o endereço
Ligação Principal/
Secundária
O Mega Trix™ utiliza a ligação de dados DMX para o seu modo
para saber como ligar este produto para funcionamento principal/secundário e o
saber pormenorizadamente como configurar este
3 CANAIS
Percentagem/Definição
Selecciona um programa automático
(1-50)
250 ó 255
Modo de activação de som
Velocidade do
programa
0-100% (lento para rápido)
3
Sinal de validação
000 ó 255
0-100% (lento para rápido)
Instalação
no início deste guia e no
manual do utilizador do produto. As instruções de instalação são fornecidas no
Botão de ajuste do suporte
O Mega Trix™ pode traba lhar com um controlador DMX quando se encontra li gado
uma ligação regular da série DMX.
DMX
Se não estiver famili ar iza do c om o modelo DM X, t ra ns fir a o doc um ento DMX Primer
a partir de www.chauvetlighting.com.
personalizações DMX.
DMX
Transfira o Manual do Utilizador do Mega Trix™ e consulte o capítulo
para saber como ligar est e produ to para a operaçã o DMX e o capítu lo
para saber pormenorizadamente como configurar este produto para a op er ação DMX.
DMX mais elevado recomendado é 510.
Principal/Secundário.
Transfira o manual do utilizado r do Mega Trix™ e consu lte o capí tulo Configuração
capítulo Funcionamento para
produto para funcionamento principal/secundário.
Valores DMX
Canal Função Valor
Programas
1
automáticos
2
Diagrama
de instalação
do produto
21
Antes de in stalar este pro duto, leia as No tas de Segurança
capítulo Configuração do manual do utilizador.
000 ó 249
000 ó 255
Orifício de instalação
do tripé
Suporte de montagem
Page 22

Mega Trix™ GR IT
Informazioni
sulla Guida
La Guida Rapida Mega Trix™ contiene informazioni su montaggio, collegamenti,
Esclusione di
responsabilità
Le informazioni e le specifiche contenute in questa guida possono essere modificate
Note di
Sicurezza
l'uso e la
• Per evitare il rischio di folgorazione, collegare sempre ad un circuito dotato di
essere molto caldo.
Contatti
Per richiedere assistenza o restituire l'apparecchiatura, al di fuori di Stati Uniti, Regno
Unito, Irlanda, Messico o Benelux contattare il distributore locale. Per informazioni sui
opzioni menù e valori DMX.
senza preav v iso.
Le Note di Sicurezza includono informazioni importanti circa il montaggio,
manutenzione.
messa a terra.
• Prima di effettuare la p ulizia o sostituire il fusibile, scollegare l'uni tà
dell'alimentazione elettrica.
• Quando l'unità è in funzione, evitare l'esposizione diretta degli occhi all a sorgente
luminosa.
• Assicurarsi che il cavo di alimentazione non sia piegato o danneggiato.
• Quando si monta l'unità in alto, assicurarla ad un dispositivo di bloccaggio
utilizzando un cavo di sicurezza.
• Assicurarsi che non vi sia materiale infiammabile vicino all'unità durante il
funzionamento.
• Non toccare il co n tenitore dell'unità durante il funzionamento perché potrebbe
• Assicurarsi sempre che la tensione di alimentazione della presa alla quale viene
collegata l'unità sia entro il campo specificato sull'etichetta o sul pannello
posteriore.
• Questa apparec chiatura deve essere utilizzata soltanto in interni (IP20)! Per evit are
il rischio di incend io o di folgorazione non esporre l'apparecchiatura alla pioggia o
all'umidità.
• Montare sempre l'unità in posizione ben vent ilata, ad almeno 50 cm. (20") da
qualsiasi superficie.
• Ass icur a r s i che nessuna a pertura di vent i l a z ione dell'uni t à s ia ostruita.
• Non collegare mai ad un dimmer.
• Assicurarsi di sostituire il fusibile con un altro dello stesso tipo e classe.
• Non trasportare mai l'unità t enendola dal cavo di alimenta zione o qualsiasi parte
mobile. Utilizzare sempre la staffa d i montaggio o le maniglie.
• Massima temperatura ambient e ammessa: 40 °C (104 °F). Non utilizzare l'unità a
temperature superiori.
• In caso di gravi p r o blemi di funzio namento sospendere immediatamente l'utilizzo.
• Non tentare di riparare questo prodotto. Riparazioni eseguite da personale non
autorizzato possono creare danni o malfunziona m enti. Contattare il più vicin o
centro autoriz z a to di as sistenza tecnica.
• Per evitarne l'eccessiva usura e migliorarne la durata nel tempo, scollegare l'unità
dalla presa elettrica o disattivare l'alimentazione tramite l'apposito interruttore, se
inutilizzata per lunghi perio di .
contatti, visitare il sito Web www.chauvetlighting.com.
22
Page 23

Mega Trix™ GR IT
Che cosa è
incluso
Mega Trix™
Scheda di garanzia
Prima di
Disimballare Mega Trix™ ed accertarsi di aver ricevuto tutti i componenti integri. Se
l'imballo o i materiali nell'imballo appaiono danneggiati o mostrano segni di
Descrizione
Mega Trix™ è un effetto luce DMX animato e leggero. Le ottiche nitidissime creano
raggi di luce intensa con animazioni che scaturiscono di faretto in faretto senza parti
per altoparlanti, Mega Trix è anche collegabile in cascata consentendo così di
Informazioni
Display aLED
Microfono
Uscita
alimentazione
Ingresso
alimentazione
Manopola sensibilità
sonora
Uscita DMX
Ingresso DMX
Anello di
sicurezza
Cavo di alimentazione
iniziare
del prodotto
generali
maltrattamento notificarlo immediatamente al trasportatore, non a Chauvet.
in movimento. Insta llabile agevolmente su lla maggior parte dei trepp iedi e supporti
risparmiare tempo nella stesura dei cavi e limitarne la confusione.
Guida Rapid a
23
Page 24

Mega Trix™ GR IT
Alimentazione
CA
Questa unità è dotata di alimentatore a commutazione automatica con tensione in
Per evitarne l'eccessiva usura e migliorarne la durata nel tempo, scollegare
l'unità dalla presa elettrica o disattivare l'alimentazione tramite l'apposito
Collegamento
Per il numero massimo di unità collegabili in cascata a 120 V oppure a 240 V, fare
Sostituzione
fusibile
Per la sosti t uzione del fu sibile nell'unità, effettuare i seguenti passaggi:
5. Riposizi onare il portafusibile e ricollegare l'alimentazione elettrica.
Indirizzo DMX
d 1
001–512
Imposta l'indirizzo DMX iniziale
Programma Auto
AUTO
Attiva il programma automatico
Velocità
programma
Sound Active
SND
Attiva la modalità Sound Active
Programmazione
Per i dettagli su come programmare q uesta unità, si prega di fare riferimento al
Descrizione del
pannello di
Pulsante
Funzione
<MENU>
Consente di uscire dal menù o dalla funzione correnti.
Consente di attivare il menù visualizzato o impostare il valore
selezionato nell a fu nzione selezionata.
Consente di spostarsi verso l'alto nell'elenco menù e di
aumentare il valore numerico all'interno di una funzione.
Consente di spostarsi verso il basso nell'elenco menù e di
diminuire il valore numerico all'interno di una funzione.
ingresso di 100–240 V CA, 50/60 Hz.
interruttore, se inutilizzata per lunghi periodi.
riferimento al Manua le Utente o alla targhetta c olloc ata sul prodotto.
1. Scollegare l'unità d al l a pre sa di corrente.
2. Inserire la punta di un giravite a testa piatta nella fessura dell'alloggiamento del
fusibile.
3. Rimuovere il cap pellotto dall'alloggiamento ed estrarre il fusibile.
4. Rimuovere il fusibile bruciato e sostituirlo con uno identico.
Opzioni del Menù
Livello principale Livelli di programmazione Descrizione
S-- S 1–S100
controllo
relativo Manuale Utente.
<ENTER>
<UP>
<DOWN>
Imposta la velocità programma Auto
24
Page 25

Mega Trix™ GR IT
Collegamento
all'indirizzo
Collegamento
Mega Trix™ utilizza una normale connessione dati DMX per le relative funzioni.
per le informazioni su come collegare questa unità per il DMX e al capitolo
Indirizzo iniziale
Per assicurare il completo accesso a tutti i canali in ciascuna modalità DMX,
Collegamento
Master/Slave
rarla per il funzionamento in
3-CH
Canale
Funzione
Valore
Percentuale/Impostazione
Programmi
automatici
000 ó 249
Selezione programma auto (1-50)
250 ó 255
Modalità Attivazione sonora
Velocità
programma
3
Stroboscopio
000 ó 255
0-100% (lento-veloce)
Montaggio
Prima di montare qu es ta unità, leggere le Note di Sicu rezza all'inizio di questa Guida e
Manopola di regolazione staffa
Staffa di montaggio
Foro per il montaggio
Mega Trix™ può funzi onare con un controller DMX quando collegat o tramite una
normale connessione seriale DMX.
DMX
Se non si ha familiarità con lo standard DMX, scaricare DMX Primer
www.chauvetlighting.com.
Scaricare il Manuale Utente Mega Trix™ e fare riferi mento al cap itolo Impostazioni
DMX
Funzionamento per i dettagli su come configurarla per il funzionamento DMX.
l'indirizzo maggiorm ente raccomandato è 510.
In modalità Master/Sl av e, Mega Trix™ utilizza il collegamento dati DMX.
Scaricare il Manuale Utente Mega Trix™ e fare riferi mento al cap itolo Impostazioni
per le informazioni su come collegare questa unità in Master/Slave e al capitolo
Funzionamento per i dettagli su come configu
Master/Slave.
Valori DMX
1
2
nel relativo Manua le Utente. Le ist ruzioni di montaggi o vengono fornite n el capitolo
Impostazioni del Manuale Utente.
Schema di
Montaggio
dell'unità
000 ó 255 0-100% (lento-veloce)
su treppiede
25
Page 26

Mega Trix™ QRG PL
Informacje
dotyczące
instrukcji
Informacje i specyfikacje zawarte w niniejszym dokumencie (QRG) podlegają zmianie
Wskazówki
dotyczące
bezpieczeństwa
• Zawsze należy podłączać produkt do sieci z uziemieniem, aby uniknąć ryzyka
bardzo gorąca.
• Zawsze należy upewnić się, że napięcie, do jakiego podłączane jest urządzenie
poważnych problemów z obsługą należy natychmiast zaprzestać jego
wyeliminuje niepotrzebne zużycie i przedłuży żywotność urządzenia.
Instrukcja obsługi Mega Trix™ Quick Reference Guide (QRG) zawiera wszystkie
podstawowe informacje dotyczące podłączenia i montażu produktu oraz opcje menu
wraz z wartościami DMX.
Oświadczenie
bez powiadomienia.
Informacje dotyczące bezpieczeństwa zawierają ważne informacje związane z
instalacją, użytkowaniem oraz konserwacją.
porażenia prądem.
• Zawsze należy odłączyć zasilanie przed przystąpieniem do czyszczenia urządzenia
lub wymianą bezpiecznika.
• Należy unikać bezpośredniego kontaktu oczu ze źródłem światła w czasie pracy
urządzenia.
• Należy upewnić się, czy kabel zasilający nie jest zagięty lub uszkodzony.
• W przypadku podwieszania urządzenia należy zawsze zabezpieczyć je stosując
linkę zabezpieczającą.
• Należy upewnić się, że w pobliżu pracującego urządzenia nie znajdują się żadne
łatwopalne materiały.
• Nie należy dotykać obudowy urządzenia podczas pracy, ponieważ może ona być
odpowiada temu, które zostało określone na naklejce lub tylnej części produktu.
• Produkt może być używany jedynie w pomieszczeniach! (IP20) Aby uniknąć
ryzyka wystąpienia pożaru lub zwarcia, urządzenia nie należy wystawiać na
działanie deszczu lub wilgoci.
• Produkt należy zawsze instalować w miejscu z odpowiednią wentylacją
przynajmniej 20 cali (50 cm) od przyległych do niego powierzchni.
• Należy upewnić się, że kratki wentylacyjne na obudowie urządzenia nie są
zablokowane.
• Nigdy nie należy podłączać urządzenia do ściemniacza.
• Należy upewnić się, że wymieniany bezpiecznik jest takiego samego typu oraz
posiada identyczną wartość.
• Nigdy nie należy przenosić urządzenia trzymając je za przewód lub inne ruchome
części. Do przenoszenia produktu należy zawsze używać uchwytu montażowego
lub uchwytów do jego przenoszenia.
• Maksymalna temp eratura otoczenia to 40 °C. Nie należy używać produktu w
wyższych temperaturach.
• W przypadku
dalszego użytkowania.
• Nigdy nie należy samodzielnie naprawiać urządzenia. Naprawy przeprowadzone
przez nieprzeszkolone osoby mogą doprowadzić do uszkodzenia produktu lub jego
nieprawidłowego działania. Proszę skontaktować się z najbliższym
autoryzowanym centrum pomocy technicznej.
• Podczas kiedy urządzenie jest nieużywane należy odłączyć je od źródła zasilania
poprzez wyłączenie bezpiecznika lub wyciągnięcia wtyczki z gniazda, co
26
Page 27

Mega Trix™ QRG PL
Kontakt
Poza Stanami Zjednoczonymi, Zjednoczonym Królestwem, Irlandią, Meksykiem oraz
Co wchodzi w
skład zestawu
Mega Trix™
Karta gwarancyjna
Przed
włączeniem
urządzenia
Przed przystąpieniem do użytkowania Mega Trix™ należy upewnić się, że wszystkie
Opis produktu
Mega Trix™ jest bardzo lekką lampą do wyświetlania rozmaitych efektów z obsługą
Wyświetlacz
LED
Mikrofon
Wyjście
zasilania
Wejście
zasilania
Wyjście
DMX
Wejście
DMX
krajami Beneluksu w celu uzyskania pomocy lub zwrotu produktu należy
skontaktować się z dystrybutorem na terenie danego kraju. W celu uzyskania
informacji proszę odwiedzić naszą stronę internetową www.chauvetlighting.com.
Przewód zasilający
dostarczone części są w dobrym stanie. W przypadku, gdy opakowanie lub jego
zawartość noszą ślady uszkodzenia, należy natychmiast poinformować o tym fakcie
Ogólny opis
produktu
dostawcę, a nie firmę Chauvet.
DMX. Niezwykle precyzyjna optyka zapewnia wyświetlanie wyraźnych promieni
światła wraz z płynnymi animacjami z każdej matrycy bez użycia jakichkolwiek
ruchomych części. Bardzo łatwy montaż na większości stojaków, również
kolumnowych. Mega Trix™ oferuje również możliwość połączenia w trybie power-
linking, co istotnie skraca czas instalacji.
Pokretło do regulacji
Instrukcja obsługi
czułości
Pętla
zabezpieczająca
27
Page 28

Mega Trix™ QRG PL
Zasilanie
Podczas kiedy urządzenie jest nieużywane należy odłączyć je od źródła zasilania
Podłączenie
W celu sprawdzenia dokładnej ilości urządzeń Mega Trix™ jakie mogą zostać
połączone przy napięciu zasilającym 120 V lub 240 V, proszę zapoznać się z instrukcją
Wymiana
W przypadku konieczności wymiany bezpiecznika w urządzeniu Mega Trix™ należy
Usunąć przepalony bezpiecznik z zacisku i wymienić na nowy dokładnie o takim
5. Włożyć uchwyt bezpiecznika i ponownie włączyć zasilanie.
G
P
O
Adres DMX
d 1
001–512
Ustalenie adresu początkowego DMX
Program
automatyczny
Prędkość
programów
Ustawienie prędkości programu
automatycznego
Aktywacja
(Sound active)
Programowanie
Szczegółowe informacje dotyczące programowania niniejszego urządzenia znajdują
Opis panelu
Przycisk
Funkcja
<MENU>
Wyjście z bieżącej opcji menu lub funkcji.
Włączenie aktualnie wyświetlanej opcje menu lub ustawienie
aktualnie wybranej wartości dla wybranej funkcji.
Przejście w górę po liście menu oraz zwiększenie wartości
numerycznej w funkcji.
Przejście w dół po liście oraz obniżenie wartość numerycznej w
funkcji.
Produkt posiada automatyczne przełączanie zakresu zasilania, które pozwala na
działanie produktu przy napięciu wejściowym 100-240 VAC, 50/60 Hz.
poprzez wyłączenie bezpiecznika lub wyciągnięcia wtyczki z gniazda, co
wyeliminuje niepotrzebne zużycie i przedłuży żywotność urządzenia.
produktów:
bezpiecznika
Opcje Menu
ŁÓWNY POZIOM
dźwiękiem
obsługi lub etykietą znajdująca się na urządzeniu.
postępować zgodnie z poniższym:
1. Odłączyć urządzenie od gniazda zasilania.
2. Włożyć końcówkę śrubokręta z płaską końcówką do otworu zacisku
bezpiecznika.
3. Podważyć osłonę bezpiecznika znajdującą się na obudowie i wyciągnąć
bezpiecznik.
4.
samym rodzaju i wartości.
OZIOMY PROGRAMOWANIA
AUTO
S-- S 1–S100
SND
się w instrukcji obsługi.
Aktywacja programu automatycznego
Włączenie trybu aktywacji dźwiękiem
PIS
sterowania
<ENTER>
<UP>
<DOWN>
28
Page 29

Mega Trix™ QRG PL
Połączenie
Podłączenie
Urządzenie Mega Trix™ wykorzystuje standardowe połączanie DMX w przypadku
przeczytać,
dowiedzą się Państwo szczegółowo w jaki sposób przeprowadzić
Adres
początkowy
W celu zapewnienia pełnego dostępu do wszystkich kanałów w każdym trybie DMX
Połączenie
Master/Slave
Mega Trix™ wykorzystuje połączenie danych DMX dla trybu Master/Slave.
przeczytać,
3-CH
Procent/Ustawienia
Programy
automatyczne
000 ó 249
Wybór programu automatycznego (1-50)
250 ó 255
Tryb reakcji na dźwięk
Prędkość
programów
3
Strobowanie
000 ó 255
0-100% (od wolnego do szybkiego)
Mega Trix™ może współpracować z kontrolerem DMX, gdy jest podłączony za
pomocą standardowego połączenia szeregowego DMX.
DMX
Jeżeli nie są Państwo zaznajomieni z systemem DMX, proszę pobrać dokument DMX
Primer znajdujący się na stronie www.chauvetlighting.com.
kanałów DMX (persanalities):
DMX
Proszę pobrać Instrukcję Obsługi Mega Trix™ . W rozdzi ale Ustawienia
w jaki sposób należy podłączyć urządzenie, żeby pracowało w trybie DMX, a z
rozdziału Działanie
konfigurację urządzenia do pracy w trybie DMX.
najbardziej zalecanym adresem DMX jest 510.
Proszę pobrać Instrukcję Obsługi Mega Trix™ . W rozdzi ale Ustawienia
w jaki sposób należy podłączyć urządzenie, żeby pracowało w trybie Master/Slave, a
z rozdziału Działanie dowiedzą się Państwo szczegółowo, w jaki sposób
przeprowadzić konfigurację urządzenia do pracy w trybie Master/Slave.
Wartości DMX
Kanał Funkcja Wartość
1
2
29
000 ó 255 0-100% (od wolnego do szybkiego)
Page 30

Mega Trix™ QRG PL
Montaż
Wskazówkami
Rysunek
Otwór do montażu na
Przed przystąpieniem do montażu urządzenia, proszę zapoznać się ze
Bezpieczeństwa znajdującymi się na początku niniejszego dokumentu oraz w
szczegółowej Instrukcji Obsługi. Instrukcje dotyczące montażu zostały opisane w
rozdziale Ustawienia w Instrukcji Obsługi.
montażowy
Gałka do regulacji
wsporników
statywie
Wspornik
30
Page 31

Mega Trix™ BH NL
Over deze
handleiding
De Mega Trix™ Beknopte Handleiding (BH) bevat informatie over zowel de
De informat ie en specific aties in deze BH kunnen zonder v oorafgaande ken nisgeving
Deze veiligheidsinstructies bevatten belangrijke veiligheidsinformatie over de
kan worden.
Installeer dit product op een locatie met voldoende ventilatie, op ten minste 50 cm
ontkoppelen.
Contact
Van buiten de VS, Verenigd Koninkrijk, Ierland, Mexico of Benelux kunt u contact
opnemen met de distributeur of om ondersteuning vragen dan wel het product
aansluitin g en montage van het product, als de menu-opties en de DMX-waarden.
Disclaimer
Veiligheidsinstructies
worden gewijzigd.
installatie, het gebruik en het onderhoud.
• Sluit dit product altijd aan op een geaard circuit om elektrocutierisico's uit te
sluiten.
• Haal altijd de stekker uit het stopcontact voordat u dit product reinigt of voor het
vervangen va n de zekering .
• Ver mi jd dir ecte bloo ts telling van het o o g aan de lichtbro n a l s he t pr o duct in
werking is.
• Zorg ervoor dat het stroomsnoer niet knikt of beschadigd.
• Als dit product boven het hoofd wordt geplaatst, moet u het altijd met een
veiligheidskabel vastmaken aan een bevestigings middel.
• Controleer dat er tijdens gebruik geen ontvlambare materi alen dichtbij de eenheid
staan.
• Raak de behuizing van dit product tijdens gebruik niet aan, omdat het zeer warm
• Controleer altijd of de spanni ng van het stopcontact waar u di t product op aansluit
binnen het bereik is dat staat vermeld op de sticker of h et achterpaneel van het
product.
• Het product is alleen voor gebruik binnenshuis! (IP20) Om risico op brand of
elektris che schokken te voorkomen, mag dit product niet aan regen of vocht
worden blootgesteld.
•
afstand van aangrenzende oppervlakken.
• Zorg ervoor dat er geen ventilat ie-openingen van de behuizing van het product
worden geblokkeerd.
• Sluit dit product nooit aan op een dimmer.
• Zorg ervoor dat de zekering wordt vervangen door een andere van hetzelfde type.
• Draag dit product nooit aan het stroomsnoer of een bewegend onderdeel. Gebruik
altijd de ophang-/montagebeugel o f de hendels.
• De maximale omgevingstemperatuur bedraagt 40 °C. Gebruik dit product niet bij
hogere temperaturen.
• Stop direct met het gebruik van dit product in geval van ernstige
gebruiksproblemen.
• Repareer dit product nooit zelf. Reparaties die worden uitgevoerd door onbevoegde
technici kunnen leiden tot schade of storingen. Neem contact op met het
dichtstbijzijnde bevoegde technische hulpcentrum.
• Om onnodige slijtage te elimineren en zijn levensduur te verlengen, gedurende
perioden wanneer het product niet wordt gebruikt, moet u het product van de
stroom afsluiten door een aardleksch akelaar om te zetten of door het te
retourneren. Ga naar www.chauvetlighting.com voor contactinformatie.
31
Page 32

Mega Trix™ BH NL
Wat is
inbegrepen
Mega Trix™
Garantiekaart
Voordat u
Vóór het gebruik van uw Mega Trix™ moet u ervoor zorgen dat u alle onderdelen
die hierboven zijn aangegeven in goede toestand hebt ontvangen. Als de verpakking
of het materiaal binnenin beschadigd zijn of tekenen van ruwe behandeling vertonen,
Beschrijving
De Mega Trix™ is een lichtgewich t, geanimeerde DMX-eff ectlamp. Superheld ere
pod, zonder
ga Trix™ is eenvoudig te monteren aan de meeste
driepoten en luidsprekerstandaarden en biedt ook power linking om tijd en rommel te
LED-display
Microfoon
Vermogensuitgang
Stroomingang
Geluidsgevoeligheidsknop
DMX-
uitgang
DMX-
ingang
Veiligheidslus
Stroomsnoer
begint
laat dit dan onmiddelli jk weten aan d e vervoerder en n iet aan Chauvet.
optica creër en s ch erpe li ch tbund els met vlo eien de a nimat ies van p od-totbewegende delen. De Me
besparen.
Productoverzicht
Beknopte handleiding
32
Page 33

Mega Trix™ BH NL
AC-stroom
Dit product heeft een voeding met automatisch bereik die werkt met een
Om onnodige slijtage te elimineren en zijn leve nsduur te verlengen, gedurende
perioden wanneer het product niet wordt gebruikt, moet u het product van de
stroom afsluiten door een aardlekschakelaar om te zetten of door het te
Power Linking
Zie de gebruikershandleiding of het etiket op het product voor het maximum aant al te
Vervangen van
Gebruik de volgende stappen voor het vervangen van de zekering in de Mega Trix™:
Druk de beveiligingskap uit de behuizing, waardoor de geplaatste zekering wordt
5. Plaats de zekeringhouder terug en steek de stekker er weer in.
DMX-adres
d 1
001–512
Stelt het DMX-startadres in
Automatisch
programma
Programmasnelh
eid
Geluidsactief
SND
Schakelt de geluidsactieve modus in
Programmeren
Voor meer informatie over hoe dit product moet worden geprogrammeerd, raadpleegt
Beschrijving
<MENU>
Sluit het huidige menu of functie af.
Activeert het huidige getoonde menu of plaatst de huidige
geselecteerde waarde in de geselecteerde functie.
Navigeert omhoog via het menu of verhoogt de numerieke
waarde wanneer in een fu nctie.
Navigeert omlaag via het menu of verlaagt de numerieke
waarde wanneer in een fu nctie.
ingangsspanning van 100–240 VAC, 50/60 Hz.
ontkoppelen.
koppelen Mega Trix™-eenheden (power linking) bij 120 V of 240 V.
de zekering
1. Ontkoppel dit product van het stopcontact.
2. Wig de punt van een platte s chroevendraaier in de sleuf van de zekeringhouder.
3.
uitgetrokken.
4. Verwijder de doorgebrande zekering uit de beveiligi ngskap en verva ng deze
door een zekering van exact hetzelfde type en vermogen.
Menu opties
HOOFDNIVEAU PROGRAMMEERNIVEAUS BESCHRIJVING
AUTO
S-- S 1–S100
u de gebruikershandleiding van het product.
Toets Functie
bedieningspaneel
<ENTER>
<UP>
<DOWN>
Schakelt het automatische programma in
Stelt automatische programmasnelheid in
33
Page 34

Mega Trix™ BH NL
DMX-koppeling
controller werken indien gekoppeld met een
DMX-aansluiting
De Mega Trix™ gebruikt een normale DMX-gegevensverbinding voor zijn DMX-
en raadpleeg het hoofdstuk
bedienig en
voor meer informatie hoe u dit product configureert voor
Startadres
modus te garanderen is het
Master/slave-
verbinding
De Mega Trix™ maakt gebruik van de DMX -dataverbinding voor haar Master-/Slave-
en raadpleeg het hoofdstuk
voor meer informatie hoe u dit product
3-CH
Functie
Automatische
programma's
000 ó 249
Selecteer autoprogramma (1-50)
250 ó 255
Geluidsactieve modus
Programmasnelhei
d
0–100% (langzaam tot snel)
3
Stroboscoop
000 ó 255
0–100% (langzaam tot snel)
Montage
aan het begin van
instructies zijn
Montagediagram van
Instelknop van de beugel
Montagebeugel
Driepootmontagegat
De Mega Trix™ kan met een DMXreguliere DMX seriële verbinding.
Als u niet bekend bent met de DMX-standaard, download dan de DMXbasishandleiding op www.chauvetlighting.com.
persoonlijkheden:
Download de Mega Trix™ gebruikershandleiding
Instellingen om erachter te komen hoe u dit product aansluit voor DMXhet hoofdstuk Bediening
DMX-bediening.
Om volledige toegang tot alle kanalen in elke DMXhoogste aanbevolen DMX-adres voor dit product 510.
modus.
Download de Mega Trix™ gebruikershandleiding
Instellingen om erachter te komen hoe u dit product aansluit voor Master/Slavebedienig en het hoofdstuk Bediening
configureert voor Master/Slave-bediening.
DMX-waarden
Kanaal
1
2
het product
Lees alvorens dit product te monteren alle veiligheidsvoorschriften
deze gids en in de gebruikershandleiding van het product. De montagegegeven in het hoofdstuk Instelling van de gebruikershandleiding.
Waarde Percentage/instelling
000 ó 255
34
Page 35

Mega Trix™ QRG RU
О данном
руководстве
Правовая
оговорка
Информация и спецификации, приведенные в этом руководстве, могут меняться
Замечания по
безопасности
• Подключайте это устройство только к заземленному контуру, чтобы
он может сильно нагреваться.
Краткое руководство (QRG) по Mega Trix™ содержит информацию о
подключении и монтажа устройства, а также настройках меню и значениях DMX.
без уведомления.
Настоящие Замечания по безопасности содержат важную информацию о
безопасности при монтаже, эксплуатации и техническом обслуживании.
избежать риска поражения электрическим током.
• Всегда отключайте устройство от источника питания перед его очисткой или
заменой предохранителя.
• Не смотрите на источник света, когда устройство включено.
• Убедитесь, что провод электропитания не перегнут и не поврежден.
• При монтаже этого устройства сверху всегда закрепляйте продукт на
крепежном устройстве с помощью предохранительного троса.
• Не допускайте размещения рядом с устройством во время работы
воспламеняющихся материалов.
• НЕ прикасайтесь к корпусу этого устройства во время его работы, поскольку
35
Page 36

Mega Trix™ QRG RU
находиться в диапазоне, указанном на наклейке на задней панели устройства.
е 20 дюймов (50 см) от соседних
). Не
ожет
Контакт
За пределами США, Великобритании, Ирландии, Мексики и стран Бенилюкса по
• Напряжение розетки, к которой подключается это устройство, всегда должно
• Данное устройство предназначено только для использования в помещениях
(IP 20)! Чтобы уменьшить риск возгорания и поражения электрическим
током, не подвергайте устройство воздействию дождя или влаги.
• Монтаж устройства должен выполняться только при наличии достаточной
вентиляции на расстоянии не мене
поверхностей.
• Убедитесь, что на корпусе устройства нет заблокированных отверстий.
• Никогда не подключайте это устройство к регулятору яркости.
• Обязательно заменяйте предохранитель на устройство того же типа и
номинала.
• Никогда не перемещайте это устройство за шнур питания или другую
подвижную часть. Пользуйтесь для этого только подвесным/монтажным
кронштейном или ручками.
• Максимальная температура окружающей среды составляет 104 °F (40 °C
допускайте работы этого устройства при высокой температуре.
• В случае серьезного нарушения в работе этого устройства немедленно
прекратите его использование.
• Ни в коем случае не пытайтесь самостоятельно выполнять ремонт этого
устройства. Ремонт, выполненный неуполномоченными техниками, м
привести к повреждениям или сбоям устройства. Обратитесь в ближайший
авторизованный центр технической поддержки.
• Во избежание ненужного износа и для продления срока службы
неиспользуемое устройство следует полностью отключить от питания с
помощью выключателя или путем извлечения вилки из розетки.
вопросам поддержки или возврата устройства обращайтесь к своему
дистрибьютору. Контактная информация приведена на сайте
www.chauvetlighting.com .
36
Page 37

Mega Trix™ QRG RU
Комплект
поставки
Mega Trix™
Гарантийная карта
Перед
началом
работы
™ убедитесь в том, что получены
Описание
Светодиодный
дисплей
Микрофон
Выход
питания
Вход
питания
Ручка регулировки
звуку
Выход
DMX
Вход DMX
Предохранительная
проушина
Шнур питания
Перед использованием устройства Mega Trix
все указанные детали и что они находятся в исправном состоянии. Если
коробка или ее содержимое имеют признаки повреждения или неправильного
обращения, немедленно сообщите об этом не Chauvet, а перевозчику.
Mega Trix™ – это легкий анимированный DMX-спецэффект. Сверхчеткая
продукта
Обзор устройства
оптика создает яркие лучи света с динамичной полномасштабной анимацией.
Mega Trix™ легко монтируется на большинство треножников и штативов
динамиков и предлагает возможность объединенного подключения питания,
что позволяет сэкономить время и избежать беспорядка с проводами.
Краткое руководство
чувствительности к
37
Page 38

Mega Trix™ QRG RU
Питание
переменного
тока
Во избежание ненужного износа и для продления срока службы
Подключение
объединяться при
Замена
Для замены предохранителя в Mega Trix™ выполните следующие шаги:
Извлеките перегоревший предохранитель из предохранительного зажима и
питание.
DMX-адрес
d 1
001~512
Настройка начального адреса DMX
Автопрограмма
AUTO
Включение автопрограммы
Скорость
программы
Звуковая
активация
Программирование
Информацию о программировании этого устройства см. в руководстве
Описание панели
<MENU>
Выход из текущего меню или функции.
Текущее отображаемое меню или настройка текущего
выбранного значения в выбранной функции.
Перемещение вверх по списку меню и увеличение
числового значения при работе.
Перемещение вниз по списку меню и уменьшение
числового значения при работе.
Это устройство имеет функцию автоматического выбора диапазона
электропитания и может работать со входным напряжением в диапазоне 100~240 В пер. т, 50/60 Гц.
неиспользуемое устройство следует полностью отключить от питания с
помощью выключателя или путем извлечения вилки из розетки.
Максимальное число устройств Mega Trix™, которые могут
питания
напряжении 120 или 240 В, см. в Руководстве пользователя или на этикетке на
продукте.
предохранителя
1. Отсоедините это устройство от розетки питания.
2. Вставьте кончик отвертки с плоской головкой в отверстие держателя
предохранителя.
3. Извлеките предохранительный колпачок из корпуса и вытащите
установленный предохранитель.
4.
замените его на предохранитель того же типа и номинала.
5. Повторно вставьте держатель предохранителя и снова подключите
Опции меню
Главный уровень Уровни программирования Описание
S-- S 1-S100
SND
пользователя устройства.
Кнопка Функция
управления
<ENTER>
<UP>
Настройка скорости автопрограмм
Включение режима звуковой активации
<DOWN>
38
Page 39

Mega Trix™ QRG RU
Связь по DMX
при подключении
на
DMX-
соединение
Mega Trix™ использует для своих профилей DMX обычное соединение
ы узнать, как настроить его для
Начальный
адрес
Подключение
/Slave
Устройство Mega Trix™ использует соединение передачи данных DMX для
3-CH
Значение
Процент/уставка
000 ó 249
Выбор автопрограммы (1-50)
250 ó 255
Режим звуковой активации
Скорость
программы
000
0-100% (медленно-быстро)
3
Стробоскоп
000 ó 255
0-100% (медленно-быстро)
Монтаж
Перед монтажом этого устройства прочитайте Замечания по безопасности в
Инструкции
Ручка регулировки
кронштейна
Монтажный
кронштейн
Монтажное отверстие
треножника
Устройство Mega Trix™ может работать с контроллером DMX
с помощью обычного последовательного соединения DMX.
Если вы не знакомы с DMX, загрузите вводное руководство DMX Primer
сайте www.chauvetlighting.com.
передачи данных DMX:
Загрузите Руководство пользователя Mega Trix™ и обратитесь к главе
«Настройка», чтобы узнать, как подключить это устройство для работы в
режиме DMX, и к главе «Эксплуатация», чтоб
работы в режиме DMX.
Для обеспечения полного доступа ко всем каналам в каждом из режимов DMX
максимальный рекомендуемый адрес DMX – 510.
Master
режима Master/Slave.
Загрузите Руководство пользователя Mega Trix™ и обратитесь к главе
«Настройка», чтобы узнать, как подключить это устройство для работы в
режиме Master/Slave, и главе «Эксплуатация», чтобы узнать, как настроить его
для работы в режиме Master/Slave.
Значения DMX
Канал Функция
1 Автопрограммы
2
начале этого руководства и в Руководстве пользователя устройства.
по монтажу приведены в главе «Настройка» Руководства пользователя.
Схема
монтажа
устройства
ó 255
39
Page 40

Mega Trix™ QRG Multi-Language
Contact
WORLD HEADQUARTERS - Chauvet
General Information
Technical Support
www.chauvetlighting.com
UNITED KINGDOM AND IRELAND - Chauvet Europe Ltd.
General Information
Fax: +44 (0)1773 511110
Technical Support
MEXICO - Chauvet Mexico
General Information
Voice: +52 (728) 285-5000
Technical Support
CHAUVET EUROPE - Chauvet Europe BV BA
General Information
Voice: +32 9 388 93 97
Technical Support
www.chauvetlighting.eu
Outside the U.S., United Kingdom, Ireland, Mexico, or Benelux, contact the dealer
. Follow their instructions to request support or to return a product. Visit
our website for contact details.
Us
Address:5200 NW 108th Avenue
Sunrise, FL 33351
Voice: (954) 577-4455
Fax: (954) 929-5560
Toll free:(800) 762-1084
Voice: (954) 577-4455 (Press 4)
Fax: (954) 756-8015
Email: tech@chauvetlighting.com
World Wide Web
Address: Unit 1 C
Brookh ill Road Industrial Estate
Pinxton, Nottingham, UK
NG16 6NT
Voice: +44 (0)1773 511115
Address:Av. Santa Ana 30
Parque Industrial Lerma
Lerma, Mexico C.P. 52000
Address: Stokstraat 18
9770 Kruishoutem
Belgium
Email: uktech@chauvetlighting.com
World Wide Web
www.chauvetlighting.co.uk
Email: servicio@chauvet.com.mx
World Wide Web www.chauvet.com.mx
Email: Eutech@chauvetlighting.eu
World Wide Web
of record
Mega Trix™ QRG Rev. 5 ML9
© Copyright 2015 Chauvet
All rights reserved
Printed in the P. R. C.
40
 Loading...