

Page 1
BEFORE YOU BEGIN:
• The trolley must be in down (closed door) position during assembly
and installation. If you have a completely installed garage door opener,
the rail/opener assembly must be taken down. UP and DOWN Limits must
be readjusted after installation.
• Opener hanging brackets will require repositioning and the addition of an
extra bracket for stability due to increased rail length.
Ten-Foot Rail Extension Kit
Model 7710CB
To prevent possible SERIOUS INJURY or DEATH:
• Disconnect ALL electric and battery power BEFORE performing
ANY service or maintenance.
IF THIS IS A NEW INSTALLATION:
Use the front (header), chain/cable assembly, and longer emergency
release rope in this kit in place of those packaged with your garage door
opener. Add the enclosed center rail as the second rail section, creating a
five piece rail assembly. Complete the assembly, installation, and
adjustment of your opener according to your owner’s manual, with the
exception of adding an additional hanging bracket for stability.
IF THIS IS AN EXISTING INSTALLATION, CONTINUE AS FOLLOWS:
1. Disconnect power to opener.
2. Pull down on the emergency release handle, then disconnect the trolley
from the door arm.
3. Disconnect the rail/opener assembly from the header bracket and
hanging brackets, and place it on the floor.
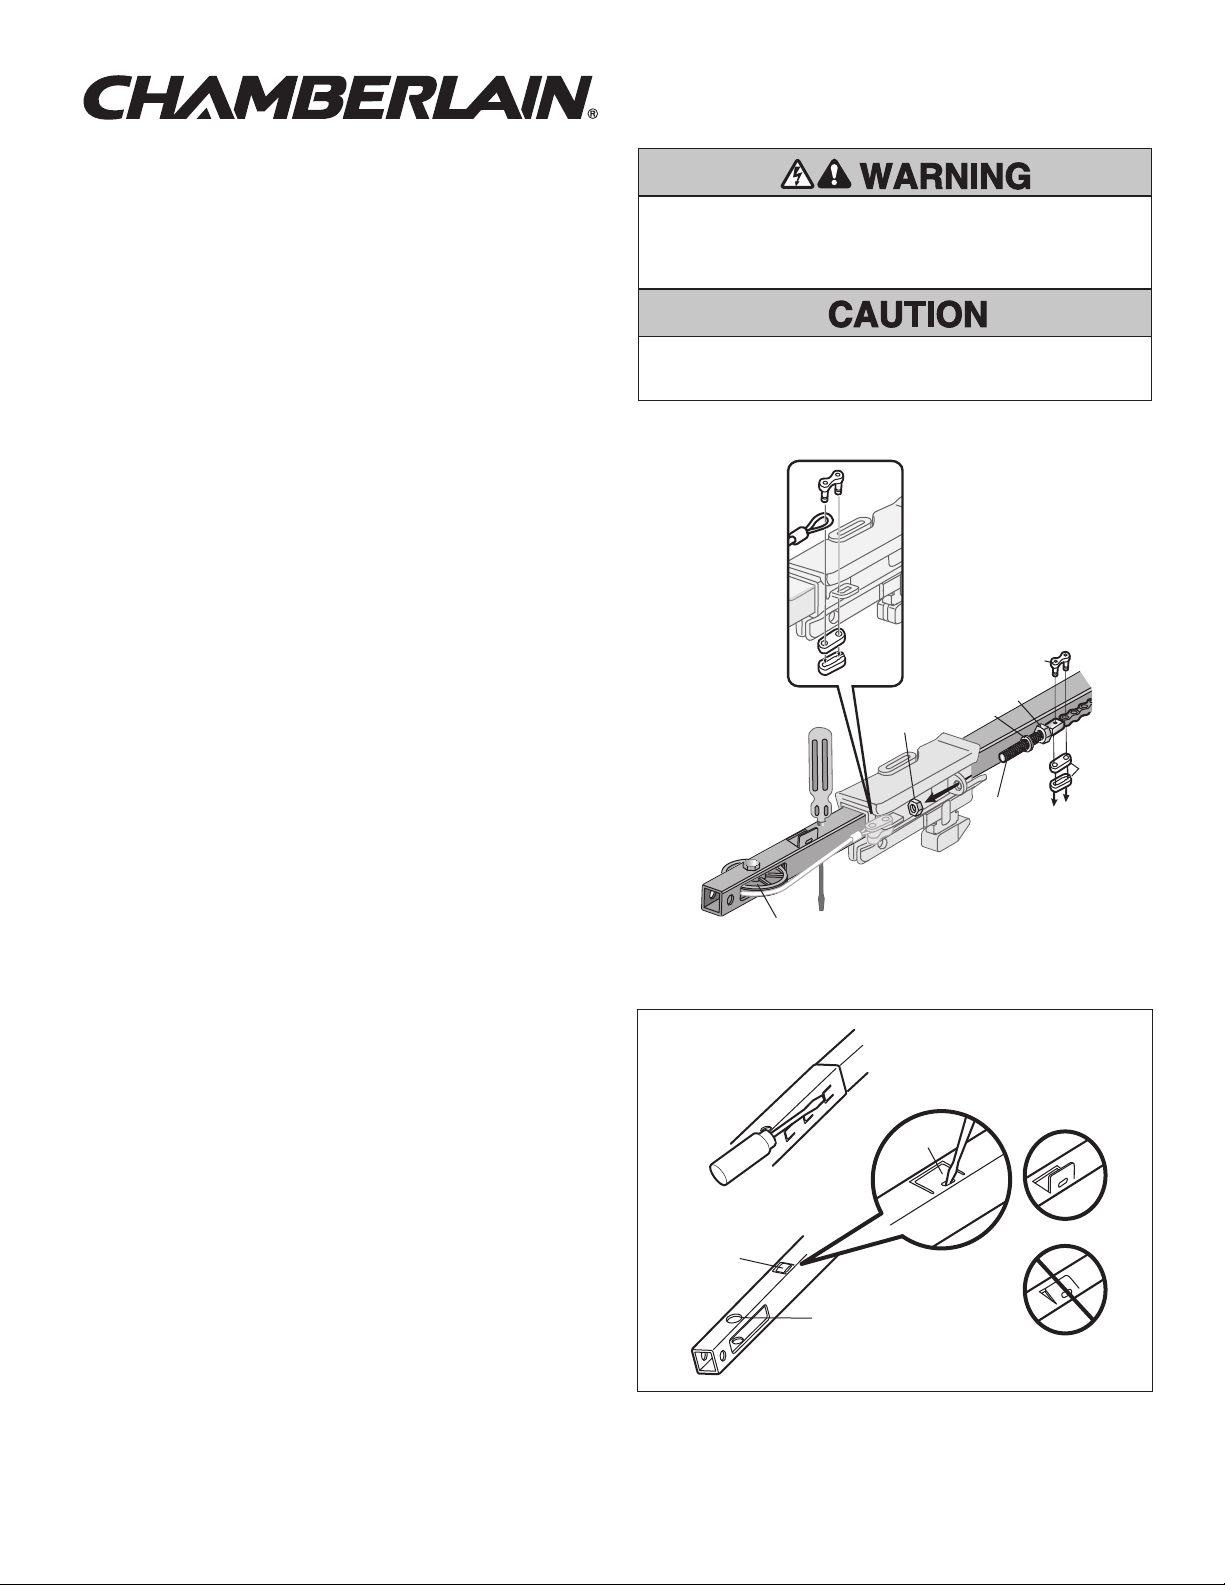
4. Remove the outer nut (Figure 1) from the trolley shaft and set aside.
5. Disconnect the two master link assemblies from the trolley (Figure 1)
and discard.
6. Remove idler pulley assembly and set aside.
7. Remove the chain/cable assembly and discard.
8. Push the trolley back toward the opener. Disconnect the front rail and
second rail sections by using a screwdriver tip to pry up the outer tab
on each side of the rail (Figure 2), then slide it off the existing rail
assembly. Discard the front and second rails.
9. Align the new front and center rails with the existing rail assembly,
keeping the cut out “window” at the front (header) end. Be sure to keep
rails right side up: the idler pulley bolt hole above the window is larger
on top of the rail than on the bottom. Slide the new center rail onto the
assembly, then add the front rail. Tabs along the side will lock into
place.
10. As a temporary stop, insert a screwdriver into the hole 10" (25 cm)
from the front end of the rail (Figure 1). Slide the trolley assembly to
this point.
11. Locate the rail tab. Use a flathead screwdriver and lift the rail tab until
the tab is vertical (90°) (Figure 2).
12. Refer to your owner’s manual to complete the assembly, re-installation
and adjustment of your opener. NOTE: Before hanging the opener, an
additional hanging bracket is necessary for stability. See Adding An
Additional Hanging Bracket on reverse side. (Replace the old emergency
release rope with the new, longer replacement rope.)
13. Reconnect power.
14. Make adjustments and test the safety reversal system according to the
owner's manual.
The garage door MUST be in the fully closed position during
installation.
Figure 1
Master
Link
Inner
Lock
Nut
Washer
Threaded
Shaft
Front Rail
Section
Idler Pulley
Outer
Nut
Figure 2
To remove rail pry both
end tabs of front
rail slightly outward
Rail Tab
NEW
FRONT RAIL
Rail Tab
CORRECT
INCORRECT
Master
Link
Idler Bolt hole
(KEEP LARGER
ONE ON TOP)
Page 2
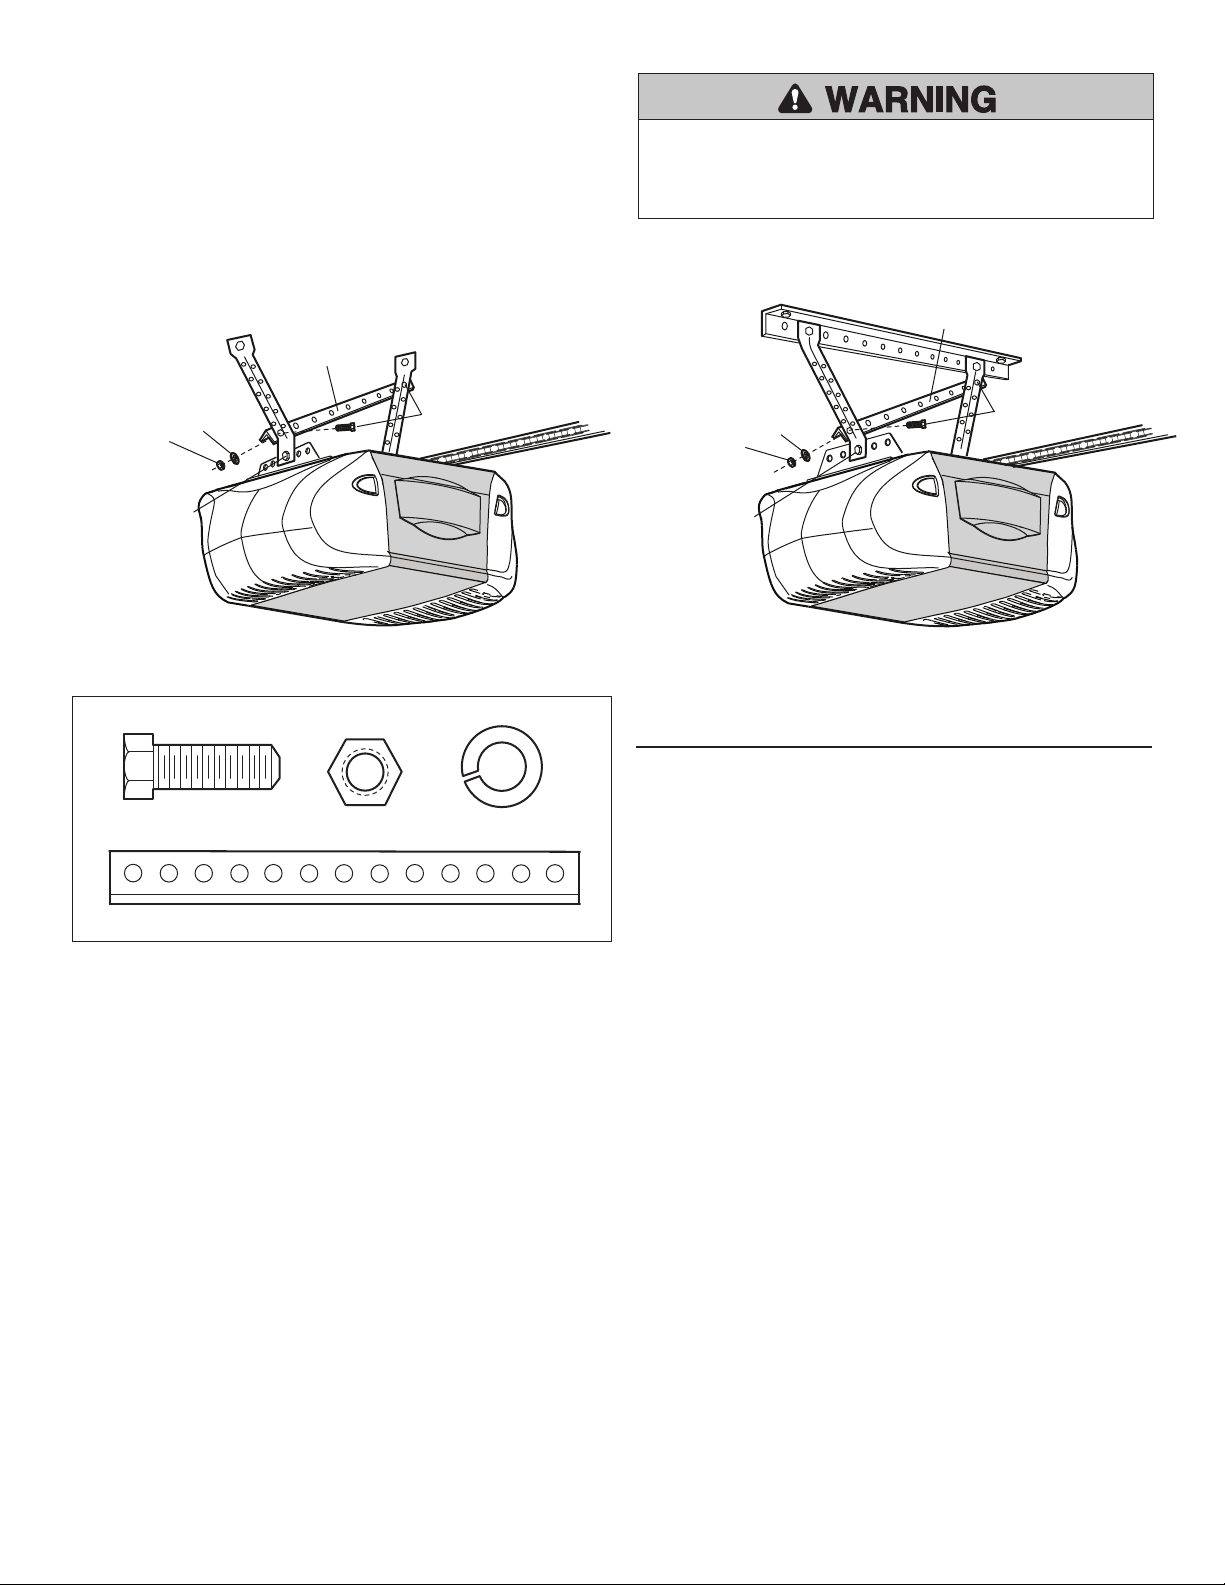
ADDING AN ADDITIONAL HANGING BRACKET:
Cut the enclosed hanging bracket (cross brace) to fit across the installed
hanging brackets. Fasten the cross brace to the top and bottom hole of the
hanging brackets (Figure 3 and Figure 4) using 5/16" -18x7/8" hex bolts,
5/16 lock washers and 5/16" -18 nuts.
To avoid possible SERIOUS INJURY from a falling garage door
opener, fasten it SECURELY to structural supports of the garage.
Concrete anchors MUST be used if installing any brackets into
masonry.
Figure 3 Figure 4
Hanging Bracket
(Cross Brace)
Lock Washer 5/16"
Nut 5/16"-18
Lock Washer 5/16"
Nut 5/16"-18
HARDWARE SHOWN ACTUAL SIZE
Bolt 5/16"-18x7/8"
Lock Washer 5/16"
Nut 5/16"-18
Lock Washer 5/16"
Nut 5/16"-18
REPLACEMENT PARTS
Part No. Description Qty
183C158-14 Header Rail Extension 1
Hex Bolt
5/16"-18x7/8"
Nut 5/16"-18
Lock Washer 5/16"
41A5807-2 10' Chain/Cable Assembly 1
183C157-10 Center Rail Section 1
41A3021 Rope 1
4A1008 Master Link Kit 1
Hanging Bracket
(Cross Brace)
Bolt 5/16"-18x7/8"
Hanging Bracket (Cross Brace) Not shown actual size
© 2013, The Chamberlain Group Inc.
114A2747F All Rights Reserved
Page 3

AVANT DE COMMENCER :
AVERTISSEMENTAVERTISSEMENT
ATTENTIONATTENTION
AVERTISSEMENT AVERTISSEMENT
AVERTISSEMENT
AVERTISSEMENT
• Le chariot doit être en position abaissée (porte fermée) durant l’assemblage et
l’installation. Si l’ouvre-porte de garage est entièrement installé, l’ensemble de
rail/ouvre-porte doit être démonté. Les limites de MONTÉE et de DESCENTE
doivent être réajustées après l’installation.
• Les supports de montage de l’ouvre-porte devront être repositionnés en raison de
la longueur accrue du rail.
Nécessaire de rallonge de rail de
10 pieds (3 m)
Modèle 7710CB
Pour éviter des BLESSURES GRAVES ou FATALES :
• Débranchez TOUTE alimentation électrique et piles AVANT d’effectuer TOUT
entretien ou maintenance.
S’IL S’AGIT D’UNE INSTALLATION NOUVELLE :
Utiliser le rail avant (frontale), l’ensemble de chaîne/câble et la corde plus longue de
dégagement d’urgence contenus dans ce nécessaire en remplacement de ceux
accompagnant votre ouvre-porte. Terminer l’assemblage, l’installation et le réglage
de votre ouvre-porte en conformité avec les instructions apparaissant dans votre
manuel.
S’IL S’AGIT D’UNE INSTALLATION EXISTANTE, POURSUIVRE COMME SUIT :
1. Couper l’alimentation de l’ouvre-porte de garage.
2. Tirer la poignée de dégagement d’urgence vers le bas, détacher ensuite le chariot
du bras de la porte.
3. Détacher l’ensemble de rail/ouvre-porte du support frontal et des supports de
montage, et placer cet ensemble sur le sol.
4. Retirer l’écrou extérieur (Figure 1) de l’arbre du chariot et mettre de côté.
5. Détacher les deux ensembles de maillon principal du chariot (Figure 1) et jeter.
6. Retirer l’ensemble de poulie-guide et mettre de côté.
7. Retirer l’ensemble de chaîne/câble et jeter.
8. Repousser le chariot vers la tête de l’ouvre-porte. Détacher la section du rail
avant en utilisant l’extrémité d’un tournevis pour faire levier sur la languette
extérieure de chaque côté du rail (Figure 2), puis la faire glisser hors du rail
central. Disposez du premier et du second rail.
9. Aligner les nouveaux rails frontal et central sur l’ensemble existant de rail, en
gardant les petits trous le long du même bord, et la “fenêtre” découpée à
l’extrémité avant (frontale). S’assurer de garder les rails le bon côté vers le haut:
le trou de boulon de la poulie-guide au-dessus de la fenêtre est plus gros sur le
dessus du rail que sur le dessous. Faire glisser le nouveau rail central sur
l’ensemble, puis ajouter le rail avant. Les languettes sur le côté se bloqueront en
place.
10. Comme boutoir temporaire, insérez un tournevis dans l’orifice situé à 10 pouces
(25 cm) du devant du rail. (Figure 1) Faire glisser l’ensemble de chariot jusqu’à
ce point.
11. Localiser l’onglet du rail. Utiliser un tournevis à tête plate et soulever l’onglet du
rail à la verticale, c’est-à dire à un angle de 90 degrés (Figure 2).
12. Se reporter au manuel d’instructions pour terminer l’assemblage, la
ré-installation et le réglage de votre ouvre-porte. REMARQUE : Avant de
suspendre l’ouvre-porte, la pose d’un support pendant supplémentaire est
nécessaire afin d’assurer la stabilité de l’ensemble. Voir « Ajout d’un support
pendant supplémentaire » au verso. (Remplacer l’ancienne corde de dégagement
d’urgence par la nouvelle corde de remplacement plus longue.)
13. Rebranchez l’alimentation.
14. Faites tous les ajustements et testez le système de retournement de securite en
accordance avec le manuel d’instruction.
La porte de garage DOIT être complètement fermée pendant l’installation.
Figure 1
Maillon de
raccord
Écrou
intérieur
Écrou
extérieur
Rail avant
Poulie
Rondellefrein
Maillon de
raccord
Tige filetée
Figure 2
Pour retirer le rail, faire levier sur
les deux languettes d'extrémité
du rail avant légèrement
vers l'extérieur.
BON
MAUVAIS
L’onglet
du rail
NOUVEAU
RAIL AVANT
L’onglet
du rail
Trou de boulon de
poulie - guide
(GARDER LE GROS
TROU SUR LE DESSUS)
Page 4

AVERTISSEMENTAVERTISSEMENT AVERTISSEMENT
AVERTISSEMENT
AJOUT D’UN SUPPORT PENDANT SUPPLÉMENTAIRE :
Découper le support pendant inclus (entretoise) pour l’adapter transversalement sur
les supports déjà installés. Fixer l’entretoise sur les trous supérieur et inférieur des
supports pendants (Figure 3 et Figure 4) à l’aide de 18 vis à tête hexagonale 5/16 po
x 7/8 po, des rondelles deblocage 5/16 po et de 18 écrous 5/16 po.
Pour éviter d’éventuelles BLESSURES GRAVES par suite de la chute d’un
ouvre-porte de garage, fixer l’ouvre-porte SOLIDEMENT aux solives du
garage. On DOIT utiliser des ancrages de béton si les supports sont posés
dans la maçonnerie.
Figure 3 Figure 4
Support Pendant
(Entretoise)
Rondelle-frein de 5/16 po
Écrou de 5/16 po-18
Rondelle-frein de 5/16 po
Écrou de 5/16 po-18
Boulon hexagonale
de 5/16 po
GRANDEUR RÉELLE DES FIXATIONS
Écrou de
5/16 po-18
Boulon de 5/16 po-18 x 7/8 de po
Rondelle-frein de
5/16 po
Rondelle-frein de 5/16 po
Écrou de 5/16 po-18
PIÉCES DE REPARATION
De Pièce Désignation Qté
183C158-14 Rallonge de rail frontal 1
41A5807-2 Ensemble de chaîne/câble de 10pi (3m) 1
183C157-10 Section de rail centrale 1
41A3021 Corde 1
4A1008 Maillon de raccord 1
Rondelle-frein de 5/16 po
Écrou de 5/16 po-18
Support Pendant
(Entretoise)
Boulon de 5/16 po-18 x 7/8 de po
Support pendant (Entretoise) Ne pas grandeur réelle
© 2013, The Chamberlain Group Inc.
114A2747F Tous droits réservés
 Loading...