

Page 1

5900335
RR
TM
Optipay CC
A-66 Coin Changer
Operation and Maintenance Manual
(Revision 1)
Includes configuration setup using a Palm Pilot
Setting Module
May 05
1-800-628-8363
RR
JCM Part Number 960-000102.Rev. 1
5900335
Page 2

JCM is a registered trademark of JCM American Corporation. All other product names mentioned herein may be
registered trademarks or trademarks of their respective companies. Furthermore,
in each case throughout this publication.
™
, ® and © are not always mentioned
Page 3

Optipay™ CC
Table of Contents
1 TOC
1 GENERAL INFORMATION...................................................................................1-1
General Information .................................................................................................... 1-1
General Information Concerning Coin Changer ........................................................................1-2
Advantages ...............................................................................................................................1-2
Service Tools ............................................................................................................... 1-2
PC Test Station..........................................................................................................................1-2
Configuration Tools....................................................................................................................1-3
Update Tools .............................................................................................................................1-3
2 SAFETY INSTRUCTIONS.....................................................................................2-1
Proper use................................................................................................................................. 2-1
Protecting Yourself and the Equipment .................................................................... 2-1
3 DESIGN .................................................................................................................3-1
The Coin Validator....................................................................................................... 3-1
Device Overview .......................................................................................................... 3-1
Return Lever..............................................................................................................................3-2
Keyboard ...................................................................................................................................3-2
Pilot Lights................................................................................................................................. 3-2
Interfaces...................................................................................................................................3-2
DIP Switch Block .......................................................................................................................3-2
Product Labels ..........................................................................................................................3-3
The Payout Unit ........................................................................................................... 3-3
Tube Cassette ...........................................................................................................................3-3
Payout Module ..........................................................................................................................3-4
Filling Level Sensors ................................................................................................................. 3-4
MDB Vending Machine Cable ..................................................................................... 3-4
4 FUNCTIONS..........................................................................................................4-1
Filling and Emptying Change Tubes.......................................................................... 4-1
Configuring Change Tube Coin Maximum ................................................................ 4-1
Security Stock Considerations .................................................................................. 4-2
Inhibiting Certain Coin Types ..................................................................................... 4-2
Disabling the Inventory Keys ..................................................................................... 4-2
Configuring Tokens ..................................................................................................... 4-2
Sending the Telephone/Currency Code to the Vending Machine
Controller ..................................................................................................................... 4-2
Tube Counter Automatic Correction.......................................................................... 4-2
Resetting the Tube Counter........................................................................................ 4-2
Individual Wake-up Time Considerations ................................................................. 4-3
Accepting and Converting a Second Currency Type (optional) ............................. 4-3
Minimizing String Manipulation (optional) ................................................................ 4-3
5 INSTALLATION .................................................................................................... 5-1
6 ENERGIZING ........................................................................................................ 6-1
7 OPERATION .........................................................................................................7-1
Vending Change by Using the Keyboard or Emptying the Tube Cassette ............ 7-1
Emptying the Change Tubes to a Certain Fill Level ................................................. 7-1
5900335 © 2005 JCM-American C
1-i
Page 4

Optipay™ CC Table of Contents
Validator Change Filling..............................................................................................7-1
Inhibiting Coin Types Using DIP Switch Block Settings .......................................... 7-2
8 CLEANING............................................................................................................ 8-1
9 TRANSPORT ........................................................................................................9-1
10 TECHNICAL DATA.............................................................................................10-1
A-66 Specifications.................................................................................................. 10-1
CE Certification .......................................................................................................... 10-1
11 CONFIGURATION ..............................................................................................11-1
Workshop Testing the Coin Changer....................................................................... 11-1
Workshop Testing and/or Configuring the Coin Changer...................................... 11-1
On-Site Testing and/or Configuring the Coin Changer in a Vending Machine..... 11-1
®
PC Programming Station and Palm Pilot
Handheld Use...................................... 11-1
Which Functions Can be Configured?..................................................................... 11-2
WinEMP
PalmA66
PalmEMP
©
Software .................................................................................................... 11-2
©
Software.................................................................................................... 11-2
©
Software .................................................................................................. 11-2
PC Programming Station Device Environment....................................................... 11-2
®
Connecting a Palm Pilot
Handheld ........................................................................ 11-3
12 PALM PILOT® USAGE .......................................................................................12-1
A66US Changer Program Usage .............................................................................. 12-1
Requirements .......................................................................................................................... 12-1
Managing Coin and Configuration Settings .............................................................................12-1
Changer Service, Token Programming, and Currency Conversion......................................... 12-4
Changer Diagnostics................................................................................................. 12-6
13 INDEX..................................................................................................................13-1
A TROUBLE SHOOTING ........................................................................................ A-1
Quick Pilot Light Diagnosis ....................................................................................... A-1
Diagnosis Using a Palm Pilot
®
Setting Module ....................................................... A-2
B GLOSSARY ......................................................................................................... B-1
5900335 © 2005 JCM-American Corporation
1-ii
Page 5

Optipay™ CC
List of Figures
1 LOF
Figure 1-1 Optipay™ CC A-66 Coin Changer........................................................ 1-1
Figure 3-1 A-66 Design Features........................................................................... 3-1
Figure 3-2 Coin Validator’s Rear Side ................................................................... 3-2
Figure 3-3 Coin Validator Removal........................................................................ 3-2
Figure 3-4 Coin Validator Side Label ..................................................................... 3-3
Figure 3-5 Coin Validator Front Label.................................................................... 3-3
Figure 3-6 Tube Cassette Removal/Replacement................................................. 3-4
Figure 4-1 Tube Cassette Removal ....................................................................... 4-1
Figure 5-1 Coin Validator Removal........................................................................ 5-1
Figure 5-2 Coin Changer mounting hole locations................................................. 5-1
Figure 6-1 Coin Validator Keyboard....................................................................... 6-1
Figure 7-1 Coin Validator Removal........................................................................ 7-2
Figure 7-2 Coin Validator Switch Block.................................................................. 7-2
Figure 8-1 Opening and Closing the Coin Validator’s Access Panel ..................... 8-1
Figure 11-1 PC Programming Station Connection................................................. 11-3
Figure 11-2 Palm to Validator or Changer Connection .......................................... 11-3
Figure 12-1 Typical M100/500 Series Palm Pilot® Handheld & Software ................. -1
Figure 12-2 Palm A66US Selection ....................................................................... 12-1
Figure 12-3 Selecting Settings............................................................................... 12-1
Figure 12-4 Selecting Mode................................................................................... 12-1
Figure 12-5 Operating Modes ................................................................................ 12-2
Figure 12-6 Inhibit Coin Channels Mode ............................................................... 12-2
Figure 12-7 Float Level Mode ................................................................................ 12-2
Figure 12-8 Float up Selection Warning ................................................................ 12-3
Figure 12-9 Security Stock Mode........................................................................... 12-3
Figure 12-10 Coin Sorting Mode ............................................................................. 12-3
Figure 12-11 Recycler Mode ................................................................................... 12-4
Figure 12-12 Other Settings Mode .......................................................................... 12-4
Figure 12-13 Clone Mode........................................................................................ 12-4
Figure 12-14 Service Mode ..................................................................................... 12-4
Figure 12-15 Filling Levels Mode ............................................................................ 12-5
Figure 12-16 Teach Tokens Mode .......................................................................... 12-5
Figure 12-17 Token Programming Mode ................................................................ 12-5
Figure 12-18 Conversion Setting Mode................................................................... 12-6
Figure 12-19 Diagnostics Mode .............................................................................. 12-6
Figure 12-20 Error List Mode .................................................................................. 12-6
Figure A-1 Quick Diagnosis with the Help of the Pilot Lights ................................. A-1
5900335 © 2005 JCM-American C
1-iii
Page 6

Optipay™ CC List of Figures
THIS PAGE INTENTIONALLY LEFT BLANK
5900335 © 2005 JCM-American C Corporation
1-iv
Page 7

Optipay™ CC
List of Tables
1 LOT
Table 3-1 Side Label Features ..............................................................................3-3
Table 3-2 Front Label Features .............................................................................3-3
Table 3-3 U.S. Coin Cassette Capacity .................................................................3-3
Table A-1 LED Indicator Meanings ....................................................................... A-1
Table A-2 Display Indicators ................................................................................. A-2
5900335 © 2005 JCM-American C
1-v
Page 8

Optipay™ CC List of Tables
THIS PAGE INTENTIONALLY LEFT BLANK
5900335 © 2005 JCM-American Corporation
1-vi
Page 9
Optipay™ CC
A-66 Coin Changer
Section 1
1 GENERAL INFORMATION
This section provides a general overview of the
advantages and options of the Optipay™ CC A-66
Coin Changer. This first section is designed to help
you navigate through this manual with ease.
General Information
This manual describes the design, operation and
functional range of the A-66 Coin Changer (See
Figure 1-1 ). Sections 5, 6 and 7 explain the steps
necessary towards installation, energizing and
operation of the coin changer.
Chapters 8 to 11 describe how the Coin Changer is
cleaned, transported and electronically configured.
The section entitled “Configuration” deals prima-
rily with the use of a Palm Pilot
Changer. The JCM WinEMP
PalmEMP
©
configuration programs are described
®
to configure Coin
©
, PalmA66© and
separately in the software instructions of section
11.
The appended "Index", "Setting Module Functional Overview", and "Trouble Shooting" sections
reduce the search for specific explanations and
additional help when required.
To make operation of this device and navigation
within this manual easier, the following illustrations were used within the text:
•
Safety instructions, which need to be
observed in order to protect the operators and
equipment, have been written in bold text and
have been given the pictographs:
•
Special Notes, which effect the use of the Coin
Changer have been written in italic text and
have been given the pictograph:
•
Steps, requiring the operator to perform
specific actions are given sequential numbers
(1., 2., 3., etc.).
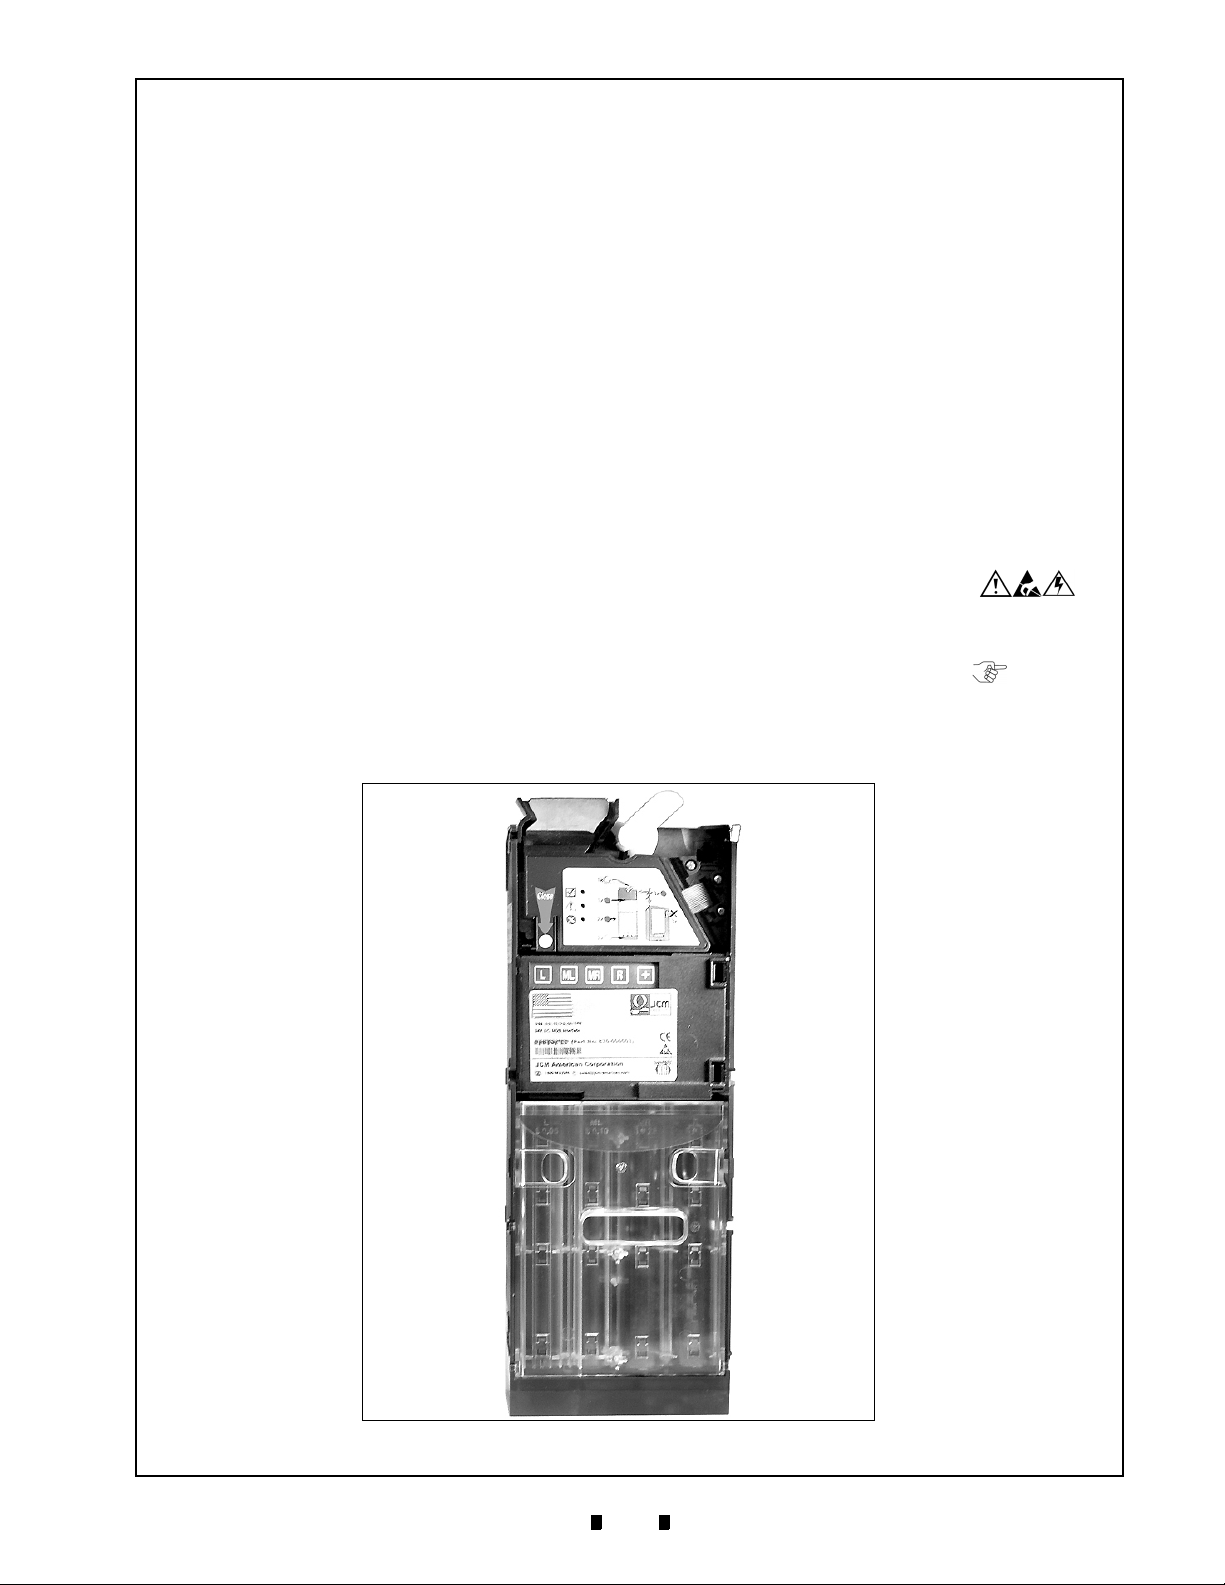
Figure 1-1 Optipay™ CC A-66 Coin Changer
5900335 © 2005 JCM-American Corporation
ID = A66Frontmono.jpg
1-1
Page 10

Section 1 Optipay™ CC GENERAL INFORMATION
At the beginning of each section you will find a
"Chapter Guide", that summarizes the content of
the specific section.
Separate software instructions to configure the
Coin Changer are located in "Configuration" section 11.
•
WinEMP© – Contains the configuration and
diagnostics programs for the JCM Coin
Validators, and the operating instructions for
the Optipay™ CC A-66 Coin Changer.
•
PalmA66© – Contains the operating
instructions for configuring the Optipay™ CC
A-66 Coin Changer
•
PalmEMP© – Contains the operating
instructions for configuring the A-66 Coin
Validator.
If these instructions are not available to you,
they can be downloaded at any time from
the JCM home page (www.jcm-american.com) in a compressed Portable Document File (PDF) format.
General Information Concerning Coin
Changer
The four tube Optipay™ CC A-66 Coin Changer
series is designed for vending and service
machines containing the serial Multi Drop Bus
(MDB) interface.
The integrated Coin Validator contains the reliable
sensor system and false money rejection capabilities of the tried and tested G-40.4000 Coin Validator within the G-46.4 Coin Changer series.
In order to react as quickly as possible to newly
inserted false coins and to enable your individual
adjustments, the Coin Validator can be connected
to a Personal Computer (PC) programming station
containing the WinEMP
nostics software, including a card reader, chip card
and the G-19.0641 test assembly. With the aid of a
Palm Pilot
PalmA66
®
handheld containing PalmEMP©, and
©
program applications, the Coin
Changer can be configured directly at the vending
machine independently from the PC method. This
manual deals exclusively with the Coin Changer
configuration using the Palm Pilot
tions using the other programs, separate software
instructions are available. (see the "Service tools"
section in this section and Chapter 11 "Configuration" for further information).
©
configuration and diag-
®
. For configura-
Token types not programmed by the manufacturer,
can be programmed directly at the Coin Changer
by inserting the new tokens.
Advantages
•
An easily configured Coin Validator enables
fast reaction to changing market situations and
new false coin introductions
•
Easy configuration with help from:
–
the WinEMP© PC software for the workshop
–
the PalmA66© or PalmEMP© with Palm
®
Pilot
handheld software
•
Reliable sensing system and optimum
rejection of false coins due to the integrated,
electronic A-66 Coin Validator
•
Universal payout mechanism for different coin
diameters and thicknesses
•
Flexible payout combinations by easy tube
cassettes change out
•
Faster service due to error diagnosis
•
Splash-proof electronics
•
A monitored coin run and controlled sorting
guarantee an improved operating reliability
and protection against manipulation
•
An acceptance speed of 2 coins per second
•
A teach mode, able to learn up to three
different tokens types or sizes
•
Flash Memory technology for implementing
uncomplicated and time-saving Coin Validator
operating software updates
Service Tools
In order to test the Coin Changer and adapt it to the
individual needs of your facility, the following
accessories can be acquired from JCM:
PC Test Station
If you only wish to check the functionality of the
Coin Changer without making any adjustments, the
JCM Test Station is sufficient for this purpose. The
Test Station is composed of the following two
components:
•
Test software WinMDB© and
•
Tester G-19.0654 for use as Vending Machine
simulation and MDB functional testing.
5900335 © 2005 JCM-American Corporation
1-2
Page 11

GENERAL INFORMATION Optipay™ CC Section 1
If it is desirable to test all functions and not
just the MDB functions, an additional G-
55.0348 RJ-45 PC plug adaptor is available
from JCM, allowing you to connect the Coin
Changer directly to the PC using the easily
accessible 8-pin modular RJ-45 jack
receptacle located on the top right side of
the device.
Configuration Tools
In order to react as quickly as possible to new false
coins in the workshop or on site, and enable individual adjustments, the coin changer can be connected to a:
•
JCM Programming Station consisting of:
–
WinEMP© configuration and diagnostics
software which includes the card reader and
chip card
–
Tester G-19.0641
•
JCM Palm Pilot
and PalmA66
®
,
and applications PalmEMP©
©
for a Palm Pilot® handheld
Chapter 11 "Configuration" explains which of the
preceding configuration tools can be used to set the
different Coin Changer parameters.
Update Tools
The Coin Changer’s integrated Coin Validator is
equipped with microprocessor circuitry that con-
tains Flash Memory. This allows quick updates of
the Coin Validator’s operating software without
complications. In order to load new operating soft-
ware into the Coin Validator, one of the following
three alternatives is required:
•
a JCM PC Update Station consisting of:
–
WinFlash© software
–
Tester G-19.0641
–
Programming adapter G-19.0646
•
a JCM Flash Prommer G-55.0350 or
•
JCM Palm "PalmFlash©" application for a
Palm Pilot
®
handheld and a Flash Adapter
5900335 © 2005 JCM-American Corporation
1-3
Page 12

Section 1 Optipay™ CC
THIS PAGE INTENTIONALLY LEFT BLANK
5900335 © 2005 JCM-American Corporation
1-4
Page 13
Optipay™ CC
A-66 Coin Changer
Section 2
2 SAFETY INSTRUCTIONS
This section providessafety instructions for using
the Optipay™ CC A-66 Coin Changer.
Before operating the device for the first time,
please carefully read through this manual at least
once, and most importantly, read the safety instructions. This ensures that the contents of this manual
and the operation of the A-66 Coin Changer is
completely understood.
Proper use
The four tube A-66 Coin Changer is intended for
use in vending and service machines containing the
serial MDB interface. Only use the A-66 Coin
Changer for this purpose. Under no circumstances
can the manufacturer be held liable for any damage
or loss resulting from improper use of the device.
The Coin Changer series is state of the art and has
been constructed in compliance with recognized
safety regulations. Nevertheless, this equipment
can be a source of danger. Therefore, please
observe the following safety regulations:
Protecting Yourself and the Equipment
The A-66 Coin Changer may only be
connected by a qualified electrician/
electronics technician.
Only use the Coin Changer according to
for it’s intended use. Under no
circumstances can the manufacturer be
held liable for any damage or loss
resulting from improper use of this
device.
The Coin Validator‘s printed circuit
board (pcb) is fitted with electronic
components which may be damaged
beyond repair by electrostatic
discharge.
Please observe the handling
instructions regarding static sensitive
components.
Select the correct operating voltage for
the Coin Changer (see device label
directly, or Figure 3-4 in section 3).
Never pull on the Coin Validator’s Coin
Changer connecting cable when a
voltage is applied!
Remove the Vending Machine’s Power
Line Plug before you install, clean or
remove the Coin Changer.
Always transport the Coin Changer
empty of coins and in its original
packaging. It is sufficiently protected in
this way. Never carry the Coin Changer
by its external cables.
Contact JCM if you wish to alter the Coin
Changer’s design greater than that
which is described in these instructions.
Keep water and other liquids away from
the Coin Changer.
Dispose of a damaged Coin Changer
correctly, if you have no further use for
it.
JCM reserves the right to make
technical modifications to the device
which are not covered by these
instructions.
5900335 © 2005 JCM-American Corporation
2-1
Page 14

Section 2 Optipay™ CC
THIS PAGE INTENTIONALLY LEFT BLANK
5900335 © 2005 JCM-American Corporation
2-2
Page 15
Optipay™ CC
A-66 Coin Changer
Section 3
3 DESIGN
This section describes the general design of the
Optipay™ CC A-66 Coin Changer and the various
Coin Validator components within it important to
the operation of the device. The following items
will be discussed:
•
Return lever, keyboard, pilot lights, interfaces,
DIP Switch block, product labels
•
Tube cassette, pay out set, and filling level
sensors
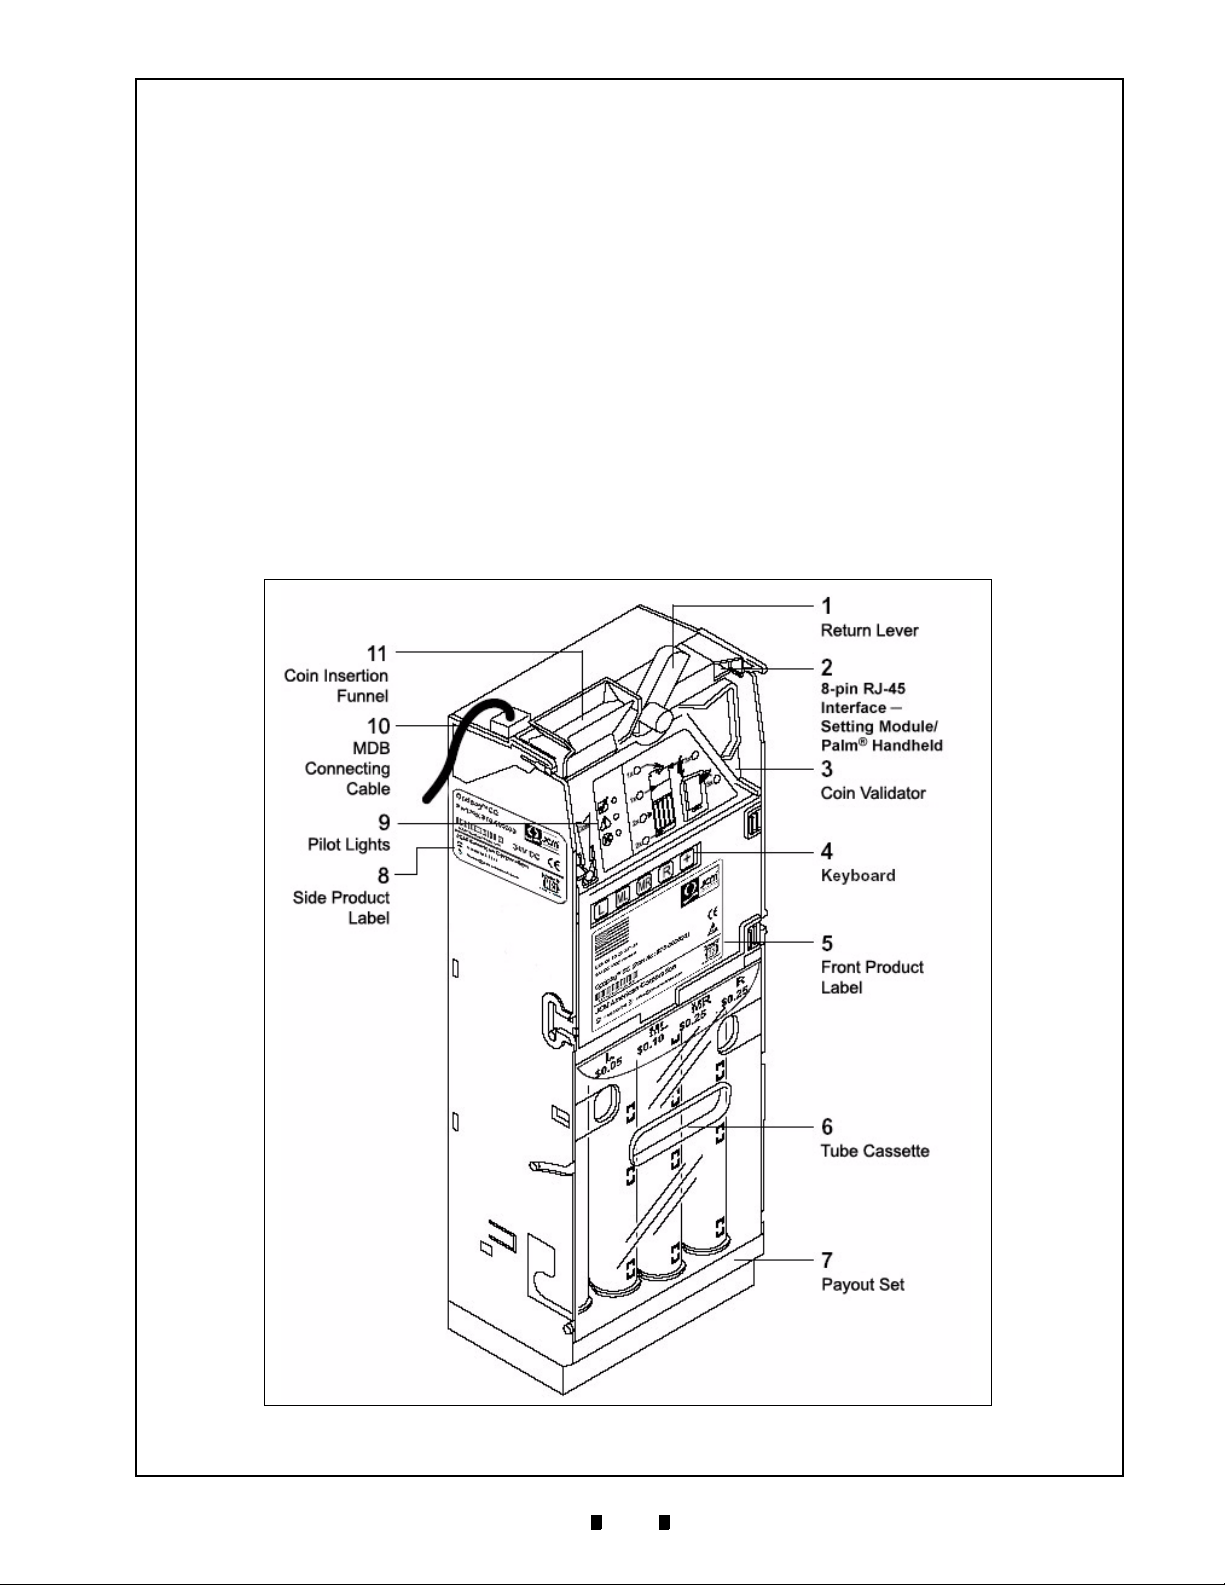
Device Overview
The Coin Validator
Coins inserted into the Coin Validator (3)
(See Figure 3-1 ) pass through the Coin Insertion
Funnel (11) into the validation area of the device.
Here the coin’s properties are compared with the
values contained in the stored acceptance bands
data. Rejected coins from the Coin Validator pass
into the return area tray of the Vending Machine. In
the event of a sale, accepted coins are either
directed to one the four Tube Cassettes (6) or into
the Cash Box below them.
Figure 3-1 A-66 Design Features
5900335 © 2005 JCM-American Corporation
3-1
Page 16
Section 3 Optipay™ CC DESIGN
Return Lever
The Return Lever (See Figure 3-1 [1]) on the top
of the Coin Validator is operated by using the
Vending Machine’s Return Button. Operating this
lever is necessary if inserted coins are awaiting
return, or a coin jam caused by stuck coins require
removal. When the return lever is operated, the
measurement and validation area of the Coin Validator opens so that all objects within the Coin
Validator are directed to the return area tray
(See Figure 3-1 ).
Keyboard
The front of the Coin Validator is equipped with a
five key touch-sensitive membrane Keyboard
(See Figure 3-1 [4]) which allows filling of the
Payout Unit's change tubes before the device is put
into operation or emptying them for inventory (See
section 4 "Functions" and section 7 "Operation" for
further information).
Pilot Lights
There is a Pilot Light set of three Light-Emitting
Diode (LED) at the front of the Coin Validator
positioned beneath one another colored; Green,
Yellow, and Red respectively (See Figure 3-1 [9]).
These LED Pilot Lights are mainly used for quick
fault diagnosis, but can also indicate the units
current status in normal operation conditions
(See Figure 3-1 ).
If the top Green LED lights or flashes, no faults are
indicated and the device is working properly. If the
middle Yellow LED flashes there is a definite general fault indicated that usually can be easily remedied.
If the bottom Red LED flashes, a fault that must be
remedied by a service technician is indicated. (also
see the section 14 "Trouble Shooting" appendix).
Board (PCB) edge connector (See Figure 3-2 [11])
which allows connection of the Coin Validator to a
programming PC and a JCM Test Station.
Figure 3-2 Coin Validator’s Rear Side
DIP Switch Block
Individual settings for inhibiting various coin types
can be easily made by selecting the proper switches
on the 10-position DIP Switch Block located on the
rear PCB of the device (See Figure 3-2 (
well as section 7 "Operation" for detailed user
information).
13
) as
Interfaces
There is a 40-Pin Dual Inline Header interface jack
on the middle rear of the Coin Validator’s circuit
board (See Figure 3-2 [12]). This interface allows
the device to be connected to the Coin Changer
using a pre-assembled flat ribbon cable assembly.
On the top right front of the Coin Validator there is
an 8-pin RJ-45 receptacle jack (See Figure 3-1
[2]). This connector allows the Coin Changer to be
connected to a Palm Pilot
configuration purposes. On the left side of the Coin
Validator there is a direct 5-Pin Printed Circuit
5900335 © 2005 JCM-American Corporation
®
handheld device for
Figure 3-3 Coin Validator Removal
3-2
Page 17
DESIGN Optipay™ CC Section 3
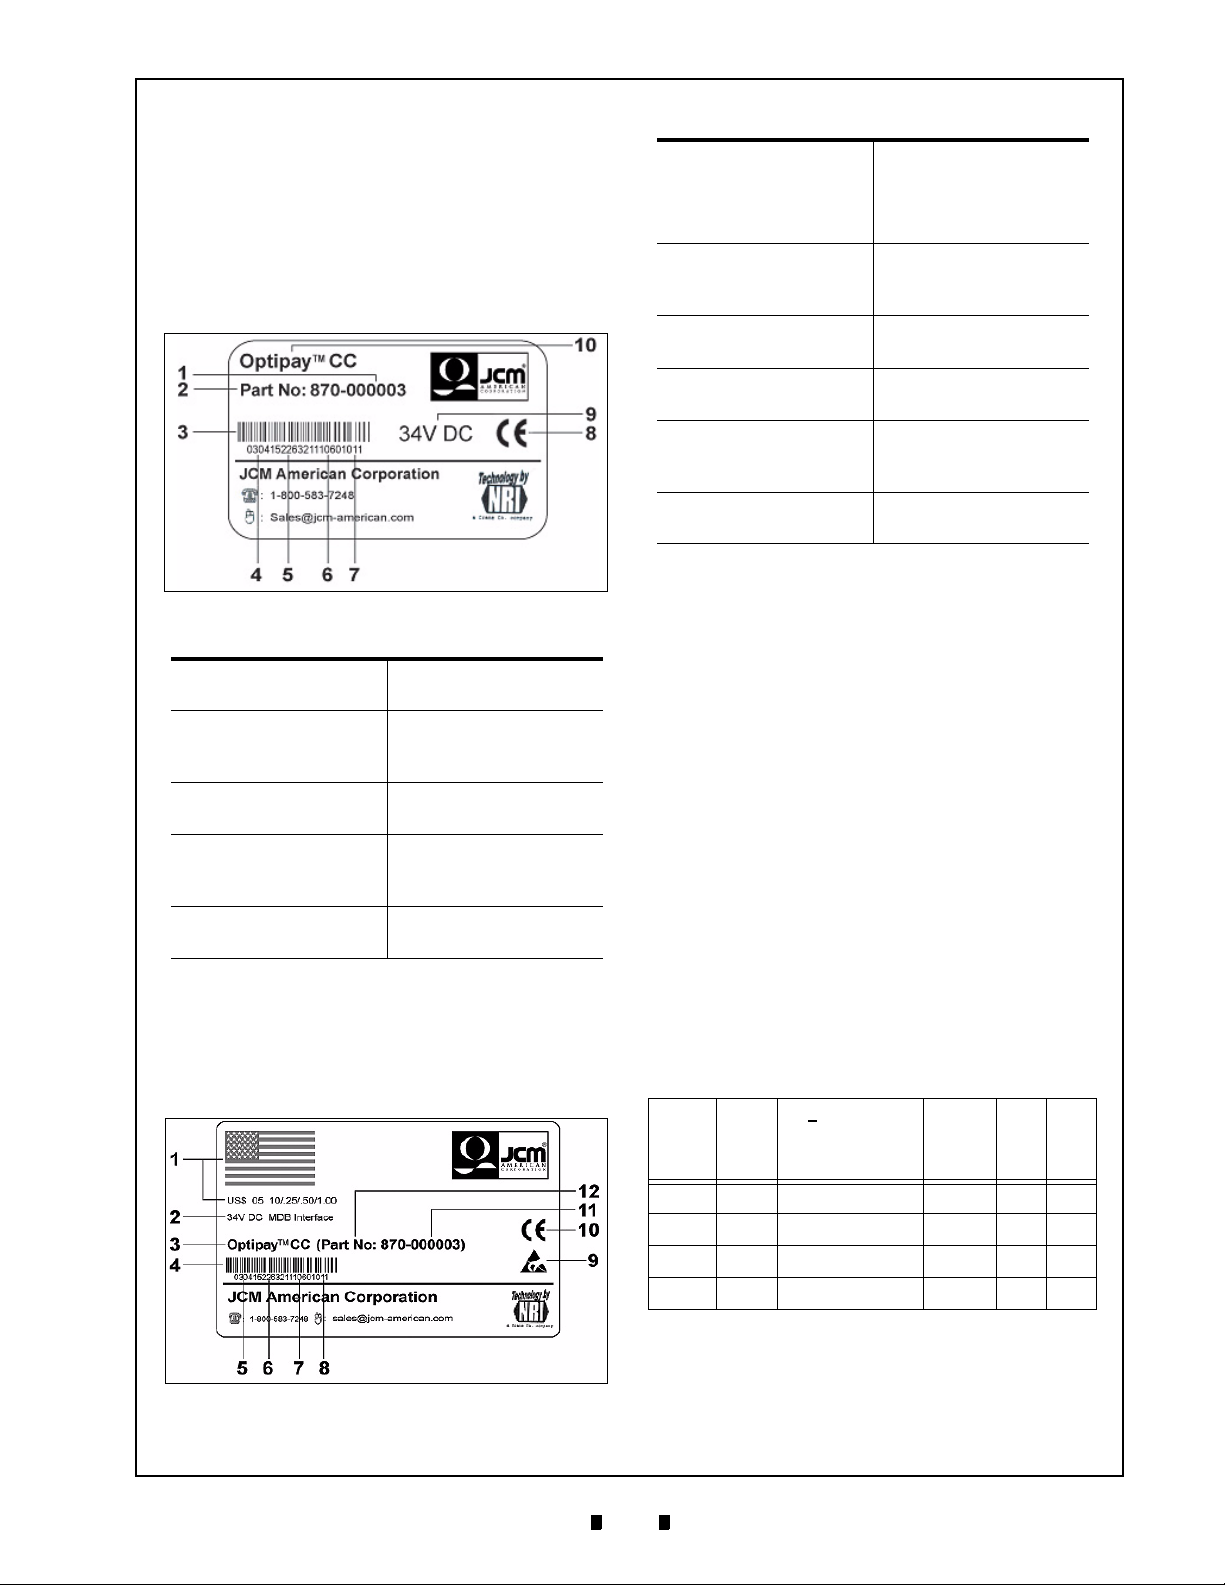
Product Labels
The Coin Validator’s Side Product Label
((See Figure 3-1 [11] and Figure 3-4) contains all
the device defining data, such as the device type
and series, and the data programmed according to
customer specifications such as their currency and
relative country’s coin type requirements listed in
Table 3-1.
Figure 3-4 Coin Validator Side Label
Table 3-1 Side Label Features
1. Data block number 2. Order number
3. Device part number 4. Serial device
5. Barcode 6. Certified European
7. Date of
manufacture (4
digit)
9. Ordering code
(8 digit)
The Front Product Label (See Figure 3-1 [5] and
Figure 3-5) contains similar information as the side
label with additional content regarding safety and
relative country’s coin age denomination require-
ments listed in Table 3-2.
(6 digit)
number per order
number (3 digit)
mark
8. Nominal Voltage
10. Product Trade
Marked name
Table 3-2 Front Label Features
1. Country flag,
country code and
currency/coin type
requirements
3. Nominal voltage &
Interface
5. Product name 6. Safety tested
7. Barcode 8. Certified European
9. Date of
manufacture (4
digit)
11. Ordering code
(8 digit)
2. Order number
(6 digit)
4. Serial device
number per order
number (3 digit)
certification logo
mark
10. Data block number
12. Device part number
The Payout Unit
The Payout Unit consists of the four tube cassette
and the payout set. The device is equipped with
filling level sensors and tube counters to monitor
each tube cassette’s inventory.
Tube Cassette
The Tube Cassette (See Figure 3-1 [6] and Figure
3-6 [1]) incorporates four change tubes with
different diameters for collecting four user coin
types, available for vending to a customer. A
sticker located at the top of the Tube Cassette iden-
tifies which tube accepts a particular denomination
coin value.
The tube coin storage capacity depends on the
thickness of each coin type (example: approxi-
mately 87 U.S. 25
3-3 for a listing of the U.S. coin values and quanti-
ties allowed per tube.
Table 3-3 U.S. Coin Cassette Capacity
Thick
Coin
Value
-ness
(cm)
¢
coins can fill a tube), See Table
o
N
. of Coins
@ 100%
Sensor Level
Empty
@
50%@ 75%
Figure 3-5 Coin Validator Front Label
5900335 © 2005 JCM-American Corporation
0.5 1.87 78 10 39 59
0.10 1.3 112 14 56 85
0.25 1.67 87 11 44 66
1.00 2.0 73 9 36 55
The Coin Validator tests whether an accepted coin
should be sorted into one of the four tubes, or be
directed to the Cash Box according to customer
programming.
3-3
Page 18

Section 3 Optipay™ CC DESIGN
If at any time another combination of tube coins is
required, the appropriate cassette can be ordered
from the JCM and simply exchanged in the
assembly (See Figure 3-6 [1]).
Figure 3-6 Tube Cassette Removal/Replacement
Payout Module
Vending change is done by two motors installed at
the bottom of the Payout Set (See Figure 3-1 [6]),
which rotate in order to vend the desired coins.
Filling Level Sensors
The capacity of each tube is monitored by four
independent sensors viewing the number of it’s
related coins:
•
An empty sensor is positioned at the height of
8 to 10 collected coins
•
A 50% sensor approximately half way up
•
A 75% sensor near the top, and
•
A full sensor is positioned at the top rim of
each tube.
In order for the tube counters to function without
fault when the change tubes are filled by inserting
coins through the Coin Changer, or when the tubes
are filled by removing the four Tube Cassette, the
filling level sensors must check the tube counter’s
status after every coin acceptance and coin vend.
If the number of coins does not correspond with the
measured tube capacity level, the tube count will
be corrected depending on the respective tubes
coin thickness.
If a tubes "full" sensor displays the message "tube
full", all further coins for this tube will be automatically directed to the Cash Box. Only when
coins have been vended again from this tube, will
more coins be allowed into the tube.
The left side motor is responsible for vending the
left “
Tube L
(5)” and middle left “
Tube ML
(4)”
tube coins, and the right side motor is responsible
for vending the right “
“
Tube MR
(3)” tube coins.
Tube R
(2)” and middle right
MDB Vending Machine Cable
The MDB Interface Connecting Cable (See Figure
3-1 [10]) to the Vending Machine is installed at
the top left corner of Coin Changer. For details of
how to install the Coin Changer into a Vending
Machine, see section 5 "Installation".
5900335 © 2005 JCM-American Corporation
3-4
Page 19

Optipay™ CC
A-66 Coin Changer
Section 4
4 FUNCTIONS
This section describes the main functions of the
Optipay™ CC A-66 Coin Changer with particular
emphasis on:
•
Filling and emptying the change tubes
•
Considering the maximum number of coins
configured for the change tube
•
Considering the configured security stock of
tube coins
•
Inhibiting certain coin types
•
Disabling the inventory keys
•
Configuring tokens
•
Sending the telephone/currency code to the
Vending Machine control
•
Correcting the tube counter automatically
•
Resetting the tube counter
•
Considering the individual wake-up time
•
Accepting and converting a second currency
coinage (optional)
•
Minimizing string manipulation (optional)
Only these functions will be described in this
section. If adjustable functions require changing,
see section 7 "Operation" for direct Coin Changer
adjustments, and section 11 "Configuration" for
using the configuration tools to reset them.
Filling and Emptying Change Tubes
The simplest and quickest way to fill and empty the
tube cassette is to remove the cassette (See Figure
4-1 ). This allows for coin sorting or the removal of
several coins at once.
If the correct number of tube coins is required to
simplify coin management, the change tubes can
be filled by inserting individual coins into the Coin
Changer one at a time. The tube counters register
every coin inserted or paid out when activated by
the keyboard (see section 6 "Energizing" and
section 7 "Operation").
The tube cassette can also be both filled and emptied in this manor with the help of the PC software
or the Palm Pilot
11 "Configuration").
®
handheld software (see section
Figure 4-1 Tube Cassette Removal
Coins can vend individually, (e.g. for test purposes), consecutively for inventory purposes, or
before device transportation.
If the tubes must always be filled or emptied to a
certain capacity by service personal, a “float level”
can be configured (see section 11 "Configuration").
This filling capacity is irrelevant for normal use
and only guarantees that a known number of coins
is present for accounting purposes. If the “float
level” function is activated, Cash Box coins will
not be accepted. Consequently, the Cash Box must
not be emptied prior to refilling the tubes because
the unaccepted coins will not be counted during a
refill.
Configuring Change Tube Coin
Maximum
The Coin Changer can be configured so each
change tube will accept a fixed number of coins.
When this fixed number is reached in a tube, all
subsequent coins destined for this tube will be
automatically directed to the Cash Box. Only when
coins have been vended from this tube, will more
coins be allowed to enter it. (See section 11 "Configuration").
If this function is unused, the full sensor located at
the top of the tube determines when the coins will
be directed into the Cash Box and no longer into
the coin tube, irrespective of the number of coins
inserted.
5900335 © 2005 JCM-American Corporation
4-1
Page 20

Section 4 Optipay™ CC FUNCTIONS
In thi
Security Stock Considerations
If a security stock is configured for the individual
tubes, the Coin Changer will not vend a minimum
number of tube coins. The security stock can be set
between 1 and 9 coins. It should be set higher for
coins which have stacking and edge standing problems rather than those that lay flat, as these coin
types do not fall easily when they land on a stack
higher than the coin (see section 11 "Configuration").
The Coin Changer can also be configured in such a
way that the security stock can be paid out of the
Vending Machine, or the security stock can be
delivered to the Vending Machine, when the
machine polls the capacity level (see section 11
"Configuration").
Inhibiting Certain Coin Types
If certain coin types are no longer being accepted
as Vending Machine payment (e.g. because too
many false coins of a particular type are in circulation), these coins types can either be inhibited
directly on the device by setting specific DIP
switches on the rear DIP Switch block (see Chapter
7 "Operation"), or by applying the PC software or
®
the Palm Pilot
section 11 "Configuration").
handheld software instructions (see
Disabling the Inventory Keys
The inventory keys constitute a part of the Coin
Changer’s front Keyboard: (e.g., keys , ,
and ).
These keys allow the vending of one, several or all
coins from the corresponding Left, Middle Left,
Middle Right and Right change tube. Should operation of these keys no longer be desired, they can
be inhibited, or configured in such a way that they
can be enabled by Vending Machine control (see
section 11 "Configuration").
Configuring Tokens
The Coin Changer contains three coin channel
memory locations for configuring a maximum of
three different type tokens. Therefore, a new
token’s measured value can be directly assigned to
a coin channel on the Vending Machine by inserting the corresponding tokens into it. The acceptance band generated will then accept these tokens
for payment within the Vending Machine.
In addition, you can choose between a normal and
wide acceptance band for the configured tokens.
However, a wide acceptance band should only be
set if a limited number of the tokens are available
for generating the token’s value measurement, or if
the tokens show very large tolerance values. Otherwise, there is the danger that a large number of
false coins will be accepted.
Tokens can either be configured so the customer
gets his selected product free of charge (free vend
tokens), or configured to assign a certain set
denomination (value tokens). The Coin Changer
can either direct the accepted tokens to the cashbox or send them back to the customer in the return
tray.
Chapter 11 "Configuration" reveals which configuration tool can be used to configure tokens.
Sending the Telephone/Currency
Code to the Vending Machine
Controller
Depending on which state or country the machine
is installed, a telephoned currency code can be
remotely sent to the Vending Machine control and
set into the Coin Changer (e.g. for setting menu
and display text).
For more details on how to change the pre-programmed telephone/currency code, please see section 11 "Configuration".
Tube Counter Automatic Correction
Usually after every coin acceptance and pay out,
the Coin Changer compares the tube counter
status and the sensor’s measured fill level, and, if
necessary, corrects the tube counter data.
If the Vending Machine control is unable to process
the automatic tube counter correction, the Coin
Changer can be set so that the tube count will not
be automatically corrected (see section 11 "Configuration").
s case, the change tubes should be
filled by inserting the coins through the
Coin Changer and not by directly placing
the coins into the tube cassettes (see
section 6 "Energizing" or section 7
"Operation").
Resetting the Tube Counter
After the change tubes have being emptied following repairs with tube counter correction switched
OFF, the Coin Changer’s tube counters should be
reset for start up. This is so the tube counter will
begin to count from zero again when the tubes are
5900335 © 2005 JCM-American Corporation
4-2
Page 21

FUNCTIONS Optipay™ CC Section 4
being refilled, rather than from the stored number
of coins set in the register (see section 11 "Configuration").
Individual Wake-up Time Considerations
For battery operated Coin Changers with an external wake-up line, a specific time period can be set
that specifies how long the Coin Changer remains
ON after the last Vending Machine poll (wake-up
time) (see section 11 "Configuration").
When the wake-up time has elapsed, the Coin
Changer automatically switches itself OFF and
must be re-initialized again by the Vending
Machine control system activating the external
wake-up line.
Accepting and Converting a Second Currency Type (optional)
If the Coin Changer needs to accept two currency
types, the second currency value can be converted
to the main currency value using a set rate.
The second currency value is rounded up or down
respectively in such a way that it can be managed
by the main currency counter. Chapter 11 "Configuration" describes which configuration tool is used
to program a second currency.
Minimizing String Manipulation
(optional)
The Coin Changer can be optionally equipped with
a String Sensor. This device recognizes coins
inserted into the device connected to a string and
inhibits this type of coin from being accepted. By
recognizing this security condition these coin types
will not generate a credit value.
The sensitivity of the String Sensor can be individually set for each unit (see section 11 "Configuration").
Following a string manipulation attempt it is possible to reject the next 100 tube coins inserted by
directing them to the Cash Box instead of into the
coin tubes. Coins directed to the Cash Box are less
prone to manipulation, so further attempts at string
manipulation will obviously fail (see section 11
"Configuration").
5900335 © 2005 JCM-American Corporation
4-3
Page 22

Section 4 Optipay™ CC
THIS PAGE INTENTIONALLY LEFT BLANK
5900335 © 2005 JCM-American Corporation
4-4
Page 23

Optipay™ CC
A-66 Coin Changer
Section 5
5 INSTALLATION
This section provides a installation instructions for
the Optipay™ CC A-66 Coin Changer.The A-66
Coin Changer is either:
•
Energized within a Vending Machine, or
•
Connected to a JCM Test Station using
WinMDB
•
Connected to one of the following JCM
configuration tools for set up purposes:
–
A PC programming station containing
WinEMP
–
A Palm Pilot® handheld (containing
installed PalmA66
software).
This section describes how to connect the Coin
Changer to a Vending Machine. For details on connecting the service tools, see section 11 "Configuration".
To avoid damage to the equipment,
please make sure that you check the
following before installation:
– check that the Coin Changer’s MDB
– check that the Coin Changer’s power
The following steps describe how to install the
Coin Changer into a Vending Machine:
1. Disconnect the Vending Machine’s main AC
power plug.
2. Unlock (See Figure 5-2 [1]), pull out [2] and
remove the Coin Validator from the Coin
Changer assembly by carefully lifting the left
and right side catches and gently pulling
forward as indicated by the arrows illustrated
in Figure 5-1.
3. Hang the A-66 in the Vending Machine using
the three mounting holes located on the back
wall of the Coin Validator. Two holes are
©
software for test purposes or
©
software
®
and/or PalmEMP®
connecting cable is suitable for the
Vending Machine interface.
supply is the same as the nominal
voltage stated on its product label.
Figure 5-1 Coin Validator Removal
Upper Mounting Holes
Figure 5-2 Coin Changer mounting hole locations
3
4
Another hole
at bottom
Pull
Out
2
Lift up
1
located at the top (See Figure 5-2 [3]) and
one is located at the bottom [4] (not shown).
Ensure that the Coin Validator assembly
remains safely connected to the Coin
Changer by the flat 40-wire ribbon cable.
4. Tightly secure the Coin Changer's housing to
the Vending Machine.
5. Replace the Coin Validator back into the Coin
Changer and engage.
Ensure that an air space exists between
the Vending Machine’s return lever and
that of the Coin Changer when closing.
5900335 © 2005 JCM-American Corporation
5-1
Page 24

INSTALLATION Optipay™ CC Section 5
6. Connect the Coin Changer to the Vending
Machine using the MDB connecting cable
(See Figure 5-1 [1]).
NOTE: A second Harness containing a four
pin connector is used with the optional
DBV-301 Validator’s RC-10 Recycling Unit.
This should be tied off if not being used.
7. Reconnect the Vending Machine’s main AC
power supply. The three LEDs (See Figure 51 [2]) located on the Coin Validator’s front
panel will briefly illuminate to test their
functions. Afterwards, the Green LED should
remain lit. The Coin Changer is now
operational and ready for use.
5900335 © 2005 JCM-American Corporation
5-2
Page 25

Optipay™ CC
A-66 Coin Changer
Section 6
6 ENERGIZING
This section provides energizing (power-up)
instructions for the Optipay™ CC A-66 Coin
Changer.
Although the individual functions of the A-66 Coin
Changer are pre-programmed by the manufacturer
to customer specifications, the first time the device
is activated, the four Tube Cassette change tubes
must be filled with relevant coin types.
In many cases the Vending Machine’s
controls will offer a filling function. In this
case they should be used, because the
control unit might not accept the filling level
capacity of the Coin Changer.
If the Cash Box contains coins, it must be
emptied, otherwise new coins directed to
the Cash Box will not be counted.
To begin the energizing process:
1. Press the Plus key (See Figure 6-1 [4]).
An audible signal will sound and the Green
LED (See Figure 6-1 [1]) will begin flashing
indicating that the Coin Changer is no longer
in a standard operating mode and has now
entered the filling level mode.
2. Insert the coin tubes.
The Coin Validator’s tube counter meters in
the accepted coins, and the Coin Changer
sorts the corresponding coin type into its preconfigured tube until either:
–
The full sensor is covered, or
–
The maximum coin number is configured,
or
–
The float level is reached.
If the “float” function is active, tube coins
inserted thereafter will not be accepted and
will be directed to the return area tray.
Otherwise, they will be accepted and directed
to the Cash Box.
If all the coin tubes are full:
3. Press the Plus key again.
Two audible signals will sound and the Green
LED will light constantly indicating that the
Coin Changer is no longer in the filling level
mode and has returned to the operating mode.
If no coins are inserted in a 30 second time
period, the Coin Changer will automatically
return to the operating mode, without
having to press the Plus
time.
key a second
Figure 6-1 Coin Validator Keyboard
5900335 © 2005 JCM-American Corporation
6-1
Page 26

Section 6 Optipay™ CC
THIS PAGE INTENTIONALLY LEFT BLANK
5900335 © 2005 JCM-American Corporation
6-2
Page 27

Optipay™ CC
A-66 Coin Changer
Section 7
7 OPERATION
This section explains how to enter functions and
settings directly on the Optipay™ CC A-66 Coin
Changer using its various operating controls (e.g.,
the front panel Keyboard and the DIP Switch
Block), rather than using the additional programming tool accessories.
Vending Change by Using the
Keyboard or Emptying the Tube
Cassette
Coins can be either vended from the change tubes
individually if a coin acceptance test is desired, or
consecutively when the tubes need to be completely emptied (e.g., before transit, for repairs, or
in case of an inventory).
Membrane inventory keys , , and apply
to the "left", "middle left", "middle right", and
"right" coin tubes respectively.
If the Coin Changer is configured so the
inventory keys are disabled, these
membrane keys will not be active. The
device is either configured so the keyboard
can be enabled by the Vending Machine’s
control system, or so the keyboard must
be initially activated by one of the various
configuration tools (see section 11
"Configuration").
To vend tube coins individually, simply press the
corresponding , , and key. One coin
will pay out each time the specific key is pressed.
To vend several tube coins:
1. Hold down the desired , , or membrane key for approximately five seconds.
The corresponding tube will automatically
empty without having to press the respective
key again.
2. Now, press any other key.
The coins will stop dispensing if not already
completely emptied.
If the Coin Changer is configured so the
inventory keys are disabled, these
membrane keys will not be active. The
device is either configured so the keyboard
can be enabled by the Vending Machine’s
control system, or so the keyboard must
be initially activated by one of the various
configuration tools (see section 11
"Configuration").
Emptying the Change Tubes to a
Certain Fill Level
If a “float” level is configured, the change tubes
can be emptied to the tube counter’s set float level
value.
Emptying the change tubes to the set float level:
1. Press the Plus key.
An audible signal will sound and the Green
LED will begin flashing indicating that the
Coin Changer is no longer in a standard operating mode and has now entered the filling
level mode.
2. Hold down any key, for approximately five
seconds (the Green LED illuminates).
All tubes will automatically empty to the
preconfigured float level. Afterwards, two
audible signals will sound and the Green LED
will light constantly indicating that the Coin
Changer is no longer in the filling level mode,
and has returned to the operating mode.
Validator Change Filling
After an inventory or repair the tube cassette’s four
change tubes can be refilled with relevant coin
types through the Coin Validator using the keyboard.
In many cases the Vending Machine’s
controls will offer a filling function. In this
case they should be used, because the
control unit might not accept the filling level
capacity of the Coin Changer.
If the Cash Box contains coins, it must be
emptied, otherwise new coins directed to
the Cash Box will not be counted.
5900335 © 2005 JCM-American Corporation
7-1
Page 28

Section 7 Optipay™ CC OPERATION
1. Press the Plus key.
An audible signal will sound and the Green
LED will begin flashing indicating that the
Coin Changer is no longer in a standard operating mode and has now entered the filling
level mode.
2. Insert the coin tubes.
The Coin Validator’s tube counter meters in
the accepted coins, and the Coin Changer
sorts the corresponding coin types into its relative pre-configured tube until either:
–
The full sensor is covered, or
–
The maximum coin number is configured,
or
–
The float level is reached.
If the “float” function is active, tube coins
inserted thereafter will not be accepted and
will be directed to the return area tray.
Otherwise, they will be accepted and directed
to the Cash Box.
If all the coin tubes are full:
3. Press the Plus key again.
Two audible signals will sound and the Green
LED will light constantly indicating that the
Coin Changer is no longer in the filling level
mode, and has returned to the operating mode.
If no coins are inserted in a 30 second
time period, the Coin Changer will
automatically return to the operating
mode, without having to press the Plus
key a second time.
and right side catches and gently pulling forward as indicated by the arrows illustrated in
Figure 7-1 .
Figure 7-1 Coin Validator Removal
Ensure that the Coin Validator remains
safely connected to the Coin Changer
by the flat 40-wire ribbon cable.
2. Set the related DIP Switches (1 through 8) to
their correct position (ON) using a scribe,
small screw driver or an opened paper clip
(See Figure 7-2 ).
Inhibiting Coin Types Using DIP
Switch Block Settings
By setting various switches on the DIP Switch
Block located on the rear Coin Validator’s circuit
board, it is possible to inhibit configured coin types
related to the first eight memory slots (coin channels) of the Coin Changer without using the additional configuration tools available. For details on
which coin type has been programmed for each
coin channel, please contact your JCM representative, or connect the Coin Validator to the Palm
®
Pilot
using PalmA66
ware (see section 11 "Configuration").
To inhibit a specific coin type:
1. Remove the Coin Validator from the Coin
Changer assembly by carefully lifting the left
5900335 © 2005 JCM-American Corporation
®
and/
or PalmEMP® soft-
Figure 7-2 Coin Validator Switch Block
The assigned coin types will no longer be
accepted, and will now be directed to the
return area tray.
3. Reinstall the Coin Validator and activate it.
With the aid of the configuration tools, the
possibility to inhibit any or all of the
pre-programmed coin types also exists
(see section 11 "Configuration").
7-2
Page 29

Optipay™ CC
A-66 Coin Changer
Section 8
8 CLEANING
This section explains how to clean the Optipay™
CC A-66 Coin Changer.
Only wipe the Coin Validator from time to time
with a damp cloth (use luke warm water containing
a mild dish cleaning liquid):
Under no circumstances allow the cloth
to be wet enough to allow excess fluid
to run into the device. Otherwise the
printed circuit board (pcb) may be
damaged.
Do not use any solvents or scouring
agents which can attack the plastic
surfaces of the device.
1. Remove the Vending Machine’s main AC
power plug.
2. Press up on the locking catch lever and open
the Coin Validator panel to the left
(See Figure 8-1 [1]).
3. Wipe the coin runway clean once inside the
coin validation area.
4. Close the Coin Validator panel and gently
press in on the "Close" arrow white dot until
the metal spring engages behind the lever and
a click is heard (See Figure 8-1 [2]).
5. Reconnect the Vending Machine to the main
AC power supply.
Figure 8-1 Opening and Closing the Coin Validator’s Access Panel
5900335 © 2005 JCM-American Corporation
8-1
Page 30

Section 8 Optipay™ CC
THIS PAGE INTENTIONALLY LEFT BLANK
5900335 © 2005 JCM-American Corporation
8-2
Page 31

Optipay™ CC
A-66 Coin Changer
Section 9
9 TRANSPORT
This chapter explains how to transport the Optipay™ CC A-66 Coin Changer.
Empty the tube cassette before
transporting the device so that loose
coins do not fall out.
Pull the Vending Machine's main AC
power plug before removing the Coin
Changer from the Vending Machine.
To avoid unnecessary damage, only
transport the device in its original
packaging; and, under no circumstance
carry it by it’s connecting cable.
5900335 © 2005 JCM-American Corporation
9-1
Page 32

Section 9 Optipay™ CC
THIS PAGE INTENTIONALLY LEFT BLANK
5900335 © 2005 JCM-American Corporation
9-2
Page 33

Optipay™ CC
A-66 Coin Changer
Section 10
10 TECHNICAL DATA
This section lists and defines the Optipay™ CC A-66 Coin Changer specifications.
A-66 Specifications
Coin acceptance 20 coin types maximum
16 different coin channels (up to 3 tokens)
Coin diameter: 0.59–1.23 in. (15–33 mm)
Coin thickness: 0.047–0.138 in. (1.2–3.5 mm)
Coin vending: 4 coin types from a tube cassette
(coin diameter and thickness depends on the specific tube
cassette)
Device dimensions: Height: 14.96 in. (380.0 mm)
Width: 5.25 in. (133.5 mm)
Depth: 3.01 in (76.5 mm [80 mm with return]) lever depressed])
Machine interface: Serial Multi-Drop Bus (MDB) interface
Mounting position: Vertical (maximum deviation = 2°)
Temperature range: -4 °F to 167 °F (-20 °C to +75 °C)
Humidity: 90% maximum
Nominal voltage: 24 Volts DC
Power consumption: Standby = 1.2 Watts; maximum 6 Watts with 24 V DC
Noise immunity: The device fulfills the current requirements on generic immunity
and generic emissions according to current EC directives (a
EMC law)
Safety prescriptions: Low voltage directive
CE Certification
The CE certificate (CE = Communautés
Européennes) confirms that our products
comply with the specified basic requirements of the applicable directive. The CE
certif-icate is not a quality assurance certificate in
terms of the quality expected by the manufacturer,
but only in terms of the quality demanded legally.
It is a pure administrative certificate and is
intended only as proof of compliance with the
directives for the monitoring authorities and not
directed at clients or final customers.
The following directives and their subsequent
changes can be applied partially to JCM devices:
1. The EMC Directive (89/336/EEC) regarding
devices that cause electromagnetic interference or are interfered with by same.
2. The Low Voltage Directive (73/23/EEC)
regarding electrical equipment used with a
nominal voltage between 50 and 1000 Volts
AC and 75-1500 Volts DC.
The CE Certificate Labelling Directive (93/68/
EEC) modification regarding the application and
use of CE labels.
5900335 © 2005 JCM-American Corporation
10-1
Page 34

Section 10 Optipay™ CC
THIS PAGE INTENTIONALLY LEFT BLANK
5900335 © 2005 JCM-American Corporation
10-2
Page 35

Optipay™ CC
A-66 Coin Changer
Section 11
11 CONFIGURATION
This section explains how to configure the Optipay™ CC A-66 Coin Changer for use.
In order to test the A-66 Coin Changer, react
quickly to new false coin occurrences, and make
individual adjustments in the workshop or on site,
three different service tools are available to facilitate these Coin Changer requirements.
This section includes:
•
A presentation of the individual service tools
required depending on where the Coin
Validator is to be tested or configured
•
Lists of the functions which can be set with
each service tool
•
Lists of the equipment required for testing or
configuration using the respective tool
•
Brief descriptions detailing how to connect the
various service tools to the Coin Changer
Workshop Testing the Coin
Changer
If Coin Changer functionality needs to be checked
without making any adjustments, the JCM Test
Station is sufficient for this purpose. The Test Station is composed of the following two components:
•
Test Software WinMDB© and
•
Tester G-19.0654 for Vending Machine
simulation and MDB functions testing
Workshop Testing and/or Configuring the Coin Changer
If the Coin Changer requires testing and configuration in the workshop, the following three JCM configuration solutions are available:
•
A PC programming station consisting of:
–
WinEMP© configuration and diagnostics
software, including a card reader and a chip
card
–
Tester G-19.0641 for checking the power
supply
•
A Palm Pilot® handheld containing:
–
PalmEMP© and/or PalmA66© software
installed
–
Tester G-19.0641or G55.0338 for checking
the power supply.
If the vending unit does not require
testing, it is unnecessary to dismantle the
entire Coin Changer. In this case it is just
sufficient to remove the Coin Validator
from the Coin Changer in order to
configure or test it.
If it is difficult to connect the G-19.0641
tester to the 5-pin PCB Edge Connector
Plug located behind the Coin Changer
housing, and it is more desirable to
connect the G-55.0338 tester by means of
the MDB connecting cable, an additional
8-pin RJ-45 PC-Adaptor (plug and cable
G 55.0348) can be obtained from JCM for
this purpose. This will allow the Coin
Changer to connect directly to a PC using
the easily accessible 8-pin RJ-45 jack on
the top right corner of the device. This will
also allow testing of all Coin Changer
functions and not just the MDB functions
available through the 5-pin pcb edge
connector plug.
On-Site Testing and/or Configuring
the Coin Changer in a Vending
Machine
If the Coin Changer must be tested or configured in
a Vending Machine on site, the following mobile
JCM configuration tools are available:
•
A Palm Pilot® Handheld with PalmEMP© and
PalmA66
©
software installed
PC Programming Station and Palm
®
Pilot
There are separate operating instructions available
for the PC base station using WinEMP
and the Palm Pilot
PalmEMP
tains all necessary detailed steps for configuring
the Coin Changer from installation, to its initial
connection and operation. This user manual only
provides a general overview relative to these
instructions.
Handheld Use
©
software
®
using PalmA66© and
©
handheld software. This software con-
5900335 © 2005 JCM-American Corporation
11-1
Page 36

Section 11 Optipay™ CC CONFIGURATION
•
The WinEMP© software or PalmA66© and
PalmEMP
figure JCM Coin Validators as well as update the
data block in the device memory (data block download). All three programs identify the connected
Coin Validator and the device’s own data, and
present them on the video screen of your PC or on
the Palm Pilot
©
software is used to diagnose and con-
®
handheld’s display.
Which Functions Can be Configured?
All available functions of the Coin Changer can be
set with the PC programming station using the
WinEMP
either of the Palm Pilot
some of the functions can be set. However, both of
the Palm Pilot
configuration possibilities as using the WinEMP
PC based software alone.
In addition to Coin Changer diagnostics, (e.g. in
Service cases) the following functions can be set:
©
PC based software, whereas, by using
®
handheld programs, only
®
programs together allow the same
©
WinEMP© Software
WinEMP© software provides:
•
Replacement of the tube cassette
•
Resetting of the tube counters
•
Genuine coin acceptance optimization and
false coin rejection
•
New coin type and token configuration
•
Other tube coin type configuration
•
Configuring the maximum number of tube
coins
•
Configuring a security stock
•
Inhibiting individual coin types
•
Disabling the inventory keys
•
Configuring the telephone and currency code
•
Suppressing or activating the tube counter
correction
•
Configuring an individual wake-up time
•
Configuring a second currency including the
conversion factor
•
Minimizing string manipulation
•
Configuring the smallest coin values decimal
point reference and the calculations basis for
all coin types
•
Data block download of current coin
information
Restoration of an old Coin Changer
configuration
•
Storing Coin Changer settings for a
standardized configuration (cloning)
PalmA66© Software
PalmA66© software provides:
•
Replacement of the tube cassette
•
Resetting of the tube counters
•
Configuring up to three token types
•
Other tube coin type configuration
•
Configuring the maximum number of tube
coins
•
Configuring a security stock
•
Inhibiting individual coin types
•
Disabling the inventory keys
•
Configuring telephone and currency codes
•
Suppressing or activating the tube counter
correction
•
Configuring an individual wake-up time
•
Configuring a second currency including its
conversion factor
•
Minimizing string manipulation
•
Configuring the smallest coin values decimal
point reference and the calculations basis for
all coin types
•
Storing Coin Changer settings for a
standardized configuration (cloning)
PalmEMP© Software
PalmEMP© software provides:
•
Genuine coins acceptance optimization and
false coin rejection
•
New coin type and token configuration
(acceptance band only, not the token type)
•
Data block download of current coin
information
•
Storing Coin Changer settings for a
standardized configuration (cloning)
PC Programming Station Device
Environment
The PC programming station consists of:
•
WinEMP© configuration and diagnostics
software including Card Reader
G-19.0647 and chip card
5900335 © 2005 JCM-American Corporation
11-2
Page 37

CONFIGURATION Optipay™ CC Section 11
•
Tester G-19.0641 for the checking the power
supply (See Figure 11-1 ).
Figure 11-1 PC Programming Station Connection
Connecting a Palm Pilot® Handheld
PalmEMP© and PalmA66© are JCM software solutions that can be installed on a Palm Pilot
held as additional applications. The Palm Pilot
Figure 11-2 Palm to Validator or Changer Connection
®
hand-
®
handheld can be simply connected to the Coin Val-
idator or Coin Changer by means of an additional
connecting cable (See Figure 11-2 illustrating a
simple software delivery method).
5900335 © 2005 JCM-American Corporation
11-3
Page 38

Section 11 Optipay™ CC
THIS PAGE INTENTIONALLY LEFT BLANK
5900335 © 2005 JCM-American Corporation
11-4
Page 39

12 PALM PILOT® USAGE
Optipay™ CC
A-66 Coin Changer
Section 12
A66US Changer Program Usage
This section describes the use of a Palm Pilot® to
configure the Optipay™ CC A-66 Coin Changer
using PalmA66
Requirements
•
A Palm Pilot® Handheld – All M100, 500 and
Tungsten Series handhelds (See Figure 12-1)
•
Centaur Changer Communication Cable
•
JCM A66US Changer Program for the Palm
Pilot
•
PC with Windows 2000 or XP O/S
•
Palm Pilot® Application Suite
•
Hot Sync Cradle or Cable*.
*Refer to the Palm Pilot® user’s manual
for program installation and Hot Sync
instructions.
©
and/or PalmEMP© software.
®
*
a
Figure 12-2 Palm A66US Selection
Managing Coin and Configuration Set-
tings
1. Turn on the Palm Pilot® and select the JCM
Palm A66US application (See Figure 12-2).
2. Select the
screen (See Figure 12-3 a).
3. Select the
menu screen (See Figure 12-4 a).
Settings
Operating modes…
tab on the main menu
tab on the
Figure 12-1 Typical M100/500 Series Palm
®
Pilot
Handheld & Software
a
Figure 12-3 Selecting Settings
a
Figure 12-4 Selecting Mode
5900335 © 2005 JCM-American Corporation
12-1
Page 40

Section 12 Optipay™ CC PALM PILOT® USAGE
a
b
c
d
e
f
g
h
j
Figure 12-5 Operating Modes
4. Set functions listed in
Figure 12-5 “a” through “h”.
Select the desired settings and click Send
(See Figure 12-5 i)
Changer or
return to the
a).
Inventory
•
Blocked
•
Enabled by machine control
check box functions are:
– Inventory keypad is disabled
to program the Coin
Cancel
(See Figure 12-5 j)
Settings
screen.
–
Inventory keypad can be enabled by the
Vending Machine. This requires a
service pass code
•
Enabled
b).
Payout security stock allowed
– Inventory keypad enabled
– Check
to enable the machine to pay the entire
contents of the change tubes.
c).
Accumulate credit
– Low value coins are
inserted until a credit value is reached. The
Coin Changer then sends the value to the
VMC.
d).
Float up function on
– Enable to allow
float up levels. Coin “float” values are set
on the “Coin Settings” page.
e).
With high string protection
– Enabling
high string protection will cause the Coin
Changer to send the next 100 coins to the
cashbox if the string sensor is triggered.
f).
Tube Counter with security stock
–
Check Tube Counter’s security stock,
including the security stock values, to
transmit tube contents to the VMC.
g).
No correction of tube counters
– to
disable the automatic Coin Changer Coin
Tube Sensors.
m).
“Tube empty” function for bills
–
Check this function to disable acceptance
of high value bills when the Coin Changer
is empty.
i
to
5. Select
Inhibit Mask…
on the screen
to enable or disable coin/bill acceptance
(See Figure 12-6 a).
a). Select the tick box next to each denomin-
ation that is to be disabled (See Figure 126 b).
a
b
c
Figure 12-6 Inhibit Coin Channels Mode
b). Select
Changer or
Send
to program the Coin
Cancel
to return to the
screen (See Figure 12-6 c).
6. Setting the Changer’s “Float Level”.
a). Configure the “Float Level” for each coin
denomination by using the triangular “up”
and “down” pointing arrows on the
screen (See Figure 12-7 a).
b). Click
Send
to program the Coin Changer
(See Figure 12-7 b).
a
Figure 12-7 Float Level Mode
b
5900335 © 2005 JCM-American Corporation
12-2
Page 41

PALM PILOT® USAGE Optipay™ CC Section 12
c). Float-up function warning (See Figure 12-
8).
If “Float up function on” is enabled and
the level settings are not configured (i.e.,
set to zero [0]), the tube float level will
only fill to the 50% sensor level.
Figure 12-8 Float up Selection Warning
7. Setting Coin Changer “Security Stock”
quantities.
a). Configure the “Security Stock” for each
tube by using the drop
down menu’s triangular “up” and
“down”arrows to set the desired value
(See Figure 12-9 a).
8. Configuring Changer tube “Coin Sorting”.
a). Select
Coin sorting
mode menu.
…
from the
b). The screen
shows the current tube configuration
(See Figure 12-10).
c). To change the tube configuration, select
Change
(b) and then select from the
available payout combinations listed.
d). Click
e).
f).
OK
(c) to select or
Back
to reset to Step “b” and then
Send
to program the Coin Changer.
a
c
Figure 12-9 Security Stock Mode
Send
b). Click
program the Coin Changer or
(See Figure 12-9 b) to
Cancel
(See Figure 12-9 c) to return to the
mode menu.
NOTE: A “Security Stock” level of three
(3) coins is recommended to prevent
“coin bounce” and possible stacking
issues in the Coin Changer tubes.
b
d
c
e
b
Figure 12-10 Coin Sorting Mode
9. Enabling the Bill Recycler.
a). Select the
Recycler
menu screen and then check the
5
Recycler active
…
tab on the
tick box to enable the
RC-10 recycling unit (See Figure 12-11).
The recycle value will be set by the Coin
Changer’s software.
5900335 © 2005 JCM-American Corporation
12-3
Page 42

Section 12 Optipay™ CC PALM PILOT® USAGE
11. Cloning configuration settings.
a
a). Click on the menu bar and select
Clone setting data
(See Figure 12-13 a).
c
a
Figure 12-11 Recycler Mode
b
d
12. The “
a). Select the
Other settings”
Other settings…
configurations.
mode on the
menu screen and the following
selections will appear:
•
Smallest coin value:
– Reference value
for all coin values programmed. All coin
values to be accepted must be a multiple
of the smallest coin value
(See Figure 12-12).
Select the desired options and click
Send to program the Changer.
Figure 12-12 Other Settings Mode
•
Telephone code: – and
Currency code:
– These codes are used
in combination to set the Vending
Machine’s language and currency type.
Figure 12-13 Clone Mode
b). To record the Coin Changer’s settings,
select
Read out
from the
menu that appears, then select the
desired record number (See Figure 12-13
b-to-c) in the menu that
appears.
c). To program the settings into a new Coin
Changer, select
Back
c) or
d). Select the appropriate
Record 2
Send
(See Figure 12-13
to reset to Step “b” and
Record 1 or
button (See Figure 12-13 d).
Changer Service, Token Programming,
and Currency Conversion
1. Changer payout set & tube counter editing.
NOTE: The Telephone Code is initially set
to “01” and the Currency Code is initially
set to “9001”.
•
MDB feature level
–
Level 3
– The changer controls all
: –
payout functions
–
Level 2
– The vending VMC controls
all payout functions
•
Wake up time:
– External input enable
signal for use with battery powered
units.
•
String sensitivity:
– “0” is the
minimum sensitivity level setting. “
is the maximum sensitivity level setting.
b). Make value changes by using the related
Up/Down menu triangular arrows to set
the desired value and select
5900335 © 2005 JCM-American Corporation
Send .
b
a
c
49
”
12-4
e
f
Figure 12-14 Service Mode
d
Page 43

PALM PILOT® USAGE Optipay™ CC Section 12
a). Select the
Service
tab on the main menu
screen (See Figure 12-14 a), and then
b). Select
Payout set
on the menu
that appears to view the coin levels in each
tube (See Figure 12-14 b). Click on the
related
L ML MR R
tube
position tab to perform a payout test on the
respective tube (See Figure 12-14 c).
c). To edit the counter, click
Edit counter
(See Figure 12-14 d) and
d). Adjust levels using the respective “up”
and “down” pointing triangular arrow
(See Figure 12-14 e).
l). Click
Send
to program the Coin Changer
(See Figure 12-14 f).
2. Viewing the “Filling Levels”.
a). Select the
Service
tab on the main menu
screen (See Figure 12-15 a); then
b
a
b
c
Figure 12-16 Teach Tokens Mode
d). While in the “Teach Token” mode insert a
minimum
of 10 coins to program tokens
into the Coin Changer’s memory
(See Figure 12-17 d).
a
Figure 12-15 Filling Levels Mode
b). Select
Filling levels
to view the coin
level bargraphs, count, each tube’s total
coin value and the entire Tube Cassette’s
total monitory value.
2. Teaching new coins & tokens.
a). Select
Teach token
on the
menu screen (See Figure 12-16 a -b), then
b). Select the desired channel to program the
chosen token (See Figure 12-16 c).
c). From the screen select a new
Te ac h
token to program (i.e.,
) or one to
change that has already been programmed
into the Coin Changer memory (i.e.,
Change code
).
d
e
f
h
g
Figure 12-17 Token Programming Mode
e). Select
Continue
on the
menu screen within the menu
revealing a third
menu (See Figure 12-17 e).
f). Select either
Normal
or
Wide
acceptance parameters (See Figure 12-17 f);
then
g). Select
OK
in the
menu that appears (See Figure 12-17 g).
c). Select the appropriate func-
tion tab (e.g.,
Value token
or
Vend token
,
Reject token
) to complete token pro-
gramming within the menu.
5900335 © 2005 JCM-American Corporation
12-5
Page 44

PALM PILOT® USAGE Optipay™ CC Section 12
a). The menu functions available
(See Figure 12-19 b) are as follows:
•
Software:
a
b
number
•
EMP:
•
Sorting:
•
Tube sensors:
•
Payout module:
•
Inhibit switches
– Current software version
– Changer self test
– Sorting gate test
– Self test
– Self test
– Current switch
positions graphic.
b). Select
access the fault description
Details
(See Figure 12-19 c) to
page
and review the fault status if any.
2. To view the changer statistical meters:
c
Figure 12-18 Conversion Setting Mode
4. Currency conversion settings
a). Select the
Service
tab on the main menu
screen (See Figure 12-18 a); then
b). Select
Convert currency
(See Figure 12-
18 b) to view the screen.
c). Set the required coin base and conversion
rate values. In addition, the appropriate
a). Click on the menu bar and then
b). Select from one of the three available
Meter lists (i.e.,
counter 1
or
Error list
Statistic counter 2
,
Statistic
[See Figure 12-20 a]).
b
a
coin channel parameters must also be set.
NOTE: Currency conversion can only be
set if multiple currencies are programmed
into the Coin Changer.
e). Select
Send
when finished program-
c
d
ming (See Figure 12-18 c).
Changer Diagnostics
1. Select
screen (See Figure 12-19 a-b).
Diagnostics
from the main menu
b
a
Figure 12-19 Diagnostics Mode
5900335 © 2005 JCM-American Corporation
Figure 12-20 Error List Mode
c). The
“Error List”
reveals the
menu screen (See Figure 12-20 b) that displays an error
“Counter”
, error
“Code”
list
and 10 sensor type failure totals.
d). “
c
Statistic counter 1
” (See Figure 12-20 c)
displays the page 1 listing of the coins
accepted relative to the coin channel.
e). “
Statistic counter 2
” (See Figure 12-20 d)
displays the page 2 listing of the total
coins accepted, paid out, and rejected. It
also shows the total transactions for each
coin tube.
12-6
Page 45

Optipay™ CC
A-66 Coin Changer
Section 13
13 INDEX
A
Acceptance band
token validation programming… 4-2
width of
…
4-2
Acceptance speed
advantages… 1-2
Adjustable functions
changing of… 4-1
AN/AB messages
…
A-2
Audible signals
sounding of… 7-1
Automatic return to operation
30 second delay period… 6-1
A66US Changer Program
software requirement of a… 12-1
B
Battery operated Coin Changers
w/external wake-up… 4-3
C
Card Reader
PC Programming Station requirement for a
11-2
Cash Box
emptying of… 6-1
location
CE mark certification
description of… 10-1
Change tube
filling of… 6-1
Chip card
PC Programming Station requirement for a
11-2
Coin acceptance
conditions for… 6-1
Coin and configuration settings
Managment of… 12-1
Coin Changer
design of… 3-1
general information concerning the
5-1; 6-1
installation of a
Coin insertion funnel
location & use… 3-1
Coin number allowance
requirements
correct amounts of
Coin storage capacity
thickness dependency for… 3-3
…
3-1
…
…
…
5-1
4-1
…
…
1-1; 2-1
Coin type inhibiting
certain types of… 4-2
Coin types
differences of… 3-3
Coin Validator
cleaning the… 8-1
integral part of Coin Changer
A-66.4000 version
integration of
removal of
…
…
5-1
…
3-1
1-2
Communication cable
requirement of a… 12-1
Controlled sorting guarantee
advantages of… 1-2
Customer specifications
special label listing of… 3-3
D
Data block
updating the… 11-2
Diagnostic functions
steps to set… 12-6
DIP Switch Block
location of… 3-2
DIP Switch Bock
location & settings… 7-1
DIP Switches 1 through 8
setting of… 7-2
Disabling inventory keys
configuration
defination for
…
7-1
Disclaimer
JCM rights reserved… 2-1
Display indicator meanings
table listing of… A-2
E
Easy configuration
advantages of… 1-2
EMC Directive
definition of the… 10-1
Emptying the Change Tubes
completely, or to a certain level… 7-1
;
Energizing
beginning the process of… 6-1
Energizing Coin Changer
in a Vending Machine, by using a Test Station
5-1
Entering functions and settings
methods for… 7-1
equipment damage
…
5-1
Error diagnosis
service advantages for… 1-2
…
5900335 © 2005 JCM-American Corporation
13-1
Page 46

Section 13 Optipay™ CC INDEX
F
False coin introductions
new & fast reactions to… 1-2
Fault diagnosis
quick LED indicating for… 3-2
Fault LED illumination conditions
Green, Yellow, Red… A-1
Fault List screen display
error counter, error code and sensor failure totals
of
…
12-6
Fault occurance indicators
FE messages
…
A-2
…
A-1
Filling change through the Validator
using keyboard to… 7-1
Filling level sensors
empty, 50%, 75% & full
description of
…
3-4
Flash Adapter
a Palm Pilot handheld adapter… 1-3
Flash Memory
programming advantages of… 1-2
Flash Prommer
part of JCM PC Update Station components
1-3
…
Flexible payout combinations
advantages of a… 1-2
Float Level
configuration conditioning of the… 7-1
configuring a
…
4-1
Front Product Label
location & device defining data listings on… 3-3
G
General Information
product related… 1-1
Green LED
normal operation
indication of
…
3-2
I
K
Keyboard
description of
uses for
…
7-1
front part of Coin Validator
membraine type
…
3-2
L
LED
Light-Emitting Diode
part of Coin Validator diagnostics
…
3-2
LED Indicator Meanings
table listing… A-1
Liability
JCM dislaimer… 2-1
statement of
…
2-1
Low Voltage Directive
definition of the… 10-1
M
Maximum coin content
configuring of… 4-1
MDB Connecting Cable
Vending Machine interfacing… 3-4
MDB connecting cable
use of an… 5-1
Membrane keys
touch-sensitive part of the Coin Validator’s
keyboard
…
3-2
Monitored coin run
advantages of a… 1-2
Multi Drop Bus
a Vending Machine interface requirement… 1-2
N
Navigation
within manual
procedures for
…
1-1
O
Individual coin vending
for unit testing, inventory & transportation… 4-1
INFO messages
…
A-2
Inhibiting coin types
using the DIP Switch Block settings to… 7-2
Inventory keys
disabling of… 4-2
uses of the
…
7-1
J
JCM PC Update Station
component parts of… 1-3
JCM service tool availability
JCM Test Station
components… 1-2
requirements & usage
usage of a
5900335 © 2005 JCM-American Corporation
…
5-1
…
…
3-2
A-1
Operating instructions
separate
location of
…
1-2
Operating software
update advantages of… 1-2
Optimum false coin rejection
advantages of… 1-2
P
Palm Pilot
software requirements & usage
Palm Pilot Handheld
types & software requirements… 12-1
Palm Pilot handheld personal assistant
PalmEMP
JCM/Palm software type
uses for
13-2
…
…
A-2
1-1
…
4-1
…
1-2
Page 47

INDEX Optipay™ CC Section 13
software application
description of
…
1-2
PalmE66
JCM/Palm software type
uses for
…
1-1
software application
description of
…
1-2
PalmFlash
a Palm Pilot handheld application… 1-3
Payout module
location & usage… 3-4
Payout Unit
location & use of… 3-3
tube cassettes & payout set usage
…
3-3
PC base station
programming uses of a… 11-1
PC Programming Station
uses of a… 5-1
PC programming station
configuration & component parts of… 1-2
PC Test Station
usage… 1-2
PC & Palm Pilot Programming
usage of… 11-1
PDF
Portable Document File
homepage location for this documents
…
1-2
Personal Computer (PC)
programming station usage… 1-2
Pilot lights
fault indicating LEDs on Coin Validator… 3-2
Pre-program coin type ihibiting
using configuration tools to… 7-2
Pre-programmed telephone/currency code
see Chapter 11… 4-2
Product Labels
location and feature listings on the… 3-3
Programming Adapter
part of JCM PC Update Station equipment… 1-3
Programming PC
requirements & usage… 3-2
Proper use
of Coin Changer… 2-1
Protection
yourself and equipment… 2-1
Q
quick updates
Flash Memory usage… 1-3
R
Red LED
major fault
indication of
Reliable sensing system
advantages of a… 1-2
Return Lever
part of Coin Validator… 3-2
…
3-2
Ribbon cable
flat, multi-wire
usage
…
3-2
RJ-45 PC plug adaptor
…
1-3
S
Safety
instructions for… 2-1
pictographs indicating
…
1-1
Second Currency Type
accepting & converting of… 4-3
Security stock
maintenance considerations for… 4-2
Vending Machine payout methods
…
4-2
Security stock allowance
1-9 coin maximum… 4-2
Service tools
JCM recommendations for… 1-2
Side Product Label
location & device defining data listings on… 3-3
Software
descriptions of & user instructions for… 1-1
Software instructions
user reference to… 1-2
Software updates
advantages for… 1-2
Special Notes
italic text highlighted… 1-1
Specifications
table listing of… 10-1
Splash-proof electronics
advantages of… 1-2
Stacking and edge standing
problems regarding… 4-2
Statistic counters
one & two
display description of
…
12-6
Status or fault messages
e.g., INFO, AN/AB or FE… A-2
Steps
sequential numbering of… 1-1
String Manipulation
minimizing… 4-3
String Sensor
option
description & usage
sensitivity of
…
…
4-3
4-3
T
Teach mode
advantages of… 1-2
Test Software
WinMDB use in Workshop… 11-1
Test software
uses with WinMDB… 1-2
Tester
#G-19.0654
usage
…
1-2
5900335 © 2005 JCM-American Corporation
13-3
Page 48

Section 13 Optipay™ CC INDEX
…
2-1
…
2-1
…
2-1
2-1
…
12-3
2-1
…
…
…
…
…
…
4-1
5-1
12-3
…
12-5
1-3
2-1
12-6
Tester G-19.0654
uses in Workshop… 11-1
Testing and/or configuring
in Workshop… 11-1
On-Site
…
11-1
Testing requirements
conditions for… 11-1
Tokens
configuring of… 4-2
Tools
configuration… 1-3
JCM configurations of
service
availablity of
udating
…
…
1-3
11-1
…
5-1
Trouble Shooting
see Section 14… 1-1
Tube cassette
sticker location & information content of… 3-3
w/change tubes & content ID
…
3-3
Tube Cassettes
filling and emptying
simplest & quickest methods for
…
4-1
Tube cassettes
location & use… 3-1
Tube Counter
automatic correction of… 4-2
resetting of
status of
status & description
…
…
4-2
4-2
…
3-4
Tube "Full" Sensor
requirement & location of… 3-4
Two currency types
acceptance of… 4-3
U
Units current status
normal or fault indicators for… 3-2
Universal payout mechanism
advantages of a… 1-2
V
Vend tokens
free or value of… 4-2
Vending coins
by emptying the Tube Cassette… 7-1
using the Keyboard to
Vending Machine simulation tester
Tester G-19.0654… 1-2
Vending several tube coins
instructions for… 7-1
…
7-1
correct unit operating voltage
disposal of unit
electrical shock
electronic components
electrostatic discharge damage
emptying Cash Box prior to refilling
flat 40-wire ribbon cable connection
Float up function zero setting
handling static sensitive components
keeping unit dry and clean
liquid damage
pulling connecting cable
removing power
security stock level 3 coin minimum
setting the currency conversion value
Teach Token mode coin minimums
transportation of unit
transporting unit
always repackage when
unit installation
…
…
…
…
8-1
…
2-1
2-1
2-1
5-1
…
…
…
…
9-1
2-1
Windows PC
operating system requirements… 12-1
WinEMP
JCM software type
uses for
…
1-1
software application
description of
…
1-2
WinFlash
software for JCM PC Update Station use… 1-3
Workshop testing
requirements for… 11-1
Y
Yellow LED
minor fault
indication of
…
3-2
Numerics
40-Pin Dual Inline Header
service interface jack
location of
5-pin pcb edge connector plug
location of… 11-1
5-Pin printed circuit board edge connector
location & usage… 3-2
8-pin modular RJ-45 Jack receptacle
8-pin RJ-45 jack
location of the… 11-1
8-pin RJ-45 PC-adaptor plug
additional part requirement to use… 11-1
8-pin RJ-45 receptacle jack
location & usage… 3-2
…
3-2
W
Wake-up time
setting of… 4-3
Warning
air space allowance
altering design
5900335 © 2005 JCM-American Corporation
…
5-1
…
5-1
contact JCM before proceeding with
…
2-1
13-4
Page 49

Optipay™ CC
A-66 Coin Changer
Appendix A
A TROUBLE SHOOTING
If a Coin Changer fault occurs, the pilot lights at
the top of the Coin Validator will indicate the
fault’s location.
The following JCM diagnostic service tools are
available to detail diagnose the fault’s cause (see
the "Diagnosis Using the Setting Module" area in
this appendix, as well as the in related information
located in sections 1 and 11 of this manual).
Front Panel LED Indicators
Quick Pilot Light Diagnosis
If the Green LED at the top of the Coin Validator is
lit or is flashing, no faults are indicated and the
device is working properly (See Figure A-1).
If the Yellow LED in the middle of the Coin
Validator flashes there is a definite fault which
generally can be easily remedied.
If the Red LED at the bottom of the Coin Validator
flashes, a fault that must be remedied by a service
technician is probable.
The label at the top of the Coin Validator may help
in locating the fault and Table A-1 lists their
meanings.
Figure A-1 Quick Diagnosis with the Help of the Pilot Lights
Table A-1 LED Indicator Meanings
LED Meaning Trouble
Green Lit Coin changer
Green
Flashing
Green &
Yellow Lit
5900335 © 2005 JCM-American Corporation
operational
Filling level
mode active
Inserted coin
inhibited
from the
Vending
Machine
No error
No error
Check vending machine
settings (a possibility
that high value coins
were inhibited as tube is
empty)
Table A-1 LED Indicator Meanings (Continued)
LED Meaning Trouble
Green &
Red Lit
Yellow
Flashes
once
A-1
Inserted coin
inhibited
from the
Vending
Machine
Return lever
pressed or
switch in Coin
Valida t or
defective
Activate coin channel
using switching block or
Palm Setting Module
with WinEMP
®
Pilot
with PalmA66
Check return mechanism in Vending
Machine or
Service case
©
or Palm
©
Page 50

Appendix A Optipay™ CC TROUBLE SHOOTING
Table A-1 LED Indicator Meanings (Continued)
LED Meaning Trouble
Yellow
Flashes
Twice
Yellow
Flashes
3 times
Red
Flashes
once
Red
Flashes
twice
Red
Flashes
3 times
Coins stuck in
vend area or
motor failure
Coin changer
inhibited
by Vending
Machine
Fault in Coin
Validator
Fault in Coin
Validator
Vending
Machine no
longer communicates
with Coin
Changer (has
sent no command in 2
secs.)
Remove tube cassette
and any jammed coins,
then vend one coin from
each tube using the
inventory keys or Service case
Check Vending
Machine (possibly
empty or defective)
Remove jammed coins
by pressing the return
lever on the Coin Validator or Service case, Coin
Validator may have to be
exchanged
Service case, Coin
Validator may have to be
exchanged
Check Vending
Machine control or
connecting cable
Diagnosis Using a Palm Pilot® Setting Module
If a Coin Changer fault occurs, the Palm Pilot® Setting Module displays the appropriate status or error
message as soon as you connect it to the RJ-45
interface jack on the Coin Changer’s front panel
(see chapter 11 "Configuration"). Depending on
the operating mode or fault, three status or fault
messages are displayed as follows:
•
INFO messages: used in general only for
information about particular operating states
•
AN/AB messages: indicate where a coin was
accepted (AN) or why a coin was rejected
(AB)
•
FE messages: indicate why the Coin Changer
no longer functions (Table A-2).
Table A-2 Display Indicators
Display Meaning Trouble
INFO
INFO -01
Return Lever
pressed or a
switch in Coin
Validator defective
No error or, check the
return mechanism in
Vending Machine, or
Service case
Table A-2 Display Indicators (Continued)
Display Meaning Trouble
InFo-09 String sensor
active
InFo-09A Tube coins are
delivered to the
cash-box after
a recognized
string manipulation
InFo-80 Coin Changer
inhibited by
Vending
Machine
AN
An X YY
An X YY
AB
Ab-01 Measured
Ab-02 Inserted coin
Ab-03 Inserted coin
Ab-04 Inserted coin
Ab-05 CP3 or CP4
Accepted coin
will be sorted
into:
X = 0 cash-box
X = 1 left tube
X = 2 middle
left tube
X = 3 middle
right tube
X = 4 right tube
Inserted coins
accepted in the
coin channel
YY = 01–16
(Channel No.)
inserted coin
values are outside the acceptance band limit
inhibited by the
Coin Changer
has not passed
through measurement section in the
appropriate
amount of time
was not recognized
sensor active
Coin on string
recognized (no error),
or
check sensor
(Service case)
No error.
This function can be
deactivated however,
using PRO 04 02
Check Vending
Machine (possibly
empty or defective)
No error
If necessary, widen
acceptance band limit
using with WinEMP
PalmEMP
Enable coin channel
using DIP Switch Block
or Palm Setting Module
with WinEMP
Pilot
Remove coins or foreign objects by pressing the return lever on
the Coin Validator, or
check measurement by
air-core coil or CP2
level (Service case)
Insert coin again more
slowly
Insert coin more slowly,
or inserted coin not on
string or check sensors
(Service case)
©
©
®
with PalmA66
©
or
or Palm
©
5900335 © 2005 JCM-American Corporation
A-2
Page 51

Appendix A Optipay™ CC TROUBLE SHOOTING
Table A-2 Display Indicators (Continued)
Display Meaning Trouble
Ab-06 Sensor behind
the acceptance
gate has not
recognized the
inserted coin
Ab-07 Sensor behind
the acceptance
gate has not
recognized
inserted coin
Ab-08 Inserted coin
has covered
the sorting control for too long
a time
Ab-09 String manipu-
lation recognized
Ab-10 Inserted coin
recognized in
false money
coin channel
Ab-11 Inserted coin
recognized as
enabling token
Ab-12 Inserted coin
inhibited from
the Vending
Machine
Ab-00 Other fault with
coin acceptance
FE
FE-01 Coins jammed
in the payout
area (left tube)
Check acceptance
gate with WinEMP
PalmEMP
®
and if
necessary, exchange it
(Service case) or check
the CP3 sensor
(Service case)
Check acceptance
gate with WinEMP
PalmEMP
®
and if
necessary, exchange it
(Service case) or
Check the CP4 sensor
(Service case)
Insert coin more
slowly, or Inserted coin
not on string or check
the CP4 sensor
(Service case)
Inserted coin not on
string or if necessary,
reduce sensitivity of the
String Sensor using
PRO 21 01 or clean
and/or exchange
String Sensor (Service
case), or check acceptance gate for ease of
movement (Service
case)
No error
No error
Check Vending
Machine’s settings
(is possible that high
value coins were
inhibited because tubes
are empty)
Service case
Remove the cassette
and jammed coins,
then vend one coin
from this tube using the
“L” inventory key, or a
Service case
®
®
or
or
Table A-2 Display Indicators (Continued)
Display Meaning Trouble
FE-02 Coin jammed in
the payout area
(middle left
tube) or
motor failure of
middle left tube
FE-03 Coin jammed in
the payout area
(middle right
tube) or
motor failure
(middle
right tube)
FE-04 Coin jammed in
the payout area
(right tube) or
motor failure
(right tube)
FE-13 Checksum fault
by acceptance
band
FE-14 Checksum fault
by coin values
FE-15 Checksum fault
by configuration
FE-38 Vending
Machine no
longer communicates with
Coin Changer
(has sent no
command in 2
seconds.)
Remove the cassette
and jammed coin,
then vend one coin
from this tube using the
“ML” inventory key, or a
Service case
Remove the cassette
and jammed coin,
then pay out one coin
from this tube using the
“MR” inventory key, or
a Service case
Remove the cassette
and jammed coin, then
pay out one coin from
this tube using the “R”
inventory key or a
Service case
Check and, if
necessary, adjust the
acceptance band of the
appropriate coin
channel with WinEMP
or PalmEMP
©
Check and, if necessary, correct coin
values with WinEMP
or PalmEMP
©
Check PRO functions
with the Palm Setting
Module and, if necessary, correct them
Check Vending
Machine control or the
interconnecting cable
©
©
5900335 © 2005 JCM-American Corporation
A-3
Page 52

Optipay™ CC TROUBLE SHOOTING
THIS PAGE INTENTIONALLY LEFT BLANK
5900335 © 2005 JCM-American Corporation
A-4
Page 53

BGLOSSARY
Optipay™ CC
A-66 Coin Changer
Appendix B
No. Term
1 A-66 – The Coin Changer Series product code number.
A
C
2 Optipay™ CC – The A-66 Bill Validator Series product name.
3 Coin Validator – An integral part of the A-66 Centaur product
D
4 Data Block – a specific data area in a programmable memory used to hold coin setup data.
5 DIP Switch – Dual Inline Package Switch - a printed circuit board mountable two-position
slide switch package containing up to 16 individual switches.
6 DIP Switch Block – a single Dual Inline Package two-position circuit board switch set.
7 Dual Inline Header – a chassis connector consisting of two female or male pin rows counting
greater than ten.
F
8 Filling Level Sensor –four sensors that detects the relative volume of coins within a given
tube. More than one sensor is usually present mounted in the chassis
behind the coin cassette.
9 Flash Memory – Electronically programmable memory integrated circuits that can be reused
without requiring special erasure procedures.
10 Float Level – A specific amount of coinage remaining in a cassette tube when servicing a
vending machine.
L
11 LED – acronym for Light Emitting Diode.
M
12 MDB – acronym for Multi Drop Bus - a communications protocol standard used by the
Vending Machine Industry.
13 Membrane Keys – A type of keyboard in which the keys are covered by a transparent, plastic
shell. The keys have very little movement, but are pressure sensitive to
touch. The primary advantage of a membrane keyboard is that
the covering protects its internal components from dirt, but quick and
accurate typing is usually difficult.
5900335 © 2005, JCM American, Corporation
B-1
Page 54

P Appendix B Optipay™ CC Glossary
Glossary of Terms
Continued
No. Term
P
14 Palm Pilot – A portable handheld programmable electronic device that functions as a personal
organizer, but can also contain other applications that allow music playback,
photographic display, view and edit documents, up and down loading of software
and much more. Also commonly called a Personal Digital Assistant (PDA).
15 Payout Module – a motorized coin dispensing mechanism.
16 Payout Set –a motorized coin dispensing assembly located below the coin cassette.
17 PCB Edge Connector – a keyed set of printed circuit tabs at the edge of a printed circuit board
designed to receive a mating pin count interface connector.
18 Pilot Lights – different colored incandescent or Light Emitting Diodes (LEDs) surface
mounted on a device to visually indicate specific operation conditions or
warnings.
R
19 Receptacle Jack – a diagnostics connector located on the Validator’s front panel for cable
connection to a Palm Pilot® handheld programming device.
S
20 Security Stock – a preset number of coins programmed to remain in a cassette to prevent
jamming problems caused when coins bounce off the cassette’s plastic surface.
T
21 Token – a non-negotiable coin designed for inhouse or promotional use.
22 Tube Cassette – a four tube coin holder that facilitates easy bulk coin removal and filling
operations.
23 Tube Counter – a memory counter that tracks the number of coins accepted and reports same
to the host machine housing the Coin Changer.
W
24 Wake-up Time – part of a power saving circuit feature used with a battery powered Coin ®
Changer.
5900335 © 2005, JCM American, Corporation
B-2
Page 55

Optipay™ CC Glossary
5900335 © 2005, JCM American, Corporation
B-3
Page 56

5900335
RR
May 05
TM
Optipay CC
A-66 Coin Changer
Operation and Maintenance Manual
(Revision 1)
Includes configuration setup using a Palm Pilot
Setting Module
RR
5900335
 Loading...