


INSTRUCTION MANUAL
PLEASE READ ALL THE INSTRUCTIONS COMPLETELY BEFORE USE.
WARNING: TO PREVENT
FIRE OR ELECTRIC SHOCK
HAZARD, DO NOT EXPOSE
THIS PRODUCT TO RAIN OR
MOISTURE.
CAUTION
RISK OF ELECTRIC
SHOCK DO NOT OPEN
THE LIGHTNING |
|
CAUTION: TO REDUCE THE |
|
THE EXCLAMATION |
FLASH AND ARROW- |
|
RISK OF ELECTRIC |
|
POINT WITHIN THE |
HEAD WITHIN THE |
|
SHOCK, DO NOT REMOVE |
|
TRIANGLE IS A WARN- |
TRIANGLE IS A WARN- |
|
THE RADIO BACK. NO |
|
ING SIGN ALERTING |
ING SIGN ALERTING |
|
USER SERVICEABLE |
|
YOU OF IMPORTANT |
YOU OF “DANGEROUS |
|
PARTS INSIDE. REFER |
|
INSTRUCTIONS |
VOLTAGE” INSIDE THE |
|
SERVICING TO QUALIFIED |
|
ACCOMPANYING THIS |
RADIO. |
|
SERVICE PERSONNEL. |
|
RADIO. |
|
|
|
|
|
|
|
|
|
|
|
|
|
|
|
Copyright © 2002 by C. Crane Company, Inc., Fortuna, CA 95540 800-522-8863 • ccrane.com
All rights reserved. No part of this booklet may be reproduced, in any form or means whatsoever, without permission in writing from C. Crane Company, Inc.
ccradioplusmanual.qxd Rev 5/01
TABLE OF CONTENTS |
|
SAFETY INSTRUCTIONS ......................................................... |
4-5 |
INTRODUCTION ........................................................................... |
6 |
UNPACKING ................................................................................ |
6 |
BUTTON IDENTIFICATION ........................................................... |
7 |
GETTING STARTED |
|
POWERING YOUR RADIO .............................................. |
8 |
INSTALLING THE BATTERIES ........................................ |
9 |
DISPLAY PANEL .......................................................... |
10 |
SETTING THE CLOCK ................................................. |
11 |
SETTING THE ALARM ........................................... |
11-12 |
SNOOZE FEATURE ...................................................... |
12 |
SLEEP TIMER .............................................................. |
12 |
RADIO OPERATION |
|
TUNING ........................................................................ |
13 |
WEATHER ALERT SYSTEM .................................. |
14-15 |
DISPLAY LIGHT ........................................................... |
16 |
LOCK SWITCH ............................................................. |
16 |
HEADPHONE JACK ..................................................... |
16 |
RESET BUTTON .......................................................... |
16 |
AUDIO & RECORDING JACKS ............................... |
17-18 |
SETTING THE TIMER ............................................. |
18-19 |
INSTRUCTIONS FOR LIGHT & SOLAR ................................ |
19-20 |
NICAD CHARGING SYSTEM ........................................ |
20 |
NICAD BATTERY INFO ................................................. |
21 |
SPECIFICATIONS ................................................................ |
22-23 |
RADIO NOISE TROUBLESHOOTING ......................................... |
24 |
LISTENING TIPS ....................................................................... |
25 |
PERSONAL STATION LOG ....................................................... |
26 |

SAFETY INSTRUCTIONS
READ BEFORE OPERATING EQUIPMENT
SAVE THESE INSTRUCTIONS
1)Read and understand all safety and operating instructions before the radio is operated.
2)Retain Instructions: The safety and operating instructions should be retained for future reference.
3)Heed Warnings: All warnings on the appliance and operating instructions should be followed.
4)Water and Moisture: The appliance should not be used near water. Do not use near a bathtub, washbowl, laundry tub, kitchen sink, wet basement, swimming pool, etc.
5)Unplug the receiver from the AC power outlet before cleaning. Use only a damp cloth for cleaning the exterior of the receiver.
6)Do not place the radio on an unstable cart, stand, bracket or table. The radio may fall, causing serious personal injury and damage to the receiver.
7)Ventilation: This radio should be situated so that its location or position does not interfere with its proper ventilation. For example, the radio should not be used on a bed, sofa, rug or other soft surfaces that may block the ventilation openings. It should not be placed in a built-in situation like a cabinet that may reduce air flow through the ventilation openings.
8)Heat: Never put the radio in direct sunlight in an unventilated area or behind glass like a car’s interior. The appliance should be away from heat sources such as radiators, heat registers, stoves, or other appliances that produce heat.
9)Power Cords: The power cord should be positioned so it is not walked on, pinched, or items placed on top of it. Pay particular attention to cords at plugs, convenience receptacles, and the point where they exit from the unit. Unplug the power cord by gripping the power plug, not the cord. Operate the radio using only the correct type of power source indicated. If you are not sure of the type of power supply to your home, consult your dealer or local power company.
Page 4

10)Do not overload wall outlets or extension cords. This can result in a risk of fire or electrical shock. Never insert objects of any kind into the receiver through openings. The objects may touch dangerous voltage points or short out parts. This could cause a fire or electrical shock.
11)If the radio is left unattended and unused for long periods of time, unplug it from the wall outlet. This will prevent damage caused by lightning or power line surges.
12)If the radio is left unattended and unused for long periods of time, remove the batteries. The batteries may leak and damage furniture or your radio.
13)Do not attempt to service the receiver yourself. Removing the cover may expose you to dangerous voltage, and will void the warranty. Refer all servicing to authorized service personnel.
14)The receiver is equipped with a polarized type plug (a plug having one blade wider than the other). This plug will fit into the power outlet only one way. This is a safety feature. If you are unable to insert the plug fully into the outlet, try reversing the plug. If the plug still fails to fit, contact an electrician to replace the obsolete outlet. Do not defeat the safety purpose of this plug.
15)The appliance should be serviced by qualified service personnel when:
A.The power supply cord or the plug has been damaged, or
B.Objects have fallen or liquid has been spilled into the radio, or
C.The radio has been exposed to rain, or
D.The radio does not appear to operate normally or exhibits a marked change in performance, or
E.The radio has been dropped, or the enclosure damaged.
16)The user should not attempt to service the appliance beyond that described in the operating instructions. All other servicing
should be referred to qualified service personnel. This symbol is to alert you to important operation or servicing instructions that may appear in the owner’s manual.
17)Do not charge alkaline batteries. See instructions on page 20.
 Page 5

INTRODUCTION
Thank you for purchasing the high performance digital CCRadio plus. The CCRadio plus incorporates the highest quality parts and superior engineering to produce the most sensitive AM receiver available. It also covers FM Stereo, Weather, and TV audio channels 2-13. The special Weather Alert System may sound an alarm if a signal is broadcast from National Oceanic and Atmospheric Administration (NOAA) in the United States. Canada also has a similar system.
UNPACKING
The box should contain the CCRadio plus, the power cord and this manual. If anything is missing or damaged, please contact your dealer immediately. We recommend you keep the box in the unlikely event your radio will need servicing.
Page 6
BUTTON IDENTIFICATION
13
16
12
17 |
18 |
4
|
|
|
|
|
|
|
|
|
|
|
|
|
|
|
|
|
|
|
|
|
|
|
|
|
|
|
|
|
|
|
|
|
|
|
|
|
|
|
|
|
|
|
|
|
|
|
|
|
|
|
|
|
|
|
|
|
|
|
|
|
|
|
|
|
|
|
|
|
|
|
|
|
|
|
|
|
|
|
|
|
|
|
|
|
|
|
|
|
|
|
|
|
|
|
|
|
|
|
|
|
|
|
|
|
|
|
|
|
|
|
|
|
|
|
|
|
|
|
|
|
|
|
|
|
|
|
|
|
|
|
|
|
|
|
|
|
|
|
|
|
|
|
|
|
|
|
9 |
|
|
|
|
|
|
|
|
|
|
|
|
|
|
|
|
|
|
|
|
|
|
|
|
|
|
|
|
|
|
|
|
|
|
|
|
|
|
|
|
|
|
|
|
|
|
|
|
|
|
|
|
|
|
|
|
|
|
|
|
|
|
|
|
|
|
|
|
|
|
|
|
|
|
|
|
|
|
|
|
|
|
|
|
|
|
|
|
|
|
|
|
|
|
|
|
|
|
|
|
|
|
|
|
|
|
|
|
|
|
|
|
|
|
|
|
|
|
|
|
|
|
|
|
|
|
|
|
|
|
|
|
|
|
|
|
|
|
|
|
|
|
|
|
|
|
|
|
|
|
|
|
|
|
|
|
|
|
|
|
|
|
|
|
|
|
|
|
|
|
|
|
|
|
|
|
|
|
|
|
|
|
|
|
|
|
|
|
|
|
|
|
|
|
|
|
|
|
|
|
|
|
|
|
|
|
|
|
|
|
|
|
|
|
|
|
|
|
|
|
|
|
|
|
|
|
|
|
|
|
|
|
|
|
|
|
|
|
|
|
||
|
|
1 |
2 |
|
|
|
|
|
|
|
|
|
|
|
|
|
|
|
|
|
|
|
|||||||
|
|
|
|
|
|
|
|
|
|
|
|
|
|
|
|
|
|
|
|
|
|
|
|
|
|
|
|
|
|
|
|
|
|
|
|
|
|
|
|
|
|
|
|
|
|
|
|
|
|
|
|
|
|
|
|
|
|
|
|
|
|
|
|
|
|
|
|
|
|
|
|
|
|
|
|
|
|
|
|
|
|
|
|
|
|||||
|
|
|
|
|
|
|
|
|
|
|
|
|
|
|
7 |
|
|
|
|
|
|
|
|
|
|
|
|||
|
|
|
|
|
|
|
|
|
|
|
|
|
|
|
|
|
|
|
|
|
|
|
|
|
|
|
|
|
|
|
|
|
|
|
|
||||||||||||||||||||||||
|
|
|
|
|
|
|
|
||||||||||||||||||||||
|
|
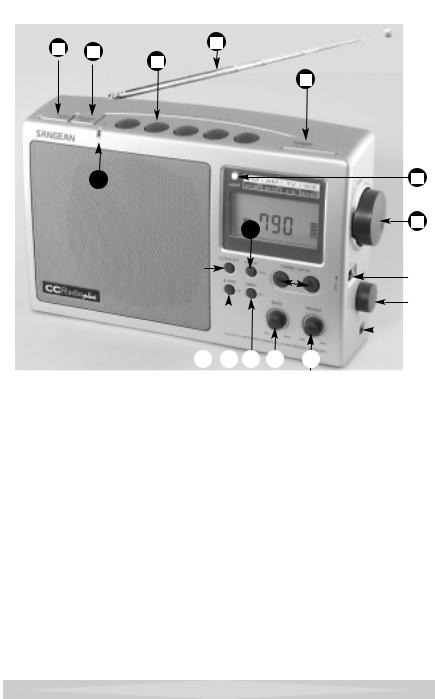
BUTTON IDENTIFICATION |
|
|
|
|
|||||||||||||||||||||||
1) |
Clock Set |
|
|
|
|
|
|
|
|
|
|
|
|
|
|
|
|
|
|
|
|
|
|
|
|||||
10) |
|
Lock Switch |
|
|
|
|
|||||||||||||||||||||||
2) |
Alarm/Set |
11) |
Tuning Knob |
|
|
||||||||||||||||||||||||
3) |
Timer/Set |
12) |
|
Power/Sleep Timer |
|
|
|||||||||||||||||||||||
4) |
Display Clock or Frequency |
13) |
Telescopic Antenna |
|
|
||||||||||||||||||||||||
5) |
Bass Control |
14) |
|
Memory (1-5) |
|
|
|||||||||||||||||||||||
6) |
Treble Control |
15) |
|
Weather Alert (3 Modes) |
|
|
|||||||||||||||||||||||
7) |
Tuning/Time Set (Up/Down) |
16) |
|
Band/AUXILIARY |
|
|
|||||||||||||||||||||||
8) |
Headphone Jack |
17) |
|
Weather Alert Light |
|
|
|||||||||||||||||||||||
9) |
Volume Control |
18) |
|
Display Light |
|
|
|||||||||||||||||||||||
|
|
|
|
|
|
|
|
|
|
|
|
|
|
|
|
|
|
|
|
|
|
|
|
|
|
|
|
|
|
|
|
|
|
|
|
|
|
|
|
|
|
|
|
|
|
|
|
|
|
|
|
|
|
|
|
|
|
|
|
Note: When you see a “• ” next to a word describing a button on the radio, it means you must hold the button down to activate the function. The appropriate symbol will then show on the display along with a beep. To deactivate the function hold it until it beeps again and the symbol disappears from the display.
 Page 7
GETTING STARTED
POWERING YOUR RADIO
Before powering your radio be sure to read the Safety Instructions on pages 4 and 5.
The CCRadio plus will run on (4) “D” size NiCad or alkaline batteries or on 120V AC house current using the included power cord. Batteries are optional. The batteries are necessary to keep the time clock and memories if the power cord is removed from the radio for more than three minutes.
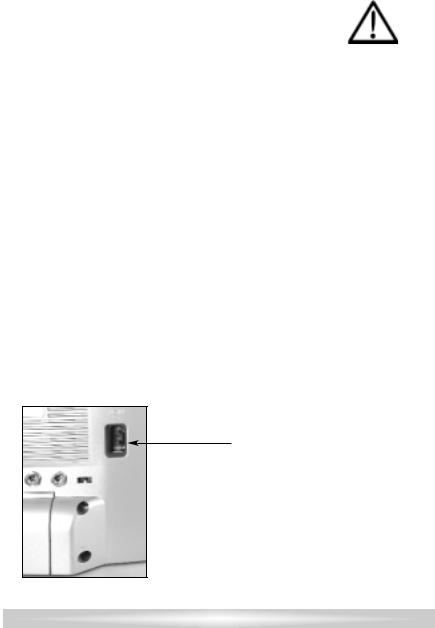
AC OPERATION
Before you plug the AC cord into the radio be sure the AC voltage is 120Volts/60Hz. If you have batteries in the radio and you use the AC power cord, the batteries will automatically be disconnected.
NOTE: If you remove the power cord without turning the radio OFF, the radio will automatically revert to the batteries.
Insert the plug on the end of the supplied power cord into the AC power jack on the back of the radio.
Page 8

INSTALLING THE BATTERIES
1)Position the radio face down on a soft surface to protect it.
2)Remove the battery compartment cover.
3)Insert the (4) “D” cell batteries into the compartment as indicated in the drawing below. Be sure the negative (-) end is against the spring. Refer to the drawing below to insure correct installation of your batteries.
4)Replace the battery cover. You are now ready to operate your radio.
Remove battery cover by pressing |
|
|
|
AC power cord |
|
both clips at the same time towards |
|
|
|
plugs in here. |
|
the bottom of the radio. |
|
|
|
|
|
|
|
|
|
|
|
First Battery |
Second |
|
Battery |
Third Battery 

BATTERY REPLACEMENT
The battery indicator will display the battery level for approximately seven seconds after the radio is switched off. After removing dead batteries for replacement, you have approximately three minutes to replace the batteries before your clock and memory information will be lost (if the radio is not plugged in).
This symbol means |
This symbol means |
This flashing symbol means |
the batteries are full. |
batteries are dead. |
the batteries need replacing. |
|
|
|
|
|
Page 9 |
|
|
|
 Loading...