


INSTRUCTION MANUAL
PLEASE READ ALL THE INSTRUCTIONS COMPLETELY BEFORE USE
Ver. 1.4 AND SAVE THIS MANUAL FOR FUTURE REFERENCE

Introduction/ Safety Instructions
Introduction
The CC Pocket radio uses the latest in digital chip technology along with our own techniques developed at C. Crane. It is able to bring in a weak FM station better than perhaps any other pocket radio. The button layout is easy to understand for basic use. It is different than other radios because some of the features can be changed by reading the manual and using multiple button presses to change them.
On AM, overload from a strong local station has been a problem since the dawn of radio. The CC Pocket may be able to shut out the offending station perhaps like no other radio you have owned.
If you have any question about your radio, please give us a call or check out ccrane.com/faqs/CCPocket.
READ BEFORE OPERATING EQUIPMENT
SAVE THESE INSTRUCTIONS
1)Read and understand all safety and operating instructions before the radio is operated.
2)Heat: Never put the radio in direct sunlight in an unventilated area or behind glass like a carʼs interior. The appliance should be away from heat sources such as radiators, heat registers, stoves, or other appliances that produce heat.
3)If the radio is left unattended and unused for long periods of time,remove the batteries. The batteries may leak and damage furniture or your radio.
4)The user should not attempt to service the appliance beyond that described in the operating instructions. All other servicing should be referred to qualified service personnel.
For your future reference:
Serial No. (Found inside battery compartment) Date of purchase Name & address of dealer
Unpacking
The box should contain the CCPocket, the Voz-P earphones, and this manual. If anything is missing or damaged, please contact your dealer immediately. We recommend you keep the packaging in the unlikely event your radio will need servicing.
CCPocket |
Page 2 |

Table of Contents
Installing |
The |
Batteries.............................................................. |
4 |
|
Display |
Screen |
Identification..................................................... |
5 |
|
Powering |
the Radio.................................................................... |
6 |
||
Setting |
the Sleeptimer................................................................ |
6 |
||
Listening |
with |
Earphones.......................................................... |
6 |
|
Earphones as FM Antenna........................................................ |
6 |
|||
Setting the Volume...................................................................... |
6 |
|||
Tuning |
a |
Station.......................................................................... |
6 |
|
Saving a Station to Memory....................................................... |
6 |
|||
Listening |
with |
Speaker............................................................... |
6 |
|
Changing |
Bands......................................................................... |
7 |
||
Changing |
Pages......................................................................... |
7 |
||
Setting |
Weather Alert................................................................. |
7 |
||
Changing Display Views............................................................. |
7 |
|||
Lock Switch................................................................................. |
|
7 |
||
Headphone/ Speaker Switch...................................................... |
8 |
|||
Removing the Belt Clip............................................................... |
8 |
|||
Setting The Clock........................................................................ |
9 |
|||
Setting |
The Alarm.................................................................... |
9 |
||
Disable |
Beep Sound…………...………………...…...................10 |
|||
Designate Frequency or Clock While Listening................... |
10 |
|||
Activate 9 or 10 kHz AM Tuning……....……..................….......11 |
||||
Activate 1 kHz AM Tuning Steps.............................................. |
11 |
|||
Activate Narrow AM Filters…….............……..................….......11 |
||||
Reset All Settings...................................………….....................11 |
||||
Disable the Display for Better Reception............................... |
11 |
|||
Troubleshooting Guide............................................................ |
12 |
|||
Specifications........................................................................ |
|
13 |
||
Page 3 |
CCPocket |
Getting Started
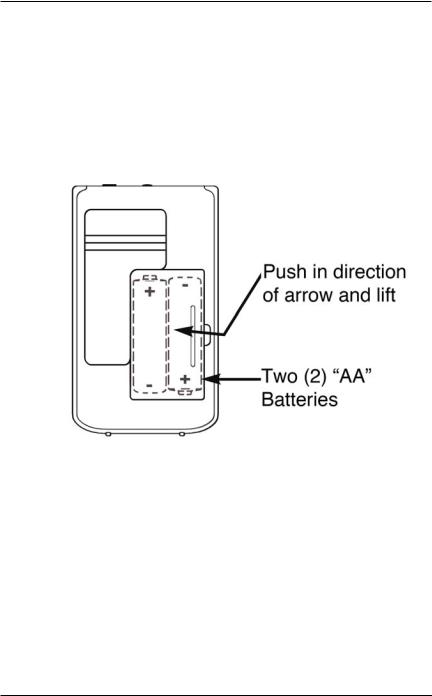
INSTALLING THE BATTERIES
1)Position the radio face down on a soft surface to protect it.
2)Remove the battery cover using your fingernail or small tool. Press and lift the area indicated below.
3)Insert the two (2) “AA” cell batteries into the compartment as indicated. Be sure the negative (-) end of each battery is against the spring.
4)Replace the battery cover. You are now ready to operate your radio.
CCPocket |
Page 4 |

Radio Identification
DISPLAY SCREEN
A.Battery Icon
B.Page number (for station memories)
C.Station Memories 1-5
D.Reception Signal Strength
E.Band Indicator (AM, FM, Weather)
F.Frequency / Time
G.Speaker is Activated
H.Alert is Activated
I.Alarm is Activated
J.Stereo FM Reception
K.Sleep Timer is Activated
L.Lock Switch is Activated (buttons are disabled)
Page 5 |
CCPocket |
 Loading...