


INSTRUCTION MANUAL
PLEASE READ ALL THE INSTRUCTIONS COMPLETELY BEFORE USE AND SAVE THIS MANUAL FOR FUTURE REFERENCE.

Before Use
Please read IMPORTANT SAFETY INSTRUCTIONS on page 25 before use. It is important to read and understand all instructions.
WARNING: TO PREVENT FIRE OR ELECTRIC SHOCK HAZ-
ARD, DO NOT EXPOSE THIS PRODUCT TO RAIN OR MOISTURE.
CAUTION
RISK OF ELECTRIC
SHOCK DO NOT OPEN
THE LIGHTNING |
|
CAUTION: TO REDUCE THE |
|
THE EXCLAMATION |
FLASH AND ARROW- |
|
RISK OF ELECTRIC |
|
POINT WITHIN THE |
HEAD WITHIN THE |
|
SHOCK, DO NOT REMOVE |
|
TRIANGLE IS A WARN- |
TRIANGLE IS A WARN- |
|
THE RADIO BACK. NO |
|
ING SIGN ALERTING |
ING SIGN ALERTING |
|
USER SERVICEABLE |
|
YOU OF IMPORTANT |
YOU OF “DANGER- |
|
PARTS INSIDE. REFER |
|
INSTRUCTIONS |
OUS VOLTAGE” |
|
SERVICING TO QUALIFIED |
|
ACCOMPANYING THIS |
INSIDE THE RADIO. |
|
SERVICE PERSONNEL. |
|
RADIO. |
|
|
|
|
|
|
|
|
|
|
|
|
|
|
|
For your future reference:
Serial No. |
|
|
Date of purchase |
|
(found inside battery compartment) |
|
|||
|
|
|
||
Name & address of dealer |
|
|
|
|
|
|
|
|
|
Unpacking
The box should contain the CCRadio SW, the AC Adapter, (2) PAL Antenna Connectors, and this manual. If anything is missing or damaged, please contact your dealer immediately. We recommend you keep the box in the unlikely event your radio will need servicing.
Copyright © 2007 by C. Crane Company, Inc., Fortuna, CA 95540
Phone: 1-800-522-8863 Web: ccrane.com
All rights reserved. No part of this booklet may be reproduced, in any form or means whatsoever, without permission in writing from C. Crane Company, Inc.

Table of Contents
Unpacking ....................................................................................................... |
2 |
|
Quick |
Start ..................................................................................................... |
4 |
Radio |
Identification .................................................................................. |
5-7 |
|
Front View ............................................................................................. |
5 |
|
Side Views ............................................................................................. |
6 |
|
Back View ............................................................................................... |
7 |
Features and Operation Explained |
|
|
|
Introduction ......................................................................................... |
8 |
|
Sleep Mode ............................................................................................. |
8 |
|
Clock Set .......................................................................................... |
10-11 |
|
Saving Stations to Memory ................................................................. |
11 |
|
Alarm Set ......................................................................................... |
11-12 |
|
Battery Charging ............................................................................. |
12-13 |
|
Shortwave Band .................................................................................. |
13 |
|
AM RF Gain ...................................................................................... |
15-16 |
|
LCD Display .......................................................................................... |
17 |
|
Audio Line Out ...................................................................................... |
18 |
|
AM IF Output ........................................................................................ |
20 |
Specifications .................................................................................................. |
21 |
|
Troubleshooting Guide ................................................................................. |
22 |
|
PAL Connector Assembly .............................................................................. |
22 |
|
Safety Instructions .......................................................................................... |
23 |

Quick Start
1. Turn “AM RF GAIN” control knob y full clockwise.
2. Slide “AM SENSITIVITY” switch H to “DISTANT” position.
3. Slide “FM/SW ANTENNA” switch J to “INTERNAL” position.
4. Select band by rotating band selection knobs:
a)For AM band turn “AM/SW” knob i to “AM” and “AM/SW–FM” knob o to “WIDE”.
b)For FM band turn “AM/SW” knob o to “MONO”.
c)For SW turn “AM/SW” knob i to “SW1”, “SW2” or “SW3” and “AM/SW–FM” knob o to “WIDE.”
5.Apply power:
a)Use AC ADAPTER by connecting the adapter to “DC IN” jack D; or
b)Install batteries by sliding “BATTERY SIZE” switch S to type of battery being used. Insert 4 batteries into Battery Compartment L, paying close attention to orientation of the batteries’ + and – ends.
6.Turn on the radio by pressing the POWER button Q.
7.Press the “DIAL SPEED FAST” button w above the tuning knob.
8.Use the “TUNING” knob q to locate a station.
9.Adjust “VOLUME” knob e, “TREBLE” knob t and “BASS” knob r to
desired levels.
For Button and Knob locations, see Radio Identification diagrams on pages 5-7.
Page 4 |
CCRadio SW |
Radio Identification — Front View
|
|
|
|
|
|
|
|
p |
[ ] |
|
|
|
|
|
|
|
|
|
|
|
|
||||||
|
|
|
|
|
|
|
|
|
|
|
|
|
|
|
|
|
|
|
|
|
|
|
|
|
Q |
||
|
|
|
|
|
|
|
|
|
|
|
|
|
|
|
|
|
|
|
|
|
|
|
|
|
|||
|
|
|
|
|
|
|
|
|
|
|
|
|
|
|
|
|
|
|
|
|
|
|
|
W |
|||
|
|
|
|
|
|
|
|
|
|
|
|
|
|
|
|
|
|
|
|
|
|
|
|
||||
|
|
|
|
|
|
|
|
|
|
|
|
|
|
|
|
|
|
|
|
|
|
|
|
E |
|||
|
|
|
|
|
|
|
|
|
|
|
|
|
|
|
|
|
|
|
|
|
R |
||||||
|
|
|
|
|
|
|
|
|
|
|
|
|
|
|
|
|
|
|
|
|
|||||||
|
|
|
|
|
|
|
|
|
|
|
|
|
|
|
|
|
|
|
|
|
|
|
|
|
|
|
T |
o |
|
|
|
|
|
|
|
|
|
|
|
|
|
|
|
|
|
|
|
|
Y |
||||||
|
|
|
|
|
|
|
|
|
|
|
|
|
|
|
|
|
|
|
|
|
|
U |
|||||
|
|
|
|
|
|
|
|
|
|
|
|
|
|
|
|
|
|
|
|
|
|
|
|||||
|
|
|
|
|
|
|
|
|
|
|
|
|
|
|
|
|
|
|
|
|
|
||||||
|
|
|
|
|
|
|
|
|
|
|
|
|
|
|
|
|
|
|
|
|
|
I |
|||||
|
|
|
|
|
|
|
|
|
|
|
|
|
|
|
|
|
|
|
|
|
|
||||||
i |
|
|
|
|
|
|
|
|
|
|
|
|
|
|
|
|
|
|
|
|
|
|
O |
||||
|
|
|
|
|
|
|
|
|
|
|
|
|
|
|
|
|
|
|
|
|
|
||||||
|
|
|
|
|
|
|
|
|
|
|
|
|
|
|
|
|
|
|
P |
||||||||
|
|
|
|
|
|
|
|
|
|
|
|
|
|
|
|
|
|
|
|
|
|
|
|||||
|
|
|
|
|
|
|
|
|
|
|
|
|
|
|
|
|
|
{ |
|
|
|
|
|||||
u |
|
|
|
|
|
|
|
|
|
|
|
|
|
|
|
|
|
|
|
|
|
|
|
|
|||
|
|
|
|
|
|
|
|
|
|
|
|
|
|
|
|
|
|
|
|
|
|
|
|
||||
|
|
|
y |
t |
|
|
|
|
|
|
|
|
|
|
|
|
|
|
|
|
|
|
|
||||
|
|
|
|
|
|
|
|
|
|
|
|
|
|
|
|
|
|
|
|
|
|
|
|
|
|||
|
|
|
|
|
|
|
|
|
|
|
|
|
|
|
|
|
|
|
|
|
|
|
|||||
|
r |
e w |
|
q |
} |
|
|
|
|
|
|
|
|
||||||||||||||
|
|
|
|
|
|
|
|
|
|
|
|
|
|
|
|
|
|
|
|
|
|
|
|
|
|
|
|
|
|
|
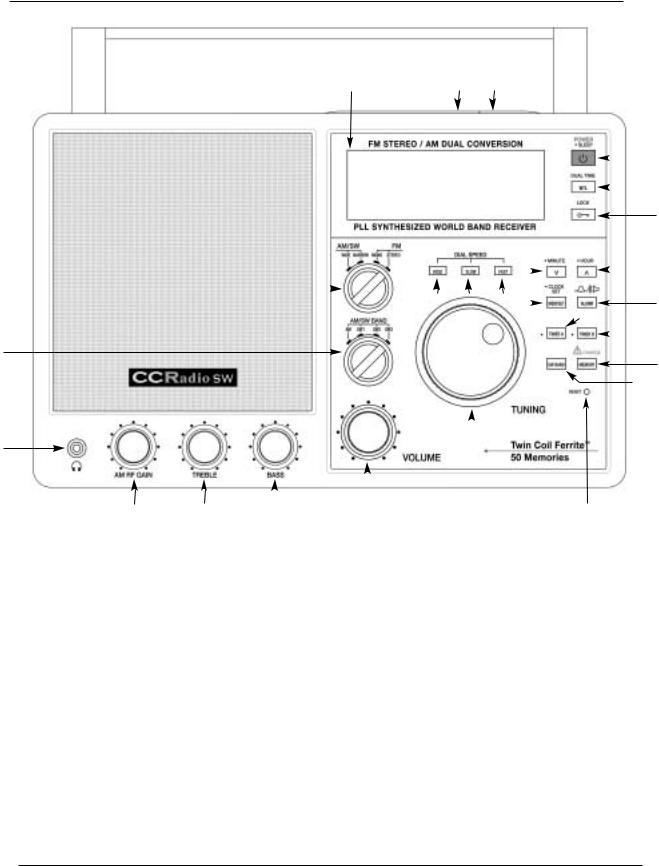
Front/Top Identification |
|
|
|
|
|
|
|
|
|
|
|
|
|
|
|
|
|
|
|
|
|
|
||
|
|
|
|
|
I • TIMER A |
|
|
|
|
|
|
|
|
|
|
|
|
|
|
|
|||||||
|
|
Q POWER or • SLEEP Timer |
|
|
|
|
t TREBLE Control |
|
|
|
|
|
|
|
|
|
|
||||||||||
|
|
W DUAL TIME Button |
|
|
O • TIMER B |
|
|
|
|
y AM RF GAIN |
|
|
|
|
|
|
|
|
|
|
|||||||
|
|
E LOCK Button |
|
|
P MEMORY or • CHARGE |
|
u Headphone Jack |
|
|
|
|
|
|
|
|
|
|
||||||||||
|
|
R Down or • MINUTE |
|
|
{ SW BAND Selection |
|
i AM/SW BAND Selection |
|
|
||||||||||||||||||
|
|
T Up or • HOUR or |
|
|
} RESET |
|
|
|
|
o AM/SW–FM Band Selection |
|
|
|||||||||||||||
|
|
|
12/24 Hour Clock |
|
|
q TUNING Knob |
|
|
|
|
p LCD Display |
|
|
|
|
|
|
|
|
|
|
||||||
|
|
Y MEMORY SET or |
|
|
w DIAL SPEED Selection |
|
[ SNOOZE Button |
|
|
|
|
|
|
|
|
|
|
||||||||||
|
|
|
• CLOCK SET |
|
|
e VOLUME Control |
|
] LIGHT Button |
|
|
|
|
|
|
|
|
|
|
|||||||||
|
|
U ALARM |
|
|
r BASS Control |
|
|
|
|
|
|
|
|
|
|
|
|
|
|
|
|
|
|
|
|||
|
|
|
|
|
|
|
|
|
|
|
|
|
|
|
|
|
|
|
|
|
|
|
|
|
|||
|
|
|
|
|
|
|
|
|
|
|
|
|
|
|
|
|
|
|
|
|
|
|
|
|
|
|
|
NOTE: The “•”next to a button description means “press and hold” for a second function.
CCRadio SW |
Page 5 |

Radio Identification — Side Views
Left |
Right |
 F
F
A
|
G |
S |
H |
|
|
D |
|
|
J |
Left View
A LINE OUT Jacks
S BATTERY SIZE Switch
D DC POWER IN Jack
F Radio Handle
Right View
GKEY LIGHT Switch
HAM SENSITIVITY Switch
J FM/SW ANTENNA Switch
Page 6 |
CCRadio SW |

Radio Identification — Back View
K
d
s
a
:L
Inside Battery Compartment
Back View
KWhip Antenna
LBattery Compartment
: AM IF OUTPUT
a AM EXTERNAL ANTENNA s GROUND
d FM/SW EXTERNAL ANTENNA f AM Tuning Step Switch
SIZE AA |
SIZE AA |
|
|
1.5V |
1.5V |
|
|
|
|
SIZE D |
|
|
|
1.5V |
|
SIZE AA |
SIZE AA |
|
|
1.5V |
1.5V |
|
|
|
|
9K |
10K |
SIZE D |
SIZE D |
SIZE D |
|
1.5V |
1.5V |
1.5V |
|
|
|
|
f |
CCRadio SW |
Page 7 |

Features and Operation Explained — Front of Radio
Introduction
The CCRadio-SW can receive weaker signals, with superior audio, than perhaps any portable radio ever made. You are given much more control over how the radio works, sounds and picks up a signal. You can even deliver a digital signal to a computer for decoding. Learning how the radio works will help you with your audio experience.
Please refer to the Radio Identification diagrams on pages 5-7 as you read through this instruction manual. Radio controls and their functions are listed numerically in this manual.
NOTE: The “•”next to a button description on the radio means that button has a dual function. “Press and hold” briefly to activate the second function. The dual functions are usually done with the power “off”, while AC power is connected or batteries installed.
Q POWER• SLEEP
The “POWER • SLEEP” button has nine operational settings: 90, 60, 45, 30, 15, 10, 5, 1 (minutes) and “ON” (continuous).
When you press and release the “POWER” button the first time you will see “60” minutes displayed for about two seconds. This indicates the radio is set to operate for 60 minutes and then shut off. A SLEEP icon  will also be displayed continuously during this timed playing mode. When the radio shuts “off”, the SLEEP icon
  will disappear. This is the radio’s “SLEEP” operation. The radio will function with this “60” minute “SLEEP” time limit every time you turn the radio “on” until you change it to a different one of the nine SLEEP settings.
To change to a different setting, press and release the “POWER • SLEEP” button while any one of the nine “SLEEP” settings is displayed. They are only displayed for two seconds at a time. Each press of the button will display the next setting respectively. Stop on the setting you desire and it will be remembered for your convenience each time you turn the radio “on”. If you select any one of the sleep settings, except “ON”, the SLEEP icon will be displayed while the radio is “on”. When “on” is selected, the radio will simply turn on and off when the power button is pushed.
Pressing the “POWER • SLEEP” button while the radio is operating on any of the settings will turn the radio off.
W DUAL TIME
The “DUAL TIME”  button has two functions:
1)It toggles between “WORLD” and “LOCAL” time clock with the radio “on” or “off”. The radio displays the word LOCAL or WORLD indicating which clock time is the default display time clock. Press and release this button and the alternate time clock will display its time for two seconds, along with the word LOCAL or WORLD.
Page 8 |
CCRadio SW |
 Loading...