

Page 1
Internet Radio
INSTRUCTION MANUAL
Rev. 2 11/2013
Page 2

c
Please read IMPORTANT SAFETY
INSTRUCTIONS on page 43
understand all instructions. Keep these precautions and instructions
where all who use this radio will read them.
WARNING: TO PREVENT FIRE OR ELECTRIC SHOCK HAZARD,
DO NOT EXPOSE THIS PRODUCT TO RAIN OR MOISTURE.
Before Use
before use. It is important to read and
m
CAUTION
RISK OF ELECTRIC SHOCK
DO NOT OPEN
CAUTION: TO REDUCE THE RISK OF ELECTRIC SHOCK, DO
NOT REMOVE THE RADIO BACK. NO USER SERVICE ABLE
PARTS INSIDE. REFER SERVICING TO QUALIFIED SERVICE
PERSONNEL.
THE LIGHTNING FLASH AND ARROWHEAD WITHIN THE
c
m
For your future reference:
Serial No.
TRIANGLE IS A WARNING SIGN ALERTING YOU OF
“DANGEROUS VOLTAGE” INSIDE THE RADIO.
THE EXCLAMATION POINT WITHIN THE TRIANGLE IS A
WARNING SIGN ALERTING YOU OF IMPORTANT
INSTRUCTIONS ACCOMPANYING THIS RADIO.
Date of Purchase
Name & Address of Dealer
Unpacking
The box should contain the CC WiFi Radio, AC Adapter and this
manual. If any thing is missing or damaged, please contact your
dealer immediately. We recommend you keep the box in the unlikely
event your radio needs to be serviced.
Copyright ©2008-2013 by
C. Crane Company, Inc.
1001 Main St, Fortuna, CA 95540
Phone: 1-800-522-8863 Web: ccrane.com
All rights reserved. No part of this booklet may be reproduced, in any form or
means what soever, without permission in writing from C. Crane Company, Inc.
Page 2 CC WiFi
Page 3

Table of Contents
Unpacking ................................................................................ 2
Location of Controls ........................................................... 4-5
Getting Started
Turning the Radio On ................................................ 6
Connecting to a Wireless Network .......................... 7
Entering Your WEP or WPA Key .............................. 8
Connecting to Network Using Ethernet Cable ...... 10
Choosing a Radio Station ..................................................... 11
Searching for a Station ......................................................... 13
Changing the Volume ............................................................ 14
Storing a Station as a Preset ................................................ 14
Play a Stored Radio Station Preset ..................................... 14
Menu Time Out ...................................................................... 15
Setting the Time and Date .................................................... 15
Setting the Alarm ................................................................... 16
Setting the Sleep Timer ......................................................... 18
Media Player Functions ........................................................ 19
Configure Menu Options ....................................................... 23
Configuring “My Stuff” .......................................................... 25
Configuring “My Stations” .................................................... 25
Adding Content to “My Streams” or “My Podcasts” .......... 26
Setting Up Extra Features ..................................................... 27
Using “My Pandora” .............................................................. 27
Using “My Aupeo” ................................................................. 29
Using “Live365” ..................................................................... 31
Help Pages ............................................................................. 33
Menu Flow Charts ................................................................. 40
Safety Instructions ................................................................. 43
Memory Preset Log ............................................................... 44
Location of CC WiFi Radio Serial Number ........................... 48
Software License Information ............................................... 48
Thank you for choosing the CC WiFi radio. Read this manual carefully
to get the best performance from this unit.
CC WiFi Page 3
Page 4
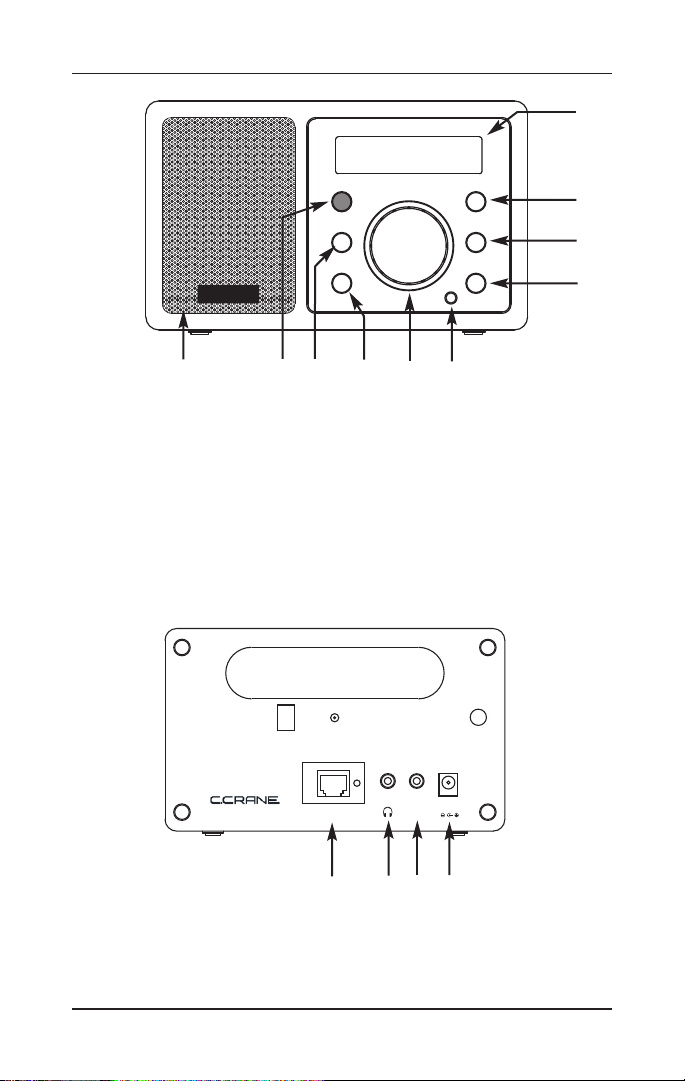
Location of Controls — Front and Back of Radio
POWER
B
ACK
REPLY
ill
/
$
i
il
luu
DIAL / SELECT
1
2
3
CC WiFi
LINE
OUT
ETHERNET
DC IN 7.5V
Q
W
E
R
O
I
w
U
Y
U
I
O
P
q
w
q
T
Y
DIAL/VOLUME/SELECT
REPLY
BACK
POWER ON/OFF
Speaker
{
}
Headphone Jack
Ethernet Jack
P
Q
LCD Display
W
PLAY/PAUSE/STOP or
PRESET #1
E
PREVIOUS or PRESET #2
R
NEXT or PRESET #3
T
Remote Sensor
{
DC Power Jack
} Line Out Jack
Page 4 CC WiFi
Page 5

Location of Controls — Remote Control
J
H
G
Buttons 23-26 and 29-30 are used only in Media Player
mode while playing tracks from your computer.
e
POWER: Switch radio
ON/OFF
r
1-9: Store presets and recall
functions
t
MUTE: Mute the audio
y
REPLY: Used for Pandora,
Aupeo! and adding stations
to Reciva
u
STORE: Store up to 99
radio stations
i
--/-: Used for presets 10 and
above
o
RECALL: Play pre-set
stations
p
+ or - VOL: Adjust volume
[
PLAY/PAUSE: Play or pause
track
F
D
e
r
t
y
u
i
o
p
[
]
A
S
]
STOP: Stop track play. Press
and hold to delete a track
from the playlist
A
NEXT: Play next track
S
BROWSE: View tracks in
playlist
D
UP/DOWN: Scroll through
options
F
SELECT: Select a displayed
option
G
MODE: Switch between
Repeat and Shuffle modes
H
PREV: Play previous track
J
BACK: Reverts back to the
previous menu or option
CC WiFi Page 5
Page 6
Getting Started – Turning On Your WiFi Radio
Plug the power adapter cube into a 120V AC power outlet. Connect
the power adapters small plug into the jack on the back of the radio
that is labeled “DC IN 7.5V”.
Caution: Use only the power adapter supplied with the radio.
Connecting a power adapter other than the one that was
supplied with your radio could cause permanent damage to the
radio and may be hazardous.
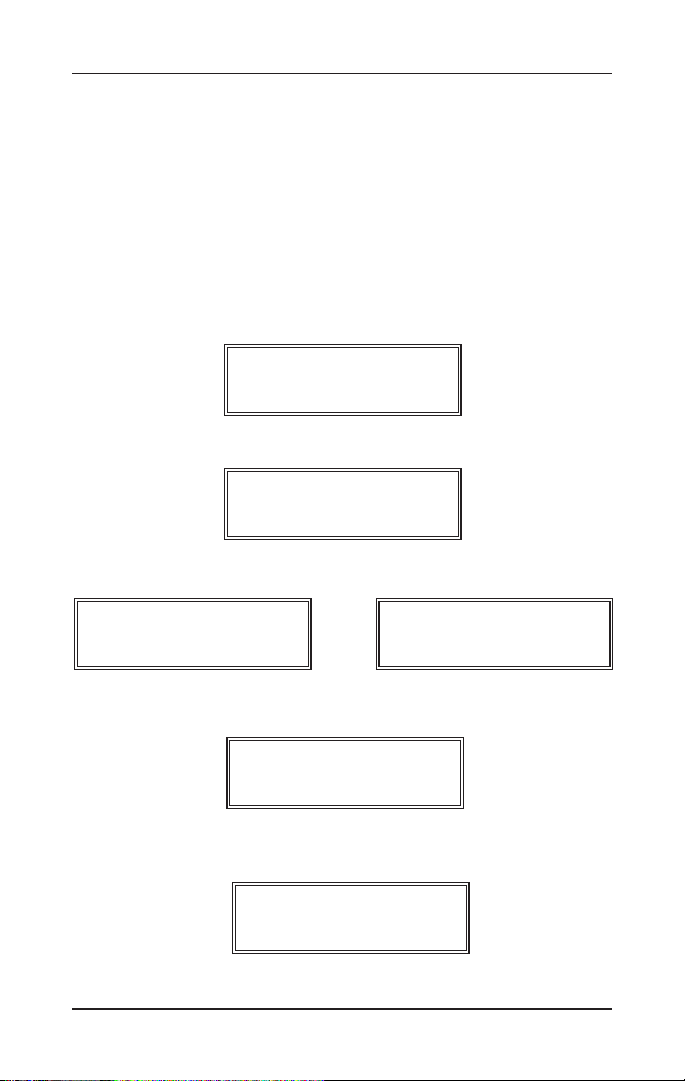
After a few seconds the display on the front of the radio will light up
and show:
CC WiFi Radio
Followed by:
Reciva Enabled
ARM Powered
Followed by:
Starting ...
Followed by:
and
Initialising
Network
Scanning
If the radio cannot find any wireless networks, then the display will
show:
No networks
found
If no networks are found, see page 33 for troubleshooting assistance.
Page 6 CC WiFi
Page 7

Getting Started – Turning On Your WiFi Radio
Connecting to a Wireless Network
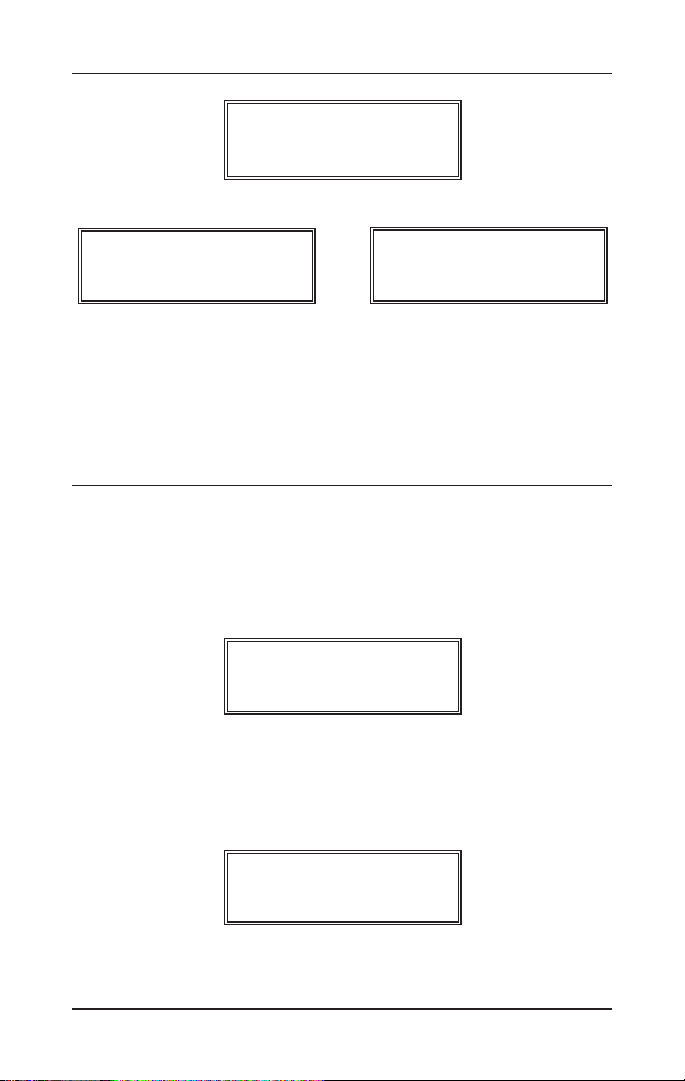
When the radio finds wireless networks, it will show the network
names (also called the ESSID) in the display screen.
Example:
SELECT NETWORK
< WiFi Network 1 >
Note: You can always use the BACK button to start over at the
previous screen.
The wireless network will show in the display after the wireless
network scan. There may be more wireless networks to choose from
by further rotating the dial.
Example:
To connect to your wireless network, select it by pushing the dial in.
Need Help?: Refer to help page 33 for help finding which SSID
(Network Name) is yours.
< SELECT NETWORK >
<
Network 2 >
CC WiFi Page 7
Page 8
Connecting to a Wireless Network
If the display
shows:
However, if the screen displays:
Enter WEP Key
you must enter the correct WEP or WPA wireless encryption key
(Wireless Password) to proceed.
Note: Take note which type of key your network requires for future
reference.
Connecting to
Network
or
then continue
on to page 12.
Enter WPA Key
Entering Your WEP or WPA Key (Wireless Password)
Need Help?: Refer to help page 33 for help finding your WEP or
WPA Key.
After a few seconds the display will go into a password entry mode.
This mode contains upper case letters, lower case letters, numbers,
and special characters.
END <> A BCDE
Notice that the letter “A” is separated from the other characters in the
center of the display. Rotate the dial and you will see how the center
character is always separated from the other characters. Continue
rotating the dial until the first character of your WEP or WPA password
is in the center of the display. Select it by pressing the main dial in.
ABCDE F GHIJ
_
After you have selected the first character of your password, it will
appear below.
Page 8 CC WiFi
Page 9

Entering Your WEP or WPA Key (Wireless Password)
ABCDE F GHIJ
F _
Turn the dial to the next character in the password and SELECT.
Repeat this process until your entire wireless password is entered on
the lower line.
Example:
XYZab c defg
Frank12abc _
Note: WEP passwords use numbers 0-9 and upper case letters A-F.
WPA passwords are case sensitive to upper and lower case letters,
so you must enter them exactly.
After the final character is entered, turn the dial until “END” shows in
the middle of the display — press the dial to select.
()“ END ghA
The display will show “Connecting to network” as the radio connects
to the WiFi network.
Connecting to
and
Network
Your network’s name will be displayed here.
Then:
Station Update
Connecting to
“My Network”
From Reciva
Need Help?: Refer to help pages 33-38 for troubleshooting
connection problems.
When finished, the radio automatically goes to the “Primary Menu”
that contains six options: STATIONS, PERSONAL RADIO,
MY STUFF, MEDIA PLAYER, CONFIGURE and ALARM CLOCK.
CC WiFi Page 9
Page 10
Entering Your WEP or WPA Key (Wireless Password)
< Stations >
Personal Radio
Note: Menu tree flow charts are located on pages 40-42.
To begin choosing stations skip to “Choosing a Radio Station” on
page 11.
Connecting to a Network Using Ethernet Cable (optional)
When using an ethernet cable to connect, little setup is required.
1. While the radio is unplugged from power, connect a standard Cat5
or Cat6 Ethernet cable (not included with radio)
to an open LAN port on your router. The LAN
ports are the ones typically numbered 1-4 on
the back of your router.
Note: Ethernet cables can be purchased from
C. Crane Company or your local electronics store.
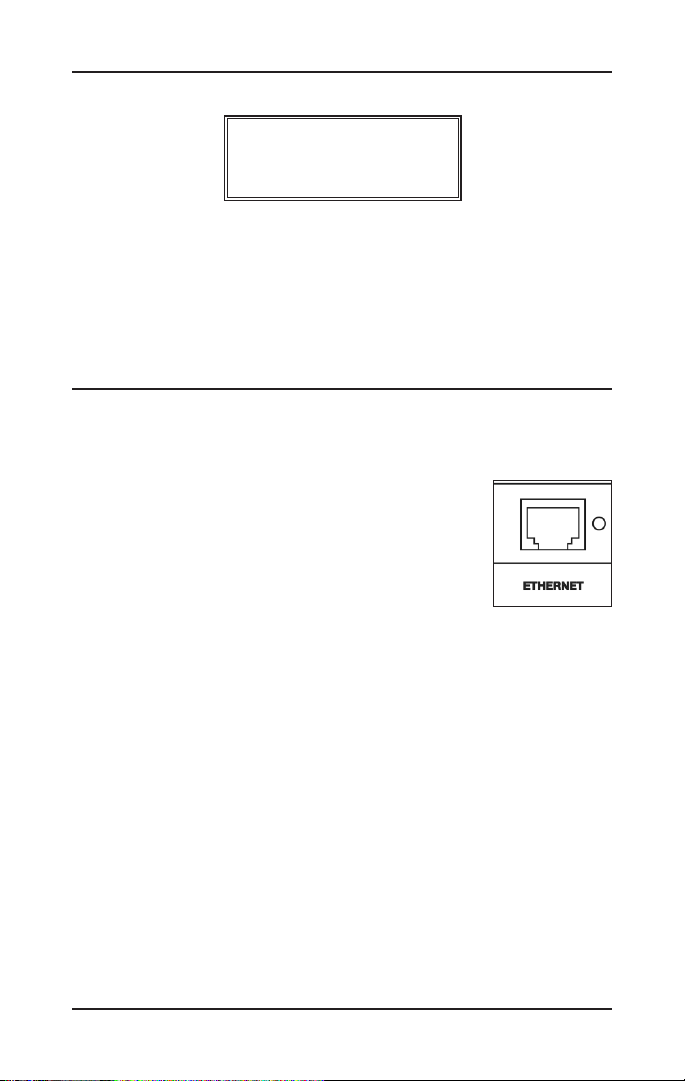
2. Connect the opposite end of the Ethernet cable to the Ethernet
port on the back of your radio.
3. Plug in the power cord to the radio.
After a few seconds, the connection light will flash indicating a good
connection.
After the radio successfully connects to your router it will automatically
go to the “Primary Menu” that contains six options: STATIONS,
PERSONAL RADIO, MY STUFF, MEDIA PLAYER, CONFIGURE and
ALARM CLOCK.
Need Help?: Refer to help page 37 for troubleshooting connection
problems.
Note:
Menu tree flow charts are located on pages 40-42.
Page 10 CC WiFi
Page 11
Choosing a Radio Station
1. From the Primary Menu, choose “Stations” by turning the dial until
brackets are positioned on both sides. Press the dial to select.
< Stations >
Personal Radio
2. Next, turn the dial to choose a radio station from either the
“Location”, “Genre” or “Search” menu. Press the dial to continue
into the selected menu.
Note: The “Location” menu lets you choose a radio station from a particular continent then country. The “Genre” menu lets you choose a
radio station by categorized content – for example: “Dance, Classical,
Rock, Talk” etc. For direct station name entry, see “Searching for a
Station” on page 13.
< Location >
Genre
Need Help?: To find which genre or location contains your favorite
station, refer to help page 38.
3. After pressing “SELECT” on “Location” or “Genre”, rotate the dial
to scroll through the locations or genres. Selections are listed in
alphabetical order.
Press the dial to continue into the selected menu.
By Location:
By Genre:
4. After loading, the first two radio stations will show in the display
screen.
CC WiFi Page 11
< USA >
< News Talk >
or
Venezuela
or
News Updates
Location
< Genre >
Page 12

Choosing a Radio Station
Example:
Radio stations are listed in alphabetic order, so you may need to turn
the dial many times until your desired station is reached.
5. Press the dial to listen to a selected station.
Example:
The display will show “Connecting” followed by “Buffering”. The
connecting process can sometimes take up to a minute or two,
depending on the speed of the station.
Example:
< 101 RU Classic >
101 RU Humor
< KGO-AM 810 >
KGUM 570 AM
< KGO-AM 810 >
Connecting /
followed by
< KGO-AM 810 >
Buffering 50%
Once the station is fully buffered, it will begin to play. You may need to
turn up the volume by using the same dial.
When a station is playing, the following information will show on the
display (for example):
Station Name: BBC Radio 1
Audio quality, and Audio format: 32 kbps WMA
Player that the radio is using: Real Enabled
Page 12 CC WiFi
Page 13

Searching for a Station
You can search for an Internet radio station by directly entering the
station name or call sign into the radio.
1. From the Primary Menu, choose “Stations” by turning the dial until
brackets are positioned on both sides. Press the dial to select.
< Stations >
Personal Radio
2. Next, turn the dial clockwise past “Location” and “Genre” to
“Search”. Press the dial to select.
Genre
< Search >
3. Rotate the dial clockwise until the first character of the desired
station name is displayed in the top/middle and press the dial to
select. The selected character will show beneath the other
characters on a separate line. Continue on to the next character in
the desired station name until all characters are entered.
The example below shows KGO entered into the search feature.
AB C D E F G HI J KL
KGO _
4. When finished, rotate the dial until “END” is located in the
top/middle of screen and then press the dial to select.
}( ) ” END <> AB
KGO _
5. The radio will now display the station names resulting from the
search. You can rotate the dial to browse through the results.
When you are ready to play a station align the brackets on either
side of the station name and press the dial to select.
KGOT-FM 101.3
< KGO-AM 810 (Ne >
CC WiFi Page 13
Page 14

Changing the Volume
You can change the volume by turning the dial clockwise to increase
the volume and counterclockwise to decrease the volume. The display
shows the volume bar. You cannot change the volume when you are
in a menu, except when using the remote control. After a station is
selected and begins to play, you can then change the volume with the
main dial.
Store a Radio Station as a Preset
A. Using the Controls on the Front of the Radio to Play Presets 1-3.
While a radio station is playing, press and hold one of the preset
buttons for three seconds or until the display screen shows
“Assigned to Preset”.
B. Using the Remote Control to Store Presets 1-9.
While a radio station is playing, press and hold the preset number
on the remote control that you want the station to be stored to.
After three seconds the display screen will show “Assigned to
Preset”.
C. Using the Remote Control to Store Presets 10-99.
While a radio station is playing, press the STORE button, then the
-/-- button, and then enter your desired preset number. The display
screen will show “Assigned to Preset”.
Play a Stored Radio Station Preset
A. Using the Controls on the Front of the Radio to Play Presets 1-3.
Briefly press and release the preset button assigned to the station
you want.
B. Using the Remote Control to Recall Presets 1-9.
Briefly press and release the preset button assigned to the station
you want.
C. Using the Remote Control to Recall Presets 10-99.
Briefly press the RECALL button, then the --/- button, and then
enter your desired preset number 10-99.
Page 14 CC WiFi
Page 15

Menu Time-Out
When a radio station is playing — if BACK or SELECT is pressed, the
radio will go into menu selection mode. If no radio controls are used
within ten seconds, the radio will “time-out” and go back to the
currently playing radio station.
Setting the Time and Date
Note: At any point, you can use the BACK button to start over at the
previous screen.
1. If you are currently listening to a radio station, briefly press the dial
once to access the Primary Menu. You can also access the
Primary Menu by pressing and holding the BACK button.
The Primary Menu contains six options: STATIONS, PERSONAL
RADIO, MY STUFF, MEDIA PLAYER, CONFIGURE and ALARM
CLOCK.
2. Turn the main dial until “Configure” shows in brackets — press
the dial to select.
Media Player
< Configure >
3. Turn the dial clockwise to “Clock Setup” — press the dial to
select.
Register
< Clock Set-up >
4. Turn the dial to “Set Time/Date” — press the dial to select..
< Set Time/Date >
Clock Format
5. Turn the dial until the hour setting is correct — press the dial to
select.
6. Turn the dial until the minute setting is correct — press the dial to
select.
CC WiFi Page 15
Page 16

Setting the Time and Date
Set Time
12:00 AM
7. Turn the dial until the day of the month is correct — press the dial
to select. Follow the same method for setting the month and year.
Set Date
01 Jan 2008
8. When finished, the radio will show “Time and Date Set”.
Time and Date
Set
Setting the Alarm
Note: At any point, you can use the BACK button to start over at the
previous screen.
1. If you are currently listening to a radio station, briefly press the dial
once to access the Primary Menu. You can also access the
Primary Menu by pressing and holding the BACK button.
The Primary Menu contains six options: STATIONS, PERSONAL
RADIO, MY STUFF, MEDIA PLAYER, CONFIGURE and ALARM
CLOCK.
2. Turn the main dial clockwise until “Alarm Clock” shows in
brackets — press the dial to select.
Configure
< Alarm Clock >
3. Turn the dial until “Set Alarms” shows in brackets — press the dial
to select.
< Set Alarms >
Sleep Timer
Page 16 CC WiFi
Page 17

Setting the Alarm
4. Turn the dial and choose one of the five alarm slots to set — press
the dial to select.
Disable All
< 1 OFF >
5. Turn the dial until the hour setting is correct — press the dial to
select.
6. Turn the dial until the minute setting is correct — press the dial to
select.
Set Alarm
12:00 AM
7. Choose how frequently you want the alarm to sound. Choose
between “Once”, “Every Day”, “Weekly”, “Week Days”, and
“Weekends” — press the dial to select.
< Once >
Every Day
Note: If “Once” or “Weekly” is selected, you will also be prompted to
select the day of the week that you would like the alarm to sound.
8. Choose whether to sound the alarm as a buzzer or a preset radio
station — press the dial to select.
< Buzzer >
Preset Station
Note: If you do not have any radio stations stored as presets, then
“Buzzer” will be your only option.
9. When the setup is finished, the display will show “Alarm Set”.
Alarm Set
CC WiFi Page 17
Page 18

Setting the Sleep Timer
With the sleep timer enabled, the internet radio will automatically
switch itself off after a set amount of time.
Note: At any point, you can use the BACK button to start over at the
previous screen.
1. If you are currently listening to a radio station, briefly press the dial
once to access the Primary Menu. You can also access the
Primary Menu by pressing and holding the BACK button.
The Primary Menu contains six options: STATIONS, PERSONAL
RADIO, MY STUFF, MEDIA PLAYER, CONFIGURE and ALARM
CLOCK.
2. Turn the main dial clockwise until “Alarm Clock” shows in
brackets — press the dial to select.
Configure
< Alarm Clock >
3. Turn the dial until “Sleep Timer” shows in brackets — press the
dial to select.
Set Alarms
< Sleep Timer >
4. The radio will show “Sleep Timeout” and the amount of time
before the radio turns off. By default the sleep timer is turned off.
Sleep Timeout
< Off >
5. Turn the dial to increase the amount of time before the radio turns
itself off. 15 minute increments are used. Press the dial to select.
Sleep Timeout
< 00:15 >
Page 18 CC WiFi
Page 19

Media Player Functions
6. “Timer Set” will show in the display indicating that the radio will
play for the selected amount of time before switching itself off.
Timer Set
Media Player Functions
The CC WiFi Radio is able to play the following audio formats:
FILE TYPE FILE EXTENSION SHOWN ON PC
MP3 .mp3
Windows Media .wma
Real .ra
iTunes .aac
Ogg Vorbis .ogg
Accessing a Computers Stored Audio
Note:
At any point, you can use the BACK button to start over at the
previous screen.
1. If you are currently listening to a radio station, briefly press the dial
once to access the Primary Menu. You can also access the
Primary Menu by pressing and holding the BACK button.
The Primary Menu contains six options: STATIONS, PERSONAL
RADIO, MY STUFF, MEDIA PLAYER, CONFIGURE and ALARM
CLOCK.
2. Turn the main dial clockwise until “Media Player” shows in
brackets — press the dial to select.
My Stuff
< Media Player >
CC WiFi Page 19
and
then
< UPNP Servers >
Playback Mode
Page 20

Media Player Functions
Using “UPNP Servers” to access stored audio:
This method scans for Universal Plug and Play (UPNP) servers on
the network. UPNP servers gather media and distribute to other
network devices.
If using a Mac: You will be required to use third party software to
enable your computer as a UPNP server.
If using Microsoft Windows XP through Windows 8: It is possible to
use your computer as a UPNP server without installing additional
software. Depending on your version of Windows, enabling
the UPNP server is different. It is best to consult the web for
instructions on how to enable the UPNP Server on your particular
Windows OS version.
1. On your CC Wifi, press the dial and select “UPNP Servers”.
2. Choose your desired UPNP server.
Note: You can use the media controls on radio or the media controls
on the remote control to access audio.
1. Turn the dial to “Music” — press the dial to select.
2. Turn the dial to “Album Artist” — press the dial to select.
3. Turn the dial to the desired artist — press the dial to select.
4. Turn the dial to the desired album — press the dial to select.
5. Turn the dial to the desired audio track — press the dial to select
and the track will begin to play.
Page 20 CC WiFi
Page 21

Media Player Functions
Play a Whole Album
You may only play Whole Albums after you have accessed a
computer’s stored audio. Refer to the section titled “Accessing a
Computer’s Stored Audio” on page 19.
1. Turn the dial to “Music” — press the dial to select.
2. Turn the dial to “Album Artist” — press the dial to select.
3. Turn the dial to the desired artist — press the dial to select.
4. Turn the dial to the desired album — press the dial to select.
5. Turn the dial to [Add to Queue] — press the dial to select.
Queuing Up Tracks for Later Playback
Use the same process as playing a track (see above). The track
selected will be added to the queue to play next.
Queuing Up Albums for Later Playback
Use the same process as playing a whole album (above). The album
selected will be added to the queue to play next.
Media Player Controls
Play, Pause, and Stop:
pause a track, or hold button to stop a track.
Skip to Previous Track: Use the IOU button to play the previous
track in the queue.
Skip to Next Track: Use the iiwibutton to play the next track in
the queue.
Display Play Mode (remote control only): Use the “MODE”
button to show repeat and shuffle mode status.
Use the iiwi/$ button to play a track,
CC WiFi Page 21
Page 22

Media Player Functions
Browsing the List of Queued Tracks
Press the BROWSE button on the remote control. The name of the
track that is currently playing will be listed first. Turn the dial clockwise
or press the
listed in the queue.
If you want to jump ahead to a particular place in the queue, scroll to
the desired track and press the dial to select.
Playing Queued tracks in random order (Shuffle Play)
Note:
1. Briefly press the dial once to access the Primary Menu. You can
also access the Primary Menu by pressing and holding the BACK
button.
The Primary Menu contains contains six options: STATIONS,
PERSONAL RADIO, MY STUFF, MEDIA PLAYER, CONFIGURE
and ALARM CLOCK.
2. Turn the main dial clockwise until “Media Player” shows in
brackets — press the dial to select.
3. Turn the dial clockwise until “Playback Mode” shows — press the
dial to select.
4. Turn the dial clockwise until “Shuffle” shows — press the dial to
select.
▼button on the remote control, to view all the tracks
The remote control can also be used.
Repeat Queued Tracks After All Have Played
1. Briefly press the dial once to access the Primary Menu. You can
also access the Primary Menu by pressing and holding the BACK
button.
The Primary Menu contains contains six options: STATIONS,
PERSONAL RADIO, MY STUFF, MEDIA PLAYER, CONFIGURE
and ALARM CLOCK.
2. Turn the main dial clockwise until “Media Player” shows in
brackets — press the dial to select.
3. Turn the dial clockwise until “Playback Mode” shows — press the
dial to select.
4. Turn the dial clockwise until “Repeat” shows — press the dial to
select.
Page 22 CC WiFi
Page 23

Configure Menu Options
To access the “Configure” menu follow these steps:
1. Briefly press the dial once to access the Primary Menu. You can
also access the Primary Menu by pressing and holding the BACK
button.
The Primary Menu contains six options: STATIONS, PERSONAL
RADIO, MY STUFF, MEDIA PLAYER, CONFIGURE and ALARM
CLOCK.
2. Turn the main dial until “Configure” shows in brackets — press
the dial to select. Turn the dial clockwise to access all the options.
<Wi-Fi and Network Setup>
This option is used for configuring your radio’s network settings, network parameters, and scanning for wireless networks. Once the radio
has established a connection to the network, the information will be
saved to the radio for later use.
<Version>
Displays the electronic serial number and other information pertaining
to software and hardware installed on your internet radio.
<Network Firmware Upgrade>
Use this option to download new control programing for the radio. If
there is new firmware available when this option is selected, then the
radio will prompt you to download.
Note: A firmware upgrade may take several minutes. DO NOT TURN
OFF THE POWER TO YOUR RADIO WHEN UPGRADING
FIRMWARE.
CC WiFi Page 23
Page 24

Configure Menu Options
If the firmware upgrade is interrupted, your radio may endure
permanent damage. A firmware upgrade may take several minutes to
finish.
<Language>
Allows you to change the display language.
<Reset Factory Defaults>
This option puts all settings back to their default, as they were when
the radio left the factory. If you perform a factory reset on your radio,
you will lose all your presets, clock settings, and wireless network
connection settings.
<Get Registration Key>
This option will display a key that can be used to register the radio on
the Reciva Customer Portal.
<Clock Set Up>
Use this option to set the time, date and clock format. See “Setting
the Time and Date” on page 15.
<Backlight Settings>
Selecting this option will alter the Internet radio’s backlight values.
1. After selecting the “Backlight” menu item, the radio will show
three backlight adjustment modes: “Inactive”, “Active”, and
“Standby”. These three settings are explained below:
a) The “active” state is when the user is pressing buttons or
turning knobs.
b) The radio goes into its “inactive” state when there is no
user activity for 30 seconds.
c)
“Standby” is the state when the radio has been turned off.
2. Rotate the dial to select the desired backlight mode — press the
dial to select.
3. The radio will display the current backlight value for the selected
mode. You can change this value by turning the dial to increase or
decrease it.
<UPNP>
Use this option to set a name for your radio that can be recognized by
Page 24 CC WiFi
Page 25

Configure Menu Options
the UPNP Server.
<WiFi Signal Strength>
This option will give you your current WiFi signal strength between the
radio and the router. Our experience shows that a signal strength of
20 to 30% is required for good reception.
Configuring “My Stuff”
Registering an account on Reciva’s website:
1. Open Reciva’s website,
Internet browser on your computer.
2. Enter your Register Code, which can be found from the “Configure
> Get Registration Key” menu on the radio. Refer to page 42 for
the Menu Flowchart.
3. Follow the onscreen instructions to “Create Account” or log in if
you already have an account. Your radio has now been added to
your Reciva account.
4. Once you are logged into your account,
click on “Manage My Stuff”. You will be
able to add or edit information for “My Stations”, “My Streams”,
and ”My Podcasts”.
http://radios.reciva.com, from your
Configuring “My Stations”
You can search for radio stations that are available in Reciva’s
database on their website or from your radio (see page 13).
1. Click in the box titled “Search for Stations”.
2. Type the call letters of the station to search.
3. Click the Search button.
4. Reciva will display a list of search results.
CC WiFi Page 25
Page 26

Configuring “My Stations”
5. Click on the Station Icon of your choice.
6. Reciva will show that the station has “Passed or Failed the Reciva
Daily Stream Test”.
7. If the radio station “Passed”, scroll down
and click the “Add to My Stations” button.
8. Your station will be added to your account’s “My Stations” list. This
list can be viewed or edited by clicking on the “Go to My Stations”
link.
9. Once your selected Internet station appears in your “My Stations”
list, you may play these stations from your CC WiFi radio.
10. These stations will be available on your radio from the Primary
Menu as “My Stuff”.
Tip: To add or remove a station from “My Stations” with the radio:
Press the “Reply Button” while listening to the station, then select
“Add to My Stations” or “Delete from My Stations”.
Adding Content to “My Streams” or “My Podcasts”
1. Once you are logged into your Reciva website account, you can
add custom content to the “My Streams” or “My Podcasts” sections.
2. Click on “Manage My Stations”, then click on either “My Streams”
or “My Podcasts”.
3. Follow the onscreen instructions to enter the name of the stream
or podcast and its media stream URL. Click on Save. The media
stream URL should be a link to a website’s actual audio stream. If
you have any doubt about locating the media stream URL from a
web page, please refer to the Forum section on Reciva’s website
for instructions.
4. After the stream or podcast as been added, you may play them
from your Internet radio. The new programming will be available
on your radio from the Primary Menu in “My Stuff”.
Note: Newly added streams or podcasts will only be available to your
radio once your radio has downloaded a new “stations” list. To cause
the radio to download a new stations list immediately, remove and
reconnect the power to your radio.
Page 26 CC WiFi
Page 27

Setting Up Extra Features
There are several extra features and services that can be added to
your CC WiFi Radio to enhance your listening experience. These
services cannot be added to your radio until you have created a
Reciva radio account online. See “Configuring ‘My Stuff’ ” on page 25.
Once your computer is logged-in to your Reciva radio account
(
radios.reciva.com), follow the steps below:
1. Click on “See extra features”.
2. From the dropdown window, click on the
logo of the extra feature that you want to add to your radio.
3. Follow the onscreen instructions that explain how to sign up for the
extra feature that you want to add to your radio.
4. After setup is complete, come back to your CC WiFi Radio. Unplug
the power cable momentarily and reinsert it again.
Using “My Pandora”
Before setting up Pandora on your radio, you must first add this extra
feature to your Reciva radio account. See “Setting Up Extra Features”
above.
Using Pandora:
1. Select “Personal Radio” and then select “My Pandora”.
Stations
< Personal Radio >
2. If you have previously used Pandora with your computer online
then you can listen to one of your stations by selecting “Stations”.
and
then
< My Pandora >
< Stations >
Create Station
3. Once “Stations” is selected, you can browse through your
previously added stations by rotating the dial. When you are ready
to play the station, position the brackets on either side of the
selection and press the dial to select.
CC WiFi Page 27
Page 28

Using “My Pandora”
< The Beatles Radio >
The Doors Radio
4. If you are new to Pandora, you will not have any stations yet.
Select “Create Station” and then enter in your favorite song title or
artist name. Notice that the middle character on the top line is the
one that is ready for selection. Rotate the dial to the desired
character and then press SELECT by pressing the dial in. When a
character is selected, it will be displayed on the lower line.
Stations
< Create Station >
5. When finished, rotate the dial until “END” is located in the middle
of the upper line and then press SELECT. You can now rotate the
dial and select one of the search results.
< }( )~ END <>AB >
ELVIS PRESLEY
6. Once a result is selected, Pandora will begin to play music that is
similar to the artist or song title that was selected and create a
“station” of that music. It will be listed as “Elvis Presley Radio”, as
in our example. By pressing the “REPLY” button on the CC WiFi
Radio, you will be shown a menu in which you will have further
control options, such as “SKIP” song or “Give Feedback”, where
you can give the currently playing song a “Thumbs Up” or
“Thumbs Down”. If you choose “Thumbs Up” then this song will be
played more. If “Thumbs Down” is selected, the song will never be
played again on this station. Note: “Add Feedback” does not work
on all stations. The “SKIP” song option is limited to only 6 skips
per station, per hour.
Elvis Presley Radio
I Walk the Line by John
<END <> A BCDE>
ELVIS PRESLEY
ELVIS PRESLEY
Elvis Presley & Lisa
(ARTIST)
< Give Feedback >
SKIP
Note: It is possible to assign this station to an available preset on
Page 28 CC WiFi
Page 29

Using “My Pandora”
your radio for quick playback. Also, this station will be saved in the
“Stations” portion of “My Pandora”. Visit
options using the same Pandora username and password that you
entered into your Reciva account.
www.pandora.com for more
Using “My Aupeo”
Before setting up Aupeo on your radio, you must first add this extra
feature to your Reciva radio account. See “Setting Up Extra Features”
on page 27.
Using Aupeo:
Select “Personal Radio” and then select “My Aupeo”.
Stations
< Personal Radio >
The Aupeo service on the CC WiFi Radio offers four options:
and
then
< My Aupeo >
< Personal Stations >
Aupeo Stations
Mood Radio
Artist Station
Personal Station – This station plays music from your past listening
history on Aupeo. When you “love” or “ban” or “block” songs, Aupeo
records this information to a profile so that it can later guess what
content you like.
Aupeo Stations – These are stations that Aupeo has categorized by
genre. Selecting a genre such as “Rock” will give you various rock
stations. Some stations will have an asterisk before the name,
indicating that it is a premium station requiring a premium user
account. For more information about premium user accounts, go to
www.aupeo.com/premium
Mood Radio –
your mood (such as “Happy”) and then a preferred genre (such as
CC WiFi Page 29
This advanced music selector allows you to select
Page 30

Using “My Aupeo”
“Jazz”). Once your preferences are selected, Aupeo begins to play
music that matches accordingly.
Artist Station – In this area, you can enter your favorite artist and
Aupeo will play artists with similar type music.
Once “Artist Station” is selected, the radio will display an interface for
entering your artist name. Notice that the middle character on the top
line is the one that is ready for selection. Rotate the dial to the desired
character and then press SELECT by pressing the dial in. When a
character is selected, it will be displayed on the lower line.
<END <> A BCDE>
ELVIS
When finished, rotate the dial until “END” is located in the middle of
the upper line and then press SELECT.
< }( )~ END <>AB >
ELVIS
You can now rotate the dial and select one of the search results.
< ELVIS PRESLEY >
Elvis Costello
Once a result is selected, your station will begin to play.
Tip: Use the regular preset buttons on the front of the radio or remote
control to store your artist station for later playback.
Aupeo Feedback Button – By using the REPLY button on the radio
or remote, you can send feedback to Aupeo about any song that
plays. You can select “LOVE” if you would like the currently playing
song to play more often, or you can select “Ban” if you never want to
hear the song played again. Selecting “Skip” will skip to the next song.
Selecting “Artist Station” will start a whole new station based on the
currently playing artist.
www.aupeo.com for more options. Use the same Aupeo user-
Visit
name and password that you entered into your Reciva account to log
into Aupeo’s website.
Page 30 CC WiFi
Page 31

About “Live365”
Live365 is a special collection of unique stations that are run by real
people and not generate by computers or focus groups. Some free
stations are available without having to create a Live365 premium
account. See “Setting Up Extra Features” on page 27.
Using “Live365”
Live365 can be located on the radio by pressing SELECT on
“Stations” from the Main Menu and rotating the dial clockwise past
Location, Genre, and Search.
< Stations >
Personal Radio
Live365 offers five options:
and
then
Search
< Live365 >
< Presets >
Recommendation
Free Stations
VIP Stations
Search Live365
Presets – If you like a Live365 station, you can add it as a preset
using the REPLY button on the front of the radio. Once added, you
can easily navigate to “Presets” to replay the station quickly.
Recommendation – These are stations that Live365 has assembled
in a group because of their popularity and diversity.
Free Stations – These are stations that Live365 has assembled as a
free sample of the premium service.
VIP Stations – If you have signed up for a premium account with
Live365 and have associated it with your online Reciva account (see
“Setting Up Extra Features” on page 27), you will be able to listen to
CC WiFi Page 31
Page 32

Using “Live365”
VIP Stations. These stations are categorized by genre (or type) of
audio content, such as Rock, Talk, and Blues, etc.
Search Live365 – In this area, you can enter your favorite artist,
music type, or station name and Live365 will search its database and
display results of stations that play similar type of audio. Station
results can then be selected and played.
1. Once “Search Live365” is selected, the radio will display an
interface for entering your search term. Notice that the middle
character on the top line is the one that is ready for selection.
Rotate the dial to the desired character and then press SELECT
by pressing the dial in. When a character is selected, it will be
displayed on the lower line.
<END <> A BCDE>
ELVIS
2. When finished, rotate the dial until “END” is located in the middle
of the upper line and then press SELECT.
< }( )~ END <>AB >
ELVIS
3. You can now rotate the dial and select one of the search results.
< ELVIS HITS RADIO >
Hot Rodzilla Radio
4. Once a result is selected, your station will begin to play.
Tip: Use the regular preset buttons on the front of the radio or remote
control to store your artist station for later playback.
Visit www.live365.com for more information.
Page 32 CC WiFi
Page 33

Help Pages — Wireless Network Help
“No Networks Found” shows after scanning for wireless networks:
1. Sometimes your wireless network will not show on the first scan.
Try scanning for networks again on your radio.
2. Check the LED lights on the front of your wireless router. Be sure
that the “power” and “wireless” LED lights are on. If they are not
on, you may need to call the manufacturer of the router for more
assistance.
3. Your radio may be out of range of your wireless network. Place
the radio closer to your router as a test, then scan for wireless
networks again. The CC WiFi Radio may not have the same WiFi
range as a new WiFi enabled laptop.
4. There is a setting on your WiFi router called “Enable SSID
Broadcast”. This must be enabled. You may need to call the
manufacturer of the router for more assistance.
About Your Network Name (SSID): This is the name which was
assigned to your wireless router by the person who set it up. After
scanning for your wireless network, rotate the dial through all of the
results because you may recognize your network name (SSID). If your
router’s manufacture name is displayed, try selecting it (e.g., “Linksys”
or “Netgear”). If your wireless network has not been renamed from the
default factory name, then it most likely does not require a wireless
encryption key (WEP or WPA) password to connect.
About Your WEP or WPA Encryption Key: This is also called a
“Wireless Network Password” and is used to keep unwanted “guests”
from using your wireless network. If you are unaware of what your
password is, you can follow our suggested steps for finding it:
1. Search your records for a document that was printed out after the
setup of your router. This document should contain the WEP Key
or WPA Passphrase. If your router was setup by someone else,
they should have provided you with a document that contained the
needed information.
2. If you are using a wireless router that was provided by your Inter net Service Provider, the WEP or WPA key will sometimes be
CC WiFi Page 33
Page 34

Help Pages — Wireless Network Help
printed on the bottom of the router.
3. If all else fails, try calling the manufacturer of your wireless router
for assistance with locating the routers wireless encryption key.
Having Trouble Connecting to a Wireless Network: This problem
can be caused by a number of possible scenarios.
1. Check your WEP or WPA wireless encryption key — it may be
wrong. If you don't know your WEP or WPA encryption key, refer to
the section above titled “About Your WEP or WPA Encryption Key.
2. WEP keys should be entered using uppercase letters A-F and
numbers 0-9. WEP keys are easy to spot because they use
either 10 total characters or 26 total characters. When entering a
WPA key you must enter it exactly as entered in your router’s
settings, including upper and lower case letters.
3. After scanning for wireless networks, turn the dial through all the
possible choices. You may recognize your network as another
name.
4. Be sure that your internet is working. Try accessing the internet
using a computer that is connected to the same router as the
radio. If you cannot access the internet on your computer, the
radio will not connect either. It may be necessary to call your internet service provider for help repairing your internet connection.
5. Check to see if the radio will work using an Ethernet cable. If still
no success, then call C. Crane (800-522-8863) for troubleshooting
assistance.
Page 34 CC WiFi
Page 35

Help Pages — Error Message Troubleshooting
Timeout Getting IP Address:
1. An incorrect WEP or WPA key may have been entered into the
radio. This is the most common reason for this error. Check your
router to make sure your wireless encryption key is correct or see
page 33-34 for more help with finding your encryption key. A good
troubleshooting test is to temporarily try connecting to your router
with encryption disabled.
2. Your radio may be too far away from the wireless router. Try
moving it closer or use the ethernet cable.
3. Wireless router is not DHCP enabled. Consult your router’s user
manual for enabling DHCP or contact the manufacturer of the
router for more assistance.
4. Your router may be using an unknown encryption type. Try a
different type of encryption on your router. One good
troubleshooting test is to temporarily disable your router’s
encryption and see if the radio connects to it.
5. There may be too much interference from nearby wireless devices.
Move the radio away from laptops or other wireless devices.
2.4gHz telephones and baby monitors can cause interference,
if placed near the radio.
6. You may be attempting to connect to an ad-hoc type network. If
you are attempting to connect to a network that is not yours, it may
be configured for ad-hoc (computer-to-computer) and may not
have internet. To check what network type you are connecting to,
use your computer to scan for available networks. On the list of
available networks you should be able to see if the network is
infrastructure type (good) or ad-hoc (bad).
Port 80 Connect Failed. Unable to Load Station List:
Your radio is unable to connect to Reciva using the internet.
1. Your internet connection may not be working. Check the internet
using a computer that is connected to the same router.
CC WiFi Page 35
Page 36

Help Pages — Error Message Troubleshooting
2. UPNP may be disabled on your router. UPNP must be enabled for
the radio to work correctly. Consult your router’s user manual for
enabling UPNP or contact the manufacturer of the router for more
assistance.
3. Your router or modem may be temporarily confused even though
your computer is working fine. Try unplugging the power from both
the router and modem for two minutes. First, power the modem
(giving it time to startup), then power the router (also giving it time
to startup). Last, power your radio and try connecting again.
Timeout Connecting to Reciva Gateway.
Check Firewall Port 5000:
Your router is not letting the radio connect to Reciva using the UPNP
service.
1. UPNP may be disabled on your router. UPNP must be enabled for
the radio to work correctly. Consult your router’s user manual for
enabling UPNP or contact the manufacturer of the router for more
assistance.
2. Your router or modem may be temporarily confused even though
your computer is working fine. Try unplugging the power from both
the router and modem for two minutes. First, power the modem
(giving it time to startup), then power the router (also giving it time
to startup). Last, power your radio and try connecting again.
3. Your internet provider may be blocking UPNP (port 5000) from
being used by their customers. This is very uncommon but some
satellite internet companies, colleges, and businesses block this
port for an extra layer of network security. To find out if this port is
being blocked, speak with your internet service provider or system
administrator.
4. Your router may not offer the UPNP setting. In this case, manually
open port 4999-5001 and assign these open ports to an IP
address that is a little higher than your computer’s. (Example: If
your computer’s IP address is 192.168.1.5, assign the open ports
to 192.168.1.9.) On your radio, select “Configure”, then select
“Wi-Fi and Network Setup”, then select “Edit Configuration”.
When the message displays “Auto DHCP Yes or No” select “NO”.
From this point, enter the new IP address that has the open ports
assigned to it, along with other network information.
Page 36 CC WiFi
Page 37

Help Pages — Ethernet Network Help
The LED Connection Light Does Not Flash When Cable is
Inserted into Radio:
1. Be sure that the power is connected to both the radio and the
router.
2. Your Ethernet cable may be damaged or incompatible. Use a
“Straight Through” Cat5 or Cat6 Ethernet Cable. You can purchase
Ethernet cables from C. Crane or your local electronics store.
Having Trouble Connecting to a Network using an Ethernet
Cable:
1. Be sure that your internet is working. Try accessing the internet
using a computer that is connected to the same router as the
radio. If you cannot access the internet on your computer, the
radio will not connect either. It may be necessary to call your
internet service provider for help repairing your internet
connection.
3. It may be necessary to configure your radio with a “static” IP
address if your router is not setup to use DHCP. To manually
configure the radio’s network settings, navigate on your radio to:
Configure > Wi-Fi and Network Setup > Edit Configuration.
Contact your network administrator to acquire the proper network
addresses.
CC WiFi Page 37
Page 38

Help Pages — Radio Station Help
Having Trouble Playing a Radio Station:
1. If you are unable to play all radio stations, the radio may have lost
connection to your router. Unplug the radio’s power cord
momentarily and reconnect.
2. The radio is “buffering” on a particular station:
a) Try moving the radio closer to the router.
b) If this does not help, the station may be overloaded with
connected listeners.
c) If your computer will access the station but not the WiFi
radio, contact
to be updated.
3. If the radio shows “Connecting” for long periods of time, the station
link may be broken. To check the “Up Status” of a radio station, go
to
www.reciva.com and type in the name of the station in the
“Find” bar. After the results are displayed, click on the desired
radio station for more information. If the station has not passed the
“Daily Streaming Test”, it will not play on your CC WiFi Radio. To
fix this problem contact
Having Trouble Finding a Particular Radio Station: With your
computer, go to
www.reciva.com and type in the name of the station
in the “Find” bar. After the results are displayed, click on the desired
radio station for more information. The information displayed will show
you which “Location” or “Genre” to choose on your WiFi radio to play
your particular radio station. You can also directly enter the station
name into the “Search” portion of the radio. “Search” is located in the
same area as “Location” and “Genre”. See “Searching for a Station”
on page 13.
support@reciva.com to see if the link needs
support@reciva.com.
How Do I Add a New Station to Reciva: With your computer, go to
www.reciva.com and search for your station first. If it is not found,
click on the “Click Here to Add It” link. You will be required to enter the
information pertaining to the radio station. After the “Add Station” form
is submitted, Reciva will review the request and post within a few
days. Once the station is posted, you will be able to play it from your
CC WiFi Radio.
Page 38 CC WiFi
Page 39

Notes
CC WiFi Page 39
Page 40

Menu Flow Chart
STATIONS
LOCATION
GENRE
SEARCH
LIVE365
USA, UK, GERMANY, FRANCE,
CHINA ... AND MANY MORE
NEWS, TALK, ROCK, JAZZ,
OLDIES ... AND MANY MORE
DIRECTLY ENTER A STATION
NAME TO SEARCH
VIEW PRESETS,
RECOMMENDATIONS,
FREE STATIONS, VIP STATIONS
OR SEARCH LIVE365
PERSONAL RADIO
MY PANDORA MY AUPEO
STATIONS
PERSONAL
STATION
Page 40 CC WiFi
AUPEO
STATION
CREATE
STATION
MOOD
RADIO
ARTIST
STATION
Page 41

Menu Flow Chart
MY STUFF
MY STATIONS
MY STREAMS
MY PODCASTS
LIVE365
MEDIA PLAYER
UPNP
SERVERS
CONTAINS STATIONS ADDED TO
YOUR RECIVA ACCOUNT USING A
CONTAINS STREAMS MANUALLY
ACCOUNT USING A COMPUTER
CONTAINS PODCASTS MANUALLY
ACCOUNT USING A COMPUTER
PLAYBACK
MODE
COMPUTER
ENTERED TO YOUR RECIVA
ENTERED TO YOUR RECIVA
VIEW PRESETS AND
RECOMMENDATIONS
CLEAR
QUEUE
ALARM CLOCK
SET
ALARMS
CC WiFi Page 41
SLEEP
TIMER
Page 42

Menu Flow Chart - Wifi and Network Setup
CONFIGURE
WI-FI and
NETWORK
SETUP
BACKLIGHT
SETTINGS
CLOCK
SET-UP
GET
REGISTRATION
KEY
UPNP
VERSION
RESET TO
FACTORY
DEFAULTS
ACTIVE
INACTIVE
STANDBY
SET TIME/
DATE
CLOCK
FORMAT
SERVICE
PACK
SERIAL
NUMBER
SERIAL
FIRMWARE
APPLICATION
SCAN FOR
NETWORKS
ENTER
NETWORK
NAME
VIEW
CONFIGURATION
EDIT
CONFIGURATION
NETWORK
KERNEL
FIRMWARE
UPGRADE
BOOTLOADER
WIFI
SIGNAL
HARDWARE ID
STRENGTH
LANGUAGE
WiFi definitions can be found at www.ccrane.com/WiFiDefs
Page 42 CC WiFi
Page 43

Safety Instructions
READ BEFORE
c m
To prevent damage to your radio or possible injury to you or others, read
these safety precautions and instructions entirely before applying power
to your radio. Keep these precautions and instructions where all who use
this radio will read them.
1) COMMON CARE m
Check the radio, AC adapter and any accessories regularly. Do not use
the radio if there is any sign of damage. Only operate in accordance
with the in struc tions in this manual. Only use attachments or
accessories specified by the manufacturer.
2) DISCONNECT THE RADIO IN CASE OF MALFUNCTION m
If you smell or notice smoke, disconnect the AC Adapter immediately,
taking care to avoid burns. Contact C. Crane Company or their
representative for inspection and service before any future operation.
Only use the AC-DC Adapter recommended with the unit and replace it
if wires become frayed or exposed. It should have an output of 7.5
Volts DC with the center positive, and not less than 1.2 Amps. Use
only the recommended adapter. Otherwise it may damage the radio or
cause a fire or electric shock.
3) KEEP OUT OF REACH OF CHILDREN m
Dropping the radio can cause damage or injury. Keep the AC Adapter
cord in a position so someone cannot trip and cause the radio to fall.
4) KEEP AWAY FROM WATER AND MOISTURE m
Keep the radio dry. Liquids and moisture can damage the radio. If a
liquid leaks into the radio do not operate and seek a qualified service
shop. To clean the radio, remove the power and use a damp cloth on
the exterior only.
5) KEEP AWAY FROM EXTREME TEMPERATURES m
Extreme temperatures can damage the radio. Do not leave or use the
radio where it can be subjected to high or very cold temperatures.
6) DO NOT ATTEMPT TO SERVICE RADIO m
Refer all service work to a qualified service shop when the radio does
not appear to operate normally, exhibits a change in performance or
the radio has received damage. Never open the radio as this may
expose you to dangerous voltages and this will void all warranties.
7) OUTSIDE ANTENNAS OR CABLES m
Outside antennas or cables that create a potential hazard should not
be used with this radio unless installed by qualified personnel.
OPERATING EQUIPMENT
SAVE THESE INSTRUCTIONS
CC WiFi Page 43
Page 44

Memory Preset Log
Preset
Location/Genre
1
2
3
4
5
6
7
8
9
10
11
12
13
14
15
16
17
18
19
20
21
22
23
24
25
Please feel free to copy this page.
Station
Host
Page 44 CC WiFi
Page 45

Memory Preset Log
Preset
Location/Genre
26
27
28
29
30
31
32
33
34
35
36
37
38
39
40
41
42
43
44
45
46
47
48
49
50
Please feel free to copy this page.
CC WiFi Page 45
Station
Host
Page 46

Memory Preset Log
Preset
Location/Genre
Station
Host
51
52
53
54
55
56
57
58
59
60
61
62
63
64
65
66
67
68
69
70
71
72
73
74
75
Please feel free to copy this page.
Page 46 CC WiFi
Page 47

Memory Preset Log
Preset
Location/Genre
76
77
78
79
80
81
82
83
84
85
86
87
88
89
90
91
92
93
94
95
96
97
98
99
100
Please feel free to copy this page.
CC WiFi Page 47
Station Host
Page 48

Location of Your CC WiFi Radio Serial Number
From the “Primary Menu” of the CC WiFi Radio, follow this path to
find your serial number: Configure > Version > Serial Number
Record your serial number here for future reference:
This product contains software licensed under version 2 of the GNU public
license and version 2.1 of the GNU Lesser Public License. The source code
for this software is available from:
http://www.reciva.com/gpl/
This product includes technology owned by Microsoft Corporation and under
a license from Microsoft Licensing GP. Use or distribution of such technology
outside of this product is prohibited without a license from Microsoft
Corporation and/or Microsoft Licensing, GP as applicable.
Model: CC Wifi
ANSI C63.4: 2003
THIS DEVICE COMPLIES WITH PART 15 OF THE FCC RULES. OPERATION IS SUBJECT TO THE FOLLOWING TWO CONDITIONS.
1) THIS DEVICE MAY NOT CAUSE HARMFUL INTERFERENCE, AND
2) THIS DEVICE MUST ACCEPT ANY INTERFERENCE RECEIVED,
INCLUDING INTERFERENCE THAT MAY CAUSE UNDESIRED
OPERATION.
Notice: Any changes or modifications not expressly approved by the
party responsible for compliance could void the user’s authority
to operate the equipment.
 Loading...