

Page 1
INSTRUCTION MANUAL
P
LEASE READ ALL THE INSTRUCTIONS COMPLETELY BEFORE USE.
WARNING: TO PREVENT
FIRE OR ELECTRIC SHOCK
HAZARD, DO NOT EXPOSE
THIS PRODUCT TO RAIN OR
MOISTURE.
THE LIGHTNING
FLASH AND ARROWHEAD WITHIN THE
TRIANGLE IS A WARNING SIGN ALERTING
YOU OF “DANGEROUS
VOLTAGE” INSIDE THE
RADIO.
CAUTION:TO REDUCE THE
RISK OF ELECTRIC
SHOCK, DO NOT REMOVE
THE RADIO BACK. NO
USER SERVICEABLE
PARTS INSIDE. REFER
SERVICING T O QUALIFIED
SERVICE PERSONNEL.
THE EXCLAMATION
POINT WITHIN THE
TRIANGLE IS A WARNING SIGN ALERTING
YOU OF IMPORTANT
INSTRUCTIONS
ACCOMPANYING THIS
RADIO.
CAUTION
RISK OF ELECTRIC
SHOCK DO NOT OPEN
Page 2

Copyright © 2002 by C. Crane Company, Inc., Fortuna, CA 95540
800-522-8863 • ccrane.com
All rights reserved. No part of this booklet may be reproduced, in any form or
means whatsoever, without permission in writing from C. Crane Company, Inc.
ccradioplusmanual.qxd Rev 5/01
Page 3

TABLE OF CONTENTS
SAFETY INSTRUCTIONS
......................................................... 4-5
I
NTRODUCTION ...........................................................................
6
U
NPACKING
................................................................................ 6
B
UTTON I
DENTIFICATION ........................................................... 7
G
ETTING STARTED
POWERING YOUR RADIO .............................................. 8
I
NSTALLING THE BATTERIES ........................................ 9
D
ISPLAY PANEL .......................................................... 10
S
ETTING THE CLOCK ................................................. 11
S
ETTING THE ALARM ........................................... 11-12
S
NOOZE FEATURE ...................................................... 12
S
LEEP
TIMER .............................................................. 12
R
ADIO
OPERATION
TUNING
........................................................................ 13
W
EATHER ALERT SYSTEM .................................. 14-15
D
ISPLAY LIGHT ........................................................... 16
L
OCK SWITCH ............................................................. 16
H
EADPHONE JACK ..................................................... 16
R
ESET BUTTON .......................................................... 16
A
UDIO & RECORDING JACKS ............................... 17-18
S
ETTING THE TIMER ............................................. 18-19
I
NSTRUCTIONS FOR LIGHT & SOLAR ................................ 19-20
N
I
CAD CHARGING SYSTEM ........................................ 20
N
ICAD BATTERY INFO ................................................. 21
SPECIFICATIONS ................................................................ 22-23
R
ADIO NOISE TROUBLESHOOTING ......................................... 24
LISTENING TIPS ....................................................................... 25
PERSONAL STATION LOG ....................................................... 26
Page 4

Page 4
SAFETY INSTRUCTIONS
READ BEFORE OPERATING EQUIPMENT
SA VE THESE INSTRUCTIONS
1) Read and understand all safety and operating instructions before the
radio is operated.
2) Retain Instructions: The safety and operating instructions should be
retained for future reference.
3) Heed Warnings: All warnings on the appliance and operating instructions should be followed.
4) Water and Moisture:The appliance should not be used near water. Do
not use near a bathtub, washbowl, laundr y tub, kitchen sink, wet
basement, swimming pool, etc.
5) Unplug the receiver from the AC power outlet before cleaning. Use
only a damp cloth for cleaning the exterior of the receiver.
6) Do not place the radio on an unstable cart, stand, bracket or table.
The radio may fall, causing serious personal injury and damage to
the receiver.
7) Ventilation: This radio should be situated so that its location or position does not interfere with its proper ventilation.For example, the
radio should not be used on a bed, sofa, rug or other soft surfaces
that may block the ventilation openings. It should not be placed in a
built-in situation like a cabinet that may reduce air flow through the
ventilation openings.
8) Heat: Never put the radio in direct sunlight in an unventilated area or
behind glass like a car’s interior.The appliance should be away from
heat sources such as radiators, heat registers, stoves, or other appliances that produce heat.
9) Power Cords: The power cord should be positioned so it is not walked
on, pinched, or items placed on top of it. Pay particular attention to
cords at plugs, convenience receptacles, and the point where they
exit from the unit. Unplug the power cord by gripping the power plug,
not the cord. Operate the radio using only the correct type of power
source indicated. If you are not sure of the type of power supply to
your home, consult your dealer or local power company.
Page 5

Page 5
10) Do not overload wall outlets or extension cords.This can result in a
risk of fire or electrical shock. Never insert objects of any kind into the
receiver through openings.The objects may touch dangerous voltage
points or short out par ts. This could cause a fire or electrical shock.
11) If the radio is left unattended and unused for long periods of time,
unplug it from the wall outlet.This will prevent damage caused by
lightning or power line surges.
12) If the radio is left unattended and unused for long periods of time,
remove the batteries.The batteries may leak and damage furniture or
your radio.
13) Do not attempt to ser vice the receiver yourself. Removing the cover
may expose you to dangerous voltage, and will void the warranty.
Refer all servicing to authorized service personnel.
14) The receiver is equipped with a polarized type plug (a plug having
one blade wider than the other).This plug will fit into the power outlet
only one way.This is a safety feature.If you are unable to inser t the
plug fully into the outlet, try reversing the plug. If the plug still fails to
fit, contact an electrician to replace the obsolete outlet. Do not defeat
the safety purpose of this plug.
15) The appliance should be ser viced by qualified ser vice personnel
when:
A. The power supply cord or the plug has been damaged, or
B. Objects have fallen or liquid has been spilled into the radio, or
C. The radio has been exposed to rain, or
D. The radio does not appear to operate normally or exhibits a
marked change in performance, or
E. The radio has been dropped, or the enclosure damaged.
16) The user should not attempt to ser vice the appliance beyond that
described in the operating instructions. All other servicing
should be referred to qualified service personnel.This
symbol is to alert you to important operation or ser vicing
instructions that may appear in the owner’s manual.
17) Do not charge alkaline batter ies. See instructions on page 20.
Page 6
INTRODUCTION
Thank you for purchasing the high performance digital CCRadio
plus
.The
CCRadio
plus
incorporates the highest
quality parts and superior engineer ing
to produce the most sensitive AM
receiver available. It also covers FM
Stereo, Weather, and TV audio channels 2-13.The special Weather Alert
System may sound an alarm if a signal
is broadcast from National Oceanic and
Atmospheric Administration (NOAA) in
the United States. Canada also has a
similar system.
The box should contain the CCRadio
plus
, the power cord and this manual. If anything is missing or damaged, please contact your dealer
immediately. We recommend you keep the box in the unlikely event your
radio will need servicing.
UNPACKING
Page 6
Page 7
Page 7
8
10
11
13
14
15
16
12
9
6
5
1
2 3
7
4
17
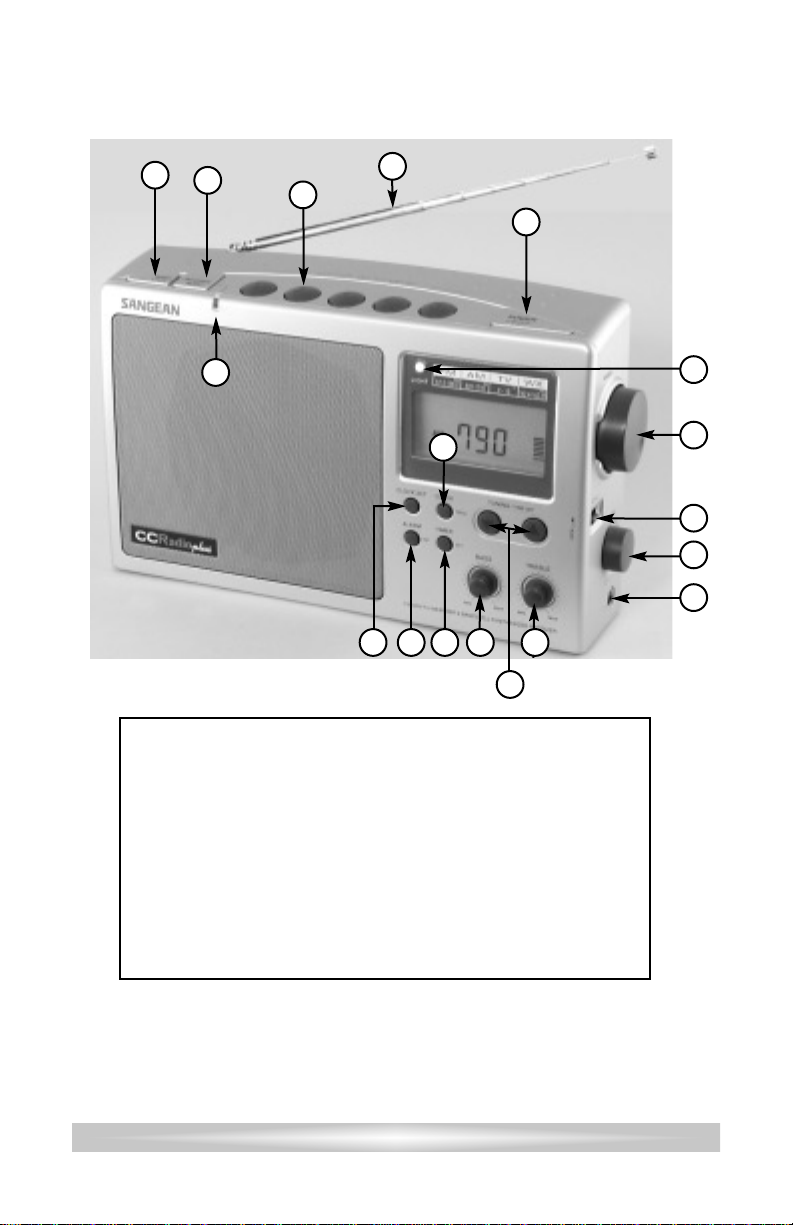
BUTTON IDENTIFICATION
18
10) Lock Switch
11) Tuning Knob
12) Power/Sleep Timer
13) Telescopic Antenna
14) Memory (1-5)
15) Weather Alert (3 Modes)
16) Band/AUXILIARY
17) Weather Alert Light
18) Display Light
1) Clock Set
2) Alarm/Set
3) Timer/Set
4) Display Clock or Frequency
5) Bass Control
6) Treble Control
7) Tuning/Time Set (Up/Down)
8) Headphone Jack
9) Volume Control
BUTTON IDENTIFICATION
Note: When you see a “ •” next to a word describing a button on
the radio, it means you must hold the button down to activate
the function.The appropr iate symbol will then show on the
display along with a beep.To deactivate the function hold it until
it beeps again and the symbol disappears from the display.
Page 8
Page 8
POWERING YOUR RADIO
The CCRadio
plus
will run on (4) “D” size NiCad or alkaline batteries or
on 120V AC house current using the included power cord.Batter ies are
optional.The batteries are necessary to keep the time clock and
memories if the power cord is removed from the radio for more than
three minutes.
GETTING STARTED
Before powering your radio be sure to read
the Safety Instructions on pages 4 and 5.
AC OPERATION
Before you plug the AC cord into the radio be sure the AC voltage is
120Volts/60Hz. If you have batteries in the radio and you use the AC
power cord, the batteries will automatically be disconnected.
NOTE: If you remove the power cord without turning the radio OFF, the
radio will automatically revert to the batteries.
Insert the plug on the end of
the supplied power cord into
the AC power jack on the
back of the radio.
Page 9
Page 9
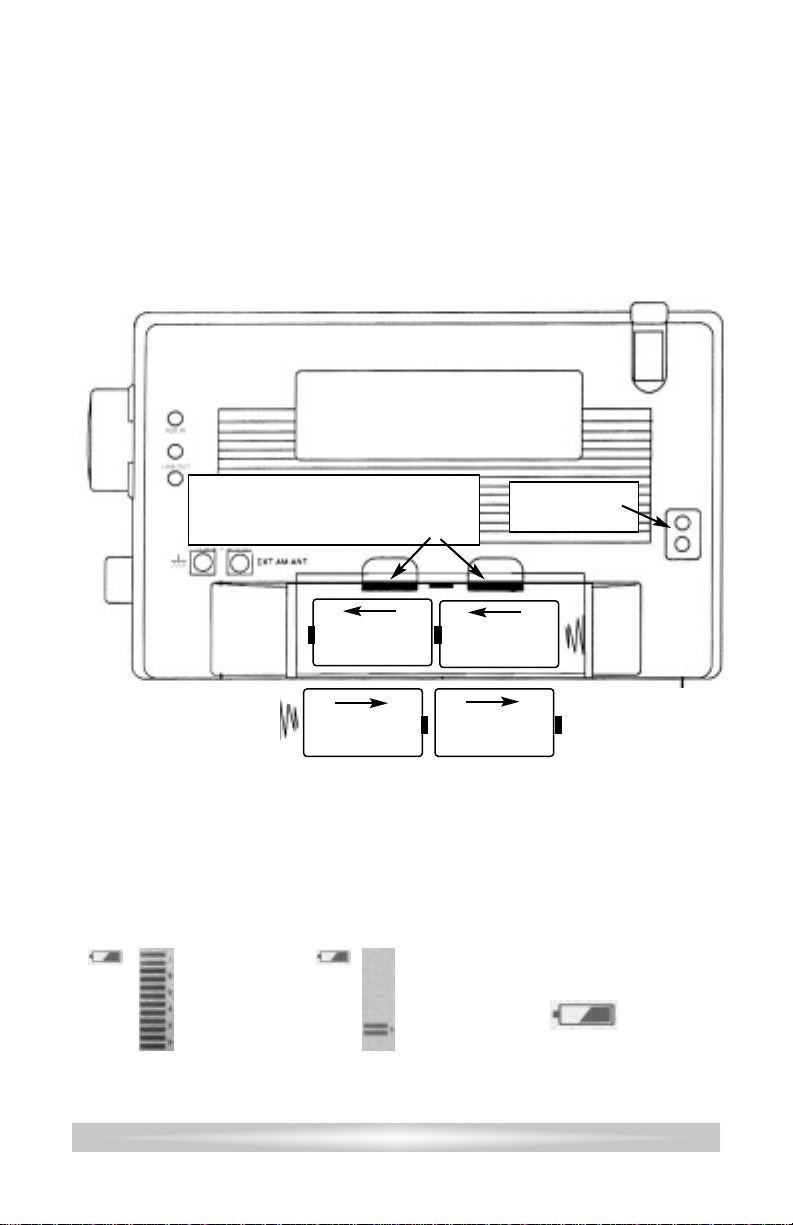
INSTALLING THE BATTERIES
BATTERY REPLACEMENT
1) Position the radio face down on a soft surface to protect it.
2) Remove the battery compartment cover.
3) Insert the (4) “D” cell batteries into the compartment as indicated in
the drawing below. Be sure the negative (-) end is against the
spring. Refer to the drawing below to insure correct installation of
your batteries.
4) Replace the battery cover.You are now ready to operate your radio.
The battery indicator will display the battery level for approximately
seven seconds after the radio is switched off. After removing dead batteries for replacement, you have approximately three minutes to replace
the batteries before your clock and memory information will be lost (if
the radio is not plugged in).
This symbol means
the batteries are full.
This flashing symbol means
the batteries need replacing.
First Battery
Second
Battery
Fourth
Battery
Third Battery
This symbol means
batteries are dead.
Remove battery cover by pressing
both clips at the same time towards
the bottom of the radio.
AC power cord
plugs in here.
Page 10

Page 1 0
1
1) Weather Aler t Modes
2) Memory Location (1 - 5)
3) Key Lock On/ Off
4) Sleep Timer/Snooze Status
5) Battery Symbol
6) Battery Power Level Indicator
and Signal Strength Meter
7) Timer Active Indicator
8) Clock Seconds
9) Frequency /Clock Display
10) Alarm Status and Type
11) AM / PM Indicator
12) Indicates Band In Use
13) AUX IN Indicator
14) Stereo Reception
89
3
4
5
6
2
7
10
12
11
DISPLAY PANEL
13
14
Page 11

Page 11
Please read this entire section carefully before you start. Set the time
with the radio off.You will need to go through the steps listed below without stopping for more than 15 seconds at any given time or you will have
to start over.(Refer to page 7 for Button Identification.)
1) Press the Clock Set Button.The hour digit will flash.
2) Using the Up/Down Tuning Button, select the appropriate
hour digit and AM or PM.
3) Press the Clock Set Button again to select the minutes digits, the
minutes digits will flash. Use the Up/Down Buttons to adjust the
minutes to the appropriate time.
4) You must press the Clock Set Button again to complete the time
setting.This also sets the seconds to “00”.
SETTING THE CLOCK
SETTING THE ALARM
There are two different alarm modes on the CCRadio
plus
.You can
choose to wake up to the radio or to a tone.You can set the alarm with
the radio on or off.
To set the type of alarm:
Press and hold the Alarm Button until you hear a
beep and see one of these symbols flashing on the display.
To wake with the radio:While
Alarm
is flashing on
the display, press the Clock Set Button until you see
the symbol shown right.When the alarm goes off the
radio will play the last station selected at the same volume level last set.
To wake with a multi level tone: While
Alarm
is flashing,
press the Clock Set Button until you see the symbol
shown right.
To shut off the alarm function: Press and hold the Alar m Button until you hear a short beep and both symbols disappear.
To set the time for the alarm to go off:
1) Press and hold the Alarm Button, the hour digit and
Alarm
symbol will flash.
2) Using the Up/Down Tuning Button, select the appropriate
hour.
3) Press the Alarm Button again. Use the Up/Down Tuning Buttons
to adjust the minute to the appropriate time.
4) Press the Alarm Button again to complete the alarm setting.
Page 12

Page 1 2
NOTES ON THE ALARM
You can also set the alarm time immediately after selecting the radio or
buzzer alarm as described on page 11.
To stop the alarm from going off every day, press and hold the Alarm
Button until
ALARM
disappears from the display.
Once the alarm is set, it will automatically go off the next day at the same
time. Use the Power Button to shut off the alarm until the next day.
If the radio alarm is selected, tune the radio to your favorite station and set
the volume before turning your radio off for the day.When the alarm activates the radio will play the last station listened to.
The tone alarm is called HWS or Humane Wake (if that is possible) System.
The alarm tone beep will increase in volume every 15 seconds for one
minute followed by one minute of silence before repeating the cycle.
The alarm system will sound for one hour unless turned off by pressing the
Power Button.
When the buzzer alarm is sounding, if you press any button except the
Power Button the alarm will temporar ily stop for five minutes.The little Zs
and
Alarm
symbol will flash on the display while the radio is in snooze
mode.To shut off the alarm and snooze feature press the Power Button.
SNOOZE FEATURE
SLEEP TIMER FEATURE
Your CCRadio
plus
is equipped with a Sleep Timer that enables the radio
to continue playing for up to 120 minutes after activation, then shuts the
radio off.Selectable times are 120 90, 60, 30 and 15 minutes.
Press and hold the Power/ Sleep Button until the pictogram of a
person in bed and the numbers 120 are displayed.
Holding the Power/ Sleep Button down will reduce the time in steps,
showing times of 120, 90, 60, 30, and 15 minutes.If you miss the time you
want, simply continue holding the button until the desired time shows on
the display. Release the button. Now the pictogram of the person in bed
will appear on the display.The radio will then shut off after the set amount
of time.To deactivate the Sleep Timer, simply shut the radio off using the
Power Button.
Page 13

Page 13
RADIO OPERATION
The CCRadio
plus
features four bands:AM / FM / TV Audio 2-13 and
Weather.
M
ANUAL
TUNING
1) Press the Power Button to turn on the radio.
2) Select the band by pressing the Band Button.
3) A single press of the Up or Down Tuning Buttons will
change the frequency up or down for AM and FM bands,
and channel up or down for Weather and TV bands.
Each press of tuning Up and Down buttons will change the frequency by
10 KHz in AM mode and 100 KHz in FM mode.
S
CAN TUNING
Same as above except press and hold the Tuning Up or Down
Button for more than .5 second.The radio will scan and stop
automatically when it finds an active station.The Scan Tuning will not
work on the weather band. It may also stop scanning on strong interference or noise. Press and hold again to resume.
R
OTARY
TUNING
Rotating the tuning knob will change AM/FM by frequency and the
weather/TV bands by channel.
M
EMORY TUNING
Five stations may be stored into memory in each
of the four bands.
1) Tune to the station or channel you want to memorize.
2) Press and Hold the desired Memory Button for two seconds or
until you hear a beep.The station or channel is then memorized.
The display will show the memory number.
To recall the memorized station, select the correct band and press and
release the Memory Button. The radio will instantly tune to the station
stored in memory. If the button is held down, the station you are tuned
to will now be stored in that memory position.
Page 14

Page 1 4
The WEATHER ALERT modes on the CCRadio
plus
can alert you to
special weather related emergencies. During an emergency or weather
related hazard, NOAA issues an emergency tone that will set off an
audible and/or visual alarm on the radio.
NOTE: Hazard warnings are not available in all areas.
There are seven standard NOAA weather channels used in the US and
Canada.This radio receives broadcasts up to 50 miles from transmitting
stations.
1) To listen to the standard NOAA weather channels, turn the radio on,
press the Band button until
WX
shows on the display.The telescopic whip antenna may need to be fully extended and in the “up”
position to receive a station clearly.
2) The channel number of the weather station is shown on the display.
Pressing the Tuning Up or Down Buttons will toggle you through the
seven programmed channels. There should be one or more weather
service stations broadcasting in your local area.You will hear a
report that is updated usually once or more per day for your area.If
there is a severe weather or weather related emergency, NOAA will
update the weather broadcast more frequently. If there is a weather
emergency, the NOAA will issue an alert tone.
After locating and tuning in your weather station the radio can now be
placed into WEATHER ALERT mode. The WEATHER ALERT mode
enables you to listen to your favorite AM or FM station or turn the radio
off, and still receive an alert signal warning you of a special emergency.
There are three active WEATHER ALERT modes on the CCRadio
plus
.
NOTE:
1) When activated, the WEATHER ALERT consumes power even
when the radio is turned off.
2) Be aware that if you are not using AC power the WEATHER
ALERT will completely drain your batteries. If your batteries are
dead and AC power is off, the WX Alert Alarm will not work
SETTING THE WEATHER ALERT
1) To place the radio in WEATHER ALERT mode, press and hold the
Weather Aler t Button for two seconds: You will hear a shor t beep
and see this symbol, shown on page 15 (top right), on the display.
WEATHER ALERT SYSTEM
Page 15

This is WEATHER ALERT mode with flashing light
only (no Alarm). If NOAA issues a weather related
emergency, the radio will automatically alert you with
a small flashing light near the top of the radio.The Aler t light
continues to flash until any button is pushed.
2)
To access the second mode, (WEATHER ALERT with NOAA Audio)
.
Press and hold the WEATHER ALERT Button again for two seconds
until you hear a long beep.The symbol, shown at
right, will be displayed in this mode.In this mode,
if the NOAA alert tone is issued, the red light
flashes and the radio switches to Weather Audio automatically. To
cancel the WEATHER ALERT, press the Band Button on the radio.
3)
To access the third mode, (WEATHER ALERT with flashing light and
siren)
. Press and hold the WEATHER ALERT
Button again for two seconds until you hear a
double beep.The symbol, shown at right, will
appear and the light near the top radio comes on continuously. In
this mode, if the NOAA alert tone is issued, the red light on the top
of the radio flashes and a siren turns on for up to 1 minute.In this
mode, when the siren is active, pressing any button on the radio
instantly turns the radio to the Weather Audio and cancels the siren.
SPECIAL NOTE: If you have the headphones plugged in and a weather alert is issued, the audio to the headphones will be cut-off and the siren will sound through the radio’s speaker.
T
URNING OFF THE WEATHER ALERT
Press the WEATHER ALERT Button again for two seconds:
The alarm goes off and is inactive.The
ALERT
symbol will
disappear from the display.
In any of the active WEATHER ALERT modes, the weather receiver
stays on and listens for an emergency tone issued from NOAA in case
of emergency.
You may get a periodic test tone from the NOAA that will cause an
unexpected alarm on your CCRadio
plus
.This tone is only a test and will
happen periodically, usually every Wednesday at noon, or whenever the
agency decides to test their emergency alert system. Simply pressing
any button on the receiver will shut the alert tone off.After an alert has
been issued, the WEATHER ALERT light and/or siren will stay on for
one minute or until you turn it off by pressing any button.
Page 15
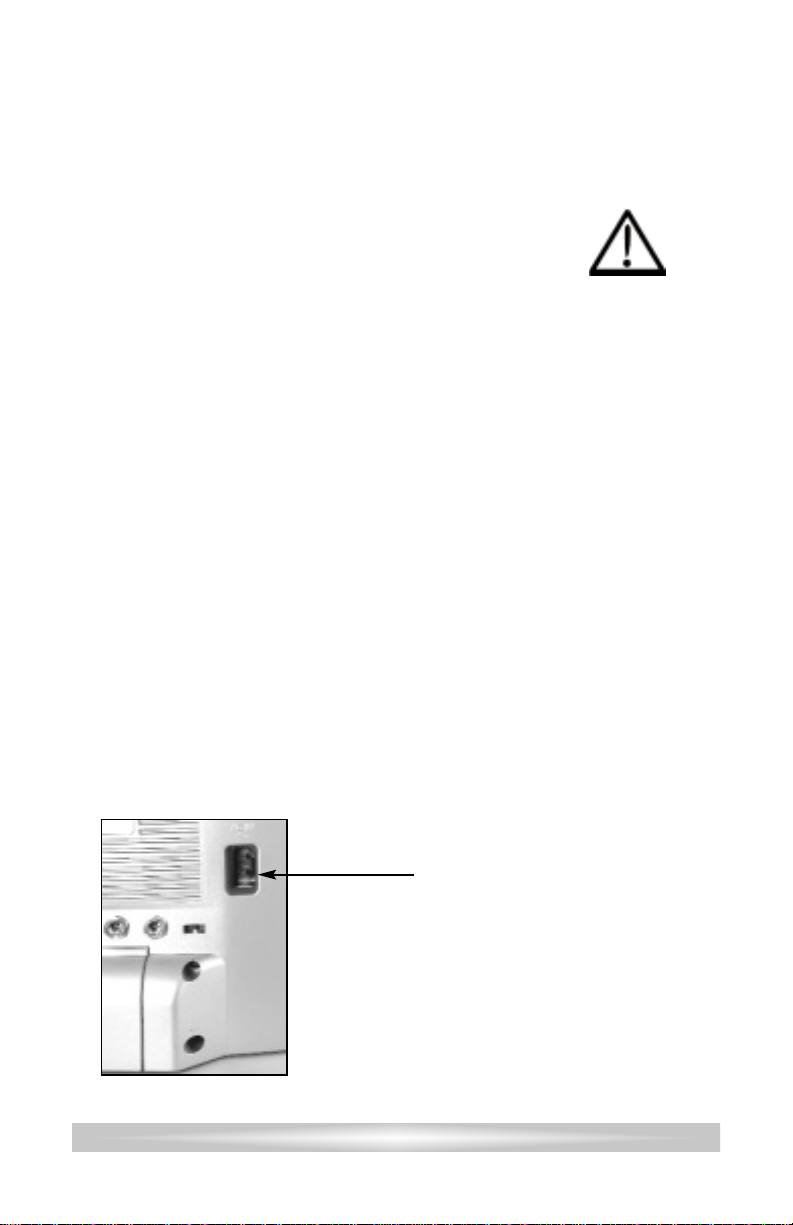
Page 16

LOCK S
WITCH
The Lock switch can be used when transporting
the radio to prevent accidentally turning it on.
When the switch is pushed up you will see the
Lock symbol appear on the display. It
can also be used to disable all functions of the
radio when it is turned on. Push the switch
down to release the lock.
HEADPHONE JACK
You can use a stereo or mono headphone with a 3.5 mm plug. When
you insert the headphone plug, the speaker is disconnected.This radio
receives FM in stereo through the headphones.
RESET BUTTON
Once in awhile glitches may occur on any portable digital radio. This can
be caused by static electricity, unusual key strokes or a power disruption. If this happens, use the end of a paper clip or ball point pen and
push it into the hole briefly to reset the radio.You will lose the clock
time, and all the stations stored in memory when the radio is reset.
Lock
Switch
Headphone
Jack
Reset Button
Bottom View of CCRadio
plus
Page 1 6
DISPLAY LIGHT ON AC P OWER
When the radio is plugged into AC power, the display light will always be
on unless you turn it off.The special green LED bulbs last about
100,000 hours and use very little electrical energy. If you
want to turn off the display light, press the Light button.Refer to
page 7 for button identification.
D
ISPLAY LIGHT ON BATTERIES
When batteries are used the display light can be turned on by
pressing the light button.The display light automatically goes off
two minutes after the last time you press any button.
DISPLAY LIGHT
Right Side View
Page 17

Page 17
The jacks on the back, left side of the radio are for audio input (AUX IN),
audio output (LINE OUT) and a timer activation switch .
AUDIO & RECORDING JACKS
AUX IN JACK
The green jack, labeled AUX IN is used to connect an external audio
source such as a CD Player or recorder, so you can listen through your
CCRadio
plus
’ speaker. To do this, you will need the appropriate patch-
cord. (Refer to page 23 for patchcord specifications).
Warning: If a “LINE OUT” is not available on your external audio
source, you can use the headphone jack. However, the volume
must be kept low or damage to the CCRadio
plus
may result.
1) Plug your patchcord into the LINE OUT or Headphone Jack of your
external audio source.
2) Plug the other end into the AUX IN jack on the CCRadio
plus
.
3) With the power on, press and hold the Band/AUX Button until you
hear a short beep and AUX appears on the display.
4) Turn on your external audio source to hear the audio played
through the CCRadio
plus
.
5) To turn the AUX off, press the Band/AUX Button again and the AUX
will disappear from the display.
NOTE: Volume can be controlled from the CCRadio
plus.
LINE OUT JACK
The red jack, labeled LINE OUT, is used to output the audio from the
CCRadio
plus
to another device such as a recorder, your home stereo,
or some other unit.To do this, you will need an 1/8” stereo patchcord.
Note: The LINE OUT jack differs from a headphone jack because the
volume level of a headphone jack varies depending on the volume of
the radio.The LINE OUT jack has a set line level so the volume is consistent no matter what the position of the volume knob.
1) Plug your patchcord into the LINE OUT jack on the CCRadio
plus
.
2) Plug the other end of the patchcord into the LINE IN or AUDIO IN of
the device you want to send the audio to and you will hear the radio
AUX IN Jack
Timer Activation Switch
LINE OUT Jack
RECORDING
ACCESSORY
VersaCorder
Designed to work
with the CCRadio
plus
. Record up to 4 hours
on one side of a cassette.
(See page 23 for details.)
Page 18

Page 1 8
through the other source.You can still listen to the CCRadio
plus
while using the LINE OUT jack.
TIMER ACTIVATION SWITCH
The black jack labeled with this symbol is for use with a recorder that
has a timer activated switch.You would use this switch if you wanted to
do a timed recording. It is used in conjunction with the LINE OUT jack.
See your recorder for specific instructions.
SETTING THE TIMER
Please read this entire page carefully before you start.You will need
to go through the 3 steps listed below without stopping. If you stop
for more than 15 seconds, you will need to press and hold the
Timer Button until you hear a single beep.Then start at step one
again.
Before you begin, program the stations that you will want to record into
memory. Refer to page 13 for instructions on programming memory presets. The timer has an ON TIME and an OFF TIME.You must set both
in order for the timer to work correctly.
STEP 1:TO SET THE ON TIME
1) Press and hold the Timer/Set Button until you hear a double beep
and the word ON, the hour digit and
TIMER
flash on the display.
2) Use the Tuning Up/Down Buttons to set the hour, verifying that the
time is set correctly for AM or PM as shown on the display.
3) Press the Timer/Set Button again so the minutes and the word
ON
and
TIMER
flash on the display.
4) Use the Tuning Up/Down Buttons to set the minutes.
STEP 2:TO SET THE OFF TIME
1) Press the Timer/Set Button again until the word
OFF
, the hour digit
and
TIMER
flash on the display.
2) Use the Tuning Up/Down Buttons to set the hour. Again, verify that
the time is set correctly for AM or PM.
3) Press the Timer/Set Button again so the word
OFF
and
TIMER
and
the minutes, flash on the display.
4) Use the Tuning Up/Down Buttons to set the minutes.
STEP 3:TO SET THE FREQUENCY
1) Press the Timer/Set Button again to select your desired frequency.
The word
TIMER
and the memory preset will flash on the display.
Using the Band Button, select the appropriate band (AM, FM, TV or
WX). Press the memory button 1-5 that corresponds with your
desired station.
2)
You must Press the Timer/Set Button again to complete the setup.
Page 19

Page 1 9
The timer will go ON and OFF at the same time and same station
every day until you turn the timer off or reprogram it.
TO TURN OFF THE TIMER
If
TIMER
is showing on the display then the Timer is set. Press and hold
the Timer/Set Button until you hear a shor t beep and the word
TIMER
disappears from the display.
NOTES O
N THE TIMER
To stop the timer from going off every day press and hold the
Timer/Set Button until you hear a short beep the word
TIMER
disappears.
Once the timer is programmed, you may use your radio as normal. If you
are using the radio during a “timed” operation, the radio will automatically
switch to the programmed station, and turn off with the programmed OFF
TIME.
The word
TIMER
flashes while the radio is playing in Timer Mode.
The timer can be used to play your favorite program ever y day.
I
NSTRUCTIONS FOR
THE LIGHT &SOLAR OPTIONS
The optional Solar & Light Kit (shown left) can be
ordered separately. Kit includes:
·
4 Watt Solar Panel
·
4 Heavy Duty ‘D’ NiCad Batteries
·
6V DC Charging Adapter (not shown)
·
White LED lamp
Item #CPP ......... $119.95
You may use alkaline batteries for operation of the
CCRadio
plus
and the Light, but never charge alkaline
batteries with the 6V DC charging adapter or solar panel.
To use the CCRadio
plus
with the Light
only: Plug the light into the jack labeled
“LED Lamp”.The light will come on when
plugged in, as long as the radio has power.
The white LED bulb is very energy
efficient, lasts for thousands of hours and
is virtually unbreakable.The cord on the
LED Lamp
Jack
Page 20

Page 2 0
light will extend up to 12’. Just pull on the connector and unreel it to the
desired length.The black base of the light opens up to reveal a handle
that is used to reel the cord back in.The base is also a magnet, so you
can mount it to any metal surface like a refrigerator or a car.
Please note: All NiCad batteries come slightly charged. First, charge the
(4) ‘D’NiCad batteries.You can do this in the CCRadio
plus
via the 6V
Adapter or with the 4 Watt Solar Panel.To install the batter ies please
refer to page 9.
Please read the NiCad Information on page 21 to ensure you get the
best service from your NiCad batteries.
To charge the batter ies via the adapter, plug the 6V Adapter into the jack
labeled “6V DC Charging Circuit” on the back of the CCRadio
plus
. Once
the batteries are charged you may use the radio. To use the light, plug it
into the jack labeled “LED Lamp”.
To charge the batter ies via the Solar Panel,
plug the panel into the jack
labeled “6V DC Charging Circuit”.The NiCads will charge via the Solar
Panel every time it is in full or par tial sunlight. The Solar Panel can be
mounted outside.There is a voltage blocking device in the radio that
prevents loss of a charge when the Panel is not in the sun. Generally,
the Solar Panel puts out equal power required to run the radio. If you
charge the batteries for eight hours in the full sun you may get nearly
eight hours of play time.The CCRadio
plus
can be operated while the
batteries are being charged. The Solar Panel will run the radio in full
sunlight without the NiCad batteries installed.
6V DC
Charging Circuit
OPTIONAL N
ICAD BATTERY CHARGING SYSTEM
WARNING:
NEVER
CHARGE
ALKALINE
BATTERIES WITH
6V DC CHARGING ADAPTER
OR
SOLAR PANEL
Page 21

Page 21
NiCad batteries are a great financial and ecological investment if you
know how to use them.
• New NiCad batteries require a few charging and discharging cycles
to come up to full power. First, charge the batteries. Next, allow them to
drain by running them in the CCRadio
plus
until it shuts off and no sound
is heard.Then recharge the batteries fully. This procedure should be
repeated two more times if you want to get the full output of your NiCads
as soon as possible.
• Do not overcharge NiCad batteries.Excessive charging heat can
reduce their life span. It is difficult to overcharge the NiCad batteries with
the Solar Panel because the current is low. If you use the 6 volt adapter
to charge the batteries, it should be disconnected after about 27 hours.
• NiCads slowly lose their charge even without use. It is best to
charge them up for an hour or so once a month if you are keeping them
for emergency use.Uncharged NiCads can be stored indefinitely, but will
need to be reconditioned before use.
• NiCads can develop a “memory”. If they are constantly drained only
half way and then recharged, they will lose some of their capacity. It is
best to fully discharge NiCads a few times a year so the batteries will
retain their full capacity.
• For optimum results, check your batteries with a battery tester twice
a year. Be sure batteries that are low are charged separately until they
equalize with batteries of a naturally higher charge.
• It is best to charge NiCad batteries slowly.You can substantially
reduce the life span of a NiCad battery by consistently charging at a high
rate in a commercial charger.The charge rates for both the AC Adapter
and Solar Panel are relatively low.
The Solar Panel can remain attached to the CCRadio
plus
, as long as
NiCad batteries are installed.This will create an automatic charging cycle
whenever the radio is not in use. For best battery performance, however,
be sure to fully drain and recharge your NiCads about twice per year.
Run Times And Charge Times For NiCad Batteries
CCRadio
plus
with heavy duty NiCad batteries ......... Approx. 48 Hrs.
Approx. time to charge NiCad batteries with AC Adapter .........27 Hrs.
Approx. time to charge NiCad batteries with Solar Panel .........67 Hrs.
Times are approximate.Please read previous page for more radio/light operational tips.
Page 22

Page 2 2
SPECIFICATIONS
FREQUENCY COVERAGE
FM Band: 87.5 - 108 MHz Stereo
AM Band: 520 - 1710 kHz
TV Band: Channels 2-13 Audio Only
WEATHER
BAND
Channel 1: 162.400 MHz Channel 5: 162.500 MHz
Channel 2: 162.425 MHz Channel 6: 162.525 MHz
Channel 3: 162.450 MHz Channel 7: 162.550 MHz
Channel 4: 162.475 MHz
ROTARY TUNING KNOB RESOLUTION
AM - 1 kHz TV - 1 Channel
FM - 50 kHz WX - 1 Channel
POWER SOURCE
AC 120 Volts 60Hz
Batteries: (4) “D” size
P
OWER CONSUMPTION
AC Power: 8 Watts
Battery Power: 40-50 mA DC
AUDIO
10% THD at output power @ 1.8 Watt AC typical
@ .9 Watt Battery
Speaker: 5”, 4 Ohm, 6 Watts
ANTENNA
FM, TV and Weather Band:Telescopic whip antenna
AM Band: 1) Built-in Ferrite Bar - 7/16” dia x 8” long (200 mm)
2) External AM antenna directly wired through filter
network into RF front end.
DIMENSIONS
11” W x 6-1/2” H x 4” D (at the base)
WEIGHT
Approximately 3.8 pounds without batteries
Note: Specifications are subject to change without notice.
Page 23

Page 2 3
SPECIFICATIONS
6V DC CHARGING JACK
2.1 mm ID tipped negative.6 - 9V DC @ 400mA input for directly
charging NiCad batteries. Can also power your radio and charge
NiCad batteries using a 4 Watt Solar Panel. Do not charge
alkaline batteries.
Item #6CA ................... $10.95 6V Charging Adapter
Item #S04 .................... $59.95 Sangean 4 Watt Solar Panel
LED L
AMP JACK
4 Volt output for use with external LED lamp.
Item #CWL ................... $19.95
LINE IN J
ACK
300 - 1000mV RMS (line level) input from external audio source.
Do not overload.
LINE OUT J
ACK
300 - 1000mV RMS (line output)
T
IMER ACTIVATION SWITCH
Low impedance, transistor driven switch. Used for operation of
external recording devices.
P
ATCHCORDS
Can be purchased directly from C. Crane Company Inc.
at 1-800-522-8863 or you can obtain a comparable
patchcord from your local electronics store.
3 x 1/8” Stereo Patchcord, 40” L.
Item #VPC ..................$14.95
V
ERSACORDER
Dual speed tape recorder.Designed to work with
CCRadio
plus.
Record up to 4 hours on one side of a
cassette tape. Can be purchased directly from
C. Crane Company Inc.at 1-800-522-8863 or on the web
at ccrane.com.
Item #VC ..................$99.95
Page 24

Page 2 4
R
ADIO NOISE TROUBLESHOOTING
Annoying buzzes are many times
transmitted through an AM radio.
Here is a check-off list of the most
likely causes:
• Dimmer switch.
• Fluorescent light.
• “Touch lamp” type light fixture
(even when turned off).
• Automatic on and off night lights.
• Outdoor yard lights which come on
automatically.
• Electronic bug and pest controllers.
• A light bulb that is about to burn out.
• A faulty electrical switch of any kind.
• A nearby television set.
• A store that has a fluorescent light
or a public recreation room that has
fluorescent lights located near you.
• Blinking bulbs of all kinds such as
Christmas tree lights.
• If you live in an apartment a
neighbor’s dimmer switch could be
the culprit.
• Scanners of all types.
• Dirty insulators on a nearby power
pole allowing arcing.
• Electric blanket.
• Smoke detectors that run from AC
current (battery operated is OK).
AM R
ADIONOISEPROBLEMS AND
P
OSSIBLESOLUTIONS
It is best to eliminate the interference at its source. Here’s a list of
possible solutions:
• The most obvious is to turn off the
offending device.
• Try a battery operated radio to see if
the interference is coming in from
the AC 120 Volt line, through the air,
or both.
• Turn off the circuit breakers to see if
the noise stops. If it does, then you
know it is something in your house.
Turn off one circuit at a time to isolate where the noise is coming from.
• Use a battery operated radio as a
direction finder.Turn the radio until
the loudest noise is heard — the
front and back of the radio will point
to the noise origin.
• Carry a radio around the neighborhood and see if you can find the
origin of the noise. Ask other neighbors if they have the same problem.
• If a power pole is suspected, call
the utility company and they will
check the area and possibly wash
the insulators. Dirty power pole insulators are sometimes a cause of
difficult-to-find radio interference.
• If you have a hum in your receiver
from AC line noise sometimes
grounding the radio can reduce the
hum greatly. Finding a good earth
ground may be difficult.
Page 25

Page 25
AM TUNING & LISTENING TIPS
The CCRadio
plus
is made for distant or weak AM signal listening.
Daytime reception is limited to about 300 miles maximum because you
can only receive the signal direct from the transmitter site.You may
receive AM stations thousands of miles away at dawn, dusk and at
night, depending on the time of year and atmospheric conditions.The
ionosphere is a layer of ions above the earth. At night it slows and congeals into a giant mirror and can reflect radio waves back to the earth;
allowing you to receive signals much farther away than during the day.
Distant listening is called DXing. One club that is devoted to DXing is
National Radio Club at: PO Box 164, Mannsville, NY 13661-0164.They
maintain a website at:
http://www.nrcdxas.org
Top View CCRadio
plus
Left Side Rear View
Most portable radios including the CCRadio
plus
have an internal AM
antenna. Best performance is achieved when the radio is swiveled on its
base for maximum signal pickup from the transmitting tower.This same
technique can be used to help nullify unwanted signals or radio noise.
Experimentation is the best way to see how it works for you.
The CCRadio
plus
has two external antenna terminals for AM. If your
reception is better outside, try this quick and easy antenna: Use 50’ of
insulated wire attached to one terminal and a ground to the other terminal.Try running the wire inside around a window or along a baseboard.
An antenna of more than 50’ will improve reception, but
SAFETY DIRECTIONS AND PRECAUTIONS FROM YOUR
ANTENNA SUPPLIER SHOULD BE FOLLOWED TO PREVENT INJURY FROM LIGHTNING OR ANY ACCIDENT.
External Antenna
Ter minal for AM
Ground Terminal
Page 26

Page 26
City
Frequency
Date
Time
PERSONAL STATION LOG
Station
Call Letters
Please feel free to copy this page.
Page 27

Model: CCRadio
plus
FCC ID: BYG 003
THIS DEVICE COMPLIES WITH PART 15 OF THE FCC RULES.
OPERATION IS SUBJECT TO THE FOLLOWING TWO CONDITIONS.
1) THIS DEVICE MAY NOT CAUSE HARMFUL INTERFERENCE, AND
2) THIS DEVICE MUST ACCEPT ANY INTERFERENCE RECEIVED,
INCLUDING INTERFERENCE THAT MAY CAUSE UNDESIRED
OPERATION.
Notice: Any changes or modifications not expressly approved by the
party responsible for compliance could void the user’s authority
to operate the equipment.
381C15SA
 Loading...