

Page 1
ES
Instrucciones de uso y mantenimiento para hornos de encastre
DE
Bedienungs-und Wartungsanleitungen für einbaubacköfen
FR
Instructions pour l’usage et la maintenance des fours a encastrement
EN
Operating and maintenance instructions for built-in ovens
IT
Istruzioni d’uso e manutenzione per forni ad incasso
NL
Gebruiksaanwijzing en instructies voor ovens
PT
Instruções de uso e manutenção para fornos de encastrar
RU
CH
嵌入式烤箱操作及维护指引
Page 2

Page 3

ES
INSTRUCCIONES PARA EL USUARIO
Les agradecemos por haber elegido uno de nuestros productos y esperamos que obtengan las mejores prestaciones de
este electrodoméstico. Por lo tanto le sugerimos que sigan
atentamente las instrucciones y las sugerencias de este manual para la correcta utilización de nuestros productos.
La placa de características del horno se encuentra disponible
junto con el aparato. En esta placa, visible abriendo la puerta,
se muestran todos los datos de identifi cación del aparato a los
que se deberá hacer referencia para el pedido de piezas de
repuesto.
rarse de que este producto se deseche correctamente, usted
ayudará a evitar posibles consecuencias negativas para el
ambiente y la salud pública, lo cual podría ocurrir si este producto no se manipula de forma adecuada. Para obtener información más detallada sobre el reciclaje de este producto,
póngase en contacto con la administración de su ciudad, con
su servicio de desechos del hogar o con la tienda donde compró el producto.
Este aparato ha sido construido y distribuido cumpliendo
con los requisitos esenciales de las DIRECTIVAS y NORMAS
EUROPEAS CEE siguientes:
INFORMACIÓN GENERAL
Por favor, lea atentamente este manual antes de utilizar el
aparato. Es importante que comprenda todas las funciones de
control antes de empezar a cocinar con su aparato.
Recuerde los consejos y advertencias con el título “IMPORTANTE - Advertencias e instrucciones de seguridad”.
• Este aparato ha sido diseñado para uso privado en el hogar y
puede integrarse en un armario de cocina estándar o de otro
tipo.
• Para su uso en vehículos tipo caravanas, debe tenerse en
cuenta la indicación apropiada en las Instrucciones de
Instalación.
• El uso para cualquier otro propósito o en cualquier otro
entorno sin el acuerdo expreso del fabricante invalidaría
cualquier declaración de garantía o responsabilidad.
• Su nuevo aparato está garantizado contra defectos eléctricos
o mecánicos, sujeto a determinadas exclusiones indicadas en
las Condiciones de Garantía del Fabricante.
• Lo anterior no afectará a sus derechos estatutarios.
Antes de usar este aparato, asegúrese de haber retirado cualquier embalaje protector o revestimiento.
Para colaborar en la protección del medio ambiente, separe
los materiales de embalaje según sus diferentes tipos y elimínelos de acuerdo con las leyes locales de eliminación de
residuos.
Los embalajes están concebidos para no dañar el medio ambiente; pueden ser recuperados o reciclados siendo productos
ecológicos. Reciclando el embalaje, se contribuirá a un ahorro
de materias primas y a una reducción del volumen de los desechos industriales y domésticos.
Cualquier información adicional sobre la eliminación de residuos podrá solicitarla a su agencia medioambiental local.
Cuando se utilice por primera vez, podrá percibirse un olor del
revestimiento protector o la humedad, que desaparecerá después de un breve periodo de tiempo.
El símbolo
producto no se puede tratar como desperdicios normales del
hogar. Este producto se debe entregar al punto de recolección
de equipos eléctricos y electrónicos para reciclaje. Al asegu-
en el producto o en su embalaje indica que este
Símbolo CE - 93/68 Baja tensión - 73/23 CEM-89/336
Normas de Seguridad - EN 60 335-1, EN 60 335 - 2 - 6.
Este aparato respeta las normas para la supresión de las radio-interferencias.
Dado que el Fabricante tiene una política de mejora permanente de los productos, se reserva el derecho de adaptar y
realizar las modifi caciones que se consideren necesarias sin
previo aviso.
NOTA IMPORTANTE
ADVERTENCIA e INSTRUCCIONES DE SEGURIDAD
• El aparato y sus partes accesibles se calientan durante el uso.
• Los niños menores de 8 años deben permanecer alejados a
menos que estén bajo supervisión permanente.
• Este aparato puede ser utilizado por niños a partir de 8
años, así como por personas con discapacidades físicas,
sensoriales o mentales, o que no tengan experiencia ni
conocimientos para ello, si se les supervisa o instruye en
el empleo del aparato de una forma segura y comprenden
los riesgos que ello implica. Los niños no deben jugar con el
aparato. Los niños no deben encargarse de su limpieza ni del
mantenimiento sin supervisión.
• Este aparato cumple con toda la legislación de seguridad
europea actual, sin embargo, el Fabricante desea enfatizar
que el cumplimiento no evita el hecho de que las superfi cies
del aparato se calentarán durante el uso y mantendrán el
calor después del funcionamiento.
• Por lo tanto, El Fabricante recomienda encarecidamente que
se mantenga apartados del aparato a los bebés y niños de
corta edad.
• Si no puede evitarse que los más pequeños de la familia
permanezcan en la cocina, deben estar bajo vigilancia
estricta permanentemente.
• También recomendamos tener mucho cuidado durante el
uso y limpieza. Leer atentamente el apartado de limpieza y
el apartado de mantenimiento.
• No coloque objetos pesados sobre el horno ni se apoye
sobre la puerta al abrirla, ya que podrían dañarse las
bisagras.
• No deje aceite o grasa caliente desatendidos, ya que existe
riesgo de incendio.
Page 4
• No coloque cacerolas o bandejas de horno sobre la parte
inferior de las cavidades del horno ni las cubra con papel
aluminio.
• No guardar nunca objetos infl amables dentro del horno,
pueden provocar un incendio.
• No permita que los accesorios o cables eléctricos estén en
contacto con las zonas calientes del aparato.
• No utilice el aparato para el calentamiento especial ni para
secar ropa.
• No instale el aparato cerca de cortinas o muebles tapizados.
• No intente elevar o mover los aparatos de cocina tirando de
cualquier puerta o maneta, ya que podría causar daños.
• Si la junta del horno está muy sucia, la puerta no cerrará
bien cuando el horno funcione. Los frontales de los muebles
limítrofes pueden dañarse. Mantener límpia la junta del
horno.
• Durante su uso el aparato se calienta. Se debe tener
precaución para evitar tocar elementos calefactores dentro
del horno.
• Abrir el horno con cuidado. Puede salir vapor caliente y
provocar quemaduras a quien esté cerca.
• No verter agua dentro del horno muy caliente. Puede dañar
el esmalte.
• Este aparato debe instalarlo correctamente una persona
adecuadamente cualifi cada, estrictamente de acuerdo con
las instrucciones del fabricante.
• El Fabricante declina toda responsabilidad por los daños
personales o materiales como resultado del uso indebido o
instalación incorrecta de este aparato.
• Durante el uso se producirán calor, vapor y humedad, evite
cualquier tipo de daños personales y asegúrese de que la
habitación esté adecuadamente ventilada. Si se utiliza de forma
prolongada, puede ser necesaria ventilación adicional - consulte
con su instalador cualifi cado si tiene alguna duda sobre el
volumen necesario.
INSTRUCCIONES DE USO
Este Manual del Usuario debe conservarse para su consulta
futura y el uso por parte de una persona que quizá no esté familiarizada con el aparato.
Antes de usar el horno, limpiar esmeradamente el interior del
mismo con jabón no abrasivo y agua templada. Introducir la
rejilla y la bandeja en sus respectivas guías. Una vez fi nalizada
la operación, poner el horno a temperatura máxima durante
20 minutos aproximadamente para eliminar cualquier residuo
de grasa, aceite o resinas de fabricación que podrían causar
olores desagradables durante la cocción.
ATENCIÓN
un poco de humo o causar olores desagradables. En este caso
ventilar la estancia adecuadamente hasta que termine este
primer funcionamiento.
Una vez efectuada esta sencilla operación, el horno estará listo para realizar su primera cocción.
Este aparato es de uso exclusivamente doméstico.
Utilizar el horno únicamente para cocinar alimentos.
: Puede ocurrir que en esta primera cocción salga
USO DEL HORNO
El horno está controlado termostáticamente entre 50 ºC y/o
250 ºC, dependiendo de la temperatura requerida. El piloto
luminoso del termostato se enciende y se apaga para indicar
el control de temperatura durante los periodos de funcionamiento.
El modo de cocinado deseado se selecciona usando el botón
de control multifuncional. Las funciones que pueden seleccionarse son las siguientes:
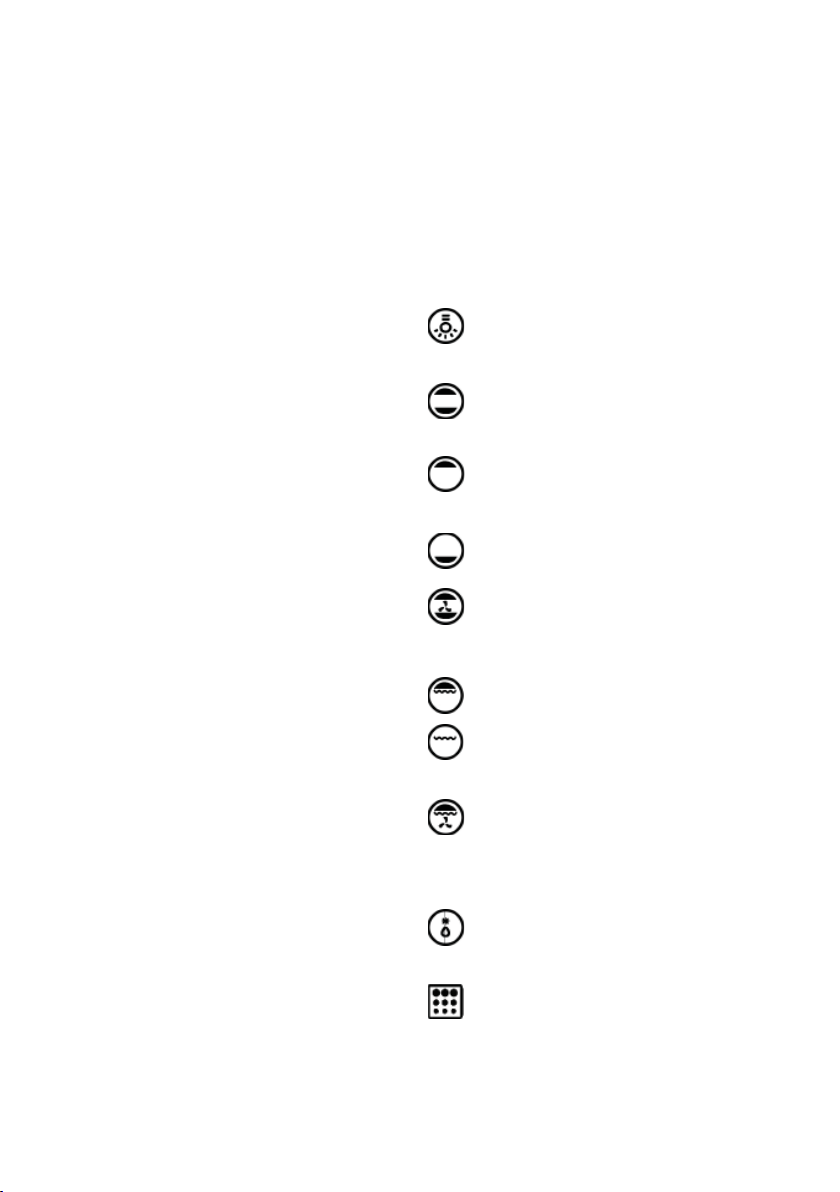
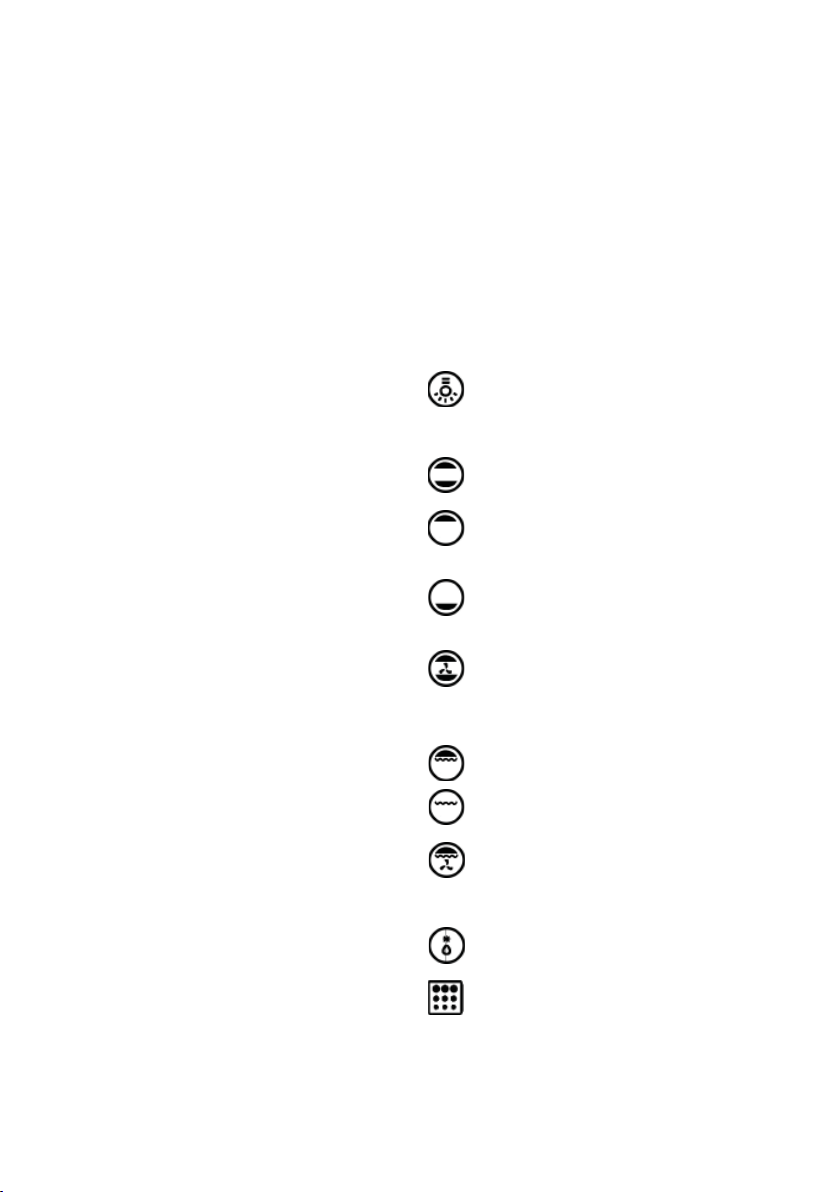
A. LUZ DEL HORNO.
el modo de cocinado para todos los modelos. La luz del
horno permanece encendida mientras se usa el horno.
B. MODO DE CONVEC CIÓN.
tradicional con calor desde los elementos superior e
inferior.
C. MODO DE ELEMENTO SUPERIOR.
Es para el cocinado suave, dorar o conservar calientes los platos cocinados.
D. MODO DE ELEMENTO INFERIOR.
Se usa para el cocinado lento y para calentar comidas.
E. MODO DE CONVECCIÓN CON REFUERZO DE
VENTILADOR.
convección con los elementos superior e inferior para
un cocinado uniforme.
F. MODO GRILL.
G. MAXI-GRILL.
sición anterior, pero el elemento del grill le proporcionará una zona más grande para asar.
H. MODO DE GRILL CON REFUERZO DE VENTILA-
DOR.
Esto proporciona un dorado rápido para que los
alimentos conserven su jugo. En cocción con ventilación forzada ésta es la función más efi ciente a nivel
energético.
I. MODO DESCONGELACIÓN.
El ventilador funciona sin calor para reducir el tiempo
de descongelación de los alimentos congelados.
J. Función pirolítica:
Al confi gurar el horno para funcionar en modo pirolítico, el indicador «PYA» aparecerá en la pantalla LED.
La temperatura predeterminada es 450 ºC. El temporizador puede ajustarse a 1:30 horas o a 2:00 horas.
Automática cuando se selecciona
Proporciona cocinado
Esto proporciona calentamiento por
Para gratinar y dorar los alimentos.
El mismo procedimiento que en la po-
Page 5
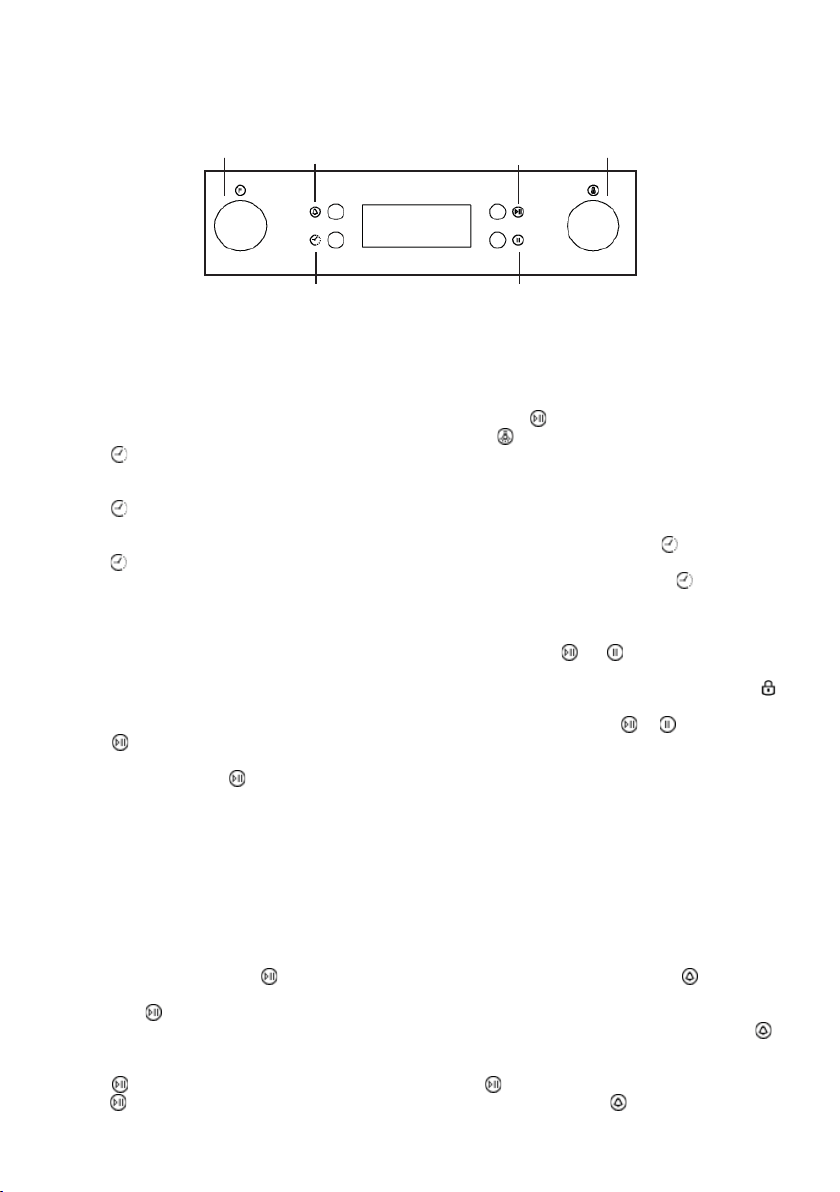
DESCRIPCIÓN DEL PRODUCTO
K1
Botón de recordatorio
Botón de paradaBotón de tiempo
Recuerde: para abrir la puerta del horno, sujete siempre con una mano
la manivela central y no toque el pasador del bloqueo para niños.
OPERATION INSTRUCTIONS
3. Ajuste de la lámpara
1) Gire «K1» para seleccionar la función pertinente. El icono
1. Ajuste del reloj
Una vez conectado el horno al suministro eléctrico, la pantalla
mostrará los símbolos «00:00».
correspondiente se encenderá.
2) Pulse el botón « » para comenzar la cocción. El icono de la
lámpara « » * «:» parpadeará.
1) Pulse « » y los dígitos de la hora parpadearán.
2) Gire «K2» para ajustar las horas (establezca un valor entre
0 y 23).
3) Pulse « » y los dígitos de los minutos parpadearán.
4) Gire «K2» para ajustar los minutos (establezca un valor entre
0 y 59).
5) Pulse « » para fi nalizar los ajustes del reloj. «:» parpadeará
y la hora se iluminará.
Nota: el reloj muestra la hora en formato de 24 horas. Una vez
4. Función de consulta
Durante el proceso de cocción puede utilizar la función
de consulta y volver, después de 3 segundos, al modo de
funcionamiento actual.
1) En modo de cocción, pulse el botón « » para ver la hora
actual.
2) Con visualización del reloj, pulse el botón « » para consultar
el tiempo de cocción.
conectado al suministro eléctrico, el reloj funcionará de forma
ininterrumpida.
5. Función de bloqueo para niños
Para bloquear: pulse « » y « » simultáneamente durante
2. Ajuste de función
1) Gire «K1» para seleccionar la función de cocción deseada.
El indicador asociado se iluminará.
2) Gire «K2» para ajustar la temperatura.
3) Pulse « » para confi rmar el inicio de la cocción. El icono
correspondiente de la temperatura «ºC» se encenderá.
4) Si ignora el paso 2, pulse « » para confi rmar el inicio de
la cocción. El tiempo predeterminado será de 9 horas y la
pantalla LED mostrará la temperatura predeterminada.
NOTA:
3 segundos y escuchará un prolongado sonido de «pitido»
para indicar que el bloqueo para niños está activado y « »
se iluminará.
Desactivación del bloqueo: pulse « » y « » simultáneamente
durante 3 segundos y escuchará un prolongado sonido
de «pitido» para indicar que el bloqueo para niños está
desactivado.
Nota: durante el modo de funcionamiento, si desea detener la
cocción, pulse el botón de parada rápidamente. No necesita
pulsar y mantener el botón de parada; esta acción es inefi caz.
1) El intervalo de ajuste del interruptor de codifi cación es el
siguiente:
0--0:30 min: intervalo de 1 minuto 0:30--9:00 horas: intervalo
de 5 minutos
2) El intervalo de ajuste de la temperatura es de 5 ºC, y el de la
función de grill radiante de 30 ºC.
3) Gire «K1» para ajustar el tiempo de cocción una vez iniciado
el proceso de cocción. Pulse « » a continuación para
reanudar la cocción.
Si no pulsa « » en el transcurso de 3 segundos, el horno
volverá al tiempo anterior y continuará la cocción.
4) Gire «K2» para ajustar la temperatura una vez iniciado el
proceso de cocción. El indicador asociado se iluminará.
Pulse « » a continuación para reanudar la cocción. Si no
pulsa « » en el transcurso de 3 segundos, el horno volverá
a la temperatura anterior y continuará la cocción.
6. Función de recordatorio:
El horno incorpora un recordatorio de 9 horas. Esta función
le ayudará a recordar cuándo debe iniciar la cocción dentro
de un intervalo de entre 1 minuto y 9 horas. El recordatorio
solo puede confi gurarse con el horno en modo de espera.
El recordatorio se confi gura de la siguiente manera:
1) Pulse el botón de ajuste del recordatorio « »;
2) Gire «K2» para ajustar las horas del recordatorio (establezca
un valor entre 0 y 9).
3) Pulse nuevamente el botón de ajuste del recordatorio « »;
4) Gire «K2» para ajustar los minutos del recordatorio
(establezca un valor entre 0 y 59).
5) Pulse « » para confi rmar el ajuste. «:» parpadeará y el
indicador del recordatorio « » se iluminará. La cuenta
atrás se pone en marcha.
Botón de inicio
K2
Page 6
Nota: la alarma del horno sonará 10 veces cuando el tiempo
llegue a cero. El símbolo « » desaparece de la pantalla para
recordarle que debe comenzar la cocción. Puede cancelar el
recordatorio durante el ajuste pulsando el botón de parada;
Una vez establecido el recordatorio, puede cancelarlo
pulsando el botón de parada dos veces.
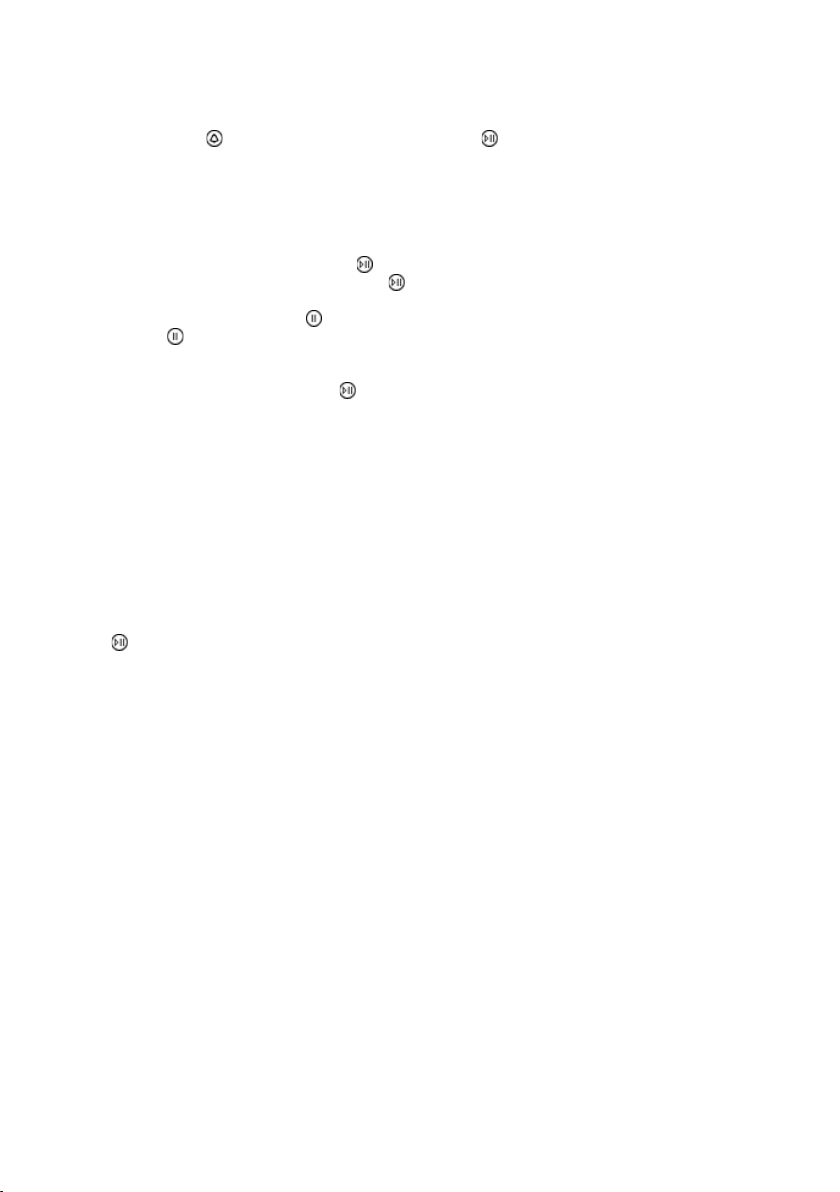
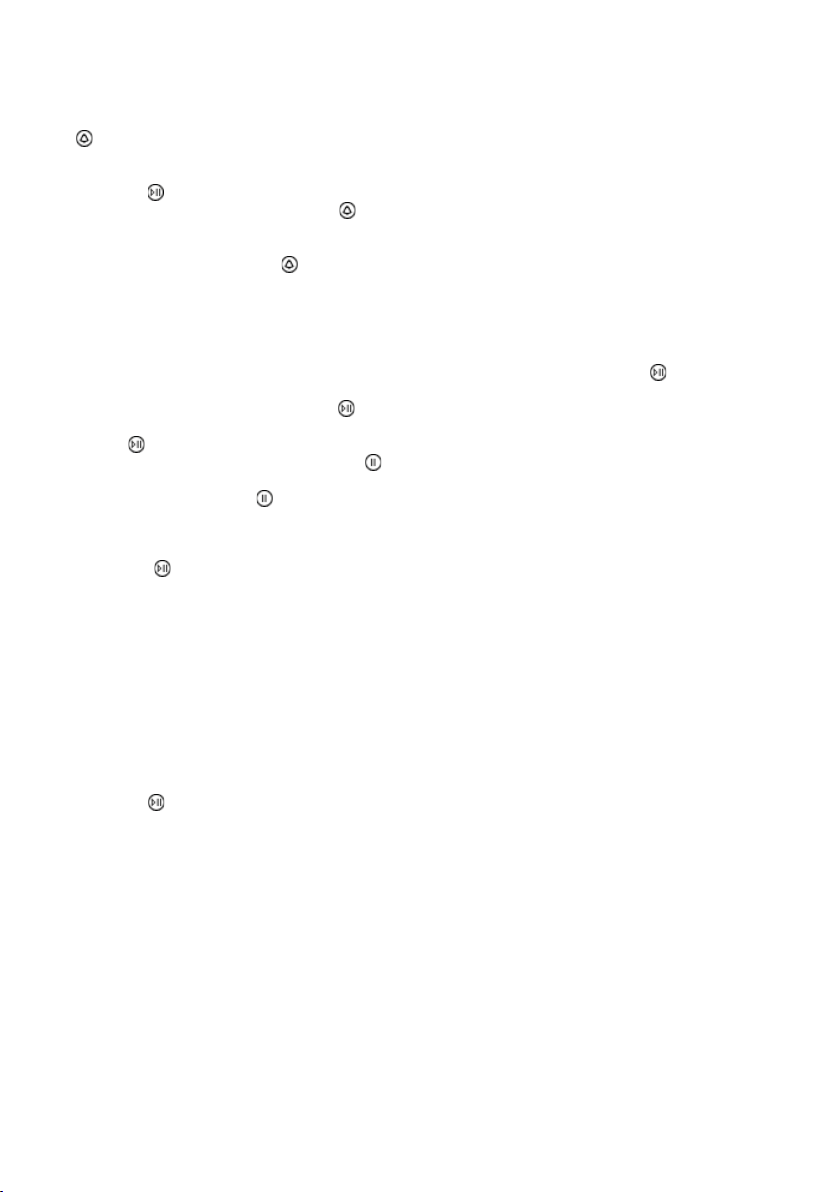
7. Función de Inicio/Pausa/Cancelación
1) Si ha establecido el tiempo de cocción, pulse «
iniciar la cocción. Si la cocción está en pausa, pulse « »
para reanudarla.
2) Durante el proceso de cocción, pulse « » una vez para
pausarlo. Pulse « » dos veces para cancelar la cocción.
8. Función de ahorro de energía
1) En modo de espera y de recordatorio, pulse « » durante
3 segundos y la pantalla LED se apagará y entrará en modo
de ahorro de energía.
2) Si no realiza ninguna acción durante 10 minutos con el horno
en modo de espera, la pantalla LED se apagará y entrará en
modo de ahorro de energía.
3) Pulse cualquier botón o gire cualquier codifi cador para salir
del modo de ahorro de energía.
9. Función pirolítica (solo algunos modelos)
Esta función le permite limpiar completamente la cavidad del
horno.
1) Gire «K1» para seleccionar la función pirolítica. «PYA»
aparecerá en la pantalla LED.
2) Pulse « » para confi rmar la función de cocción. El tiempo
predeterminado es 2:00 horas. «PYA» aparecerá en la
pantalla LED.
3) Gire «K1» para modifi car el tiempo de la función pirolítica.
Puede elegir entre dos opciones de tiempo, «1:30» o «2:00».
Nota:
A) Si la puerta del horno está abierta, el botón de inicio quedará
inoperativo y en la pantalla LED aparecerá «DOOR», «PYA».
B) Cuando la temperatura central del horno supere los 200 ºC,
pulse el botón de cancelación para volver directamente
al modo de espera y si la temperatura central del horno
supera los 300 ºC, pulse el botón de inicio y en la pantalla
LED aparecerá «COOL».
C) Si abre la puerta en modo de funcionamiento normal, el relé
del calentador cesará su funcionamiento; en la pantalla LED
aparecerá «DOOR» y la alarma emitirá un pitido continuo
hasta que cierre la puerta o pulse el botón de cancelación.
D)
Cuando fi nalice la función pirolítica y la temperatura central del
horno caiga por debajo de los 300 ºC, la pantalla LED se apagará.
E)
Antes de activar la función de limpieza pirolítica, elimine
cualquier exceso de desperdicios y asegúrese de que el horno
esté vacío. No deje ningún utensilio como cacerolas, bandeja
del horno, colector de grasa, soporte de corredera, etc.,
dentro del horno ya que podría resultar seriamente dañado.
10. Nota
1) La lámpara del horno se encenderá con todas las funciones
(excepto con la función pirolítica)
» para
2) Una vez establecido el programa de cocción, si no se pulsa el
botón «
» en el transcurso de 5 minutos, la pantalla mostrará
la hora actual o volverá al modo de espera. El programa de
ajuste quedará anulado.
3) La alarma suena si se pulsa de forma efectiva; si no es así,
no habrá respuesta.
4) La alarma sonará cinco veces para recordarle que ha
fi nalizado la cocción.
CONSEJOS ÚTILES
• Antes de cocinar, asegúrese de extraer del horno todos los
accesorios no utilizados.
•
Precaliente el horno a temperatura de cocinado antes de usarlo.
• Coloque las bandejas de cocinado en el centro del horno y
deje espacios entre ellas cuando use más de una, para que
circule el aire.
• No llenar demasiado la bandeja para preparar un pastel de
frutas jugoso. El jugo de frutas que gotea de la bandeja produce manchas que no se pueden eliminar.
•
No introducir bandejas en la base del horno y no cubrir con papel de aluminio. Esto produciría acumulación térmica. Los tiempos de cocción y asado no coinciden y pueden dañar el esmalte.
• Intente abrir la puerta lo menos posible para ver los alimentos
(la luz del horno permanece encendida durante el cocinado).
• Tenga cuidado al abrir la puerta para evitar el contacto con
las piezas calientes y vapor
FUNCIÓN PIROLÍTICA
El horno está diseñado para ofrecer una gran funcionalidad y
para que su limpieza resulte extremadamente sencilla gracias
a la función de limpieza automática pirolítica. Los modelos
pirolíticos incorporan una función de limpieza automática,
lo que signifi ca que no es necesario utilizar detergentes
en la cavidad del horno. El interior del horno se calienta y
alcanza una temperatura máxima de 500 °C, momento en el
que cualquier grasa adherida a las paredes simplemente
se eliminará al quemarse. No obstante, el vidrio cuádruple
garantiza que la puerta exterior no se caliente por encima de
los 55 °C. El ciclo pirolítico se lleva a cabo con total seguridad,
ya que un dispositivo de seguridad bloquea la puerta durante
el proceso. El ciclo de limpieza puede programarse entre
un mínimo de 1 hora y 30 minutos y un máximo de 2 horas,
dependiendo del nivel de suciedad. De este modo, los tiempos
de cocción del horno se mantendrán a unos niveles óptimos.
Advertencia:
Puesto que la limpieza pirolítica se lleva a cabo a una
temperatura extremadamente alta, para un uso duradero se
recomienda sacar todos los accesorios de la cavidad antes de
utilizar esta función de limpieza (según el modelo, entre estos
accesorios pueden incluirse: bandeja de horneado, rejilla
de horneado cromada, soporte de la rejilla cromado, asador
giratorio, termómetro para carne, cuchillo para pizza, piedra
para pizza o asa de la bandeja de horneado cromada).
Page 7

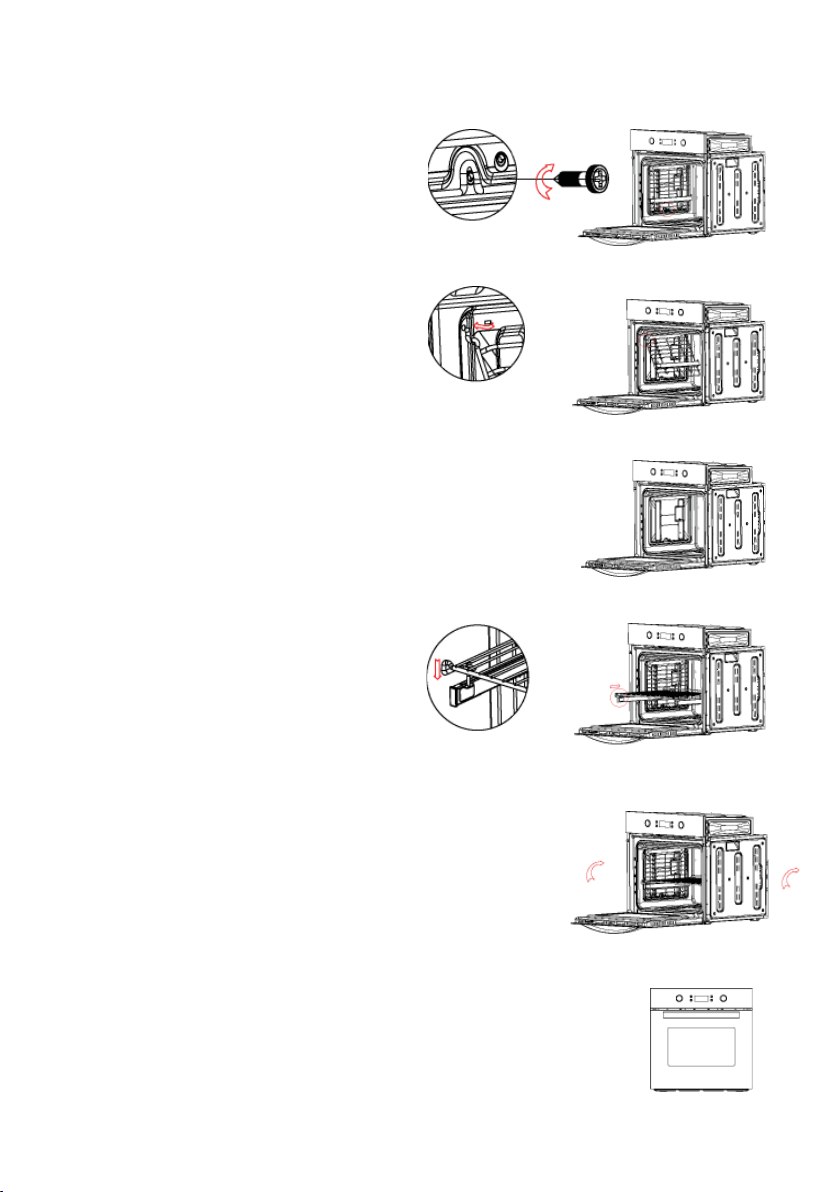
Para retirar los accesorios de la cavidad siga las instrucciones
que se indican a continuación:
1. Saque todos los accesorios de la cavidad.
2. Desmonte el soporte de la rejilla (si hay una guía telescópica
fi jada al soporte de la rejilla, no será necesario desmontarla)
de la cavidad. Coloque los accesorios en un lugar seguro
para poder localizarlos fácilmente después de la limpieza
pirolítica.
1) Afl oje el tornillo para fi jar el soporte de la rejilla con un
destornillador, como se muestra en la fi gura 1.
2) Levante el soporte de la rejilla en un ángulo de unos 30°
en relación con la cavidad y, seguidamente, extráigalo de
la cavidad; extraiga la otra placa lateral del mismo modo,
como se muestra en la fi gura 2.
3. Una vez fi nalice la limpieza pirolítica, transcurrida 1 hora,
monte de nuevo el soporte de la rejilla en la cavidad, como
se indica a continuación:
1) Introduzca la rejilla en el orifi cio de montaje de la placa
lateral del chasis principal, como se muestra en la fi gura 2.
Apriete el tornillo con un destornillador y, a continuación,
fi nalice el montaje de la otra placa lateral del mismo modo,
como se muestra en la fi gura 1.
2) Tire del riel deslizante por ambos lados e instale la rejilla
del grill en el riel deslizante, como se muestra en las fi guras
3 y 4.
4. Monte la rejilla de horneado y los otros accesorios dentro
de la cavidad; el montaje se fi nalizará como se muestra en
la fi gura 5.
fi gura 1
fi gura 2
Nota: La cavidad del horno y la bandeja de horneado están
esmaltadas; tenga cuidado durante el montaje o desmontaje
para evitar que se dañe el esmalte.
fi gura 3
fi gura 4
fi gura 5
Page 8
INSTRUCCIONES DE COCINADO
Consulte la información de los envases de los alimentos para conocer las temperaturas y tiempos de cocinado. Una vez se familiarice con el rendimiento de su aparato, pueden variarse las temperaturas y los tiempos para adaptarlos a sus gustos personales.
Compruebe que los alimentos congelados se descongelen a
fondo antes de cocinarlos, a menos que se indique otra cosa.
Tipo de alimento Temp. ºC Guías Tiempo de
cocción
en minutos
Aconsejado Personal
Dulces en molde con masa batida
Bizcochos o bollos 175 2 55-65
Tarta sublime 175 3 60-70
Dulces en molde de pastafl ora
Fondo de tartas 200 3 08-10
Fondo de tarta con requesón 200 3 25-35
Fondo de tarta con frutas 200 3 25-35
Dulces en molde con masa elevada
Fondo para tartas 180 3 30-45
Pan blando 1Kg de harina 200 3 25-35
Dulces pequeños
Pastafl ora 200 3 10-15
Masa de Buñuelos 200 2 35-45
Masa de galletas 200 3 15-20
Lasaña 225 2 40-50
Carnes (Tiempo de cocción por cada cm. de grosor)
Asados de cocción larga 200 2 120-150
Asados de cocción breve 200 2 60-90
Albóndigas 200 2 30-40
Aves
Pato 1 1/2 Kg 200 2 120-180
Oca 3 Kg 200 2 150-210
Pollo asado 200 2 60-90
Pavo 5Kg 175 2 240-260
Caza
Liebre 200 2 60-90
Pato de corzo 200 2 90-150
Pata de ciervo 175 2 90-180
Verduras
Patatas de horno 220 2 30-40
Flan de verduras cocinado 200 2 40-50
Pescado
Trucha 200 2 40-50
Besugo 200 2 40-50
Pizza 240 3 10-20
Grill
Chuletas 4 8-12
Salchichas 4 10-12
Pollo a la parrilla 2 25-35
Asado de ternera a la parrilla 0,6Kg 50-60
* El número de las guías se refi ere al más bajo (Excluido el
apoyo sobre el fondo del horno ya que la bandeja no puede
introducirse)
LOS DATOS SOLAMENTE SON INDICATIVOS PORQUE EL TIPO
Y EL TIEMPO DE COCCIÓN CAMBIAN SEGÚN LA CANTIDAD Y
LA CALIDAD DE LOS ALIMENTOS.
CÓMO SE USA EL GRILL
Colocar los alimentos que se desea dorar en la rejilla o en una
fuente de bordes muy bajos. La rejilla se tiene que colocar en
el escalón más alto, mientras que la bandeja para recoger la
grasa estará en el escalón de más abajo. Conectar la resistencia grill en la posición del selector en hornos ventilados
, ó en la posición , , del selector en hornos
multifunción.
Dependiendo del tipo de alimento (carnes, pescados, ave etc.)
será necesario dar la vuelta al mismo para poder exponer las
dos caras a los rayos infrarojos del grill. A título puramente
orientativo, indicamos algunos tiempos de cocción:
Alimentos Tiempo de cocción
al Grill aconsejado
en minutos
Carnes bajas o delgadas 4-6
Carnes normales 5-8
Pescado sin escamas 8-10
Pescado (trucha, salmón) 12-15
Salchichas 10-12
Sandwitchs 2-5
ADVERTENCIA
• No use papel aluminio para cubrir la bandeja del grill o calen-
tar.
• No envuelva los elementos en papel aluminio ni los coloque
debajo del grill - la gran refl ectancia del aluminio podría
dañar el elemento del grill.
LIMPIEZA DEL APARATO
IMPORTANTE
Como precaución de seguridad, antes de proceder con cualquier operación de limpieza del horno quitar siempre el enchufe de la toma de corriente o quitar la línea de alimentación del
aparato.
La limpieza del horno sin paneles de autolimpiado tiene que
ser realizada después del uso, cuando esté apagado pero
aún templado, no caliente, de modo que la película de grasa
producida por los vapores de la cocción sobre las paredes sea
todavía fácil de quitar, además los chorreones y salpicaduras
de grasa no tienen todavía una corteza demasiado dura y
consistente.
Page 9
Quitar los soportes laterales de alambre cromado; tirar hacia
arriba de la parte delantera para desengancharlos de la pared
y sacarlos de los orifi cios traseros. Limpiar el horno con un
paño suave embebido con una solución diluida de amoniaco;
aclarar y secar. Si quedaran todavía manchas o salpicaduras,
colocar en el fondo un paño húmedo embebido de amoniaco,
cerrar la puerta y, transcurridas algunas horas, lavar el horno
con agua caliente y detergente líquido, aclarar y secar con
cuidado. Para limpiar las partes externas de metal brillante,
usar un paño suave con agua y jabón; no hay que usar nunca
productos en polvo que contengan abrasivos.
Además evitar el uso de sustancias ácidas o alcalinas (jugos
de limón, vinagre, sal, tomates, etc.). Evitar el uso de productos a base de cloro, ácidos o abrasivos especialmente para la
limpieza de las paredes barnizadas. Tampoco utilice lana de
alambre gruesa o herramientas duras, ya que pueden dañar
los acabados superfi ciales.
No utilice limpiadores de alta presión ni aparatos de vapor
para limpiar el horno.
Normalmente, pasar un paño suave húmedo con detergente
caliente es sufi ciente, pero para las marcas persistentes se
recomienda lo siguiente:
PIEZAS ESMALTADAS VITRIFICADAS
Utilice sólo un limpiador recomendado para este tipo de material - evite los productos con base de cloruro como la lejía.
El fabricante declina toda responsabilidad en caso de que las
normas contra accidentes no hubieran sido respetadas,
IMPORTANTE
El mueble o armario adyacente y todos los materiales utilizados en la instalación deben resistir un aumento de temperatura mínima de 85 ºC sobre la temperatura ambiente durante el
uso del aparato.
Determinados tipos de muebles de cocina de vinilo o laminados son especialmente propensos a sufrir daños por decoloración a temperaturas por debajo de las indicadas.
Si el aparato se instala sin respetar este límite de temperatura
o se coloca a menos de 4 mm de los armarios adyacentes, la
responsabilidad será del propietario.
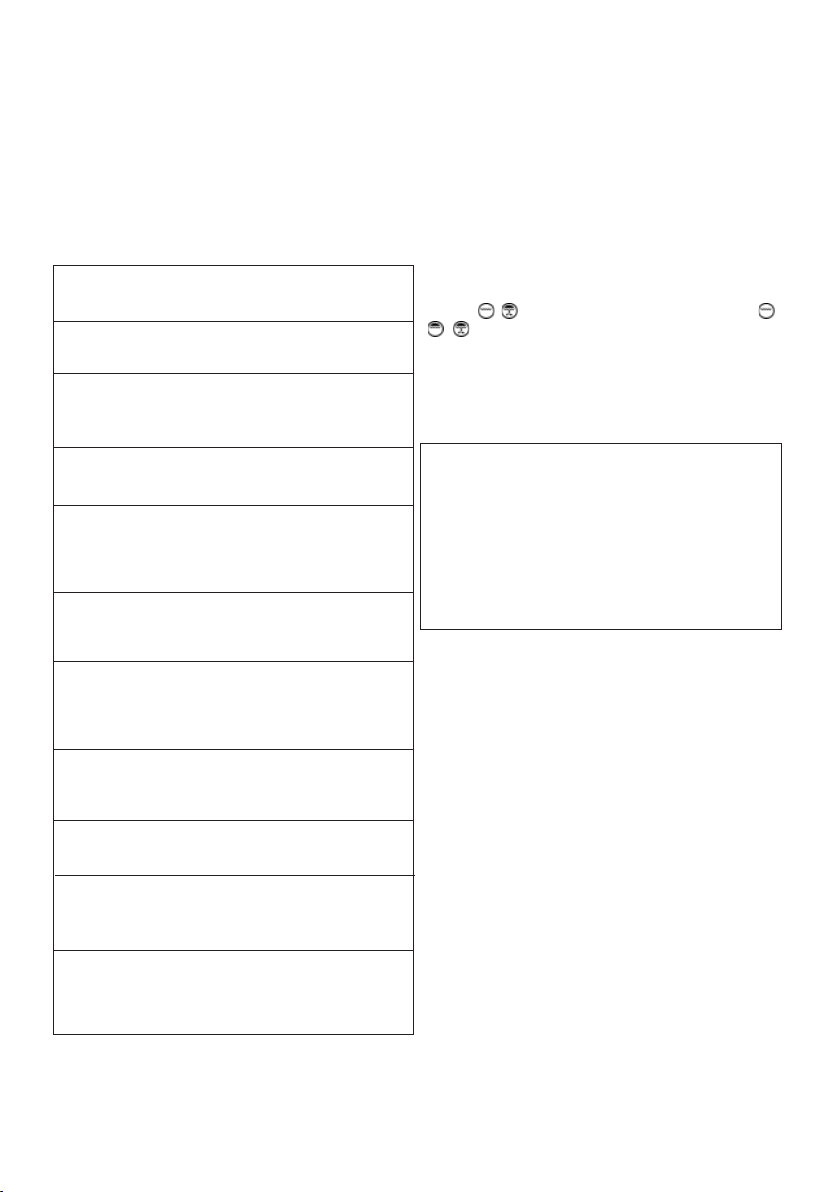
NOTAS DE INSTALACIÓN
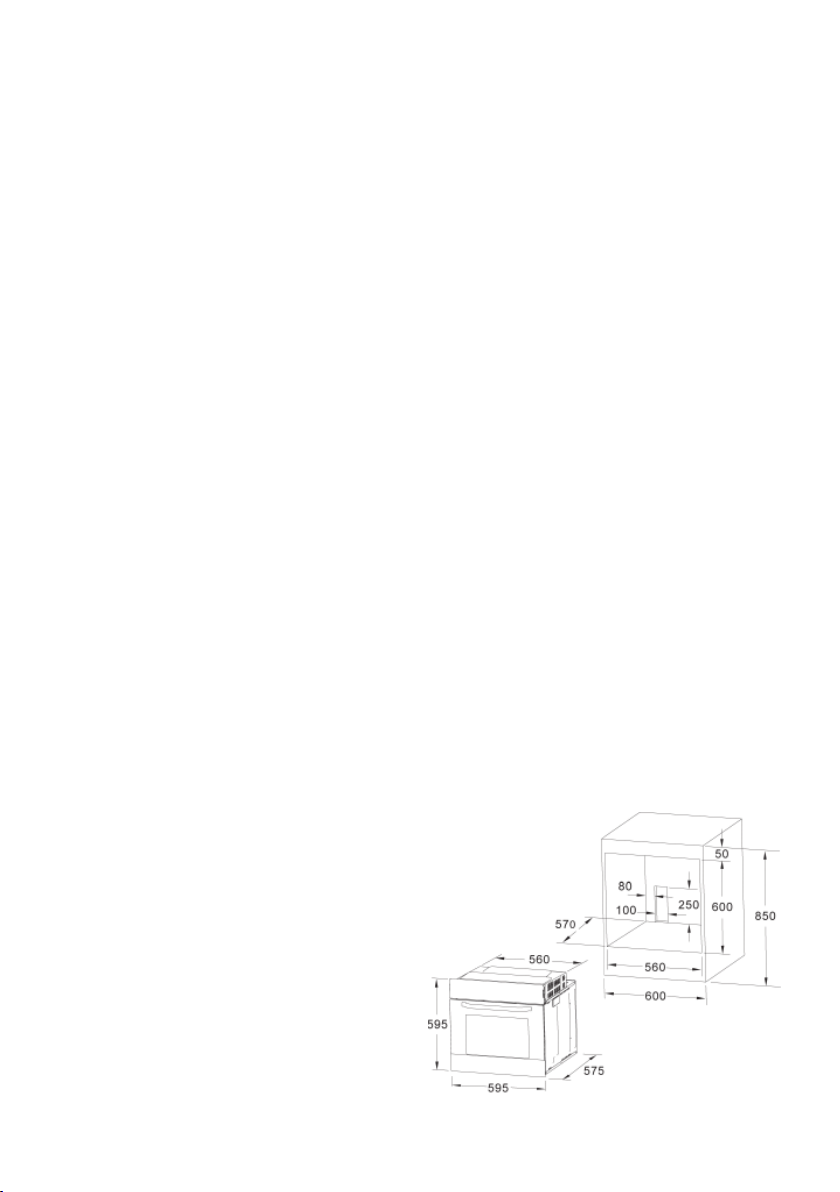
1. El horno tiene que estar instalado en un hueco estándar de
600mm, como se indica en la Fig. 5, ya sea debajo de una
encimera, ya sea colocado en una columna.
2. Al insertar el horno en una columna es indispensable, para
asegurar una ventilación sufi ciente, retirar el panel trasero
del mueble y tener una abertura de por lo menos de 85-90mm
como se indica en la Fig. 5.
3. Compruebe que el horno se ha fi jado de forma segura en
el alojamiento. La fi jación del horno en el armario se realiza
con 4 tornillos “A” Fig.5. Uno en cada esquina del marco de
la puerta del horno.
INSTRUCCIONES PARA LA INSTALACIÓN
Este aparato debe ser instalado por una persona competente,
de acuerdo con la versión actual de las Regulaciones y Normas de Seguridad del RU siguientes o sus equivalentes de la
Norma Europea:
Regulaciones urbanísticas (publicadas por el Departamento
de Medio Ambiente).
Normas urbanísticas (publicadas por el Departamento de Desarrollo de Escocia).
Regulaciones de cableado IEE.
Electricidad en las regulaciones laborales.
PUESTA EN SERVICIO PREVIA DEL APARATO
Cuando se desempaquete, compruebe que con el aparato se
incluyen las piezas siguientes:
• Manual de Instrucciones e Instalación
• reja de horno
• 1 bandeja
• Tornillos y tapones para fi jar el aparato en el alojamiento
COLOCACIÓN DEL APARATO (véase la Fig. 5)
Estos aparatos están clasifi cados como de Clase I.
La conexión a tierra es obligatoria según previsto por la ley.
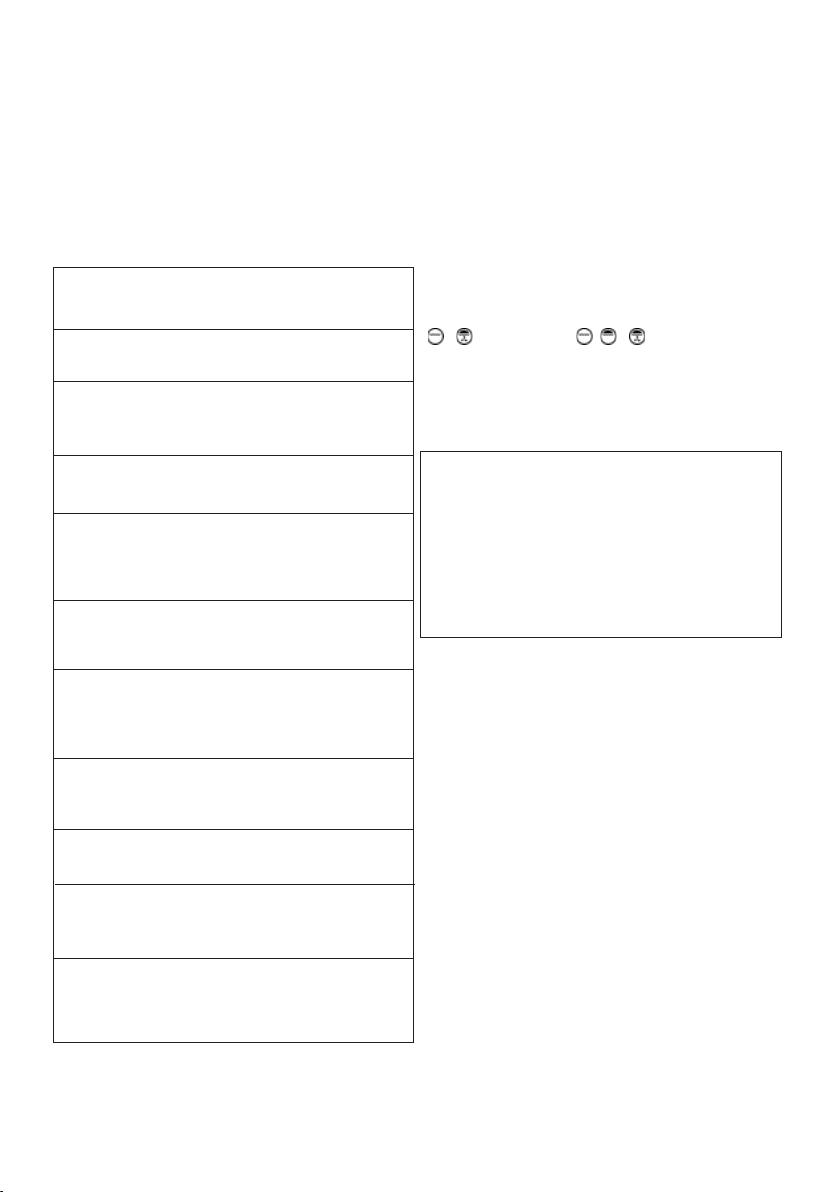
Fig. 5: Distancias de instalación para hornos eléctricos simples
de 60 cm de anchura (la forma de la carcasa superior puede
variar) y su fi jación en el armario.
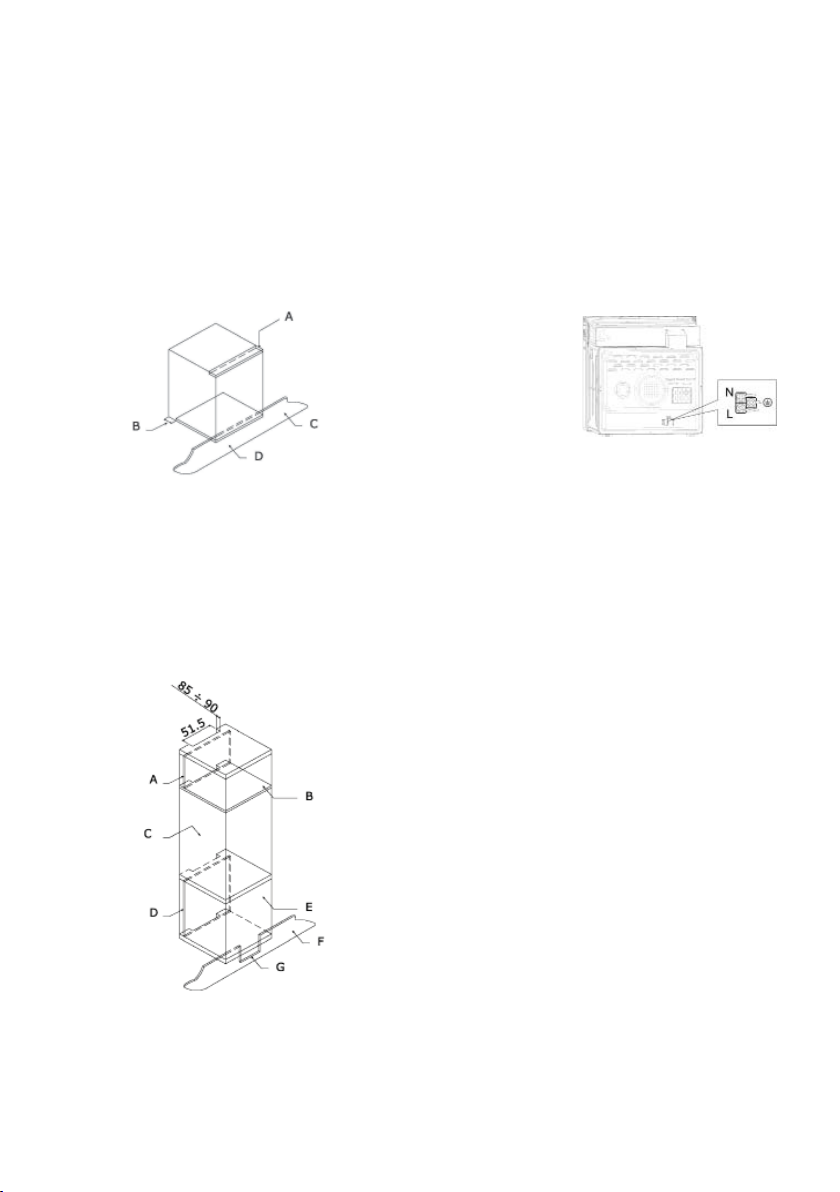
A. La guía de soporte debe quitarse
B. Espaciado 75-90 mm entre la pared y la parte trasera del
estante de soporte y la base del armario
C. Zócalo
D. Frontal de cajón falso a montar
Page 10
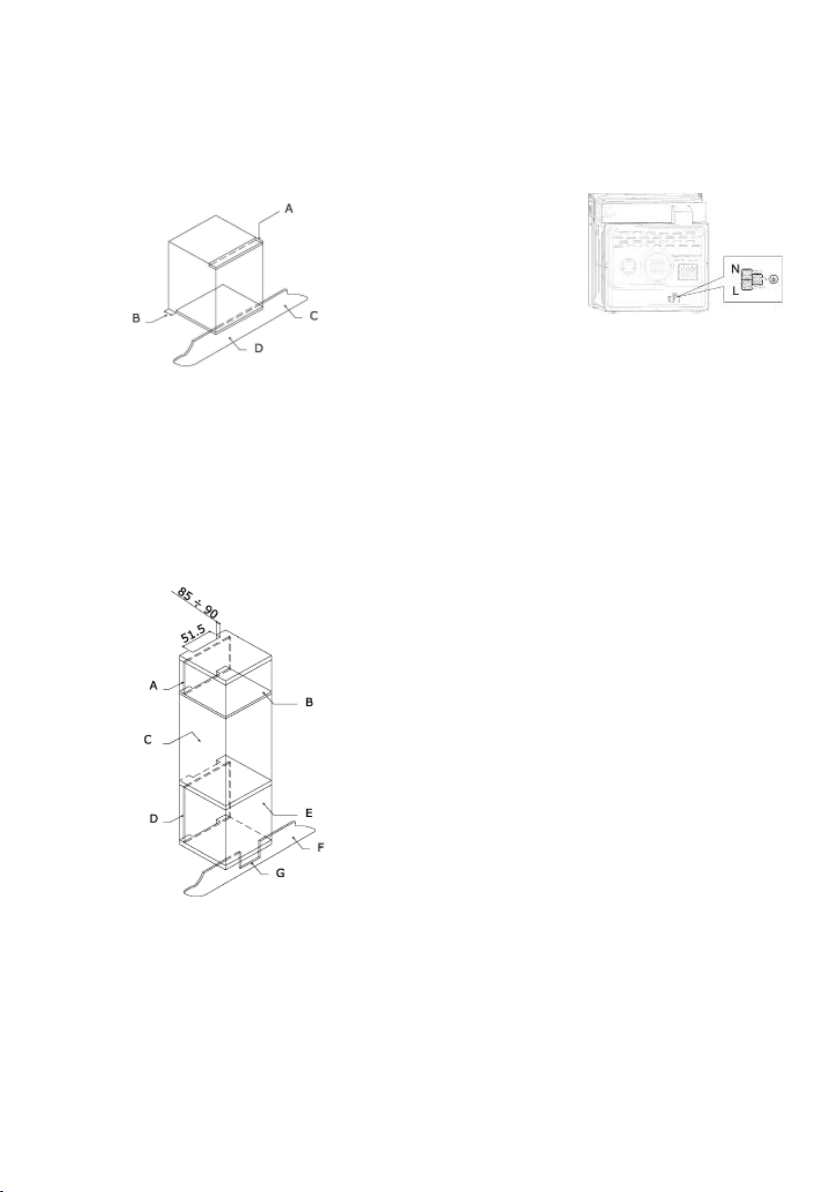
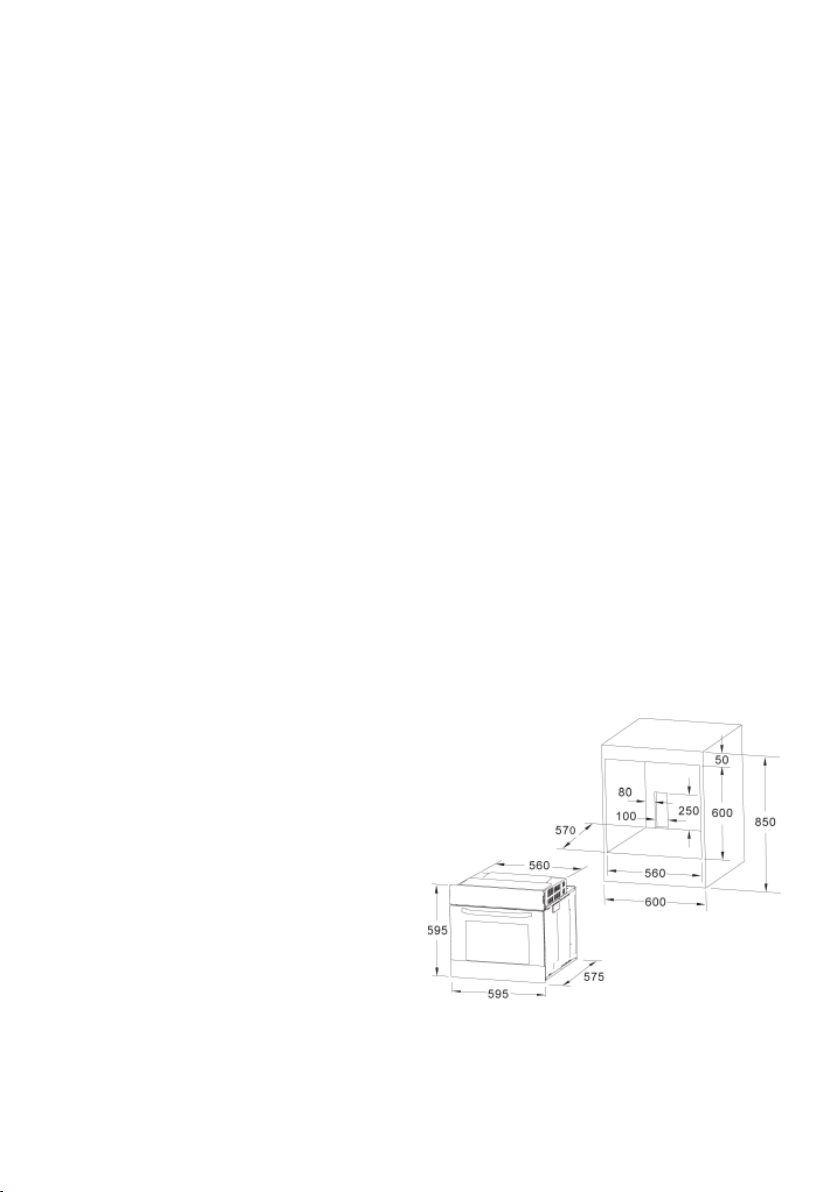
Fig. 7: Requisitos de ventilación y recorte para la instalación de
un horno eléctrico simple en una unidad de cocina estándar.
Requisitos de ventilación mínimos para los estantes superiores, de base y de soporte de la parte trasera de la unidad.
A. Panel trasero
B. Espacio de almacenamiento
C. Quitar la parte trasera de esta sección
D. Panel trasero
E. Espacio de almacenamiento
F. Zócalo
G. Recorte de ventilación mínimo 80 cm2
Fig. 8: Requisitos de ventilación y recorte para la instalación de
un horno eléctrico simple en un armario alto.
IMPORTANTE
Los conductores del cable de alimentación de red están codifi cados por colores del modo siguiente:
Verde y amarillo - Tierra
Azul - Neutro
Marrón - Línea
• El conductor verde y amarillo debe conectarse a la borna
marcada con “E” o con el símbolo de tierra o de color verde
y amarillo.
• El conductor de color azul debe conectarse a la borna mar-
cada “N”.
• El conductor de color marrón debe conectarse a la borna
marcada “L”.
• El cable, en ningún punto tendrá que llegar a una temperatura
superior de 50 ºC a la temperatura ambiente.
• Si el cable de alimentación está dañado, debe ser sustituido
por un cable o conjunto especial a suministrar por el fabricante o por su servicio posventa.
SUSTITUCIÓN DEL CABLE DE ALIMENTACIÓN DE RED
Si es necesario sustituir el cable de alimentación de red, proceda del modo siguiente:
1. Desconecte el aparato de la alimentación, destornille los
tornillos de fi jación y quite el panel trasero.
2. Destornille los tornillos de fi jación y los de las bornas para
liberar el cable existente.
3. Monte el cable de sustitución que debe cumplir con la espe-
cifi cación relacionada en los Datos Técnicos, asegurando
la conexión correcta de los códigos de color y que todos los
tornillos estén apretados correctamente.
CONEXIÓN ELÉCTRICA
Antes de conectar el aparato, compruebe que la tensión de
alimentación marcada en la placa de características coincide
con la tensión de la alimentación de red.
Para las instalaciones eléctricas, se recomienda el registro
NICEIC.
ADVERTENCIA - ESTE APARATO DEBE CONECTARSE A TIERRA
Este aparato debe cablearse en un interruptor automático bipolar de 13 A con toma protegida, que tenga separación de
contactos de 3 mm y situada en un lugar fácilmente accesible
junto al aparato.
MANTENIMIENTO
Antes de realizar el mantenimiento, desconecte el aparato de
la alimentación eléctrica.
Durante el periodo de garantía, si es necesario deben encargarse todas las intervenciones de servicio al Dpto. de Servicio de asistencia técnica del fabricante. Tenga en cuenta que
la intervención o reparación por parte de personal no autorizado invalidará dicha garantía.
SUSTITUCIÓN DE LA BOMBILLA DEL HORNO
(No cubierta por la garantía del aparato.)
El horno está provisto de una lámpara de las siguientes características: 15 W ó 25 W, 300 ºC y tipo E-14
Page 11
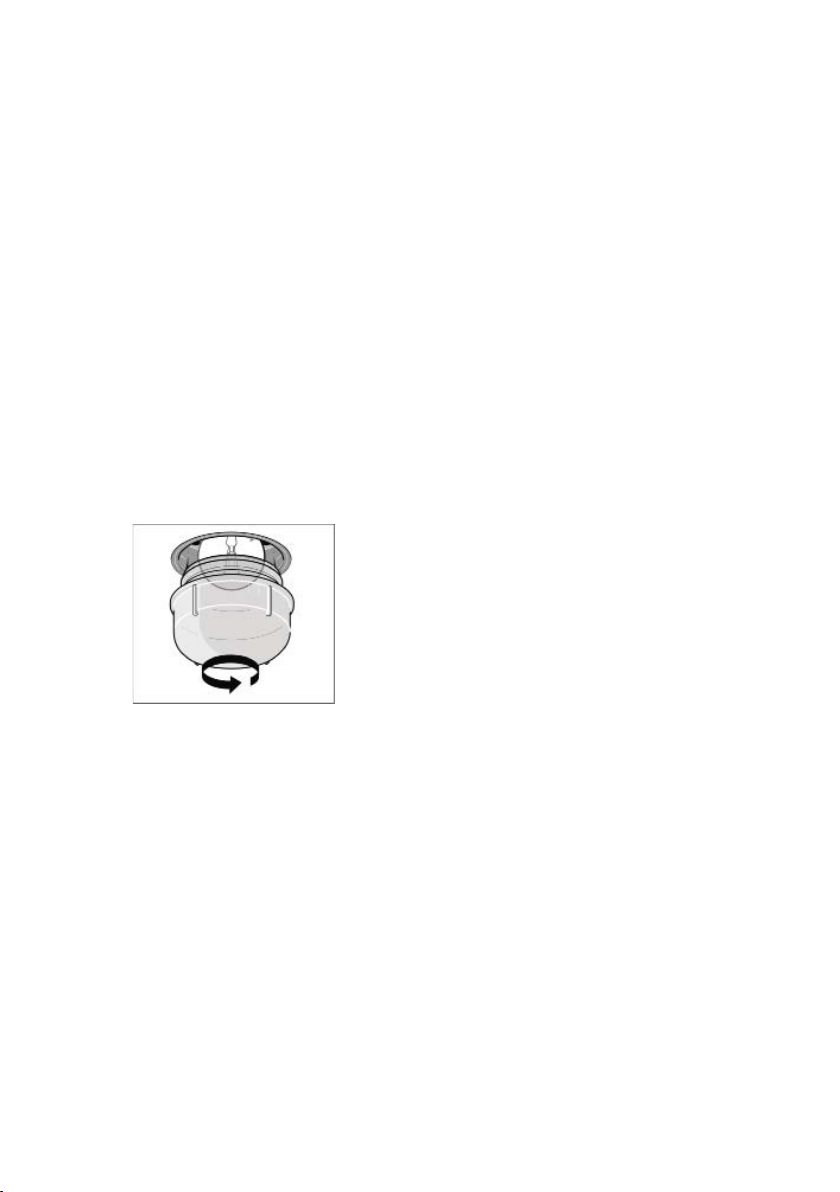
ATENCIÓN: Desconecte el aparato de la alimentación eléctrica, extraiga la puerta del horno (como se ha descrito anteriormente), así como los estantes del horno.
Extraiga la tapa de vidrio protectora de la bombilla girando en
sentido antihorario. Fig. 9 (A)
Desenrosque la bombilla vieja y elimínela de forma segura y
ecológica, cámbiela por una del tipo especifi cado en los Datos
Técnicos y monte de nuevo la tapa.
DATOS TÉCNICOS
DIMENSIONES INTERIORES
Altura: 346,5 mm
Anchura: 457 mm
Profundidad: 410 mm
Volumen útil: 70 litros
NOTA - La tapa de vidrio puede estar apretada y, por lo tanto,
necesitar una mordaza para soltarla.
CUIDADO Y SUSTITUCIÓN DE LOS REVESTIMIENTOS
CATALÍTICOS
(Cuando estén montados, los revestimientos no están cubiertos por la garantía del aparato).
Para mantener los revestimientos “siempre limpios” efi cazmente, el horno debe calentarse a un mínimo de 200 ºC siempre
que existan manchas persistentes, para evitar que se hagan
permanentes.
Si se deja que los revestimientos se pongan negros y brillantes,
deben cambiarse por otros nuevos. Extraiga todos los accesorios internos para facilitar la sustitución de los revestimientos.
Los revestimientos de recambio pueden comprarse directamente al Departamento de Recambios del fabricante (ver detalles en la contraportada). Indique las referencias de tipo de
producto descrito en la placa de características y/o el número
de serie de su aparato al realizar el pedido.
DATOS ELÉCTRICOS
Tensión nominal:
220 V - 240 V ~ 50 Hz
Conexión de alimentación: 13A (interruptor automático bipolar
con toma protegida, con separación de contactos de 3 mm)
ABSORCIÓN DE POTENCIA
Elemento calentador superior 950 W
Elemento calentador de grill 2.000 W
Elemento calentador inferior 1.100 W
Elemento calentador de convección 2.000 W
Motor de convección 33 W
Motor del asador 4,1 W
Ventilador de refrigeración 23 W
Lámpara del horno 25 W
Potencia máx. 2.100 W/3.000 W
Cable de alimentación de red:
2
3 x 1,5 mm
tipo H07RN-F <HAR>
Bombilla del horno:
15 W - 25 W / 300 ºC tornillo tipo E-14
EI Fabricante declina toda responsabilidad por los daños producidos a personas y cosas debidos a una incorrecta o impropia instalación del aparato.
EI Fabricante se reserva el derecho de aportar a sus productos todas las modifi caciones que considere necesarias y útiles, sin necesidad de previo aviso.
Page 12

Page 13

DE
HINWEISE FÜR DEN BENUTZER
Wir danken Ihnen für das uns mit dem Kauf eines unserer Produkte erwiesene Vertrauen und hoffen, dass Sie mit diesem
Gerät nur die besten Erfahrungen machen werden. In diesem
Sinne ist es von größter Bedeutung, dass Sie sich streng an
die hier gegebenen Anweisungen und unsere Empfehlungen
für eine korrekte Verwendung unserer Produkte halten.
Jedes Gerät hat sein spezifi sches Typenschild, dem Sie gegebenenfalls die für die Bestellung von Ersatzteilen erforderlichen
Angaben entnehmen können. Sie fi nden das Schild im Innenraum
nach dem Öffnen der Tür.
ALLGEMEINE ANGABEN
als normaler Hausmüll entsorgt werden kann. Vielmehr muss
das Produkt über die entsprechende Sammelstelle einer Rohstoffrückgewinnung für elektrische und elektronische Anlagen
zugeführt werden. Durch die Gewährleistung einer korrekten
Entsorgung tragen Sie zur Vermeidung von schädlichen Einfl üssen auf die Umwelt und die öffentliche Gesundheit bei, was
bei einer nicht sachgerecht vorgenommenen Beseitigung in
Frage gestellt wäre. Für weitere Hinweise zur Entsorgung des
Produkts setzen Sie sich bitte vor Ort mit der zuständigen Kontaktstelle, der Müllaufsicht oder dem Fachhändler in Verbindung, bei dem Sie das Gerät gekauft haben.
Dieses Gerät wurde in Übereinstimmung mit den folgenden europäischen Richtlinien und Normen hergestellt und vertrieben:
Vor Verwendung des Geräts wollen Sie die vorliegenden Hinweise bitte aufmerksam durchlesen. Es ist sehr wichtig, dass
Sie das Funktionsprinzip des Geräts genau kennen, bevor Sie
es praktisch in Betrieb nehmen.
Ganz besonders berücksichtigen sollten Sie die Ratschläge und
Empfehlungen, die wir für Sie unter dem Titel “WICHTIG – Ratschläge und Hinweise für Ihre Sicherheit” zusammenfassen.
• Dieses Gerät wurde für den privaten Hausgebrauch entwickelt und kann in einen Schrank usw. mit Standardmaßen
eingebaut werden.
• Für einen Betrieb in Wohnwagen, Wohnmobilen usw. müssen die entsprechenden Hinweise zum Einbau berücksichtigt werden.
• Jede unsachgemäße Verwendung des Geräts sowie der
Einsatz in einer vom Hersteller nicht ausdrücklich genehmigten Umgebung hat die Annullierung der Garantie und der
Haftung des Herstellers zur Folge.
• Für Ihr neues Gerät haben Sie im Rahmen der allgemeinen
Garantiebestimmungen des Herstellers Anspruch auf Garantie für elektrisch oder mechanisch bedingte Mängel.
• Durch obige Vorbehalte werden die Ihnen gesetzlich zustehenden Garantieleistungen nicht eingeschränkt.
Vor Inbetriebnahme des Geräts stellen Sie bitte sicher, dass
alle Teile der Verpackung, Schutzfolien usw. ordnungsgemäß
entfernt worden sind.
Im Sinne des Umweltschutzes ist das Verpackungsmaterial
entsprechend zu trennen und gesondert gemäß den vor Ort
geltenden Bestimmungen zu entsorgen.
Für die Verpackung kommt ausschließlich umweltfreundliches
Material zur Verwendung, das wiederverwertet bzw. einer
Rohstoffrückgewinnung zugeführt werden kann. Durch eine
solche Rezyklisierung tragen Sie zu einer Senkung des Rohstoffbedarfs und des anfallenden Müllaufkommens bei.
Ihre örtliche Umweltbehörde erteilt Ihnen gern weitere entsorgungstechnische Auskunft.
Bei der ersten Inbetriebnahme des Geräts kann es bedingt
durch die Schutzverkleidung oder vorhandene Feuchtigkeit zu
einer gewissen Geruchsbildung kommen, die jedoch bereits
nach kurzer Zeit verschwindet.
Das auf dem Produkt selbst bzw. auf der Verpackung ange-
brachte Symbol
weist Sie darauf hin, dass das Gerät nicht
CE-Abzeichen - 93/68 Niederspannung - 73/23 EMV-89/336
Sicherheitsnormen - EN 60 335-1, EN 60 335 - 2 - 6.
Dieses Gerät entspricht der Norm über die Unterdrückung
elektromagnetischer Störungen.
Im Zuge seiner Betriebspolitik einer ständigen Produktverbesserung behält sich der Hersteller das Recht auf eine ohne entsprechende Vorankündigung vorgenommene Einführung der jeweils
erforderlichen Anpassungen und Veränderungen vor.
WICHTIG
RATSCHLÄGE UND HINWEISE FÜR IHRE SICHERHEIT
• Das Gerät und seine zugänglichen Teile werden bei der Benutzung heiß.
• Ohne ständige Aufsicht müssen Kinder unter 8 Jahren unbedingt von dem Gerät ferngehalten werden.
• Dieses Gerät darf von Kindern ab 8 Jahren sowie von Menschen mit verminderten körperlichen, sensorischen oder
geistigen Fähigkeiten und mangelnder Erfahrung sowie
fehlenden Kenntnissen verwendet werden, wenn sie dabei
beaufsichtigt oder im sicheren Gebrauch des Gerätes unterwiesen werden und die damit verbundenen Gefahren verstehen. Kinder dürfen nicht mit dem Gerät spielen. Das Gerät
darf von Kindern nicht ohne Beaufsichtigung gereinigt oder
instand gehalten werden.
• Dieses Gerät entspricht allen derzeit gültigen europäischen
Sicherheitsaufl agen. Der Hersteller weist jedoch ausdrücklich darauf hin, dass durch diese Einhaltung eine nutzungsbedingt auftretende und auch nach dem Ausschalten noch
anhaltende starke Erwärmung der Gerätefl ächen nicht verhindert wird.
• Aus obigem Grund empfi ehlt der Hersteller, Neugeborene
und Kleinkinder vom Gerät fernzuhalten.
• Kann nicht vermieden werden, dass sich Kinder in der Küche aufhalten, sind diese ständig unter strengster Aufsicht
zu halten.
• Große Vorsicht ist ferner auch beim praktischen Einsatz und
der Pfl ege des Geräts geboten. Diesbezüglich sollte die entsprechende Anleitung aufmerksam durchgelesen werden.
• Aus Sicherheitsgründen sollten keine schweren Gegenstände auf dem Backofen abgelegt werden. Zur Vermeidung
Page 14
einer Beschädigung der Scharniere darf die Tür beim Öffnen nicht übermäßig stark beansprucht werden.
• Kein heißes Öl oder Fett unbeaufsichtigt stehen lassen; es
besteht Brandgefahr.
• Die unten im Ofen angebrachten Öffnungen nicht durch
Kochgeschirr, Backpfannen oder Alu-Folie abdecken.
• Keine entfl ammbaren Gegenstände im Backofen aufbewahren; es besteht Brandgefahr.
• Zubehörteile und Netzkabel dürfen nicht in Kontakt mit den
sich aufheizenden Bereichen des Geräts kommen.
• Gerät nicht zum Wärmen oder zum Trocknen von Wäsche
benutzen.
• Gerät nicht in unmittelbarer Nähe von Gardinen und Polstermöbeln aufstellen.
• Küchengeräte nicht an der Tür oder an irgendwelchen Griffen hochheben oder verschieben, da diese hierdurch beschädigt werden könnten.
• Bei einer stark verschmutzen Dichtung ist kein korrektes
Schließen der Tür bei Betrieb des Ofens mehr gewährleistet,
sodass es sogar zu einer Beeinträchtigung der in unmittelbarer Nähe befi ndlichen Möbel kommen kann. Die Dichtung
sollte deshalb stets sauber gehalten werden.
Bei Verwendung des Ofens heizt sich dieser auf. Im Backofen
•
befi ndliche Heizelemente dürfen deshalb nicht berührt werden.
•
Backofen stets vorsichtig öffnen. Es kann heißer Dampf austreten, der unter Umständen zu Verbrennungen der Haut führt.
• Kein Wasser in den noch heißen Ofen gießen, da dies zu einer Beschädigung der Emailfl ächen führen kann.
• Dieses Gerät darf nur von Fachpersonal in strikter Übereinstimmung mit den diesbezüglichen Hinweisen des Herstellers installiert werden.
• Bei Sachschäden oder Verletzungen, die auf einen unsachgemäßen Einsatz oder eine nicht korrekt vorgenommene Installation zurückgehen, weist der Hersteller jede Haftung zurück.
• Bei Verwendung des Geräts entsteht Hitze, Dampf und Feuchtigkeit. Sorgen Sie deshalb durch eine angemessene Belüftung
des Raums für eine Vermeidung von Verletzungen. Bei einer
sehr langen Verwendung des Geräts kann die Zuhilfenahme
einer zusätzlichen Belüftung erforderlich werden. Nehmen Sie
diesbezüglich Rücksprache mit Ihrem Fachhändler.
BEDIENUNGSANLEITUNG
Diese Bedienungsanleitung ist für spätere Zweifelsfälle oder
Personen, die mit dem Gerät nicht vertraut sind, gut aufzubewahren.
Vor seiner ersten Verwendung muss der Ofen innen mit lauwarmem Wasser und einem nicht scheuernden Reinigungsmittel gesäubert werden. Rost und Backpfanne in die entsprechenden Führungsrillen einsetzen. Anschließend Backofen
etwa 20 Minuten lang auf maximaler Temperatur halten, um so
eventuell vorhandene geruchsintensive Produktionsrückstände wie etwa Fette, Öle oder Harze vor dem ersten praktischen
Einsatz zu beseitigen.
ACHTUNG: Bei dieser ersten Inbetriebnahme kann es unter
Umständen zum Austritt von Rauch oder unangenehmen Gerüchen kommen. Ist dies der Fall, muss der entsprechende Raum
einfach nur entsprechend lang gelüftet werden.
Nach dieser einfachen Vorbereitung steht Ihnen der Backofen
für den praktischen Einsatz zur Verfügung.
Dieses Gerät ist ausschließlich für den Hausbedarf bestimmt.
Backofen nur zur Zubereitung von Speisen verwenden.
PRAKTISCHE NUTZUNG DES BACKOFENS
Zur Aufrechterhaltung der gewünschten Backtemperatur bietet dieser Ofen Ihnen eine Thermostatregelung zwischen 50 ºC
und 250 ºC. Beim Betrieb leuchtet die Thermostat-Leuchtanzeige immer wieder auf und veranschaulicht so die Funktion der
Temperaturkontrolle.
Die gewünschte Zubereitungsart wird über den Multifunktionsschalter eingestellt. Zur Verfügung stehen hierbei die folgenden Möglichkeiten:
A.INNENRAUMBELEUCHTUNG. Automatisch bei allen
Modellen bei Einstellung der Zubereitungsart. Solange
der Backofen in Betrieb ist, bleibt die Innenraumbeleuchtung eingeschaltet.
B.KONVEKTIONSBETRIEB. Ermöglicht herkömmliches
Zubereiten bei Ober- und Unterhitze.
C. OBERHITZE.
Für eine schonende Zubereitung, zum Bräunen und
zum Warmhalten fertiger Speisen.
D. UNTERHITZE.
Für eine langsame Zubereitung und zum Warmhalten
fertiger Speisen.
E.VENTILATORGESTÜTZTER KONVEKTIONSBETRIEB.
Diese Betriebsart ermöglicht eine gleichmäßige Zubereitung mit Konvektionsbetrieb bei Ober- und Unterhitze. Für konventionelles Garen ist dies die energieeffi zienteste Funktion.
F. GRILL-BETRIEB. Zum Gratinieren und Bräunen.
G. MAXI-GRILL-BETRIEB. Funktionsweise wie oben,
hier aber mit einer wesentlich größeren Grillfl äche.
H. VENTILATORGESTÜTZTER GRILL-BETRIEB. Ermög-
licht ein rasches Bräunen bei voller Wahrung des natürlichen Saftgehalt. Für Garen mit Umluft ist dies die
energieeffi zienteste Funktion
I. AUFTAUBETRIEB. Der Ventilator arbeitet ohne Hitze
zur Reduzierung der Auftauzeit.
J. PYROLYSE-FUNKTION:
Bei der Einstellung des Backofens für den Pyrolyse-Betrieb erscheint auf dem LED-Display «PYA».
Die voreingestellte Temperatur beträgt 450 ºC. Die Zeitschaltuhr kann auf 1:30 Stunden oder auf 2:00 Stunden
eingestellt werden.
Page 15

PRODUKTBESCHREIBUNG
K1
Erinnerungstaste
Starttaste
StopptasteZeittaste
Beachten Sie Folgendes: Zum Öffnen der Backofentür immer mit einer Hand den Mittelgriff
halten und den Stift der Kindersicherung nicht berühren.
K2
BEDIENUNGSANLEITUNG
1. Einstellung der Uhr
Sobald der Backofen an die Stromversorgung angeschlossen
ist, erscheinen auf dem Display die Symbole «00:00».
1) Drücken Sie « » und die Stundenziffern blinken.
2) Drehen Sie «K2» zur Einstellung der Stunden (einen Wert von
0 bis 23 einstellen).
3) Drücken Sie « » und die Minutenziffern blinken.
4) Drehen Sie «K2» zur Einstellung der Minuten (einen Wert von
0 bis 59 einstellen).
5) Drücken Sie « » zum Abschluss der Uhreneinstellung. «:»
blinkt und die Uhrzeit leuchtet auf.
Hinweis: Die Uhr zeigt die Uhrzeit im 24-Stunden-Format. Nach
dem Anschluss an die Stromversorgung funktioniert die Uhr
ununterbrochen.
2. Funktionseinstellung
1) Drehen Sie «K1» zur Auswahl der gewünschten Garfunktion.
Die zugehörige Anzeige leuchtet auf.
2) Drehen Sie «K2» zur Einstellung der Temperatur.
3) Drücken Sie « », um den Beginn des Garvorganges zu
bestätigen. Das entsprechende Temperatursymbol «ºC»
leuchtet auf.
4) Wenn Sie Schritt 2 außer Acht lassen, drücken Sie « », um
den Beginn des Garvorgangs zu bestätigen. Die voreinge-
stellte Zeit beträgt neun Stunden und das LED-Display zeigt
die voreingestellte Temperatur an.
HINWEIS:
1) Der Drehschalter weist folgendes Einstellintervall auf:
0--0:30 min: Ein-Minuten-Intervall
0:30--9:00 Stunden: Fünf-Minuten-Intervall
2) Das Einstellintervall der Temperatur beträgt 5 ºC und das der
Elektrogrillfunktion 30 ºC.
3) Drehen Sie «K1» zur Einstellung der Garzeit, sobald der Gar-
vorgang begonnen hat. Drücken Sie anschließend « », um
den Garvorgang wiederaufzunehmen.
Wenn Sie « » nicht binnen drei Sekunden drücken, kehrt
der Backofen auf die vorige Zeit zurück und der Garvorgang
wird fortgesetzt.
4) Drehen Sie «K2» zur Einstellung der Temperatur, sobald der
Garvorgang begonnen hat. Die zugehörige Anzeige leuchtet
auf. Drücken Sie anschließend «
», um den Garvorgang
wiederaufzunehmen. Wenn Sie « » nicht binnen drei Sekunden drücken, kehrt der Backofen auf die vorige Temperatur zurück und der Garvorgang wird fortgesetzt.
3. Einstellung der Lampe
1) Drehen Sie «K1» zur Auswahl der gewünschten Funktion.
Das entsprechende Symbol leuchtet auf.
2) Drücken Sie die Taste « », um den Garvorgang zu beginnen. Das Symbol der Lampe « » * «:» blinkt.
4. Abfragefunktion
Sie können die Abfragefunktion während des Garvorgangs
verwenden und nach drei Sekunden zur aktuellen Betriebsweise zurückgehen.
1) Drücken Sie im Garbetrieb die Taste « », um die aktuelle
Uhrzeit zu sehen.
2) Bei Anzeige der Uhr drücken Sie zur Abfrage der Garzeit die
Taste « ».
5. Kindersperre
Zum Sperren: Drücken Sie drei Sekunden gleichzeitig « » und
« ». Sie hören dann einen längeren «Piepton», der anzeigt,
dass die Kindersperre aktiviert ist und « » leuchtet auf.
Aufhebung der Sperre: Drücken Sie drei Sekunden gleichzeitig
« » und « ». Sie hören dann einen längeren «Piepton», der
signalisiert, dass die Kindersperre aufgehoben ist.
Hinweis: Wenn Sie während des Betriebes den Garvorgang
anhalten möchten, drücken Sie schnell die Stopptaste. Die
Stopptaste braucht nicht gedrückt gehalten zu werden; dieser
Vorgang ist unwirksam.
6. Erinnerungsfunktion:
Der Backofen ist mit einer neunstündigen Erinnerungsfunktion
ausgestattet. Mit dieser Uhrzeit werden Sie in einem Zeitintervall von einer Minute bis neun Stunden an den Zeitpunkt zum
Starten des Garvorgangs erinnert. Die Erinnerungsfunktion
kann nur eingestellt werden, wenn der Backofen im Wartebetrieb steht. Sie wird folgendermaßen eingestellt:
1) Drücken Sie die Einstelltaste der Erinnerungsfunktion « »;
2) Drehen Sie «K2», um die Erinnerungsstunden einzustellen
(stellen Sie einen Wert von 0 bis 9 ein).
Page 16
3) Drücken Sie erneut die Einstelltaste der Erinnerungsfunktion
« »;
4) Drehen Sie «K2» zur Einstellung der Erinnerungsminuten
(stellen Sie einen Wert von 0 bis 59 ein).
5) Drücken Sie « », um die Einstellung zu bestätigen. «:» blinkt
dann und die Anzeige der Erinnerungsfunktion «
auf. Der Timer wird eingeschaltet.
Hinweis: Wenn die Zeit bei Null angelangt ist, ertönt 10 Mal
der Alarm des Backofens. Das Symbol « » verschwindet vom
Display, um Sie daran zu erinnern, dass Sie den Garvorgang
starten müssen. Sie können die Erinnerungsfunktion bei der
Einstellung durch Drücken der Stopptaste löschen; Sobald die
Erinnerungsfunktion eingestellt ist, kann sie durch zweimaliges
Drücken der Stopptaste gelöscht werden.
7. Start-/Pause-/Abbruchfunktion
1) Wenn die Garzeit eingestellt ist, drücken Sie « », um den
Garvorgang zu starten. Steht der Garvorgang auf Pause, drücken Sie « », um ihn wiederaufzunehmen.
2) Drücken Sie während des Garvorgangs einmal auf « », um
diesen auf Pause zu setzen. Für den Abbruch des Garvorgangs drücken Sie zweimal auf « ».
8. Energiesparfunktion
1) Drücken Sie im Warte- und Erinnerungsbetrieb drei Sekunden lang auf «
und geht auf Energiesparbetrieb.
2) Wenn Sie 10 Minuten lang bei im Wartebetrieb stehendem
Ofen nichts tun, schaltet sich das LED-Display ab und geht
auf Energiesparbetrieb.
3) Drücken Sie zum Verlassen des Energiesparbetriebes eine
beliebige Taste oder drehen Sie einen Drehschalter.
9. Pyrolyse-Funktion (nur manche Modelle)
Die Funktion ermöglicht die vollständige Reinigung des Garraumes.
1) Drehen Sie zur Anwahl der Pyrolyse-Funktion «K1». Auf dem
LED-Display erscheint dann «PYA».
2) Drücken Sie « », um die Garfunktion zu bestätigen. Die voreingestellte Zeit beträgt 2:00 Stunden. Auf dem LED-Display
erscheint dann «PYA».
3) Drehen Sie zur Änderung der Zeit der Pyrolyse-Funktion
«K1». Sie haben die Wahl zwischen zwei Zeitoptionen: «1:30»
oder «2:00».
Hinweis:
A) Steht die Tür des Backofens offen, ist die Starttaste inaktiv
und auf dem LED-Bildschirm erscheint «DOOR», «PYA».
B) Wenn die mittlere Temperatur des Backofens 200 ºC über-
steigt, drücken Sie zur direkten Rückkehr zum Wartebetrieb
die Abbruchtaste und wenn die mittlere Temperatur des
Backofens 300 ºC übersteigt, drücken Sie die Starttaste und
auf dem LED-Display erscheint «COOL».
C) Wird im Normalbetrieb die Tür geöffnet, hört das Relais der
Heizung auf zu funktionieren; auf dem LED-Display erscheint
«DOOR» und der Alarm gibt einen kontinuierlichen Piepton
ab, bis die Tür geschlossen oder die Abbruchtaste gedrückt
wird.
». Dann schaltet sich das LED-Display ab
» leuchtet
D) Wenn die Pyrolyse-Funktion abgeschlossen ist und die mitt-
lere Temperatur des Backofens unter 300 ºC fällt, erlischt das
LED-Display.
E) Entfernen Sie vor der Aktivierung der pyrolytischen
Selbstreinigung alle Reste und sorgen Sie dafür, dass der
Backofen leer ist. Lassen Sie keine Gegenstände wie Töpfe,
Ofenbleche, Fettauffangschalen, Blechhalterungen usw. im
Backofen, denn diese könnten ernsthaft beschädigt werden.
10. Hinweis
1) Die Lampe des Backofens schaltet sich bei allen Funktionen
ein (außer bei der Pyrolyse-Funktion)
2) Sobald das Garprogramm eingestellt ist, zeigt das Display die
aktuelle Uhrzeit oder kehrt auf den Wartebetrieb zurück, wenn
nicht binnen fünf Minuten die Taste «
Einstellprogramm wird gelöscht.
3) Der Alarm ertönt, wenn richtig gedrückt wird; andernfalls
erfolgt keine Reaktion.
4) Der Alarm ertönt fünf Mal, um Sie an die Beendigung des
Garvorgangs zu erinnern.
NÜTZLICHE RATSCHLÄGE
• Vor Inbetriebnahme des Backofens müssen alle nicht zum
Einsatz gebrachten Zusatzteile aus dem Innenraum entfernt
werden.
• Backofen vor der praktischen Verwendung immer erst auf die
gewünschte Temperatur aufheizen.
• Backpfannen im Zentrum des Ofens platzieren und dazwi-
schen den für eine ausreichende Luftzirkulation erforderlichen Abstand einhalten.
• Backpfannen nicht zu weit füllen, um einen saftigen Obst-
kuchen zuzubereiten. Über den Pfannenrand austretender
Obstsaft führt zu bleibenden Flecken.
• Backpfannen nicht auf den Boden des Innenraums einsetzen
und auch nicht mit Alu-Folie abdecken. Es könnte sonst zu
einem Hitzestau kommen. Die Back- und Bratzeiten entsprächen nicht mehr den angegebenen Werten und es könnte zu
einer Beschädigung der Emailfl ächen kommen.
• Zum Überwachen des Back- oder Bratguts sollte die Tür mög-
lichst wenig geöffnet werden. (Die Innenraumbeleuchtung
bleibt während der gesamten Zubereitung eingeschaltet.)
• Tür stets mit der gebotenen Vorsicht öffnen, um nicht mit
heißen Teilen oder heißem Dampf in Berührung zu kommen.
PYROLYSE-FUNKTION
Das Design des Backofens bietet einen großen
Funktionsumfang und ermöglicht durch seine automatische
Pyrolyse-Funktion eine extrem einfache Reinigung. Die
Pyrolyse-Modelle umfassen eine Selbstreinigungsfunktion,
sodass die Verwendung von Reinigungsmitteln im Garraum
nicht erforderlich wird. Der Garraum erhitzt sich bis auf
eine Höchsttemperatur von 500 ºC. Dabei wird an den
Wänden anhaftendes Fett einfach durch Verbrennen
entfernt. Das Vierfachglas stellt dabei sicher, dass die
Backofentür sich nicht über 55 ºC erhitzt. Der Pyrolysezyklus
ist vollkommen sicher, da die Tür während des Vorgangs
» gedrückt wird. Das
Page 17
durch eine Sicherheitsvorrichtung verriegelt wird. Je nach
Verschmutzungsgrad kann der Reinigungszyklus mit einer
Dauer von mindestens eineinhalb und maximal zwei Stunden
programmiert werden. So werden die Kochzeiten des
Backofens auf einem optimalen Niveau gehalten.
Hinweis:
Da die Pyrolysereinigung bei extrem hohen Temperaturen
erfolgt, wird zum Zwecke der Langlebigkeit empfohlen, vor der
Verwendung dieser Reinigungsfunktion alles Zubehör aus dem
Garraum zu entfernen (je nach Modell umfasst dieses Zubehör:
Backblech, verchromter Rost, verchromter Rosthalter,
Bratspieß, Fleischthermometer, Pizzamesser, Pizzastein oder
verchromter Backblechgriff).
Abbildung 1
Um das Zubehör aus dem Garraum zu entnehmen, befolgen
Sie bitte die nachstehenden Anweisungen:
1. Entnehmen Sie alles Zubehör aus dem Garraum.
2. Bauen Sie den Rosthalter (falls eine Teleskopschiene am
Rosthalter angebracht ist, muss diese nicht ausgebaut
werden) aus dem Garraum aus. Platzieren Sie die
Zubehörteile an einem sicheren Ort, um sie nach der
Pyrolysereinigung einfach griffbereit zu haben.
1) Lösen Sie die Befestigungsschraube des Rosthalters mit
einem Schraubenzieher, wie auf Abbildung 1 gezeigt.
2) Heben Sie den Rosthalter in einem Winkel von ca. 30ºC zum
Garraum an und ziehen Sie ihn dann heraus; entnehmen
Sie die andere Seitenplatte auf derselben Weise, wie in
Abbildung 2 dargestellt.
3. Nach Beendigung der Pyrolysereinigung können Sie
nach Ablauf von einer Stunde den Rosthalter erneut, wie
nachstehend gezeigt, in den Garraum einbauen:
1) Führen Sie das Gitterrost in die Montageöffnung an der
Seitenwand des Hauptrahmens ein, wie in Abbildung 2
dargestellt.
Ziehen Sie die Schraube mit einem Schraubenzieher fest
und gehen Sie zum Einbau der anderen Seitenplatte, wie in
Abbildung 1 dargestellt, in derselben Weise vor.
2) Ziehen Sie beidseitig an der Gleitschiene und installieren Sie
den Grillrost auf der Gleitschiene, wie in den Abbildungen 3
und 4 dargestellt.
4. Verstauen Sie das Backgitter und sonstiges Zubehör im
Garraum; die Montage wird entsprechend der Abbildung 5
abgeschlossen.
Abbildung 2
Abbildung 3
Abbildung 4
Hinweis: Der Garraum und das Backblech sind emailliert;
gehen Sie beim Ein- und Ausbau vorsichtig vor, um
Beschädigungen an der Beschichtung zu vermeiden.
Abbildung 5
Page 18
HINWEISE ZUR ZUBEREITUNG
Die erforderlichen Temperaturen und Zubereitungszeiten
entnehmen Sie der jeweiligen Packung. Sobald Sie mit der
DIESE ANGABEN DIENEN NUR ZUR ORIENTIERUNG, DA TEMPERATUR UND ZEIT AUCH VON DER JEWEILIGEN MENGE
UND QUALITÄT ABHÄNGEN.
Leistung Ihres Geräts vertraut sind, können Sie Temperaturen
und Zubereitungszeiten nach Ihrem persönlichen Geschmack
verändern.
Sofern auf der Packung nichts anderes angegeben ist, muss
Tiefkühlkost vor der Zubereitung voll aufgetaut werden.
Gericht Temp. ºC Rille Zubereitung
in Minuten
Empfohlen Persönlich
Rührteiggebäck
Biskuit 175 2 55-65
Feine Torte 175 3 60-70
Mürbeteiggebäck
Tortenboden 200 3 08-10
Tortenboden mit Quarkbelag 200 3 25-35
Tortenboden mit Obstbelag 200 3 25-35
Hefeteiggebäck
Tortenboden 180 3 30-45
Weißbrot 1 kg Mehl 200 3 25-35
Kleingebäck
Mürbeteig 200 3 10-15
Ölgebäck 200 2 35-45
Kekse 200 3 15-20
Lasagne 225 2 40-50
Fleisch (Zubereitungszeit pro cm Stärke)
Braten mit langer Zubereitung 200 2 120-150
Braten mit kurzer Zubereitung 200 2 60-90
Fleischklößchen 200 2 30-40
Gefl ügel
Ente 1 1/2 kg 200 2 120-180
Gans 3 kg 200 2 150-210
Brathähnchen 200 2 60-90
Pute 5 kg 175 2 240-260
Wildbret
Hase 200 2 60-90
Rehschenkel 200 2 90-150
Hirschschenkel 175 2 90-180
Gemüse
Gebackene Kartoffeln 220 2 30-40
Gemüsepastete 200 2 40-50
Fisch
Forelle 200 2 40-50
Seebrassen 200 2 40-50
Pizza 240 3 10-20
Grill
Koteletts 4 8-12
Würstchen 4 10-12
Grillhähnchen 2 25-35
Gegrillter Kalbsbraten 0,6 kg 50-60
* Die Zahl der Rillen beginnt jeweils mit der untersten (also
ohne eine Aufstellung
auf dem Boden des Backofens, der für die Pfanne nicht in Frage kommt).
HINWEISE ZUR BENUTZUNG DES GRILLS
Zu grillende Speisen auf den Rost oder in eine Pfanne mit
niedrigem Rand geben. Der Rost muss hierbei ganz oben ein-
geschoben werden, während die Fettpfanne unmittelbar dar-
unter zu platzieren ist. Grill bei Backöfen mit Ventilator auf die
Position , bzw. bei Multifunktionsöfen auf Position ,
, einstellen.
Je nach Art der des Gerichts (Fleisch, Fisch, Gefl ügel usw.)
muss das Grillgut für ein gleichmäßiges Bräunen während der
Zubereitung einmal umgedreht werden. Rein orientativ seien
die folgenden Zubereitungszeiten erwähnt:
Grillgut Zubereitungszeit
in Minuten
Empfohlen
Dünnes Fleisch oder Scheiben 4-6
Normales Fleisch 5-8
Fisch ohne Schuppen 8-10
Fisch (z.B. Forelle, Lachs) 12-15
Würstchen 10-12
Sandwiches 2-5
HINWEIS
• Zum Abdecken der Grillpfanne oder zum Aufwärmen keine
Alu-Folie verwenden.
• Speisen nicht in Alu-Folie einwickeln bzw. unmittelbar unter
den Grill legen; durch das hohe Refl exionsvermögen von Aluminium könnte es zu einer Beschädigung des Grills kommen.
REINIGUNG DES GERÄTS
WICHTIG
Aus Sicherheitsgründen muss vor Reinigung des Ofens stets
erst der Netzstecker gezogen bzw. die Stromversorgung des
Geräts unterbrochen werden.
Nicht selbstreinigende Backöfen müssen nach ihrer Verwendung gereinigt werden. Hierfür muss das Gerät ausgeschaltet
und noch warm, aber nicht mehr heiß sein, da sich in diesem
Zustand die durch den Dampf beim Backen entstehende
Fettschicht an den Wänden leichter entfernen lässt und die
Fettspritzer auch noch nicht hart und fest geworden sind. Zur
Reinigung müssen zunächst die seitlichen Chromhalterungen
entfernt werden; diese sind hierzu vorne nach oben von der
Wand abzuziehen und aus ihren rückwärtigen Aufnahmen zu
befreien. Den Innenraum des Backofens mit einem weichen,
mit einer verdünnten Ammoniaklösung getränkten Lappen
Page 19
auswischen, nachspülen und trocknen. Sollten hartnäckige
Flecken oder Spritzer zurückbleiben, auf den Boden des Innenraums einen mit Ammoniak getränkten Lappen legen, Tür
schließen und Wände nach ein paar Stunden noch einmal mit
warmem Wasser und einem fl üssigen Haushaltsreiniger behandeln, nachspülen und sorgfältig trocknen. Zur Reinigung
der äußeren Hochglanzteile nur Wasser und Seife und einen
weichen Lappen verwenden. Niemals scheuernde Reinigungsprodukte in Pulverform verwenden.
Zu vermeiden sind ferner sauere und alkaline Produkte (Zitronensaft, Essig, Salz, Tomaten usw.). Besonders die lackierten
Wände dürfen nicht mit chlorhaltigen, sauren oder scheuernden Produkten behandelt werden. Ebenso wenig geeignet sind
metallene Scheuerkissen oder harte Gegenstände, da diese
Beschädigungen auf den Oberfl ächen hervorrufen können.
Backofen nicht mit Hochdruckreinigern oder Dampfgeräten
reinigen.
Normalerweise genügt es, den Backofen mit einem weichen
Tuch und einem normalen Haushaltsreiniger warm auszuwischen. Zur Beseitigung von hartnäckigen Rückständen sollte
wie folgt vorgegangen werden:
EMAILLIERTE TEILE
Nur für Emailfl ächen ausdrücklich empfohlene Reinigungsmittel verwenden. Chlorhaltige Produkte sind unter allen Umständen zu vermeiden.
HINWEISE ZUR INSTALLATION
Dieses Gerät darf nur von entsprechend befugtem Fachpersonal in Übereinstimmung mit den vor Ort geltenden technischen
Aufl agen und EU-Bestimmungen installiert werden.:
Städtebaurechtliche Verordnungen des Umweltministeriums
(in Großbritannien).
Städtebaurechtliche Normen des Entwicklungsministeriums
(in Schottland).
IEE-Norm zur Verkabelung.
Strom führende Geräte am Arbeitsplatz.
AUFSTELLUNG DES GERÄTS (siehe Fig. 5)
Dieses Gerät gehört zur Klasse I.
Eine Erdung ist gesetzlich vorgeschrieben. Bei einer Zuwiderhandlung gegen die geltenden Unfallverhütungsvorschriften
weist der Hersteller jegliche Haftung zurück.
WICHTIG
Der Schrank, in den das Gerät eingebaut wird, bzw. das diesbezüglich zum Einsatz gebrachte Material ist bei Betrieb des
Backofens einer Temperatur von mindestens 85 ºC über der
Raumtemperatur ausgesetzt.
Bestimmte mit Kunststoffanteilen hergestellte Küchenmöbel
neigen bereits bei niedrigeren als den angegebenen Temperaturwerten zu Verfärbungen oder Farbverlusten. Wird das
Gerät also ohne Berücksichtigung der erwähnten Temperaturanforderungen eingebaut bzw. besteht kein Abstand von mindestens 4 mm zu einer benachbarten Schrankwand, liegt die
diesbezügliche Verantwortung allein beim Besitzer.
HINWEISE ZUR INSTALLATION
1. Wie in Fig. 5 dargestellt, muss der Backofen in eine Stan-
dardöffnung von 600 mm unterhalb des Kochfelds oder in
eine Küchensäule eingebaut werden.
2. Beim Einbau des Backofens in eine Küchensäule muss auf
eine ausreichende Belüftung geachtet werden. Hierzu die
Rückwand des Schranks abnehmen und wie in Fig. 5 dargestellt eine Öffnung von mindestens 85-90 mm vorsehen.
3. Der Backofen muss am Aufstellungsort sicher befestigt
werden. Diesbezüglich sind die in den vier Ecken des Türrahmens vorgesehenen Schrauben “A” Fig. 5 zu verwenden.
Fig. 5: Abmessungen für den Einbau von einfachen elektrischen Backöfen mit einer Breite von 60 cm (die Ausbildung
des oberen Gehäuse kann variieren) und Befestigung innerhalb des Schranks.
VOR DER INBETRIEBNAHME
Beim Auspacken des Geräts ist darauf zu achten, dass die
nachstehend genannten Bauteile vollzählig vorhanden sind:
• Bedienungsanleitung
• Ofenrost
• Eine Backpfanne
• Schrauben und Kaschierteile zur Befestigung des Backofens
vor Ort
Page 20
A. Halterung abnehmen.
B. 75-90 mm Zwischenraum zwischen der Wand und dem rück-
wärtigen Einbaubereich bzw. dem Schrankboden.
C. Sockel.
D. Anzubringende Blende.
Fig. 7: Lüftungsbedarf und Ausschnitt für den Einbau eines einfachen elektrischen Backofens in ein Standard-Küchenmodul.
Mindestlüftungsbedarf für obere und untere Unterbringung
und Halterung des rückwärtigen Bereichs der Einheit.
A. Rückwand
B. Lagerraum
C. Hier Rückwand entfernen
D. Rückwand
E. Lagerraum
F. Sockel
G. Mindestlüftungsausschnitt 80 cm2
Fig. 8: Lüftungsbedarf und Ausschnitt für den Einbau eines einfachen elektrischen Backofens in einen Hochschrank.
Der elektrische Anschluss sollte vorzugsweise nach
NICEIC-Standard vorgenommen werden.
HINWEIS: DIESES GERÄT MUSS GEERDET WERDEN.
Dieses Gerät muss über einen bequem zugänglichen automatischen Zweipol-Schalter mit 13 A und einem Kontaktabstand
von 3 mm geführt werden.
WICHTIG
Die Leiter des Netzkabels entsprechen der folgenden Farbcodierung:
Gelb/grün - Erde
Blau- Nullleiter
Braun- Phase
• Der gelb/grüne Leiter muss an die mit “E”, dem Erdungssymbol oder die gelb/grün markierte Klemme gelegt werden.
• Der blaue Leiter muss an die mit “N” markierte Klemme
gelegt werden.
• Der braune Leiter muss an die mit “L” markierte Klemme
gelegt werden.
• Das Netzkabel darf an keiner Stelle eine Temperatur von mehr
als 50 ºC über der Raumtemperatur erreichen.
• Beschädigte Netzkabel müssen durch ein vom Hersteller
bzw. der zuständigen Kundendienststelle geliefertes gleichwertiges Kabel ersetzt werden.
AUSTAUSCH DES NETZKABELS
ELEKTRISCHER ANSCHLUSS
Vor Anschluss des Geräts muss sichergestellt sein, dass die
vor Ort vorhandene Netzspannung mit den diesbezüglichen
Angaben auf dem Typenschild übereinstimmt.
Muss das Netzkabel ausgetauscht werden, ist diesbezüglich
wie folgt vorzugehen:
1. Gerät vom Netz trennen, Halteschrauben lösen und Rück-
wand des Geräts abnehmen.
2. Halteschrauben und Schrauben der Anschlussklemmen
lösen und altes Netzkabel entfernen.
3. Neues Kabel unter Beachtung der entsprechenden Farbco-
dierung anschließen und alle Schrauben wieder fest anziehen. Das neue Netzkabel muss hierbei den im Kapitel Technische Angaben genannten Spezifi kationen entsprechen.
WARTUNG UND UNTERHALT
Vor allen Wartungs- und Unterhaltsarbeiten muss das Gerät
zunächst vom Netz getrennt werden.
Während der Garantiezeit müssen alle anfallenden Wartungsund Unterhaltsarbeiten der zuständigen Kundendienststelle
des Herstellers überlassen werden. Jeder von diesbezüglich
nicht befugten Personen vorgenommene Eingriff in das Gerät
hat die Annullierung des bestehenden Garantieanspruchs zur
Folge.
Page 21
AUSTAUSCH DER LAMPE DES INNENRAUMS
(Fällt nicht unter die Garantie des Geräts.)
Für die Beleuchtung des Innenraums kommt eine Glühlampe
mit 15 W bzw. 25 W für 300 ºC vom Typ E-14 zum Einsatz.
ACHTUNG: Gerät vom Netz trennen, Ofentür (wie an anderer
Stelle beschrieben) abnehmen und vorhandene Einsätze herausnehmen.
TECHNISCHE ANGABEN
INNENABMESSUNGEN
Höhe: 346,5 mm
Breite: 457 mm
Tiefe: 410 mm
Nutzvolumen: 70 Liter
Glasabdeckung zum Schutz der Glühbirne gegen den Uhrzeigersinn herausdrehen. Fig. 9 (A).
Alte Glühbirne herausnehmen, sicher und umweltfreundlich
entsorgen, durch eine neue ersetzen und Schutzabdeckung
wieder aufschrauben. Die neue Glühbirne muss hierbei den
im Kapitel Technische Angaben genannten Spezifi kationen
entsprechen.
ANMERKUNG: Die Glasabdeckung kann sehr straff aufsitzen,
weshalb zum Herausnehmen unter Umständen ein entsprechendes Werkzeug zum Einsatz gebracht werden muss.
PFLEGE UND AUSTAUSCH DER KATALYTISCHEN VERKLEIDUNG
(Eine bereits in das Gerät eingebaute katalytische Verkleidung
fällt nicht unter die Garantie des Geräts.)
Zur Aufrechterhaltung des Selbstreinigungseffekts muss der
Backofen zur Entfernung von hartnäckigen Flecken und Rückständen jeweils auf mindestens 200 ºC aufgeheizt werden, damit diese nicht für immer bleiben.
Wird die Verkleidung schwarz und glänzend, muss sie durch
neue Elemente ersetzt werden. Zum Austausch der Verkleidung alle Einsätze aus dem Backofen entnehmen.
Die neue Verkleidung kann als Ersatzteil direkt über die entsprechende Abteilung des Herstellers bezogen werden (siehe
Liste auf der hinteren Umschlagseite). Bei der Bestellung müssen hierbei der genaue Gerätetyp und die Baureihennummer
des Geräts angegeben werden, so wie sie auf dem Typenschild
verzeichnet sind.
ELEKTRISCHE ANGABEN
Nennspannung:
220 V - 240 V ~ 50 Hz
Speiseanschluss:13 A (automatischer Bipolar-Schalter mit
einem Kontaktabstand von 3 mm)
LEISTUNGSAUFNAHME
Oberhitze-Heizelement 950 W
Grillheizelement 2.000 W
Unterhitze-Heizelement 1.100 W
Konvektionsheizelement 2.000 W
Konvektionsmotor 33 W
Grillmotor 4,1 W
Kühlventilator 23 W
Lampe des Backofens 25 W
Max. Leistung 2.100 W/3.000 W
Netzkabel:
2
3 x 1,5 mm
Typ H07RN-F <HAR>
Innenraumbeleuchtung:
15 W - 25 W / 300 ºC, Typ E-14
Bei Sachschäden oder Verletzungen, die auf einen unsachgemäßen Einsatz oder eine nicht korrekt vorgenommene Installation des Geräts zurückgehen, weist der Hersteller jede
Haftung zurück.
Der Hersteller behält sich das Recht vor, alle von ihm als
erforderlich oder angebracht erachteten Neuerungen ohne eine
diesbezügliche Vorankündigung in das Gerät einzubringen.
Page 22

Page 23

FR
INSTRUCTIONS POUR L’UTILISATEUR
Nous vous remercions d’avoir choisi l’un de nos produits et
espérons que vous obtiendrez les meilleurs résultats de cet
électroménager.
Nous vous suggérons donc de suivre attentivement les instructions et les suggestions de ce manuel pour l’utilisation
correcte de nos produits.
La plaque signalétique du four est fournie avec l’appareil. Cette
plaque, visible une fois la porte ouverte, montre toutes les informations sur l’identifi cation de l’appareil auxquelles il sera nécessaire
de faire référence en cas de commande de pièces de rechange.
INFORMATION GÉNÉRALE
Veuillez lire attentivement ce manuel avant d’utiliser l’appareil.
Il est important que vous compreniez bien toutes les fonctions
de contrôle avant de commencer à cuisiner avec votre four.
N’oubliez pas les conseils et les mises en garde indiqués sous
le titre « IMPORTANT - Mises en garde et instructions de sécurité».
• Cet appareil a été dessiné pour une utilisation privée dans
les logements et peut être intégré dans une armoire de
cuisine standard ou d’un autre type.
• Pour son utilisation dans des véhicules du type caravanes,
tenir compte de l’indication appropriée dans les Instructions
d’Installation.
• L’utilisation dans tout autre but ou dans tout autre milieu sans
l’accord exprès du fabricant annulera toute déclaration de
garantie ou de responsabilité.
• Votre nouvel appareil est garanti contre tous défauts
électriques ou mécaniques ; la garantie est soumise à
des exclusions déterminées qui sont indiquées dans les
Conditions de Garantie du Fabricant.
• Ce qui précède n’affectera pas ses droits statutaires.
Avant d’utiliser cet appareil, assurez-vous d’avoir retiré tout
emballage de protection ou revêtement.
Pour collaborer dans la protection de l’environnement, séparez les matériels d’emballage selon leurs différents types et
éliminez-les conformément aux lois locales d’élimination de
résidus. Les emballages sont conçus pour ne pas nuire l’environnement ; étant des produits écologiques, ils peuvent être
récupérés ou recyclés. En recyclant l’emballage, vous contribuerez à une économie de matières premières et à une réduction du volume des détritus industriels et ménagers.
Pour toute information supplémentaire sur l’élimination de résidus,
veuillez vous adresser à votre agence environnementale locale.
La première fois que vous utiliserez votre appareil, une odeur
pourra se dégagée du revêtement protecteur ou de l’humidité ;
cette odeur disparaîtra rapidement.
Le symbole
que ce produit ne peut être traité comme les déchets ménagers normaux. Ce produit doit être remis au point de ramas-
sur le produit ou sur son emballage indique
sage d’appareils électriques et électroniques destinés au recyclage. En vous assurant que ce produit sera correctement
jeté, vous aiderez à éviter d’éventuelles conséquences négatives pour l’environnement et la santé publique, celles-ci pouvant avoir lieu si ce produit n’est pas manipulé d’une façon
adéquate. Pour plus d’information sur le recyclage de ce produit, veuillez contacter l’administration de votre ville, un service de déchets ménagers ou le magasin où vous avez acheté
le produit.
Cet appareil a été construit et distribué en respectant les exigences essentielles requises des DIRECTIVES et des NORMES
EUROPÉENNES CEE suivantes:
Symbole CE - 93/68 Basse tension - 73/23 CEM-89/336
Normes de Sécurité - EN 60 335-1, EN 60 335 - 2 - 6
Cet appareil respecte les normes pour la suppression des interférences radio.
Étant donné la politique d’amélioration permanente des produits appliquée par Le Fabricant, il se réserve le droit d’adapter
et de réaliser sans préavis les modifi cations qu’i considèrera
nécessaires.
NOTE IMPORTANTE
MISE EN GARDE et INSTRUCTIONS DE SÉCURITÉ
• L'appareil et ses parties accessibles chauffent pendant
l'utilisation.
• Les enfants âgés de moins de 8 ans doivent être tenus à
l'écart de l'appareil, sauf s'ils sont placés sous surveillance
permanente.
• Cet appareil peut être utilisé par des enfants à partir de 8 ans,
par des personnes aux capacités physiques, sensorielles ou
mentales réduites, ou bien par des personnes possédant une
expérience ou des connaissances insuffi santes, à condition
de les placer sous surveillance, de leur avoir fait suivre une
formation appropriée concernant l'utilisation de l'appareil
en toute sécurité et de leur faire prendre conscience des
dangers encourus. Les enfants ne doivent pas jouer avec
l'appareil. Les opérations de nettoyage et de maintenance
ne doivent pas être réalisées par des enfants non surveillés.
• Cet appareil respecte toute la législation de sécurité
européenne actuelle ; cependant, Le Fabricant désire
souligner le fait que ce respect n’évite pas que les surfaces
de l’appareil chauffent pendant son utilisation et qu’elles
resteront chaudes après le fonctionnement. Le Fabricant
recommande donc vivement d’éloigner les bébés et les
enfants de bas âges de l’appareil. Si vous ne pouvez éviter
que les plus petits restent dans la cuisine, maintenez-les en
permanence sous une stricte surveillance.
• Nous recommandons également de faire très attention
pendant l’utilisation et le nettoyage de l’appareil. Lisez
attentivement les points les concernant.
• Ne posez pas d’objets pesants sur le four et ne vous appuyez
pas sur la porte pendant son ouverture: les charnières
pourraient s’endommager.
Page 24
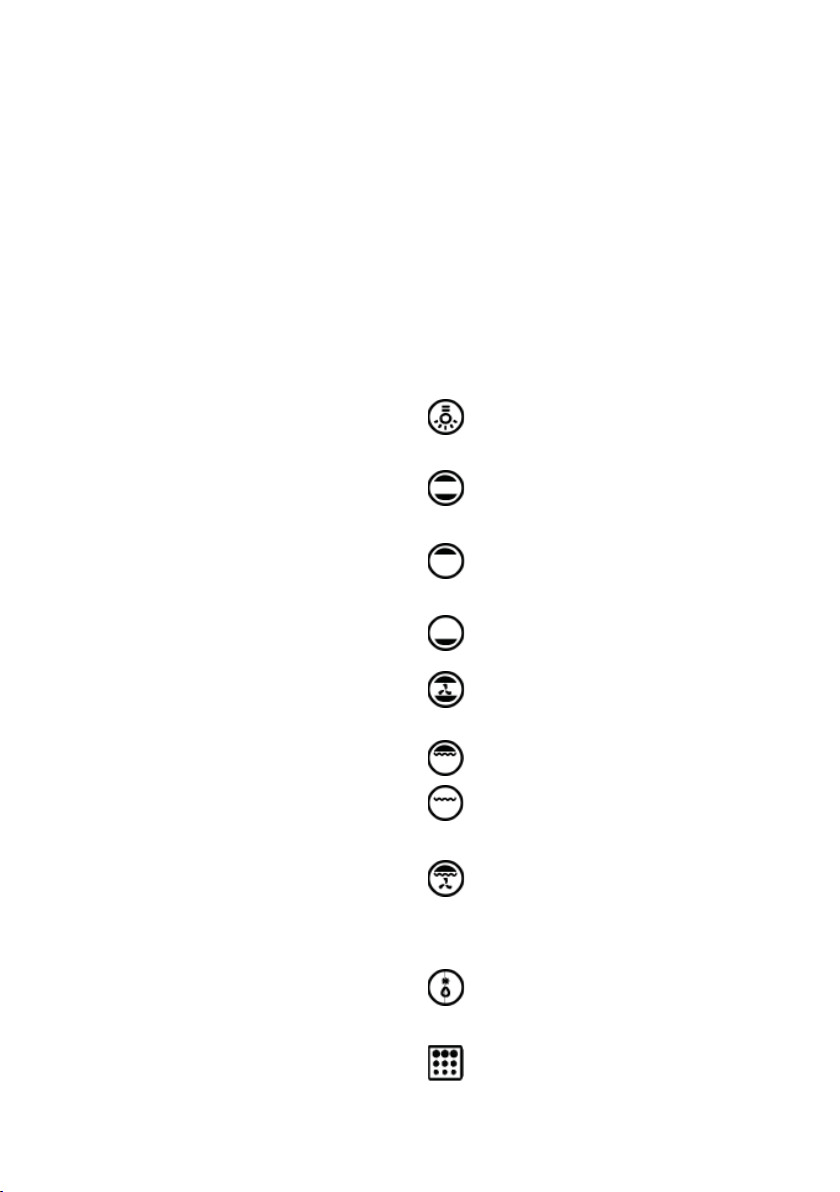
• Ne laissez pas d’huile ou de graisse chaude sans
surveillance, un risque d’incendie existant.
• Ne posez ni casseroles ni lèchefrites sur la partie inférieure
des cavités du four, et ne les couvrez pas de papier alu.
• Ne gardez jamais d’objets infl ammables dans le four: ils
peuvent provoquer un incendie.
• Veillez à ne laisser aucun accessoire ou câble électrique en
contact avec les zones chaudes de l’appareil.
• N’utilisez pas l’appareil pour le chauffage spécial ni pour
sécher des vêtements.
• N’installez pas l’appareil près de rideaux ou de meubles
tapissés.
• N’essayez pas de lever ou de bouger les appareils de cuisine
en les tirant par la porte ou la poignée: cela pourrait les
endommager.
• Si le joint du four est très sale, la porte ne fermera pas
correctement quand le four fonctionnera. Le devant des
meubles situés près du four peut être endommagés. Le joint
du four doit toujours être propre.
• Pendant son utilisation, l’appareil chauffe. Des précautions
doivent donc être prises pour éviter de toucher des éléments
chauffants à l’intérieur du four.
Ouvrez le four en faisant attention: de la vapeur chaude peut en
•
sortir et provoquer des brûlures à quiconque en serait proche.
• Ne versez pas d’eau dans le four quand il est très chaud:
l’émail pourrait s’endommager.
• Cet appareil doit être installé correctement par une personne
qualifi ée et strictement en accord avec les instructions du
fabricant.
• Le Fabricant décline toute responsabilité pour les dommages
personnels ou matériels résultats d’une utilisation non
conforme aux indications du présent manuel ou d’une
installation incorrecte de cet appareil.
•
De la chaleur, de la vapeur et de l’humidité se produiront
pendant l’utilisation du four. Évitez tout type de blessures et
assurez-vous que la pièce est ventilée d’une façon adéquate.
Si l’appareil est utilisé de façon prolongée, une ventilation
supplémentaire peut être nécessaire ; en cas de doute sur le
volume nécessaire, veuillez consulter votre installateur qualifi é.
MODE
D’EMPLOI
Ce Manuel de l’Utilisateur doit être conservé pour de futures
consultations et l’utilisation par quelqu’un qui ne serait pas familiarisé avec cet appareil.
Avant d’utiliser le four, en nettoyer soigneusement l’intérieur
à l’eau tiède et au savon non abrasif. Introduire la grille et la
lèchefrite dans leurs guides respectifs.
Ensuite, mettre le four à température maximale pendant environ 20 minutes pour éliminer tout résidu de graisse, d’huile
ou de résines de fabrication qui pourraient causer des odeurs
désagréables pendant la cuisson.
ATENCION: Au cours de cette première cuisson, il est possible
qu’un peu de fumée ou des odeurs désagréables se dégagent
du four.
Dans ce cas, ventilez correctement la pièce jusqu’à la fi n de
ce premier fonctionnement. Cette simple opération terminée,
le four sera prêt pour réaliser sa première cuisson.
Cet appareil est exclusivement destiné à une utilisation ménagère.
Utilisez le four uniquement pour cuisiner des aliments.
UTILISATION DU FOUR
Le four est contrôlé par thermostat entre 50 ºC et/ou 250 ºC,
en fonction de la température requise. Le pilote lumineux du
thermostat s’allume et s’éteint pour indiquer le contrôle de
température pendant les périodes de fonctionnement.
Le mode de cuisson désiré est sélectionné en utilisant le bouton de contrôle multifonctions. Les fonctions pouvant être sélectionnées sont les suivantes:
A. LUMIÈRE DU FOUR. Automatique pour tous les mo-
dèles quand le mode de cuisson est choisi. La lumière
du four reste allumée pendant que le four est utilisé.
B. MODE DE CONVECTION. Permet une cuisson tradi-
tionnelle avec de la chaleur des éléments supérieur et
inférieur.
C. MODE D’ÉLÉMENT SUPÉRIEUR. Pour la cuisson
douce, pour dorer ou pour conserver les plats cuisinés
chauds.
D. MODE D’ÉLÉMENT INFÉRIEUR. Utilisé pour la cuis-
son lente et pour chauffer les repas.
E. MODE DE CONVECTION AVEC RENFORT DE VENTILA-
TEUR. Permet de chauffer par convection avec les élé-
ments supérieur et inférieur pour une cuisson uniforme.
F. MODE GRIL. Pour gratiner et dorer les aliments.
G. MAXI-GRIL. Le même procédé qu’au point précédent
mais l’élément du gril permet de griller une zone plus
importante.
H. MODE DE GRIL AVEC RENFORT DE VENTILATEUR.
Permet de dorer rapidement pour que les aliments
conservent leur jus. En mode cuisson à ventilation forcée, cette fonction est la plus effi cace au niveau énergétique.
I. MODE DÉCONGÉLATION.
Le ventilateur fonctionne sans chaleur pour réduire le
temps de décongélation des aliments congelés.
J. Fonction pyrolyse :
Lorsque le four fonctionne en mode pyrolyse, le
message « PYA » apparaît sur l'affi cheur LED.
La température prédéterminée est de 450 °C.
Le minuteur peut être réglé à 1h30 ou 2h00.
Page 25
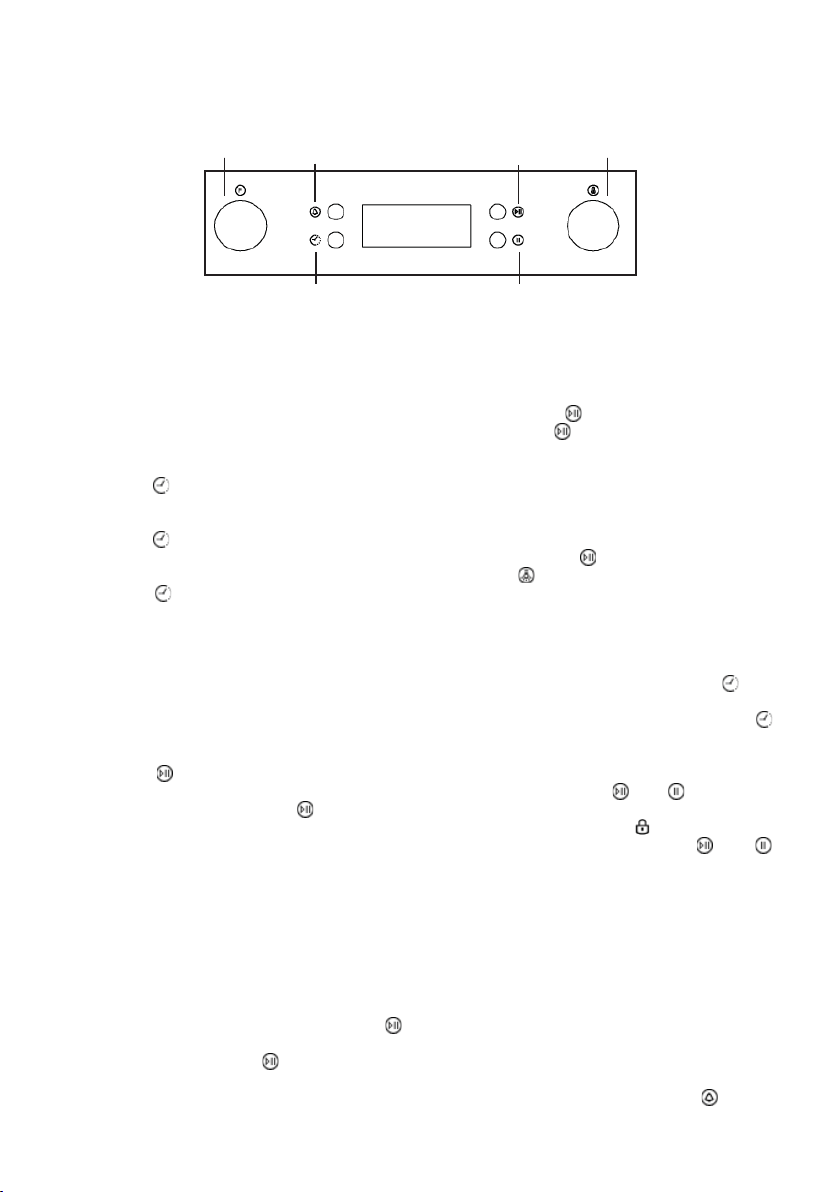
DESCRIPTION DU PRODUIT
K1
Bouton de rappel
Bouton de démarrage
Attention : pour ouvrir la porte du four, tenez toujours la manivelle centrale
avec une main et ne touchez pas le verrou de la sécurité enfants.
K2
Bouton d'arrêtBouton de réglage de temps
CONSIGNES D'UTILISATION
1. Réglage de l'horloge
Une fois le four branché à l'alimentation électrique, l'affi cheur
indique les symboles « 00:00 ».
1) Appuyez sur « », les chiffres de l'heure clignoteront.
2) Tournez la commande « K2 » pour régler les heures
(établissez une valeur comprise entre 0 et 23).
3) Appuyez sur « », les chiffres des minutes clignoteront.
4) Tournez la commande « K2 » pour régler les minutes
(établissez une valeur comprise entre 0 et 59).
5) Appuyez sur « » pour fi naliser les réglages de l'horloge.
« : » clignotera et l'heure s'allumera.
Remarque : l'horloge affi che l'heure au format 24 heures.
Une fois le four branché à l'alimentation électrique, l'horloge
fonctionnera de manière ininterrompue.
2. Réglage de fonction
1) Tournez la commande « K1 » pour sélectionner la fonction
de cuisson désirée. L'indicateur correspondant s'allumera.
2) Tournez la commande « K2 » pour régler la température.
3) Appuyez sur « » pour confi rmer le début de la cuisson.
L'icône de température correspondant « °C » s'allumera.
4) Si vous ignorez l'étape 2, appuyez sur « » pour confi rmer
le début de la cuisson. Le temps de cuisson prédéfi ni sera
de 9 heures et l'affi cheur LED indiquera la température
présélectionnée.
REMARQUE :
1) L'intervalle de réglage du commutateur de codage est le
suivant :
0--0:30 min : intervalle de 1 minute 0:30--9:00 heures :
intervalle de 5 minutes
2) L'intervalle de réglage de la température est de 5 °C, et celui
de la fonction de grill radiant est de 30 °C.
3) Tournez la commande « K1 » pour régler le temps de cuisson
une fois la cuisson commencée. Appuyez ensuite sur « »
pour reprendre la cuisson.
Si vous n'appuyez pas sur « » dans un délai de
3 secondes, le four continuera de tenir compte du temps
programmé précédemment et la cuisson se poursuivra.
4)
Tournez la commande « K2 » pour régler la température une fois
la cuisson commencée. L'indicateur correspondant s’allumera.
Appuyez ensuite sur «
» pour reprendre la cuisson. Si vous
n'appuyez pas sur « » dans un délai de 3 secondes, le four
continuera de tenir compte de la température programmée
précédemment et la cuisson se poursuivra.
3. Réglage de l'éclairage
1) Tournez la commande « K1 » pour sélectionner la fonction
d'éclairage. L'icône correspondant s'allumera.
2) Appuyez sur le bouton « » pour lancer la cuisson. L'icône
d'éclairage « » * « : » clignotera.
4. Fonction de consultation
Pendant la cuisson, vous pouvez utiliser la fonction de
consultation. Après 3 secondes, l'affi cheur retourne au mode
de fonctionnement actuel.
1) En mode de cuisson, appuyez sur le bouton « » pour
visualiser l'heure actuelle.
2) Lorsque l'horloge est affi chée, appuyez sur le bouton « »
pour consulter le temps de cuisson.
5. Fonction de verrouillage enfant
Pour verrouiller : appuyez sur « » et « » simultanément
pendant 3 secondes, vous entendrez un bip long indiquant que
le verrouillage enfant est activé et « » s'allumera.
Désactivation du verrouillage : appuyez sur « » et « »
simultanément pendant 3 secondes, vous entendrez un bip
long indiquant que le verrouillage enfant est désactivé.
Remarque : pendant le fonctionnement, si vous souhaitez
arrêter la cuisson, appuyez sur le bouton d'arrêt. Il n'est
pas nécessaire d'appuyer et de maintenir le bouton d'arrêt
enfoncé ; cela n'a aucun effet.
6. Fonction de rappel :
Le four intègre un rappel de 9 heures. Cette fonction vous aide
à vous rappeler du moment où vous devez lancer la cuisson
dans un intervalle compris entre 1 minute et 9 heures. Le rappel
ne peut être confi guré que lorsque le four se trouve en mode
veille. Il peut être confi guré comme suit :
1) Appuyez sur le bouton de réglage du rappel « » ;
2) Tournez la commande « K2 » pour régler les heures de rappel
Page 26
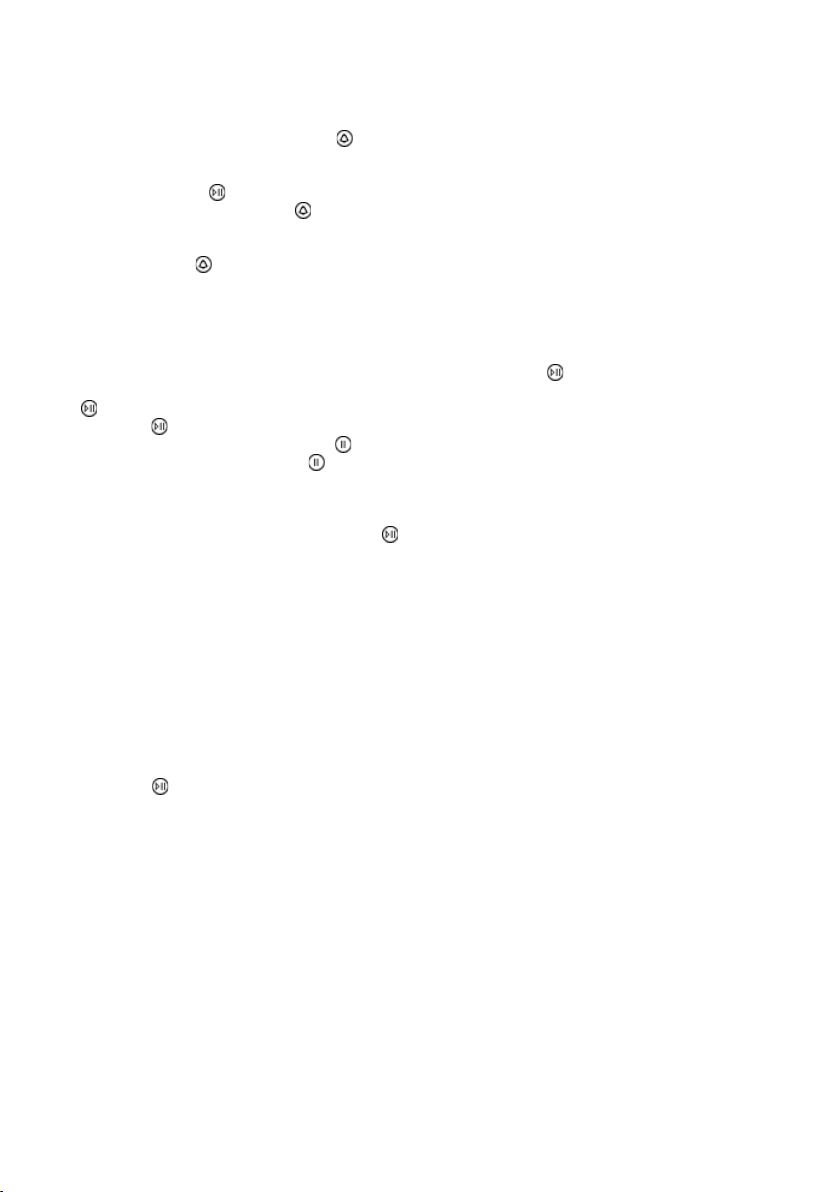
(établissez une valeur comprise entre 0 et 9).
3) Rappuyez sur le bouton de réglage du rappel « » ;
4) Tournez la commande « K2 » pour régler les minutes du
rappel (établissez une valeur comprise entre 0 et 59).
5) Appuyez sur le bouton « » pour confi rmer le réglage. « : »
clignotera et l'indicateur du rappel «
décompte commence alors.
Remarque : l'alarme du four sonnera 10 fois à la fi n du
décompte. Le symbole « » disparaît de l'affi cheur pour vous
rappeler de lancer la cuisson. Vous pouvez annuler le rappel
durant le réglage en appuyant sur le bouton d'arrêt. Une fois
le rappel réglé, vous pouvez l'annuler en appuyant deux fois
sur le bouton d'arrêt.
7. Fonction de Démarrage/Pause/Annulation
1) Lorsque vous avez défi ni le temps de cuisson, appuyez sur
« » pour lancer la cuisson. Si la cuisson est en pause,
appuyez sur « » pour la reprendre.
2) Pendant la cuisson, appuyez une fois sur « » pour la
mettre en pause. Appuyez deux fois sur « » pour annuler
la cuisson.
» s'allumera. Le
D) À la fi n de la fonction de pyrolyse, lorsque la température
centrale du four redescend sous 300 °C, l'affi cheur LED
s'éteint.
E) Avant d'activer la fonction de nettoyage par pyrolyse,
éliminez tout excès de résidus et assurez-vous que le four
est vide. Ne laissez aucun ustensile tel que casseroles,
plateaux de four, collecteurs de graisse, supports de
coulisses, etc. à l'intérieur du four au risque de les
endommager sérieusement.
10. Remarque :
1) L'éclairage du four s'allumera avec toutes les fonctions
(sauf la fonction pyrolyse)
2) Une fois le programme de cuisson établi, si vous n'appuyez
pas sur le bouton «
indiquera l'heure actuelle ou retournera au mode veille. Le
programme réglé sera annulé.
3) Si le bouton est correctement actionné l'alarme sonnera,
dans le cas contraire elle ne sonnera pas.
4) L'alarme sonnera cinq fois pour vous rappeler que la cuisson
est terminée.
» dans un délai de 5 minutes, l'affi cheur
8. Fonction économie d'énergie
1) En mode veille et en mode rappel, appuyez sur « »
pendant 3 secondes pour éteindre l'affi cheur LED et le
mettre en mode économie d'énergie.
2) Lorsque le four est en mode veille, si aucune action n'est
effectuée pendant 10 minutes l'affi cheur LED s'éteint et
passe en mode économie d'énergie.
3) Appuyez sur l'un des boutons ou tournez l'un des
commutateurs de codage pour quitter le mode économie
d'énergie.
9. Fonction pyrolyse (uniquement sur certains modèles)
Cette fonction vous permet de nettoyer complètement la cavité
du four.
1) Tournez la commande « K1 » pour sélectionner la fonction
pyrolyse. Le message « PYA » apparaîtra sur l'affi cheur LED.
2) Appuyez sur « » pour confi rmer la fonction de cuisson. La
durée prédéterminée est de 2 heures. Le message « PYA »
apparaîtra sur l'affi cheur LED.
3) Tournez la commande « K1 » pour modifi er la durée de la
fonction pyrolyse. Vous pouvez choisir entre deux options de
durée « 1h30 » ou « 2h00 ».
Remarque :
A) Lorsque la porte du four est ouverte, le bouton de démarrage
n'est pas opérationnel et les messages « DOOR » et « PYA »
apparaissent sur l'affi cheur LED.
B) Lorsque la température centrale du four dépasse 200 °C,
appuyez sur le bouton d'annulation pour retourner
directement au mode veille. Si la température centrale du
four dépasse 300 °C, appuyez sur le bouton de démarrage,
le message « COOL » s'affi chera alors.
C) Si vous ouvrez la porte en mode de fonctionnement normal,
le fonctionnement du relais du chauffage sera interrompu, le
message « DOOR » apparaîtra sur l'affi cheur LED et l'alarme
émettra un bip continu jusqu'à ce que la porte soit refermée
ou le bouton d'annulation soit activé.
CONSEILS UTILES
• Avant de cuisiner, assurez-vous de retirer du four tous les
accessoires non utilisés.
• Préchauffez le four à une température de cuisson avant de
l’utiliser.
• Placez les plats de cuisson au centre du four et, quand vous
en utilisez plusieurs, laissez un espace entre eux pour que
l’air circule.
• Ne pas remplir excessivement la lèchefrite pour préparer
un gâteau au fruit juteux. Le jus des fruits qui dégoutte de la
lèchefrite produit des taches qu’il est impossible d’éliminer.
• Ne pas introduire de plats sur la base du four et ne pas la
couvrir de papier alu ; cela produirait une accumulation thermique. Les temps de cuisson et de grillades ne coïncideraient
pas ce qui pourrait endommager l’émail.
• Ouvrez le moins possible la porte du four pour voir les aliments (la lumière du four reste allumée pendant la cuisson).
• Faites attention au moment d’ouvrir la porte pour éviter le
contact avec les pièces chaudes et la vapeur.
FONCTION PYROLYSE
Le four est conçu pour être très fonctionnel et permettre un
nettoyage d’une grande simplicité, grâce à la fonction de
nettoyage automatique par pyrolyse. Les modèles à pyrolyse
intègrent une fonction de nettoyage automatique, il n’est
donc pas nécessaire d’utiliser de détergents dans la cavité du
four. En chauffant, le four atteint une température maximale
de 500 °C et les résidus de graisse présents sur les parois
sont alors brûlés et éliminés. Cependant, grâce au quadruple
vitrage, l’extérieur de la porte du four ne dépassera pas 55 °C.
Le cycle de pyrolyse s’effectue en toute sécurité grâce à un
dispositif qui bloque la porte pendant le processus. Le cycle
de nettoyage peut être programmé de 1 heure 30 minutes au
Page 27

minimum à 2 heures au maximum, en fonction du niveau de
saleté. Ainsi, le temps de cuisson du four se maintient à un
niveau optimal.
Avertissement :
Étant donné que le nettoyage par pyrolyse s’effectue à une
température extrêmement élevée et afi n de prolonger la
durée de vie des accessoires, il est recommandé de les
retirer de la cavité avant d’utiliser la fonction de nettoyage
(selon le modèle, les accessoires peuvent inclure : plateau de
cuisson, grille de cuisson chromée, support de grille chromé,
tournebroche, thermomètre à viande, couteau à pizza, pierre à
pizza ou poignée chromée du plateau de cuisson).
Pour retirer les accessoires de la cavité, respectez les
instructions suivantes :
1. Retirez tous les accessoires de la cavité.
2. Démontez le support de la grille (si le support de la grille
est fi xé à un guide télescopique, il n’est pas nécessaire
de démonter ce guide) situé dans la cavité. Placez les
accessoires en lieu sûr afi n de les retrouver facilement
après le nettoyage par pyrolyse.
1) Desserrez la vis de fi xation du support de la grille à l’aide
d’un tournevis, comme indiqué sur la fi gure 1.
2) Soulevez le support de la grille en l’inclinant d’environ 30°
par rapport à la cavité, puis retirez-le : retirez l’autre plaque
latérale en procédant de la même manière, comme indiqué
sur la fi gure 2.
fi gure 1
fi gure 2
3. Une fois le nettoyage par pyrolyse terminé, patientez 1 heure
avant de remonter le support de la grille dans la cavité en
procédant comme suit :
1) Placez la grille dans l’orifi ce de montage de la plaque
latérale du châssis principal, comme indiqué sur la fi gure 2.
Serrez la vis à l’aide d’un tournevis puis terminez le montage
de l’autre plaque latérale en procédant de la même manière,
comme indiqué sur la fi gure 1.
2) Déployez les rails coulissants des deux côtés, puis installez-y
la grille du grill, comme indiqué sur les fi gures 3 et 4.
4. Montez la grille de cuisson et les autres accessoires dans la
cavité ; terminez le montage comme indiqué sur la fi gure 5.
Remarque : La cavité du four et le plateau de cuisson sont
émaillés ; prenez soin de ne pas endommager l’émail au cours
du montage ou du démontage.
fi gure 3
fi gure 4
fi gure 5
Page 28

INSTRUCTIONS POUR LA CUISSON
Consultez l’information des récipients des aliments pour
connaître les températures et les temps de cuisson. Lorsque
vous vous serez familiarisé avec le rendement de votre appareil, les températures et les temps peuvent être modifi és pour
les adapter à vos goûts personnels.
Vérifi ez que les aliments congelés se décongèlent bien entièrement avant de les cuisiner, sauf indication contraire.
Type d’aliment Temp. ºC Guides Temps de cuisson
en minutes
Conseillé Personnel
Plats sucrés dans moule avec pâte battue
Gâteaux ou viennoiseries 175 2 55-65
Tarte sublime 175 3 60-70
Plats sucrés dans moule à “pastafl ora”
Fond de tartes 200 3 08-10
Fond de tarte avec fromage blanc 200 3 25-35
Fond de tarte avec fruits 200 3 25-35
Fond pour tartes 180 3 30-45
Pain mou 1 Kg de farine 200 3 25-35
Petits plats sucrés
“Pastafl ora” 200 3 10-15
Pâte à Beignets 200 2 35-45
Pâte à Biscuits 200 3 15-20
Lasagne 225 2 40-50
Viandes (Temps de cuisson par cm d’épaisseur
Rôtis à cuisson longue 200 2 120-150
Rôtis à cuisson courte 200 2 60-90
Boulettes 200 2 30-40
Volailles
Canard 1 1/2 kg 200 2 120-180
Oie 3 Kg 200 2 150-210
Poulet grillé 200 2 60-90
Dinde 5 Kg 175 2 240-260
Gibier
Lièvre 200 2 60-90
Pâté de chevreuil 200 2 90-150
Gigot de cerf 175 2 90-180
Légumes
Pommes de terre au four 220 2 30-40
Flan aux légumes 200 2 40-50
Poissons
Truite 200 2 40-50
Daurade 200 2 40-50
Pizza 240 3 10-20
Gril
Côtelettes 4 8-12
Saucisses 4 10-12
Poulet grillé 2 25-35
Rôti de veau grillé 0,6 Kg 50-60
* Le numéro des guides fait référence au plus bas (l’appui sur
le fond du four étant exclus puisque le plat ne peut y être introduit
LES INFORMATIONS SUR LES EMPLACEMENT SONT DONNÉE
À TITRE radio, ÉTANT DONNÉ QUE LE TYPE ET LE TEMPS DE
CUISSON VARIENT EN FONCTION DE LA QUANTITÉ ET DE LA
QUALITÉ DES ALIMENTS.
COMMENT UTILISER LE GRIL
Posez les aliments que vous désirer dorer sur le grille ou dans
un plat à bords très bas. La grille doit être placée au niveau le
plus haut, alors que la lèchefrite doit rester au niveau le plus
bas. Connecter la résistance gril sur la position du sélecteur
pour les fours ventilés , ou sur la position , ,
du sélecteur pour les fours multifonctions. En fonction du type
d’aliment (viandes, poissons, volailles, etc.) il sera nécessaire
de les retourner pour pouvoir exposer les deux faces aux
rayons infrarouges du gril. À titre purement d’orientation, nous
indiquons ci-après quelques temps de cuisson:
Aliments au Gril Temps de cuisson
en minutes
Conseillé
Viandes peu épaisses ou fi nes 4-6
Viandes normales 5-8
Poisson sans écailles 8-10
Poisson (par ex. truite, saumon 12-15
Saucisses 10-12
Sandwichs 2-5
MISE EN GARDE
• N’utilisez pas de papier alu pour couvrir la lèchefrite ou pour
chauffer.
• N’enveloppez pas les aliments dans du papier alu et ne les
placez pas sous le gril - la grande réfl ectivité de l’aluminium
pourrait endommager l’élément du gril.
ENTRETIEN DE L’APPAREIL
IMPORTANT
Comme précaution de sécurité, avant toute opération de nettoyage du four toujours le débrancher du courant ou retirer la
ligne d’alimentation de l’appareil.
Le nettoyage du four sans panneaux autonettoyants doit être
réalisé après l’utilisation, quand l’appareil est éteint mais encore tiède, et non chaud, de sorte que la pellicule de graisse
produite par les vapeurs de la cuisson sur les parois soit encore facile à retirer ; de plus, à ce moment les éclaboussures
de graisse ne sont pas encore trop dures ni consistantes.
Retirez les supports latéraux de fi l métallique chromé ; tirez
la partie avant vers le haut pour les retirer de la paroi et des
orifi ces arrière. Nettoyez le four avec un chiffon doux imbibé
d’une solution diluée d’ammoniaque ; rincez et séchez. Si des
taches ou des éclaboussures restaient, mettez un chiffon humidifi é d’ammoniaque sur le fond du four, fermer la porte et,
Page 29
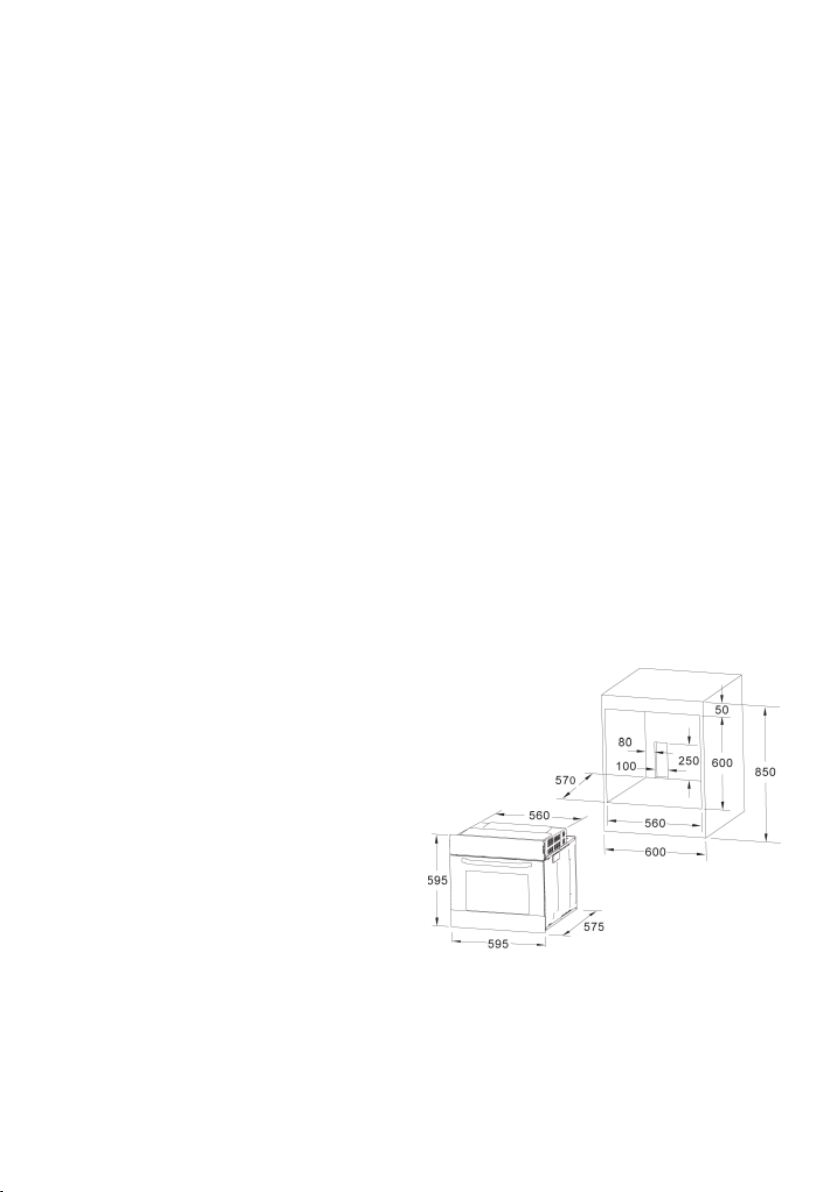
après quelques heures, lavez le four à l’eau chaude et au détergent liquide ; rincez et séchez soigneusement. Pour nettoyer
les parties externes de métal brillant, utilisez un chiffon doux et
de l’eau savonneuse ; ne jamais utiliser de produits en poudre
contenant des abrasifs.
De plus, évitez l’utilisation de substances acides ou alcalines
(jus de citron, vinaigre, sel, tomates, etc.) Évitez l’utilisation de
produits à base de chlore, d’acides ou d’abrasifs, en particulier
pour le nettoyage des parois vernies. N’utilisez pas non plus
d’éponge métallique ou d’outils rigides, les fi nitions superfi cielles du four pouvant être endommagées. N’utilisez pas de
nettoyeurs à haute pression ni d’appareils à vapeur pour nettoyer le four.
Normalement, passer un chiffon doux et humide avec un détergent chaud est suffi sant ; cependant, pour les marques persistantes, il est recommandé de procéder comme suit:
PIÈCES ÉMAILLÉES VITRIFIÉES
Utilisez seulement un nettoyant recommandé pour ce type de
matériau ; évitez les produits à base de chlorure, comme l’eau
de Javel.
INSTRUCTIONS POUR L’INSTALLATION
Cet appareil doit être installé par une personne compétente,
et conformément à la version actuelle des Règlements et
Normes de Sécurité du RU ou leurs équivalents de la Norme
Européenne:
Réglementations urbanistiques (publiées par le Département
de l’Environnement).
Normes urbanistiques (publiées par le Département de Développement d’Écosse).
Réglementations de câblage IEE.
Électricité dans les réglementations du travail.
MISE EN SERVICE PRÉALABLE DE L’APPAREIL
IMPORTANT
Le meuble ou l’armoire adjacente et tous les matériels utilisés
dans l’installation doivent résister une augmentation de température minimum de 85 ºC sur la température ambiante pendant
l’utilisation de l’appareil.
Des types de meubles de cuisine déterminés en vinyle ou laminés
sont particulièrement sujets à souffrir des dommages par décoloration à des températures situées au-dessous de celles indiquées.
Si l’appareil est installé sans que cette limite de température
soit respectée ou s’il est placé à moins de 4 mm des armoires
adjacentes, la responsabilité sera du propriétaire.
NOTES D’INSTALLATION
1. Le four doit être installé dans un logement standard de
600mm, comme indiqué Fig. 5, soit sous une cuisinière soit
dans une colonne.
2. En insérant le four dans une colonne, il est indispensable
de retirer le panneau arrière du meuble pour assurer une
ventilation suffi sante, et de laisser une ouverture d’au moins
85-90 mm, comme indiqué Fig. 5.
3. Vérifi er que le four a été fi xé correctement et d’une façon
sure dans son logement. La fi xation du four dans l’armoire se
réalise avec 4 vis “ A “, Fig. 5, une à chaque coin du cadre
de la porte du four.
Fig. 5: Distances d’installation pour fours électriques simples
de 60 cm de largeur (la forme de la carcasse supérieure peut
varier) et de sa fi xation dans l’armoire.,
Au moment du désemballage, vérifi er que les pièces suivantes
accompagnent bien l’appareil:
• Manuel d’Instructions et d’Installation
• grille de four 1 lèchefrite
• Vis et caches pour fi xer l’appareil dans le logement
MISE EN PLACE DE L’APPAREIL (voir Fig. 5)
Ces appareils sont classés comme de Classe I.
Le branchement à terre est obligatoire, conformément à ce qui est
établi para la loi. Le fabricant décline toute responsabilité dans le
cas où les normes contre accidents n’auraient pas été respectées.
A. Le guide de support doit être retiré
B. Espace de 75-90 mm entre le mur et l’arrière de l’étagère de
support et la base de l‘armoire
C. Socle
D. Face avant du caisson à monter
Page 30

Fig. 7: Conditions requises de ventilation et de découpe pour
l’installation d’un four électrique simple dans une unité de cuisine standard.
Conditions requises de ventilation minimales pour les étagères
supérieures, de base et de support de l’arrière de l’unité.
MISE EN GARDE - CET APPAREIL DOIT ÊTRE CONNECTÉ À LA
TERRE
Cet appareil doit être câblé à un interrupteur automatique bipolaire de 13 A avec prise protégée, qui ait une séparation de
contacts de 3 mm et située dans un endroit facilement accessible près de l’appareil.
IMPORTANT
Les conducteurs du câble d’alimentation de réseau sont codés
par couleurs de la façon suivante:
Vert et jaune - Terre
Bleu - Neutre
Marron - Ligne
A. Panneau arrière
B. Espace de stockage
C. Retirer l’arrière de cette section
D. Panneau arrière
E. Espace de stockage
F. Socle
G. Découpe de ventilation minimum 80 cm2
Fig. 8: Conditions requises de ventilation et de découpe pour
l’installation d’un four électrique simple dans une armoire haute.
BRANCHEMENT ÉLECTRIQUE
Avant de brancher l’appareil, vérifi er que la tension d’alimentation marquée sur la plaque signalétique coïncide bien avec
la tension de l’alimentation de réseau.
Pour les installations électriques, le registre NICEIC est recommandé.
• Le conducteur vert et jaune doit être connecté à la borne
marquée d’un “ E “ ou d’un symbole de terre ou de couleur vert et jaune. Le conducteur bleu doit être connecté à
la borne marquée d’un “N”.Le conducteur marron doit être
connecté à la borne marquée d’un “L”.
• À aucun point, le câble ne devra arriver à une température
supérieure de 50 ºC à la température ambiante.
• Si le câble d’alimentation est endommagé, il doit être rem-
placé par un câble ou un ensemble spécial que fournira le
fabricant ou le service après-vente.
REMPLACEMENT DU CÂBLE D’ALIMENTATION DE RÉSEAU
Si le câble d’alimentation de réseau doit être remplacé, procéder de la façon suivante:
1. Débrancher l’appareil de l’alimentation, dévisser les vis de
fi xation et retirer le panneau arrière.
2. Dévisser les vis de fi xation et celles des bornes pour libérer
le câble existant.
3. Monter le nouveau câble qui devra remplir les spécifi cations
en rapport avec les Informations Techniques, en assurant la
connexion correcte des codes de couleur et que toutes les
vis soient correctement serrées.
MAINTENANCE
Avant de réaliser la maintenance, débrancher l’appareil de
l’alimentation électrique.
Pendant la période de garantie, demander toutes les interventions nécessaires au Service d’Assistance Technique du
fabricant. Tenez compte du fait que l’intervention ou la réparation effectuée par un personnel non autorisé annulera cette
garantie.
REMPLACEMENT DE L’AMPOULE DU FOUR
(Non couvert par la garantie de l’appareil.)
Le four est équipé d’une lampe dont les caractéristiques sont
les suivantes: 15 W ou 25 W, 300 ºC et du type E-14
Page 31

ATTENTION: Débranchez l’appareil de l’alimentation électrique, retirez la porte du four (comme décrit précédemment)
ainsi que les étagères.
Retirez le couvercle protecteur en verre de l’ampoule, en tournant dans le sens contraire à celui des aiguilles d’une montre.
Fig. 9 (A)
Dévissez la vieille ampoule et l’éliminer d’une façon sure
et écologique ; la changer pour une du type spécifi é dans les
Informations Techniques et remonter le protecteur.
NOTE - Le protecteur en verre peut être très serré ; si besoin,
utiliser une mâchoire pour le retirer.
ENTRETIEN ET REMPLACEMENT DES REVÊTEMENTS CATALITIQUES
(Quand ils sont montés, les revêtements ne sont pas couverts
par la garantie de l’appareil)
Pour maintenir “toujours propres” d’une façon effi cace les
revêtement, le four doit être chauffé à un minimum de 200 ºC
à condition qu’il existe des taches persistantes, pour éviter
qu’elles ne deviennent permanentes.
Si les revêtements deviennent noirs et brillants, ils doivent être
changés pour des neufs. Retirer tous les accessoires internes
pour faciliter le remplacement des revêtements.
Les revêtements de rechange peuvent être achetés directement
au Service de Pièces de Rechange du fabricant (voir détails sur
la quatrième page de couverture). Au moment de passer la commande, indiquez les références du type de produit décrit sur la
plaque signalétique et/ou le numéro de série de l’appareil.
INFORMATIONS TECHNIQUES
DIMENSIONS INTÉRIEURES
Hauteur : 346,5 mm
Largeur : 457 mm
Profondeur : 410 mm
Volume utile : 70 litres
INFORMATIONS ÉLECTRIQUES
Tension nominale:
220 V - 240 V ~ 50 Hz
Connexion d’alimentation:13 A (interrupteur automatique bipolaire avec prise protégée, avec séparation de contacts de 3 mm
ABSORPTION DE PUISSANCE
Élément chauffant supérieur 950 W
Élément chauffant de grill 2 000 W
Élément chauffant inférieur 1 100 W
Élément chauffant de convection 2 000 W
Moteur de convection 33 W
Moteur de la rôtissoire 4,1 W
Ventilateur de refroidissement 23 W
Éclairage du four 25 W
Puissance maximale 2 100 W/3 000 W
Câble d’alimentation de réseau:
3 x 1,5 mm
2
type H07RN-F <HAR>
Ampoule du four:
15 W - 25 W / 300 ºC vis du type E-14
Le Fabricant décline toute responsabilité pour les dommages
produits à personnes et objets, et qui seraient le résultat d’une
installation incorrecte ou impropre de l’appareil.
Le Fabricant se réserve le droit d’apporter, sans besoin de préavis, toutes les modifi cations qu’il considérerait nécessaires
et utiles à ses produits.
Page 32

Page 33

EN
USER INSTRUCTIONS
Thank you for choosing one of our products. We hope this
household appliance provides you with the best service.
Therefore, we suggest you read the instructions and
suggestions contained in this manual carefully in order to use
our products correctly.
The specifi cations plate for this oven is available on this
appliance. This plate, visible by opening the door, displays all
the necessary identifi cation information for this appliance for
ordering replacement parts.
which could occur if this product is not handled correctly.
To receive more detailed information about recycling this
product, contact your local government, domestic waste
disposal services or the outlet where the product was bought.
This appliance has been built and distributed in compliance
with the essential requirements of the following EEC EUROPEAN
LAWS AND DIRECTIVES:
EC Symbol - 93/68 Low voltage - 73/23 CEM-89/336
Safety Rules - EN 60 335-1, EN 60 335 - 2 - 6.
GENERAL INFORMATION
Please read this manual carefully before using the appliance.
It is important that all the control functions are understood
before beginning to cook with this appliance.
Heed the advice and warnings included under the title
“IMPORTANT – Safety advice and instructions”.
• This appliance has been designed for private domestic use
and can be integrated into standard kitchen furnishings or
similar.
• In order to use in caravan-type vehicles, the suitable
indications included in the Installation Instructions should
be borne in mind.
• Use of this appliance for any other purpose or in any other
environment without the manufacturer’s express agreement
will invalidate any guarantee or liability.
• This new appliance is guaranteed against electrical or
mechanical defects, subject to certain exclusions indicated
in the Manufacturer’s Terms and Conditions of the Guarantee.
• The above does not affect your statutory rights.
Ensure that all protective packaging and covering has been
removed before using this appliance.
To collaborate in protecting the environment, separate the
packaging materials into the different types and dispose of
them according to local waste disposal regulations.
The packaging is designed so as not to harm the environment;
it can be recovered or recycled as it is an ecological product.
By recycling the packaging, you will contribute to saving raw
materials and reducing the volume of industrial and domestic
waste.
Any additional information on waste disposal may be requested
from your local environmental agency.
When used for the fi rst time, a slight smell from the protective
covering or damp may be noticeable, which will disappear
after a short time.
The symbol
this product cannot be treated as normal household waste.
This product must be handed over to an electric and electronic
equipment collection point for recycling. On ensuring that this
product is disposed of correctly, you will help to avoid possible
negative consequences for the environment and public health,
on the product or its packaging indicates that
This appliance respects laws of the suppression of radiointerference.
As the Manufacturer has a policy of continuous product
improvement, it reserves the right to adapt and carry out any
modifi cation considered necessary without prior warning.
IMPORTANT NOTICE
SAFETY INSTRUTIONS AND WARNING
• The appliance and its accessible parts become hot during use.
• Children less than 8 years of age shall be kept away unless
continuously supervised.
• This appliance can be used by children aged from 8 years
and above and persons with reduced physical, sensory or
mental capabilities or lack of experience and knowledge if
they have been given supervision or instruction concerning
use of the appliance in a safe way and understand the
hazards involved. Children shall not play with the appliance.
Cleaning and user maintenance shall not be made by
children without supervision.
• This appliance complies with all current European safety
legislation, however, the Manufacturer must emphasise
that this compliance does not prevent the surfaces of the
appliance from heating up during use and remaining hot
during its operation.
• Therefore, the Manufacturer highly recommends that this
appliance is kept out of the reach of babies and small children.
• If children cannot be kept out of the kitchen, they must be
watched at all times.
• We also recommend that great care is taken during use and
cleaning. Read the cleaning and maintenance sections for
this appliance carefully.
• Do not place heavy objects on this oven or lean on the door
when opening it, as this may damage the hinges.
• Do not leave hot oil or fats unattended as they may catch
light.
• Do not place oven dishes or trays of the lower part of the
oven or cover it in aluminium foil.
• Never store fl ammable objects inside the oven as they may
catch light.
• Do not allow the accessories or electric cables to touch the
hot parts of the appliance.
• Do not use the appliance for special heating or drying clothes.
• Do not install the appliance near curtains or upholstered
furniture.
Page 34

• Do not try to lift or move kitchen appliances by pulling any
door or handle as this may cause damage.
• If the oven join is very dirty, the door will not close properly
when the oven is working. The fronts of neighbouring
furniture may be damaged. Keep the oven join clean.
• During operation the appliance will heat up. Care must be
taken to avoid touching heating elements inside the oven.
• Open the oven carefully. Steam may escape and burn anyone
nearby.
• Do not pour water inside a very hot oven. The enamel may be
damaged.
This appliance must be installed correctly by a suitably qualifi ed
•
person, strictly following the manufacturer’s instructions
• The Manufacturer declines all liability for personal or material
damage as a result of misuse or incorrect installation of this
appliance.
• Heat, vapour and humidity are produced during use, avoid
all kinds of personal damage and ensure that the room is
suitably ventilated. If used for a prolonged period of time,
additional ventilation may be necessary – consult a qualifi ed
installer if you have any doubts about the necessary volume.
INSTRUCTIONS
This User Manual must be kept for future reference and use by
someone who is not familiar with the appliance.
Before using the oven, carefully clean the inside with a nonabrasive detergent and warm water. Introduce the grill and tray
in their respective runners. Once the operation is complete,
turn the oven on to the maximum temperature for approximately
20 minutes to remove any traces of manufacturing grease, oil
or resins which may cause unpleasant odours when cooking.
.
C. UPPER ELEMENT MODE. For gentle cooking,
browning or keeping cooked dishes warm.
D.LOWER ELEMENT MODE. For slow cooking and
heating food.
E. FAN-ASSISTED CONVECTION MODE. This provides
convection heating of the upper and lower elements for
uniform cooking.
F. GRILL. For gratinating and browning food.
G. MAXI-GRILL. As above, but the grill element provides
a larger area for roasting.
H. FAN-ASSISTED GRILL. This provides fast browning
so that food remains juicy. For convection baking, this is
the most energy-effi cient function.
I. THAWING MODE.
The fan works without heat to reduce the thawing time
for frozen food.
J. Pyrolytic function:
When the function set to prolytic mode, LED display
“PYA”.
The default temperature is 450ºC. The timer can be set
1:30 or 2:00 hours.
WARNING: During this fi rst heating some smoke or unpleasant
odours may appear. Should this happen ventilate the room
suitably until the fi rst operation is fi nalised.
Once this simple operation has been carried out the oven is
ready to use for cooking.
This appliance is exclusively for domestic use.
Use the oven to cook food only.
USING THE OVEN
The oven is controlled by a thermostat between 50 ºC and 250
ºC, depending on the temperature required. The thermostat
pilot light turns on and off to indicate the temperature control
during use.
The required cooking mode is selected using the multi-functional
control button. The functions that may be selected are:
A. OVEN LIGHT. Automatic when selecting the cooking
mode for all models. The oven light remains on when
using the oven.
B.CONVECTION MODE. Provides traditional cooking
with heat from the upper and lower elements.
Page 35

PRODUCT DESCRIPTION
K1
Remind button
Kindly reminder: To open the oven door, always use one hand to
hold the handle in the centre and do ot touching the child lock stud.
Start button
Stop buttonTime button
K2
OPERATION INSTRUCTIONS
1. Clock Setting
After connectiong the unit to the power, the symbols 00:00 will
be visible on the display.
1) Press ” “, the hour fi gures will fl ash.
2)
Rotate “K2” to adjust the hour fi gures, (Time should be within 0--23).
3) Press ” “, the minutes will fl ash.
4) Rotate “K2“ to adjust the minutes setting, (time should be
within 0-59).
5) Press ” “ to fi nish the clock settings. “:” will fl ash, and the
time will be illuminated.
Note: The clock is 24 hours. After connected to the mains
power, the clock will untimed.
2. Function Setting
1) Rotate “K1“ to choose the cooking function you require. The
related indicator will illuminated.
2) Rotate “K2“ to adjust the temperature.
3) Press ” “ to confi rm the start of cooking. The corresponding
icon for temperature ”ºC” will be on.
4) If step 2 is ignored, Press ” “ to confi rm the start of cooking.
and the default time is 9 hours, the default temperature will
display on the LED.
NOTE:
1) The step quantities for the adjustment time of the coding
switch are as follow:
0--0:30min: step 1 minute 0:30--9:00hour: step 5 minutes
2) The step quantities for the adjustment of temperature is 5ºC,
and the radiant grilling function is 30ºC.
3) Rotate “K1” to adjust the cooking time when cooking begins.
Then press ” “ to start cooking.
If ” “ not pressed within 3 seconds,the oven will revert
back to the previous time to continue cooking.
4) Rotate”K2 “ to adjust the temperature when cooking begins.
The related indicator will be illuminated. Then press ” “ to
start cooking. If ” “ not pressed in 3 seconds, the oven will
revert back to the previous temperatrue to continue cooking.
3. Lamp Setting
1) Rotate ”K1” to select the relevant function, then the
corresponding icon will be on.
2)
Press ” “ button to start cooking. Lamp icon ” “ * ”:“ will fl ash.
4. Inquiring function
During cooking process, you can use inquiring function, after
3 seconds return to the current working state.
1)
During cooking mode, press ” “ button to see the current time.
2) If the clock was set, press ” “ button to ask for cooking time.
5. Child lock function
To Lock: press ” “ and ” “ simultaneously for 3 seconds,
there will be a long “beeping” sound indicating the childrenlock is on and the ” “ will be illuminated.
Lock quitting: press ” “ and ” “ simultaneously for
3 seconds, there will be a long “beeping” sound indicating the
child-lock is released.
Note: During working mode, if you want to stop cooking,press
stop button quickly. Do not need to long pressing on stop
button,it is invalid.
6. Reminder Function:
The oven has 9 hours reminder, this function will help to remind
you to start cooking in a certain time from1 minute to 9 hours.
Only when oven in standby mode, the reminder can be set.
Follow below to set the reminder:
1) Press reminder setting button ” “;
2) Rotate “K2“ to set the hour time of reminder. (Time should
be within 0--9).
3) Press reminder setting button ” “ again;
4) Rotate “K2“ to set minute time of reminder. (Time should be
within 0--59).
5) Press ” “ to confi rm setting. “:” will be fl ash and the
indicator for reminder ” “ will light.The time counts down.
Note: The oven buzzer will sound for 10 times after the time
back to the zero hour. ” “ symbol disappears on the screen
to remind you to start cooking. You can cancel the reminder
during setting by pressing the stop button; After the reminder
has been set, you can cancel it by pressing stop button twice.
7. Start/Pause/Cancel Function
1) If the cooking time has been set, press ” “ to start cooking.
If the cooking is paused, press ” “ to resume cooking.
2) During cooking process, press ” “ once to pause the
cooking. Press ” “ twice to cancel the cooking.
Page 36

8. Energy-Saving Function
1) During in waiting state and reminding state, press ” “ for
three seconds, the LED display will go off and set to energysaving mode.
2) If no operation in10 minutes under waiting state, the LED
display will go off and go into energy-saving mode.
3) Under the energy-saving mode, press any key or rotate any
encoder can quit the energy-saving mode.
9. Pyrolytic Function(only some modles)
This function allows you to clean thoroughly the oven cavity.
1) Rotate “K1” to select the pyrolytic function. LED will display
“PYA”.
2) Press ”
3) Rotate “K1” to change the pyrolytic time. There have two
Note:
A) When the oven door is not closed, press start button will be
B) When the oven center temperature is highter than 200ºC,
C) When open the door in normal working condition, the relay
D) When the pyrolytic function fi nished working and oven center
E) Before activating the pyrolytic cleaning function, remove
10. Note
1) The oven lamp will be on for all functions.(except pyrolytic
2) Once the cooking programme has been set and the ” “
3) The buzzer sounds when effectively pressed, if not
4) The buzzer will sound fi ve times to remind you when cooking
“ to confi rm the cooking. And the default time is 2
hours, “PYA” will display on the LED.
levers time can be selected ”1:30 or 2:00”.
invalid, LED display “DOOR”, ”PYA.”
Press cancel button can return to waiting state directly and
the oven center temperature is highter than 300ºC, press
start botton, LED display “COOL”.
for heater will stop working, LED display “DOOR”, the buzzer
will beep continuously until the door closed or press the
cancel button.
temperature is lower than 300ºC. LED display will go off.
any excessive spillage and make sure that oven is empty. Do
not leave anything inside it(e.g. pans, baking tray, dripping
pan, slider bracket etc.) as this could heavily damage them.
function)
button is not pressed within 5 minutes, the current time will be
displayed or turn back to waitting state. The setting program
will be invalid.
effectively pressed there will be no response.
has fi nished.
USEFUL ADVICE
• Before cooking, make sure all oven accessories that are not
required are removed from the oven.
• Pre-heat the oven to the cooking temperature before using it.
• Place the cooking trays in the centre of the oven and leave
space in between when using more than one, so that the air
can circulate.
• Do not fi ll the tray to full when preparing a juicy, fruit cake.
Any fruit juice that drips from the tray will produce stains that
cannot be removed.
• Do not put oven trays on the base of the oven or cover it with
aluminium foil. This will cause thermal accumulation. The
cooking and roasting times will not coincide and the enamel
may be damaged.
• Try to open the oven door as little as possible to see the food
(the oven light remains on during cooking).
• Take care when opening the door to avoid contact with hot
parts and steam.
PYROLYTIC FUNCTION
The oven is designed to be highly functional and extremely
easy to clean by its Pyrolytic automatic cleaning function.
Pyrolytic models feature an automatic cleaning function which
means no detergents need to be used in the oven cavity. The
inside of the oven is heated and reaches maximum 500° C, at
which temperature any grease stuck to the walls is simply
burned off. However, the quadruple glazing ensures that the
outer door will become no hotter than 55ºC. The Pyrolytic cycle
is carried out in total safety as a special safety device locks the
door for the duration of the process. The cleaning cycle can be
programmed between a minimum of 1 hour 30 minutes and a
maximum of 2 hours depending on the level of dirt. This helps
keep oven cooking times at optimum levels.
Warning:
Since Pyrolytic cleaning it’s running at extremely high
temperature, for durable use, it’s strongly recommended to take
all accessories inside cavity out before use Pyrolytic cleaning
function(depends on different models, these accessories
include but not limit to baking pan, chromed baking rack,
chromed rack support, rotisserie fork, meat probe, Pizza knife,
Pizza stone, chromed baking pan handle).
Page 37

Please follow below instructions when removing the
accessories from the cavity:
1. Take out all accessories out of cavity;
2. Disassemble rack support (if there is a telescopic runner
fi xed to rack support, no need to disassemble it from the
rack support) from cavity. Please put the accessories to a
safe place, so that after pyrolytic cleaning, you can easily
fi nd them.
1) As shown in fi gure 1, loosen the screw in order to fi x rack
support with a screwdriver.
2) As shown in fi gure2, raise the rack support to an angle about
30º with cavity, then pull it out from cavity the other side plate
in the same way.
fi gure 1
3. After fi nishing pyrolytic cleaning , pass 1 hour, assemble the
rack support back to cavity, as follows below:
1) As shown in fi gure2, insert the rack into assembly hole of
main chasis side plate side plate.
As shown in fi gure 1, tighten the screw with a screwdriver,
and then complete the assembly of the other side plate in
the same way.
2) As shown in fi gure 3 and 4, pull the slide rail on both sides,
and install the grill rack on the slide rail.
4. Assemble baking rack and other accessories inside cavity,
then the assembly is fi nished as fi gure 5.
Note: The oven cavity and baking pan it’s enamele d, please
be care ful when disassemble or assemble to avoid broken it.
fi gure 2
fi gure 3
fi gure 4
fi gure 5
Page 38

COOKING INSTRUCTIONS
HOW TO USE THE GRILL
Read the information of the food packaging for the cooking
temperatures and times. Once familiar with the performance
of the appliance, the temperatures and times may be varied to
adapt them to your personal tastes.
Check that frozen food is completely thawed before cooking,
unless indicated otherwise.
Type of food Temp. ºC Runners Cooking time
Cake mixture desserts in moulds
Sponges or buns 175 2 55-65
Cake 175 3 60-70
Short pastry desserts in moulds
Pie base 200 3 08-10
Cheesecake pie base 200 3 25-35
Fruit pie base 200 3 25-35
Raised dough desserts in moulds
Pie base 180 3 30-45
Soft bread 1 kg of fl our 200 3 25-35
Small pastries
Short pastry 200 3 10-15
Doughnut dough 200 2 35-45
Biscuit dough 200 3 15-20
Lasagne 225 2 40-50
Meats (Cooking time per cm of thickness)
Long roasts 200 2 120-150
Short roasts 200 2 60-90
Meatballs 200 2 30-40
Poultry
Duck 1 1/2 Kg 200 2 120-180
Goose 3 Kg 200 2 150-210
Roast chicken 200 2 60-90
Turkey 5Kg 175 2 240-260
Game
Hare 200 2 60-90
Leg of venison 200 2 90-150
Vegetables
Oven-baked potatoes 220 2 30-40
Cooked vegetable fl an 200 2 40-50
Fish
Trout 200 2 40-50
Sea Bream 200 2 40-50
Pizza 240 3 10-20
Grill
Chops 4 8-12
Sausages 4 10-12
Grilled chicken 2 25-35
Spit-roasted veal 0,6Kg 50-60
in minutes
Suggested
Personal
* The runner number is counted from the bottom of the oven up
(Excluding the base of the oven as trays cannot be placed on it)
THE POSITION INFORMATION IS INDICATIVE BECAUSE THE
COOKING TYPE AND TIMES CHANGE DEPENDING ON THE
QUANTITY AND QUALITY OF THE FOOD.
Place the food to be browned on the grid or in the shallow tray.
The grid has to be placed on the highest runner, whilst the tray
for collecting fat should be on the lower runner. Connect the
grill using the following positions of fan-assisted oven selector
knob
, or in the position , , of the multi-function
oven selection knob.
Depending on the type of food (meat, fi sh, poultry, etc.) it will be
necessary to turn it over to expose both sides to the infra-red
rays of the grill. For guidance only, we indicate some cooking
times below:
Food to be grilled Cooking times
in minutes
Suggested
Lean or thin meat 4-6
Normal meat 5-8
Fish without scales 8-10
Fish (e.g. Trout, salmon) 12-15
Sausages 10-12
Sandwiches 2-5
WARNING
• Do not use aluminium foil to cover the grill tray or heat.
• Do not wrap elements in aluminium foil or place them under
the grill - the great refl ective quality of aluminium may
damage the grill element.
CLEANING THE APPLIANCE
IMPORTANT
As a safety precaution, before beginning to clean the oven
always unplug it from the power supply or remove the
appliance power lead.
Cleaning an oven that does not self-cleaning panels must be
done after use, when it is switched off but still warm, not hot, so
that the fi lm of grease produced by the cooking vapours on the
walls is still easy to remove, as well as the drips and splashes
of fat that are not yet hard and dry.
Remove the chrome-plated wire side supports; pull the front
part upwards to unattach them from the wall and remove them
from the rear orifi ces. Clean the oven with a soft cloth soaked
in a diluted ammoniac solution; rinse and dry. If there are still
stains and splashes, place a damp cloth soaked in ammoniac
at the back, close the door and, after a few hours, wash the
oven with warm water and liquid detergent, rinse and dry
carefully. To clean the shiny metal outside doors, use a soft
cloth with soap and water; do not use any powdered products
that contain abrasive substances.
Page 39

Also avoid the use of acid or alkaline substances (lemon juice,
vinegar, salt, tomatoes, etc.). Avoid using products containing
chlorine, acid or abrasive substances specially for cleaning the
varnished walls. Do not use thick steel wool or hard utensils, as
they can damage the surface fi nishes.
Do not use high pressure cleaners or steam appliances for
cleaning the oven.
Normally, wiping with a damp soft cloth and warm detergent is
enough, but for stubborn stains the following is recommended:
VITRIFIED ENAMELLED PARTS
IMPORTANT
The adjacent piece or furniture or cupboard and all the
materials used in the installation must resist a minimum
temperature increase of 85 ºC above the ambient temperature
during use of the appliance.
Certain types of vinyl or laminated kitchen furniture are
particularly susceptible to damage due to decolouration at
temperatures below those indicated.
If the appliance is installed without paying attention to this
temperature limit or if it is placed less than 4 mm from the
adjacent cupboards, liability will belong to the owner.
Only use a recommended cleaner for this type of material –
avoid chloride-based products such as bleach.
INSTRUCTIONS FOR INSTALLATION
This appliance must be installed by a competent person, in
accordance with the current version of the UK Safety Rules
and Regulations or their European equivalent:
Urban development regulations (published by the Department
of Environment).
Urban development laws (published by the Scottish Executive
Development Department).
IEE wiring regulations.
Electricity in labour regulations.
PRIOR START-UP OF THE APPLIANCE
When it is unpacked, check that the following parts are with
the oven:
• Instructions and Installation Manual
• oven grid
• 1 tray
• Screws and stoppers for fi tting the appliance in the housing
FITTING THE APPLIANCE (see Fig. 5)
These appliances are classifi ed as Class I.
The earth is obligatory as provided for by law. The manufacturer
declines all liability in the event that the accident prevention
rules have not been followed.
INSTALLATION NOTES
1. The oven has to be installed in a standard gap of 600mm, as
indicated in Fig. 5, whether under a hob or in a column.
2. On inserting the oven in a column, it is essential in order to
ensure there is enough ventilation, to remove the rear panel
of the furniture and have an opening of at least 85-90mm as
indicated in Fig. 5.
3. Check that the oven has been fi xed securely in the housing.
Fixing the oven into the cupboard is done using 4 screws “A”
Fig.5. One in each corner of the oven door frame.
Fig. 5: Installation distanced for simple electric ovens of 60 cms
wide (the shape of the upper casing may vary) and attachment
to the cupboard.
A. The support runner must be removed
B. Spacing of 75-90 mm between the wall and the rear part of
the support shelf and the base of the cupboard
C. Base
D. False box front to be assembled
Page 40

Fig. 7: Ventilation and gap requirements for the installation of e
simple electric oven in a standard cooking unit.
Minimum ventilation requirements for upper, base and support
shelves for the rear part of the unit.
A. Rear panel
B. Storage space
C. Remove the rear part of this section
D. Real panel
E. Storage space
F. Base
G. Minimum ventilation gap 80 cm2
Fig. 8: Ventilation and gap requirements for the installation of a
simple electric oven in an upper cupboard.
WARNING – THIS APPLIANCE MUST BE EARTHED
This appliance must be wired to a 13 A bipolar automatic
switch with protected socket, which has a 3 mm separation
between contacts and is placed in an easily accessible place
next to the appliance.
IMPORTANT
The conductors of the network power supply lead are coded
by colours are follows:
Green and yellow -Earth
Blue - Neutral
Brown - Live
• The green and yellow conductor must be connected to the
terminal marked “E” or with the symbol of the earth or which
is green and yellow.
• The blue conductor must be connected to the terminal
marked “N”.
• The brown conductor must be connected to the terminal
marked “L”.
• The lead must not reach a temperature higher than 50 ºC
above the ambient temperature at any point.
•
If the power lead is damaged, it must be replaced by a special
lead or unit supplied by the manufacturer or it after-sales service.
REPLACEMENT OF THE NETWORK POWER SUPPLY LEAD
If it is necessary to replace the network power supply lead,
proceed as follows:
ELECTRICAL CONNECTION
Before connecting the appliance, check that the voltage
marked on the specifi cations plate coincides with the voltage
of the electricity network.
The NICEIC register is recommended for electrical installations.
1. Disconnect the appliance from the power supply, unscrews
the fastening screws and remove the rear panel.
2. Unscrew the fastening screws and those of the terminals to
free the existing lead.
3. Assemble the replacement lead which must comply with the
information listed in the Specifi cations, ensuring the correct
connection of the colour codes and that all the screws are
correctly tightened.
MAINTENANCE
Before carrying out maintenance, disconnect the appliance
from the power supply.
During the guarantee period, if necessary all services should
be commissioned to the Manufacturer’s Technical Assistance
Service Department. Bear in mind that intervention or repair
by unauthorised personnel will invalidate this guarantee.
REPLACEMENT OF THE OVEN LIGHTBULB
(Not covered by the appliance guarantee.)
The oven has a light with the following characteristics: 15 W or
25 W, 300 ºC and type E-14
Page 41

WARNING: Disconnect the appliance from the electricity
supply, remove the oven door (as described above), as well as
the oven shelves.
SPECIFICATIONS
INTERIOR DIMENSIONS
Remove the glass cover that protects the light bulb by turning it
anti-clockwise. Fig. 9 (A)
Unscrew the old light bulb and dispose of it safely and
ecologically, change it for one as specifi ed in the Specifi cations
and replace the cover.
NOTE – The glass cover may be tight and, therefore, may need
a grip to release it.
CARE AND REPLACEMENT OF THE CATALYTIC COVERING
(When assembled, the covering is not covered by the appliance
guarantee).
In order to keep the covering “always clean” effi ciently, the
oven must be heated to a minimum of 200 ºC whenever there
are stubborn stains, so that they do not become permanent.
If the covering becomes black and shiny, they must be
replaced. Remove all the internal accessories to facilitate the
replacement of the covering.
The replacement covering may be bought directly from the
Manufacturer’s Replacement Part Department (see details
included in the cover). Indicate the reference numbers of the
product type described in the specifi cations plate and/or the
series number of the appliance on ordering.
Height: 346.5 mm
Width: 457 mm
Depth: 410 mm
Useful volume: 70 litres
ELECTRICAL INFORMATION
Nominal voltage:
220 V - 240 V ~ 50 Hz
Power connection: 13A (automatic bipolar switch with
protected socket, with 3mm separation between contacts)
POWER ABSORPTION
Top heating element 950 W
Grill heating element 2000 W
Bottom heating element 1100 W
Convection heating element 2000 W
Convection motor 33 W
Rotisserie motor 4.1 W
Cooling fan 23 W
Oven lamp 25 W
Max. power 2100W / 3000 W
Network power cable:
2
3 x 1.5 mm
type H07RN-F <HAR>
Oven light bulb:
15 W - 25 W / 300 ºC screw type E-14
The Manufacturer declines all liability for damage caused to
persons and objects due to incorrect or improper installation
of the appliance.
The Manufacturer reserves the right to make any modifi cation
it believes necessary and useful to the products, without prior
warning.
Page 42

Page 43

IT
ISTRUZIONI PER L’UTENTE
Ringraziamo la nostra clientela per la fi ducia riposta in uno dei
nostri prodotti dal quale speriamo possa ottenere prestazioni ottimali. Si raccomanda di seguire attentamente le istruzioni ed i suggerimenti del presente manuale per un adeguato uso dei prodotti.
La targhetta delle specifi che del forno viene fornita con l’apparecchio. In detta targhetta, che appare nell’aprire lo sportello,
sono riportati tutti i dati d’identifi cazione dell’apparecchio ai
quali si dovrà fare riferimento per ordinare i pezzi di ricambio.
rifi uto domestico. Per disfarsi del presente prodotto si prega di
portato nell’apposito centro di riciclaggio creato per lo smaltimento degli elettrodomestici e degli apparecchi elettronici. In
questo modo si è sicuri di smaltirlo correttamente evitando
danni all’ambiente ed alla salute pubblica, danni che si presenterebbero qualora questo prodotto non venisse riciclato nella
maniera dovuta. Per ottenere ulteriori informazioni sullo smaltimento di questo prodotto, contattare, presso l’amministrazione municipale, l’apposito servizio di residui domestici o il punto
vendita in cui è stato acquistato il prodotto.
INFORMAZIONE GENERALE
Si prega di leggere attentamente il presente manuale prima di
utilizzare l’apparecchio. È importante conoscere le funzioni di
controllo prima di iniziare a usare l’apparecchio.
Si prega di memorizzare i consigli e le avvertenze contenute
nel paragrafo intitolato “IMPORTANTE - Avvertenze ed istruzioni di sicurezza”.
• Il presente apparecchio è destinato ad uso privato nell’ambito domestico e può essere incassato in un armadio di cucina
standard o di altro genere.
• Qualora lo si voglia utilizzare in veicoli tipo camper si deve tener conto delle indicazioni specifi che riportate nelle Istruzioni
di Installazione.
• Usarlo per altri scopi o in ambienti non esplicitamente indicati dal fabbricante rende la garanzia priva di validità e esclude
eventuali responsabilità del fabbricante.
• La garanzia copre eventuali difetti elettrici o meccanici
dell’apparecchio nonostante sia soggetta a determinate esclusioni indicate nelle Condizioni di Garanzia del fabbricante.
• Quanto in precedenza riportato non pregiudica i diritti statutari del cliente.
Prima di usare il presente apparecchio, assicurarsi di rimuovere l’imballaggio protettivo o il rivestimento.
Si prega di smaltire l’imballaggio differenziando i diversi materiali e smaltendoli nel rispetto della legislazione locale relativa
al riciclaggio dei residui in maniera tale da collaborare alla salvaguardia dell’ambiente.
Gli imballaggi sono stati fabbricati con materiali non nocivi per
l’ambiente; È possibile recuperarli o riciclarli in quanto si tratta
di prodotti ecologici. Riciclando l’imballaggio si contribuisce al
risparmio di materie prime e alla riduzione del volume dei rifi uti
industriali e domestici.
È possibile richiedere ulteriori informazioni relative allo smaltimento dei residui all’apposita agenzia locale per l’ambiente.
Nell’utilizzare il presente elettrodomestico per la prima volta,
è probabile che si avverta un odore particolare dovuto al rivestimento protettivo o all’umidità, odore che sparisce dopo un
breve lasso di tempo.
Il simbolo
questo prodotto non può essere smaltito come un normale
Nel prodotto o nell’imballaggio si precisa che
Il presente apparecchio è stato fabbricato e distribuito nel rispetto dei requisiti essenziali delle seguenti DIRETTIVE E DELLE NORMATIVE EUROPEE CEE:
Simbolo CE - 93/68 Bassa tensione - 73/23 CEM-89/336
Norme di sicurezza - EN 60 335-1, EN 60 335 - 2 - 6.
Il presente apparecchio adempie le normative inerenti alla
soppressione delle radio-interferenze
Il fabbricante fedele alla propria politica di miglioramento permanente dei prodotti, si riserva il diritto di modifi care il prodotto realizzando cambiamenti considerati necessarie senza
previo avviso.
AVVISO IMPORTANTE
AVVERTENZE E ISTRUZIONI DI SICUREZZA
• L'apparecchio e le sue parti accessibili si riscaldano durante
l'uso.
• Se non costantemente controllati, i bambini di età inferiore
agli 8 anni devono essere tenuti a distanza.
• I bambini di età superiore agli 8 anni, le persone con disabilità
fi siche, sensoriali o mentali e le persone inesperte che non
ne conoscono il funzionamento possono utilizzare questo
apparecchio solo se adeguatamente assistiti o istruiti su
come utilizzarlo in modo sicuro e consapevoli dei rischi che
comporta. I bambini non devono giocare con l'apparecchio.
I bambini non devono occuparsi, senza supervisione, delle
operazioni di pulizia e manutenzione.
• Il presente apparecchio adempie le normative previste
dalla legislazione di sicurezza europea in vigore, tuttavia,
il fabbricante desidera sottolineare che tale rispetto della
normativa non evita il fatto che le superfi ci dell’apparecchio
si scaldino durante l’uso e continuino ad essere calde dopo
il funzionamento.
• Il fabbricante raccomanda vivamente di tenere l’apparecchio
lontano dalla portata dei bambini in tenera età.
• Qualora non si possa evitare la permanenza dei bambini
in cucina si consiglia di tenerli permanentemente sotto
controllo.
• Si raccomanda inoltre di fare attenzione durante l’uso e la
pulizia. Leggere attentamente il paragrafo relativo alla pulizia
e quello sulla manutenzione.
• Non sistemare oggetti pesanti sul forno e non forzare lo
sportello quando lo si apre, nel farlo infatti si potrebbero
danneggiare le cerniere dell’elettrodomestico.
Page 44

• Si prega di non allontanarsi dalla cucina qualora si stia
utilizzando olio o grasso caldo in quanto esistono seri rischi
di incendio.
• Non riporre casseruole o vassoi sulla parte inferiore delle
cavità del forno e non rivestirle con carta stagnola.
• Non conservare mai oggetti infi ammabili all’interno del
forno, potrebbero provocare un incendio.
• Non fare entrare a contatto gli accessori o i cavi elettrici con
le zone calde dell’apparecchio.
• Non utilizzare l’apparecchio come fonte di riscaldamento
addizionale o per asciugare biancheria.
• Non installare l’apparecchio in prossimità di tende oppure
mobili tappezzati.
• Non sollevare o rimuovere gli utensili di cucina tirando gli
sportelli o le manopole in quanto potrebbe causare danni.
• Se la guarnizione del forno è molto sporca lo sportello non
chiude bene quando il forno è in funzione. Le parti frontali dei
mobili vicini si potrebbero danneggiare. Mantenere pulita la
guarnizione del forno.
• Durante l’uso l’apparecchio si scalda. Si devono prendere
le dovute precauzioni per evitare di toccare gli elementi
scaldanti che si trovano all’interno del forno.
• Aprire il forno con cura. Può fuoriuscire del vapore caldo e
provocare bruciature a chi vi si trova vicino.
• Non gettare acqua all’interno del forno molto caldo. Può
danneggiare lo smalto.
• Il presente apparecchio lo deve installare correttamente una
persona qualifi cata attenendosi strettamente alle istruzioni
del fabbricante.
• Il fabbricante declina ogni responsabilità derivante da danni
personali o materiali causati dall’uso non corretto o da un
impianto non a norma.
• Durante l’uso si genera calore, vapore ed umidità.
Evitare danni personali ed assicurarsi che la cucina sia
adeguatamente ventilata. Se si utilizza in maniera prolungata,
può essere necessaria una ventilazione addizionalerivolgersi ad un installatore qualifi cato se si hanno dei dubbi
sul volume necessario.
ISTRUZIONI PER L’USO
Questo manuale dell’utente si deve conservare per future
consultazioni e l’uso da parte di persone che non conoscono
l’apparecchio.
Prima di usare il forno, pulirne a fondo l’interno con detergente
non abrasivo e acqua tiepida. Introdurre la griglia vassoio e il
vassoio nelle loro apposite guide. Una volta terminata l’operazione, portare il forno alla temperatura massima per 20 minuti
circa per eliminare eventuali resti di grasso, olio o resine di
fabbrica che potrebbero causare odori sgradevoli durante la
cottura.
ATTENZIONE: Durante la prima cottura potrebbe fuoriuscire un
po’ di fumo o si potrebbero notare odori sgradevoli. In tal caso
ventilare la stanza adeguatamente fi nché si fi nisce di usare
l’apparecchio.
Una volta realizzata questa semplice operazione, il forno è
pronto per la prima cottura.
Il presente apparecchio è atto esclusivamente per uso domestico.
Utilizzare il forno soltanto per cucinare alimenti.
USO DEL FORNO
Il forno dispone di controllo termostatico che va dai 50 ºC e/o
250 ºC. Scegliere la temperatura desiderata. La spia luminosa
del termostato si accende e si spegne per indicare il controllo
di temperatura durante il funzionamento.
La modalità di cottura desiderata si seleziona usando il pulsante di controllo multifunzionale. Le funzioni che si possono
selezionare sono le seguenti:
A. LUCE DEL FORNO. Automatica quando si seleziona
la modalità di cottura per tutti i modelli. La luce del forno rimane accesa quando si usa il forno.
B. TIPO DI CONVEZIONE. Modalità di cottura tradizio-
nale con calore dalle resistenze superiori ed inferiori.
C. MODALITÀ RESISTENZA SUPERIORE. Si usa per la
cottura delicata, dorare o conservare in caldo le vivande.
D. MODALITÀ DI RESISTENZA INFERIORE. Si usa per la
cottura a fuoco lento e per scaldare le vivande.
E. TIPO DI CONVEZIONE CON VENTILAZIONE. Modali-
tà di riscaldamento per convezione con le resistenze
superiori e inferiori per una cottura uniforme.
F. MODALITÀ GRILL. Per gratinare e dorare gli alimenti.
G. MAXI-GRILL. La stessa modalità della posizione pre-
cedente, però la resistenza del grill offre una zona più
ampia per cucinare.
H. MODALITÀ DI GRILL CON VENTILAZIONE. Offre una
doratura veloce perché gli alimenti non si asciughino.
Nel caso di cottura con ventilazione forzata, questa è la
funzione più effi ciente a livello energetico.
I. MODALITÀ SCONGELAMENTO.
La ventilazione funziona senza calore per ridurre il tempo di scongelamento degli alimenti congelati.
J. Funzione pirolitica:
Quando si confi gura il forno in modalità pirolitica, sul
display a LED si illumina la spia "PYA".
La temperatura predefi nita è di 450 ºC. Il timer può
essere regolato a 1:30 o 2:00 ore.
Page 45

DESCRIZIONE DEL PRODOTTO
K1
Tasto promemoria
Tasto di arrestoTasto del tempo
Nota importante: per aprire la porta del forno, afferrare con una mano
la maniglia centrale senza toccare il dispositivo del blocco per i bambini.
Tasto di inizio
K2
ISTRUZIONI DI FUNZIONAMENTO
1. Regolazione dell'orologio
Una volta collegato il forno alla rete elettrica, il display
visualizza i simboli "00:00".
1) Premere "
" e le cifre dell'ora iniziano a lampeggiare.
2) Ruotare "K2" per regolare le ore (impostare un valore tra 0
e 23).
3) Premere " " e le cifre dei minuti iniziano a lampeggiare.
4) Ruotare "K2" per regolare i minuti (impostare un valore tra
0 e 59).
5) Premere " " per terminare le regolazioni dell'orologio. ":"
lampeggia e l'ora si illumina.
Nota: l'orologio visualizza l'ora in formato "24 ore". Una volta
collegato alla rete elettrica, l'orologio funziona in modo
permanente.
2. Regolazione delle funzioni
1) Ruotare "K1" per selezionare la funzione di cottura
desiderata. L'indicatore associato si illumina.
2) Ruotare "K2" per regolare la temperatura.
3) Premere " " per confermare l'inizio della cottura. L'icona
corrispondente della temperatura "ºC" si illumina.
4) Se si salta il passo 2, premere " " per confermare l'inizio
della cottura. Il tempo predefi nito è di 9 ore e il display a LED
visualizza la temperatura predefi nita.
NOTA:
1) L'intervallo di regolazione del selettore è il seguente:
0--0:30 min: intervallo di 1 minuto 0:30--9:00 ore: intervallo
di 5 minuti
2) L'intervallo di regolazione della temperatura è di 5 ºC e quello
della funzione "grill radiante" di 30 ºC.
3) Ruotare "K1" per regolare il tempo di cottura una volta
iniziato il processo di cottura. Successivamente, premere
" " per riprendere la cottura.
Se non si preme " " entro 3 secondi, il forno torna al tempo
precedente e continua la cottura.
4) Ruotare "K2" per regolare la temperatura una volta iniziato
il processo di cottura. L'indicatore associato si illumina.
Successivamente, premere " " per riprendere la cottura.
Se non si preme " " entro 3 secondi, il forno torna alla
temperatura precedente e continua la cottura.
3. Regolazione della lampada
1) Ruotare "K1" per selezionare la funzione pertinente. L'icona
corrispondente si illumina.
2) Premere il tasto " " per iniziare la cottura. L'icona della
lampada " " * ":" lampeggia.
4. Funzione di consultazione
Durante il processo di cottura, è possibile utilizzare la funzione
di consultazione e, dopo 3 secondi, tornare alla modalità di
funzionamento in corso.
1) In modalità di cottura, premere il tasto " " per visualizzare
l'ora attuale.
2) Dopo aver visualizzato l'orologio, premere il tasto " " per
controllare il tempo di cottura.
5. Funzione di blocco per i bambini
Per bloccare: premere simultaneamente " " e " " per
3 secondi; viene emesso un bip prolungato che indica
l'attivazione del blocco per i bambini e il simbolo " " si
illumina.
Disattivazione del blocco: premere simultaneamente " " e
" " per 3 secondi; viene emesso un bip prolungato che indica
la disattivazione del blocco per i bambini.
Nota: durante il funzionamento, se si desidera interrompere la
cottura, premere il tasto di arresto rapido. Non è necessario
premere e tenere premuto il tasto di arresto; questa azione è
inutile.
6. Funzione di promemoria:
Il forno incorpora una funzione di promemoria che può arrivare
a 9 ore. Questa funzione aiuta a ricordare quando deve
iniziare la cottura in un intervallo compreso tra 1 minuto e 9
ore. Il promemoria può essere confi gurato solo con il forno
in modalità di stand-by. Per confi gurazione il promemoria,
procedere come segue:
1) Premere il tasto di regolazione del promemoria " ";
2) Ruotare "K2" per regolare le ore del promemoria (impostare
un valore tra 0 e 9).
3) Premere nuovamente il tasto di regolazione del promemoria
" ";
4) Ruotare "K2" per regolare i minuti del promemoria (impostare
un valore tra 0 e 59).
Page 46

5) Premere " " per confermare la regolazione. ":" lampeggia e
l'indicatore del promemoria " " si illumina. A questo punto,
inizia il conto alla rovescia.
Nota: quando il tempo arriva a zero, l'allarme del forno suona
10 volte. Il simbolo " " si spegne per ricordare che è arrivato
il momento di iniziare la cottura. Durante la regolazione, è
possibile annullare il promemoria premendo il tasto di arresto.
Una volta impostato il promemoria, è possibile annullarlo
premendo il tasto di arresto due volte.
7. Funzione di inizio/pausa/annullamento
1) Se è stato impostato il tempo di cottura, premere "
iniziare la cottura. Se la cottura è in pausa, premere " " per
riprenderla.
2) Durante il processo di cottura, premere " " una volta per
metterla in pausa. Premere " " due volte per annullare la
cottura.
8. Funzione di risparmio energetico
1) In modalità di stand-by e con il promemoria, premere " "
per 3 secondi; il display a LED si spegne ed entra in modalità
di risparmio energetico.
2) Se non si effettua alcuna azione per 10 minuti con il forno in
modalità di stand-by, il display a LED si spegne ed entra in
modalità di risparmio energetico.
3) Per uscire dalla modalità di risparmio energetico, premere
un qualunque tasto o ruotare una qualunque manopola.
9. Funzione pirolitica (solo alcuni modelli)
Questa funzione permette di pulire completamente l'interno
del forno.
1) Ruotare "K1" per selezionare la funzione pirolitica. Il display
a LED visualizza "PYA".
2) Premere " " per confermare la funzione di cottura. Il tempo
predefi nito è di 2:00 ore. Il display a LED visualizza "PYA".
3) Ruotare "K1" per modifi care la durata della funzione pirolitica.
È possibile scegliere tra due opzioni, "1:30" e "2:00".
Nota:
A) Se la porta del forno è aperta, il tasto di inizio resta inattivo
e il display a LED visualizza "DOOR", "PYA".
B) Quando la temperatura centrale del forno supera i 200 ºC,
premere il tasto di annullamento per tornare direttamente
alla modalità di stand-by mentre, se la temperatura centrale
del forno supera i 300 ºC, premere il tasto di inizio e il display
a LED visualizza "COOL".
C) Se si apre la porta in modalità di funzionamento normale, il
relè del riscaldatore smette di funzionare; sul display a LED
viene visualizzato "DOOR" e l'allarme emette un bip continuo
fi no a quando non viene chiusa la porta o premuto il tasto
di annullamento.
D) Al termine della funzione pirolitica e quando la temperatura
centrale del forno scende sotto i 300 ºC, il display a LED si
spegne.
E) Prima di attivare la funzione di pulizia pirolitica, eliminare
eventuali residui in eccesso e verifi care che il forno
sia vuoto. Non lasciare nel forno alcun utensile - ad es.
casseruole, i vassoi del forno, la vaschetta di raccolta del
" per
grasso, il supporto scorrevole, ecc. - dato che potrebbe
venire gravemente danneggiato.
10. Nota
1) La luce del forno si accende con tutte le funzioni (esclusa la
funzione pirolitica)
2) Una volta impostato il programma di cottura, se non si preme
il tasto " " entro 5 minuti, il display visualizza l'ora attuale o
torna alla modalità di stand-by. Il programma di regolazione
viene annullato.
3) L'allarme suona se viene effettivamente premuto; altrimenti,
non ci sarà risposta.
4) Terminata la cottura, l'allarme suona cinque volte.
CONSIGLI PRATICI
• Prima di cucinare, assicurarsi di rimuovere dal forno tutti gli
accessori non utilizzati.
• Riscaldare previamente il forno portandolo alla temperatura di
cottura prima di usarlo.
• Collocare i vassoi di cottura al centro del forno e lasciare degli
spazi tra uno e l’altro perché circoli l’aria.
• Non riempire il vassoio eccessivamente per preparare una
deliziosa torta di frutta. Il succo della frutta che gocciola dal
vassoio produce delle macchie che sono diffi cili da eliminare.
• Non introdurre vassoi nella base del forno e non rivestirlo con carta
stagnola. Potrebbe creare accumulazione termica. I tempi di cottura
e di arrosto non coincidono e potrebbero danneggiare lo smalto
• Si consiglia di aprire lo sportello il meno possibile per con-
trollare gli alimenti (la spia del forno rimane accesa durante
la cottura).
• Fare attenzione nell’aprire lo sportello per evitare il contatto
con i pezzi caldi ed il vapore.
FUNZIONE PIROLITICA
Il forno è progettato per garantire funzionalità ottimale e
semplicità di pulizia grazie alla funzione di pulizia automatica
pirolitica. I modelli pirolitici comprendono una funzione
di pulizia automatica che consente di pulire la cavità del
forno senza l’uso di detergenti. La parte interna del forno si
riscalda raggiungendo una temperatura massima di 500 °C;
a tale temperatura, qualsiasi residuo di grasso presente
sulle pareti verrà bruciato ed eliminato. Il vetro quadruplo
garantisce comunque che la parte esterna della porta non
superi la temperatura di 55 °C. Il ciclo pirolitico si svolge in
condizioni di totale sicurezza, poiché nel corso del processo
un dispositivo di sicurezza blocca la porta. In base al livello di
sporcizia, è possibile programmare la durata del ciclo di pulizia
da un minimo di 1 ora e 30 minuti fi no a un massimo di 2 ore.
In questo modo i tempi di cottura del forno si manterranno a
livelli ottimali.
Attenzione:
Poiché la pulizia pirolitica si svolge a una temperatura
molto alta, prima dell’utilizzo di tale funzione si consiglia di
estrarre tutti gli accessori presenti nella cavità del forno al
Page 47

fi ne di garantirne un uso duraturo (a seconda del modello,
gli accessori possono comprendere: teglia da forno, griglia
da forno cromata, supporto per la griglia cromato, spiedo per
girarrosto, termometro per carni, coltello per pizza, pietra da
pizza o manico per teglia cromato).
Per estrarre gli accessori dalla cavità del forno, seguire le
istruzioni indicate di seguito:
1. Estrarre tutti gli accessori dalla cavità.
2. Smontare il supporto della griglia dalla cavità (in caso di
guida telescopica fi ssata al supporto della griglia, non è
necessario smontarla). Una volta estratti, porre gli accessori
in un luogo sicuro per trovarli facilmente una volta terminato
il processo di pulizia pirolitica.
1) Allentare la vite di fi ssaggio del supporto della griglia con un
cacciavite, come illustrato nella fi gura 1.
2) Sollevare il supporto della griglia di circa 30° rispetto alla
cavità, quindi estrarlo dalla cavità; estrarre allo stesso modo
l’altra piastra laterale, come illustrato nella fi gura 2.
3. Una volta conclusa la pulizia pirolitica, attendere un’ora e
rimontare il supporto della griglia nella cavità,come indicato
di seguito:
1) Introdurre la griglia nel foro di montaggio della piastra
laterale del telaio principale, come illustrato nella fi gura 2.
Serrare la vite con un cacciavite, quindi, allo stesso modo,
completare il montaggio dell’altra piastra laterale, come
illustrato nella fi gura 1.
2) Tirare la rotaia scorrevole da entrambi i lati e installare la
griglia del grill sulla rotaia scorrevole, come illustrato nelle
fi gure 3 e 4.
4. Montare la griglia da forno e gli altri accessori all’interno
della cavità; il montaggio completo è illustrato nella fi gura 5.
fi gura 1
fi gura 2
fi gura 3
Nota: La cavità del forno e la teglia da forno sono smaltate;
durante il montaggio e lo smontaggio, fare attenzione per
evitare di danneggiare lo smalto.
fi gura 4
fi gura 5
Page 48

ISTRUZIONI PER LA COTTURA
Consultare l’informazione riportata sulla confezione degli alimenti per sapere le temperature ed i tempi di cottura. Una volta
che si ha una certa dimestichezza con il rendimento dell’apparecchio, si possono cambiare le temperature ed i tempi per
adattarli ai propri gusti personali.
Verifi care se gli alimenti congelati si scongelano a fondo prima
di cuocerli, a meno che le indicazioni sino diverse.
Tipo di alimento Temp. ºC Guide Tempo di cottura
in minuti
Consigliato Personale
Dolci su stampi con pasta liquida
Torte o pasticceria salata 175 2 55-65
Torta sublime 175 3 60-70
Dolci di pasta frolla su stampi
Base di torte 200 3 08-10
Base di torta con ricotta 200 3 25-35
Base di torta con frutta 200 3 25-35
Dolci con pasta lievitata su stampi
Base per torte 180 3 30-45
Pane morbido 1kg di farina 200 3 25-35
Dolcetti
Pasta frolla 200 3 10-15
Pasta per frittelle 200 2 35-45
Pasta per biscotti 200 3 15-20
Lasagne 225 2 40-50
Carni (Tempo di cottura in base a ogni cm. di spessore
Arrosto di lunga cottura 200 2 120-150
Arrosto di breve cottura 200 2 60-90
Polpette 200 2 30-40
Pollame
Anatra 1 1/2 kg 200 2 120-180
Oca 3 kg 200 2 150-210
Pollo arrosto 200 2 60-90
Tacchino 5Kg 175 2 240-260
Cacciagione
Lepre 200 2 60-90
Coscia di capriolo 200 2 90-150
Coscia di cervo 175 2 90-180
Verdure
Patate al forno 220 2 30-40
Pudding di verdure cotte 200 2 40-50
Pesce
Trotta 200 2 40-50
Pagello 200 2 40-50
Pizza 240 3 10-20
Grill
Cotolette 4 8-12
Salsicce 4 10-12
Pollo allo spiedo 2 25-35
Arrosto di vitello allo spiedo 0,6Kg 50-60
* Il numero di guide si riferisce a quello più basso (escluso
l’appoggio sulla base del forno dove il vassoio non si può introdurre)
I DATI RIPORTATI IN PRECEDENZA SONO INDICATIVI PERCHÉ
LA MODALITÀ ED IL TEMPO DI COTTURA VARIANO IN BASE
ALLA QUANTITÀ E LA QUALITÀ DEGLI ALIMENTI.
COME SI USA IL GRILL
Collocare gli alimenti che si desidera dorare nella griglia vassoio oppure in una pirofi la dai bordi molto bassi. La griglia vassoio si deve collocare nella posizione più alta, mentre il vassoio
per raccogliere il grasso verrà posto nella posizione più bassa.
Attivare la resistenza grill nella posizione del selettore nei forni
ventilati , o nella posizione , , del selettore in
forni multi-funzione.
In base al tipo di alimento (Carni, pesci, pollame ecc.) Sarà
necessario girare gli alimenti per poter esporre le due parti ai
raggi infrarossi del grill. A mero titolo orientativo, indichiamo
alcuni tempi di cottura:
Alimenti al Grill Tempo di cottura
in minuti
Consigliato
Carni basse o sottili 4-6
Cari normali 5-8
Pesce senza squame 8-10
Pesce (per es. Trotta, salmone) 12-15
Salsicce 10-12
Panini 2-5
AVVERTENZE
• Non usare carta stagnola per rivestire il vassoio del grill o
per scaldare.
• Non avvolgere gli alimenti con la carta stagnola e non riporli
al di sotto del grill - Il gran potere rifl ettente dell’alluminio potrebbe danneggiare la resistenza del grill.
PULIZIA DELL’APPARECCHIO
IMPORTANTE
Come precauzione di sicurezza, prima di iniziare eventuali
operazioni di pulizia del forno staccare la presa di corrente o
staccare la linea di alimentazione dell’apparecchio.
La pulizia del forno privo di pannelli di auto-pulizia deve essere
realizzata dopo l’uso, quando è spento ma ancora tiepido, non
caldo, in maniera tale che lo strato di grasso prodotto dai vapori della cottura sulle pareti sia ancora facile da rimuovere,
inoltre gli schizzi di grasso non hanno ancora uno spessore
eccessivamente duro e consistente. Rimuovere i supporti laterali cromati; Sollevare la parte anteriore per staccarli della
parete e estrarli dai fori posteriori Pulire il forno con un panno morbido imbevuto con una soluzione diluita di ammoniaca;
Sciacquare ed asciugare. Se rimanessero ancora macchie
oppure schizzi, porre sulla base un panno umido imbevuto
Page 49

di ammoniaca, chiudere lo sportello e, trascorse alcune ore,
lavare il forno con acqua calda e detergente liquido, sciacquare ed asciugare con cura. Per pulire le parti esterne in metallo
brillante, usare un panno morbido con acqua e detergente; non
bisogna usare mai prodotti in polvere che contengano particelle abrasive.
Si prega inoltre di evitare l’uso di sostanze acide o alcaline
(succo di limone, aceto, sale, pomodori, ecc.). Evitare l’uso di
prodotti a base di cloro, acidi o abrasivi specialmente per la
pulizia delle pareti smaltate. Non usare neanche lana d’acciaio grossa o utensili duri, potrebbero danneggiare le rifi niture
superfi ciali.
Non utilizzare pulitrici ad alta pressione né apparecchi a vapore per pulire il forno.
Normalmente, passare un panno morbido umido con detergente caldo è suffi ciente, ma per le macchie persistenti si consiglia quanto segue:
PEZZI SMALTATI VETRIFICATI
Utilizzare soltanto pulitrici consigliate per questo tipo di materiale - evitare i prodotti a base di cloruro come la candeggina.
ISTRUZIONI PER L’INSTALLAZIONE
IMPORTANTE
Il mobile o l’armadio adiacente ed i materiali utilizzati durante
l’installazione devono essere resistenti agli aumenti di temperatura minima di 85 ºC rispetto alla temperatura ambiente durante l’uso dell’apparecchio.
Alcuni tipi di mobili da cucina in vinile o laminati sono particolarmente propensi a riportare danni, come per esempio lo
scolorimento causato spesso da temperature inferiori a quelle
indicate. Se l’apparecchio viene installato senza rispettare
detto limite di temperatura o viene collocato a meno di 4 mm
dagli armadi adiacenti, la responsabilità sarà del proprietario.
AVVERTENZE PER L’INSTALLAZIONE
1. Il forno deve essere installato in uno spazio standard di 600
mm, come si indica nella Fig. 5, sia al di sotto di un piano
cottura che in una colonna.
2. Nell’inserire il forno in una colonna è indispensabile, per
assicurare una ventilazione suffi ciente, estrarre il pannello
posteriore del mobile e lasciare una apertura di almeno 8590mm come indicato nella Fig. 5.
3. Verifi care che il forno sia stato fi ssato in maniera sicura
nell’apposito vano. Il fi ssaggio del forno nell’armadio si realizza con 4 viti “A” Fig. 5. Una in ogni angolo della cornice
dello sportello del forno.
Il presente apparecchio deve essere installato da una persona
competente, ai sensi delle attuali normative di sicurezza del RU
riportate di seguito oppure quelle equivalenti della Normativa
Europea:
Disposizioni urbanistiche (pubblicate dal dipartimento dell’ambiente).
Normative urbanistiche (pubblicate dal dipartimento di sviluppo della Scozia).
Disposizioni di cablaggio IEE.
Elettricità nelle disposizioni del lavoro.
AVVIAMENTO PRELIMINARE DELL’ APPARECCHIO
Quando si rimuove l’imballaggio verifi care che vi siano i seguenti pezzi:
• Manuale di Istruzioni ed installazione
• griglia da forno
• 1 vassoio
• Viti e tapini per fi ssare l’apparecchio nell’alloggio
COLLOCAZIONE DELL’APPARECCHIO (vedere la Fig. 5)
Questi apparecchi appartengono alla Tipologia I.
Il collegamento a terra è obbligatorio ai sensi di legge. Il fabbricante non si assume alcuna responsabilità qualora non si
rispettino le normative contro gli infortuni domestici.
Fig. 5: Distanze di installazione per forni elettrici semplici di 60
cm di ampiezza (la forma della parte superiore può variare) e
l’incasso nell’armadio.
A. La guida di supporto si deve rimuovere
B. Distanziamento di 75-90 mm tra la parete e la parte posterio-
re dello scaffale di supporto e la base dell’armadio
C. Battiscopa
D. Parte frontale del falso cassetto da montare
Page 50

Fig. 7: Requisiti di ventilazione e rifi latura per l’installazione di
un forno elettrico semplice in un’unità di cucina standard.
Requisiti di ventilazione minimi per gli scaffali superiori, di base
e di supporto della parte posteriore dell’unità.
A. Pannello posteriore
B. Spazio di immagazzinamento
C. Rimuovere la parte posteriore di questa sezione
D. Pannello posteriore
E. Spazio di immagazzinamento
F. Battiscopa
G. Riquadro di ventilazione minimo 80 cm2
Fig. 8: Requisiti di ventilazione e rifi latura per l’installazione di
un forno elettrico semplice in un armadio alto.
AVVERTENZE - Il presente apparecchio si deve collegare a
terra
Il presente apparecchio si deve allacciare ad un interruttore
automatico bipolare da 13 A con la presa protetta, che abbia
una separazione di contatti di 3 mm posta in un luogo facilmente accessibile assieme all’apparecchio.
IMPORTANTE
I conduttori del cavo di alimentazione di rete sono codifi cati
attraverso i seguenti colori:
Verde e giallo - terra
Blu - Neutro
Marrone - linea
• Il conduttore verde e giallo si deve collegare all’isolatore pas-
sante indicato con “E” oppure con il simbolo di terra o con in
verde e giallo.
• Il conduttore blu si deve collegare all’isolatore passante in-
dicato con “N”.
• Il conduttore marrone si deve collegare all’isolatore passante
indicato con “L”.
• Il cavo, non deve arrivare in nessun punto ad una temperatu-
ra superiore ai 50 ºC rispetto alla temperatura ambiente.
• Se il cavo di rete è danneggiato, deve essere sostituito da un
cavo o un complesso speciale fornito dal fabbricante o dal
servizio post-vendita.
SOSTITUZIONE DEL CAVO DI ALIMENTAZIONE DI RETE
COLLEGAMENTO ELETTRICO
Prima di collegare l’apparecchio, verifi care che la tensione di
rete indicata nella targhetta di specifi che coincida con la tensione della rete domestica.
Per le installazioni elettriche, si raccomanda la registrazione
NICEIC.
Se è necessario sostituire il cavo di alimentazione di rete, procedere nel seguente modo:
1. Staccare l’apparecchio dall’alimentazione, svitare le viti di
fi ssaggio e rimuovere il pannello posteriore.
2. Svitare le viti di fi ssaggio e quelle degli isolatori passanti per
liberare il cavo esistente.
3. Montare il cavo di sostituzione che deve adempiere le spe-
cifi che indicate nei dati tecnici, assicurando il collegamento
adeguato dei codici colorati e verifi cando che tutte le viti
siano state avvitate correttamente.
MANUTENZIONE
Prima di realizzare la manutenzione, staccare l’apparecchio
dalla alimentazione elettrica.
Durante il periodo di garanzia, se è necessario si devono si
devono prenotare tutti gli interventi del servizio al Centro Servizio di assistenza tecnico del fabbricante. Tenere presente
che l’intervento o la riparazione realizzata da personale non
autorizzato priva la garanzia di validità.
Page 51

SOSTITUZIONE DELLA LAMPADINA DEL FORNO
(Non rientra in garanzia.)
Il forno è provvisto di una lampadina dalle seguenti specifi che:
15 W o 25 W, 300 ºC e tipo E-14
ATTENZIONE: Staccare l’apparecchio dalla alimentazione
elettrica, rimuovere lo sportello del forno (come indicato in
precedenza), nonché gli scaffali del forno.
DATI TECNICI
DIMENSIONI INTERNE
Altezza: 346,5 mm
Larghezza: 457 mm
Profondità: 410 mm
Volume utile: 70 litri
Rimuovere il rivestimento protettivo in vetro della lampadina
girando in senso antiorario. Fig. 9 (A)
Svitare la lampadina vecchia e smaltirla in maniera sicura e
ecologica, sostituirla con una della tipologia indicata nei dati
tecnici e montare di nuovo la protezione.
AVVISO - La protezione in vetro potrebbe essere saldamente
avvitata e, pertanto, possono essere necessarie delle tenaglie
per svitarla.
CURA E SOSTITUZIONE DEI RIVESTIMENTI CATALITICI
(Quando sono montati, i rivestimenti non rientrano nella garanzia dell’apparecchio).
Perché i rivestimenti siano “sempre puliti” qualora vi siano
delle macchie persistenti il forno si deve riscaldare ad un minimo di 200 ºC, si evita in questo modo che le macchie diventino
permanenti.
Se si lascia che i rivestimenti diventino neri e brillanti li si dovrà
sostituire con degli altri nuovi. Rimuovere tutti gli accessori interni per facilitare la sostituzione dei rivestimenti.
I rivestimenti di ricambio si possono acquistare direttamente
presso la Sezione di Ricambi del fabbricante (ulteriori informazioni nella copertina) Indicare gli estremi del tipo di prodotto
riportati nella targhetta specifi che e/o il numero di serie
dell’apparecchio nel realizzare l’ordine.
DATI ELETTRICI
Tensione nominale:
220 V - 240 V ~ 50 Hz
Collegamento di alimentazione: 13A (interruttore automatico
bipolare con la presa protetta, con separazione di contatti di 3
mm)
ASSORBIMENTO DI POTENZA
Elemento riscaldante superiore 950 W
Elemento riscaldante grill 2.000 W
Elemento riscaldante inferiore 1.100 W
Elemento riscaldante sistema a convezione 2.000 W
Motore sistema a convezione 33 W
Motore spiedo 4,1 W
Ventola di raffreddamento 23 W
Lampada del forno 25 W
Potenza max. 2.100 W/3.000 W
Cavo di alimentazione di rete:
2
3 x 1,5 mm
tipo H07RN-F <HAR>
Lampadina del forno:
15 W - 25 W / 300 ºC vite tipo E-14
Il fabbricante declina ogni responsabilità derivante da danni
personali o materiali causati da un’installazione non adeguata o da un impianto non a norma.
Il fabbricante si riserva il diritto di adattare e realizzare le modifi che considerate necessarie ed utili senza previo avviso.
Page 52

Page 53

NL
AANWIJZINGEN VOOR DE GEBRUIKER
Dank U voor de aankop van een van onze produkten. Wij hopen
dat U de beste prestaties ervan krijgen. Wij adviseren de aanwijzingen en tips in dit handboek zorgvuldig te volgen ten juiste
gebruik van onze produkten.
Het naamplaatje van de oven wordt met het apparaat meegeleveerd. Het plaat kan worden gelezen als de deur wordt open
gemaakt en het omvat alle identifi catiegegevens van het apparaat. U moet naar deze gegevens verwijzen als U onderdelen
bestellt.
ALGEMENE INFORMATIE
Les dit handboek zorgvuldig door alvorens het apparaat te
gebruiken. Het is heel belangrijk dat u alle controlefunkties
begrijpen alvorens met uw apparaat te koken.
Let goed op alle adviezen en tips onder de titel “BELANGRIJK
– Waarschuwingen en veiligheidsvoorschriften”.
• Dit apparaat is geschikt voor huiselijk gebruik en kan in een
standaard keukenkast of ander meubel worden geintegreerd.
• Ten gebruik in voertuigen, bv karavanen, let op de passende
aanwijzingen in de Opstellingsaanwijzingen.
• Door ieder ander gebruik, met een ander doel of in een ander omgeving zonder de uitdrukkelijke aanneming van de
fabricant wordt de garantie of ieder verantwoordelijkheid
ongeldig.
• Uw nieuw apparaat is gegarandeerd tegen elektrische of
mechanische fouten, onder bepaalde uitsluitingen, die en de
Garantievoorwaarden van de Fabricant worden aangegeven.
• De bovengenoemde voorwaarden hebben geen invloed op
uw statutaire rechten.
Alvorens het apparaat te gebruiken, zorg ervoor, dat uw alle
verpakkingen of bedekkingen weg heeft genomen. Om voor
de milieubescherming te werken, scheid de verschillende
verpakkingsmaterialen en gooi ze weg conform de plaatselijke
wetgeving.
De verpakking zijn milieuvriendelijk en kunnen herhaald of gerecycleerd worden. Door het recycleren van een verpakking
kan men meer aan grondstoffen sparen en de volume industriele en huiselijke vuil verminderen.
Voor nadere informatie over afvalophaling raadpleeg de plaatselijke milieubestuur.
Bij het eerste gebruik kan de beschermingsbedekking een geur
verspreiden; dit verdwijnt na een korte tijd.
Het symbool
dit produkt geen gewone huiselijk afval. Dit produkt dient in
een punt ter zameling en recycling van elektrisch en elektronisch alval. Zorg ervoor, dat dit product op een juiste manier
wordt weggegooid, om eventuele beschadigingen aan het milieu en openbare gezondheid te vermijden, die bij een niet juiste behandeling van dit produkt kunnen ontstaan. Voor nadere
informatie over de recycling van dit produkt, neem contact op
op het produkt of de verpakking duidt aan, dat
met Uw gemeentebestuur, het dienst huisafval of de winkel
waar U dit produkt heeft gekocht.
Dit apparaat werd gefabriceerd en verdeelt volgens de belangrijkste eisen van de volgende EUROPESE REGELINGEN EN EEG
NORMEN:
Logo EG - 93/68 Laagspanning- 73/23 EMC-89/336
Veiligheidsnormen - EN 60 335-1, EN 60 335 - 2 - 6.
Dit apparaat voldoet aan de vereisen ten vermeiden van radiostoringen.
De fabricant voert een beleid ter constante verbetering van
zijn producten; daardoor behoudt hij zich het recht om zonder
voorafgaande kennisgeving de producten te wijzigen of aanpassen.
BELANGRIJKE AANWIJZING
WAARSCHUWING en VEILIGHEIDSVOORSCHRIFTEN
• Het apparaat en de toegankelijke onderdelen daarvan worden tijdens het gebruik heet.
• Kinderen jonger dan 8 jaar moeten uit de buurt blijven, tenzij
voortdurend op hen gelet wordt.
• Dit apparaat mag worden gebruikt door kinderen vanaf 8 jaar
en door personen met lichamelijke, psychische, sensoriële of
mentale beperkingen of met gebrek aan ervaring en kennis,
mits zij dit doen onder toezicht of met aanwijzingen over het
veilige gebruik van het apparaat en zij de gevaren die dat met
zich meebrengt begrijpen. Kinderen mogen niet spelen met
het apparaat. Kinderen mogen zonder toezicht het apparaat
niet reinigen of er onderhoud aan verrichten.
• Dit apparaat voldoet aan de hele tegenwoordige europese
wetgeving. Toch wil de fabricant ervoor waarschuwen, dat
de oppervlakten van het apparat gedurende het gebruik
warm worden en blijven warm na het uitschakelen.
• Daarom adviseert de Fabricant om het apparat buiten het bereik van baby’s en kleine kinderen te houden.
• Indien het overmijdelijk is, dat kinderen in de keuken zijn,
moeten ze altijd onder de uiterste waakzaamheid blijven.
• Het is ook aanbevelenswaardig, dat U het oven heel zorgvuldig gebruikt en schoonmaakt. Les het paragraaf over schoonmaken en onderhoud door.
• Plaats geen zware voorwerpen op de oven en leun niet op
de deur om ze open te maken; anders kunnen de scharnieren
worden beschadigd.
• Laat geen warme olie of vet onverzorgd achter; er bestaat
brandgevaar.
• Plaats geen pan of bakplaat op de onderste deel van de oven
en bedek ze nooit met aluminiumfolie.
• Bewaar geen vlaambare voorwerpen in de oven; er bestaat
brandgevaar.
• Laat geen elektrische toebehoeren of snoeren in contact met
de warme delen van het apparaat komen.
• Gebruik dit apparaat nooit voor bijzonder verhitten of om kledingen uit te drogen.
Page 54

• Installeer het apparaato noit dichtbij gordijnen of meubel met
bekledding.
• Probeer nooit om aan de deur van apparaten in de keuken
te trekken om ze te verplaatsen; anders kunt U het apparaat
beschadigen.
• Indien de rubbernaad heel vies is, kan de deur niet volkomen
worden gesloten toen de oven is in werking. De voordeuren
van de aangrenzende meubelen kunnen worden beschadigd.
Houd de rubbernaad van de oven altijd schoon.
• Het apparaat wordt warm aan het werken. Voorzicht: raak
aan geen verwarmingselementen binnen de oven.
• Maak de oven voorzichtig open. Er kan warm stoom uitkomen en verbrandingen aan de personen, die dichtbij staan,
veroorzaken.
• Giet geen water in een heel warme oven. Anders kan de email
worden beschadigd.
• Dit apparaat dient op een juiste manier door een vakkundig
worden geïnstaleerd, volgens de aanwijzingen van de fabricant.
• De Fabricant neemt geen verantwoordelijkheid op zich voor
persoonlijke of zakelijke beschadingen als gevolv van een
onjuist gebruik of installatie van dit apparaat.
• Bij het gebruik geeft het apparaat warmt, stoom en vochtigheid. Vermeid allerlei persoonlijke schaden en zorg ervoor,
dat de ruimte genoeg is geventieleerd. Bij een langdurig gebruik, kan er extra ventilatie nodig worden – raadpleeg Uw
installateur voor ieder vraag over de nodige volume.
GEBRUIKSAANWIJZINGEN
Bewaar dit Gebruikshandboek voer toekomstige raadpleging
of voor het gebruik door een persoon, die niet met het apparaat
vertrouwd is.
Alvorens de oven te gebruiken, maak ze zorgvuldig schoon met
niet schurend zeep en lauw water. Plaats de rooster en de bakplaat in hun respektieve geleidebed. Daarna, schakel de oven
op de hoogste temperatuur gedurende ca. 20 minuut om ieder
rest van vet, olie of hars te verwijderen, die gedurende het keuken onaangename geuren kunnen veroorzaken.
A. OVENLICHT. Automatisch bij het braadmodus vor
ieder model. De ovenlicht brandt stets als de oven in
werking is.
B. MODE CONVECTIE. Funktie voor traditioneel braden
met verwarming uit ieder element: boven en beneden.
C. BOVENWARMTE . Dit is voor zacht braden en grillen
geschikt, zoals om gekochte schotels warm te houden.
D. ONDERWARMTE . Voor langzaam braden en om
schotels te verwarmen.
E. CONVECTIE + HETELUCHT. Verwarming door middel
van convectie uit de onderste en bovenste verwarmingslementen voor een gelijkmatig bakken.
F. GRILLEN. Om voedsel te grillen en roosteren.
G. MAXI-GRILLEN . Dezelfde werkwijze als in de vorige
positie, maar met een groterre grillenoppervlakte.
H. GRILLEN + HETELUCHT. Snel grilleren voor voedsel-
soorten die van binnen zacht moeten blijven. Bij het
bakken met luchttoevoer is dit de meest effi ciënte
functie op energetisch vlak.
I. ONTDOOIEN.
De ventilator werkt zonder verwarmingsfunktie om de
ontdooitijd te verminderen.
J. Pyrolysefunctie:
Bij het instellen van de oven om te werken in de
pyrolysemodus, verschijnt de indicator «PYA» op het
LED-scherm.
De vooraf ingestelde temperatuur is 450 ºC. De timer
kan worden ingesteld op 1:30 uur of op 2:00 uur.
OPGELET
: Gedurende dit eerst keuken kan er een beetje stoom
of een onaangenaam geur uit de oven komen. In dit geval, ventileer de ruimte totdat de eerste funktie is volledig uitgevoerd.
Un is de oven klaar voor het gebruik.
Dit apparaat is uitsluitend geschikt voor huiselijk gebruik.
Gebruik deze oven alleen om voedsels te koken.
GEBRUIK VAN DE OVEN
De oven wordt door een thermostaat tussen 50 ºC en/of 250 ºC
geregeld, afhankelijk van de gewenste temperatuur. Het controlelampje voor de thermostaat gaat aan of uit om de temperatuurcontrole gedurende het gebruik aan te duiden.
De gewenste wijze van braden word door middel van de multifunktie contoleknop gekozen. De mogelijke funkties zijn:
Page 55

OMSCHRIJVING VAN HET PRODUCT
K1
Herinneringsknop
Startknop
StopknopTijdknop
Onthoud: om de deur van de oven te openen moet u altijd met een hand de middelste
handgreep vasthouden zonder de pen van het kinderslot aan te raken.
K2
INSTRUCTIES OVER DE WERKING
1. Afstellen van de klok
Zodra de oven is aangesloten op de stroom verschijnen op het
scherm de symbolen «00:00».
1) Druk op « ». De cijfers van het uur gaan knipperen.
2) Draai «K2» om de uren in te stellen (op een waarde tussen
0 en 23).
3) Druk op « ». De cijfers van de minuten gaan knipperen.
4) Draai «K2» om de minuten in te stellen (op een waarde
tussen 0 en 59).
5) Druk op « » om de instellingen van de klok te beëindigen.
«:» knippert en de tijdsaanduiding wordt verlicht.
N.B.: de klok toont de tijd in 24-uursformaat. Als de oven
eenmaal op de stroomtoevoer is aangesloten blijft de klok
ononderbroken werken.
2. Afstellen van de functie
1) Draai «K1» om de gewenste bakfunctie te selecteren.
De daaraan verbonden indicator gaat branden.
2) Draai «K2» om te temperatuur in te stellen.
3) Druk op « » om de begintijd van het bakken te bevestigen.
De icoon voor de temperatuur «ºC» licht op.
4)
Als u stap 2 overslaat, druk dan op « » om de begintijd van het
bakken te bevestigen. De vooraf ingestelde tijd is 9 uur en op
het LED-scherm verschijnt de vooraf ingestelde temperatuur.
N.B.:
1) Het interval voor het afstellen van de coderingsschakelaar
is als volgt:
0--0:30 min: interval van 1 minuut
0:30--9:00 uur: interval van 5 minuten
2) Het interval voor het afstellen van de temperatuur is 5 ºC en
die van de stralingsgrillfunctie van 30 ºC.
3) Draai «K1» om de baktijd af te stellen als het bakproces
eenmaal begonnen is. Druk vervolgens op « » om verder
te gaan met bakken.
Als u niet binnen 3 seconden op « » drukt, gaat de oven
terug naar de vorige tijd en wordt het bakproces voortgezet.
4) Draai «K2» om de temperatuur af te stellen als het bakproces
eenmaal begonnen is. De daaraan verbonden indicator gaat
branden. Druk vervolgens op « » om verder te gaan met
bakken. Als u niet binnen 3 seconden op « » drukt, gaat
de oven terug naar de vorige temperatuur en wordt het
bakproces voortgezet.
3. Afstellen van de lamp
1) Draai «K1» om de bijbehorende functie te selecteren. De
overeenkomstige icoon licht op.
2) Druk op de knop «
» om het bakproces te starten. De icoon
van de lamp « » * «:» gaat knipperen.
4. Raadpleegfunctie
Tijdens het bakproces kunt u de raadpleegfunctie gebruiken
en na 3 seconden teruggaan naar de huidige werkingsmodus.
1) Druk in de bakmodus op de knop « » om de huidige tijd
te zien.
2) Druk met visuele weergave van de klok op de knop « » om
de baktijd te raadplegen.
5. Functie kindervergrendeling
Om te vergrendelen: druk gelijktijdig op « » en « »
gedurende 3 seconden. U hoort een langdurige «pieptoon»
waarmee wordt aangegeven dat de kindervergrendeling
geactiveerd is. « » licht op.
Deactiveren van de vergrendeling: druk gelijktijdig op « » en «
» gedurende 3 seconden. U hoort een langdurige «pieptoon»
waarmee wordt aangegeven dat de kindervergrendeling
gedeactiveerd is.
N.B.: als u het bakproces gedurende de werkingsmodus wilt
stopzetten, druk dan snel op de stopknop. U hoeft deze niet
ingedrukt te houden; dat heeft geen zin.
6. Herinneringsfunctie:
In de oven is een herinneringsfunctie van 9 uur ingebouwd.
Deze functie helpt u eraan te herinneren wanneer u het
bakproces moet starten, binnen een interval tussen 1 minuut
en 9 uur. De herinnering kan alleen worden ingesteld als de
oven op stand-by staat. De herinnering wordt op de volgende
manier ingesteld:
1) Druk op de knop voor het instellen van de herinnering « »;
2) Draai «K2» om de uren van de herinnering in te stellen (met
een waarde tussen 0 en 9).
3) Druk opnieuw op de knop voor het instellen van de
herinnering « »;
Page 56

4) Draai «K2» om de minuten van de herinnering in te stellen
(met een waarde tussen 0 en 59).
5) Druk op de knop « » om de instelling te bevestigen. «:» gaat
knipperen en de indicator van de herinnering « » licht op.
Het terugtellen gaat beginnen.
N.B.: het alarm van de oven klinkt 10 keer als de tijd op nul
komt te staan. Het symbool «
om u eraan te herinneren dat u het bakproces moet starten. U
kunt de herinneringsfunctie annuleren gedurende de instelling
door op de stopknop te drukken; Als de herinnering eenmaal
ingesteld is kunt u hem annuleren door twee keer op de
stopknop te drukken.
7. Functie Start/Pauze/Annuleren
1) Als u de baktijd heeft ingesteld, druk dan op « » om het
bakproces te starten. Als het bakproces op pauze staat, druk
dan op « » om het opnieuw aan te zetten.
2) Tijdens het bakproces kunt u een keer op « » drukken
om het te onderbreken. Druk twee keer op « » om het
bakproces te annuleren.
8. Functie energiebesparing
1) Op stand-by en in de herinneringsmodus, druk op « »
gedurende 3 seconden. Het LED-scherm gaat uit en de
energiebesparende modus wordt ingesteld.
2) Als u gedurende 10 minuten geen enkele handeling aan
de oven verricht als deze op stand-by staat, gaat het LEDscherm uit en gaat deze naar de energiebesparende modus.
3) Druk op een willekeurige knop of draai aan een willekeurige
codering om de energiebesparende modus te verlaten.
9. Pyrolysefunctie (enkel sommige modellen)
Met deze functie kunt u de binnenkant van de oven helemaal
schoonmaken.
1) Draai «K1» om de pyrolysefunctie te selecteren. «PYA»
verschijnt op het LED-scherm.
2) Druk op « » om de bakfunctie te bevestigen. De vooraf
ingestelde tijdsduur is 2:00 uur. «PYA» verschijnt op het LEDscherm.
3) Draai «K1» om de tijdsduur van de pyrolysefunctie te
wijzigen. U kunt kiezen tussen twee tijdopties, «1:30» of
«2:00».
N.B.:
A) Als de ovendeur open is, blijft de startknop geblokkeerd en
op het LED-scherm verschijnt «DOOR», «PYA».
B) Als de temperatuur van de oven hoger wordt dan 200 ºC,
druk dan op de annuleringsknop om direct terug te gaan
naar stand-by. Als de centrale temperatuur van de oven
hoger is dan 300 ºC, druk dan op de startknop, waarna op
het LED-scherm «COOL» verschijnt.
C)
Als u de deur opent in de normale werkingsmodus stopt het
relais van de verwarmer zijn werking; op het LED-scherm
verschijnt «DOOR» en u hoort een continue pieptoon totdat de
deur wordt gesloten of er op de annuleringsknop wordt gedrukt.
D) Als de pyrolysefunctie afgelopen is en de centrale
temperatuur van de oven is gedaald tot onder de 300 ºC, gaat
het LED-scherm uit.
» verdwijnt van het scherm
E) Verwijder alle vuilresten alvorens de pyrolysereiniging
te activeren en controleer of de oven leeg is. Laat
geen gebruiksvoorwerpen zoals pannen, ovenschalen,
vetopvangbakken, glijschuiven, etc., in de oven liggen,
aangezien deze ernstig beschadigd kunnen raken.
10. N.B.
1) De ovenlamp gaat aan met alle functies (behalve de
pyrolysefunctie)
2) Als het bakprogramma eenmaal is ingesteld en er niet binnen
5 minuten op de knop « » wordt gedrukt, verschijnt op het
scherm de huidige tijd of gaat het scherm op stand-by. Het
instellingsprogramma wordt dan geannuleerd.
3) Het alarm klinkt als hierop wordt gedrukt; als dat niet
gebeurt, is er geen reactie.
4) Het alarm klinkt vijf keer om u eraan te herinneren dat de
baktijd is verstreken.
NUTTIGE TIPS
• Alvorens de oven aan te schakelen, zorg ervoor, dat alle
toebehoeren, die niet nodig zijn, buiten de oven zijn.
• Laat de oven tot de gewenste temperatuur branden.
• Plaats de bakplaatken in de midden van de oven en laat een
afstand tussen bakplaatken als u meer dan een gebruik, zodat
de lucht kan circuleren.
• Indien u een vruchtentaart wil bakken, moet de bakplaat niet
te vol zijn. De uit de bakplaat druppelende vruchtensap veroorzaakt vlekken die ongemogelijk zijn te verwijderen.
• Plaats geen bakplaat op de onderste deel van de oven en be-
dek ze niet met aluminiumfolie. Dit kan een thermische accumulatie veroorzaken. De brad- en baktijden komen niet meer
overeen en de email kan worden beschadigd.
• Maak de deur niet te vaak open om de voedsel te zien (de
verlichting brandt stets gedurende het bakken).
• Maak de deur heel zorgvuldig open om het contact met de
warme delen en het stoom te vermijden.
PYROLYSEFUNCTIE
De oven is ontworpen om een hoge mate van functionaliteit
te bieden en om het schoonmaken te vereenvoudigen,
dankzij de automatische pyrolyse schoonmaakfunctie. In de
pyrolysemodellen is een automatische schoonmaakfunctie
ingebouwd. Dat houdt in dat het niet nodig is om
schoonmaakmiddelen te gebruiken voor de binnenkant van de
oven. De binnenkant van de oven wordt heet en bereikt een
temperatuur van maximaal 500 °C, waarop achtergebleven
vet aan de binnenkant van de wanden verbrandt en verdwijnt.
Het viervoudige glas garandeert echter dat de buitendeur
niet warmer wordt dan 55 °C. De pyrolysecyclus wordt
volkomen veilig uitgevoerd, aangezien de deur tijdens het
proces geblokkeerd blijft door een veiligheidsmechanisme.
De reinigingscyclus kan worden geprogrammeerd tussen
minimaal 1 uur en 30 minuten en maximaal 2 uur, afhankelijk
van de mate van vervuiling. Op die manier blijven de baktijden
van de oven op een optimaal niveau.
Page 57

Waarschuwing:
Aangezien de pyrolysereiniging op een zeer hoge temperatuur
wordt uitgevoerd is het, voor een duurzaam gebruik, aan te
raden om alle accessoires uit de oven te verwijderen alvorens
deze reinigingsfunctie uit te voeren (afhankelijk van het model
bestaan deze accessoires, onder andere, uit: ovenplaat,
verchroomd ovenrooster, verchroomde roostersteun,
braadspit, vleesthermometer, pizzames, pizzasteen of
verchroomd handvat van de ovenplaat).
Volg de onderstaande instructies op om deze accessoires uit
de oven te halen:
1. Haal alle accessoires uit de oven.
afbeelding 1
2. Demonteer de roostersteun (als er een telescopische
geleider aan de roostersteun bevestigd is, is het niet nodig
deze te demonteren) uit de oven. Bewaar de accessoires
op een veilige plaats, zodat u ze na de pyrolysereiniging
gemakkelijk terug kunt vinden.
1) Draai de bevestigingsschroef voor de roostersteun met een
schroevendraaier los, zoals te zien is op afbeelding 1.
2) Til de roostersteun omhoog in een hoek van ongeveer 30° ten
opzichte van de binnenkant en haal hem vervolgens uit de
oven; neem de andere zijplaat op dezelfde wijze uit de oven,
zoals te zien is op afbeelding 2.
Als de pyrolysereiniging is afgelopen monteer dan, na 1 uur
de roostersteun opnieuw in de oven, zoals hieronder wordt
aangegeven:
1) Steek het rooster in de montage-opening van de zijplaat van
het hoofdbestanddeel, zoals te zien is op afbeelding 2.
Draai de schroef met een schroevendraaier vast en monteer
tenslotte de andere zijplaat op dezelfde manier, zoals te zien
is op afbeelding 1.
2) Trek aan beide zijden aan de geleider en installeer het
grillrooster in de geleider, zoals te zien is op afbeeldingen 3
en 4.
4. Monteer het ovenrooster en de overige accessoires binnen
in de oven; en beëindig de montage zoals te zien is op
afbeelding 5.
N.B.: De binnenkant van de oven en de ovenplaat zijn
geëmailleerd; wees voorzichtig bij het monteren of
demonteren om te voorkomen dat het email beschadigd raakt.
afbeelding 2
afbeelding 3
afbeelding 4
afbeelding 5
Page 58

AANWIJZINGEN TEN BAKKEN
Raadpleeg de informatie op de voedselsverpakkingen om de
baktemperatuur en –tijd te leren kennen. Indien U al met de werking van Uw apparaat bent vertrouwd, kunt U alle temperaturen en
tijden veranderen om ze aan Uw persoonlijke smaak aan te passen.
Controleer dat de diepvriesprodukten volkomen ontdooien
alvorens ze te bakken, tenzij er anders op de verpakking wordt
aangegeven.
Soort gerecht Temp. ºC Geleider Bereidingstijd
in minuten
Geadviseer Persoonlijk
Gebak met geklpt deeg in bakvorm
Biscuit en klein gebak 175 2 55-65
Taart 175 3 60-70
Kruimeldeeg
Taartbodem 200 3 08-10
Taartbodem met kwarkvulling 200 3 25-35
Taartbodem met vruchten 200 3 25-35
Gebak met gerezen deeg in bakvorm
Taarbodem 180 3 30-45
Zachte brood 1 kg meel 200 3 25-35
Klein gebak
Kruimeldeeg 200 3 10-15
Beignets 200 2 35-45
Koekjedeeg 200 3 15-20
Lasagne 225 2 40-50
Vlees (bereidingstijd per cm. dikte)
Langdurend gebakkene vlees 200 2 120-150
Kortdurend gebakkene vlees 200 2 60-90
Gehaktballen 200 2 30-40
Pluimvee
Eend 1 1/2 Kg 200 2 120-180
Gans 3 Kg 200 2 150-210
Braadkip 200 2 60-90
Kalkoen 5Kg 175 2 240-260
Wildbraad
Haas 200 2 60-90
Gebraden ree 200 2 90-150
Gebraden hert 175 2 90-180
Groenten
Aardappelen uit de oven 220 2 30-40
Groenten pudding 200 2 40-50
Vis
Forel 200 2 40-50
Zeebrasem 200 2 40-50
Pizza 240 3 10-20
Grillen
Kotelet 4 8-12
Worst 4 10-12
Gegrillde kip 2 25-35
Gegrillde kalfsvlees 0,6Kg 50-60
* De aantal geleiders neemt heeft betrekking op de laagste
(behalve de bodem van de oven, omdat de bakplaat niet op de
boden kan liggen)
DE GEGEVENS ZIJN NADERINGEN, OMDAT DE BEREIDINGSWIJZE EN –TIJD ANDERS ZIJN VOLGENS DE HOEVEELHEID EN KWALITEIT VAN DE VOEDSEL.
OM HET GRILL TE GEBRUIKEN
Plaats het gerecht op de rooster of en heel lage bakplaat. De
rooster dient op de hoogste positie te worden geplaatst, terwijl de bakplaat om de vet te ontvangen moet op de laagste positie
liggen. Schakel de keuzeschakelaar voor het grill op de , ,
positie al Uw oven van ventilatie is voorzien, of op de positie
, , in een multifunktie-oven.
Afhakelijk van het soort gerecht (vlees, vis, pluimvee, ezv.)
kan het nodig zijn om het gerecht om te draaien om alle oppervlakten aan het grill bloot te stellen. Wij geven vervolgens
sommige bereidngstijden, uitsluitend als orientatie:
Gegrillde gerechten Bereidingstijd
in minuten
Geadviseerd
Niet te dikke vleesstukken 4-6
Normale vleesstukken 5-8
Vis zonder schubben 8-10
Vis (b.v. forel, zalm) 12-15
Worst 10-12
Sandwich 2-5
WAARSCHUWING
• Gebruik geen aluminiumfolie om de bakplaat te beddeken bij
het grillen of verwarmen.
• Plaats geen aluminiumfolie onder het grill – aluminium is heel
refl ecterend en kan het grillenonderdeel beschadigen.
SCHOONMAKEN VAN HET APPARAAT
BELANGRIJK
Als veiligheidsvoorschrift, voordat u het apparaat schoon gaat
maken, moet u eerst de stroomtoevoer naar het apparaat uitschakelen.
Het schoonmaken van de niet-zelfschoonmakende delen van
de oven moet worden gemaakt na het gebruik, als de oven uitgeschakel maar nog warm – niet te heet- is. Daardoor is gemmakkelijker om de vet van de panelen weg te nemen, omdat ze
nog niet droog en hard is. Neem de zijhouders uit chroomdraad
weg; trek de voorzijde naar boven om ze uit de wand te halen
en neem ze uit de gaten aan de achterwand. Maak de oven
schoon met een zachte doek met een verdunte ammoniaklosing; spoel uit en droog uit. Zijn er nog vlekken of resten, plaats
een met ammoniak vochtige doek aan de achterkant, sluit de
deur en was de oven naar een paar uren met warm water en
een reinigingsvloeistof, spoel en droog zorgvuldig uit. De glazen buitendelen kunt u met een zachte doek, lauw water en
Page 59

een reinigingsmiddel schoonmaken; gebruik niet reinigingspoeder die schurend kunnen zijn.
Vermijd ook het gebruik vaan zure of alkalische stoffen
(citroensap, azijn, zout, tomaat enz.) Vermijd het gebruik van
produkten op basis van chloor, zuur of schuurstoffen, bijzonder
voor het schoonmaken van email. Gebruik ook geen metalen
schuurspons, die de oppervlakten kan beschadigen.
Gebruik geen hoogdrukreinigers of stoomreinigers om de oven
schoon te maken.
Gewoonlijk is het genoeg om een zachte vochtige doek met
warme reinigingsmiddel te gebruiken, maar voor harde resten
adviseren wij het volgende:
BELANGRIJK
De aangrenzende meubel en alle voor de installatie gebruikene materialen moeten een temperaturverhoging van min. 85 ºC
boven de luchttemperatuur gedurende het gebruik van het
apparaat.
Sommige soorten keukenmeubelen uit vynil of folie kunnen
door ontkleuring beschadig werden op temperaturen die lagere zijn dan de bovengenoemde. Indien het apparaat wordt
geïnstalleerd zonder aan dit grens te achten of met een afstand
van minder dan 4 m van de aangrenzende meubelen, zal de
eigenaar verantwoordelijk voor de beschadigingen zijn.
AANMERKINGEN TER INSTALLATIE
VERGLASTE EMAILDELEN
Gebruik uitsluitend reinigingsmiddelen, die geschikt voor dit
soort materiaal zijn – gebruik geen produkten op basis van
chloor, zoals loog.
AANWIJZINGEN TER INSTALLATIE
Dit apparaat dient door een competente persoon te worden
geïnstalleerd, conform de huidige uitvoering van de RU Veiligheidsregelingen en –voorschriften of de gelijkwaardige Europese Normen:
Stedebouwkundige regelingen (uitgegeven door de Afdeling
voor het Milieu).
Stedebouwkundige normen (uitgegeven door de Afdeling voor
Ontwikkeling in Schotland).
Verkabelingsstandaarden IEE.
Elektriciteit in arbeidsregelingen.
EERSTINGEBRUIKNEMING VAN HET APPARAAT
Als u het apparaat uit de verpakking neemt, controleer dat de
volgende onderdelen zijn bijgeleverd:
• Installatie- en gebruiksaanwijzing
• bakrooster
• 1 bakplaat
• Schroeven en doppen om het apparaat in zijn plaats te
bevestigen
OPSTELLING VAN HET APPARAAT (zie Fig. 5)
Deze apparaten worden als Klasse I beschouwd.
Ze moeten volgens de wet worden geaard. De fabricant neem
geen verantwoordelijkheid op zich in het geval dat de Voorschriften ter Voorkoming van Ongevallen niet nagekomen werden.
1. De oven dient in een standaard holte van 600mm, zie Fig. 5,
hetzij onder een kookplaat of in een kolom.
2. Om de oven in een kolom te installeren is het nodig om een
genoegende ventilatie te garanderen. Daarvoor, neem het
achterpaneel van de meubel weg, om een afstand van min.
85-90mm – zie Fig. 5.
3. Controleer, dat de oven vast in de holte bevestigd is. De
oven wordt aan de meubel met behulp van 4 “A” schroeven
bevestigd – Fig. 5. Plaats een schroef in ieder hoek van de
deuropening.
Fig. 5: Afstanden ter installatie van eenvoudige elektrische
ovens van 60 cm breedte (de vorm van de boven ovenkast kan
variëren) en hun bevestiging aan de meubel.
A. De geleider van de houder moet worden weggenomen.
B. Afstand 75-90 mm tussen wand en achterkant van de houder
en de meubelbodem.
C. Sokkel
D. Voorzijde van de onechte lade, die gemonteerd moet
worden.
Page 60

Fig. 7: Ventilatie- en afstandeisen voor de installatie van een
eenvoudig elektrisch oven in een standaard keuken.
Mindeste ventilatieeisen voor de bovenste rekken, bodem en
houder van de achterkant.
A. Achterpaneel
B. Opslagruimte
C. De achterkant van dit deel wegnemen
D. Achterpaneel
E. Opslagruimte
F. Sokkel
G. Ventilatiegat min. 80 cm2
Fig. 8: Ventilatie- en afstandeisen voor de installatie van een
eenvoudig elektrisch oven in een hoge meubel.
BELANGRIJK
De toevoersnoeren hebben de volgende kleurcode:
Groen en geel - aard
Blauw - nul
Bruin - lijn
• De groene en gele draad moet aan de met een “E”, of het
aardingssymbool of gele en groene kleuren aangeduidte klem
worden aangesloten.
• De blauwe draad moet aan de met een “N” aangeduidte klem
worden aangesloten.
• De bruine draad moet aan de met een “L” aangeduidte klem
worden aangesloten.
• De snoer mag nergens warmer dan 50 ºC boven de luchttem-
peratur worden.
• Een beschadigde toevoersnoer moet onmiddelijk met een bi-
jzondere snoer worden vervangen, die door de fabricant of
zijn service wordt geleverd.
VERVANGEN VAN DE STROOMTOEVOERSNOER
Indien U de toevoersnoer moet vervangen, voer de volgende
stappen uit:
ELEKTRISCHE AANSLUITING
Alvorens het apparaat aan te sluiten, controleer dat de spanning op het naamplaat met de netspanning overeenkomt.
Wij adviseren NICEIC register voor elektrische instalaties.
WAARSCHUWING – DIT APPARAAT MOET GEAARD WORDEN
Dit apparaat moet in een automatisch tweepolige schakelaar
worden ingesloten, met een beschermde stopcontact, met
3 mm afstand tussen contacten en in een toegankelijke plaats
dichtbij het apparaat.
1. Schakel het apparaat van het net uit, schroef de bevesti-
gingsschroeven los en neem het achterpaneel weg.
2. Schroef de bevestigingsschroeven los en de schroeven van
de klemmen om de bestaande kabel vrij te maken.
3. Monteer de nieuwe snoer, die de specifi katie onder Tech-
nische Gegevens moet nakomen. Zorg daarbij ervoor, dat de
snoeren volgens de juiste kleurcode’s zijn aangesloten en
dat alle schroeven worden vastgeschroefd.
ONDERHOUD
Alvorens onderhoudwerkzaamheden uit te voeren, schakel
het apparaat uit het net.
Gedurende de garantietijd dienen alle nodige werkzaamheden aan de Technische Dienst van de fabricant opdragen. Bij
elke reparatie of werkzaamheid door niet erkende personen
wordt de garantie ongeldig.
VERVANGING VAN DE OVENLAMP
(Niet bedekt door de garantie van dit apparaat.)
De oven is van een lamp met de volgende kenmerken voorzien:
15 W of 25 W, 300 ºC en soort E-14
Page 61

LET OP: Haal de stekker van het apparaat uit het stopcontact,
maak de deur van de oven los (zoals hiervoor beschreven),
evenals de roosters van de oven.
TECHNISCHE GEGEVENS
BINNENAFMETINGEN
Draai de glazen beschermkap tegen de wijzers van de klok los
om ze weg te nemen. Fig. 9 (A)
Draai de oude lamp los en gooi ze weg in een milieuvriendelijke
plaats; vervang ze door een nieuwe lamp van de in de Technische Gegevens aangegevene type en monteer de beschermkap
terug.
AANMERKING – De glazen kap kan heel vast zitten en dus kunt
U een klem nodig hebben om ze los te maken.
ZORG EN VERVANGING VAN DE KATALYTISCHE BEKLEDING
(Als de bekleding is gemonteerd, wordt het niet door de garantie van het apparaat bedekt).
Om de bekleding “altijd schoon” te houden, moet de oven mon.
tot 200 ºC worden verwarmd als er sterke vlekken zijn, om te
vermijden, dat ze permanent worden.
Indien de bekleding zwaart en glanzend wordt, moet ze door
een nieuwe bekleding worden vervangen. Neem alle interne
toebehoren om de vervanging van de bekleding gemakkelijker
te maken.
De nieuwe bekledingen kunnen in de Onderdeelafdeling van
de fabricant worden gekocht (zie gegevens in de achterplat).
Geef de referentienummer van het soort product dat in de naamplaat wordt beschreven en/of de apparaatnummer in Uw
bestelling aan.
Hoogte: 346,5 mm
Breedte: 457 mm
Diepte: 410 mm
Netto-inhoud: 70 liter
ELEKTRISCHE GEGEVENS
Bedrijfsspanning:
220 V - 240 V ~ 50 Hz
Toevoeraansluiting:
13A (tweepolige automatische schakelaar met beschermde
stopcontact, 3 mm afstand tussen contacten)
VERMOGENSGEBRUIK
Bovenste verwarmingselement 950 W
Grill verwarmingselement 2.000 W
Onderste verwarmingselement 1.100 W
Convectie-verwarmingselement 2.000 W
Convectiemotor 33 W
Motor van het braadspit 4,1 W
Koelventilator 23 W
Ovenlamp 25 W
Max. vermogen 2.100 W/3.000 W
Toevoersnoer:
2
3 x 1,5 mm
soort H07RN-F <HAR>
Ovenlampje:
15 W - 25 W / 300 ºC schroef soort E-14
De fabricant neemt geen veraantwordelijkheid op zich voor
menselijke of zakelijke schaden die door een unjuiste installatie van het apparaat worden veroorzaakt.
De fabricant behoudt zicht het recht om, zonder voorafgaande kennisgeving, allerlei wijzingen aan zijn produkten toe te
passen, die hij als nodig en nuttig beschouwdt.
Page 62

Page 63

PT
INSTRUÇÕES PARA O UTENTE
Agradecemos ter escolhido um dos nossos produtos e esperamos que obtenha os melhores serviços deste electrodoméstico. Portanto sugerimos que siga atentamente as instruções
e as sugestões deste manual para a correcta utilização dos
nossos produtos.
A placa de características do forno encontra-se disponível
juntamente com o aparelho. Nesta placa, visível ao abrir a
porta, mostram-se todos os dados de identifi cação do aparelho, a que se deverá fazer referência para o pedido de peças
sobresselentes.
produto não se manipulasse de maneira adequada. Para obter
informação mais detalhada sobre a reciclagem deste produto,
ponha-se em contacto com a administração da sua cidade,
com o seu serviço de resíduos do lar ou com a loja onde comprou o produto.
Este aparelho foi construído e distribuído cumprindo os requisitos essenciais das DIRECTIVAS e NORMAS EUROPEIAS CEE
seguintes:
Símbolo CE - 93/68 Baixa tensão - 73/23 CEM-89/336
Normas de Segurança - em 60 335-1, em 60 335 - 2 - 6.
INFORMAÇÃO GERAL
Por favor, leia atentamente este manual antes de utilizar o
aparelho. É importante que compreenda todas as funções de
controlo antes de começar a cozinhar com o seu aparelho.
Recorde os conselhos e advertências com o título
“IMPORTANTE - Advertências e instruções de segurança”.
• Este aparelho foi concebido para uso privado no lar e pode integrar-se num armário de cozinha standard ou de outro tipo.
• Para o seu uso em veículos tipo caravanas, deve levar-se em
conta a indicação apropriada nas Instruções de Instalação.
• O uso para qualquer outro propósito ou em qualquer outro
ambiente sem o acordo expresso do fabricante invalidaria
qualquer declaração de garantia ou responsabilidade.
• O seu novo aparelho está garantido contra defeitos eléctricos ou mecânicos, sujeito a determinadas exclusões indicadas nas Condições de Garantia do Fabricante.
• O anterior não afectará os seus direitos estatutários.
Antes de usar este aparelho, assegure-se de ter retirado qualquer embalagem protectora ou revestimento. Para colaborar
na protecção do meio ambiente, separe os materiais de embalagem segundo os seus diferentes tipos e elimine-os de acordo
com as leis locais de eliminação de resíduos.
As embalagens estão concebidos para não prejudicar o meio
ambiente; podem ser recuperadas ou recicladas, pois são
produtos ecológicos. Reciclando a embalagem, contribuir-se
-á para economizar matérias primas e para uma redução do
volume dos resíduos industriais e domésticos.
Poderá pedir qualquer informação adicional sobre a eliminação de resíduos à sua agência ambiental local.
Quando se utilize pela primeira vez, poderá sentir-se um cheiro
do revestimento protector ou da humidade, que desaparecerá
depois de um breve período de tempo.
O símbolo
produto não se pode tratar como desperdícios normais do lar.
Este produto deve entregar-se no ponto de recolha de equipamentos eléctricos e electrónicos para reciclagem. Ao assegurar-se de que este produto é descartado correctamente, ajudará a evitar possíveis consequências negativas para o
ambiente e a saúde pública, o que poderia ocorrer se este
no produto ou na embalagem indica que este
Este aparelho respeita as normas para a supressão das rádiointerferências.
Dado que o Fabricante tem uma política de melhoria permanente dos produtos, reserva-se o direito de adaptar e realizar
as modifi cações que se considerem necessárias sem prévio
aviso.
NOTA IMPORTANTE
ADVERTÊNCIA E INSTRUÇÕES DE SEGURANÇA
• O aparelho e as respectivas partes acessíveis podem aquecer durante o seu funcionamento.
• As crianças menores de 8 anos devem permanecer afastadas, a menos que estejam sob supervisão permanente.
• Este aparelho pode ser utilizado por crianças a partir dos
8 anos, assim como por pessoas com defi ciências físicas,
sensoriais ou mentais, ou que não tenham experiência nem
conhecimentos sobre o mesmo, se forem supervisionadas ou
formadas para uma utilização segura e que tenham noção
dos riscos envolvidos. As crianças não devem brincar com o
aparelho. As crianças não devem realizar a limpeza ou manutenção do mesmo sem supervisão.
• Este aparelho cumpre toda a legislação de segurança europeia actual. No entanto, o Fabricante deseja observar que o
cumprimento não evita o facto de que as superfícies do aparelho se aquecerão durante o uso e manterão o calor depois
do funcionamento.
• Portanto, o Fabricante recomenda encarecidamente que se
mantenham os bebés e crianças de curta idade afastados do
aparelho.
• Se não se pode evitar que os mais pequenos da família permaneçam na cozinha, devem estar permanente sob vigilância estrita.
• Também recomendamos ter muito cuidado durante o uso e
limpeza. Ler atentamente a alínea de limpeza e a alínea de
manutenção,
• Não coloque objectos pesados sobre o forno nem se apoie
sobre a porta ao abri-la, pois poderiam danifi car-se as dobradiças.
• Não deixe azeite ou gordura quente desatendidos, pois existe
risco de incêndio.
• Não coloque caçarolas ou bandejas de forno sobre a parte inferior das cavidades do forno nem as cubra com papel
alumínio.
Page 64

• Nunca guarde objectos infl amáveis dentro do forno, podem
provocar um incêndio.
• Não permita que os acessórios ou fi os eléctricos estejam em
contacto com as zonas quentes do aparelho.
• Não utilize o aparelho para o aquecimento especial nem para
secar roupa.
• Não instale o aparelho perto de cortinas ou móveis forrados.
• Não tente elevar ou mover os aparelhos de cozinha puxando
por qualquer porta ou cabo, pois poderia causar danos.
• Se a junta do forno está muito suja, a porta não se fechará
bem quando o forno estiver a funcionar. A parte da frente
dos móveis limítrofes podem danifi car-se. Conservar limpa a
junta do forno.
• Durante o uso o aparelho aquece. Deve ter-se a precaução
de evitar tocar elementos calefactores dentro do forno.
• Abrir o forno com cuidado. Pode sair vapor quente e provocar
queimaduras a quem estiver perto.
• Não verter água muito quente dentro do forno. Pode danifi car
o esmalte.
• Este aparelho deve ser instalado correctamente por uma
pessoa adequadamente qualifi cada, rigorosamente de acordo com as instruções do fabricante.
• O Fabricante declina qualquer responsabilidade por danos
pessoais ou materiais como resultado do uso indevido ou instalação incorrecta deste aparelho.
• Durante o uso produzir-se-ão calor, vapor e humidade, evite qualquer tipo de danos pessoais e assegure-se de que a
casa está adequadamente ventilada. Se se utiliza de forma
prolongada, pode ser necessária ventilação adicional - consulte o seu instalador qualifi cado se tem alguma dúvida sobre
o volume necessário.
INSTRUÇÕES DE USO
Este Manual do Utente deve conservar-se para sua consulta
futura e uso por parte de uma pessoa que talvez não esteja
familiarizada com o aparelho.
Antes de usar o forno, limpar esmeradamente o interior do
mesmo com sabão não abrasivo e água morna. Introduzir a
grelha e a bandeja nas suas respectivas guias. Uma vez fi nalizada a operação, pôr o forno à temperatura máxima durante
20 minutos aproximadamente para eliminar qualquer resíduo
de gordura, azeite ou resinas de fabrico que poderiam causar
cheiros desagradáveis durante a cocção.
USO DO FORNO
O forno está controlado termostaticamente entre 50 ºC e/ou
250 ºC, dependendo da temperatura requerida. O piloto luminoso do termóstato acende-se e apaga-se para indicar o controlo de temperatura durante os períodos de funcionamento.
O modo de cozinhação desejado selecciona-se usando o
botão de controlo multifuncional. As funções que podem
seleccionar-se são as seguintes:
A. LUZ DO FORNO . Automática quando se selecciona o
modo de cozinhação para todos os modelos. A luz do
forno permanece acesa enquanto se usa o forno.
B. MODO DE CONVECÇÃO. Proporciona cozinhação
tradicional com calor desde os elementos superior e inferior.
C. MODO DE ELEMENTO SUPERIOR. É para a cozinha-
ção suave, dourar ou conservar quentes os pratos cozinhados.
D. MODO DE ELEMENTO INFERIOR. Usa-se para a cozi-
nhação lenta e para aquecer comidas.
E. MODO DE CONVECÇÃO COM REFORÇO DE VENTILA-
DOR. Isto proporciona aquecimento por convecção com os
elementos superior e inferior para uma cozinhação uniforme.
F. MODO GRILL. Para gratinar e dourar os alimentos.
G. MAXI-GRILL. O mesmo procedimento que na posi-
ção anterior, mas o elemento do grill proporcionar-lhe
-á uma zona mais grande para assar.
H. MODO DE GRILL COM REFORÇO DE VENTILADOR.
Proporciona um dourado rápido para que os alimentos
conservem o seu suco. Em cozedura com ventilação forçada, esta é a função mais efi ciente a nível energético.
I. MODO DESCONGELAÇÃO.
O ventilador funciona sem calor para reduzir o tempo
de descongelação dos alimentos congelados.
ATENÇÃO: Pode ocorrer que nesta primeira cocção saia um
pouco de fumo ou cause cheiros desagradáveis. Nesse caso
ventilar a casa adequadamente até que termine este primeiro
funcionamento.
Uma vez efectuada esta simples operação, o forno estará
pronto para realizar a sua primeira cocção.
Este aparelho é de uso exclusivamente doméstico.
Utilizar o forno unicamente para cozinhar alimentos.
J. Função de limpeza pirolítica:
Ao confi gurar o forno no modo de funcionamento
pirolítico, o visor LED indicará "PYA".
A temperatura predefi nida é de 450 ºC. O temporizador
pode ser regulado até 1:30 horas ou 2:00 horas.
Page 65

DESCRIÇÃO DO PRODUTO
K1
Botão da função lembrete
Nota: para abrir a porta do forno, segure sempre com uma mão
a pega central e não toque no fecho de bloqueio para crianças.
Botão de início
Botão de paragemBotão de tempo
K2
INSTRUÇÕES DE FUNCIONAMENTO
1. Acerto do relógio
Depois de ligar o forno à alimentação eléctrica, o visor indicará
os símbolos "00:00".
1) Prima " " e os dígitos da hora fi carão intermitentes.
2) Rode "K2" para acertar as horas (defi na um valor entre 0 e 23).
3) Prima " " e os dígitos dos minutos fi carão intermitentes.
4) Rode "K2" para acertar os minutos (defi na um valor entre 0
e 59).
5) Prima " " para fi nalizar os acertos do relógio. ":" fi cará
intermitente e a hora acender-se-á.
Nota: o relógio indica a hora no formato de 24 horas. Uma
vez ligado à alimentação eléctrica, o relógio funcionará
ininterruptamente.
2. Regulação da função
1) Rode "K1" para seleccionar a função de cozedura desejada.
O indicador associado acender-se-á.
2) Rode "K2" para regular a temperatura.
3) Prima " " para confi rmar o início da cozedura. O ícone
correspondente da temperatura "ºC" acender-se-á.
4) Se ignorar o passo 2, prima " " para confi rmar o início da
cozedura. O tempo predefi nido será de 9 horas e o visor LED
indicará a temperatura predefi nida.
NOTA:
1) O intervalo de regulação do interruptor de codifi cação é o
seguinte:
0--0:30 min: intervalo de 1 minuto 0:30--9:00 horas: intervalo
de 5 minutos
2) O intervalo de regulação da temperatura é de 5 ºC e o da
função grill radiante de 30 ºC.
3) Rode "K1" para regular o tempo de cozedura logo que o
processo de cozedura seja iniciado. Em seguida, prima " "
para retomar a cozedura.
Se não premir " " nos 3 segundos seguintes, o forno voltará
ao tempo anterior e continuará a cozedura.
4) Rode "K2" para regular a temperatura logo que o processo
de cozedura seja iniciado. O indicador associado acender-
se-á. Em seguida, prima " " para retomar a cozedura. Se
não premir " " nos 3 segundos seguintes, o forno voltará à
temperatura anterior e continuará a cozedura.
3. Regulação da lâmpada
1) Rode "K1" para seleccionar a função em causa. O ícone
correspondente acender-se-á.
2) Prima o botão " " para iniciar a cozedura. O ícone da
lâmpada " " * ":" fi cará intermitente.
4. Função de consulta
Durante o processo de cozedura, pode utilizar a função de
consulta e voltar, após 3 segundos, ao modo de funcionamento
actual.
1) No modo de cozedura, prima o botão " " para ver a hora
actual.
2) Na visualização do relógio, prima o botão " " para consultar
o tempo de cozedura.
5. Função de bloqueio para crianças
Para bloquear: prima simultaneamente " " e " " durante
3 segundos e será emitido um aviso sonoro prolongado para
indicar que o bloqueio para crianças está activado; " "
acender-se-á.
Desactivação do bloqueio: prima simultaneamente " " e " "
durante 3 segundos e será emitido um aviso sonoro prolongado
para indicar que o bloqueio para crianças está desactivado.
Nota: durante o modo de funcionamento, caso pretenda parar
a cozedura, prima o botão de paragem rápida. Não necessita
de premir e manter premido o botão de paragem; esta acção
é inefi caz.
6. Função lembrete:
O forno integra uma função lembrete de 9 horas. Esta função
irá ajudá-lo a lembrar-se quando deve iniciar a cozedura
dentro de um intervalo compreendido entre 1 minuto e 9 horas.
A função lembrete só pode ser confi gurada com o forno em modo
de espera. A função lembrete confi gura-se da seguinte forma:
1) Prima o botão de regulação da função lembrete " ";
2) Rode "K2" para acertar as horas da função lembrete (defi na
um valor entre 0 e 9).
3) Prima novamente o botão de regulação da função lembrete
" ";
4) Rode "K2" para acertar os minutos da função lembrete
(defi na um valor entre 0 e 59).
5) Prima " " para confi rmar a regulação. ":" fi cará intermitente
e o indicador da função lembrete " " acender-se-á.
A contagem decrescente começa.
Page 66

Nota: o alarme do forno tocará 10 vezes quando o tempo
chegar a zero. O símbolo " " desaparece do visor para lhe
lembrar que deve iniciar a cozedura. Pode cancelar a função
lembrete durante a regulação premindo o botão de paragem;
Uma vez defi nida a função lembrete, pode cancelá-la premindo
duas vezes o botão de paragem.
7. Função de Início/Pausa/Cancelamento
1) Se defi niu o tempo de cozedura, prima "
cozedura. Se a cozedura estiver em pausa, prima " " para
retomá-la.
2) Durante o processo de cozedura, prima uma vez " " para
colocá-lo em pausa. Prima duas vezes " " para cancelar
a cozedura.
8. Função de poupança de energia
1) No modo de espera e na função lembrete, prima " " durante
3 segundos; o visor LED apagar-se-á e entrará em modo de
poupança de energia.
2) Se não efectuar qualquer acção durante 10 minutos com o
forno em modo de espera, o visor LED apagar-se-á e entrará
em modo de poupança de energia.
3) Prima qualquer botão ou rode qualquer comando para sair
do modo de poupança de energia.
9. Função de limpeza pirolítica (só em alguns modelos)
Esta função permite-lhe limpar completamente a cavidade do
forno.
1) Rode "K1" para seleccionar a função de limpeza pirolítica.
O visor LED indicará "PYA".
2) Prima " " para confi rmar a função de cozedura. O tempo
predefi nido é de 2:00 horas. O visor LED indicará "PYA".
3) Rode "K1" para modifi car o tempo da função de limpeza
pirolítica. Pode escolher entre duas opções de tempo: "1:30"
ou "2:00".
Nota:
A) Se a porta do forno estiver aberta, o botão de início
permanecerá desactivado e no visor LED aparecerá
"DOOR", "PYA".
B) Quando a temperatura central do forno ultrapassar
os 200 ºC, prima o botão de cancelamento para voltar
directamente ao modo de espera; se a temperatura central
do forno ultrapassar os 300 ºC, prima o botão de início e no
visor LED aparecerá "COOL".
C) Se abrir a porta em modo de funcionamento normal, o relé
do aquecedor deixará de funcionar; o visor LED indicará
"DOOR" e o alarme emitirá um aviso sonoro contínuo até
que a porta seja fechada ou o botão de cancelamento seja
premido.
D) Quando fi nalizar a função de limpeza pirolítica e a temperatura
central do forno for inferior a 300 ºC, o visor LED apagar-se-á.
E) Antes de activar a função de limpeza pirolítica, elimine
qualquer excesso de resíduos e assegure-se de que o
forno está vazio. Não deixe nenhum utensílio como panelas,
bandeja do forno, colector de gordura, suporte de corrediça,
etc., dentro do forno, de modo a evitar danos graves.
" para iniciar a
10. Nota
1) A lâmpada do forno acender-se-á com todas as funções
(excepto com a função de limpeza pirolítica)
2) Uma vez defi nido o programa de cozedura, se não premir
o botão "
hora actual ou voltará ao modo de espera. O programa de
regulação fi cará anulado.
3) O alarme toca se for accionado voluntariamente; de outra
forma, não haverá resposta.
4) O alarme tocará cinco vezes para avisar que a cozedura
terminou.
CONSELHOS ÚTEIS
• Antes de cozinhar, assegure-se de retirar do forno todos os
acessórios não utilizados.
• Pré-aqueça o forno a temperatura de cozinhação antes de
usá-lo.
• Coloque as bandejas de cozinhação no centro do forno e dei-
xe espaços entre elas quando usar mais de uma, para que
circule o ar.
• Não encher demasiado a bandeja para preparar um pastel
de frutas sumarento. O sumo de frutas que goteja da bandeja
produz manchas que não se podem eliminar.
• Não introduzir bandejas na base do forno e não cobrir com
papel de alumínio. Isso produziria acumulação térmica.
Os tempos de cocção e de assar não coincidem e podem
danifi car o esmalte,
• Tente abrir a porta o menos possível para ver os alimentos
(a luz do forno permanece acesa durante o cozinhado).
• Tenha cuidado ao abrir a porta para evitar o contacto com as
peças quentes e o vapor.
FUNÇÃO PIROLÍTICA
O forno foi concebido de forma a oferecer um desempenho
elevado e uma limpeza extremamente fácil de realizar
graças à função de limpeza automática pirolítica. Os modelos
pirolíticos dispõem de uma função de limpeza automática, o
que signifi ca que não é necessário utilizar detergentes na
cavidade do forno. O interior do forno aquece e atinge uma
temperatura máxima de 500 °C, à qual qualquer gordura colada
às paredes é facilmente eliminada ao queimar-se. No entanto,
o vidro quádruplo assegura que a porta exterior não atinge
uma temperatura superior a 55 °C. O ciclo pirolítico é realizado
em total segurança, uma vez que um dispositivo de segurança
bloqueia a porta durante o processo. O ciclo de limpeza pode
ser programado entre um período mínimo de 1 hora e 30
minutos e um período máximo de 2 horas, consoante o nível de
sujidade. Deste modo, os tempos de cozedura do forno serão
mantidos a níveis optimizados.
Aviso:
Para uma utilização duradoura, e uma vez que a limpeza
pirolítica é realizada a uma temperatura extremamente
elevada, recomenda-se retirar todos os acessórios da
cavidade antes de utilizar esta função de limpeza (consoante
" nos 5 minutos seguintes, o visor indicará a
Page 67

o modelo, estes acessórios podem ser: bandeja de cozedura,
grelha de cozedura cromada, suporte de grelha cromado,
assador rotativo, termómetro para carne, cortador de pizza,
pedra para pizza ou pega cromada para bandeja de cozedura).
Para retirar os acessórios da cavidade, siga as seguintes
instruções:
1. Retire todos os acessórios da cavidade.
2. Desmonte o suporte da grelha (se existir uma guia telescópica
fi xada no suporte da grelha, não será necessário desmontála) da cavidade. Coloque os acessórios num local seguro
para poder localizá-los facilmente após a limpeza pirolítica.
1) Com uma chave de fendas, desaperte o parafuso de fi xação
do suporte da grelha, como indicado na fi gura 1.
2) Levante o suporte da grelha a um ângulo de cerca de
30° relativamente à cavidade e, de seguida, retire-o da
cavidade; extraia a outra placa lateral do mesmo modo, tal
como indicado na fi gura 2.
3. Uma hora depois de terminada a limpeza pirolítica, volte a
montar o suporte da grelha na cavidade, de acordo com as
seguintes instruções:
1) Introduza a grelha no orifício de montagem da placa lateral
da estrutura principal, como indicado na fi gura 2.
Com uma chave de fendas, aperte o parafuso e, de seguida,
fi nalize a montagem da outra placa lateral do mesmo modo,
como indicado na fi gura 1.
2) Puxe a calha deslizante por ambos os lados e instale a
grelha do grill na calha deslizante, como indicado nas
fi guras 3 e 4.
fi gura 1
fi gura 2
4. Monte a grelha de cozedura e os outros acessórios dentro
da cavidade; a montagem será concluída tal como indicado
na fi gura 5.
Nota: A cavidade do forno e a bandeja de cozedura são
esmaltadas; durante a montagem ou desmontagem, tenha
cuidado para evitar danifi car o esmalte.
fi gura 3
fi gura 4
fi gura 5
Page 68

INSTRUÇÕES DE COZINHAÇÃO
Consulte a informação das embalagens dos alimentos para conhecer as temperaturas e tempos de cozinhação. Logo que se
familiarize com o rendimento do seu aparelho, podem variar-se
as temperaturas e os tempos para adaptá-los aos seus gostos
pessoais.
Comprove se os alimentos congelados se descongelam a fundo antes de os cozinhar, excepto se se indica outra coisa.
Tipo de alimento Temp. ºC Guias Tempo de cocção
em minutos
Aconselhado Pessoal
Doces em molde com pasta batida
Biscoitos ou bolos 175 2 55-65
Torta sublime 175 3 60-70
Doces em molde de pastafl ora
Fundo de tortas 200 3 08-10
Fundo de torta com requeijão 200 3 25-35
Fundo de torta com frutas 200 3 25-35
Doces em molde com pasta levedada
Fundo para tortas 180 3 30-45
Pão mole 1Kg de farinha 200 3 25-35
Doces pequenos
Pastafl ora 200 3 10-15
Pasta de Filhós 200 2 35-45
Pasta de bolachas 200 3 15-20
Lasanha 225 2 40-50
Carnes (Tempo de cocção por cada cm. de espessura
Assados de cocção longa 200 2 120-150
Assados de cocção breve 200 2 60-90
Almôndegas 200 2 30-40
Aves
Pato 1 1/2 Kg 200 2 120-180
Ganso 3 Kg 200 2 150-210
Frango asado 200 2 60-90
Peru 5Kg 175 2 240-260
Caça
Lebre 200 2 60-90
Perna de cabrito-montês 200 2 90-150
Perna de cervo 175 2 90-180
Verduras
Batatas de forno 220 2 30-40
Flan de verduras cozinhado 200 2 40-50
Peixe
Truta 200 2 40-50
Besugo 200 2 40-50
Pizza 240 3 10-20
Grill
Costeletas 4 8-12
Salsichas 4 10-12
Frango grelhado 2 25-35
Assado de vitela na grelha 0,6Kg 50-60
* O número das guias refere-se ao mais baixo (Excluído o apoio
sobre o fundo do forno já que a bandeja não pode ser introduzida)
OS DADOS SOBRE COLOCADOS SÃO INDICATIVOS PORQUÉ O
TIPO YH O TEMPO DE COCÇÃO MUDAM SEGUNDO A QUANTIDADE E A QUALIDADE DOS ALIMENTOS.
COMO SE USA O GRILL
Colocar os alimentos que se deseja dourar na grelha ou numa
travessa de bordes muito baixos. A grelha tem que ser colocada no ponto mais alto, enquanto que a bandeja para recolher
a gordura estará no ponto mais abaixo. Ligar a resistência grill
na posição do selector em fornos ventilados , ou na posição , , do selector em fornos multifunção.
Dependendo do tipo de alimento (carnes, peixes, ave etc.) será
necessário dar a volta ao mesmo para poder expor os dois lados aos raios infravermelhos do grill. A título puramente orientativo, indicamos alguns tempos de cocção:
Alimentos ao Grill Tempo de cocção
em minutos
Aconselhado
Carnes baixas ou delgadas 4-6
Carnes normais 5-8
Peixe sem escamas 8-10
Peixe (por ex. Truta, salmão) 12-15
Salsichas 10-12
Sanduíches 2-5
ADVERTÊNCIA
• Não use papel alumínio para cobrir a bandeja do grill ou
aquecer.
• Não envolva os elementos em papel alumínio nem os coloque
debaixo do grill - a grande refl ectância do alumínio poderia
danifi car o elemento do grill.
LIMPEZA DO APARELHO
IMPORTANTE
Como precaução de segurança, antes de efectuar qualquer
operação de limpeza do forno tirar sempre a fi cha da tomada
de corrente ou tirar a linha de alimentação do aparelho.
A limpeza do forno sem painéis de autolimpeza tem que ser
realizada depois do uso, quando estiver apagado mas ainda
morno, não quente, de modo que a película de gordura produzida pelos vapores da cocção sobre as paredes é ainda fácil
da tirar, além dos jorros e salpicos de gordura não terem ainda
uma crosta demasiado dura e consistente. Tirar os suportes
laterais de arame cromado; puxar para cima a parte dianteira
para os soltar da parede e tirá-los dos orifícios traseiros. Limpar o forno com um pano suave embebido numa solução diluída de amoníaco; enxaguar e secar. Se fi caram ainda manchas
ou salpicos, colocar no fundo um pano húmido embebido em
amoníaco, fechar a porta e, passadas algumas horas, lavar o
forno com água quente e detergente líquido, enxaguar e secar
Page 69

com cuidado. Para limpar as partes externas de metal brilhante, usar um pano suave com água e sabão; não se deve usar
nunca produtos em pó que contenham abrasivos.
Evitar também o uso de substâncias ácidas ou alcalinas (sumo
de limão, vinagre, sal, tomate, etc.). Evitar o uso de produtos
à base de cloro, ácidos ou abrasivos especialmente para a
limpeza das paredes envernizadas. Tão-pouco utilize palha
de aço grossa ou ferramentas duras, pois podem danifi car os
acabamentos superfi ciais.
Não utilize limpadores de alta pressão nem aparelhos de vapor
para limpar o forno.
IMPORTANTE
O móvel ou armário adjacente e todos os materiais utilizados
na instalação devem resistir a um aumento de temperatura mínima de 85 ºC acima da temperatura ambiente durante o uso
do aparelho.
Determinados tipos de móveis de cozinha de vinil ou laminados
são especialmente propensos a sofrer danos por descoloração a temperaturas abaixo das indicadas. Se o aparelho se
instala sem respeitar este limite de temperatura ou se coloca
a menos de 4 mm dos armários adjacentes, a responsabilidade
será do proprietário.
Normalmente, é sufi ciente passar um pano suave húmido com
detergente quente, mas para as marcas persistentes recomenda-se o seguinte:
PEÇAS ESMALTADAS VITRIFICADAS
Utilize só um limpador recomendado para este tipo de material evite os produtos com base de cloreto, como a lixívia.
INSTRUÇÕES PARA A INSTALAÇÃO
Este aparelho deve ser instalado por uma pessoa competente,
de acordo com a versão actual das Regulações e Normas de
Segurança do RU seguintes ou seus equivalentes da Norma
Europeia:
Regulações urbanísticas (publicadas pelo Departamento de
Meio Ambiente).
Normas urbanísticas (publicadas pelo Departamento de Desenvolvimento da Escócia).
Regulações de cablagem IEE.
Electricidade nas regulações laborais.
PÔR O APARELHO EM FUNCIONA MENTO PRÉVIO
Quando se desembale, comprove se com o aparelho se incluem as peças seguintes:
• Manual de Instruções e Instalação
• relha de forno
• 1 bandeja
• Parafusos e tampões para fi xar o aparelho no alojamento
COLOCAÇÃO DO APARELHO (ver Fig. 5)
Estes aparelhos estão classifi cados como de Clase I.
A ligação a terra é obrigatória segundo o previsto pela lei.
O fabricante declina qualquer responsabilidade no caso de
que as normas contra acidentes não sejam respeitadas.
NOTAS SOBRE A INSTALAÇÃO
1. O forno tem que estar instalado num espaço standard de
600mm, como se indica na Fig. 5, seja debaixo de uma mesa
de trabalho ou colocado numa coluna.
2. Ao inserir o forno numa coluna é indispensável, para asse-
gurar uma ventilação sufi ciente, retirar o painel traseiro do
móvel e ter uma abertura de pelo menos de 85-90mm como
se indica na Fig. 5.
3. Comprove se o forno foi fi xado de maneira segura no aloja-
mento. A fi xação do forno no armário realiza-se com 4 parafusos “A” Fig.5, um em cada esquina da guarnição da porta
do forno.
Fig. 5: Distâncias de instalação para fornos eléctricos simples
de 60 cm de largura (a forma da carcaça superior pode variar)
e a sua fi xação no armário.
A. A guia de suporte deve ser retirada
B. Espacejado 75-90 mm entre a parede e a parte traseira da
estante de suporte e a base do armário
C. Soco
D. Frente de gaveta falsa a montar
Page 70

Fig. 7: Requisitos de ventilação e recorte para a instalação de
um forno eléctrico simples numa unidade de cozinha standard.
Requisitos de ventilação mínimos para as estantes superiores,
de base e de suporte da parte traseira da unidade.
A. Painel traseiro
B. Espaço de armazenagem
C. Quitar a parte traseira de esta secção
D. Painel traseiro
E. Espaço de armazenagem
F. Soco
G. Recorte de ventilação mínimo 80 cm2
Fig. 8: Requisitos de ventilação e recorte para a instalação de
um forno eléctrico simples num armário alto.
IMPORTANTE
Os condutores do fi o de alimentação da rede estão codifi cados por cores do modo seguinte:
Verde e amarelo - Terra
Azul - Neutro
Castanho - Linha
• O condutor verde e amarelo deve ser ligado ao borne mar-
cado com “E” ou com o símbolo de terra ou de cor verde e
amarelo.
• O condutor de cor azul deve ser ligado ao borne marcado
“N”.
• O condutor de cor castanha deve ser ligado ao borne mar-
cado “L”.
• Em nenhum ponto o fi o terá que chegar a uma temperatura
superior em 50 ºC à temperatura ambiente.
• Se o fi o de alimentação está danifi cado, deve ser substituído
por um fi o ou conjunto especial a fornecer pelo fabricante ou
pelo seu serviço pós-venda.
SUBSTITUIÇÃO DO FIO DE ALIMENTAÇÃO DE REDE
Se for necessário substituir o fi o de alimentação de rede, proceda da seguinte maneira:
1. Desligue o aparelho da alimentação, desaparafuse os parafusos de fi xação e tire o painel traseiro.
2. Desaparafuse os parafusos de fi xação e os dos bornes para
libertar o fi o existente.
3. Monte o fi o de substituição que deve cumprir a especifi cação relacionada nos Dados Técnicos, assegurando a ligação
correcta dos códigos de cor e que todos os parafusos estejam
apertados correctamente.
LIGAÇÃO ELÉCTRICA
Antes de ligar o aparelho, comprove se a tensão de alimentação marcada na placa de características coincide com a
tensão da alimentação de rede.
Para as instalações eléctricas, recomenda-se o registo NICEIC.
ADVERTÊNCIA - ESTE APARELHO DEVE SER LIGADO A TIERRA
Este aparelho deve ser ligado a um interruptor automático bipolar de 13 A com tomada protegida, que tenha separação de
contactos de 3 mm e situada num lugar facilmente acessível
junto do aparelho.
MANUTENÇÃO
Antes de realizar a manutenção, desligue o aparelho da alimentação eléctrica.
Durante o período de garantia, se é necessário devem encarregar-se todas as intervenções de serviço ao Dpto. de Serviço
de assistência técnica do fabricante. Tenha em conta que a
intervenção ou reparação por parte de pessoal não autorizado
invalidará a garantia.
SUBSTITUIÇÃO DA LÂMPADA DO FORNO
(Não coberta pela garantia do aparelho.)
O forno está munido de uma lâmpada das seguintes características: 15 W ou 25 W, 300 ºC e tipo E-14
Page 71

ATENÇÃO: Desligue o aparelho da alimentação eléctrica, tire
a porta do forno (como se descreveu anteriormente), assim
como as estantes do forno.
Retire a tampa de vidro protectora da lâmpada girando em
sentido anti-horário. Fig. 9 (A)
Desenrosque a lâmpada velha e elimíne-a de maneira segura
e ecológica, troque-a por uma do tipo especifi cado nos Dados
Técnicos e monte de novo a tampa.
NOTA - A tampa de vidro pode estar apertada e, portanto,
necessitar de uma pinça para soltá-la.
CUIDADO E SUBSTITUIÇÃO DOS REVESTIMENTOS CATALÍTICOS
(Quando estejam montados, os revestimentos não estão
cobertos pela garantia do aparelho).
Para manter os revestimentos “sempre limpos” efi cazmente,
o forno deve aquecer-se a um mínimo de 200 ºC sempre que
existam manchas persistentes, para evitar que se tornem permanentes.
Se se deixa que os revestimentos se ponham negros e brilhantes, devem mudar-se por outros novos. Retire todos os acessórios internos para facilitar a substituição dos revestimentos.
Os revestimentos sobresselentes podem comprar-se directamente ao Departamento de Sobresselentes do fabricante (ver
pormenores na contracapa). Indique as referências de tipo de
produto descrito na placa de características e/ou o número de
série do seu aparelho ao fazer o pedido.
DADOS TÉCNICOS
DIMENSÕES INTERIORES
Altura: 346,5 mm
Largura: 457 mm
Profundidade: 410 mm
Volume útil: 70 litros
DADOS ELÉCTRICOS
Tensão nominal:
220 V - 240 V ~ 50 Hz
Ligação de alimentação: 13A (interruptor automático bipolar
com tomada protegida, com separação de contactos de 3 mm)
ABSORÇÃO DE POTÊNCIA
Elemento aquecedor superior 950 W
Elemento aquecedor de grill 2000 W
Elemento aquecedor inferior 1100 W
Elemento aquecedor de convecção 2000 W
Motor de convecção 33 W
Motor do assador 4,1 W
Ventilador de refrigeração 23 W
Lâmpada do forno 25 W
Potência máx. 2100 W/3000 W
Fio de alimentação de rede:
2
3 x 1,5 mm
tipo H07RN-F <HAR>
Lâmpada do forno:
15 W - 25 W / 300 ºC parafuso tipo E-14
O Fabricante declina qualquer responsabilidade pelos danos
produzidos a pessoas e coisas devidos a uma incorrecta ou
imprópria instalação do aparelho.
O Fabricante reserva-se o direito de efectuar nos seus produtos todas as modifi cações que considere necessárias e úteis,
sem necessidade de prévio aviso.
Page 72

Page 73

RU
ИНСТРУКЦИИ ДЛЯ ПОЛЬЗОВАТЕЛЯ
Благодарим Вас за выбор одного из наших продуктов.
Надеемся, что эта бытовая техника сослужит Вам хорошую службу. Поэтому предлагаем Вам прочитать
данные инструкции и содержащиеся в этом руководстве предложения, чтобы правильно пользоваться
нашими продуктами.
Паспортная табличка на данную духовку находится
прямо на ней. В этой табличке, которая видна, если
открыть дверцу, находится вся идентификационная
информация на духовку, которая нужна при заказе
запасных частей.
ОБЩАЯ ИНФОРМАЦИЯ
Прежде чем пользоваться духовкой, внимательно
прочтите данное руководство. Важно, чтобы прежде
чем готовить на этой духовке, понять все функции
управления.
Обращайте внимание на все советы и предупреждения, которые даются под заголовком “ВАЖНАЯ ИНФОРМАЦИЯ – Советы и инструкции по технике безопасности”.
• Духовка разработана для домашнего пользования,
и она может быть встроена в стандартную кухонную
мебель.
• При использовании ее в транспортных средствах
типа дома-фургона нужно учитывать соответствующие указания, включенные в инструкции по монтажу.
• Использование этой духовки для каких-либо других
целей или в любой другой обстановке без явно выраженного согласия изготовителя приводит к аннулированию гарантии и отказу от ответственности.
• Гарантируется, что в новой духовке нет электрических или механических дефектов, в соответствии с
некоторыми исключениями, которые указаны в “Положениях и условиях гарантии изготовителя”.
• Вышеуказанное не влияет на Ваши законные права.
Прежде чем пользоваться духовкой, нужно обязательно снять всю защитную упаковку и покрытия. Для оказания содействия в защите окружающей среды, разделите упаковочные материалы на различные типы и
утилизируйте их в соответствии с местными правилами, касающимися утилизации отходов.
Упаковка разработана таким образом, чтобы не навредить окружающей среде; ее можно восстановить
или переработать, так как она является экологически
чистым продуктом. Если Вы переработаете данную
упаковку, Вы внесете свой вклад в дело экономии сырьевых материалов и в дело снижения объемов промышленных и домашних отходов.
Дополнительную информацию об утилизации отходов можно затребовать в местном экологическом
агентстве.
В начале эксплуатации, можно почувствовать легкий запах от защитного покрытия или сырости, который исчезнет через какой-то непродолжительный период времени.
Символ на продукте или его упаковке указывает
на то, что данный продукт нельзя рассматривать как
обычный бытовой мусор. Данный продукт для переработки должен сдаваться на пункт сбора электрического и электронного оборудования. Если Вы позаботитесь о правильной утилизации данного продукта,
Вы поможете избежать возможных негативных последствий для окружающей среды и здоровья населения, которые могут возникнуть при непрерывной утилизации продукта. Для получения более подробной
информации относительно утилизации данного продукта, обратитесь в местные органы управления, в
службу утилизации домашних отходов или в магазин,
где Вы купили данный продукт.
Эта духовка была изготовлена и реализована в соответствии с важнейшими требованиями следующих
ЕВРОПЕЙСКИХ ЗАКОНОВ И ДИРЕКТИВ ЕЭС:
Символ EС - 93/68 Низковольтное оборудование 73/23 СEM-89/336
Правила техники безопасности - EN 60 335-1,
EN 60 335 - 2 - 6.
Данное устройство соответствует законам о подавлении радиопомех.
Так как изготовитель придерживается принципов
постоянного совершенствования продукта, он оставляет за собой право принимать и выполнять всякие
модификации, которые считаются необходимыми, без
какого бы то ни было предварительного уведомления.
АЖНОЕ ЗАМЕЧАНИЕ – ИНСТРУКЦИИ ПО ТЕХНИКЕ
БЕЗОПАСНОСТИ И ПРЕДУПРЕЖДЕНИЕ
• Электроприбор и его открытые части могут значительно нагреваться во время использования.
• Детям младше 8 лет разрешается приближаться к электроприбору только в том случае, если они находятся
под постоянным присмотром взрослых.
• К использованию данного электроприбора допускаются дети старше 8 лет и лица с ограниченными физическими, сенсорными или умственными возможностями,
а также лица, не располагающие достаточными знаниями и опытом, если они находятся под наблюдением или
были проинструктированы относительно безопасного
использования данного электроприбора, а также понимают опасности, сопряженные с его эксплуатацией.
Детям запрещается играть с электроприбором. Детям
не следует доверять чистку и техническое обслуживание электроприбора без должного присмотра.
• Данное устройство соответствует всему текущему
европейскому законодательству по безопасности,
однако изготовитель должен подчеркнуть, что это
соответствие не касается нагревания поверхностей
устройства во время эксплуатации, которые остаются горячими во время работы.
• Поэтому изготовитель настоятельно рекомендует не
допускать к устройству маленьких детей.
• Если обеспечить отсутствие детей в кухне невозможно, за ними нужно постоянно следить.
• Также рекомендуем быть осторожными во время
пользования и очистки. Внимательно прочитайте
разделы по данному устройству, касающиеся очистки и технического обслуживания.
Не кладите на духовку тяжелых предметов и не опи-
•
райтесь на дверцу, когда ее открываете, потому что это
Page 74

может привести к повреждению петель.
• Не оставляйте без присмотра горячее масло или жир,
так как они могут загореться.
• Не кладите противни или подносы на дно духовки и не
прикрывайте ее алюминиевой фольгой.
• Никогда не храните внутри духовки легковоспламеняемые предметы, потому что они могут загореться.
Не допускайте прикосновения принадлежностей или
•
электрических кабелей с горячими деталями устройства.
• Не используйте устройство для специальных нагреваний или для сушения одежды.
• Не устанавливайте устройство вблизи занавесок или
мягкой мебели.
• Не пытайтесь поднимать или перемещать кухонные
устройства за ручку или за дверцу, так как этим Вы можете их повредить.
• Если плоскости сопряжения духовки очень грязны,
дверца не будет надлежащим образом закрываться
во время работы. Могут быть повреждены передние
части близко расположенной мебели. Поддерживайте
чистоту плоскостей сопряжения духовки.
• Во время работы устройство нагревается. Следует
быть осторожным и избегать контакта с нагревательными элементами внутри духовки.
• Открывайте духовку осторожно. Из духовки может вырвать пар и причинить ожоги находящимся рядом.
• Не вливайте воду вовнутрь очень горячей духовки. Может быть повреждена эмаль.
• Устройство должно правильно устанавливаться лицом,
обладающим достаточной квалификацией, в строгом
соответствии с инструкциями изготовителя.
• Изготовитель снимает с себя любую ответственность за
травмы или материальный ущерб, наступившие в результате неправильной эксплуатации или неправильной установки данной духовки.
• Во время работы образуется тепло, испарения и вла
избегайте получения травм и обеспечьте надлежащую вентиляцию помещения. При пользовании в течение продолжительного периода может оказаться
необходимой дополнительная вентиляция – если у
Вас возникнут сомнения в отношении необходимого объема, проконсультируйтесь с квалифицированным монтажником.
га,
ИНСТРУКЦИИ
Данное руководство пользователя должно храниться в качестве справочного пособия на будущее и
для пользования человеком, незнакомым с данным
устройством.
Прежде чем пользоваться духовкой, тщательно очистите внутренние поверхности неабразивным чистящим средством и теплой водой. Установите решетку
и противень в соответствующие направляющие. По
завершении этой операции, включите духовку на максимальную температуру примерно на 20 минут для
удаления следов заводской смазки, масла или смолы,
которые могут стать причиной неприятных запахов во
время приготовления пищи.
ПРЕДУПРЕЖДЕНИЕ: Во время первого нагревания
может появиться дым или неприятные запахи. В таком
случае хорошо провентилируйте помещение, пока не
закончится первая операция.
После окончания этой простой операции духовка будет готова для приготовления пищи.
Настоящее устройство предназначено исключительно для домашнего пользования.
Используйте духовку только для приготовления пищи.
ПОЛЬЗОВАНИЕ ПЛИТОЙ
Данная духовка регулируется термостатом в диапазоне от 50ºС до 250ºС, в зависимости от нужной температуры. Индикаторная лампочка термостата включается
и выключается для указания на температурный контроль во время пользования.
Необходимый режим готовки выбирается при помощи многофункциональной кнопки управления. Можно выбрать следующие функции:
A. ОСВЕЩЕНИЕ ДУХОВКИ. Она автоматиче-
ская при выборе режима готовки для всех
моделей). Освещение духовки всегда
включено при пользовании ею.
B. КОНВЕКЦИОННЫЙ РЕЖИМ. Обеспечивает
традиционную готовку с поступлением тепла
от верхнего и нижнего элементов.
С. РЕЖИМ ВЕРХНЕГО ЭЛЕМЕНТА. Для готовки
на медленном огне, для поджаривания или
хранения готовых блюд теплыми.
D. РЕЖИМ НИЖНЕГО ЭЛЕМЕНТА. Для готовки
на медленном огне и для подогревания пищи.
E. КОНВЕКЦИОННЫЙ РЕЖИМ С ПОДДУВОМ.
Обеспечивает конвекционное нагревание
верхним и нижним элементами для равномерной тепловой обработки.
F. РЕШЕТКА. Для режима “гриль” и поджаривания
пищи.
G. МАКСИ-ГРИЛ. Как и выше, но грилевый
элемент обеспечивает большую площадь для
жарения.
H. РЕШЕТКА С ОБДУВОМ. Обеспечивает быстрое
поджаривание с тем, чтобы пища оставалась
сочной. При запекании с принудительным обдувом
эта функция наиболее эффективна с точки зрения
энергопотребления.
I. РЕЖИМ ОТТАИВАНИЯ.
Вентилятор работает без тепла для уменьшения времени оттаивания замороженных
продуктов.
J. Пиролитическая функция:
Когда духовой шкаф настроен на пиролитический
режим работы, на светодиодном дисплее отображается индикация «PYA».
Температура по умолчанию составляет 450ºC.
Таймер можно настроить на 1:30 или 2:00 часа.
Page 75

ОПИСАНИЕ ИЗДЕЛИЯ
K1
Кнопка напоминания
Кнопка запуска
Кнопка остановкиКнопка настройки времени
Напоминание: чтобы открыть дверцу духового шкафа, всегда удерживайте ручку
одной рукой по центру, не касаясь стопорного штифта блокировки от детей.
K2
ИНСТРУКЦИЯ ПО ЭКСПЛУАТАЦИИ
1. Настройка часов
После подключения электроприбора к источнику
питания на дисплее будет отображена индикация «00:00».
1) Нажмите «
2) Вращайте ручку «K2», чтобы настроить значение часа
(в диапазоне от 0 до 23).
3) Нажмите «
4) Вращайте ручку «K2», чтобы настроить значение минут
(в диапазоне от 0 до 59).
5) Нажмите «
На экране начнет мигать символ «:» и загорится
» – начнет мигать значение часа.
» – начнет мигать значение минут.
», чтобы завершить настройку часов.
индикация времени.
Примечание: в часах электроприбора используется
24-часовой формат времени. После отключения
электроприбора от источника питания настройки часов
будут потеряны.
2. Настройка функций
1) Вращайте ручку «K1», чтобы выбрать нужную
функцию приготовления. Загорится соответствующий
индикатор.
2) Вращайте ручку «K2», чтобы настроить температуру.
3) Нажмите кнопку «
приступить к приготовлению. Загорится соответствую-
щий значок температуры «ºC».
4) Если Вы пропустили шаг 2, нажмите «
ступить к приготовлению – время по умолчанию будет
», чтобы подтвердить настройку и
», чтобы при-
установлено на 9 часов, а температура по умолчанию
будет отображена на светодиодном дисплее.
ПРИМЕЧАНИЕ:
1) Вращая ручку, Вы осуществляете настройку времени
со следующим шагом:
от 0 до 0:30 мин: шаг 1 минута; от 0:30 до 9:00 часов:
шаг 5 минут.
2) Шаг настройки температуры составляет 5ºC, для
инфракрасного гриля – 30ºC.
3) Когда приготовление запущено, вращайте ручку «K1»,
чтобы настроить время приготовления. Затем нажмите
кнопку «
Если в течение 3 секунд не нажать кнопку «
шкаф продолжит приготовление с предыдущей
», чтобы начать приготовление.
», духовой
настройкой времени.
4) Когда приготовление запущено, вращайте ручку «K2»,
чтобы настроить температуру. Загорится соответству-
ющий индикатор. Затем нажмите кнопку «
начать приготовление. Если в течение 3 секунд не на-
», чтобы
жать кнопку «
», духовой шкаф продолжит приготов-
ление с предыдущей настройкой температуры.
3. Настройка лампы
1) Вращайте ручку «K1», чтобы выбрать нужную функцию
– на экране появится соответствующий значок.
2) Нажмите кнопку «
нию. Значок лампы «
», чтобы приступить к приготовле-
» * «:» начнет мигать.
4. Функция справки
Если во время приготовления Вы воспользуетесь
функцией справки, то через 3 секунды электроприбор
снова вернется в текущий режим работы.
1) В режиме приготовления нажмите кнопку «
просмотреть текущее время.
2) Если часы настроены, нажмите кнопку «
просмотреть время приготовления.
», чтобы
», чтобы
5. Функция блокировки от детей
Включение блокировки: одновременно нажмите и удерживайте кнопки «
лышите долгий звуковой сигнал, обозначающий включение функции блокировки от детей, а на экране загорится
символ «
Отмена блокировки: одновременно нажмите и удерживайте кнопки «
те долгий звуковой сигнал, обозначающий, что функция
» и « » в течение 3 секунд – Вы ус-
».
» и « » в течение 3 секунд, Вы услыши-
блокировки от детей отключена.
Примечание: если Вы хотите прервать процесс приготовления, кратковременно нажмите кнопку остановки. Не
следует долго удерживать кнопку остановки – это неверная команда.
6. Функция напоминания:
Чтобы Вы не забыли запустить приготовление, духовой
шкаф может выдавать соответствующее напоминание
по истечении периода времени от 1 минуты до 9 часов.
Напоминание можно настроить только в том случае,
когда духовой шкаф находится в режиме ожидания.
Чтобы настроить напоминание, следуйте приведенным
ниже инструкциям:
1) Нажмите кнопку настройки напоминания «
2) Вращайте ручку «K2», чтобы настроить значение часа
».
для выдачи напоминания. (Значение должно быть в
диапазоне от 0 до 9).
3) Нажмите кнопку настройки напоминания «
4) Вращайте ручку «K2», чтобы настроить значение минут
» еще раз.
Page 76

для выдачи напоминания. (Значение должно быть в
диапазоне от 0 до 59).
5) Нажмите «
экране начнет мигать символ «:» и загорится индикация
напоминания «
Примечание: по истечении заданного времени звуковой
сигнал прозвучит 10 раз. Символ «
экрана, напоминая Вам о необходимости запустить
приготовление. Вы можете отменить настроенное
напоминание нажатием кнопки остановки: когда
напоминание настроено, его можно отменить, дважды
нажав кнопку остановки.
7. Функция запуска/паузы/отмены
1) Когда время приготовления настроено, нажмите
кнопку «
приготовление приостановлено, нажмите кнопку
», чтобы возобновить его.
«
2) Во время приготовления один раз нажмите кнопку
», чтобы приостановить его. Дважды нажмите
«
кнопку «
8. Функция экономии энергии
1) Когда электроприбор находится в режиме ожидания
или запрограммирован на выдачу напоминания,
нажмите и удерживайте кнопку «
секунд – светодиодный дисплей погаснет и перейдет
в режим экономии энергии.
2) Если в режиме ожидания на протяжении 10 минут не
выполняется никаких действий, светодиодный дисплей погаснет и перейдет в режим экономии энергии.
3) Чтобы выйти из режима экономии энергии, нажмите
любую кнопку или поверните любую ручку.
9. Пиролитическая функция (предусмотрена только
на некоторых моделях)
Данная функция позволяет тщательно очистить
внутреннее пространство духового шкафа.
1) Вращайте ручку «K1», чтобы выбрать пиролитическую
функцию. На светодиодном дисплее появится
индикация «PYA».
2) Нажмите «
операции. Время выполнения по умолчанию
установлено на 2 часа; на светодиодном дисплее будет
отображаться индикация «PYA».
3) Вращайте ручку «K1», чтобы изменить время
выполнения пиролитической функции. Вы можете
настроить время выполнения на одно из двух
значений – «1:30» или «2:00».
Примечание:
А) Если дверца не закрыта, после нажатия кнопки запуска
операция не начнется; в этом случае на светодиодном
дисплее будет отображена индикация «DOOR», «PYA».
Б) Если температура внутри духового шкафа выше
200ºC, нажмите кнопку отмены, чтобы вернуть
электроприбор непосредственно в режим ожидания;
если же температура внутри духового шкафа выше
300ºC, нажмите кнопку запуска – на светодиодном
дисплее будет отображена индикация «COOL».
В) Если в нормальном режиме работы открыть дверцу
духового шкафа, сработает реле нагревателя и духовой
шкаф прекратит работу; при этом на светодиодном
дисплее появится индикация «DOOR», а звуковой
», чтобы подтвердить настройку. На
». Затем начнется отсчет времени.
» исчезнет с
», чтобы запустить приготовление. Если
», чтобы отменить приготовление.
» в течение трех
», чтобы подтвердить выполнение
сигнал будет выдаваться, пока Вы не закроете дверцу
и не нажмете кнопку отмены.
Г) Когда выполнение пиролитической функции завершено,
а температура внутри духового шкафа опустится ниже
300ºC, светодиодный дисплей погаснет.
Д) Прежде чем активировать пиролитическую функцию,
удалите излишки разлившейся жидкости и убедитесь,
что духовой шкаф пуст. Не оставляйте внутри духового
шкафа посторонние предметы (например, сковороды,
противни, поддоны, салазки и т. д.), поскольку в противном случае они могут быть серьезно повреждены.
10. Примечание:
1) Во время выполнения всех функций (кроме
пиролитической функции) лампа духового шкафа
будет оставаться включенной.
2) Когда программа приготовления задана, но кнопка
» не была нажата в течение 5 минут, на дисплее будет
«
отображено текущее время, а электроприбор вернется
в режим ожидания. В этом случае настройка программы
будет недействительной.
3) Звуковой сигнал выдается при своевременном нажатии кнопки, в противном случае сигнала не последует.
4) После завершения приготовления звуковой сигнал
прозвучит пять раз.
ПОЛЕЗНЫЕ СОВЕТЫ
• Прежде чем готовить, обязательно извлеките все не-
нужные принадлежности из духовки.
• Прежде чем приступить к работе, предварительно
разогрейте духовку до нужной температуры тепловой обработки.
• Установите противни в центре духовки и для цирку-
ляции воздуха. Если используете более одного противня, оставьте между ними пространство.
• Не наполняйте противень доверху при приготовле-
нии сочного фруктового кекса. Капающие с противня фруктовые соки оставляют невыводимые пятна.
• Не кладите противни на дно духовки и не накрывай-
те дно алюминиевой фольгой. Это приведет к накоплению тепла. Время готовки и жарения не совпадет,
и может быть повреждена эмаль.
• Постарайтесь как можно меньше приоткрывать
дверцу духовки, чтобы посмотреть на пищу (освещение духовки во время готовки не выключается).
• Будьте осторожны, открывая дверцу, чтобы избе-
жать контакта с горячими деталями и паром.
ФУНКЦИЯ ПИРОЛИТИЧЕСКОЙ ОЧИСТКИ
Благодаря своему дизайну этот духовой шкаф не только
многофункционален, но и прост в уходе с помощью
функции автоматической пиролитической очистки.
Особенностью моделей с функцией пиролитической
очистки является автоматическая очистка, при
использовании которой нет необходимости в
применении моющих средств для внутренней
поверхности духового шкафа. Температура в духовом
шкафу достигает максимальной температуры в 500 °C,
при которой любой жир, прилипший к стенкам, просто
выгорает. Несмотря на такую высокую температуру,
внешняя дверь из четырехслойного стекла нагревается
не выше 55 °C. Пиролитический цикл выполняется в
условиях полной безопасности благодаря специальному
Page 77

защитному устройству, которое блокирует дверь на
время очистки. Продолжительность цикла очистки
можно запрограммировать от минимума в 1 час 30
минут до максимума в 2 часа в зависимости от степени
загрязнения. Благодаря этому время приготовления в
духовом шкафу поддерживается на оптимальном уровне.
Внимание:
В связи с использованием очень высокой температуры
выполнения пиролитической очистки, настоятельно
рекомендуется извлечь из духового шкафа все дополнительные принадлежности до использования функции пиролитической очистки для продления срока их службы (в
зависимости от моделей эти дополнительные принадлежности включают: противень для запекания, хромированную решетку для запекания, хромированную решетчатую
подставку, вертел, термометр для мяса, нож для пиццы,
камень для пиццы, хромированную ручку для противня).
Во время извлечения дополнительных
принадлежностей из духового шкафа, пожалуйста, придерживайтесь следующих
инструкций:
1. Извлеките из духового шкафа все дополнительные
принадлежности.
2.
Разберите решетчатую подставку (если к решетчатой
подставке прикреплена телескопическая направляющая,
ее не нужно отсоединять от решетчатой подставки) и извлеките ее. Положите дополнительные принадлежности
в безопасное место, чтобы легко найти их после пиролитической очистки.
1) Как показано на рисунке 1, с помощью отвертки
выкрутите винт, чтобы отсоединить решетчатую
подставку.
2) Как показано на рисунке 2, поднимите решетчатую
подставку на 30º, затем извлеките ее из духового шкафа.
Те же самые действия повторите с другой стороны.
3. Подождите 1 час после завершения пиролитической
очистки, затем соберите решетчатую подставку в
духовом шкафу, как указано ниже:
1) Как показано на рисунке 2, вставьте решетку в отверстие
на боковом основании.
Как показано на рисунке 1, закрутите винт отверткой,
затем таким же способом соберите подставку с другой
стороны.
2) Как показано на рисунках 3 и 4, потяните направляющие
скольжения с обеих сторон и установите на них решетку
для гриля.
4. Соберите решетку для запекания и другие
дополнительные принадлежности в духовом шкафу.
Полная сборка показана на рисунке 5.
Примечание: Поверхность внутри духового шкафа и противень для запекания
покрыты эмалью, поэтому, пожалуйста,
будьте осторожны, чтобы не повредить их
во время разбирания и собирания.
рисунок 1
рисунок 2
рисунок 3
рисунок 4
рисунок 5
Page 78

ИНСТРУКЦИИ ПО ГОТОВКЕ
Прочитайте информацию на упаковке пищевого продукта, касающуюся температуры обработки и времени. После ознакомления с работой духовки можно
варьировать величины температуры и времени для
приспособления их к Вашим личным предпочтениям.
Перед готовкой проверьте продукты на предмет пол-
ного оттаивания, если не указано иное.
Тип пищевого продукта Темп. ºСНаправля-
Десерты из смеси для кекса в формах
Бисквиты или булочки
Кексы
Десерты - песочное тесто в формах
Основа пирога
Основание творожного
кекса
Основание фруктового
кекса
Десерты - поднятое тесто в формах
Основа пирога
Мягкий хлеб 1 кг муки
Маленькие пирожные
Песочное тесто
Тесто для пончиков
Бисквитный пончик
Ласанья
Мясо (время на см толщины)
Большие куски
жареного мяса
Малые куски жареного
мяса
Фрикадельки
Птица
Утка 1 ½ кг
Гусь 3 кг
Жареный цыпленок
Индейка 5 кг
Дичь
Заяц
Нога оленины
Овощи
Картофель печеный в
духовке
Открытый пирог с
вареными овощами
Рыба
Форель
Морской карась
Пицца
Гри ль
Отбивные
Колбасы
Цыпленок на гриле
Телятина, поджаренная
на шампуре 0,6 кг
ющие
175 2 55-65
175 3 60-70
200 3 08-10
200 3 25-35
200 3 25-35
180 3 30-45
200 3 25-35
200 3 10-15
200 2 35-45
200 3 15-20
225 2 40-50
200 2 120-150
200 2 60-90
200 2 30-40
200 2 120-180
200 2 150-210
200 2 60-90
175 2 240-260
200 2 60-90
200 2 90-150
220 2 30-40
200 2 40-50
200 2 40-50
200 2 40-50
240 3 10-20
* Номер направляющих отчитывается снизу вверх
(дно духовки исключается, так как на него противни
ставить нельзя)
Время
готовки в
минутах
Предлаг-
аемое
4 8-12
4 10-12
2 25-35
50-60
Персона-
льное
ИНФОРМАЦИЯ О РАСПОЛОЖЕНИИ ЯВЛЯЕТСЯ ПРИМЕРНОЙ, ПОТОМУ ЧТО ТИП ТЕПЛОВОЙ ОБРАБОТКИ И
ПРОДОЛЖИТЕЛЬНОСТЬ ЗАВИСЯТ ОТ КАЧЕСТВА И КОЛИЧЕСТВА ПИЩЕВЫХ ПРОДУКТОВ
КАК ПОЛЬЗОВАТЬСЯ ГРИЛЕМ.
Положите продукты, которые нужно поджарить, на
решетку или на мелкий противень. Решетку следует
поместить на самые верхние направляющие, а противень для сбора жира нужно установить на самые
нижние направляющие. Подключите гриль, пользуясь
следующими положениями селекторного переключателя для духовки с вентиляторным обдувом
или положениями
, , селекторного переклю-
,
чателя для многофункциональной духовки.
В зависимости от типа пищевого продукта (мясо, рыба,
птица и т.д.) нужно будет переворачивать его, чтобы
подвергнуть воздействию инфракрасного излучения
обе стороны гриля. Для примерного руководства мы
указывает некоторые величины продолжительности
обработки:
Продукты для Время готовки в
обработки на гриле минутах Предлагаемое
Нежирное или тонкое мясо 4-6
Обычное мясо 5-8
Рыба без чешуи 8-10
Рыба (например, форель, лосось) 12-15
Колбасы 10-12
Сэндвичи 2-5
ПРЕДУПРЕЖДЕНИЕ
• Не пользуйтесь алюминиевой фольгой для покрытия противня гриля или источника тепла
• Не заворачивайте элементы в алюминиевую фольгу
и размещайте их под грилем - большая отражательная способность алюминия может повредить
элемент гриля.
ОЧИСТКА ДУХОВКИ
ВАЖНОЕ ЗАМЕЧАНИЕ:
В качестве меры предосторожности, прежде чем чистить духовку, нужно обязательно отключить ее от электропитания,
или отсоединить от духовки силовой кабель.
Очистка духовки, не снабженной самоочищающимися
панелями, нужно выполнять после работы, когда она
отключена, но еще теплая, не горячая, с тем, чтобы
можно было легко удалять жирную пленку, образованную парами от тепловой обработки на стенках, и когда
еще не застыли и не засохли подтеки и капли жира.
Снимите хромированные боковые проволочные опоры; потяните переднюю часть вверх для отделения от
стенки и снимите их из задних отверстий. Очистите
духовку мягкой тканью, смоченной в разбавленном
растворе хлористого аммония; промойте и высушите.
Если еще остались пятна и брызги, положите сзади
влажную ткань, смоченную в растворе хлористого
аммоний, закройте дверцу и через несколько часов
вымойте духовку теплой водой с жидким моющим
Page 79

средством, промойте ее и осторожно высушите. Для
чистки наружных дверок с поверхностью из блестящего металла воспользуйтесь мягкой тканью с мылом
и водой; не пользуйтесь порошковыми средствами,
так как в них содержатся абразивные вещества.
Кроме того, не пользуйтесь кислотами и щелочами
(лимонным соком, уксусом, солью, томатами и т.д.).
Не пользуйтесь продуктами, содержащими хлор, кислоты или абразивные вещества, предназначенными
специально для чистки лакированных поверхностей.
Не пользуйтесь металлической ватой или твердыми инструментами, потому что они могут повредить
отделку поверхности.
Не пользуйтесь очистителями под высоким давлением или паровой чисткой для очистки духовки.
Обычно достаточно бывает протирания влажной мягкой тканью и теплым моющим средством, а для трудновыводимых пятен рекомендуется следующее:
ДЕТАЛИ, ЭМАЛИРОВАННЫЕ VITRIFIED
Для этого типа материала воспользуйтесь только рекомендованным очистителем – избегайте продуктов
на основе хлора, таких как отбеливатели.
ИНСТРУКЦИИ ПО УСТАНОВКЕ
Духовка должна устанавливаться квалифицированным специалистом в соответствии с текущей версией
норм и правил техники безопасности Соединенного
Королевства или их европейских аналогов:
Нормы градостроительства (опубликованы департаментом окружающей среды)
Законы градостроительства (опубликованы шотландским
исполнительным департаментом развития)
Электротехнические правила Института инженеров
по электрике и электронике
Электричество в трудовом законодательстве
ПЕРЕД ВКЛЮЧЕНИЕМ ДУХОВКИ
При распаковке проверьте, находятся ли в духовке
следующие детали:
• Инструкции и руководство по установке.
• печные решетки или
• 1 противень
• Винты и стопоры для встраивания духовки в нишу.
Монтаж духовки (смотри рис. 5)
Эти духовки классифицируются по классу I.
Заземление обязательно, как того требует закон. Изготовитель снимает с себя всю ответственность при
несоблюдении правил предотвращения несчастных
случаев.
ВАЖНОЕ ЗАМЕЧАНИЕ:
Примыкающая мебель или шкаф, а также все материалы, используемые при установке, должны выдерживать, как минимум, повышение температуры на 85ºС
выше температуры окружающей среды во время ра-
боты духовки.
Определенные типы кухонной мебели из винила или
слоистого пластика особо чувствительны к повреждениям в связи с обесцвечиванием при температурах
ниже указанной. Если духовка устанавливается без
учета этого температурного предела, или если она
устанавливается на расстоянии менее 4 мм от примыкающих шкафов, ответственность за это будет нести
владелец.
ЗАМЕЧАНИЯ ПО УСТАНОВКЕ
1. Духовка устанавливается в стандартном проеме 600
мм, как указано на рисунке 5, будь то под полкой для
нагревания или в пенал.
2. При установке духовки в пенал очень важно, чтобы
обеспечить достаточную вентиляцию, снять заднюю
панель с мебели и предусмотреть отверстие размерами, по крайней мере, 85 – 90 мм как указано на рисунке 5.
3. Проверьте, чтобы духовка была надежно зафикси-
рована в нише. Закрепление духовки в шкафу осуществляется при помощи 4 винтов “A”, рис. 5. По одному в каждом углу дверной рамы духовки.
Рис. 5: Расстояния при установке для простых электрических печей шириной 60 см (форма верхнего кожуха
может быть разной) и встраивание в шкаф.
A. Опорную направляющую нужно снять
B. Расстояние 75-90 мм между стенкой и задней ча-
стью опорной полки и основанием шкафа
C. Основание
D. Устанавливается декоративная накладка
Рис. 7: Требования к вентиляции и зазорам при установке простой электрической духовки в стандартной
кухонной мебели.
Минимальные требования к вентиляции для верхней,
базовой и опорной полок для задней части духовки.
A. Задняя панель
B. Место для хранения
C. Снимите заднюю часть этой секции
D. Задняя панель
E. Место для хранения
F. Основание
G. Минимальный зазор для вентиляции 80 см2
Page 80

Рис. 8: Требования к вентиляции и зазорам при установке простой электрической духовки в верхнем шкафу.
ЭЛЕКТРИЧЕСКИЕ СОЕДИНЕНИЯ
Прежде чем подключать духовку, проверьте, чтобы
напряжение, указанное на паспортной табличке,
совпадало с напряжением электрической сети.
Для электрических установок рекомендуется пользоваться регистром NIСEIС (Совет национальной инспекции для подрядчиков, выполняющих электротехнические работы).
ПРЕДУПРЕЖДЕНИЕ – ДАННОЕ УСТРОЙСТВО ПОДЛЕЖИТ ЗАЗЕМЛЕНИЮ
Проводка данного устройства должна осуществляться через двухполюсный автоматический выключатель
на 13 ампер с защищенной розеткой, в котором предусмотрен зазор 3 мм между контактами, и который
устанавливается в легко доступном месте рядом с
устройством.
ВАЖНОЕ ЗАМЕЧАНИЕ
Проводящие жилы сетевого кабеля питания обозначены цветовой маркировкой следующим образом:
Зелено-желтый - Земля
Голубой - Нейтраль
Коричневый - Фаза
• Температура проводника ни в какой его точке не
должна достигать температуры выше 50ºС над температурой окружающей среды.
• Если силовой кабель поврежден, его нужно заме-
нить специальным кабелем или кабелем, поставляемым изготовителем или при послепродажном обслуживании.
ЗАМЕНА СЕТЕВОГО КАБЕЛЯ ПИТАНИЯ
При необходимости заменить сетевой кабель питания
поступите следующим образом:
1. Отсоедините духовку от электропитания, отвинтите
винты крепления и снимите заднюю панель.
2. Отвинтите винты крепления и винты клемм, чтобы
освободить старый кабель.
3. Присоедините новый кабель, который должен соот-
ветствовать информации, указанной в технических
условиях, следя за цветовой маркировкой и затягивая винты соответствующим усилием.
ТЕХНИЧЕСКОЕ ОБСЛУЖИВАНИЕ
Прежде чем выполнять техническое обслуживание, отсоедините духовку от электропитания.
В течение гарантийного периода все необходимое обслуживание должно поручаться отделу
технического обслуживания изготовителя. Помните, что вмешательство или ремонт со стороны
неуполномоченного на этого персонала приводит
к аннулированию настоящей гарантии.
ЗАМЕНА ЛАМПОЧКИ ОСВЕЩЕНИЯ ДУХОВКИ
(На лампочку гарантия на духовку не распространяется)
В духовке предусмотрена лампочка со следующими характеристиками: 15 ватт или 25 ватт, 300ºС, тип
резьбы E-14
• Зелено-желтый проводник должен быть присоединен к клемме, обозначенной “E” или к клемме с
символом заземления, или к клемме, обозначенной
зелено-желтым цветом.
• Голубой проводник должен быть присоединен к
клемме, обозначенной “N”.
• Коричневый проводник должен быть присоединен к
клемме, обозначенной “L”.
Page 81

ПРЕДУПРЕЖДЕНИЕ: отсоедините духовку от сети
электрического питания, снимите дверцу духовки
(как описано выше), а также полки духовки.
Снимите стеклянную крышку, защищающую лампочку,
повернув ее против часовой стрелки. Рис. 9 (A)
Вывинтите старую лампочку и утилизируйте ее безопасным образом и без вреда окружающей среде,
ввинтите новую, как указано в технических условиях,
и поставьте на место крышку.
ПРИМЕЧАНИЕ – Стеклянная крышка может сидеть
туго, и для снятия может потребоваться усилие.
Уход за каталитическим покрытием и его
замена
(Если предусмотрено это покрытие, гарантия на
духовку на покрытие не распространяется).
Для того чтобы покрытие всегда очищалось эффективно, духовка должна нагреваться, по крайней мере, до
200ºС в любом случае, когда возникают трудновыводимые пятна с тем, чтобы они не остались навсегда.
Если покрытие становится черным и зеркальным, его
нужно заменить. Извлеките все внутренние принадлежности, чтобы было легче производить замену покрытия.
Покрытие на замену можно приобрести непосредственно в отделе запасных частей изготовителя (смотри подробную информацию, указанную на покрытии). При заказе укажите справочные номера типа
продукта, указанные на паспортной табличке и (или)
серийный номер духовки.
ТЕХНИЧЕСКИЕ УСЛОВИЯ
ВНУТРЕННИЕ РАЗМЕРЫ:
Высота: 346,5 мм
Ширина: 457 мм
Глубина: 410 мм
Полезный объем: 70 литров
ОХЛАЖДАЮЩИЙ ВЕНТИЛЯТОР
Тангенциальный вентилятор охлаждения устанавливается на следующих моделях:
ЭЛЕКТРИЧЕСКИЕ ДАННЫЕ
Номинальное напряжение:
220-240 вольт, 50 герц
Подключение питания: 13-амперный автоматический
выключатель с защищенной розеткой, в котором
предусмотрен зазор 3 мм между контактами
ЭНЕРГОПОТРЕБЛЕНИЕ:
Верхний нагревательный элемент 950 Вт
Нагревательный элемент гриля 2000 Вт
Нижний нагревательный элемент 1100 Вт
Конвекционный нагревательный элемент
Конвекционный двигатель 33 Вт
Двигатель вертела 4,1 Вт
Охлаждающий вентилятор 23 Вт
Лампа духового шкафа 25 Вт
Макс. мощность 2100 Вт / 3000 Вт
Сетевой кабель питания:
3 x 1,5 мм
Лампочка освещения духовки:
15 -25 ватт, 300ºС, тип резьбы E-14
Изготовитель не несет никакой ответственность за
ущерб, причиненный людям и материальному имуществу из-за неправильной установки духовки.
Изготовитель сохраняет за собой право вносить в
изделия изменения, которые, по его мнению, являются необходимыми или полезными без предварительного уведомления.
2
, тип H07RN-F <HAR>
2000 Вт
Page 82

Page 83

CH
用户手册
感谢您选择我们的产品,希望我们的家电产品可以为您
提供最好的服务。因此,我们建议您仔细阅读本用户手
册的说明和建议,以便正确地使用我们的产品。
本产品提供了一个烤箱规格铭牌,打开箱门即可看到该铭
牌,其中显示有订购烤箱更换零件所需的产品身份信息。
概述
请在使用产品前仔细阅读本手册,在使用产品前了解
所有控制功能非常重要。
请注意阅读“重要——安全建议和指南”的建议和警告。
•
本产品设计用于私人住宅使用,并可以集成到标准
的厨房家居或类似系统中。
• 若在大篷车辆使用,必须遵循安装说明的注意事项。
•
未经制造商明确认可,将本产品用于任何其他目的
或在任何其他环境中使用将导致产品的任何保修或
责任无效。
•
本款新产品保证无电气或机械故障,不包括制造商
保修条款及条件提及的某些例外。
•
以上条款不影响您的法定权利。
在使用本产品之前,请确保所有的保护性包装和覆盖
物都已移除。
请保护环境,将包装材料分成不同类型,并根据当地
废弃物处理法规进行处置。
本产品包装的设计使用了环保材料,可以回收利用,以
避免对环境造成不利影响。通过回收包装材料,您可以
为节约原材料和减少工业及生活垃圾尽一份力量
您可以从当地环保机构获取垃圾处理相关的任何其他
信息。
首次使用时
味或潮湿,这种情况会很快消失。
本产品及包装上的符号表示本产品不能作为一般家庭
垃圾处理。本产品必须交由电气和电子设备回收点处
理。确保本产品的正确处理将有助于避免因不恰当处
置而对环境和公众健康产生可能的负面影响。关于本
产品回收的更多详细信息,请联系当地政府、生活垃
圾处理服务机构或本产品的销售点。
本产品的生产和销售遵守以下 EEC 欧盟法律和指令的
基本要求:
EC 符号 - 93/68 低电压 - 73/23 CEM-89/336
安全法规 - EN 60 335-1, EN 60 335 - 2 - 6
,您可能会注意到保护层有轻微的气
。
重要事项
安全指南和警告
• 在使用过程中烤箱及其配件也会随之发热。
• 8 岁以下儿童应远离烤箱,除非在大人的监督下。
•
8 岁以上儿童、肢体或精神残障人士、以及不了解其操作
要领的人群,在对其进行监督或指导其安全使用并使其了
解可能产生的风险后,可进行操作。禁止儿童玩弄该设
备。在没有监督的情况下,儿童不得清洗或维护烤箱。
•
本产品符合所有的当前欧洲安全法规要求,但制造
商必须强调一点,本产品在使用过程中将进行加
热,产品表面仍将处于高温状态。
•
因此,制造商强烈建议将本产品放置在婴儿和儿童
接触不到的地方。
•
如果有儿童进入厨房,必须在任何时候都有人监护。
•
我们还建议您在使用和和清洁过程中小心操作,
请仔细阅读本产品的清洁和维护章节。
•
请勿在烤箱上放置重物,开门后勿倚靠在上面,
这有可能会损坏铰链。
•
烹饪热油或脂肪时请勿离开,以免着火。
•
烤箱底部请勿放置烤盘或使用铝箔覆盖
•
切勿在烤箱内放置易燃物品,以免着火。
•
避免配件或电缆接触产品高温部位。
•
请勿将本产品用于特殊加热或烘干衣服。
•
请勿将产品安装在靠近窗帘或软垫家具的地方。
•
请勿试图使用拉门或把手的方式抬起或移动本产
品,以免造成损坏。
•
如果烤箱连接处很脏,则烤箱工作时可能无法正常
关门。邻近的家具可能会被损坏。请保持烤箱连接
处清洁。
•
烤箱在使用过程中温度将升高,必须小心避免接触
烤箱内的热部件。
•
请小心打开烤箱,其热蒸汽可能会导致过于靠近的
人员被烧伤。
•
请勿将水倒进热烤箱,以免造成搪瓷损坏。
•
本产品必须由符合资质的人员严格按照制造商的说
明正确安装。
•
由于误用或不正确安装本产品而造成的人身或财产
损害,制造商不负有任何责任。
•
本产品在使用过程中将产生热量、水汽和湿度,请确
保房间适当通风,避免造成各种人身伤害。如果需长
时间使用,可能需要加强通风,如果您对所需的通风
量有任何疑问,请咨询具有资质的安装人员。
本产品遵守无线电干扰抑制法律法规。
制造商致力持续改进产品性能,因此保留对产品进行
其认为必要的任何修改而无需另行通知的权利。
Page 84

操作方法
敬请保留本用户手册,以供将来或不熟悉本产品使用
的人员参考。
在使用烤箱前,请使用非研磨性清洁剂和温水小心地
清洗内部,然后将烤架和烤盘放置在各自位置。操作
完成后,请启动烤箱,使用最高温度运行约 20 分钟,
去除生产过程中留下的任何微量油脂或树脂,以避免
在烹饪时产生异味。
警告:在首次加热过程中,可能会出现一些烟雾或难
闻的气味。若发生这种情况,请确保室内适当通风,
直至首次操作完成。
完成这个简单的操作后,烤箱就可以用于烹饪食物了。
本产品仅限国内使用。
烤箱仅可用于烹饪食物。
使用烤箱
烤箱的温度由恒温器控制在 50℃ 和 250℃ 之间,视
所需温度而定。在使用过程中,恒温器指示灯将亮起
或熄灭,以指示温度控制。
您可以使用多功能控制按钮选择所需的烹饪模式,
可以选择的功能包括:
A. 烤箱灯模式:所有型号默认选择的烹饪模
式,在使用烤箱时灯泡仍然亮着。
B. 对流模式:由上下方元件提供的热量进行传
统的烹调。
C. 上管模式:用于一般烹饪和烧烤或菜肴
保温。
J. 热解功能:
选择烤箱热解模式后,指示灯《PYA》(热解)将
在 LED 显示屏上亮起。
预设温度为 450 ºC。定时器可调节为一个半小时或
两小时。
D. 下管模式:用于长时间烹饪和加热食物。
E. 风扇辅助对流模式:由上管和下管提供对流
加热以进行均匀烹饪。
F. 烧烤模式:对于焗烤和烧烤。
G. 最大烧烤模式:同上,但烧烤配件提供更大
的烧烤面积。
H. 风扇辅助烧烤模式:快速烧烤,以使食物保
持多汁。在强行通风烘烤模式下这是最节能的方式。
I. 解冻模式:
由风扇辅助,但不加热,用于减少冷冻食品的
解冻时间。
Page 85

产品描述
K1
请记住:如需打开烤箱的门,请始终用一只手
握紧中间的把手,不要碰到儿童锁门栓。
备忘功能键
开始键
停止键时间键
K2
功能说明
1.调整时钟
一旦将烤箱连接电源,屏幕上将显示《00:00》标志。
1) 按《 》键,小时位置上的数字开始闪烁。
2) 转动《K2》调节小时(数值在 0 至 23 之间)。
3) 按《 》键,分钟位置上的数字开始闪烁。
4) 转动《K2》调节分钟(数值在 0 至 59 之间)。
5) 按《 》结束时钟调节。《:》标志将开始闪烁,并且
时间将亮起。
备注:时钟显示模式为 24 小时制。一旦连接至电源,时
钟将开始不间断工作。
2.功能调节
1) 转动《K1》选择理想的烹饪功能。对应的指示灯将会
亮起。
2) 转动《K2》调节温度。
3) 按《 》确定开始烹饪。温度所对应的图标《ºC》将
亮起。
4) 如忽略第 2 步,按《 》确定开始烹饪。预设时间为
9 小时,LED 屏幕上将会显示预设温度。
备注:
1) 时间开关的调节间隔如下:
0--0:30 分钟:调节间隔为 1 分钟 0:30--9:00 小时:
调节间隔为 5 分钟。
2) 温度的调节间隔为 5 ºC,辐射烤制功能的温度调节间
隔为 30 ºC。
3) 烹饪流程开始后,转动《K1》调节烹饪时间。接下来
按《 》继续烹饪。
如您在 3 秒钟内没有按《 》,烤箱将回到之前的时
间并继续工作。
4)
烹饪流程开始后,转动《K2》调节温度。对应的指示灯
将会亮起。接下来按《 》继续烹饪。如您在 3 秒钟
内没有按《 》,烤箱将回到之前的温度并继续工作。
4.查看功能
在烹制过程中,您可以使用查看功能,并在 3 秒后回到
当前工作模式。
1) 在烹饪模式中,按《 》键查看实际时间。
2) 根据时钟显示,按《 》键查看烹饪时间。
5.儿童锁功能
如需锁起:同时长按《 》和《 》3 秒,您将听到一
声长《哔》声,即指示儿童锁已激活,《 》将亮起。
如需解锁:同时长按《 》和《 》3 秒,您将听到一
声长《哔》声,即指示儿童锁已解锁。
备注:在工作模式中,如需停止烹饪,请按快速停止
键。无需长按停止键;该动作无效。
6.备忘功能:
烤箱带 9 小时备忘功能。该功能可以帮您在 1 分钟到
9 小时的时间间隔内记录何时应开始烹饪。只能在等待模
式中设置烤箱的备忘功能。备忘功能的设置方法如下:
1) 按备忘功能调节键《 》;
2)
转动《K2》调节备忘功能的小时(数值在 0 至 9 之间)。
3) 再次按备忘功能调节键《 》;
4)
转动《K2》调节备忘功能的分钟(数值在 0 至 59 之间)。
5) 按《 》确定调节。《:》将开始闪烁,备忘功能指示
灯《 》将亮起。倒计时开始。
备注:时间为 O 时,烤箱警报将响 10 次。《 》标志在
屏幕上消失,提醒您应开始烹饪。您可通过按停止键的
方式取消备忘功能;一旦设定了备忘功能,您可以按两
次停止键将其取消。
7.开始 / 暂停 / 取消功能
1) 如您已设定完烹饪时间,按《 》开始烹饪。如烹饪
暂停,按《 》继续。
2) 在烹饪过程中,按一次《 》暂停。按两次《 》取
消烹饪。
3.灯的调节
1) 转动《K1》选择适当的功能。对应的图标将亮起。
2) 按《 》键开始烹饪。灯的图标《 》 * 《:》将开始
闪烁。
8.省电功能
1) 在等待和备忘模式中,长按《
》3 秒,LED 屏幕将关
闭并进入省电模式。
2) 在等待模式中,如果 10 分钟内您未对烤箱进行任何操
作,LED 屏幕将关闭并进入省电模式。
Page 86

3) 按任意键或转动任何调节器退出省电模式。
9.热解功能(仅限某些型号)
该功能可彻底清洁烤箱的细微之处。
1)
转动《K1》选择热解功能。LED 屏幕上将显示 《PYA》。
2) 按《 》确定烹饪功能。预设时间为 2:00 小时。
LED
屏幕上将显示 《
PYA
》。
3) 转动《K1》更改热解功能时间。有两个时间选项供选
择,《1:30》或《2:00》。
备注:
A) 如果烤箱门处于开启状态,开始键将被禁用,并且
LED 屏幕上将显示《
DOOR
》(门),《
PYA
》。
B) 当烤箱中心温度超过 200 ºC时,按取消键直接回到
等待模式;当烤箱中心温度超过 300 ºC时,按开始
键,LED 屏幕中将显示《
COOL
》(冷却)。
C) 如在正常工作模式中将门打开,加热继电器将停止工
作,LED 屏幕中将显示《
DOOR
》,并发出连续的哔声
警告,直至门被关上或按下取消键。
D) 热解功能完成并且烤箱中心温度降至 300 ºC 以下
后,LED 屏幕将关闭。
E) 在激活热解清洁功能前,请移走任何多余的残留物,
确保烤箱是空的。不要将任何器具例如锅子、烤盘、
吸油容器、活动支架等留在烤箱内,因其可能造成严
重的损坏。
10.备注
1) 使用(除热解功能外的)任何功能时,烤箱的灯都会
亮起。
2) 设定完烹饪程序,如果您没有在 5 分钟内按《 》
键,屏幕将显示实际时间并回到等待模式。调节的程
序将被取消。
3) 如按键有效,将会发出警告音;相反,将没有回音。
4) 警告音将会响五次以提醒您烹饪结束。
热解功能
该烤箱的设计提供了强大的功能,为使清洁变得十分便
捷,它带有热解自动清洁功能。带热解的产品型号含有
自动清洁功能,这就表示不需要在烤箱内腔使用清洁
剂。烤箱内部开始加热,并达到最高 500 °C 的温度,
在这个时候,经过炙烤,任何粘附在内壁上的油脂都可
以轻松地去除。然而,四头玻璃可以保证外门不会被加
热至超过 55 °C 的温度。热解循环在工作中是完全安全
的,因为在此过程中,有一个安全装置将会对门进行隔
离。根据烤箱的脏污程度,可以对清洁周期进行设定,
时长在 1 小时 30 分钟(最短)至 2 小时(最长)之间。
这样一来,烤箱的烹饪时间将保持在最佳水平。
警告:
由于热解清洁的工作温度极高,为使设备更耐用,建议
在使用此清洁功能前取出烤箱内腔的所有配件(根据不
同型号,这些配件可包括:烤盘、镀铬烤架、镀铬烤架
的支架、旋转烤叉、肉类温度计、披萨刀、披萨石或镀
铬烤盘把手)。
一些实用建议
•
在烹饪前,请确保无需使用的配件都从烤箱中移除。
•
在使用之前先将烤箱预热至烹调温度。
•
使用多个烤盘时,请将烤盘置于烤箱中间,并使烤盘之间留有一
些空间,以便空气流通。
•
在烤制多汁的水果蛋糕时,请勿让烤盘过满,从烤盘溢出果汁所
造成的污渍可能很难去除。
•
请勿将烤盘置于烤箱的基座上,或者使用铝箔覆盖基座,这会导
致热量积聚,从而导致烹饪和烘焙时间不符,并可能会损坏搪
瓷。
•
尽可能少打开炉门观察食品(在烹饪过程中烤箱灯仍然亮着)。
•
开门时请小心,避免接触热部件和蒸汽。
Page 87

请根据以下说明取出烤箱内腔配件:
1. 取出烤箱内腔所有配件。
2. 卸下烤箱内腔中烤架的支架(如果烤架的支架上有一
个固定的可伸缩式导向装置,则不需要将其卸下)。
将配件放置在安全的地方,以便热解清洁结束后,可
以轻松地再将其归位。
1) 用螺丝刀松开螺丝将烤架的支架固定,如图 1 所示。
将烤架的支架抬高,使其与烤箱内腔呈 30° 左右的
2)
角。然后,将其从内腔中取出,用同样的方式取出另一
侧板,如图二所示。
3. 热解清洁结束后,请静待 1 小时,然后将烤架的支架
重新装回内腔,如下:
1) 把烤架插入底盘侧板上的安装孔内,如图 2 所示。
用螺丝刀拧紧螺丝,然后用同样的方式完成另一侧板
的安装,如图 1 所示。
2) 拉住滑条的两侧,将烤架安装到滑条中,如图 3 和 4
所示。
4. 将烤架和其他配件安装到内腔中,整个安装过程就完
成了,如图 5 所示。
备注:烤箱内腔和烤盘上均有珐琅涂层,请小心安装和
拆卸,以避免破坏珐琅。
图 1
图 5
图 3
图 4
图 5
Page 88

烹饪指南
请阅读食品包装提供的烹调温度和时间的信息。在熟悉本产品的功
能后,您可以根据个人口味对温度和时间进行调整。
请确保冷冻食品在烹调前已完全解冻,除非另有说明。
食物类型
温度
滑轨 烹饪时间
ºC
(分钟)
建议
个人
蛋糕甜点混合模具
海绵蛋糕或小面包
蛋糕
175 2 55-65
175 3 60-70
松脆酥皮甜点模具
派皮
芝士派皮
水果芝士派皮
200 3 08-10
200 3 25-35
200 3 25-35
面团甜点模具
派皮
软面包 1 千克面粉
180 3 30-45
200 3 25-35
小糕点
松脆酥皮
甜甜圈面团
饼干面团
烤宽面条
200 3 10-15
200 2 35-45
200 3 15-20
225 2 40-50
肉类(烹饪时间视厚度而定)
长烤肉
短烤肉
肉丸
200 2 120-150
200 2 60-90
200 2 30-40
家禽
鸭肉 1 1/2 Kg
鹅肉 3 Kg
烤鸡
火鸡 5Kg
200 2 120-180
200 2 150-210
200 2 60-90
175 2 240-260
野味
野兔
鹿腿
蔬菜
烤箱烤土豆
熟蔬菜馅饼
200 2 60-90
200 2 90-150
220 2 30-40
200 2 40-50
鱼类
鳟鱼
鲷鱼
比萨
烧烤
肉片
香肠
烤鸡
烤小牛肉 0.6 Kg
* 烤箱滑轨的计数方向为从下向上(不包括烤箱底盘,因为烤盘无
法放置其上)
位置信息仅供参考,因为烹调类型和时间取决于食物的数量和质量。
200 2 40-50
200 2 40-50
240 3 10-20
4 8-12
4 10-12
2 25-35
50-60
如何进行烧烤
请将待烧烤的食物放置在烤网或烤盘上。烤网应置于
上方滑轨,托盘应置于下方滑轨以收集油脂。选择风
扇辅助烤箱选择旋钮的位置 [
], [ ] 或多功能烤箱
选择旋钮的[ ] [ ] [ ] 位置。
根据不同类型的食物(肉类、鱼类、家禽等),有时
需要进行翻转以使双面都使用红外线烧烤过。以下一
些烹饪时间可供参考:
待烤食物 烹饪时间
(分钟)
建议
瘦肉或薄肉 4-6
一般肉类 5-8
去鳞鱼 8-10
鱼类(如鳟鱼、鲑鱼) 12-15
香肠 10-12
三明治 2-5
警告
•
请勿使用铝箔覆盖烤盘或加热。
•
请勿将部件包在铝箔中,或将它们放在烤架下——
铝的高反射率可能会损坏烤架。
产品清洁
重要事项
为安全起见,在开始清洁之前,请务必将烤箱电源插
头拔下或拔掉其电源线。
对于非自清洁烤箱,在使用后必须进行清洁,请在烤
箱断电并处于温而不热的状态时进行清洁,这时由烹
饪蒸汽产生的油脂膜仍很容易去除,溅散的脂肪尚未
干硬。
取下镀铬钢条托架,将前方部件向上托起脱离箱壁,
并从后方取出。使用在稀氨溶液浸泡过的软布清洁烤
箱,进行冲洗并干燥。如果仍有污渍和溅渍,可将用
氨水浸泡过的湿布放在烤箱内,关上箱门,过几小时
后,使用温水和液体洗涤剂清洁烤箱,再小心冲洗并
干燥。清洁箱门外部的金属光泽时,请使用软布和肥
皂水,请勿使用任何含有研磨物质的粉状产品。
此外,还要避免使用酸性或碱性物质(柠檬汁、醋、
盐、西红柿等)。避免使用含氯、酸或研磨物质的产
品,特别是在清洁含有涂层的箱壁时。不要使用粗丝
羊毛或较硬的工具,因为它们可能有损表面光洁度。
不要使用高压清洁剂或蒸汽机清洁烤箱。
通常情况下,使用湿软布和温洗涤剂擦洗就可以了,
对于顽固污渍,建议如下:
Page 89

搪瓷部件
这种材质仅可使用推荐的清洁剂——避免使用含氯产
品,例如漂白剂。
安装说明
本产品必须由具有相关资质的人员安装,并符合英国
安全法律法规或欧洲同等法规:
城市发展法规(环境部发布)。
城市发展规律(苏格兰行政发展部发布)。
IEE 配线法规。
劳动电力法规。
启用产品前
开箱后,请检查烤箱的以下配件是否齐全:
•
说明和安装手册
•
烤箱网
•
1 个托盘
•
用于安装产品配件的螺丝和插头
产品安装(参见图 5)
本产品被列为一类产品
法律强制规定必须提供地线。制造商拒绝为由于未遵
循事故预防规则而发生的事故承担任何责任。
重要事项
在使用烤箱过程中,烤箱附近的电器、家具、橱柜或
在安装过程中使用的所有材料都必须能忍受至少高于
环境温度 85ºC 的温度升高。
在低于标示温度下,某些类型的乙烯或层压板家具特
别容易脱色损坏。
如果安装产品时无视此温度限制,或者产品与相邻柜
子的距离小于 4mm,则责任由买方负责。
安装注意事项
1. 无论是安装在灶台还是柜子,烤箱的标准间隙均应
为 600mm,如图 5 所示。
2. 如果将烤箱放置在柜子中,必须移除柜子后方面
板,并至少留 85-90mm 的间隙,以确保有足够的通
风,如图 5 所示。
3. 确保烤箱得到安全固定。使用 4 个螺丝将烤箱固定
到柜子,如图 5 所示,烤箱四角各一个。
图 5:60cm 宽简单电烤炉的安装距离,(上部外壳的
形状可能会有所不同)和与柜子的连接。
A. 必须移除支持滑轨
B. 墙壁与支撑架后部和橱柜底部之间有 75-90mm
的间距
C. 基座
D. 安装前面假板
图 7:在标准厨房单元安装简单的电烤炉的通风和间
距要求。
单元后部上方、底部和支持架的最低通风要求。
A. 后面板
B. 存储空间
C. 取下后面板部分
D. 后面板
E. 存储空间
F. 基座
G. 最小通风间距 80 cm2
Page 90

图 8:在上层柜子安装简单的电烤炉的通风和间距要求。
电源连接
在连接产品之前,请确认规格铭牌上所述电压与电网
的电压一致。
建议使用经 NICEIC(英国电气安装工程监察委员会)
认证的电气装置。
警告:本产品必须接地
本产品必须使用带保护插座的 13 A 双极型自动开关
连接,其触点之间有 3mm 的间隔,并放置在产品可以
方便连接的地方。
重要信息
电源线的导线颜色编码如下:
绿色和黄色 - 地线
蓝色 - 零线
褐色 - 火线
更换电源线
如需要更换电源线,步骤如下:
1.
断开产品电源,取下紧固螺钉,卸下后面板。
2. 松开紧固螺钉和接线端子,取下原来的线缆。
3. 使用符合规格要求的线缆进行更换,请确保颜色代
码连接正确,并正确拧紧所有螺丝。
维修保养
在进行维修前,请先断开产品电源。
在保修期内,如有必要,所有维修服务都应交给制造商
的技术服务部。请注意,未经授权的人员干预或修理本
产品将导致保修无效。
更换烤箱灯泡
(不在产品保修范围内)
烤箱灯泡特性:15 W 或 25 W,300°C,类型 E-14
警告:请断开烤箱的电源,移除箱门(操作如上
所述)和烤箱架。
逆时针方向转动用于保护灯泡的玻璃盖将其卸下。图 9 (A)
拧下旧灯泡,根据安全和环保规定恰当废弃,使用产
品规格说明指定的灯泡进行更换,并装上保护盖。
注意,玻璃盖可能会较紧,因此,可能需要握住取下。
•
绿色和黄色的导线必须连接到标有“E”或地线标识
或颜色为绿色和黄色的终端。
•
蓝色的导线必须连接到标有“N”的终端。
•
褐色的导线必须连接到标有“L”的终端。
•
在任何时候,导线的温度都不可高于环境温度 50ºC
以上。
•
如果电源线损坏,必须使用由制造商或其售后服务
点提供的特定导线或部件更换。
催化涂层的保养与更换
(组装后,涂层不在产品保修范围内)。
为使涂层有效保持“永远干净”,在有顽固污渍时,
必须至少将烤箱加热到 200ºC,以免其成为永久污渍。
如果涂层变黑或有光泽,则必须更换。请移除所有内
部配件,以方便更换涂层。
涂层可以直接从制造商的配件更换部门购买(详情请
参阅封底)。订购时,请注明规格铭牌上所标的产品
类型参考号和 / 或产品序列号。
Page 91

产品规格
内部尺寸
高度:346.5 毫米
宽度:457 毫米
深度:410 毫米
可用容量:70 升
电子信息
额定电压:
220 V - 240 V ~ 50 Hz
电源连接:13A(带保护插座的自动双极开关,触点
之间有 3mm 间隔)
能耗
顶部加热元件 950 瓦
烤制加热元件 2,000 瓦
底部加热元件 1,100 瓦
对流加热元件 2,000 瓦
对流电机 33 瓦
烤制电机 4.1 瓦
冷却风扇 23 瓦
烤箱灯 25 瓦
最大功率 2,100 / 3,000 瓦
电源线:
3 x 1.5 mm2 类型 H07RN-F <HAR>
烤箱灯泡:
15 W - 25 W / 300 ºC 螺纹类型 E-14
制造商拒绝为由于不正确或不恰当安装产品而造成的
人身和财产损害承担任何责任。
制造商有权对产品进行任何其认为必要和有用的
修改,无需另行通知。
Page 92

Page 93

Page 94

CATA ELECTRODOMÉSTICOS, S.L.
c/ Ter, 2 - 08570 TORELLÓ (Barcelona) SPAIN
60813030.01.02.2014
60811205.30.11.2010
 Loading...