

Page 1
V-REGI series
Store support system
Standard package
Sales management
Customer File Reference Manual
V-R7000
V-R100
1
Page 2

Contents
1.
1.1. .................................................................................................................... 5 Outline of the system
.................................................................................................................. 6 Jobs and functions list
1.2.
..................................................................................................................... 7 What’s RFM Analysis
1.3.
2.
2.1. ................................................................................................................................. 9 Customer Note
2.1.1. ...........................................................................................................................................................10 Main screen
2.1.2.
.................................................................................................................................... 11 Register New Customer
2.1.3.
....................................................................................................... 12 Register New Customer at Registr ation
2.1.4.
...............................................................................................................................17 Edit Customer Information
2.1.5.
.............................................................................................................................18 Lock Customer Information
2.1.6.
.......................................................................................................................... 19 Delete Customer Information
2.1.7.
................................................................................................................................................20 Search Customer
2.1.8.
...............................................................................................................................................................22 Functions
2.2. ........................................................................................................................ 37 Customer Analysis
2.2.1. ..........................................................................................................................................................37 Base Screen
2.2.2.
.......................................................................................................................................................39 Rank Settings
2.2.3.
.............................................................................................................. 40 Search from Result of RFM Analysis
2.2.4.
.................................................................................................................................................................42 Function
...................................................................................... 5
............................................................................ 9
Introduction of the Customer File
Operation of the V-REGI Customer File
2.3. ........................................................................................................ 45 Settings for Customer File
2.3.1. .............................................................................................................................................................45 Main Menu
2.3.2.
......................................................................................................................................46 Customer File Settings
2.3.3.
.................................................................................................. 49 Set Up Candidates (List) of Customer File
2.3.4.
.....................................................................................................................................51 Setting of RFM Analysis
2.3.5.
.................................................................................................................. 52 Functions (On Customer Setting)
2.3.6.
..............................................................................................................................................................70 Protection
2.3.7.
.......................................................................................................................................................71 Data Deletion
3.
3.1. ...................................................................................................................... 73 Customer Accounts
3.1.1. ..................................................................................................................................................................73 Settings
3.1.2.
.................................................................................................................................................73 Customer charge
3.1.3.
........................................................................................................... 73 Receive payment of customer charge
3.1.4.
......................................................................................... 75 Check the current balance of customer charge
3.1.5.
...................................................................................................................................75 Cancel customer charge
4.
4.1. ...................................................................................................................................... 76 Output PDF
4.1.1. ........................................................................................................................................................78 Save location
4.1.2.
........................................................................................................................................... 76
....................................................................................................................................................................78 Others
.............................................................................. 73
Link with Sales Management System
Others
2
Page 3

Introduction
This manual explains functions and operation of Customer File.
Take advance notice
The copyrights for this manual, as well as all rights related to the software noted in this
manual are the property of CASIO Computer Co. , Ltd.
The unauthorized reproduction of this manual in whole or part is prohibited without the
express, written permission of CASIO
The content of this manual may change without prior notice due to improvements to the
product and/or changes in their specifications.
Adobe, Reader are trademarks of Adobe Systems Incorporated.
3
Page 4

SECTION 1
Introduction of the Customer
File
4
Page 5
A
1. Introduction of the Customer File
1.1. Outline of the system
V-REGI Customer File offer management of Customer Information at the store.
Customer File
dd / Modify / Delete
Customer
Maintenance
RFM Analysis
Configure Customer
File System
Stamp Control
Coupon Control
Send Customer File
RFM Analysis
Configure Customer System
Issue Stamp Receipt by
Customer File
Issue Coupon Receipt by
Customer File
Send customer file as E-Mail
attachment
E-Mail Issue
E-Mail Magazine
Issue E-Mail by Customer File
This is function just for CXD Next
5
Page 6

1.2. Jobs and functions list
Customer Note --- Operations to control Customer Information
New:R egister new Customer Information
Edit :Edit Customer Information
Delete:Delete Customer Information
Print:Print Customer Information
Function: Print Customer Information, Print Customer Bar Code,
The privilege to a customer is set up. (Givi ng a discount)
Send Customer File as E-Mail attachment, Send E-Mail to Customer.
Search:Search with C ustomer Information to fi nd out Customer, sort and print them
Customer Analysis --- Operations to analyze wh
Analysis:Customer Analysis with RFM, show list.
Rank:Setup range values for RFM Analysis
Print:Print result of RFM Analysis
Function: Print result of RFM Analysis, Print Customer Bar Code,
The privilege to a customer is set up. (Givi ng a discount)
Send Customer File to Administrator as E-Mail attachment , Send E-M ail to
Customer.
Search:Search with C ustomer Information to fi nd out Customer, sort and print them
Settings for Customer File --- Customize “Customer Note” and “Customer Analysis” o
Item:
List:When “Input Method” is List ( Candidate), Setup item of list
RFM:Setup r ange v alues for RFM Analysis
Function: Setting for Stamp , Coupon, and A dministr ator E- Mail Address to se nd Customer
Protection: Set Administrator password, Set User passwo rd and limi tation.
Set: Initialize reservati on data
program name of each parameters and control for Customer File
File.
at customer has purchased in the past
peration.
6
Page 7

1.3. What’ s RFM Analysis
RFM
From Wikipedia, the free encyclopedia
RFM is a method used for analyzing customer
commonly used in database marketing
attention in retail
RFM stands for
Recency - How recently did the customer purchase?
Frequency - How often do they purchase?
Monetary V alue - How much do they spend?
To create an RFM analysis, one creates categories for each attribute. For instance, the
R
ecency attribute might be broken into three categories: customers with purchases within
the last 90 days; between 91 and 365 days; and longer than 365 days. Such categories may
be arriv
to find meaningful breaks.
Once each of the attributes has appropriate categories defined, segments are created from
the intersection of the values. If there were three categories for each attribute, then the
resulting matrix would have twenty-seven possible combinations (one well-known
commercial approach uses five bins per attributes, which yields 125 segments). Companies
may also decide to collapse certain subsegments, if the gradations appear too small to be
useful. The resulting segments can be ordered from most valuable (highest recency,
frequency, and value) to least valuable (lowest recency, frequency, and value). Identifying
the most valuable RFM segments can capitalize on chance relationships in the data used for
this analysis. For this reason, it is highly recommended that another set of data be used to
validate the results of the RFM segmentation process.
ed at by applying business rules, or using a data mining technique, such as CHAID
.
behavior and defining market segments. It is
and direct marketing and has received particular
,
7
Page 8

SECTION 2
Operation of the Customer File
8
Page 9
2. Operation of the V-REGI Customer File
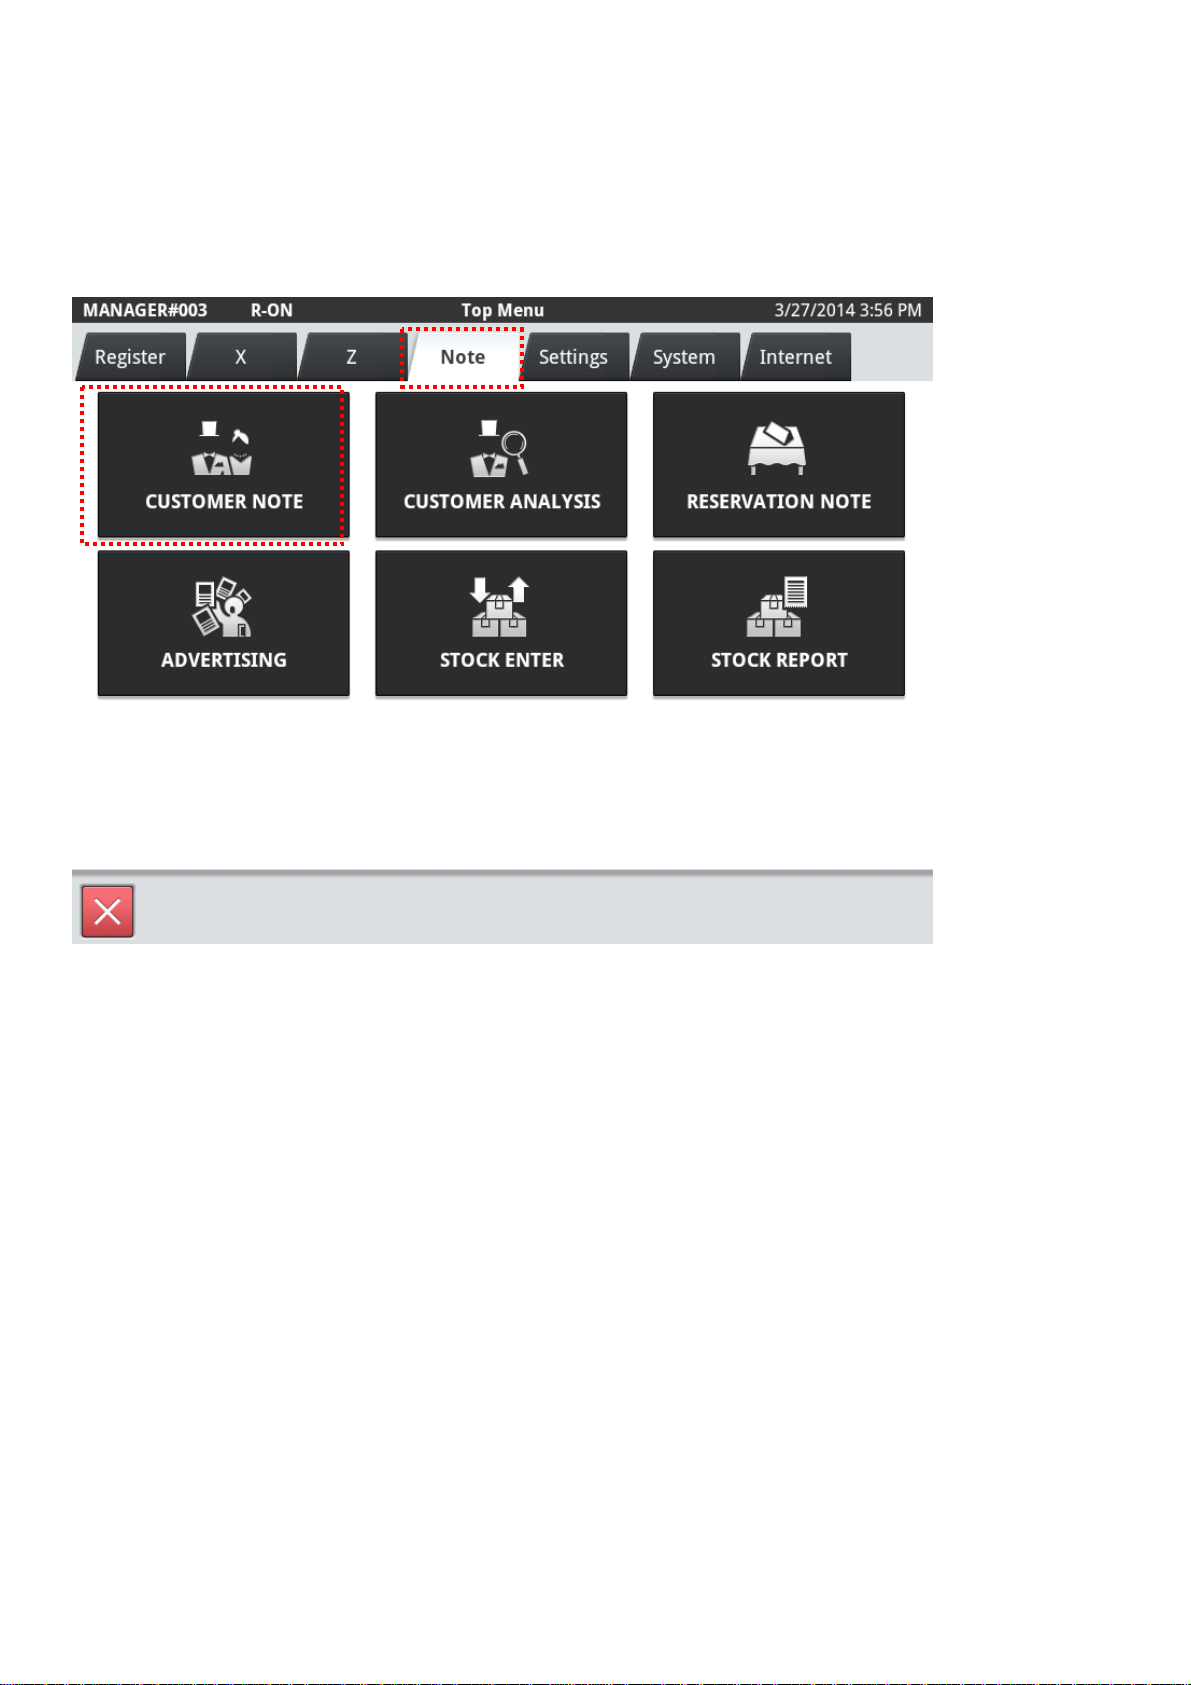
2.1. Customer Note
Customer note can be entered from Top Menu – Note tab.
9
Page 10
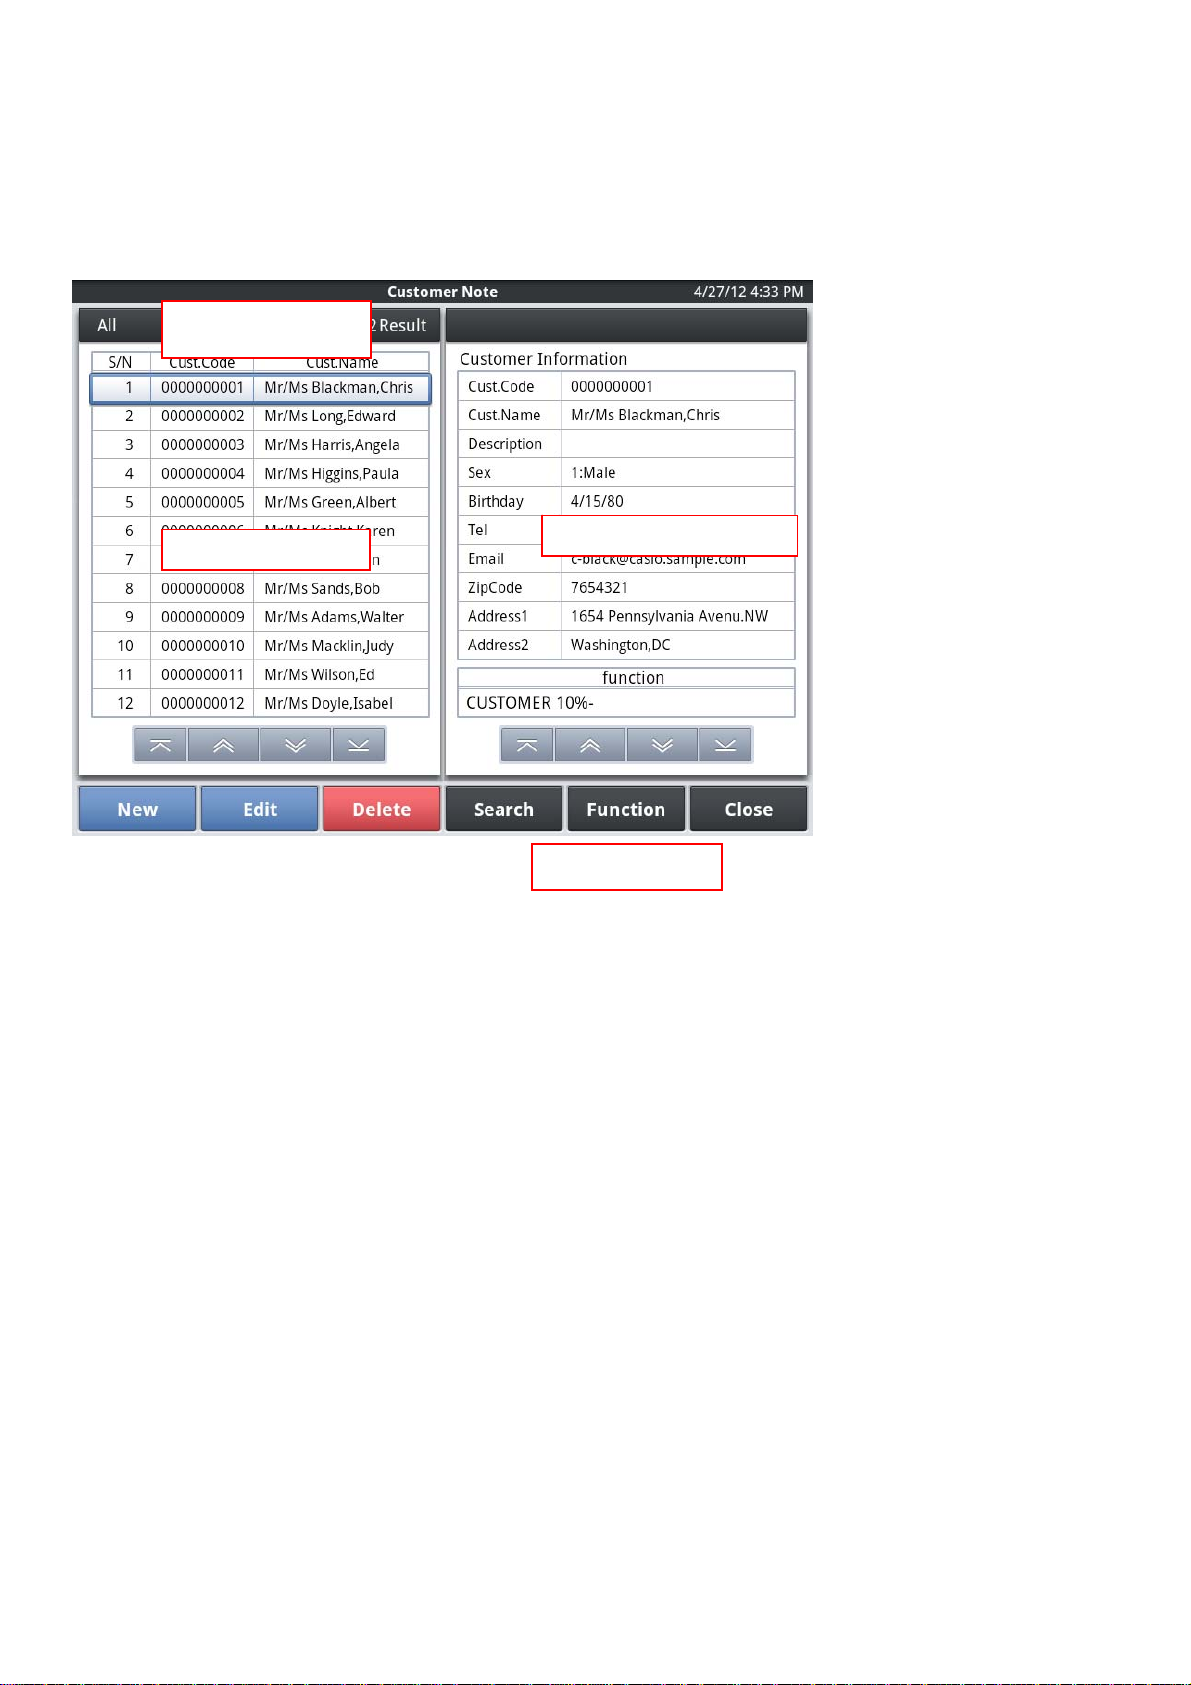
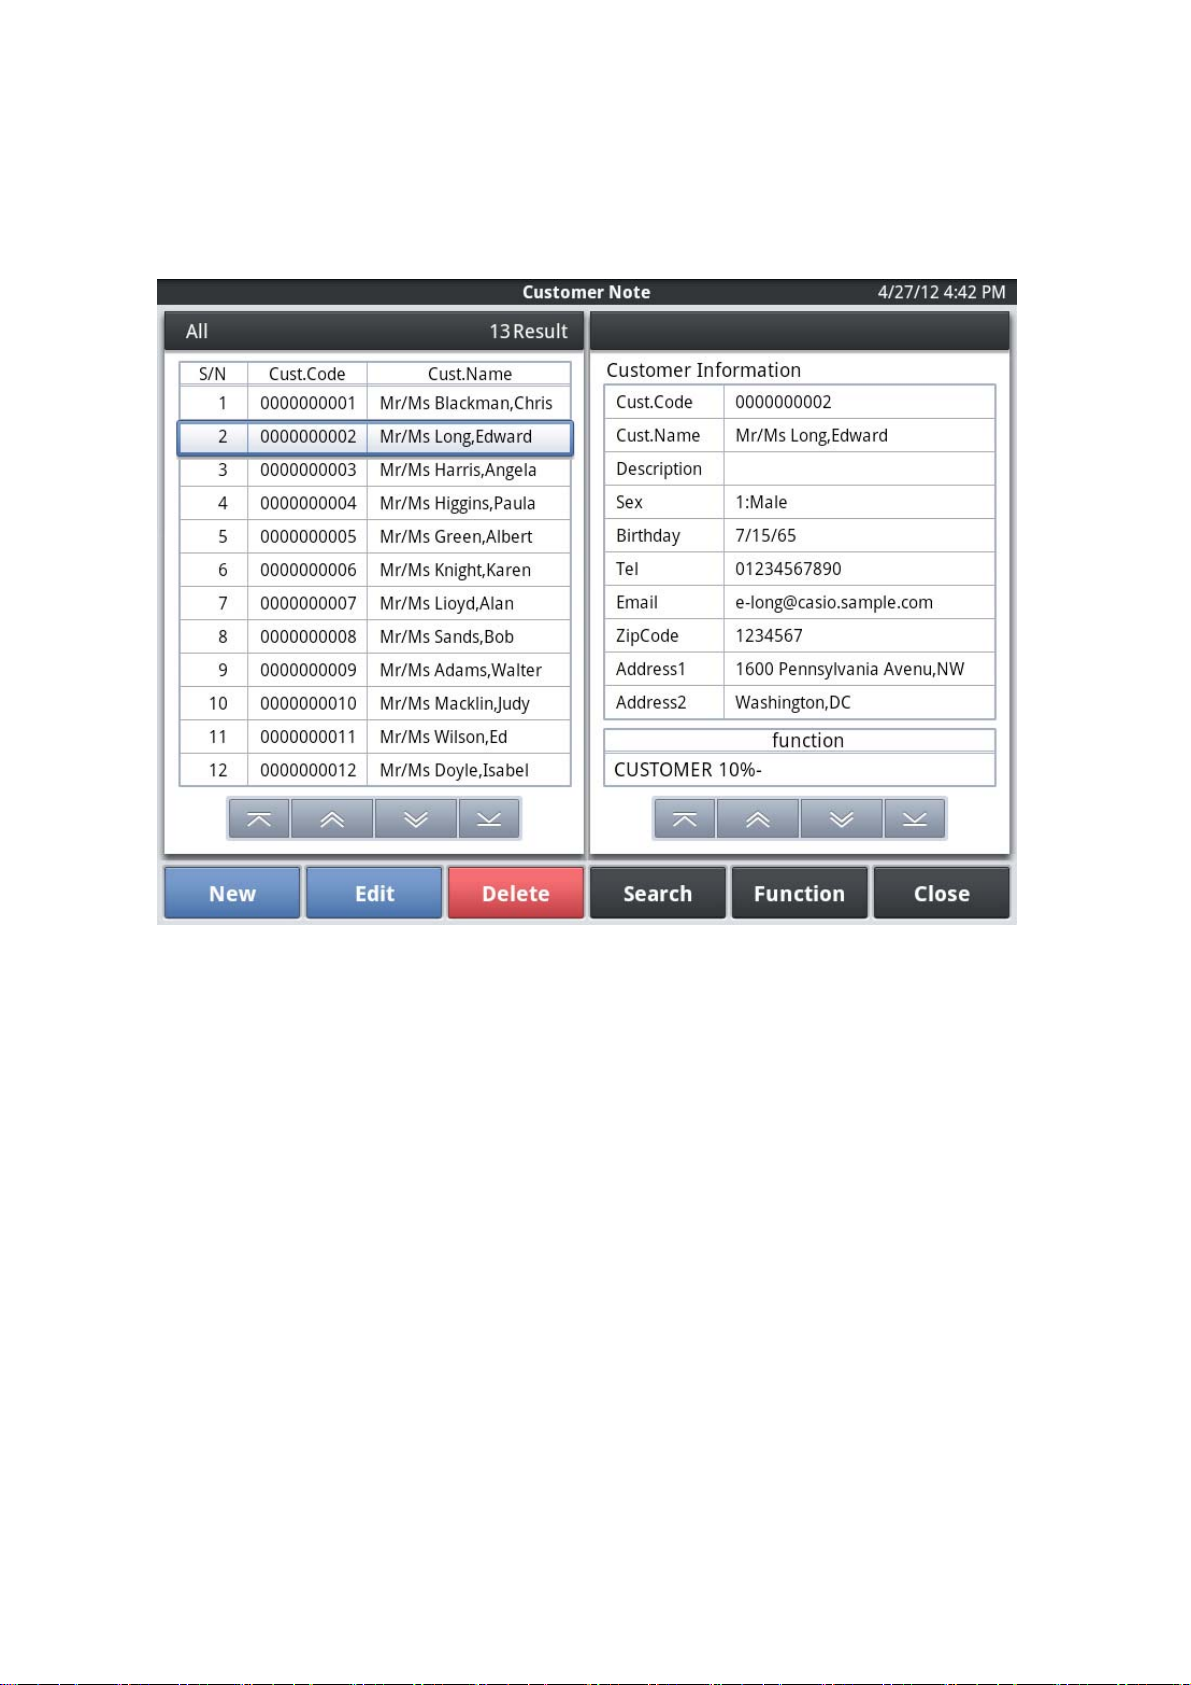
2.1.1. Main screen
Here is the main screen of the Customer File
A.Result Ar ea
B.List of customers
・The number of result of search, and list will be indi cated.
・Tap《 or 》to move back / forw ard list.
A.Result Area
C.Customer Information
D.Function keys
・Tap this field to get dialog to search customer.
・Browse list of Customer
・Display detailed Customer Information where you have tapped List Are at B .
C.Details of Customer Information
・Display detailed Customer Information where you have tapped List Are at B .
・Tap》 to show customer stamp and charge sales information.
B.List of Customer
D.Function keys
・Av ailable function k eys are displa yed in this field.
10
Page 11
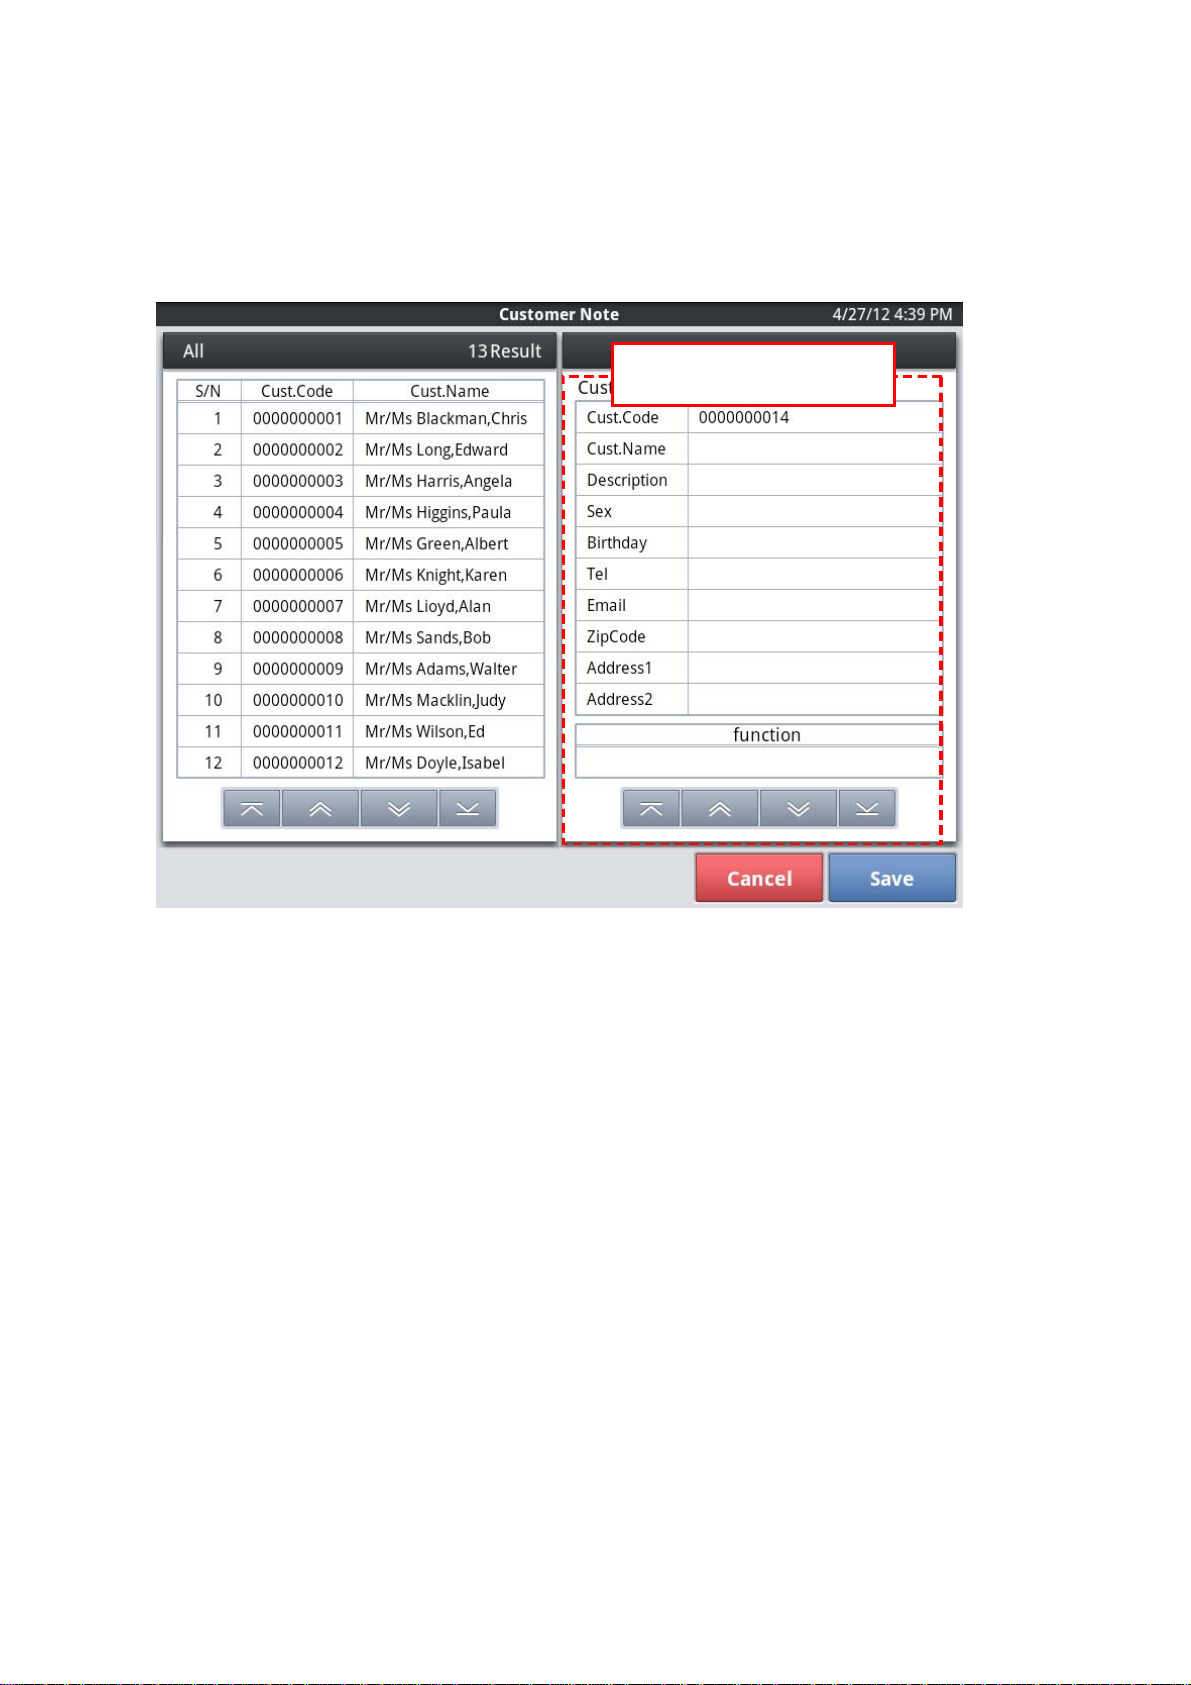
2.1.2. Register New Customer
R egister new Customer
Detailed display region
When the tap of <New> is carried out, a detailed display region will be in the
input state of New Customer Information.
A customer code is assigned automatically.
After inputting required information, if the tap of <Save> is carried out,
Customer Information will be registered.
When you stop an input, please carry out the tap of <Cancel>
11
Page 12
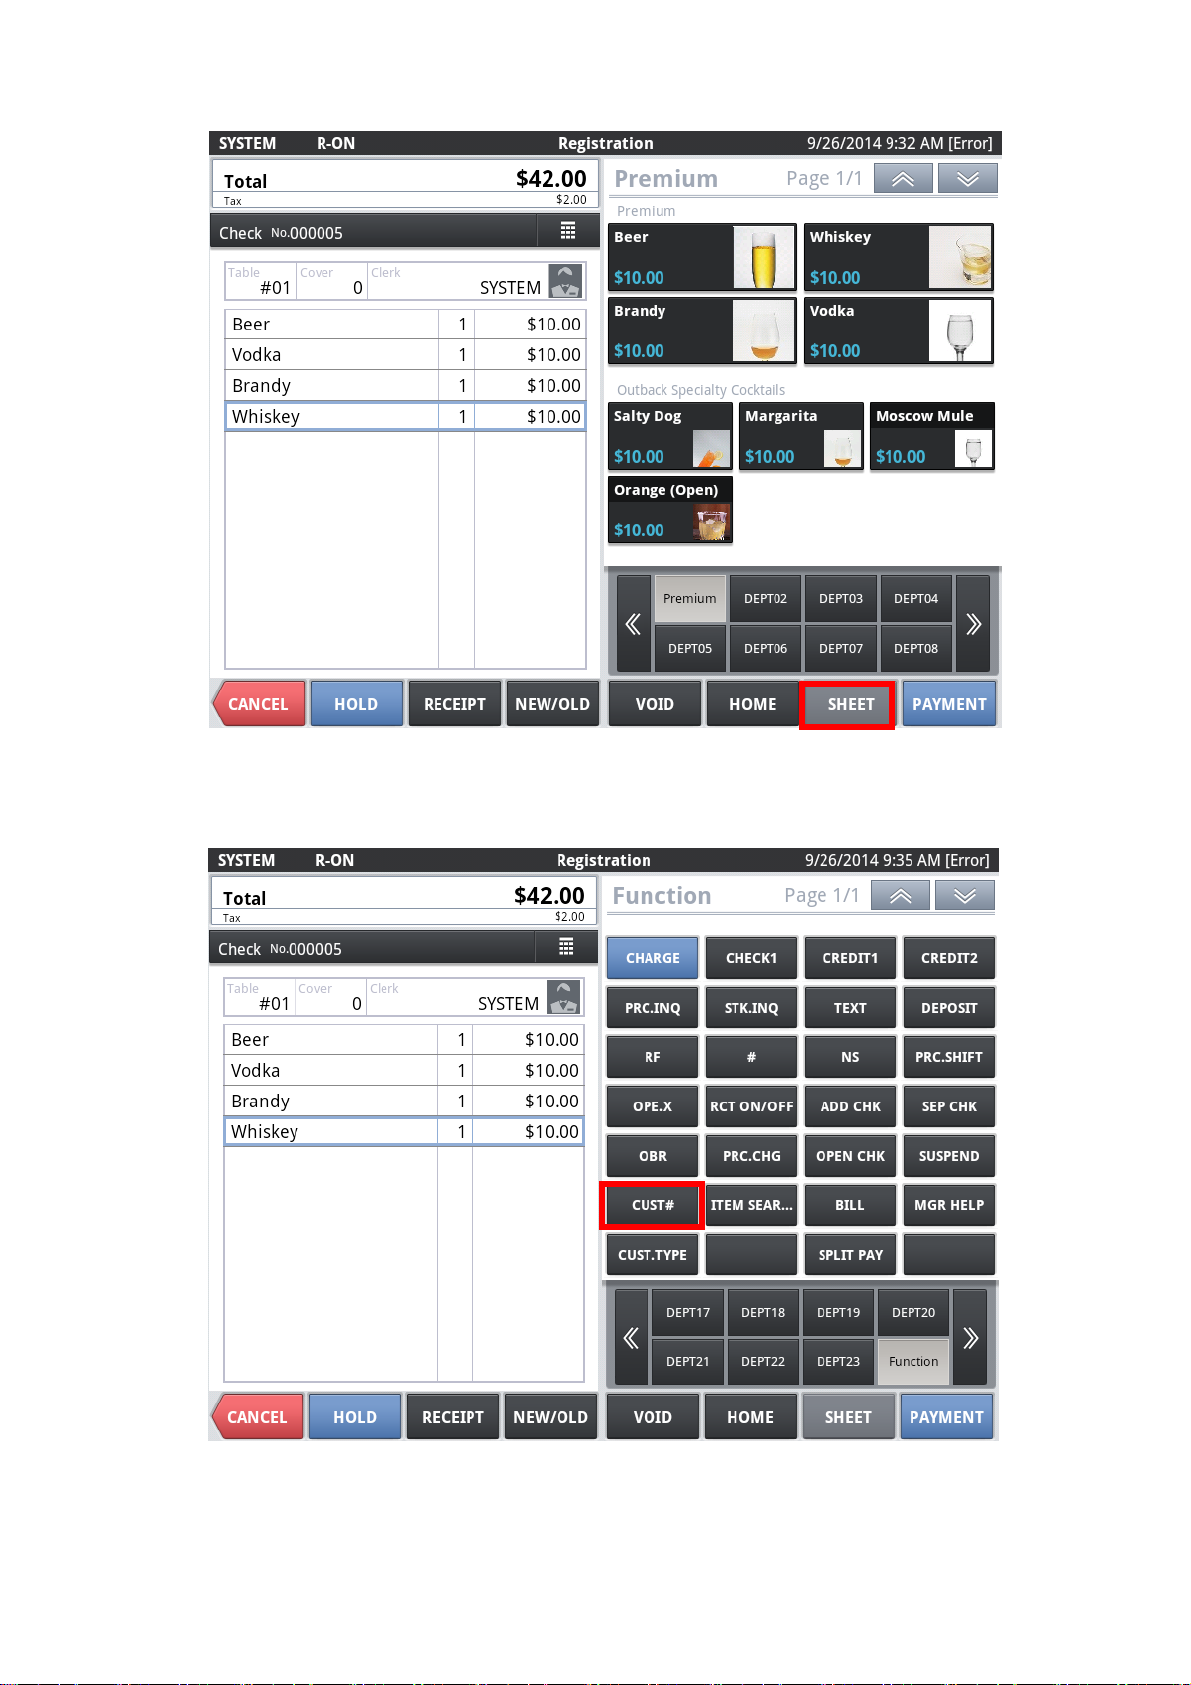
2.1.3. Register New Customer at R egistr ation
During operation of the register, if you want to search or register a customer,
Please tap the <SHEET> the lower right corner of the screen.
12
・ Tap <CUST#>
Page 13
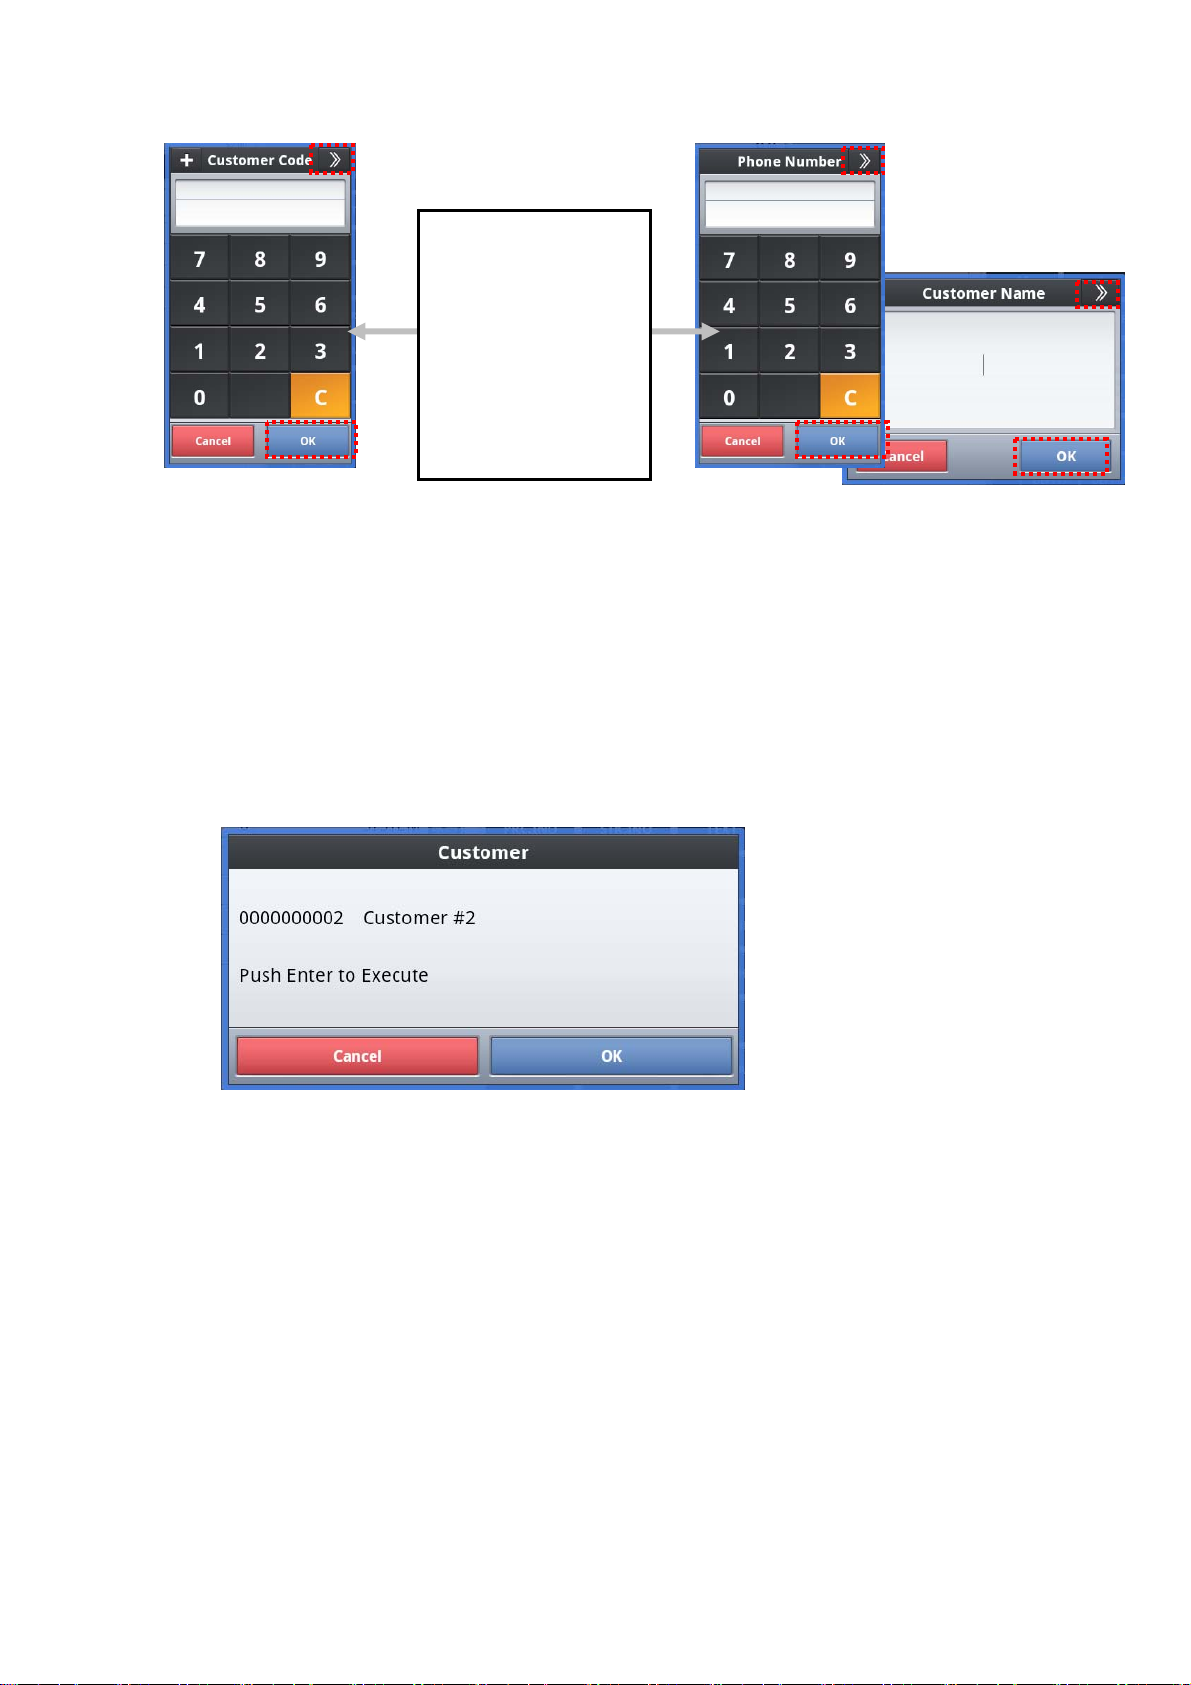
[Switching of the dialog]
When you tap the title
right ">>" mark
It is possible to switch
customer code search,
phone number search,
the customer name
search.
・ When you tap the <OK> without entering the customer code, you will be able
to search for the customer from the customer list.
・ After confirmation, please refer to the following [1] and [2], the operation
description.
[1] If the customer is already registered
Customer name that corresponds to the customer code that you entered
will be displayed.
Make sure the customer name that appears. When you tap the bot tom
right of this dialog the <OK>, customers listed will be selected.
13
Page 14
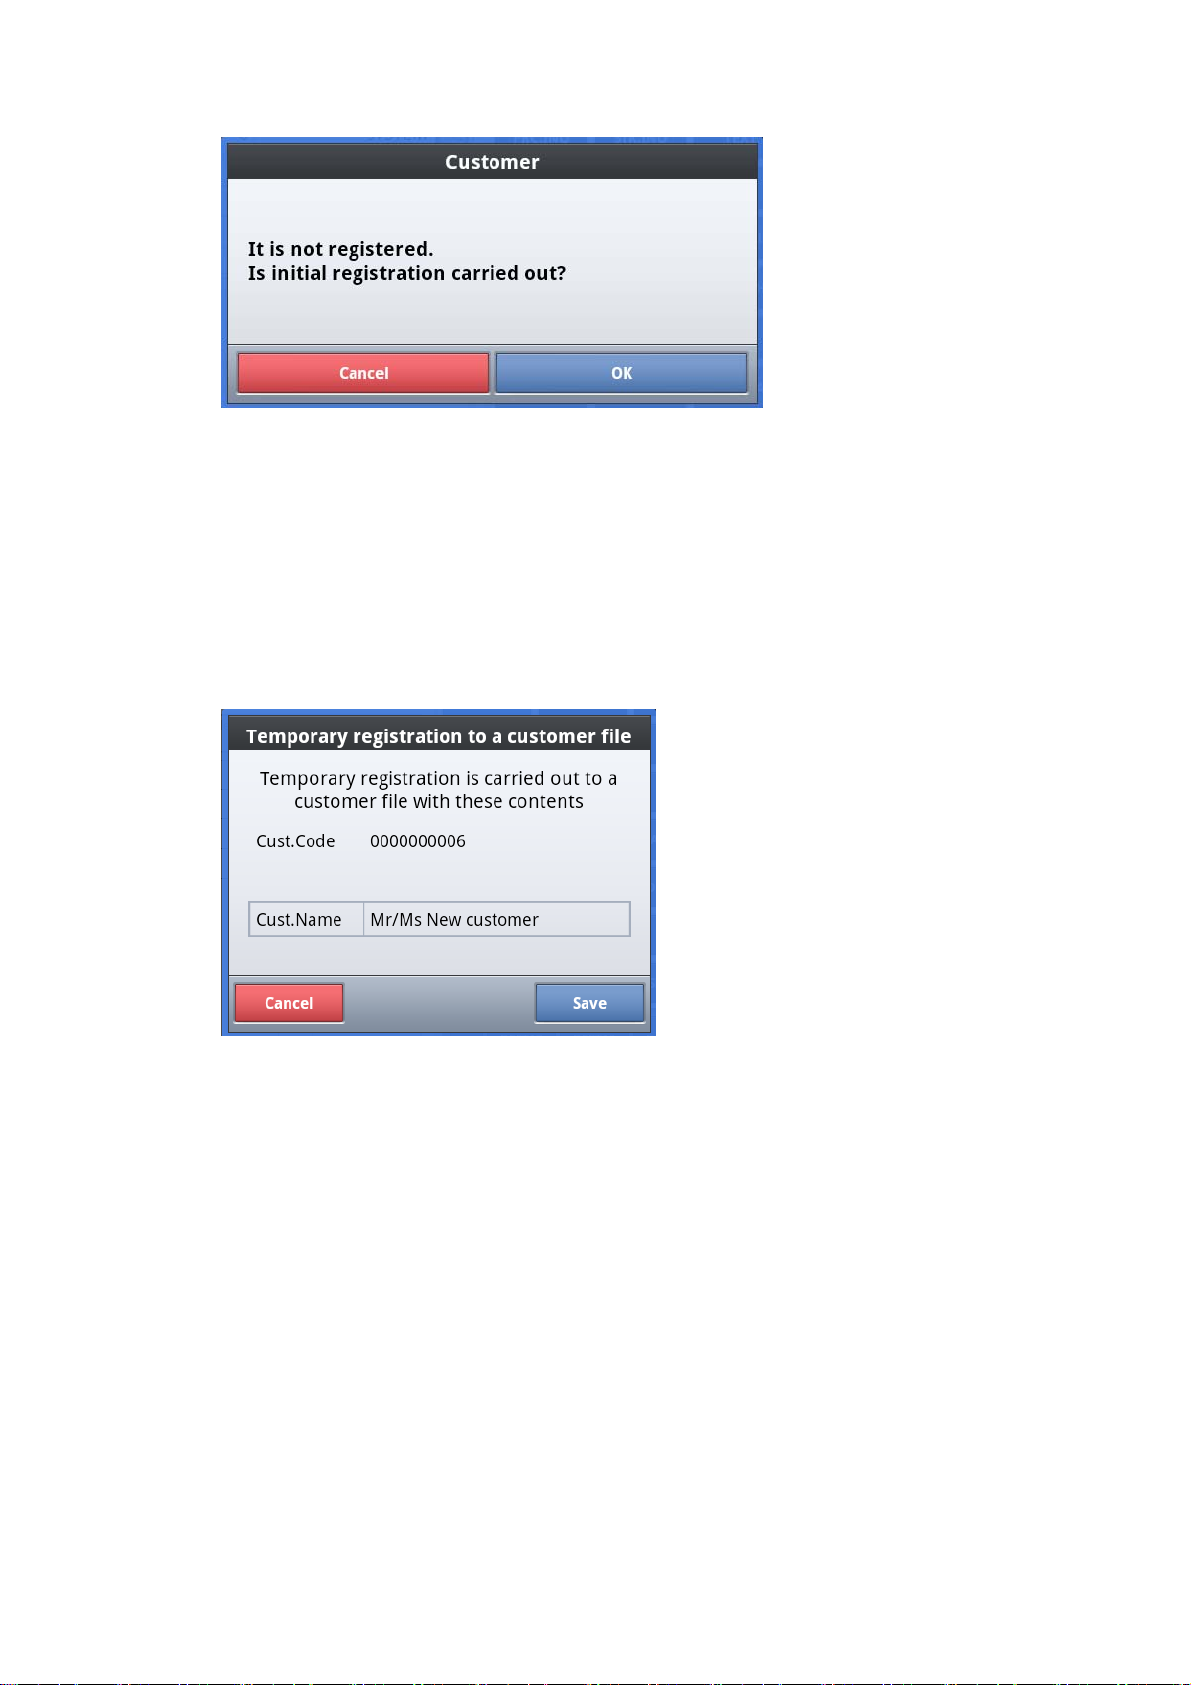
[2] Customer is not registered, if you want to register as a new custo mer
Dialog is displayed if the customer has not been registered.
If you want to register as a new customer, and then tap <OK> dialog
lower right.
Please tap the <Cancel> If you want to cancel the registr ation.
14
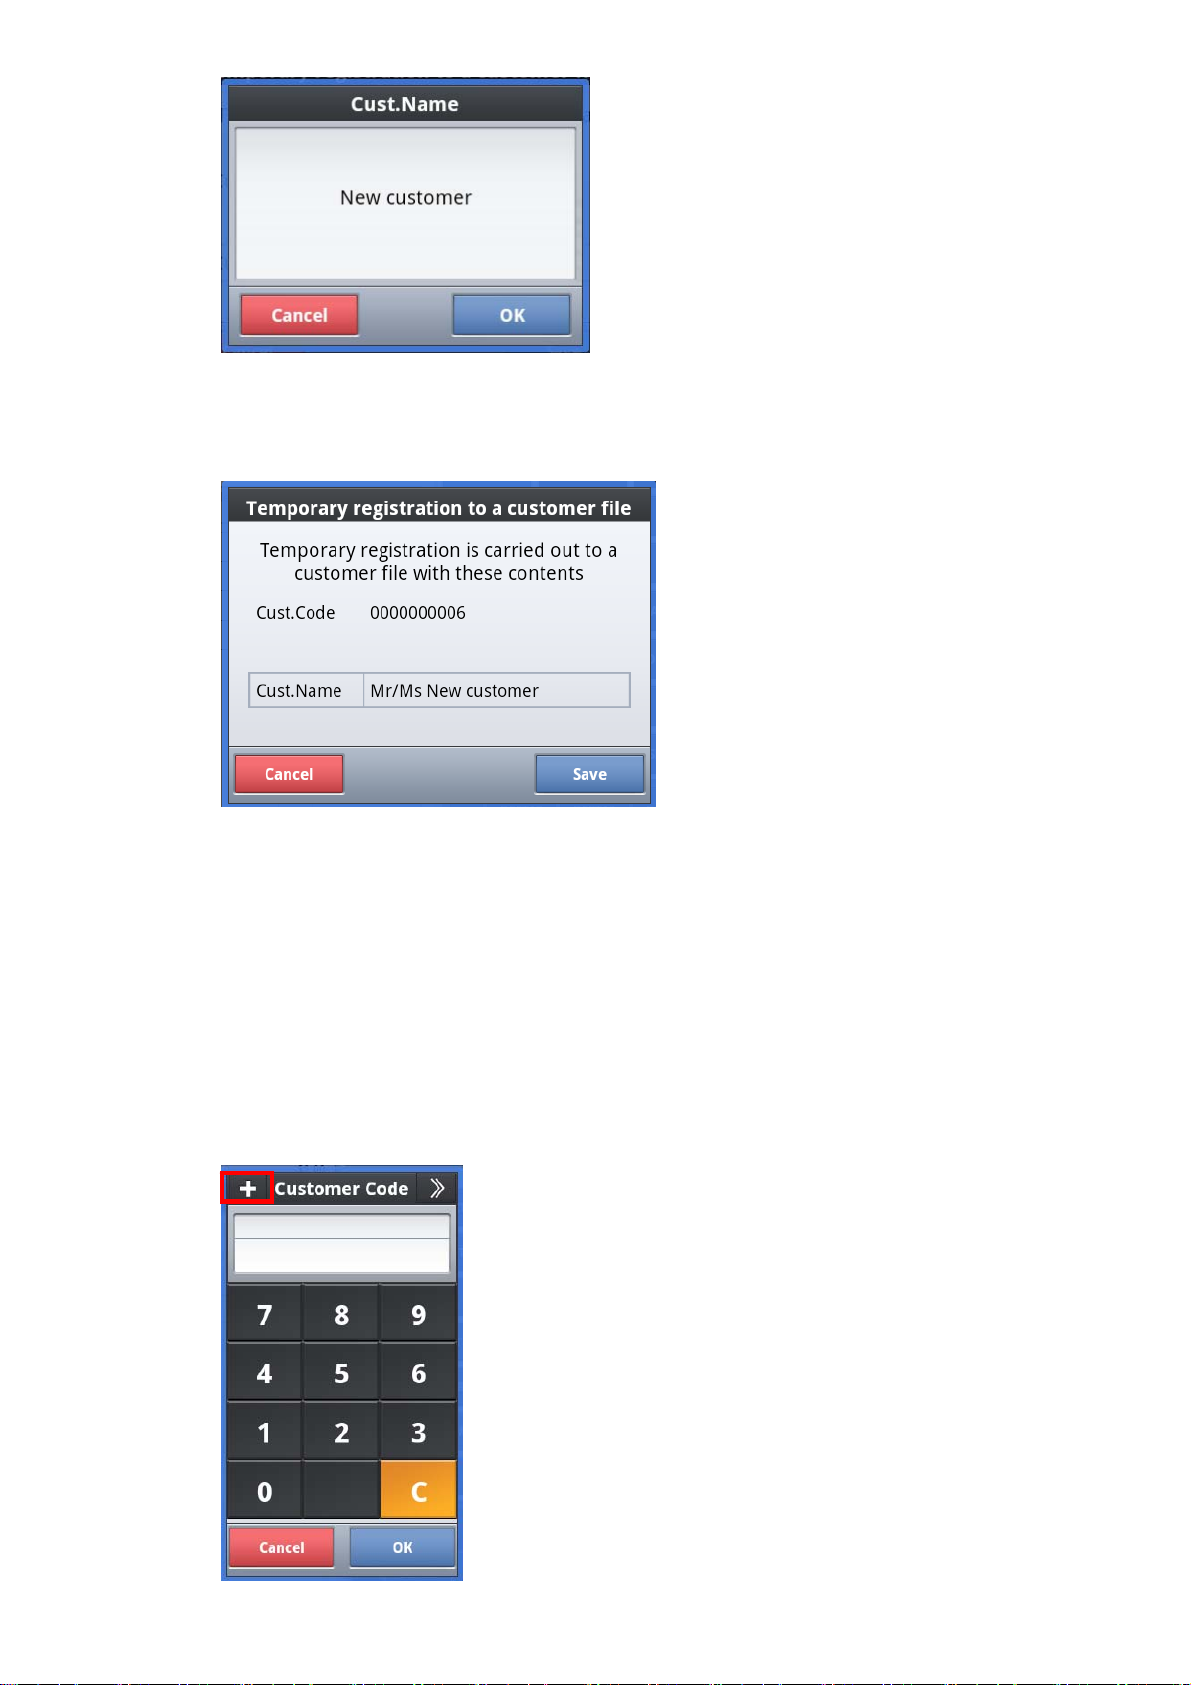
Registration confirmatio n screen of the customer is display ed, register
the customer's name.
When you tap the frame that are listed as "New Customer", customer
name input screen is displayed.
Page 15
Enter Customer Name, and tap<OK>.
Make sure what you have entered, tap the <OK> dialog bottom right, it
will be registered.
Customer information after registration you can be changed in the
[Customer Note].
[3] If you want to register a new customer easily from the beginning
15
Page 16
I will tap in the upper left corner of the customer code input dialog [+].
Customer code is issued automatically, go to the registration
confirmation screen.
A subsequent operation is the same as the registr ation of new
customers.
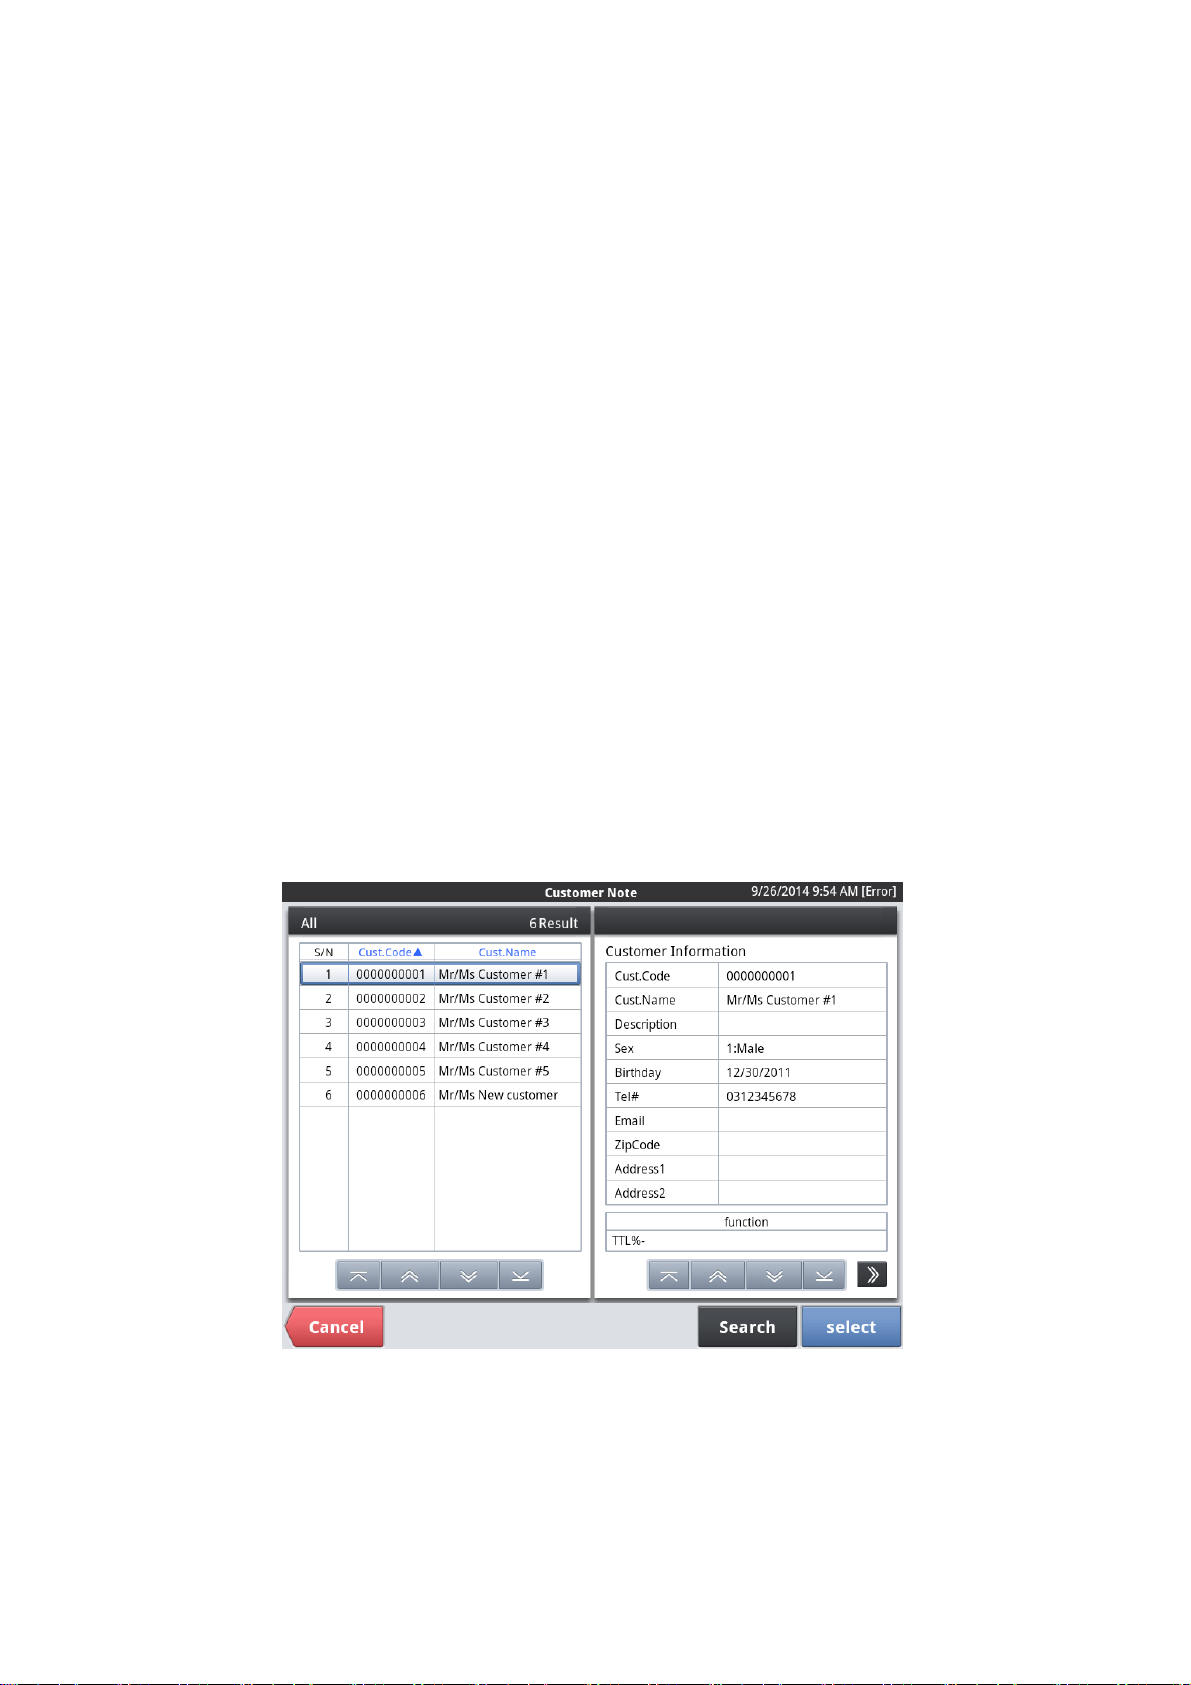
[4] If you w ant to select from the entire customer list
Select from a list of customer book.
In a state of displaying customer code input dialog, I will tap the <OK>
without entering the customer code.
Customer list is displayed. Tap the list display area on the left side,
customer information of the target appears on the right side, and then
tap <OK>.
Tap the <Cancel> If y ou wa nt to stop the oper ation.
16
Page 17
2.1.4. Edit Customer Information
Edit registered Customer Information
T ap the List area in the main menu to displa y detailed Customer Information
for editing
Enter required information and tap <Sav e> this will store your new settings.
To cancel entry, tap <Cancel> button
17
Page 18
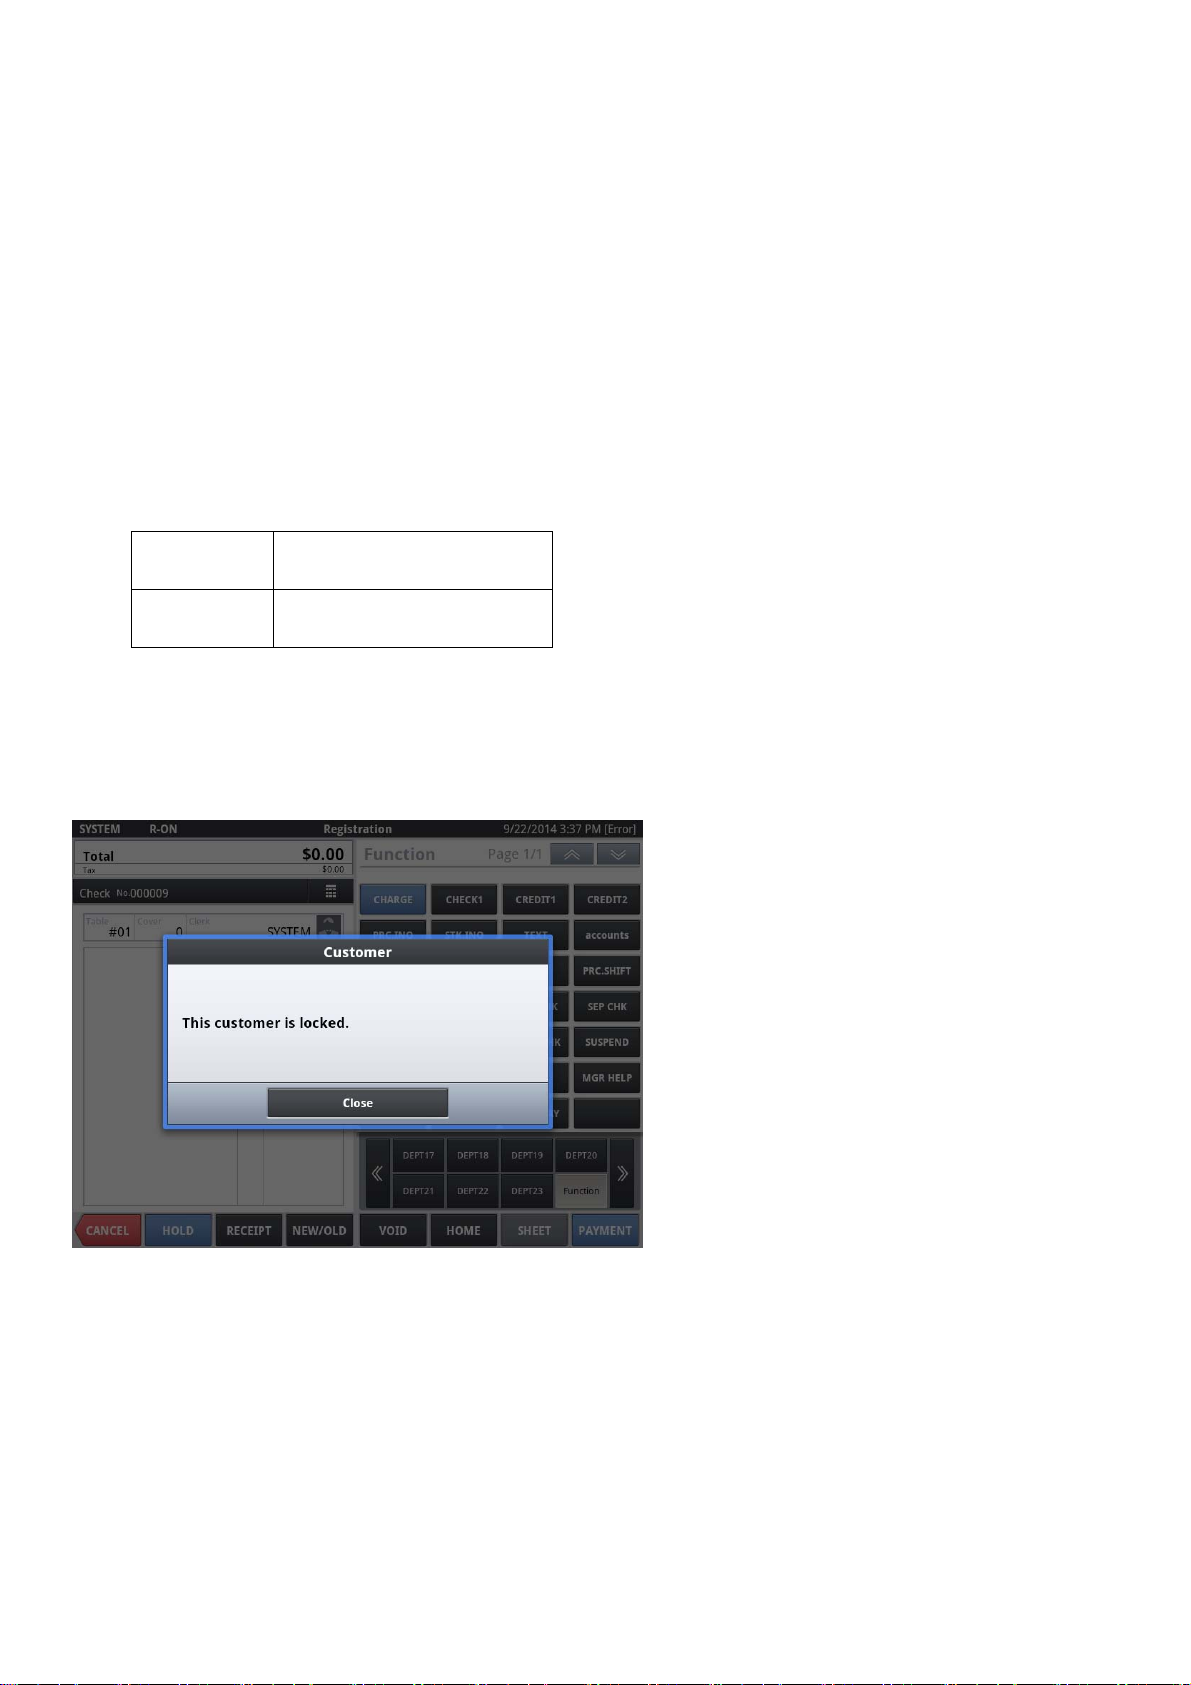
2.1.5. Lock Customer Information
Lock Customer Information
Tap the List area on the main screen and then tap <Edit> butto n while the details are
displayed.
Scroll down the customer information area.
Change set value of Out of Service.
0:Valid Unlock the customer
1:Invalid Lock the customer
When confirmation dialog is displayed, tap <Enter> to delete customer
To cancel delete sequence, tap <Close> button
This locked customer information can not be used in R egistr ation.
18
Page 19
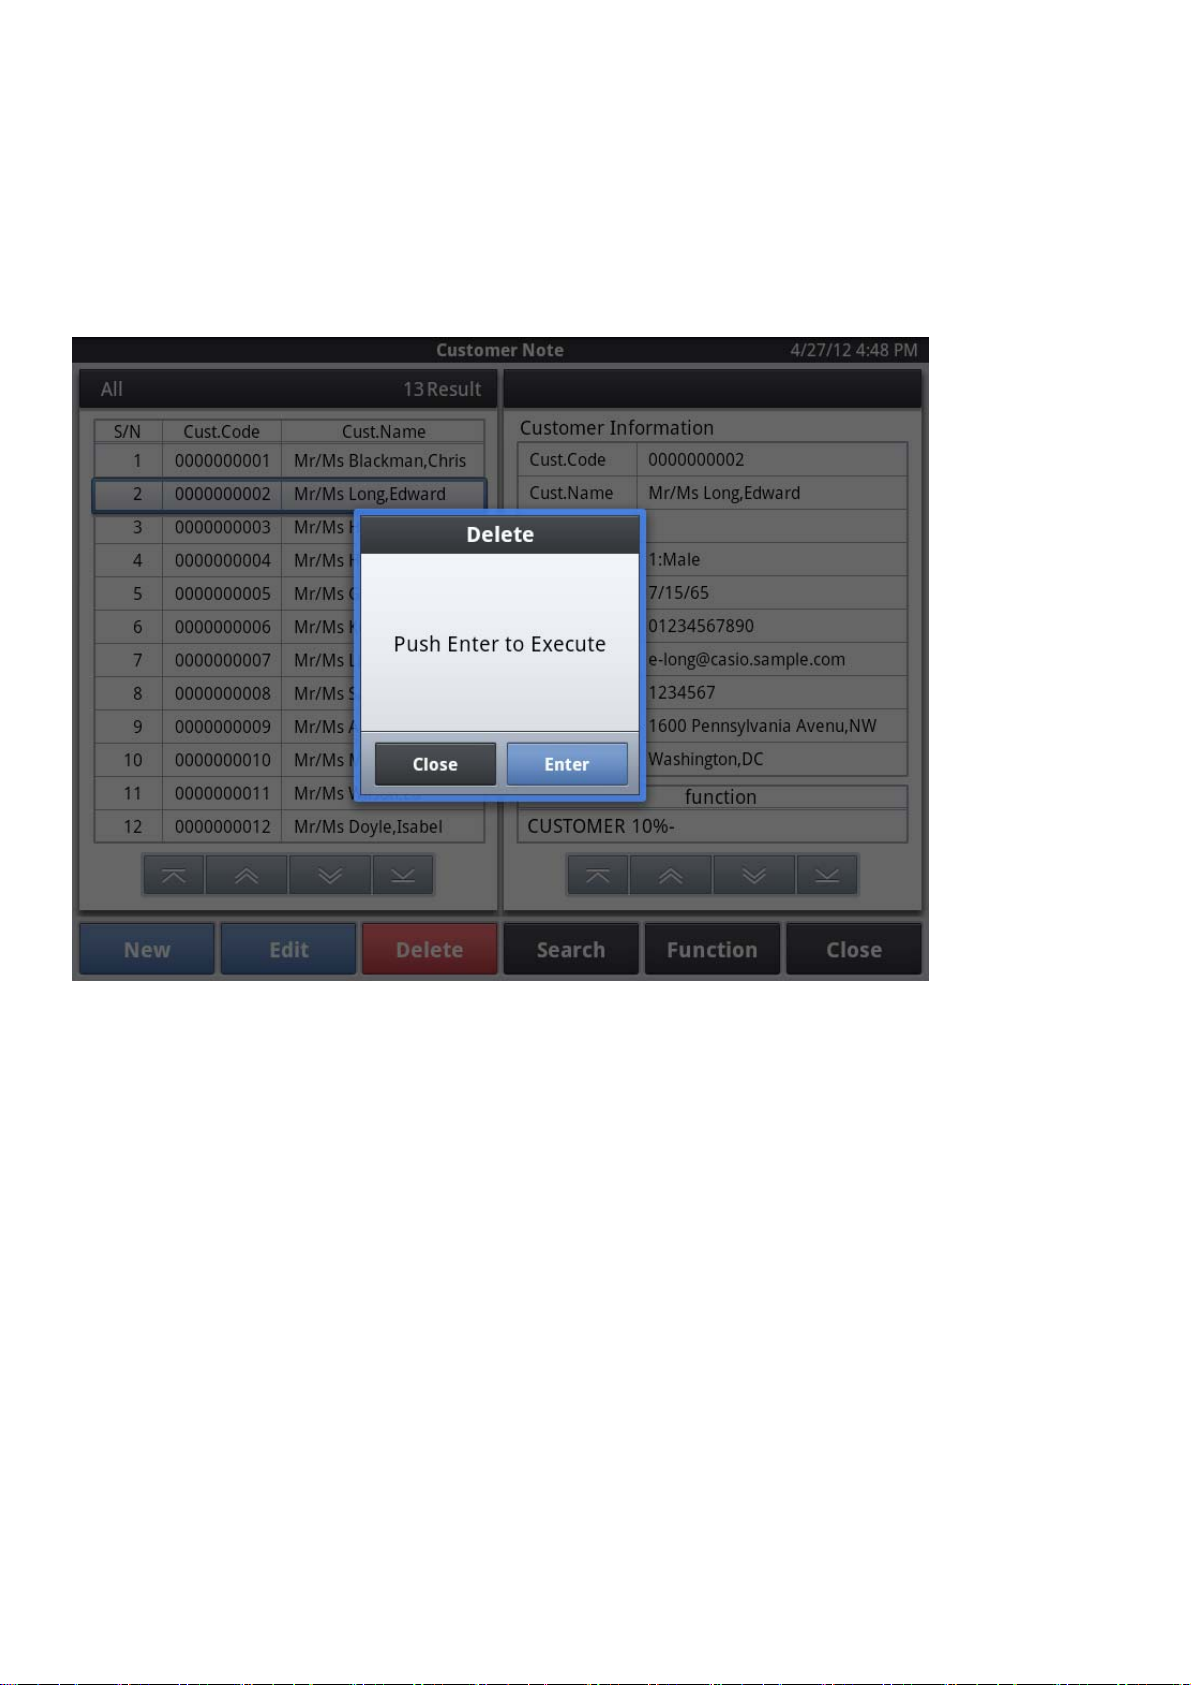
2.1.6. Delete Customer Information
Delete Customer Information
T ap the List area on the main screen and then tap <Delete> button while the details are
displayed.
When confirmation dialog is displayed, tap <Enter> to delete customer
To cancel delete sequence, tap <Close> button
19
Page 20
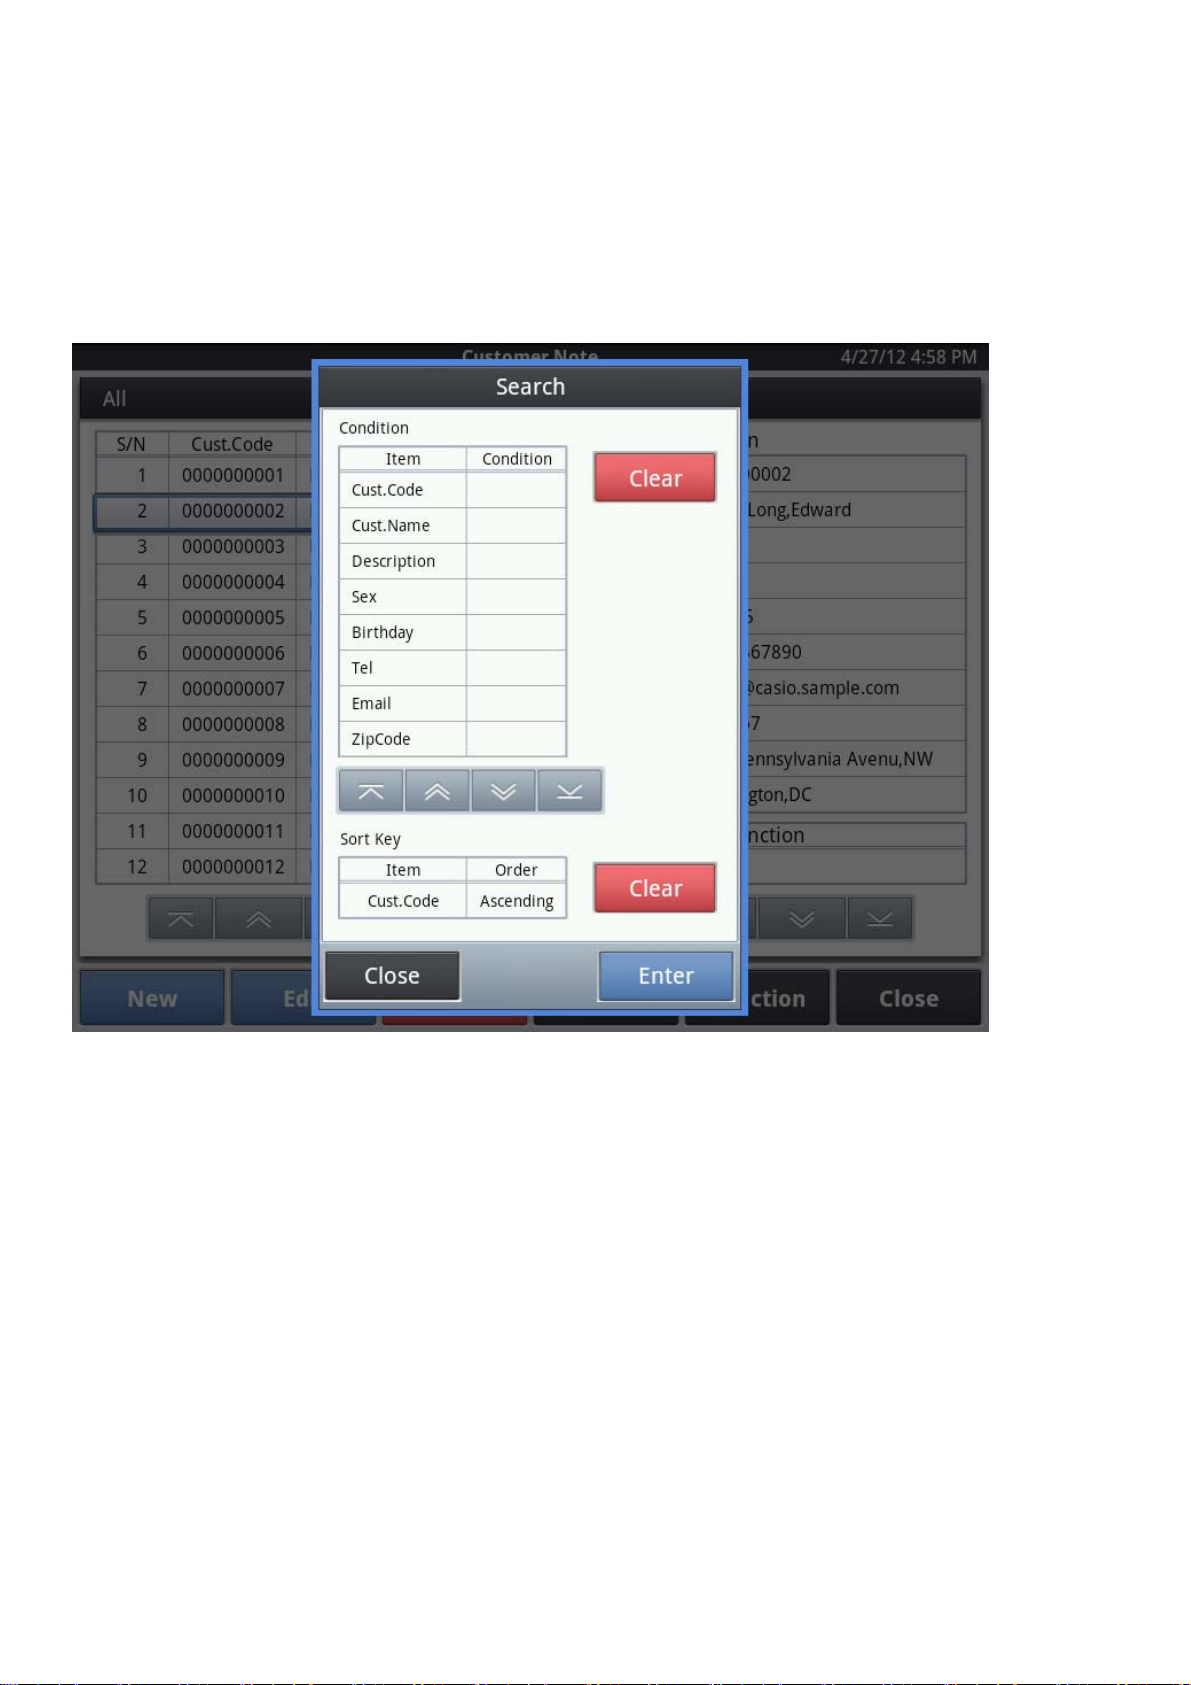
2.1.7. Search Customer
2.1.7.1. Search by condition
Y ou can find Custo mer by using search function with specific key.
A search dialog will be displayed if the tap of the search region is carried out.
A search condition can be inputted by carrying out the tap of the search condition item.
20
Page 21
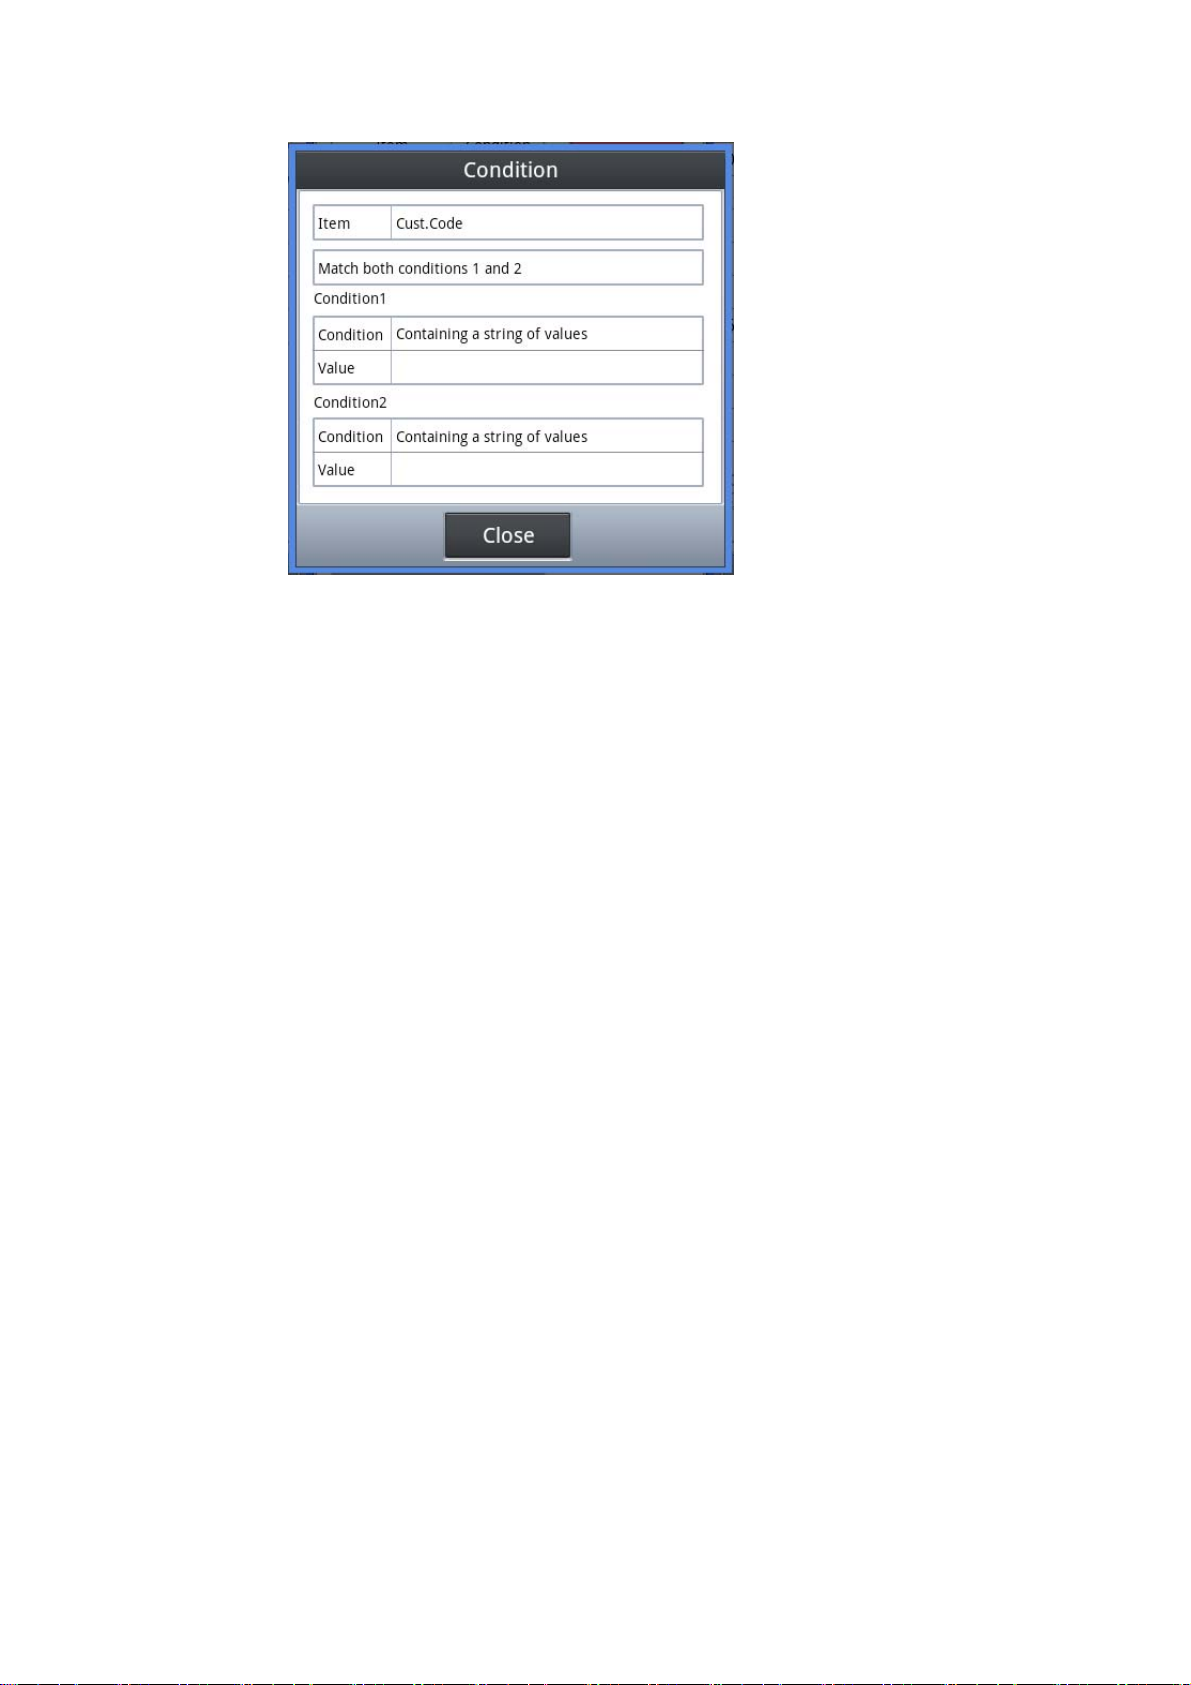
Example of a search condition input
The sorting method can be specified by carrying out the tap of the sorting item.
After inputting a search condition and sorting conditions, if the tap of <Enter> button is
carried out, it will search, and display a result on a list display region.
When you have stopped searching, please carry out the tap of <close>.
21
Page 22
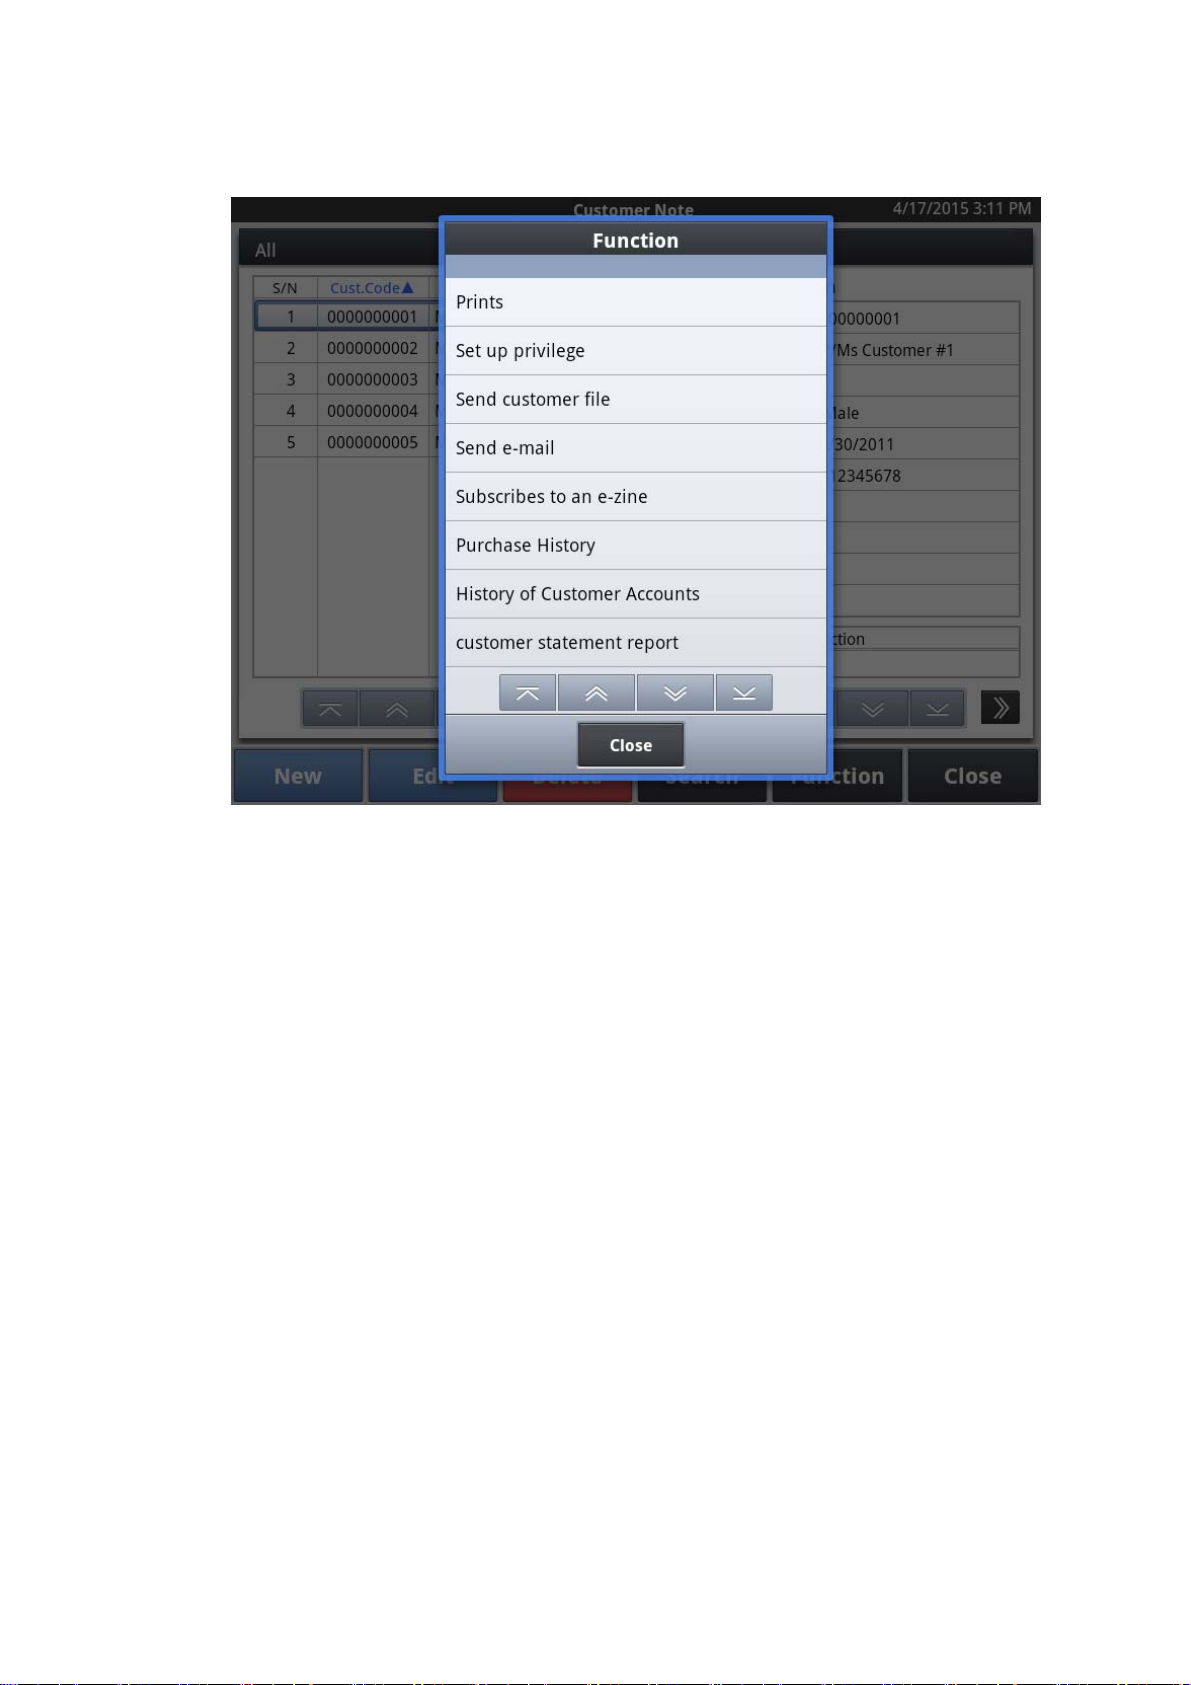
2.1.8. Functions
Functions:
Print Customer Information, Print Customer Bar Code,
The privilege to a customer is set up. (Giving a discount)
Send Customer File as E-Mail attachment.
Send E-Mail to Customer as DM.
E-Mail Magazine Subscription for CXD NEXT.
Purchase history
History of customer accounts
Print customer statement report
22
Page 23
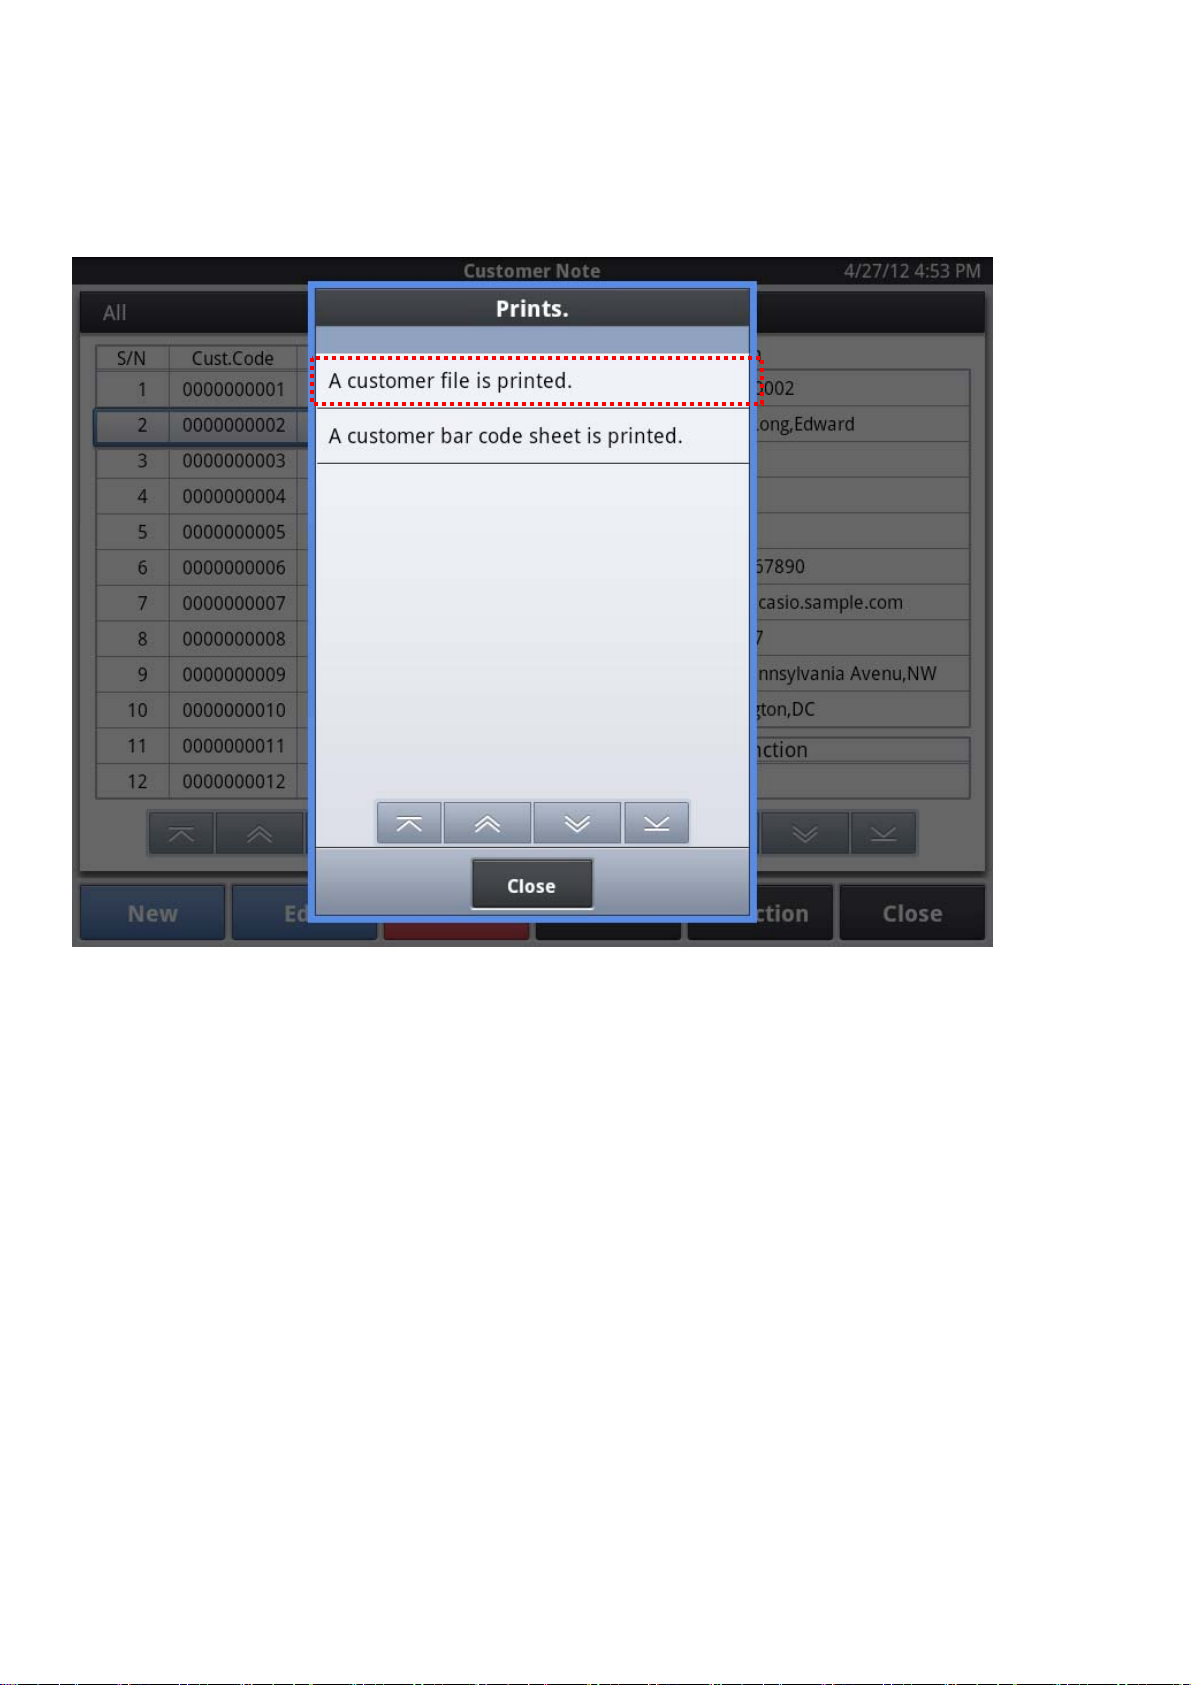
2.1.8.1. Print Out Customer Information
It is possible to print out registered Customer Information.
Tap <Print> butto n at the main menu fo r print out
Batch or individual Customer Information can be selected
23
Page 24

2.1.8.2. Print out Customer Scanning Code
In [Customer Bar Code Sheet is printed], VX prints Customer Bar Code
(Scanning Code. Not Customer Code) on EAN 12 + 1 (Check Digit)
24
Page 25

2.1.8.3. Setting for Customer Privilege
The privilege to a customer is set up. (Givi ng a discount)
A setup of a privilege can be performed when the tap of the <Func> button at the
base of the screen is carried out.
Selection of [Batch data input] and [Individual setting] can be performed.
In the case of [Batch data input] setting, a privilege can be set to all customers
displayed in the list.
In the case of [Individual setting] setting, a privilege can be set to the customer
specified in the list displayed.
The list of discount in the cash register will be displayed when a package setup or
separate setting is chosen, please carry out a tap and choose.
Specifying a customer in the displayed list, when deleting a privilege (Func) -- after
that tap -- <modify> -- button and please carry out the tap of the privilege of a
25
Page 26

detailed display region continuously.
26
Page 27

2.1.8.4. Send Customer File
Send Customer File to Administrator as E-Mail attachment.
Select contents to send.
27
Page 28

2.1.8.5. Send E-Mail to Customer
Send E-Mail to Customer.
There are two ways to send.
Immediately
By Timer (ex.AM10:00)
28
Page 29

Once “Immediately” or “By Timer” is selected, the Time and contents will be displa yed.
<Enter> : Go
<Close>: Cancel
29
Page 30

2.1.8.6. E-Mail Magazine Subscription
E-Mail Magazine Subscription for CXD NEXT.
Available only in Japan.
30
Page 31

2.1.8.7. History of Customer Accounts
Y ou can check history of customer accounts and current balance of each custo mer.
Tap the List area on the main screen and then tap <Functio n> button while the
details are displayed.
Select [History of Customer Accounts].
About Customer Accounts, please refer the other page on this manual.
Current balance
History of customer accounts
Tap the icon , detail of transaction is opened.
Tap the icon , detail of transaction is closed.
Tap the icon , you can search by some conditions.
Tap <Print> button, the dialog will appea r.
Print Print index and opened detail.
Save as PDF file Sav e index and opened detail.
31
Page 32

Print
Print out report like the following.
********* Receipt top message 1 ********
********* Receipt top message 2 ********
2015/01/01 18:00 MANAGER#003
Customer statement report
Period 2015/12/01--2015/12/31
Customer#
Mr Customer #1
PREVIOUS BALANCE
TOTAL PAYMENT
TOTAL CHARGE
NEW BALANCE
--------------------------------------2014/12/20 20:20 000001
CHARGE @1,800
---------------------------------------ITEM A 1 @1,000
ITEM B 1 @1,000
TTL%- -@200
CHARGE 1 @1,800
--------------------------------------- TA TAX TTL
TX1 @1,667 @133 @1,800
--------------------------------------TOTAL CHARGE
--------------------------------------- TA TAX TTL
TX1 @1,667 @133 @1,800
Store Stamp
0000000001
@1,800
(@1,800)
@0
@0
CASHIER#001
@1,800
(1)
(2)
Print date / time / clerk name of
report issuing
(3)
Customer number and name
(4)
Transaction type
Details of transaction.
Print if it is opened on display.
Total amount of CHARGE and
Total amount of tax on CHARGE.
(1) Store Stamp
Print graphic logo (Store Stamp) saved in printe r.
If graphic logo data is not set (CSB008 GRAPHICCODE=00001 and 000011 are
“null”), it is not printed.
32
Page 33

Refer [Sales management Progr amming and Reference Manual], you can get
more information about how to save gr aphic logo to printer.
GRAPHICCODE Purpose
000001 Receipt logo 1 (built-in printer)
000011 Receipt logo 1 (external printer)
* If you wish to stop printing graphic logo, change the setting on DB .
Refer [Sales management Progr amming and Reference Manual], and
program like the following.
print or not print Store Stamp
Table Customer CMB001 Customer setting
SETKEY CUSTCREDIT.REPORT.FLAG.GRAPHIC
SETVALUE
0 :not print
1 :print
(2) Receipt top message 1, 2
Print receipt top message 1 and 2.
Refer [Sales management Progr amming and Reference Manual], you can get
more information about how to program message.
Title Value
Receipt top message 1
Receipt to message 2
Assigns message 1 which is printed on upper part
of receipts. Set for 58 mm and 80 mm width
individually.
Assigns message 2 which is printed on upper part
of receipts. Set for 58 mm and 80 mm width
individually.
* If you wish to stop printing message, change the setting on DB.
Refer [Sales management Progr amming and Reference Manual], and
program like the following.
print or not print Receipt top message 1
Table Customer CMB001 Customer setting
SETKEY CUSTCREDIT.REPORT.FLAG.MESSAGE1
SETVALUE
0 :not print
1 :print
33
Page 34

print or not print Receipt top message 2
Table Customer CMB001 Customer setting
SETKEY CUSTCREDIT.REPORT.FLAG.MESSAGE2
SETVALUE
0 :not print
1 :print
(3) Period
Print the period if you search by date.
(4) Summary
Title Value
PREVIOUS BALANCE Previous balance before selected date.
If there is no selection of period, does not print.
TOTAL PAYMENT Total amount of DEPOSIT.
If you select the period, the amount is total in
selected period.
TOTAL CHARGE Total amount of CHARGE.
If you select the period, the amount is total in
selected period.
NEW BALANCE Current balance.
If you select the period, the balance is latest
amount in selected period.
34
Page 35

Save as PDF file
Tap <Sav e as PDF>, the display of Sav e PDF file will appear.
* About function of PDF, refer other page on this manual.
* The customer number is added to prefix file name.
* PDF file sample
* not print clerk name of report issuing
35
Page 36

2.1.8.8. Print customer statement report
Y ou can do batch print of repo rts of history of customer accounts.
Tap the List area on the main screen and then tap <Functio n> button while the
details are displayed.
Select [customer statement report].
Bach or individual customer can be selected.
Title
Set period Set the period of statement.
print or save Select “print” or “sav e as PDF file”.
path of file saved Set path of PDF file.
with details tick: output statement with details.
un-tick: output statement without details.
Skip the balance zero customer tick: skip to output the zero-balance customers.
un-tick: output the zero-balance customers who
has transaction in specified period.
Tap <OK> button, then start to printing.
36
Page 37

2.2. Customer Analysis
2.2.1. Base Screen
Layout of Customer Analysis Base Screen
A.Search region
C. Detail Informatio n
B.List of customers
D.Feature button region
A. Search region
- Display the number of the customer appropriate by RFM Analysis.
- When the tap of the search region is carried out, a search condition input dialog
will be displayed.
B. List display region
- Indicate a customer's RFM value specified by the search condition of A, and the
comprehensive rank (P) by list.
- When the tap of the list is carried out, the customer's detailed information will
be displayed on the detailed display regi on of C.
37
Page 38

C. Detailed display region
- Display a customer's details of purchase and a customer's details which carried
out the tap in the list display region of B.
D. Feature button region
- display the feature button which can be operated on the screen.
38
Page 39

2.2.2. Rank Settings
The standard value of the five-step r ank used for RFM Analysis
See RFM Analysis.
39
Page 40

2.2.3. Search from Result of RFM Analysis
Rank conditions are specified, the result of RFM Analysis is sorted with search, and a list is
displayed.
A search dialog will be displayed when the tap of the search region of a base
screen is carried out. Search condition item.
A search condition can be inputted by carrying out a tap.
40
Page 41

(The example of a search condition input )・
The sorting method can be specified by carrying out the tap of the sorting item.
After inputting a search condition and sorting conditions, if the tap of the <Enter> is
carried out, it will search, and display a result on a list display region.
When you stop search, please carry out the tap of the <Close>.
41
Page 42

2.2.4. Function
Functions:
Print result of RFM Analysis, Print Customer Bar Code.
The privilege to a customer is set up. (Giving a discount) (*)
Send Customer File to Administrator as E-Mail attachment ( *)
Send E-Mail to Customer as DM (*)
E-Mail Magazine Subscription for CXD NEXT(*)
(*): These functions are the same as Customer Note.
42
Page 43

2.2.4.1. Print out Result of Customer Analysis
When the tap of the <print> of a base screen is carried out, print of a RFM
Analysis result will be made.
Selection of [Batch Print] and [Individual Print] can be performed.
In [Batch Print], print the information of all the customers of a list display region.
In
[Individual Print], print a customer's information specified in the list display
region.
43
Page 44

2.2.4.2. Print out Customer Scanning Code
In [Customer Bar Code Sheet is printed], VX prints Customer Bar Code
(Scanning Code. Not Customer Code) on EAN 12 + 1 (Check Digit)
2.2.4.3. Setting for Customer Privilege
The privilege to a customer is set up. (Giving a discount)
44
Page 45

2.3. Settings for Customer File
2.3.1. Main Menu
Layout of settings function
B.Lis
A.Select functions
t of items and edit area
C.Function button area
A.Select functions
・Functions can be s elected by tapping the tab area
B.List of items and edit area
・Shows items where specified by “Select functions ” for item edit.
C.Function button area
・A v ailable function k eys are displa yed
45
Page 46

2.3.2. Customer File Settings
The item name of Customer File information and the existence of the item are set up.
A Customer Information item can be changed by carrying out the tap of the <Edit> of
the base screen of an item tab.
Carry out the tap of the display name and change the display name of a Customer
Information item.
Carry out the tap of the display existence and change the display existence of a
Customer Information item.
However, the following items are not made to the display OFF. (It always displays)
1. Customer Code
2. Customer Name
46
3. Sex
4. Telephone Number
5. Customer Registration Day
Page 47

6. Use Improper Flag
If the tap of <upward arrow> is carried out, the item specified will be mov ed upwards.
If the tap of <downward arrow> is carried out, the item specified will be moved
downward.
About an arbitrary item, the input method can be changed by carrying out the tap of the
input method.
1. Character: A software keyboard performs a character input.
2. Number: It inputs in a number input dialog.
3. Date: It inputs in the date input dialog.
4. Time: It inputs in a time input dialog.
5. Telephone number: It inputs in a telephone number input dialog.
6. Sex: It chooses from a choice. (with a man, a woman, and no specification)
7. Candidate (List): The choice set up with the candidate tab is displayed and chosen.
- If the tap of <Save> button is carried out, the modify result of a setup will be saved
and it will return to a base screen.
47
Page 48

- When you stop a setup, please carry out the tap of <Close>button.
48
Page 49

2.3.3. Set Up Candidates (List) of Customer File
It is possible to program candidates for Customer Information
1. Change to the correction screen of [List] and [V alue] by carrying out the tap
of the [Edit] button of the base screen of [List Tab].
2. If the tap of the [List] is carried out, the candidate v alue (choice)
corresponding to it will be displayed.
3. Carry out the tap of the [New] button by the side of [List], and create a new
candidate name.
4. Carry out the tap of the [Delete] button on the side of [List], and delete the
candidate name specified. First, please delete all the candidate values of a
candidate name to delete.
49
Page 50

5. Carry out the tap of the [New] button on the side of [V alue], and create a new
candidate value.
6. Carry out the tap of the [Delete] button on the side of [V alue], and delete the
specified candidate value.
7. Where [List] or [V alue] is specified, a display orde r can be changed if the tap
of < upward arrow> and < downward arrow > is carried out.
8. If the tap of the [Save] button on the side of [List] is carried out, the change
result of a setup will be saved and it will return to the base screen.
9. When you stop a setup, please carry out the tap of the [Cancel button].
50
Page 51

2.3.4. Setting of RFM Analysis
The standard value of the five-step r ank used for RFM Analysis
Each standard value can be changed by carrying out the tap of the <edit>
button of the RFM tab.
The tap of the standard value table of each RFM is carried out, and a v alue is
changed.
If the tap of <Save> button is carried out, the change result of a setup will be
saved and it will return to the base screen.
When you stop a setup, please carry out the tap of the <Cancel> button.
51
Page 52

2.3.5. Functions (On Customer Setting)
Function:
Customer group setting.
→ Set the Customer group name and options that are loyalty discount,
Credit limit amount, and loyalty stamp.
Setting for Stamp
Setting for Coupon
Setting for Administrator E-Mail Address to send Customer File
Setting for Contents of E-Mail
52
Setting for E-Mail Magazine Subscription Information for CXD NEXT
Setting for history of customer accounts
Page 53

2.3.5.1. Customer group setting
・ Group code
Set the customer group code. Code needs to be unique.
・ Group name
Set the name of customer group.
・ Loyalty discount keycode.
Select the loyalty from keyc ode. R ate discount and Amount discount
are in the list.
・ Loyalty discount value.
Enter the values for Loyalty discount keycode. When the “0” value is
entered , discount function works as the setting is preset amount and preset
rate.
Rate : The keycode is R ate dis count function
53
Page 54

Amount: The keycode is Amount discount function,.
・ Credit limit amount
Select “Unlimited” or “Enter AMT” from the list dialog, Numeric dialog
will be shown when the Enter AMT is selected.
・ Use a Customer Loyalty stamp function.
The setting is valid when the Loyalty stamp function is used flag is
OFF at 2.3.5.2 Setting for stamp .
54
Page 55

2.3.5.2. Setting for Stamp
Setting for Stamp
Select use or not the customer loyalty stamp function for all customers.
When the loyalty stamp func tion needs to be controlled by customer group,
this flag needs to be OFF.
55
Page 56

Rate Setting
Select unit of Stamp issuing.
unit of Stamp issuing
per sales amount Stamp is issued per sales amount.
per one transaction Stamp is issued per one transaction.
per sales quantity Stamp is issued per sales quantity.
Tap <Next> to program more settings.
Tap <Cancellation> to cancel this process.
Per Sales Amount
Per One Transaction
56
Page 57

Per Sales Quantity
Stamp V alid Term Setting.
57
Page 58

Stamp Contents Settings
Sample Stamp Issus is Available.
Others
58
tick: not print the customer loyalty stamp receipt.
un-tick: print the customer loyalty stamp receipt.
Page 59

2.3.5.3. Coupon Setting
Setting for Coupon
59
Page 60

Coupon V alid Term Setting
Coupon Contents Setting
Sample Stamp Issus is Available.
60
Page 61

2.3.5.4. Setting for Administrator to send Customer File
Setting for Administrator E-Mail Address to send Customer File
61
Page 62

T ap <Edit of E-Mail>, Enter Administrator E-Mail Address to send Customer File.
62
Page 63

Tap <The compression password of a Customer File >, Enter password.
63
Page 64

2.3.5.5. Customer mail
Setting for Contents of E-Mail
64
Page 65

Tap <Edit of E-Mail >, Enter contents.
65
Page 66

Tap <Time >, Enter Time to s end to Customer.
66
Page 67

2.3.5.6. E-Mail Magazine Subscription
Setting for E-Mail Magazine Subscription Information for CXD NEXT
Available just for CXD NEXT in Japan.
67
Page 68

Tap<Login Information >, Ent er User code and P assword.
68
Page 69

2.3.5.7. History of customer accounts
Sign Receipt
Title
Print sign receipt Select print or not print out sign receipt.
Statement Report
Title
A graphic logo is printed. Print or not print the graphic logo on the
statement.
Print receipt top message 1. Print or not print the receipt top message1.
Print receipt top message 2. Print or not print the receipt top message2.
Period of history of customer accounts
Title
Past [ ] months Set period of history of customer accounts.
Show all. tick: you can see all of history.
un-tick: conform the above setting.
If you use the function “Show all”, the performance of functions may be
deteriorated. For example of functions , “payme nt charge” and “history of
customer accounts”.
So we do not recommend using “Show all”.
69
Page 70

2.3.6. Protection
Protection: Set Administrator password, Set User password and limitation.
Protection: Set Administrator password, Set User password and limitation.
70
Page 71

2.3.7. Data Deletion
The purchase total data of a register is deleted. All customer data is deleted.
Tap the <Enter> button if you wish to delete reserv ation information for entire
data or for a specific date onward. To confirm deletion, a confirmation dialog will
appear to select desired key.
To cancel delete oper ation, tap <Close> button.
71
Page 72

1 Aggregate purchasing data to remove Delete purchasing data of all customers.
2 Delete all the customer data Delete all of customer data.
3 Delete customer loyalty stamp Delete loyalty stamp data of all customers.
4 Delete history of customer account Delete history of customer account.
[Delete all]
Delete all of customer account data.
[Delete details of balance zero]
Delete data of customer whose balance is zero.
5 Send the setting data to Terminal Send setting data of customer management
system to other terminal.
6 Reset to zero specified customer data Delete data of specified customer except for
customer basic information.
[Delete data]
customer purchase history
customer loyalty stamp
customer balance and history of account
72
Page 73

3. Link with Sales Management System
3.1. Customer Accounts
This function manages the amount of customer charge.
3.1.1. Settings
This function uses deposit key to receive payment of customer charge.
set key value
Func Code 000025
Descriptor DEPOSIT
Deposit minus Charge Payment
Media definition Charge
Refer [Sales Management S ystem Sale s management Progr ammi ng and
Reference Manual], you can get more information of setting.
3.1.2. Customer charge
Set customer on registration screen by <CUST#> button, and register items
with normally operation.
Tap <charge> but ton to finaliz e transaction as customer char ge.
3.1.3. Receive payment of customer charge
Tap <deposit> button progr amme d abov e.
At first, select customer.
73
Page 74

If the customer is already selected on the sales registration screen, it is not need
to select customer again.
After select customer, History of Customer Accounts will appear on the screen.
74
Tap <P ayment>, Dialog of input amount will a ppear to input amount of
payment.
After input the amount of payment, tap <OK> on the dialog.
Register to sales management system as payment of customer charge.
After register it, the operation of finalize tr ansaction is same as normally one.
Page 75

3.1.4. Check the current balance of customer charge
Refer the page [History of Customer Accounts] in this manual.
3.1.5. Cancel customer charge
Cancel customer charge by normally operation of sales registr ation in Reg Minus
mode.
R efer [Sales Mana gement S ystem Sales mana gement Progr amming and
Reference Manual], you can get more information.
The amount of customer charge is re-calculated by using the amount canceled.
75
Page 76

4. Others
4.1. Output PDF
Tap <Sav e xxx pdf xxx> button in each functions, it will appear the screen like
the above.
Tap <Execute> to sa ve file to folder displa yed on the screen.
Tap <Browse> to change folder and file name .
Tap <R eturn> to cancel this process.
Change folder and file name to save
76
Page 77

Change file name to save.
Tap this area.
Change folder to save.
Tap thi
s area.
Tap <Confirm> to return with information edited on this screen.
Tap <R eturn> to cancel this process.
If Output PDF is success, the following pop-up will appear.
If Output PDF is failed, the following pop-up will appear.
There will be the following causes.
Causes Solution
SD is not insert to your machine, but
Insert and mount SD.
you set save area to SD .
There are not enough empty area to
Delete unnecessary data.
save PDF.
77
Page 78

4.1.1. Save location
Default locations of saving PDF are the following.
V-R7000
Functions default path (1st time after install)
Reservation Note /strage/emulated/0/CASIO/Reserv ation
Reserved Items /strage/emulated/0/CASIO/R eserv ation
Purchase History /strage/emulate d/0/CASIO/R eserv ation
History of Customer Accounts /strage/emulated/0/CASIO/Customer
Reservation Table /strage/emulated/0/CASIO/R eserv ation
VX-100
Functions default path (1st time after install)
Reservation Note /mnt/sdcard/CASIO/Reservation
Reserved Items /mnt/sdcard/CASIO/Reservation
Purchase History /mnt/sdcard/CASIO/R eservation
History of Customer Accounts /mnt/sdcard/CASIO/Customer
Reservation Table /mnt/sdcard/CASIO/Reserv ation
After 2nd time, save location is same as previous one.
4.1.2. Others
We check ed to read PDF file on the below en vironment.
OS : Windows7 SP1
PDF Reader : Adobe® R eader® XI 11.0.08
78
Page 79

V-REGI-REF-E
CA1510-A
Sales management
Customer File Reference Manual
79
 Loading...