

Page 1
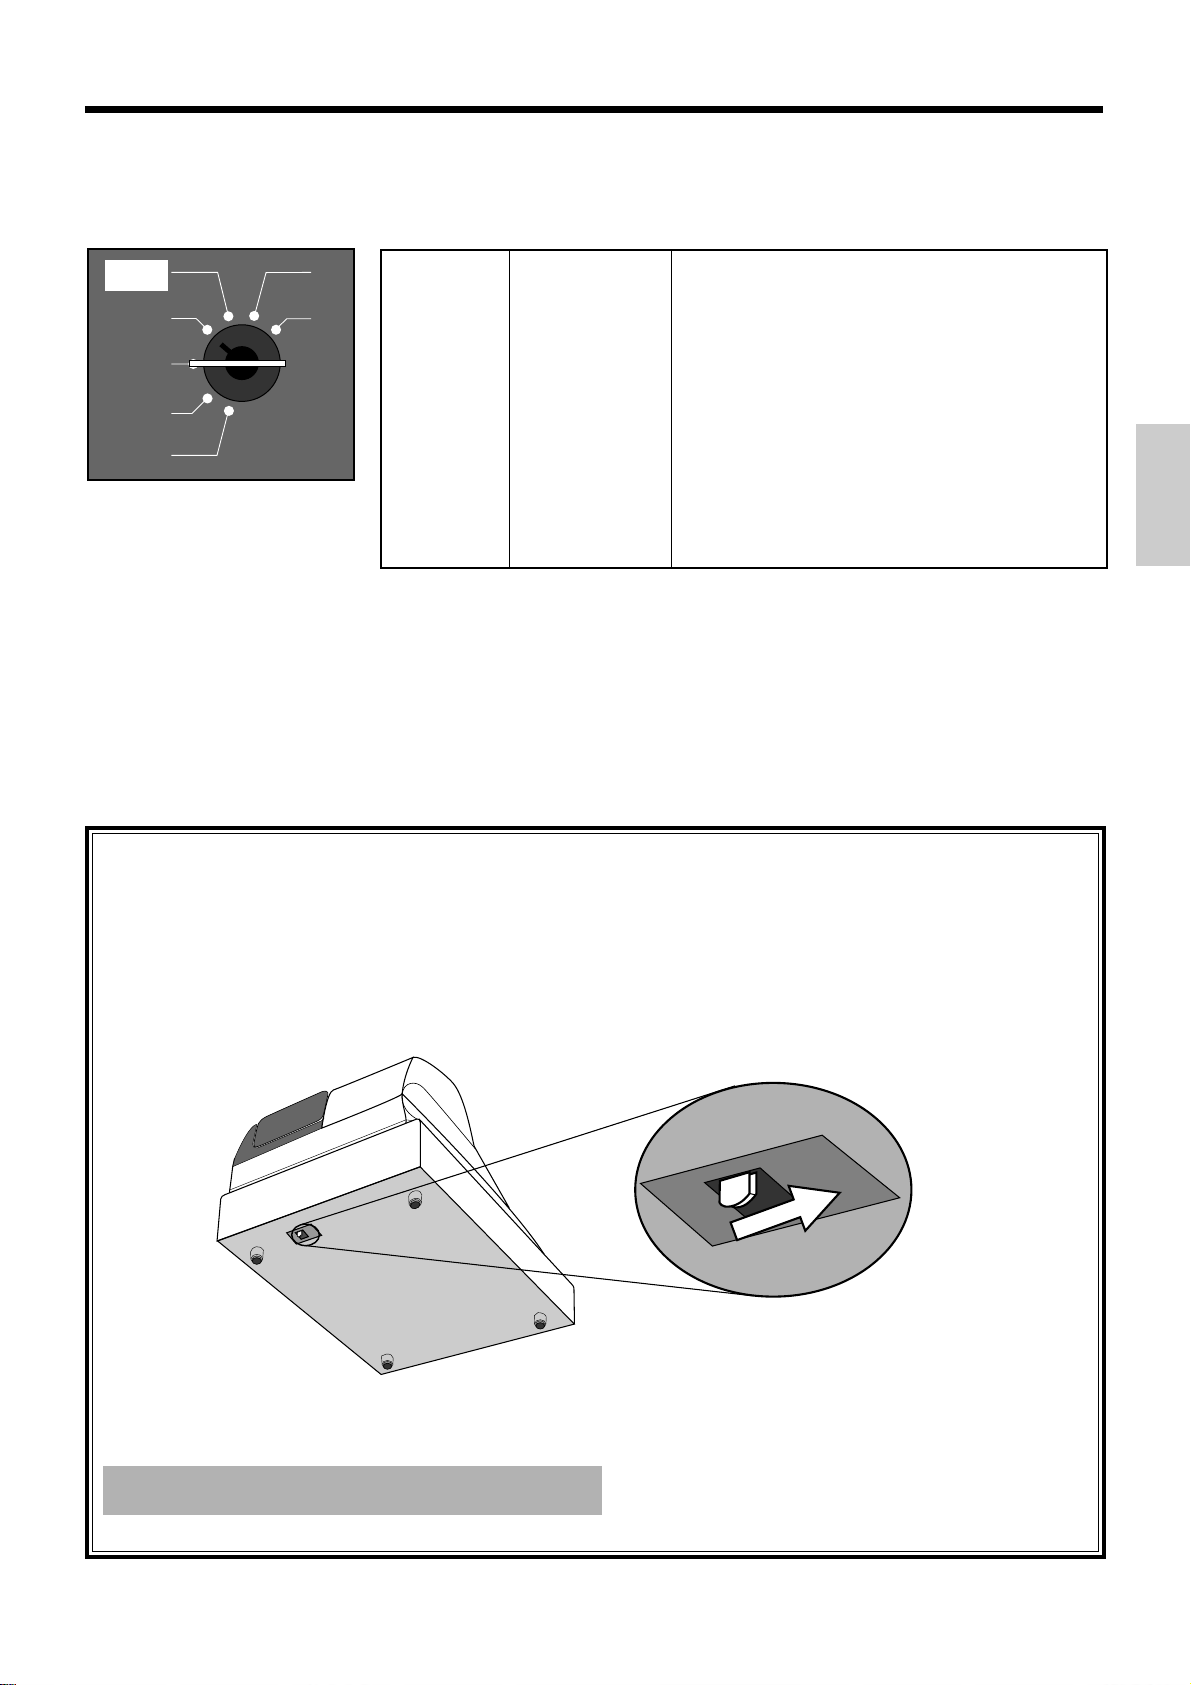
ELECTRONIC CASH REGISTER
TK
-
810
THANK YOU
YOUR RECEIPT
CALL AGAIN !
HAMBURGER
•10
COFFEE
FRENCH-
FRIES
SANDWICH
ICE CREAM
•10
TK-810 TK-810
C
7
8
9
4
5
6
1
2
3
0
00
Eu Di U.K.
OPERATOR'S INSTRUCTION MANUAL
Page 2
Introduction & Contents
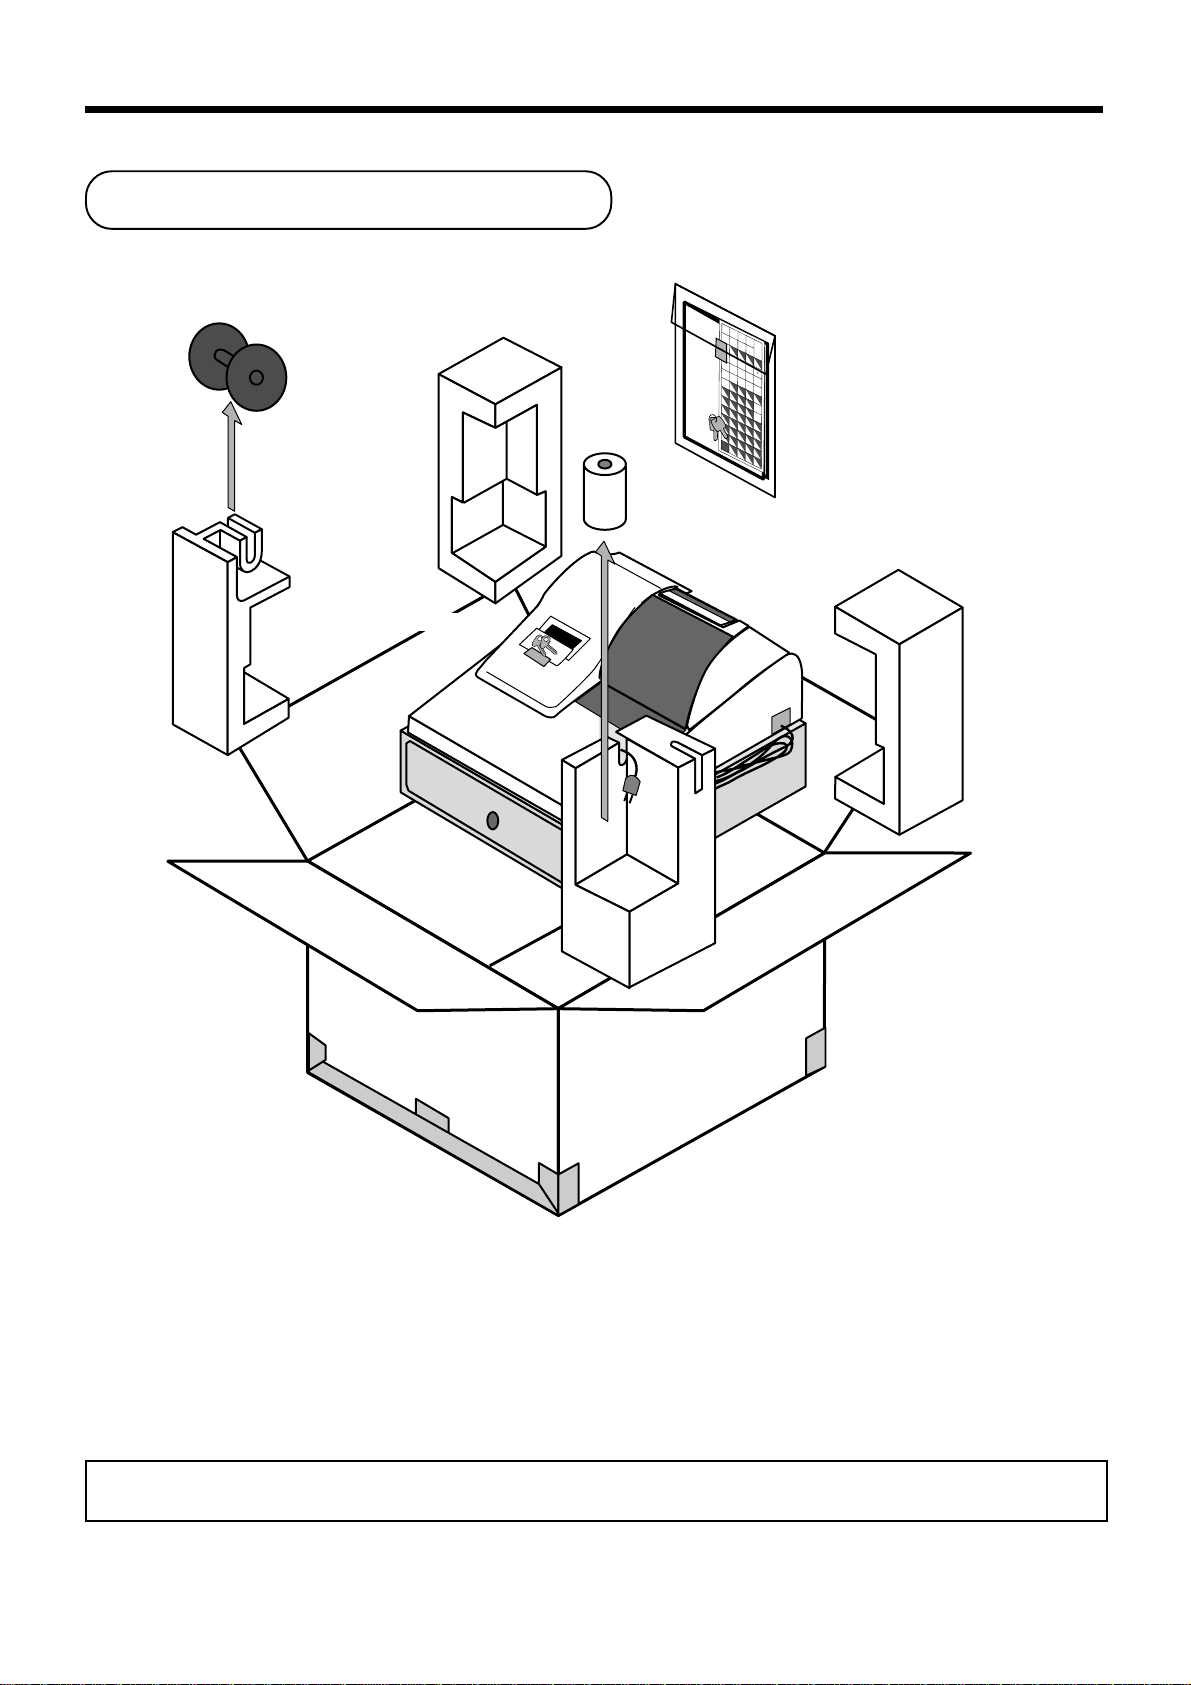
Unpacking the register
Take-up reel
Operator/Program key
Roll paper
D
EE
F
U
L
P
#-2
/
Operators
*
-
9
6
3
8
5
C
Instruction
2
7
U
T
N
F
4
E
I
H
M
S
•
1
@
'
#
(
:
Manual
%
G
N
5
U
F
M
4
T
E
L
3
S
D
K
2
R
C
J
1
Q
B
I
P
A
H
O
#-1
!
Operator's
0
0
0
instruction manual/
&
L
E
B
Z
I
D
S
E
C
A
P
S
Chacter sheet/
Z
Y
X
Drawer key
W
V
Welcome to the CASIO TK-810!
Congratulations upon your selection of a CASIO Electronic Cash Register, which is designed to
provide years of reliable operation.
Operation of a CASIO cash register is simple enough to be mastered without special training.
Everything you need to know is included in this manual, so keep it on hand for reference.
Consult your CASIO dealer if you have any questions about points not specifically covered in this
manual.
The main plug on this equipment must be used to disconnect mains power.
Please ensure that the socket outlet is installed near the equipment and shall be easily accessible.
Please keep all information for future reference.
2
Page 3
Important!
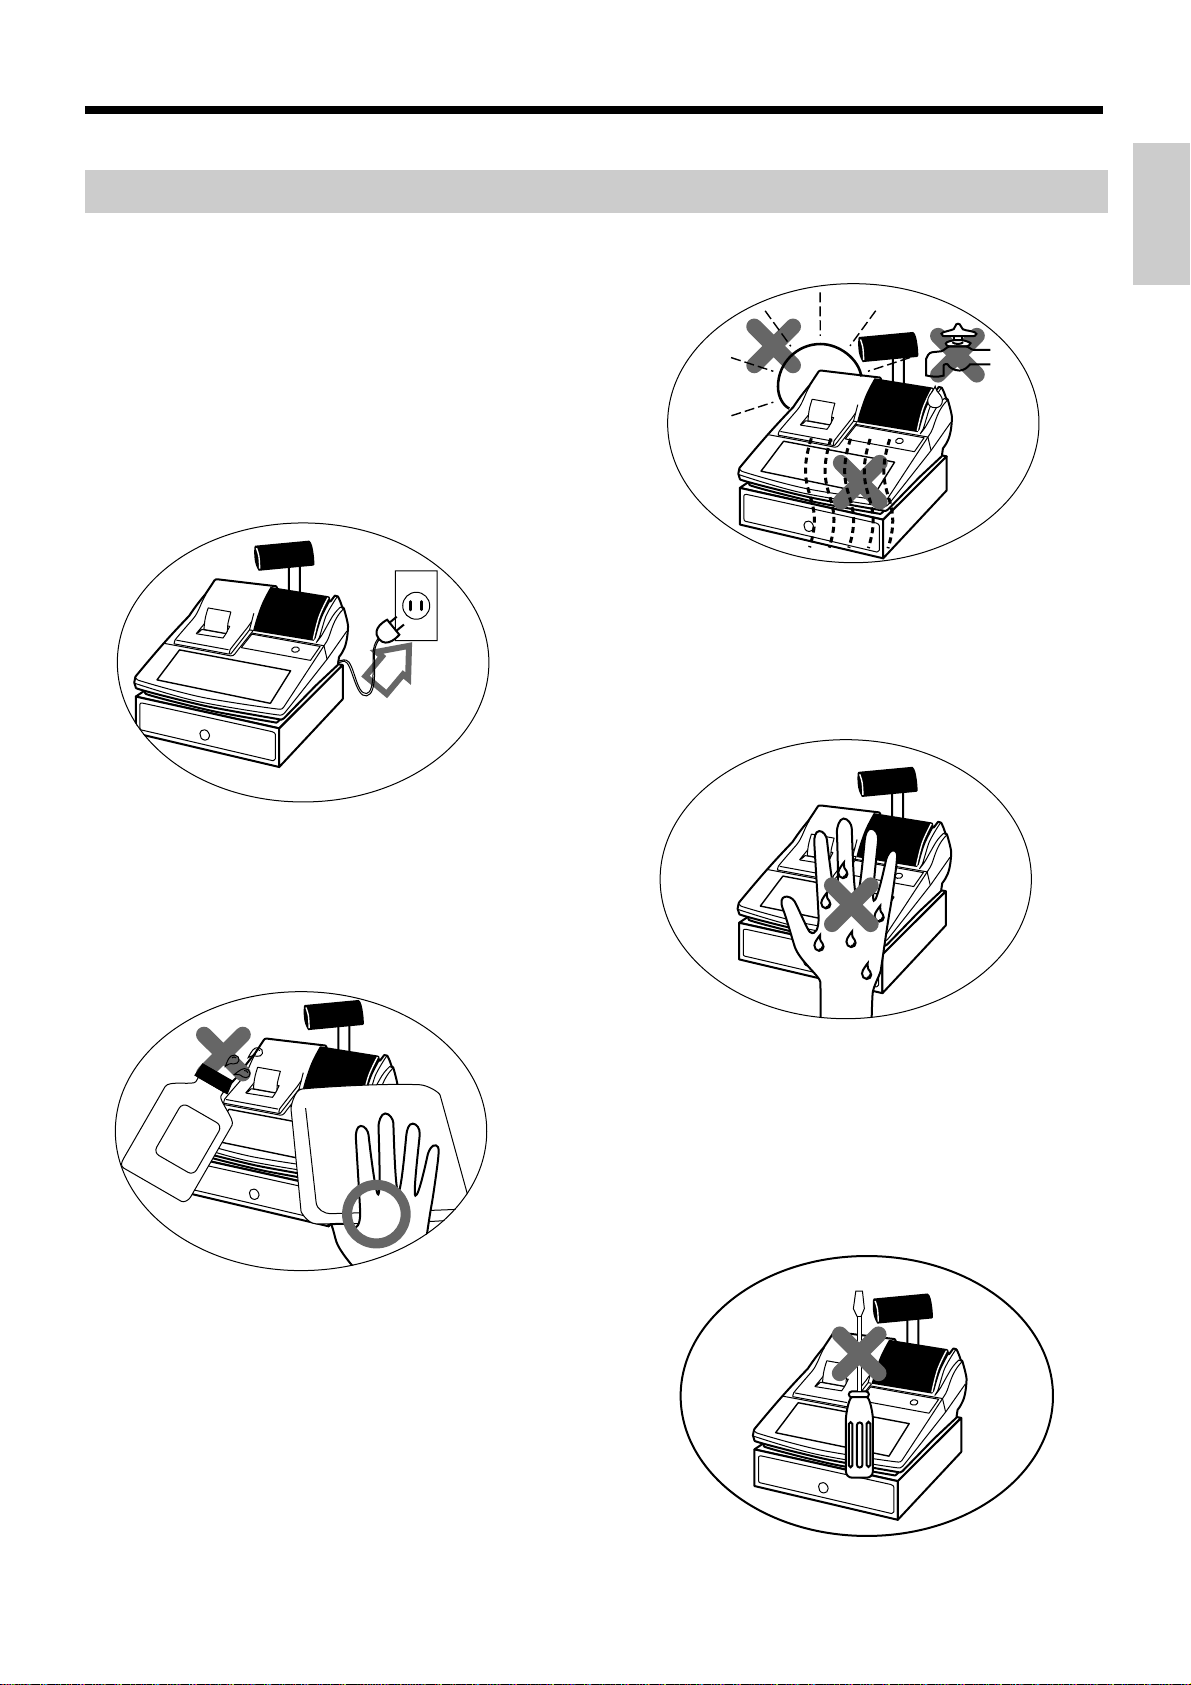
Before you do anything, be sure to note the following important precautions!
Do not locate the cash register where it will be
subjected to direct sunlight, high humidity,
splashing with water or other liquids, or high
temperature (such as near a heater).
Be sure to check the sticker on the side of the
cash register to make sure that its voltage
matches that of the power supply in the area.
Introduction & Contents
Never operate the cash register while your
hands are wet.
Never try to open the cash register or attempt
your own repairs. Take the cash register to your
authorized CASIO dealer for repairs.
Use a soft, dry cloth to clean the exterior of the
cash register. Never use benzene, thinner, or
any other volatile agent.
3
Page 4

Introduction & Contents
Introduction & Contents .........................................................2
Unpacking the register....................................................................................................... 2
Getting Started ........................................................................6
Remove the cash register from its box .............................................................................. 6
Remove the tape holding parts of the cash register in place............................................. 6
Plug the cash register into a wall outlet ............................................................................. 6
Insert the mode key marked "PGM" into the mode switch................................................. 6
Install receipt/journal paper ............................................................................................... 7
To load 1-ply paper for printing of receipts............................................................................... 7
To load 1-ply paper for printing of journal ................................................................................ 8
To load 2-ply paper for printing of receipts............................................................................... 9
Set the date ..................................................................................................................... 10
Set the time ..................................................................................................................... 10
Select printouts receipt or journal .................................................................................... 10
Programming automatic tax calculation............................................................................11
Programming tax calculations (without special rounding)...................................................... 11
Programming tax calculations (with special rounding)........................................................... 14
Programming for the Euro ............................................................................................... 15
Programming for the Australian GST............................................................................... 16
Setting the bottom message............................................................................................ 17
Introducing TK-810................................................................18
General guide .................................................................................................................. 18
Mode key, drawer, mode switch.............................................................................................18
Displays .................................................................................................................................20
Keyboard ...............................................................................................................................22
Basic Operations and Setups ..............................................24
How to read the printouts ................................................................................................ 24
How to use your cash register ......................................................................................... 25
Clerk sign on/off .....................................................................................................................26
Displaying the time and date .................................................................................................27
Preparing coins for change....................................................................................................27
Preparing and using department keys............................................................................. 28
Registering department keys ................................................................................................. 28
Programming department keys.............................................................................................. 29
Registering department keys by programming data .............................................................. 30
Preparing and using PLUs............................................................................................... 31
Programming PLUs ...............................................................................................................31
Registering PLUs ...................................................................................................................32
Preparing and using flat-PLUs......................................................................................... 33
Programming flat-PLUs .........................................................................................................33
Registering flat-PLUs .............................................................................................................34
Preparing and using discounts ........................................................................................ 35
Programming discounts ......................................................................................................... 35
Registering discounts ............................................................................................................36
Preparing and using reductions....................................................................................... 37
Programming for reductions ..................................................................................................37
Registering reductions ........................................................................................................... 38
Registering with Euro currency exchange ....................................................................... 39
Registering credit and check payments........................................................................... 40
4
Page 5

Registering returned goods in the REG mode................................................................. 41
Registering returned goods in the RF mode.................................................................... 42
Registering money received on account ......................................................................... 43
Registering money paid out............................................................................................. 43
Making corrections in a registration................................................................................. 44
No sale registration.......................................................................................................... 46
Printing the daily sales reset report ................................................................................. 47
Con venient Operations and Setups ....................................48
Post-finalization receipt format, General printing control, Compulsory,
Machine features ............................................................................................................ 48
About post-finalization receipt................................................................................................ 48
Programming general printing control.................................................................................... 49
Programming compulsory and clerk control function .............................................................50
Programming read/reset report printing control ..................................................................... 51
Setting a store/machine number...................................................................................... 51
Programming to clerk ...................................................................................................... 52
Programming descriptors and messages ........................................................................ 54
Programming report descriptor, grand total, special character, report title,
receipt message and clerk name .....................................................................................54
Programming department key decriptor.................................................................................56
Programming PLU descriptor ................................................................................................ 57
Programmming flat-PLU descriptor ....................................................................................... 58
Programming function key descriptor ....................................................................................59
Entering characters ......................................................................................................... 60
Department key programming ......................................................................................... 62
PLU feature programming ............................................................................................... 64
Flat-PLU feature programming ........................................................................................ 66
Discount/premium key feature programming................................................................... 71
Currency exchange programming ................................................................................... 73
Check tracking system .................................................................................................... 76
Arrangement programming.............................................................................................. 81
Other function key programming ..................................................................................... 83
Advanced program for the Euro ...................................................................................... 85
Calculator functions ......................................................................................................... 88
Keyboard layout change.................................................................................................. 90
Printing read/reset reports ............................................................................................... 92
Reading the cash register's program............................................................................... 99
Introduction & Contents
Troubleshooting ..................................................................104
When an error occurs .................................................................................................... 104
When the register does not operate at all...................................................................... 105
Clearing a machine lock up ........................................................................................... 106
In case of power failure ................................................................................................. 106
User Maintenance and Options..........................................107
To replace the ink ribbon ............................................................................................... 107
To replace journal paper ................................................................................................ 108
To replace receipt paper ................................................................................................ 109
Specifications......................................................................110
Index.....................................................................................111
5
Page 6
Getting Started
This section outlines how to unpack the cash register and get it ready to operate. Y ou should read this part of
the manual even if you ha ve used a cash register before. The following is the basic set up procedure, along
with page references where you should look for more details.
O
p
e
ra
tors
Ins
tru
ctio
n
M
a
n
u
a
l
1.
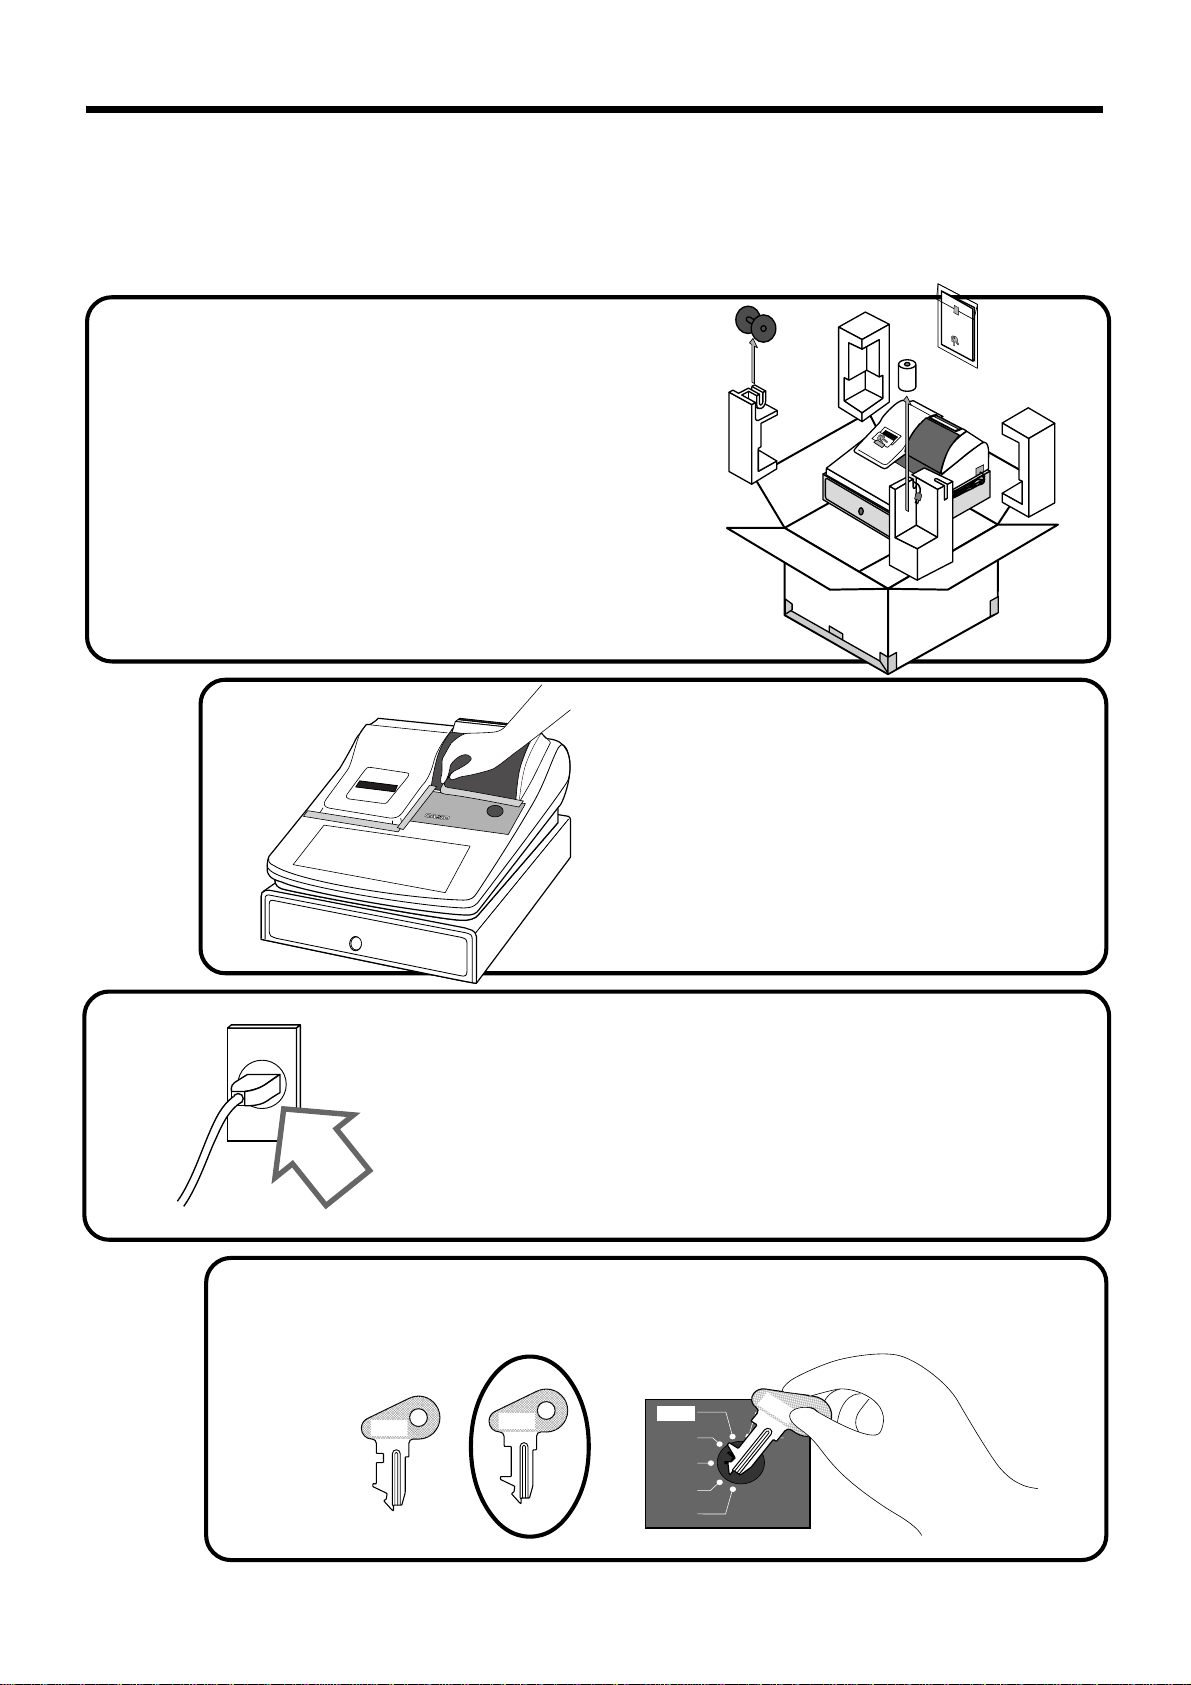
Remove the cash register from its box.
Make sure that all of the parts and accessories
are included.
£00
CE-300TK-810
2.
Remove the tape holding parts
of the cash register in place.
Also remove the small plastic bag taped
to the printer cover . Inside you will find
the mode keys.
3.
Plug the cash register into a wall outlet.
Be sure to check the sticker on the side of the cash
register to make sure that its voltage matches that of
the power supply in your area. The printer will
operate for a few seconds.
4.
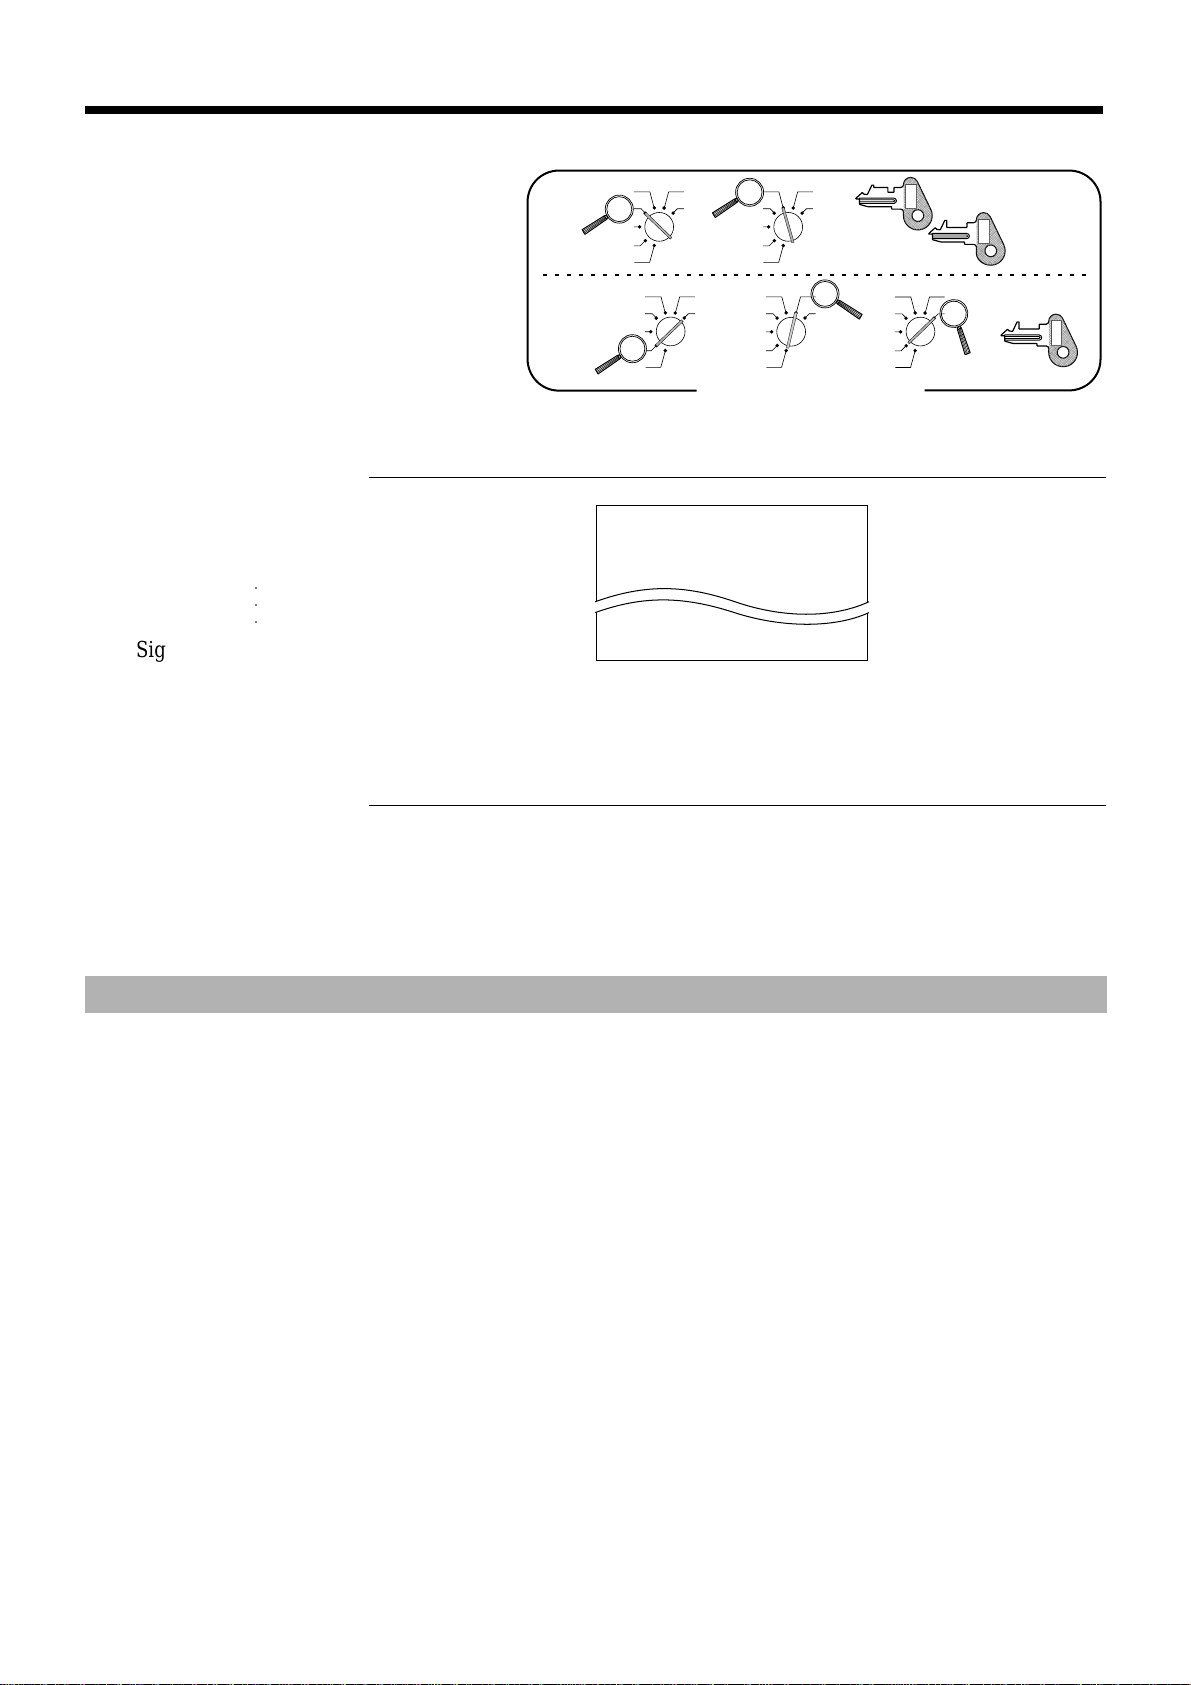
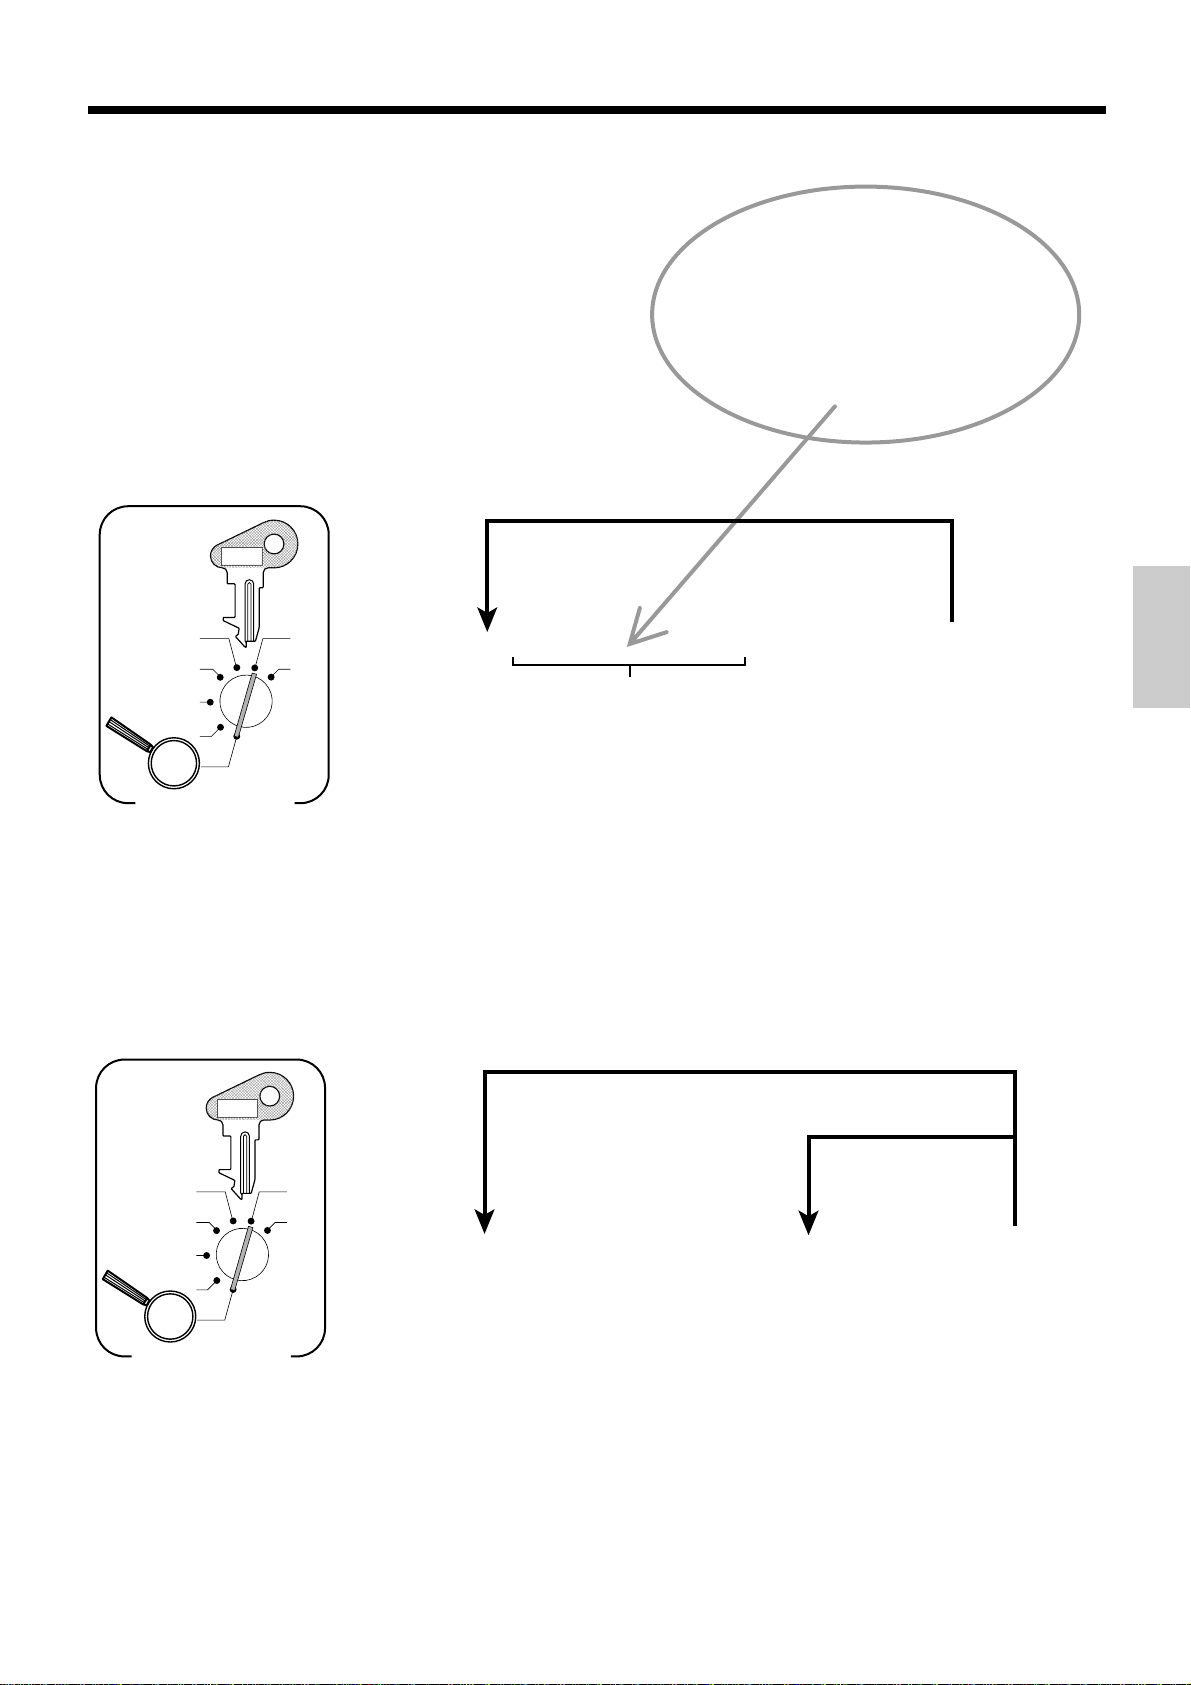
Insert the mode key marked "PGM" into the mode switch.
PGM
X
C-A32
OP
C-A02
PGM
C-A32
CAL
REG
OFF
RF
PGM
Z
Z
6
Page 7
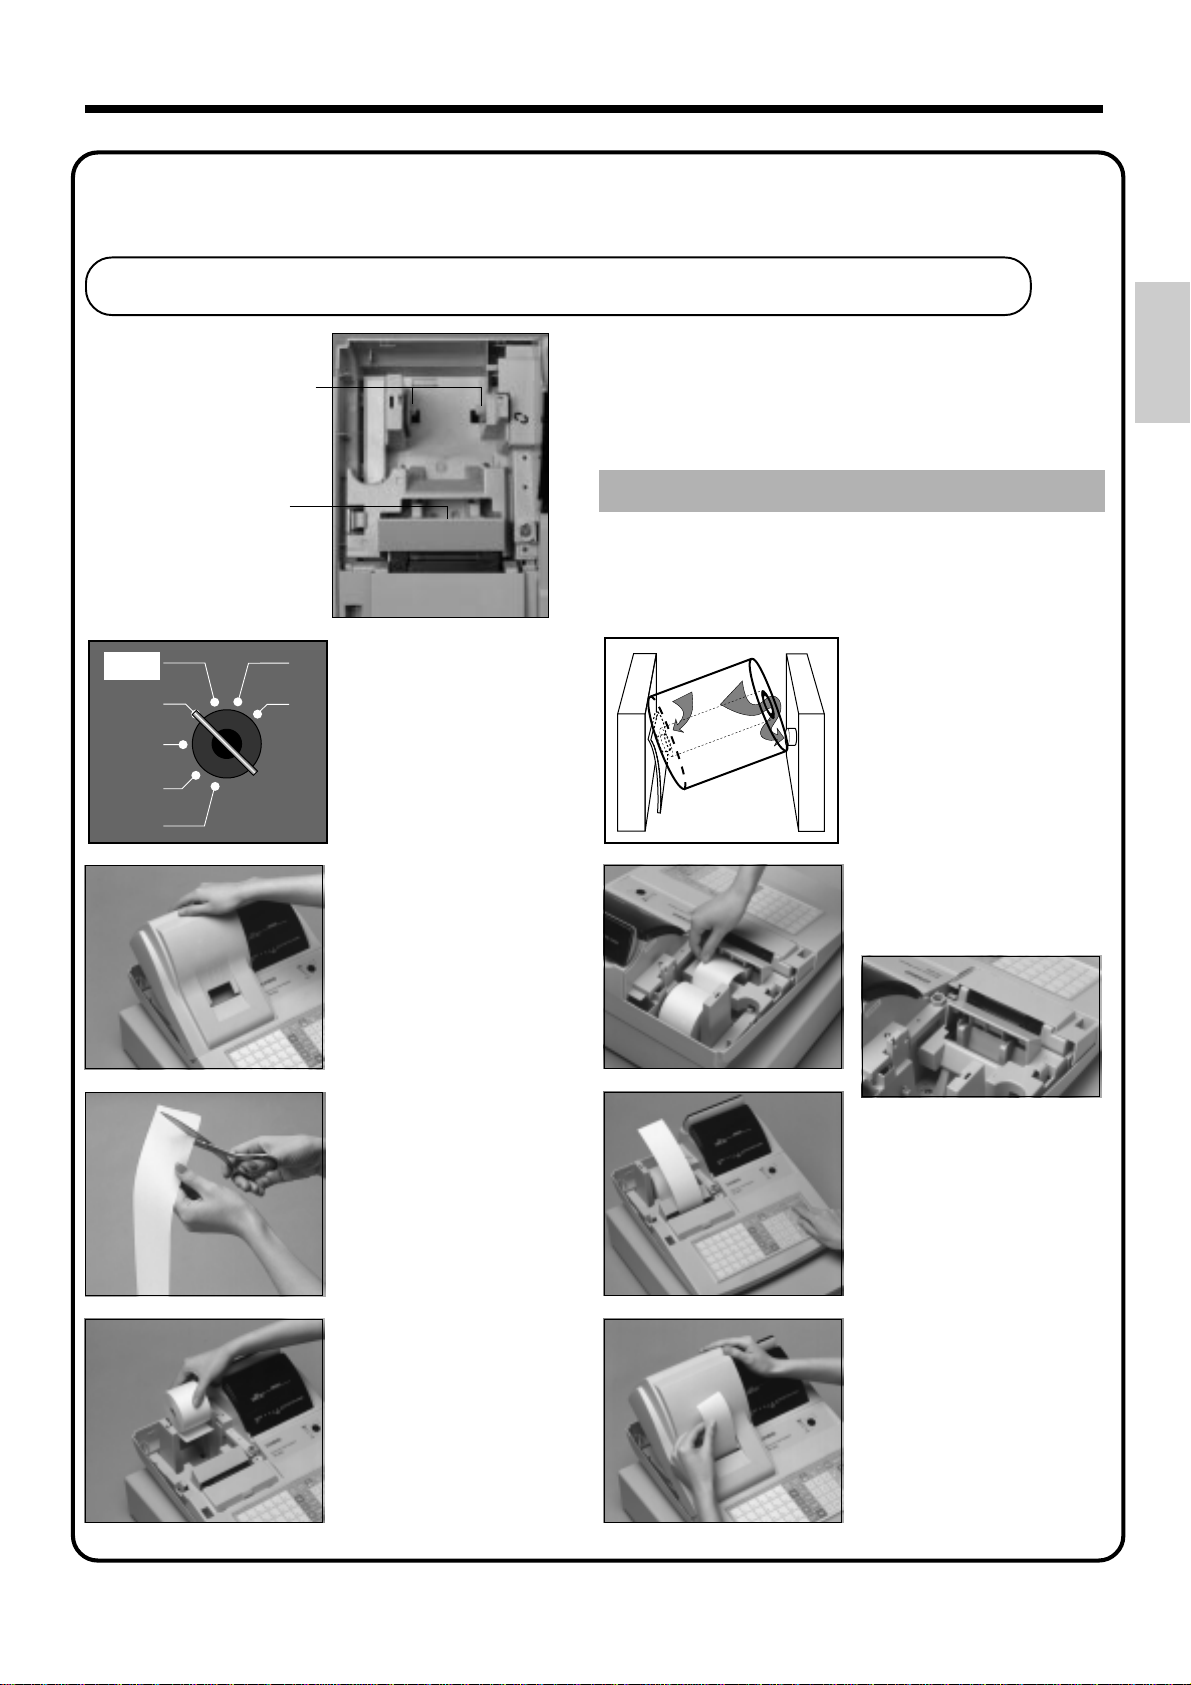
5.
Install receipt/journal paper .
To load 1-ply paper f or printing of receipts
Roll paper spindle
Paper inlet
CAL
REG
OFF
RF
PGM
X
11
1
11
Z
Use a mode key to set the
mode switch to REG
position.
22
2
22
Remove the printer cover.
Important!
Never oper ate the cash register without paper.
It can damage the printer.
55
5
1
2
55
Work the paper roll gently
between the two spindles
so that they slip into the
center hubs of the roll.
66
6
66
Insert paper to the paper
inlet.
Getting Started
33
3
33
Cut off the leading end of
the paper so it is even.
44
4
44
Ensuring the paper is being
fed from the bottom of the
roll, lower the roll into the
space behind the printer.
77
7
77
Press the f key until
about 20 cm to 30 cm of
paper is fed from the
printer.
88
8
88
Replace the printer cover,
passing the leading end of
the paper through the
cutter slot. Tear off the
excess paper.
7
Page 8

Getting Started
5.
Follow steps
Install receipt/journal paper. (continued…)
To load 1-ply paper for printing of journal
11
1 through
11
77
7 under "To load 1-ply paper for printing receipts" on the previous page.
77
88
8
88
Remove the flat side plate
of the take-up reel.
BB
B
BB
Press the f key to take
up any slack in the paper.
99
9
99
Slide the leading end of
the paper into the groove
on the spindle of the takeup reel and wind it onto
the reel two or three turns.
00
0
00
Replace the flat side plate
of the take-up reel.
AA
A
AA
Place the take-up reel into
place behind the printer,
above the roll paper.
CC
C
CC
Replace the printer cover.
8
Page 9

5.
Install receipt/journal paper. (continued…)
To load 2-ply paper f or printing of receipts
Follow steps
11
1 through
11
55
5 under "To load 1-ply paper for printing of receipts" above.
55
66
6
66
Separate the two sheets of
the paper.
77
7
77
Join the ends of the paper
again and insert them into
the paper inlet.
99
9
99
Insert the leading end of the inner sheet (which will be
your journal) into the take-up reel, as described
starting from
88
8
88
Press the f key until
about 20 cm to 30 cm of
paper is fed from the
printer.
Getting Started
88
step
8 under "To load 1-ply paper for printing of a
88
journal."
00
0
00
Replace the printer cover, passing the leading end of the
outer sheet through the cutter slot. Tear off the excess
paper.
9
Page 10
Getting Started
6.
7.
Set the date.
PGM
C-A32
CAL
REG
OFF
RF
PGM
Mode Switch
Set the time.
PGM
C-A32
6 1s 6
X
Z
Example:
15, January 2001 2
:: :: ::
Year Month Day
Current date
010115
6 1s 6 : : : : 6 X 6 C
6 X 6 C
8.
CAL
REG
OFF
RF
X
Z
Example:
08:20 AM
09:45 PM
PGM
Mode Switch
Select printouts receipt or journal.
PGM
C-A32
6 1s 6 { } 6 c 6 s
CAL
REG
OFF
RF
X
Z
Note:
Be sure to select 0 (receipt) when you use 2-ply paper.
PGM
Current time
2 0820
2 2145
Issue receipt =
Print journal =
0
1
10
Mode Switch
Page 11
Assign Tax Table 1.
Enter tax rate
(2 integer and 4 decimal).
Enter rounding method, tax calculation method.
Terminate the procedure.
6
6
6
6
4
3s
4
0125s
4
::::::
a
4
0a
4
::::
a
4
s
Assigning Tax Table 2, enter 0225.
Assigning Tax Table 3, enter 0325.
Example: 15% = 15
8.25% = 8^25
Add-on tax
Fraction round up = 9002
Fraction round off = 5002
Fraction cut off = 0002
Add-in tax
Fraction round up = 9003
Fraction round off = 5003
Fraction cut off = 0003
Mode Switch
X
Z
CAL
REG
OFF
RF
PGM
PGM
C-A32
9.
Tax table programming
Programming automatic tax calculation
This cash register is capable of automatically calculating up to three different sales taxes. The sales tax
calculations are based on rates, so you must tell the cash register the rates, the type of tax (add-in or add-on),
and the type of rounding to apply. Note that special rounding methods (page 12) are also available to meet
certain local tax requirements.
Important!
After you program the tax calculations, you also have to individually specify which departments
(page 29) and PLUs (page 31) are to be taxed.
Programming tax calculations (without special rounding)
Prepare the following subjects:
1. Tax rates
2. Rounding method for tax calculation (Round up/Round off/Cut off)
3. Tax calculation system (Add-on/Add-in)
Programming procedure
Getting Started
11
Page 12

Getting Started
9.
Tax table programming (continued…)
About special rounding…
Besides cut off, round off and round up, you can also specify "special rounding" for subtotals and
totals. Special rounding conv erts the right-most digit of an amount to "0" or "5" to comply with the tax
requirements of certain areas.
1 Special Rounding 1
Last (right-most) digit Rounding result Examples:
0 ~ 2 2 0 1.21 ➔ 1.20
3 ~ 7 2 5 1.26 ➔ 1.25
8 ~ 9 2 10 1.28 ➔ 1.30
2 Special Rounding 2
Last (right-most) digit Rounding result Examples:
0 ~ 5 2 0 1.12 ➔ 1.10
6 ~ 9 2 10 1.55 ➔ 1.60
3 Special Rounding 3
Last (right-most) digit Rounding result Examples:
00 ~ 24 2 0 1.24 ➔ 1.00
25 ~ 74 2 50 1.52 ➔ 1.50
75 ~ 99 2 100 1.77 ➔ 2.00
4 Special Rounding 4 (Denmark Rounding)
With Denmark rounding, the rounding method applies to subtotals depends on whether you
finalize the transaction by inputting an amount tendered or not.
• When a finalization is performed without an amount tendered entry
Last (right-most) 2digits
of subtotal
00 ~ 12 2 00
13 ~ 37 2 25
38 ~ 62 2 50
63 ~ 87 2 75
88 ~ 99 2 100
• When a finalization is performed with an amount tendered entry
Last (right-most) 2digits
of change due
00 ~ 12 2 00
13 ~ 37 2 25
38 ~ 62 2 50
63 ~ 87 2 75
88 ~ 99 2 100
5 Special Rounding 5 (Australian Rounding)
Last (right-most) digit Rounding result Examples:
0 ~ 2 2 0 1.21 ➔ 1.20
3 ~ 7 2 5 1.26 ➔ 1.25
8 ~ 9 2 10 1.28 ➔ 1.30
Rounding result
Rounding result
12
Page 13

9.
Tax table programming (continued…)
• Partial tenders (payments) :for Denmark Rounding
No rounding is performed for the amount of tendered nor for the change amount due when the
customer makes a partial tender . When a partial tender results in a remaining balance within the
range of 1 through 12, the transaction is finalized as if there was no remaining balance.
• Display and printing of subtotals :for Denmark and Australian Rounding
When you press the s key, the unrounded subtotal is printed and shown on the display. If the
cash register is also set up to apply an add-on tax rate, the add-on tax amount is also included in
the subtotal that is printed and displayed.
Important!
When you are using Denmark rounding, you can use the a k ey to register tendered amount
in which the last (right-most) digits are 00, 25, 50 or 75. This restriction does not apply to the
h, k and c keys.
Getting Started
13
Page 14
Getting Started
9.
Tax table programming (continued…)
Programming tax calculations (with special rounding)
Prepare the following subjects:
1. Tax rates
2. Rounding method for tax calculation (Round up/Round off/Cut off)
3. Tax calculation system (No/Add-on/Add-in)
4. Rounding system (Special rounding 1/Special rounding 2/Special rounding 3/Denmark rounding
/Australian rounding) (only effective for Tax Table 1)
Programming procedure
CAL
REG
OFF
RF
X
Z
PGM
Assign Tax Table 1.
Assigning Tax Table 2, enter 0225.
Assigning Tax Table 3, enter 0325.
Enter tax rate (2 integer and 4 decimal).
Example: 15% = 15
8.25% = 8^25
no tax = 0
Enter rounding method, tax calculation method.
Special rounding 1
Add-on tax
Fraction round up = 9012
Fraction round off = 5012
Fraction cut off = 0012
Add-in tax
Fraction round up = 9013
Fraction round off = 5013
Fraction cut off = 0013
No tax = 0010
Special rounding 2
Add-on tax
Fraction round up = 9022
Fraction round off = 5022
Fraction cut off = 0022
Add-in tax
Fraction round up = 9023
Fraction round off = 5023
Fraction cut off = 0023
No tax = 0020
Special rounding 3
Add-on tax
Fraction round up = 9062
Fraction round off = 5062
Fraction cut off = 0062
Add-in tax
Fraction round up = 9063
Fraction round off = 5063
Fraction cut off = 0063
No tax = 0060
Denmark rounding
Add-on tax
Fraction round up = 9032
Fraction round off = 5032
Fraction cut off = 0032
Add-in tax
Fraction round up = 9033
Fraction round off = 5033
Fraction cut off = 0033
No tax = 0030
Terminate the procedure.
Mode Switch
6
0125s
6
::::::a
6
Australian rounding
Add-in tax
Fraction round up = 9073
Fraction round off = 5073
Fraction cut off = 0073
6
::::a
4
3s
4
4
4
0a
4
4
s
C-A32
PGM
14
Page 15
10.
For the Euro only
Basic programming
You must define the main currency of change amount for calculation. And also the currency of
subtotal amount should be programmed for printouts.
PGM
C-A32
63s 6 2422s 6 : : a 6 s
D2D
1
D2= The currency of change amount:
CAL
REG
OFF
RF
PGM
Mode Switch
X
Z
(1) Local: 0
(2) Euro: 1
= Euro status
D
1
(1) Main currency = Local, Print out subtotal = Local: 0
(2) Main currency = Euro, Print out subtotal = Euro: 1
(3) Main currency = Local, Print out subtotal = Both: 2
(4) Main currency = Euro, Print out subtotal = Both: 3
Programming an exchange rate
For accepting both the local currency and the Euro, the exchange rate against the Euro should be
programmed.
PGM
C-A32
CAL
REG
OFF
RF
PGM
Mode Switch
63s 6 1999s 6 : ~ : : a 6 s
D2D
D
7
D7 ~ D2 = Enter the exchange rate with a maximum of 6 digits
X
Z
D1= Specify the position of decimal point.
No decimal point, Integer only = 0
1st decimal place = 1
2nd decimal place = 2
3rd decimal place = 3
4th decimal place = 4
5th decimal place = 5
6th decimal place = 6
1
Getting Started
Example: D
1 Euro = 1.977 DM 2 19773
1 Euro = 1957.77319 LIt 2 1957772
~ D2 + D
7
1
15
Page 16
Getting Started
11.
For the Euro only
Restrict the currency
You can restrict the registerable currency to the Euro only, by the following procedure.
PGM
C-A32
CAL
REG
OFF
RF
PGM
Mode Switch
X
X
Z
Z
Issue the following reset reports before this program.
• Daily sales report, • Monthly sales report, • Periodic sales report 1 and 2,
• PLU report, • Hourly sales report
(Otherwise, the "e90" appears on the display.)
601072002s 66 a
6 s
After conpletion of this procedure, the "EURO" message is printed on receipt.
(Execution)
(Cancellation)
11.
For Australia only
You can set some programmable options to suit the Australian GST by the following procedure.
PGM
C-A32
601012001s 66 a
6 s
After this procedure:
CAL
REG
OFF
RF
PGM
Mode Switch
X
X
Z
Z
(1) Tax symbol (*) is printed.
(2) Taxable amount is skipped.
(3) "GST INCLUDED" is set to the TX1 descriptor.
(4) "TAXABLE AMT" is set to the TA1 descriptor.
(5) Total line is printed even in direct (cash) sale.
(6) Australian rounding is set.
(7) "$" is set to the monetary symbol.
(8) Print "MOF message" on receipt.
(9) Tax (10% tax rate, add-in tax, fraction rround off) is set to the tax table1
No data is set to other tax tables.
(10) The taxable amount and tax amount except TA1/TX1 are not printed on report.
(11) Restriction (to 0, 5) on last amount digit of cash sales, received on account, paid out,
and money declaration.
(Execution)
(Cancellation)
16
Page 17
12.
Setting the bottom message (This step can be skipped.)
The procedure setting the logo message includes two steps.
1. Setting the bottom message you want.
2. Turning on the bottom message printing status in the general printing control.
Setting the bottom message you want.
Set "CLEARANCE SALE" to line 1 and "JAN. 20 TO JAN. 31" to line 2.
PGM
C-A32
CAL
REG
OFF
RF
PGM
Mode Switch
X
62s6
Z
: :
32s 6
Memory
No.
yromeM
.oN
90
01
gnimmargorP
sretcarahc
ELASECNARAELC
13.NAJOT02.NAJ
For more details, please refer page 56.
CHAR.
SHIFT
A
H
O
V
To the next memory No.
Characters
6 –a 6 s
Getting Started
sretcarahC
MENU
(
5
4
3
2
1
6
7
D
C
B
a
b
c
K
J
I
h
i
j
R
Q
P
o
p
q
X
W
v
w
x
0
9
8
F
E
f
e
d
M
L
m
l
k
T
S
t
s
r
Z
Y
SPACE
z
y
C
SHIFT
)
@
G
g
N
n
U
u
DBL
SIZE
8
7
•
#
5
4
'
%
2
1
:
&
00
0
FEED
PLU
/
9
.
*
6
,
#-2
3
+
!
#-1
?
Turning on the bottom message printing status in the general printing control.
PGM
C-A32
CAL
REG
OFF
RF
6 3s 6 0522s 6
X
Z
*
6 20144a 6 s
PGM
Mode Switch
Note: If you have already set other programmable options in the general printing control, please add "4" to your
prior program value. (For more details, please refer to page 49.)
If you want to print other (logo, commercial) messages, please refer to page 49 and 56.
* For Australia, enter "60010145."
17
Page 18
Introducing TK-810
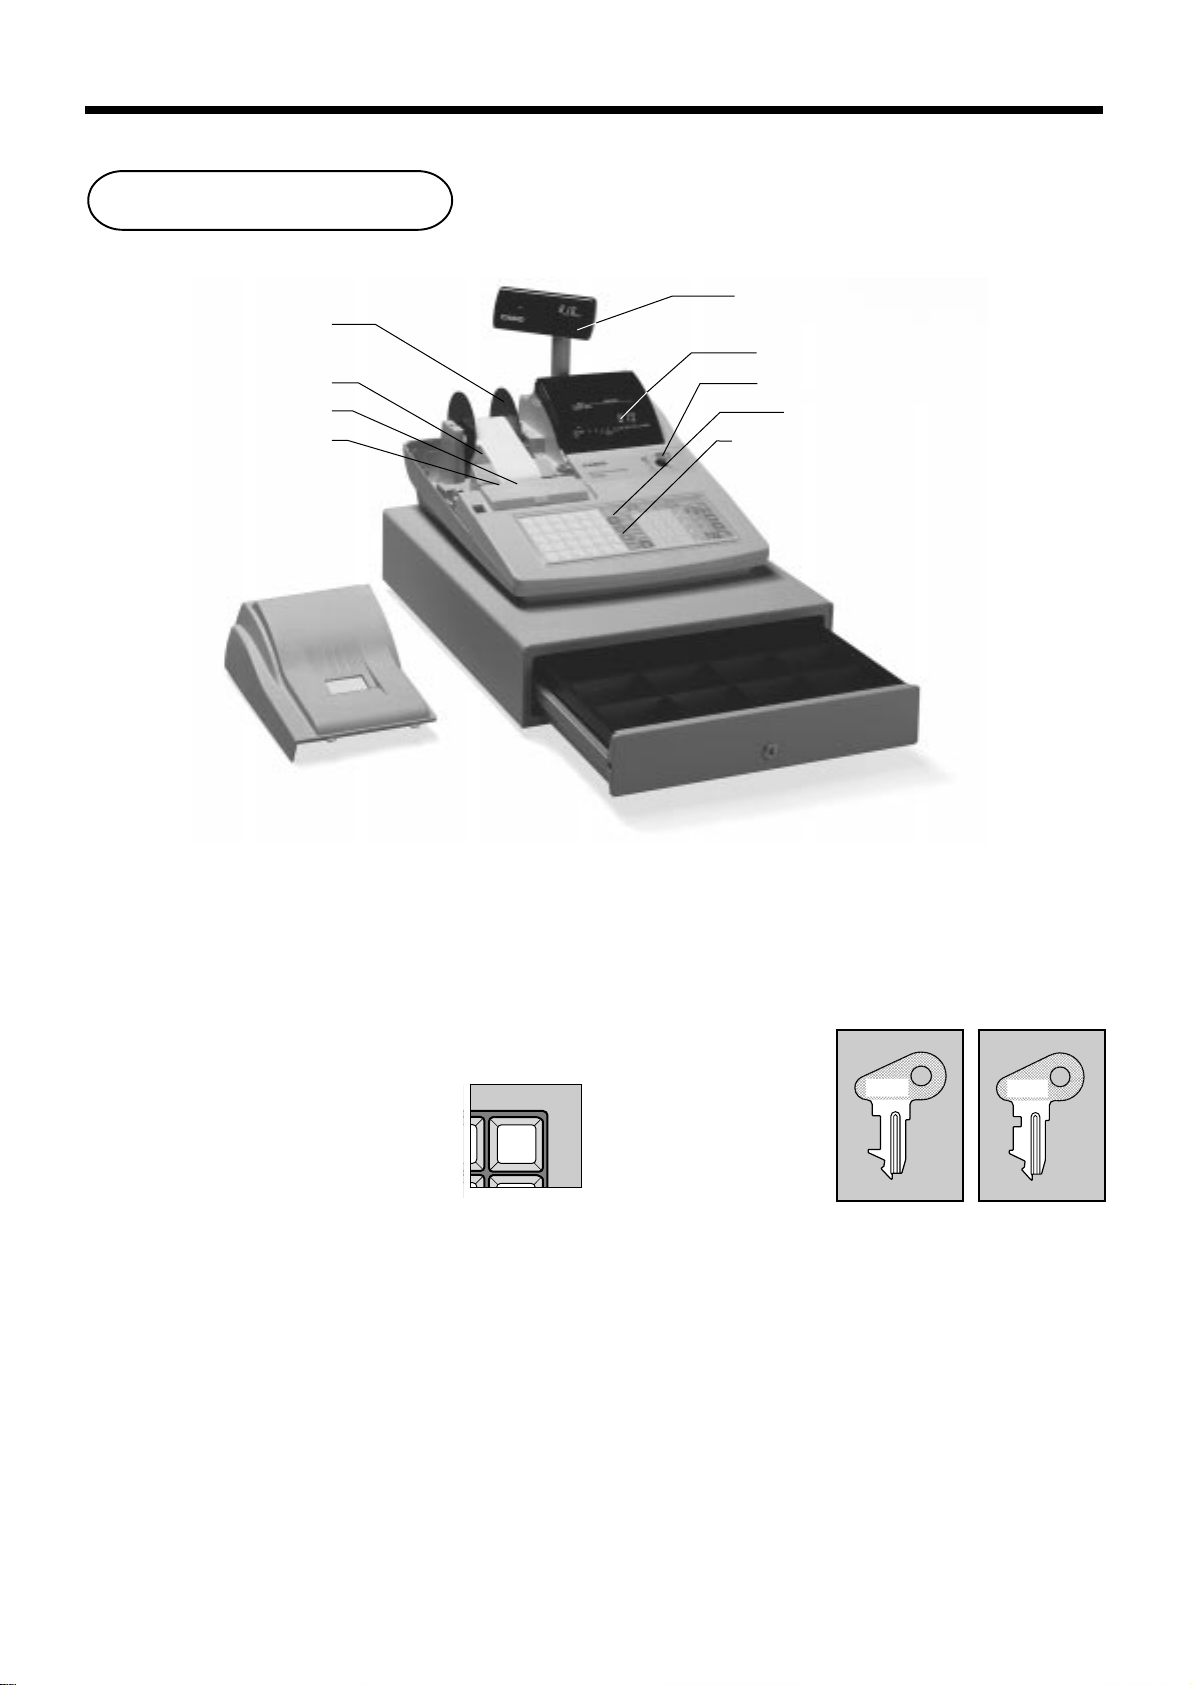
General guide
This part of the manual introduces you to the cash register and provides a general explanation of its various parts.
Pop-up display
Take-up reel
Main display
Roll paper
Printer
Printer ink ribbon
Mode switch
Keyboard
Wetproof cover
Printer cover
Roll paper
You can use the roll paper to print receipts and a
journal (page 7 ~ 9).
Printer ink ribbon
Provides ink for printing of registration details on the
roll paper (page 107).
Receipt On/Off key
When you are using the printer for receipt
printer, you can use this key (in the REG
and RF modes only) to turn the printer on
and off. If a customer asks for a receipt
while receipt printing is turned off by this
key, you can issue a post-finalization receipt (page 48).
Note: Instead of the receipt on/off switch, receipt
issuance is controlled by this key.
RECEIPT
ON/OFF
Drawer
Drawer lock
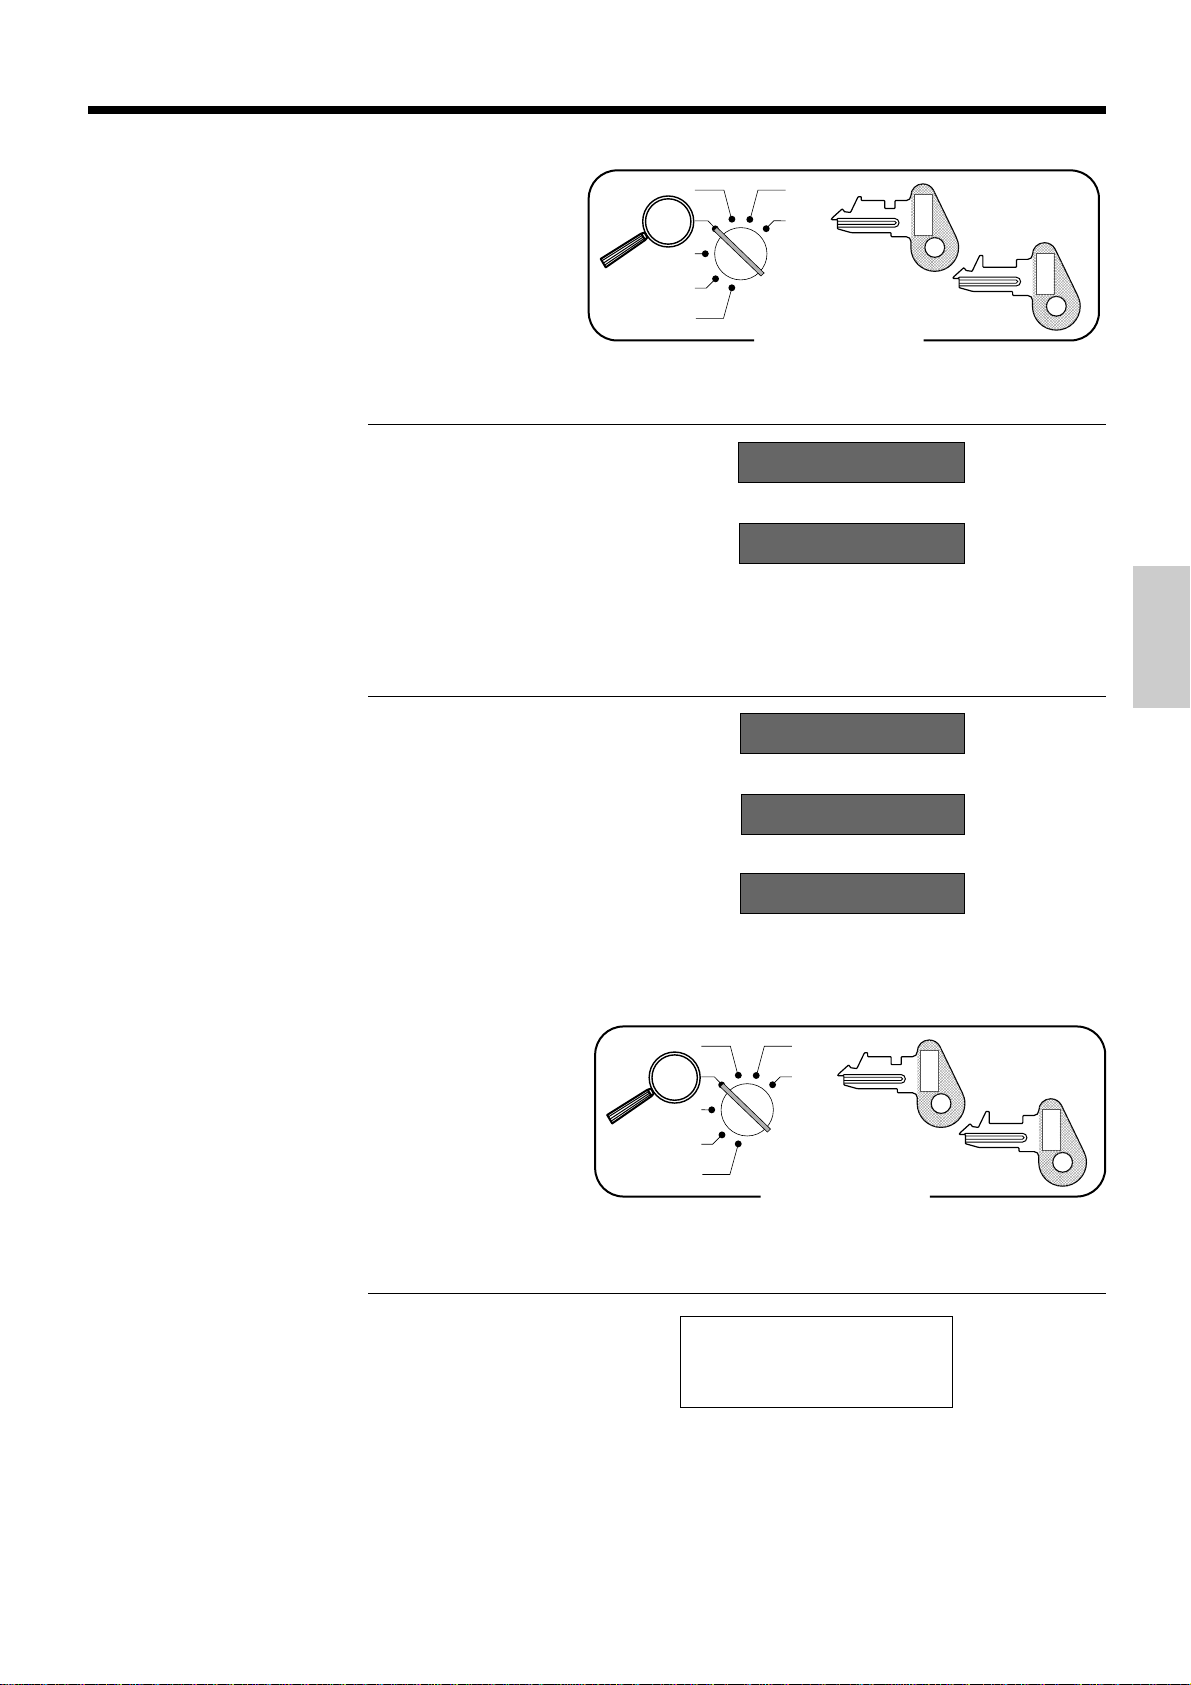
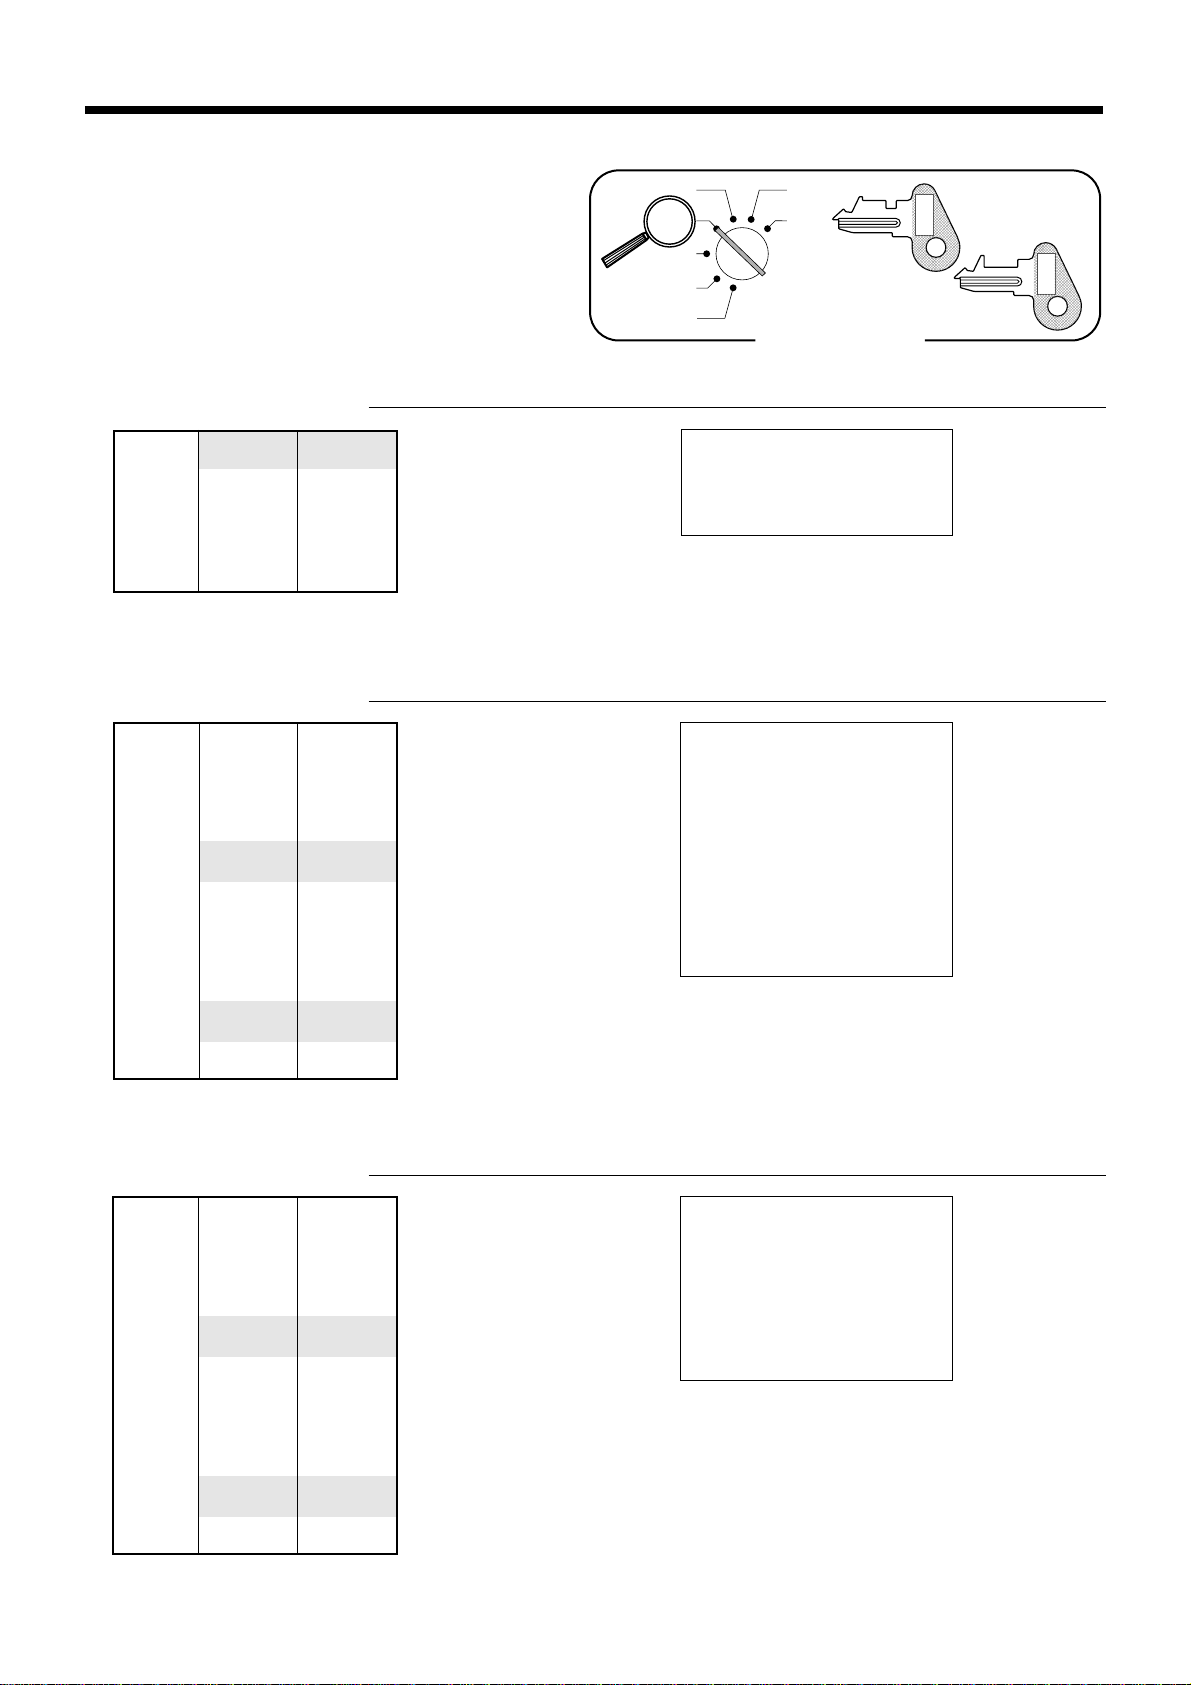
Mode key
There are two types of mode keys: the program key
(marked "PGM") and the operator key (marked "OP").
The program key can be used to set the mode switch to
any position, while the operator key can select the
REG, CAL and OFF position.
PGM
C-A32
OP
C-A02
Program Operator
key key
18
Page 19
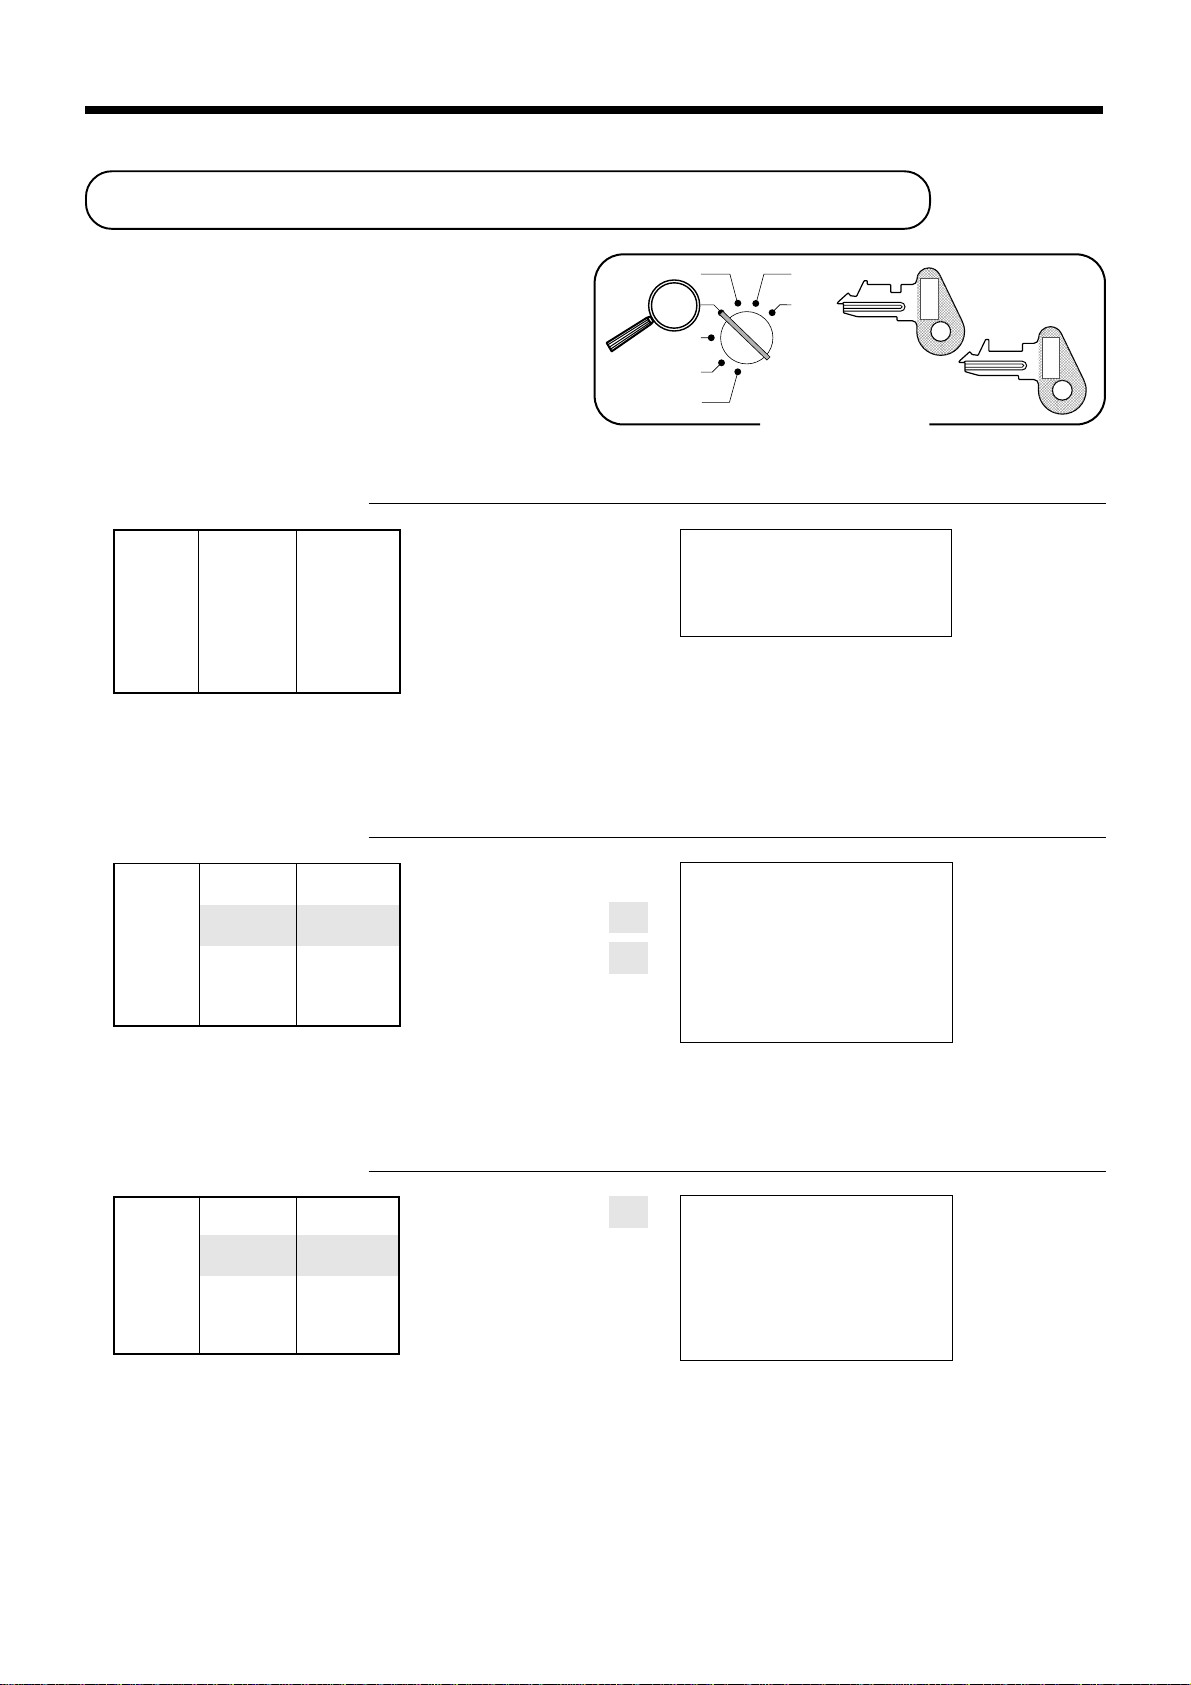
Mode switch
Use the mode keys to change the position of the mode switch and select the mode you want to use.
CAL
REG
OFF
RF
PGM
X
Z
Mode Switch
—————————————————————————————————
Z RESET
—————————————————————————————————
X READ
—————————————————————————————————
CAL
—————————————————————————————————
REG REGISTER Use this mode for normal registration.
—————————————————————————————————
OFF STAND-BY Cash register standing by.
—————————————————————————————————
RF REFUND Use this mode to register refund transaction.
—————————————————————————————————
PGM PROGRAM
Mode Name Description
CALCULATOR
Drawer
The drawer opens automatically whenever you finalize
a registration and whenever you issue a read or reset
report. The drawer will not open if it is locked with the
drawer key.
Reads sales data in memory and clears the data.
Reads sales data in memory without clearing the data.
Use this mode for calculator.
Use this mode for cash register programming.
Drawer lock
Use the drawer key to lock and unlock the drawer.
Introducing TK-810
When the cash drawer does not open!
In case of power failure or the machine is in
malfunction, the cash drawer does not open
automatically. Even in these cases, you can open the
cash drawer by pulling drawer release lever (see below).
Important!
The drawer will not open, if it is locked with a drawer lock key.
19
Page 20
Introducing TK-810
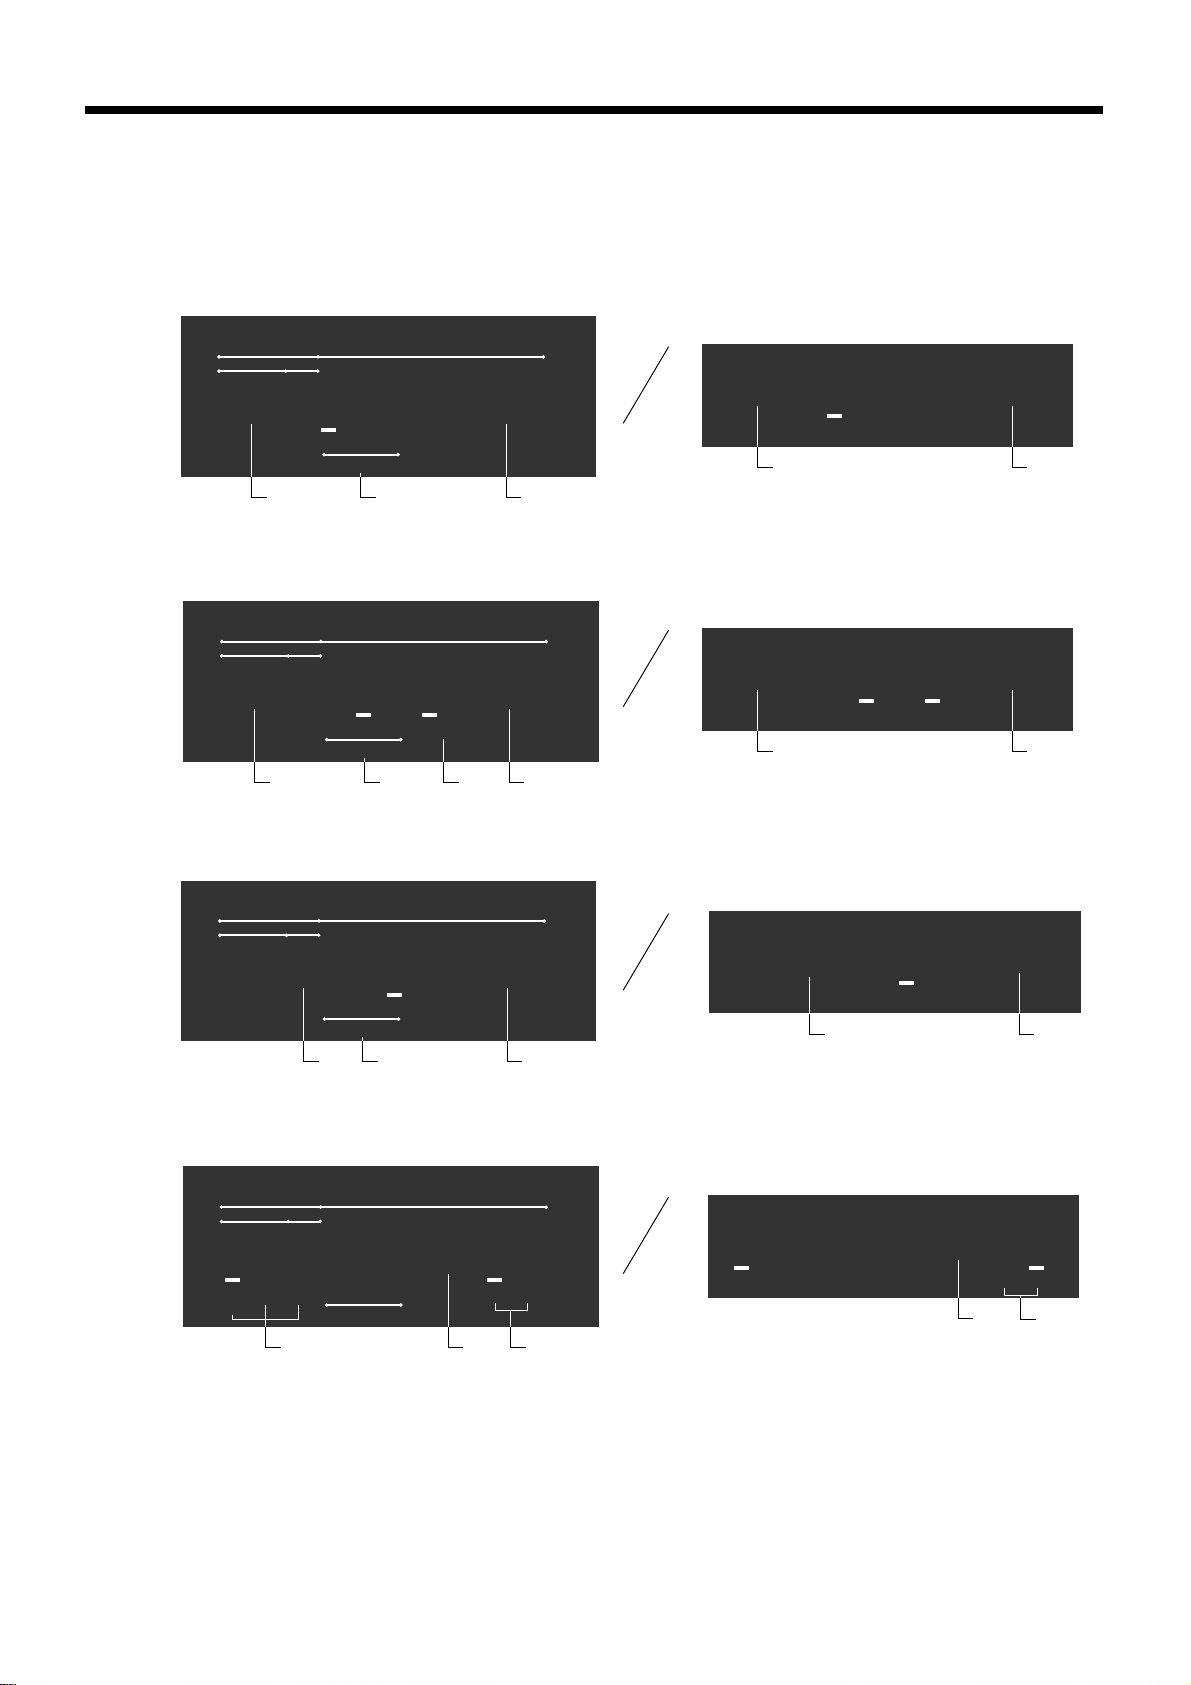
Displays
Main Display Pop-up display
Department registration
DEPT RPT
01 ¡50
XZ
RECEIPT
ON
PLU, flat-PLU registration
DEPT RPT
123
TAX
2
040 ™50
XZ
RECEIPT
ON
Repeat registration
DEPT RPT
123
TAX
4
2 £50
RECEIPT
ON
XZ
123
TAX
613
AMOUNTPLU
2nd 3rd
3
AMOUNTPLU
2nd 3rd
3 5
AMOUNTPLU
2nd 3rd
TOTAL CHANGE
1
TOTAL CHANGE
1
TOTAL CHANGE
01 ¡50
TOTAL CHANGE
2
1
040 ™50
TOTAL CHANGE
4
1
2 £50
TOTAL CHANGE
6
1
Totalize operation
DEPT RPT
XZ
RECEIPT
ON
20
8
123
TAX
AMOUNTPLU
1™34
2nd 3rd
TOTAL CHANGE
1
7
¶66
TOTAL CHANGE
1
7
Page 21

1 Amount/Quantity
This part of the display shows monetary amounts. It
also can be used to show the current date and time.
2 Department number
When you press a department key to register a unit
price, the corresponding department number (01 ~
08) appears here.
3 Taxable sales status indicators
When you register a taxable item, the corresponding
indicator is lit.
4 PLU, flat-PLU, subdepartment number
When you register a PLU, flat-PLU, subdepartment
item, the corresponding PLU, flat-PLU, subdepartment number appears here.
5 2nd, 3rd menu indicator
When you press the , keyto designate the 2nd/3rd
menu or register a 2nd/3rd item, the corresponding
indicator is lit.
Introducing TK-810
6 Number of repeats
Anytime you perform a repeat registration (page
28), the number of repeats appears here.
Note that only one digit is displayed for the number
of repeats. This means that a "5" could mean 5, 15
or even 25 repeats.
7 Total/Change indicators
When the TOTAL indicator is lit, the displayed
value is monetary total or subtotal amount.
When the CHANGE indicator is lit, the displayed
value is the change due.
8 Receipt on/off, X, Z indicators
Receipt ON/OFF: When the register issues receipts,
this indicator is lit. (REG/RF mode only)
X: Indicates X mode
Z: Indicates Z mode
21
Page 22
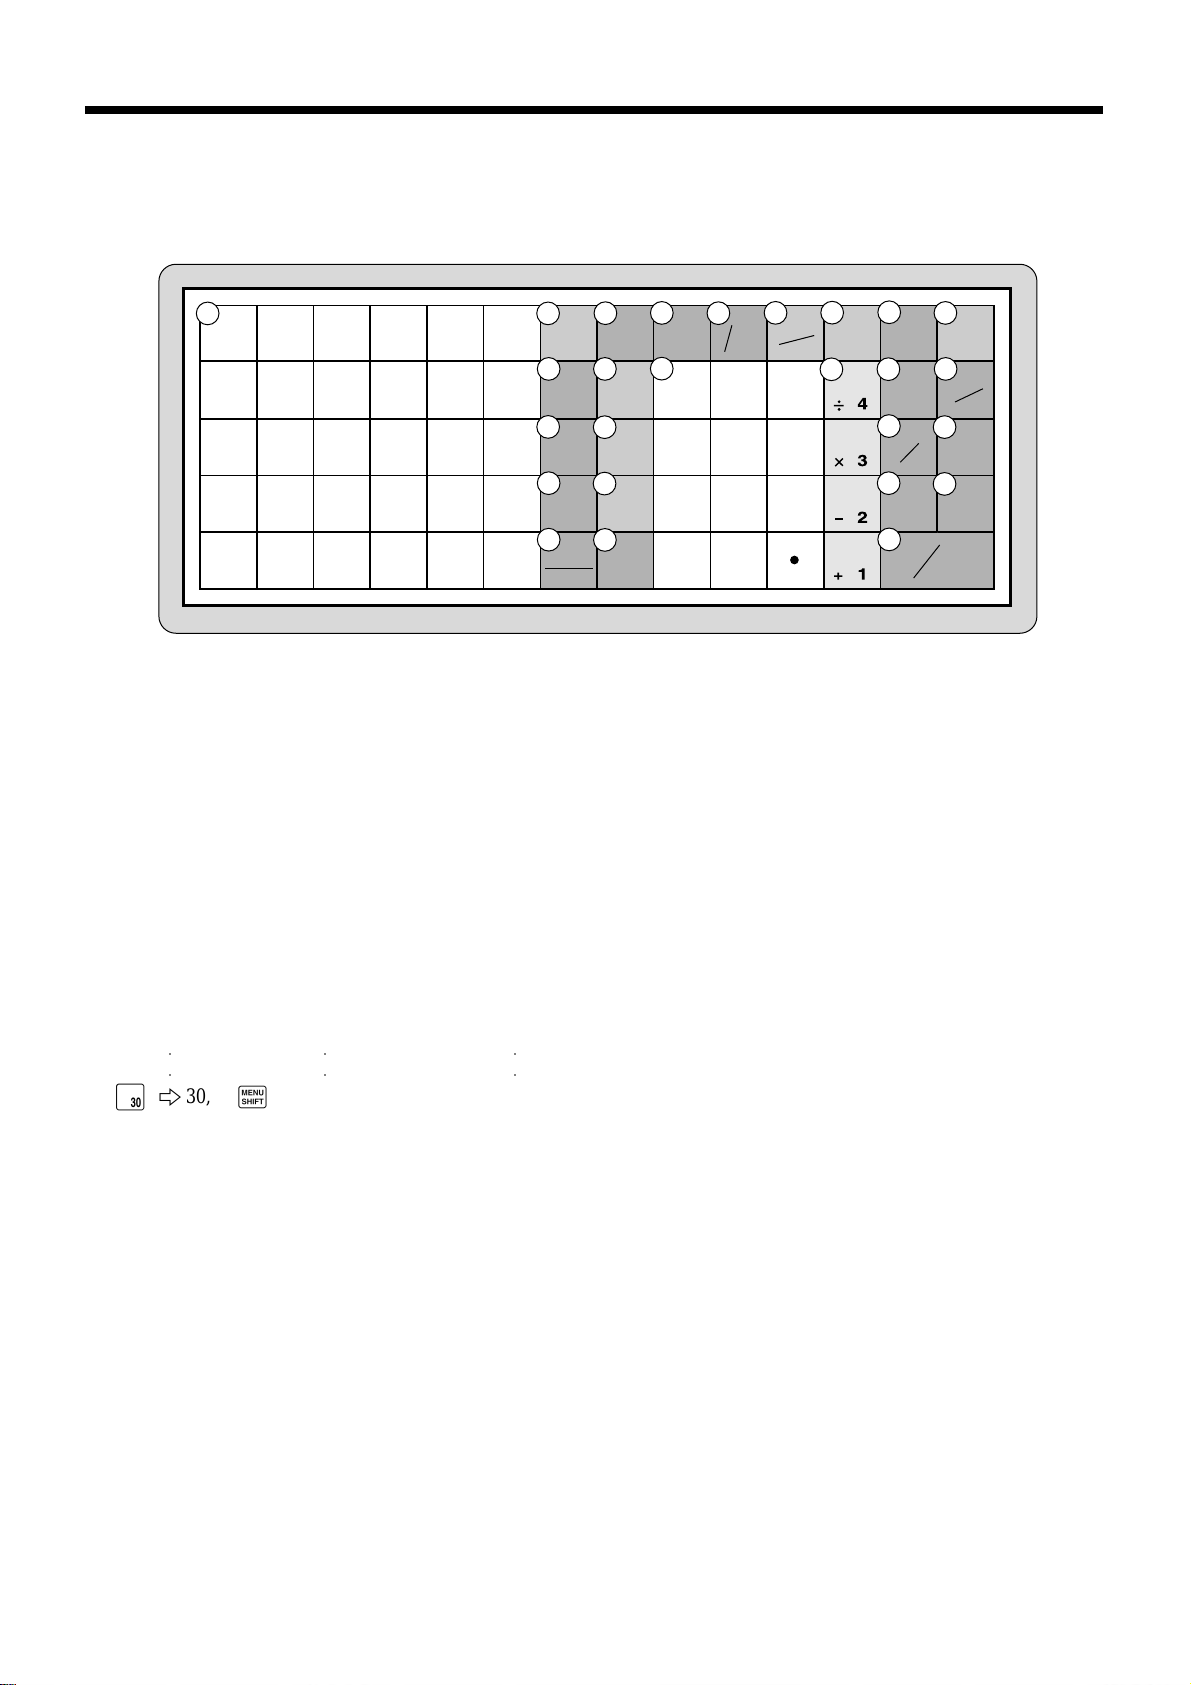
Introducing TK-810
Keyboard
1
5
10
15
20
25
4
9
14
19
24
3
8
13
18
23
2
7
12
17
22
1
6
11
16
21
• Register Mode
1 Flat PLU key G,H ~ L
Use these keys to register items to flat PLUs.
2 Guest/Post receipt key g
Guest receipt key: Press this key to produce a guest
receipt (page 77) in a check tracking system.
Post receipt key: Press this key to produce a post-finalization receipt (page 48).
3 Menu shift key ,
Use this key to shift the flat PLU key number from 1
through 30 to 31 through 60 or 61 through 90.
G 2 1, ,G 2 31, ,,G 2 61
H 2 2, ,H 2 32, ,,H 2 62
○○
L 2 30, ,L 2 60, ,,L 2 90
4 Clear key C
Use this key to clear an entry that has not yet been
registered.
5 Multiplication/Date/Time key X
Use this key to input a quantity for a multiplication
operation. Between transactions, this key displays the
current time and date.
6 Open/Clerk number key o
This key is initialized as Clerk number key.
Clerk number key: Use this key to sign clerk on and off
the register.
Open key: Press this key to temporarily release a limitation on the number of digits that can be input for a unit
price.
In case of using "Open" function, allocate "Open" key by
programming.
○○
2
30
10
29
16
28
20
27
24
ERR.CORR
26
CANCEL
○○
GUEST/
POST
RECEIPT
11
%
17
-
21
RF
25
3
MENU
SHIFT
ADD/
PRICE
OLD
NEW
NB
4
12
C/AC
6
C
5
X
DATE
TIME
OPEN
CLK #
13 14
9
8
7
6
5
4
3
2
1
00
0
7
PLU
8
FEED
RC
MR
18
#
22
SUB
TOTAL
26
CA AMT
= TEND
7 PLU key +
Use this key to input PLU (subdepartment) numbers.
8 Paper feed key f
Hold this key down to feed paper from the printer.
9 Receipt on/off key D
Press this key twice to change the status "receipt issue" or
"no receipt." This key is only effective when the "use
printer for receipt printer" in the printer control program
is selected. In case of "receipt issue", the "RECEIPT ON"
indicator is lit.
0 Discount key p
Use this key to register discounts.
A Add/Price key :
Add check key: Use this key to combine the details of
more than one check into a single check in a check
tracking system.
Price key: Use this key to register unit prices for subdepartment.
B Ten key pad 0, 1, ~ 9, -, ^
Use these keys to input numbers.
C Department keys &, ', ( and )
Use these keys to register items to departments.
D Received on account key [
Press this key following a numeric entry to register
money received for non-sale transactions.
NS
9
RECEIPT
ON/OFF
15
EURO
PD
19
CHK
23
CR
22
Page 23

E Euro/Paid out key I
Euro key: Press this key to convert the main currency to
the sub currency (the Euro/the local money) when
registering a subtotal amount. This key is also used for
specifying sub currency while entering an amount of
payment or declaration in drawers.
Paid out: Press this key following a numeric entry to
register money paid out from the drawer.
F Minus key m
Use this key to input values for subtraction.
G Old check key O
In a check tracking system, use this key to input the
number of an existing check (previously created using the
N key) whose details are stored in the check tracking
memory. Existing checks are reopened to perform further
registration or to finalize them.
H Non-add/No sale key B
Non-add key: To print reference number (to identify a
personal check, credit card, etc.) during a transaction,
press this key after some numerical entries.
No sale key: Press this key to open the drawer without
registering anything.
I Check key k
Use this key to register a check tender.
J Refund key R
Use this key to input refund amounts and void certain
entries.
K New check key N
In a check tracking system, use this key to input a new
check number in order to open a new check under that
number.
L Subtotal key s
Press this key to display and print the current subtotal
(includes add-on tax) amount.
M Credit key c
Use this key to register a credit sale.
N Error correct/Cancel key e
Use this key to correct registration errors and to cancel
registration of entire transactions.
O New balance key n
In a check tracking system, use this key to add latest
registered total to the previous balance to obtain a new
balance.
P Cash amount tendered key a
Press this key to register a cash sale.
• Calculator Mode
4 Clear/All clear key C
0 Percent key p
B Ten key pad 0, 1, ~ 9, -, ^
C Arithmetic operation key &, ', ( and )
D Memory recall key [
H Drawer open key B
P Equal key a
Introducing TK-810
23
Page 24
Basic Operations and Setups
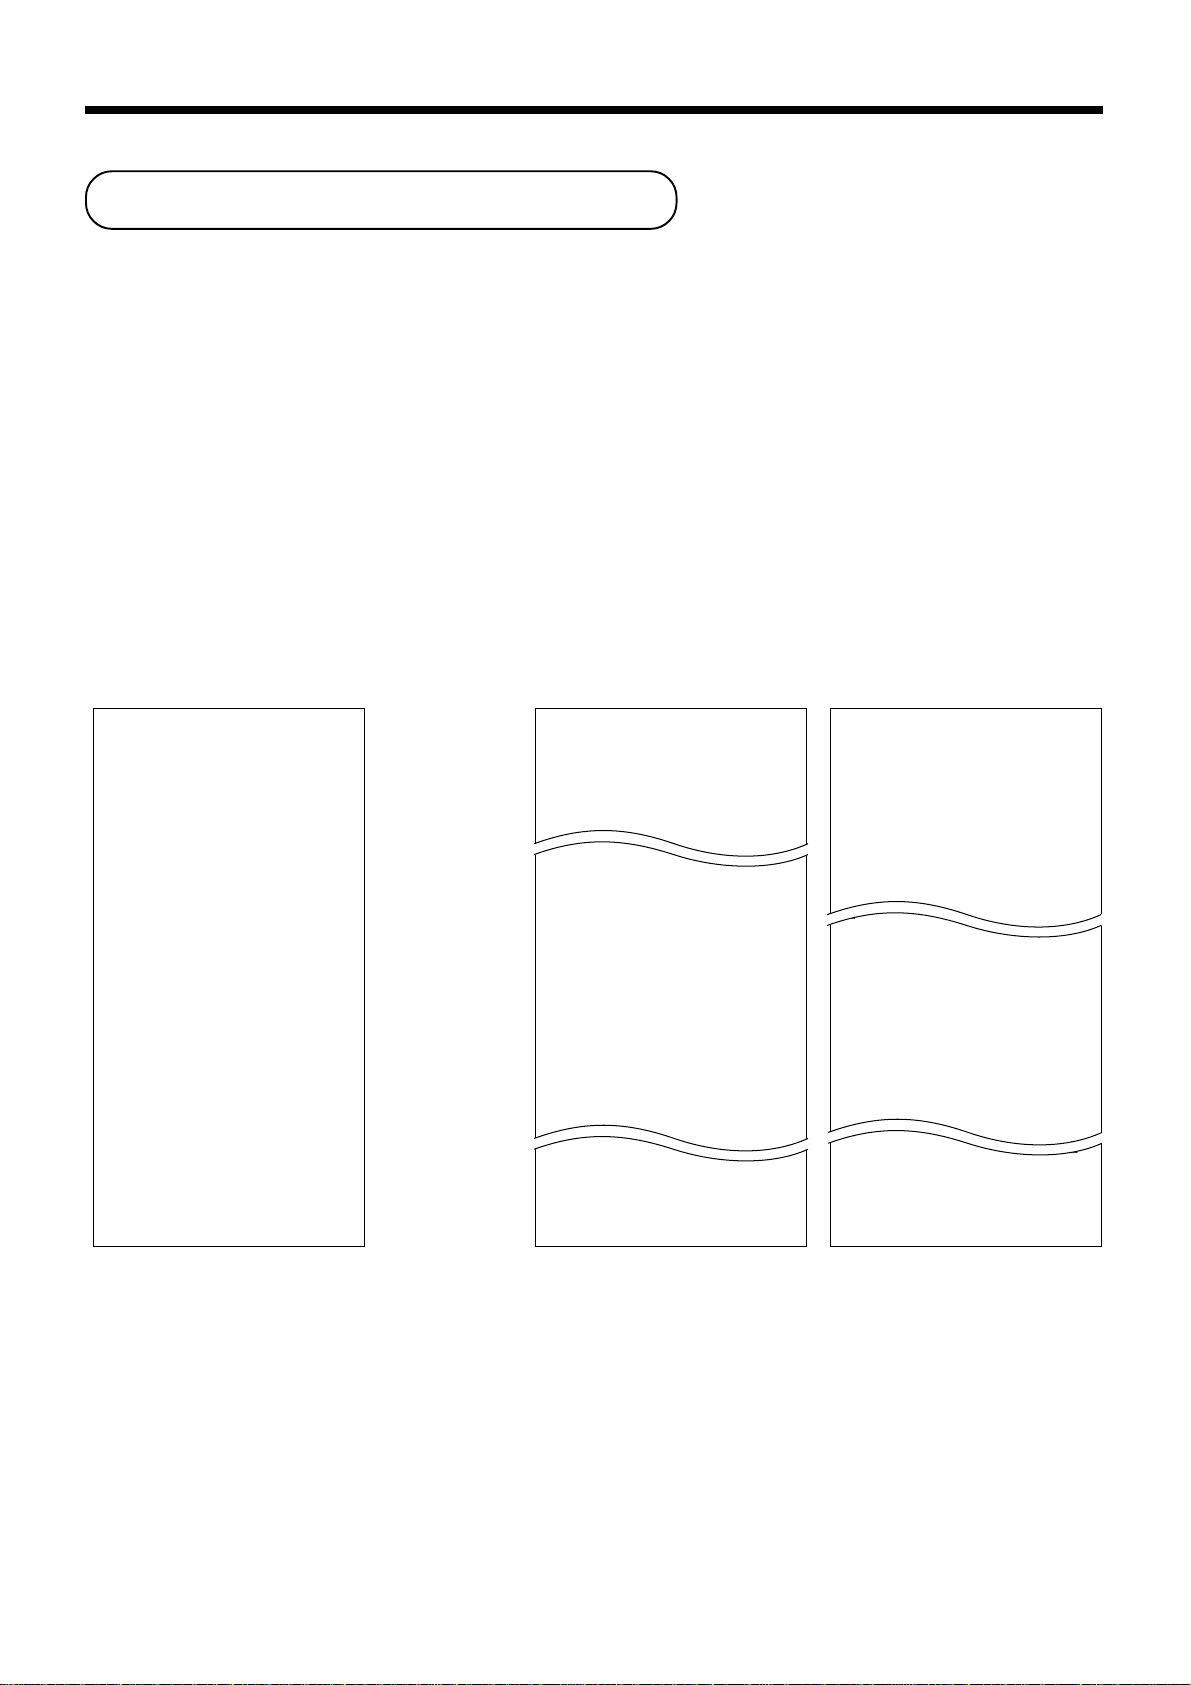
How to read the printouts
• The journal and receipts are records of all transactions and operations.
• The contents printed on receipts and journal are identical, except the date printing line. (The date line is printed
on receipts and reports.)
• You can choose the journal skip function (page 49).
If the journal skip function is selected, the cash register will print the total amount of each transaction, and the
details of premium, discount and reduction operations only, without printing department and PLU item registrations on the journal.
• The following items can be skipped on receipts and journal.
•Time
• Consecutive number
• Taxable status
• Taxable amount
Receipt Sample
************************
* THANK YOU *
** CALL AGAIN **
************************
* COMMERICIAL MESSAGE *
* COMMERICIAL MESSAGE *
* COMMERICIAL MESSAGE *
* COMMERICIAL MESSAGE *
15-01-2001 12:34 0001
REG
DEPT01 •1.00
DEPT02 •2.00
5 X @1.00
DEPT03 •5.00
TA1 •3.00
TX1 •0.15
TA2 •5.00
TX2 •0.20
TL •
CA •10.00
CG •1.65
7 No
*** BOTTOM MESSAGE ***
*** BOTTOM MESSAGE ***
*** BOTTOM MESSAGE ***
*** BOTTOM MESSAGE ***
C
01 000123
8.35
— Logo message
— Commercial message
— Date/Time/Machine No.
— Mode/Clerk/
Consecutive No.
— Item counter
— Bottom message
Journal Sample Journal Sample
(Item lines Included) (Item lines Skipped)
12:33 0001
REG
DEPT01 •1.00
DEPT02 •2.00
TA1 •3.00
TX1 •0.15
CA •
2 No
12:34 0001
REG
DEPT01 •1.00
DEPT02 •2.00
5 X @1.00
DEPT03 •5.00
TA1 •3.00
TX1 •0.15
TA2 •5.00
TX2 •0.20
TL •
CA •10.00
CG •1.65
7 No
12:35 0001
REG
DEPT01 •1.00
DEPT02 •2.00
5 X @1.00
DEPT03 •5.00
C
01 000122
3.15
C
01 000123
8.35
C
01 000124
12:32 0001
REG
TA1 •3.00
TX1 •0.15
CA •
2 No
12:33 0001
REG
TA1 •3.00
TX1 •0.15
CA •
2 No
12:34 0001
REG
TA1 •3.00
TX1 •0.15
TA2 •5.00
TX2 •0.20
TL •
CA •10.00
CG •1.65
7 No
12:35 0001
REG
TA1 •3.00
TX1 •0.15
TA2 •5.00
TX2 •0.20
C
01 000121
3.15
C
01 000122
3.15
C
01 000123
8.35
C
01 000124
In the operation examples contained in this manual, the print samples are what would be produced if the roll paper
is being used for receipts. They are not actual size. Actual receipts are 58 mm wide. Also, all sample receipts and
journals are printout images.
24
Page 25
How to use your cash register
The following describes the general procedure you should use in order to get the most out of your cash register.
BEFORE business hours…
• Check to make sure that the cash register is
plugged in securely. Page 6
• Check to make sure there is enough paper
left on the roll. Page 7
• Read the financial totals to confirm that they are
all zero. Page 93
• Check the date and time. Page 27
DURING business hours…
• Register transactions. Page 28
• Periodically read totals. Page 92
AFTER business hours…
• Reset the daily totals. Page 47
• Remove the journal. Page 108
• Empty the cash drawer and leave it open. Page 19
• Take the cash and journal to the office.
Basic Operations and Setups
25
Page 26
Basic Operations and Setups
Clerk sign on and sign off
Any time you begin any registration or program,
clerk sign on operation is necessary.
CAL
REG
OFF
RF
PGM
OP
X
CAL
Z
REG
OFF
RF
PGM
X
Z
C-A02
C-A32
PGM
Clerk sign on
Signing clerk 1 on:
Signing clerk 2 on: 2 6 o
○○○
Signing clerk 20 on: 20 6 o
1 6 o
Clerk sign off
Signing clerk off:
0 6 o
CAL
REG
OFF
RF
PGM
X
CAL
Z
REG
OFF
RF
PGM
X
Z
Mode Switch
OPERATION RECEIPT
15-01-2001 12:34
REG
DEPT01 •1.00
DEPT02 •2.00
5 X @1.00
DEPT03 •5.00
OPERATION
C
01 000123
X
CAL
REG
OFF
RF
PGM
X
Z
Z
C-A32
PGM
— Mode/clerk name/consecutive No.
• The current clerk is also signed off whenever you set the mode switch to OFF position.
Important!
• The error code "E08" appears on the display whenever
you try to perform a registration, a read/
reset operation without signing on.
• The signed on clerk is also identified on the receipt/journal.
• The clerk numbers are initialized as 1 through 20. In case of using other clerk number , see page
52 for programming.
26
Page 27
Displaying the time and date
You can show the time or date on the display of the
cash register whenever there is no registration being
made.
To display and clear the time
OPERATION DISPLAY
CAL
REG
OFF
RF
PGM
X
Z
Mode Switch
C-A02
OP
C-A32
PGM
Time appears on the display Hour Minutes (24-hour system)
Clears the time display
To display and clear the date
OPERATION DISPLAY
Date appears on the display Day Month Year
Clears the date display
Preparing coins for change
You can use the following procedure to open the drawer
without registering an item. This operation must be
performed out of a sale.
(You can use the [ key instead of the B key. See
page 43.)
X
C
X
X
C
CAL
REG
OFF
RF
PGM
08-3º
º00
08-3¡
(Time is displayed first)
15-01-01
º00
X
Z
Mode Switch
C-A02
OP
C-A32
PGM
Basic Operations and Setups
Opening the drawer without a sale
OPERATION RECEIPT
B
15-01-2001 08:35
REG
#/NS ••••••••••••
C
01 000001
27
Page 28
Basic Operations and Setups
Preparing and using department keys
Registering department keys
The following examples show how you can use the
department keys in various types of registrations.
Single item sale
OPERATION RECEIPT
Unit price $1.00
——————————
Item Quantity 1
——————————
Dept. 1
—————————————
Payment Cash $1.00
Repeat
OPERATION RECEIPT
1-
Unit price
&
Department
a
CAL
REG
OFF
RF
PGM
X
Z
Mode Switch
15-01-2001 08:40
REG
DEPT01 •1.00
CA •
C
01 000002
1.00
OP
C-A02
— Date/time
— Mode/consecutive No.
Department No./
—
unit price
— Cash total amount
C-A32
PGM
Unit price $1.50
——————————
Item Quantity 3
——————————
Dept. 1
—————————————
Payment Cash $10.00
Multiplication
Unit price $1.00
——————————
Item Quantity 12.5
——————————
Dept. 1
—————————————
Payment Cash $20.00
150&
&
&
s
15-01-2001 08:45
REG
DEPT01 •1.50
DEPT01 •1.50
DEPT01 •1.50
TL •
CA •10.00
CG •5.50
C
01 000003
10-a
OPERATION RECEIPT
12^5X
Quantity
(4-digit integer/2-digit decimal)
1-&
s
15-01-2001 08:50
REG
12.5 X @1.00
DEPT01 •12.50
TL •
CA •20.00
CG •7.50
C
01 000004
20-a
— Repeat
— Repeat
4.50
— Quantity/unit price
12.50
28
Page 29
Programming department keys
To program a unit price for each department
PGM
C-A32
X
CAL
REG
OFF
RF
PGM
Mode Switch
6 1s 6 : : : : : : 6
Z
$1234.56 2 123456
To another department
Unit price
Unit price
Example:
$1.00 2 100
$10.25 2 1025
&
(Dept 1)
'(Dept 2)
((Dept 3)
{
)(Dept 4)
6 s
}
To program the tax calculation status for each department
Tax calculation status
This specification defines which tax table should be used for automatic tax calculation.
See page 11 for information on setting up the tax tables.
Programming procedure
Different status to different department
PGM
C-A32
CAL
REG
OFF
RF
PGM
Mode Switch
X
Z
6 1s 6
Note: Tax symbols
⁄
: Tax table 1
¤
: Tax table 2
‹
: Tax table 3
All departments are initialized as no tax calculation.
• Tax table 1
• Tax table 2
• Tax table 3
{
• No tax calculation
:
:
:
:
[
`
k
B
different department
6
}
Same status to
&
(Dept 1)
'
(Dept 2)
(
(Dept 3)
{
)
(Dept 4)
Basic Operations and Setups
6 s
}
29
Page 30
Basic Operations and Setups
Registering department keys by
programming data
Preset price
OPERATION RECEIPT
Unit price ($1.00)
—————————
Item Quantity 1
—————————
Dept. 2
—————————————
Payment Cash $1.00
Preset tax status (Add-on tax)
Unit price ($2.00)
—————————
Quantity 5
Item 1 —————————
Dept. 3
—————————
Taxable (1)
—————————————
Unit price ($2.00)
—————————
Quantity 1
Item 2 —————————
Dept. 4
—————————
Taxable (2)
—————————————
Payment Cash $20.00
preset
preset
preset
preset
preset
OPERATION RECEIPT
20-a
'
a
5X
(
)
s
CAL
REG
OFF
RF
PGM
X
Z
Mode Switch
15-01-2001 08:55
REG
DEPT02 •1.00
CA •
15-01-2001 09:00
REG
5 X @2.00
DEPT03 ⁄ •10.00
DEPT04 ¤ •2.00
TA1 •10.00
TX1 •0.50
TA2 •2.00
TX2 •0.12
TL •
CA •20.00
CG •7.38
C
01 000005
C
01 000006
1.00
12.62
OP
C-A02
— Department No./
unit price
— Tax status
— Tax status
— Taxable Amount 1
— Tax 1
— Taxable Amount 2
— Tax 2
C-A32
PGM
Preset tax status (Add-in tax)
Unit price ($2.00)
—————————
Quantity 5
Item 1 —————————
Dept. 3
—————————
Taxable (1)
—————————————
Unit price ($2.00)
—————————
Quantity 1
Item 2 —————————
Dept. 4
—————————
Taxable (2)
—————————————
Payment Cash $20.00
preset
preset
preset
preset
30
OPERATION RECEIPT
5X
(
)
s
15-01-2001 09:05
REG
5 X @2.00
DEPT03 ⁄ •10.00
DEPT04 ¤ •2.00
TL •
CA •20.00
CG •8.00
C
01 000007
12.00
20-a
— Tax status
— Tax status
Page 31

Preparing and using PLUs
This section describes how to prepare and use PLUs.
CAUTION:
Before you use PLUs, you should first tell the cash register how it should handle the registration.
Programming PLUs
To program a unit price for each PLU
PLU No.
*
90
PLU No.
To new (not sequential) PLU
+ 6 : : : : : : 6 a 6 s
CAL
REG
OFF
RF
PGM
C-A32
1 to
X
Z
6 1s 6
PGM
Mode Switch
To program tax calculation status for each PLU
Unit price
Example:
$1.00 2 100
$10.25 2 1025
$1234.56 2 123456
Different unit price
to next PLU
Same unit price
to next PLU
Unit price
PGM
C-A32
CAL
REG
OFF
RF
PGM
Mode Switch
Note: Tax symbols
⁄
: Tax table 1
¤
: Tax table 2
‹
: Tax table 3
All PLUs are initialized as no tax calculation.
*
The number of PLU depends on the memory allocation. See the page 76.
X
Z
6 1s 6
Different status to different PLU
• Tax table 1
• Tax table 2
• Tax table 3
{
• No tax calculation
:
:
:
:
[
`
k
B
to different PLU
6
}
PLU No.
Same status
Same status to
the next PLU
6 + 6s
Basic Operations and Setups
31
Page 32

Basic Operations and Setups
Registering PLUs
The following examples show how you can use PLUs in
various types of registrations.
Registering by subdepartment, see the "Convenient
Operations and Setups" on page 69.
PLU single item sale
OPERATION RECEIPT
Unit price ($2.50)
—————————
preset
Item Quantity 1
—————————
PLU 14
—————————————
Payment Cash $3.00
14
3-a
PLU repeat
PLU code
+
s
CAL
REG
OFF
RF
PGM
X
Z
Mode Switch
15-01-2001 09:10
REG
PLU014 •2.50
TL •
CA •3.00
CG •0.50
C
01 000008
2.50
OP
C-A02
— PLU No./unit price
C-A32
PGM
Unit price ($2.50)
—————————
Item Quantity 3
—————————
PLU 14
—————————————
Payment Cash $10.00
PLU multiplication
Unit price ($1.20)
—————————
Item Quantity 15
—————————
PLU 2
—————————————
Payment Cash $20.00
preset
preset
OPERATION RECEIPT
14+
+
+
s
15-01-2001 09:15
REG
PLU014 •2.50
PLU014 •2.50
PLU014 •2.50
TL •
CA •10.00
CG •2.50
C
01 000009
10-a
OPERATION RECEIPT
15X
Quantity
(4-digit integer/2-digit decimal)
2+
s
15-01-2001 09:20
REG
15 X @1.20
PLU002 •18.00
TL •
CA •20.00
CG •2.00
C
01 000010
18.00
7.50
32
20-a
Page 33

Preparing and using flat-PLUs
This section describes how to prepare and use flat-PLUs.
Programming flat-PLUs
To program a unit price for each flat-PLU
PGM
C-A32
X
CAL
REG
OFF
RF
PGM
Mode Switch
6 1s 6 : : : : : : 6
Z
Unit price
Unit price
Example:
$1.00 2 100
$10.25 2 1025
$1234.56 2 123456
To another flat-PLU
G
(Flat-PLU 1)
H
(Flat-PLU 2)
L
{
<
,,G
(Flat-PLU 30)
,G
(Flat-PLU 31)
(Flat-PLU 61)
6 s
}
To program tax calculation status for each flat-PLU
Different status to different flat-PLU
PGM
C-A32
CAL
REG
OFF
RF
PGM
Mode Switch
X
Z
6 1s 6
Note: Tax symbols
⁄
: Tax table 1
¤
: Tax table 2
‹
: Tax table 3
All PLUs are initialized as no tax calculation.
• Tax table 1
• Tax table 2
• Tax table 3
{
• No tax calculation
,,L
:
r
:
`
:
k
:
B
6
}
(Flat-PLU 90)
Same status to
different flat-PLU
G
H
{
L
<
,G
,,G
,,L
Basic Operations and Setups
6 s
}
33
Page 34

Basic Operations and Setups
Registering flat-PLUs
The following examples show how you can use flat-PLUs
in various types of registrations.
CAL
REG
OFF
RF
PGM
Flat-PLU registration with manual price and preset price
OPERATION RECEIPT
Unit price $2.50
—————————
Item 1 Quantity 2
—————————
Flat-PLU 1
—————————————
Unit price ($2.00)
—————————
preset
Item 2 Quantity 1
—————————
Flat-PLU 2
—————————————
Payment Cash $10.00
250G
G
Repeat registration
H
s
10-a
15-01-2001 09:25
REG
PLU001 •2.50
PLU001 •2.50
PLU002 •2.00
TL •
CA •10.00
CG •3.00
X
Z
Mode Switch
C
01 000011
7.00
OP
C-A02
— PLU No./unit price
— Repeat
C-A32
PGM
Flat-PLU registration using menu shift
OPERATION RECEIPT
Unit price ($2.50)
—————————
Item 1 Quantity 1
—————————
preset
Press , once to designate
flat-PLU 31 - 60.
Flat-PLU 31
—————————————
Unit price ($1.50)
—————————
preset
Item 2 Quantity 5
—————————
Flat-PLU 90
—————————————
Press , twice to designate
flat-PLU 61 - 90.
Payment Cash $10.00
10-a
,
G
5X
,,
L
s
15-01-2001 09:27
REG
PLU031 •2.50
5 X @1.50
PLU090 •7.50
TL •
CA •10.00
CG •0.00
C
01 000012
10.00
34
Page 35

Preparing and using discounts
This section describes how to prepare and register discount.
Programming discounts
You can use the p key to register discounts (percentage decreases). The more detailed informations about the
discount (and premium) are described in the "Registering discounts and premiums" section in the "Convenient
Operations and setups" on page 72.
To program a rate to the p key
PGM
C-A32
6 1s 6 : : :
:
6 p 6 s
CAL
REG
OFF
RF
PGM
Mode Switch
To program tax status to the p key
PGM
C-A32
X
Z
Example:
10%
5.5%
12.34%
6 1s 6
CAL
REG
OFF
RF
PGM
Mode Switch
X
Z
Note: Tax symbols
⁄
: Tax table 1
¤
: Tax table 2
‹
: Tax table 3
*
: Tax table 1, 2 and 3
Tax status for the p key is initialized as no tax calculation.
Preset rate
10
2
5^5
2
12^34
2
• Tax table 1
• Tax table 2
• Tax table 3
• Tax table 1, 2 and 3
{
• No tax calculation
:
[
:
`
:
k
:
[`k
:
B
6 p 6 s
}
Basic Operations and Setups
35
Page 36

Basic Operations and Setups
Registering discounts
The following example shows how you can use the p
key in various types of registration.
Discount for items and subtotals
OPERATION RECEIPT
Unit price $5.00
—————————
Item 1 Quantity 1
—————————
Dept. 1
—————————————
Unit price
—————————
($10.00)
preset
Item 2 Quantity 1
—————————
PLU 16
—————————————
Discount Rate (5%)
—————————————
Subtotal
discount
Rate 3.5%
preset
—————————————
Payment Cash $15.00
Applies the preset discount
rate to the last item registered.
The input value takes priority
of the preset value.
5-&
16+
3^5p
15-a
p
s
s
CAL
REG
OFF
RF
PGM
X
Z
Mode Switch
15-01-2001 10:30
REG
DEPT01 •5.00
PLU016 •10.00
5%
%- -0.50
ST •14.50
3.5%
%- -0.51
TL •
CA •15.00
CG •1.01
C
01 000013
13.99
C-A02
OP
C-A32
PGM
• You can manually input rates up to 4 digits long (0.01% to 99.99%).
Taxable status of the
p key
• Whenever you perform a discount operation on the last item registered, the tax calculation for discount amount
is performed in accordance with the tax status programmed for that item.
• Whenever you perform a discount operation on a subtotal amount, the tax calculation for the subtotal
amount is performed in accordance with the tax status programmed for the
p key.
36
Page 37

Preparing and using reductions
This section describes how to prepare and register reductions.
Programming for reductions
You can use the m key to reduce single item or subtotal amounts. The following procedure lets you
program the tax calculation method for the m key.
To program tax calculation status
• Tax table 1
PGM
C-A32
6 1s 6
CAL
REG
OFF
RF
PGM
Mode Switch
Taxable status of the m key
The tax calculation for the reduction amount is performed in accordance with the tax status programmed for the
m key, regardless of whether the reduction is performed on the last item registered or a subtotal amount.
To program preset reduction amount
PGM
C-A32
CAL
REG
OFF
RF
PGM
Mode Switch
X
Z
Note: Tax symbols
⁄
: Tax table 1
¤: Tax table 2
‹
: Tax table 3
*: Taxable 1, 2 and 3
Tax status for the m key is initialized no tax calculation.
X
Z
6 1s 6 : : : : : : 6 m 6 s
• Tax table 2
• Tax table 3
• Tax table 1, 2 & 3
{
• No tax calculation
Unit price
Example:
$1.00 2 100
$10.25 2 1025
$1234.56 2 123456
Unit price
:
[
:
`
:
k
:
[`k
:
B
6 m 6 s
}
Basic Operations and Setups
37
Page 38

Basic Operations and Setups
Registering reductions
The following examples show how you can use the m
key in various types of registration.
Reduction for items
OPERATION RECEIPT
Unit price $5.00
—————————
Item 1 Quantity 1
—————————
Dept. 1
—————————————
Reduction
Amount $0.25
—————————————
Unit price ($6.00)
—————————
preset
Item 2 Quantity 1
—————————
PLU 45
—————————————
Reduction
—————————————
Amount ($0.50)
preset
Payment Cash $11.00
Reduces the last amount
registered by the value input.
5-&
25m
45+
11-a
m
s
CAL
REG
OFF
RF
PGM
X
Z
Mode Switch
15-01-2001 10:35
REG
DEPT01 •5.00
- -0.25
PLU045 •6.00
- -0.50
TL •
CA •11.00
CG •0.75
C
01 000014
10.25
C-A02
OP
C-A32
PGM
• You can manually input reduction values up to 7 digits long.
• The amount you input for the reduction is neither subtracted from the department nor PLU totalizer.
Reduction for subtotal
OPERATION RECEIPT
Unit price $3.00
—————————
Item 1 Quantity 1
—————————
Dept. 1
—————————————
Unit price $4.00
—————————
Item 2 Quantity 1
—————————
Dept. 2
—————————————
Subtotal
Reduction
Amount $0.75
—————————————
Payment Cash $7.00
3-&
4-'
s
75m
Reduces the subtotal by the
value input here.
s
7-a
15-01-2001 10:40
REG C01 000015
DEPT01 •3.00
DEPT02 •4.00
- -0.75
TL •
CA •7.00
CG •0.75
6.25
38
Page 39

Registering with Euro currency exchange
The following examples shows the basic operation using
the euro currency exchange function.
Case 1
OPERATION DISPLAY
Main Currency Local (FFr)
—————————————
Payment
Euro
(Cash, E15)
—————————————
Change Local
—————————————
Unit price $6.00
—————————
Item Quantity 1
—————————
Dept. 1
—————————————
Rate
1 Euro = 0.5 FFr
—————————————
Printout of Both
Subtotal currencies
Pressing I before subtotal converts
the subtotal amount into the Euro.
Pressing I after amount tendered
converts the amount into the Euro.
Press a to finalize the transaction.
The change amount in the main
currency is shown on the display.
6-&
Is
15-
I
a
CAL
REG
OFF
RF
PGM
*1
*2
X
Z
Mode Switch
1"00e
1%00e
!50
RECEIPT
OP
C-A02
—
Subtotal in Euro
—
Tender in Euro
— Change in FFr
C-A32
PGM
*1
If the payment is the same as the subtotal amount, you can skip this
step. Press the a key directly after the subtotal.
*2
If the payment is less than the subtotal amount, the cash register
specifies it as a partial payment and shows the balance in the main
currency on the display.
15-01-2001 10:42
REG
DEPT01 •6.00
TL •
EURO
CA }15.00
CA •7.50
CG •1.50
C
01 000016
Case 2
This is another case of currency exchange. The procedure is the same as of Case 1.
Main Currency Euro
—————————————
Payment
—————————————
Change Euro
—————————————
Unit price 12 Euro
—————————
Item Quantity 1
—————————
Dept. 1
—————————————
Rate
1 Euro = 0.5 FFr
—————————————
Printout of Both
Subtotal currencies
Local
(Cash, 6FFr)
RECEIPT
15-01-2001 10:45
REG
DEPT01 }12.00
TL }
LOCAL
CA •6.00
CA }12.00
CG }0.00
C
01 000017
}
12.00
12.00
•6.
00
6.00
—
— Converted amount
— Euro character
— Payment (Euro)
— Converted payment
— Change (Local)
Subtotal
—
(Main currency: Euro)
— Converted amount
— Local character
— Payment (Local)
— Converted payment
— Change (Euro)
Subtotal
(Main currency: Local)
Basic Operations and Setups
In Case 2, the "l" indicator is lit instead of the "e" indicator to show the amount of local money.
39
Page 40

Basic Operations and Setups
Registering credit and check payments
The following examples show how to register credits
and payments by check.
Check
OPERATION RECEIPT
Unit price $10.00
10-&
—————————
Item Quantity 1
—————————
Dept. 1
10-k
—————————————
Payment Check $10.00
Credit
OPERATION RECEIPT
s
CAL
REG
OFF
RF
PGM
X
Z
Mode Switch
15-01-2001 10:50
REG
DEPT01 •10.00
TL •
CHK •10.00
CG •0.00
C
01 000018
10.00
C-A02
OP
C-A32
PGM
Unit price $15.00
15-)
—————————
Item Quantity 1
—————————
Dept. 4
0123B
—————————————
Reference Number 0123
—————————————
Payment Credit $15.00
Mixed tender (cash, credit and check)
OPERATION RECEIPT
Unit price $55.00
—————————
Item Quantity 1
—————————
Dept. 4
—————————————
Check $30.00
—————————
Payment Cash $5.00
—————————
Credit $20.00
55-)
30-k
s
c
s
5-a
c
15-01-2001 10:55
REG
DEPT04 •15.00
#/NS 0123
CR •
15-01-2001 11:00
REG
DEPT04 •55.00
TL •
CHK •30.00
CA
CR •20.00
C
01 000019
15.00
C
01 000020
55.00
•5.00
— Reference No.
40
Page 41

Registering returned goods in the REG mode
The following example shows how to use the R key in
the REG mode to register goods returned by customers.
OPERATION RECEIPT
Unit price $2.35
—————————
Item 1 Quantity 1
—————————
Dept. 1
235&
2-'
1+
—————————————
Unit price $2.00
Item 2 Quantity 1
—————————
—————————
Dept. 2
235&
Pressing R specifies that the
next item registered is a return.
—————————————
Unit price ($1.20)
—————————
Item 3 Quantity 1
—————————
PLU 1
preset
1+
You have to press R before
registering each returned item.
—————————————
Unit price $2.35
Returned
Item 1
—————————
Quantity 1
—————————
Dept. 1
—————————————
Returned
Item 3
Unit price ($1.20)
—————————
Quantity 1
—————————
preset
PLU 1
—————————————
Payment Cash $2.00
R
R
s
a
CAL
REG
OFF
RF
PGM
X
Z
Mode Switch
15-01-2001 11:05
REG
DEPT01 •2.35
DEPT02 •2.00
PLU001 •1.20
RF ••••••••••••
DEPT01 -2.35
RF ••••••••••••
PLU001 -1.20
CA •
C
01 000021
2.00
C-A02
OP
C-A32
PGM
Basic Operations and Setups
41
Page 42

Basic Operations and Setups
Registering returned goods in the RF mode
The following examples show how to use the RF mode
to register goods returned by customers.
Normal refund transaction
OPERATION RECEIPT
Unit price $1.50
Returned
Item 1
—————————
Quantity 2
—————————
Dept. 1
—————————————
Returned
Item 2
Unit price ($1.20)
—————————
Quantity 6
—————————
preset
PLU 2
—————————————
Payment Cash $10.20
150&
&
6X
2+
s
a
CAL
REG
OFF
X
Z
RF
PGM
Mode Switch
15-01-2001 11:10
RF
C01 000022
DEPT01 •1.50
DEPT01 •1.50
6 X @1.20
PLU002 •7.20
CA •
10.20
C-A32
PGM
Reduction of amounts paid on refund
OPERATION RECEIPT
Unit price $4.00
Returned
Item 1
—————————
Quantity 1
—————————
Dept. 3
—————————————
Reduction
Amount $0.15
—————————————
Returned
Item 2
Unit price ($1.20)
—————————
Quantity 1
—————————
preset
4-(
15m
2+
p
s
a
15-01-2001 11:15
RF
C01 000023
DEPT03 •4.00
- -0.15
PLU002 •1.20
5%
%- -0.06
CA •
4.99
PLU 2
—————————————
Discount Rate (5%)
—————————————
preset
Payment Cash $4.99
Important!
To avoid miss registrations in the RF mode, return the mode switch to the f ormer position immediately.
42
Page 43

Registering money received on account
The following example shows how to register money
received on account. This registration must be performed
out of a sale.
OPERATION RECEIPT
Received amount $700.00
7--[
Amount can be up to 8 digits.
CAL
REG
OFF
RF
PGM
X
Z
Mode Switch
15-01-2001 11:20
REG
RC •700.00
C
01 000024
C-A02
OP
C-A32
PGM
Registering money paid out
The following example shows how to register money
paid out from the register. This registration must be
performed out of a sale.
OPERATION RECEIPT
Paid out amount $1.50
150I
Amount can be up to 8 digits.
CAL
REG
OFF
RF
PGM
X
Z
Mode Switch
15-01-2001 11:30
REG
PD •1.50
C
01 000025
C-A02
OP
C-A32
PGM
Basic Operations and Setups
43
Page 44

Basic Operations and Setups
Making corrections in a registration
There are three techniques you can use to make
corrections in a registration.
• To correct an item that you input but not yet
registered.
• To correct the last item you input and registered.
• To cancel all items in a transaction.
To correct an item you input but not yet registered
OPERATION RECEIPT
2-
1-&
12X
—
— Correction of unit price
C
—
—
C
— Correction of quantity
11X
2-'
—
CAL
REG
OFF
RF
PGM
X
Z
Mode Switch
15-01-2001 11:35
REG
DEPT01 •1.00
11 X @2.00
DEPT02 •22.00
PLU003 •1.30
PLU015 •10.00
TL •
CA •15.00
CR •19.30
C
01 000026
34.30
C-A02
OP
C-A32
PGM
2
C
3+
15+
6-
C
15+
Enter subdepartment No. again.
10-A
s
10-
C
15-a
c
—
— Correction of PLU No.
—
—
— Correction of subdepartment unit price
(See page 69 for registering.)
—
—
— Correction of partial tender amount
—
44
Page 45

To correct an item you input and registered
OPERATION RECEIPT
1-&
2-'
'
e
2+
e
5+
15+
6-A
e
15+
10-A
8X
4-)
e
6X
4-)
—
— Clearance
—
—
— Correction of PLU No.
—
—
Correction of sub-
—
department unit price
—
—
— Correction of quantity
—
15-01-2001 11:40
REG
DEPT01 •1.00
DEPT02 •2.00
DEPT02 •2.00
CORR -2.00
PLU002 •1.20
CORR -1.20
PLU005 •1.50
PLU015 •6.00
CORR -6.00
PLU015 •10.00
8 X @4.00
DEPT04 •32.00
CORR -32.00
6 X @4.00
DEPT04 •24.00
ST •35.50
50%
CORR -32.00
%- •32.00
ST •35.50
5%
%- -1.93
RF ••••••••••••
DEPT02 -2.00
CORR •2.00
RF ••••••••••••
DEPT02 -2.20
TL •
CA •20.00
CORR -20.00
CA •15.00
CR •19.37
C
01 000027
34.37
s
50p
e
s
5p
R2-'
e
R220'
s
20-a
e
15-a
c
—
— Correction of discount
—
—
— Correction of refund item
—
—
— Correction of partial tender
—
Basic Operations and Setups
45
Page 46

Basic Operations and Setups
To cancel all items in a transaction
OPERATION RECEIPT
1-&
2-'
3-(
4-)
15-01-2001 11:45
REG
DEPT01 •1.00
DEPT02 •2.00
DEPT03 •3.00
DEPT04 •4.00
CANCEL ••••••••••••
C
01 000028
s
Pressing s key is necessary to cancel
the transaction.
e
Important!
• Note that the number of items included in the transaction to be cancelled is limited (24 ~ 40
items), depending on the complexity of the transaction. If you try to cancel a transaction that
exceeds the limit, an error occurs.
In case of occurrence of this error, register these items in the RF mode.
• You can program the cash register that this cancel operation is not allowed.
No sale registration
You can use the following procedure to open the drawer
without registering a sale. This operation must be
performed out of a sale.
OPERATION RECEIPT
B
CAL
REG
OFF
RF
PGM
X
Z
C-A02
OP
Mode Switch
15-01-2001 11:50
REG
#/NS ••••••••••••
C
01 000029
C-A32
PGM
46
Page 47

Printing the daily sales reset report
This report shows daily sales totals.
OPERATION REPORT
CAL
REG
OFF
RF
PGM
X
X
Z
Z
Mode Switch
8
a
C-A32
PGM
15-01-2001 12:00
Z
C01 000030
0000
DAILY
DEPT01 QT 15
•339.50
DEPT02 QT 19
•62.70
DEPT03 QT 31
•139.10
DEPT04 QT 23
•332.67
NON-LINK_DEPT QT 10
•94.90
-----------------------GROSS QT 253
•1146.90
NET No 100
•1217.63
CAID •903.06
CHID •197.17
CKID •183.60
TA1 •732.56
TX1 •43.96
TA2 •409.72
TX2 •21.55
TA3 •272.50
TX3 •8.18
ROUND •4.75
CANCEL No 2
•108.52
RF MODE No 2
•3.74
-----------------------CA No 81
•836.86
CHK No 10
•197.17
CR No 9
•183.60
RC No 2
•78.00
PD No 1
•6.80
- No 8
•3.00
%- No 10
•4.62
RF No 7
•27.79
CORR No 10
•12.76
#/NS No 5
-----------------------C
01 No 12
•127.63
C
02 No 6
C
20 No 24
•113.90
-----------------------GT •0000001217.63
Z 0001
— Date/time
— Reset mode/clerk/consecutive No.
—
Report code/report title/reset symbol/
reset counter
— Department No./No. of items
— Department amount
—
Non-link department No. of items
*1
*1
— Non-link department amount
— Gross No. of items
— Gross sales amount
— No. of customers
— Net sales amount
— Cash in drawer amount
— Charge in drawer amount
— Check in drawer amount
— Taxable amount 1
— Tax amount 1
— Taxable amount 2
— Tax amount 2
— Taxable amount 3
— Tax amount 3
*2
*2
*2
*2
*2
*2
— Rounding amount
— Cancellation count
— Cancellation amount
— Refund mode operation count
—
Refund mode operation amount
*3
*3
— Cash sales count
— Cash sales amount
— Check sales count
— Check sales amount
— Credit sales count
— Credit sales amount
— Received on Account count
— Received on Account amount
— Paid out count
— Paid out amount
— Subtraction count
— Subtraction amount
— Discount count
— Discount amount
— Refund key count
— Refund key amount
*3
*3
— Error correction count
— Error correction amount
— No sale count
— Clerk 1/clerk 1 sales count
— Clerk 1 sales amount
— Non-resettable grand-sales total
Basic Operations and Setups
*1
Zero totalled departments (the amount and item numbers are both zero) are not printed.
*2
Taxable amount and tax amount are printed only the corresponding tax table is programmed.
*3
These items can be skipped by programming.
47
Page 48

Convenient Operations and Setups
This section describes more sophisticated setups and operations that you can use to suit the needs of your retail
environment.
Post-finalization receipt format,
General printing control,
Compulsory,
Machine features
About post-finalization receipt
You can issue a receipt even if the cash register is not in the receipt mode.
The post -finalization receipt lets you issue a receipt after finalization of the transaction.
Note that all of the following conditions must be satisfied.
• The option "print receipts" is selected.
• The receipt issuance status must be OFF.
• The transaction must be finalized in the REG or RF mode using the a, h, k or c key.
Post-finalization receipt example
You can program the cash register to print the
transaction total only (below Total format) or full details
(below Detailed format) on the post-finalization receipt.
Note that if the transaction contains more than 45 lines
(including receipt header), the cash register prints in a
Total format regardless of your programming.
OPERATION RECEIPT
Unit price $10.00
—————————
Item 1 Quantity 1
—————————
Dept. 1
—————————————
Unit price $20.00
—————————
Item 2 Quantity 1
—————————
Dept. 2
—————————————
Payment Cash $30.00
10-&
20-'
30-a
CAL
REG
OFF
RF
PGM
X
Z
C-A02
OP
Mode Switch
s
Receipt is not issued.
g Post-finalization receipt is issued.
If "Automatic issue" is selected, no need to press g key.
Total format Detailed format
C-A32
PGM
15-01-2001 12:35
REG
CA •
C
01 000123
30.00
Important!
• You can issue only one post-finalization receipt per transaction.
48
15-01-2001 12:35
REG
DEPT01 •10.00
DEPT02 •20.00
TL •
CA •30.00
CG •0.00
C
01 000123
30.00
Page 49

Programming general printing control
.noitareporednetgnirudenillatotbusehtfognitnirpsserppuS
a
.edamsinoitareporednetonfineveenillatotehttnirP
)ailartsuArofylno(.latotxattnirP
.emittnerrucehttnirP
.lanruojnoetadehtpikS
.rebmunevitucesnocehtpikS
.lanruojtnirP/tpiecertnirP
)eussilaunam(yektpiecertsoP
.tnuomaelbaxattnirP
.slobmysxattnirP
.dlosmetiforebmuntnirP
LANRUOJPIKS
(.lanruojnosenilmetipikS
.lobmysretimiledtigiD
.lobmyslamiceD
.tpiecernoegassemogoltnirP
.tpiecernoegassemmottobtnirP
)
.desserpsiyekehtnehwlatotbustnirP
egassemFOMTSGnailartsuAtnirP
.tpiecernoegassemlaicremmoctnirP
/)eussicitamotua(yekezilaniFybtpiecertsopeussI
tpiecertsopehtnitamroflatoT/tamrofliateD
.noitcasnartagnizilaniferofebsnehpyhtnirP
b
c
a
b
c
a
b
c
a
b
c
a
b
a
b
a
b
a
b
c
0=oN
1=seY
0=oN
2=seY
0=oN
4=seY
0=seY
1=oN
0=seY
2=oN
0=seY
4=oN
0=tpieceR
1=lanruoJ
0=launaM
2=citamotuA
0=liateD
4=latoT
0=seY
1=oN
0=seY
2=oN
0=oN
4=seY
0=oN
1=seY
0=oN
2=seY
0=ammoC
1=doireP
0=doireP
2=ammoC
0=oN
1=seY
0=oN
4=seY
0=oN
1=seY
0=oN
2=seY
0=oN
4=seY
:
D
:
D
:
D
:
D
:
D
:
D
:
D
:
D
)c+b+a(
8
)c+b+a(
7
)c+b+a(
6
)c+b+a(
5
)b+a(
4
)b+a(
3
)b+a(
2
)c+b+a(
1
PGM
C-A32
CAL
REG
OFF
RF
PGM
Mode Switch
6 3s 6 0522s6
X
Z
6
: : :
D
8 D7 D6 D5 D4 D3 D2 D1
: :
: :
:
a 6 s
Convenient Operations and Setups
49
Page 50

Convenient Operations and Setups
Programming compulsory and clerk control function
ecroF s .noitazilaniferofebnoitarepo
.noitarepodaerlaicnanifdna
"0"syawlA
sserp,"oN"fI(.noitartsiger , ).emithcae
;erudecorpnoitacilpitluM
1 ytitnauQ × ,tnuoma 2 tnuomA × ytitnauq
.ytitnauq
)ailartsuArofylno(
.deussi
.noitarepolecnactibihorP
a
teser/daeryliadagniwollaerofebnoitaralcedyenomaecroF
b
.sremotsucforebmunehtretneotecroF
0=oN
2=seY
0=oN
4=seY
0=oN
2=seY
:
D
:
D
)b+a(
8
7
;
D
6
ULP-talftxenehtrofsutatstfihsunemehtniatniaM
a
b
rotnuomasayekULP-talferofebseirtneciremunehttaerT
c
.deussisitpieceranehwreffubyekehtraelC
.deussisitroper/tpieceranehwffo-ngisotuamrofreP
,selashsacfotigidtnuomatsalno)5,0ot(noitcirtseR
noitaralcedyenomdnatuodiap,tnuoccanodeviecer
.yalpsidemitgnirud"sdnoces"yalpsiD
a
b
c
sitroperteseryliadehtnehwrebmunevitucesnocehtteseR
a
b
1 0=
2 2=
0=oN
1=seY
:
)c+b+a(
D
:
D
:
D
:
D
5
)c+b+a(
4
3
)b+a(
2
0=tnuomA
4=ytitnauQ
0=oN
1=seY
0=oN
2=seY
0=oN
4=seY
0=oN
2=seY
0=seY
1=oN
0=oN
2=seY
"0"syawlA
PGM
C-A32
CAL
REG
OFF
RF
PGM
Mode Switch
6 3s 6 0622s6
X
Z
6
:
: ; : :
D
8 D7 D6 D5 D4 D3 D2 D1
: :
;
D
1
;
a 6 s
50
Page 51

Programming read/reset report printing control
.troper
.troper
PGM
C-A32
yadehtforebmunevitucesnoctsalehtdnatsrifehttnirP
.troperteserselasyliadehtno)egnar.oNevitucesnoc(
teser/daernoitcasnartdnatnemtrapednosenillatotorezpikS
a
.troperteser/daerULPnosenillatotorezpikS
.troperselasylruohnosenillatotorezpikS
.troperteser/daernooitarselasehttnirP
ehtnolatotdnargelbatteser-nonehtfognitnirpsserppuS
.troperteseryliad
"0"syawlA
b
c
a
b
teser/daerehtnotnuocdnalatotedomFRfognitnirpsserppuS
4=seY
0=oN
0=seY
1=oN
0=seY
2=oN
0=seY
4=oN
0=oN
1=seY
0=oN
2=seY
0=oN
1=seY
:
D
:
D
:
D
:
D
6
)c+b+a(
5
)b+a(
4
3
;;
D2D
1
6 3s 6 0822s6
CAL
REG
OFF
RF
PGM
Mode Switch
X
Z
6
: : :
D6 D5 D4 D3 D2 D1
:
; ;
a 6 s
Setting a store/machine number
You can set a 4-digit machine number to identify your machine. The machine number is printed on receipts/journal
for each transaction.
PGM
C-A32
CAL
REG
OFF
RF
PGM
Mode Switch
6 3s 6 0222s6
X
Z
15-01-2001 12:34
0001
REG
DEPT01 •1.00
DEPT02 •2.00
5 X @1.00
DEPT03 •5.00
C
01 000123
: :
D4 D3 D2 D1
— Date/time/machine No.
:
:
a 6 s
Convenient Operations and Setups
51
Page 52

Convenient Operations and Setups
Programming to clerk
You can program up to 4-digit assigning number (clerk number), trainee status of clerk (i.e. training cashier) and
commission rate for each clerk.
Programming clerk number
PGM
C-A32
To other clerk
CAL
REG
OFF
RF
PGM
Mode Switch
Programming trainee status of clerk
PGM
C-A32
CAL
REG
OFF
RF
PGM
Mode Switch
X
Z
6 3s 6
X
Z
6 3s 6
Clerk No.
1
{
20
Clerk No.
1
{
20
:
:
07
}
67
}
s 6 : : : : a 6 s
Clerk number
To other clerk
Training clerk:
s 6
1
Normal clerk:
{
0
a 6 s
}
When a training clerk signs on, the cash register automatically enters the training mode.
In the training mode, no operations are affected on any totalizers nor counters.
The training mode symbols are printed in the columns of receipt entries produced in the training mode.
The cash register exits the training mode when the training clerk signs off.
52
Page 53

Programming clerk commission rate
Note: In addition to the commission rate program (this program), do not forget to program the commission status
for item (department, PLU and flat-PLU).
To other clerk
Clerk No.
PGM
C-A32
6 3s 6
1
{
:
68
}
s 6
CAL
REG
OFF
RF
X
Z
6 : : : : : : : : a 6 s
20
Integer Decimal
Integer Decimal
PGM
Mode Switch
Commission
rate 1
Commission
rate 2
About the clerk interrupt function
The register can be programmed to allow the clerk interrupt function, which makes it possible for multiple clerks to
simultaneously uses the same register. If a clerk starts registration of a transaction, another clerk can interrupt the
original registration and begin new one. The original clerk can be later resume the interrupted original registration.
To use clerk interrupt function
PGM
C-A32
6 3s 6 0422s6 : ; ; a 6 s
CAL
REG
OFF
RF
X
Z
PGM
Mode Switch
1 noitacificepsgnikcartkcehC
2 noitacificepstpurretnikrelC
"0"syawlA
"0"syawlA
D
3 D2 D1
1 0=
2 4=
:
D
;
D
;
D
3
Convenient Operations and Setups
2
1
53
Page 54

Convenient Operations and Setups
Programming descriptors and messages
The following descriptors and messages can be programmed;
• Report descriptor (such as gross total, net total, cash in drawer…)
• Grand total
• Special character (such as mode symbol, taxable symbol…)
• Read/reset report title • Messages (Logo, commercial and bottom message)
• Clerk name • Function key descriptor
• PLU item descriptor • Department key descriptor
Programming report descriptor, grand total, special character, report title,
receipt message and clerk name
To other program code
PGM
C-A32
To the next memory No.
CAL
REG
OFF
RF
PGM
Mode Switch
yromeM
.oN
10
20
30
40
50
60
70
80
90
01
11
21
31
41
51
61
71
81
91
02
12
22
32
42
52
margorP
edoc
rotpircsedtropeR
10
X
6 2s 6
Z
latotssorG
latotteN
rewardnihsaC
rewardniegrahC
rewardnikcehC
rewardnitiderC
1tnuomaelbaxaT
1xaT
2tnuomaelbaxaT
2xaT
3tnuomaelbaxaT
3xaT
gnidnuoR
latotnoitallecnaC
latotedomdnufeR
: : : :
Memory
No.
stnetnoCretcarahclaitinIsruoY
ycnerrucbusrofrewardnihsaC
ycnerrucbusrofrewardniegrahC
ycnerrucbusrofrewardnikcehC
ycnerrucbusrofrewardnitiderC
rewardnihsacycnerrucngieroF
rewardnikcehcycnerrucngieroF
1noissimmockrelC
2noissimmockrelC
tnuocedomrotaluclaC
latottnemtrapedknil-noN
Program
SSORG
TEN
DIAC
DIHC
DIKC
DIRC
ACEC
KCEC
1AT
1XT
2AT
2XT
3AT
3XT
DNUOR
LECNAC
EDOMFR
1.MMOC
2.MMOC
LAC
s 6 Characters 6 a 6 s
☞
code
DIACORUE
DIHCORUE
DIKCORUE
DIRCORUE
TPED_KNIL-NON
See "Entering characters" section.
54
Page 55

yromeM
.oN
latotdnarG
1002
10
20
30
40
50
60
70
80
90
11
21
31
41
51
61
71
81
91
02
12
22
42
62
72
82
92
03
13
eltittropeR
10
20
30
40
60
70
80
90
01
11
margorP
edoc
latotdnarG
stnetnoCretcarahclaitinIsruoY
TG
retcarahclaicepS
).ae2(ytitnauQ/.oN/@/tnuomA
).ae2()TSGnailartsuA(ytitnauQ/.oN/@/tnuomA
).ae2(lobmysycnerrucbuS/remotsuC/tnuocmetI
).ae2(gnicirptilpS/noitacilpitluM
).ae2(3~1sutatselbaxaT
).ae2()TSGnailartsuA(1sutatselbaxaT
sutatselbaxatllA
).ae2(lobmysycnerrucngieroF
).ae4(edomdnufeR/edomgeR
)2(edommargorP
).ae4(edomZ/X
edomgniniarT
lobmysgniniarT
)gniredneT(lobmyslatoT
32
42
lobmysegnahC
)tpiecertsoP(lobmyslatoT
)noitartsiger%(lobmyslatoT
gnidnesatadmargorp-otuA
gnivieceratadmargorp-otuA
margorp-otuA
egassemdnelamronmargorp-otuA
egassemdnerorremargorp-otuA
egassemdnedecrofmargorp-otuA
tropernoegassemlatoT
latotecivreS
rebmunkcehC
retcarahcycnerruclacoL
retcarahcoruE
ycnerruclacolniegnahC
oruEniegnahC
eltittroperyliaD
eltittroperULP
eltittroperselasylruoH
eltittroperpuorG
eltittroperlaicnaniF
eltittroperylhtnoM
eltittroper1-cidoireP
eltittroper2-cidoireP
eltittroperlaudividnI
eltittroperkcehcnepO
• @NoQT
$ @NoQT
NoCT }
X /
⁄ ¤ ‹
* ¤ ‹
*
* * * *
REG
RF
P
X Z
DAILY
PLU
HOURLY
GROUP
FLASH
n (n= 1 ~ 6)
****
LT
GC
LT
TS
MGP
DNE
RORRE
**DNE**
LATOT
LTCVRS
#-KCEHC
LACOL
ORUE
GCLACOL
GCORUE
YLHTNOM
********
MGPDNES
MGPVCER
Convenient Operations and Setups
1-CIDOIREP
2-CIDOIREP
KCEHCNEPO
55
Page 56

Convenient Operations and Setups
yromeM
.oN
10
20
30
40
50
60
70
80
90
01
11
21
31
41
51
yromeM
.oN
krelC
10
20
30
40
50
60
91
02
margorP
edoc
egassemtpieceR
23
margorP
edoc
10krelC
20krelC
30krelC
70
40krelC
50krelC
60krelC
91krelC
02krelC
stnetnoCretcarahclaitinIsruoY
egassemogolfoenilts1
egassemogolfoenildn2
egassemogolfoenildr3
egassemogolfoenilht4
egassemmottobfoenilts1
egassemmottobfoenildn2
egassemmottobfoenildr3
egassemmottobfoenilht4
stnetnoCretcarahclaitinIsruoY
YOUR RECEIPT
THANK YOU
CALL AGAIN
egassemlaicremmocfoenilts1
egassemlaicremmocfoenildn2
egassemlaicremmocfoenildr3
egassemlaicremmocfoenilht4
TAX INVOICE
.gsmFOMTSGenilartsuAfoenilts1
* INDICATES
.gsmFOMTSGenilartsuAfoenildn2
TAXABLE SUPPLY
.gsmFOMTSGenilartsuAfoenildr3
C
01
C
02
C
03
C
04
C
05
C
06
C
19
C
20
Programming department key descriptor
PGM
C-A32
CAL
REG
OFF
RF
6 2s 6
X
Z
☞
See "Entering characters" section.
Characters
PGM
Mode Switch
stnetnoCretcarahclaitinIsruoY
yektnemtrapeD
10tnemtrapeD
20tnemtrapeD
30tnemtrapeD
40tnemtrapeD
56
10TPED
20TPED
30TPED
40TPED
To another department
6
{
&
(Dept 1)
'
(Dept 2)
(
(Dept 3)
)
(Dept 4)
6 s
}
Page 57

Programming PLU descriptor
PGM
C-A32
To new (not sequential) PLU
To the next PLU
CAL
REG
OFF
RF
PGM
Mode Switch
.oNULPstnetnoCretcarahclaitinIsruoY
ULP
100
200
300
400
500
600
700
800
900
010
110
210
310
410
510
610
710
810
910
020
120
220
320
420
520
620
720
820
920
892
992
003
X
6 2s 6
Z
100ULP
200ULP
300ULP
400ULP
500ULP
600ULP
700ULP
800ULP
900ULP
010ULP
110ULP
210ULP
310ULP
410ULP
510ULP
610ULP
710ULP
810ULP
910ULP
020ULP
120ULP
220ULP
320ULP
420ULP
520ULP
620ULP
720ULP
820ULP
920ULP
892ULP
992ULP
003ULP
PLU No.
100ULP
200ULP
300ULP
400ULP
500ULP
600ULP
700ULP
800ULP
900ULP
010ULP
110ULP
210ULP
310ULP
410ULP
510ULP
610ULP
710ULP
810ULP
910ULP
020ULP
120ULP
220ULP
320ULP
420ULP
520ULP
620ULP
720ULP
820ULP
920ULP
892ULP
992ULP
003ULP
+ 6
☞
Characters
See "Entering characters" section.
a 6 s
Convenient Operations and Setups
Normally, 90 PLU are allocated. Memory reallocation or memory expansion is necessary to allocate 300 PLU.
57
Page 58

Convenient Operations and Setups
Programming flat-PLU descriptor
To another flat-PLU
PGM
C-A32
*
G(Flat-PLU 1)
CAL
REG
OFF
RF
PGM
Mode Switch
6 2s 6 Characters 6
X
Z
*
Hit , first, if designating flat-PLU 31 - 60.
Hit
,, first, if designating flat-PLU 61 - 90.
ULP
100ULP
200ULP
300ULP
400ULP
500ULP
600ULP
700ULP
800ULP
900ULP
010ULP
110ULP
210ULP
310ULP
410ULP
510ULP
610ULP
710ULP
810ULP
910ULP
020ULP
120ULP
220ULP
320ULP
420ULP
520ULP
620ULP
720ULP
820ULP
920ULP
880ULP
980ULP
090ULP
☞ See "Entering characters" section.
stnetnoCretcarahclaitinIsruoY
100ULP
200ULP
300ULP
400ULP
500ULP
600ULP
700ULP
800ULP
900ULP
010ULP
110ULP
210ULP
310ULP
410ULP
510ULP
610ULP
710ULP
810ULP
910ULP
020ULP
120ULP
220ULP
320ULP
420ULP
520ULP
620ULP
720ULP
820ULP
920ULP
880ULP
980ULP
090ULP
H(Flat-PLU 2)
{
L(Flat-PLU 30)
6 s
}
58
Page 59

Programming function key descriptor
PGM
C-A32
To other function key
CAL
REG
OFF
RF
PGM
Mode Switch
6 2s 6
X
Z
egrahC
kcehC
tiderC
piT
suniM
sulP
dnufeR
dioV
TAV
ecirP
ULP
nepO
Characters
☞
See "Entering characters" section.
stnetnoCretcarahclaitinIsruoY
noitcnuF
derednettnuoma/hsaC
ecnalaBweN
retcarahcllaceR
tnuoccanodevieceR
tuodiaP/oruE
tnuocsiD
muimerP
xatlaunaM
lecnaC/tcerrocrorrE
tpiecertseuG/tpiecertsoP
dda-noN
elasoN/dda-noN
elasoN
remotsucfo.oN
tnemegnarrA
egnahcxeycnerruC
tfihsxaT
tfihsuneM
nepoteserP
.oNkrelC/nepO,.oNkrelC
latotbuS
ffo/notpieceR
emitetaD/noitacilpitluM
kcehcweN
kcehcdlO
kcehcdlO/weN
kcehcddA
orezelbuoD"00"
orezelpirT"000"
tnioplamiceD"."
6
AC
HC
KHC
RC
BN
RAHC
PIT
CR
DP
-
-%
+
+%
XAT
FR
RROC
DIOV
#
SN/#
SN
TC
GRA
EC
TAV
CRP
ULP
S/T
UNEM
NEPO
2NPO
#KLC
LT
FFO/NO
X
KHCWEN
KHCDLO
KCEHC
KHCDDA
00
000
.
Function key
TCRG/P
6 s
Convenient Operations and Setups
59
Page 60

Convenient Operations and Setups
Entering characters
In this section, the method to enter descriptors or messages (characters) to the cash register during programming is
described.
Characters are specified by character keyboard or by codes. In the first half of this section, the usage of character
keyboard is described. In the latter half, inputting method by character code is described.
Using character keyboard
1
CHAR.
SHIFT
A
a
H
h
O
o
V
v
2
1
2
3
4
5
6
7
8
9
0
B
C
D
E
F
b
c
d
e
f
I
J
K
L
M
i
j
W
k
P
Q
R
p
q
r
X
Y
w
x
y
l
m
S
T
s
t
8
Z
SPACE
z
9
(
G
N
U
DBL
SIZE
3
4
MENU
SHIFT
)
@
g
#
n
%
u
&
C
7
9
8
7
•
6
5
4
'
3
2
1
:
11
10
00
0
5
PLU
/
*
-
!
.
,
+
?
6
FEED
12
#-2
13
#-1
1 Shift key
Pressing this key shifts the character from the uppercase
letter to lower case letter and returns to the uppercase
letter in sequence.
2 Alphabet keys
Used input to characters.
3 Menu shift key
Use this key to shift the flat-PLU key number from 1
through 30 to 31 through 60 or 61 through 90.
4 Clear key
Clears all input characters in the programming.
5 PLU key
Use this key to input PLU numbers.
6 Feed key
Hold this key down to feed paper from the printer.
7 Numeric keys
Used to enter program codes, memory number and
character codes.
Example:
Input "
A
pple Juice", enter "DBL SIZE", "A", "SHIFT", "p", "p", "l", "e", "SPACE", "SHIFT", "J",
"SHIFT", "u", "i", "c", "e" –.
8 Space key
Set a space by depression.
9 Double size letter key
Specifies that the next character you input to a double size
character. You must press this key before each double size
character.
0 Character fixed key
Enter when the alphabetic entry for a descriptor, name or
message has been completed.
A Backspace/Character code fixed key
Registers one character with code (2 or 3 digit).
Clears the last input character, much like a back space
key.
B Program end key
Terminates the character programming.
C Character enter key
Registers the programmed characters.
60
Page 61

Entering characters by code
Every time you enter a character, choose character codes by the character code list (below) and press the ≠ key
to settle it. After you complete entering characters, press the – key to fix them.
Example: Input "
A
pple Juice", enter "255 ≠ 65 ≠ 112 ≠ 112 ≠ 108 ≠ 101 ≠ 74 ≠ 117
≠ 105 ≠ 99 ≠ 101 ≠ –."
Character code list
arahCedoCarahCedoCarahCedoCarahCedoCarahCedoCarahCedoCarahCedoC
!
=
#
$
%
&
'
(
)
*
+
,
.
/
ecapS23
33
43
53
63
73
83
93
04
14
24
34
44
54
64
74
0
1
2
3
4
5
6
7
8
9
:
;
<
•
>
?
84
94
05
15
25
35
45
55
65
75
85
95
06
16
26
36
@
A
B
C
D
E
F
G
H
I
J
K
L
M
N
O
46
56
66
76
86
96
07
17
27
37
47
57
67
77
87
97
P
Q
R
S
T
U
V
W
X
Y
Z
^
¥
[
\
]
08
18
28
38
48
58
68
78
88
98
09
19
29
39
49
59
£
a
b
c
d
e
f
g
h
i
j
k
l
m
n
o
69
79
89
99
p
q
r
s
001
t
101
u
201
v
301
w
401
x
501
y
601
z
701
fi
801
fl
901
‡
011
·
111
‚
211
Ç
311
ü
411
é
511
â
611
ä
711
à
811
å
911
ç
021
ê
121
ë
221
è
321
ï
421
î
521
ì
621
Ä
721
Å
821
921
031
131
231
331
431
531
631
731
831
931
041
141
241
341
arahCedoCarahCedoCarahCedoCarahCedoCarahCedoCarahCedoCarahCedoC
É
æ
Æ
ô
ö
ò
û
ù
ÿ
Ö
Ü
ø
⁄
¤
‹
›
441
á
541
í
641
ó
741
ú
841
ñ
941
Ñ
051
ß
151
Ê
251
¿
351
Ë
451
È
{
551171
651
|
¡
751371
851
§
951
¶
061
Ï
161
Î
261
Ì
361
Í
461
Á
561
Â
661
À
761
Õ
861
õ
961
Ô
071
Ò
Ú
271
Û
Ù
471
"
571
_
671
Ã
c
771391902522142
Ë
871491012622242
971591112722342
Ï
081691212822442
K
181791312922542
L
281891412032642
N
381991512132742
s
481002612232842
Ü
581102712332942
z
681202812432052
ä
781302912532152
c
881402022632252
ë
981502122732352
g
091602222
ï
191702322
k
291802422042
l
n
s
E
I
U
a
e
e
i
u
i
o
o
a
e
i
ö
ö
u
u
«
»
∂
∆
∫
π
∏
∑
Ø
}
Ω
º
µ
Ÿ
832452
932
Convenient Operations and Setups
elbuoD
ezis
552
61
Page 62

Convenient Operations and Setups
Department key feature programming
There are two different methods you can use to assign features to department keys. With "Batch feature
programming", you can use a single operation to assign multiple features.
"Individual feature programming", on the other hand, let you assign features one-by-one. This method is
recommended for programming of special features to individual department keys.
Batch feature programming
When using this procedure to assign multiple features to departments, use 9-digit codes that you create using the
following procedure
To another department key
PGM
CAL
REG
OFF
RF
PGM
C-A32
3s
6
X
Z
6 : : : : : ; ; ; ; 6
D
9 D8 D7 D6 D5 D4 D3 D2 D1
&
(Dept 1)
'
(Dept 2)
(
(Dept 3)
{
)
(Dept 4)
6
}
s
Mode Switch
&'()
tnemtrapedevitageN
tnemtrapedhsaH
elasmetielgniS
noitacificepstimiltigidhgiH
1sutatselbaxaT
2sutatselbaxaT
3sutatselbaxaT
1noissimmoC
2noissimmoC
a
b
a
b
c
a
b
0=oN
2=seY
0=oN
4=seY
0=oN
1=seY
tnacifingiS
rebmun
0=oN
1=seY
0=oN
2=seY
0=oN
4=seY
0=oN
1=seY
0=oN
2=seY
:
D
:
D
:
D
:
D
:
D
)b+a(
9
8
7
)c+b+a(
6
)b+a(
5
62
"0"syawlA
"0"syawlA
;;
D4D
;;
D2D
3
1
Page 63

Individual feature programming
With this procedure, you can assign individual features to specific departments. Please select the command code of
the contents you want to program, and follow the procedure below.
To another department key
PGM
C-A32
CAL
REG
OFF
RF
PGM
Mode Switch
dnammoC
edoc
6610
6681elasmetielgniS
6651noitacificepstimiltigidhgiH
6630
6690
6 3s 6
X
Z
Command code
6
tnemtrapedevitageN
tnemtrapedhsaH
1sutatselbaxaT
2sutatselbaxaT
3sutatselbaxaT
1noissimmoC
2noissimmoC
s 6
Program code
noitceles/stnetnoC
Different program
to the next dept.
Same program
to the next dept.
&
(Dept 1)
'
(
{
)
(Dept 2)
(Dept 3)
(Dept 4)
0=oN
2=seY
0=oN
4=seY
0=oN
1=seY
rebmun
0=oN
1=seY
0=oN
2=seY
0=oN
4=seY
0=oN
1=seY
0=oN
2=seY
6
a
b
a
b
c
a
b
tnacifingiS
6 s
}
margorP
edoc
:
)b+a(
:
:
:
)c+b+a(
:
)b+a(
To program a unit price to a department key, please refer the page 29.
Convenient Operations and Setups
63
Page 64

Convenient Operations and Setups
PLU feature programming
There are two different methods you can use to assign features to PLUs. With "Batch feature programming", you
can use a single operation to assign multiple features.
"Individual feature programming", on the other hand, let you assign features one-by-one. This method is
recommended for programming of special features to individual PLUs.
Batch feature programming
When using this procedure to assign multiple features to PLUs, use 9-digit codes that you create using the
following procedure.
To new (not sequencial) PLU
PGM
C-A32
CAL
REG
OFF
RF
PGM
Mode Switch
6 3s 6
X
Z
6
ULPtnemidnoC
ULPevitageN
ULPhsaH
elasmetielgniS
1sutatselbaxaT
2sutatselbaxaT
3sutatselbaxaT
1noissimmoC
2noissimmoC
)05~00(knilpuorG
Different program to the next PLU
PLU No.
.ULP/tnemtrapedbussataerT
)40~00(kniltnemtrapeD
+ 6
: : : : : : : : :
D
9 D8 D7 D6 D5 D4 D3 D2 D1
a
b
c
a
b
)tnemtrapedbusrof(noitacificepstimiltigidhgiH
a
b
c
a
b
0=oN
1=seY
0=oN
2=seY
0=oN
4=seY
0=oN
1=seY
0=ULP
rebmun
0=oN
1=seY
0=oN
2=seY
0=oN
4=seY
0=oN
1=seY
0=oN
2=seY
rebmun
rebmun
rebmun
rebmun
6 a 6 s
:
)c+b+a(
D
9
:
)b+a(
D
:
D
8
7
4=.tpedbuS
tnacifingiS
:
)c+b+a(
D
6
:
)b+a(
D
5
tnacifingiS
::
tnacifingiS
tnacifingiS
D4D
3
::
tnacifingiS
D2D
1
64
Page 65

Individual feature programming
With this procedure, you can assign individual features to specific PLUs. Please select the command code of the
contents you want to program, and follow the procedure below.
To another PLU
PGM
C-A32
CAL
REG
OFF
RF
PGM
Mode Switch
dnammoC
edoc
6610
6681
6651)tnemtrapedbusrof(noitacificepstimiltigidhgiH
6630
6690
6611
6 3s 6
X
Z
6
ULPtnemidnoC
ULPevitageN
ULPhsaH
elasmetielgniS
1sutatselbaxaT
2sutatselbaxaT
3sutatselbaxaT
1noissimmoC
2noissimmoC
)05~00(knilpuorG
Command code
.ULP/tnemtrapedbussataerT
)40~00(kniltnemtrapeD
PLU No.
s 6
Different program
to the next PLU
Same program
to the next PLU
+ 6
noitceles/stnetnoCedocmargorP
Program code
a
b
c
a
b
a
b
c
a
b
6 a 6 s
0=oN
1=seY
0=oN
2=seY
0=oN
4=seY
0=oN
1=seY
0=ULP
4=.tpedbuS
tnacifingiS
rebmun
0=oN
1=seY
0=oN
2=seY
0=oN
4=seY
0=oN
1=seY
0=oN
2=seY
tnacifingiS
rebmun
tnacifingiS
rebmun
tnacifingiS
rebmun
tnacifingiS
rebmun
:
)c+b+a(
:
)b+a(
:
:
)c+b+a(
:
)b+a(
Convenient Operations and Setups
::
::
To program a unit price to a PLU or a subdepartment, please refer to the page 31.
65
Page 66

Convenient Operations and Setups
Flat-PLU feature programming
There are two different methods you can use to assign features to flat-PLUs. With "Batch feature programming",
you can use a single operation to assign multiple features.
"Individual feature programming", on the other hand, let you assign features one-by-one. This method is
recommended for programming of special features to individual flat-PLUs.
Batch feature programming
When using this procedure to assign multiple features to flat-PLUs, use 9-digit codes that you create using the
following procedure.
To another flat-PLU key
CAL
REG
OFF
RF
PGM
PGM
C-A32
63s6 : : : : : : : : : 6
X
Z
*
Hit
,
first, if designating flat-PLU 31 - 60.
Hit
,,
D
9 D8 D7 D6 D5 D4 D3 D2 D1
first, if designating flat-PLU 61 - 90.
*
G
H
{
L
(Flat-PLU 1)
(Flat-PLU 2)
(Flat-PLU 30)
6s
}
Mode Switch
ULPtnemidnoC
ULPevitageN
ULPhsaH
elasmetielgniS
noitacificepstimiltigidhgiH
1sutatselbaxaT
2sutatselbaxaT
3sutatselbaxaT
1noissimmoC
2noissimmoC
)40~00(kniltnemtrapeD
)05~00(knilpuorG
a
b
c
a
b
c
a
b
0=oN
1=seY
0=oN
2=seY
0=oN
4=seY
0=oN
1=seY
tnacifingiS
rebmun
0=oN
1=seY
0=oN
2=seY
0=oN
4=seY
0=oN
1=seY
0=oN
2=seY
tnacifingiS
rebmun
tnacifingiS
rebmun
tnacifingiS
rebmun
tnacifingiS
rebmun
:
D
:
D
:
D
:
D
:
D
::
D4D
::
D2D
)c+b+a(
9
8
7
)c+b+a(
6
)b+a(
5
3
1
66
Page 67

Individual feature programming
With this procedure, you can assign individual features to specific flat-PLUs. Please select the command code of
the contents you want to program, and follow the procedure below.
To another flat-PLU key
PGM
C-A32
CAL
REG
OFF
RF
PGM
Mode Switch
dnammoC
edoc
6610
6681elasmetielgniS
6651noitacificepstimiltigidhgiH
6630
6690
6611
6 3s 6
X
Z
Command code
6
*
Hit
,
first, if designating flat-PLU 31 - 60.
Hit
,,
ULPtnemidnoC
ULPevitageN
ULPhsaH
1sutatselbaxaT
2sutatselbaxaT
3sutatselbaxaT
1noissimmoC
2noissimmoC
)05~00(knilpuorG
first, if designating flat-PLU 61 - 90.
)40~00(kniltnemtrapeD
Different program
to the next flat-PLU
Same program
s 6
Program code
noitceles/stnetnoCedocmargorP
to the next flat-PLU
*
G
H
6
{
L
(Flat-PLU 30)
a
b
c
a
b
c
a
b
(Flat-PLU 1)
(Flat-PLU 2)
0=oN
1=seY
0=oN
2=seY
0=oN
4=seY
0=oN
1=seY
tnacifingiS
rebmun
0=oN
1=seY
0=oN
2=seY
0=oN
4=seY
0=oN
1=seY
0=oN
2=seY
tnacifingiS
rebmun
tnacifingiS
rebmun
tnacifingiS
rebmun
tnacifingiS
rebmun
6 s
}
:
)c+b+a(
:
:
:
)c+b+a(
:
)b+a(
Convenient Operations and Setups
::
::
To program a unit price to a PLU or a subdepartment, please refer to the page 31.
67
Page 68

Convenient Operations and Setups
Registering example
Locking out and releasing high digit limitation
First of all, the y key should be allocated, refer to page 90.
OPERATION RECEIPT
Unit price $10.50
—————————
Quantity 1
Item —————————
Dept. 3
—————————
—————————————
Max.digit (3)
preset
Payment Cash $11.00
1050(
ERR OR ALARM
(Exceeding max. digits)
C
y
Cancels limitations
for next entry
1050(
CAL
REG
OFF
RF
PGM
X
Z
Mode Switch
15-01-2001 12:40 0001
REG
DEPT03 •10.50
TL •
CA •11.00
CG •0.50
C
01 000030
10.50
C-A02
OP
C-A32
PGM
s
11-a
Single item sales items
You can issue a receipt by simply touching the single item sales department or PLU. The following e xamples show how
you register single-item-sale departments. Registration of single item sale PLUs is identical.
Single item
OPERATION RECEIPT
Unit price $2.00
—————————
Quantity 1
Item —————————
Dept. 4
—————————
Sales status Single item
2-)
15-01-2001 12:45 0001
REG
DEPT04 •2.00
CA •
C
01 000031
2.00
68
Page 69

Multiple item sale
OPERATION RECEIPT
Unit price $2.00
—————————
Quantity 1
Item 1 —————————
Dept. 3
—————————
Sales status
Normal
——————————————–
Unit price $5.00
2-(
5-)
Single item status is not
effective during transaction.
a
It is necessary to press the
finalize key.
15-01-2001 12:50 0001
REG
DEPT03 •2.00
DEPT04 •5.00
CA •
C
01 000032
7.00
—————————
Quantity 1
Item 2 —————————
Dept. 4
—————————
Sales status Single item
——————————————–
Payment Cash $7.00
Note: The single item sales department or PLU should be registered at the top of the transaction, otherwise the
transaction is not finalized. It is necessary to press a, h, k or c key.
Examples of registering subdepartments
Single item sale
Unit price $6.00
—————————
Item Quantity 1
—————————
Subdept. 15
—————————————
Payment Cash $10.00
OPERATION RECEIPT
15+
PLU (subdepartment)
code
6-A
Unit price
15-01-2001 12:55 0001
REG
PLU015 •6.00
TL •
CA •10.00
CG •4.00
C
01 000033
s
10-a
6.00
Convenient Operations and Setups
69
Page 70

Convenient Operations and Setups
Repeat
OPERATION RECEIPT
Unit price ($3.00)
—————————
Item 1 Quantity 3
—————————
Subdept. 15
—————————————
Unit price $2.00
—————————
Item 2 Quantity 2
—————————
Subdept. 15
—————————————
Payment Cash $20.00
Multiplication
Unit Price $6.00
—————————
Item Quantity 1.25
—————————
Subdept. 15
—————————————
Payment Cash $10.00
preset
15+
Hit A without a unit price
recalls preset price.
15+
2-A
20-a
OPERATION RECEIPT
1^25X
Quantity
(4-digit integer/2-digit decimal)
15+
6-A
A
A
A
A
s
15-01-2001 13:00 0001
REG
PLU015 •3.00
PLU015 •3.00
PLU015 •3.00
PLU015 •2.00
PLU015 •2.00
TL •
CA •20.00
CG •7.00
15-01-2001 13:05 0001
REG
1.25 X @6.00
PLU015 •7.50
TL •
CA •10.00
CG •2.50
C
01 000034
13.00
C
01 000035
7.50
s
10-a
70
Page 71

Discount/premium key feature programming
In this section, detail information of p (discount key) and W (premium key) are described.
Programming to the discount or premium key
To program a discount/premium rate, please refer to the page 35.
PGM
C-A32
p
CAL
REG
OFF
RF
PGM
Mode Switch
6 3s 6 : : ; : :
X
Z
D
7 D6 D5 D4 D3 D2 D1
; ;
6 { } 6 s
W
p
,)tnuocsid(
W
"0"syawlA
1sutatselbaxaT
2sutatselbaxaT
3sutatselbaxaT
1noissimmoC
2noissimmoC
"0"syawlA
"0"syawlA
yek
2=pudnuor,1=ffotuc,0=ffodnuor,lortnocnoitcarF
.egatnecrepdemmargorpedirrevootyrtnelaunamtibihorP
tnacifingiS
rebmun
0=oN
2=seY
:
D
:
D
7
6
;
D
5
a
b
c
a
b
0=oN
1=seY
0=oN
2=seY
0=oN
4=seY
0=oN
1=seY
0=oN
2=seY
:
D
:
D
)c+b+a(
4
)b+a(
3
;
D
;
D
2
1
Convenient Operations and Setups
71
Page 72

Convenient Operations and Setups
Registering discounts and premiums
CAL
REG
OFF
RF
PGM
Discount for Items and subtotals
X
Z
Mode Switch
Refer to "Preparing and using discounts" in "Basic Operations and Setups" on page 35.
Premium for Items and subtotals
You should allocate the
W key first, refer to the page 90.
OPERATION RECEIPT
Unit price
—————————
($10.00)
preset
Item 1 Quantity 1
—————————
Dept. 4
—————————————
Premium Rate 7%
—————————————
Unit price ($5.00)
—————————
preset
Quantity 1
Item 2 —————————
PLU 32
—————————————
Subtotal
premium
Rate (5%)
preset
)
7W
Applies the input value as a
premium rate (7%).
32+
s
For this operation, press
this key instead of s.
W
Applies the preset premium
rate (5%) to the subtotal.
s
15-01-2001 13:15 0001
REG
DEPT04 •10.00
7%
%+ •0.70
PLU032 •5.00
ST •15.70
5%
%+ •0.79
TL •
CA •20.00
CG •3.51
C
01 000037
—————————————
Payment Cash $20.00
20-a
16.49
C-A02
OP
C-A32
PGM
• You can manually input rates up to 4 digits long (0.01% to 99.99%).
Taxable status of the
p key or the W key
• Whenever you perform a discount/premium operation on the last item registered, the tax calculation for discount/premium amount is performed in accordance with the tax status programmed for that item.
• Whenever you perform a discount/premium operation on a subtotal amount, the tax calculation for the subtotal
amount is performed in accordance with the tax status programmed for the
W key .
72
Page 73

Currency exchange programming
When the q key is pressed, a current subtotal including tax is converted directly into foreign currency and the
result is displayed, and the subsequent finalization is handled using the foreign currency. The currency exchange
function is released by finalizing a transaction, partial tender operation, receipt issuance, or by pressing the s
key. First of all, the q key should be allocated, refer to the page 90.
Currency exchange rate programming
PGM
C-A32
CAL
REG
OFF
RF
PGM
Mode Switch
6 1s 6 : : :
X
Z
Example:
$1.00 = ¥110.50
¥100 = $0.9050
Integer
(Max. 4-digit)
1^105
2
0^905
2
Currency exchange feature programming
PGM
C-A32
6 3s 6 : ; ; : ; : : 6 q 6 s
CAL
REG
OFF
RF
X
Z
D
7 D6 D5 D4 D3 D2 D1
PGM
: : : : :
Decimal
(Max. 4-digit)
Preset rate
6 q 6 s
Mode Switch
2=pudnuor,1=ffotuc,0=ffodnuor,lortnocnoitcarF
"0"syawlA
;ycnerrucngierofroflobmysyratenoM
0=lobmysycnerruclacoL
1=)margorpretcarahclaicepsehtni(1lobmysyratenoM
2=)margorpretcarahclaicepsehtni(2lobmysyratenoM
3=)margorpretcarahclaicepsehtni(3lobmysyratenoM
4=)margorpretcarahclaicepsehtni(4lobmysyratenoM
"0"syawlA
;ycnerrucngierofrofretimiledtigiD
2=ammoC,0=doireP
ycnerrucgniwollof)secalplamiced(edocmetsysyratenoM
;noitarepoegnahcxe
,0=ycnerruclacolsaemaS 0º ,1= 00º ,2= 0 3=
tnacifingiS
rebmun
tnacifingiS
rebmun
tnacifingiS
rebmun
tnacifingiS
rebmun
:
D
;;
D6D
:
D
;
D
:
D
:
D
7
5
4
Convenient Operations and Setups
3
2
1
73
Page 74

Convenient Operations and Setups
Registering foreign currency
1) Full amount tender in foreign currency
CAL
REG
OFF
RF
PGM
X
Z
Mode Switch
C-A02
OP
C-A32
PGM
* Pre-programmed exchange rate: ¥ 1 = $0.0090
Important!
Tenders in a foreign currency can be registered using the a and k keys only. Other finalize
keys cannot be used.
OPERATION DISPLAY RECEIPT
10-&
20-'
q
5 Enter the unit price and press the
applicable department key.
5 Enter the next unit price and press
the applicable department key.
5 Press the
ing a numeric value. This operation converts the subtotal (including tax) dollar value into yen by
applying a pre-programmed exchange rate. The result is shown
on the display but not printed on
the receipt or journal.
q key without enter-
01 1º00
(Displays in $)
02 2º00
(Displays in $)
33£333
(Displays in ¥: 333,333)
15-01-2001 13:20 0001
REG
DEPT01 •10.00
DEPT02 •20.00
TL •
CE
CA ¥500,000
CA •45.00
CG •15.00
C
01 000038
30.00
50--q
(5,000.00)
a
74
5 Enter the amount tendered in yen
and press the
eration converts the entered yen
amount into dollars by applying a
pre-programmed exchange rate.
The result is shown on the display.
5 Press to finalize the transaction.
Note that you do not need to reenter the dollar amount.
The register automatically calculates the change amount due in
dollars and shows it on the display,
receipts and journal.
q key. This op-
4∞00
(Displays in $: 45.00)
1∞00
(Displays in $)
Page 75

2) Partial tender in a foreign currency
* Pre-programmed exchange rate: ¥ 1 = $0.0090
Important!
Partial tender in a foreign currency can be registered using the a key and k keys only.
Other finalization keys cannot be used, but the remaining tender can be finalized using any
finalize key.
OPERATION DISPLAY RECEIPT
10-&
20-'
q
20--q
(2,000.00)
a
k
5 Enter the unit price and press the
applicable department key.
5 Enter the next unit price and press
the applicable department key.
5 Press the
tering a numeric value. This operation converts the subtotal (including tax) dollar value into yen
by applying a pre-programmed
exchange rate. The result is
shown on the display but not
printed on the receipt or journal.
5 Enter the partial amount tendered
in yen and press the
This operation converts the entered yen amount into dollars by
applying a pre-programmed exchange rate. The result is shown
on the display.
5 Press the
cash tender for the yen partial
tender. Note that you do not need
to reenter the dollar amount.
The register automatically deducts the dollar equivalent of the
yen amount tendered from the
total amount due and shows the
amount on the display.
Press to finalize the transaction.
5
q key without en-
q key.
a key to specify
01 1º00
(Displays in $)
02 2º00
(Displays in $)
33£333
(Displays in ¥: 333,333)
1•00
(Displays in $: 18.00)
1™00
(Displays in $)
1™00
(Displays in $)
15-01-2001 13:25 0001
REG
DEPT01 •10.00
DEPT02 •20.00
TL •
CE
CA ¥200,000
CA •18.00
CHK •12.00
C
01 000039
30.00
Convenient Operations and Setups
75
Page 76

Convenient Operations and Setups
Check tracking system
With the TK-810 check tracking system, you can program the cash register to store the transaction total only
(includes total amount, check number, clerk number store number and date/time) or registration full details.
Selecting total only or full detail check trackings
It is necessary to initialize the register to switch this option.
The procedure is as follows:
1 Power off the register.
2 Insert the PGM key into the mode switch.
3 Pressing down the f key and turn the mode switch to PGM mode (do not release the f key).
4 The display shows ten zeros with decimal points, release the f key.
5 Choose one of these.
• Detailed check tracking (In this case, maximum PLU number becomes 90). 2 Enter "0".
• Total only check tracking (In this case, maximum PLU number becomes 300). 2 Enter "2".
6 Press the s key.
To use check tracking specification
PGM
C-A32
6 3s 6 0422s6 : ; ; a 6 s
CAL
REG
OFF
RF
X
Z
PGM
Mode Switch
1 noitacificepsgnikcartkcehC
2 noitacificepstpurretnikrelC
"0"syawlA
"0"syawlA
D
3 D2 D1
1 0=
2 4=
:
D
;
D
;
D
3
2
1
76
Page 77

Registering examples
Opening a check
CAL
REG
OFF
RF
PGM
X
Z
Mode Switch
OPERATION RECEIPT
C-A02
OP
C-A32
PGM
Check number 1234
—————————————
Unit price
($10.00)
—————————
Item 1 Quantity 1
—————————
Dept. 4
—————————————
Unit price ($5.00)
—————————
Item 2 Quantity 1
—————————
PLU 32
Adding to a check
Check number 1234
—————————————
Unit price
($20.00)
—————————
Item Quantity 1
—————————
Dept. 2
1234N
preset
Input a new check number
up to 8 digits.
32+
preset
Press n to temporarily
finalize the transaction.
OPERATION RECEIPT
1234O
preset
)
s
n
'
n
15-01-2001 13:25 0001
REG
NEWCHK
DEPT04 •10.00
PLU032 •5.00
SRVC TL •
15-01-2001 13:30 0001
REG
OLDCHK
ST •15.00
DEPT02 •20.00
SRVC TL •
C
01 000038
1234
15.00
C
01 000039
1234
35.00
— Check No.
— Check No.
— Previous balance
Closing a check
Check number 1234
—————————————
Payment Cash
$40.00
OPERATION RECEIPT
1234O
s
40-a
g
If necessary, press g to
issue the guest receipt.
15-01-2001 13:35 0001
REG
OLDCHK
ST •35.00
TL •
CA •40.00
CG •5.00
15-01-2001 13:35 0001
REG
CHK-#
DEPT04 •10.00
PLU032 •5.00
DEPT02 •20.00
TL •
CA •40.00
CG •5.00
C
01 000040
C
01 000038
1234
35.00
Convenient Operations and Setups
1234
35.00
77
Page 78

Convenient Operations and Setups
The program controlling check tracking specifications
"0"syawlA
"0"syawlA
PGM
C-A32
CAL
REG
OFF
RF
PGM
Mode Switch
rofgnitnirpdnanoitaluclacxaT
tpiecertseugeussiotyroslupmoC
n
noitartsigererofebrebmunkcehcretneotyroslupmoC
noitazilanif
a
b
a
.krelcrehtonaybedamrebmunkcehcehtnepoottibihorP
b
6 3s 6 1822s6
X
Z
6
: :
D7 D6 D5 D4 D3 D2 D1
0=seY
1=oN
0=seY
4=oN
0=oN
1=seY
0=oN
4=seY
; ; ;
D4D3D2D
; ;
:
)b+a(
D
7
:
)b+a(
D
6
;
D
5
;;;;
1
a 6 s
The program for n
PGM
C-A32
CAL
REG
OFF
RF
X
Z
PGM
Mode Switch
:noitcnufhsac-otuA
.denepoton
"0"syawlA
"0"syawlA
6 3s 6 : : ; ; ; : ; ; 6 n 6 s
D
8 D7 D6 D5 D4 D3 D2 D1
a
sikcehcanehwdetavitcasinoitcnuf
0=oN
2=seY
:
D
7
;;;
D6D5D
.nwodkaerbTAVtnirP
0=oN
1=seY
:
D
3
;;
D2D
1
4
78
Page 79

How to program set menu
Programming set menu includes two steps;
1 Assigning PLUs and flat-PLUs to set menu tables. (These items are treated as "child" PLU.)
2 Assigning set menu tables to "parent" PLU
(When a "parent" PLU is registered, all "child" PLUs in the designated set menu table are registered.)
Programming set menu table
To another table
1
PGM
C-A32
6 3s 6
{
20
28s 6
}
CAL
REG
OFF
RF
PGM
Mode Switch
yromeM
.oN
10
20
30
40
50
60
70
80
90
01
11
21
31
41
51
61
71
81
91
02
X
Z
*
Hit
Hit
82
6
,
first, if designating flat-PLU 31 - 60.
,,
margorP
edoc
first, if designating flat-PLU 61 - 90.
stnetnoCULP-talf/ULP
1unemteS
2unemteS
3unemteS
4unemteS
5unemteS
6unemteS
7unemteS
8unemteS
9unemteS
01unemteS
11unemteS
21unemteS
31unemteS
41unemteS
51unemteS
61unemteS
71unemteS
81unemteS
91unemteS
02unemteS
Max. 5 PLU/flat-PLUs
PLU No.
*
G
(Flat-PLU 1)
H
(Flat-PLU 2)
+
{
L
(Flat-PLU 30)
To the next table
6 a 6
}
s
{
a
(Terminate)
Convenient Operations and Setups
79
Page 80

Convenient Operations and Setups
Programming assignment to "parent" PLU
Parent PLU/flat-PLU
PGM
C-A32
CAL
REG
OFF
RF
PGM
Mode Switch
*
Hit
Hit
6 3s 6 1366s 6
X
Z
6
PLU No.
*
G
(Flat-PLU 1)
H
(Flat-PLU 2)
{
L
(Flat-PLU 30)
,
first, if designating flat-PLU 31 - 60.
,,
first, if designating flat-PLU 61 - 90.
To another link
+
6
}
How to program the condiment PLU and preparation PLU
See page 65, 67 for programming.
To program a preparation PLU, set both the condiment flag and the hash flag.
1
{
20
a 6 s
}
Printing VAT break downs
The following example shows how to get VAT break
down.
Anytime you press the ` or v key in a transaction,
VAT break down is automatically printed out at the end
of the transaction.
` or v key should be allocated in PGM 4, refer to
the page 90.
OPERATION RECEIPT
Unit price $10.00
—————————
Quantity 1
Item —————————
—————————————
Payment Cash $10.00
Dept. 1
—————————
Taxable (1)
preset
10-&
10-a
s
`
CAL
REG
OFF
RF
PGM
15-01-2001 13:40 0001
REG
DEPT01 ⁄ •10.00
TA1 •9.62
TX1 •0.38
TL •
CA •10.00
CG •0.00
X
Z
Mode Switch
C
01 000039
10.00
C-A02
OP
C-A32
PGM
• Every receipt needs VAT break down lines, select the finalize (a, h, k, c) key status to "Invoice."
Refer to page 83.
80
Page 81

Arrangement programming
You can assign up to ten key operations to the "Arrangement" key. It makes possible to perform multiple key
operations with the touch of a single key in any mode except OFF and PGM.
Use the procedure shown below to assign key to the "Arrangement" key. Note that different operations must be
used depending on the type of operation being assigned.
• To assign a function key, department key, flat-PLU key or value.
Press the function key, department key, or numeric key you want to assign.
• To assign a PLU
Input the PLU number you want to assign and press the + key.
• C, f, and the key which is not allocated on the keyboard cannot assign in the "Arrangement" key program,
• Conditions of receipt on/off and the clerk assignment is followed when an "Arrangement" key program is
executed.
Arrangement key programming
Arrangement key allocation
Please refer to page 90.
Attribution of "Arrangement" key programming
PGM
C-A32
CAL
REG
OFF
RF
PGM
Mode Switch
6 3s 6 : : ; ; ; : ; : 6 Q 6 s
X
Z
"000"syawlA
"0"syawlA
)1elbatsnaem"0"(
D
8 D7 D6 D5 D4 D3 D2 D1
.edomFRehtninoitarepoelbasiD
.edomGERehtninoitarepoelbasiD
.edomXehtninoitarepoelbasiD
.edomZehtninoitarepoelbasiD
.rebmunelbattnemegnarrasayrtnecirnemunehttaerT
)5~1,0(rebmunelbattnemegnarrakniL
a
b
a
b
0=oN
1=seY
0=oN
2=seY
0=oN
1=seY
0=oN
2=seY
:
D
:
D
)b+a(
8
)b+a(
7
Convenient Operations and Setups
;;;
D6D5D
0=oN
1=seY
:
D
4
3
;
D
2
tnacifingiS
rebmun
:
D
1
81
Page 82

Convenient Operations and Setups
The operations in the "Arrangement" key programming
1
PGM
C-A32
CAL
REG
OFF
RF
PGM
Mode Switch
6 3s 6
X
Z
6
2
{
38s 6 Q 6
}
5
: : : : : : : : : :
Up to ten key operations
6 Q 6 s
yromeM
.oN
10
202
303
404
505
Registering examples
margorP
edoc
83
tnemegnarrA
rebmunelbat
1
CAL
REG
OFF
RF
PGM
ecneuqesyeK
X
Z
C-A02
OP
C-A32
PGM
Mode Switch
OPERATION RECEIPT
Arrange Number 1
—————————————
Unit price
—————————
Item 1 Quantity 1
—————————
Dept. 4
—————————————
Unit price $5.00
—————————
Item 2 Quantity 1
—————————
PLU 32
—————————————
Payment Cash $15.00
$10.00
82
1Q
Arrangemant No. can be
preset to Q key.
s
15-a
15-01-2001 13:45 0001
REG
DEPT04 •10.00
PLU032 •5.00
TL •
CA •15.00
CG •0.00
C
01 000041
15.00
— Check No.
Page 83

Other function key feature programming
You can define a selection of features for the function keys by specifying an 8-digit program code for each key.
To other function key
PGM
C-A32
CAL
REG
OFF
RF
6 3s 6 : ; : : : : : : 6
X
Z
D
D
D
D
D
D
8
7
6
5
D
44
4
3
D
2
1
Function key
6 s
PGM
Mode Switch
a,h,k,c
tpecxe(derednettnuomaroftigidtsalehtno)5,0ot(tcirtseR
a
)
)ailartsuArofylno(
"0"syawlA
gnirednetdnalatotbusrofnoitacificepstimiltnuomahgiH
1*
stnuoma
derednet
*1
High amounts limits:
tnemyaplaitrapafoyrtnetibihorP
.derednettnuomaehtfoyrtneehttibihorP
.derednettnuomaehtfoyrtneecroF
.nwodkaerbTAVtnirP
2*
.eudtnuomaegnahcrofnoitacificepstimiltnuomahgiH
a
b
c
a
tnuomarofstigidowttsalno)57,05,52,00ot(noitcirtseR
b
1*
High amount limitations are specified as 2-digits. The first digit you specify limits the maximum value of the
leftmost digit of the value within the range of 0 through 9. The second digit you specify indicates the number of
zeros in the limit value, again within the range of 0 through 9.
Example: $600.00 maximum 2 Enter 64.
Entering "00" clears the limitation.
0=oN
1=seY
:
D
8
;
D
7
mumixaM
)9~0(eulav
forebmuN
)9~0(sorez
0=oN
1=seY
0=oN
2=seY
0=oN
4=seY
0=oN
1=seY
0=oN
4=seY
mumixaM
)9~0(eulav
forebmuN
)9~0(sorez
::
D6D
:
D
:
D
::
D2D
5
)c+b+a(
4
)b+a(
3
1
Convenient Operations and Setups
*2
Always program "Restrict = 4" here for cash amount tendered key when you are using Denmark rounding.
83
Page 84

Convenient Operations and Setups
r, P
"0"syawlA
"0"syawlA
m,U
"0"syawlA
;;
D8D
7
mumixaM
1*
otrefer(stnuoma
)38egapno
gnirednetdnalatotbusrofnoitacificepstimiltnuomahgiH
)9~0(eulav
forebmuN
)9~0(sorez
::
D6D
5
;;;;
D4D3D2D
1
;;
D8D
7
(.ecnalabtidercawollA m )ylno
(.elasafoedistuonoitartsigerwollA U )ylno
noitacificepstimiltigidhgiH
1sutatselbaxaT
2sutatselbaxaT
3sutatselbaxaT
1noissimmoC
2noissimmoC
a
b
c
a
b
0=oN
1=seY
tnacifingiS
rebmun
0=oN
1=seY
0=oN
2=seY
0=oN
4=seY
tnacifingiS
rebmun
tnacifingiS
rebmun
:
D
:
D
:
D
:
D
6
5
)c+b+a(
4
)b+a(
3
"0"syawlA
Y
"0"syawlA
"0"syawlA
u,B
"0"syawlA
"0"syawlA
;;
D2D
1
;;;;
D8D7D6D
3~1sutatselbaxaT
)3=3elbaxaT,2=2elbaxaT,1ro0=1elbaxaT(
tnacifingiS
rebmun
:
D
5
4
;;;
D3D2D
1
;;
D8D
7
.noitcasnarttsrifehtsataerT
0=oN
1=seY
:
D
6
D5D4D3D2D
;;;;;
1
84
Page 85

Advanced programming for the Euro
The following programmings are also required for further use.
Select rounding option
"0"syawlA
PGM
C-A32
CAL
REG
OFF
RF
PGM
Mode Switch
:oruEehtfonoitpognidnuortceleS
2=pudnuoR,1=ffotuC,0=ffodnuoR
".revohctiwscitamotuA"ehtrofetaddnahtnom,raeyehtretnE
6 3s 6 2322s6
X
Z
: ; : : : : : : a 6 s
6
D8 D7 D6 D5 D4 D3 D2 D1
tnacifingiS
rebmun
:
D
8
;
D
7
txenehteeS
.egap
: ~ :
D
D~
6
1
Defining the main currency to the Euro
The default definition of the main currency is local. If you define the Euro as main currency, you should change the
characters for the in-drawer sub currency amount in the fixed totalizer.
<Example>
NET 02
CAID 03
CHID 04
CKID 05
CRID 06
EURO CAID 07
EURO CHID 08
EURO CKID 09
EURO CRID 10
CECA
NET 02
CAID 03
CHID 04
CKID 05
CRID 06
→
LOCAL CAID 07
→
LOCAL CHID 08
→
LOCAL CKID 09
→
LOCAL CRID 10
CECA
Convenient Operations and Setups
85
Page 86

Convenient Operations and Setups
Programming to restrict the currency
This section describes how to prepare your cash register for the day when the Euro becomes the only currency in
Europe. There are two methods to restrict the main currency to the Euro. With "Manual switchover", you should
follow the procedure at the end of the business hours on the day before the switchover day in 2002. With
"Automatic switchover", the register will automatically preform switchover at the time you preset.
Important!
• Note that the other currencies are not available after entering this program.
• The grand sakes total registered until the switchover will be reset by the operation to avoid the mixture of sales
under the different monetary systems.
• You must change the unit prices set for departments and PLUs after switchover.
Manual switchover
For users whose main currency has been the local money
Please refer to the page 16 of this manual.
For users whose main currency has been the euro
It is not necessary to issue those reset report above.
Automatic switc hover
For users whose main currency has been the local money
Issue the following reset reports before the swichover programming. Otherwise the "E90" indicator will
appear on the display, meaning an error.
• Daily sales report, • Monthly sales report, • Periodic 1/2 sales report, • PLU report, • Hourly sales report
For users whose main currency has been the euro
It is not necessary to issue those reset report above.
Programming
The following procedure lets you specify the date and time to perform switchover automatically.
After the automatic switchover is performed, the "EURO" message is printed on receipt.
:oruEehtfonoitpognidnuortceleS
2=pudnuoR,1=ffotuC,0=ffodnuoR
"0"syawlA
owthtiwetaddnahtnom,)stigidowttsalhtiw(raeyehtretnE
".revohctiwscitamotuA"ehtrofhcaestigid
>elpmaxE<
107020:2002,1yluJ
tnacifingiS
rebmun
:
D
;
D
::::::
D6D5D4D3D2D
8
7
1
yaDhtnoMraeY
86
PGM
C-A32
CAL
REG
OFF
RF
PGM
Mode Switch
6 3s 6 2322s6
X
Z
: ; : : : : : : a 6 s
6
D8 D7 D6 D5 D4 D3 D2 D1
Page 87

>elpmaxE<
"0"syawlA
:sutatsoruE
PGM
C-A32
CAL
REG
OFF
RF
PGM
Mode Switch
."revohctiwscitamotuA"rofemitrevohctiwsehtretnE
ehtroftitesottnawuoyesacnI.00:00siemitrevohctiwsehtfoeulavtluafedehT(
).setunimehtdnaruohehtretne,emittnereffid
::::
D8D7D6D
5
etuniMruoH
0312=.m.p03:9,0380=.m.a03:8
;;
D4D
3
:tnuomaegnahcfoycnerrucehT
1=oruE,0=lacoL
0=lacoL:latotbustuotnirP,lacoL:ycnerrucniaM)1(
1=oruE:latotbustuotnirP,oruE:ycnerrucniaM)2(
2=htoB:latotbustuotnirP,lacoL:ycnerrucniaM)3(
tnacifingiS
rebmun
tnacifingiS
rebmun
:
D
:
D
2
1
3=htoB:latotbustuotnirP,oruE:ycnerrucniaM)4(
6 3s 6 2422s6
X
Z
6
: : :
D8 D7 D6 D5 D4 D3 D2 D1
: ; ;
: :
a 6 s
CAUTION
• If the switchover is not performed although the preset date / time passed, check if all the specified reports above
have been issued, and perform "Manual switchover".
Money declaration
Press the I key to specify the currency before entering of the cash-in-drawer amount.
DEPT01 QT 203.25
•1108.54
------------------------
X/Z
Mode Switch
8
I
8
: ~ :
(Up to 10 digits)
8
B
Skip if declaring
in main currency.
GRS QT 981.25
•6475.40
NET No 111
•6843.63
CAID •1919.04
# •1928.04
-9.00
CHID •139.04
CKID •859.85
CRID •709.85
EURO CAID }0.12
# }0.00
}0.12
EURO CHID }2.34
EURO CKID }23.38
EURO CRID }0.01
TA1 •732.56
— Cash in drawer
— Money declared amount
— Difference
— Charge total in drawer
— Check total in drawer
— Credit total in drawer
— Cash in drawer in sub currency
— Money declared amount in sub currrency
— Difference
— Charge total in drawer in sub currency
— Check total in drawer in sub currency
— Credit total in drawer in sub currency
Convenient Operations and Setups
CAUTION
To complete a declaration, perform this procedure for the local money and the Euro each.
87
Page 88

Convenient Operations and Setups
Calculator functions
While registering at the REG mode, you can switch to
CAL mode and then return to REG mode to resume the
registration.
Example 1 (Calculation examples)
OPERATION DISPLAY
Clear
5+3-2= 5&3'2a §
(23-56)×78=
(4×3-6)/3.5+8=
12 % on 1500
4(3'6)3^5&8a ª714285714
23'56(78a -257¢
1500'(12p 18º
Example 2 (Memory recall)
OPERATION DISPLAY/RECEIPT
Unit price $10.00
—————————
Item 1 Quantity 1
—————————
Dept. 1
—————————————
Unit price $20.00
—————————
CAL
REG
OFF
RF
PGM
X
C-A02
Z
Mode Switch
10-&
20-'
Item 2 Quantity 1
—————————
—————————————
Dept. 2
Payment by 3 persons
Cash $10.40
each
CAL
REG
OFF
RF
PGM
X
C-A02
Z
Mode Switch
Memory recall:
Recalls subtotal amount
CAL
REG
X
Z
OFF
RF
PGM
Mode Switch
CC ç
OP
PGM
C-A32
15-01-2001 13:35 0001
REG
DEPT01 •10.00
DEPT02 •20.00
C
01 000041
s
OP
PGM
C-A32
[ 3º
C-A02
0
OP
C-A32
PGM
88
)3a 1º
Divides the subtotal by 3
persons
CAL
REG
OFF
RF
PGM
X
Z
Mode Switch
Memory recall:
Recalls the result amount
OP
C-A02
PGM
C-A32
[
a
[a
[a
TL •30.
CA •10.00
CA •10.00
CA •10.00
CG •0.00
00
Page 89

Programming calculator mode control
tnirP
a
"0"syawlA
PGM
C-A32
CAL
REG
OFF
RF
PGM
Mode Switch
nehwrewardnepO
nehwrewardnepO
a
B
.edomLACnidesserpsi
.edomLACnidesserpsi)lauqe(
.troperyliadehtnotnuocdnalatot)lauqe(
6 3s 6 1022s6
X
Z
6
a
b
c
0=oN
1=seY
0=oN
2=seY
0=seY
4=oN
: ; ; ; ;
D5 D4 D3 D2 D1
:
)c+b+a(
D
5
;;;;
D4D3D2D
1
a 6 s
About the daylight saving time
It is possible to set the internal clock forward/backward
by 1 ~ 9 hour(s) for the daylight saving time.
OPERATION DISPLAY
• Forward by 1 hour
*
• Backward by 1 hour X
*
CAL
REG
OFF
RF
PGM
X
1
X
C
m
1
X
Z
Mode Switch
12-3$
12-3$
13-3$
~00
12-3$
12-3$
13-3$
(Blinking)
(Blinking)
OP
C-A02
Set forward by 1 hour.
C-A32
PGM
Convenient Operations and Setups
* Put 2 ~ 9, in case of set the clock by 2 ~ 9 hours.
X
C
11-3$
~00
Set backward by 1 hour.
89
Page 90

Convenient Operations and Setups
Keyboard layout change
You can change the keyboard layout or allocate some new functions on the keyboard.
Note: Before changing the keyboard layout, you must issue the daily and periodic reset reports.
Configuration of the physical key layout
The shadowed keys are fixed function keys. You cannot chang e the function of these keys.
#-67
#-62
#-57
#-52
#-47
#-42
#-37
#-66
#-65
#-61
#-60
#-56
#-55
#-51
#-50
#-46
#-45
#-41
#-40
#-36
#-35
#-32
#-31
#-30
#-27
C
8
7
5
4
#-26
9
6
#-25
#-24
#-23
FEED
#-20
#-19
#-17
#-16
#-15
#-64
#-63
#-59
#-58
#-54
#-53
#-49
#-48
#-44
#-43
#-39
#-38
#-34
#-33
#-29
#-28
2
#-11
3
#-12
1
0
#-22
#-21
SUB
TOTAL
#-13
#-14
Note: The a key in programming procedures mean the #-13 key on the keyboard.
Programming the function of each key
PGM
C-A32
CAL
REG
OFF
RF
PGM
Mode Switch
stnetnoC
egrahC20dda-noN04nepoteserP86
kcehC30elasoN/dda-noN14.oNkrelC/nepO96
tiderC40elasoN24ecirP/ddA07
ecnalaBweN60remotsucfo.oN34.oNkrelC27
retcarahcllaceR01tnemegnarrA44latotbuS57
piT51egnahcxeycnerruC54ffo/notpieceR67
tnuoccanodevieceR02TAV64emitetaD/noitacilpitluM28
tuodiaP/oruE12ecirP94TAV/tuodiaP98
suniM72ULP05kcehcweN19
tnuocsiD821tnemtrapeD1510kcehcdlO29
sulP922tnemtrapeD1520kcehcdlO/weN39
muimerP033tnemtrapeD1530kcehcddA49
xatlaunaM234tnemtrapeD1540noitcnufoN00
dnufeR33tfihsxaT75orezelbuoD"00"69
lecnaC/tcerrocrorrE43ULP-talF36orezelpirT"000"79
dioV53tfihsuneM46tnioplamiceD"."89
X
6 4s 6
Z
: : : :
Appropriate key
6 6 s
Function code
(2 or 4 digits)
Note: Two zero key, Three zero key, Decimal point key
can only be allocated in #-11 and #-12 position.
noitcnuF
edoc
derednettnuoma/hsaC10tpiecertseuG/tpiecertsoP83nepO76
stnetnoC
noitcnuF
edoc
stnetnoC
noitcnuF
edoc
90
Page 91

The outline of the functions
• Cash/amount tendered:
This key is used to register a cash amount due either with
or without a tendered amount input.
• Charge:
This key registers a charge sale.
• Check:
This key is used to register a check payment amount
either with or without a tendered amount input.
• Credit:
This key registers a credit sale.
• New balance:
This key adds latest registered total to the previous
balance to obtain a new balance.
• Recall character:
This key is used to print programmed text messages.
•Tip:
This key registers tips.
• Received on account:
This key registers a received on account amount.
• Euro/Paid out:
This key registers an amount paid out from the register
and this key is also used for Euro transactions.
• Minus:
This key registers an amount for subtraction.
• Discount:
This key applies a preset or manually input percent rate to
obtain the discount amount for the last registered item or
subtotal.
• Plus key:
This key registers an amount for addition.
• Premium:
This key applies a preset or manually input percent rate to
obtain the premium amount for the last registered item or
subtotal.
• Manual tax:
This key is used to register manually entered tax.
• Refund:
This key declares next input a return or cancels the last
registered item in a transaction.
• Error correct/Cancel:
This key corrects registration errors or cancels entire
registrations of current transaction.
• Void:
This key invalidates preceding data registered for departments, PLUs or flat-PLUs.
This key must be pressed before the transaction involving
the data to be invalidated is finalized, but is also effective
even after calculation of a subtotal amount.
• Post receipt/Guest receipt:
After finalization, this key produces a post receipt.
After designating a check number, this key produces a
guest receipt.
• Non-add, No sale:
Non-add; These keys print reference numbers during
transaction.
No sale; These key open the drawer between the transactions.
• Number of customers:
This key is used to enter the number of customers.
• Arrangement:
Executes the multiple operations assigned.
• Currency exchange:
This key calculates subtotal amounts or paying amount
dues in foreign currency.
•VAT:
This key prints a VAT breakdown.
• Price:
Use this key to register unit prices for subdepartment.
• PLU:
Use this key to input PLU (subdepartment) numbers.
• Department:
Use these keys to register items to departments.
• Tax shift:
This key changes the tax status of the next item.
It is necessary to assign the tax status of this key.
• Flat-PLU:
Use these keys to register items to flat-PLUs.
• Menu shift:
This key shifts flat-PLU key from 1st to 2nd, 2nd to 3rd
or 3rd to 1st.
• Open:
This key releases maximum digit limit.
• Preset open:
This key suspends compulsory specifications.
• Clerk number:
This key assigns clerk numbers.
• Subtotal:
This key obtains subtotal including the add-on tax and the
previous balance.
• Multiplication/Date•time:
This key is used to input quantities for multiple items with
the same price.
This key also displays the time or date between transactions.
• New check:
This key is used in a check tracking system to input a
new check number in order to open a new check under
that number.
• Old check:
This key is used in a check tracking system to input the
number of an existing check whose details are stored in a
check tracking memory. Existing checks are reopened to
perform further registration or to finalize them.
• New/Old check:
This key is used in a check tracking system to input check
numbers in order to open new checks and to reopen
existing checks. When the clerk inputs a check number,
the register checks to see if that number already exists in
the check tracking memory. If there is no match number
in memory, a new check is opened under the input
number. If the check number already stored in memory,
that check is reopened for further registration or finalization.
• Add check:
This key is used in check tracking system to combine the
details of more than one check into a single check.
Convenient Operations and Setups
91
Page 92

Convenient Operations and Setups
Printing read/reset reports
• Read report
You can print read reports at any time during the business day without affecting the data stored in the cash
register's memory.
• Reset report
You should print reset reports at the end of the business day.
Important!
• The reset operation issues a report and also clears all sales data from the cash register's memory .
• Be sure to perform the reset operations at the end of each business day. Otherwise , you will not
be able to distinguish between the sales data for different dates.
To print the individual department, PLU/flat-PLU/subdepartment read report
This report shows sales for specific departments or PLU/flat-PLU/subdepartments.
OPERATION REPORT
CAL
REG
OFF
RF
PGM
X
Z
C-A32
PGM
Mode Switch
8
• Specifying a department
*
&, ', (, )
• Specifying a PLU
**
1 ~ 90 or 300*
**
• Specifying a flat-PLU
***
G, H ~ L, ,G ~ ,,L
*
***
15-01-2001 17:05 0001
X
C01 000250
X
DEPT01 QT 15
29.6% •339.50
DEPT02 QT 19
5.46% •62.70
PLU001 QT 31
12.12% •139.10
PLU002 QT 23
29% •332.67
-----------------------TOTAL QT 88
76.19% •873.97
— Date/time/machine No.
— Read mode/clerk/consecutive No.
— Read symbol
— Department No./No. of items
— Sales ratio/department amount
— PLU No./No. of items
— Sales ratio/PLU amount
— Total No. of items
— Total amount
92
8
s
After you finish to select departments, PLU/subdepartments, press s to terminate.
**
It depends on the memory allocation, refer to page 76.
Page 93

To print the financial read report
This report shows gross sales, net sales, cash in drawer and check in drawer.
OPERATION REPORT
CAL
REG
OFF
RF
PGM
Mode Switch
8
Money declaration
X
Z
C-A32
*1
PGM
15-01-2001 17:10 0001
X
C01 000251
FLASH
GROSS QT 1216
•21954.50
NET No 523
•27733.12
CAID •27289.10
# •27270.00
•19.10
CKID •398.00
CRID •332.67
X
— Date/time/machine No.
— Read mode/clerk/consecutive No.
— Report title/read symbol
— Gross No. of items
— Gross amount
— Net No. of customers
— Net amount
— Cash in drawer (b)
— Declared amount (a)
— Difference (b) - (a)
— Check in drawer
— Credit in drawer
(Cash in drawer amount B)
8
X
*1
Money declaration:
Count how much cash is in the drawer and input this amount (up to 10-digits).
The cash register will automatically compare the input with the cash in drawer in the memory and print the
difference between these two amounts.
Note that if money declaration is required by programming (page 50), you cannot skip this procedure.
To print the group PLU read report
This report shows PLU/flat-PLU/subdepartment group totals.
OPERATION REPORT
CAL
REG
OFF
RF
PGM
X
Z
C-A32
PGM
Mode Switch
8
6a
15-01-2001 17:15 0001
X
C01 000252
0006
GROUP
01
•••••••• QT 16
0.24% •54.50
02
•••••••• QT 25
0.09% •21.33
03
•••••••• QT 132
0.12% •90.78
•••••••• QT 6
0.02% •4.50
-----------------------TOTAL QT 156
0.47% •332.67
X
— Date/time/machine No.
— Read mode/clerk/consecutive No.
— Report code/report title/read
symbol
— Group 01/No. of items
— Sales ratio/group 01 amount
— Total of non-group link PLUs
— Total No. of items
— Total amount
Convenient Operations and Setups
93
Page 94

Convenient Operations and Setups
To print the daily sales read/reset report
This report shows sales except for PLUs.
OPERATION REPORT
X
CAL
REG
OFF
RF
PGM
Mode Switch
8
X
Z
Read Reset
PGM
C-A32
CAL
REG
OFF
RF
PGM
Mode Switch
X
Z
Z
C-A32
PGM
Money declaration
(Cash in drawer amount B)
8
a
15-01-2001 17:20 0001
Z
C01 000253
0000
DAILY
DEPT01 QT 1015
47.07% •10339.50
DEPT02 QT 19
31.87% •7000.70
DEPT03 QT 31
18.84% •4139.10
DEPT04 QT 23
1.51% •332.67
NON-LINK_DEPT QT 10
0.43% •94.90
-----------------------GROSS QT 1253
•21960.90
NET No 545
•30217.63
CAID •29903.06
# •29903.06
•0.00
CKID •183.60
CRID •197.17
TA1 •732.56
TX1 •43.96
TA2 •409.72
TX2 •21.55
*1
Money declaration:
Z 0001
*1
— Date/time/machine No.
— Reset mode/clerk/consecutive No.
—
Report code/report title/reset symbol/
reset counter
*5
— Department No./No. of items
— Sales ratio/department amount
—
Non-link department No. of items
— Non-link department amount
— Gross No. of items
— Gross sales amount
— No. of customers
— Net sales amount
— Cash in drawer amount (b)
— Declared amount (a)
— Difference (b) - (a)
— Check in drawer amount
— Credit in drawer amount
— Taxable amount 1
— Tax amount 1
— Taxable amount 2
— Tax amount 2
*3
*3
*3
*3
TA3 •272.50
TX3 •8.18
ROUND •4.75
CANCEL No 2
•108.52
RF MODE No 2
•3.74
CAL No 10
-----------------------CA No 81
•836.86
CHK No 10
•197.17
CR No 9
•183.60
*2
RC No 2
*2
•78.00
PD No 1
•6.80
- No 8
•3.00
%- No 10
•4.62
RF No 7
•27.79
CORR No 10
•12.76
P/G RCT No 2
#/NS No 5
-----------------------C
01 No 12
•127.63
********
C
02 No 6
•27.63
********
C
03 No 24
-----------------------GT •0000351217.63
000001---¶000253
— Taxable amount 3
— Tax amount 3
*3
— Rounding amount
— Cancellation count
— Cancellation amount
— Refund mode operation count
—
Refund mode operation amount
— CAL mode operation count
— Cash sales count
— Cash sales amount
— Check sales count
— Check sales amount
— Credit sales count
— Credit sales amount
— Received on Account count
— Received on Account amount
— Paid out count
— Paid out amount
— Subtraction count
— Subtraction amount
— Discount count
— Discount amount
— Refund key count
— Refund key amount
— Error correction count
— Error correction amount
— Post receipt count
— No sale count
— Clerk 1/clerk 1 sales count
— Clerk 1 sales amount
—
Training clerk
—
— Non-resettable grand-sales total
— Consecutive No. range of the day
Count how much cash is in the drawer and input this amount (up to 10-digits).
The cash register will automatically compare the input with the cash in drawer in the memory and print the
difference between these two amounts.
Note that if money declaration is required by programming (page 50), you cannot skip this procedure.
*2
Zero totaled departments (the amount and item numbers are both zero) are not printed.
*3
Taxable amount and tax amount are printed only the corresponding tax table is programmed.
*4
These items can be skipped by programming.
*5
The "*" symbol is printed on the reset report, memory overflow occurred in the totalizer.
*3
*4
*4
*4
*4
*4
94
Page 95

To print the PLU/flat-PLU/subdepartment read/reset report
This report shows sales for PLUs/flat-PLUs/subdepartments.
OPERATION REPORT
15-01-2001 17:25 0001
0001
PLU001 QT 16
0.24% •54.50
PLU002 QT 25
0.09% •21.33
PLU003 QT 132
0.12% •90.78
PLU200 QT 6
0.02% •4.50
-----------------------TOTAL QT 156
100% •21960.90
PGM
CAL
REG
OFF
RF
PGM
CAL
REG
OFF
RF
Mode Switch
1a
8
X
X
Z
Z
X
Z
Read
PGM
C-A32
Reset
PGM
C-A32
Mode Switch
8
1a
To print the hourly sales read/reset report
Z
C01 000254
PLU
Z 0001
— Date/time/machine No.
— Read mode/clerk/consecutive No.
— Report code/report title/reset
symbol/reset counter
— PLU001/No. of items
— Sales ratio/PLU001 amount
— Total No. of items
— Total amount
This report shows hourly breakdowns of sales.
OPERATION REPORT
CAL
REG
OFF
RF
PGM
X
Z
Read
PGM
C-A32
Mode Switch
8
2a
X
CAL
REG
OFF
RF
PGM
X
Z
Z
Mode Switch
8
Reset
PGM
C-A32
15-01-2001 17:30 0001
Z
C01 000255
0002
HOURLY
00:00-01:00 No 6
•4.50
01:00-02:00 No 25
•21.33
02:00-03:00 No 132
•90.78
23:00-24:00 No 1
•1.50
-----------------------TOTAL No 56
•1338.40
Z 0001
— Date/time/machine No.
— Read mode/clerk/consecutive No.
— Report code/report title/reset
symbol/reset counter
— Time range/No. of customers
— Sales amount
— Total No. of customers
— Total amount
Convenient Operations and Setups
2a
95
Page 96

Convenient Operations and Setups
To print the monthly sales read/reset report
This report shows monthly breakdowns of sales.
OPERATION REPORT
PGM
CAL
REG
OFF
RF
PGM
CAL
REG
OFF
RF
Mode Switch
Mode Switch
X
Z
8
3a
X
X
Z
Z
8
3a
Read
PGM
C-A32
Reset
PGM
C-A32
15-01-2001 17:35 0001
Z
C01 000256
0003 MONTHLY Z 0001
01
•••• No 6
•4.50
02
•••• No 25
•21.33
03
•••• No 132
•90.78
31
•••• No 1
•1.50
-----------------------TOTAL No 56
•1338.40
— Date/time/machine No.
— Read mode/clerk/consecutive No.
— Report code/report title/reset
symbol/reset counter
— Date of a month/No. of customers
— Sales amount
— Total No. of customers
— Total amount
96
Page 97

To print the periodic 1/2 sales read/reset reports
These reports show sales breakdowns of sales by any two kinds of period you want.
OPERATION REPORT
X
CAL
REG
OFF
RF
PGM
Mode Switch
8
X
Z
Read Reset
PGM
C-A32
CAL
REG
OFF
RF
PGM
Mode Switch
X
Z
Z
8
C-A32
PGM
100 (Periodic-1)/
300 (Periodic-2)
8
a
15-01-2001 17:40 0001
Z
C01 000257
0200 PERIODIC-1 ZZ0001
DEPT01 QT 1015
47.07% •10339.50
DEPT02 QT 19
31.87% •7000.70
DEPT03 QT 31
18.84% •4139.10
DEPT04 QT 23
1.51% •332.67
NON-LINK_DEPT QT 10
0.43% •94.90
-----------------------GROSS QT 1253
•21960.90
NET No 545
•30217.63
CAID •29903.06
CKID •183.60
CRID •197.17
TA1 •732.56
TX1 •43.96
TA2 •409.72
TX2 •21.55
TA3 •272.50
TX3 •8.18
ROUND •4.75
CANCEL No 2
•108.52
RF MODE No 2
•3.74
CAL No 10
200 (Periodic-1)/
400 (Periodic-2)
— Date/time/machine No.
— Reset mode/clerk/consecutive No.
—
Report code/report title/reset symbol/
reset counter
— Department No./No. of items
— Sales ratio/department amount
—
Non-link department No. of items
— Non-link department amount
— Gross No. of items
— Gross sales amount
— No. of customers
— Net sales amount
— Cash in drawer amount
— Check in drawer amount
— Credit in drawer amount
— Taxable amount 1
— Tax amount 1
— Taxable amount 2
— Tax amount 2
— Taxable amount 3
— Tax amount 3
*2
*2
*2
*2
*2
*2
— Rounding amount
— Cancellation count
— Cancellation amount
— Refund mode operation count
—
Refund mode operation amount
— CAL mode operation count
*1
*1
*3
*3
8
a
-----------------------CA No 81
•836.86
CHK No 10
•197.17
CR No 9
•183.60
RC No 2
•78.00
PD No 1
•6.80
- No 8
•3.00
%- No 10
•4.62
RF No 7
•27.79
CORR No 10
•12.76
P/G RCT No 2
#/NS No 5
-----------------------C
01 No 12
•127.63
********
C
02 No 6
•27.63
********
C
03 No 24
•217.63
— Cash sales count
— Cash sales amount
— Check sales count
— Check sales amount
— Credit sales count
— Credit sales amount
— Received on Account count
— Received on Account amount
— Paid out count
— Paid out amount
— Subtraction count
— Subtraction amount
— Discount count
— Discount amount
— Refund key count
— Refund key amount
*3
*3
— Error correction count
— Error correction amount
— Post receipt count
— No sale count
— Clerk 1/clerk 1 sales count
— Clerk 1 sales amount
—
Training clerk
—
Convenient Operations and Setups
*1
Zero totalled departments (the amount and item numbers are both zero) are not printed.
*2
Taxable amount and tax amount are printed only the corresponding tax table is programmed.
*3
These items can be skipped by programming.
97
Page 98

Convenient Operations and Setups
To print the open check read/reset report
This report shows previous balance of non-closed checks.
OPERATION REPORT
X
CAL
REG
OFF
RF
PGM
Mode Switch
25a
Individual
8
8
X
Z
Read
PGM
C-A32
CAL
REG
OFF
RF
PGM
Mode Switch
All
Individual
X
Z
Z
8
25a
8
All
Reset
PGM
C-A32
8
Check No.
8
a
Check No.
8
*
N
*
You can use the O key or the w key instead.
8
8
a
8
*
N
15-01-2001 17:45 0001
Z
C01 000258
0025 OPEN CHECK Z
CHECK #:
15-01-2001 12:30
REG
•
CHECK #:
15-01-2001 13:40
REG
•
CHECK #:
15-01-2001 17:10
REG
•
123456
C
01 000108
C
01 000132
C
05 000203
12.24
123556
82.04
215485
22.38
— Date/time/machine No.
— Read mode/clerk/consecutive No.
— Report code/report title/reset
symbol
— Check No.
— Date/time
— Mode/clerk/consecutive No.
— Previous balance
98
-----------------------TOTAL •
338.40
— Total amount (prints on the all
report only)
Page 99

Reading the cash register's program
To print unit price/rate program (except PLU)
OPERATION REPORT
CAL
REG
OFF
RF
PGM
X
Z
Mode Switch
8
C-A32
PGM
10-01-2001 09:30 0001
P1
000010
P1
••••••••••••••••••••
DEPT01 ⁄ @1.00
DEPT02 @2.00
DEPT03 @0.00
DEPT04 @0.00
- @0.00
%- 12.34%
CE 105.0500
1s
8
s
*1
Department without being programmed are not printed on this report.
— Date/time/machine No.
— Mode/consecutive No.
— Program read symbol
— Dept. No./tax status/unit price
— Reduction preset amount
— Percent rate
— Currency exchange rate
*1
99
Convenient Operations and Setups
Page 100

Convenient Operations and Setups
To print key descriptor, name, message program (except PLU)
OPERATION REPORT
CAL
REG
OFF
RF
PGM
X
Z
Mode Switch
8
2s
8
s
C-A32
PGM
10-01-2001 09:35 0001
P2
000011
P2
••••••••••••••••••••
GROSS 01
NET 02
CAID 03
CHID 04
CRID 05
EURO CAID 07
EURO CHID 08
EURO CRID 09
CECA 11
CECK 12
TA1 13
TX1 14
TA2 15
TX3 18
ROUNDING 19
CANCEL 20
RF MODE 21
COMM.1 22
CAL 23
NON-LINK_DEPT 25
CA 01
CR 02
CHK 03
PD 04
ON/OFF 05
TL 06
RC 08
CLK-# 14
X 15
NB 16
NEWCHK 17
CE 25
ARG 26
+ 27
DEPT01 01
DEPT02 02
DEPT03 03
DEPT04 04
C
01 01
C
02 02
C
19 03
C
20 20
GT 01
• @NoQT 01
NoCT } 02
X / 03
⁄ ¤ ‹ 04
* 05
* * * * 06
REG
RF
30
31
DAILY
PLU
HOURLY
07
P
08
01
02
03
09
— Date/time/machine No.
— Mode/consecutive No.
— Program read symbol
— Gross character
— Net character
— Cash in drawer character
— Charge in drawer character
— Cash in drawer for sub currency
— Charge in drawer for sub currency
— Foreign currency cash character
— Foreign currency check character
— Taxable amount 1 character
— Tax 1 character
— Rounding character
— Cancellation total character
— Refund mode total character
— Non link department character
— Cash key descriptor
— Credit key descriptor
— Check key descriptor
— Paid out key descriptor
— Receipt on/off key descriptor
— Received on account key descriptor
— Multiplication key descriptor
— Currency exchange key descriptor
— Department 1 key character
— Department 2 key character
— Department 3 key character
— Department 4 key character
— Clerk 01 character
— Clerk 02 character
— Clerk 20 character
— Grand total character
—
Special character
—
—
Report header
100
PERIODIC-2 09
01
YOUR RECEIPT
02
* INDICA
15
TAXABLE SUPPLY
AGAIN
—
—
Receipt message
—
 Loading...