

Page 1
MA1211-EA
Ú
#!3)/#/-054%2#/,4$
Operation Guide 3403
Features
Your watch provides you with the features and functions described below.
World Time ◆ ................................................................................ Page E-20
Instantly view the current time in 100 cities around the globe.
Alarms ◆ ........................................................................................ Page E-24
The watch can be confi gured to sound a tone and fl ash its display illumination, or to
vibrate when a preset alarm time is reached.
Stopwatch ◆ .................................................................................. Page E-31
The stopwatch measures elapsed time up to 1000 hours in 1/100-second
increments.
Timer ◆ .......................................................................................... Page E-34
The timer counts down from a preset start time, and the watch sounds a tone and
fl ashes its display illumination, or it vibrates when the countdown reaches zero.
Congratulations upon your selection of this CASIO watch.
E-1
E-3E-2
Contents
Features ................................................................................................................ E-2
About this User’s Guide ........................................................................................ E-7
Display Types ..................................................................................................E-7
Button Names and Display Indications ..............................................................E-8
Display Indicators ..........................................................................................E-10
Using Modes ....................................................................................................... E-12
Mode Overview ..............................................................................................E-14
Adjusting the Time Setting .................................................................................E-15
Confi guring Current Time and Date Settings ...................................................E-15
World Time .......................................................................................................... E-20
To view the times in other time zones .............................................................E-20
To confi gure the Summer Time (DST) setting ..................................................E-22
E-4
Other Settings ..................................................................................................... E-42
To turn the button operation tone on or off .....................................................E-42
To change the alarm/timer alert method .........................................................E-44
Illumination .......................................................................................................... E-46
To illuminate the display .................................................................................E-46
Using Auto Light ............................................................................................E-47
To enable or disable Auto Light ......................................................................E-48
Auto Light Precautions ...................................................................................E-49
To specify the illumination duration .................................................................E-50
Low Battery Indication ........................................................................................ E-52
Specifi cations ..................................................................................................... E-54
E-6
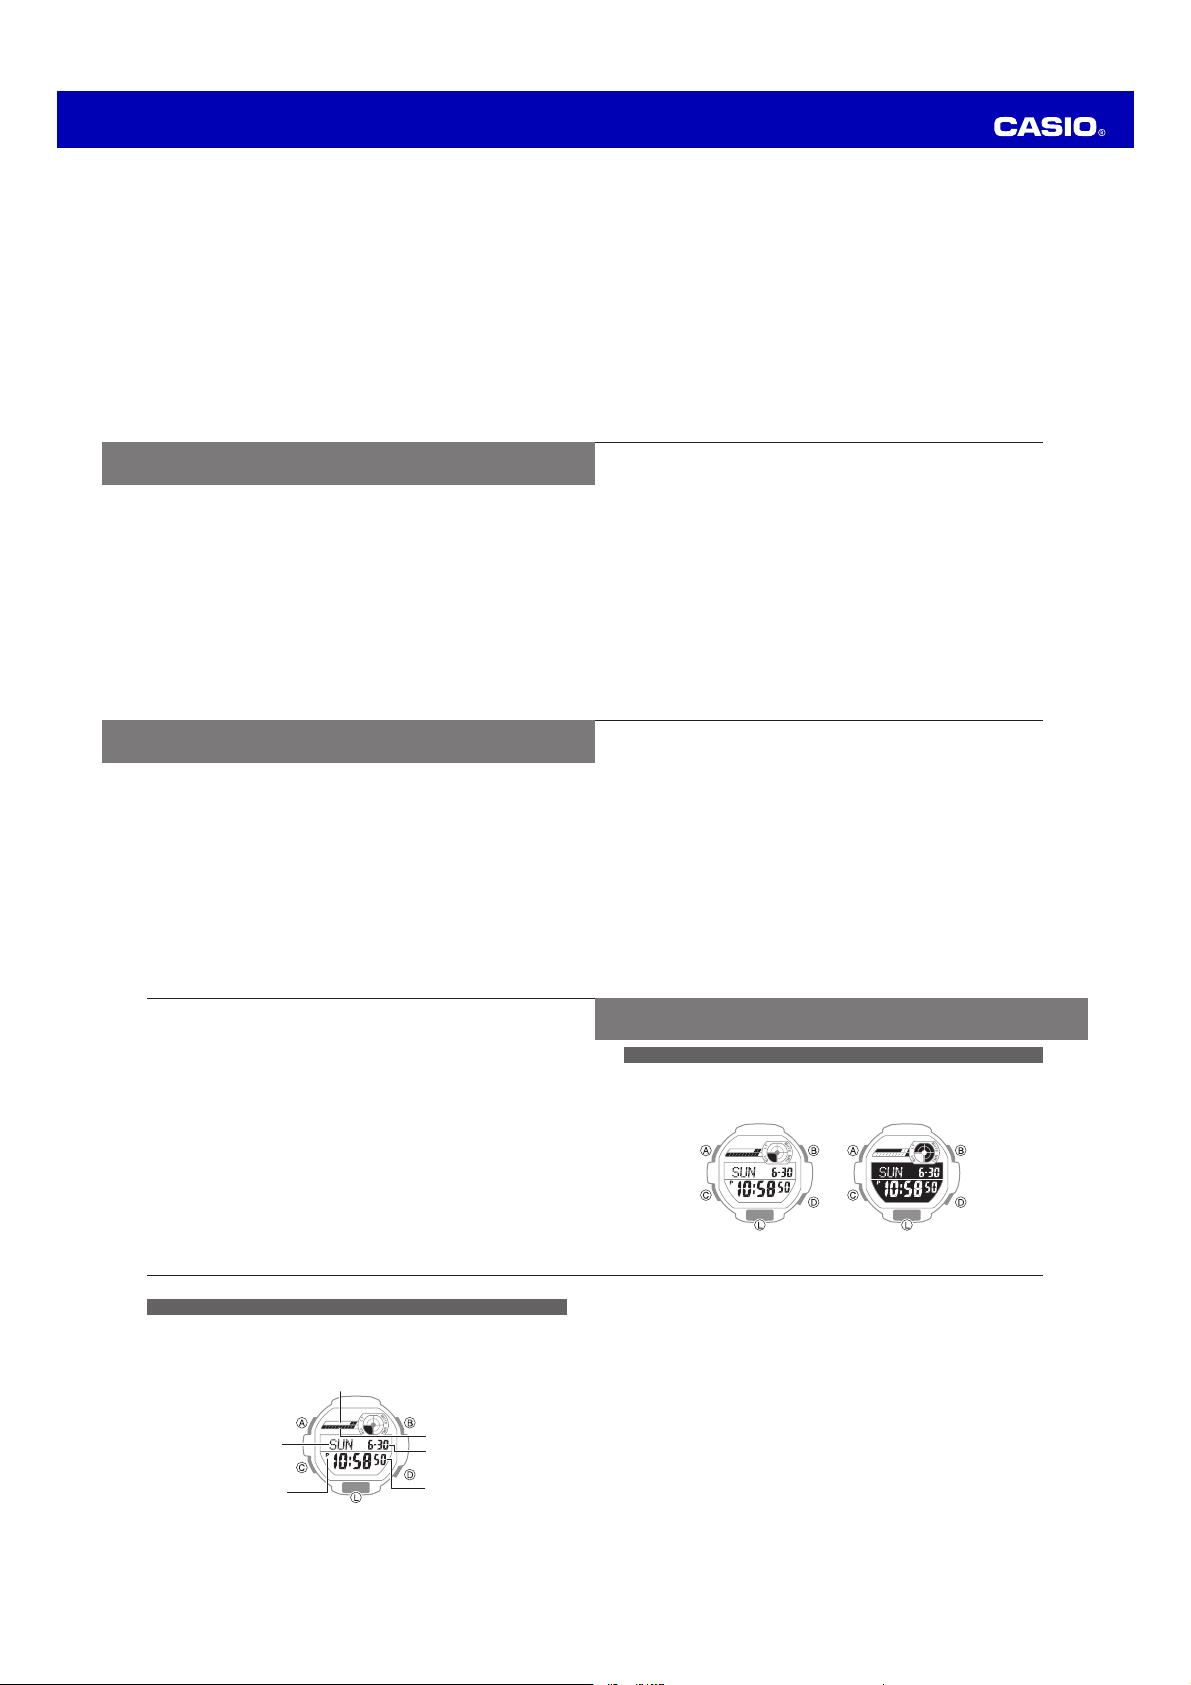
Button Names and Display Indications
Operations on this watch are performed using buttons A through D, and the L
button. The illustration below shows the locations and the meanings of the different
buttons and display indicators.
See “Using Modes” (page E-12).
Changes with current time minutes
Alarms and Hourly Time Signal ..........................................................................E-24
To enter the Alarm Mode................................................................................E-24
To change an alarm setting ............................................................................ E-26
To stop a tone/vibration alert operation ..........................................................E-30
To test the alarm ............................................................................................E-30
Stopwatch ........................................................................................................... E-31
To enter the Stopwatch Mode ........................................................................E-31
To measure time with the stopwatch ..............................................................E-32
Timer ................................................................................................................... E-34
To enter the Timer Mode ................................................................................E-35
To set the timer start time ..............................................................................E-36
To perform a countdown ................................................................................E-38
Using the Timer in the Timekeeping Mode ......................................................E-39
To stop a tone/vibration alert operation ..........................................................E-41
About this User’s Guide
Display Types
Depending on the model of your watch, display text appears either as dark fi gures
on a light background or light fi gures on a dark background. All sample displays in
this manual are shown using dark fi gures on a light background.
Note that the display style of a watch is fi xed. You cannot switch between styles.
x
Note
The names shown above are used in the button operation explanations throughout
x
this User’s Guide.
Note that the illustrations in this User’s Guide are intended for reference only. The x
actual watch may appear somewhat different than depicted in the illustrations.
E-5
E-7
Changes with current
time seconds
Month, day
Hour, minutes, seconds
E-9
E-8
Day of the week
PM indicator
(no display for AM)
(Illuminates display)
Page 2
Operation Guide 3403
A
B
C
A
Display Indicators
Number Name Meaning More Info
1
Auto Light ON indicator Auto Light enabled. E-48
2
Vibration indicator Vibration alert enabled for alarms/timer. E-45
3
PM indicator
4
Snooze indicator Snooze alarm enabled. E-28
E-10
Indicates p.m. times during 12-hour
timekeeping.
E-8
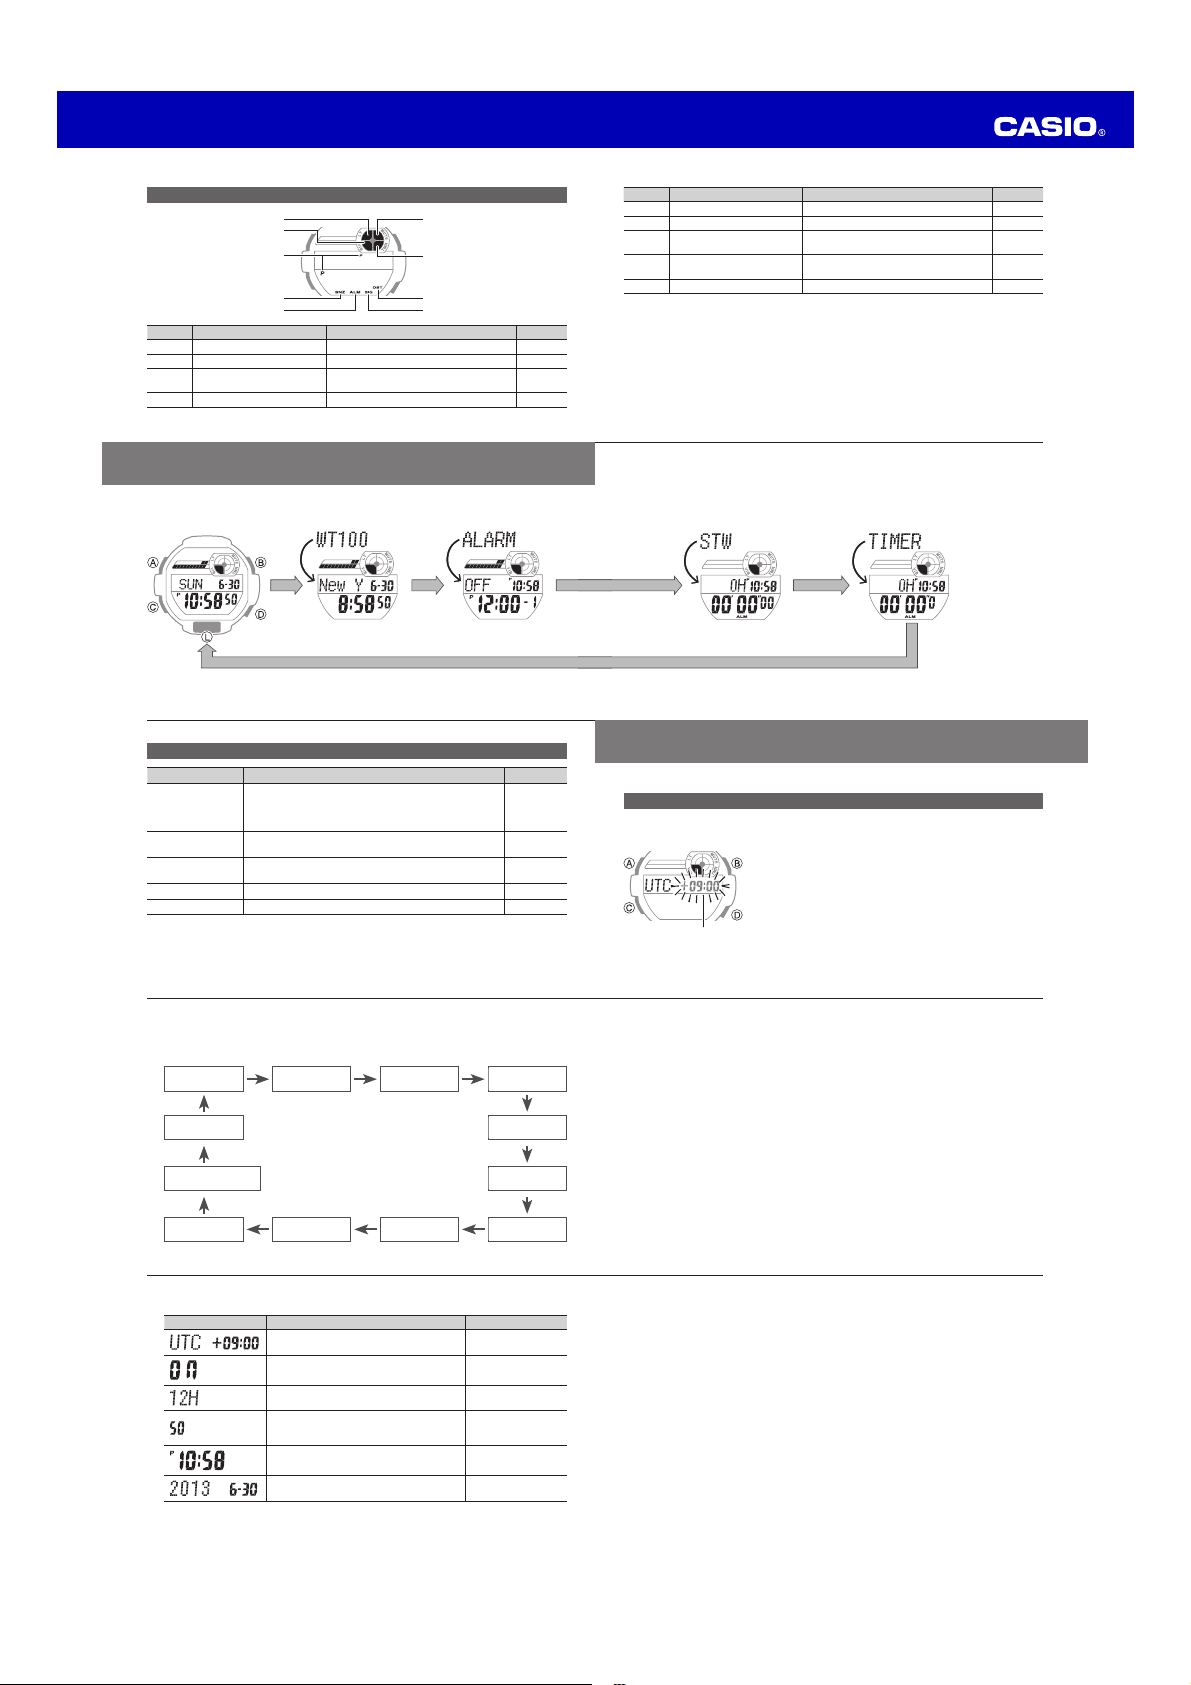
Using Modes
Each press of C cycles between modes as shown in the illustration below.
Timekeeping Mode World Time Mode Alarm Mode
E-12
Mode Overview
Mode Functions More Info
Timekeeping Mode
World Time Mode
Alarm Mode
Stopwatch Mode Elapsed time measurement x E-31
Timer Mode Start time settings; countdown x E-34
Current time display x
Time, date, summer time settings; 12/24-hour display x
switching
Timer display
x
Current time in 100 cities (35 time zones) around x
the globe
Alarm time and on/off settings x
Hourly time signal on/off x
E-12
E-15
E-39
E-20
E-24
Number Name Meaning More Info
5
Alarm indicator Alarm is turned on. E-28
6
MUTE indicator Button operation tone disabled. E-43
7
Timer indicator
8
DST indicator
9
Hourly time signal indicator Hourly time signal is turned on. E-28
Stopwatch Mode Timer Mode
Timer countdown operation in
progress.
Summer time enabled (time advanced
by one hour).
E-39
E-22
Adjusting the Time Setting
Use the procedure below to confi gure the watch’s time and date settings.
Confi guring Current Time and Date Settings
In the Timekeeping Mode, hold down
1
●
zone setting screen appears.
[SET Hold] will appear on the watch display,
followed by the time zone setting screen.
Time zone
for about two seconds until the time
E-11
E-13
E-14
Use
to select the item whose setting you want to change.
2
●
Each press of C cycles through available settings in the sequence shown below.
Time Zone
C
11
Alarm/Timer
alert method
C
10
Display illumination
duration
C
9
Operation tone
on/off
E-16
Use
and D to change the currently selected setting as described below.
3
●
Screen Setting Operation
E-18
1
C C C
Summer time
8
Day
C C C
Time zone of the city where you will use
the watch
Summer time on/off
12-hour (12H)/24-hour (24H) timekeeping
switching
Seconds 00-reset
x
From 30 to 59 seconds, resetting adds
1 to the minute setting.
Hour and minutes settings
Year, month, day settings
2
12/24-hour
timekeeping
7
Month
3
Seconds
4
Hour
5
Minutes
6
Year
Use B and D.
Press D.
Press D.
Press D.
Use B and D.
Use B and D.
C
C
C
Note
The numbers in the above diagram indicate how many times you need to press
C to display each setting.
Note
Refer to the “City Name List” (back of this manual) to determine the time zone of
the city where you will be using the watch.
Summer time, or Daylight Saving Time (DST) as it is known in some countries,
x
calls for setting clocks ahead one hour from standard time during the summer
season. Note that the period during which and the areas where summer time is
applied depend on each country. Some countries or geographic areas may not
use summer time.
The DST indicator will be on the display and timekeeping will be advanced by
x
one hour when summer time is turned on.
The watch’s Full Auto Calendar automatically makes adjustments in the day x
setting to account for different length months and leap year.
After all the settings are the way you want, press
4
●
Timekeeping Mode.
to return to the
E-15
E-17
E-19
Page 3
Operation Guide 3403
A
C
B
B
D
B
C
C
World Time
World Time lets you display the current time in any one of 100 cities (35 time zones)
around the world.
To view the times in other time zones
In the Timekeeping Mode, press
1
●
City name
E-20
Current date in
World Time city
Current time in
World Time city
to enter the World Time Mode.
See “Using Modes” (page E-12).
[WT100] will appear on the display for about
1
one second, and then the name of the
currently selected World Time city will scroll
across the display.
To confi gure the Summer Time (DST) setting
In the World Time Mode, hold down A for about two seconds.
●
DST indicator
E-22
x
[DST Hold] will appear on the display. After that,
[DST Hold] will disappear and the summer time
setting will toggle to either on or off.
x DST on the display indicates that summer time is
turned on.
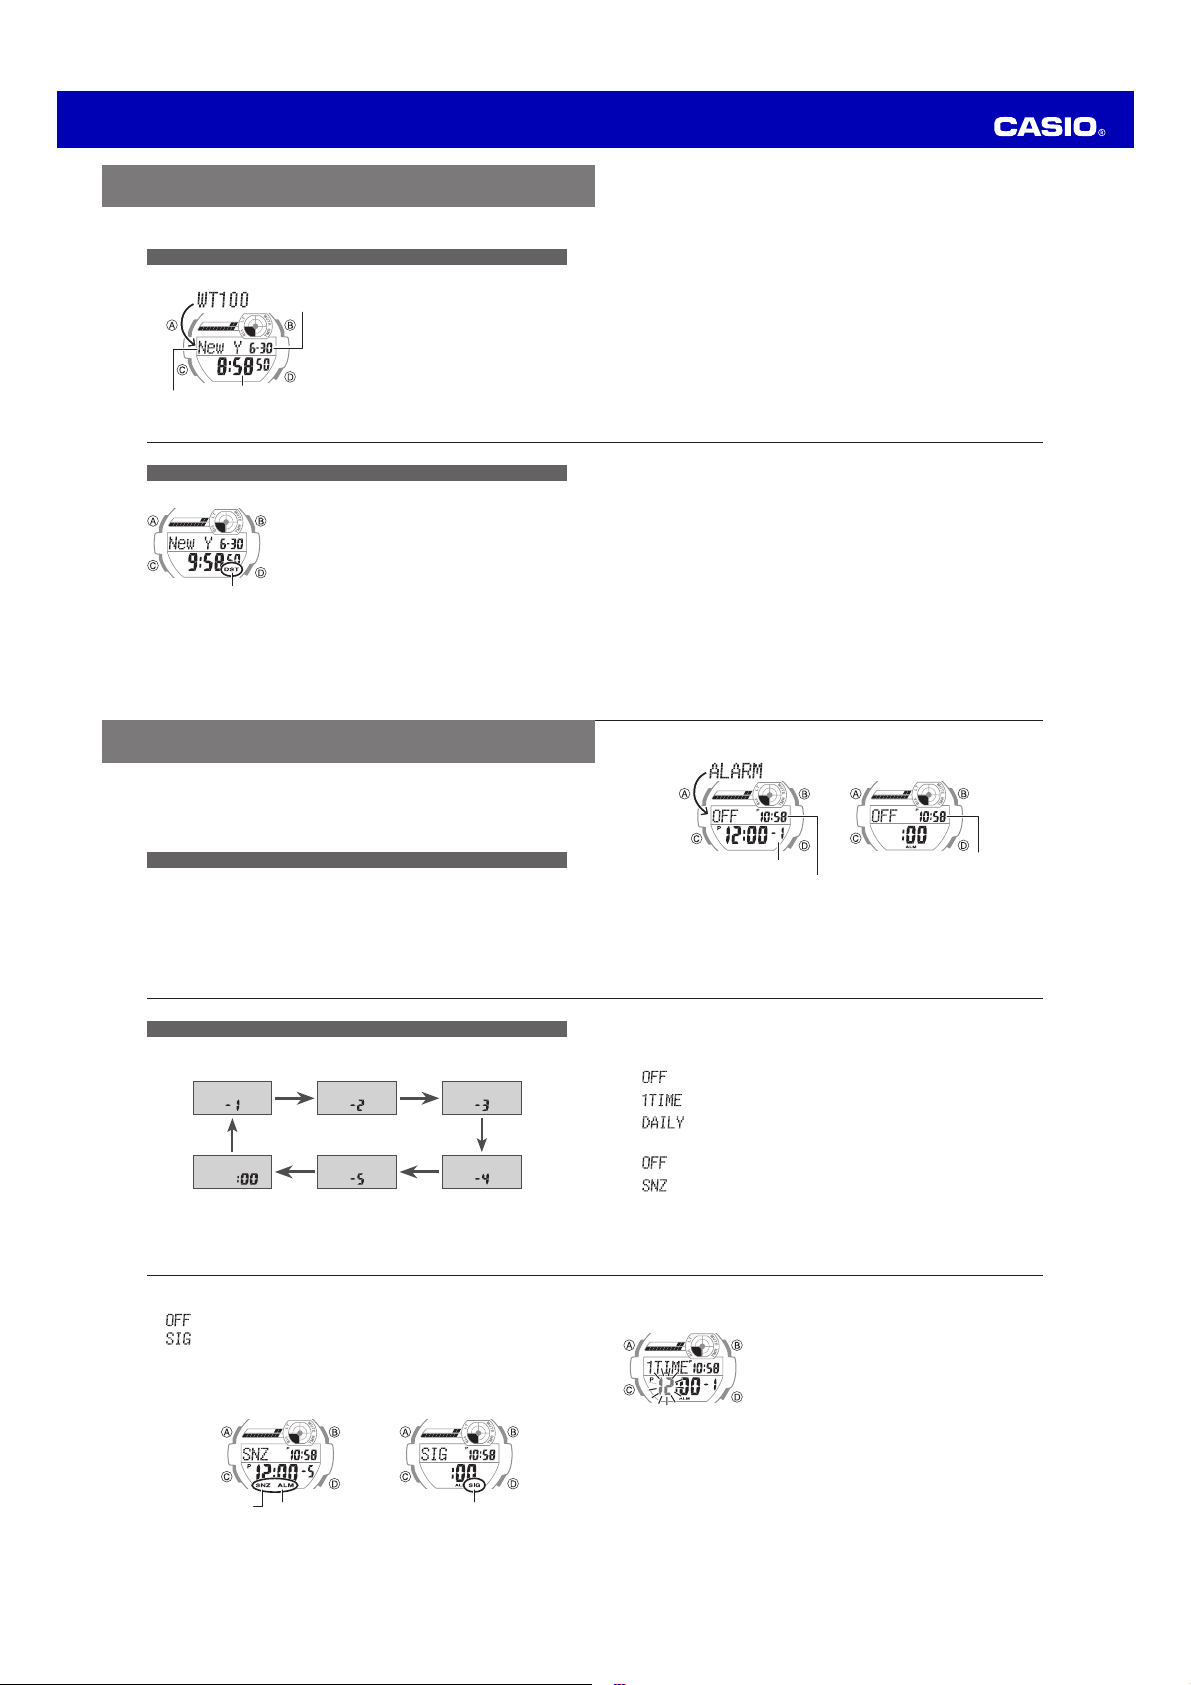
Alarms and Hourly Time Signal
You can set up to fi ve different alarms. When any one of the alarm times is reached
the watch will sound an alarm tone and fl ash its display illumination, or it will vibrate
for about 10 seconds. The hourly time signal causes the watch to sound a tone and
fl ash its display illumination or to vibrate every hour on the hour.
See “To change the alarm/timer alert method” (page E-44).
To enter the Alarm Mode
In the Timekeeping Mode, press C twice to enter the Alarm Mode.
●
See “Using Modes” (page E-12).
[ALARM] will appear on the display for about one second. After that, an alarm
setting screen (Alarm 1 through Alarm 5, or hourly time signal) will appear.
Note
Scrolling of the World Time city name will stop after about two minutes. To restart scrolling, press A.
Use
and D to scroll through the World Time Mode city names.
2
●
See “City Name List” (back of this manual).
Scrolling to a city name displays the current time in that city. x
Holding down either button scrolls at high speed. x
To display the UTC city name (UTC offset 0), press x B and D at the same
time.
To return to the Timekeeping Mode, press
3
●
Note
x
Summer time, or Daylight Saving Time (DST) as it is known in some countries,
calls for setting clocks ahead one hour from standard time during the summer
season. Note that the period during which and the areas where summer time is
applied depend on each country. Some countries or geographic areas may not use
summer time.
The DST indicator will be on the display and timekeeping will be advanced by one
x
hour when summer time is turned on.
The summer time setting cannot be changed for the UTC World Time zone. x
The summer time setting is applied to the currently selected time zone only. A x
setting confi gured for one time zone does not affect any other time zone.
Alarm setting screen
Alarm number
Current time
Note
If you do not perform any operation for about two or three minutes while in the Alarm
Mode, the watch will automatically return to the Timekeeping Mode.
four times.
E-21
E-23
Hourly time signal setting screen
Current time
E-24
Use
to select the alarm type or to toggle the hourly time signal between
To change an alarm setting
In the Alarm Mode, use
1
●
change.
Alarm 1
( )
Hourly Time
Signal ( )
E-26
Hourly time signal
: Hourly time signal does not sound.
: Hourly time signal sounds every hour on the hour.
The Alarm indicator is displayed while an alarm is turned on, while the Hourly
time signal indicator is displayed while the hourly time signal is turned on.
When the snooze alarm is turned on, both the alarm indicator and the snooze
indicator are displayed.
E-28
to select the alarm whose setting you want to
D D
Alarm 2
( )
Snooze alarm
( )
D D
Alarm on
Alarm indicatorSnooze indicator
Hourly time signal on
Hourly time signal indicator
Alarm 3
( )
Alarm 4
( )
DD
2
●
on and off.
Alarm 1 to 4
: Alarm does not sound.
Alarm sounds only once at the preset time and does not sound again after
:
that.
: Alarm sounds at the preset time each day.
Snooze alarm
: Alarm does not sound.
Alarm sounds at the preset time each day, and up to seven times at fi ve-
:
minute intervals thereafter.
To change an alarm time setting, hold down
3
●
the hour digits of the current alarm time start to fl ash.
Each press of
4
●
minutes digits.
The fl ashing digits are the ones that are selected.
Use
and D to change the fl ashing setting, and set the hour and minutes
5
●
you want.
Holding down either button scrolls the setting at high speed.
x
If you are using 12-hour timekeeping, the PM indicator will appear for times x
between noon and 11:59 p.m.
[SET Hold] will appear on the display. After that, [SET
Hold] will disappear and the hour digits will fl ash.
causes the fl ashing to move between the hour and the
for about two seconds until
E-25
E-27
E-29
Page 4

Operation Guide 3403
B
A
A
C
A
C
After all the settings are the way you want, press
6
●
screen.
To return to the Timekeeping Mode, press
7
●
To stop a tone/vibration alert operation
Pressing any one of the buttons will stop an ongoing tone/vibration alert
●
operation.
To test the alarm
In the Alarm Mode, hold down D to perform the tone/vibration alert
●
operations.
E-30
To measure time with the stopwatch
The following shows button operations for stopwatch operations.
●
Elapsed time/cumulative time x
D D D D B
Start Stop (Restart) (Stop) Reset
Split time (paused elapsed time reading) x
D B B D B
Start Split Split time display
Pressing B while timing is being performed displays the split time (with [SPLIT]
fl ashing), but elapsed timing continues internally.
E-32
cancel
to exit the setting
three times.
Stop Reset
Timer
The timer start time can be set in one-second increments up to 24 hours. The watch
will sound a tone and fl ash its display illumination, or it will vibrate when the end of
the timer countdown is reached.
See “To change the alarm/timer alert method” (page E-44).
Note
You can start a timer countdown operation while in the Timekeeping Mode.
See “Using the Timer in the Timekeeping Mode” (page E-39) for more information.
Stopwatch
The stopwatch measures elapsed time in units of 1/100 seconds up to 999 hours,
59 minutes, 59.99 seconds. Elapsed time returns to zero automatically and timing
continues from there when the maximum limit is reached.
To enter the Stopwatch Mode
Minutes 1/100 second
Hours
Note
Once started, elapsed time measurement continues until you press
x D to stop
it, even if you change to a different mode and even if the stopwatch reaches the
elapsed time measurement limit.
If you change to another mode while a split time is frozen on the display, split time
x
display will be canceled.
To enter the Timer Mode
Minutes 1/10 second
Hours
Seconds
Seconds
Current time
Current time
In the Timekeeping Mode, press C three
●
times to enter the Stopwatch Mode.
See “Using Modes” (page E-12).
[STW] will appear on the display for about
one second, and then the stopwatch screen
will appear.
In the Timekeeping Mode, press C four
●
times to enter the Timer Mode.
See “Using Modes” (page E-12).
E-31
E-33
E-34
Use
and D to change the currently selected setting (hours, minutes, or
To set the timer start time
In the Timer Mode, hold down
1
●
Use
to move the fl ashing between the hours, minutes, and seconds.
2
●
The fl ashing digits are the ones that are selected.
E-36
To perform a countdown
The following shows button operations for a countdown.
●
D
Start Stop (Restart) (Stop) Reset
Note
A tone/vibration alert is performed for about 10 seconds when the end of the
x
countdown is reached, and the display returns to the screen that was shown
before the countdown was started.
Even if you exit the Timer Mode while a timer countdown is ongoing, the
x
countdown will continue and the tone/vibration alert operation will be performed
when the end of the countdown is reached.
x
A timer indicator fl ashes while a countdown operation is in progress.
E-38
D D D B
for about two seconds.
[SET Hold] will appear on the display. After that, [SET
Hold] will disappear and the hours digits will fl ash.
Note
If a timer countdown operation is in progress, press
x
D to stop it and then press B to reset the timer to
its start time before performing the above step.
If a timer countdown operation is paused, press
x B
to reset the timer to its start time before performing
the above step.
3
●
seconds).
Holding down either button scrolls the setting at high speed.
x
To specify a start time of 24 hours, set the timer to 0H 00'00". x
After all the settings are the way you want, press
4
●
screen.
Using the Timer in the Timekeeping Mode
To start a timer countdown ◆
In the Timekeeping Mode, press D.
●
This will cause the day of the week and day display to change to a timer display.
D
to exit the setting
Timer indicator
Timer
E-35
E-37
E-39
Page 5

Operation Guide 3403
D
A
A
A
C
C
D
A
Note
If a previous countdown was stopped part way through in the Timer Mode,
x
pressing D will resume the countdown.
The x D button will be disabled if a countdown that was started in the Timer Mode
is still in progress.
x
An ongoing countdown (started in either the Timer Mode or Timekeeping Mode)
cannot be stopped or reset in the Timekeeping Mode.
To view the timer start time ◆
In the Timekeeping Mode, press A.
●
This will cause the timer start time (the start time you set with the procedure on
page E-36) to appear for one second in the display in place of the day of the
week and day.
E-40
Other Settings
You can use the procedures in this section to turn the tone that sounds when you
press a button on or off.
You can also select either tone and display illumination fl ashing, or vibration as the
alert method for the alarm and timer.
To turn the button operation tone on or off
In the Timekeeping Mode, hold down
1
●
two seconds until the time zone setting screen
appears.
E-42
To return to the Timekeeping Mode, press
4
●
Note
The above procedure affects the button operation tone only. The alarm, hourly time
signal, and time up alarm are not affected.
To change the alarm/timer alert method
In the Timekeeping Mode, hold down
1
●
two seconds until the time zone setting screen
appears.
1
Press
2
●
See “Confi guring Current Time and Date Settings”
(page E-15).
The screen will show either [VIB] or [FLASH].
.
11 times to display alert setting screen.
for about
for about
Note
If a countdown was stopped part way through in the Timer Mode, the current
x
(stopped) countdown time will be displayed when you press A in the Timekeeping
Mode.
While a countdown is in progress, the display will show the countdown. You can
x
switch to display of the day of the week and day by pressing A.
To stop a tone/vibration alert operation
Pressing any one of the buttons will stop an ongoing tone/vibration alert
●
operation.
Press
2
MUTE indicator
3
Vibration indicator
3
4
To test vibration ◆
In the Timekeeping Mode, hold down B to perform the vibration operation.
●
nine times to display the button
●
operation tone setting screen.
See “Confi guring Current Time and Date Settings”
(page E-15).
The screen will show either [KEY
Press
to toggle the setting between
●
[KEY
] (ON) and [MUTE] (OFF).
When [MUTE] (OFF) is selected, a MUTE indicator is
displayed to indicate that the button operation tone
will not sound.
Press
to toggle the setting between [VIB] and
●
[FLASH].
The Vibration indicator is shown on the display while
[VIB] is selected.
: Alert by vibration.
Alert by tone and fl ashing display
:
illumination.
To return to the Timekeeping Mode, press
●
] or [MUTE].
E-41
E-43
.
E-44
Illumination
You can use the procedure below to illuminate the display for easy reading in the
dark.
To illuminate the display
Press L to illuminate the display.
●
Note
Illumination will turn off automatically if it is on when an alarm time or the end of a
countdown is reached.
Light Use Precautions ◆
Frequent use of the light can shorten battery life.
E-46
To enable or disable Auto Light
Auto Light ON indicator
E-48
In the Timekeeping Mode, hold down L for at least
●
three seconds.
This will toggle Auto Light between enabled (Auto Light
ON indicator displayed) and disabled.
Using Auto Light
When Auto Light is enabled, angling the watch towards your face at an angle of 40˚
or greater will illuminate the display automatically.
40˚ or greater
Note
Auto Light is disabled automatically while an alarm is sounding.
Auto Light Precautions
Auto Light may not work properly if your arm is angled horizontally x
15˚ or more as shown in the illustration.
The presence of static electricity or magnetism can cause Auto
x
Light not to work. If this happens, try lowering your arm and
raising it back up again.
You may notice a rattling sound inside the watch when you angle
x
it towards your face. This is the sound of the Auto Light switch,
and does not indicate malfunction.
Auto Light remains enabled only for about six hours. After that it is
x
disabled automatically.
E-45
E-47
E-49
Page 6

D
A
To specify the illumination duration
A
C
In the Timekeeping Mode, hold down
1
●
two seconds until the time zone setting screen
appears.
Press
2
●
duration setting screen.
See “Confi guring Current Time and Date Settings”
(page E-15).
The screen will show either [LT1], [LT3], or [LT5].
Operation Guide 3403
Press
to cycle the illumination duration setting between [LT1]
3
●
for about
10 times to display the illumination
(1.5 seconds), [LT3] (3 seconds), and [LT5] (5 seconds).
To return to the Timekeeping Mode, press
4
●
.
E-50
Low Battery Indication
A low battery indicator appears on the display when battery voltage drops below
a certain level. Availability of some functions becomes limited while the low battery
indicator is displayed. If the low battery indicator remains on the display, have the
battery replaced as soon as possible.
Note
For information about battery life guidelines and supported battery types, see the
product specifi cations.
See “Specifi cations” (page E-54).
E-52
Specifi cations
Accuracy at normal
temperature
Basic Functions : Hour, minutes, seconds; a.m./p.m. (P); 12/24-hour
World Time : Current time in 100 cities (35 time zones) + UTC (Universal
Alarms and Hourly
Time Signal
E-54
:±15 seconds a month
(including Stopwatch and Countdown Timer accuracy)
timekeeping format; Month, day, day of the week; Full auto
calendar (2000 to 2099); Summer time setting
Coordinated Time) time display; Summer time setting
: Alarms
Daily or one-time alarms: 4
Snooze Alarm: 1
Setting units: Hour, minute
Tone and display illumination fl ash, or vibration alert: 10 seconds
Hourly time signal
Beeps or vibrates every hour on the hour
E-51
The following describes how display of the low battery indicator affects watch
operation.
Low Battery indicator
Note
Repeated use of the display illumination, tone/vibration alert, or other functions over
a short period can result in a momentary drop in battery voltage. This can cause
temporary display of the low battery indicator and limited availability of some watch
functions.
Stopwatch : Measuring unit: 1/100 second
Countdown Timer : Countdown unit: 1/10 second
Other : Low battery alert; Auto return to Timekeeping Mode; Alert by
Battery : One lithium battery (Type: CR2032)
The watch enters the Timekeeping Mode.
x
Display illumination becomes disabled. x
Alert sound and vibration become disabled. x
E-53
Measuring capacity: 999:59'59.99" (1000 hours)
Measurement functions: Elapsed time, cumulative time, split
Countdown range: 24 hours
Setting unit: 1 second
Time up alert: 10-second tone and display illumination fl ashing,
tone and illumination, or by vibration; High-brightness LED
light; Selectable illumination duration; Operation tone on/off
times
or vibration
E-55
Approximate
Battery Life
: 5 years
Usage Conditions
Light: Once (1.5 seconds)/day
x
Alarm: Once (vibration for 10 seconds)/day x
Approximate battery life can be shortened by more frequent
operation.
City Name List
Time
Zone
–8
–7
L-1
L-3
E-56
City Name List
City Name
(UTC)
Reykjavik
Lisbon
Casablanca
London
Madrid
Paris
Algiers
Brussels
Amsterdam
Zurich
L-2
Time
Zone
City Name
Frankfurt
Oslo
Rome
0
Copenhagen
Berlin
Stockholm
Budapest
Warsaw
+1
Cape Town
Athens
Time
Zone
Helsinki
Istanbul
Kyiv
Cairo
+1
Jerusalem
Moscow*
Jeddah
Tehran +3.5
+2Sofi a
Dubai +4
Kabul +4.5
City Name
Time
Zone
+2
+3Addis Ababa
City Name
Karachi +5
Delhi +5.5
Kathmandu +5.75
Novosibirsk*
Dhaka
Yangon +6.5
Bangkok
Jakarta
Kuala Lumpur
Singapore
Hong Kong
Perth
Time
Zone
Beijing
Manila
Shanghai
Taipei
+6
Seoul
Tokyo
Adelaide +9.5
+7Hanoi
Vladivostok*
Sydney
Noumea +11
+8
Wellington
Suva
City Name
Time
Zone
Chatham Islands +12.75
Nukualofa +13
+8
Kiritimati +14
Pago Pago –11
Honolulu –10
+9
Anchorage –9
Vancouver
San Francisco
+10Guam
Seattle
Los Angeles
Tijuana
Edmonton
+12
Phoenix
City Name
Page 7

Operation Guide 3403
City Name
Chihuahua
Denver
Mexico City
Winnipeg
Dallas
Houston
Guatemala City
Chicago
Atlanta
Havana
Toronto
Lima
Washington DC
L-4
Time
Zone
Kingston
–7
Philadelphia
Bogota
New York
Boston
–6
Caracas –4.5
Santiago
La Paz
San Juan
Halifax
St.John’s –3.5
–5
Buenos Aires
Montevideo
City Name
Time
Zone
–5
–4
–3
City Name
Rio de Janeiro –3
Fernando de
Noronha
Praia –1
Time
Zone
Note
x
The above list shows the city names of this watch.
If you will use the watch in a city that is not included in the City Name List, select a x
–2
city name that is in the same time zone as your city.
Time zones in the above list are in accordance with Coordinated Universal Time x
(UTC).
* In June 2012, the time offsets of the cities listed below were changed by +1 hour.
Note that this watch does not refl ect this change and it uses the former offsets of
these cities.
When using this watch in the cities below, always leave the summer time setting
ON in order to advance the time by one hour.
Moscow
Novosibirsk
Vladivostok
L-5
 Loading...