

Page 1

DT-930 Series
Quick Start Guide
(Version 1.00)
CASIO Computer Co., Ltd.
Copyright ©2006. All rights reserved.
April 2006
Page 2

2
Table of Contents
Preface ................................................................................................................. 4
1. Prerequisites ................................................................................................. 5
1.1 Skills Required ............................................................................................ 5
1.2 Software Development Tools .................................................................... 5
1.3 General Flow of Application Development ............................................... 6
2. Setting Up The Development Environment .............................................. 7
2.1 Installing the C Compiler ........................................................................... 7
2.2 Setting Path and Environment Variables ................................................. 7
2.3 Installing the CASIO Software Development Kit ...................................... 8
2.4 Editing Source Code .................................................................................. 9
2.5 Compiling ...................................................................................................10
2.6 Linking ........................................................................................................10
2.6.1 Preparation of Linking ...........................................................................11
2.6.2 Adjusting Tool ( SUBMK.EXE ) for Start Address ................................11
2.6.3 Example of Linking .................................................................................12
2.7 Converting Load Module ( *.ABS ) to Download File ..............................13
2.7.1 CNVS.EXE ...............................................................................................13
2.7.2 APCNVY.COM .........................................................................................14
2.8 Checking Application Program Size ........................................................15
2.9 Downloading Programs ............................................................................16
2.9.1 Using Multi-drop Method .......................................................................16
2.9.2 Using LMWIN Method .............................................................................21
2.10 Installing Application to Drive B ............................................................24
2.10.1 Using LMWIN Method ...........................................................................24
2.10.2 Using Multi-drop Method .....................................................................24
No part of this document may be produced or transmitted in any form or by any means, electronic
or mechanical, for any purpose, without the express written permission of CASIO Computer Co.,
Ltd. in Tokyo Japan. Information in this document is subject to change without advance notice.
CASIO Computer Co., Ltd. makes no representations or warranties with respect to the contents or
use of this manual and specifically disclaims any express or implied warranties of merchantability
or fitness for any particular purpose.
© 2006 CASIO Computer Co., Ltd. All rights reserved.
Page 3

3
Editorial Record
Manual
Ve r si o n
no.
Date edited Page Content
1.00 April 2006 Original version
Page 4

4
Preface
This guide clearly and concisely sets out the information developers need to know to get started
with the CASIO 930 Series development. The purpose of this guide is to get you to the point where
you can start development; you should refer to the software manual and Library manual for detailed
information on the specific APIs.
In this document, although the words "HT" and “the terminal” are often used, they denote the
"DT-930 handheld terminal".
Page 5

5
1. Prerequisites
1.1 Skills Required
The following skills are required by developers aiming to develop application software for the
DT-930 series.
• MS-DOS command prompt
• C language
1.2 Software Development Tools
The following software are required to develop the application program.
• Hitachi SH-C Compiler.
This compiler is used to compile and link your application program.
• CASIO HT software development kit
In order to develop an application program for CASIO handheld terminals, it is necessary to install
the CASIO handheld terminal SDK. It can be obtained by downloading.
• File communication program
You need proper communication software by the cradle type. If you use DT-960IOE Basic Cradle,
you need the Multi-drop utility. Or, if you use DT-964IOE Satellite Cradle or HA-E60IO Bridge
Basic Cradle, you need the LMWIN utility.
Page 6
6
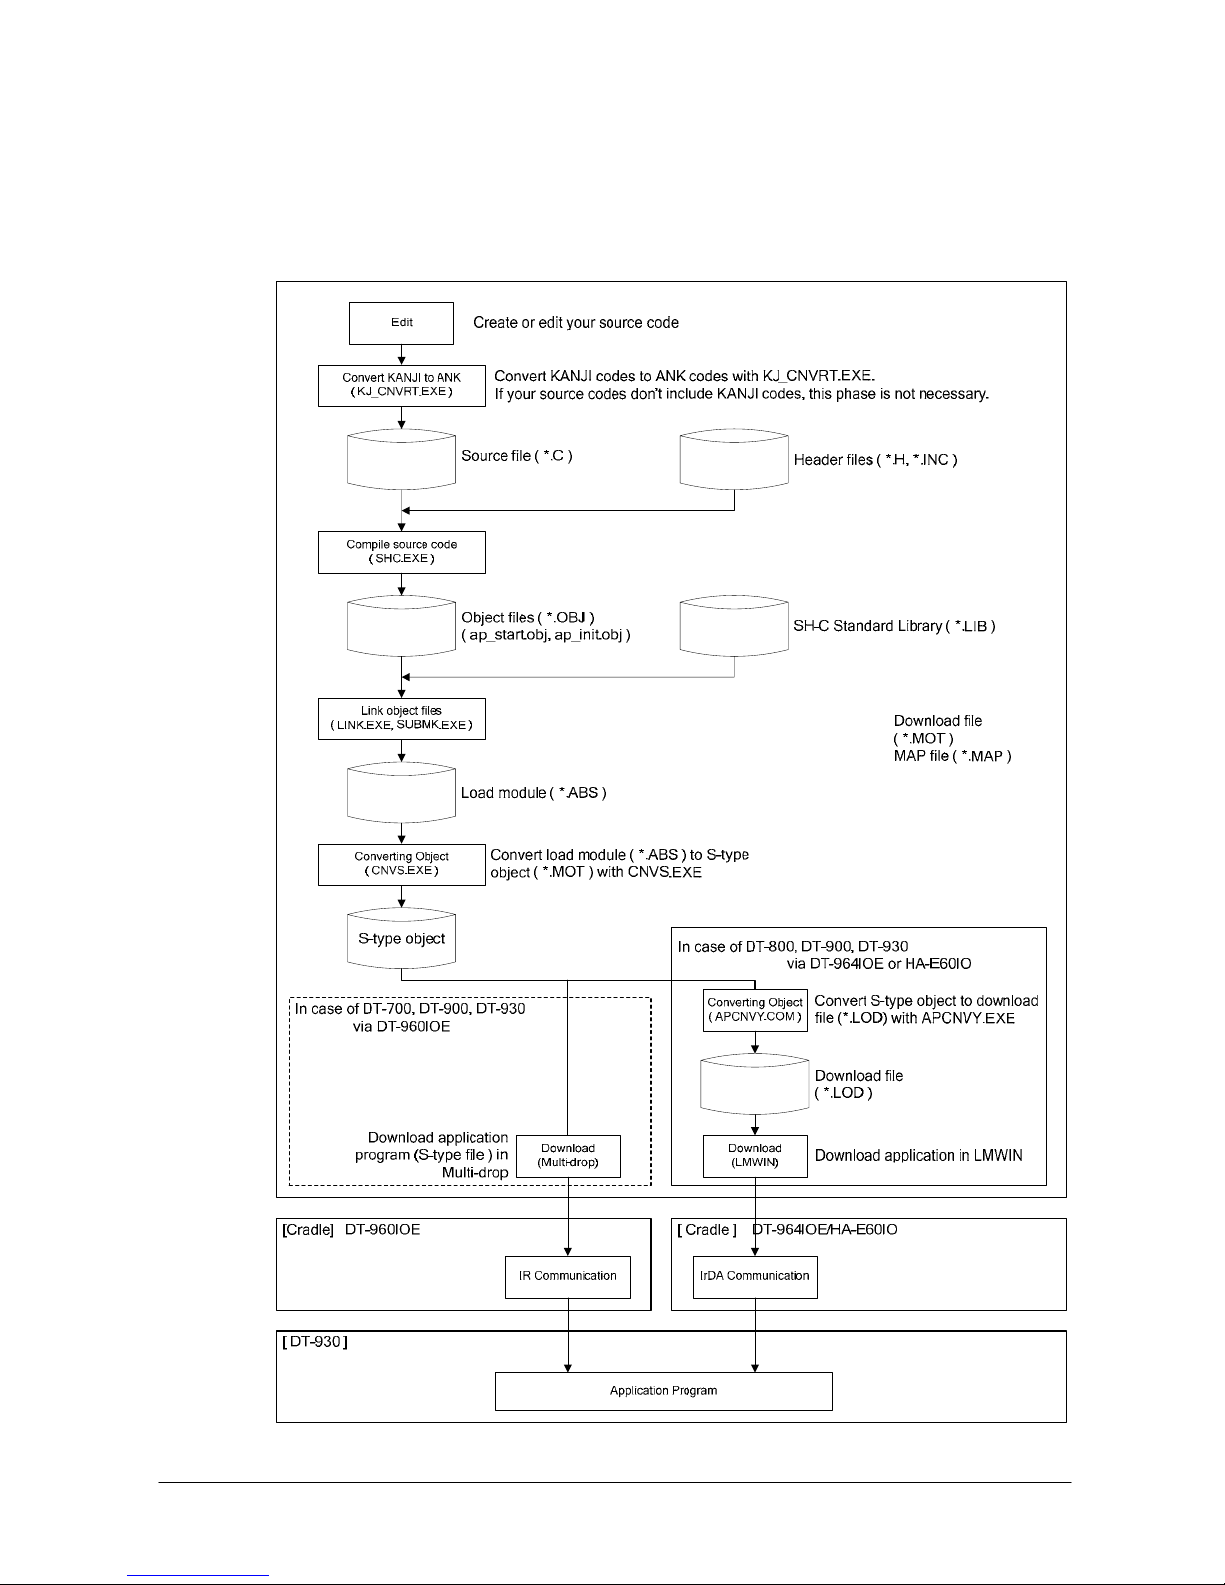
1.3 General Flow of Application Development
The general flow of application program development is shown below.
Fig. 1.1
Page 7
7
2. Setting Up The Development Environment
The development tools (i.e. compiler, linker, etc.) are MS-DOS based program. The following
explanations are supposed to use DOS prompt of MS-Windows.
2.1 Installing the C Compiler
Firstly, make the required directory as follows:
C:\> mkdir C:\SHC <ENTER>
C:\> cd C:\SHC <ENTER>
1. Insert the SHC Compiler disk no. 1/3 into your Drive A:
C:\SHC> XCOPY /S A:\*.* C: <ENTER>
2. Insert the SHC Compiler disk no. 2/3 into your Drive A:
C:\SHC> XCOPY /S A:\*.* C: <ENTER>
3. Insert the SHC Compiler disk no. 3/3 into your Drive A:
C:\SHC> XCOPY /S A:\*.* C: <ENTER>
4. Insert the SHC Linker disk no. 1/1 into your Drive A:
C:\SHC>XCOPY /S A:\*.* C:\SHC\BIN<ENTER>
2.2 Setting Path and Environment Variables
It is necessary to set proper path and environment variables for compiling. Create a batch file like
setenv.bat and execute it before compiling. An example of contents of the file according to the
environment used in this guide is as follows:
echo off
SET DRV=C:\SHC
PATH=%drv%\BIN;%path%
SET SHC_LIB=%drv%\BIN
SET SHC_INC=%drv%\INCLUDE
SET SHC_TMP=C:\
Note:
SHC_LIB is used to specify where the compiler is, not for the libraries.
Page 8

8
2.3 Installing the CASIO Software Development Kit
The model specific SDKs are provided at the CASIO web site. The following example is the layout
recommended for the terminal.
Table 2.1
C:\DT930\
APCNVY.COM Download file converter
SUBMK.EXE Application loading address adjusting utility
BIN\
KJ_CNVRT.EXE Kanji code converter
ITRON.H ITRON library
CMNDEF.H BIOS common definition
BIOS1DEF.H BIOS jump table structure definition
BIOS1MAC.H BIOS macro definition
BIOS5DEF.H Bluetooth I/F jump table definition
BIOS5MAC.H Bluetooth I/F macro definition
CU_MULTI.H Header file for Multi-drop protocol programming
CU_DT500.H Header file for DT-500 protocol programming (This file
is used only for the Japanese domestic models)
COM_APLM.H Header for the Pseudo full duplex communication
INCLUDE\
PRN_BT.H Header for Bluetooth Printer Access Function
AP_START.OBJ Startup object for DT-800/DT-900/DT-930 series
AP_STARTA.OBJ Startup object for the DT-700 compatible A mode.
AP_STARTB.OBJ Startup object for the DT-700 compatible B mode.
AP_INIT.OBJ Initialize module for the application
COM_APLM.OBJ Pseudo full duplex communication library
OBJ\
PRN_BT.OBJ Bluetooth Printer Access Function
LIB\ HICIF.LIB ITRON Library
Page 9

9
2.4 Editing Source Code
In order to explain the steps of application development, the following source codes are used. In
this guide, the file name is SAMPLE.C and is placed at C:\DT930\AP\
< SAMPLE.C>
#include <stdio.h>
#include <stdlib.h>
#include <string.h>
#include "itron.h"
#include "CMNDEF.H"
#include "bios1mac.h"
ap_start( )
{
KEY_INP pkey_inp;
ER retcd;
lcd_csr_put( 1, 1 );
lcd_string( LCD_ANK_STANDARD, LCD_ATTR_NORMAL,(UB*)"Hello." , LCD_LF_OFF );
lcd_csr_put( 7, 1 );
lcd_string( LCD_ANK_STANDARD, LCD_ATTR_NORMAL,(UB*)"Push Any Key" , LCD_LF_OFF );
lcd_csr_set(LCD_CSR_UNDER);
pkey_inp.ext = KEY_NON_EXT;
pkey_inp.echo = ECHO_ON;
pkey_inp.font_size = LCD_ANK_STANDARD;
pkey_inp.type = LCD_ATTR_NORMAL;
pkey_inp.line_pos = 5;
pkey_inp.column_pos = 1;
retcd = key_read( &pkey_inp );
exit(0);
}
Page 10

10
2.5 Compiling
[Usage]
SHC < Options > Source files
[Options]
/I=Path name : Specify where include files are
/OP=n : Optimization
n=0 : No optimize
n=1 : Optimize
<Example>
C:\DT930\AP>SHC /I=.,C:\DT930\INCLUDE,C:\SHC\INCLUDE SAMPLE.C
2.6 Linking
The linking operation needs the following steps so that a load module (*.ABS) and a MAP file
(*.MAP) are generated
1. Link objects
2. Adjust start address of B, R section by Submk.exe
3. Re-link objects
Page 11

11
2.6.1 Preparation of Linking
Before linking, you have to create SUBCOMMAND file. This file contains settings needed by the
linker.
<SAMPLE.SUB>
INPUT C:\DT930\OBJ\AP_START.OBJ,&
C:\DT930\OBJ\AP_INIT.OBJ,&
C:\DT930\AP\SAMPLE.OBJ
LIBRARY C:\SHC\LIB\SHCLIB.LIB
LIBRARY C:\DT930\LIB\HICIF.LIB
ROM (D,R)
START P,C,D,hicif(09048030)
OUTPUT .\SAMPLE
PRINT .\SAMPLE
FORM A
EXIT
A. Specify objects which constitute application program
The startup files for DT-930 series (i.e. AP_START.OBJ,AP_INIT.OBJ) and application
program.
B. ROM support option
Specify “D” and “R” sections in order to split your application data area into initialized
area and un-initialized area.
C. Start address of the application program
This value must be “09048030”.
Note:
Refer to the SH-C manual for the detail.
[Usage]
LNK -SUBCOMMAND=<SUBCOMMANNND_file name>
2.6.2 Adjusting Tool (SUBMK.EXE) for Start Address
This tool re-calculates the start address of “B” and “R” sections based on the information from
MAP file, and edits SUBCOMMAND file. After having corrected SUBCOMMAND file, your
application program has to be linked again.
Caution:
Because the tool starts modifying the SUBCOMMAND file directly, back up it before using the
tool.
[Usage]
SUBMK SUBCOMMANNND_file name
A
B
C
Page 12

12
2.6.3 Example of Linking
C:\DT930\AP>COPY SAMPLE.ORG SUBFILE.SUB → A
C:\DT930\AP>LNK -SUBCOMMAND=SUBFILE.SUB → B
C:\DT930\AP>SUBMK SUBFILE.SUB → C
C:\DT930\AP>LNK -SUBCOMMAND=SUBFILE.SUB → D
A. Copy original the SUBCOMMAND file to a file to be modified with SUBMK.EXE.
B. Link your application once to get a MAP file which is used by the SUBMK.EXE.
C. Execute the SUBMK.EXE.
D. Link your application program again with the modified SUBCOMMAND file.
Page 13

13
2.7 Converting Load Module (*.ABS) to Download File
The load module (*.ABS) generated by the linker explained in the previous page needs to be
converted into the proper format for downloading to the terminal. For this purpose, you need to
properly use CNVS.EXE and APCNVY.COM by the cradle type. Refer to Chapter 1.2 “Software
Development Tools” for the cradle types.
When you use the DT-960IOE Basic Cradle, the ABS file needs to be changed to S-type object
(*.MOT) with CNVS.EXE. The S-type object (*.MOT) can be downloaded to the terminal in the
Multi-drop utility.
When you use the DT-964IOE Satellite Cradle or the HA-E60IOE Bridge Basic Cradle, the S-type
object file needs to be changed to download file (*.LOD) with APCNVY.EXE. The download file
(*.LOD) can be downloaded to the terminal in the LMWIN utility.
2.7.1 CNVS.EXE
[Function]
Convert the load module (*.ABS) into S-type object (*.MOT) file
[Usage]
CNVS load_module_name
Note:
The extension of the load module is omissible.
<Example>
CNVS SAMPLE
Fig. 2.1
Page 14

14
2.7.2 APCNVY.COM
[Function]
Convert S-type object into download file (*.LOD)
[Usage]
APCNVY S_type_object_name Download_file_name
< Example >
APCNVY SAMPLE.MOT SAMPLE.LOD
Note:
APCNV needs the map file of the same name. Place the MAP file created at linking to the same
folder.
Page 15

15
2.8 Checking Application Program Size
The application program size on the terminal is not the same as the size of download files, *.MOT
or *.LOD file explained in Chapter 2.7. To know the correct size of your application program, see
MAP file generated by linker. The distance from the start address in it to the end address is exactly
the size of your application program. If you require to know only whether your application program
can be put in the application area of the terminal, check the end address from MAP file. However,
when the size of application program area of the terminal is changed, the end address of this area is
also changed. The default size of application program area and the address map of the terminal are
as follows.
Table 2.2 Default size of the application program area
Size of the area Address map
DT-930 series Approx. 336 Kbytes 09048030h to 0909C000h
In order to get the start address and the end address of the application program from the MAP file,
refer to “SECTION NAME*” and “*TOTAL ADDRESS*”
ATTRIBUTE : CODE NOSHR START END LENGTH UNIT NAME
P H'???????? - H'???????? H'????????
AP
_
Start AP_Start
H'???????? - H'???????? H'????????
apsmp apsmp
H'???????? - H'???????? H'????????
__slow_mvn
__
slow_mvn
* TOTAL ADDRESS * H'09048030 - H'???????? H'????????
ATTRIBUTE : DATA NOSHR
C H'???????? - H'???????? H'????????
AP
_
Start AP_Start
H'???????? - H'???????? H'????????
ap_init ap
_
init
H'???????? - H'???????? H'????????
apsmp apsmp
* TOTAL ADDRESS * H'???????? - H'???????? H'????????
ATTRIBUTE : DATA NOSHR RAM
R H'???????? - H'???????? H'????????
AP_Start AP_Start
H'???????? - H'???????? H'????????
ap
_
init ap_init
H'???????? - H'???????? H'????????
apsmp apsmp
* TOTAL ADDRESS * H'???????? - H'???????? H'????????
The start address of the application program is the address at START in TOTAL ADDRESS line
of ATTRIBUTE “P”. The address here must be 09048030. The end address of the application
program is the address at END in TOTAL ADDRESS line of ATTRIBUTE “R”. The size of the
application program is the difference between these two addresses.
Page 16

16
2.9 Downloading Programs
2.9.1 Using Multi-drop Method
To handle communication between the terminal and a PC the Multi-drop utility is used. This
communication method uses the DT-960IOE Basic Cradle only.
To install the Multi-drop utility in your PC, execute the setup.exe and follow dialogue messages
appeared on your PC.
Configuration file
CONFIG.HTS is a parameter file that allows you to set up all the parameters in the System Menu
of the terminal. It is useful when you develop programs because it makes sure that all your
communication parameter settings are maintained after a re-boot.
Downloading program to the terminal
The procedure below applies if you have followed the installation guides described in Chapters 1
and 2. Or, if you have not, then you will have to change the path names. You must have a .map file
and a .mot file in the download directory (each application consists of a .mot file but the Multi-drop
utility will refer to the .map file during installation). Additionally, you will have the latest version of
the OS patch files patch001.lod and patch002.lod. Also, you will need CONFIG.HTS in that
directory too.
1. Run the Multi-drop utility on your PC. The screen with the main menus, Settings(F
),
Execute (R
) and Version (V), shown will appear.
Fig. 2.3
Page 17

17
2. Select File setting in Settings (F
) menu and specify ‘C:\DT930\AP’ in Application
storage directory field (see Fig. 2.4). Note that your input in the field will not be accepted if
the directory does not exist on the PC.
3. Select Communication in Settings (F
) menu and then select 19200BPS in the COM speed
pull-down menu for the COM speed. Note COM0=COM1 on your PC and COM1=COM2. Set
this to whichever port you use.
4. Select Execute(R)
in Fig. 2.6 to make the Multi-drop utility enter to the ‘Polling’ state.
Fig. 2.4
Fig. 2.5
Fig. 2.6
Page 18

18
4. On the terminal, make the System Menu appear by holding down the S and . (decimal) keys
together as you turn on the power on the terminal.
1 : EXECUTE AP
2 : SET MODE
3 : DATE/TIME
4 : TRANSMIT
5 : VERSION
5. Select “4: TRANSMIT” in Fig. 2.7.
1 : MULTI INSTALL
2 : AP INSTALL
3 : DUPLICATE HT
4 : UTILITY
5 : PROTOCOL
6 : PORT
7 : SPEED
MLT
SIR
19K
6. Check that parameters 5, 6 and 7 (Protocol, Port, Speed) in Fig. 2.8 are correctly set. For
example, if using the cradle (either DT-964IOE Satellite Cradle or HA-E60IO Bridge Basic
Cradle) these settings would be MLT, SIR and 19K respectively.
7. Select “2: AP INSTALL” in Fig. 2.8 and then the screen below appears.
1 : A DRIVE
2 : B DRIVE
8. Select “1: A DRIVE”. In fact, the application is not copied to Drive A or B. It is installed in an
area called the ‘Application storage area’. This is part of the RAM memory – in the DT-700
mode it has not drive letter but in the normal mode it is known as Drive C.
Fig. 2.7
Fig. 2.8
Fig. 2.9
Page 19

19
Downloading files to the terminal
If you want to download a file other than application to the terminal then follow the steps below.
1. Specify the directory where your files are stored in Transmitting data storage directory
field as described in Fig. 2.10.
2. Click OK button in Fig. 2.10 and then select Execute (R
) menu in Fig. 2.11. The application
will enter to the ‘Polling’ state.
3. On the terminal select “4: TRANSMIT”.
1 : EXECUTE AP
2 : SET MODE
3 : DATE/TIME
4 : TRANSMIT
5 : VERSION
Fig. 2.10
Fig. 2.11
Fig. 2.12
Page 20

20
4. As soon as the menu no. 4 is selected in Fig. 2.12, the following screen in Fig. 2.13 will appear.
1 : MULTI INSTALL
2 : AP INSTALL
3 : DUPLICATE HT
4 : UTILITY
5 : PROTOCOL
6 : PORT
7 : SPEED
FLINK
SIR
115K
5. After selecting “4: UTILITY” in Fig. 2.13, the following screen will appear.
1 : SEND FILE
2 : RECEIVE FILE
3 : FORMAT DRIVE
4 : CHG MEM SIZE
5 : FILE MODE NORM
6. Select “2: RECEIVE FILE” in Fig. 2.14, and then “1: A DRIVE” or “2: B DRIVE” in Fig. 2.15.
The files will be downloaded to the terminal and you will be able to access them from an
application. In this case, the files are copied truly to the drive you have specified.
1 : A DRIVE
2 : B DRIVE
Fig. 2.13
Fig. 2.14
Fig. 2.15
Page 21

21
2.9.2 Using LMWIN Method
The upload/download procedure with DT-964IOE Satellite Cradle or HA-E60IO Bridge Basic
Cradle using the LMWIN utility is much flexible. Here are some brief instructions for downloading
a program to the terminal. If your PC does not have the LMWIN utility installed, install it prior to
starting the procedures described below.
Create a script to download patch file
1. Run the LMWIN utility and continues the rest of steps, 2 to 9.
2. Select New Script File from S
cript menu.
3. Click B
rowse button.
4. Navigate to the directory where you have stored the patch files (e.g. c:\dt930\ap) and click
patch001.lod, and then OK button.
5. Enter ‘A:\’ in Destination Dir field.
6. Click A
dd button. ‘/s c:\.....\patch001.LOD a:\’ appears in Script field.
7. Repeat the steps 3 to 6 for any other patch files.
8. Click S
ave button and then a dialogue box will appear. Enter the file name (e.g.
patch930.scr) in the box.
9. Click Ex
it button.
Fig. 2.16
Page 22

22
Create a script to download LOD file
1. Run the LMWIN utility and continue the rest of steps, 2 to 8.
2. Select NEW Script File from S
cript menu.
3. Click Browse button.
4. Navigate to the directory where you have stored the .lod file (e.g. c:\dt930\ap) and click it.
Click OK button.
5. Enter ‘C:\’ in Destination Dir field.
6. Click A
dd button. ‘/S C:\.....\SAMPLE.LOD C:\’ will appear in Script field.
7. Click Save button and then a dialogue box will appear. Enter a script file name (e.g.
program.scr) in the box.
8. Click E
xit button.
Execute a script to download files to the terminal
1. Select Script File from Execute menu.
2. Select the required .scr file and click OK button. See Fig. 2.17.
3. On the terminal, select “4: TRANSMIT” in the System Menu.
1 : EXECUTE AP
2 : SET MODE
3 : DATE/TIME
4 : TRANSMIT
5 : VERSION
Fig. 2.17
Fig. 2.18
Page 23

23
4. On the terminal, check that the parameters 5, 6 and 7 are FLNK, IR and 115K respectively.
When the HA-60IO Bridge Basic Cradle is used, the parameter 5 must be FLINK. See Fig.
2.19.
5. Select “4: UTILITY” in Fig. 2.20. The screen below will appear. Select “1: TRANS FILE”
menu.
1 : TRANS FILE
2 : FORMAT DRIVE
3 : CHG MEM SIZE
4 : FILEMODE NORM
The download should now take place. When it is done, select “1: EXECUTE AP” in the
System Menu on the terminal. You only have to download the patch file(s) once. You would
need to download them again if you have formatted the Drive A on the terminal. If you want
to download other files (product look up file or font files) then it is simple to create a script or
issue a send command in the LMWIN utility to do so.
Fig. 2.20 Communication via HA-E60IO
Fig. 2.21
Fig. 2.19 Communication via DT-964IOE
Page 24

24
2.10 Installing Application to Drive B
2.10.1 Using LMWIN Method
You can install your application and other important information on Drive B to ensure that recovery
from a fatal error (for example, if the Drive A is corrupted or lost its format for some reason) be
made. Follow the steps below:
1. Compile your application so that it is in the download file (*.LOD).
2. Copy the application, patch files and system files (CONFIG.HTS, etc) to B:\
3. Create a text file called astart.hts. It should contain one line which will be something like this:
B:\mainapp.lod (where mainapp.lod is the name of your application)
4. Copy astart.hts to B:\.
5. When the system re-boots after a fatal error it will ask you to re-format the Drive A. After that
it will access the files in the root directory of Drive B. It will apply the patch files and
configuration files. It will read the astart.hts file. The application listed in the astart file will be
copied to the application area in the RAM (sometimes known as Drive C) and then executed.
If your application is designed in such a way that it backs up important data to the Drive B
occasionally, then you can re-copy the backed up data to the Drive A and continue.Therefore, you
can minimise any loss of data.
2.10.2 Using Multi-drop Method
If you are using the DT-960IOE Basic Cradle and the Multi-drop utility you can download a .lod
application file to Drive B (along with the other necessary files) as follows:
1. Copy the .lod file, config.hts, astart.hts and patch files (plus any other files you may want) to a
directory on your PC.
2. In the Multi-drop, specify the same directory in Transmitting data storage directory field
you have used in step no. 1 above. Refer to Fig. 2.4.
3. Set the Multi-drop utility to the polling mode by selecting Execute (R
) menu. Refer to Fig.
2.6.
4. On the terminal, check that the parameters of protocol, port and speed in the TRANSMIT menu
(see Fig. 2.8) are set to MLT, SIR and 19K respectively
5. Select “4: UTILITY” in the menu.
6. Select “2: RECEIVE FILE” in the menu.
7. Select “2: B DRIVE” in the menu.
The files will now be downloaded. When you select “1: EXECUTE AP” menu your .lod file will be
copied to the application area in the memory and then executed.
 Loading...