


E
Handheld Terminal


 100 Series
User’s Guide
Be sure to read “Safety Precautions” inside this guide before trying to use your Handheld Terminal.

•Bluetooth is a registered trademark owned by Bluetooth SIG, Inc. and licensed to CASIO COMPUTER CO., LTD.
•Microsoft and Windows are either registered trademarks or trademarks of Microsoft Corporation in the United States and/or other countries.
Information in this document is subject to change without advance notice. CASIO Computer Co., Ltd. makes no representations or warranties with respect to the contents or use of this manual and specifically disclaims any express or implied warranties of merchantability or fitness for any particular purpose.

Contents
Safety Precautions ......................................................................................... |
E-3 |
Operating Precautions ................................................................................... |
E-7 |
Important......................................................................................................... |
E-9 |
Regulatory Information .................................................................................. |
E-9 |
Handheld Terminal System Configuration ................................................. |
E-10 |
General Guide ............................................................................................... |
E-11 |
Loading and Removing the Battery Pack................................................... |
E-14 |
Loading .............................................................................................................. |
E-14 |
Removing........................................................................................................... |
E-16 |
Attaching the Hand Strap ............................................................................ |
E-17 |
Setting up ...................................................................................................... |
E-18 |
Using the Mouse Emulator Function ................................................................. |
E-18 |
Adjusting Display Brightness ............................................................................ |
E-20 |
Display Auto Dimmer ........................................................................................ |
E-20 |
Using the Laser Scanner (DT-X100-10E) .................................................... |
E-21 |
Warning Label.................................................................................................... |
E-22 |
Bar Code Scanning Position .............................................................................. |
E-22 |
Adjusting the Laser Light Emission Width ................................................. |
E-23 |
Using the C-MOS Imager (DT-X100-20E).................................................... |
E-25 |
Warning Label.................................................................................................... |
E-26 |
Bluetooth® Communication ............................................................................... |
E-27 |
Resetting the Handheld Terminal................................................................ |
E-28 |
Performing a Full Reset (Initialization) ............................................................ |
E-29 |
DT-X100 Specifications ............................................................................... |
E-30 |
E-1

Using the USB Cradle (HA-F60IO/HA-F60IOA) .......................................... |
E-34 |
General Guide .................................................................................................... |
E-34 |
Connecting the USB Cradle Power Supply ....................................................... |
E-36 |
Specifications ..................................................................................................... |
E-39 |
Using the Ethernet Cradle (HA-F62IO/HA-F62IOA) ................................... |
E-40 |
General Guide .................................................................................................... |
E-40 |
Connecting the Ethernet Cradle Power Supply.................................................. |
E-42 |
Specifications ..................................................................................................... |
E-45 |
Using the Cradle-type Battery Charger (HA-F30CHG).............................. |
E-46 |
General Guide .................................................................................................... |
E-46 |
Connecting the AC Adaptor for Cradle-type Battery Charger........................... |
E-47 |
Specifications ..................................................................................................... |
E-49 |
Using the Cradle-type Dual Battery Charger (HA-F36DCHG) .................. |
E-50 |
General Guide .................................................................................................... |
E-50 |
Charging Battery Pack ....................................................................................... |
E-52 |
Connecting Multiple Cradle-type Dual Battery Chargers.................................. |
E-53 |
Specifications ..................................................................................................... |
E-54 |
Using the Dual Battery Charger (HA-F32DCHG)........................................ |
E-56 |
General Guide .................................................................................................... |
E-56 |
Charging Battery Pack ....................................................................................... |
E-58 |
Connecting Multiple Dual Battery Chargers...................................................... |
E-59 |
Specifications ..................................................................................................... |
E-60 |
Using Rechargeable Battery Pack.............................................................. |
E-61 |
Battery Pack Specifications................................................................................ |
E-62 |
Large-capacity Battery Pack Specifications....................................................... |
E-62 |
Attaching the Hand Belt (HA-F95HB).......................................................... |
E-63 |
Attaching the Hand Belt..................................................................................... |
E-63 |
E-2

Safety Precautions
Congratulations upon your selection of this CASIO product. Be sure to read the following Safety Precautions before trying to use it for the first time.
Your neglect or avoidance of the warning and caution statements in the subsequent pages causes the danger of fire, electric shock, malfunction and damage on the goods as well as personal injury.
Markings and Symbols
The following are the meanings of the markings and symbols used in these Safety Precautions.
Danger |
This symbol indicates information that, if ignored or applied |
|
incorrectly, creates the danger of death or serious personal injury. |
||
|
This symbol indicates information that, if ignored or applied Warning incorrectly, creates the possibility of death or serious personal
injury.
This symbol indicates information that, if ignored or applied Caution incorrectly, creates the possibility of personal injury or property
damage.
• A diagonal line indicates something you should not do. The symbol shown here indicates you should not try to take the unit apart.
• A black circle indicates something you should do. The symbol shown here 
 indicates you should unplug the unit from the wall outlet.
 Warning
Disassembly and Modification
• Never try to disassemble or modify the Handheld Terminal and its options including battery pack and battery in any way.
Abnormal Conditions
• Should the Handheld Terminal and/or its options including battery pack and battery become hot or start to emit smoke or a strange odor, immediately turn off the power and contact your dealer or distributor whom you purchased the product from, or an authorized CASIO service provider.
E-3
 Warning
Dust and Moisture
•Though the Handheld Terminal is dust and water splash resistant, its options including the battery pack are not. Keep loose metal objects and containers filled with liquid away from your Handheld Terminal and the options. Also, never handle the Handheld Terminal and the options while your hands are wet.
Laser Light
•This product uses laser light for aiming a bar code. Never look directly into the laser light or shine the laser light into the eyes.
 Warning
Interference with the Operation of Other Equipment (Using Wireless Data Communication)
•Keep your Handheld Terminal well away from anyone wearing a pacemaker. Radio waves emitted by the Handheld Terminal can affect the operation of a pacemaker.
•Before the use in aircraft, be sure to consult with cabin crew for interference the Handheld Terminal emits.
•Before the use in medical facility, be sure to consult with the facility management or the manufacture of a specific medical equipment that the Handheld Terminal may interfere with.
•Do not use the Handheld Terminal nearby gas pump or chemical tank or any other places flammable or explosive.
 Caution
Foreign Objects
•Take care to ensure that metals or combustible objects are not inserted into the openings of the Handheld Terminal or its options, and not to allow moisture to get inside of them.
Location
•Install the cradle properly on a flat and stable surface so that it cannot fall down onto floor.
•Do not leave the Handheld Terminal and its options for a long period in a car parked in direct sunlight.
LCD Screen
•Never apply strong pressure to the screen or subject it to strong impact. Doing so can crack the LCD Screen.
Low Temperature Burn
•Avoid prolonged contact with the skin while the Handheld Terminal is switched on. Some areas on the back of the Handheld Terminal may become hot during use and could cause low-temperature burns.
E-4
Optional Lithium-ion Battery Pack
 Danger
•Never use the Handheld Terminal and its option including the battery pack and battery next to open flame, near a stove, or any other area exposed to high heat, or leave them for a long period of time in a vehicle parked in direct sunlight.
•Never use the battery pack with any device other than the Handheld Terminal.
•Never dispose of the battery pack by incinerating it or otherwise expose it to heat.
•Never transport or store the battery pack together with metal objects that may result in shorting positive (+) and negative (–) terminals of the battery pack. Be sure to place the battery pack in its case whenever transporting or storing it.
•Never throw the battery pack or otherwise subject it to strong impact.
•Never pierce the battery pack with nails, hit it with a hammer, or step on it.
 • Use only the specified battery charger to charge the battery pack.
 Warning
•Never place the battery pack in a microwave oven or any other high-voltage device.
•If the amount of time period the battery pack can serve becomes
considerably short even after it has been fully charged for the specified time period, stop using it.
•Should the battery pack start to leak or emit a strange odor, immediately move it away from any nearby flame. Leaking battery fluid is combustible.
•Should fluid from the battery pack accidentally get into your eyes or on the skin, do not rub it. Immediately rinse it off with clean tap water and then consult a physician.
 Caution
• Replace only with the same type of battery pack recommended by CASIO. Dispose of used battery packs according to the local regulation.
•Keep the battery pack out of the reach of small children.
•Risk of explosion if battery is replaced by an incorrect type. Dispose of used batteries according to the instructions.
E-5
Power Supply / AC Adaptor
 Warning
•Do not use the Handheld Terminal at a voltage other than the specified voltage. Also, do not connect the Handheld Terminal to a multi-plug power strip.
•Never modify, sharply bend, twist, or pull on the power cord.
•Never use a detergent to clean AC adaptor and its power cable, especially on the plug and the jack.
•Do not use an AC adaptor with a bent connector.
•Do not twist or wrench the connector.
•When using the battery chargers and the cradles, be sure to use the
respective AC adaptors.
 Caution
•Never pull on the power cord when unplugging it. Always hold the plug when unplugging it from the wall outlet.
•Never touch the plug while your hands are wet.
•Be sure to unplug the power cord from the wall outlet before cleaning the
battery chargers and the cradles.
•Unplug the power cord from the wall outlet whenever leaving the battery chargers and the cradles unattended for a long period.
•The housing of the AC adaptor can become warm during normal use.
•At least once a year, unplug the AC adaptor from the wall outlet and clean
any dust that builds up between the prongs of the plug.
Dust built up between the prongs can lead to the danger of fire.
•Check that the connector is properly oriented and then push it straight in (do not insert upside down).
•Do not allow fluids or foreign objects to get into the AC adaptor.
•Choose a location where the power cord is readily accessible and can be easily plugged in and unplugged.
•When using the AC adaptor, always use a power outlet with the specified power supply and voltage, and ensure that the power plug is inserted into the socket fully and securely.
Backup of All Important Data
Caution
•Note that CASIO Computer Co., Ltd. shall not be held liable to you or any third party for any damages or loss caused by deletion or corruption of data due to use of the Handheld Terminal, malfunction or repair of the Handheld Terminal or its peripherals, or due to the batteries going dead.
•The Handheld Terminal employs electronic memory to store data, which means that memory contents can be corrupted or deleted if power is interrupted due to the batteries going dead or incorrect battery replacement procedures. Data cannot be recovered once it is lost or corrupted. Be sure to make backup of all important data. One way to do this is to use the separately sold cradles to transfer data to a computer.
E-6

Use Casio genuine battery pack only
 Danger
•We recommend the use of Casio genuine battery packs with Casio devices. Casio genuine battery packs are tested for quality and safety for the safe use of the product they are installed. We cannot be held liable for accidents or damages caused by counterfeit Casio battery packs or battery packs other than Casio genuine battery packs. When buying a battery pack, pay due attention to buy a Casio genuine battery pack.
Operating Precautions
Your Handheld Terminal and its options are precision. Improper operation or rough handling can cause problems with data storage and other problems. Note and observe the following precautions to ensure proper operation.
•Do not continue operating the Handheld Terminal when battery power is low.
Doing so can cause data to be lost. When the battery goes low, charge it as soon as possible.
•Do not leave dead battery pack in the Handheld Terminal for a long period.
Dead battery pack can leak, leading to malfunction and damage to the Handheld Terminal.
•Use the Handheld Terminal and its options only within the specified temperature range.
Use outside of the specified temperature range creates the risk of malfunction.
•Avoid using the Handheld Terminal and its options in areas subject to the following conditions.
The following conditions create the risk of damage to the Handheld Terminal.
—Large amounts of static electricity
—Extreme heat or extreme cold
—High humidity
—Sudden temperature extremes
—Large amounts of dust
•Do not use volatile chemical substances such as thinners, benzene or toiletries to clean the Handheld Terminal.
When the Handheld Terminal is dirty, wipe it clean with a soft, dry cloth. Rubbing with excessive force could scratch the display.
•The power-supply terminals and Data Communication terminals should be cleaned from time to time using an implement such as a dry cotton bud.
Soiling on the terminals may cause connection defects.
•Take care when using chemicals.
Applying thinners, gasoline, kerosene, solvents or oils, or substances such as cleaners, adhesives, paints, medications or toiletries that contain those materials, to the plastic case or cover may cause discoloration or other damage.
•The back of the Handheld Terminal may become hot during use. This is normal and does not indicate a fault.
E-7

•802.11a/n Restrictions:
—This product is for indoor use only when using channels 36, 40, 44, 48, 52, 56, 60, or 64 (5150-5350 MHz).
—To ensure compliance with local regulations, be sure to select the country in which the access point is installed
•Although the Handheld Terminal meets the IP54 level of the International Standard IEC60529, pay your attention to the following when using it in the rain.
—After a large amount of rain or water falls on the Handheld Terminal, wipe off it immediately.
—Do not use it in the rain for a long period of time.
—Make sure the battery cover and connect cover are closed securely before using it.
—Do not press on the screen or keys with excessive force when using it in the rain.
•Dead Pixels
The LCD panel employed in this product uses high precision and substantial number of components which commonly cause a small number of the pixels not to light or to remain lit all the time. This is due to the characteristics of LCD panel yield in accuracy over 99.99% and permissible.
•Lithium-ion Battery Pack
Each lithium-ion battery pack has its life. The life span heavily depends on how the battery pack is charged or stored which may cause deterioration of the battery pack to shorten the life span if it is handled improperly. Note the tips below to make the battery pack last long.
—Be sure to charge the battery pack before using it if the battery pack is used for the first time or if it has not been used for a long period of time.
—If the battery pack is repeatedly charged, the life span becomes short. To avoid the repetition of charging the battery pack, be sure that the remaining capacity is low before you start charging.
—Be sure to charge the battery pack in recommended temperature range. The temperature range is dependant on device you use to charge including battery chargers and Handheld Terminals. Refer to the respective user guides. Charging the battery pack in a temperature outside of the recommended range causes deterioration.
—When used at low temperatures, the battery pack has a reduced capacity and will supply power for shorter time.
The life span of the battery pack is also shortened.
—Charging the battery pack while the battery pack itself is freeze including inside causes deterioration. Be sure to resume an ordinary room temperature on the battery pack and then leave it unattended for approximately one hour before charging.
—After charging the battery pack, if the performance of the battery pack does not show any recovery, it is a sign of ending the life. Replace it with a new battery pack.
—Avoid the battery pack with a full of the capacity to store for a long period of time. If you need to store it for a long period, be sure that the remaining capacity is 30 to 50 percent and to store in a moderate low temperature. This can reduce deterioration.
E-8
—The battery pack gradually deteriorates over time. In particular, storing (or using) the fully charged battery pack at high temperatures tends to accelerate battery pack deterioration.
Important
•This guide does not include any information about programming and download procedures. See the applicable separate documentation for information about the procedures.
After Service
•Should this product ever malfunction, contact your original retailer providing information about the product name, the date you purchased it, and details about the problem.
Regulatory Information
Europe
DT-X100
Options of DT-X100
Manufacturer:
CASIO COMPUTER CO., LTD.
6-2, Hon-machi 1-chome, Shibuya-ku, Tokyo 151-8543, Japan
Responsible within the European Union: Casio Europe GmbH
Casio-Platz 1, 22848 Norderstedt, Germany www.casio-europe.com
•Please keep all information for future reference.
•The declaration of conformity may be consulted at http://doc.casio.com
•Products are for distribution within all member states of the EU.
•Options of DT-X100 are HA-F60IOA, HA-F62IOA, HA-F30CHG, HA-F32DCHG, HA-F20BAT, HA-F21LBAT, AD-S42120C-N5, AD-S15050B-N5, DT-380USB-A and AC-CORD-EU
Maximum radio output power
•IEEE802.11a/b/g/n: 2.4GHz band 20dBm; 5GHz band
 14dBm.
•Bluetooth: 2.4GHz 4dBm.
4dBm.
Hereby, CASIO COMPUTER CO., LTD. declares that the radio equipment type DT-X100 is in compliance with Directive 2014/53/EU.
E-9
Handheld Terminal System Configuration
Accessories
Please check the contents in the box before using the Handheld Terminal for the first time.
The Handheld Terminal comes with the standard battery pack cover and protector already fitted.
DT-X100 Series
• Hand Strap
• Large-capacity Battery Pack Cover
• User's Guide
|
Options |
|
|
|
|
• USB Cradle |
HA-F60IO*/HA-F60IOA |
||||
• Ethernet Cradle HA-F62IO*/HA-F62IOA |
|||||
• Cradle-type Battery Charger |
HA-F30CHG |
||||
• Cradle-type Dual Battery Charger HA-F36DCHG* |
|||||
• Battery Pack |
HA-F20BAT |
|
|||
• Large-capacity Battery Pack |
HA-F21LBAT |
||||
• Dual Battery Charger |
HA-F32DCHG |
||||
• AC Adaptor for USB Cradle/Ethernet Cradle/ |
|||||
|
Dual Battery Charger |
AD-S42120C |
|||
• AC Adaptor for Cradle-type Battery Charger AD-S15050B |
|||||
• AC Adaptor for Cradle-type Dual Battery Charger AD-S60160B*
• Power Cord AC-CORD
• Cable DT-380USB-A
• Hand Belt HA-F95HB
* Not sold in the EU or in EFTA member states.
For the latest options list, refer to the ON-LINE manual available at
http://support.casio.com/en/manual/manual.php?cid=010
E-10

General Guide
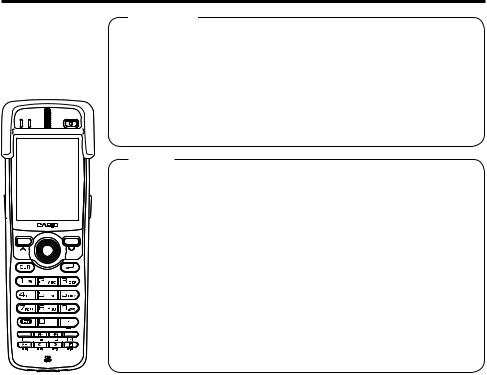
Handheld Terminal (DT-X100)
TOP
17
DT-X100-10E
Left |
Front |
|
|
|
1 2 |
3 |
4 |
|
|
|
5 |
|
|
|
6 |
16 |
|
|
|
8 |
|
|
8 |
|
|
|
7 |
12 |
|
|
9 |
10
11
13
14
Bottom
18
19 19
17
DT-X100-20E
Right |
Back |
23
22
15
24 


 24
24
26
25
DT-X100-10E |
21 20 21 |
|
|
|
|
1 |
Indicator 1 |
Orange: Charging the battery pack. |
|
|
Green: Charging the battery pack is complete. |
|
|
Red: Battery pack error or the surrounding temperature is out of |
|
|
the charging temperature range. |
2 |
Indicator 2 |
Flashes in blue when operating via Bluetooth or in orange when |
|
|
operating via WLAN. Lights in green when reading a bar code |
|
|
successfully. Flashes magenta when the DT-X100 is connected |
|
|
to a PC by the USB. |
3 |
Speaker |
Buzzer and voice messages are output here. |
4 |
Power Key |
Turns the power on and off. |
5 |
Protector |
Fitted on the Handheld Terminal. |
E-11

6 |
Screen |
Displays text and operating instructions. |
|
|
|
7 |
Trigger Center Key |
Used to perform bar code reading. Can be assigned an arbitrary |
|
|
function. |
8 |
Cursor Keys |
Perform the same functions as the up and down arrow keys on a |
|
|
PC keyboard. |
9 |
Enter Key |
Press when finishing entering numerical values or when moving |
|
|
to the next step. |
10 |
Numeric Keys |
Used to enter numeric values and decimal points. |
|
|
|
11 |
Fn Key |
Used to make various settings in combination with the function |
|
|
keys or numeric keys or when starting a pre-registered |
|
|
application. |
12 |
CLR Key |
Used to clear one letter to the left of the cursor. |
|
|
|
13 |
Function Keys |
Various functions other than bar code reading can be assigned to |
|
|
these keys. |
|
|
The default key assignments are as follows. |
|
|
F1: Similar function as the Alt key on a PC keyboard. |
|
|
F2: Similar function as the Shift+Tab keys combination on a PC |
|
|
keyboard. Used to move the cursor among entry or selection |
|
|
items. |
|
|
F3: Similar function as the Tab key on a PC keyboard. Used to |
|
|
move the cursor among entry or selection items. |
|
|
F4: Not assigned. |
|
|
F5: Enter a space. |
|
|
F6: Similar function as the cursor left key on a PC keyboard. |
|
|
F7: Similar function as the cursor right key on a PC keyboard. |
|
|
F8: Select text entry mode. |
|
|
(The mode changes in order of Numeric Uppercase letter |
|
|
Lowercase letter) |
14 |
Microphone |
Used to input a sound including voice. |
15 |
Trigger R Key |
Used to perform bar code reading. |
16 |
Trigger L Key |
Used to perform bar code reading. |
|
|
|
17 |
Barcode Reader Port |
Laser light or LED light is emitted from this window that reads |
|
|
bar codes. |
18 |
IR Port |
Used for communication with another Handheld Terminal. |
19 |
Power Contacts |
Used to receive power provided by the USB Cradle or Ethernet |
|
|
Cradle. |
20 |
Data Communication |
Used for data communications. |
|
Terminal |
|
E-12

21 |
Strap Holes |
Used to attach the hand strap. Also used for the hand belt. |
|
|
|
22 |
Reset Switch |
Used to reset the Handheld Terminal. |
|
|
|
23 |
Hand Belt Holes |
Used to attach the hand belt. |
24 |
Battery Pack Cover |
Used to lock the battery cover and to release. |
|
Lock Switch |
|
25 |
Battery Pack Cover |
Used to cover the battery compartment that holds the battery |
|
|
pack inside. |
26 |
Mount Holes |
These holes hold the terminal seating in the optional USB |
|
|
Cradle or in the Ethernet Cradle. |
E-13

Loading and Removing the Battery Pack
Your Handheld Terminal uses two types of battery: a battery pack and a memory backup battery.
The battery pack is used to power normal operations and to store data, while the memory backup battery provides the power required to maintain memory contents when the battery pack power is unable to supply power for some reason.
The operating power is supplied by a battery pack. You can choose between a battery pack (HA-F20BAT) and a large-capacity battery pack (HA-F21LBAT).
The backup battery is installed inside of the Handheld Terminal.
This guide uses the following terms to refer to the batteries.
Battery Pack: Rechargeable battery pack (HA-F20BAT or HA-F21LBAT) for normal operations and data storage
Backup Battery: Built-in battery for memory backup
When the battery pack power goes low, immediately charge it or replace it with a charged battery pack.
You can use the Dual Battery Charger, the Cradle-type Battery Charger, the Cradle-type Dual Battery Charger, the USB Cradle, or Ethernet Cradle to charge a battery pack. See the sections of this guide that cover the Dual Battery Charger, the Cradle-type Battery Charger, the Cradle-type Dual Battery Charger, the USB Cradle, and the Ethernet Cradle for information about how to use them for charging.
Important!
Always keep backup copies of all important data!
•The battery pack powers normal operation and also provides power required to maintain memory contents, while the backup battery provides backup power to maintain memory contents. Because of this, you should not remove the battery pack if the backup battery is dead. Removing the battery pack while the backup battery is dead causes data in the memory to be corrupted or lost. Note that once data is lost it cannot be recovered. Always keep separate backup copies of all important data.
•The charge of a battery pack when you purchase it may be depleted due to testing at the factory or natural discharge during shipment and storage. Be sure to charge the battery pack before you use it.
•The life of a battery pack is limited, and charging a battery pack causes it to gradually lose its ability to maintain the charge. If your battery pack seems to require charging very frequently, it probably means it is time to purchase a new one.
•If a battery pack is used past the end of its service life, it may swell up in size. In such a case, replace the battery pack with a new one.
•If the backup battery is fully charged, it will maintain the contents of the terminal’s memory (RAM) for approximately 10 minutes when the main battery pack is removed.
•It takes 4 days with the main battery pack installed in the terminal for the backup battery to be charged fully.
Loading
1.Turn over the Handheld Terminal.
2.Remove the rechargeable battery pack cover as follows:


 Slide the left and right lock switches for the rechargeable battery pack cover simultaneously in the direction indicated by the arrows.
E-14
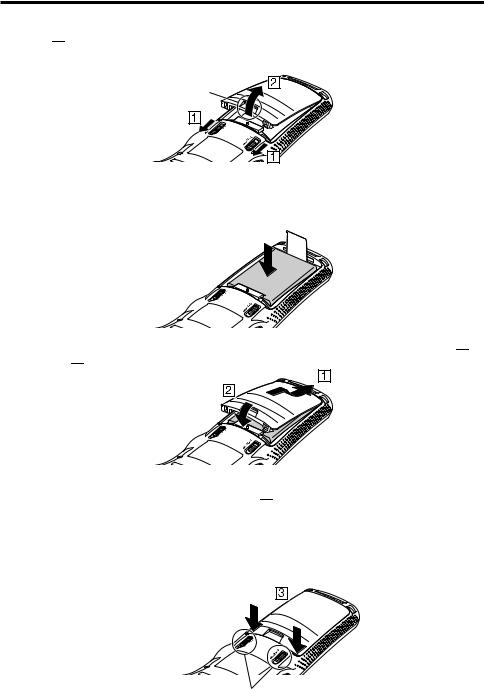


 While holding the switches back, hook your fingertip into the notch in the rechargeable battery pack cover and lift the cover up in the direction indicated by the arrow.
Notch
3.Load a battery pack (HA-F20BAT) or large-capacity battery pack (HA-F21LBAT). Take care that the battery pack is oriented correctly when you load it. In addition, load the battery back while making sure that the end of the battery pack removal tape is protruding above the battery pack.
4.Put back the battery pack cover in the compartment as instructed by the arrows,  and
and  in the illustration.
After putting back the cover, firmly press the cover so that it is locked in the position by the two Battery Pack Cover Lock Switches 

 .
.
•Ensure that both the switches returned all the way down to the home positions as indicated by the two arrows.
If the switches are lackadaisically positioned, it causes the switches not to activate.
When loading a large-capacity battery pack, use the large-capacity battery cover instead of the standard battery cover.
Battery Pack Cover Lock Switches
E-15
Removing
1.Make sure that the Handheld Terminal is turned off. If the power is on, press the power key to turn it off.
2.Turn over the Handheld Terminal.
3.Remove the rechargeable battery pack cover as follows:


 Slide the left and right lock switches for the rechargeable battery pack cover simultaneously in the direction indicated by the arrows.


 While holding the switches back, hook your fingertip into the notch in the rechargeable battery pack cover and lift the cover up in the direction indicated by the arrow.
4. Remove the battery pack by pulling up the removal tape as shown in the illustration.
Important!
•When removing the battery pack, make sure you do not leave the Handheld Terminal without a battery pack for more than about 10 minutes. Doing so can cause data in the memory to be deleted.
•When removing the battery pack, be sure you carefully follow the proper procedure as explained in this guide.
•Never try to use other type of battery than the ones that are specified for this product.
•When removing the battery pack, pull the removal tape straight up and remove the battery pack. Removing with excessive force can damage the battery pack.
•Before starting to use the DT-X100, ensure that the battery pack cover is properly closed. If not, the power cannot be turned on or is turned off abruptly while the DT-X100 is in use.
E-16
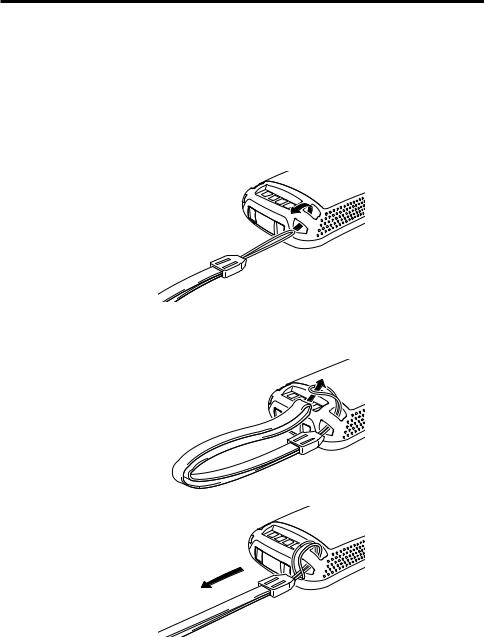
Attaching the Hand Strap
The hand strap can be used to prevent the Handheld Terminal from dropping when carrying it around. Since there are two strap holes where the hand strap can be attached, use the hole that affords the ease of use. Attach the hand strap according to the procedure described below.
To attach the hand strap
1.Pass the thin cord of the hand strap through the hand strap hole on the back of the Handheld Terminal.
2.Pass the other end of the strap (the part you put around your hand) through the loop formed by the thin cord.
Important!
Do not swing the Handheld Terminal around holding the hand strap.
E-17
Setting up
Using the Mouse Emulator Function
The mouse emulator function lets you make settings and adjustments by using a mouse cursor.
To use the mouse cursor, first set up the mouse emulation mode by following the below procedure.
In the emulation mode, the numeric keys and Trigger R key are used to manipulate the mouse cursor. (In the emulation mode, the numeric keys and Trigger R key cannot be used for entering numerics and scanning bar codes respectively.)
■ Activating the mouse emulator function
• While no mouse cursor is shown on the screen, press the “Fn” key followed by the “4” key. The mouse cursor appears, and the mouse emulator function is now active.
* To turn off the function, press the same key sequence again, i.e. “Fn” key “4” key. * Each push of this key toggles the function between on and off.
■ Using the mouse cursor
Activate the mouse emulator function as described above.
Mouse cursor movement
• Press a numeric key for the direction in which you want to move the mouse cursor.
Mouse cursor moves in the arrow direction.
*Holding down a key moves the mouse cursor continuously.
Left click
This serves for selecting a file, making a menu selection, or a similar action.
•Move the mouse cursor to the position where you want to click, and press the “5” key.
E-18
Right click (calling up a menu)
•Move the mouse cursor to the position where you want to click, and press the Trigger R key.
Left double click
Performing this action while the mouse cursor is on an icon starts an application, opens a file, etc.
•Move the mouse cursor to the position where you want to double click, and press the “5” key twice.
*The double click timing follows the double tap setting of Windows CE. The setting can be changed by accessing the “Mouse” icon in the Control Panel.
Dragging
This action allows you to move an application icon on the screen or a file or folder in File Explorer.
•Move the mouse cursor to the position where you want to start dragging, and press the “5” key. Then move the mouse cursor by holding down the “5” key and pressing another numeric key for the direction in which you want to move. The selected item will be dragged along with the cursor. When you release the “5” key, the item is dropped at the current location.
E-19
 Loading...