

Page 1
BP-1MY
BP-1MY-1
GETTING ACQUAINTED
Thank you for purchasing this CASIO product. Be sure you read this
User’s Guide before trying to operate it. To ensure your personal safety,
make you pay particular attention to the section titled “SAFETY
PRECAUTIONS”.
Note
• Keep this User’s Guide in a safe place for future reference.
• This Blood Pressure Monitor Base Unit is designed for taking accurate
blood pressure readings at home or some other fixed location. It
displays systolic and diastolic blood pressure values, and pulse rate
(BPM).
• It is also used for setting basic data on the Blood Pressure Monitor
Watch (BP-1B Series). See the “Module No. 2420 User’s Guide” for
full details about setting the Watch’s basic data.
• All mentions of “Base Unit” in this manual refer to the CASIO Digital
Blood Pressure Monitor Base Unit (BP-1MY), and “Watch” refers to
the CASIO Blood Pressure Monitor Watch (BP-1B Series).
SAFETY PRECAUTIONS
Warning
• Self-diagnosis of your physical condition based on the measurement
results of the Base Unit is extremely dangerous. Make sure you
always consult your physician concerning your physical condition.
• Do not use a mobile phone or other device that emits radio waves in
the vicinity of the Base Unit while taking blood pressure readings. Do
not take blood pressure readings in the vicinity of a TV, microwave
oven, etc. Doing so can produce incorrect readings.
• Never use the Base Unit for any other purpose other than taking blood
pressure readings.
• Do not use the Base Unit to measure the blood pressure of young
children.
• Never try to take the Base Unit or cuff apart, and never modify them in
any way. Doing so can lead to malfunction of the Base Unit and other
serious problems.
Batteries
Incorrect use of batteries can cause corrosive fluid to leak from them,
and creates the risk of fire and personal injury due to exploding batteries.
To avoid such problems, make sure you carefully observe the following
battery guidelines.
• Always make sure that the (+)/(–) polarity of batteries is correct when
you load them.
• Never mix new batteries with old ones.
• Never mix batteries of different types.
• Be sure to remove the batteries from the Base Unit if you do not plan
to use it for a long time.
• Use only the batteries that are specifically recommended for the Base
Unit.
• Take care when using your fingernail to remove batteries from the
battery compartment. Pulling on batteries can cause long nails to
break.
KEEPING ATTUNED TO YOUR BLOOD
PRESSURE LEVELS
Your blood pressure is like a constant message from your body.
Monitoring your blood pressure provides you with vital feedback about
your current physical condition. High blood pressure, for example, often
shows no symptoms of its own, and so except for an abnormally high
measurement reading. Left undetected and untreated, high blood
pressure can often lead to more serious, life-threatening illness.
All of this means that daily blood pressure readings for the purpose of
detecting early warning signs from our bodies are an essential part of
any comprehensive personal health management program.
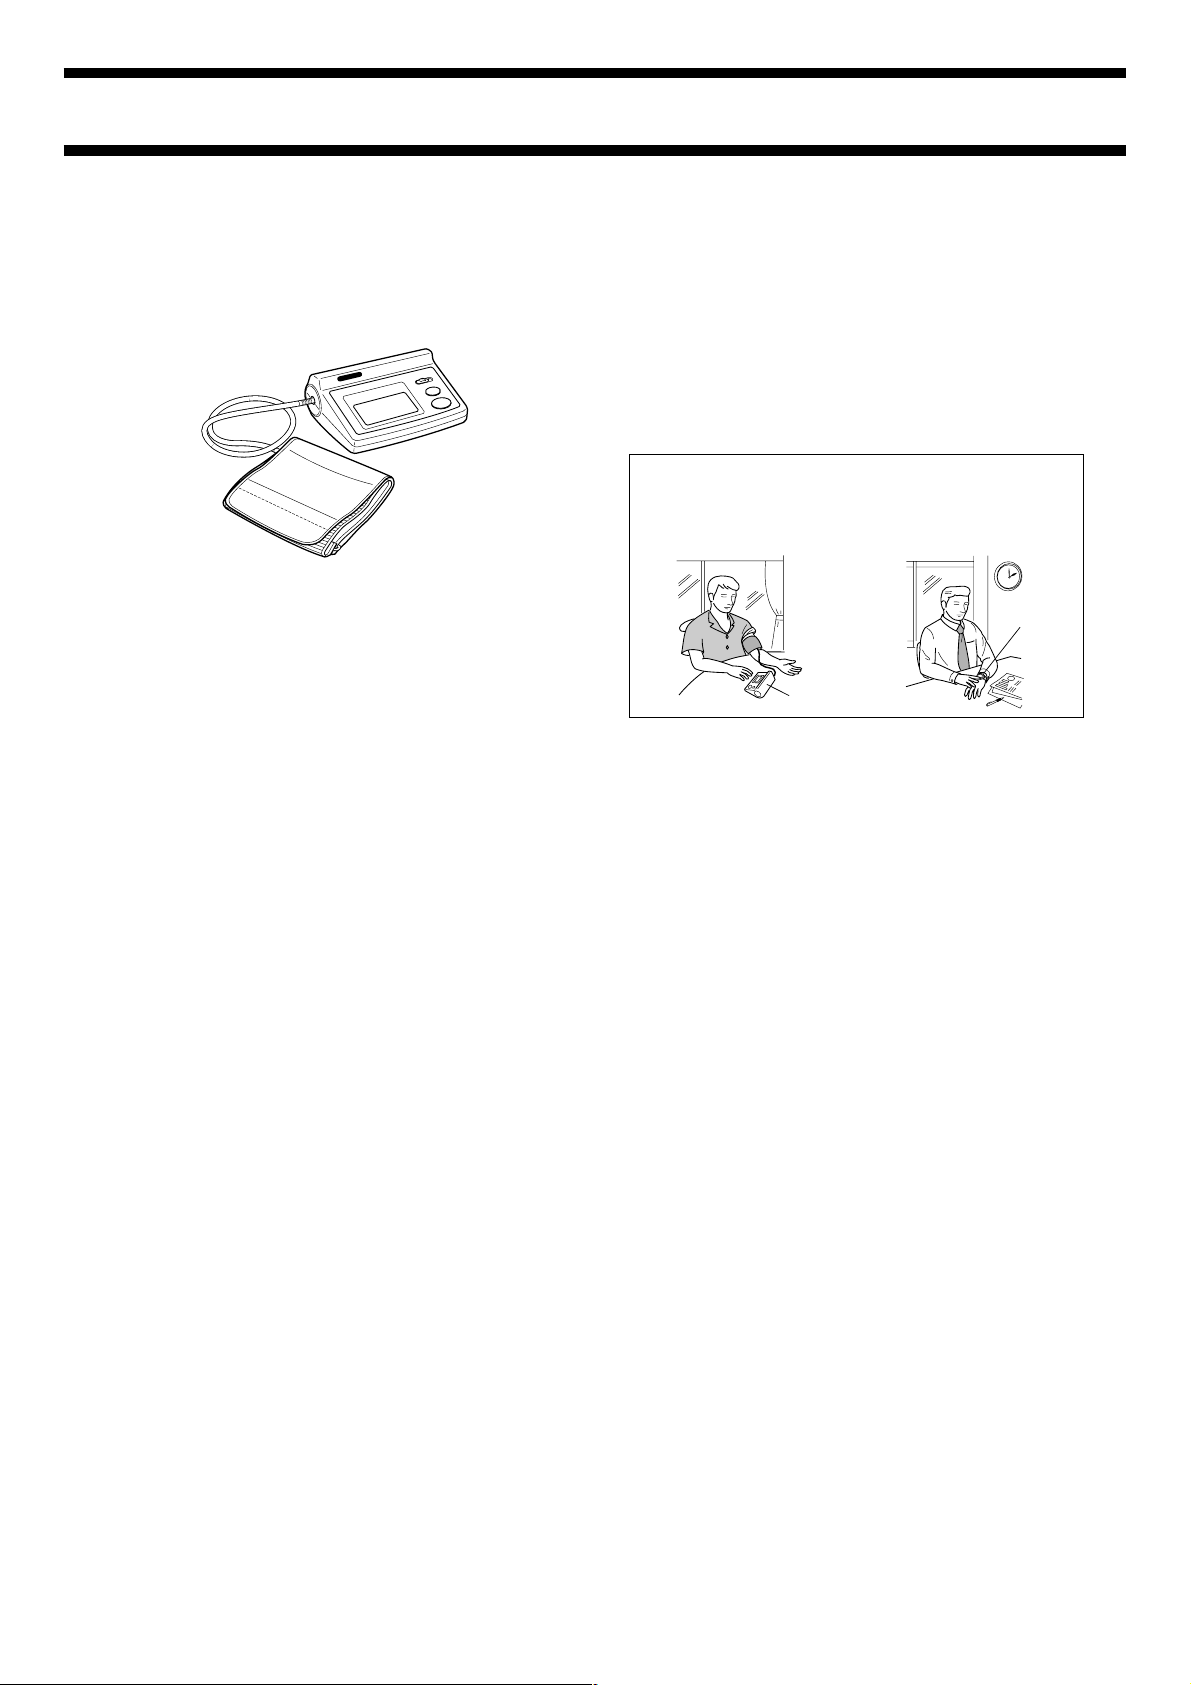
The CASIO Blood Pressure Monitor Watch and Base Unit make it
possible for you to take quick and easy blood pressure readings at
home and while you are out. Together, they provide you with
essential blood pressure data throughout the day.
At home While you are out
Watch
Base Unit
Base Unit
The Base Unit is a cuff type digital blood pressure monitor that measures
your systolic and diastolic blood pressure, as well as your pulse rate. It is
also used for setting basic data on the Watch.
Watch
This Watch measures blood pressure using a fingertip pulse wave
detection system. After you use the Base Unit to measure your basic
data and send it to the Watch, you can use the Watch to take readings,
without applying pressure to your upper arm. Simply place your finger
onto the Watch’s sensor and your blood pressure and pulse rate appear
in a few moments.
The Story of Blood Pressure
What is Blood Pressure?
Blood pressure represents the change in pressure against the interior of
artery walls, which is caused by blood being sent through the circulatory
system by each beat of the heart. There are actually two blood pressure
values: systolic blood pressure and diastolic blood pressure.
Systolic blood pressure is the pressure exerted by the blood when the
heart contracts, causing artery walls to expand.
Diastolic blood pressure, on the other hand, is the pressure exerted by
the blood when the heart expands, and artery walls return to their
original shapes.
What causes blood pressure to change?
A variety of different factors can cause a change in blood pressure,
including age, climate, emotional stress, gender, living environment, and
basic diet.
• Average systolic blood pressure tends to rise with age due to natural
loss of elasticity in arterial walls.
Handling
• Do not use the Base Unit if it appears to be malfunctioning, damaged,
etc.
Page 2
BP-1MY-2
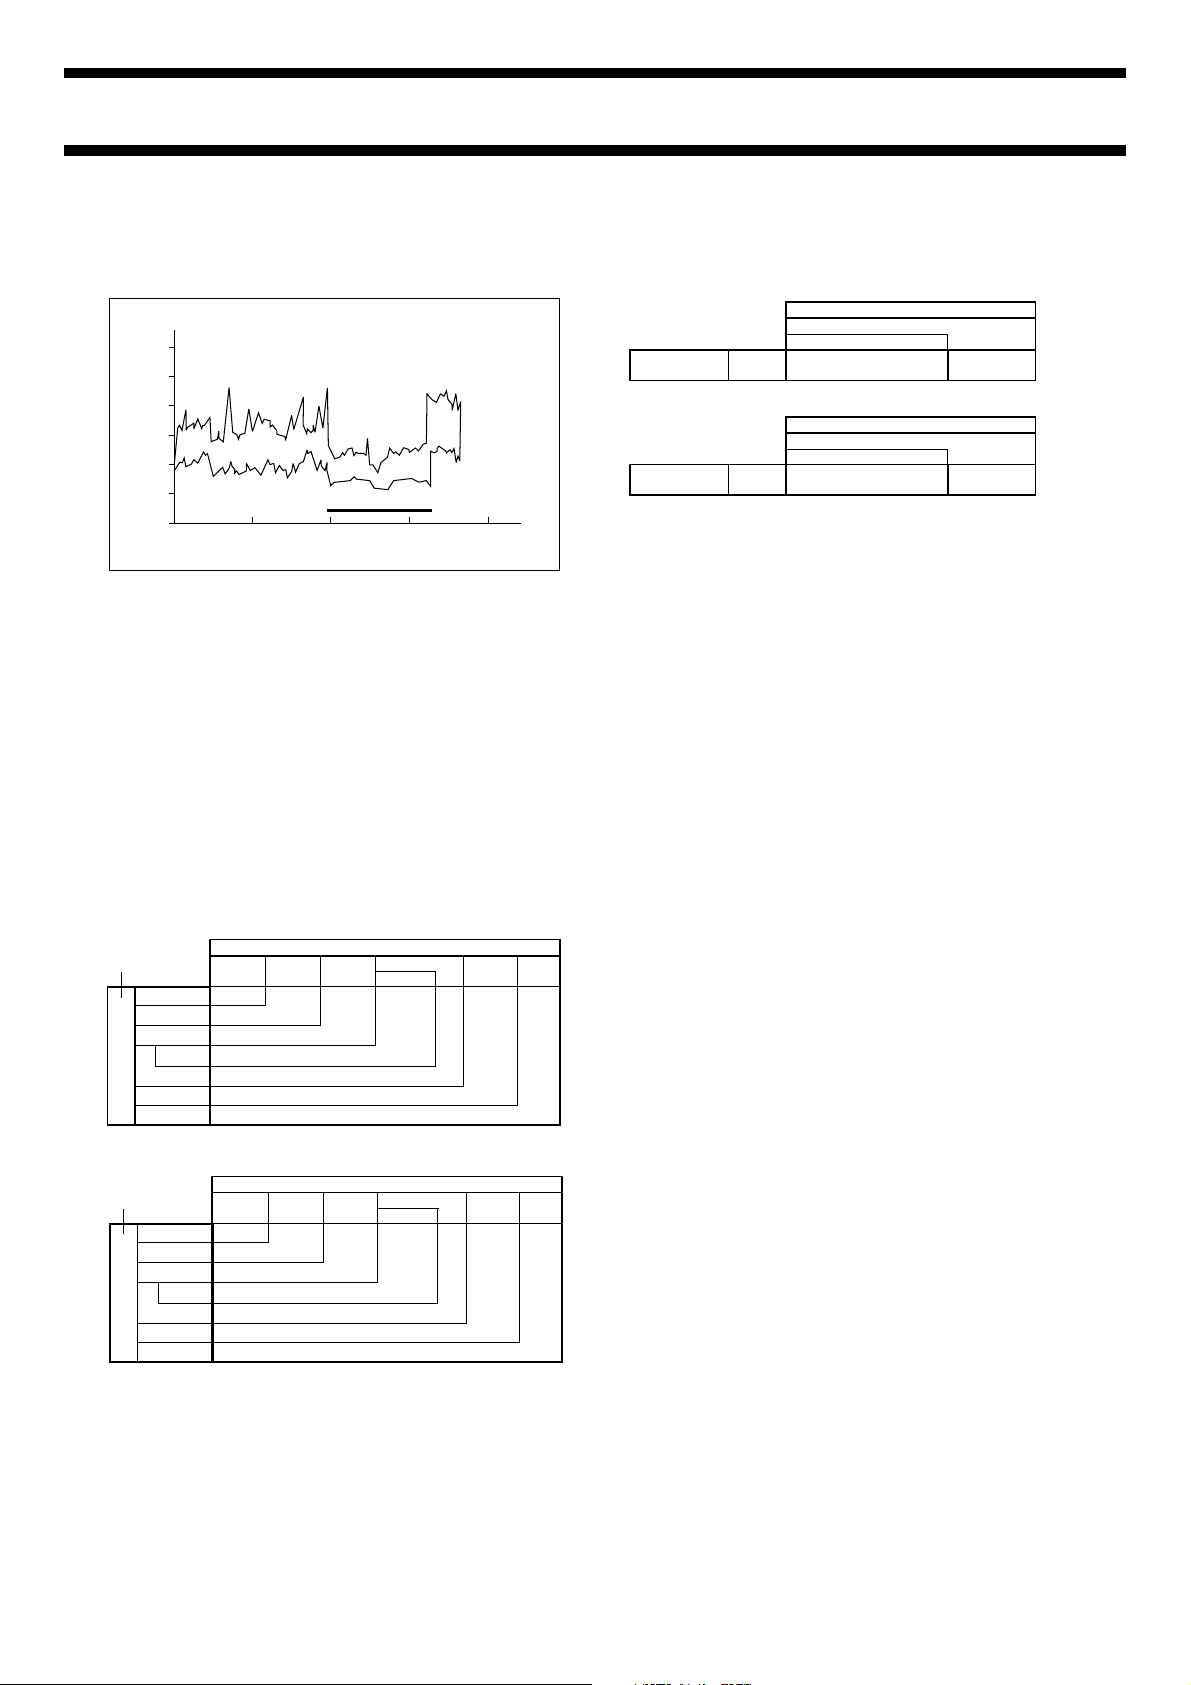
• Your blood pressure fluctuates throughout the day. Normally, it is at its
highest shortly after you awake in the morning, and it reaches its
lowest level some time while you are asleep. A fluctuation between
maximum and minimum systolic blood pressure levels of about
20mmHg is considered normal.
Pressure
kPa mmHg
21.3
160
18.6
140
16.0
120
13.3
100
10.6
80
8.0
60
5.3
40
12 18 24 6 12
Blood Pressure Fluctuation
During the Day (Example)
Bevan, Honour & Stott : Clin. Sci (1969)36,329-344
Sleeping
Time
The above is upper arm blood pressure data.
• A rise in blood pressure can be caused by physical exercise, drinking
coffee or tea, smoking, the need to urinate, and other factors.
• Blood pressure is also affected by your physical condition, as well as
stress due to your emotional state, worry, etc.
• A blood pressure reading can also be affected by your posture when
the reading is taken. Normally, your blood pressure will be lower if you
are sitting instead of standing.
• Temperature and humidity can also affect blood pressure. Normally,
winter blood pressure readings tend to be higher than summer
readings.
Definitions and Classification of Blood Pressure Levels
Though the general rule of thumb for normal systolic (maximum value)
blood pressure is your current age plus 90mmHg, this is not always
necessarily true. The following chart shows some general guidelines for
blood pressure values.
• The following tables show classifications for hypertension (high blood
pressure) according to the World Health Organization (WHO) and the
International Society on Hypertension (ISH) (1999).
Diastolic Blood
Pressure (mmHg)
Up to 80
80 to 84
85 to 89
90 to 94
90 to 99
100 to 109
110 or greater
Up to 120
Optimal
(target)
Systolic Blood Pressure (mmHg)
130 to 139
120 to 129
Normal
High-Normal
Subgroup: Borderline
Grade 1 Hypertension (“mild”)
Grade 2 Hypertension (“moderate”)
Grade 3 Hypertension (“severe”)
140 to 159
140 to 149
160 to 179
180 or
greater
• When diastolic blood pressure is up to 90mmHg, systolic blood
pressure greater than 140mmHg is classified as Isolated Systolic
Hypertension, while systolic blood pressure within the range of 140 to
149mmHg is classified as Subgroup: Borderline Isolated Systolic
Hypertension.
Systolic Blood Pressure (mmHg)
140 or greater
Diastolic Blood
Pressure (mmHg)
Diastolic Blood
Pressure (kPa)
140 to 149
Borderline: Subgroup Isolated
Up to 90
Systolic Hypertension
18.6 or greater
18.6 to 19.8
Borderline: Subgroup Isolated
Up to 12.0
Systolic Hypertension
Isolated Systolic
Hypertension
Systolic Blood Pressure (kPa)
Isolated Systolic
Hypertension
Why is high blood pressure a cause for concern?
As its name implies, high blood pressure causes arteries to be exposed
to high pressure, and can cause lesions in the arteries that supply blood
to brain, heart, liver, and other vital organs. Left untreated, high blood
pressure can lead to loss of heart function, hardening of the arteries, and
a host of other problems like those described below.
• Aneurysms in the brain’s blood vessels, which can lead to stroke
• Enlargement of the heart, which can lead to heart failure
• Narrowing of blood vessels in the kidney, which can lead to kidney
failure
• Premature hardening of the arteries throughout the body, especially
those in the heart, brain, and kidneys, which can lead to heart attack,
stroke, or kidney failure
What does low blood pressure indicate?
Some symptoms of low blood pressure are chronic fatigue, dizziness,
shoulder stiffness, palpitation of the heart, and shortness of breath. Be
sure to contact your physician if you suffer from any of these symptoms.
Monitoring Blood Pressure Levels on Your Own
When is the best time to take readings?
You should take readings during which you are most relaxed and stable.
It is also important to take readings at the same times everyday, every
morning, noon, and night, for example. Of course, you can also take
readings at any other time you wish, but the important thing is to take
blood pressure readings an integral part of your overall health control
activities.
Be sure to keep records.
Your blood pressure will fluctuate with changes in your physical
condition and even the weather. Because of this, you should keep a
record that includes not only measured values, but also information
about your physical condition and surrounding conditions. Try making it
your goal to build an entire year of daily records.
• You can make copies of the “Blood Pressure Record” at the back of
this manual and use them to keep track of changes in your blood
pressure and pulse measurements.
Diastolic Blood
Pressure (kPa)
Up to 10.6
10.6 to 11.2
11.3 to 11.8
12.0 to 12.5
12.0 to 13.2
13.3 to 14.5
14.6 or greater
16.0 to 17.2
Up to 16.0
Optimal
(target)
Normal
High-Normal
Subgroup: Borderline
Grade 1 Hypertension (“mild”)
Grade 2 Hypertension (“moderate”)
Systolic Blood Pressure (kPa)
17.3 to 18.5
Grade 3 Hypertension (“severe”)
18.6 to 21.2
18.6 to 19.8
21.3 to 23.8
24.0 or
greater
Is there anything I should do before taking a reading?
First of all, try to relax. Take five or six deep, cleansing breaths. Also,
note the following pointers.
Take readings in a quiet location.
Select a comfortable location that is free of loud noise and vibration, and
is neither overly hot nor cold. A temperature of about 20°C is best.
Take readings while you are calm.
Avoid times when you are worried or otherwise emotionally upset, and
after eating, exercise, or drinking coffee.
Maintain good posture during readings.
Keep your arm and wrist at about the same height as your heart. It is
also important to be free if tension.
Take readings at the same time everyday.
Remember that blood pressure is constantly changing. Try to take your
readings at the same time each day.
Page 3
BP-1MY-3
Why are values produced by readings I take at home
different from values produced when my doctor takes
readings?
Slight tension caused by a visit to the doctor or a hospital can cause
blood pressure readings taken there to be a bit higher. This, of course,
assumes that you are following the correct procedures when taking your
readings at home.
It could be due to a condition called “white-coat hypertension.”
“White-coat hypertension” is a condition caused by the atmosphere that
is present in a hospital. It is an emotional condition, and does not
indicate a physical problem. It is important to be relaxed while taking a
blood pressure reading.
Controlling Blood Pressure
Daily Life
How you live your daily life is an important factor in achieving good blood
pressure. Improved living habits and patterns can actually decrease the
chance of high blood pressure. The first step on the road to proper living
is eliminating overexertion and stress.
The following are some proven tips for developing good living habits and
enjoying the benefits of good blood pressure.
• Reduce salt intake.
• Go to bed early and get up early.
• Eat regular meals every morning, noon, and night.
• Get enough sleep.
• Set aside enough time for yourself in order to get some stress relief.
• Try to achieve a balance between your mental and physical well
being.
Exercise
Proper exercise plays an important role in controlling blood pressure.
The accent here is on the word “proper,” because the wrong type of
exercise can actually do more harm than good. Aerobic exercise, such
as walking at a comfortable pace, is the best for controlling blood
pressure.
Healthy Walking Tips
Keep your gaze on the ground
relatively far in front of you.
Keep your chin in.
Keep your head upright and
pointed straight ahead.
Keep your chest out
and your back straight.
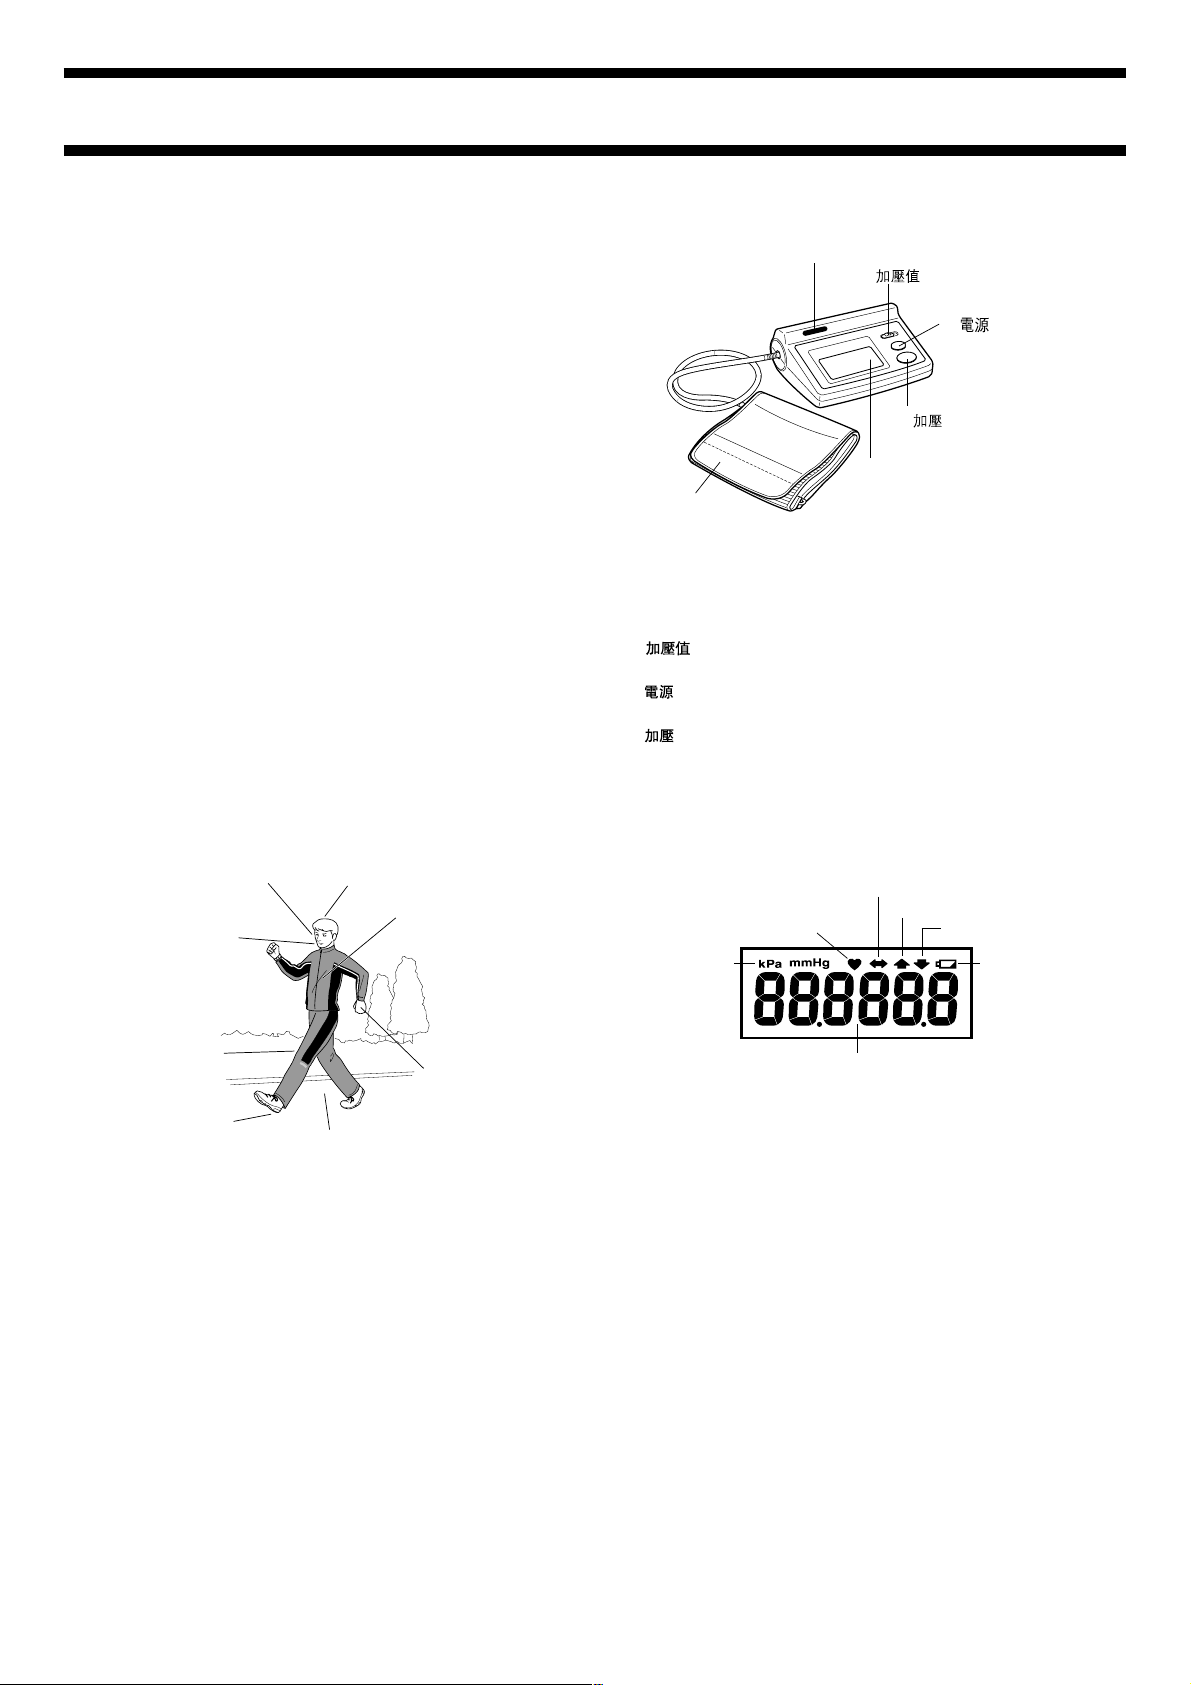
GENERAL GUIDE
1 Infrared Port
2
Cuff
1Infrared Port
This port is used when transferring data from the Base Unit to the
Watch.
• See the User’s Guide that comes with the Watch for information about
setting basic data.
2
Use this switch to set the maximum estimated systolic pressure value.
3
Press this button to toggle power on and off.
4
Press this button to start measurement.
Pressing this button while measurement is in progress stops the
measurement.
5Display
The display shows blood pressure and pulse rate values.
Switch
Button
Button
Display Contents
2 Data communication indicator
1 Pulse indicator
7
Blood pressure
unit
Switch
4
5 Display
3 Inflation indicator
3
Button
Button
4 Deflation indicator
5 Low battery
indicator
Walk briskly in
a straight line.
Lower your foot to
the ground heel first.
Other things to remember when exercising!
• Keep it brisk, but don’t overdo it!
• Don’t forget to warm up and cool down.
• Be sure to drink water to replenish lost fluids.
• Try to stick to indoor exercises on very hot or very cold days.
Important!
• Always consult with your physician before undertaking any physical
exercise program.
Take long strides.
Let your arms swing
forward and back.
6 Measured value
1Pulse indicator
Flashes when a pulse is detected.
Stops flashing and remains on the display as long as the pulse rate is
displayed after measurement is complete.
2Data communication indicator
Indicates that data is being sent to the Watch.
3Inflation indicator
Flashes when the cuff is being inflated.
4Deflation indicator
Flashes when the cuff is being deflated.
5Low battery indicator
Indicates that batteries are low.
Replace batteries as soon as possible after this indicator appears.
• This indicator also appears if batteries are loaded with the (+) and (–)
ends facing in the wrong directions.
6Measured value
Shows systolic and diastolic blood pressure values, and pulse rate (BPM).
7Blood pressure unit
The Base Unit can display blood pressure in units of kPa or mmHg. See
“BLOOD PRESSURE UNITS” for more information.
Page 4

BP-1MY-4
Sample Displays
kPa
Diastolic Blood Pressure
Systolic Blood Pressure
mmHg
Diastolic Blood Pressure
Systolic Blood Pressure
Pulse Rate
Pulse Rate
• Most of the display illustrations in this manual use kPa (the factory
default unit) as the blood pressure measurement unit.
BATTERIES
Power Requirements
• The Base Unit is powered by four AA-size batteries.
• Use of batteries recommended by CASIO or their equivalents is
recommended.
Important!
• Replace batteries as soon as possible after the low battery indicator
( ) appears on the display.
• Make sure that the (+) and (–) ends of the batteries are oriented
correctly when you load them.
• Never mix new batteries with old ones.
• Never mix batteries of different types.
• Be sure to remove the batteries from the Base Unit if you do not plan
to use it for a long time.
• The original batteries that come with the Base Unit are not
rechargeable. Never try to charge them.
• The original batteries that come with the Base Unit are loaded at the
factory before shipment. Because of time spend in transit and storage,
the original batteries may not provide the service life indicated below.
• Should batteries ever leak, immediately wipe the fluid from inside the
battery compartment, taking care not to get any on your skin.
• Keep batteries out of the reach of small children. If a battery is
accidentally swallowed, immediately contact a physician.
• Leaving old batteries in the Base Unit can cause unexpected
problems.
• Dispose of used batteries in accordance with the regulations and laws
in your particular country or area.
# Slide the battery compartment cover back into place to close it.
• If display contents appear abnormal after you load batteries,
remove the batteries, wait for about two or three seconds, and then
reload them.
AFFIXING THE CUFF TO YOUR ARM
• Affix the cuff to your arm so it is in contact with bare skin.
• If you are wearing clothing made of thick material (such as a sweater),
it is better to remove the thick clothing than to roll up the sleeve.
! Insert the plug of the cuff into the Base
Unit.
• Make sure you insert the plug as far
as it will go.
Plug
Connector
@ Widen the opening of the cuff and then slip it over your left arm.
The cuff material should form a
loop, with the end of the material
passing through the oblong metal
ring. Pull the end of the material
through the ring so the cuff is
snug on your arm, double it back
against the ring, and secure it in
place with the fastening tape.
If the end of the material is
accidentally pulled out from
the metal ring, insert it back
in, making sure that the
fastening tape is facing
outward.
• Always have the cuff on your left arm whenever taking readings for
the purpose of setting the Watch’s basic data. If you are simply
taking readings with the Base Unit only, however, you can have the
cuff on your right arm.
# Pull on the end of the cuff material until the cuff is snug on your arm,
and use the fastening tape to secure it in place.
There should be about one
or two centimeters between
the edge of the cuff and
your elbow joint.
• The cuff should not be
touching your elbow joint.
Your hand should be open,
palm facing upwards.
Position the cuff so the air tube is
located at the top of your biceps.
• The tube should align
approximately with your middle
finger.
Battery Life
You can expect approximately 300 measurements from a fresh set of
AA-size alkaline batteries (LR6).
Loading Batteries
! Pressing down on the ▼ part of the battery compartment cover, slide
the cover in the direction indicated by the arrow.
• Remove the old batteries, if there are any.
To openTo close
OPEN
@ Making sure that their (+) and (–) ends are oriented correctly, load the
new batteries into the battery compartment.
Press here and slide.
Tighten the cuff until
all of the open space
between your arm and
the cuff is eliminated.
• Take care that you
do not over tighten
the cuff.
Fastening tape
• Leaving space between the cuff and your arm, can cause over
inflation, and apply very strong pressure to your arm. It can also
interfere with proper measurement.
Page 5

BP-1MY-5
$ With your hand open and the palm facing upwards, place your elbow
on a table or other surface so the center of the cuff is at about height
as your heart.
Center of cuff
• If the center of the cuff is too low, try putting a towel or cushion
under your elbow.
• Make sure that the air tube does not pass under your arm.
Yes! No!
BLOOD PRESSURE UNITS
The Base Unit can display blood pressure in units of kPa or mmHg. In
the case of kPa, the Base Unit actually measures using mmHg units and
then converts the results to kPa.
• The initial factory default blood pressure unit is kPa. The unit also
returns to kPa whenever you replace Base Unit batteries.
To specify the blood pressure unit
While the Base Unit is turned off, hold
down its
seconds, and then release the button.
• The Base Unit will perform its zero reset
procedure and then display
the standby screen, with the currently
selected blood pressure unit
indicated at the top.
button for about three
@ Press the button to turn on the Base Unit.
• Release the
hold the
• Pressing the
button right away after you depress it. Do not
button down for more than about a second.
button again turns off power.
All segments appear momentarily.
▲
Pressure zero-setting in progress.
Flashes
Measurement will not start if
you press the
this indicator is flashing.
# Press the button.
• This starts inflation of the cuff and displays the pressure value.
• During measurement, the indicator flashes on the display to
indicate that the pulse is being detected. The
flashing and remains on the display as long as the pulse rate is
displayed after measurement is complete.
$ After measurement is complete, the displays alternates between the
systolic and diastolic blood pressure values, and the pulse rate.
Systolic Blood Pressure Diastolic Blood Pressure
button while
▲
Standby
Measurement starting
indicator stops
kPa
▲
• The above procedure toggles the blood pressure unit between kPa
and mmHg.
• The blood pressure unit you select remains selected even if you turn
off the Base Unit.
mmHg
▲
TAKING A BLOOD PRESSURE READING
• Make sure you are relaxed before starting the measurement procedure.
• Do not move your arm or the rest of your body while a measurement
is in progress.
! Put the cuff on your arm and set the
upper limit of your systolic (high) blood pressure value.
• If you think your systolic blood pressure is around 17.3kPa (130mmHg)
you should select 20.0kPa (150mmHg) as the
switch to the estimated
setting.
▲
▲
Pulse Rate
kPa mmHg
% Press the
• An Auto Power Off feature automatically turns off the Base Unit if
you leave it on for about three minutes.
Note
• Avoid taking too many consecutive measurements with the Base Unit.
Pressure from the Base Unit cuff can cut off circulation in your arm
and cause incorrect readings. Remove the cuff and wait a while before
taking another reading.
• Correct readings are impossible when diastolic blood pressure is
greater than 180mmHg.
button to turn off the Base Unit.
▲
▲
Re-inflation
If the Base Unit determines that pressure in insufficient during a
measurement operation, it automatically re-inflates the cuff. Re-inflation
may also be performed if you move or talk, or if there is excessive noise
or another type of disturbance during a measurement procedure.
• Note that positioning the cuff so its air tube underneath your arm
(especially when your arm is pressing down on the tube) can cause
noise. This can lead to re-inflate or even make proper measurement
impossible.
Page 6

BP-1MY-6
Stopping a Measurement
To stop an ongoing measurement operation, press the button. This
causes the Base Unit to deflate the cuff and then go into standby.
Pressing the
button also causes the Base Unit to deflate the cuff
and turn off.
Recording Blood Pressure Readings
You can make copies of the “Blood Pressure Record” at the back of this
manual and use them to keep track of changes in your blood pressure
and pulse measurements.
ERROR MESSAGES
When any of the errors described below occurs, the Base Unit deflates the
cuff and then waits for further button operation or data communication with
the Watch.
Message Cause Action
Err 01
Err 02
Err 03
Err 04
Err 44.0
(kPa)
Err 330
(mmHg)
• The Base Unit cannot
detect a suitable pulse.
setting is too low.
•
• Noise due to body
movement.
• The cuff is not connected
to the Base Unit properly,
or a hole in the cuff.
• The cuff is too loose on the
arm.
value is too low.
•
• Noise due to body
movement.
• The cuff is too loose on the
arm.
• Increase in cuff pressure
due to body movement.
• Do not move or speak
while measurement is in
progress.
• Make sure the air tube is
not under your arm.
• Check the air tube connection to the Base Unit.
• Tighten the cuff so there is
no space between your
arm and the cuff.
• If there is air leaking from
the cuff because it is old or
it has a hole in it, replace
the cuff with a new one.
• Do not move or speak
while measurement is in
progress.
• Make sure the air tube is
not under your arm.
• Tighten the cuff so there is
no space between your
arm and the cuff.
• Take care so no pressure
is applied to the cuff while
measurement is in
progress.
PRECAUTIONS DURING USE
• Do not leave the Base Unit in areas exposed to direct sunlight or near
a heater.
• Do not expose the Base Unit to severe vibration or impact.
• To clean the exterior of the Base Unit, wipe it with a dry cloth or with a
cloth moistened with a weak solution of water and a mild neutral
detergent. Wring all excess liquid from the cloth before wiping. Never
use thinner, benzene, or other volatile agents for cleaning. Doing so
can discolor or damage the case.
• Do not submerse the cuff in water or launder it.
• Be sure to remove the batteries from the Base Unit if you do not plan
to use it for a long time.
CASIO COMPUTER CO., LTD. assumes no responsibility for any
loss, or any claims by third parties that may arise through the
use of the Base Unit.
The appearance of the low battery indicator shown below causes the
Base Unit to cancel any ongoing measurement or communication
operation and wait for further button operation.
Indicator Cause Action
• Battery power is low. Replace the Base Unit
batteries.
TROUBLESHOOTING
Check the points noted below whenever you experience operational
problems with the Base Unit.
Problem What to Check and What to Do
Nothing happens when
you press the
button.
Inflation is performed, but
the cuff does not inflate.
If the actions recommended above do not correct your problem, the
Base Unit itself may be malfunctioning. In this case, contact the store or
dealer where you purchased the Base Unit.
• Is battery power low?
→ Replace the batteries with a full set of
new ones.
• Are batteries loaded correctly?
→ Check to make sure that batteries are
loaded correctly.
• Is the cuff’s plug connected correctly to the
Base Unit?
→ Check the plug for proper connection.
• Is there a hole in the cuff?
→ Contact the store or dealer where you
purchased the Base Unit about replacing
the cuff.
Page 7

Blood Pressure Record
BP-1MY-7
Make extra copies for future use.
Name:
Date:
Notes:
Example
Systolic
Values
Diastolic
Values
Date
12345678 9 10
Time
250
240
230
220
210
200
190
180
170
160
150
140
130
120
110
100
90
BLOOD PRESSURE (Unit: mmHg)
80
70
60
50
40
Pulse
Notes
11 12 13 14 15 16 17 18 19 20 21 22 23 24 25 26 27 28 29 30 31
Blood Pressure Record
Name:
Date:
Notes:
Example
Systolic
Values
Diastolic
Values
12345678 9 10
Date
Time
33.0
32.0
31.0
30.0
29.0
28.0
27.0
26.0
25.0
24.0
23.0
22.0
21.0
20.0
19.0
18.0
17.0
16.0
15.0
14.0
BLOOD PRESSURE (Unit: kPa)
13.0
12.0
11.0
10.0
9.0
8.0
7.0
6.0
Pulse
Notes
11 12 13 14 15 16 17 18 19 20 21 22 23 24 25 26 27 28 29 30 31
 Loading...