

Page 1
Module No. 1570
A L M
S I G
A
LT
I
RECALL
AUTO
MANUALA
L
A-LIGHT
A L M
S I G
A
LT
I
RECALL
AUTO
MANUALA
L
A-LIGHT
A L M
S I G
A LT I
RECALL
AUTO
MANUALA
L
A-LIGHT
A L M
S I G
A
LT
I
RECALL
AUTO
MANUALA
L
A-LIGHT
A L M
S I G
A
LT
I
RECALL
AUTO
MANUALA
L
A-LIGHT
A L M
S I G
A
LT
I
RECALL
AUTO
MANUALA
L
A-LIGHT
A L M
S I G
A
LT
I
RECALL
AUTO
MANUALA
L
A-LIGHT
A L M
S I G
A
LT
I
RECALL
AUTO
MANUALA
L
A-LIGHT
1570-1
GENERAL GUIDE
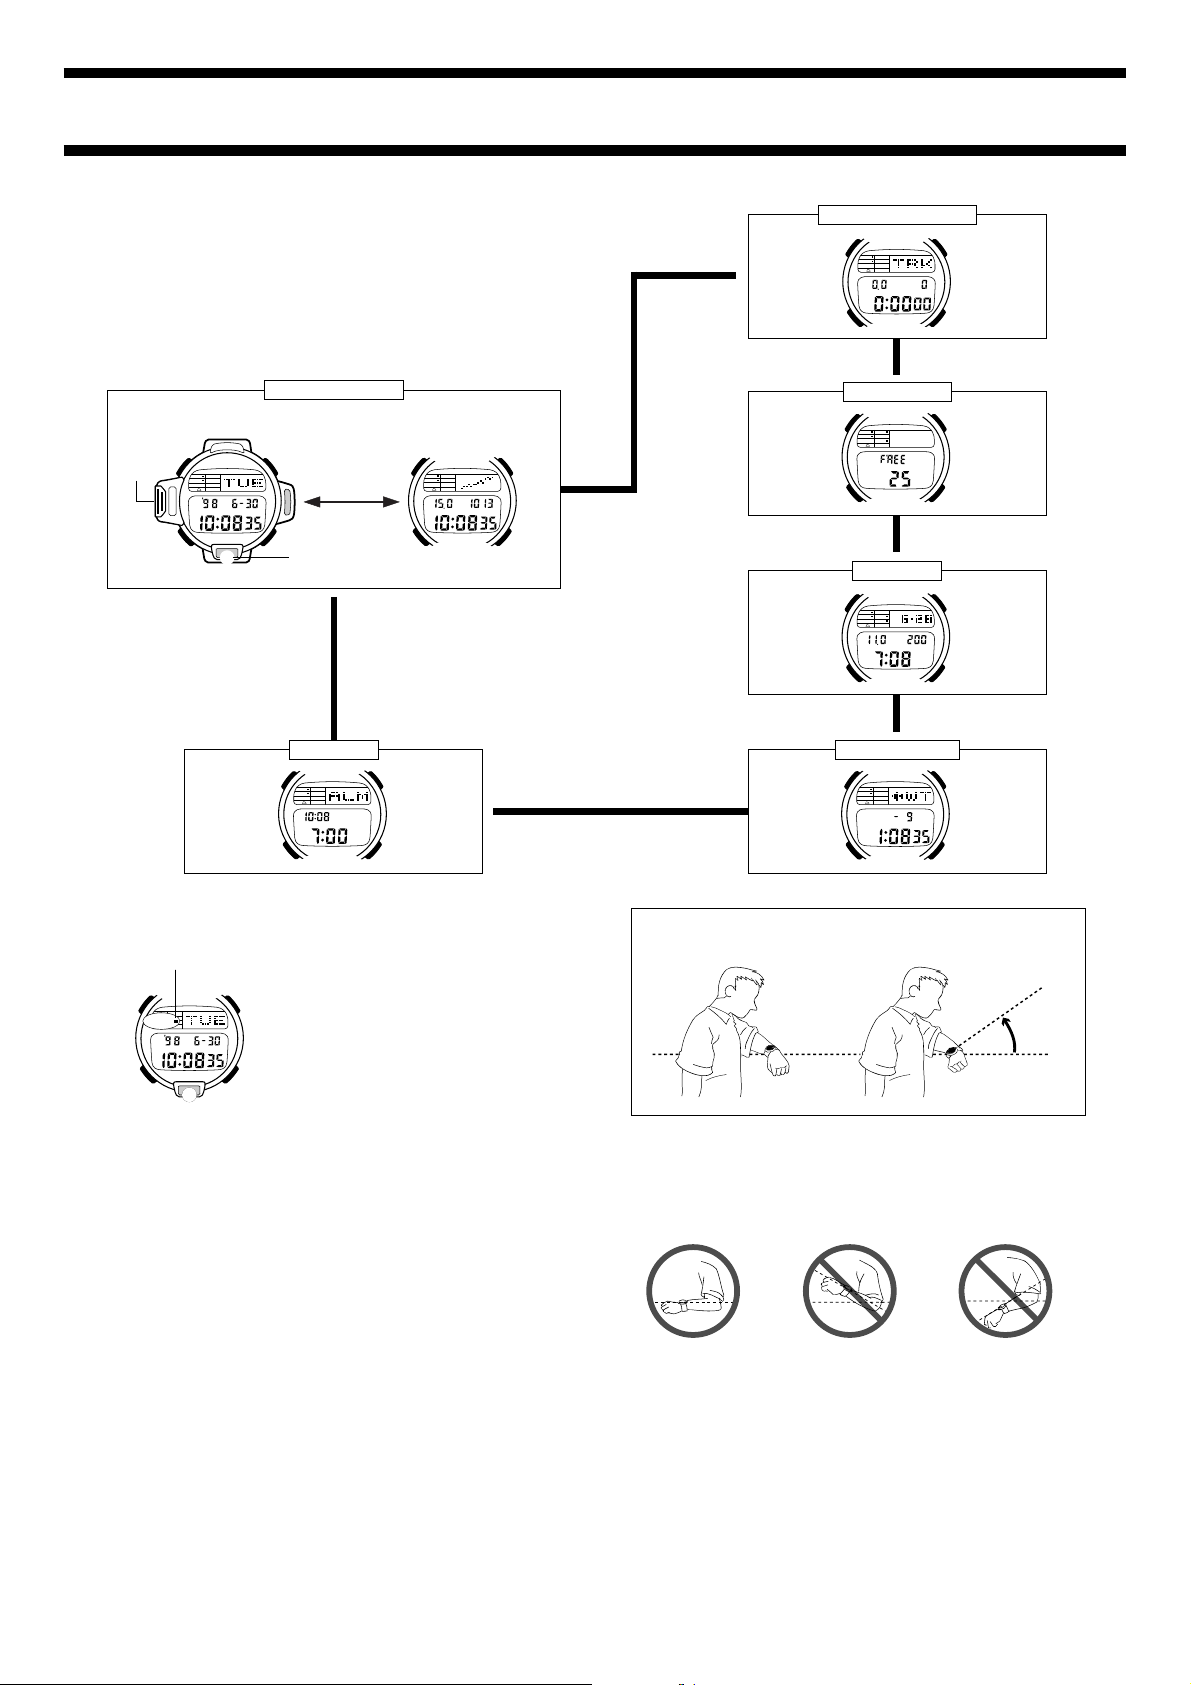
• Press C to change from mode to mode.
• Hold down C for one or two seconds in any mode to switch back to the
Timekeeping Mode.
Timekeeping Mode
Sensor
(Timekeeping)
A
P
C
L
B
D
(Light)
Alarm Mode
Press D.
▲
(Barometric Pressure/
Temperature)
hPa
mb
˚C
P
Trekking Counter Mode
▼
km
STEP
▲
Altimeter Mode
▲
Recall Mode
m
˚C
A
▲
World Time Mode
▼
A
BACKLIGHT
Auto light switch on indicator
A
A
A-LIGHT
P
C
C
L
L
• The illumination provided by the backlight may be hard to see when viewed
under direct sunlight.
• The watch will emit an audible sound whenever the display is illuminated.
This is caused by a transformer that vibrates when the EL panel lights up. It
does not indicate malfunction of the watch.
• The backlight automatically turns off whenever an alarm sounds.
To manually turn on the backlight
In any mode, press L to illuminate the display for about two seconds.
• The above operation turns on the backlight regardless of the current auto
light switch setting.
About the Auto Light Switch
Turning on the auto light switch causes the backlight to turn on whenever you
position your wrist as described below.
• Avoid wearing the watch on the inside of your wrist. Doing so causes the
auto light switch to operate when it is not needed, which shortens battery
life.
The backlight uses an EL (electro-luminescent)
panel that causes the entire display to glow for
easy reading in the dark. The watch’s auto light
B
switch automatically turns on the backlight
when you angle the watch towards your face.
• The auto light switch must be turned on
(indicated by the auto light switch on
indicator) for it to operate.
D
D
Note
• The electro-luminescent panel loses
illuminating power after very long use.
P
Moving the watch to a position that is parallel to the ground and then tilting
it towards you more than 40 degrees causes the backlight to light.
Parallel to
ground
• The backlight turns off in about two seconds, even if you keep the watch
pointed towards your face.
• The backlight may not light if the face of the watch is more than 15 degrees
off the parallel as shown below. Make sure that the back of your hand is
parallel to the ground.
Parallel to ground
• Static electricity or magnetic force can interfere with proper operation of the
auto light switch. If the backlight does not light, try moving the watch back to
the starting position (parallel with the ground) and then tilt it back toward
you again. If this does not work, drop your arm all the way down so it hangs
at your side, and then bring it back up again.
• Under certain conditions the backlight may not light until about one second
or less after turn the face of the watch towards you. This does not
necessarily indicate malfunction of the backlight.
More than 15 degrees
too high
More than 15 degrees
too low
More
than
40°
Page 2
1570-2
A L M
S I G
A
LT
I
RECALL
AUTO
MANUALA
L
A-LIGHT
A L M
S I G
A
LT
I
RECALL
AUTO
MANUALA
L
A-LIGHT
A L M
S I G
A LT I
RECALL
AUTO
MANUALA
L
A-LIGHT
A L M
S I G
A
LT
I
RECALL
AUTO
MANUALA
L
A-LIGHT
To turn the auto light switch on and off
In the Timekeeping Mode, hold down D for one second to turn the auto light
switch on (A-LIGHT
• In order to protect against running down the battery, the auto light switch is
automatically turned off approximately two or three hours after you turn it
on. Repeat the above procedure to turn the auto light switch back on if you
want.
• The
mark next to A-LIGHT is on the display in all modes while the auto
light switch is turned on.
Warning!
• Never try to read your watch when mountain climbing or hiking in
areas that are dark or in areas with poor footing. Doing so is
dangerous and can result in serious personal injury.
• Never try to read your watch when running where there is danger of
accidents, especially in locations where there might be vehicular or
pedestrian traffic. Doing so is dangerous and can result in serious
personal injury.
• Never try to read your watch when riding on a bicycle or when
operating a motorcycle or any other motor vehicle. Doing so is
dangerous and can result in a traffic accident and serious personal
injury.
• When you are wearing the watch, make sure that its auto light switch
is turned off before riding on a bicycle or operating a motorcycle or
any other motor vehicle. Sudden and unintended operation of the auto
light switch can create a distraction, which can result in a traffic
accident and serious personal injury.
) and off (A-LIGHT).
CHANGING THE MEASUREMENT UNITS
You can change the measured values displayed by the watch between the
following units.
Altitude: meters (m)
Temperatures: Celsius (°C)
Barometric Pressure: hecto-pascals/millibars (hPa/mb)
Some countries call this unit hecto-pascal (hPa), while other countries call it
*
millibars (mb). It really makes no difference, because 1 hPa = 1 mb. In this
manual, we will refer to hPa/mb or hPa (mb).
Important!
• Certain measurement functions are automatically terminated when you
change the measurement units. Be sure that you perform this operation
before starting actual measurements.
• Changing the altitude unit of measurement automatically switches the
altitude alarm off.
• Changing the barometric pressure unit of measurement automatically
restarts the barometric pressure graph from a new value.
• Changing any of the units of measurement immediately starts to display
newly measured data in the unit you specify. It also affects the unit of
measurement for any data already stored in memory.
To change the measurement units
A
C
↔ feet (ft)
↔ Fahrenheit (°F)
↔ inchesHg (inHg)
*
1. In the Timekeeping Mode, press D until
B
hPa
mb
˚C
D
the Barometric Pressure/Temperature
screen appears.
2. Hold down A until
temperature value) appears flashing in the
display. The data on the display is flashing
because it is
3. Press C to change the selection in the
following sequence.
selected
OFF (or the
.
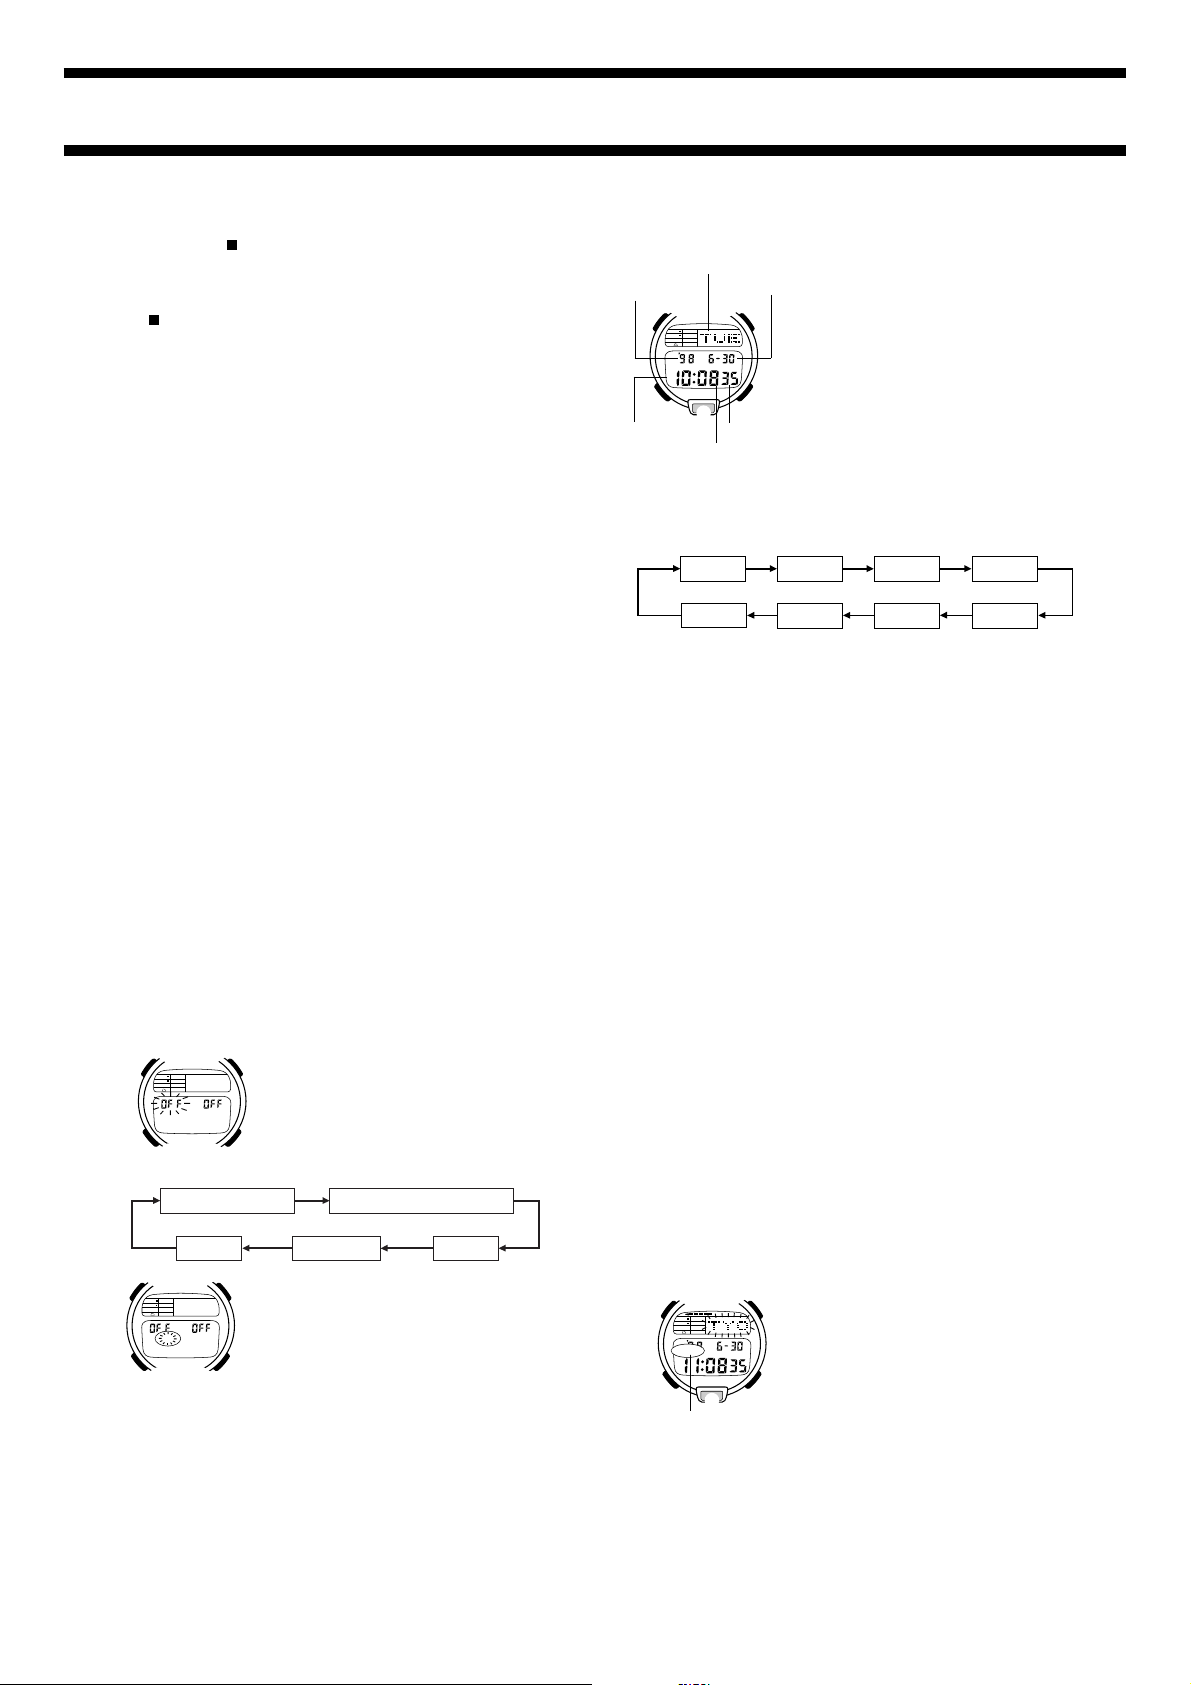
TIMEKEEPING FUNCTION
In addition to time and date settings, the
Day of week
Year
Month – Day
A
P
C
PM indicator
L
D
Seconds
Hour : Minutes
• At this time, the city code currently set for the Timekeeping Mode appears
in the upper part of the display in place of the day of the week.
3. Press C to change the selection in the following sequence.
Seconds City Code
CNT
• See “Adjusting the display contrast” for details on using the CNT (contrast)
setting.
4. While the seconds digits are selected (flashing), press D to reset the
seconds to
• If you press D while the seconds count is in the range of 30 to 59, the
seconds are reset to
count is in the range of 00 to 29, the minutes count is unchanged.
• With the 12-hour format, the P (PM) indicator appears to the left of the hour
digits for times in the range of noon to 11:59 pm and the A (AM) indicator
appears to the left of the hour digits for times in the range of midnight to
11:59 am.
• The 24-hour format is indicated by 24 on the display. Times are shown in
the range of 00:00 to 23:59.
5. Press C until the city code is flashing on the display.
6. Use B and D to scroll through the city codes until you find the one you
want to set as your home city.
• D scrolls forward, while B scrolls back through the city codes. Holding
down either button scrolls through the city codes at high speed.
• See the “CITY CODE TABLE” for a complete list of available codes.
7. Press C until the hour digits are flashing on display.
8. Press D to increase the setting or B to decrease it. Holding down either
button changes the setting at high speed.
9. Repeat steps 7 and 8 to set the minutes, year, month, and day.
10.After you make the settings you want, press A to return to the
Timekeeping Mode (Timekeeping screen).
• The day of the week is automatically set in accordance with the date.
• The date can be set within the range of January 1, 1995 to December 31,
2039.
• Changing the Timekeeping Mode’s city code also causes the time to
change to the current time in time zone where the city is located.
• If you do not operate any button for a few minutes while a selection is
flashing, the flashing stops and the watch goes back to the Timekeeping
Mode automatically.
• Holding down B while in the Timekeeping Mode (Timekeeping screen)
displays the currently selected city code in place of the day of the week.
00 and L to toggle between the 12-hour and 24-hour formats.
Timekeeping Mode also lets you adjust the
contrast of the display. Timekeeping Mode time
is linked with World Time Mode time, so be
sure to select the city code for your current
B
location before setting the time in the
Timekeeping Mode.
Setting the city code, time, and
date
1. In the Timekeeping Mode, press D until
the Timekeeping screen appears.
2. Hold down A until the seconds digits starts
to flash on the display. The seconds digits
flash because they are
Hour Minutes
Day
Month
00 and 1 is added to the minutes. If the seconds
selected
Year
.
Temperature Calibration Barometric Pressure Calibration
Switching between standard time and daylight saving
time
m/ft
A
˚C
C
B
hPa
mb
D
hPa(mb)/inHg
4. Use C to select the unit (°C/°F,
hPa(mb)/inHg or m/ft) you want.
5. Press B or D to select the currently
selected unit.
6. After making your selection, press A to
return to the Timekeeping Mode (Pressure/
Temperature screen).
°C/°F
Daylight Saving Time (DST), which is also sometimes called “summer time,”
advances the time one hour, as is the custom in some areas during the
summer.
1. In the Timekeeping Mode, press D until
L
B
D
the Timekeeping screen appears.
2. Hold down A until the seconds digits starts
to flash on the display. The seconds digits
flash because they are
3. Press C until the city code is flashing on
the display.
4. Press L to toggle Daylight Saving Time on
(DST displayed) and off (DST not
displayed).
selected
.
A
DST
P
C
DST indicator
5. After you make the settings you want, press A to return to the
Timekeeping Mode (Timekeeping screen).
• The DST indicator appears on the display to indicate that daylight saving
time is turned on.
Page 3
1570-3
A L M
S I G
A
LT
I
RECALL
AUTO
MANUALA
L
A-LIGHT
A L M
S I G
A
LT
I
RECALL
AUTO
MANUALA
L
A-LIGHT
A L M
S I G
A
LT
I
RECALL
AUTO
MANUALA
L
A-LIGHT
Adjusting the display contrast
Graphic area
A
P
C
4. Pressing D makes the images on the display darker, while B makes
them lighter.
• Display contrast can be adjusted to one of six levels. Two dots in the
graphic area indicate the lightest contrast setting (Level 1), while 12 dots
indicates the darkest setting (Level 6).
5. After you make the settings you want, press A to return to the
Timekeeping Mode (Timekeeping screen).
1. In the Timekeeping Mode, press D until
the Timekeeping screen appears.
2. Hold down A until the seconds digits starts
B
D
to flash on the display. The seconds digits
flash because they are
• At this time, dots appear in the graphic area
of the display to indicate the current contrast
setting. Every two dots represent one
contrast level.
3. Press C seven times until the
indicator appears on the display.
selected
.
CNT
BAROMETER FUNCTIONS
This watch uses a pressure sensor to measure air pressure. This sensor can
be calibrated.
Important!
The barometer that is built into this watch measures changes in air pressure,
which you can then apply to your own weather predictions. It is not intended
for use as a precision instrument in official weather prediction or reporting
applications.
Example barometer applications
• Before going mountain climbing, you can take readings to find out the
probable upcoming weather.
• You can predict the weather for golf or other outdoor activities.
About barometric measurements
The barometer automatically takes measurements every two hours (starting
from midnight), regardless of what mode you are in. Barometric pressure
measurements are also taken every five seconds for three minutes after you
display the Timekeeping Mode’s Barometric pressure/Temperature screen.
The last measurement result, along with the current temperature is displayed
in the Barometric pressure/Temperature screen.
Understanding the barometer screen
1. Use C to enter the Timekeeping Mode.
2. Press D to display the Barometric Pressure/Temperature screen.
• If you do not press any button for 10 or 11 hours, the watch automatically
returns to the Timekeeping screen.
A
Temperature
˚C
P
C
(Barometric Pressure/Temperature)
1 The barometric pressure graph shows the barometric readings for the
*
past 26 hours. The flashing point on the right of the display is the point for
the last measurement.
2 The display shows “– – – – hPa/mb” (or inHg) if a measured value falls
*
outside the range of 460 hPa/mb to 1100 hPa/mb (13.55 inHg to 32.45
inHg). The normal display will return as soon as the pressure returns
within the allowable range.
Using the barometric pressure graph
Changes in barometric pressure are caused by changes in the weather and
temperature. The following shows how to interpret the data that appears on
the barometric pressure graph.
B
Barometric pressure graph
(Unit: 1 hPa(mb)/0.05 inHg)
hPa
mb
Last measurement
(updated every 2 hours)
D
A rising graph generally means
better weather.
2
*
Note that if there are sudden
changes in weather or temperature, the graph line of past
measurements may run off the top
or bottom of the display. The entire
graph will become visible once
barometric conditions stabilize.
The following conditions cause the barometric pressure measurement to be
skipped, with the corresponding point on the barometric pressure graph being
left blank.
• Barometric reading that is out of range (460 hPa/mb to 1100 hPa/mb or
13.55 inHg to 32.45 inHg)
• Sensor malfunction
• Dead battery
Not visible on display
Calibrating the barometric pressure measurement
The sensor of this watch is calibrated at the factory before shipment and
further adjustment is normally not required. If noticeable error is found in the
barometric pressure readings produced by the watch, you can adjust it to
correct the error.
Important!
Incorrectly calibrating the barometric pressure measurement of this watch can
result in incorrect readings. Compare the readings produced by the watch with
those of another reliable accurate barometer.
To calibrate the barometric pressure
1. In the Timekeeping Mode, use D to
A
˚C
C
• The
OFF indicator appears when the factory setting is being used for the
calibration.
4. Each press of D increases the displayed barometric pressure by 1 hPa/mb,
while pressing B decreases it. Holding down either button changes the
value at high speed.
• If you have selected inHg as your unit of measurement, the above
operations change the reading by 0.05 inHg.
• Pressing B and D at the same time returns to the
5. After calibrating the barometric pressure, press A to return to the
Barometric Pressure/Temperature screen.
• If you do not operate any button for a few minutes while the barometric
pressure digits are flashing, the flashing stops and the watch goes back to
the Barometric Pressure/Temperature screen.
1
*
A built-in temperature sensor measures temperature and shows the measured
value on the display. The thermometer can be calibrated.
Important!
Temperature measurements are affected by your body temperature (while you
are wearing the watch), direct sunlight, and moisture. To achieve a more
accurate temperature measurement, remove the watch from your wrist, place
it in a well ventilated location out of direct sunlight, and wipe off all moisture
from the case. It takes approximately 20 to 30 minutes for the case of the
watch to reach the actual surrounding temperature.
B
hPa
mb
D
THERMOMETER FUNCTIONS
display the barometric pressure and
temperature.
2. Hold down A until the display clears.
or the temperature value should be flashing
on the display.
3. Press C to show the barometric pressure
calibration display. At this time,
barometric pressure value should be
flashing on the display.
OFF
OFF or the
OFF display.
About temperature measurements
Temperature measurements are taken automatically every five minutes,
regardless of what mode the watch is in. Measured temperature values can be
viewed in the Timekeeping or Altimeter Mode. Temperature measurements
are taken every five seconds for the first three minutes after you display the
Timekeeping Mode’s Barometric Pressure/Temperature screen, or after you
enter the Altimeter Mode. After that, temperature measurements are taken
every five minutes.
• Temperature measurement data can be recalled along with altitude
measurement data.
A falling graph generally means
deteriorating weather.
Page 4

1570-4
A L M
S I G
A
LT
I
RECALL
AUTO
MANUALA
L
A-LIGHT
A L M
S I G
A
LT
I
RECALL
AUTO
MANUALA
L
A-LIGHT
A L M
S I G
A
LT
I
RECALL
AUTO
MANUALA
L
A-LIGHT
A L M
S I G
A
LT
I
RECALL
AUTO
MANUALA
L
A-LIGHT
A L M
S I G
A
LT
I
RECALL
AUTO
MANUALA
L
A-LIGHT
Understanding the temperature display
1. Use C to enter the Timekeeping Mode.
2. Press D to display the Barometric Pressure/Temperature screen.
• If you do not press any button for 10 or 11 hours, the watch automatically
returns to the Timekeeping screen.
B
hPa
mb
D
Temperature
A
C
˚C
P
(Barometric Pressure/Temperature)
• The display shows “– –.– °C” (or °F) if a measured value falls outside the
range of –20.0°C to 60.0°C (–4.0°F to 140.0°F). The normal display will
return as soon as the temperature returns within the allowable range.
• For details on viewing the temperature in the Altimeter Mode, see
“Understanding the altimeter display”.
Calibrating the temperature measurement
The temperature sensor of this watch is calibrated at the factory before
shipment and further adjustment is normally not required. If noticeable error is
found in the temperature readings produced by the watch, you can adjust it to
correct the error.
Important!
Incorrectly calibrating the temperature measurement of this watch can result in
incorrect readings. Carefully read the following before doing anything.
• Compare the readings produced by the watch with those of another reliable,
accurate thermometer.
• If adjustment is required, remove the watch from your wrist and wait for 20
or 30 minutes to give the temperature of the watch time to stabilize.
To calibrate the temperature
1. In the Timekeeping Mode, use D to
A
˚C
C
3. Each press of D increases the displayed temperature by 0.1°C while
pressing B decreases it. Holding down either button changes the value at
high speed.
• If you have selected Fahrenheit as your unit of measurement, the above
operations change the reading by 0.2°F.
• Pressing B and D at the same time returns to the
4. After calibrating the temperature, press A to return to the Barometric
Pressure/Temperature screen.
• If you do not operate any button for a few minutes while the temperature
digits are flashing, the flashing stops and the watch goes back to the
Barometric Pressure/Temperature screen.
B
hPa
mb
D
display the barometric pressure and
temperature.
2. Hold down A until the display clears.
or the temperature value should be flashing
on the display.
• The
OFF indicator appears when the factory
setting is being used for the calibration.
OFF
OFF display.
TREKKING COUNTER FUNCTIONS
Graphic area
Mode indicator
A
km
STEP
C
Elapsed time (hours,
minutes, seconds)
Distance
• Note that the accuracy of data measured by the trekking counter can be
affected when you are walking on sand or other soft ground, on a steep
upgrade, on a steep downgrade, or on stairs.
• Be sure to take care not to drop the watch while walking.
• To improve the accuracy of measured data, be sure to turn off the trekking
counter whenever you are taking a break or stop walking for any other
reason.
• Be sure to select a unit of measurement before using the trekking counter.
Metric Units: stride length = centimeters, distance = kilometers
Inch/Mile Units: stride length = inches, distance = miles
The trekking counter uses a vibration sensor to
count how many steps you take. It also records
the amount of time you spend walking. After
you input the length of your stride, it also
B
automatically calculates and displays the
distance you have covered.
Important!
• The watch must be hanging free in order for
D
Steps
the vibration sensor to work, so the trekking
counter cannot count the number of steps
you take if the watch is on your wrist. Be
sure to wear the watch on your waist.
Changing the trekking counter measurement units
1. Use C to enter the Trekking Counter
A
C
B
cm
km
D
Mode.
2. Hold down A until the stride length value
flashes on the display. The stride length
value flashes because it is
3. Press C to change the selection in the
following sequence.
selected
.
Measurement unitStride
Stride length
• When the measurement unit is selected, the currently set measurement unit
symbols (km/cm or mi/in) also flashes on the display.
4. Press B or D to toggle the measurement unit between metric units (km/
cm) and inch/mile units (mi/in).
5. After you are finished making the setting you want, press A to return to
the Trekking Counter Mode.
• If you do not operate any button for a few minutes while a selection is
flashing, the flashing stops and the watch goes back to the Trekking
Counter Mode automatically.
• Note that changing the units automatically clears the stride length setting.
This means that if you want to the trekking counter to calculate and display
the distance you cover, you must re-input your stride length whenever you
change the units.
Setting your stride length
1. In the Trekking Counter Mode, hold down
A
C
B
cm
D
A until the stride length value flashes on
the display.
2. Each press of D increases the value by 1,
while B decreases it. Holding down either
button changes the value at high speed.
• You can set a stride length in the range of 20
to 200 cm or 10 to 80 inches.
3. After you finish making the setting, press
A to return to the Trekking Counter Mode.
Using the trekking counter
1. Attach the watch correctly to your belt.
• See “BAND CLIP” for details. The procedure you should use depends on
the type of band (cloth, leather, metal) that comes with your watch.
2. Press D while in the Trekking Counter Mode to start the trekking counter
operation.
• Elapsed time, number of steps, and distance covered are all shown on the
display while the trekking counter is operating.
3. Press D to temporarily stop trekking counter operation.
• You can use D to stop and re-start trekking counter operation as many
times as you like. Each time you press D to re-start, the elapsed time,
number of steps and distance covered values start from point they were at
when you press D to stop trekking counter operation.
• The trekking counter operation continues internally even if you change to
another mode.
• If you change the stride length setting while a trekking counter operation is
in progress causes the trekking counter operation to pause. Pressing D
resumes the operation.
4. After you are finished using the trekking counter, press D to stop
operation and then press B to clear all of the values to zero.
• The trekking counter is not intended for use as an all-day pedometer.
Trekking counter operation requires considerable battery power, so be sure
to press D to stop its operation after you are through using it. Next, hold
down C for about two seconds to return to the Timekeeping Mode.
• To protect against prematurely running down the battery, trekking counter
operation turns off automatically and the watch emits a 2-second beep to
alert you if the trekking counter is left on for more than 24 hours. Note that
measured values up to the point that the trekking counter turns off are
retained, so you can start the next operation from the displayed values.
• While the trekking counter is operating, the graphic area of the display
indicates the number of steps you have taken. The first block flashes during
steps 0 through 999. At step 1,000, the first block stays on and the second
block flashes from steps 1,000 to 1,999. This continues block-by-block until
step 9,999. At step 10,000, the first block flashes and the process starts
again. The display below that the number of steps is in the range of 4,000 to
4,999 (or 14,000 to 14,999, 24,000 to 24,999, etc.).
Page 5

ALTIMETER FUNCTIONS
A L M
S I G
A
LT
I
RECALL
AUTO
MANUALA
L
A-LIGHT
A L M
S I G
A
LT
I
RECALL
AUTO
MANUALA
L
A-LIGHT
A L M
S I G
A
LT
I
RECALL
AUTO
MANUALA
L
A-LIGHT
A L M
S I G
A
LT
I
RECALL
AUTO
MANUALA
L
A-LIGHT
A L M
S I G
A
LT
I
RECALL
AUTO
MANUALA
L
A-LIGHT
A L M
S I G
A
LT
I
RECALL
AUTO
MANUALA
L
A-LIGHT
A built-in altimeter uses a pressure sensor to detect the current air pressure,
which is then used to estimate the current altitude in accordance with ISA
(International Standard Atmosphere) values for altitude and air pressure. If
you preset a reference altitude, the watch will also calculate the current
relative altitude based on your preset value. Altimeter functions also include
data storage memory and an altitude alarm.
Important!
• This watch estimates altitude based on air pressure. This means that
altitude readings for the same location may vary if air pressure changes.
• Sudden changes in the weather make it impossible to produce accurate
altitude readings.
• This watch employs a semiconductor pressure sensor, which is affected by
temperature changes. When taking altitude measurements, be sure to do
so while ensuring that the watch is not exposed to temperature changes.
• Do not use this watch while participating in sports where there are sudden
altitude changes. Also, do not use this watch for applications that demand
professional or industrial level precision. This watch should not be used
while engaging in the following activities: sky diving, hang gliding,
paragliding, gyrocopter riding, glider riding, etc.
Applications
When no reference altitude is preset:
• The watch produces approximate altitude readings.
When a reference altitude is preset:
• Before beginning the climb, set the reference altitude to 0 m at the foot of
the mountain. This makes it possible to determine the difference in altitude
between the reference point and your destination.
• To determine the height of a tall
building, set the reference altitude to
0 m on the ground floor. Note,
however, that if the building is
pressurized or air conditioned, you
may not be able to get a good reading.
• To determine the difference in altitude between your house and another
location, set the reference altitude to 0 m at your house, and then check the
reading when you arrive at the other location.
• When mountain climbing, you can
input the altitude from a marker as your
reference altitude, which will then let
you know your altitude as your climb
proceeds. The following conditions will
prevent you from obtaining accurate
readings:
When air pressure changes because of changes in the weather
Extreme temperature changes
When the watch itself is subjected to strong impact
About altitude measurements
There are two types of altitude measurements: those for displayed data
(Altimeter Mode measurement) and those for memory data (memory
measurements; See “Memory measurements”).
Altimeter Mode measurement
This type of measurement is performed only when the watch is in the Altimeter
Mode. As soon as you enter the Altimeter Mode, measurements are taken
every five seconds for the first three minutes. After that, measurements are
taken every two minutes. The display unit for Altimeter Mode measurements is
5 m (20 feet), and the display range is 0 to 6000 m (0 to 19680 feet).
• The measured altitude may be a negative value in cases where there is a
reference altitude value set or because of certain atmospheric conditions.
Understanding the altimeter display
Use C to enter the Altimeter Mode. Note that once you enter the Altimeter
Mode, if you do not press any button for 10 or 11 hours, the watch
automatically returns to the Timekeeping Mode.
Current altitude
(flashing)
Mode indicator
A
C
1
*
Auto memory measurement
2
indicator
*
B
D
Current
temperature
400
(Altitude Graph)
(Unit: 10 m/20 ft)
˚C
P
Current timeRemaining memory
m
Current altitude
1570-5
1 The mark next to ALTI flashes while a measurement is being taken
*
every five seconds. It does not flash during the measurements taken
every two minutes.
2 The mark next to AUTO flashes while a memory measurement is in
*
progress. The indicator stops flashing while no measurement is being
performed.
Memory measurements
Memory measurements are taken independently of Altimeter Mode
measurements and stored directly into memory (along with temperature
measurements) for later recall. There are two types of memory
measurements: “Auto Memory Measurements” and “Manual Memory
Measurements”.
Auto Memory Measurements
With auto memory measurement, the watch continuously performs
measurements whenever the minutes in the Timekeeping Mode reach 00, 15,
30, or 45, until you switch auto measurements off. The watch continues to
take measurements regardless of whether or not you change modes, so you
can keep a running log of temperature and altitude changes automatically.
Manual Memory Measurements
You can use the manual procedure to take a reading anytime you want to
store your current altitude data into memory for later recall. Manual memory
measurements can be performed only while the watch is in the Altimeter
Mode.
About the memory...
Each memory item (auto or manual) stored by the watch consists of the
current altitude, plus the date, time, and temperature. Data is stored in the
same sequence that it is input.
Memory can hold a total of 50 sets of data, which is enough to store 12 hours
and 15 minutes of auto memory data (if you do not take any manual readings
during that time).
Important!
Further auto or manual memory measurements
become impossible whenever memory is full.
The message
that memory is full. Always check the amount of
memory remaining before starting memory
measurements, and delete data if necessary.
Selecting Auto or Manual Memory Measurement
Use the following procedure to switch between auto or manual memory
measurement. Note that you cannot perform this operation while a preset auto
memory measurement is already in progress.
1. In the Altimeter Mode, hold down A until the display clears. After 4 or 5
seconds, either
to flash. The data flashes because it is
2. Press C to change the selection in the following sequence.
(Altitude Alarm Setting)
3. Press C to select the Memory Measurement Setting screen (with either
the
4. Press B or D to switch between auto memory measurement (AUTO
or manual memory measurement (MANUAL
5. After selecting the type of measurement you want, press A to return to
the Altimeter Mode.
FULL on the display indicates
OFF or the current reference altitude value (if set) will start
selected
(Reference Altitude Setting)
A
C
B
m
D
Press C.
Auto memory measurement
indicator
m
Press C.
(Memory Measurement Setting)
mark next to AUTO or MANUAL flashing).
.
Press C.
AUTO
).
)
Page 6

1570-6
A L M
S I G
A
LT
I
RECALL
AUTO
MANUALA
L
A-LIGHT
A L M
S I G
A
LT
I
RECALL
AUTO
MANUALA
L
A-LIGHT
A L M
S I G
A
LT
I
RECALL
AUTO
MANUALA
L
A-LIGHT
A L M
S I G
A
LT
I
RECALL
AUTO
MANUALA
L
A-LIGHT
A L M
S I G
A
LT
I
RECALL
AUTO
MANUALA
L
A-LIGHT
Memory Measurement SettingAltitude Alarm SettingReference Altitude Setting
Using Auto Memory Measurement
Auto memory measurement
indicator
A
AUTO
P
m
˚C
C
• The auto memory measurement indicator flashes on the display when you
start auto memory measurements. The indicator continues to flash
(indicating that measurements continue) even if you change modes.
• Auto memory measurement cuts off automatically whenever there are 49
sets of data stored in memory. The 50th set of data measured when you
stop the measurement operation in step 3 below is also stored in memory.
3. To stop measurements at any point, hold down D again until the watch
emits a short beep.
• A final measurement is taken when you switch auto memory measurement
off, and that data is also stored into memory. Such data is indicated by
FIN during the recall operation.
1. Confirm that the auto memory measurement
indicator is shown on the display. If it is not,
use the procedures under “Selecting Auto or
B
D
Manual Memory Measurement” to select
auto memory measurement.
2. Hold down D until the watch emits a short
beep, indicating the start of the measurement.
• The data measured when you first start auto
memory measurement is also stored into
memory.
Using Manual Memory Measurement
Manual memory
measurement indicator
A
MANUAL
m
˚C
P
C
• Button operation becomes impossible during the 4 or 5 seconds that it
takes to complete a measurement. Normal operation will return once the
operation is finished.
1. Confirm that the manual memory
measurement indicator is shown on the
display. If it is not, use the procedures
B
D
under “Selecting Auto or Manual Memory
Measurement” to select manual memory
measurement.
2. Hold down D until the watch emits a short
beep, indicating that a measurement is
taken.
3. Repeat step 2 whenever you want to take a
reading.
Setting a Reference Altitude
After you set a reference altitude, the watch automatically calculates the
difference between the current altitude and your preset value. The altitude
measurements produced by this watch are subject to error caused by changes
in air pressure. Because of this, we recommend that you set the reference
altitude during your climb whenever one is available.
1. In the Altimeter Mode, hold down A until
A
C
2. Press D to increase the current reference altitude value by 5 m or B to
decrease it. Holding down either button changes the value at high speed.
• If you have selected feet as your unit of measurement, the above
operations change the reading in increments of 20 feet.
• You can set the reference altitude within the range of –6000 m to 6000 m
(–19680 feet to 19680 feet).
• Pressing B and D at the same time returns to the
3. After setting the reference altitude you want, press A to return to the
Altimeter Mode.
B
m
D
the display clears. After 4 or 5 seconds,
either
OFF or the current reference altitude
value (if set) will start to flash. The data
flashes because it is
• The
OFF indicator appears when the factory
setting is being used for the calibration.
selected
.
OFF message.
About the Altitude Alarm
The altitude alarm sounds for about five seconds whenever the current
altitude matches a preset value. You can press any button to stop the alarm
after it starts to sound. Note that the altitude alarm sounds only while the
watch is in the Altimeter Mode.
Example:
If you set the altitude alarm at 130 meters, it will sound when you pass the
130-meter mark on your way up and on your way back down.
To set the altitude alarm
1. In the Altimeter Mode, hold down A until the display clears. After 4 or 5
seconds, either
to flash. The data flashes because it is
2. Press C to change the selection in the following sequence.
OFF or the current reference altitude value (if set) will start
selected
.
Altitude alarm on indicator
A
C
• You can set the altitude alarm setting within the range of –6000 m to 6000
m (–19680 feet to 19680 feet).
• Setting an altitude value automatically switches the altitude alarm on.
5. After setting the altitude alarm value, press A to return to the Altimeter
Mode.
3. Press C to select the altitude alarm setting
B
m
D
display (indicated by the
4. Press D to increase the altitude alarm
value by 5 m or B to decrease it. Holding
down either button changes the value at
high speed.
• If you have selected feet as your unit of
measurement, the above operations change
the setting in increments of 20 feet.
ALM indicator).
To switch the altitude alarm off
1. In the Altimeter Mode, hold down A until the display clears. After 4 or 5
seconds, either
to flash. The data flashes because it is
2. Press C to change the selection in the following sequence.
3. Press C to select the altitude alarm setting display (indicated by the
ALM indicator).
4. Press D and B at the same time to change the setting to
switch the altitude alarm off.
5. After switching the altitude alarm off, press A to return to the Altimeter
Mode.
OFF or the current reference altitude value (if set) will start
selected
.
OFF and
About the Target Altitude Graph
Graphic area
A
m
˚C
P
C
The start point differs according to what type of memory measurement
*
procedure you are using. With auto memory measurements (AUTO
shown on the display), the start point is the first altitude measured. With
manual memory measurements (MANUAL
start point is 0 m (0 ft).
• The target altitude graph is not shown on the display if the altitude alarm is
off.
Example:
• The display below would appear at a current altitude of 160 m when you are
using manual memory measurement with a target altitude setting of 200 m.
Eight points on the graph are darkened because you are 8/10 of the way to
your target.
• The display below would appear at a current altitude of 160 m when you are
using auto memory measurement with a target altitude setting of 200 m and
a starting point of 100 m. Six points on the graph are darkened because you
are 6/10 of the way to your target.
The Target Altitude Graph appears in the
graphic area of the display in the Altimeter
B
Mode. It divides the difference between your
start point
the altitude alarm into 10 equal parts. It then
shows a graph that shows your current
location, to give you some idea of how much
farther you must go to reach your altitude
D
setting.
altitude and the value you set for
*
shown on the display), the
This indicator “ ”
appears once you pass the
target altitude.
Memory Measurement SettingAltitude Alarm SettingReference Altitude Setting
Page 7

1570-7
A L M
S I G
A
LT
I
RECALL
AUTO
MANUALA
L
A-LIGHT
A L M
S I G
A
LT
I
RECALL
AUTO
MANUALA
L
A-LIGHT
A L M
S I G
A
LT
I
RECALL
AUTO
MANUALA
L
A-LIGHT
A L M
S I G
A
LT
I
RECALL
AUTO
MANUALA
L
A-LIGHT
A L M
S I G
A
LT
I
RECALL
AUTO
MANUALA
L
A-LIGHT
A L M
S I G
A LT I
RECALL
AUTO
MANUALA
L
A-LIGHT
A L M
S I G
A
LT
I
RECALL
AUTO
MANUALA
L
A-LIGHT
A L M
S I G
A
LT
I
RECALL
AUTO
MANUALA
L
A-LIGHT
A L M
S I G
A
LT
I
RECALL
AUTO
MANUALA
L
A-LIGHT
A L M
S I G
A
LT
I
RECALL
AUTO
MANUALA
L
A-LIGHT
P
A L M
S I G
A
LT
I
RECALL
AUTO
MANUALA
L
A-LIGHT
A L M
S I G
A
LT
I
RECALL
AUTO
MANUALA
L
A-LIGHT
P
A
D
C
B
About memory data
Use the following procedures to recall measurement data stored in memory.
To scroll through data items
1. Use C to enter the Recall Mode.
2. Press D to scroll forward through the stored data items or B to scroll
backward.
• Holding down either button scrolls through the data items at high speed.
• The data item that is displayed when you exit the Recall Mode is still
displayed the next time you enter the Recall Mode.
Mode indicator
A
Temperature
C
• Measured data is stored in memory even if an error occurs during the
measurement. For details on errors, see “ERROR WARNING FUNCTIONS”.
About the memory data display
Data stored in memory appears in one of the formats shown below, depending
on the measurement method (auto or manual), or whether it is the maximum
or minimum reading.
• Auto Memory Data
Auto memory measurement indicator
D
B
A
˚C
A
C
B
m
D
(Auto Memory Start Display)
B
D
An altitude graph appears in place of the date for the display of data
*
between the start and end data. The altitude graph divides by 8 the
difference between the maximum and minimum altitudes achieved during
the auto memory measurement, and shows relative changes.
• Manual Memory Data
Manual memory measurement indicator
D
B
A
˚C
A
C
B
m
D
• Maximum/Minimum Data
D
B
A
˚C
A
C
B
m
D
Deleting Data
Delete data in the Recall Mode. The actual procedure you should use to
delete data depends on the type of data it is.
Date
˚C
A
Time
Press D.
Press B.
˚C
P
(End Display)
D
B
D
B
B
m
Altitude
D
Altitude graph
A
*
m
˚C
B
D
m
D
m
˚C
A
B
D
m
˚C
P
B
(Minimum Altitude)(Maximum Altitude)
To delete auto memory data
The following procedure deletes an entire set (from start measurement to end
measurement) of auto memory data.
Auto memory
measurement indicator
A
m
˚C
A
C
(Auto Memory Start Display)
Important!
You cannot delete data while an auto memory
measurement is in progress (the
B
to AUTO flashing).
1. In the Recall Mode, display the start data of
the set of auto memory data that you want
to delete.
2. To clear the data, hold down A until the
D
watch emits a beep (and until
flashing on the display).
mark next
CLR stops
To delete manual memory, maximum, and minimum data
1. In the Recall Mode, display the data that you want to delete.
2. To clear the data, hold down A until the watch emits a beep (and until
CLR stops flashing on the display).
WORLD TIME FUNCTIONS
Mode indicator
City Code
Home time
differential
Current time in the
selected city
Timekeeping in the World Time Mode
The current time in all the World Time zones is calculated in accordance with
the Greenwich Mean Time (GMT) differential for each zone, based on the
current home time setting in the Timekeeping Mode.
You can also turn Daylight Saving Time (DST) on or off separately for each
time zone. Turning on daylight saving time automatically advances the
corresponding time setting by one hour.
• The seconds count of the World Time is synchronized with the seconds
count in the Timekeeping Mode.
• The 12-hour/24-hour format of the World Time matches the format you
select in the Timekeeping Mode.
• With daylight saving time, clocks are set one hour later in order to better
take advantage of daylight hours during the summer, when days are longer.
Whether or not daylight saving time is used depends on the country you are
in.
Viewing the Time in Another Zone
1. Use C to enter the World Time Mode.
2. Press D to scroll forward through the city codes (time zones) and B to
scroll back.
• Holding down either button scrolls through the city codes at high speed.
Switching a Zone between Standard Time and
Daylight Saving Time
A
DST
P
C
DST indicator
• The DST indicator appears whenever daylight saving time is turned on for
the zone (city) whose time is currently on the display.
B
D
The World Time Mode shows the current
time in 27 cities (29 time zones) around the
world.
• For full information on city codes, see the
“CITY CODE TABLE”.
• The Home Time differential shows the
difference between the time in the
currently displayed city and the city that
is selected in the Timekeeping Mode.
• The time zone that is displayed when you
leave the World Time Mode will still be
displayed when you enter the World
Time Mode again.
1. In the World Time Mode, display the time
zone (city code) whose standard time/
daylight saving time setting you want to
change.
• You can make separate settings for each
zone (city).
2. Hold down A for about one second to
toggle daylight saving time on (DST
displayed) and off (DST not displayed).
Page 8

1570-8
A L M
S I G
A
LT
I
RECALL
AUTO
MANUALA
L
A-LIGHT
A L M
S I G
A
LT
I
RECALL
AUTO
MANUALA
L
A-LIGHT
A L M
S I G
A
LT
I
RECALL
AUTO
MANUALA
L
A-LIGHT
A L M
S I G
A
LT
I
RECALL
AUTO
MANUALA
L
A-LIGHT
ALARM FUNCTIONS
Hourly time signal
on indicator
Alarm on
indicator
A
A
C
Hour
Minutes
Setting the alarm time
1. Use C to enter the Alarm Mode.
2. Hold down A until the hour digits flash on the display. The hour digits
flash because they are
• At this time, the alarm is automatically switched on.
3. Press C to change the selection in the following sequence.
4. Press D to increase the selection or B to decrease it. Holding down
either button changes the selection at high speed.
• The format (12-hour and 24-hour) of the alarm time matches the format you
select for normal timekeeping.
• When setting the alarm time using the 12-hour format, take care to set the
time correctly as morning (A) or afternoon (P).
5. After you set the alarm, press A to return to the Alarm Mode.
Turning the Daily Alarm and Hourly Time Signal on
and off
Press D while in the Alarm Mode to change the status of the Daily Alarm and
Hourly Time Signal in the following sequence.
[Alarm ON Indicator / Hourly Time Signal ON Indicator]
ALM ■
SIG ■
Both ON Both OFF
Testing the alarm
Hold down D while in the Alarm Mode to sound the alarm.
When the Daily Alarm is on, the alarm sounds
for 10 seconds at the preset time each day.
Press any button to stop the alarm after it starts
to sound.
When the Hourly Time Signal is on, the watch
beeps every hour on the hour.
B
Mode indicator
D
selected
.
Hour Minutes
ALM
SIG
ALM ■
SIG
Daily Alarm only
ALM
SIG ■
Hourly Time
Signal only
ERROR WARNING FUNCTIONS
This watch is designed to automatically stop taking measurements when there
is a sensor malfunction, when battery power drops below a certain level, or
when battery voltage is decreased below a certain level due to very cold
temperatures.
Sensor malfunction
˚C
P
Important!
• If the sensor is malfunctioning when it comes time for an barometric
pressure measurement to be taken, the barometric pressure value appears
as
xxxx on the display and the corresponding point on the barometric
pressure graph is left blank.
marks flash next to ALM, SIG and A-LIGHT whenever there is a
•
momentary voltage drop due to continuous use of the backlight, etc. The
marks stop flashing when voltage returns to its normal level.
• The alarm, hourly time signal, and backlight are all disabled whenever the
marks are flashing on the display.
• All functions, except for mode change operations, are disabled while the
BAT message is on the display.
• There may be cases where the
you change modes. In this case, you can continue using the watch normally
unless the error warning message reappears.
Momentary voltage drop
hPa
mb
A L M
S I G
A-LIGHT
P
hPa
mb
˚C
ERR or BAT message is cleared once
Low battery
˚C
P
hPa
mb
Whenever there is a sensor malfunction, be sure to take the watch to an
authorized CASIO distributor or Service Center as soon as possible. If the
appearance of the
temperature, the message should clear from the display when normal
temperature returns. It is recommended, however, that you still have the
watch checked by an authorized CASIO distributor or Service Center.
BAT message is caused by extremely low
Battery Replacement
ALWAYS LEAVE BATTERY REPLACEMENT UP TO THE DEALER
WHERE YOU BOUGHT THE WATCH OR TO AN AUTHORIZED CASIO
DISTRIBUTOR. BE SURE TO SHOW THE FOLLOWING INFORMATION
TO THE PERSON REPLACING THE BATTERY.
Attention dealer or CASIO distributor
Be sure to use the following procedure when replacing the battery.
1. Open and remove the back cover.
• If
CLOSE appears on the display when you open the back cover, replace
the back cover. Wait for a few minutes and try again.
• The message
that the watch is storing data to or recalling data from EEPROM. Wait for a
while before replacing the battery to give the
clear. If
replace the battery.
2. Remove the battery holder.
3. Remove the old battery and load a new one.
4. Replace the battery holder.
5. Touch the AC contact and the battery (+) side with metallic tweezers.
6. Close the back cover.
WAIT on the display after you replace the cover indicates
WAIT remains on the display for a long time, go ahead and
WAIT message a chance to
ABOUT ALTITUDE AND AIR
PRESSURE MEASUREMENTS
Altimeter
Generally, air pressure and temperature decrease as altitude increases. This
watch bases its altitude measurements on International Standard Atmosphere
(ISA) values stipulated by the International Civil Aviation Organization (ICAO),
which define relationships between altitude, air pressure, and temperature.
ALTITUDE AIR PRESSURE TEMPERATURE
6000 m
5500 m
5000 m
4500 m
4000 m
3500 m
3000 m
2500 m
2000 m
1500 m
1000 m
500 m
0 m
Source: International Civil Aviation Organization
ALTITUDE AIR PRESSURE TEMPERATURE
20000 ft
18000 ft
16000 ft
14000 ft
12000 ft
10000 ft
8000 ft
6000 ft
4000 ft
2000 ft
0 ft
Source: International Civil Aviation Organization
There are two standard methods of expressing altitude: Absolute altitude and
relative altitude. Absolute altitude expresses an absolute height above sea
level. Relative altitude expresses the difference between the height of two
different places.
472 hPa/mb
540 hPa/mb
616 hPa/mb
701 hPa/mb
795 hPa/mb
899 hPa/mb
1013 hPa/mb
13.76 inHg
16.22 inHg
19.03 inHg
22.23 inHg
25.84 inHg
About 6.7 hPa/mb per 100 m
About 7 hPa/mb per 100 m
About 8 hPa/mb per 100 m
About 9 hPa/mb per 100 m
About 10 hPa/mb per 100 m
About 11 hPa/mb per 100 m
About 12 hPa/mb per 100 m
About 0.119 inHg per 200 ft
About 0.1315 inHg per 200 ft
About 0.15 inHg per 200 ft
About 0.17 inHg per 200 ft
About 0.192 inHg per 200 ft
About 0.21 inHg per 200 ft
Height of building 130 m
(Relative altitude)
–24°C
–17.5°C
–11°C
About 6.5°C
–4.5°C
per 1000 m
2°C
8.5°C
15°C
–12.2°F
2.0°F
16.2°F
About 3.6°F
per 1000 ft
30.5°F
44.7°F
59.0°F29.92 inHg
Rooftop at an altitude of
230 m above sea level
(Altitude above sea
level)
Sea
Page 9

1570-9
6
Barometer
Barometric pressure indicates changes in the atmosphere, and by monitoring
these changes you can predict the weather with reasonable accuracy. Rising
barometric pressure indicates good weather, while falling pressure indicates
deteriorating weather conditions.
The barometric pressures that you see in the newspaper and on the TV
weather report are measurements corrected to values measured at 0 m sea
level.
CITY CODE TABLE
City Code
– – –
HNL
ANC
LAX
DEN
CHI
NYC
CCS
RIO
– – –
– – –
LON
PAR
CAI
JRS
JED
THR
DXB
KBL
KHI
DEL
DAC
RGN
BKK
HKG
TYO
ADL
SYD
NOU
WLG
Based on data as of December 1997.
*
City
HONOLULU
ANCHORAGE
LOS ANGELES
DENVER
CHICAGO
NEW YORK
CARACAS
RIO DE JANEIRO
LONDON
PARIS
CAIRO
JERUSALEM
JEDDAH
TEHRAN
DUBAI
KABUL
KARACHI
DELHI
DHAKA
YANGON
BANGKOK
HONG KONG
TOKYO
ADELAIDE
SYDNEY
NOUMEA
WELLINGTON
GMT
Differential
–11
–10
–09
–08
–07
–06
–05
–04
–03
–02
–01
+00
+01
+02
+03
+3.5
+04
+4.5
+05
+5.5
+06
+6.5
+07
+08
+09
+9.5
+10
+11
+12
Other major cities in same time zone
PAGO PAGO
PAPEETE
NOME
SAN FRANCISCO, LAS VEGAS,
VANCOUVER, SEATTLE, DAWSON CITY
EL PASO, EDMONTON
HOUSTON, DALLAS/FORT WORTH, NEW
ORLEANS, MEXICO CITY, WINNIPEG
MONTREAL, DETROIT, MIAMI, BOSTON,
PANAMA CITY, HAVANA, LIMA, BOGOTA
LA PAZ, SANTIAGO, PORT OF SPAIN
SAO PAULO, BUENOS AIRES, BRASILIA,
MONTEVIDEO
PRAIA
DUBLIN, LISBON, CASABLANCA,
DAKAR, ABIDJAN
MILAN, ROME, MADRID, AMSTERDAM,
ALGIERS, HAMBURG, FRANKFURT,
VIENNA, STOCKHOLM, BERLIN
ATHENS, HELSINKI, ISTANBUL, BEIRUT,
DAMASCUS, CAPE TOWN
KUWAIT, RIYADH, ADEN, ADDIS ABABA,
NAIROBI
SHIRAZ
ABU DHABI, MUSCAT
MUMBAI, CALCUTTA
COLOMBO
JAKARTA, PHNOM PENH, HANOI,
VIENTIANE
SINGAPORE, KUALA LUMPUR, BEIJING,
TAIPEI, MANILA, PERTH, ULAANBAATAR
SEOUL, PYONGYANG
DARWIN
MELBOURNE, GUAM, RABAUL
PORT VILA
CHRISTCHURCH, NADI, NAURU ISLAND
BAND CLIP
One-Piece Cloth Band and Two-Piece Cloth Band
To fasten the two-piece band on your wrist
1. Wrap the wide inner band around your wrist,
pressing the fasteners on the bands together to
secure it.
• Band fasteners can separate when wet.
Buckle
2. Wrap the narrow outer band around your wrist.
Grasping the buckle between your thumb and
middle finger, insert the band into the buckle while
pressing down the top of the band with your
forefinger.
• The buckle locks with a snap when fastened.
• Actual buckle shape depends on watch model.
To adjust the length of the two-piece band
1. Slide the buckle on the band to adjust the band
length.
2. Pass the band around the outside of the buckle.
3. Double the band back around the inside of the
buckle and then pull on the end to tighten.
Using the Band Clip
Be sure to attach the band clip to the watch and then attach the watch to your belt
whenever using the Trekking Counter. Failure to attach the Trekking Counter
correctly to your belt can produce poor measurement accuracy.
To attach the band clip
1. Remove the band from the watch.
• If your watch was a one-piece band with a
fixed buckle, pull the band to remove it from
the watch.
• If your watch has a two-piece band with
removable buckle, remove the buckle from the
outer band and then slide the band from the
watch.
2. Insert the band clip into the attachment
bottom (6 o’clock position)
double it back, and fasten the snaps to
secure it in place.
of the watch,
at the
Slide
Attachment (6 o’clock position)
Fastener
12
Slide
Band clip
3. Attach the band clip to your belt.
12 o’clock position
Trekking Counter Precautions
• Be sure to turn off the Trekking Counter when: taking part in any activity
involving jumping, bending, stretching, etc.; resting; riding a bicycle, train,
bus, or any other vehicle that vibrates.
• Any of the following can cause measurements to lose accuracy: walking on
loose ground, up or down steep slopes; running; shuffling your feet; uneven
strides; walking in sandals, shower shoes, or similar footwear; walking up or
down stairs.
• Measurements may become inaccurate or even fail entirely if the watch is
exposed to strong magnetic force.
• Always be sure to fasten the band clip to the bottom (6 o’clock position) of
the watch, and not to the top (12 o’clock position).
• Take care to avoid dropping the watch while walking.
• When using the Trekking Counter, make sure the watch is not resting
against your clothing or waist pack. If the watch is not hanging loosely, the
Trekking Counter will not be able to count your steps correctly.
• When walking up stairs or performing other activities that requires raising of
the leg, measurement accuracy can be affected by the watch bumping
against or riding on your leg. In such a case, try to position the band clip so
it hangs naturally, away from your leg.
• Wear the band clip so it is located in front of your body. This helps to make
sure the watch and band clip do not become accidentally caught on
something and pulled off your belt.
Page 10

1570-10
Leather Band
To fasten the band on your wrist
1. Pass the end of the band through the opening in
the lock cover and then through the belt loop.
2. Fold the buckle over the two metal pieces, and
press down on the buckle until it snaps into
place.
3. Close the lock cover and press down until it
snaps into place.
• To remove the band from your wrist, pull up on the
sides of the lock cover with your thumb and
forefinger to release it, and then unfold the buckle.
Metal pieces
Buckle
To adjust the length of the band
1. Pull up the flap on the inside of the buckle to
release the band, and then slide the band in or
out to adjust its length.
Caution!
The resistance of the flap is quite strong, so do
not use your fingernail when pulling it up.
Instead, use a screwdriver or other similar tool.
2. After the band is the length you want, fold the
flap back down to lock it in place.
Trimming the tip of the band
Band trimming is optional. Use scissors to cut off the tip of the band to
eliminate any excess that protrudes from the buckle after you adjust the length
of the band. It is recommended that you cut the band at a point that is 5 to 10
mm inside the tip of the buckle.
Important!
• Always handle scissors and other cutting tools with care to avoid personal
injury.
• Take care not to trim too much off the end of the band. It is probably best to
cut off a little at a time until you get the band to the length you want.
• Cutting the band may cause the ends of the thread of the remaining part to
come loose. If this happens, do not pull on the thread. Trim the loose thread
with scissors.
Belt loop
Lock cover
Flap
Buckle
Tip of buckle
Metal Band
To fasten the band on your wrist
1. Fold the buckle over the two metal
pieces, and press down on the
buckle until it snaps into place.
2. Close the lock cover and press
down until it snaps into place.
• To remove the band from your wrist,
pull up on the sides of the lock cover
with your thumb and forefinger to
release it, and then unfold the buckle.
Metal pieces
Buckle
Lock cover
Using the Band Clip
Be sure to attach the band clip to the watch and then attach the watch to your
belt whenever using the Trekking Counter. Failure to attach the Trekking
Counter correctly to your belt can produce poor measurement accuracy.
To attach the band clip
1. Press the buttons on the sides of the
two band clasps to release them,
and remove the bands.
2. Close the band clasp at the top (12
o’clock position) of the watch.
Squeeze gently but firmly until it
locks in place.
3. Hook the band clip into the band
clasp
at the bottom (6 o’clock
position)
, and then close the clasp.
Squeeze gently but firmly until it
locks in place.
4. Attach the band clip to your belt.
Band clasp
6 o’clock position
Band clip
Using the Band Clip
Be sure to attach the band clip to the watch and then attach the watch to your
belt whenever using the Trekking Counter. Failure to attach the Trekking
Counter correctly to your belt can produce poor measurement accuracy.
To attach the band clip
1. Press the buttons on the sides of the two band
clasps to release them, and remove the bands.
2. Close the band clasp at the top (12 o’clock
position) of the watch. Squeeze gently but firmly
until it locks in place.
3. Hook the band clip into the band clasp
the bottom (6 o’clock position)
close the clasp. Squeeze gently but
firmly until it locks in place.
, and then
at
4. Attach the band clip to your belt.
Trekking Counter Precautions
• Be sure to turn off the Trekking Counter when: taking part in any activity
involving jumping, bending, stretching, etc.; resting; riding a bicycle, train,
bus, or any other vehicle that vibrates.
• Any of the following can cause measurements to lose accuracy: walking on
loose ground, up or down steep slopes; running; shuffling your feet; uneven
strides; walking in sandals, shower shoes, or similar footwear; walking up or
down stairs.
• Measurements may become inaccurate or even fail entirely if the watch is
exposed to strong magnetic force.
• Always be sure to fasten the band clip to the bottom (6 o’clock position) of
the watch, and not to the top (12 o’clock position).
• Take care to avoid dropping the watch while walking.
• When using the Trekking Counter, make sure the watch is not resting
against your clothing or waist pack. If the watch is not hanging loosely, the
Trekking Counter will not be able to count your steps correctly.
• When walking up stairs or performing other activities that requires raising of
the leg, measurement accuracy can be affected by the watch bumping
against or riding on your leg. In such a case, try to position the band clip so
it hangs naturally, away from your leg.
• Wear the band clip so it is located in front of your body. This helps to make
sure the watch and band clip do not become accidentally caught on
something and pulled off your belt.
Band clasp
6 o’clock position
Band clip
12 o’clock position
12 o’clock position
Trekking Counter Precautions
• Be sure to turn off the Trekking Counter when: taking part in any activity
involving jumping, bending, stretching, etc.; resting; riding a bicycle, train,
bus, or any other vehicle that vibrates.
• Any of the following can cause measurements to lose accuracy: walking on
loose ground, up or down steep slopes; running; shuffling your feet; uneven
strides; walking in sandals, shower shoes, or similar footwear; walking up or
down stairs.
• Measurements may become inaccurate or even fail entirely if the watch is
exposed to strong magnetic force.
• Always be sure to fasten the band clip to the bottom (6 o’clock position) of
the watch, and not to the top (12 o’clock position).
• Take care to avoid dropping the watch while walking.
• When using the Trekking Counter, make sure the watch is not resting
against your clothing or waist pack. If the watch is not hanging loosely, the
Trekking Counter will not be able to count your steps correctly.
• When walking up stairs or performing other activities that requires raising of
the leg, measurement accuracy can be affected by the watch bumping
against or riding on your leg. In such a case, try to position the band clip so
it hangs naturally, away from your leg.
• Wear the band clip so it is located in front of your body. This helps to make
sure the watch and band clip do not become accidentally caught on
something and pulled off your belt.
 Loading...