

Page 1
{MiscellaneousPUB}{Prod uction}{Health Group}{Unrestricted}
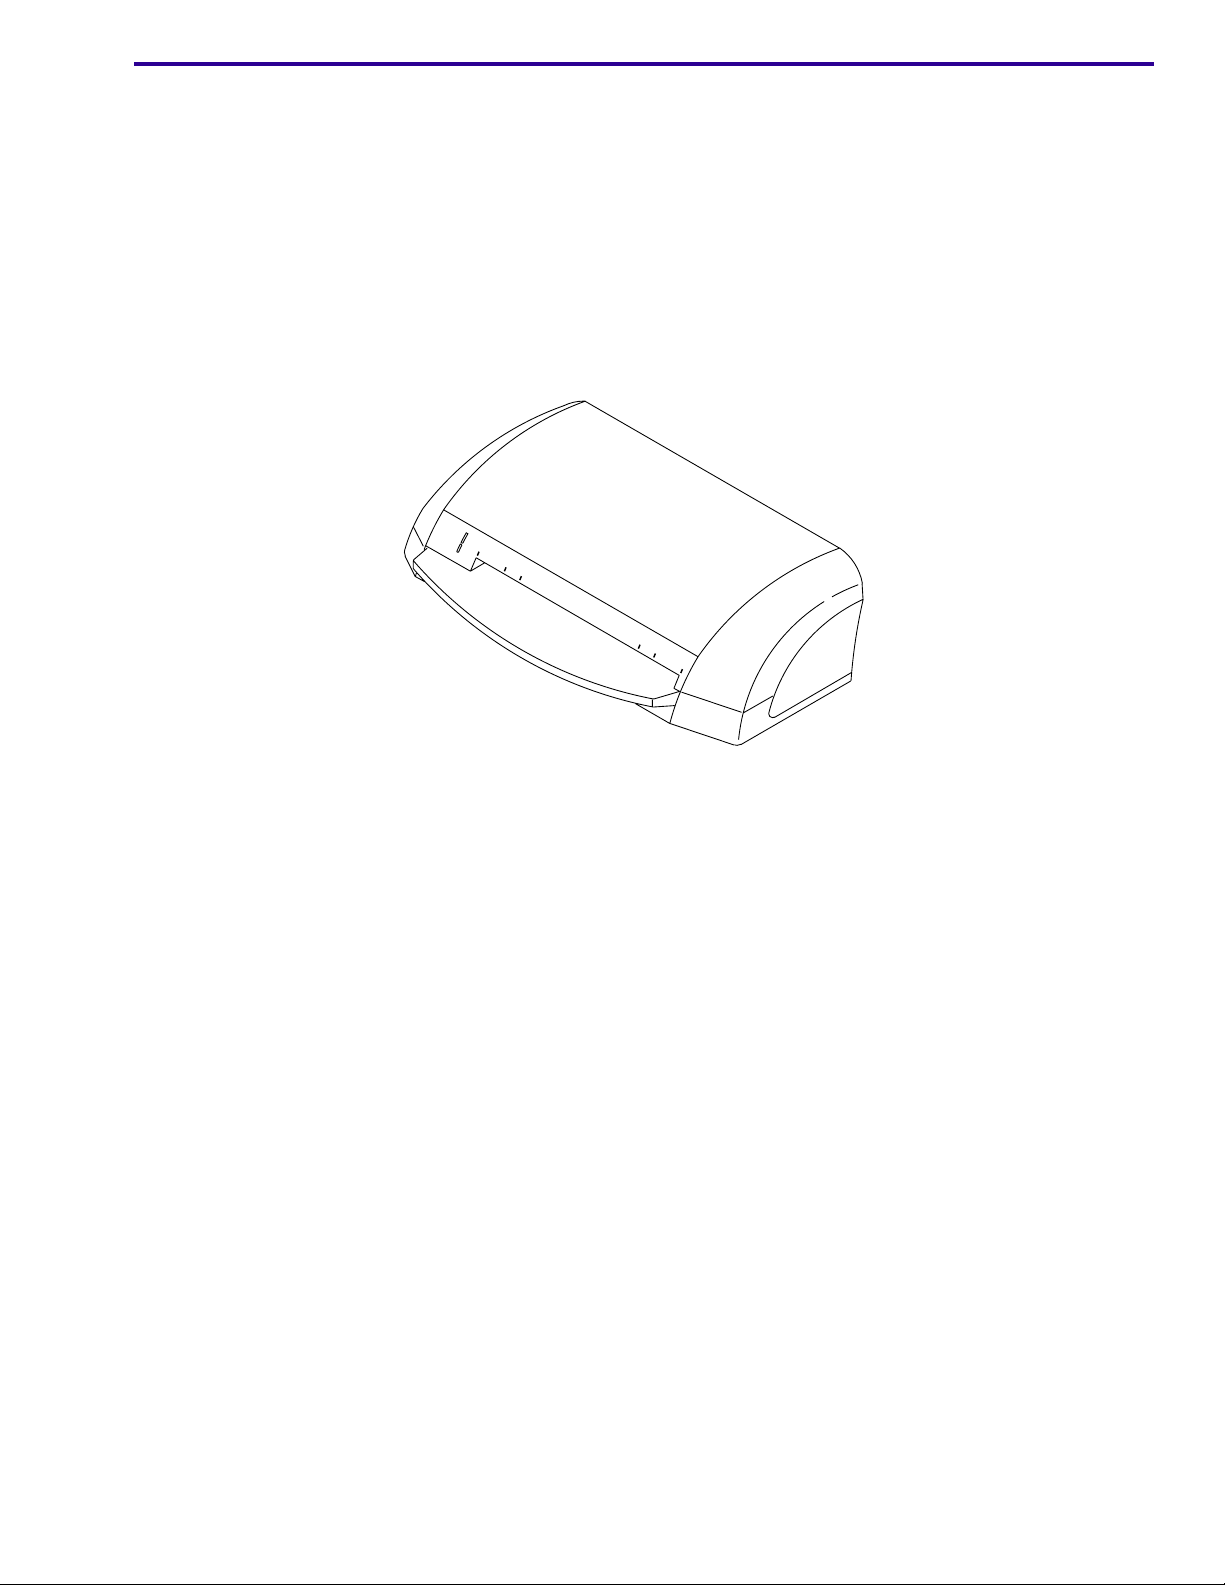
CARESTREAM DIRECTVIEW VITA CR System
Hardware Guide
14x17
14x14
8x10
11x14
10x12
24x30
8x10
10x12
24x30
11x14
Publication No. 8H8430
27JUN2010
14x17
14x14
© CARESTREAM HEALTH, INC. 2010
Page 2
MISCELLANEOUS PUBLICATION
CARESTREAM DIRECTVIEW VITA CR System Hardware User Guide
Document No.: 8H8430
Copyright Carestream Health, Inc. 2010
All rights reserved. No part of this manual may be reproduced or copied in any form by any means -- graphic,
electronic, or mechanical, including photocopying, typing, or information retrieval systems -- without written
permission of Carestream Health.
Use of Manual
CARESTREAM CR Systems are designed to meet international safety and performance standards. Personnel
operating the unit must have a thorough understanding of the proper operation of the system. This manual has been
prepared to aid medical and technical personnel to understand and operate the system. Do not operate the system
before reading this manual and gaining a clear understanding of the operation o f the system. If any part of this manual
is not clear, please contact your Carestream Health representative for clarification.
Authorized Representatives
LES MERCURIALES
40, rue Jean Jaures
93176 BAGNOLET CEDEX
France
Carestream Health, Inc.
Rochester, NY 14608
CARESTREAM is a trademark of Carestream Health.
© Carestream Health, Inc., 2010
ii 27JUN2010 – 8H8430
Page 3

Table of Contents
Description Page
Using the CARESTREAM DIRECTVIEW VITA CR System. . . . . . . . . . . . . . . . . . . . . . . . 1
VITA CR Operational Principles
System Status Indicator
Loading a Cassette into the System
Using 15 x 30 Cassettes with the System
Required 15 x 30 Adapter Components
Using the CR Imaging Plate 15 x 30 cm Adapter and Cassette
Using the CARESTREAM VITA CR SYSTEM SOFTWARE Only
Maintaining and Cleaning the System
Cleaning the VITA CR Rollers
Cleaning the VITA CR
Cassette with Flexible Phosphor Screen Instructions
Opening the Cassette
Loading a Phosphor Screen Into the Cassette
Removing a Phosphor Screen from the Cassette
Labeling the Cassette
Cleaning the GP2 Phosphor Screens
Cleaning CARESTREAM VITA CR CASSETTES
Disinfecting Equipment, Cassettes, and Screens
Disposal and Recycling of Cassettes and Screens
VITA CR Specifications
Scanner Physical Specifications
Supported Cassette Sizes and Throughput
Storage and Operation Environments
Publication History
. . . . . . . . . . . . . . . . . . . . . . . . . . . . . . . . . . . . . . . . . 1
. . . . . . . . . . . . . . . . . . . . . . . . . . . . . . . . . . . . . . . . . . . . . . . 1
. . . . . . . . . . . . . . . . . . . . . . . . . . . . . . . . . . . . . . 2
. . . . . . . . . . . . . . . . . . . . . . . . . . . . . . . . . . . . . 5
. . . . . . . . . . . . . . . . . . . . . . . . . . . . . . . . . . . 5
. . . . . . . . . . . . . . . . . 5
. . . . . . . . . . . . . . . 6
. . . . . . . . . . . . . . . . . . . . . . . . . . . . . . . . . . . . . . . . 7
. . . . . . . . . . . . . . . . . . . . . . . . . . . . . . . . . . . . . . . . . . 7
. . . . . . . . . . . . . . . . . . . . . . . . . . . . . . . . . . . . . . . . . . . . . . . . 9
. . . . . . . . . . . . . . . . . . . . . . . . . . . . 11
. . . . . . . . . . . . . . . . . . . . . . . . . . . . . . . . . . . . . . . . . . . . . . . . . 11
. . . . . . . . . . . . . . . . . . . . . . . . . . . . . . 11
. . . . . . . . . . . . . . . . . . . . . . . . . . . 11
. . . . . . . . . . . . . . . . . . . . . . . . . . . . . . . . . . . . . . . . . . . . . . . . . 13
. . . . . . . . . . . . . . . . . . . . . . . . . . . . . . . . . . . . . 14
. . . . . . . . . . . . . . . . . . . . . . . . . . . 15
. . . . . . . . . . . . . . . . . . . . . . . . . . . . 15
. . . . . . . . . . . . . . . . . . . . . . . . . . 16
. . . . . . . . . . . . . . . . . . . . . . . . . . . . . . . . . . . . . . . . . . . . . . . . . . . 17
. . . . . . . . . . . . . . . . . . . . . . . . . . . . . . . . . . . . . . . . . 17
. . . . . . . . . . . . . . . . . . . . . . . . . . . . . . . . 17
. . . . . . . . . . . . . . . . . . . . . . . . . . . . . . . . . . . . 17
. . . . . . . . . . . . . . . . . . . . . . . . . . . . . . . . . . . . . . . . . . . . . . . . . . . . . . . 19
8H8430 – 27JUN2010 iii
Page 4

MISCELLANEOUS PUBLICATION
iv 27JUN2010 – 8H8430
Page 5
Using the CARESTREAM DIRECTVIEW VITA CR System
Section 1: Using the CARESTREAM DIRECTVIEW VITA CR System
Note
The CARESTREAM DIRECTVIEW VITA CR SYSTEM is designed for medical professionals to read phosphor CR
screens. The system includes:
• CARESTREAM VITA CR SYSTEM SOFTWARE
• Plug and play USB2 interface
• Optional screens and cassettes in the following standard sizes: 8 x 10 in.; 10 x 12 in.; 11 x 14 in.; 14 x 14 in.;
14 x 17 in.; 24 x 30 cm; 14 x 33 in., and 15 x 30 cm.
Note
From this point on, CARESTREAM DIRECTVIEW VITA CR SYSTEM will referred to as “Vita CR” or “System”.
VITA CR Operational Principles
The VITA CR is a digital imaging system used for image acquisition and processing of sta tic projection radiog raphy
images. The System utilizes a phosphor screen with energy storage capability as an X-ray image receptor.
After exposure, a laser beam stimulates t he phosphor screen, creating luminescen ce (“blue light”) proportiona l to the
local X-ray exposure. The luminescence signal is captured by a Photo Multiplier Tube (PMT), digitized, and
processed for review.
The System enables you to read a storage phosphor screen quickly and erase it for the next exposure.
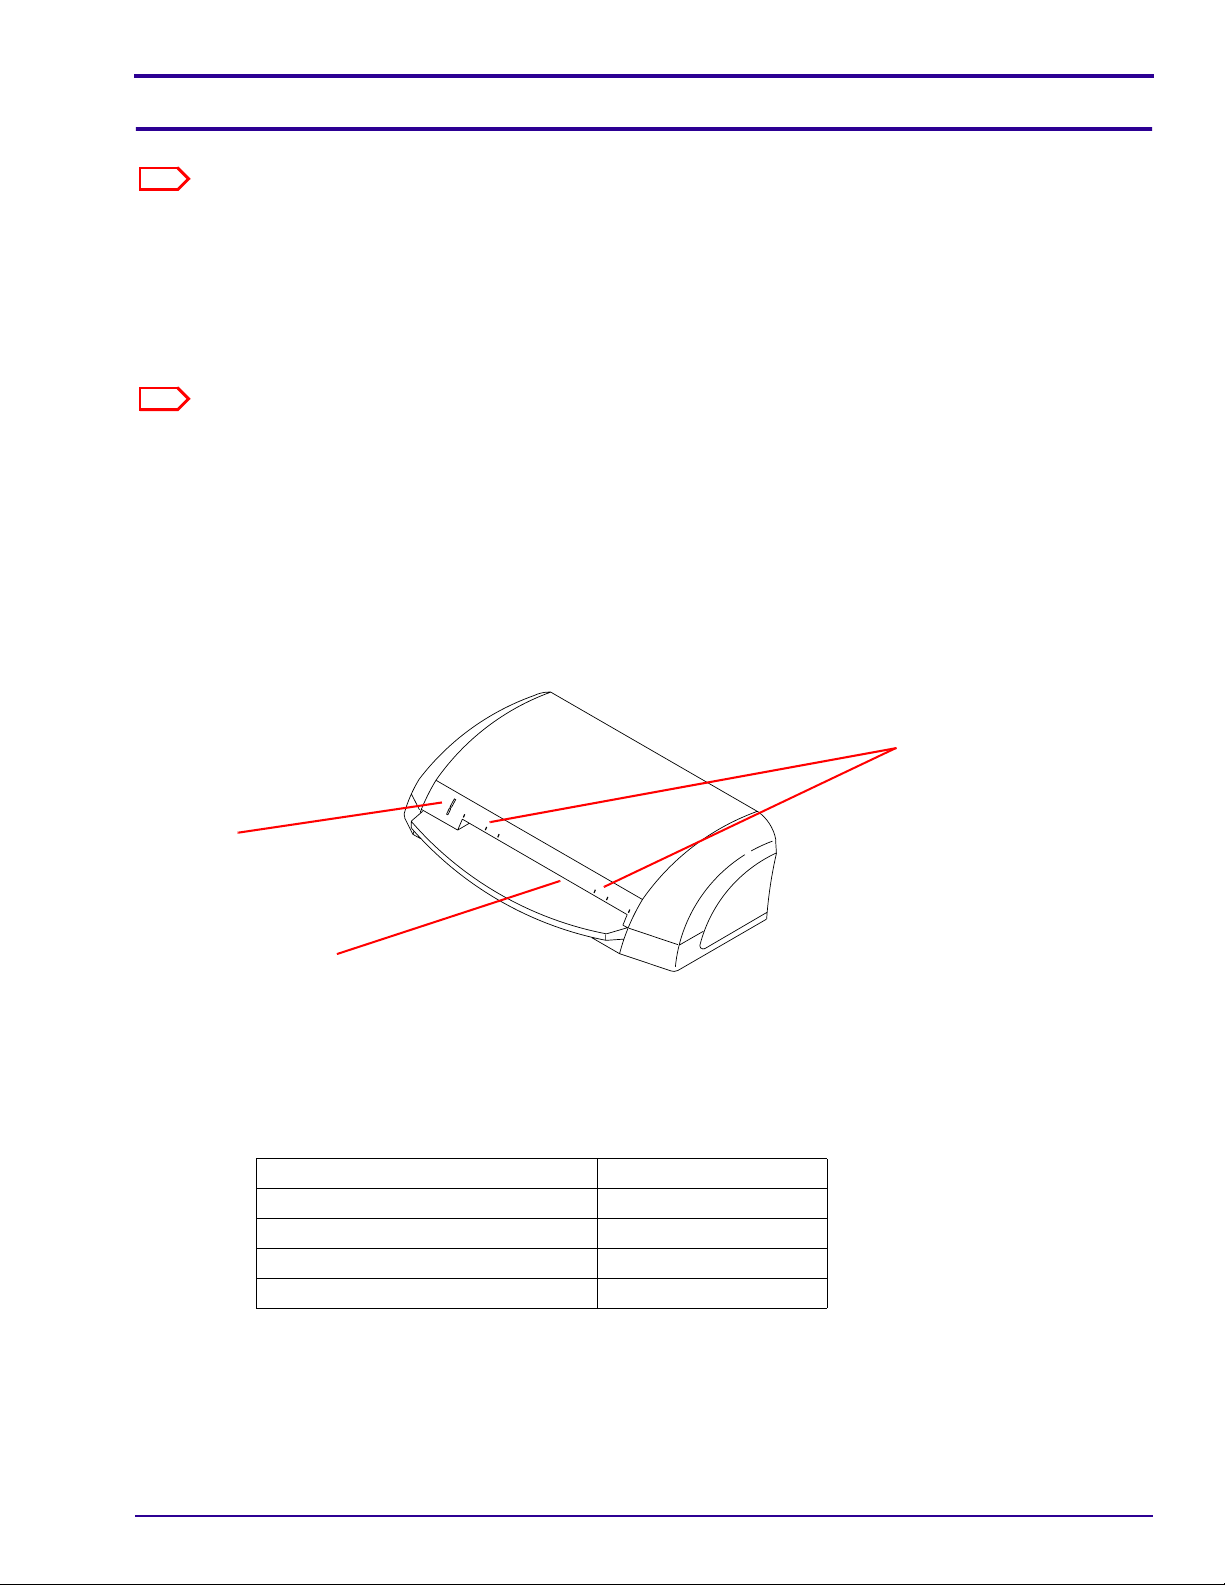
scanner status
indicator
14x17
14x14
8x10
11x14
10x12
24x30
8x10
10x12
24x30
11x14
14x17
14x14
cassette position
indicators
cassette tray
Front View of the Scanner
System Status Indicator
The scanner status indicator is located on the front of the System to the left of the cassette entry slot.
The colors indicate the following:
System Status LED
Powering up and Homing Orange
Ready for Scan Steady Green
Scanning Blinking Green
Error Blinking Orange
8H8430 – 27JUN2010 1
Page 6
MISCELLANEOUS PUBLICATION
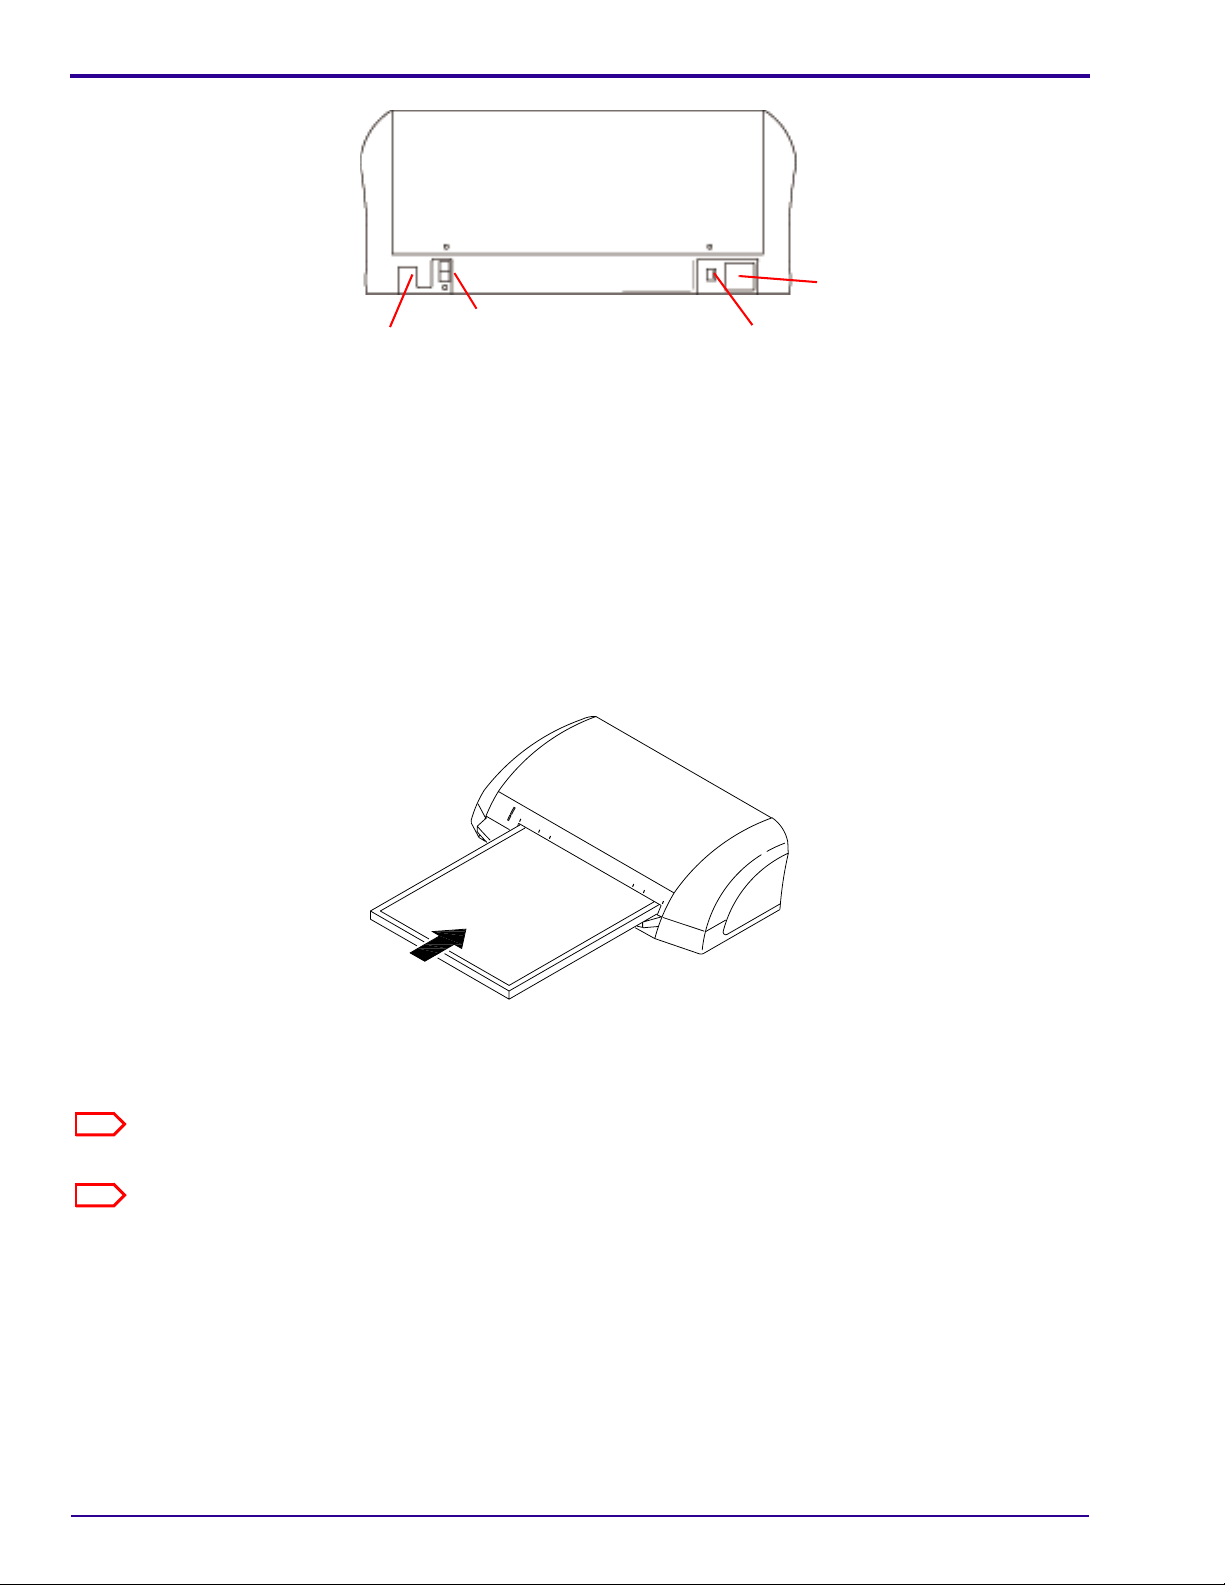
On-off Switch
Power Connector
USB Connector
Rear View of Scanner
Loading a Cassette into the System
The storage phosphor screen is contained in the cassette. The only time that the screen should be out of the cassette
is when the scanner automatically loads it into the scanner drum for reading or if you are cleaning the cassette.
[1] Verify that the scanner status “Insert Plate” message appears in the lower left corner of the software use r
interface.
[2] Insert the cassette into the scanner with:
• The gray side up
• The open edge (with red arrow) toward the scanner
• The cassette centered exactly in the scanner slot
1
4
x
1
1
7
4
x
1
4
8
1
x
1
1
x
0
1
1
4
0
x
1
2
2
4
x
3
0
I-Button Panel
8
x1
0
10
x1
2
2
4
x
3
0
11
x
1
4
1
4
x
17
1
4
x1
4
Loading a Cassette
[3] Slightly push the cassette into the scanner until the cassette locks into place. The screen is then pulled
automatically into the scanner.
Note
If you do not take action within two minutes, the cassette is automatically ejected.
Note
If the automatic bar code cassette identification fails, a software message prompts you to manually select the screen
size.
You can now scan, erase, or unload the screen. For further instructions, refer to the CARESTREAM VITA CR
SYSTEM SOFTWARE User Guide.
2 27JUN2010 – 8H8430
Page 7

Using the CARESTREAM DIRECTVIEW VITA CR System
8H8430 – 27JUN2010 3
Page 8

MISCELLANEOUS PUBLICATION
4 27JUN2010 – 8H8430
Page 9
Using 15 x 30 Cassettes with the System
Section 1: Using 15 x 30 Cassettes with the System
Required 15 x 30 Adapter Components
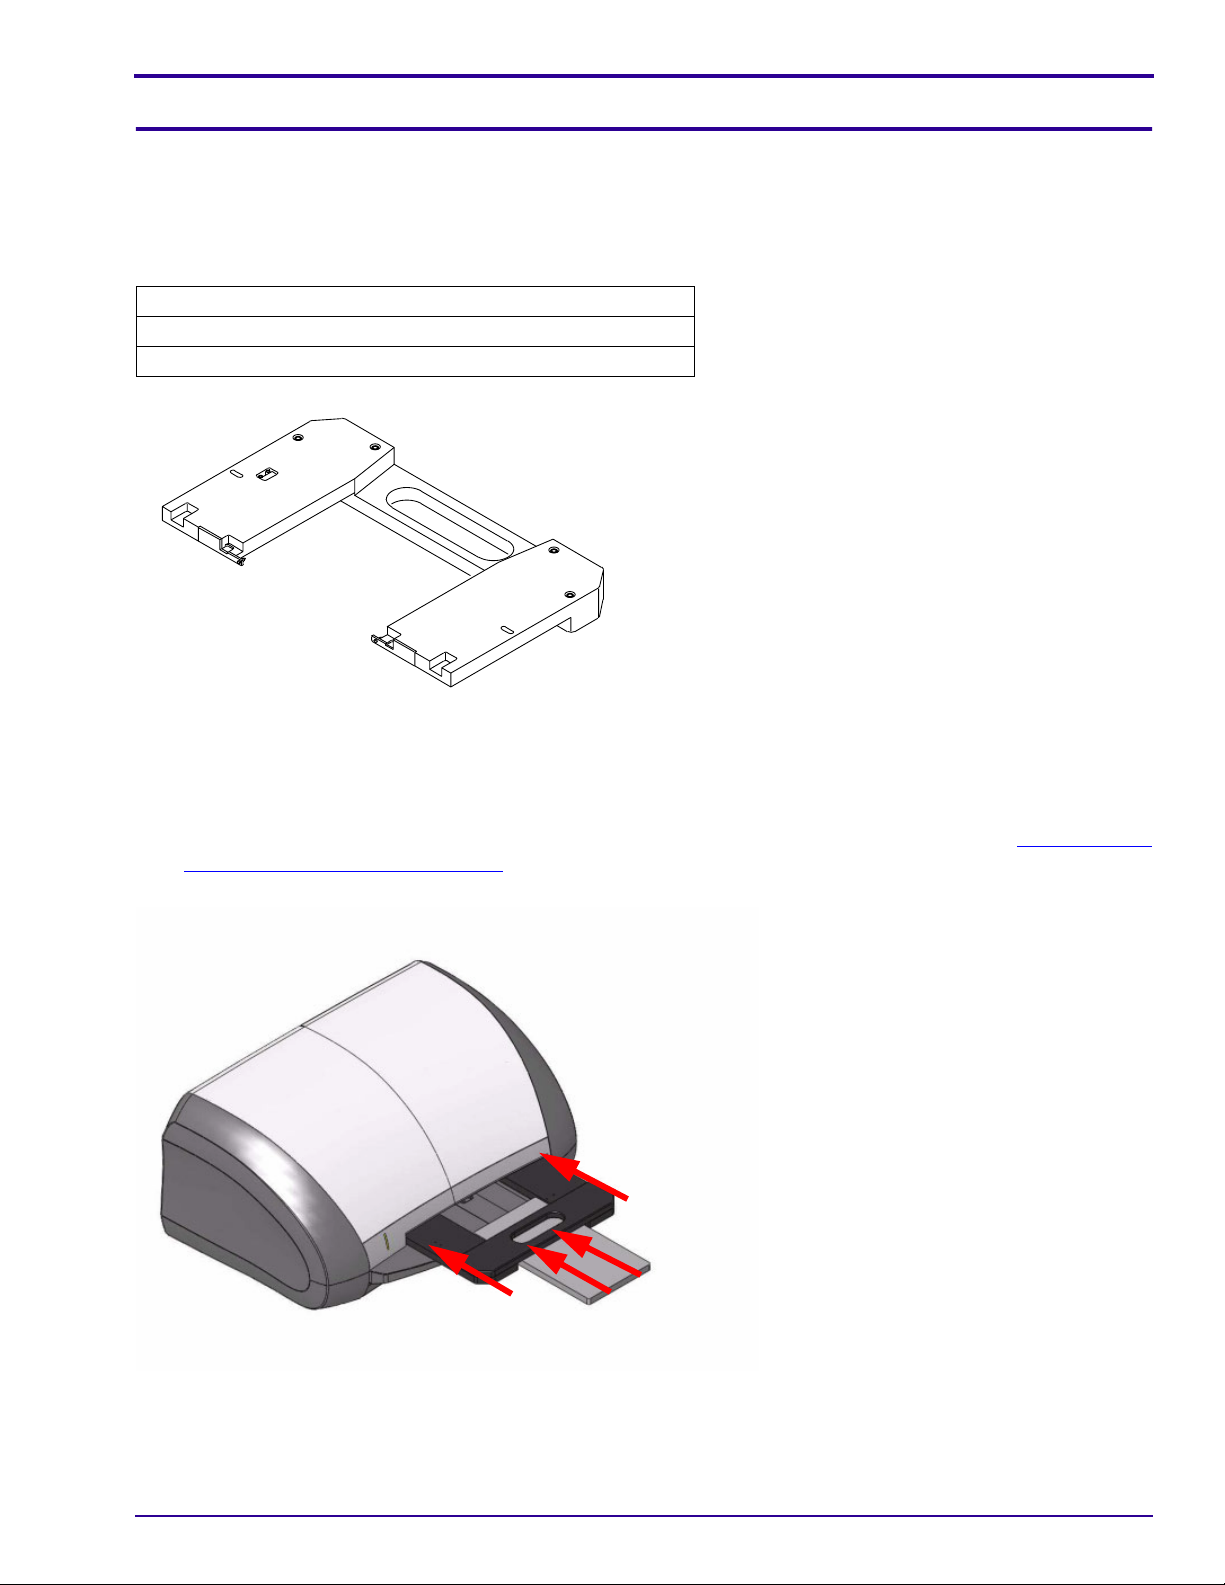
• 15 x 30 Cassette Adapter PN AC000012 (see the table for correct adapter type)
• 15 x 30 Cassette
VITA CR
Cassette Adapter with sensor magnet
AC000012
Cassette Adapter (sensor magnet, no pin)
Using the CR Imaging Plate 15 x 30 cm Adapter and Cassette
[1] Place the adapter on the system tray and push it into the system un til it is securely seated. See “Required 15 x
30 Adapter Components” on Pag e 1 for details on using the cor rect adapter.
[2] Place the 15 x 30 cassette on the CR tray within the adapter and push it until it locks in the system.
Adapter
Adapter opening
8H8430 1
Page 10
MISCELLANEOUS PUBLICATION
Using the CARESTREAM VITA CR SYSTEM SOFTWARE Only
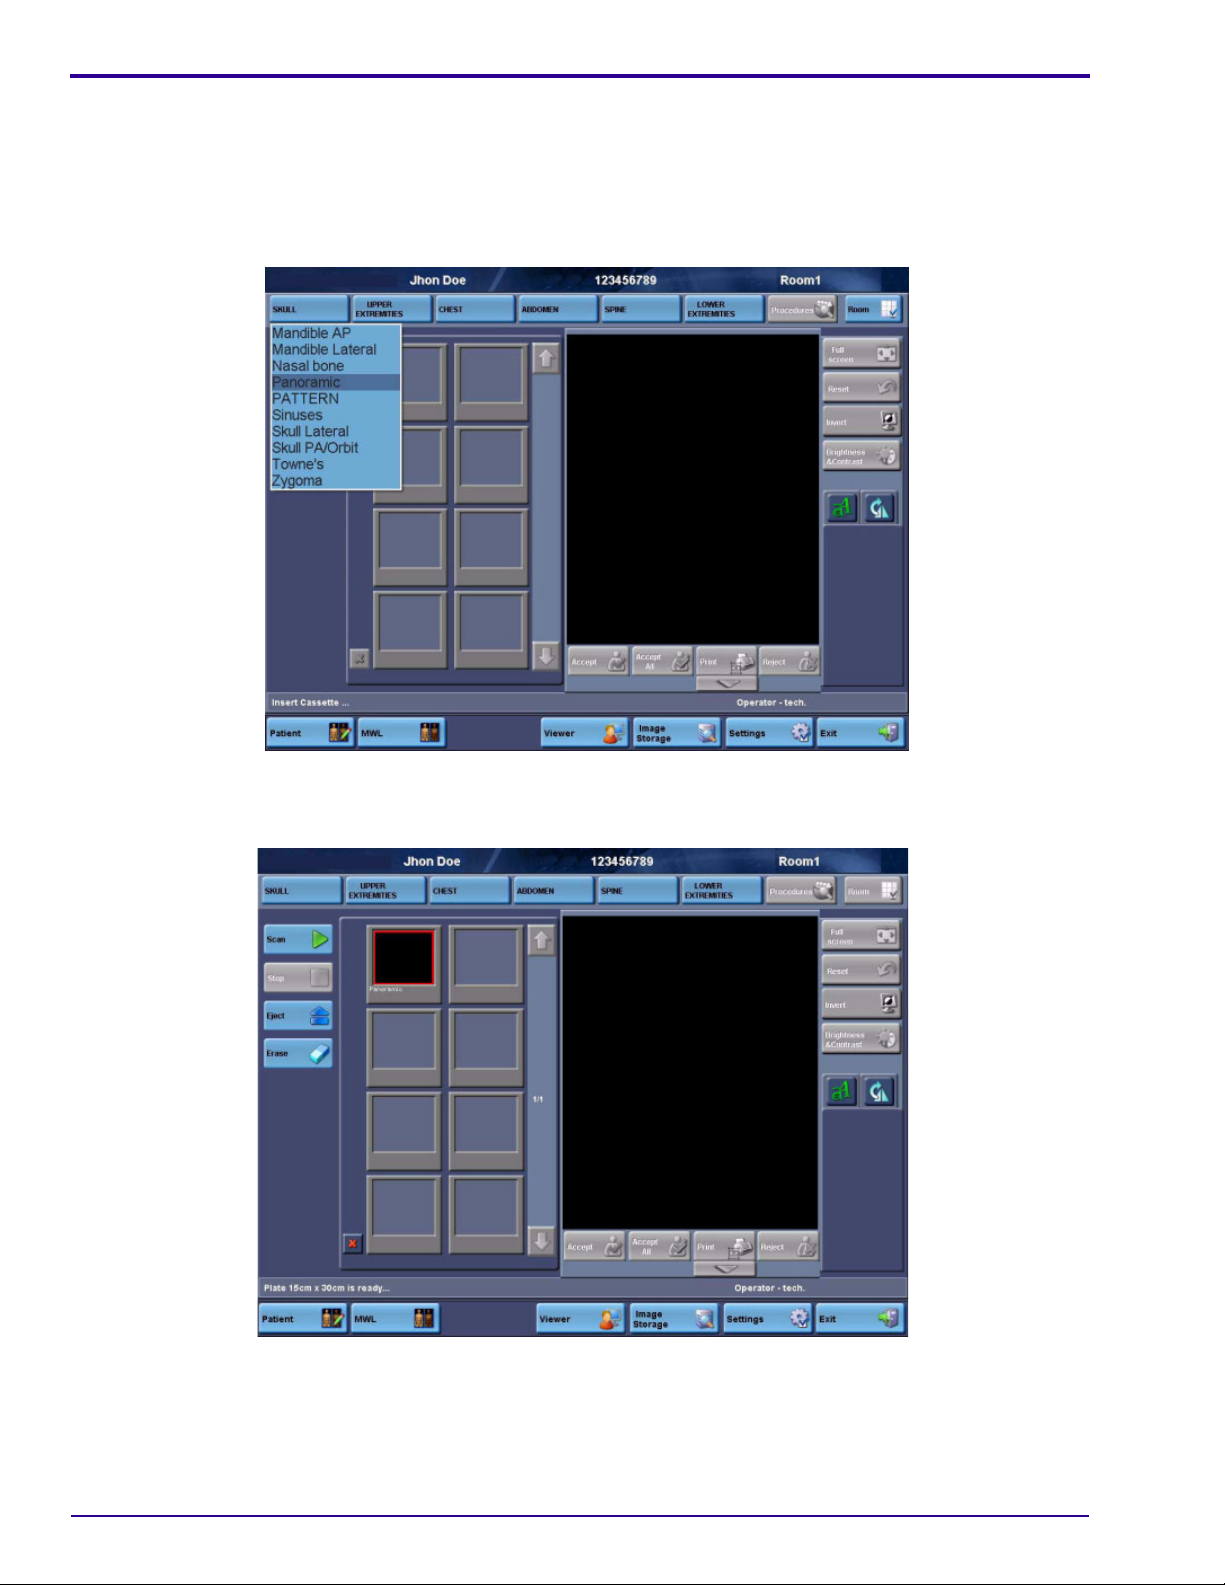
[1] Begin a regular scanning procedure.
[2] In the Patient list screen, enter patient information or select a patient from the list.
[3] Click the Acquire button to move to the Scan screen.
[4] In the Scan screen, click SKULL and select the Panoramic view position from the sub-list.
Scan screen
The System is ready to start the scan.
Scan screen - Plate 15 cm x 30 cm is ready
[5] Click Scan to start the scan.
[6] When the cassette is ejected, you can scan another image ( with the adapter left in place), or re mov e it and the
Adapter from the tray.
2 27JUN20108H8430
Page 11
Maintaining and Cleaning the System
Section 6: Maintaining and Cleaning the System
Cleaning the VITA CR Rollers
The Roller Cleaning Cycles
The roller-cleaning device enables you to clean the ro llers t hat fe ed th e sto rage p hosp hor scree n fro m the casset te
into the scanner. Clean the rollers periodically to remove dust and small particles.
Every 1,000 scanning cycles you will receive a reminder (popup window message) to clean the rollers.
Cleaning the rollers resets the roller cleaning counter.
If you do not clean the rollers the reminder message will appear every 100 scanning cycles.
Important
Not cleaning the rollers periodically will reduce the image quality.
The Roller Cleaning Procedure
The cleaning device includes the following items:
• Cleaning tray
• Cleaning plate with adhesive strips inside a protective envelope
[1] Remove any cassettes and screens from the scanner.
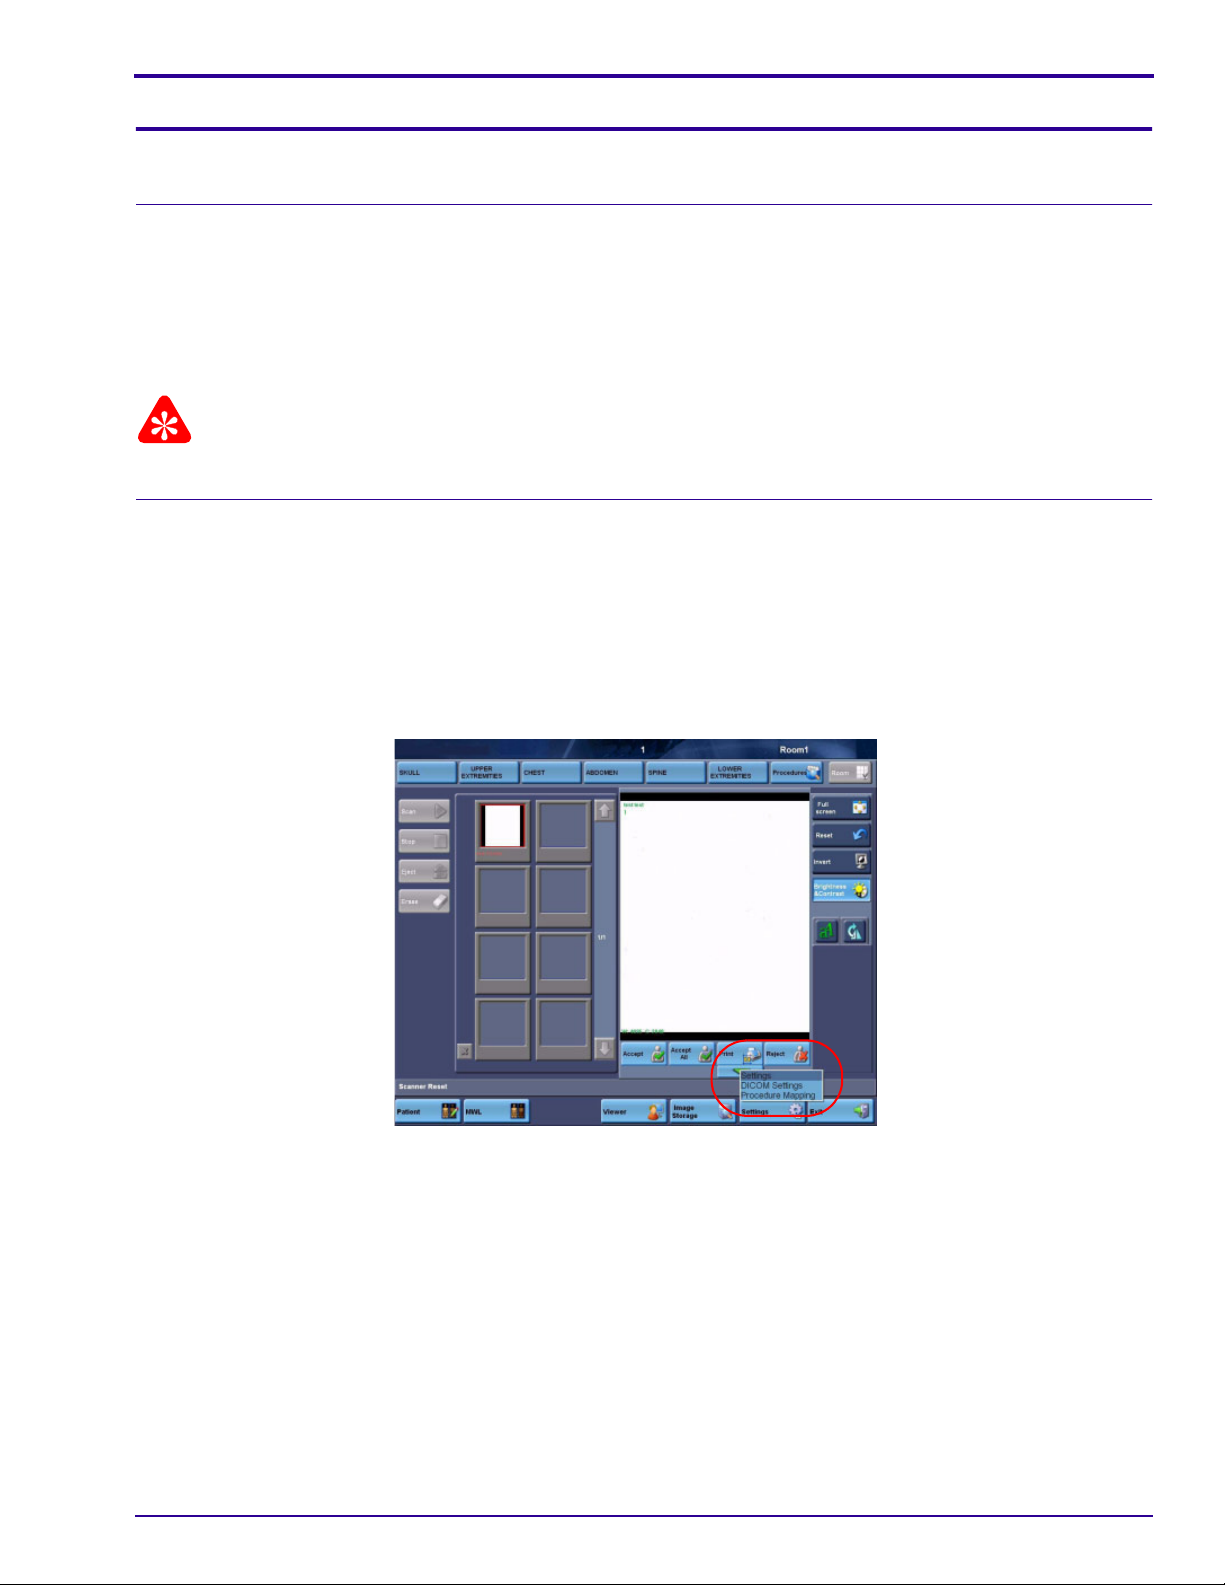
[2] Start the CARESTREAM VITA CR SYSTEM SOFTWARE.
[3] In the main screen, select Settings>Settings>User tab.
Main screen
8H8430 – 27JUN2010 91
Page 12
MISCELLANEOUS PUBLICATION
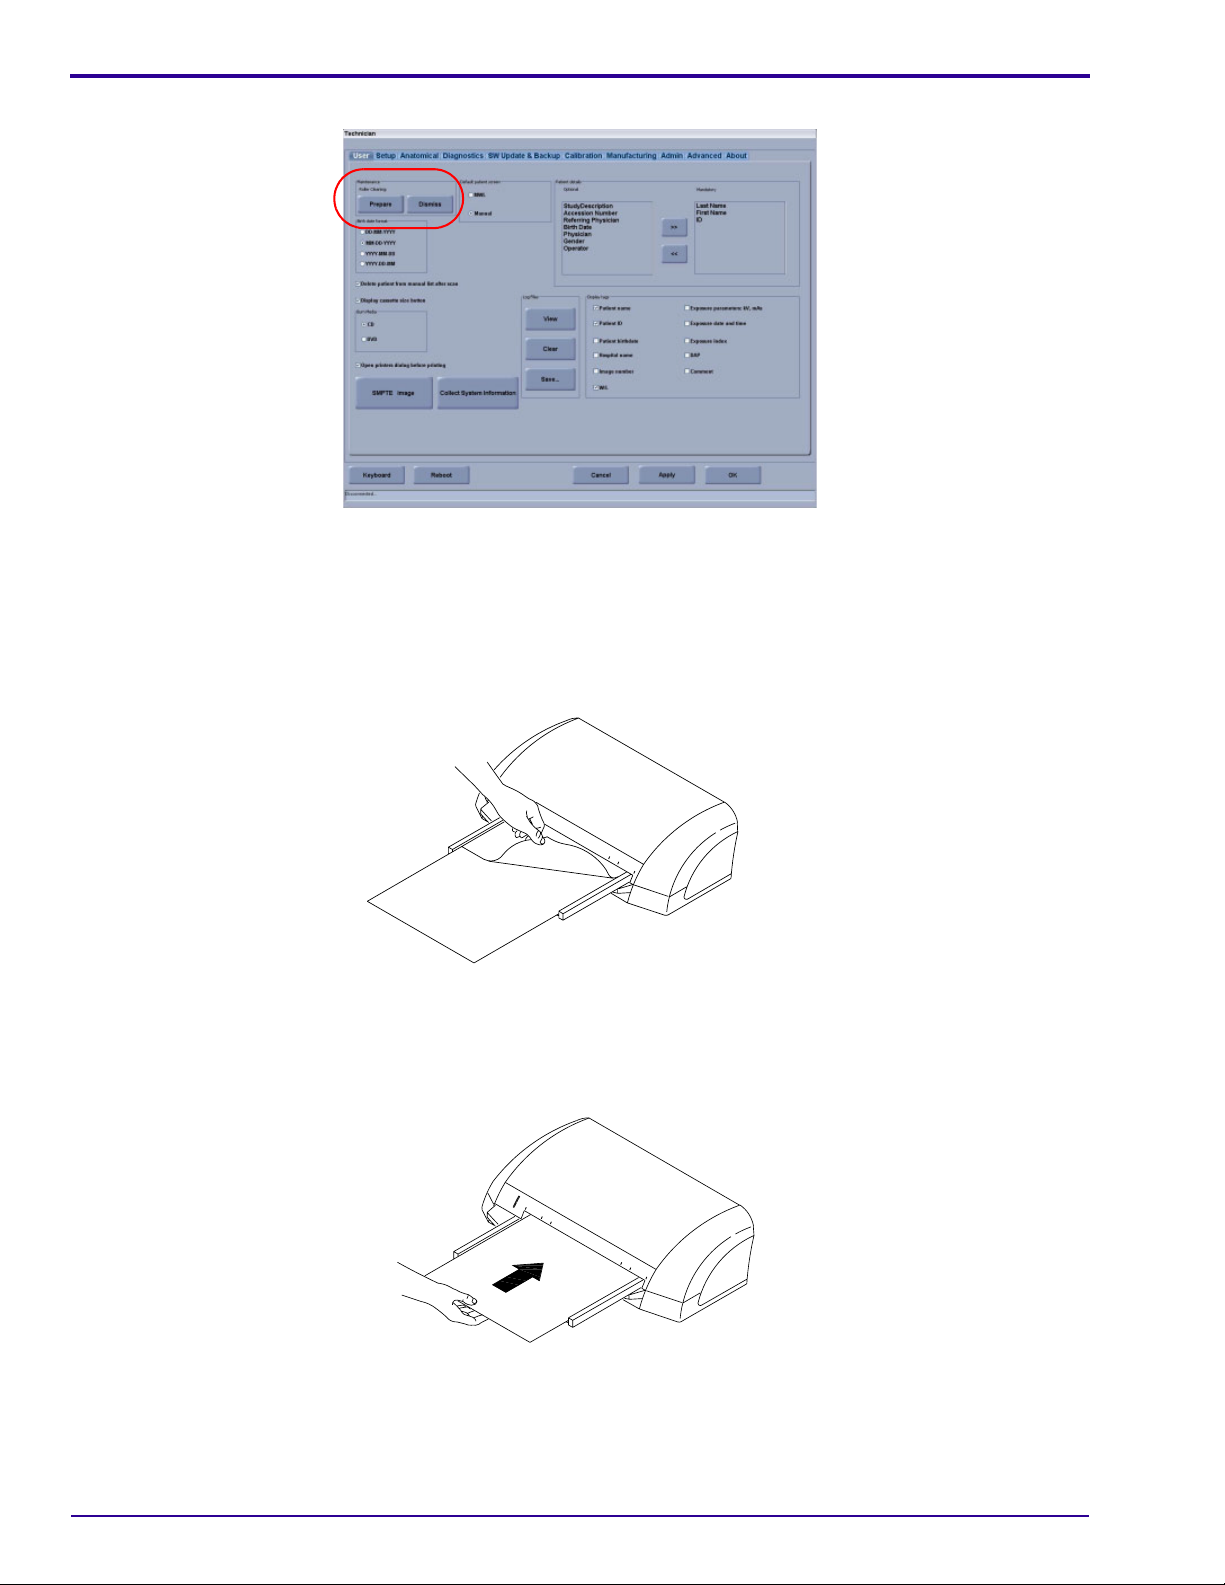
[4] Click the Prepare button in the Maintenance subsection next to “Roller Cleaning”.
User tab
[5] When a warning message appears, click OK to continue.
[6] Insert the Cleaning Tray into the unit tray. Make sure it locks into place.
[7] Place the cleaning plate on the tr ay. Make sure the cleaning plate is placed in the correct dire ction, as specified
on the plate.
Remove the protective paper from the cleaning plate to expose the adhesive.
8
x
1
0
1
0
x
1
2
2
4
x
3
0
11
x
14
1
4
x
1
1
7
4
x1
4
Removing the protective strips
[8] Click OK.
[9] While holding onto the plate, push the plate gently into the scanner until the rollers start to pull it into the
scanner. It should go in almost entirely, with approximately a quarter of the plate remaining outside.
1
4
x1
1
7
4
x
1
4
8
1
x
1
1
x1
0
1
4
0
x
1
2
2
4
x3
0
8
x
1
0
1
0
x
1
2
2
4
x
3
0
1
1
x
1
4
1
4
x1
1
7
4
x
1
4
Pushing the cleaning plate into scanner
[10] An on-screen message appears. Click OK and pull out the cleaning plate and the tray.
[11] Repeat Steps 4 through 10 three times.
[12] To complete th e pr oc ed ure, turn off the scanner, then turn on the scanner.
92 27JUN2010 – 8H8430
Page 13
Maintaining and Cleaning the System
Dismissing Roller Cleaning Reminder
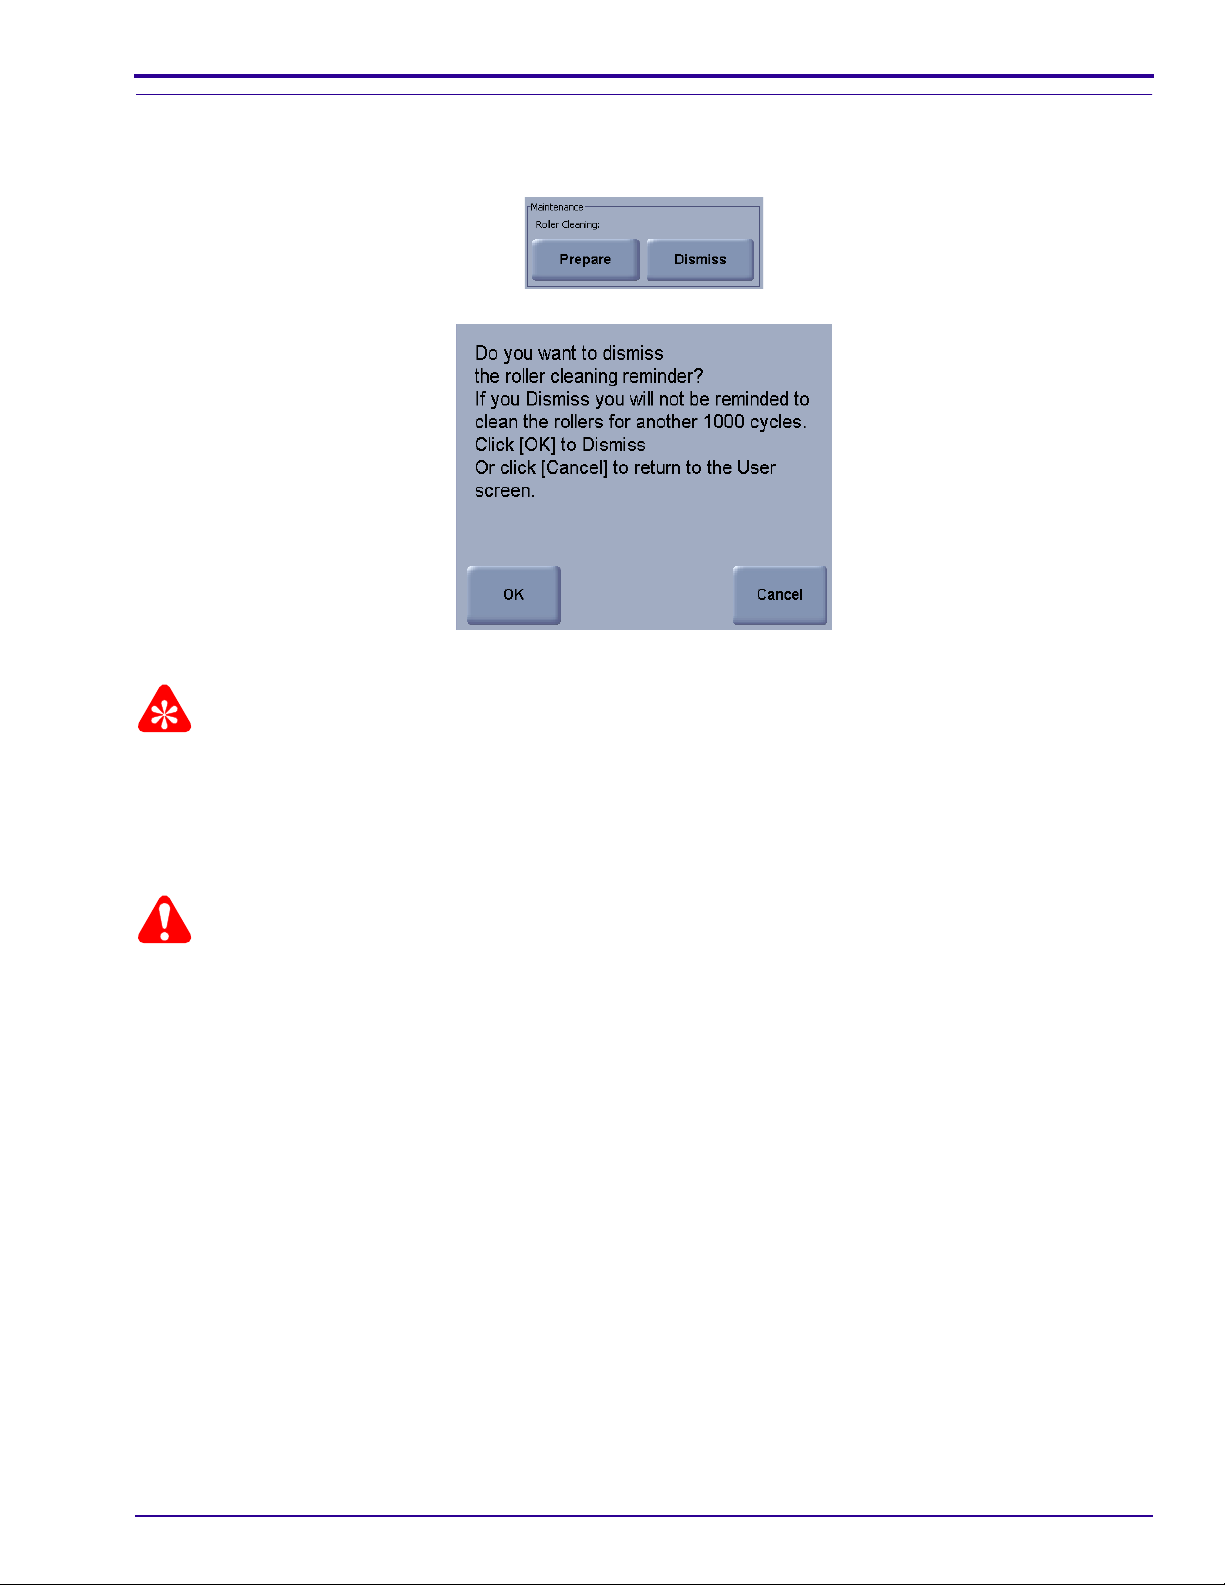
To prevent the roller cleaning reminder from appearing every 100 cycles, click the Dismiss button on the User
screen.
The following message appears; click OK to dismiss the message or Cancel to return to the User screen.
Roller cleaning dismiss message
Important
Not cleaning the rollers periodically will reduce the image quality.
Cleaning the VITA CR
Clean the outer surfaces only with water using a soft, lint-fr ee cloth. Dampen the cloth. Th en wipe the outer surfaces
lightly.
Caution
Do not use alcohol or alcohol-based products to clean any of the scanner components.
8H8430 – 27JUN2010 93
Page 14

MISCELLANEOUS PUBLICATION
94 27JUN2010 – 8H8430
Page 15
Cassette with Flexible Phosphor Screen Instructions
Section 1: Cassette with Flexible Phosphor Screen Instructions
Opening the Cassette
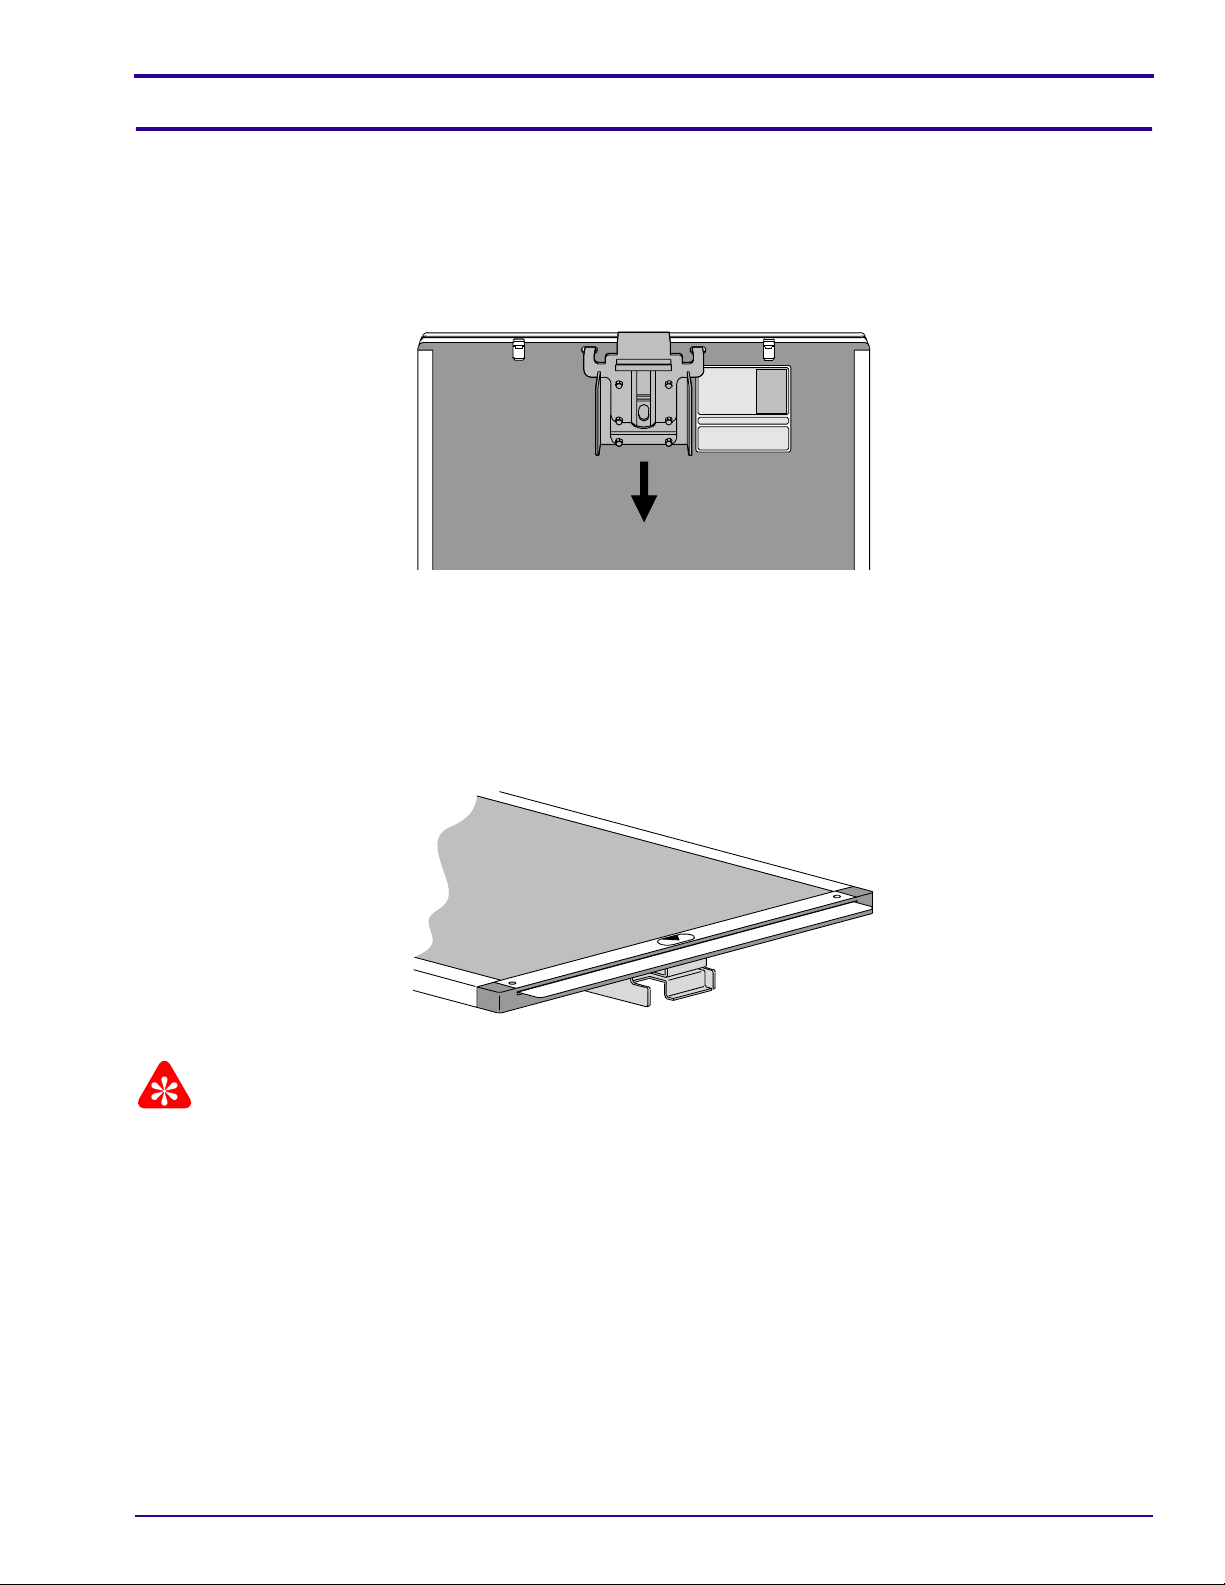
1. Slide the edge of the extraction tool provided with your CR System (PN SK2500 56) over the back edge of the
cassette.
2. Pull the tool down until it enters the square slots in the back of the cassette.
Loading a Phosphor Screen Into the Cassette
1. With the extraction tool in place, hold the screen with the wh ite (pho sphor) sid e up. I nsert the scre en so that the
dark side is facing the cassette labels.
2. Hold the cassette vertically and make sure the screen is fully inserted into the cassette.
3. Pull up on the release lever to remove the extraction tool.
Important
If you fail to insert the screen correctly:
• The screen may not feed properly from the cassette, causing an error message.
• An exposed image might not be processed.
• The screen may fall out of the cassette.
Removing a Phosphor Screen from the Cassette
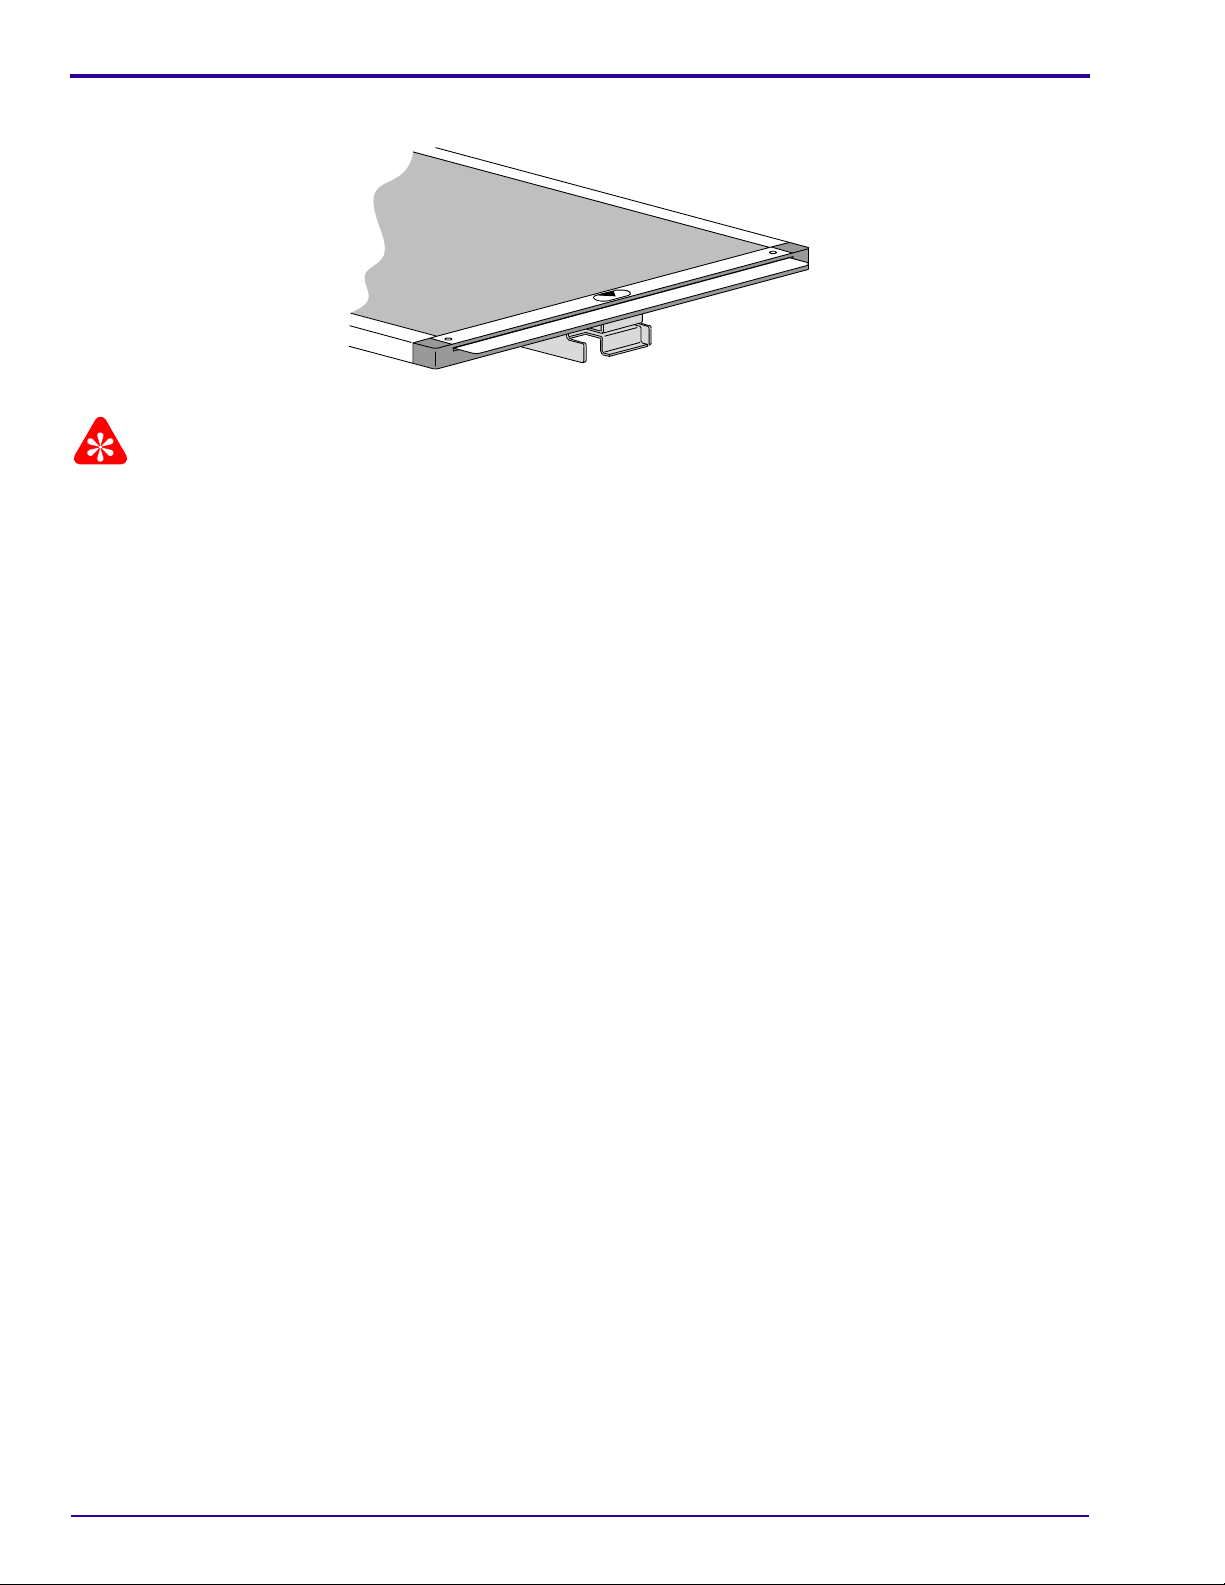
1. With the extraction tool in place, hold the cassette hor izontally. Push the slider in the middle of t he extraction tool
towards the open edge of the cassette until the screen is visible.
2. Carefully pull the screen out.
8H8430 – 27JUN2010 1
Page 16
MISCELLANEOUS PUBLICATION
3. Pull up on the extraction tool release lever to remove the tool.
Important
If you fail to insert the screen correctly:
• The screen may not feed properly from the cassette, causing an error message.
• An exposed image might not be processed.
• The screen may fall out of the cassette.
2 27JUN2010 – 8H8430
Page 17
Cassette with Flexible Phosphor Screen Instructions
Labeling the Cassette
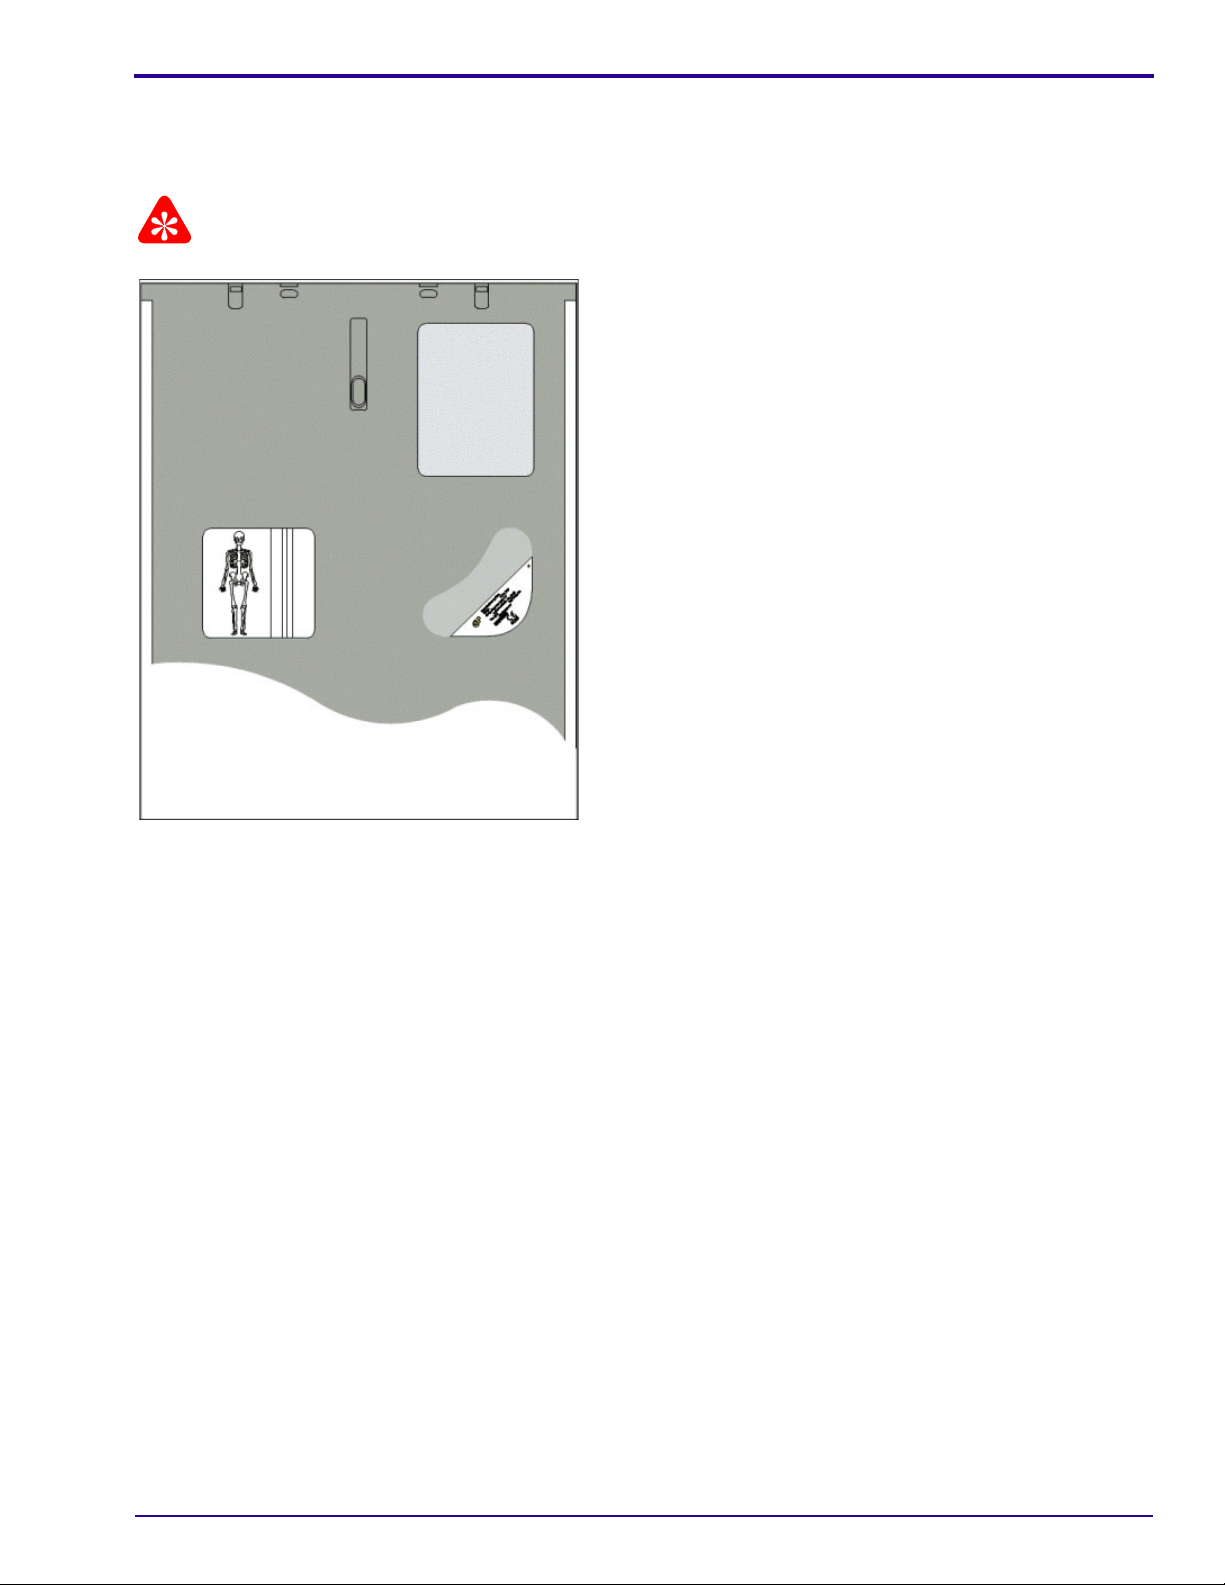
Screens are supplied with a Screen Type label and an optional Extremity label.
Label placement for the non tube side surface is illustrated.
Important
Position the labels so that they do not interfere with the Bar Code label.
8H8430 – 27JUN2010 3
Page 18
MISCELLANEOUS PUBLICATION
Cleaning the GP2 Phosphor Screens
General
Under normal use, the GP2 Phosphor Screens will eventually show wear. Screen wear can result in image artifacts.
This wear may occur from abrasion of the protective overcoat or inadvertent damage to the surface of the screen.
Important
Failure to routinely clean the screens with a recommended solution may create the following result:
• The screen may not move smoothly from the cassette into the reader, causing an error message.
• The screen may not fully return to the cassette at the end of the cycle, pre venting t he cassett e from latch ing; no
error message appears.
• Image artifacts.
Cleaning Materials
• Several soft, lint-free cloths
• Screen Cleaner (CAT no. 845-4977)
Cleaning Method
1. Dampen the cloth with a small amount of Screen Cleaner. Do not pour Screen Cleaner directly onto the
screen.
2. Wipe the screen thoroughly, one side at a time, applying pressure to remove persistent contaminations if
necessary.
3. Using another dry cloth, wipe the screen thoroughly dry. Do not leave the screen to air dry.
Caution
Read and follow the instructions in the manufacturer’s Material Safety Data Sheet (MSDS) prior to use.
Caution
Never insert a phosphor screen into a cassette unless the screen and cassette are thoroughly dry.
Caution
Cleaning materials other than those reco mmended can contain chemicals that cause visible or hidden damage to the
screen or cassette and could result in immediate or futur e image artifacts. Never use isopropyl alcohol (isopropanol,
rubbing alcohol) to clean screens or cassettes.
4 27JUN2010 – 8H8430
Page 19

Cassette with Flexible Phosphor Screen Instructions
Cleaning CARESTREAM VITA CR CASSETTES
Cleaning Materials
• Several soft, lint-free cloths
• A mild soap and water solution, or Screen Cleaner (CAT no. 845- 4977)
Cleaning Method
1. Dampen the cloth with a small amount of Screen Cleaner. Do not pour Screen Cleaner directly onto the
cassette.
2. Wipe the cassette thoroughly, one side at a time, applying pressure to remove persistent contaminations if
necessary.
3. Using another dry cloth, wipe the cassette thorough ly dry. Do not leave the cassette to air dry.
Caution
Cleaning materials other than those recommended can contain chemicals that cause visible or hidden damage to the
screen or cassette and could result in im mediate or futu re image arti facts. Never use isopr opyl alcohol (isoprop anol,
rubbing alcohol) to clean screens or cassettes.
Disinfecting Equipment, Cassettes, and Screens
If the Equipment and/or Cassette/Screen is visibly conta minated with blood or bodily fluids, rem ove the blood/bodily
fluids followed by intermediate-level disinfection as indicated prior to use.
Cleaning Materials
• Several soft, lint-free cloths
• For CASSETTES—a 1:10 bleach/water solution (one part of 5.25% sodium hypochlorite to ten parts water)
• For SCREENS—a commercially-prepared equivalent solution of diluted blea ch that contains NO materials which
can cause screen damage.
Disinfection Method: Cassettes
1. Dampen the cloth thoroughly with a small amount of the bleach/water solution. Do no pour solution directly
onto the cassette.
2. Wipe the cassette thoroughly, one side at a time, applying pressure to remove persistent contaminations if
necessary.
3. Using another dry cloth, wipe the cassette thoroughly dry.
Disinfection Method: Screens
1. Dampen the cloth with a small amount of diluted bleach solution. Do no pour directly onto the screen.
2. Wipe the screen thoroughly, one side at a time, applying pressure to remove persistent contaminations if
necessary.
3. Using another dry cloth, wipe the screen thoroughly dry. Do not leave the screen to air dry.
Caution
Be sure all external and internal surfaces are thoroughly dry before reassembling and returning screens and
cassettes to use.
8H8430 – 27JUN2010 5
Page 20

MISCELLANEOUS PUBLICATION
Disposal and Recycling of Cassettes and Screens
Screen Disposal
Due to the presence of barium, the screen may be considered a hazardou s o r special waste at the en d of its useful
service life. For disposal or recycling information, contact your local authorities.
Cassette Disposal and Recycling
The CR cassette contains lead. Disposal of lead is regulated due to environmental considerations. For disposal or
recycling information, contact your local authorities.
For More Information
For more information concerning these products, inside the United States call Carestream Health Inc. at
1.800.328.2910. Outside the U.S., contact the Customer Support Center in your country.
6 27JUN2010 – 8H8430
Page 21
VITA CR Specifications
Section 5: VITA CR Specifications
Scanner Physical Specifications
Weight <36 kg (79 lb)
Dimensions (W x D x H) 75 x 55 x 34 cm (29.5 x 21.7 x 13.4 in.)
Screen Type Flexible GP2 Phosphor Screen
60 degrees mounted on Z-cart Height 1430 mm
60 degrees mounted on Z-cart Depth 602 mm
Power consumption in operation 95 W
Power consumption while idle 50 W
Power consumption while in “stand-by” 50 W
Heat dissipation while in operation 324 BTU/H
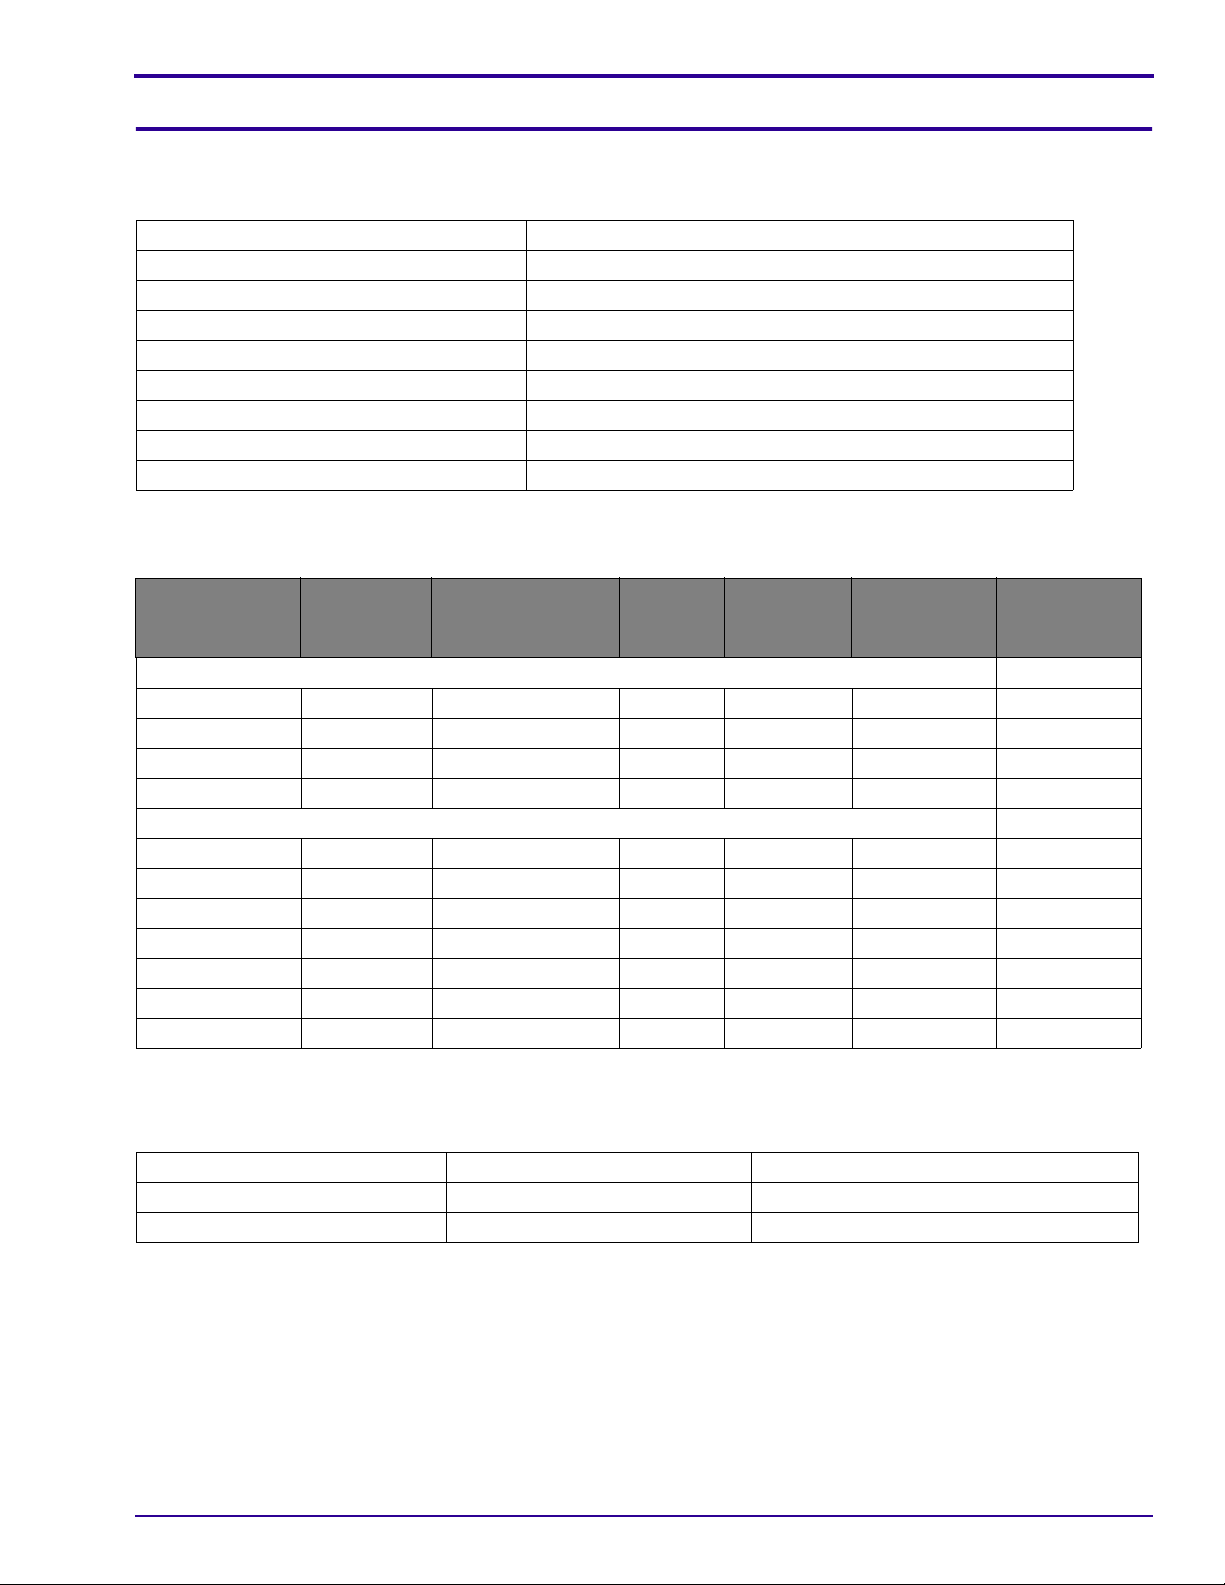
Supported Cassette Sizes and Throughput
Line pairs/
Pixel Pitch
Cassette Size
14 x 33 in. 160 2272 x 2748 6 23 50 3
14 x 17 in. 160 2180 x 2660 6 44 50 3
14 x 14 in. 160 2180 x 2180 6 47 50 3
11 x 14 in. 160 1700 x 2180 6 52 43 3
14 x 17 in. 86 4048 x 4932 12 32 82 6
14 x 14 in. 86 4048 x 4048 12 33 82 6
11 x 14 in. 86 3156 x 4048 12 38 68 6
10 x 12 in. 86 2868 x 3460 12 41 63 6
8 x 10 in. 86 2280 x 2872 12 44 62 6
24 x 30 cm 102 2284 x 2880 10 42 60 5
15 x 30 cm 86 1760 x 3404 12 52 45 6
(microns)
Pixel Matrix Size Pixel/mm
Standard Resolution
High Resolution
Throughput
(pph)
Time to First
Image (sec)
(theoretical)
mm
Storage and Operation Environments
Operation Transport/Storage
Ambient temperature: +15°C to +30°C (+59°F to +86F) -23°C to +66°C (-9°F to +150°F)
Relative humidity: 15% to 76% 5% to 86%
8H8430 – 27JUN2010 17
Page 22

MISCELLANEOUS PUBLICATION
18 27JUN2010 – 8H8430
Page 23

Publication History
Publication History
Publication
Date
27JUN2010 8H8430 8H8430 New Publication
Publication
No.
ECO
No.
Changed
Pages File Name Notes
27JUN2010 – 8H8430 19
Page 24

CARESTREAM and VITA are trademarks of Carestream Health, Inc.
The Kodak trademark and trade dress are used under license from Kodak.
Printed in U.S.A. 8H8430
Carestream Health, Inc.
Rochester, N.Y. 14608
20 27JUN2010 – 8H8430
 Loading...