

Page 1

Infant Flow® SiPAP™ Model M675
Service manual
Page 2

ii Infant Flow
This document is protected by United States and International Copyright laws.
This document may not be copied, reproduced, translated, stored in a retrieval system, transmitted in any
form, or reduced to any electronic medium or machine-readable form, in whole or in part, without the
written permission of CareFusion. Information in this document is subject to change without notice.
This document is for informational purposes only and should not be considered as replacing or
supplementing the terms and conditions of the License Agreement.
© 2008 – 2010 CareFusion Corporation or one of its subsidiaries. All rights reserved Infant Flow SiPAP
model M675 is a registered trademark of CareFusion Corporation or one of its subsidiaries. All other
trademarks are property of their respective owners.
USA
CareFusion
22745 Savi Ranch Parkway
Yorba Linda, California 92887-4668
800.231.2466 tel
+1.714.283.2228 tel
+1.714.283.8493 fax
Authorized European Representative
CareFusion Germany 234 GmbH
Leibnizstrasse 7
97204 Hoechberg, Germany
District Court Wuerzburg HRB7004
+49.931.4972.0 tel
+49.931.4972.423 fax
®
SiPAP
carefusion.com
Literature number: 675–120 Revision F
675–120 Rev. F
Page 3

Service Manual iii
Revision History
Date Revision Changes
September 2003 675-120(1) Release
November 2004 B
December 2004 C
May 2005 D
Release manual in VIASYS Healthcare template using
VIASYS Healthcare Respiratory Care nomenclature.
Revised per EO 27980. Removed the picture
from the title page.
Deleted the ESD warning from page 19.
Removed “O2 Sensor” and added the word “measured”
on page 30.
Changed “O2 sensor” to “fuel cell” on pages 39, 45, 62,
68, 69, 73, 86, and 87.
Replaced the O2 senor row on page 50.
Updated the error codes on pages 56 and 57.
Replaced the warning on page 61.
Changed the Fitting procedure on pages
64, 68, and 75.
Changed step 6 on page 65.
Added Addendum A – Oxygen Leak Test
Changed Transducer Assy. To Transducer Interface on
page 88.
Revised per ECO 60329
Update address/contact info
Update battery remove/install procedure
Added note for fuel cell disposal
Update check valve assembly remove/install procedure
Update water trap & restrictor remove/install procedure
Delete redundant leak test
Update list of service parts
August 2008 E
675-120 Rev. F
Updated company information
Updated company information
Corrected Table 2 and updated Table 3
Updated Figure 6
Updated Figure 10
Updated the section “Diagnostics.”
Updated Table 6 starting on page 43
Page 4

iv Infant Flow
Date Revision Changes
April 2010 F Changed Ti to T-High throughout
Figure 5 - Diagnostic screen updated
Spelling correction from “GRD” to “GND”
Added “Note: transducer must be attached.”
Changed “10 V” to “11.10 V”
Updated Table 6 - Error Codes (E50 - E54) and added
E55
Removed “Blender (Check Valves and Filter) Annually”
from table 7.
Added “, and two screws on the case-bottom”.
Added “and document L2879”
Replaced Ti symbol with T-High symbol
Changed “PL5” to “PL2”
Replaced Figure 3
Replaced Figure 4 and 5. Changed “value doesn’t” to
“value on the external oxygen analyzer doesn’t”.
Changed “467352” to “68289”; changed “777245” to
“52700A”; removed items 677-005A, 675-311, S117635,
467461, 467460.
Removed item S117641; changed “675-310” to “M675AFRONT”
®
SiPAP
675-120 Rev. F
Page 5

Service Manual v
Warranty
The Infant Flow® SiPAP is warranted to be free from defects in material and
workmanship and to meet the published specifications for One (1) year from date of
shipment.
The liability of CareFusion, (referred to as the Company) under this warranty is
limited to replacing, repairing or issuing credit, at the discretion of the Company, for
parts that become defective or fail to meet published specifications during the
warranty period; the Company will not be liable under this warranty unless (A) the
Company is promptly notified in writing by Buyer upon discovery of defects or failure
to meet published specifications; (B) the defective unit or part is returned to the
Company, transportation charges prepaid by Buyer; (C) the defective unit or part is
received by the Company for adjustment no later than four weeks following the last
day of the warranty period; and (D) the Company’s examination of such unit or part
shall disclose, to its satisfaction, that such defects or failures have not been caused
by misuse, neglect, improper installation, unauthorized repair, alteration or accident.
Any authorization of the Company for repair or alteration by the Buyer must be in
writing to prevent voiding the warranty. In no event shall the Company be liable to
the Buyer for loss of profits, loss of use, consequential damage or damages of any
kind based upon a claim for breach of warranty, other than the purchase price of any
defective product covered hereunder.
The Company warranties as herein and above set forth shall not be enlarged,
diminished or affected by, and no obligation or liability shall arise or grow out of the
rendering of technical advice or service by the Company or its agents in connection
with the Buyer's order of the products furnished hereunder.
Limitation of Liabilities
This warranty does not cover normal maintenance such as cleaning, adjustment or
lubrication and updating of equipment parts. This warranty shall be void and shall not
apply if the equipment is used with accessories or parts not manufactured by the
Company or authorized for use in writing by the Company or if the equipment is not
maintained in accordance with the prescribed schedule of maintenance.
The warranty stated above shall extend for a period of One (1) year from date of
shipment, with the following exceptions:
1. Components for monitoring of physical variables such as temperature,
pressure, or flow are warranted for ninety (90) days from date of receipt.
2. Elastomeric components and other parts or components subject to
deterioration, over which the Company has no control, are warranted for sixty
(60) days from date of receipt.
3. Internal batteries are warranted for ninety (90) days from the date of receipt.
The foregoing is in lieu of any warranty, expressed or implied, including, without
limitation, any warranty of merchantability, except as to title, and can be amended
only in writing by a duly authorized representative of the Company.
675-120 Rev. F
Page 6

vi Infant Flow
®
SiPAP
Contents
Revision History ............................................................................... i
Warranty .......................................................................................... v
Limitation of Liabilities ................................................................... v
Notices .......................................................................................... viii
EMC Notice ............................................................................................................... viii
MRI Notice ................................................................................................................. viii
Intended Use Notice ................................................................................................... ix
Regulatory Notice ....................................................................................................... ix
Classification .............................................................................................................. ix
Declaration of Conformity Notice ................................................................................. x
Chapter 1 – Product Description ........................................................ 1
Chapter 2 – Product Specifications .................................................... 3
Modes .......................................................................................................................... 3
Controls ....................................................................................................................... 3
Monitors ....................................................................................................................... 3
Alarms ......................................................................................................................... 4
Pneumatic Supply ........................................................................................................ 4
Electrical Supply .......................................................................................................... 4
Atmospheric & Environmental ...................................................................................... 5
Physical ....................................................................................................................... 5
Chapter 3 – Warnings and Cautions ................................................... 7
Terms .......................................................................................................................... 7
Warnings ..................................................................................................................... 7
Cautions ...................................................................................................................... 9
Chapter 4 – System Construction ..................................................... 11
Touch Screen ............................................................................................................ 15
Alarm Conditions ....................................................................................................... 17
Diagnostic Screen ...................................................................................................... 17
Chapter 5 – Operation ....................................................................... 19
Gas Flow ................................................................................................................... 19
Electronic Functions .................................................................................................. 22
Electrical Layout ........................................................................................................ 23
Fault Management ..................................................................................................... 24
Chapter 6 – Operation ....................................................................... 25
Preparing and Connecting the Equipment.................................................................. 25
Switching On the IFSD ............................................................................................... 28
Alarms Test ............................................................................................................... 29
Infant Flow
Setting Up the Equipment .......................................................................................... 32
Setting the NCPAP Parameters ................................................................................. 33
®
SiPAP™ User Verification Test Checklist ............................................... 31
675-120 Rev. F
Page 7

Service Manual vii
Setting the BiPhasic Parameters ................................................................................ 34
Setting the Triggered BiPhasic Parameters ................................................................ 35
Calibration .................................................................................................................. 37
Giving a Manual Timed Sigh ...................................................................................... 37
Operation Without Electrical Power ............................................................................ 37
Fault Indications ......................................................................................................... 38
Diagnostics ................................................................................................................ 44
Chapter 7 – Maintenance ................................................................... 51
Cleaning ......................................................................................... 51
Maintenance ................................................................................... 51
General ...................................................................................................................... 51
Maintenance Frequencies .......................................................................................... 52
Removal and Fitting of Case ...................................................................................... 53
Removal and Fitting of Battery ................................................................................... 54
Removal and Fitting of Oxygen Filter ......................................................................... 55
Removal and Fitting of Fuel Cell Filter/Restrictor ....................................................... 56
Removal and Fitting of the Fuel Cell .......................................................................... 57
Removal and Fitting of Blender and Components ...................................................... 58
Removal and Fitting of Water Trap Filter .................................................................... 62
Removal and Fitting of Case Bleed Filtered Restrictor ............................................... 63
Removal and Fitting of PA Solenoid Valve ................................................................. 64
Chapter 8 – Explanation of Symbols ................................................ 65
Appendix A – Oxygen Leak Test ....................................................... 69
Appendix B – Product Configurations .............................................. 73
Non-US Configuration Parameters ............................................................................. 73
US Configuration Parameters .................................................................................... 73
Appendix C – Spare Parts .................................................................. 75
Appendix D – Pneumatics Assembly ................................................ 79
Glossary .............................................................................................. 81
675-120 Rev. F
Page 8

viii Infant Flow
Notices
EMC Notice
This equipment radiates and is susceptible to radio frequency energy. If not installed
and used in accordance with the instructions in this manual, electromagnetic
interference may result. The equipment has been tested and found to comply with
the limits set forth in BS EN60601-1-2 for Medical Electrical Equipment Part 1-2:
General requirements for safety-collateral standard. Electromagnetic compatibility –
requirements and tests. These limits provide reasonable protection against
electromagnetic interference when operated in the intended use environments (e.g.
hospitals) described in this manual.
This device is also designed and manufactured to comply with the following
standards;
Safety: UL 60601-1: 2003 Medical Electrical Equipment, Part 1: General
Requirements for Safety.
CAN/CSA C22.2 No 601.1-M90, Medical Electrical Equipment - Part
1: General Requirements for Safety including C22.2 No. 601.1S1-94
(IEC601-1, Amendment 1:1991) Supplement No. 1-94 to CAN/CSA
22.2 No. 601.1-M90
®
SiPAP
With regards to Electrical Safety:
Class 1 equipment
Contains type BF patient applied parts
Continuous Operation
MRI Notice
This equipment contains electromagnetic components whose operation can be
affected by intense electromagnetic fields.
Do not operate this device in a MRI environment or in the vicinity of high-frequency
surgical diathermy equipment, defibrillators, or short-wave therapy equipment.
Electromagnetic interference could disrupt the operation of the device.
675-120 Rev. F
Page 9

Service Manual ix
Intended Use Notice
The Infant Flow® SiPAP, consisting of a Driver and Generator plus NCPAP Prongs
and Masks, is a medical device intended for the provision of Bi-Level CPAP to
produce a sigh. This system is for use in Hospital, Hospital Type facilities and intraHospital transport environments and is indicated for the treatment of Newborn and
Infant patients.
Operators of this equipment and Service Engineers are required to read and thoroughly
understand the contents of this manual before using or maintaining the equipment.
This manual is intended for use by a competent, fully qualified Service
Engineer. It includes a description of the unit and how it works. It also contains
operating and diagnostic procedures and maintenance instructions. For usage
of associated equipment, refer to the Manufacturer’s literature.
Regulatory Notice
Federal law restricts the sale of this device except by or on order of a physician.
Classification
Type of Equipment: Medical Equipment, Class 1 and internally powered, IPX1
Protected, and uses type BF applied parts. Equipment is not suitable for use in
presence of flammable anesthetics.
675-120 Rev. F
Page 10

x Infant Flow
Declaration of Conformity Notice
This medical equipment complies with the Medical Device Directive, 93/42/EEC, and
the following Technical Standards, to which Conformity is declared:
Council Directive(s): MDD 93/42/EEC Annex II (excluding section 4)
Safety: EN 60601-1, EN 794-1
EMC: EN 60601-1-2:2001
Conformity Assessment: MDD Annex II
Quality System: ISO 13485
EU Notified Body: BSI (Reg. No. 0086)
Device Classification: IIb
®
SiPAP
EU Notified Body:
BSI (Reg. No. 0086)
Trade names:
Infant Flow SiPAP
Manufactured by:
CareFusion
22745 Savi Ranch Parkway
Yorba Linda, CA 92887, USA
If you have a question regarding the Declaration of Conformity for this product,
please contact CareFusion.
675-120 Rev. F
Page 11

Service Manual 1
Chapter 1 – Product Description
The Infant Flow® SiPAP is a non-invasive form of respiratory support designed for
use in hospital environments such as Neonatal and Pediatric Intensive Care Units. It
can also be used when transporting patients within the hospital environment.
The Infant Flow
configuration. The Plus configuration provides NCPAP and time triggered, BiPhasic
modes with and without breath rate monitoring. The Comprehensive configuration
offers these features plus patient BiPhasic mode with apnea backup breaths. The
Infant Flow
display, pressure time waveform graphics, integrated patient monitoring, alarms for
high and low pressure and FiO
As a result of the unique patented design, the Infant Flow
to provide the most stable CPAP at the lowest work of breathing for patients
compared to other devices. The outstanding performance of the Infant Flow
is irrespective of patient demand or expiratory flows. This system has been designed
and tested to perform optimally when used only with accessories available from
CareFusion. These accessories include circuits and generators, prong and mask
patient interfaces and bonnets.
®
SiPAP is currently available in a Plus or Comprehensive
®
SiPAP comes standard in all configurations with an LCD touch screen
and up to 2 hours of backup battery power.
2
®
SiPAP has been proven
®
SiPAP
Infant Flow® SiPAP Features
The expanded capabilities of the Infant Flow® SiPAP Plus and Comprehensive
configurations allow for applications to broader range of patients who may otherwise
not be candidates for non-invasive respiratory support.
NCPAP – allows for continuous positive airway pressure based on clinician set
pressure. Breath rate monitoring/alarm can be activated in this mode.
BiPhasic - allows for time triggered pressure assists to be delivered based on
clinician set inspiratory time, rate, and pressure criteria. Breath rate monitoring/alarm
can be activated in this mode.
BiPhasic tr* - allows for patient triggered pressure assists to be delivered based on
clinician set inspiratory time and pressure criteria. Breath rate monitoring/alarm, and
Apnea backup breaths are automatically active in the mode.
Patented Infant Flow
the generation of consistent infant nasal CPAP with a low work of breathing
compared to other devices.
Fully integrated alarms packages – . Supply gases failure, High Patient Pressure,
Low patient pressure, high and low delivered Oxygen concentration, change from AC
to DC power source, low and flat battery charge status and Low breath rate/apnea
alarm.
Battery Backup – Up to 2 hours of battery backup allows for intra-hospital transport.
Clear indicators are provided for power supply in use (AC or DC), and battery charge
level.
®
Generator - The Infant Flow® Generator is a fluidic device for
675-120 Rev. F
Page 12

2 Infant Flow
• •
• •
•
•
• •
•
•
•
• •
•
• •
•
•
Screen Lock - After 120 seconds of no screen inputs, the screen changes to the
Locked Screen to prevent inadvertent changes. Upon activation of a high priority
alarm the screen changes to an unlocked state to allow for immediate interventions
as required.
Table 1 - Functions and Accessories
Functions & Accessories Plus Comprehensive*
®
SiPAP
NCPAP
NCPAP with breath rate monitoring
and alarm
BiPhasic
BiPhasic with breath rate monitoring
and alarm
BiPhasic tr*
Internal Battery
Manual Breath
Apnea Back up rate
Screen lock
Prioritization of alarms
*Comprehensive configuration not available for sale in the United States
CAUTION
The Infant Flow SiPAP™ has been designed and tested as a complete system
using Infant Flow™ accessories. Only accessories approved for use should be
used. If in doubt, please contact your local CareFusion representative.
675-120 Rev. F
Page 13

Service Manual 3
Chapter 2 – Product Specifications
Modes
• NCPAP
• NCPAP with breath rate monitoring and low rate alarm
• BiPhasic (time triggered)
• BiPhasic (time triggered) with breath rate monitoring and low rate alarm
• BiPhasic tr (patient triggered ) with breath rate monitoring, low breath rate
alarm, and apnea back up
Controls
• Inspiratory Time (T-High): 0.1-3.0 seconds
• Rate (R): 1-120 (Comprehensive only. The comprehensive configuration is
not available for sale in the United States.)
• Rate (R): 1-54 (Plus only)
• Apnea Interval (T
• Apnea Interval (T
• NCPAP/Pres Low flowmeter: 0-15L/min, accuracy +/- 15% of selected output
• NCPAP/Pres High flowmeter: 0-5L/min, accuracy +/- 15% of selected output
• Manual Breath: X 1
• Rate monitoring on/off: NCPAP
• %O
Monitors
• CPAP
• PEEP
• MAP
• PIP
• %O
• I:E ratio
apnea): 10-30 seconds, 5 second intervals (Comp* only)
LBR): 10-30 seconds, 5 second intervals (Plus only)
: 21 - 100% - accuracy +/-3%
2
2
• Spontaneous rate (Rs)
• Battery charge level
675-120 Rev. F
Page 14

4 Infant Flow
Alarms
• High airway pressure – 3 cmH20 above measured airway pressure
• High circuit pressure – maximum 11 cmH20 in time triggered Biphasic mode
• High circuit pressure – maximum 15 cmH20 in patient triggered Biphasic tr
mode (Comprehensive only. The comprehensive configuration is not
available for sale in the United States.)
• Low airway pressure – 2 cmH20 below measured airway pressure or 1
cmH20 if otherwise would be zero
• High and Low delivered Oxygen concentration +5% of setting
• Low breath rate alarm
• Low or Flat battery charge level
• Alarm volume (electronic alarms) 70 dBa at 1 meter
Pneumatic Supply
• Patient Gas Outlet: 15 mm standard taper fitting
®
SiPAP
• Patient Pressure Input: 4.5 mm Luer taper fitting
• Gas Supply: Nominal 4 bar or 60 psi, clean, dry medical air and oxygen
• Range: 2.8 to 6 bar (40 to 90 psi); maximum differential pressure 2 bar
(30 psi)
• Manometer: Range 0 to + 20 cmH2O, accuracy, ± 2% of span
• Gas Connections: Standard DISS or NIST connectors
Electrical Supply
• Input Voltage:100-230 VAC
• Input Frequency: 50/60 Hz
• Power Consumption: 50 VA maximum
• Fuse Rating For 220 V nominal operation: “T” Type 2.5 A at 250 V
• Device Housing Protection rating level: IPX1
• Battery Working Time: 2 hours (from fully charged state)
• Battery Charging Time: max. 16 hours
675-120 Rev. F
Page 15

Service Manual 5
Atmospheric & Environmental
• Temperature Range-Operating: 5 – 40° C
• Storage: 0 - 50° C
• Relative Humidity -Operating: 0 – 90% non-condensing
• Storage: 0 – 90% non-condensing
Physical
• Dimensions (driver only)-(W x H x D) 26 x38 x 23.5 cm /
10.25 x15 x 9.25 in
• Weight (driver only)-8.8 kg / 19.5 lb
675-120 Rev. F
Page 16

6 Infant Flow
®
®
SiPAP
Infant Flow
SiPAP™
Model M675
675-120 Rev. F
Page 17

Service Manual 7
Chapter 3 – Warnings and Cautions
Please review the following safety information prior to operating the Infant Flow
SiPAP. Attempting to operate this equipment without fully understanding its features
and functions may result in unsafe operating conditions.
Warnings and Cautions, which are general to the use of the device under all
circumstances, are included in this section. Some Warnings and Cautions are also
inserted within the manual where they are most meaningful.
Notes are also located throughout the manual to provide additional information
related to specific features.
If you have a question regarding the installation, set up, operation, or maintenance of
the device, contact technical support at CareFusion.
Terms
WARNINGS identify conditions or practices that could result in serious adverse
CAUTIONS identify conditions or practices that could result in damage to the
NOTES identify supplemental information to help you better understand how
®
reactions or potential safety hazards.
ventilator or other equipment.
the ventilator works.
Warnings
• Whenever a patient is attached to respiratory care equipment, constant
attendance is required by qualified personnel. The use of an alarm or
monitoring system does not give absolute assurance of warning for every
malfunction that may occur in the system. In addition, some problems may
require immediate attention.
• The gas blender incorporated in this product is designed to mix medical
grade air and oxygen only. Do not modify the inlets to accommodate other
source gases such as anesthetic gases.
• Check that the water trap is empty before use and empty it frequently during
use.
• Liquid water or other contaminants in either gas supply, particularly the air
supply, may cause malfunction of this equipment and equipment connected
to it.
• When filling a humidifier, do not move the stand. Moving or transporting the
stand while refilling may cause the stand and equipment to over balance.
675-120 Rev. F
Page 18

8 Infant Flow
• Do not use conductive patient circuits with the Infant Flow SiPAP Driver.
• Nasal CPAP can cause nasal irritation, septal distortion, skin irritation and
pressure necrosis. Observe the usage guidelines to minimize these
complications.
®
SiPAP
• This device exhausts O
during normal operation. Oxygen vigorously
2
accelerates combustion. To avoid fire hazard, do not place flammable
materials or sources of heat close to the exhaust.
• Do not use the equipment without the exhaust tube fitted (refer to Figure 2).
• To reduce trip hazard, always ensure cable and tubes are restrained away
from walking areas.
• The Abdominal Respiratory Sensor will not detect all forms of apnea.
Independent monitoring should always be used with this device.
• If the unit is shelf mounted, ensure that the unit is stable and that hoses and
cables are restrained to avoid hazard of toppling.
• This equipment is not suitable for use in the presence of a flammable
anesthetic mixture.
• The NCPAP Pres High flowmeter must be adjusted to zero when not required
for the patient.
• Under extreme conditions (minimum supply pressure and maximum gas
demand, including auxiliary output) output flow rates and delivered pressure
may be reduced.
• Only use the supplied AC cable to connect to the power supply.
• Do not attach the Generator to the patient until the initial set up is complete.
• The
indicates a connection between the transducer interface and the
unit. It does not indicate correct positioning of the Abdominal Respiratory
Sensor.
• Calibration must only be done when the unit is not connected to the patient.
• Verify that the displayed value for delivered FiO
corresponds to the value set
2
on the blender. Refer to Faults and Indications.
• Oxygen vigorously accelerates combustion. To avoid explosion hazard, do
not use any instrument or other equipment that may have been exposed to oil
or grease contamination.
675-120 Rev. F
Page 19

Service Manual 9
Cautions
• Federal Law (USA) restricts this device to sale by or on the order of a
physician.
• The precision gas blender in this product may become non-functional or
damaged if used without the protective water trap and filters provided.
• The power switch on this unit does not isolate the external power supply.
Disconnect the power supply cable to ensure complete isolation.
• Before use, verify that this equipment has been authorized for use by a
qualified person.
• The Infant Flow SiPAP™ has been designed and tested as a complete
system using Infant Flow™ accessories. Only accessories approved for use
should be used. If in doubt, please contact your local CareFusion
representative.
• Where the integrity of the external protective earth conductor is in doubt, the
equipment shall be powered by its internal power source (battery).
• Do not immerse any part of the IFSD in water or sterilize it with gas or steam.
• Ensure patient breathing circuit is replaced at regular intervals.
675-120 Rev. F
Page 20

10 Infant Flow
®
®
SiPAP
Infant Flow
SiPAP™
Model M675
675-120 Rev. F
Page 21

Service Manual 11
Chapter 4 – System Construction
CAUTION
Where the integrity of the external protective earth conductor is in doubt the
equipment shall be powered by its internal power source (battery).
The IFSD is AC powered with an integral rechargeable DC battery that provides
power for up to two hours without any interruption of performance or function. If the
AC power supply fails or is disconnected, the IFSD automatically switches to battery
power and gives an audio and visual alarm.
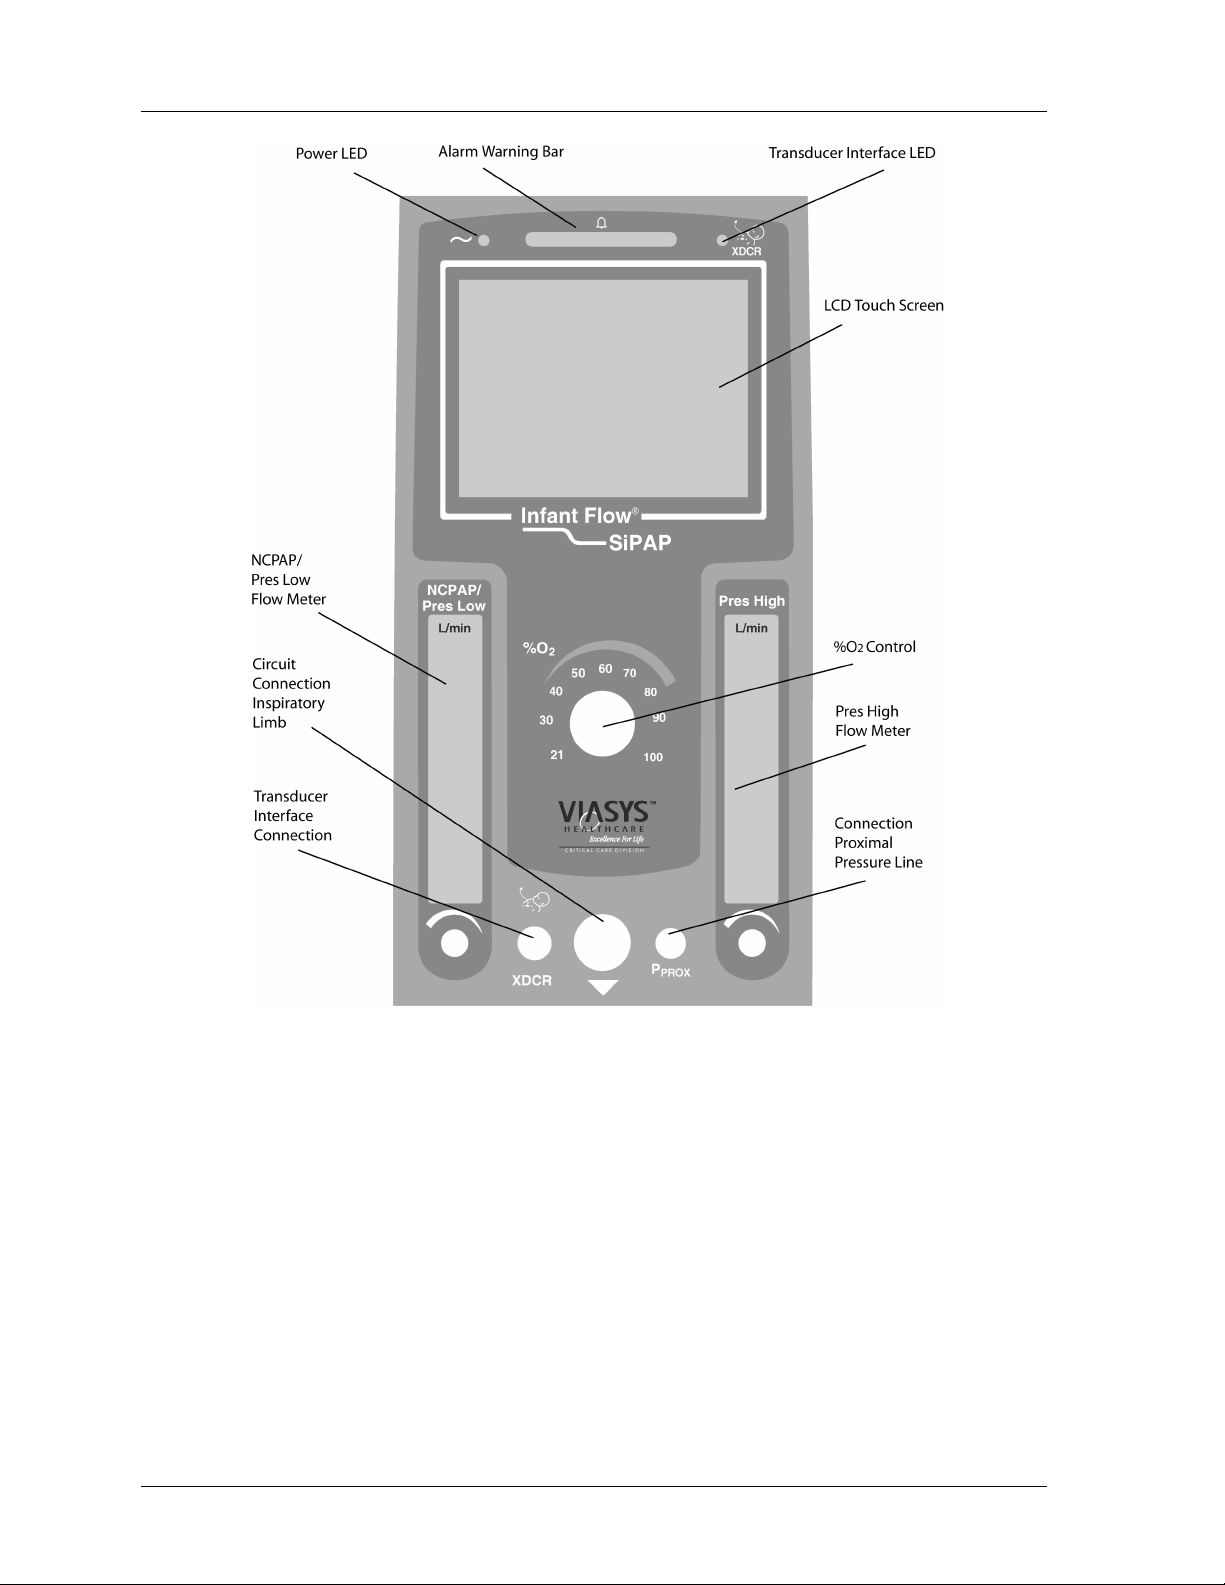
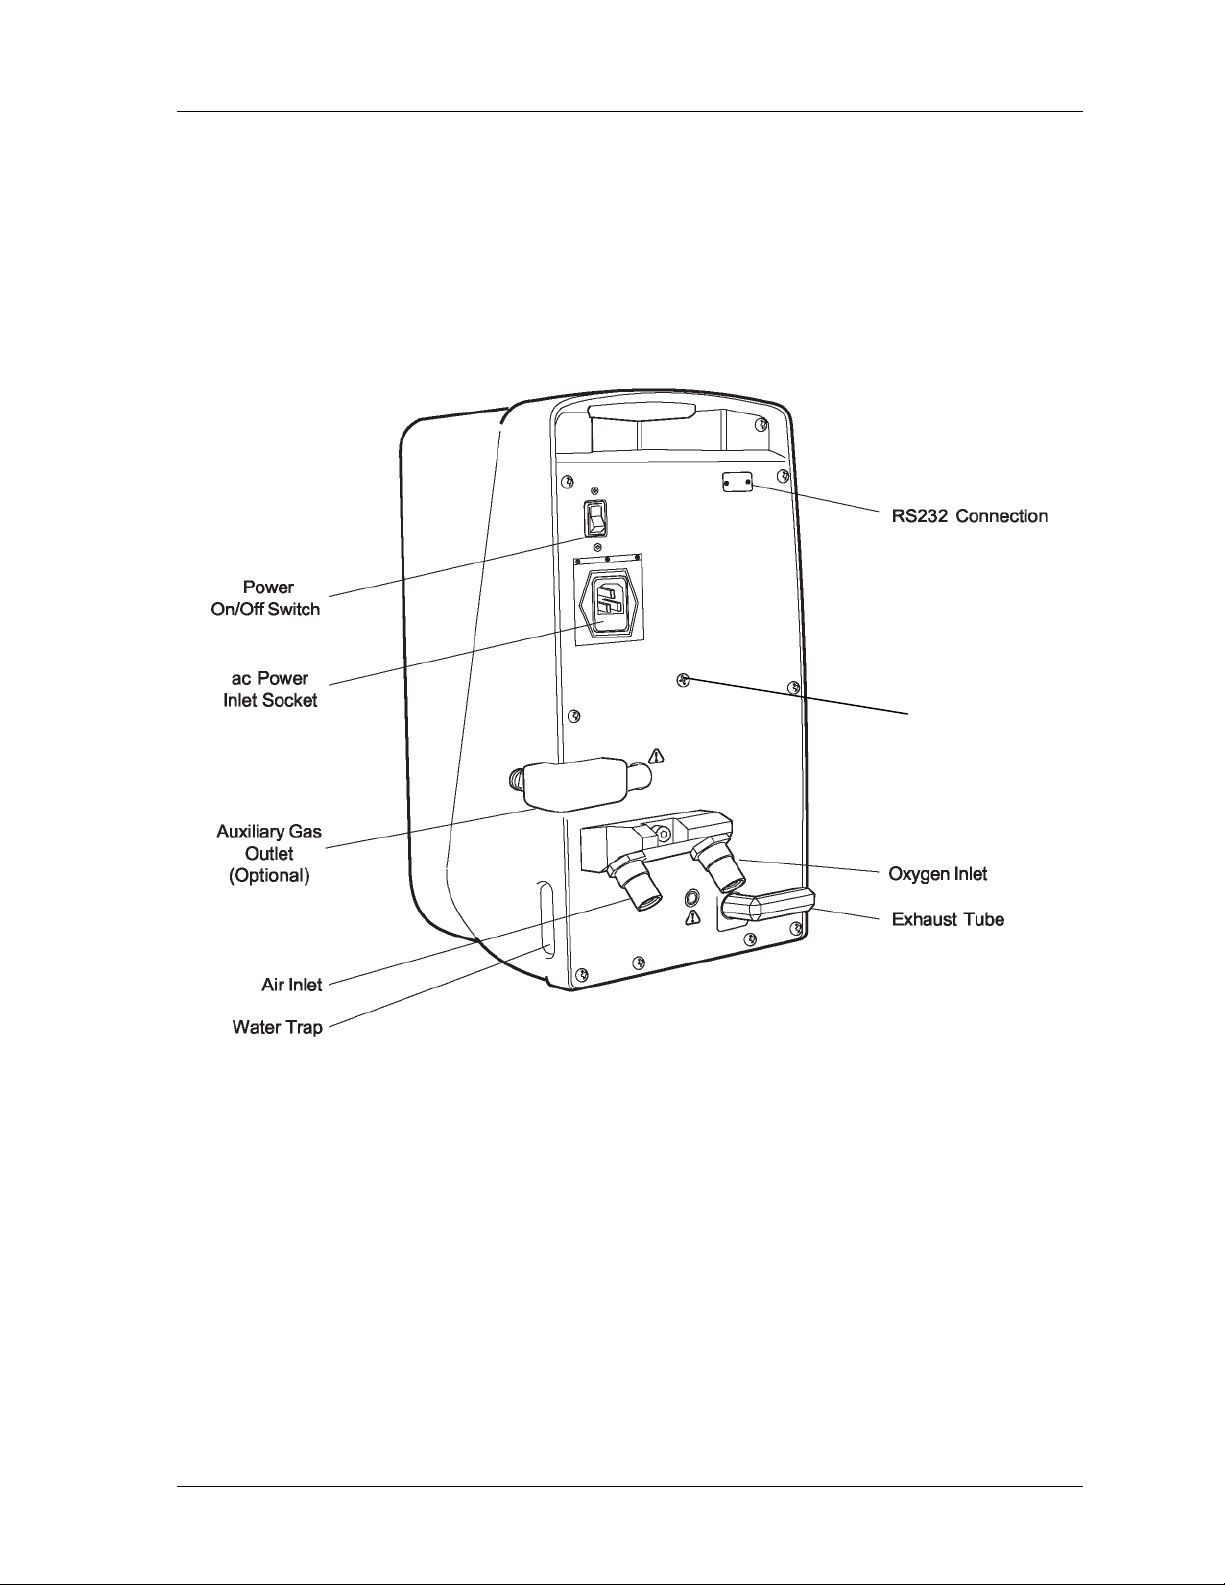
The IFSD is enclosed in a case with Operator controls and input connectors on the
front and rear panel. The front panel is shown in Figure 1. The back panel is shown
in Figure 2. The case incorporates non slip feet for table top use or must be fitted to
a dedicated stand. The major components within the casing are:
• a gas module
• an electronics module
• a front panel module
• a patient trigger module
• a firmware module
675-120 Rev. F
Page 22
12 Infant Flow
®
SiPAP
Figure 1: IFSD Front Panel
Gas Module
The function of the gas module is to take air and oxygen, blend them into the
required mixture and deliver this mixture to the patient at the prescribed flow rate.
The gas module also measures the oxygen concentration, measures the patient
pressure, provides an auxiliary gas outlet (optional) and provides switched Biphasic flow.
The main components are an air/oxygen blender, a flow manifold, a vent valve, an
exhaust manifold with alarm whistle, NCPAP Pres low and NCPAP Pres high flowmeters,
and a valve/sensor PCB. The inlet gas connections are on an interchangeable inlet block
to allow for different gas fittings. The exhaust manifold discharges gas to the outside of
the case and is positioned away from the electrical connectors and switch to reduce any
potential explosive hazard.
675-120 Rev. F
Page 23
Service Manual 13
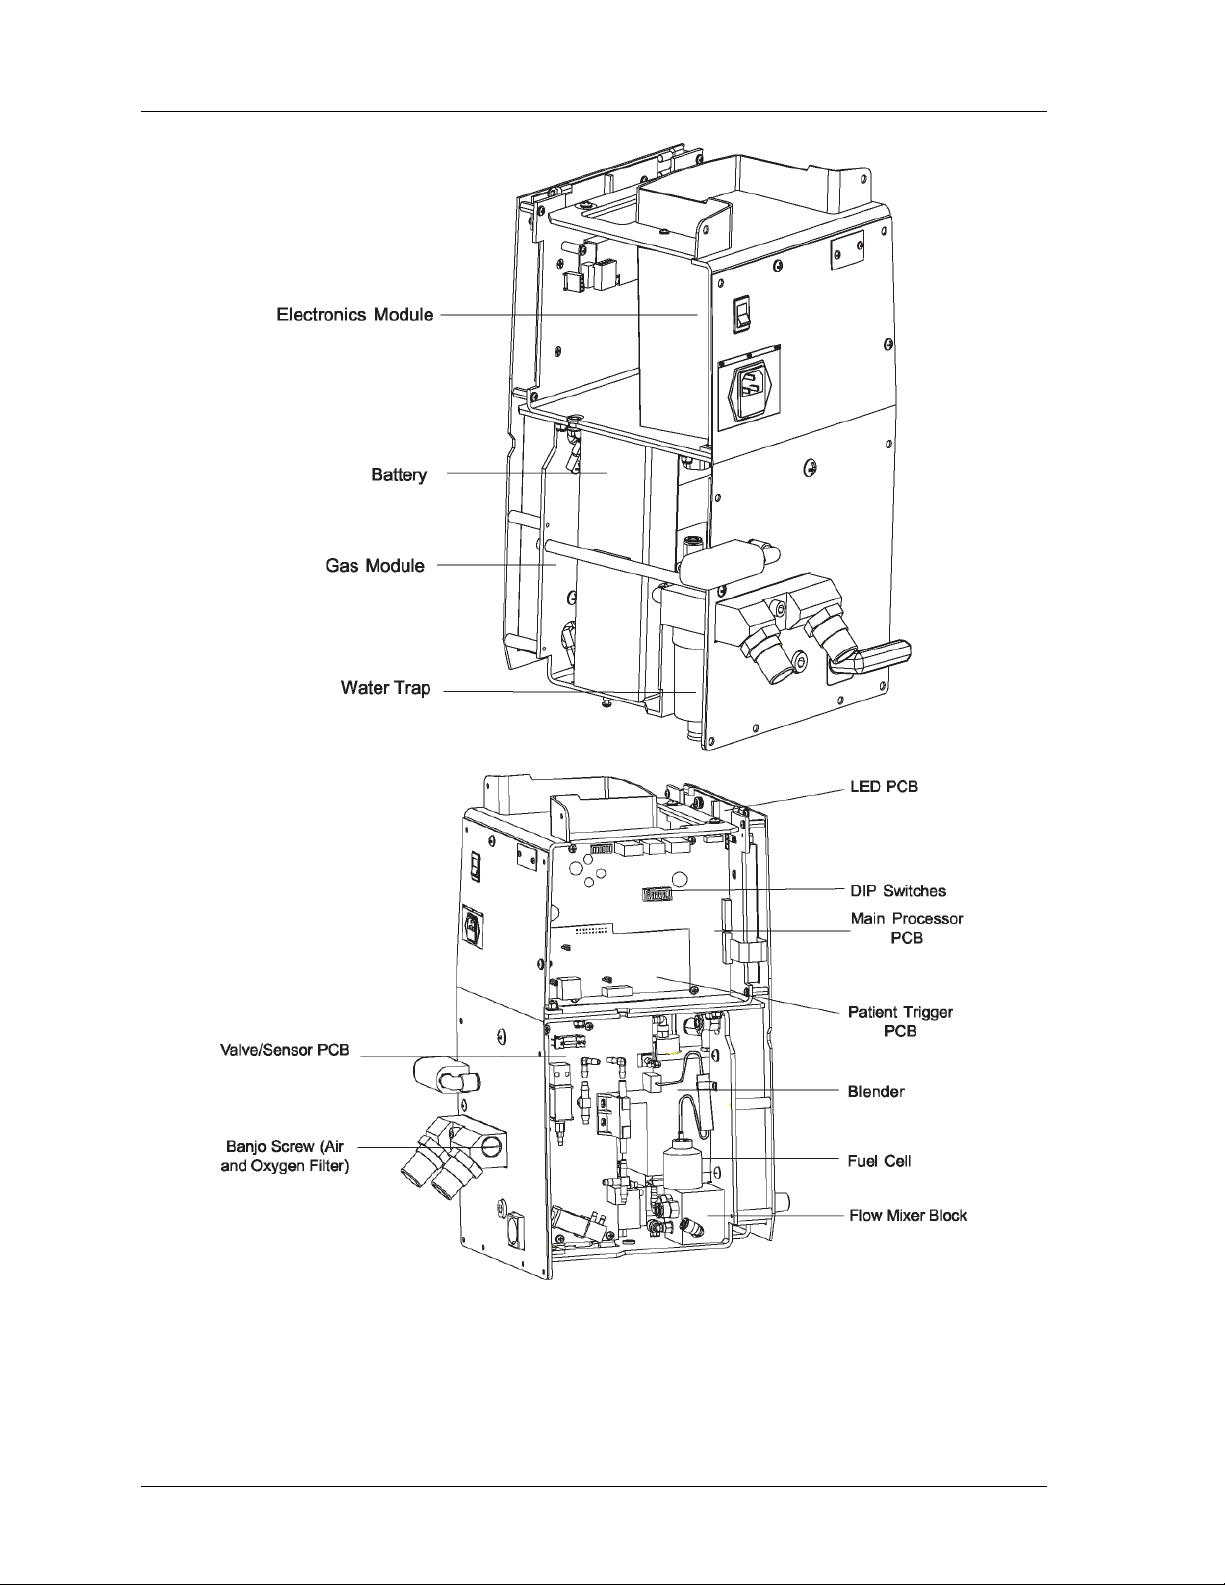
Electronics Module
The function of the electronics module is to power the unit either by AC mains supply
or DC emergency battery supply, to control the gas module and read the gas module
sensors. The main components are a power supply unit, a rechargeable battery, a
main processor PCB, LED PCB, Valve/Sensor PCB and a LCD screen (touch
screen). The LCD screen includes a back-light which is always on when the IFSD is
powered. The touch screen displays information and receives inputs from the Operator
via the touch screen keyboard.
Figure 2: IFSD Back Panel
Leak Test
Port
675-120 Rev. F
Page 24
14 Infant Flow
®
SiPAP
Figure 3: IFSD Internal Components
675-120 Rev. F
Page 25

Service Manual 15
Front Panel Module
The function of the front panel module is to house the gas and electrical connections
to the patient, Operator controls and indicators. The module consists of a front panel
plate, the touch screen with key pad, flowmeters and FiO
and indicators and an ambient light sensor. The backlight on the touch screen is
decreased if the ambient light sensor detects a low ambient light level and increased
if it detects a high ambient light level.
The green Power light is always on when AC power is connected to the unit.
control, patient connectors
2
The Alarm Warning Bar
Patient Trigger Module (Plus and Comprehensive Models)
The patient trigger module consists of a PCB which plugs into the main processor
PCB. Its function is to detect patient breaths and apnea and give this information to the
main processor in the electronics module. The main processor uses the signals from the
patient trigger module to instruct the biphasic pressure control to provide a timed sigh
to the patient.
Firmware Module
The firmware module is the unit’s embedded software. Its function is to instruct the
microprocessor how to control the unit and to interact with the Operator.
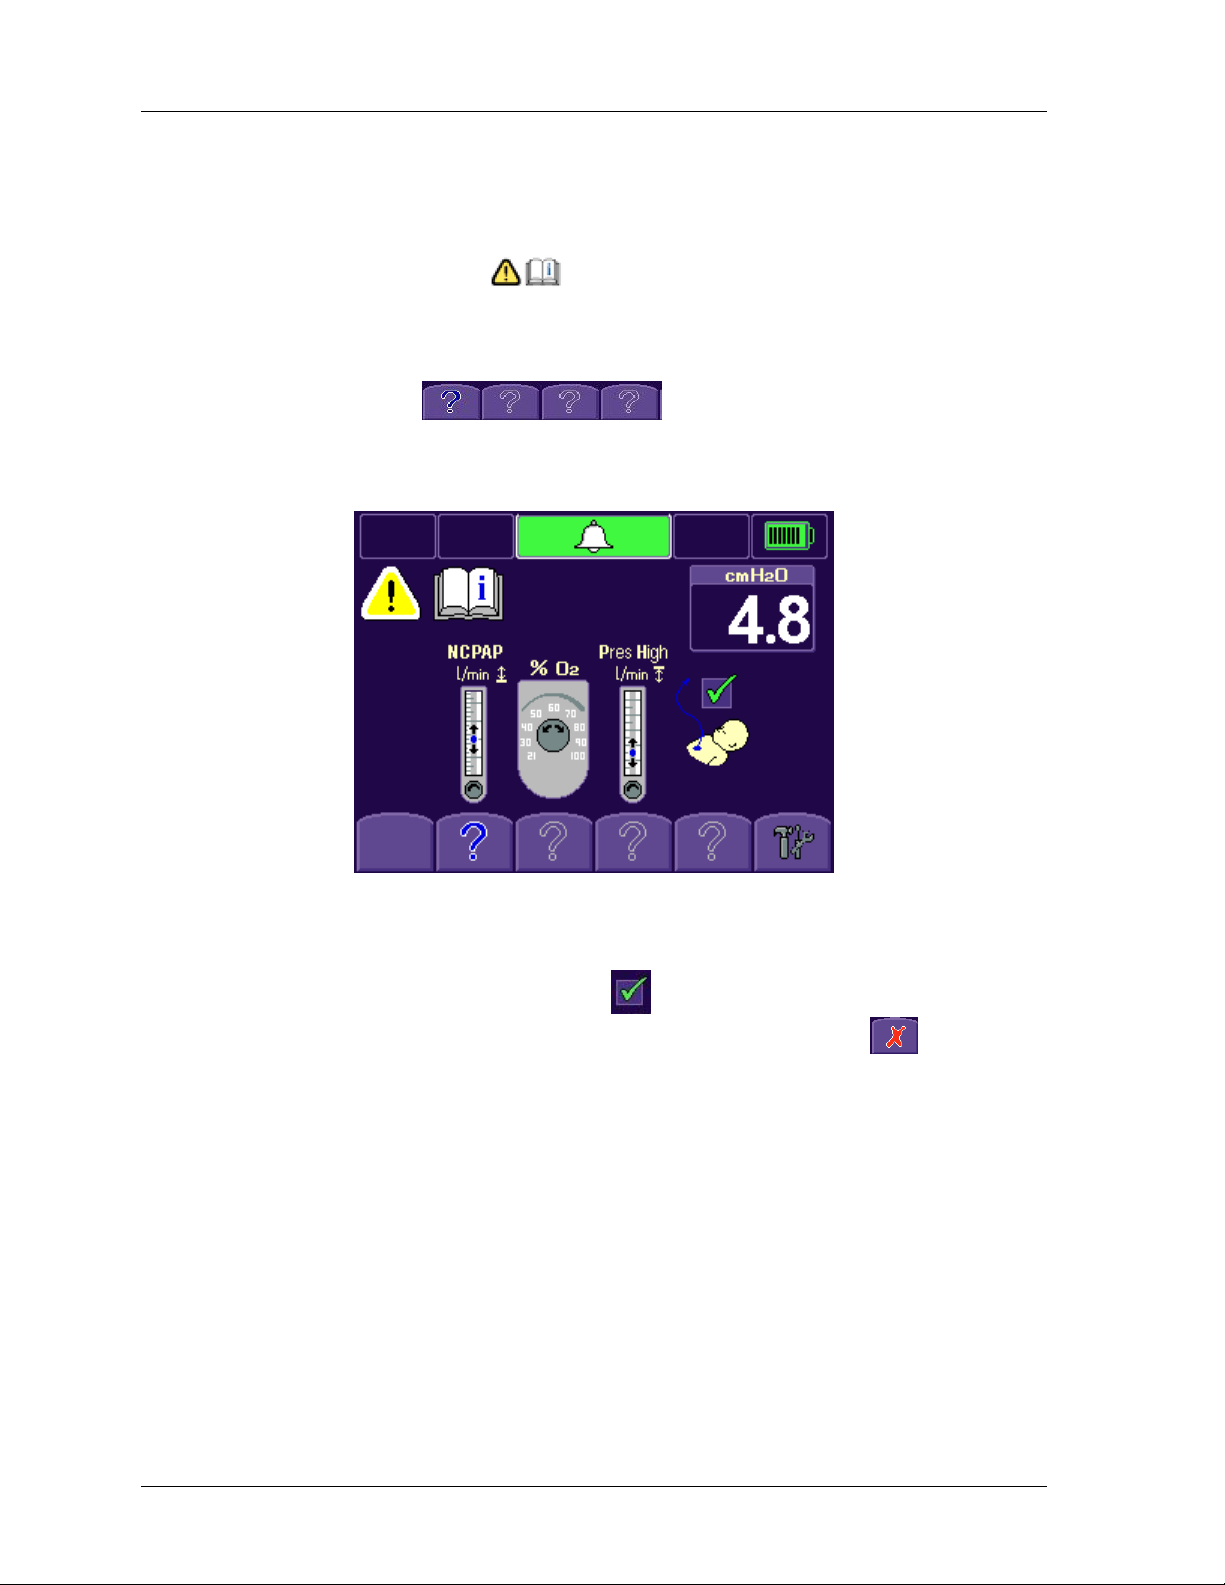
Touch Screen
The touch screen provides the Operator with a series of screens with icons to enable
settings, calibration and fault diagnosis. The Start Up Screen is shown in Figure 4.
The display includes a status bar which incorporates a battery status, mode
indicator, alarm button and patient trigger indicator. The center part of the display
shows icons which relate to the function being selected or performed. The display also
includes a key pad with six keys. The icon in each key changes depending on the
function being performed.
flashes red to indicate an alarm.
Battery Status and Charging Indicator
If the battery status shows three bars or less, the display flashes alternately between
red bars on a white background and a pink background.
Alarm Button
The alarm button alerts the Operator to fault conditions. An audible alarm is activated
at the same time. In the unalarmed condition the button is green
high-priority alarm condition, the button flashes
alarm is heard. If the alarm button is pressed (to silence the audible alarm), the
button changes to
the button flashes
alarm condition, the button is solid
675-120 Rev. F
. In the
red and an audible
and flashes red. In a medium-priority alarm condition,
yellow and an audible alarm is heard. In a low-priority
yellow with an audible alarm. If any
Page 26
16 Infant Flow
alarm condition resets itself, the yellow alarm bar remains to alert the clinician of a
previous problem.
Caution/Information
The Caution/Information icon alerts the Operator to read this manual. It flashes
during an alarm condition.
Mode Indicator
The Mode Indicator shows four question marks when in Start up or Adjust and
changes to show the applicable mode in use (e.g. NCPAP).
®
SiPAP
Figure 4: Touch Screen Display – Start Up
Patient Trigger Indicator (Plus and Comprehensive Models)
The Patient Trigger indicator changes to when the transducer interface is
connected and ready to be connected to the patient and indicates a
transducer interface is not connected.
when the
675-120 Rev. F
Page 27
Service Manual 17
Alarm Conditions
Audible and visible alarm indications are given to alert the Operator to specified
conditions that affect the operation of the unit. The electronic alarm limits are
automatically set after two minutes without Operator inputs but the Operator can
manually set the alarm parameters for certain conditions if required. The IFSD has
the following alarms:
• an audible Whistle which sounds a constant tone when the gas imbalance
limits are exceeded.
• an audible Alarm which sounds a constant tone or two different intermittent
tones; medium or high level (medium level sounds beep.beep.beep every 15
seconds and high level sounds beep.beep.beep beep beep every 10 seconds).
• a visual Warning Bar which flashes red continuously, flashes intermittently or
comes on continuously.
• an Alarm Button on the touch screen status bar which flashes continuously.
Other indications are given to indicate the status of the condition. Refer to Table 2 for
alarms and indications for specified conditions.
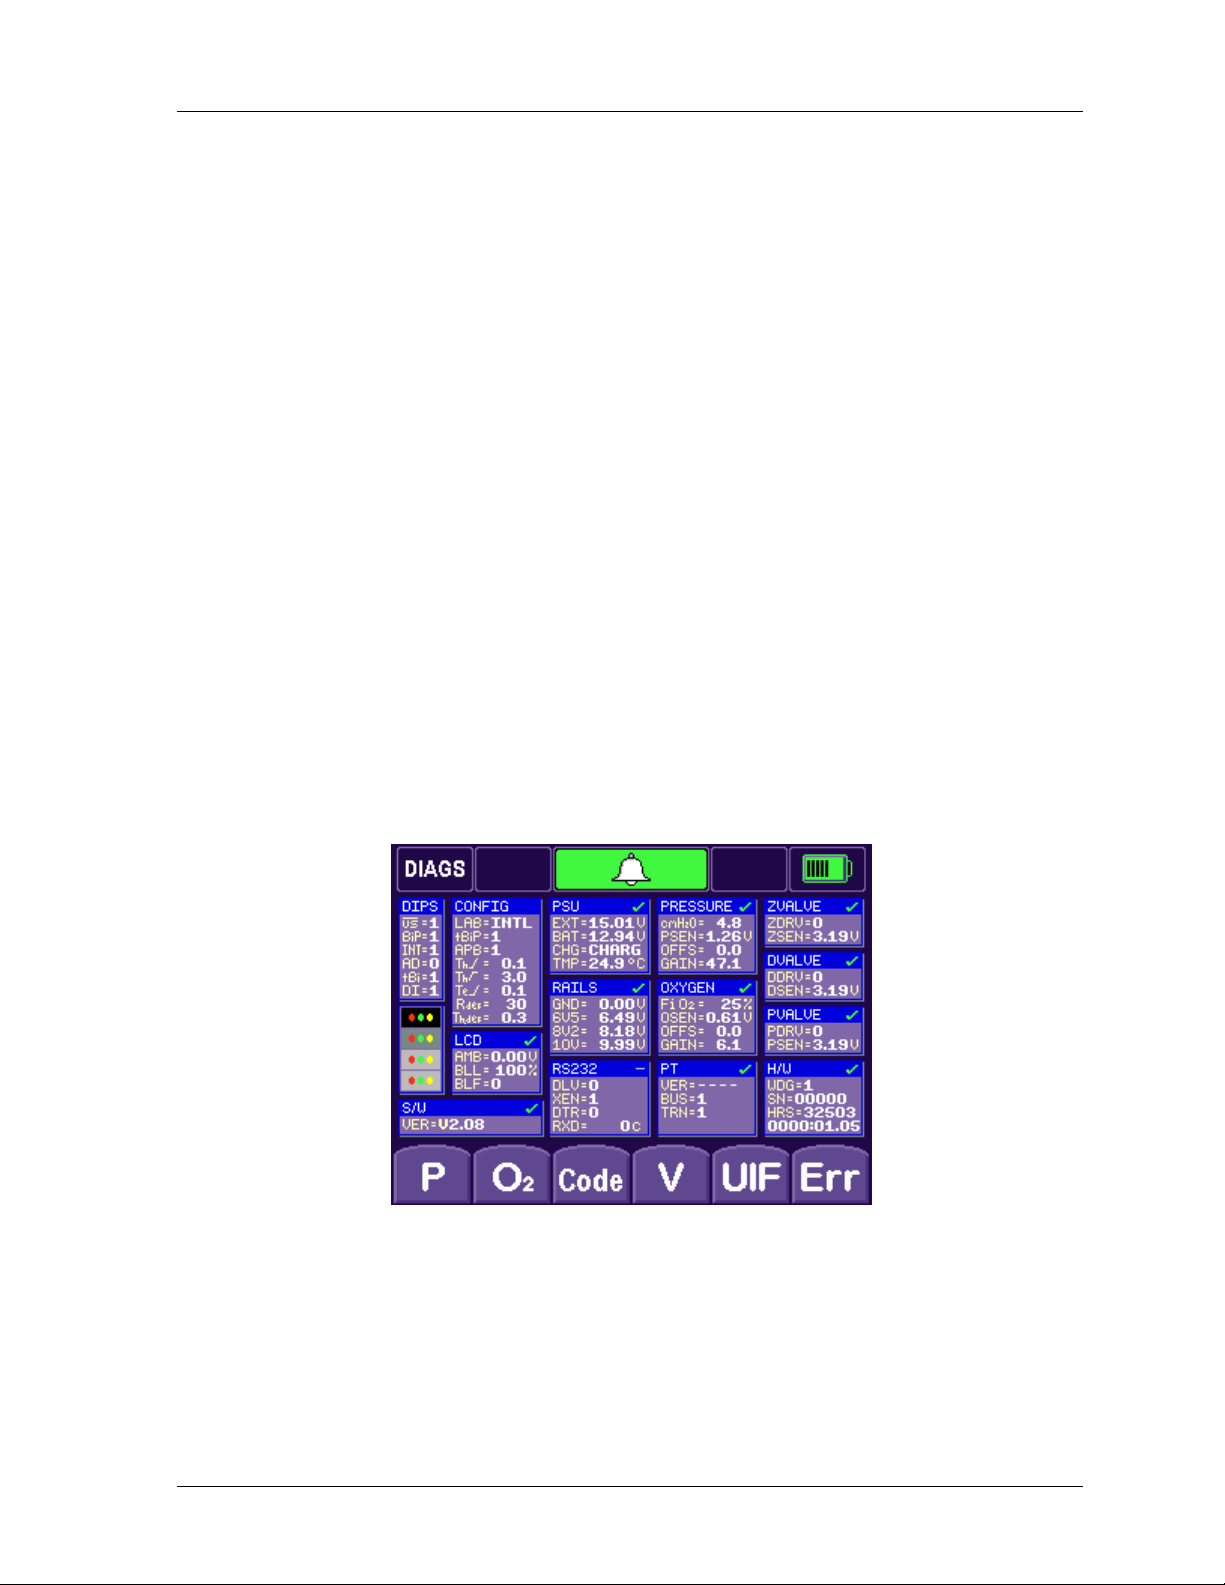
Diagnostic Screen
A diagnostic screen is provided for low level calibration, test procedures for valves
and an error log. Figure 5 shows the screen display. Labeling of Diagnostic screen
will be the same regardless of configuration.
Figure 5: Diagnostic Screen
675-120 Rev. F
Page 28

18 Infant Flow
PCB. Position 1 is on and 0 is off.
INDICATOR
contrast.
Box
Description
PT
The PT box shows the status of the Patient Trigger module.
RS232
The RS232 box shows factory set data.
Table 2 - Diagnostics Screen Boxes
Box Description
DIPS The DIPS box shows the position of the DIP switches on the main processor
®
SiPAP
CONTRAST
CALIBRATION
INDICATOR
The contrast indicator box is for use in the factory for setting the screen
The calibration indicator box shows
successfully completed and a
if the calibration fails.
during calibration, a when
The following display boxes show if the values are within the set parameters, a
if the values are outside the set parameters, a if the function is not
calibrated and a
if the function is disabled on the DIP switch.
Table 3 - Additional Diagnostics Screen Boxes
S/W The S/W box shows the version and serial number of the loaded firmware.
H/W The H/W box shows the status of the watchdog timer (WDG) and the EEPROM
CONFIG The CONFIG box shows the software configuration based on the DIP switch
LCD The LCD box shows the ambient light sensor voltage (AMB), the back light level
PSU The PSU box shows the external power supply voltage (EXT), the battery voltage
RAILS The RAILS box shows the ground voltage (GND), and the control voltages (6.5,
2
P).
(E
settings and requirements. LAB = INTL or US (controlled by DIP 3), which is the
Comprehensive or Plus model; tBiP = 1 or 0 (controlled by DIP 2 and 5), which
indicates Triggered BiPhasic is enabled (1) or disabled (2); APB = 1 or 0
(controlled by DIP 2), which indicates that Apnea BiPhasic is enabled (1) or
disabled (0); The remaining symbols provide the default and ranges for
inspiratory time, and breath rate (controlled by DIP 1).
(BLL) and if the backlight is operative (BLF - 1 for fail, O for on).
(BAT), the battery charge status (CHG) and the temperature (TMP).
8.2 and 10 V).
PRESSURE The PRESSURE box shows cm H2O pressure value, the voltage from the
pressure sensor (PSEN) and the software offset (OFFS) and gain (GAIN)
values.
OXYGEN The OXYGEN box shows the FiO2 %, the voltage from the oxygen sensor
(OSEN) and the software offset (OFFS) and gain (GAI N) values.
ZVALVE The ZVALVE box shows if the Z DRIVE is operative (ZDRV - 1 for fail, O for on)
for the zero valve and the Z sensor (ZSEN) voltage.
DVALVE The DVALVE box shows if the D DRIVE is operative (DDRV - 1 for fail, O for on)
for the dump valve and the D sensor (DSEN) voltage.
PVALVE The PVALVE box shows if the P DRIVE is operative (PDRV - 1 for fail, O for on)
for the pressure assist valve and the P sensor (PSEN) voltage.
675-120 Rev. F
Page 29

Service Manual 19
Chapter 5 – Operation
Gas Flow
With the oxygen and air connections connected and the power switched on, oxygen
and air at 386 kPa (56 psig) flows to the blender. The air passes through a water trap
with an integral filter where any moisture in the air is removed. Oxygen and air are
filtered before entering a non-return valve in the blender. The blender mixes the
oxygen and air in the proportion set by the position of the FiO
blender supplies blended gas between 2.5 and 30 L/min.
The blender incorporates an alarm/bypass module. If a single gas supply fails or
there is an imbalance between the inlet gas pressures exceeding 200 kPa (30 psig),
the module directs the flow through a reed whistle to warn the Operator of the
condition and at the same time connects the inlet gas at the higher pressure to the
blender outlet.
The blended gas is filtered before passing through a flow control to an oxygen
analyzer. The oxygen analyzer utilizes a galvanic fuel cell to measure and display
the measured delivered oxygen concentration.
control valve. The
2
A vent valve on the exhaust manifold incorporates a solenoid operated pilot valve
and a large orifice spool valve. The vent valve is normally held in the open position
by a spring to vent high flow rates with low pressure drops so that the patient
pressure is minimal. The electrically actuated pilot valve is operated by blended gas
so that the vent valve continues to operate if one gas supply is lost.
Blended gas flows through an electronically operated dump valve which is normally
in the closed position. If over pressurization occurs, the sensors detect the condition
and the controller signals the dump valve to open, sounds an alarm buzzer and at
the same time closes the vent valve to rapidly reduce the patient pressure to near
zero. When the over pressure condition stops, the controller signals the vent valve to
open and the dump valve to close.
The NCPAP flowmeter is set by the Operator to the required flow. The flow rate is
shown on the gauge on the flowmeter. When the flowmeter control knob is turned
fully clockwise, the flow of gas is turned off.
675-120 Rev. F
Page 30

20 Infant Flow
®
SiPAP
Figure 6: IFSD Gas Flow Schematic
675-120 Rev. F
Page 31

Service Manual 21
The patient pressure is shown on the touch screen and is monitored by a pressure
sensor which sends the signal to the main processor. A zeroing valve automatically
checks the pressure readings against atmospheric pressure to ensure accuracy of
the patient pressure readings.
A mechanical pop-off valve is factory set to limit the delivered pressure to a safe
level sufficient to achieve the maximum required patient pressure at the generator.
Adjustment of the pop-off valve is not required by Operators.
Auxiliary Output (Optional)
Blended gas flows through a fixed flow control and non-return valve to a standard
DISS fitting on the back panel to supply a maximum 15 L/min for delivery to the
patient via other sources.
Inspiratory Pressure
Blended gas passes through a variable outlet flow control and through the NCPAP
Pres high flowmeter. The NCPAP Pres high flowmeter is set by the Operator to the
required flow. The outlet from the NCPAP Pres high flowmeter when not delivering to
the patient flows through a restrictor to exhaust, allowing the flowmeter to be
adjusted without delivering gas to the patient. The flow rate is shown on the gauge
on the flowmeter. When the flowmeter control knob is turned fully clockwise, the flow
of gas is turned off. The flow is directed to the patient via a high speed selector valve
which operates when requested by the NCPAP Pres high timing.
WARNING
The NCPAP Pres high must be adjusted to zero when not required for the
patient.
Triggered BiPhasic
For BiPhasic Tr, a micro controller provides reliable indications of breaths derived
from the patient abdominal respiratory sensor. It sends signals to operate the
NCPAP Pres high valve to provide a timed sigh.
WARNING
Under extreme conditions (minimum supply pressure and maximum gas
demand, including auxiliary output) output flow rates may reduce.
Operation without Electrical Power
The IFSD can be used without electrical power. In this mode, NCPAP Pres low flow
only is delivered, set by the NCPAP Pres low flowmeter and the required FiO
this mode, visual indications and warnings are not given except for the gas failure
alarm.
level. In
2
675-120 Rev. F
Page 32

22 Infant Flow
Electronic Functions
Sensors mounted on the valve/sensor PCB monitor pressure, flow rate and oxygen.
Sense signals for each of the valves allow the micro-controller to monitor the valve’s
state and determine whether the valve is connected or short circuited. Current to the
valve sensor PCB is limited via the fuses below a 10 VA limit to ensure safety in a
possible oxygen enriched environment.
The patient trigger PCB interfaces with the main processor PCB via a 20 way head.
Communication between the two PCB’s is via a CAN bus. The main processor PCB
also supplies +5 V power to this PCB and monitors other control signals.
®
SiPAP
Figure 7: IFSD Electronic Enclosure
675-120 Rev. F
Page 33

Service Manual 23
Electrical Layout
Figure 8 shows the electrical wiring and PCB connector layout.
Figure 8: IFSD Electrical Wiring Diagram
675-120 Rev. F
Page 34

24 Infant Flow
BiPhasic
BiPhasic
Fault Management
When a software detectable fault condition occurs, the unit still allows a basic level of
treatment to the patient. Table 4 shows the fault conditions and the level of control
available.
Table 4 - Faults, Available Modes and Control Functions
Measurements Software Control Modes
®
SiPAP
Alarm Functionality FiO2 CmH2O NCPAP
Fault lockout
screen shows
error
code(s).
Error code(s)
shown
on mode
selection
screen.
Status bar
mode
alternates
Error code(s)
shown
on mode
selection
screen.
Status bar
mode
Battery status
shows
discharged
battery.
Unit inoperable by
software, operable
in
unpowered
Unit restricted to
NCPAP and
NCPAP+Apnea
modes.
Patient trigger
(NCPAP+Apnea,
BiPhasic+Apnea
and
BiPhasic Tr)
modes not
available.
Unit will not
operate
on battery power
when external
power
supply is
removed.
X X X X X X
NCPAP+
Apnea
X
+ Apnea
X X
Tr
X
675-120 Rev. F
Page 35

Service Manual 25
Chapter 6 – Operation
The operating procedures below show the procedures for all models. Reference
should only be made to the procedures for the model in use. Read the Warnings and
Cautions at the beginning of this manual before you start the procedures.
Preparing and Connecting the Equipment
WARNING
Ensure the whistle sounds during gas connection, if not the device may be
faulty and should not be used.
1 Connect the Medical Air and Oxygen hoses to the IFSD connections on the
back panel.
WARNING
Only use the supplied AC cable to connect to the power supply.
2 Connect the power supply cable to a suitable power supply outlet. The green
power light will come on regardless of the position of the power switch.
3 Connect the patient circuit to the IFSD as required. Figure 9 shows a typical
configuration, the actual configuration may vary dependent on the type of ancillary
equipment used and the clinical needs prescribed for the patient. For functional
test purposes, the Generator nasal prongs can be occluded to simulate patient
responses.
4 Connect the transducer module to the sensor and to the IFSD. For functional
test purposes, lightly tap the abdominal respiratory sensor to simulate patient
breathing.
675-120 Rev. F
Page 36

26 Infant Flow
®
SiPAP
Figure 9: Patient Connections
WARNING
Check that the water trap is empty before use and empty it frequently during
use.
675-120 Rev. F
Page 37

Service Manual 27
5 Make sure that the water trap is empty. If necessary, empty any water from the
trap (refer to Chapter 3, Maintenance).
6 Gas Flow Pressure Setting
The IFSD provides a virtually constant airway pressure irrespective of patient
demand or expiratory flows via the specially designed generator and nasal prongs. This
is the reason for the IFSDs ability to provided superior NCPAP. The IFSD is subject
to a direct relationship between controlled enriched gas flow and NCPAP pressure.
A nomogram illustrating the relationship between constant airway pressure and flow
settings is shown in Figure 10. Example: 8 L/min gas flow provides 5 cm H
2
O
NCPAP.
Note
Individual devices have a tolerance of up to ± 10% from that illustrated in the
nomogram and in particular, at pressures below 2 cm H
2
O.
675-120 Rev. F
Figure 10: Flow Pressure Nomogram
Page 38

28 Infant Flow
Switching On the IFSD
WARNING
Do not attach the Generator to the patient until the initial set up is complete.
Put the power switch on the back panel to the position.
• the warning bar comes on
• the green power light remains on
• the audible alarm sounds
The unit carries out a full functional check. If the checks are not successful (program
memory fault, power supply not connected or emergency battery voltage low), the
screen remains black and the warning bar stays on.
If the checks are successful, the warning bar goes off and the screen changes to the
Power Up Screen.
After two seconds the screen changes to the Power Up Check Screen.
®
SiPAP
During the power up checks:
• the screen image is shown in negative
• the warning bar comes on for one second
• the Apnea light comes on for one second
• the audible alarm sounds for one second
• the dump valve is tested
• the pressure is set to zero
After two seconds the screen changes to the Start Up Screen.
• the alarm limits are disabled
A flashing question mark alternating with a red cross appears under the first
adjustment to be made.
To calibrate
the O2 fuel cell, refer to the section “Calibration” on page 37.
Note
Where a mode is not applicable (e.g. Patient Trigger), the button is blank and the
icons are not shown.
675-120 Rev. F
Page 39

Service Manual 29
Alarm Test Initial Settings
2
NCPAP / Pres Low flow meter
For Step 9 Use the settings provided below
LBR
Alarms Test
WARNING
Prior to patient application, ensure that all User Verification testing and
calibration procedures are successfully completed. User Verification testing
and calibration procedures must be done off patient.
NOTE
Following each alarm verification test, ensure that control settings and alarm limits
are reset as instructed before proceeding to the next test.
Air Supply Pressure
O
Supply Pressure
Patient Circuit
Generator
% O2
Pres High flow meter
Mode
Rate
T-High
Tapnea (Non-U.S. Configuration) /
T
(U.S. Configuration)
Perform the Alarms Test on the Infant Flow® SiPAP™ using the following steps and
the initial settings provided above.
1. Make appropriate connections for air and O
to appropriate AC outlet. Attach patient circuit, generator and patient interface
(mask or prong) as shown in Figure 3. Occlude the opening to the patient.
2. Power up the driver and allow Power On Check to complete.
3. Low airway pressure alarm: From NCPAP operating mode, with alarms set,
remove occlusion from opening to patient. Verify that the low airway pressure
alarm activates. Restore the patient interface occlusion and press the Alarm
Mute / Silence button for 3 seconds to reset the alarms.
4. High airway pressure alarm: Adjust the NCPAP / Pres Low flow meter to 11
L/min. Verify that the high airway pressure alarm activates. Return the NCPAP
/ Pres Low flow meter to 8 L/min and press the Alarm Mute / Silence button for
3 seconds to reset the alarms.
> 30 psig (2.1 bar)
> 30 psig (2.1 bar)
Infant Flow® Patient Circuit
Infant Flow® Generator
8 L/min (for delivery of 5 cmH2O)
30%
3 L/min
NCPAP
30 bpm
0.3 sec
20 sec
gas supply. Connect power cord
2
675-120 Rev. F
Page 40

30 Infant Flow
®
SiPAP
5. High %O2 Alarm: Adjust the % O2 control to 35%. Verify that the High %O
2
alarm activates. Return the O2 control setting to 30%. Reset alarms by
pressing the Alarm Mute / Reset button for 3 seconds.
6. Low % O
Alarm: Adjust the % O2 control to 25%. Verify that the Low %O
2
2
alarm activates. Return the O2 control setting to 30%. Reset alarms by
pressing the Alarm Mute / Reset button for 3 seconds.
7. Loss AC Alarm: Disconnect the AC power cord from the wall outlet. Verify that
the Loss AC alarm activates. Reconnect the AC power cord. Clear the alarm
by pressing the Alarm Mute / Reset button.
8. High Circuit Pressure Alarm: Increase nCPAP pressure to 11.1 cmH
O by
2
increasing the NCPAP/PRES Low Flow meter. Verify that the High Circuit
pressure alarm activates. Return NCPAP/PRES Low Flow meter to 8 LPM and
press the Alarm Mute/Silence button for three seconds to reset the alarms.
9. Low Breath Rate (Apnea) Alarm: Attach the transducer to the unit. Select and
confirm BiPhasic+Apnea/LBR (U.S. Configuration). Change the mandatory rate
control to setting for rate to 1 bpm. Verify that the Low Breath rate alarm
activates after the default interval of 20 seconds. Return the rate control to 30
bpm and clear the alarm by pressing the Alarm Mute / Reset button for 3
seconds. Note: transducer must be attached.
675-120 Rev. F
Page 41

Service Manual 31
Power On Check
Low Airway Pressure Alarm
High Airway Pressure Alarm
2
Infant Flow® SiPAP™ User Verification Test
Checklist
Driver Serial Number:_____________________ Test Date:_________________
TEST PASS FAIL
Automated Tests
Manual Tests
Two Point O2 Sensor Calibration
Patient Circuit Leak test
Manual Alarms Checks
High O
Low O
Loss AC Alarm
High Circuit Pressure Alarm
Low Breath Rate (Apnea) Alarm
Alarm
2
Alarm
Signature of tester:_______________________________________________
Title___________________________________________________________
675-120 Rev. F
Page 42

32 Infant Flow
Setting Up the Equipment
The procedures show the screen set up for all modes. If a mode is not applicable to
the model in use, go to the next applicable step.
Adjust the NCPAP Pres low flowmeter to indicate the required flow rate. When done,
®
SiPAP
touch the flashing
The button icon changes to a
Set the FiO
confirm each time.
and NCPAP Pres high flow as appropriate, touching the button to
2
button to confirm the initial setting
and the next button starts flashing.
WARNING
Ensure that the pressure is consistent with the flow rate.
WARNING
Verify that the displayed value for delivered FiO2 corresponds to the value
set on the blender. Refer to Faults and Indications.
If an alarm is activated, the button displays a flashing cross. The alarm condition
must be cleared before the setting is confirmed (refer to Table 1).
WARNING
The indicates a connection between the transducer interface and the
unit. It does not indicate correct positioning of the abdominal respiratory
sensor.
Note
All triggered modes (NCPAP+Apnea, BiPhasic+Apnea, BiPhasic Tr) are
automatically confirmed with a
When all of the initial settings have been confirmed (NCPAP Pres low, FiO2, NCPAP
Pres high and/or Respiratory sensor) the screen changes to the Adjust Screen.
• the alarm limits remain disabled
To set the alarm limits, touch the NCPAP button or the alarm button for three
seconds. If a button is not touched within two minutes, the alarm limits will be
automatically set.
if the patient trigger is connected.
Note
NCPAP+Apnea, BiPhasic+Apnea, BiPhasic Tr selection buttons are not lit if the
transducer interface box is not connected to the IFSD.
675-120 Rev. F
Page 43

Service Manual 33
When the alarm limits have been set, the screen changes to the Mode Selection
Screen and defaults to the nCPAP mode.
• the alarm limits are set
Touch NCPAP, NCPAP+Apnea, BiPhasic, BiPhasic+Apnea, or BiPhasic Tr to enter
the Parameter Set up Screen for each mode.
Note
When the Mode Selection screen is showing, NCPAP treatment will always be
delivered.
After two minutes if the Operator has not made any inputs, the screen changes to the
Locked Screen.
• the key pad is locked
• the display remains as shown for patient monitoring
Touch the
• the display returns to the Mode Selection Screen
button for three seconds to unlock the key pad.
Note
If a high priority alarm occurs, the keypad automatically unlocks.
Setting the NCPAP Parameters
For NCPAP+Apnea function the transducer interface and the abdominal respiratory
sensor must be connected.
From the Mode Select Screen touch the NCPAP + Apnea
The screen changes to the Parameter Set Up Screen and shows:
• the patient respiration rate (Rsp)
• the delay time for the alarm to come on Tapnea
• the Inspiratory time for a manual sigh
Use the
buttons to set the alarm delay time.
button.
Confirm the settings by touching the flashing button. When the settings have
been accepted, the screen changes to the Locked Screen.
Touch the
• the display changes to the Parameter Adjust Screen
675-120 Rev. F
button to unlock the key pad.
Page 44

34 Infant Flow
Note
If a high priority alarm occurs, the key pad automatically unlocks.
To return to the Mode Selection Screen, touch the button.
Setting the BiPhasic Parameters
For BiPhasic+Apnea function the transducer interface and the abdominal respiratory
sensor must be connected.
®
SiPAP
From the Mode Select Screen touch the Biphasic
The screen changes to the Parameter Set Up Screen and shows:
• the NCPAP Pres high inspiration time (T
• the NCPAP Pres high respiration rate (R)
• the Inspiration/Expiration ratio (I/E)
-High)
button.
Note
If a transducer interface is connected to the unit, is displayed and BiPhasic +
Apnea monitoring mode is enabled. In addition to the above parameters, the screen
shows:
• the detected breath bar graph
• the detected breath rate (Rsp)
• the delay time for the alarm to come on (Tapnea)
Push the individual buttons to select between the parameters T
Tapnea. Use the buttons to set the parameter for T-High, Rate, and
Tapnea.
-High, Rate, and
Note
The I/E rate changes accordingly.
Confirm the BiPhasic settings by touching the flashing BiPhasic or BiPhasic + Apnea
button.
When the settings have been accepted, the screen changes to the locked screen
and treatment starts.
To adjust the parameters, touch the
The screen changes to the BiPhasic or BiPhasic + Apnea Adjust Screen.
Parameters T
675-120 Rev. F
-High and Rate can now be adjusted.
button.
Page 45

Service Manual 35
Note
The I/E rate changes accordingly.
To return to the Mode Selection Screen, touch the button.
Note
The button is shown with a pink background if an alarm condition occurs. If this
occurs, the button cannot be operated until the alarm condition has been cleared or
silenced using the alarm button.
After two minutes if the Operator has not made any inputs, the screen changes to the
Locked Screen.
• the key pad is locked
• the display remains as shown for patient monitoring
Touch the
• the display returns to the BiPhasic or BiPhasic + Apnea Adjust Screen
button to unlock the keypad.
Note
If a high priority alarm occurs, the keypad automatically unlocks.
Setting the Triggered BiPhasic Parameters
From the Mode Select Screen touch the BiPhasic Tr button.
Note
The transducer interface must be connected to enter this mode.
The screen changes to the Parameter Set Up Screen and shows:
• the patient’s respiration rate (Rsp)
• the NCPAP Pres high inspiration time (T
• the NCPAP Pres high backup respiration rate (Rb)
• the delay time for the apnea alarm to come on (Tapnea)
-High)
Press each individual button to select between the parameters T
Tapnea. Use the
Confirm the BiPhasic Tr settings by touching the flashing BiPhasic Tr button.
When the settings have been accepted, the screen changes to the locked screen
and treatment starts.
675-120 Rev. F
-High, Rb and
buttons to set the parameter for T-High, Rb and Tapnea.
Page 46

36 Infant Flow
To adjust the parameters, touch the button.
The screen changes to the BIPHASIC TR Adjust Screen.
®
SiPAP
Parameters T
To return to the Mode Selection Screen, touch the
-High, Rb and Tapnea can now be adjusted.
button.
Note
The button is blank if an alarm condition occurs. If this occurs, the button
cannot be operated until the alarm condition has been cleared or silenced using the
alarm button.
After two minutes if the Operator has not made any inputs, the screen changes to the
Locked Screen.
• the key pad is locked
• the display remains as shown for patient monitoring
Touch the
• the display returns to the BiPhasic Tr Adjust Screen
button to unlock the key pad.
Note
If a high priority alarm occurs, the key pad automatically unlocks.
675-120 Rev. F
Page 47

Service Manual 37
Calibration
WARNING
Calibration must only be done when the unit is not connected to the patient.
From the Start Up Screen touch the button.
The screen changes to the Calibration Screen.
• the alarm limits are disabled
Turn the FiO
Turn the FiO
Touch the
The screen returns to the Start Up Screen .
control to 21 and confirm by touching the flashing button.
2
control to 100 and confirm by touching the flashing button.
2
button.
Note
If the calibration procedure fails, a red is shown in the applicable button. Recalibrate and if necessary, replace the O
fuel cell.
2
Giving a Manual Timed Sigh
In the Mode Select or Adjust screens of NCPAP+Apnea, BiPhasic+Apnea or BiPhasic
Tr - touch the
button to give the patient a manual timed sigh.
Operation Without Electrical Power
The IFSD can be used without mains or battery power. To use the IFSD in this
mode, set the required NCPAP flow on the NCPAP Pres low flowmeter and the
required FiO
except for the gas failure alarm/bypass which will operate until pressures are balanced.
level. All audible and visual indications and warnings are not given
2
675-120 Rev. F
Page 48

38 Infant Flow
Fault Indications
Refer to Table 1 (all models) and Table 2 (BiPhasic and BiPhasic Tr models only) for
the fault indications for specific faults and the procedures for resetting or canceling.
Discharged Battery
When the battery voltage is too low to power the circuits, the screen changes to the
Power Down Screen.
• all functions and controllable inputs are disabled
• the controller waits for the power source to be connected
• when external power is restored, the screen changes to the Power Up Screen
• the screen goes blank when the battery power is too low to power the Power
Down Screen
Fault Lockout
If a fault occurs which is detectable by the software and prevents the unit from
operating correctly, the screen changes to the Fault Lockout Screen.
®
SiPAP
• all functions and controllable inputs are disabled but the unit can still be used
without electrical power
• the related fault code numbers are shown on the screen
• the alarm bar comes on and the predominant fault code number is shown in
the status bar
If an error code is shown, refer to the Service Manual or contact your Service
Engineer to rectify the faults.
Over Pressure Indications
If an over pressure occurs, the software opens the dump valve to release the
pressure.
• the upper pressure limit is shown in red
• the pressure display flashes
• when the pressure drops below the lower limit, the lower limit is shown in red
and the pressure flashes alternately between the limits
Rectify the fault by adjustment of the high pressure and touch the warning button for
three seconds to reset.
675-120 Rev. F
Page 49

Service Manual 39
returns to normal.
Table 5 - Faults and Indications
Alarm Method of Setting
Minimum oxygen
concentration
18 FiO2).
(<
Over pressure
(Patient pressure
> 11 cmH
O when in
2
Always active when
power is on.
Always active when
power is on.
NCPAP mode).
Indications and
Actions
Intermittent high level
Audible Alarm.
Warning Bar flashes.
display flashes.
FiO
2
Digital O
alarm low
2
limit is highlighted.
Alarm Button flashes.
Intermittent high level
Audible Alarm.
Warning Bar flashes.
Pressure display
flashes.
Digital high-pressure
alarm limit is
highlighted.
Alarm Button flashes.
Dump valve actuated
for three seconds to
stop flow to patient and
repeated until flow
Method of Resetting
or Canceling
Restore FiO
level to
2
above the low limit
then push Alarm
Button for three
seconds.
Reduce pressure to
below the high
pressure limit then
push the Alarm
Button for three
seconds.
High oxygen concentration
5 FiO2 above set point
(>
at time alarm is set for 15
seconds,
or
104 FiO2 for > 15
>
seconds).
Set automatically on
entering NCPAP
mode for the first time
after start up or by
pushing the Alarm
Button for three
seconds at any time.
Intermittent high level
Audible Alarm.
Warning Bar flashes.
digital display
O
2
flashes.
Digital O
alarm high
2
limit is highlighted.
Alarm Button flashes.
Push the Alarm
Button once to stop
the Audible Alarm for
30 seconds (Alarm
Button flashes, digital
alarm high limit
O
2
stays highlighted,
Warning Bar still
flashes).
Push the Alarm
Button for three
seconds to reset the
limit (alarms clear).
675-120 Rev. F
Page 50

40 Infant Flow
®
SiPAP
Alarm Method of Setting
Low oxygen concentration
5 FiO2 below set point
(<
at time alarm is set for 15
seconds,
or
20 FiO2 for > 15
<
seconds).
High NCPAP pressure (>
3 cmH
O above set point
2
at time alarm is set for 15
seconds).
Set automatically on
entering NCPAP
mode for the first time
after start up or by
pushing the alarm
button for three
seconds at any time.
Set automatically on
entering NCPAP
mode for the first time
after start up or by
pushing the alarm
button for three
seconds at any time.
Indications and
Actions
Intermittent high level
Audible Alarm.
Warning Bar flashes.
digital display
O
2
flashes.
Digital O
alarm low
2
limit is highlighted.
Alarm Button flashes.
Intermittent high level
Audible Alarm.
Warning Bar flashes.
Pressure display
flashes.
Digital pressure high
limit is highlighted.
Alarm Button flashes.
Method of Resetting
or Canceling
Push the Alarm
Button once to stop
the Audible Alarm for
30 seconds (Alarm
Button flashes, digital
alarm low limit
O
2
stays highlighted,
Warning Bar still
flashes).
Push the Alarm
Button for three
seconds to reset the
limit (alarms clear).
Push the Alarm
Button once to stop
the audible alarm for
30 seconds (Alarm
Button flashes, digital
pressure high limit
stays highlighted,
Warning Bar still
flashes). Push the
Alarm Button for
three seconds to
reset the limit (alarms
clear).
Low pressure
2 cmH2O below set
(<
point for 15 seconds)
or
1 cmH2O at any time).
<
Set automatically on
entering NCPAP
mode for the first time
after start up or by
pushing the alarm
button for three
seconds at any time.
Intermittent high level
Audible Alarm.
Warning Bar flashes.
Pressure display
flashes.
Digital pressure low
limit is highlighted.
Alarm Button flashes.
Push the Alarm
Button once to stop
the Audible Alarm for
30 seconds (Alarm
Button flashes, digital
pressure low limit
stays highlighted,
Warning Bar still
flashes ).
Push the Alarm
Button for three
seconds to reset the
limit (alarms clear).
675-120 Rev. F
Page 51

Service Manual 41
Alarm Method of Setting
Over pressure (Patient
pressure
> 11 cmH
O when in
2
Always active when
power is on.
BiPhasic or BiPhasic Tr
mode).
High BiPhasic/ BiPhasic
Tr pressure
(MAP >
3 cmH2O above
set point at time alarm is
set for 15 seconds).
Set automatically on
entering NCPAP
mode for the first time
after start up or by
pushing the alarm
button for three
seconds at any time.
Indications and
Actions
Intermittent high level
Audible Alarm.
Warning Bar flashes.
digital display
O
2
flashes.
Digital O
alarm low
2
limit is highlighted.
Alarm Button flashes.
Intermittent high level
Audible Alarm.
Warning Bar flashes.
High MAP pressure
display flashes.
Digital high MAP
pressure limit is
highlighted.
Alarm Button flashes.
Method of Resetting
or Canceling
Reduce pressure to
below the high
pressure limit then
push the Alarm
Button for three
seconds.
Push the Alarm
Button once to stop
the Audible Alarm for
30 seconds (Alarm
Button flashes, digital
high MAP pressure
limit stays
highlighted, Warning
Bar still flashes).
Push the Alarm
Button for three
seconds to reset the
limit (alarms clear).
Low battery charge
40%).
(<
Low battery voltage
11.10 V for 5 seconds).
(<
Automatic Battery status indicator
changes from gray to
red.
Automatically
constantly monitored
with the power switch
in the on position with
no external power
connected.
Intermittent medium
level Audible Alarm.
Warning Bar flashes
intermittently.
Battery status indicator
flashes.
Unit starts a controlled
shut down at a set limit.
Connect external
power.
Push the Alarm
Button once to stop
the Audible Alarm for
three minutes (Alarm
Button flashes,
battery status
indicator stays
flashing).
Connect external
power (alarms clear).
Visual alarms remain
until battery charge
state is above low
675-120 Rev. F
Page 52

42 Infant Flow
number).
®
SiPAP
Alarm Method of Setting
Battery fault
(Battery disconnected or
failing to take or hold
charge).
External power
disconnected.
Automatic Intermittent high level
Automatic Intermittent high level
Indications and
Actions
Audible Alarm.
Warning Bar flashes
intermittently.
Battery status indicator
flashes.
Screen displays
flashing fault code (E
number)
Audible Alarm.
Warning Bar flashes
intermittently.
Battery status indicator
and power indicator
alternately flash.
Method of Resetting
or Canceling
Cannot be reset.
Push the Alarm
Button once to stop
the Audible Alarm for
60 seconds.
Refer to Service
Engineer.
Push the Alarm
Button once to stop
the audible alarm.
(The Warning Bar
stops flashing and
the battery status
indicator is
displayed.)
Reconnect the
external power.
Software fault Automatic Intermittent high level
Audible Alarm.
Warning Bar flashes
intermittently.
Screen displays
flashing fault code (E
number).
Software not running with
unit connected to power
Blender whistle Water trap blocked,
Oxygen cell calibration
error.
Automatic Constant Audible
Alarm.
Warning Bar on.
Screen displays
flashing fault code (E
Audible Alarm. Refer to Service
full or leaking; filters
blocked; loss of wall
pressure; imbalance
of wall gas supply.
Automatic monitoring
(oxygen cell
incorrectly calibrated,
damaged or depleted).
Difference between
displayed and set
value.
Cannot be reset.
Refer to Service
Engineer.
Cannot be reset.
Refer to Service
Engineer.
Engineer.
Calibrate or replace
oxygen cell. Refer to
Service Manual.
675-120 Rev. F
Page 53

Service Manual 43
Alarm Method of Setting
Flowmeter fault. Flowmeter fault No flow indications or
Electrical fault. Electrical fault External power light
Low breath rate
(Rr = 0 for >
timeout as determined by
patient trigger module).
breath rate
Set automatically on
entering BiPhasic Tr,
NCPAP + Apnea or
BiPhasic +Apnea
modes if patient
trigger is installed and
selected.
Indications and
Actions
flow cannot be
adjusted.
does not match screen
icon.
Intermittent high level
Audible Alarm.
Warning Bar flashes.
Breath rate digital
display flashes.
Breath rate icon
flashes.
In BiPhasic models
with monitored NCPAP
+ Apnea, a single sigh
is given.
In BiPhasic Tr Mode
backup sighs at the set
rate are given.
Alarm Button flashes.
The timer is reset and
the applicable sigh
function is repeated
until breathing
restoration is detected
or the Operator
intervenes.
Method of Resetting
or Canceling
Refer to Service
Engineer.
Refer to Service
Engineer.
Push the Alarm
Button once to stop
the Audible Alarm for
30 seconds (Alarm
Button flashes,
breath rate icon and
digital display still
flashes, Warning Bar
still flashes, in
BiPhasic Tr Mode
backup sighs at the
set rate continue).
Restore patient
breathing.
If breath detection is
restored before the
next breath rate
timeout period has
elapsed, the alarm
condition is
automatically
cleared.
BiPhasic/BiPhasic Tr
mode fails to operate as
set.
675-120 Rev. F
Automatic monitoring Intermittent high level
Audible Alarm.
Warning Bar flashes
intermittently.
NCPAP Pres high on
time display flashes.
Screen displays
flashing fault code (E
number).
Cannot be silenced
Revert to NCPAP
mode or refer to
Service Engineer.
Page 54

44 Infant Flow
Diagnostics
Diagnostic mode is accessed by enabling DIP switch 6 and exited by disabling it.
Enable DIP switch 6 during Start Up, Adjust or Mode Selection.
The screen changes to the Diagnostics Menu Screen (for a description of the
displayed information, refer to pages 17-18):
• the alarm limits are disabled
• low level calibration procedure for pressure and oxygen sensors are available
via the key pad
• test procedures for valves and user interface are available via the key pad
• the error log is accessible via the key pad
Select to carry out a pressure calibration
The diagnostic main screen stays the same and the key pad layout changes. With
nothing attached to the pressure line inlet port, touch the first key to calibrate at 0 cm
H
O. Connect the pressure gauge inline on a patient circuit and connect the circuit to
2
the unit and the occlude prongs. Adjust the nCPAP Flowmeter until pressure reads
10 cm H
O ±0.2 cm H2O, and touch the second key to calibrate at 10 cm H2O.
2
®
SiPAP
To return to the Diagnostics Menu Screen, touch the
button.
Select
to carry out an oxygen calibration
The diagnostic main screen stays the same and the key pad layout changes. Set the
blender knob at 21% and touch the first key to calibrate at 21 %. Set the blender
knob at 100% O
To return to the Diagnostics Menu Screen, touch the
and touch the second key to calibrate at 100 % O2.
2
button.
Select
to enter a security code.
In order to upgrade features on the unit, a security code must be obtained from
CareFusion Technical Support (see Figure 11). After the code is entered, the
customer’s unit can be upgraded to different feature sets as laid out by Marketing.
675-120 Rev. F
Page 55
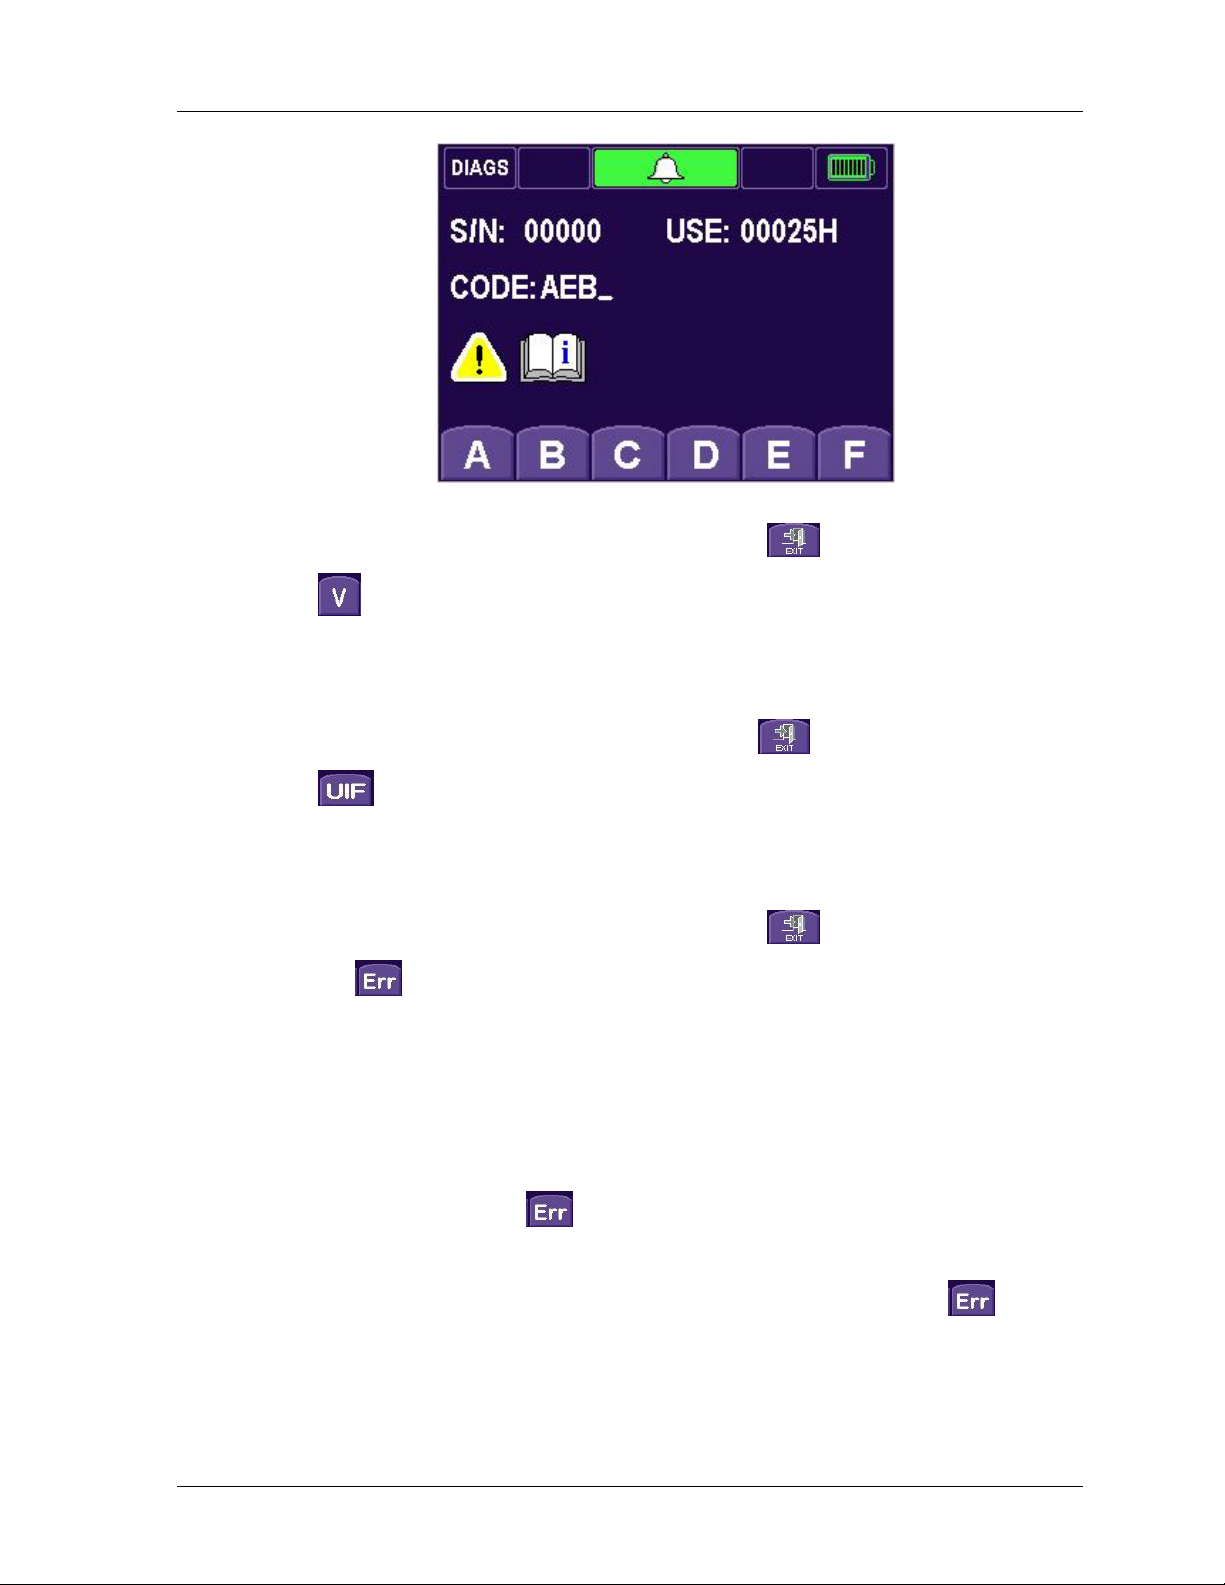
Service Manual 45
Figure 11: Security Screen
To return to the Diagnostics Menu Screen, touch the button.
Select
to carry out a valve test
The diagnostic main screen stays the same and the key pad layout changes. Touch
the first key to test the zero valve, the second key to test the dump valve and the third
key to test the PA valve.
To return to the Diagnostics Menu Screen, touch the
Select
to carry out a user interface test
button.
The diagnostic main screen stays the same and the key pad layout changes. Touch
the first key to test the battery, the second key to test the audible alarm and the third
to test the respiratory indicator.
To return to the Diagnostics Menu Screen, touch the
Touch the
button to show the Error Log Screen
button.
The screen changes to the Error Log Screen and shows a list of error code numbers.
The error code is:
• shown normal if it has occurred since the last reset
• shown grayed if it is inactive since the last reset
• flashing if the error is active since power up or last cleared
To mute flashing errors, the
Refer to Table 6 for the details of error codes and corrective action.
When the corrective action has been taken, to clear all faults, press the
675-120 Rev. F
button.
button.
Page 56

46 Infant Flow
Warning Bar on.
normal mode.
Table 6 - Error Codes
®
SiPAP
Error
Code
- Program memory
Fault Condition Consequence
Unusable – Software
checksum error.
corrupt, execution
inhibited.
- Battery too discharged
(<6.5 V) to operate LCD,
Unusable - no user
interface display.
analogue and valve driver
circuits (no external
power).
- Battery too discharged
(<10 V) to operate
Unusable – sensor
readings invalid.
analogue and valve driver
circuits but sufficient for
LCD driver (no external
power).
E10 Non-volatile memory fault. Unusable - unable to
retrieve/set unit
configuration and
calibration data.
Software
Response
Hardware held in
permanent reset
condition with
Hardware held in
reset condition
with Warning Bar
(status LED off)
on until external
power applied.
User lockout
‘Plug in external
power’ prompt
User lockout
‘Error number’
prompt.
Corrective
Action
Reload
software.
Plug in
external
power.
Plug in
external
power.
Replace main
control PCB.
E11 Calibration data lost. Unusable – sensor
readings invalid.
E12 Configuration DIP settings
and/or PT PRESENT
different to non-volatile
Unusable – possible
incomplete unit set up
performed.
configuration record.
User lockout
‘Error number’
prompt.
User lockout
‘Error number’
prompt.
Put the unit
into
diagnostics
mode (DIP6
ON) and recalibrate O
2
and pressure
sensors.
Ensure that all
the DIP switch
settings are
correct and
the patient
trigger
board/cable
are correctly
attached (if
required). Put
the unit into
diagnostics
mode, clear
the E12 error,
then return to
675-120 Rev. F
Page 57

Service Manual 47
Error
Code
Fault Condition Consequence
E20 Charged battery voltage
too low (<11 V) when
under test load.
E21 External supply voltage too
low (<14 V) to charge
battery (battery flat).
E22 Analog supply rails out of
limits.
E23 Valve driver supply rails
out of limits.
No backup – battery
capacity low.
No backup – battery will
not charge.
Unusable - unreliable
sensor readings.
Unusable - unreliable
valve operations.
Software
Response
Battery fault icon
flashes and ‘Error
number’ alarm
prompt.
Battery low alarm
continues even
when external
power applied.
‘Error number’
alarm prompt.
User lockout
‘Error number’
prompt.
User lockout
‘Error number’
prompt.
Corrective
Action
Replace
battery or
charger.
Replace the
PSU module.
Replace the
main control
PCB and
re-calibrate O
and pressure
sensors.
Replace the
main control
PCB and recalibrate O
2
and pressure
sensors.
2
E24 Hardware safe-start
watchdog disabled.
E30 Pressure sensor fault
(ADC hits rail).
E31 Zero valve not connected
(via sense).
Unusable – valve
disabled.
Unusable – pressure
sensor readings invalid.
Unusable – pressure
sensor readings
unreliable.
User lockout
‘Error number’
prompt.
User lockout
‘Error number’
prompt.
User lockout
‘Error number’
prompt.
Power cycle
unit. If fault
still occurs,
replace the
main control
PCB and
re-calibrate O
and pressure
sensors.
Replace the
pneumatics
PCB and recalibrate O
2
and pressure
sensors.
Replace the
pneumatics
PCB and recalibrate O
2
and pressure
sensors.
2
675-120 Rev. F
Page 58

48 Infant Flow
circuits.
®
SiPAP
Error
Code
Fault Condition Consequence
E32 Zero valve activation fault
(via sense).
E33 Unable to auto zero
pressure sensor.
E41 Dump valve not connected
(via sense).
E42 Dump valve activation fault
(via sense).
Unusable – pressure
sensor readings
unreliable.
Unusable – pressure
sensor readings
unreliable.
Restricted - no over
pressure protection.
Restricted - no over
pressure protection.
Software
Response
User lockout
‘Error number’
prompt.
User lockout
‘Error number’
prompt.
Restricted mode
‘Error number’
alarm prompt.
Restricted mode
‘Error number’
alarm prompt.
Corrective
Action
Replace the
pneumatics
PCB and recalibrate O
2
and pressure
sensors.
Replace the
pneumatics
PCB and recalibrate O
2
and pressure
sensors.
Replace the
pneumatics
PCB and recalibrate O
2
and pressure
sensors.
Replace the
pneumatics
PCB and recalibrate O
2
and pressure
sensors.
E50 Oxygen sensor fault (ADC
hits rail).
E51 Oxygen sensor cannot be
calibrated by user (bad
offset or high gain).
No oxygen monitor –
oxygen sensor
readings invalid.
No oxygen monitor –
possible fuel cell,
electronic, blender or
gas supply fault.
”E##” displayed;
high priority
alarm.
”E##” displayed;
high priority
alarm.
Replace the
pneumatics
PCB and recalibrate O
2
and pressure
sensors /
circuits.
Check the
Error Log
screen in
diagnostics
mode. If an
E52 error also
occurs,
replace the
fuel cell and
re-calibrate the
sensor-
O
2
otherwise
check the
blender ,gas
supplies, or
675-120 Rev. F
Page 59

Service Manual 49
O2 sensor.
Error
Code
Fault Condition Consequence
E52 Oxygen sensor calibrates
but the fuel cell is worn out
(low gain).
E53 Oxygen sensor too noisy
to calibrate (calibration
timeout).
Oxygen calibration suspect
(oxygen value has been
E54
measured as outside range
18 – 104%)
Oxygen sensor disabled by
the operator
E55
No oxygen monitor –
oxygen sensor
readings unreliable.
No oxygen monitor –
oxygen sensor
readings unreliable.
Oxygen sensor
readings unreliable
No oxygen or alarm
monitoring
Software
Response
”E##” displayed;
high priority
alarm.
”E##” displayed;
high priority
alarm.
”E##” displayed;
high priority
alarm.
“E##” alarm
displayed.
Corrective
Action
Replace the
fuel cell
O
2
and recalibrate the
Replace the
fuel cell
O
2
and recalibrate the
sensor or
O
2
circuits.
Recalibrate
sensor. If
O
2
this fails
replace the O
cell and recalibrate.
Re-power the
device to reenable
oxygen
monitoring.
2
E61 NCPAP Pres high valve
not connected (via sense).
E62 NCPAP Pres high valve
activation fault (via sense).
E70 PT module fault (PTRDY
or CAN bus failure).
Restricted -
BiPhasic/BiPhasic
unusable.
Restricted BiPhasic/BiPhasic Tr
unusable.
Untriggerable - Apnea
and PT unusable.
Restricted mode.
‘Error number’
alarm prompt.
Restricted mode.
‘Error number’
alarm prompt.
Reduced
functionality
‘Error number’
alarm prompt.
Replace the
pneumatics
PCB and recalibrate the
and
O
2
pressure
sensor.
Replace the
pneumatics
PCB and recalibrate the
and
O
2
pressure
sensor.
Check the
Patient
Trigger
interface
module/cables
are correctly
connected.
675-120 Rev. F
Page 60

50 Infant Flow
alarm prompt.
board/cable.
®
SiPAP
Error
Code
Fault Condition Consequence
E71 No breath signal from PT
module although CAN
data does not report
Apnea.
E72 No trigger signal from PT
module in BiPhasic Tr
mode.
E90* Spurious software
interrupt, XTAL fails, stack
overflow/ underflow, CPU
Class B exception.
E90 Abnormal hardware,
software or watchdog
reset.
Untriggerable - Patient
may be in Apnea but
PT module may be
dysfunctional.
Untriggerable – No
BiPhasic Tr treatment
given to patient.
Spurious – software
interrupted and restarts
(possibly during
treatment).
Spurious – software
restarts possibly during
treatment.
Software
Response
Reduced
functionality
‘Error number’
alarm prompt.
Reduced
functionality
‘Error number’
Hardware
reinitialized
(disabled) with
alarm bar on and
audible alarm
sounding to
identify root
cause.
Software restarts
‘Error number’
alarm prompt.
Corrective
Action
Replace the
Patient
Trigger
board/cable.
Replace the
Patient
Trigger
Replace the
main control
PCB and recalibrate O
2
and pressure
sensors.
Replace the
main control
PCB and
re-calibrate O
and pressure
sensors.
2
E91 Internal software error
detected.
Unusable – software
unreliable.
E99 Unknown error detected. Unusable – software
unreliable.
* - Generated as a consequence of the fault.
User lockout
‘Error number’
prompt.
User lockout
‘Error number’
prompt.
Replace the
main control
PCB and
re-calibrate O
and pressure
sensors.
Replace the
main control
PCB and
re-calibrate O
and pressure
sensors.
2
2
675-120 Rev. F
Page 61

Service Manual 51
Chapter 7 – Maintenance
Cleaning
CAUTION
Do not immerse any part of the IFSD in water or sterilize it with gas or steam.
1 Clean the exterior surfaces of the IFSD and the transducer interface with a mild
soap or liquid disinfectant solution. Do not use cleaning agents that contain
abrasives.
2 Make sure that cleaning agents do not enter the unit through patient
connection ports.
Maintenance
WARNING
Oxygen vigorously accelerates combustion. To avoid explosion hazard, do
not use any instrument or other equipment that may have been exposed to
oil or grease contamination.
General
1 Examine the exterior of the case for damage and dirt. If necessary clean the
2 Check the water trap on the back panel. If water is visible in the water trap,
3 Technical Assistance can be obtained from the offices listed at the beginning
4 Store the unit in a clean dry location. Make sure that the connections and ports
5 Dispose of scrap units in accordance with the local regulations
Removal and Fitting of Parts – General
1 Only parts approved by CareFusion may be used in this unit.
2 Remove all attached patient connections before removal of parts. Disconnect
3 Place the unit on a stable, clean work surface before removal of parts.
4 Numbers in parenthesis in the Removal/Fitting procedures are the item
unit.
push the button on the bottom of the water trap to release the water.
of this manual.
are suitably blanked to prevent the ingress of dirt, moisture and foreign objects. If
the unit is not being used for a long period of time, remove the battery.
the unit from the power supply.
numbers on the associated figure.
675-120 Rev. F
Page 62

52 Infant Flow
blender or Blender Overhaul Kit
Maintenance Frequencies
Table 7 shows the recommended frequencies for replacement of components.
Table 7 - Maintenance Frequencies
Component Replacement Frequency
Battery Annually
Oxygen Filter Annually
Fuel Cell Filter/Restrictor Annually
Fuel Cell Annually
Water Trap Filter Annually
®
SiPAP
Pilot Drive Check Valves Annually
Case Bleed Filtered Restrictor Annually
Blender Alarm and Bypass
Components (by replacement of
Solenoid Valve (by replacement of
Valve/Sensor PCB)
Every Two Years
Every Five Years
675-120 Rev. F
Page 63

Service Manual 53
Removal and Fitting of Case
Refer to Figure 12.
Removal
1 Remove eight screws (1) on the rear panel and two screws on the case-
bottom.
2 Pull off the case (2).
Fitting
1 Install the case (2) over the main frame, making sure that all wires and pipes
are secure and cannot be trapped by the case.
2 Install the ten screws (1) on the rear panel and tighten.
3. Carry out an Oxygen Leak check (see Appendix A on page 69) and functional
check of the IFSD.
Note: An Oxygen Leak test must be done after every service that requires removal of
the case to ensure no buildup of oxygen is present within the case.
2
675-120 Rev. F
1
Figure 12: Case Removal/Fitting
1
1
Page 64

54 Infant Flow
Removal and Fitting of Battery
Refer to Figure 13.
Removal
1 Remove the case.
2 Disconnect the battery lead connector SK3 (1) (cable 5) from the plug PL3 on
the Main Processor PCB. Remove the screw (2) on the rear panel and remove
the spacer (3). Note position of cable tie securing battery, then cut and remove
cable tie.
3 Pull the battery (4) complete with lead from the compartment.
Note
The battery is held in position in the compartment by a tab on the frame and secured
by cable tie P/N 461964.
4 Feed the battery lead through the frame, pull the grommet (6) from the
recessed hole in the frame and remove the battery.
®
SiPAP
Note
Exhausted batteries and oxygen fuel cells both contain lead and must be disposed of
according to local regulations.
Fitting
1 Feed the battery lead through the frame to plug PL3 on the Main Processor
PCB.
2 Slide the battery into the compartment against the tab (5) and position the
grommet (6) in the recessed hole in the frame.
3 Install the spacer (3) and secure in position with the screw (2). Tighten the
screw (2).
4 Connect the battery lead connector SK3 (1) to the plug PL3 on the Main
Processor PCB.
5 Install new cable tie securing the battery against the metal tab.
6 Refit the case.
675-120 Rev. F
Page 65

Service Manual 55
Figure 13: Battery Removal/Fitting
Removal and Fitting of Oxygen Filter
Note
This procedure can be done without removing the case.
Refer to Figure 14.
Removal
1 Remove the banjo screw (1) on the end of the air/oxygen mounting block (2).
2 Remove the filter (3).
3 Remove and discard the O-ring (4).
Fitting
1 Install a new O-ring (4) on the banjo screw (1).
2 Install a new filter (3) in the air/oxygen mounting block and install the banjo
screw (1).
3 Tighten the banjo screw (1).
675-120 Rev. F
Figure 14: Oxygen Filter Removal/Fitting
Page 66

56 Infant Flow
Removal and Fitting of Fuel Cell Filter/Restrictor
Refer to Figure 15.
Removal
1 Remove the case .
2 Remove the oxygen filter screw (1) from the flow mixer block (2). Remove the
filter/restrictor (3). Remove and discard the O-ring (4) and the O-ring (5) from
the oxygen filter screw (1).
Fitting
1 Install a new O-ring (5) on the oxygen filter screw (1). Install a new O-ring (4)
and the filter/ restrictor (3) into the flow mixer block (2). Install the oxygen filter
screw (1) and tighten.
2 Refit the Case.
3 Carry out an Oxygen Leak check (see Appendix A on page 69) and functional
check of the IFSD and calibrate the fuel cell.
®
SiPAP
Figure 15: Oxygen Filter Restrictor Removal/Fitting
675-120 Rev. F
Page 67

Service Manual 57
Removal and Fitting of the Fuel Cell
Refer to Figure 16.
Removal
1 Remove the case.
2 Disconnect the connector SK12 (1) from the top of the fuel cell.
3 If necessary, remove the screw (2) securing the C clip (3) and release the C
clip securing the cable (cable 7) and the ferrite.
4 Unscrew the fuel cell (4) from the flow mixer block (5).
Note
The fuel cell is installed finger tight, but it may be necessary to use a suitable wrench
on the flats at the top of the fuel cell to remove it. The leak compensation pipe (6)
can also be disconnected from the elbow to gain access.
5 Discard the fuel cell (4) and attached O-ring.
Note
Exhausted batteries and oxygen fuel cells both contain lead and must be disposed of
according to local regulations.
Fitting
1 Check the expiration date of the new fuel cell. Remove the fuel cell from the
sealed package and check that the fuel cell has an O-ring installed above the
threads.
2 Screw the fuel cell (4) into the flow mixer block (5) and tighten finger tight.
3 If removed, secure the cable (cable 7) and the ferrite with C clip (3) and the
screw (2).
4 5 Connect the connector SK12 (1) to the fuel cell.
5 Refit the case.
6 Carry out an Oxygen Leak check (see Appendix A on page 69) and functional
check of the IFSD and calibrate the fuel cell.
675-120 Rev. F
Page 68

58 Infant Flow
Figure 16: Fuel Cell Removal/Fitting
®
SiPAP
Removal and Fitting of Blender and Components
Refer to Figure 17.
Removal
1 Remove the case.
2 Remove the battery.
3 Disconnect the connector SK1 (1) on the LED PCB.
4 Disconnect the connector SK5 (2) on the Main Processor PCB.
5 Disconnect the connector at PL2 (3) on the Patient Trigger PCB.
1
6 Remove the input connection tube (4) by pulling the elbow off the
tube, taking care not to break the barbs on the elbow.
7 Remove the cover (6) from the front of the FiO
control knob (7) and the two
2
covers (8) from the front of the NCPAP Pres low and NCPAP Pres high flow
control knobs (9) by gently prying out of the recess in the knob with a small
screwdriver.
8 Using a screwdriver or Circle pliers, unscrew the central securing nuts for the
flowmeter knobs and pull off the control knobs (9).
9 Using the Special wrench, unscrew the collet on the front of the FiO
knob (7), remove the collet and pull off the control knob (7).
10 Remove the eight screws (10) from the front panel (11).
11 Pull the front panel assembly (11) off the frame, taking care not to damage any
tubes.
12 Remove and discard the O-ring (12).
/8 “ silicone
control
2
675-120 Rev. F
Page 69

Service Manual 59
13 Remove the Valve/Sensor PCB (13) as follows:
a Disconnect the fuel cell connector SK1 (14) at PL1 on the Valve/Sensor
PCB.
b Disconnect the dump/vent valve connector SK3 (15) at PL3 on the
Valve/Sensor PCB.
c Remove the five screws (16).
d Pull the Valve/Sensor PCB (13) downwards and out forward to
disconnect the PCB from the D plug PL2.
e Disconnect the exhaust tubes and the PA flow tube and remove the
Valve/Sensor PCB.
14 At the blender, disconnect the air supply (17), the oxygen supply (18), the
whistle outlet tube (19) and the main outlet (20).
15 Remove the pilot drive check valves as follows:
a Note location of cable ties securing the check valve assemblies behind
the flowmeters, then cut and remove the cable ties.
b Hold the nut (25) and unscrew the cylinder body (23).
c Remove the duckbill check valves (26), guide (27) and seat (28).
d Discard the duckbill check valves (26).
16 Remove the four screws (21) securing the blender (22) and remove the
blender. Do not remove the collet knob on the front of the blender.
17 Replace the blender check valves and filter at the blender inlet (refer to the
Blender Service Manual if installing the Blender Overhaul Kit).
18 To replace the blender alarm bypass components, first locate the reed alarm
cap on the blender. This will be located either on the back of the unit to the
right of the inlet block or on the inlet gas block itself. Refer to directions in the
Blender Service Manual to replace components.
Note
Should the alarm cap not be in either location, contact CareFusion Technical
Support.
675-120 Rev. F
Page 70

60 Infant Flow
®
SiPAP
Figure 17: Blender and Components Removal/Fitting
675-120 Rev. F
Page 71

Service Manual 61
Fitting
1 Fit new pilot drive check valves as follows:
a Fit the seat (28), a duckbill check valve (26), the guide (27), the second
duck bill check valve into the cylinder (23).
b Hold the nut (25) and tighten the cylinder body (23).
c Hold check valve assembly against cable tie mounts behind flowmeter
and install new cable tie. Repeat for the other check valve assembly.
2 Fit the blender or refurbished blender (22) with the four screws (21) into the
front frame panel.
3 Connect the air supply (17), the oxygen supply (18), the whistle outlet tube (19)
and the main outlet (20).
Note
See Appendix D for the tubing diagram.
4 Fit the Valve/Sensor PCB (13) as follows:
a Connect the exhaust tubes and the PA flow tube.
b Fit the Valve/Sensor PCB (13) to the D plug PL2.
c Fit the five screws (16).
d Connect the fuel cell connector SK1 (14) at PL1 on the Valve/Sensor
PCB.
e Connect the dump/vent valve connector SK3 (15) at PL3 on the
Valve/Sensor PCB.
5 Fit a new O-ring (12) to the front panel assembly.
6 Fit the front panel assembly (11) and install the eight screws (10).
7 Set the FiO
(7) so that the pointer is in the 21 % position and install the control knob. Secure
the control knob with the nut and tighten. Install the cover (6).
8 Install the NCPAP Pres low and NCPAP Pres high flow control knobs (9) on
the spindles. Using a screwdriver or Circle pliers tighten the central securing
nuts. Install the covers (8).
9 Install the input connection tube (4) on the elbow of the
10 Connect the connector at PL5 (3) on the Patient Trigger PCB.
11 Connect the connector SK5 (2) on the Main Processor PCB.
12 Connect the connector SK1 (1) on the LED PCB.
13 Install the battery.
14 Carry out an Oxygen Leak check (see Appendix A on page 69) and functional
check of the IFSD and calibrate the fuel cell.
15 Install the case.
collet on the blender to the 21 % position. Align the control knob
2
1
/8 “ silicone tube.
675-120 Rev. F
Page 72

62 Infant Flow
Removal and Fitting of Water Trap Filter
Refer to Figure 18 and document L2879.
Removal
1 Remove the filter bowl (1) using the water trap tool included with the IFSD (P/N
673-051-A).
2 Pull out and discard the filter (2) from the water trap.
Fitting
1 Install the new filter (2) in the water trap.
2 Screw on the water trap bowl (1) and tighten using the water trap tool.
®
SiPAP
675-120 Rev. F
Page 73

Service Manual 63
Removal and Fitting of Case Bleed Filtered
Restrictor
Refer to Figure 18 and document L2879.
Removal
1 Remove the case and loosen the clamp securing the restrictor to sheet metal.
2 Note restrictor flow direction, then remove the case bleed filtered restrictor (3)
from the 4mm tube.
3 Discard the case bleed filtered restrictor (3).
Fitting
1 Install the new case bleed filtered restrictor (3) to the tube in the proper
orientation.
2 Re-secure the restrictor to the sheet metal.
3 Install the case.
675-120 Rev. F
Figure 18: Water Trap Filter Removal/Fitting
Page 74

64 Infant Flow
Removal and Fitting of PA Solenoid Valve
The PA Solenoid Valve is replaced by replacing the Valve/Sensor PCB
Removal
1 Remove the case.
2 Remove the Valve/Sensor PCB.
Fitting
1 Install the new Valve/Sensor PCB.
2 Carry out an Oxygen Leak check (see Appendix A on page 69) and functional
check of the IFSD and calibrate the fuel cell.
®
SiPAP
675-120 Rev. F
Page 75

Service Manual 65
Chapter 8 – Explanation of Symbols
The following symbols may be referenced on the Infant Flow® SiPAP driver or in
accompanying documentation
Symbol Source / Compliance Meaning
Symbol #03-02 IEC 60878
Symbol #5016 IEC 60417 This symbol indicates a FUSE.
CareFusion Symbol
2.5A/T 250 V
101010
Symbol #5031 IEC 60417 This symbol indicates DIRECT CURRENT (DC)
Symbol #5032 IEC 60417
Symbol #01-14 IEC 30878
Symbol #5019 IEC 60417
Symbol #01-20 IEC 60878
Symbol #5021 IEC 60417
Symbol # 01-24 IEC 60878
Symbol #5007 IEC 60417
Symbol #01-01 IEC 60878
Symbol #5008 IEC 60417
Symbol #01-02 IEC 60878
Indicates ATTENTION, consult ACCOMPANYING
DOCUMENTS
This symbol indicates an INTERNAL BATTERY
FUSE
Fuse holder and fuse rating
Electrical AC inlet
The equipment is suitable for alternating current.
This symbol indicates protective EARTH (ground).
This symbol indicates the EQUIPOTENTIAL
connection used to connect various parts of the
equipment or of a system to the same potential, not
necessarily being the earth (ground) potential (e.g.,
for local bonding).
Power ON
Power OFF
Power ON (for part of the equipment)
MDD Directive 93/42/EEC CE Mark
675-120 Rev. F
Power OFF (for part of the equipment)
ETL Mark and Registration Number
Page 76

66 Infant Flow
connection.
Symbol Source / Compliance Meaning
®
SiPAP
CareFusion Symbol
CareFusion Symbol Respiratory Connection and Indicator
Symbol # 5333 IEC 60417
Symbol #02-03 IEC 60878
Operating temperature range of unit
Warning Bell
This symbol indicates TYPE B equipment, which
indicates equipment that provides a particular
degree of protection against electric shock,
particularly with regards to allowable leakage
current and reliability of the protective earth
Type BF patient applied part
Year of Manufacture
Unique Batch Number Identifier
Use Before Expiry Date shown
Year-Month
Single Use Only - Do NOT Re-use
Keep Dry
Keep Away from Heat
RS232 Connection
675-120 Rev. F
Page 77

Service Manual 67
Symbol
Description
Symbols used on buttons:
The following symbols are used to label user input areas within the graphical display.
As needed displays in this table are shown separately as Domestic US configuration
displays (left-hand column) and International configuration displays (right-hand
column).
High Priority Alarm Active
Medium Priority Alarm Active
Low Priority Alarm Active; medium and high priority
alarms are resolved. Alarm does not flash.
No alarms (active or resolved) are present
Active alarm silenced
Adjust BiPhasic rate
Adjust BiPhasic Tr backup rate
Adjust apnea alarm timeout
Adjust low breath rate alarm timeout
Adjust BiPhasic, BiPhasic Tr on time, and NCPAP
manual breath function
Decrease / Increase currently selected parameter
Go to mode select screen.
Nasal CPAP mode
675-120 Rev. F
Page 78

68 Infant Flow
Nasal CPAP mode with breath rate monitoring
BiPhasic mode
BiPhasic mode with breath rate monitoring
BiPhasic Tr mode with breath rate monitoring
Manual Breath. Single breath cycle at current settings
-High, NCPAP Pres high and O
for T
cycle is delivered regardless of button press duration
Toggle between Main Screen and Monitored Parameter
Screen
Go to user calibration mode screen
%. One breath
2
®
SiPAP
Confirm
Wait
Completed
Action has failed
Press to un-lock keypad
Warning message. To clear, press any of the three
icons.
Note
Provision of labeling in this manual for any function should not be taken as evidence
that the function is available. For example parameter R
not currently approved for use in the US.
relates to BiPhasic Tr mode,
B
675-120 Rev. F
Page 79

Service Manual 69
Appendix A – Oxygen Leak Test
Oxygen Leak Test
This test will check for leaks within the enclosure.
Test equipment needed:
Calibrated oxygen analyzer
1. Connect the driver to the air and oxygen supplies. Use adaptors to couple to the
customer-specified gas block on the driver.
2. Connect the oxygen analyzer sampling tube to the driver by replacing the M6 pan screw
(675-002) with an M6 fitting. Before operating the driver, take an initial O2 concentration
reading and record on TIR-004. Plug the fitting.
3. Switch the power on. The next step will setup the unit to operate in Bi-phasic mode for
any Comprehensive or Plus version.
4. Set the NCPAP (Low Pressure) Flowmeter to about 8 LPM then push the soft key button
below the left flowmeter icon (Figure A–1).
Figure A–1
5. Set the %O2 to 100% then push the soft key button below the blender icon.
6. Set the pressure High Flowmeter to about 2 LPM then push its soft key button under the
right flowmeter icon.
The Respiratory Sensor option is not required, but to finish, select this soft key button.
675-120 Rev. F
Page 80

70 Infant Flow
®
SiPAP
7. Accept the NCPAP settings by selecting the NCPAP soft key. (%O2 should display 100)
(Figure A–2).
Figure A–2
8. The next screen varies but select BiPhasic soft key (Figure A–3).
Figure A–3
675-120 Rev. F
Page 81

Service Manual 71
9. Accept the default BiPhasic settings by selecting the BiPhasic soft key again
(Figure A–4).
Figure A–4
10. Verify that the measured value on the external oxygen analyzer doesn’t exceed 23%
FiO2. If so, then troubleshoot for an oxygen leak. Check all the fittings and connections
and repeat the Oxygen Leak Test (Figure A–5).
675-120 Rev. F
Figure A–5
Page 82

72 Infant Flow
®
®
SiPAP
Infant Flow
SiPAP™
Model M675
675-120 Rev. F
Page 83

Service Manual 73
Parameter
Min
Max
Accuracy
Units
3
± 0.005
0.5
15%
1
apnea
Appendix B – Product Configurations
Non-US Configuration Parameters
Set Oxygen concentration, %O2 21 100
CPAP flow rate 0 15
Bi-level additional flow rate 0 5
BiPhasic on time, T-High (inspiration time) 0.1 3.0 *
BiPhasic rate, R (respiration rate) 1 120
BiPhasic Tr backup rate, Rb (backup
respiration rate)
Breath rate timeout 10 30
* T-High automatically reduces at higher R and Rb rate settings to maintain a minimum off time of 100
milliseconds.
1 120
±
±15%
± 15%
±
± 0.5
± 1
%
L/min
L/min
seconds
pm
pm
seconds
US Configuration Parameters
Parameter Min Max Accuracy Units
Inspired oxygen fraction, FiO2 21 100
CPAP flow rate 0 15
Bi-level additional flow rate 0 5
BiPhasic on time, T-High (inspiration
time)
BiPhasic rate, R (respiration rate) 1 54
Breath rate timeout 10 30
0.1 3.0 *
±3
±15%
±
± 0.005
± 0.5
±
%
L/min
L/min
seconds
Pm
Seconds
* T-High automatically reduces at higher R and Rb rate settings to maintain a minimum off time of 1000
milliseconds.
DEFAULT SETTINGS
Inspiration Time T-High: 0.3 seconds (1.0 sec U.S) +/- 1%.
Rate during BiPhasic modes R: 30 / minute (10 / minute U.S.)
Back Up Rate During BiPhasic Tr Rb: 10 / minute
Apnea Interval T
675-120 Rev. F
: 20 seconds (+/- 1%)
Page 84

74 Infant Flow
®
®
SiPAP
Infant Flow
Model M675
SiPAP™
675-120 Rev. F
Page 85

Service Manual 75
Appendix C – Spare Parts
To identify a part referenced in this manual, refer to the associated Figure and Item
number in Table 8.
Table 8 - Spare Parts
Figure Item Number Part Name Part Number
13 3 Battery, Packaged 777244
14 3 Filter 06804
4 O-ring, 7/16” x 9/16” 465476
15 3 Filter/Restrictor 672-024-SA
4 O-ring, 1/8” x ¼” 465474
5 O-ring, ¼” x 3/8” 465457
16 4 Fuel Cell 68289
17 12 O-ring, 7/16” x 9/16” 465476
13
22 Blender 11329
26 Pilot Drive Check Valves 675-230
18 2 Water Trap Filter Element 467269
3 Case Bleed Filtered Restrictor 467542
Valve/Sensor PCB Assembly,
Packaged
777245
675-120 Rev. F
Page 86

76 Infant Flow
Part Number
Description
467469
FLOWMETER KNOB
467466
WASHER M3 CRINKLE BECU (FOR CASE)
777244
PACKAGED BATTERY, MK3
673-051-A
WATERTRAP TOOL
465474
O-RING, O2 FILTER
52700A
VALVE/SENSOR PCB (PACKAGED ASSEMBLY)
467458
POWER INPUT TWIN FUSE
675-300
EXHAUST TUBE 90 DEGREE
03895
VALVE CHECK DCKBL BLACK
22562
BLENDER KNOB (for blender part number 11798)
Additional Service Parts:
467472 BLENDER CONTROL KNOB (for blender part number 11329)
467468 CAP, BLENDER CONTROL KNOB
467471 POINTER, BLENDER CONTROL KNOB
467470 CAP, FLOWMETER KNOB
675-308 CASE
467467 FOOT, POLYURETHANE .5OD
675-200 FLOWMETER MK3 HIGH
675-201 FLOWMETER MK 3 LOW
09220 FLOWMETER, AUXILIARY
47072 SPACER ROUND M4X155MM NYLON
467595 COMPRESSION PAD
465464 FILTER, WATERTRAP
®
SiPAP
465476 O-RING, PATIENT CONNECTOR
672-024-SA ASSEMBLY, FILTER
465457 O-RING, O2 SCREW/FLOWMETER/GAS BLOCK
68289 FUEL CELL
675-230 PILOT DRIVE DUCKBILL ASSY
467542 CASE BLEED FILTER RESTRICTOR
675-260 LCD CABLE 12
675-257 LED BOARD CABLE-6
467459 FUSE TIME LAG 2.5A 250V
675-307 AUX FLOW MOUNTING BLOCK
11798 ASSY BIRD BLENDER
10003 MAINT KIT MCRBLNDR+LOFLO
675-101-xxx OPS MAN INF FLOW SiPAP
677-002 TRANSDUCER INTERFACE
467349 ABDOMINAL RESP SENSOR 25PK
06804 FILTER NYLON CONE INL
467269 FILTER ELEMENT (WATERTRAP)
467455 SWITCH COVER
675-120 Rev. F
Page 87

Service Manual 77
675-310-FR
FRONT PANEL
675-316
MK3 TRIGGER LEUR
777072-101
ASSY O2 /AIR FITTINGS MARK III DISS
461964
CABLE TIE, BATTERY
Part Number Description
675-256
675-310-EN FRONT PANEL
675-310-RO FRONT PANEL
675-312 CONNECTOR PATIENT INLET
675-209 O2 SENSOR CABLE
777072-xxx BLOCK, INLET O2/AIR System
777242-101 SERVICE KIT, Mk3 DRIVER ANNUAL
777242-103 SERVICE KIT, Mk3 DRIVER 5 YEAR
777072-102 ASSY O2 AIR FITTINGS MARK III NIST
777072-103 ASSY O2 /AIR FIT MARKIII FEMALE DISS
777072-103 ASSY O2 AIR FIT MARKIII AIR LIQUIDE
52000-00239 CABLE TIE, CHECK VALVE ASSEMBLY
11431 ASSEMBLY, AUXILLIARY FLOWMETER
SWITCH CABLE ASSY
675-120 Rev. F
Page 88

78 Infant Flow
®
®
SiPAP
Infant Flow
SiPAP™
Model M675
675-120 Rev. F
Page 89

Service Manual 79
Appendix D – Pneumatics Assembly
675-120 Rev. F
Page 90

80 Infant Flow
®
SiPAP
675-120 Rev. F
Page 91

Service Manual 81
Glossary
Term Meaning
Apnea
Bpm
Bps Bytes per second
cmH2O Centimeters of Water (Pressure)
CPAP Continuous Positive Airway Pressure
FiO2 Fraction of Inspired Oxygen
Generator
I/E Inspiration/Expiration ratio
IFSD Infant Flow SiPAP Driver
LBR Low Breath Rate monitoring (US labeling)
L/min Liters per minute
MAP Mean Airway Pressure
BiPhasic
BiPhasic+Apnea BiPhasic Ventilation with Apnea monitoring (non-US labeling)
Temporary inability to breathe; monitoring of breathing (non-US
labeling)
Breaths per minute (applies to each of spontaneous, triggered
and mandatory)
Patient attachment for delivering CPAP, used with nasal prongs or
mask
BiPhasic Ventilation - CPAP with additional pressure pulses,
time-triggered and time-cycled
BiPhasic +LBR BiPhasic with low breath rate monitoring (US labeling)
BiPhasic Tr
NCPAP Nasally applied CPAP
NCPAP+LBR NCPAP with Low Breath Rate monitoring (US labeling)
NCPAP+Apnea NCPAP with Low Breath Rate monitoring (non-US labeling)
Non-US labeling Labeling using non-linguistic symbols in place of English text
PEEP Positive End-Expiratory Pressure
PIP Peak Inspired Pressure
BiPhasic Flow Inspiratory Pressure
PRS
Rate Mandatory BiPhasic rate (per minute)
RB
RSP Patient’s spontaneous respiratory rate (per minute)
s / sec Seconds
Sigh A single pulse of additional gas flow
Triggered BiPhasic Ventilation - CPAP with additional pressure
pulses, patient-triggered and time-cycled
Product Requirement Specification. A fully controlled baseline
document
Backup ventilator rate (in BiPhasic Tr mode during apnea alarm,
per minute; non-US labeling)
675-120 Rev. F
Page 92

82 Infant Flow
Term Meaning
Apnea Interval (non-US labeling) or Low Breath Rate (LBR)
T
apnea
/ T
LBR
T-High Machine breath inspiration time (seconds)
monitor alarm time (US-labeling); both in seconds
This mnemonic may also be associated with an alarm icon
®
SiPAP
Treatment
Application of NCPAP, BiPhasic, BiPhasic Tr, with or without
breath monitoring, to the patient
US labeling Labeling using English text in place of symbols and/or icons
675-120 Rev. F
 Loading...