

Page 1
ENGLISH
Network Video Recording Software RM Series
Administrator Manual
///
This user manual should be read before using the software.
Page 2

Introduction
Thank you for purchasing RM-64/RM-25/RM-9 v4.3 Network Video Recording Software (hereafter referred to as “RM-64/25/
9” or “this software”).
This manual also explains how to use RM-Lite v4.3 Network Video Recording Software (hereafter referred to as “RM-Lite”).
For the difference between RM-64/25/9 and RM-Lite, please refer to “About RM-Lite” (P. 30).
Please read this manual before using the software. After reading this manual, keep it in a safe place for future reference.
The cameras described in this manual may include models not be sold in your country or region.
In addition, please read the license agreement before using the software. The license agreement can be found in the
LICENSE folder on the setup CD-ROM.
Precautions for Use (Disclaimer)
Video Recording
Flaws or other problems with this software may result in recording failure or destruction or loss of recorded data.
Canon shall have no liability whatsoever for any loss or damages incurred by the user as a result of such problems.
Copyright
Videos, images or sounds recorded with your camera may not be utilized or published without consent of copyright
holders, if any, except in such a way as permitted for personal use under the relevant copyright law.
Trademarks
• Canon and the Canon logo are registered trademarks of Canon Inc.
• Microsoft, Windows, Windows Server, Windows Vista, Internet Explorer, SQL Server, and Visual C++ are registered
trademarks or trademarks of Microsoft Corporation in the United States and other countries.
• Windows is legally recognized as Microsoft Windows Operating System.
• QuickTime is a trademark of Apple Inc.
• Apache is a trademark of the Apache Software Foundation.
• Pentium, Intel Core and Xeon are trademarks of Intel Corporation in the United States or other countries (or both).
• NVIDIA and GeForce are registered trademarks or trademarks of NVIDIA Corporation in the United States and other
countries.
• Oracle and Java are registered trademarks of Oracle and/or its affiliates. Other names may be trademarks of their
respective owners.
• All other company or product names used in this manual are trademarks or registered trademarks of their respective
holders.
Third Party Software
This product contains third party software modules.
Each module’s license conditions are also available in the OpenSourceSoftware folder in the LICENSE folder on the
accompanying set-up CD-ROM.
THIS PRODUCT IS LICENSED FROM MPEGLA, LLC. UNDER THE MPEG-4 VISUAL PATENT PORTFOLIO LICENSE FOR
THE PERSONAL AND NON-COMMERCIAL USE OF A CONSUMER TO (i) ENCODE VIDEO IN COMPLIANCE WITH THE
MPEG-4 VISUAL STANDARD (“MPEG-4 VIDEO”) AND/OR (ii) DECODING MPEG-4 VIDEO THAT WAS ENCODED BY A
CONSUMER ENGAGED IN A PERSONAL AND NON-COMMERCIAL ACTIVITY. NO LICENSE IS GRANTED OR SHALL BE
IMPLIED FOR ANY OTHER USE. ADDITIONAL INFORMATION INCLUDING THAT RELATING TO PROMOTIONAL,
2
Page 3

INTERNAL AND COMMERCIAL USES AND ADDITIONAL LICENSING MAY BE OBTAINED FROM MPEG LA, LLC. SEE
http://www.mpegla.com.
This product is licensed under AT&T patents for the MPEG-4 standard and may be used for encoding MPEG-4 compliant
video and/or decoding MPEG-4 compliant video that was encoded only (1) for a personal and non-commercial purpose or
(2) by a video provider licensed under the AT&T patents to provide MPEG-4 compliant video. No license is granted or
implied for any other use for MPEG-4 standard.
3
Page 4
User Manuals
R13
R12
M50
H652
H651
R11
R10
M641
M640
M741
M740
S30
Types of User Manuals
This product has the following manuals:
Administrator Manual (this manual)
This manual is intended for the system administrator and provides information on how to operate this software product.
Please also read the manuals provided with each camera, as required.
Notes
1 Any unauthorized reproduction of this guide is prohibited.
2 The contents of this manual are subject to change without any prior notice.
3 This document has been prepared with the utmost attention to accuracy. If you have any comments, however,
please contact a Canon sales representative.
4 Canon shall assume no liability for any outcome of using this product, regardless of Items 2 and 3 above.
How to Use This Manual
This manual is intended for display and reading on your computer screen.
Software Screenshots
The software screenshots samples shown in this guide are for illustration only. The screenshots may differ from the
actual screens displayed.
The VB-R11 is mainly used as the example camera in this manual. In addition, screens using Windows 8.1 are
displayed as samples to describe operations.
Symbols Used in This Manual
Symbols Indicating Camera models
The following symbols indicate information unique to a specific camera model.
Symbol Camera Model
VB-R13VE, VB-R13
VB-R12VE
VB-M50B
VB-H652LVE
VB-H651V
VB-R11VE and VB-R11
VB-R10VE
VB-M641VE and VB-M641V
VB-M640VE and VB-M640V
VB-M741LE
VB-M740E
VB-S30D
4
Page 5
Symbol Camera Model
S31
S80x
S90x
H43
H41
H630
H610
H730
H710
M42
M40
M620
M600
M
720
M700
C500
C60
C300
C50F
C50i
RM-64/25/9
VB-S31D
VB-S800D and VB-S805D
VB-S900F and VB-S905F
VB-H43
VB-H41
VB-H630VE and VB-H630D
VB-H610VE and VB-H610D
VB-H730F
VB-H710F
VB-M42
VB-M40
VB-M620VE and VB-M620D
VB-M600VE and VB-M600D
VB-M720F
VB-M700F
VB-C500VD and VB-C500D
VB-C60
VB-C300
VB-C50Fi and VB-C50FSi
VB-C50i and VB-C50iR
Symbols Indicating Products
The following symbols indicate information that is unique to the RM-64/25/9 and the RM-Lite version.
Symbol Meaning
Features unique to the RM-64/25/9. They cannot be used with RM-Lite.
Information unique to RM-Lite.
Symbols Indicating Precautions
The following symbols indicate descriptions you should pay close attention to.
Symbol Meaning
Important Cautions and restrictions during operation. Make sure to read these carefully.
Note Supplementary descriptions and reference information.
5
Page 6

Table of Contents
Introduction...................................................................................................................... 2
Precautions for Use (Disclaimer) ............................................................................................ 2
Trademarks ............................................................................................................................. 2
Third Party Software................................................................................................................ 2
User Manuals................................................................................................................... 4
Types of User Manuals ...........................................................................................................4
How to Use This Manual ......................................................................................................... 4
Symbols Used in This Manual................................................................................................. 4
Chapter 1 Before Use
Features......................................................................................................................... 12
Operating Environment.................................................................................................. 14
For High-reliability/H.264 Video Format Systems ................................................................. 14
For Small-scale Systems (Storage Server, Viewer, and RM Manager Installed) .................. 16
For Large-scale Systems (with Multiple Storage Servers) .................................................... 18
Important Notes Concerning System Requirements ............................................................ 20
Additional Considerations..................................................................................................... 21
Supported Cameras ...................................................................................................... 22
About the Latest Camera Firmware ...................................................................................... 23
Camera Video Sizes..............................................................................................................23
Product Type and Number of Licenses......................................................................... 24
About Licenses ..................................................................................................................... 24
Compatibility with Network Video Recorder VK-64/16/Lite................................................... 25
System Configuration Example ..................................................................................... 26
Configuration Example 1: Install All on a Single Computer .................................................. 26
Configuration Example 2: Storage Server and Viewers Installed Separately on Multiple
Networked Computers ..................................................................................................... 27
Configuration Example 3: Multiple Storage Servers and Viewers Installed.......................... 27
System Design............................................................................................................... 28
Maximum System Configuration ........................................................................................... 28
Determining the Capacity of the Storage Server .................................................................. 28
Calculating Network Bandwidth............................................................................................ 28
Notes on Storage Server Operation...................................................................................... 29
About RM-Lite................................................................................................................ 30
Functional Limitations for RM-Lite......................................................................................... 30
Features that Cannot Be Used in RM-Lite ............................................................................ 30
Specification Comparison for RM-64/25/9 and RM-Lite ....................................................... 31
Setup Flow ..................................................................................................................... 32
Day-to-Day Operation........................................................................................................... 33
Chapter 2 Installation
How to Install the Software ............................................................................................ 36
Installation Procedures .........................................................................................................36
Upgrade from an Earlier Version .......................................................................................... 39
6
Page 7

Upgrade from RM-Lite to RM-64/25/9................................................................................... 40
Settings After Installation ............................................................................................... 41
Windows Firewall Settings .................................................................................................... 41
Security Level Setting ........................................................................................................... 42
Sound Settings for Using the Audio Feature......................................................................... 42
Chapter 3 Storage Server Setup
Connect RM Manager to the Storage Server ................................................................ 44
Start Recording Immediately After Registering a Camera ............................................ 46
Add a Camera ............................................................................................................... 47
Display the [Cameras] Tab ................................................................................................... 47
Add Cameras One at a Time ................................................................................................ 47
Search For and Add Cameras .............................................................................................. 49
Change Camera Information................................................................................................. 49
Remove a Camera ................................................................................................................ 50
Chapter 4 System Management With RM Manager
RM Manager Functions ................................................................................................. 52
[Tree View] Tab..................................................................................................................... 53
[Cameras] Tab...................................................................................................................... 53
[Storage Server] Tab............................................................................................................. 54
[Users] Tab ........................................................................................................................... 54
[Storage Server Search Results] Tab ................................................................................... 55
[Activity Logs] Tab ................................................................................................................ 55
[Live Events Log] Tab ...........................................................................................................56
Menus ................................................................................................................................... 56
Add a User .................................................................................................................... 58
About User Groups ...............................................................................................................58
Display the [Users] Tab ........................................................................................................ 58
Add a User............................................................................................................................ 58
Change the User Information................................................................................................ 59
Remove a User ..................................................................................................................... 59
Add a User Group and Specify Its Access Permissions ...................................................... 60
Notification of Events by E-mail .................................................................................... 62
Display the [Event] Tab.........................................................................................................62
Configure Event Priorities and E-mail Notifications............................................................... 62
Manage Disk Space ...................................................................................................... 65
Change the Destination of the Recording File and the Maximum Disk Usage..................... 65
Specify the Storage Period for Recorded Video................................................................... 66
Low Remaining Disk Space Level and Solutions.................................................................. 67
Chapter 5 Setting a Recording Schedule
Record on a Regular Basis (Repeating Weekly Schedules) ......................................... 72
Display the [Recording Schedules] window......................................................................... 72
Display the [Edit Schedule Item] dialog box ........................................................................ 73
Specify the Recording Period and Day of the Week ............................................................ 73
Specify the Recording Mode ................................................................................................ 74
7
Page 8

Specify Advanced Settings................................................................................................... 75
Check the Recording Schedule............................................................................................ 75
Configure the Recording Mode ............................................................................................ 75
Configure the Advanced Recording Settings....................................................................... 84
Copy a Weekly Schedule to Another Camera ...................................................................... 92
Record at Specific Times (Special Day Schedule Settings) ......................................... 94
Display the [Special Day Schedules] Tab ............................................................................ 94
Name the Special Day Recording Schedule ........................................................................ 95
Specify the Day..................................................................................................................... 95
Specify the Schedule for Each Camera................................................................................ 96
Chapter 6 Monitor Video with the Viewer
Launch the Viewer ......................................................................................................... 98
Viewer Features ............................................................................................................. 99
Toolbar .................................................................................................................................. 99
View Live Video ........................................................................................................... 101
Select a Camera to View Live Video ................................................................................... 101
Select a Layout to View Live Video..................................................................................... 102
Operate the Camera .................................................................................................... 103
Set the Camera Angle......................................................................................................... 103
Play Back Audio.................................................................................................................. 106
Compensate for Dark Regions in the Video........................................................................ 107
Record Now................................................................................................................. 108
View Recorded Video .................................................................................................. 109
Search for a Recording....................................................................................................... 109
Play a Recording................................................................................................................. 110
Zoom a Region of the Video (Viewer PTZ).......................................................................... 111
Save Part of a Recording.................................................................................................... 112
Save a Snapshot of the Displayed Video............................................................................ 113
Check Events............................................................................................................... 115
View a Live Event ................................................................................................................ 115
Search for Events................................................................................................................ 116
Chapter 7 Viewer Settings
Configure the Viewer ................................................................................................... 120
Display the [Viewer Settings] Dialog Box ........................................................................... 120
Configure the Viewer Display and Operation Settings ....................................................... 120
Configure Event Notification and Priorities ......................................................................... 121
Configure the Display/Hide Mode for Each Event .............................................................. 122
Configure the Video Window ....................................................................................... 123
Change the Video Window Size.......................................................................................... 123
Change the Video Window Format..................................................................................... 123
Change the Video Window Resolution................................................................................ 124
Configure the Callout Window Mode .................................................................................. 124
Configure the Video Window Layout ........................................................................... 126
Apply the Layout................................................................................................................. 126
Save the Layout .................................................................................................................. 127
8
Page 9

Configure the Grid ..............................................................................................................127
Configure a Dynamic Layout .............................................................................................. 128
Configure a Layout Sequence ............................................................................................ 129
Organize Layouts................................................................................................................131
Configure the [Advanced Camera Settings] ............................................................... 133
Adjust the Video Quality...................................................................................................... 134
Adjust the Focus and Speed .............................................................................................. 137
Configure External Outputs................................................................................................. 138
Chapter 8 Backup
Backup ........................................................................................................................ 140
Destinations of the Backup Files......................................................................................... 140
Notes on Backup ................................................................................................................ 141
How to Restore a Backup ............................................................................................ 142
Restoring from Backup Data............................................................................................... 142
Chapter 9 Troubleshooting
Actions Required When Recording Errors Occur ....................................................... 146
Solutions When Viewer Problems Occur ..................................................................... 147
Viewer and Video Windows ................................................................................................ 147
Timeline............................................................................................................................... 148
[Extract Video] .................................................................................................................... 148
Video Recording .................................................................................................................148
Connection Problems.......................................................................................................... 149
Error Messages ........................................................................................................... 150
Messages Displayed in the Viewer..................................................................................... 150
Messages Recorded in the Log Files ................................................................................. 153
Event Information......................................................................................................... 157
Camera Errors..................................................................................................................... 157
Events Indicating Errors or Warning Levels and Corresponding Actions .......................... 158
Appendix
Create a Shortcut Icon for Launching the Viewer........................................................ 160
Check Event Notification E-mail .................................................................................. 161
Content and Format of Event E-mail Notifications .............................................................. 161
Changing the Storage Server IP Address ................................................................... 163
Changing the Storage Server IP Address with RM Manager ............................................. 163
Change the Storage Server IP Address with the Command Line....................................... 163
Checking the Software Versions.................................................................................. 164
Checking the Version of RM Manager................................................................................ 164
Checking the Version of the Viewer .................................................................................... 164
Checking the Version of the Storage Server....................................................................... 164
How to Upgrade the License....................................................................................... 165
Uninstall .......................................................................................................................166
Functional Limitations for MPEG-4 and H.264 Formats............................................... 167
Live View ............................................................................................................................. 167
9
Page 10

Video Recording .................................................................................................................167
Playback ............................................................................................................................. 167
Using the AXIS Q7404/Q7401 ..................................................................................... 168
Supported Firmware ........................................................................................................... 168
Usage Precautions.............................................................................................................. 168
Functional Limitations ......................................................................................................... 168
Index............................................................................................................................ 170
10
Page 11

Chapter
Before Use
This chapter introduces items that should be understood before using the software.
Page 12

Features
The RM-64/25/9 is a software product family used to monitor multiple locations using network cameras and to record and
play back video from the cameras. It is possible to set up a monitoring system with a maximum of 512 cameras when using
multiple Storage Servers.
Operation when using the Viewer and RM Manager
The Viewer is used to view video, and RM Manager is used for system management and to configure Storage Server
settings.
Multiple recording modes
In addition to being able to record video for a specific period, you also have recording modes, such as sensor
recording, motion detection recording, intelligent function recording and volume detection recording, which start
recording when a particular type of camera event occurs.
Support for JPEG/MPEG-4 and H.264 *
The JPEG, MPEG-4 and H.264 video formats are supported for live view and recording. Using MPEG-4 or H.264
formats decreases the load on the network bandwidth, while maintaining high quality video and saving hard disk
space when recording.
Direct camera operation *
You can change the camera angle and use the zoom while watching the live view.
Two-way audio*
Send and receive live audio and simultaneously record audio with the video. You can also use this feature to
communicate with a location that has a camera.
* Only available for cameras that support the feature.
Flexible screen layout
You can arrange multiple video windows in the Viewer, so you can compare video from different locations at the
same time. The Viewer lets you create multiple layouts and organize them in tabs on the viewing area, so you can
easily switch between different camera video.
You can also operate up to two Viewer windows at the same time. With an environment that supports multiple
displays, you can create a dual-display monitoring setup by locating a Viewer on each of the displays.
Tags
You can assign tags to a camera that give you information about the camera, such as its location and camera type.
This is particularly useful when searching for cameras in a large-scale system.
12
Dynamic layouts
With this feature, you can automatically display videos in the Viewer on a layout from cameras that meet specific
criteria, such as the camera status.
User access management with user groups
You can create user groups to more easily manage user access. By assigning permissions to a group, you
automatically assign the same permissions to each member of the group.
Page 13

1
Shade control
Important
Shade control automatically compensates for the dark regions in the video and can be used for both live and
recorded video.
Record Now (Manual recording)
Use this feature to immediately start recording when you do not have a recording schedule set up.
Saving the specified video
You can extract part of a recording and save it as a video file that can be played on a computer.
Viewer PTZ
You can instantly crop a region of live video or recorded video during playback using an intuitive operation to zoom in
on that region.
You can also crop and zoom several videos simultaneously for side-by-side comparison.
Some features have limited functionality. For details, please refer to “About RM-Lite” (P. 30).
Storage Server/Viewer v3.2 and earlier, and Storage Server/Viewer/RM Manager v4.3 cannot connect.
Before Use
13
Page 14
Operating Environment
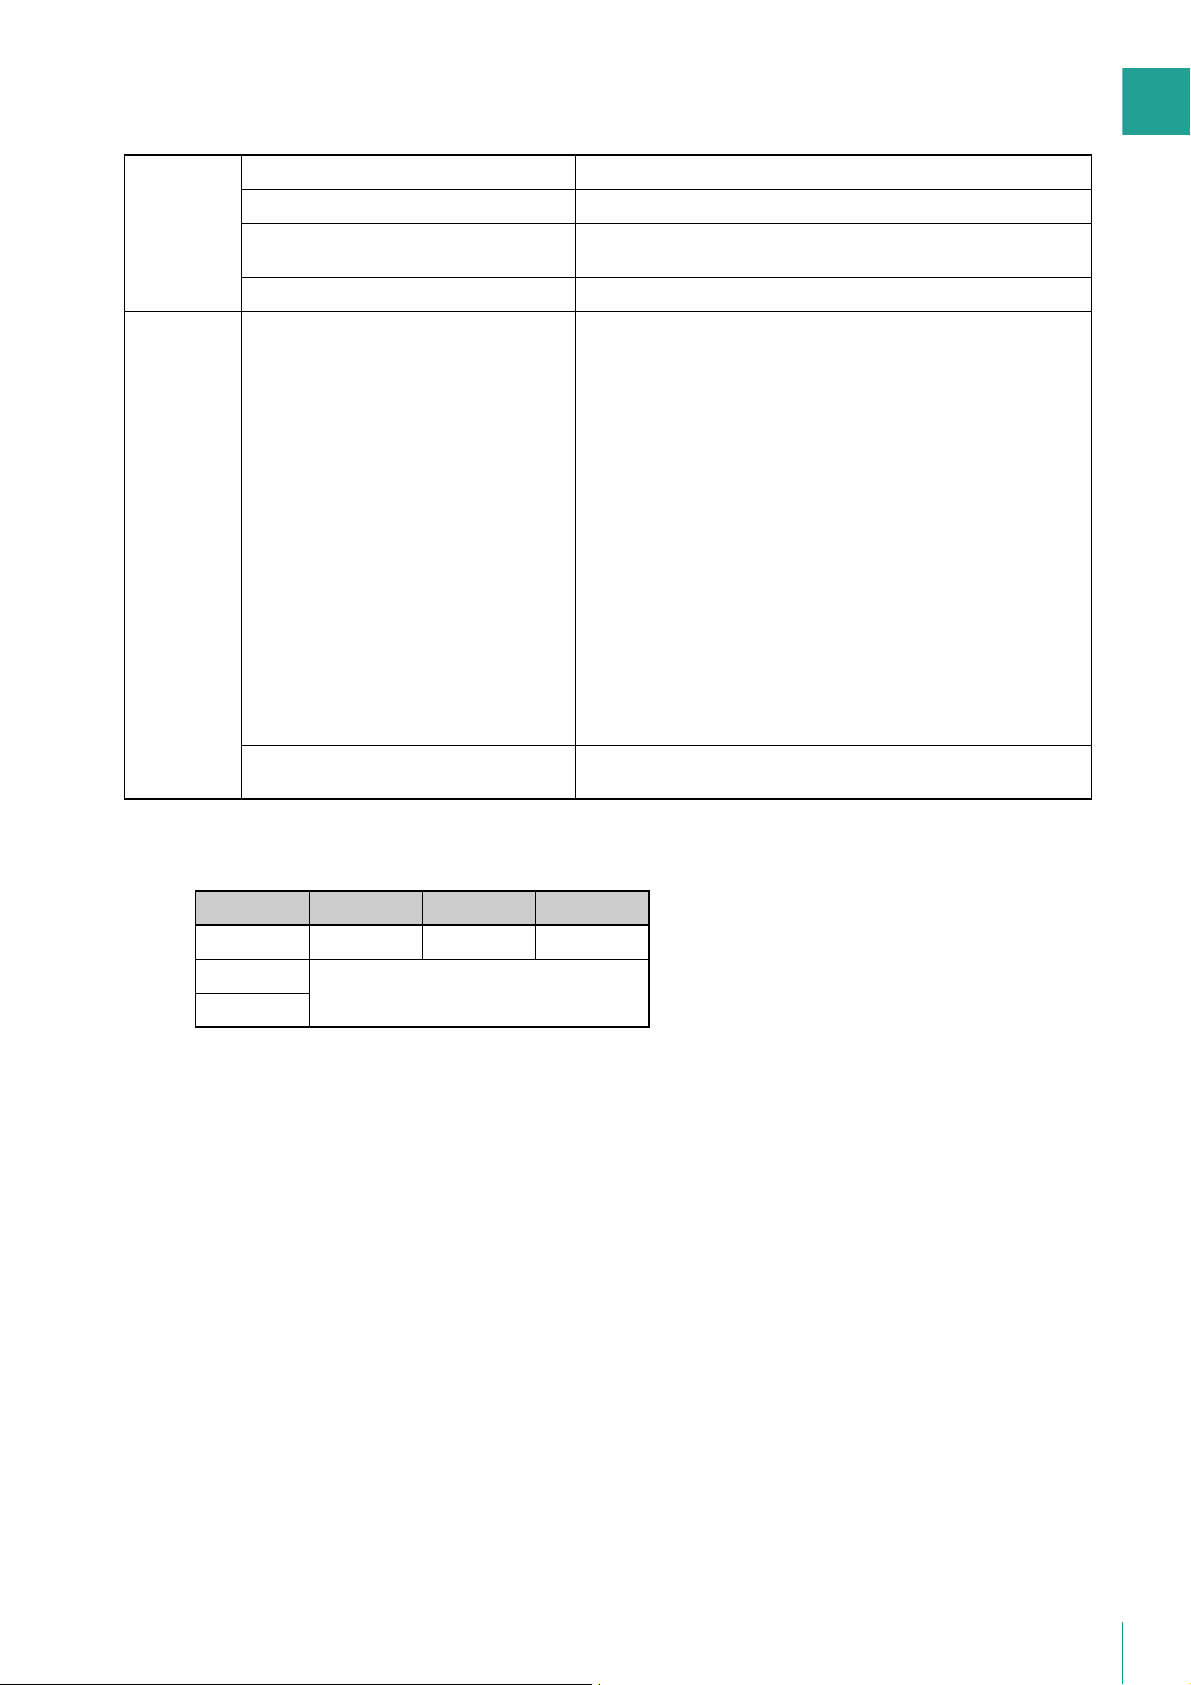
For High-reliability/H.264 Video Format Systems
Storage Server Viewer/RM Manager
CPU Intel Xeon 3060 or Intel Core 2 Duo 2.4 GHz or
higher
or an Intel CPU of equivalent class that meets the
following requirements:
Clock speed: 2.4 GHz or greater
L2 cache 4 MB or greater
No. of cores: 2 or more
Memory 2 GB or greater
Hard disk Interface: SAS / SATA
Cache: 16 MB or greater
Spindle speed: 7200 rpm or faster
100 MB is required for installation (an additional
500 MB is required if .NET Framework 3.5 SP1 or
.NET Framework 4.5 is not installed)
Additional space for recording files and other files
depends on the number of cameras and the
recording settings
It is recommended that you use separate hard disk
drives for the OS and the recording data.
Network controller 1000 BASE-T or similar, supporting 1 Gbps transfer speed
Display – 1280x1024 resolution or higher
Graphics – NVIDIA GeForce GT 220 or higher
Others – Audio support is required for audio playback
Intel Core i5 750 2.67 GHz or higher
Intel Core i7 3.5 GHz or higher recommended
when displaying 1920 x 1080 video
100 MB is required for installation (an additional
500 MB is required if .NET Framework 3.5 SP1 or
.NET Framework 4.5 is not installed)
Additional space for saving extracted video files,
as required.
16-bit colors or greater
Required to display all user interfaces of the Viewer
Or a graphics card of equivalent class that meets
the following requirements:
Video memory size: 1 GB or greater
Memory interface width: 128-bit or larger
Memory clock: 790 MHz or greater
NVIDIA GeForce GTX 660 or higher recommended
when displaying 1920 x 1080 video
(P. 106).
14
Operating system Windows Vista Ultimate/Business/Enterprise SP2 32/64-bit
Windows Vista Ultimate/Business/Enterprise/Home Premium SP2 32/64-bit
Windows 7 Ultimate/Professional/Enterprise SP1 32/64-bit
Windows 7 Ultimate/Professional/Enterprise/Home Premium SP1 32/64-bit
Windows 8/Windows 8 Pro/Windows 8 Enterprise 32/64-bit
Windows 8.1/Windows 8.1 Pro/Windows 8.1 Enterprise 32/64-bit
Windows 10 Pro/Windows 10 Enterprise/Windows 10 Home 32/64-bit
Windows Server 2008 Standard SP2 32/64-bit
Windows Server 2008 R2 Standard SP1 64-bit
Windows Server 2012 Standard 64-bit
Windows Server 2012 R2 Standard 64-bit
When a highly reliable system (such as 24 hours of uninterrupted use) is required, server operating
systems are recommended.
The tablet mode for Windows 10 is not supported.
Operating system language English, German, Spanish, French, Italian, Turkish, Russian, Thai, and Japanese
Environment languages switched using language-packs are not supported.
Page 15
1
• The system requirements described in the previous section are the minimum requirements, assuming the following
operating environment:
Storage
Server
Viewer Estimated display frame rate *
Maximum recording/playback data rate 80 Mbps *
Overall recording frame rate 1280 fps or slower *
Maximum number of cameras with motion
detection*
Maximum events processed *
3
10 units
4
5
20,000 events per day
When using recommended Intel i5 + GT 220
1
2
For 1920 x 1080 display size: 20 fps (15 fps for H.264)*
For 1280 x 720 display size: 40 fps
For 1280 x 960 display size: 40 fps
For 960 x 540 display size: 45 fps
For 640 x 360 display size: 80 fps
For 640 x 480 display size: 80 fps
For 480 x 270 display size: 160 fps
For 320 x 180 display size: 320 fps
For 320 x 240 display size: 320 fps
6
Before Use
When using Intel i7 + GTX 660
For 1920 x 1080 display size: 30 fps (15 fps for H.264)*
For 1280 x 720 display size: 40 fps
For 1280 x 960 display size: 40 fps
For 960 x 540 display size: 45 fps
For 640 x 360 display size: 80 fps
For 640 x 480 display size: 80 fps
For 480 x 270 display size: 160 fps
For 320 x 180 display size: 320 fps
For 320 x 240 display size: 320 fps
Total number of simultaneously displayable
MPEG-4 and H.264 videos
*1 If the volume per second of recording and playback data handled by one Storage Server is 80 Mbps or greater, you should
review your recording requirements to ensure system stability. The following shows an estimate of the recording and playback
data volume per second for various video formats.
320 × 240 640 × 480 1920 × 1080
JPEG 810 fps 280 fps 50 fps
MPEG-4
80 Mbps
H.264
For standard resolution ([Video Quality] set to [3]), the JPEG video frame rates will result in an estimated data rate of 80 Mbps.
Audio data requires a Storage Server of 64 Kbps, regardless of the type of camera.
You can check the recording/playback data volume per second during operation on the [Storage Server] tab in RM Manager
(P. 54).
*2 The data size of recorded audio is calculated using a frame rate of 10 fps per camera.
*3 Number of cameras selected in [Detect Motion Using] > [Storage Server] for motion detection recording.
*4 Total number of all types of events.
*5 Assumes a standard resolution ([Video Quality] setting is [3]) and that the receive size and display size are the same. If the
receive size and display size are different, performance may decrease due to an increase in processing load.
*6 When multiple video sizes are combined, they will be equivalent to the following: 1920 x 1080 will be equivalent to 14 320 x
240 size videos, 1280 x 720 will be equivalent to 8 320 x 240 size videos, 1280 x 960 will be equivalent to 8 320 x 240 size
videos, 960 x 540 will be equivalent to 7 320 x 240 size videos, 640 x 360 will be equivalent to 5 320 x 240 size videos, 640 x
480 will be equivalent to 5 320 x 240 size videos, 480 x 270 will be equivalent to 2 320 x 240 size videos, 320 x 180 will be
equivalent to 1 320 x 240 size videos.
6 or less *
7
6
For example, the following combinations will result in a total equivalent of 320 x 240 at 320 fps.
1920 x 1080, 5 fps 320 x 240, 5 fps x 14 = 70 fps equivalent
1280 x 960, 5 fps 320 x 240, 5 fps x 8 = 40 fps equivalent
960 x 540, 8 fps 320 x 240, 8 fps x 7 = 56 fps equivalent
640 x 480, 8 fps 320 x 240, 8 fps x 5 = 40 fps equivalent
15
Page 16
480 x 270, 25 fps 320 x 240, 25 fps x 2 = 50 fps equivalent
320 x 240, 64 fps
Total: 320 x 240, 320 fps equivalent (70 + 40 + 56 + 40 + 50 + 64)
*7 The number of videos you can display at once depends on the amount of memory available. If there is not enough memory,
you will not be able to display videos.
• In a system environment with a large number of cameras and connected viewers and where the number of events that
may occur is also likely to be high, the Storage Server must come with the specifications that meet the needs of that
environment for stable operation.
• If you need to operate a high-reliability system (such as for 24hour operation) in a system environment, we recommend
that you use a server operating system on the computer that is used for the Storage Server.
• When high-reliability operation is required (such as for 24-hour operation, and high frequency disk access) we strongly
recommend that you use a high-reliability SAS hard disk. Using a low-reliability SATA hard disk may result in a disk error
in a one to two year period. Therefore, you may need to check the disk for errors on a regular basis, using features such
as scan disk. In such a case, recording performance may suffer during checking, due to the increased load on the disk.
• With systems intended for users requiring high-reliability/H.264, when operating both the Storage Server and the Viewer
on one computer, the operating environment must satisfy the requirements for both the Storage Server and the Viewer.
However, to help ensure stable operation, we recommend that you use separate computers for the Storage Server and
for the Viewer.
• Do not use RM Manager and the Viewer simultaneously.
For Small-scale Systems (Storage Server, Viewer, and RM Manager Installed)
Storage Server/Viewer/RM Manager
CPU Intel Pentium G6950 2.80 GHz or higher,
or an Intel CPU of equivalent class that meets the following requirements:
Clock: 2.4 GHz or higher
L2 cache: 512 KB or greater
L3 cache: 3 MB or greater (only required if the L2 cache is less than 3 MB)
Number of cores: 2 or more
Memory 2 GB or greater
Hard disk Interface: SAS / SATA
Cache: 16 MB or greater
Spindle speed: 7200 rpm or faster
200 MB is required for installation (an additional 500 MB is required if .NET Framework 3.5 SP1 or .NET
Framework 4.5 is not installed)
Additional space for recording files and other files (the actual space required depends on the number of
cameras and the recording settings)
Additional space for saving extracted video files, as required.
The hard disk drive for the recording data should have a capacity of 1GB or greater.
Network controller 100 BASE-TX or similar, 100 Mbps transfer speed
Display 1280 x 1024 resolution or higher
Others Audio support is required for audio playback (P. 106).
Operating system Windows Vista Ultimate/Business/Enterprise SP2 32/64-bit
16-bit colors or greater
Required to display all user interfaces of the Viewer
Windows Vista Ultimate/Business/Enterprise/Home Premium SP2 32/64-bit
Windows 7 Ultimate/Professional/Enterprise SP1 32/64-bit
Windows 7 Ultimate/Professional/Enterprise/Home Premium SP1 32/64-bit
Windows 8/Windows 8 Pro/Windows 8 Enterprise 32/64-bit
Windows 8.1/Windows 8.1 Pro/Windows 8.1 Enterprise 32/64-bit
Windows 10 Pro/Windows 10 Enterprise/Windows 10 Home 32/64-bit
Windows Server 2008 Standard SP2 32/64-bit
Windows Server 2008 R2 Standard SP1 64-bit
Windows Server 2012 Standard 64-bit
Windows Server 2012 R2 Standard 64-bit
The tablet mode for Windows 10 is not supported.
16
Page 17
1
Storage Server/Viewer/RM Manager
*1 Do not use H.264 in small-scale systems, as this can have a negative effect on Viewer use.
*2 The data size of recorded audio is calculated using a frame rate of 10 fps per camera.
*3 Total number of all types of events.
*4 Assumes a standard resolution ([Video Quality] setting is [ 3 ]) and that the receive size and display size are the same. If the
receive size and display size are different, performance may decrease due to an increase in processing load.
*5 The number of videos you can display at once depends on the amount of memory available. If there is not enough memory,
you will not be able to display videos.
Storage Server Maximum recording/playback data rate 16 Mbps *
1
Overall recording frame rate 256 fps or slower *
2
Maximum number of cameras with motion detection 0 units
Maximum events processed *
3
10,000 events per day
Viewer Estimated display frame rate *
4
1920 x 1080: 1 fps
1280 x 960: 2 fps
960 x 540: 5 fps
640 x 480: 10 fps
480 x 270: 15 fps
320 x 240: 30 fps
Total number of simultaneously displayable MPEG-4
videos
6 or less*
5
System components Guideline
Number of cameras Approx. 9 cameras (assuming RM-9 is used for operation)
Recording frame rate 5 fps x 9 cameras with 320 x 240 standard resolution (approx. 8 Mbps in terms of data rate)
Display frame rate When displaying only live video:
3 fps x 9 cameras (= 27 fps) with 320 x 240 standard resolution
When displaying only playback video:
5 fps x 6 cameras (= 30 fps) with 320 x 240 standard resolution
When displaying live video and playback video simultaneously:
3 fps x 8 for live display + 5 fps x 1 for playback with 320 x 240 standard resolution
Others H.264 is not used
Operating system language English, German, Spanish, French, Italian, Turkish, Russian, Thai, and Japanese
Environment languages switched using language-packs are not supported.
• The system requirements described above are the minimum configuration, assuming the following operating
environment:
Before Use
• The following are guidelines for implementing a system for a small-scale user.
• The Viewer computer specifications on P. 14 are required even for small scale systems (up to four cameras) using
RM-Lite, if you want to display H.264 video.
17
Page 18

For Large-scale Systems (with Multiple Storage Servers)
Storage Server Viewer/RM Manager
CPU Intel Xeon E3-1245 v3 or Intel Core i7 4770
3.4 GHz or higher
or an Intel CPU of equivalent class that meets the
following requirements:
Clock speed: 2.4 GHz or greater
L2 cache 4 MB or greater
No. of cores: 2 or more
Memory 6 GB or greater
Intel Core i7 4770 3.4 GHz or higher
4 GB or greater
Hard disk Interface: SAS / SATA
Cache: 16 MB or greater
Spindle speed: 7200 rpm or faster
100 MB is required for installation (an additional
500 MB is required if .NET Framework 3.5 SP1 or
.NET Framework 4.5 is not installed)
Additional space for recording files and other files
depends on the number of cameras and the
recording settings
It is recommended that you use separate hard disk
drives for the OS and the recording data.
Network controller 1000 BASE-T or similar, supporting 1 Gbps transfer speed
Display – 1280x1024 resolution or higher
Graphics – NVIDIA GeForce GTX 660 or higher
Others – Audio support is required for audio playback
Operating system Windows Vista Ultimate/Business/Enterprise SP2 32/64-bit
Windows 7 Ultimate/Professional/Enterprise SP1 32/64-bit
Windows 8/Windows 8 Pro/Windows 8 Enterprise 32/64-bit
Windows 8.1/Windows 8.1 Pro/Windows 8.1 Enterprise 32/64-bit
Windows 10 Pro/Windows 10 Enterprise/Windows 10 Home 32/64-bit
Windows Server 2008 Standard SP2 32/64-bit
Windows Server 2008 R2 Standard SP1 64-bit
Windows Server 2012 Standard 64-bit
Windows Server 2012 R2 Standard 64-bit
When a highly reliable system (such as 24 hours of uninterrupted use) is required, server operating
systems are recommended.
The tablet mode for Windows 10 is not supported.
100 MB is required for installation (an additional
500 MB is required if .NET Framework 3.5 SP1 or
.NET Framework 4.5 is not installed)
Additional space for saving extracted video files,
as required.
16-bit colors or greater
Required to display all user interfaces of the Viewer
(P. 106).
18
Operating system language English, German, Spanish, French, Italian, Turkish, Russian, Thai, and Japanese
Environment languages switched using language-packs are not supported.
• The system requirements described above are the minimum configuration, assuming the following operating
environment:
Storage
Server
Maximum recording/playback data rate 80 Mbps *
Overall recording frame rate 1280 fps or slower *
Maximum number of cameras with motion
detection*
Maximum events processed *
3
4
10 units
20,000 events per day
1
2
Page 19

1
Viewer Estimated display frame rate *
Total number of simultaneously displayable
MPEG-4 and H.264 videos
*1 If the volume per second of recording and playback data handled by one Storage Server is 80 Mbps or greater, you should
review your recording requirements to ensure system stability. The following shows an estimate of the recording and playback
data volume per second for various video formats.
320 × 240 640 × 480 1920 × 1080
JPEG 810 fps 280 fps 50 fps
5
When using Intel i7 + GTX 660
For 1920 x 1080 display size: 30 fps (15 fps for H.264)*
For 1280 x 720 display size: 40 fps
For 1280 x 960 display size: 40 fps
For 960 x 540 display size: 45 fps
For 640 x 360 display size: 80 fps
For 640 x 480 display size: 80 fps
For 480 x 270 display size: 160 fps
For 320 x 180 display size: 320 fps
For 320 x 240 display size: 320 fps
6 or less *
7
6
Before Use
MPEG-4
H.264
For standard resolution ([Video Quality] set to [3]), the JPEG video frame rates will result in an estimated data rate of 80 Mbps.
Audio data requires a Storage Server of 64 Kbps, regardless of the type of camera.
You can check the recording/playback data volume per second during operation on the [Storage Server] tab in RM Manager
(P. 54).
*2 The data size of recorded audio is calculated using a frame rate of 10 fps per camera.
*3 Number of cameras selected in [Detect Motion Using] > [Storage Server] for motion detection recording.
*4 Total number of all types of events.
*5 Assumes a standard resolution ([Video Quality] setting is [3]) and that the receive size and display size are the same. If the
receive size and display size are different, performance may decrease due to an increase in processing load.
*6 When multiple video sizes are combined, they will be equivalent to the following: 1920 x 1080 will be equivalent to 14 320 x
240 size videos, 1280 x 720 will be equivalent to 8 320 x 240 size videos, 1280 x 960 will be equivalent to 8 320 x 240 size
videos, 960 x 540 will be equivalent to 7 320 x 240 size videos, 640 x 360 will be equivalent to 5 320 x 240 size videos, 640 x
480 will be equivalent to 5 320 x 240 size videos, 480 x 270 will be equivalent to 2 320 x 240 size videos, 320 x 180 will be
equivalent to 1 320 x 240 size videos.
For example, the following combinations will result in a total equivalent of 320 x 240 at 320 fps.
1920 x 1080, 5 fps 320 x 240, 5 fps x 14 = 70 fps equivalent
1280 x 960, 5 fps 320 x 240, 5 fps x 8 = 40 fps equivalent
960 x 540, 8 fps 320 x 240, 8 fps x 7 = 56 fps equivalent
640 x 480, 8 fps 320 x 240, 8 fps x 5 = 40 fps equivalent
480 x 270, 25 fps 320 x 240, 25 fps x 2 = 50 fps equivalent
320 x 240, 64 fps
80 Mbps
Total: 320 x 240, 320 fps equivalent (70 + 40 + 56 + 40 + 50 + 64)
*7 The number of videos you can display at once depends on the amount of memory available. If there is not enough memory,
you will not be able to display videos.
• In a system environment with a large number of cameras and connected viewers and where the number of events that
may occur is also likely to be high, the Storage Server must come with the specifications that meet the needs of that
environment for stable operation.
• If you need to operate a high-reliability system (such as for 24hour operation) in a system environment, we recommend
that you use a server operating system on the computer that is used for the Storage Server.
• When high-reliability operation is required (such as for 24-hour operation, and high frequency disk access) we strongly
recommend that you use a high-reliability SAS hard disk. Using a low-reliability SATA hard disk may result in a disk error
in a one to two year period. Therefore, you may need to check the disk for errors on a regular basis, using features such
as scan disk. In such a case, recording performance may suffer during checking, due to the increased load on the disk.
19
Page 20

• To help ensure stable operation, we recommend that you use separate computers for the Storage Server and for the
Note
C50F
Viewer.
• Do not use RM Manager and the Viewer simultaneously.
Important Notes Concerning System Requirements
• The drive you install the software on and the drive for saving recorded video must be in NTFS format.
• This software does not support external storage, such as USB hard disks and NAS.
• It is recommended that you operate this software in its own dedicated LAN environment.
• The software may not be able to record video if you use an environment where the IP addresses of the cameras change.
Please use fixed IP addresses to ensure proper operation.
• Use the same network address (either IPv4 or IPv6) for cameras, Storage Server computers, and the Viewer/RM
Manager computer.
• For details on the operating system, please refer to “Additional Considerations” in “Operating Environment” (P. 21).
• Audio cannot be transmitted from a Viewer to the camera, if you use the Viewer on a computer running
• Before applying a service pack or updating the operating system, please refer to the Canon website.
• Do not use Windows Update while the system is in operation. Doing so may cause the system operation to become
• Using anti-virus software or a firewall may affect the performance of the Storage Server and Viewer.
• Running software other than this product or compatible camera management software may cause system operation to
• When there is a high load on the CPU or hard disk, video may not be recorded or displayed at the specified frame rate,
• Operation may slow down if the amount of stored data (number of recording files) becomes large.
• Depending on the performance of the computer and the network environment, changes in the recording environment
• Using IPsec may degrade the performance for recording and displaying video.
• You can use the camera audio feature (except for the VB-C50Fi, which does not support the function). Review the
• The software cannot be used with cameras on which only HTTPS encrypted communication is allowed (i.e., cameras on
• Be sure to test the system under your operating environment before starting regular operation.
C50i
Windows 10, Windows 7, Windows 8, Windows 8.1, Windows Server 2008 R2, Windows Server 2012 or Windows Server
2012 R2.
unstable, the operating system to restart, or the recording to stop.
become unstable.
recording may be interrupted, or the Viewer operation speed may decrease. In addition, recording may be interrupted
when the available hard disk space is low.
(such as the time of day and the weather) may result in it not being possible to display recorded or live video according
to the specified settings.
following items before using the feature.
– The Viewer supports transmission and reception of audio data.
– Audio data cannot be recorded separately, and is always recorded together with the video.
– Synchronization is enabled only when playing back recorded video (JPEG) and recorded audio. However, the audio
and video may not be synchronized, depending on the operating environment (P. 75).
– The audio stream may be interrupted, depending on the performance of your computer and network environment.
– Audio may be interrupted when using anti-virus software.
which settings are configured to prohibit all other types of communication).
• The system environment of the Storage Server will depend on your operating conditions (number of cameras, recording frame rate
settings, etc.), as well as the pre-event recording settings. For details, please contact your local supplier.
• Microsoft .NET Framework 3.5 SP1 or .NET Framework 4.5 is required for this software to operate. .NET Framework 3.5 SP1 is
automatically installed when installing RM-64/25/9. For RM-Lite, please install the application from the included CD-ROM before
installing RM-Lite. Enable .NET Framework 4.5 if it is currently disabled.
• The following runtime module is installed automatically with RM-64/25/9 and RM-Lite. Do not uninstall this module.
– Microsoft Visual C++ 2008 Redistributable
• Microsoft .NET Framework 4.0 is not supported.
20
Page 21

1
Additional Considerations
• Do not specify the Windows folder or the Program Files folder on the system drive as the destination for snapshots or
recording files. You cannot save images or videos to those folders.
• You cannot use the OS's shadow backup feature. For example, once you delete the configuration file for this software,
the file cannot be restored with the OS’s shadow backup feature.
Before Use
21
Page 22

Supported Cameras
Camera Firmware Version
VB-R13VE Ver. 1.0.0 or later
VB-R13 Ver. 1.0.0 or later
VB-R12VE Ver. 1.0.0 or later
VB-M50B Ver. 1.0.0 or later
VB-H652LVE Ver. 1.0.0 or later
VB-H651V Ver. 1.0.0 or later
VB-R11VE Ver. 1.0.2 or later
VB-R11 Ver. 1.0.2 or later
VB-R10VE Ver. 1.0.2 or later
VB-M641VE Ver. 1.0.2 or later
VB-M641V Ver. 1.0.2 or later
VB-M640VE Ver. 1.0.2 or later
VB-M640V Ver. 1.0.2 or later
VB-M741LE Ver. 1.0.2 or later
VB-M740E Ver. 1.0.2 or later
VB-S30D Ver. 1.3.0 or later
VB-S31D Ver. 1.3.0 or later
VB-S800D Ver. 1.3.0 or later
VB-S900F Ver. 1.3.0 or later
VB-S805D Ver. 1.3.0 or later
VB-S905F Ver. 1.3.0 or later
VB-H43 Ver. 1.2.0 or later
VB-H630VE Ver. 1.2.0 or later
VB-H630D Ver. 1.2.0 or later
VB-H730F Ver. 1.2.0 or later
VB-H41 Ver. 1.3.0 or later
VB-H610VE Ver. 1.3.0 or later
VB-H610D Ver. 1.3.0 or later
VB-H710F Ver. 1.3.0 or later
VB-M42 Ver. 1.2.0 or later
VB-M620VE Ver. 1.2.0 or later
VB-M620D Ver. 1.2.0 or later
VB-M720F Ver. 1.2.0 or later
VB-M40 Ver. 1.2.0 or later
VB-M600VE Ver. 1.1.2 or later
22
VB-M600D Ver. 1.1.2 or later
VB-M700F Ver. 1.1.2 or later
VB-C500VD/VB-C500D Ver. 1.1.2 or later
VB-C60 Ver. 1.1.3 or later
Page 23

1
Note
Camera Firmware Version
VB-C300 Ver. 1.1 Rev. 5 or later
VB-C50i/VB-C50iR Ver. 1.2 Rev. 77 or later
VB-C50FSi/VB-C50Fi Ver. 1.0 Rev. 77 or later
Please refer to “Using the AXIS Q7404/Q7401” (P. 168) for details on limitations when using the AXIS Q7404/Q7401.
H652 H651
Even if the camera’s video image has been set to rotate in the Viewer’s display using [Rotate Video Display] in the setting page, the video
displayed by and recorded in this software will not be rotated.
About the Latest Camera Firmware
You can find the latest firmware and configuration backup and restore tools for cameras that are supported by this program
at the Canon website.
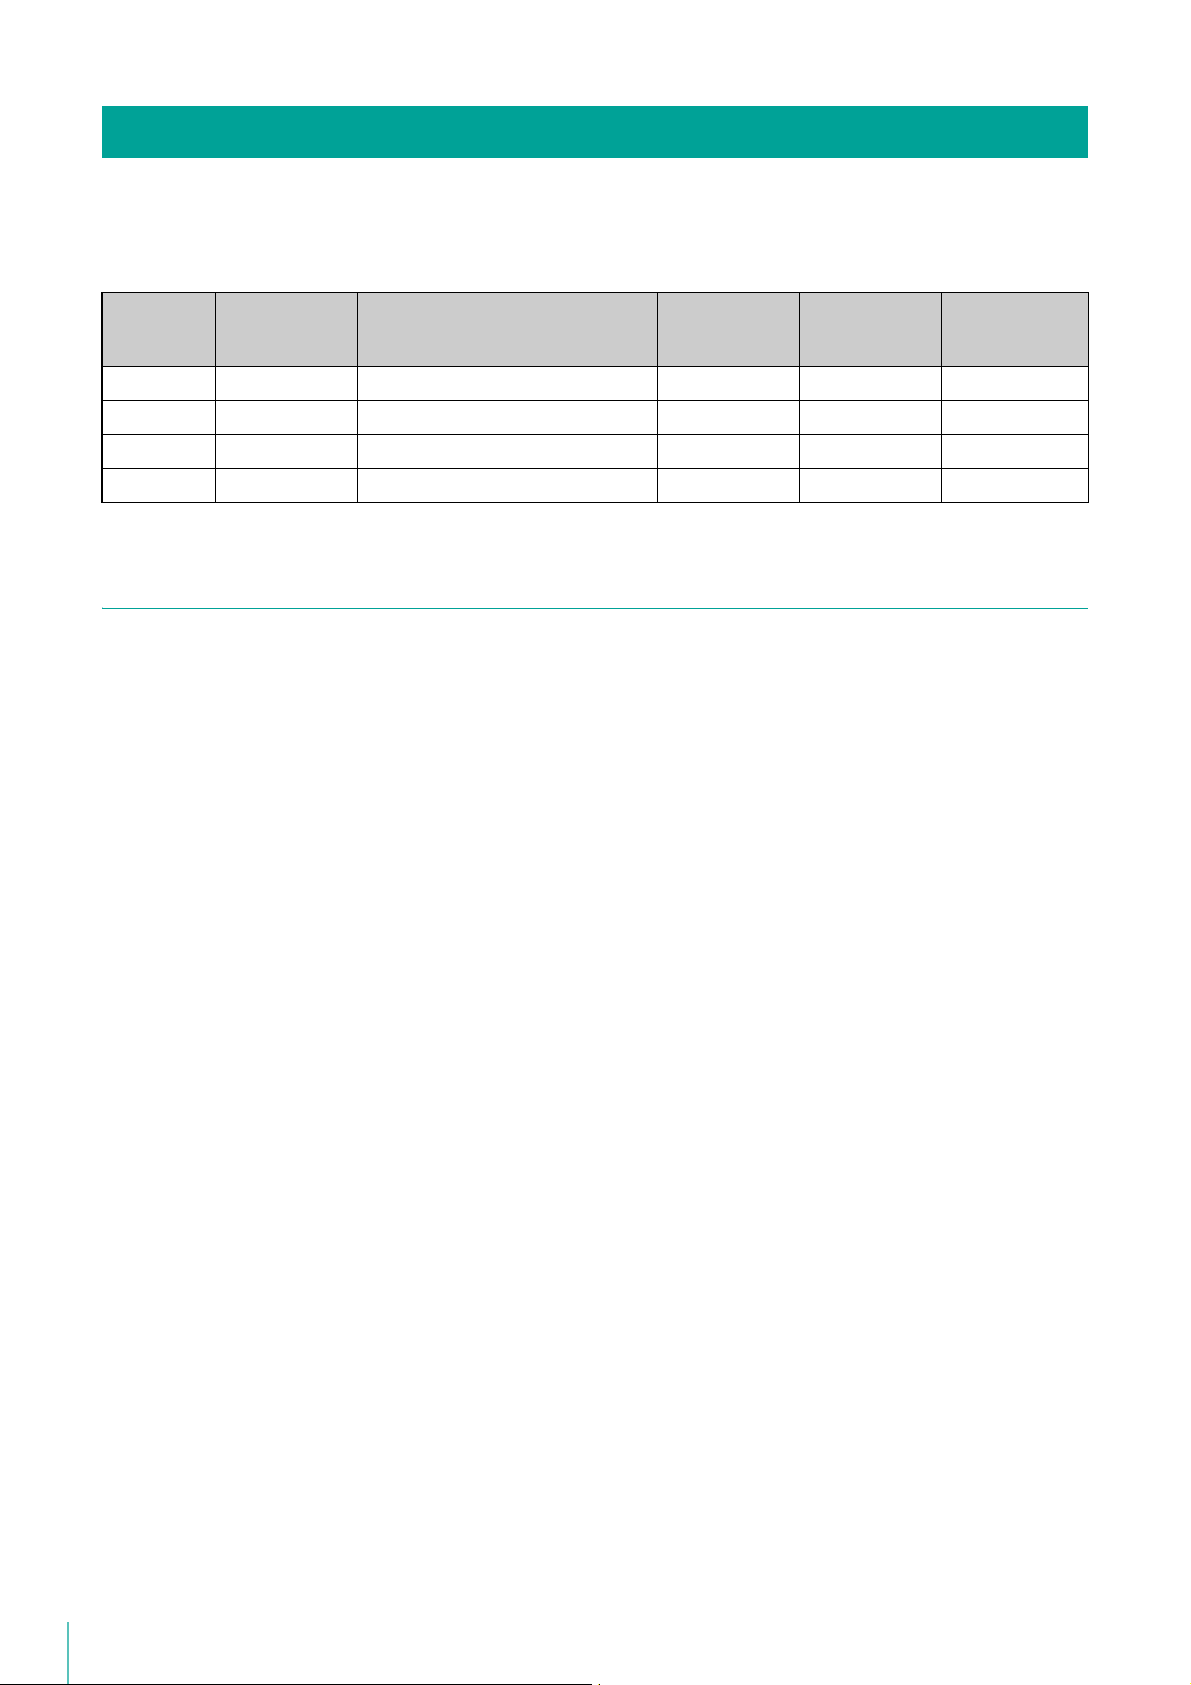
Camera Video Sizes
Before Use
Camera Category*
VB-R13VE/VB-R13/VB-R12VE/VB-H652LVE/
VB-H651V/VB-S30D/VB-S31D/VB-S800D/
VB-S900F/VB-H43/VB-H630VE/VB-H630D/
VB-H730F
VB-M50B/VB-R11/VB-R11VE/VB-R10VE/
VB-M641VE/VB-M641V/VB-M640VE/VB-M640V/
VB-M741LE/VB-M740E/VB-S805D/VB-S905F/
VB-M42/VB-M620VE/VB-M620D/VB-M720F
VB-H41/VB-H610VE/VB-H610D/VB-H710F 320×240 480×270 960×540 1920×1080
VB-M40/VB-M600VE/VB-M600D/VB-M700F 160×120 320×240 640×480 1280×960
VB-C500VD/VB-C500D/VB-C60/VB-C300/VB-C50i/VB-C50iR/
VB-C50FSi/VB-C50Fi
*1 Categories are switched on the camera’s Setting Page.
1
1080p – 480×270 960×540 1920×1080
720p – 320×180 640×360 1280×720
4:3 – 320×240 640×480 1280×960
720p – 320×180 640×360 1280×720
4:3 – 320×240 640×480 1280×960
160×120 320×240 640×480 -
Video Size
23
Page 24
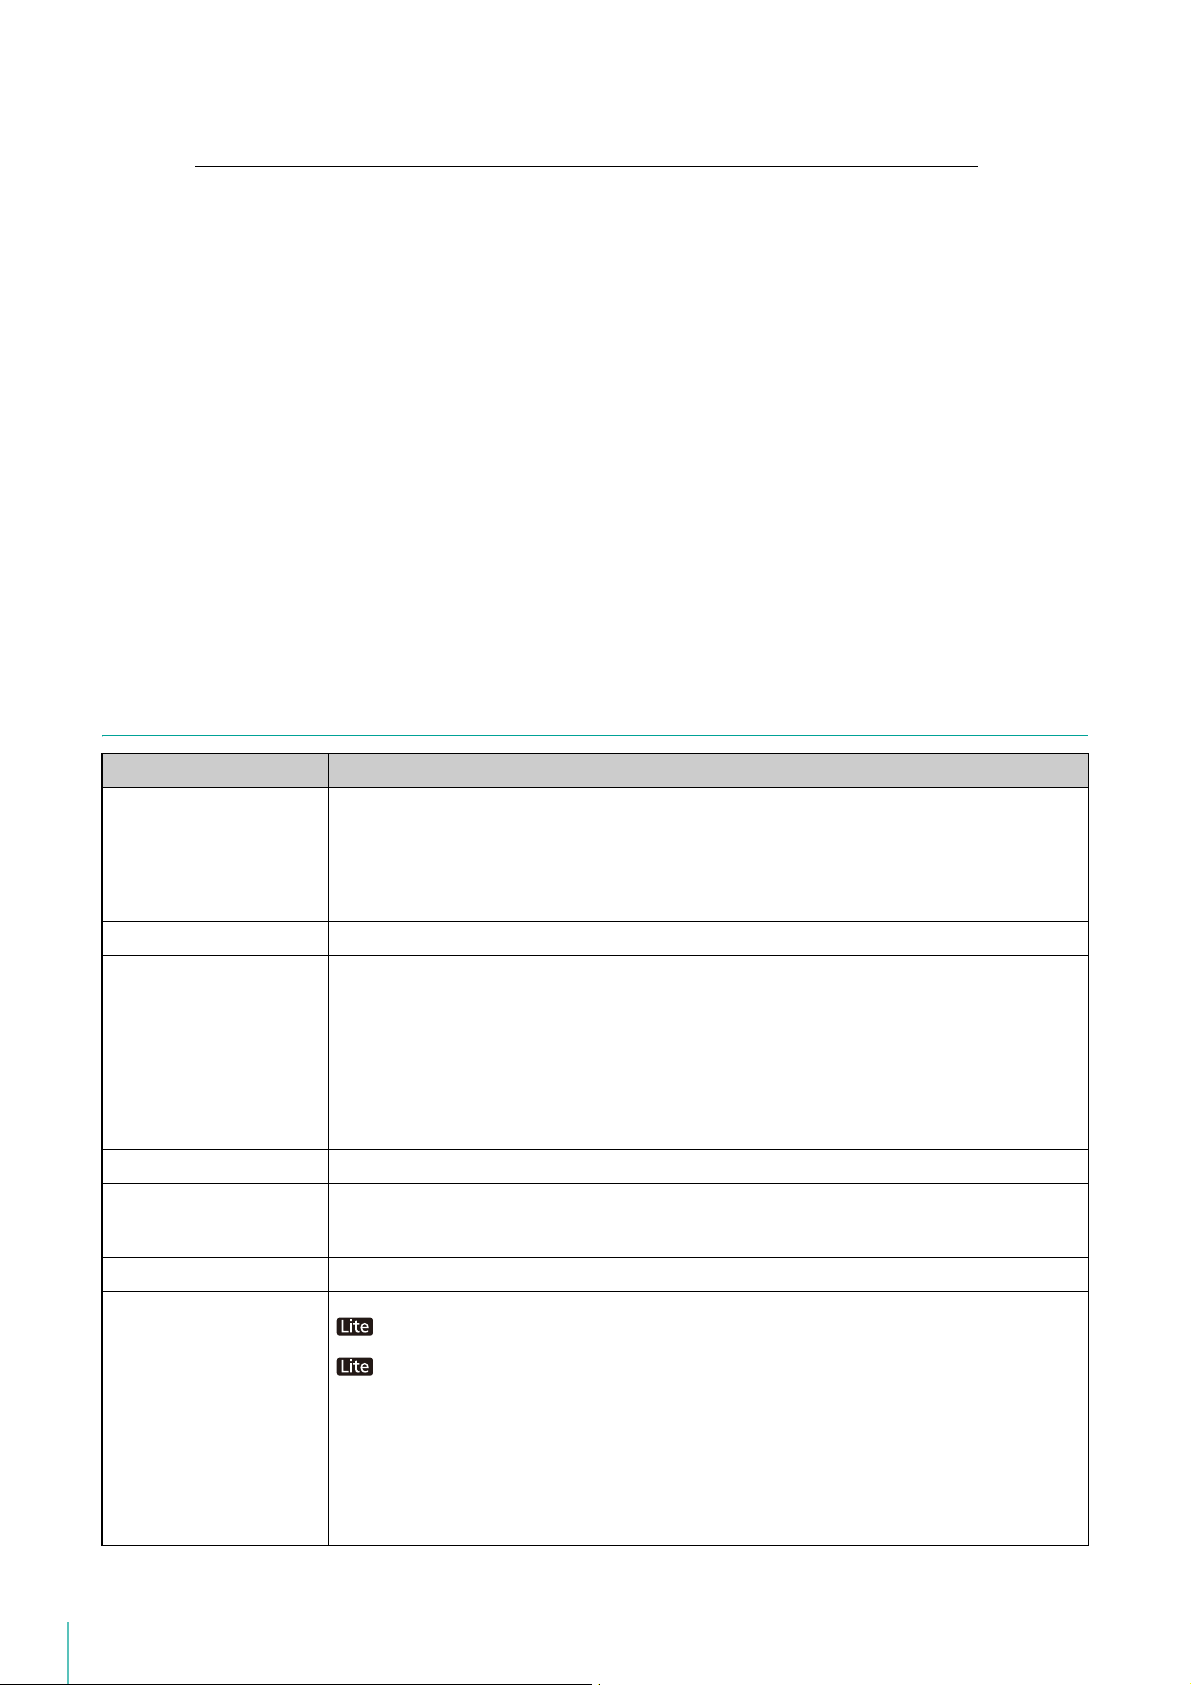
Product Type and Number of Licenses
The number of cameras that can be added to a Storage Server Group depends on the specific software product.
The following table describes the number of licenses required for Storage Servers, Viewers, and RM Managers, as well as
the number of Storage Servers that can be configured as a Storage Server Group, for each product.
Software
product
RM-64 1 64 1 1 1
RM-25 1 25 1 1 1
RM-9 1 9 1 1 1
RM-Lite 1 4 1 1 1
No. of Storage
Server groups
Max. no. of cameras that can be added
to the Storage Server Group
Number of
Storage Server
licenses
Number of
Viewer licenses
Number of
licenses for RM
Manager
About Licenses
Each software product includes one license key for the Storage Server and one license key for the Viewer. The number of
Storage Servers, Viewers, and RM Managers that can be installed with each license key is as follows.
Storage Server License Key
Allows you to install one Storage Server on one computer.
Viewer License Key
Each Viewer license key includes a single Viewer license and a single RM Manager license. Viewer and RM Manager
can be installed on the same computer or separately on different computers.
Optional Licenses (Not Supplied)
Purchase additional licenses if necessary.
RM-V/RM-Lite-V
RM-V and RM-Lite-V are licenses for adding Viewers for RM-64/25/9 and RM-Lite, respectively.
These are required if you want to install Viewer on more computers than the number of Viewer licenses you currently
own.
Upgrade Licenses
The “Upgrade License 25 for RM-9” is a license for upgrading RM-9 to RM-25.
This upgrade allows you to increase the number of cameras that can be added to a Storage Server to 25.
The “Upgrade License 64 for RM-9” and “Upgrade License 64 for RM-25” are also available.
24
Page 25

1
Compatibility with Network Video Recorder VK-64/16/Lite
Notes on Installation
This software cannot exist with VK-64/16/Lite on the same computer. Do not install this software onto a computer
where VK-64/16/Lite is installed. You can install this software after uninstalling VK-64/16/Lite. However, please be
aware of the following:
• You cannot use the cameras and recording schedule settings you added with VK-64/16/Lite. You must add and
configure the cameras and schedules again.
• You cannot use the recording files and event information associated with VK-64/16/Lite.
• You cannot play back recordings made with VK-64/16/Lite.
• This software requires a computer with specifications that are higher than those required for VK-64/16/Lite. The
computer used for VK-64/16/Lite may not meet the operation requirements for this software.
Notes on Protocol Compatibility
This software is not compatible with VK-64/16/Lite protocols, because the protocol used between the Viewer and the
Storage Server has been significantly changed. Therefore, you cannot connect to a VK-64/16/Lite Storage Server
from the Viewer in this software. Similarly, you cannot connect to this software’s Storage Server from the Viewer in VK64/16/Lite.
Notes on Recording Data and Event Data Compatibility
Before Use
This software uses event data and recording file formats that are different from VK-64/16/Lite. VK-64/16/Lite
recordings can be played back using QuickTime. However, the recordings for this software are not supported by
QuickTime. Note, however, that you can use QuickTime to play back a .mov file created using the [Extract Video]
feature in this software.
25
Page 26
System Configuration Example
Important
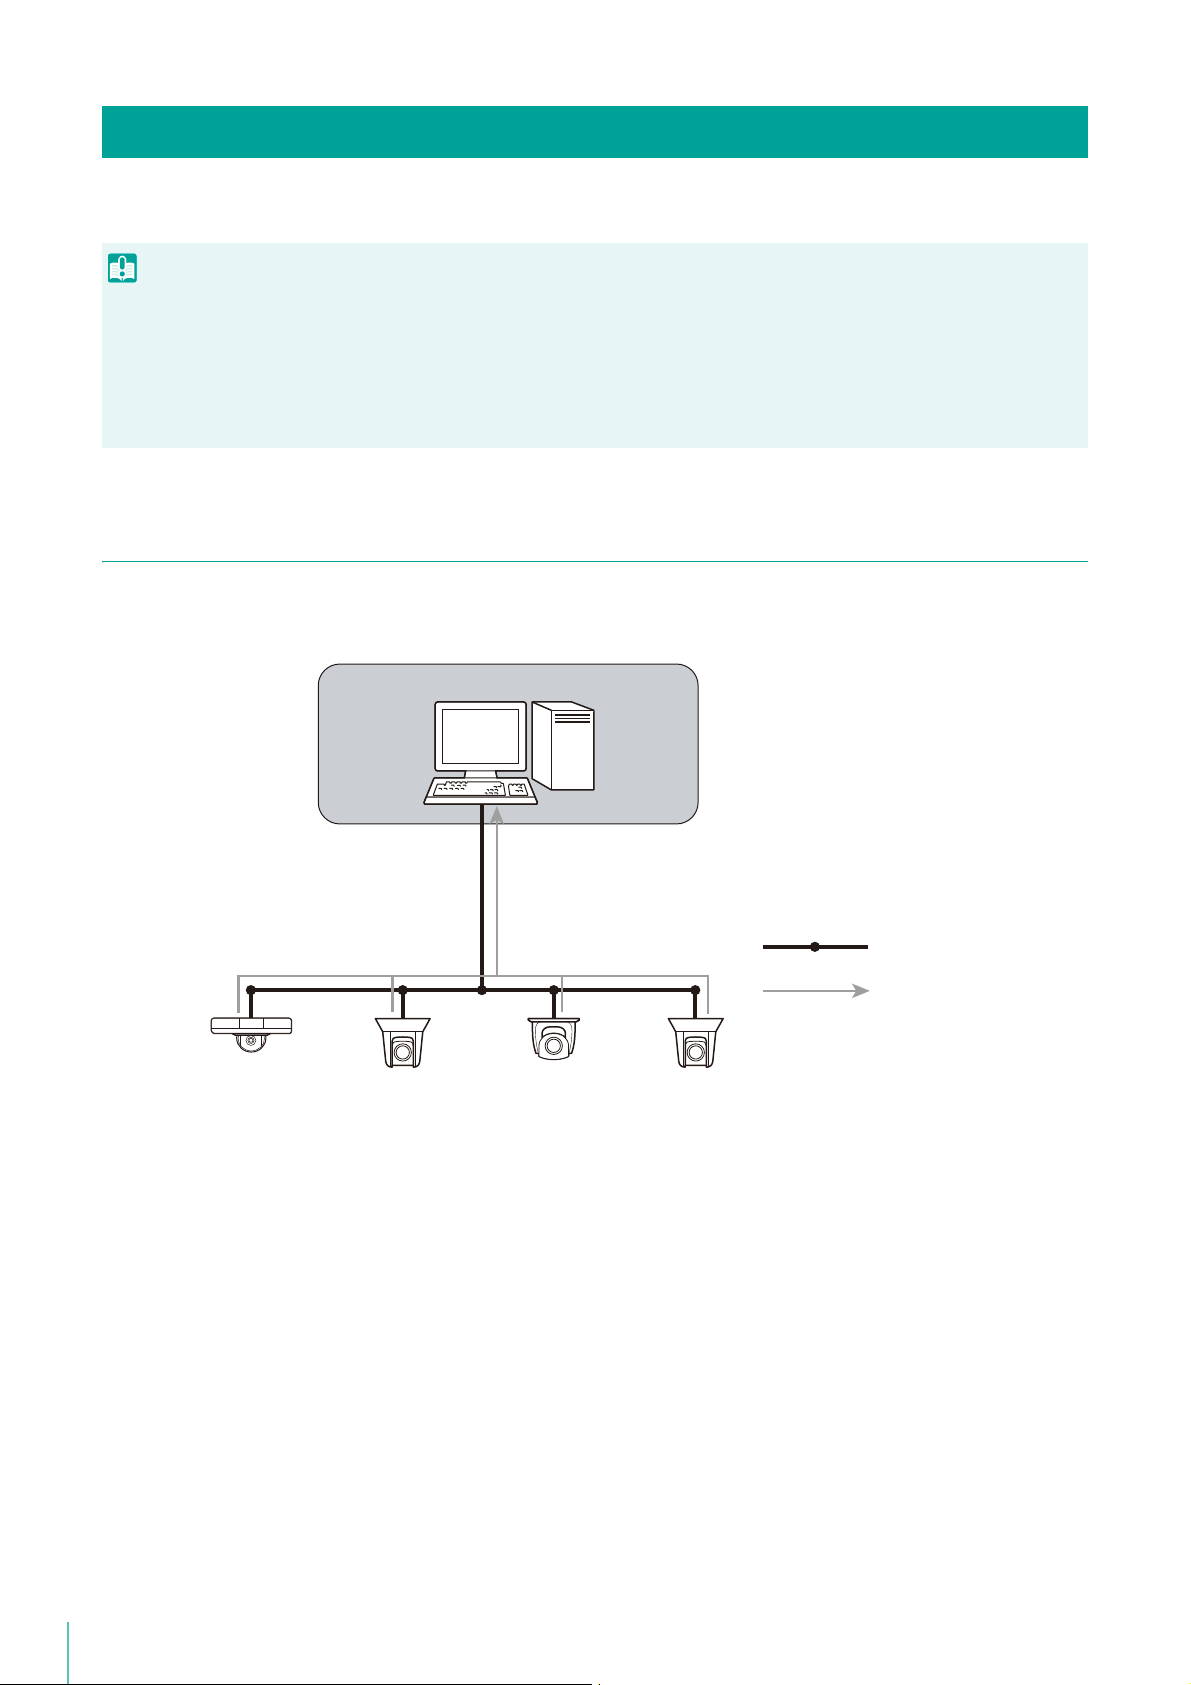
Storage Server/RM Manager/Viewer
Storage Server Group
Network
Video from the cameras
This software records video from cameras using an IP network, such as a LAN.
• The load on the Storage Server may increase depending on the number of cameras connected and the recording settings. Please refer
to “Determining the Capacity of the Storage Server” (P. 28) to consider your configuration.
• Accessing one camera or Storage Server from many Viewers at the same time may affect system performance.
• Regularly check that the time setting is correct on the computers that are running the Storage Server, RM Manager, and the Viewer.
Also, before changing the time setting on the computers, be sure to first stop the Storage Server and Viewer. Please refer to “Stopping
the Storage Server” (P. 142) for details about how to stop the Storage Server.
Configuration Example 1: Install All on a Single Computer
This example shows the simplest system configuration, where the Storage Server, RM Manager, and Viewer are installed on
one computer. Video from the cameras is displayed or recorded using the same computer.
26
Page 27
1
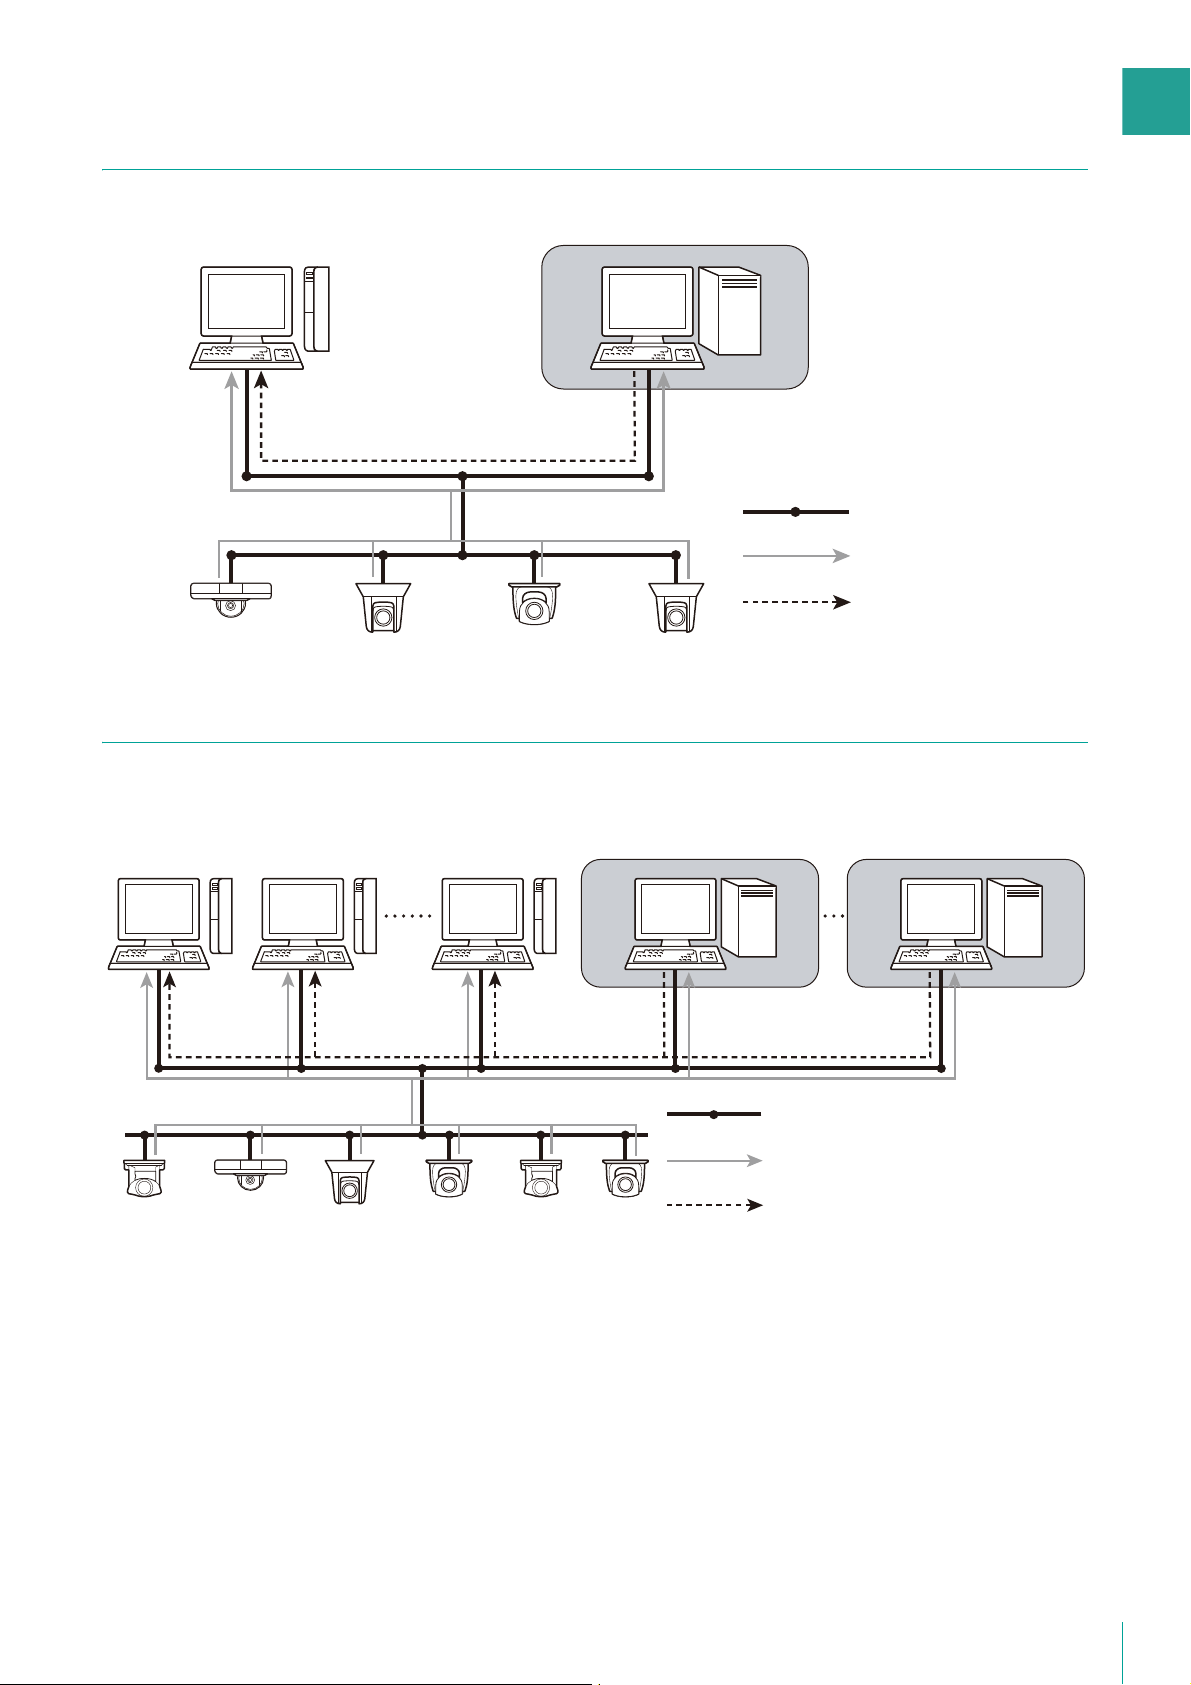
Configuration Example 2: Storage Server and Viewers Installed
RM Manager/Viewer
Storage Server Group
Network
Recorded video
Video from the cameras
RM Manager /
Viewer 1
Viewer 2
Storage Server Group 1
Network
Recorded video
Video from the cameras
Viewer 10
Storage Server Group 5
Separately on Multiple Networked Computers
You can separately install Storage Servers and Viewers on multiple computers on the network.
Before Use
Configuration Example 3: Multiple Storage Servers and Viewers Installed
By setting up more than one Viewer, you can simultaneously view a video at more than one location.
It is possible to set up a monitoring system with a maximum of 512 cameras when using multiple Storage Servers.
27
Page 28

Note
System Design
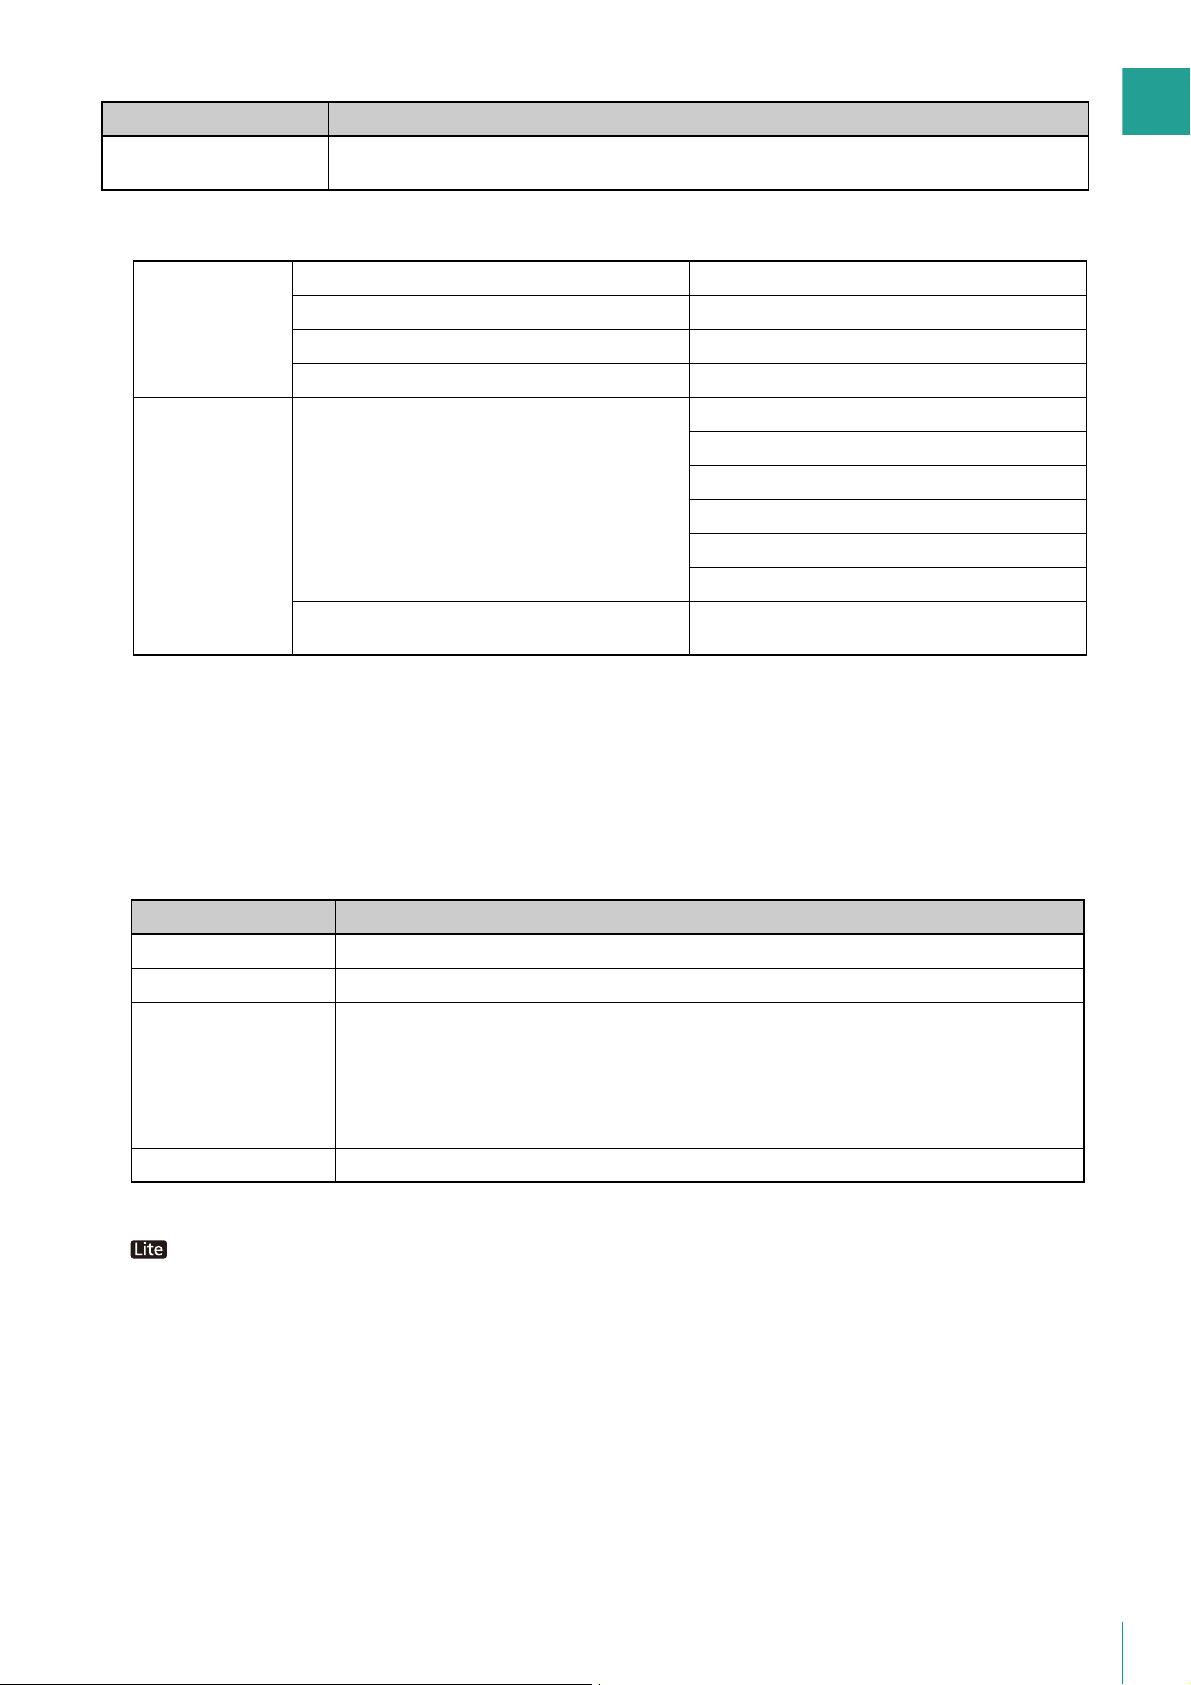
Maximum System Configuration
The following table describes the maximum system configuration supported by this software.
Number of Storage Server Groups 16
Number of Storage Servers 16 (1 for each Storage Server Group)
Number of cameras 512 units (Maximum number of cameras that can be added to one Storage
Server Group is 64 when using RM-64)
Number of simultaneously connected Viewers 12 units
Number of cameras that can be used by a Viewer 512 units (same as the max. number of cameras)
Number of camera video that can be simultaneously
displayed by a Viewer
RM Manager 1
64 units
Determining the Capacity of the Storage Server
Refer to “Operating Environment” (P. 14), and configure a system that meets the requirements. Determine the capacity of
the storage server based on factors such as the number of recording cameras, video size, video quality, and recording
times.
Hard disk capacity requirements
It is assumed that you use continuous recording at a fixed frame rate (number of frames per second), video size and
quality. The size of the recording data varies depending on the camera configuration (video quality and video size
settings). Also, the video data size used for calculating the recording data size may vary from the actual video.
You can determine hard disk capacity requirements using the Required Disk Space Calculator available on the
Canon website.
Determine the following factors beforehand when calculating the hard disk capacity.
• Number of cameras
• Video size, video quality, and frame rate of each camera
• Daily duration of recording
28
• You can also use the Data Size and Bit Rate Estimates table found on the RM-64/25/9’s CD-ROM to perform calculations.
Instructions on how to perform the calculations are also included in the table.
• The Data Size and Bit Rate Estimates table can also be found on the Canon website.
Calculating Network Bandwidth
You need to consider the network bandwidth if you want to use a network camera for both recording and live view.
You must calculate the network bandwidth both for the Storage Server and the Viewer.
For example, calculate the bandwidth as follows if you use one Storage Server (320 x 240 1 fps) and two Viewers (320 x 240
5 fps): (When usingVB-H41)
• Bandwidth for recording
10.8 (KB/frame) x 1 (frames/sec.) x 8 (bits) = 86.4 Kbps
• Bandwidth for live view (per Viewer)
10.8 (KB/frame) x 5 (frames/sec.) x 8 (bits) = 432 Kbps
Page 29

1
Therefore, the required network bandwidth is calculated as follows:
86.4 Kbps x 1 + 432 Kbps x 2 = 950.4 Kbps (approx. 0.9 Mbps)
Notes on Storage Server Operation
We recommend that you dedicate the Storage Server computer exclusively to running this software.
Be sure to avoid the following on the Storage Server computer:
• Running web server software on the computer
You cannot operate the Storage Server on a computer where web server software such as Windows standard IIS
(Internet Information Server) or Apache is already installed.
The Storage Server uses HTTP protocol to communicate with cameras. Therefore, the Storage Server may not work
normally if other web service applications exist on the same computer.
The HTTP port used by this software is 80 and cannot be changed.
• Running database server software (e.g., SQL Server, Oracle) on the computer
Database processing can place a load on the hard disk that may affect recording performance. Conversely, this
software may affect database server performance when it performs tasks that place a load on the hard disk.
• Using the computer as a file server
The hard disk is frequently accessed when the computer is used as a file server, and this may affect recording
performance. In addition, the Storage Server is more likely to run out of disk capacity if the computer is operated as a file
server.
• Running other applications on the computer
The additional processing load from running applications other than this software may affect recording performance.
This software uses the TCP port numbers 80 and 11080. These ports should not be used by other applications.
Before Use
29
Page 30

About RM-Lite
Important
RM-Lite is a simpler version of this software that is included with the camera. RM-Lite provides the same basic features as
the RM-64/25/9 product versions, but some of the functionality is limited, as described below:
• Files recorded using RM-Lite can be played back when an upgrade is made to RM-64/25/9. However, files recorded with RM-64/25/9
cannot be played back with RM-Lite.
• An RM-Lite viewer cannot connect to an RM-64/25/9 Storage Server. Similarly, an RM-64/25/9 viewer cannot connect to an RM-Lite
Storage Server.
Functional Limitations for RM-Lite
• You can add a maximum of four cameras.
• You can display a maximum of eight video windows in the Viewer. A warning message is displayed if you display nine or
more video windows.
• The maximum frame rate is as follows:
Recording: 5 fps (JPEG)
Record Now: 5 fps
• The frame rate adjustment feature is always enabled under high load. You cannot disable it.
• The maximum file size is fixed at 1 GB (max. 24 hours) and cannot be changed.
• You cannot change the [Background] property in [Layout Properties], and live view is the only playback option.
• You cannot configure [Each Tag], [All Cameras] and [Recording Cameras] in [Organize Layouts].
• AXIS Q7404/Q7401 is not supported.
Features that Cannot Be Used in RM-Lite
Storage Server
• MPEG-4 and H.264 recording
• Motion detection recording
• Sensor recording
• Intelligent function recording
• Volume detection recording
• Special day schedule recording
• Scream detection recording
• Linked event recording
RM Manager
• Simultaneous connection to multiple Storage Servers
• Sending e-mail when an event occurs
• Customizing event priority
• Adding user groups and configuring access permissions
• Importing and exporting of recording schedules
Viewer
30
• Simultaneous connection to multiple storage servers
• Multiple display support
• Layout sequences
• Display of multiple tabs
Page 31

1
•Custom grid
C300
• Dynamic layouts
• Searching using camera tags
• Advanced search feature of event search
• Event Notification - Operator Notification, Acknowledge Event
• Display of a video window when an event occurs.
• Callout Window function
C50F
C50i
RM-Lite is not included with the camera.
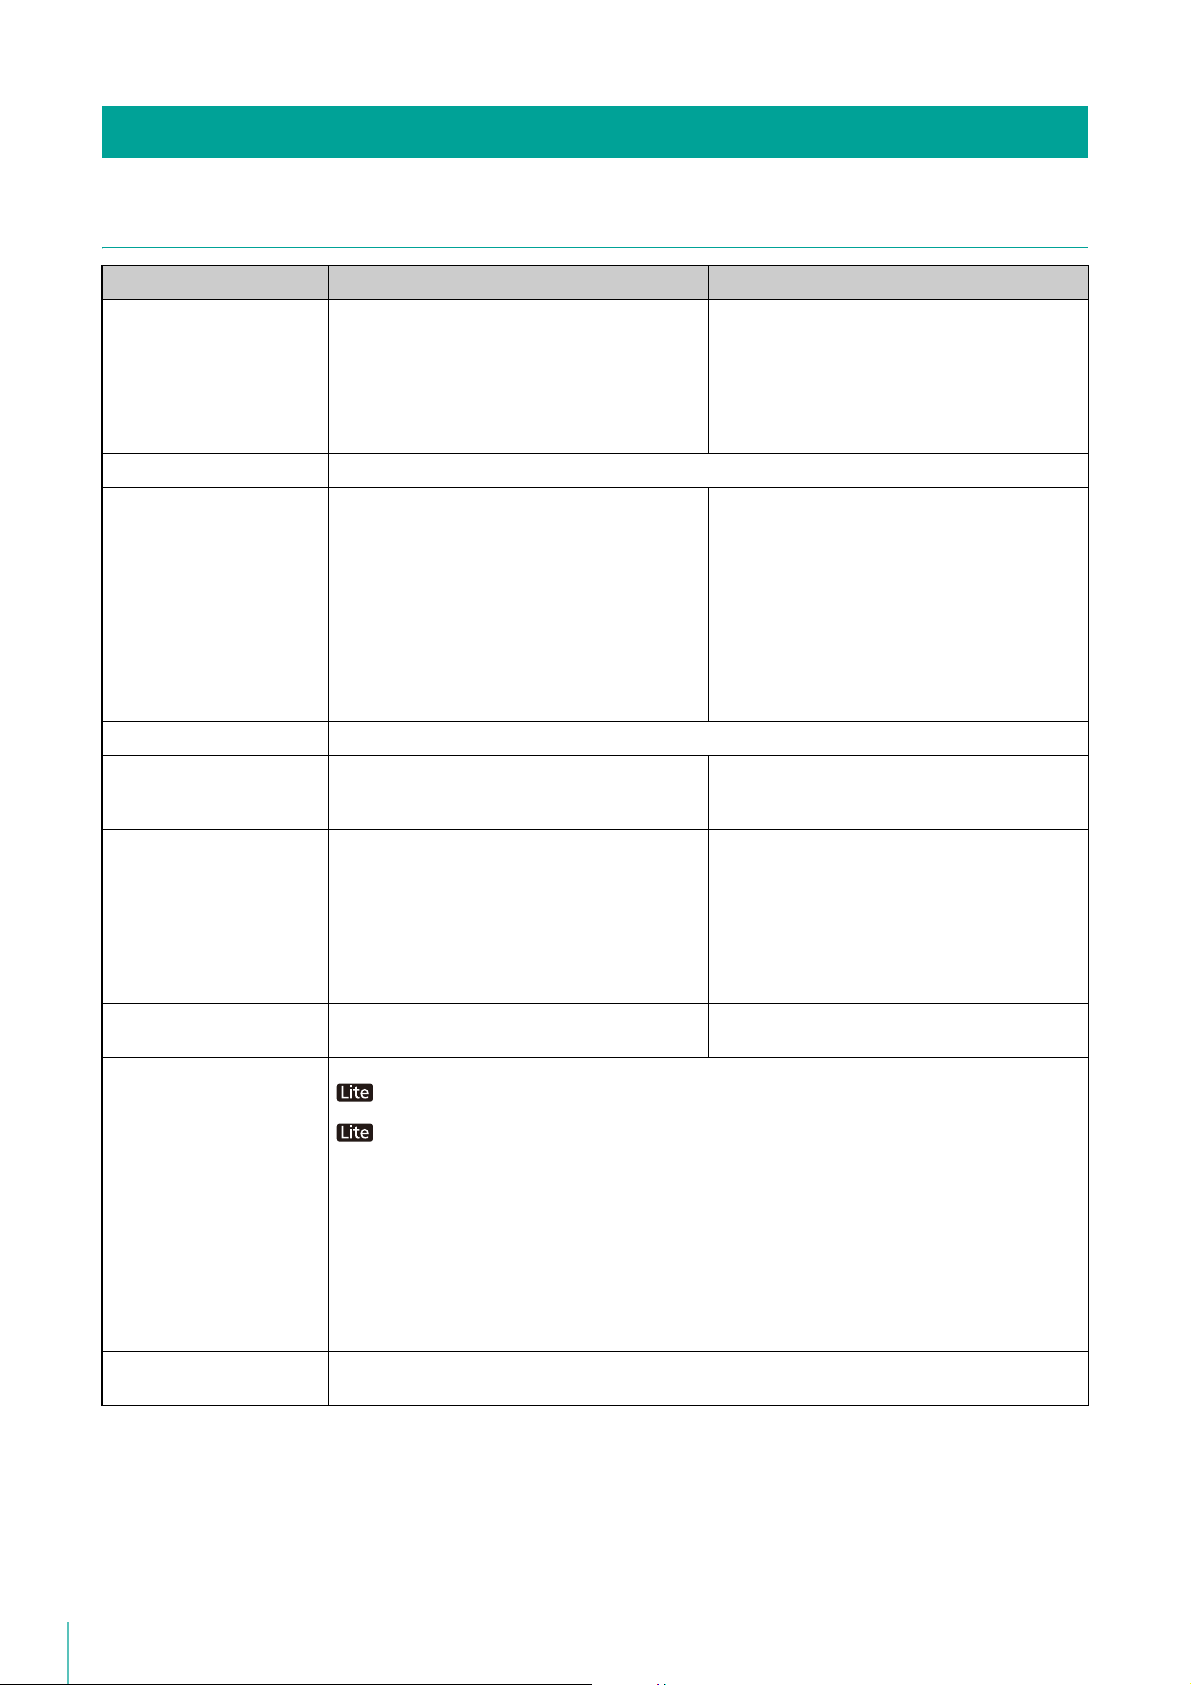
Specification Comparison for RM-64/25/9 and RM-Lite
Features RM-64/25/9 RM-Lite
Before Use
Connection to
camera
Storage Server Recording formats JPEG, MPEG-4, H.264 JPEG only
Viewer Supported live view formats JPEG, MPEG-4, H.264
Max. number of cameras for each
Storage Server
Supported cameras Based on “Supported Cameras”
Automatic camera search Available
Max. recording frame rate 30 fps *
Recording schedule Weekly schedule recording
Recording mode Continuous recording
Max. file size setting Configurable 512 or 1024 MB, 1 to
Max. storage period 99 weeks 90 days (12 weeks)
Others – The following features are not
Max. display frame rate 30 fps *
64/25/9 units 4 units
(P. 22)
AXIS Q7404/Q7401
1
Special Day schedule recording
Sensor recording
Motion detection recording
Intelligent Function recording
Volume detection recording
Scream detection recording
Linked event recording
Record Now (Manual recording)
24 hours (default: 1024 MB)
Based on “Supported Cameras”
(P. 22)
5 fps
Weekly schedule recording
Continuous recording
Record Now (Manual recording)
Fixed 1 GB (1024 MB), 24 hours
supported:
• Sending e-mail when an event
occurs
• Customizing event priority
1
Multiple display support Available –
Number of simultaneous video
windows
Audio recording/playback Available
Layout sequence feature *
3
32 or fewer per layout*
(of these up to 12 can be H.264 video
windows and up to 6 can be MPEG-4
video windows or simultaneous
H.264/MPEG-4 video windows)
Available –
2
8 or fewer is recommended.
*1 The operational limits depend on factors, such as the number of cameras, Storage Server performance, hard disk
capacity, and network load.
*2 The maximum number of dynamic layout video windows that can be displayed is 25.
*3 The layout sequence feature is a function for changing Viewer layouts at a specified interval.
31
Page 32

Setup Flow
The process from preparation before introducing the system, to operation is shown below.
Step 1 Prepare for Introducing the System
Consider the video storage period and recording conditions, determine the hard disk capacity required for recording and
prepare the equipment.
Please refer to “Chapter 1 Before Use” for system design.
Step 2 Install the Camera
Set up your cameras for live video display or recording.
Please refer to your camera manuals.
Step 3 Installation
Install this software product on your computer.
Please refer to “Chapter 2 Installation”.
Step 4 Set Up the Storage Server
Add cameras to the Storage Server, configure disk space management settings for operation, and add users.
Please refer to “Chapter 3 Storage Server Setup” and “Chapter 4 System Management With RM Manager”.
Step 5 Check Video in the Viewer
Connect the Viewer to the Storage Server Group and check video.
Please refer to “Chapter 6 Monitor Video with the Viewer”.
Step 6 Configure the Viewer
Customize the Viewer. You can save a layout to monitor video in a customized Viewer for subsequent sessions.
Please refer to “Chapter 7 Viewer Settings”.
32
Step 7 Set a Recording Schedule
Configure automatic recording settings such as recording conditions and schedules.
Please refer to “Chapter 5 Setting a Recording Schedule”.
Page 33

1
Day-to-Day Operation
• Monitor video in the Viewer, check events, and play back recorded video.
Please refer to “Chapter 6 Monitor Video with the Viewer”.
• Check system status.
Please refer to “Chapter 4 System Management With RM Manager”.
• Back up recorded files.
Please refer to “Chapter 8 Backup”.
• Error messages and problems.
Please refer to “Chapter 9 Troubleshooting”.
Before Use
33
Page 34

34
Page 35

Chapter
Installation
This chapter explains how to install this software. Precautions for updating and uninstallation are also
explained.
Page 36

Note
How to Install the Software
Important
Follow the steps below to install this software.
Installation Procedures
• You must log on to the computer as a computer administrator to install this software.
• Stop other applications that are running on the computer, such as anti-virus software, before installing the software.
Insert the installation CD-ROM into the CD drive.
1
This starts the installer automatically. If the installer does not automatically start, open the CD-ROM directory
using Windows Explorer and double-click RM40setup.exe.
• When the [User Account Control] dialog box appears, click [Yes] or [Continue].
• On computers running Windows 7, Windows Vista or Windows Server 2008, if .NET Framework 3.5 is not installed, a dialog box is
displayed asking you to install .NET Framework 3.5. Click [Install] to install .NET Framework 3.5.
• Double-click RMLiteInstall.exe in the [Applications] folder on the setup CD-ROM included with the camera.
• .NET Framework 3.5 is not automatically installed. Use the installer in the [Applications] folder on the setup CD-ROM included
with the camera.
Click [Next].
2
36
Page 37

2
Read the license agreement carefully. Click [I accept the terms in the license agreement], and then click [Next] to
3
continue.
Enter your license key(s) and click [Next].
4
Enter the license key(s) for installing the software (Storage Server and Viewer. The Viewer also includes RM
Manager). To install just one of these programs, enter the license key for the corresponding software only, and
click [Next].
Installation
Instead of a screen for license key entry, a screen appears for entering the user name and department. Click
[Next].
37
Page 38

Note
Note
Select the program to install and click [Next].
5
You can configure the software so that only certain parts of programs are installed. Select which programs not to
install. Click the application that you do not want to install and select [This feature will not be available].
If you entered the license key for Storage Server in step 4 proceed to step 6. If you entered the license key for a
Viewer only, proceed to step 7.
A dialog box for specifying the software to be installed is displayed. If you click [Complete], proceed to step 6. If
you click [Custom], the same dialog box as above appears.
• You can click [Change] to change the destination folder. However, we recommend that you do not change the destination.
• To check the available disk space on each drive of the computer and the disk space required for installation, click [Space].
If you have configured settings so the Storage Server is not installed, click [Next] and proceed to step 7.
Select the [Add storage server programs to the Windows Firewall exception list.] check box and click [Next].
6
38
• When installing on a computer that has multiple network interfaces, select the network interface to use in the [Network adapter]
list and the assigned IP address in the [IP address] list.
• The IP address selected here is the IP address specified for connecting to the Storage Server Group with the Viewer.
Page 39

2
Note
Click [Install].
7
Click [Finish].
8
Installation
Click [Yes] to restart the computer.
9
The Viewer and RM Manager launch icon appears on your desktop when the installation is complete.
A launch icon for the Storage Server will not appear. This Storage Server starts automatically.
Upgrade from an Earlier Version
When upgrading, use the installer of the new version to install the new version on top of the earlier version without
uninstalling the earlier version. This preserves the settings such as the added camera information and recording schedule,
and recorded data.
Note that if you uninstall the earlier version before installing the new version, you will need to redo all of your camera and
recording settings.
39
Page 40

Note
Note
Important
• Before upgrading or reinstalling the software, be sure to create backups of the recording settings and recorded data. For details on
backup, please refer to “Chapter 8 Backup”.
• Before upgrading the software, verify that RM Manager and Viewer are not connected to the Storage Server.
• The license key included with the earlier version must be entered when upgrading.
• Some functions from Viewer v3.2 and earlier have been moved to RM Manager.
• Both v3.2 and earlier and v4.3 cannot be installed on the same computer.
Upgrade from RM-Lite to RM-64/25/9
Installing RM-64/25/9 on a computer where RM-Lite is installed will upgrade it to RM-64/25/9. This preserves the settings
such as the camera information, recording schedule, and recorded data.
RM-Lite cannot co-exist with RM-64/25/9 on the same computer.
40
Page 41

2
Settings After Installation
Configure the following settings after installing this software according to the operating system you are using.
Windows Firewall Settings
If you install the Storage Server and the Viewer on different computers, you must change the Windows Firewall settings on
the computer used for the Storage Server.
During installation, select [Add storage server programs to the Windows Firewall exception list. ] to complete settings. If you
did not select the above check box during installation, perform the following procedure to change the Windows Firewall
settings.
The following settings are not required if you install the Storage Server and Viewer onto the same computer.
When using Windows 7, Windows 8, Windows 10, Windows Server 2008
R2, or Windows Server 2012
Click [System and Security] in the [Control Panel], and then click [Windows Firewall].
1
Click [Advanced Settings] to display the [Windows Firewall with Advanced Security] window.
2
Click [Inbound Rules] and select [New Rule] from the [Action] menu to start the [New Inbound Rule Wizard].
3
Installation
Click [Port], and then click [Next].
4
Click [TCP] and [Specific local ports], and then enter 80 as the port number. Then click [Next].
5
Click [Allow the connection], and then click [Next].
6
Click [Next].
7
Enter a name (such as the Storage Server or Storage Server Group name) in [Name] and click [Finish].
8
The added inbound rule should be displayed in the [Windows Firewall with Advanced Security] window, with a
9
checkmark icon displayed next to the rule.
When using Windows Vista or Windows Server 2008
Click [Start] > [Control Panel] to open the [Control Panel].
1
Click [System Security] > [Windows Firewall].
2
If the [Control Panel] is set to [Classic View], double click [Windows Firewall].
Click [Change settings].
3
If the [User Account Control] dialog box is displayed, click [Continue].
Click the [Exceptions] tab and click [Add Port].
4
In the [Add a Port] dialog box, enter the name of the Storage Server and 80 as the port number. Make sure that
5
[TCP] is selected and click [OK].
41
Page 42

Note
Confirm that the added Storage Server is now displayed in the [Windows Firewall] dialog box and that the check
6
box is selected. Then, click [OK].
Security Level Setting
In Internet Explorer, the default security level setting for Internet or intranet sites in Internet Explorer 9 or later, and Windows
Server 2008 is “High”. Therefore, you are not able to configure settings in the Setting Page or top page of the camera.
Follow these steps to register the page as a trusted site.
Start Internet Explorer and click [Tools] > [Internet Options] to display the [Internet Options] dialog box.
1
Click the [Security] tab.
2
Click [Trusted Sites] and click [Sites].
3
Clear the [Require server verification (https:) for all sites in this zone] check box.
4
Enter the IP address of your camera in [Add this website to the zone] and click [Add].
5
• For details on registration with trusted sites, click [Learn more about Internet Explorer’s Enhanced Security Configuration] in the
[Internet Options] dialog box and refer to the displayed summary.
• JavaScript may be disabled in the standard security setting, even if a content block dialog box is not displayed. This may limit the
operation of the setting page or the camera’s Viewer. The JavaScript setting is enabled automatically once trusted site
registration is complete.
Sound Settings for Using the Audio Feature
The sound feature is disabled by default in Windows Server 2012, and 2008. To receive audio with the camera’s Viewer,
follow these steps to enable the sound feature.
Click [Hardware and Sound] in the [Control Panel] and then click [Sound].
1
If the [Control Panel] in Windows Server 2008 is set to [Classic View], double-click [Sound] and proceed to step
3.
If the [Audio Service Not Running] dialog box is displayed, click [Yes].
2
The [Sound] dialog box is displayed. Select the [Playback] tab and confirm that an appropriate audio device is
3
installed.
If no audio device is installed, refer to the manual for your computer on how to install an audio device.
42
Page 43

Chapter
Storage Server Setup
This chapter explains Storage Server setup and how to add cameras using RM Manager.
Page 44

Note
Connect RM Manager to the Storage Server
Important
Launch RM Manager to connect to the Storage Server Group.
• You must log on to the computer as a computer administrator to launch RM Manager.
• It is strongly recommended that only one administrator configure the Storage Servers.
• Before configuring settings for the Storage Server, check to make sure that other users are not connected to the Storage Server with
Viewer or RM Manager.
Double-click the [RM Manager] icon on your desktop.
1
RM Manager starts.
When the [User Account Control] dialog box appears, click [Yes] or [Continue].
Right-click the [Storage Server Search Results] tab (P. 55) in the Storage Server, and then click [Connect to
2
Storage Server Group].
Or Click [File] > [Connect to Storage Server Group].
44
The [Connect to Storage Server Group] dialog box appears.
Page 45

3
Note
Enter the password in [Password] and click [Connect].
Important
3
Leave the user name as “administrator”. The default administrator password is “NVR”.
Connect to the Storage Server. Information for the connected Storage Server Group appears in the [Tree View]
tab.
Storage Server Setup
• You should change the password for the default user (administrator) as a security measure. For details on how to change the
password, please refer to “Change the User Information” (P. 59).
• Be sure to remember your password.
When there is a time difference of five seconds or longer between the Storage Server and the RM Manager computer, a message
prompting you to synchronize them will appear. Adjust the system time of the RM Manager computer to the time of the Storage
Server. You can disable the message display in [RM Manager Settings].
45
Page 46

Start Recording Immediately After Registering a Camera
By configuring settings before registering a camera, you can start recording with the following settings immediately after the
camera is registered.
Recording conditions Description
Recording time Continuous recording 24 hours per day
Video format JPEG
Maximum frame rate 3 fps
Video size
Audio recording None
Click [Settings] > [RM Manager], and display the [General] tab in the [RM Manager Settings] dialog box.
1
Select the [Start recording when the camera is registered] check box.
2
320×240, 320×180, 480×270
(configured automatically based on camera’s [Video Size Set] setting)
Click [OK].
3
46
Page 47

3
Note
Note
Add a Camera
You can add a camera to be used for displaying video or recording to a Storage Server.
The number of cameras you can add to a Storage Server depends on the version of this software product.
You can add a maximum of four cameras.
Display the [Cameras] Tab
Click [Settings] >[Cameras], and display the [Cameras] tab in the [Settings] dialog box.
Storage Server Setup
When connected to multiple Storage Server Groups, select the Storage Server Group to add a camera to. The Storage Server Group to add
cameras to can be changed in the [Cameras] tab’s [Storage Server Group] option.
Add Cameras One at a Time
Add cameras one at a time to the list of cameras on the [Cameras] tab.
Click [Add].
1
The [Add Camera] dialog box appears.
47
Page 48

Enter the information required to add the camera.
Important
(2)
(1)
(3)
(4)
(5)
(6)
C50F
C50i
2
(1) [Host Name]
Enter the host name or IP address of the camera.
(2) [Port]
Enter the port number for communicating with the camera. Typically, leave [80] unchanged.
(3) [User Name]
Enter the user name for the camera.
(4) [Password]
Enter the password for the user specified in (3).
(5) [Storage Server Group]
Display the appropriate Storage Server Group name.
(6) [Tags]
Add camera tags. Click the [Edit] button to open the [Edit Tags] dialog box, and select tags from [Tags].
Adding camera tags ahead of time lets you search for and specify cameras by their tags.
Click the [Edit] button to create new camera tags. Created tags can also be used for other cameras
connected to the same Storage Server.
Click [OK].
3
Close the [Add Camera] dialog and the cameras are added to the camera list in the [Cameras] tab.
Video from a camera connected to a multi-terminal VB-EX50 cannot be displayed live or recorded by this software.
• Enter the camera’s user name and password in [User Name] and [Password].
• If the host name or IP address of the camera is changed after registration, you must also change the Storage Server setting. For
details, please refer to “Change Camera Information” (P. 49).
48
Page 49

3
Search For and Add Cameras
Note
You can search for cameras that are on the same network as the Storage Server.
Click [Find].
1
The cameras on the subnet are displayed in the [Camera Search Results] dialog box.
Select the check boxes for cameras to add.
2
You can add more than one camera by selecting multiple check boxes.
To select all the cameras, click [Select All].
Storage Server Setup
Click [Add].
3
The [Add Camera] dialog boxes for the cameras selected in step 2 are displayed in the order of the [Camera
Search Results] list (from top to bottom).
Enter the information required to add the camera, referring to step 2 in “Add Cameras One at a Time” (P. 47).
4
Click [OK] to close the dialog box.
5
Repeat steps 4 and 5.
6
When you finish adding cameras, click [Cancel].
7
• You can only connect to cameras that are located on the same subnet as the computer on which RM Manager is installed. For
details on how to add cameras on a different subnet, please refer to “Add Cameras One at a Time” (P. 47).
• The names of the cameras (stored on the camera) are displayed in the list in the [Camera Search Results] dialog box. However,
the VB-C300 camera name is not displayed.
• Cameras that have already been added are also found. However, a check box is not displayed next to the camera.
• If you cannot find the camera you are searching for, please refer to “Add Cameras One at a Time” (P. 47) and add the camera.
• Host names or IPv4 addresses are displayed in the [Host Name] column of the [Camera Search Results] dialog box. (IPv6
addresses are not supported.)
Change Camera Information
You can change the camera registration information,
Select the appropriate camera and click the [Edit] button.
1
Camera properties are displayed.
49
Page 50

Change the camera Information.
Important
2
[General] tab
Set the camera name. The camera name is only used by this software. The camera name stored on the camera is
not changed.
Click the [Update] button to change thumbnail images.
Click the [Edit] button to specify camera tags.
[Advanced] tab
Click [Disable Camera] and change the [Connection Settings] as necessary. To enable the camera after
changing settings, click [Enable Camera].
Click the [Apply] button to apply changes to registered information, and then click the [OK] button.
3
Remove a Camera
This action removes a camera added to the Storage Server.
If you remove a camera, you will no longer be able to play back recordings made with the camera. If you need to play back the
recordings, use [Disable Camera] instead of removing the camera.
Select a camera in the list of cameras on the [Cameras] tab.
1
Click [Remove].
2
A message appears, asking if you want to remove the camera.
Click [Yes].
3
50
Page 51

Chapter
System Management With RM Manager
RM Manager is used for system management of this software. With it, you can manage users, cameras, disk
space, and add recording schedules.
Page 52

RM Manager Functions
Menus (P. 56)
[Tree View] Tab (P. 53)
[Cameras] Tab (P. 53)
[Storage Server] Tab (P. 54)
[Users] Tab (P. 54)
[Storage Server Search Results] Tab (P. 55)
[Activity Logs] Tab (P. 55)
[Live Events Log] Tab (P. 56)
RM Manager consists of four upper tabs ([Tree View], [Cameras], [Storage Server], [Users]), three lower tabs ([Storage
Server Search Results], [Activity Log], [Live Events]), and menus.
52
Page 53

4
[Tree View] Tab
Red: Error
Green: Normal
This tab displays in a tree the Storage Servers connected to RM Manager, the destination drive for recording files, and
registered cameras.
Cameras appear under the storage drive. You can check Storage Server and camera status.
System Management With RM Manager
[Cameras] Tab
Displays cameras registered to Storage Servers connected to RM Manager in a list. Information such as the camera model
name, host name (or IP address), registered Storage Server Group, and camera status are displayed. Display items can be
rearranged and filtered.
53
Page 54

The following items appear in [Status], showing the current connection status between the camera and the recording
server.
[Status] display Meaning
Recording Recording video
Monitoring
Connecting Establishing a connection between the Storage Server and camera.
Idle The Storage Sever is connected to the camera.
Disabled The Camera is disabled.
Error The Storage Server is failing to connect to the camera.
Unlicensed
Due to motion detection or pre event recording schedule, the Storage Server is monitoring a
camera.
The number of connected cameras exceeds the number of licenses for the installed Storage
Server.
[Storage Server] Tab
You can check the operating status and available disk space of Storage Servers connected to RM Manager. Display items
can be rearranged and filtered.
54
[Users] Tab
Users connected to the Storage Server appear here. You can check who is connected to a Storage Server and from what
location. By default, names are displayed by user name order. You can make it easier to check Storage Server access
status by rearranging names by Storage Server and filtering which Storage Servers are displayed.
Page 55

4
[Storage Server Search Results] Tab
Regardless of whether or not they are connected to RM Manager, active Storage Servers in the same subnet are displayed
in a list. Right-click to connect/disconnect Storage Servers from RM Manager. When connected, the Storage Server also
appears in the upper section.
[Activity Logs] Tab
System Management With RM Manager
Logs of user operations for Storage Servers from RM Manager or the Viewer are displayed here. You can filter the display
by Storage Server Group or type of operation. Activity logs can be exported as files by clicking [File] > [Export Activity Log].
55
Page 56

[Live Events Log] Tab
Events are displayed here. Display items can be rearranged and filtered. Event information is similarly displayed in the
Viewer's [Live Events Log]. You can configure the event levels and types in the [RM Manager Settings] dialog box by
clicking [Settings] > [RM Manager].
Menus
The following menus are available in the RM Manager menu bar.
[File] menu
[Connect to Storage Server Group]
Connects to the Storage Server Group.
[Disconnect From Storage Server Group]
Disconnects from the Storage Server Group.
[Export Activity Log]
Logs displayed in the [Activity Logs] tab are saved as files.
[Exit]
Shut down RM Manager.
[Settings] menu
Opens various dialog boxes and lets you configure various settings for Storage Server Groups connected to RM
Manager.
[Cameras]
Displays the [Cameras] tab in the [Settings] dialog box. You can add cameras to the Storage Server (P. 47).
[Storage Server]
Displays the [Storage Server] tab in the [Settings] dialog box. You can configure settings for recording file destination
drive and storage period (P. 65, P. 66).
56
[Users]
Displays the [Users] tab in the [Settings] dialog box. You can add users to the Storage Server Group and change
passwords (P. 58).
[Storage Server Group]
Displays the [Storage Server Group Settings] dialog box. You can configure the priority level for each event and
configure the e-mail notification function for when events occur.
[RM Manager]
Displays the [RM Manager Settings] dialog box. You can configure the event level that appears in the [Live Events
Log] tab and the level and method of notification for notifying operators of events.
Page 57

4
[Tools] menu
Important
[Recording Schedules]
Displays the [Recording Schedules] window. You can configure recording schedules (P. 72).
[Tags]
Displays the [Tag Settings] dialog box. You can add, change names, and delete tags here.
[Backup/Restore Configuration]
Backs up or restores settings data for Storage Servers, registered cameras, recording schedules, etc. By backing up
settings before editing them, you can restore to a previous state even after changing the settings.
To back up settings, select the backup destination folder in the [Backup] tab, and click [Start Backup]. A folder with
a name that starts with “NVR30” will be created in the specified folder, and the backup files and folders will be stored
in the folder.
To restore settings, select the folder with the name that starts with “NVR30” that was created during backup in the
[Restore] tab, and click [Start Restore].
• Recorded video, event data, and server log data will not be backed up. For details on preparing for system or equipment
failures, please refer to “Chapter 8 Backup” (P. 139).
• Restoring backed up settings data returns the state of camera registration and various settings to that at the time of backup. Be
aware that recorded video and events for cameras added after the backup procedure will not be viewable. We recommend
performing backup again after registering new cameras.
[Change IP Address]
Changes the IP address set in the Storage Server. If the IP address of the Storage Server computer changes, the IP
address settings must also be updated (P. 163).
System Management With RM Manager
[Change License]
If, for example, you upgrade from RM-9 to RM-25 or from RM-25 to RM-64, you can change the license when a new
one has been obtained (P. 165).
[Reset Servers Reference Time]
Synchronizes the Storage Server service time and the Storage Server computer time. Because this is adjusted
periodically under normal circumstances, there is no need to use this option. Please only use this option if the
Storage Server computer time is significantly affected, such as when changing time zones.
57
Page 58

Note
Add a User
Important
In addition to the registered administrator, new users can be added, and operation can be split between administrators and
guest users.
About User Groups
This software provides the following two user groups, each with different user permissions.
Administrator
All Viewer and RM Manager operations are available.
Operator (Guest user)
Users in this group have limited access to the features of the Viewer. They cannot configure RM Manager or set a
recording schedule.
You can specify the group to which the added user belongs by selecting from [User Group].
You can create a new user group and specify permissions for users that belong to the group.
• Only a default user called “administrator” is created in the Administrator user group.
The password for this user is “NVR”. We recommend that you change the password for this user after installation.
We strongly recommend that, for normal surveillance operation, you create individual users with access permissions for only the
minimum required functionality.
• Please be sure to remember your password.
You cannot add user groups.
Administrator for this software program does not refer to the Windows administrator.
Display the [Users] Tab
Select the appropriate Storage Server, click [Settings] > [Users], and display the [Users] tab in the [Settings] dialog box.
Add a User
Specify user groups and add new users.
Click [Add].
1
The [Add User] dialog box appears.
58
Page 59

4
Note
Note
Enter the information required to add the user.
(1)
(2)
(3)
(4)
2
(1) [User Name]
Enter the name of the user to be added.
(2) [Password]
Enter the password used to log into the Viewer.
(3) [Confirm Password]
Enter the password in (2) for confirmation.
(4) [User Group]
Select the user group (“Administrator” or “Operator”).
You can also select an added user group. For details, please refer to P. 60.
Click [OK].
3
The [Add User] dialog box closes and added users appear in the user list on the [Users] tab.
System Management With RM Manager
Change the User Information
You can change settings for registered users. Passwords can be changed here.
Select a user in the list.
1
Click [Edit].
2
The [Edit User] dialog box appears.
Change the user information.
3
The “administrator” user name and user groups cannot be changed.
Remove a User
You can remove registered users.
You cannot delete the default “administrator” user.
Select a user in the list.
1
Click [Remove].
2
A message appears, asking if you want to remove the user.
Click [Yes].
3
59
Page 60

Add a User Group and Specify Its Access Permissions
Note
(1)
(2)
(3)
(4)
Access permissions for each feature
Selected camera tags
You can create additional user groups and specify access permissions for the group.
In the [Settings] dialog box, click the [User] tab and click [User Group Settings] to display the [User Group Settings] dialog
box.
(1) List of user groups
Displays a list of existing user groups.
RM-64/2 5/9
(2) [Add], [Edit], and [Remove]
Add, edit or remove a user group.
You cannot edit or remove the “Administrator” and “Operator” user groups.
(3) [Full Control]
Assign all access permissions for the selected user group.
(4) [Partial Control]
Specify individual access permissions for the selected user group.
Specify Individual Access Permissions
Click [Partial Control] and select the check boxes next to the desired access permissions for each feature.
60
Page 61

4
Select the check box next to a feature to enable operation of the feature.
Camera tags are only displayed for [View Recording Schedules], [View Live Video], and [Playback Recorded Video]. Click
a tag to display a dialog box for specifying camera tags to narrow down the cameras to which the access permissions will
be assigned.
System Management With RM Manager
61
Page 62

Note
Notification of Events by E-mail
(1)
(2)
(3)
(4)
You can configure settings so that an e-mail notification is set when an event occurs. You can set event priority levels ahead
of time and change e-mail destinations according to the priority.
For details on e-mail notification content when an even occurs, please refer to “Appendix: Check Event Notification E-mail” (P. 161).
RM-64/2 5/9
Display the [Event] Tab
Select the appropriate Storage Server, click [Settings] > [Storage Server Group], and display the [Storage Server Group
Settings] dialog box. Click the [Event] tab.
Configure Event Priorities and E-mail Notifications
Configure event priority levels, e-mail destinations, and e-mail server settings.
62
(1) [E-mail Notification]
Display a list of e-mail addresses for sending notification messages when an event is triggered, and the priority of the
event.
(2) [Add], [Edit], and [Remove]
Add, edit or remove an e-mail notification recipient.
(3) [Mail Server Settings]
Configure the mail server used for notifications.
(4) [Event Priorities]
Configure the event priorities. You can configure priorities in five levels: Highest, High, Medium, Low, Lowest.
Page 63

4
Configure the Mail Server
Note
(1)
(2)
(3)
(4)
(5)
Click [Mail Server Settings].
1
The [Mail Server Settings] dialog box is displayed.
Configure the mail server settings.
2
(1) [SMTP Server] and [Port]
Enter an SMTP server name and change the port number, as required.
(2) [Authentication]
Specify an SMTP server authentication method ([None], [POP before SMTP], [SMTP-AUTH]).
If [POP before SMTP] is selected, the Storage Server performs POP authentication before sending an e-mail
message.
System Management With RM Manager
(3) [User Name]
If [POP before SMTP] or [SMTP-AUTH] is selected in [Authentication], enter a user name to be used for
authentication.
(4) [Password]
Enter a password to be used for authentication with the user name entered in (3).
(5) [POP Server] and [Port]
If [POP before SMTP] is selected in [Authentication], enter the name of the POP server to be used for
authentication and the port number, as required.
Click [OK].
3
The [Mail Server Settings] dialog box closes and settings are saved.
If [POP before SMTP] is selected in [Authentication], the Storage Server performs POP authentication before sending an e-mail
message.
Set an E-mail Notification Destination
Click [Add].
1
The [E-mail Notification Settings] dialog box appears.
63
Page 64

Configure the e-mail notification settings.
(1)
(2)
(3)
(4)
2
(1) [To]
Enter an e-mail address as the destination.
(2) [From]
Enter the e-mail address of the sender.
(3) [Subject]
Enter the subject of the e-mail.
(4) [Min. Priority]
Specify the minimum event priority level which will generate an e-mail notification.
Click [OK].
3
The [E-mail Notification Settings] dialog box closes and the e-mail address for the specified destination and the
event priority are added to the [E-mail Notification] list.
64
Page 65

4
Manage Disk Space
Important
You can configure various settings in order to manage Storage Server disk space.
Change the Destination of the Recording File and the Maximum Disk Usage
Specify a drive for recording or change the maximum disk usage. By default, the maximum disk usage is set to [Do not
limit].
Select the appropriate Storage Server, click [Settings] > [Storage Server], and display the [Storage Server] tab in
1
the [Settings] dialog box.
Click [Edit].
2
The [Storage Server Settings] dialog box is displayed.
Clear the check boxes next to the drives that should not be used for recording.
3
System Management With RM Manager
Specify the maximum disk usage.
4
Click [Do not limit] for each drive to display the maximum disk usage.
Select [Maximum Disk Space Used] and specify a maximum disk usage that does not exceed the total disk
capacity.
• It is recommended that you do not specify the system drive (typically the C drive) as the destination for the recording file.
• You cannot specify a drive that has a capacity of less than 1GB.
Click [OK].
5
The [Storage Server Settings] dialog box closes and settings are saved.
65
Page 66

Specify the Storage Period for Recorded Video
(1)
(2)
(1)
(2)
(3) (4) (5)
You can specify the storage period for video recorded on the Storage Server. Select the appropriate Storage Server, click
[Settings] > [Storage Server], and display the [Storage Server] tab in the [Settings] dialog box. You can specify the storage
period for video recorded on the Storage Server in [Recorded Video Settings].
(1) [Ensure video is kept for at least]
Check this option when to specify a minimum storage period. Select the units (day or week) of the storage period and
enter the number of days or weeks, up to a maximum of 99 weeks. Recorded video is usually stored for the minimum
storage period unless this is unavoidable.
(2) [Ensure video is kept for up to]
Check this option when to specify a maximum storage period. Select the units (day or week) of the storage period and
enter the number of days or weeks, up to a maximum of 99 weeks. Recorded video is automatically deleted when it
exceeds the maximum storage period.
Specify a minimum storage period that is within the maximum storage period. For example, if the maximum storage period
is ten days, specify a minimum storage period of two days.
Specify the the number of days (1 to 90) or weeks (1 to 12) for the minimum and maximum storage periods. [Ensure video is
kept for up to] is always enabled.
The Storage Sever monitors available disk space for recording video. When disk space falls below “(Number of cameras +
1) x 64MB” (threshold level), recorded video will be deleted starting with the oldest video, including video still within the
maximum storage period, until enough disk space above the threshold level has been freed (P. 68). When this happens, a
“Delete recorded files (when disk space is low)” event occurs.
Video within the minimum storage period will be deleted if enough disk space above the threshold level cannot be freed,
even if all the recorded video that has exceeded the minimum storage period is deleted. When this happens, a “Delete
recorded files (when disk space is insufficient)” event occurs, which indicates insufficient disk space for the video
recording settings. Changes to the system configuration, such as disk space, or video quality and frame rates for recorded
video, are recommended.
66
(1) Maximum storage period (ten days here)
(2) Minimum storage period (two days here)
(3) Delete recorded data
Page 67

4
(4) When the disk capacity reaches the threshold level, the data for that period is deleted and a “Delete recorded files
Note
Important
Important
Drive letter
drive has low free disk
space: Notification
Notification
Set [Maximum Disk
Space Used]
Notification
level
(when disk space is low)” event occurs.
(5) If the disk capacity stays at the threshold level after executing (4), the data for that period is deleted and a “Delete
recorded files (when disk space is insufficient)” event occurs.
Depending on the maximum disk usage setting for the Storage Server (P. 65), recordings may not be stored for the full storage period
specified in this setting.
Low Remaining Disk Space Level and Solutions
The Storage Server monitors the disk space and responds according to the amount of available space.
Disk Space Status Description
Low remaining disk space
notification level
Threshold level
Limit level
You can specify a reference value using [Low Disk Space Warning Level] on the
[Recording Settings] tab in the [Storage Server Group Settings] dialog box.
The Storage Server calculates a reference value based on various conditions and
settings.
System Management With RM Manager
Action When the Low Remaining Disk Space Notification Level is Reached
The Storage Server issues an event when the disk space available for recording (i.e. available space relative to the
maximum disk space used) goes below a certain level.
If [Maximum Disk Space Used] (P. 65) is not set, the drive capacity of the disk that stores the recording file is
considered to be the maximum disk space.
An event e-mail notification is sent when the priority level of [Low Disk Space Warning] in the [Event] tab (P. 62) of the [Storage
Server Group Settings] dialog box meets or exceeds the level specified in the [E-mail Notification Settings] dialog box (P. 63).
On receiving an event e-mail notification, an administrator can act promptly (for example, by removing unnecessary recording
schedules) before a problem occurs due to low disk space.
Low Remaining Disk Space Notification Level Conditions and Calculation Method
If one of the following conditions is met, a low remaining disk space notification level is indicated.
Condition 1: If the Storage Server disk space usage exceeds the following values:
M x (100 - A)/100
(M: Value specified in [Maximum Disk Space Used], A: Value specified in [Low Disk Space Warning Level])
67
Page 68

For example, if the value for [Maximum Disk Space Used] is 100 GB and the value for [Low Disk Space Warning
Note
Note
Low disk space
<drive letter>
drive file
delete: Begin
Remove from
the oldest
Notification
Threshold level
Level] is 10%, the Storage Server reaches the low remaining disk space notification level when the Storage Server
disk space usage becomes 90 GB or more.
Condition 2: If the free disk space falls below the following values:
Disk space x A/100
(A: Value specified in [Low Disk Space Warning Level])
For example, if the disk space is 80 GB and the value for [Low Disk Space Warning Level] is 10%, the Storage Server
reaches the low remaining disk space notification level when the remaining free disk space becomes 8 GB or less.
If other applications use the same hard disk, you need to consider condition 2. Even if the Storage Server uses a small amount of
disk space, it may reach the low remaining disk space notification level according to condition 2 because other applications have
consumed a portion of the disk space.
Calculation Example
Disk Drive D Drive E Drive
Disk Space 100 GB 200 GB
Free Disk Space 50 GB 200 GB
Value for [Maximum
Disk Space Used]
Value for Low
Remaining Disk Space
Notification Level
40 GB 200 GB
Condition 1:
40 GB x (100-10)/100 = 36 GB used
Condition 2:
100 GB x 10/100 = 10 GB remaining
Condition 1:
200 GB x (100-10)/100 = 180 GB used
Condition 2:
200 GB x 10/100 = 20 GB remaining
Action When the Threshold Level is Reached
Recording continues, however, the Storage Server starts deleting recording files, beginning with old files, and issues
an event.
• Recording files are deleted, even if they have not reached the [Maximum Storage Period]. However, if the oldest file is currently in
use by the Viewer (for example, for playback of recorded video), it will not be deleted and the next oldest file will be deleted
instead. Deletion continues sequentially until the free disk space meets or exceeds the threshold again. For details on saving
files, please refer to Chapter 8.
• Normally, a recording file for which the minimum storage period has not elapsed is excluded from deletion. Note that such files
are also deleted if the free disk space cannot meet and exceed the threshold value by deleting all the other files.
68
Threshold Level Conditions and Calculation Method
The threshold level is considered reached when the amount of free disk space drops below the following level.
(Number of cameras + 1) x 64 MB
Page 69

4
Action When the Limit Level is Reached
Important
Low disk space
<drive letter>
drive file
delete: Begin
Recording
stopped
notification
Notification
Limit level
Remove from
the oldest
The Storage Server stops recording and issues an event when the free disk space drops to this level.
The Storage Server resumes recording and issues an event when the free disk space increases above this level after
deleting recording files.
Limit Level Conditions and Calculation Method
The limit level is considered reached when the amount of free disk space drops below 64 MB. This value is fixed.
• The threshold level is to protect against reaching the limit level. We recommend that you take appropriate measures, such as
deleting unnecessary recording data, when the event for the low remaining disk space notification level occurs.
• Storing recordings that cause the threshold level to be exceeded increases the load on the Storage Server and may cause
recording to be interrupted, resulting in incomplete recordings. We strongly recommend that you operate the Storage Server at
below the threshold level.
• If e-mail notification is specified, an e-mail message is sent for the event that occurs at each level (P. 62).
• Note that the threshold level conditions may be met before the low remaining disk space notification level conditions are
satisfied, depending on the circumstances. For example, a large number of cameras with limited disk capacity may cause a
value for (Numbers of cameras +1) x 64 MB to be larger than the value of disk capacity x low free disk space notification setting/
100.
System Management With RM Manager
69
Page 70

70
Page 71

Chapter
Setting a Recording Schedule
You can record automatically by the schedule set in RM Manager. You can also configure settings to record
periodically each day using a repeating weekly schedule, or specific days only using special day recording
schedules.
Page 72

Record on a Regular Basis (Repeating Weekly Schedules)
Important
(1)
(2)
(3)
(4)
You can configure a recording schedule for each day of the week.
The configuration items and values that are available will vary depending on the camera and settings used for recording. For details,
please refer to the camera manual.
Display the [Recording Schedules] window
Launch RM Manager to connect to the Storage Server Group (P. 44).
1
Click [Tools] > [Recording Schedules] to display the [Recording Schedules] window.
2
The [Repeating Weekly Schedules] tab is selected whenever the [Recording Schedules] window is displayed.
(1) [Add Schedule Item], [Edit], [Delete], [Import], and [Export]
Add, edit, remove, import, and export recording schedules.
(2) [Zoom] slider
Zoom in and zoom out the time line of the schedule area.
72
(3) [Search for] box
Search for the camera to be used for display.
(4) Schedule area
Displays the currently registered cameras and their corresponding weekly schedules, arranged by day of
the week.
Page 73

5
Display the [Edit Schedule Item] dialog box
(1)
(2)
(3)
Displays all cameras registered to the Storage Server Group in the schedule area. Select a camera to add to the recording
schedule.
When adding multiple cameras, you can use [Search for] to filter the camera display (P. 101).
Select a camera you want to configure a recording schedule for.
1
Click the [Add Schedule Item] button.
2
The [Edit Schedule Item] dialog box appears.
Setting a Recording Schedule
(1) Recording time settings area
Specify the day of the week and the time period for recording.
(2) Recording mode list
Select the recording mode.
(3) Recording settings area
Configure the settings for the recording mode selected in (2).
Specify the Recording Period and Day of the Week
Configure the recording time and day in the recording time settings area.
Specify the recording period.
1
• To record for the entire day without specifying a start and end time, click [All Day].
• To specify a recording period, enter the start time in [Start Time] and the end time in [End Time]. Use these
items when you want to specify a recording time that goes past midnight, such as when recording late into the
night. Alternatively, select a duration for the recording (minimum of 15 min.) in the [Duration] field.
73
Page 74

Note
Note
Select the check boxes for the days of the week on which to repeat the recording in [Repeat On].
Important
2
If you click [Select All], you can select check boxes for all days. To clear all selections, click [Clear All].
To use one Storage Server with more than 32 cameras connected to it, set the start time of the recording schedule leaving 15minute intervals or longer so that the recording schedules of 33 or more cameras do not start at the same time. If recording
schedules for 33 or more cameras start at the same time, recording may be delayed for some cameras.
• You cannot specify overlapping recording schedules on the same camera.
• The time of the recording schedules is based on the Storage Server clock. We recommend that you synchronize the clocks on all
the Storage Server you are using.
• If you set the operating system to automatically handle daylight saving time, the time will be automatically adjusted on the first
and last days of the daylight saving time period.
Specify the Recording Mode
Specify the recording mode. Recording begins based on conditions met within the set day and time.
Select the check box next to the recording mode you want to use.
1
For example, if you want continuously record for the entire duration of the recording schedule, select the check
box next to [Continuous Recording].
Configure the recording mode settings in the recording settings area.
2
The settings are different for each recording mode.
• Continuous recording (P. 75)
Records continuously for the specified recording period.
• Sensor recording (P. 77)
Starts recording when there is a signal from a sensor connected to the camera.
• Motion detection recording (P. 78)
Starts recording when motion is detected.
• Intelligent Function recording (P. 80)
Starts recording when motion that meets the Intelligent Function detection criteria is detected.
• Volume detection recording (P. 81)
Starts recording when the volume detection criteria are met.
• Scream detection recording (P. 82)
Starts recording when a scream is detected.
• Linked event recording (P. 83)
Recording begins when a linked event occurs.
• The available recording modes depend on the camera model.
• You can specify the priority of the events generated by sensor recording, motion detection recording, Intelligent Function
recording and volume detection recording. For details, please refer to (P. 77, P. 78, P. 80, P. 81). When two events occur
simultaneously, the event with the higher priority takes precedence.
• You can specify more than one recording mode at the same time. For example, you can select motion detection recording and
specify a frame rate that is higher than continuous recording. This way, a high frame rate is used only when motion is detected.
• The motion detection feature notifies you there is motion in an area when motion is not ordinarily expected. Do not use this feature
for busy areas where motion detection may be triggered frequently.
• On models on which both motion detection recording and intelligent function recording can be configured, please use intelligent
function recording.
• When an event occurs, data is saved in the Storage Server as an operation record. As the number of operation records
increases, operation during event detection and the search and Viewer response speeds may be affected. Use “Maximum
74
Page 75

5
events processed” (P. 15), described in “Operating Environment” > “For High-reliability/H.264 Video Format Systems,” as a
Important
(4)
(5)
(6)
(1)
(2)
(3)
guide.
• The volume detection recording and scream detection recording are not available on cameras on which a microphone cannot be
connected.
• The sensor recording function is not available on cameras on which a sensor cannot be connected.
Only continuous recording can be used.
Specify Advanced Settings
Advanced settings are available when the [Advanced] button is displayed in the recording settings area. For details, please
refer to “Configure the Advanced Recording Settings” (P. 84).
Check the Recording Schedule
When you click [OK] to close the [Edit Schedule Item] dialog box, the set recording schedule appears in the schedule area.
The schedule becomes active as soon as it is displayed in the schedule area. Check the recording schedule in the
schedule area.
C50F
C50i
• The camera supports sensor recording and schedule recording to internal memory (picture recording function). If these
features on the camera are enabled, they take precedence over the Storage Server recording schedule. You must
disable the feature on the camera before using the recording schedule on the Storage Server.
• If [Restrict Service Time] is enabled on the camera, recording will take place only during the service time, irrespective of
the recording schedule.
Setting a Recording Schedule
Be sure to test recording schedules before using them.
Configure the Recording Mode
Continuous Recording Settings
75
Page 76

(1) [Resolution]
Note
Important
S30
S31
S80x
S90x
H43
H41
H630
H610
H730
H710
M42
M40
M620
M600M720
M700
C500
C60
Specify the resolution.
If you select [Not Specified], the camera’s resolution setting is used for recording.
(2) [Video Format]
Specify the video format ([JPEG], [MPEG-4] or [H.264], etc.).
The available formats depend on the camera model.
(3) [Maximum Frame Rate]
Specify the maximum frame rate (number of frames recorded in one second) in the range from 0.1 to 30 frames
per second (fps).
(4) [Record audio if available]
Select this check box if you want to record audio together with the video.
(5) [Advanced]
Displays the [Advanced Recording Settings] dialog box (P. 84).
(6) [Use the recording-mode stream]
Enable the recording stream function. With this function, the camera temporarily stores the video in its own
memory before sending it to the Storage Server. This can help reduce the effects of non-uniform network traffic
(jitter).
• You can save JPEG video of the recorded stream to a memory card in the camera using [Use the recording mode stream] if the
stream could not be distributed due to a network failure. Video is saved at a frame rate of 1 fps. For details, please refer to the
camera manual.
• The size of the recording data increases as the resolution and frame rate become higher. Make sure there is sufficient hard disk
space available before specifying a higher resolution and frame rate.
• If you select [MPEG-4] or [H.264], the [Storage Server] option in [Detect Motion Using] cannot be selected.
• Even if the [Record audio if available] check box is selected, audio will not be recorded if the audio sending function has not
been activated on the camera. If you schedule a recording, make sure the audio sending function on the camera has been set
to [Enable].
• If you select [MPEG-4] or [H.264] for the [Video Format] setting, the [Maximum Frame Rate] setting cannot be changed. The
settings on the camera are used for recording.
• It may not be possible to record at the specified frame rate depending on the load on the Storage Server CPU or the hard disk.
Recording may also pause intermittently.
• Recording may be performed at lower than the specified frame rate, depending on the number of Viewers that are accessing the
camera, the load on the camera and Storage Server, variation in network traffic, and the environment at the time of recording.
• Audio recording is enabled when the recording mode is selected. You cannot schedule audio-only recording.
• If MPEG-4 or H.264 recording format is used, the recorded audio will not be in sync with the recorded video. If JPEG recording
format is used, the recorded audio will be in sync with the recorded video for the most part, however it is not guaranteed that it will
be completely in sync.
• Recording mode stream operates only with cameras that support the recording mode stream function and if a stream has been
acquired.
• To use recording mode stream, select [Video Format] > [JPEG], and set [Maximum Frame Rate] to “10” or lower value.
• When the recording-mode stream function is used, the streamed video has a higher priority than the live video. Depending on the
load on the camera, such as the number of Viewers that are simultaneously connected to the camera, display of the live video
may stop.
If an upload function is already being used on the camera, you cannot use the recording-mode stream function. To use the
recording-mode stream function, select [Upload] > [Upload Disabled] on the Setting Page of the camera.
M50
[Digital PTZ (JPEG)] cannot be selected for [Video Format].
76
• Only supports [JPEG] for the [Video Format].
• The maximum frame rate is five fps.
Page 77

5
Sensor Recording Settings
Note
Important
(3)
(1)
(2)
(4)
(1) [Do not record]
Select to not record even when there is a signal from this sensor.
You can individually enable or disable recording for each sensor. For example, you may not want to record
when there is door sensor signal, but to start recording when there is a window sensor signal.
RM-64/25/9
Setting a Recording Schedule
(2) [Start Recording]
Start recording when there is a signal from the sensor. After selecting the item, configure the recording settings
below the item.
(3) [Priority]
Select the event priority. For details, please refer to “Check Events” (P. 115).
(4) [Invert this event]
Select this checkbox to start recording when the input from the sensor disappears.
For example, start recording when there is no signal from the sensor, and stop recording when a signal is
present.
The other settings are the same as those for continuous recording (P. 75).
• When you select the [Sensor Recording] check box in the recording mode list in step 1, [Do not record] is selected for all of the
sensors. You must select [Start Recording] for at least one sensor to be able to start sensor recording.
• The sensor inputs can generate a large number of events for the Storage Server, thereby increasing the load on the server. For
reference, if the Storage Server is continuously receiving more than ten events per minute, we recommend that you use
continuous recording mode.
• If the recording period for a schedule ends while sensor recording is in progress, recording will stop.
• The number of tabs depends on the number of compatible external devices (sensors) that are connected to the camera.
• The name of the external device that is registered in the camera is displayed in the [Sensor Name] box.
• If a sensor recording is triggered with the same priority as one that is currently recording, the second sensor will be given priority
and begin recording. The remainder of the first recording sensor, if any, will continue recording after the second sensor ends.
77
Page 78

Motion Detection Recording Settings
Note
Important
(1)
(2)
(3)
(4)
C50F
C50i
The motion detection feature is not suitable for applications where high reliability is required. We recommend that you do not use
the motion detection feature in applications such as surveillance, which require high reliability. Canon cannot take responsibility
for any accidents or damages associated with using the motion detection feature.
RM-64/25/9
Using the Camera for Motion Detection
(1) [Detect Motion Using]
Select [Cameras] to detect motion using a camera.
(2) [Do not record]
Select this item if you do not want recording to start when motion is detected.
You can use this to individually enable or disable recording for each area. For example, you may want to record
when motion is detected around a vault, but not record when motion is detected around an entrance.
(3) [Start Recording]
Start recording when motion is detected.
(4) [Priority]
Select the event priority. For details, please refer to “Check Events” (P. 115).
The other settings are the same as those for continuous recording (P. 75).
To use motion detection, you must create a schedule with motion detection using the camera’s schedule setting tool.
• If the camera supports four motion detection areas, tabs named [Area 1] through [Area 4] are displayed in the recording settings
area. You can specify settings individually for each motion detection area.
• The [Area Name] box displays the name of the area that is registered in the camera.
• To use a camera for motion detection, you must configure the motion detection settings on the camera. For details, please refer to
the camera manual.
• When using the camera for motion detection with more than one motion detection area, you can specify the event priority for each
area.
• Motion detection is suspended when the camera is panning, tilting or zooming, irrespective of the motion detection settings.
• If motion is detected in multiple motion detection areas that have the same priority, recording will start with the area having the
lowest number.
78
Page 79

5
Using the Storage Server for Motion Detection
Note
Important
[Recording Settings] tab [Settings] tab
(1)
(2)
(3)
(4)
(5)
(6)
(7)
(8)
(9)
The load on the Storage Server CPU increases when motion detection is performed on the Storage Server. We strongly
recommend that you use the motion detection on the camera, if it is available.
If you select [MPEG-4] or [H.264] in [Video Format], the [Storage Server] option in [Detect Motion Using] cannot be selected. Note
also that if you select [MPEG-4] or [H.264] in other recording modes besides motion detection recording, the [Storage Server]
option still cannot be selected.
Setting a Recording Schedule
(1) [Detect Motion Using]
Select [Storage Server] to detect motion using a Storage Server.
(2) [Priority]
Select the priority of the motion detection events. For details, please refer to “Check Events” (P. 115).
(3) [Frame Rate]
Specify the motion detection frame rate (frames per second).
(4) [Settings Mode]
If you select [Simple], [Sensitivity] and [Area Ratio] can only be set using the sliders. [Duration] is fixed at 0.2
seconds.
If you select [Advanced], the [Sensitivity], [Area Ratio] and [Duration] settings become available so that values
can be set.
(5) [Sensitivity]
Specify the motion detection sensitivity within the range of 1 to 256. Increase the number to increase the
sensitivity.
(6) [Area Ratio]
Specify the area of the preview video that the Storage Server uses for motion detection. The range is 0 to 100%.
The size marker inside the Detection Indicator changes position depending on the value of this setting.
(7) [Duration]
Specify the length of time the motion signal must be present to decide that there is motion. The range is 0.0 to
5.0 seconds.
(8) [Active Region]
Displays a preview video from the camera used for motion detection.
Displays a dotted-line frame representing the active region on top of the preview video. Drag the frame handles
to make it larger or smaller.
79
Page 80

(9) [Detection Indicator]
Important
Colored bar
Size marker
Notification Indicator
(1)
(2)
(3)
The size marker changes position depending on the value of the [Area Ratio] setting. Adjust the motion
detection settings while viewing the preview video and the Detection Indicator.
The colored bar changes depending on the value of the [Sensitivity] and the [Area Ratio] settings.
Color of the
Colored Bar
Green
Red
Meaning
The detected motion does not reach the values specified in [Sensitivity] and [Area Ratio].
In this case, the colored bar remains to the left of the size marker.
The detected motion exceeds the values specified in [Sensitivity] and [Area Ratio]. In this
case, the colored bar remains to the right of the size marker.
The other settings are the same as those for continuous recording (P. 75).
• If the recording period for a schedule ends while motion detection recording is in progress, recording will stop.
• The detection indicator is not affected by the [Duration] setting. Be sure to take the detection time into account when adjusting
the motion detection settings.
• To perform motion detection on the Storage Server, you must specify [JPEG] for the [Video Format]. Also, if you simultaneously
use more than one recording mode, all the [Video Format] settings must be [JPEG]. An error message is displayed if you try to
use a format other than [JPEG] and motion detection on the Storage Server at the same time.
• Make the [Priority] setting on the [Recording Settings] tab lower than the priority of any of the other recording settings.
Intelligent Function Recording Settings
Tabs named [Rule 1] through [Rule 15] are displayed, as shown. Each tab can be configured individually.
(1) [Do not record]
(2) [Start Recording]
80
Do not record even when the conditions for this rule are met.
Start recording when the conditions for this rule are met. After selecting the item, configure the recording
settings below the item.
Page 81

5
(3) [Priority]
Note
Important
Important
(3)
(2)
(1)
Select the event priority. For details, please refer to “Check Events” (P. 115).
The other settings are the same as those for continuous recording (P. 75).
• To use Intelligent Function recording, you must configure the Intelligent Function recording settings on the camera. For details,
please refer to the camera manual.
• If the recording period for a schedule ends while Intelligent Function recording is in progress, recording will stop.
The name of the rule is displayed in [Rule Name].
Volume Detection Recording Settings
Setting a Recording Schedule
(1) [Do not record]
Do not record even when audio is detected.
(2) [Start Recording]
Start recording when audio is detected. After selecting the item, configure the recording settings below the item.
(3) [Priority]
Select the event priority. For details, please refer to “Check Events” (P. 115).
The other settings are the same as those for continuous recording (P. 75).
• If the recording period for a schedule ends while volume detection recording is in progress, recording will stop.
• To use volume detection recording, you must first configure the volume detection recording settings on the camera. For details,
please refer to the camera manual.
81
Page 82

Scream Detection Recording Settings
Important
(3)
(2)
(1)
(1) [Do not record]
Do not record even when a scream is detected.
(2) [Start Recording]
Start recording when a scream is detected. After selecting the item, configure the recording settings below the
item.
(3) [Priority]
Select the event priority. For details, please refer to “Check Events” (P. 115).
The other settings are the same as those for continuous recording (P. 75).
• If the recording period for a schedule ends while scream detection recording is in progress, recording will stop.
• To use scream detection recording, you must first configure the scream detection recording settings on the camera. For details,
please refer to the camera manual.
82
Page 83

5
Linked Event Recording Settings
Important
(3)
(2)
(1)
Tabs named [Rule 1] through [Rule 4] are displayed as shown. Each tab can be configured individually.
Setting a Recording Schedule
(1) [Do not record]
Do not record even when linked events occur.
(2) [Start Recording]
Start recording when linked events occur. After selecting the item, configure the recording settings below the
item.
(3) [Priority]
Select the event priority. For details, please refer to “Check Events” (P. 115).
The other settings are the same as those for continuous recording (P. 75).
• If the recording period for a schedule ends while linked event recording is in progress, recording will stop.
• To use linked event recording, you must first configure the linked event recording settings on the camera. For details, please
refer to the camera manual.
83
Page 84

Configure the Advanced Recording Settings
(1) (2) (3) (4)
(5)
Click [Advanced] in the recording mode settings area to display the [Advanced Recording Settings] dialog box and
configure the operation when recording starts.
(1) [Camera Position]
Specify the camera angle for recording.
(2) [Image Adjustment] tab
Adjust the video quality.
(3) [Focus] tab
Adjust the focus.
(4) [External Outputs] tab
Enable or disable output to external devices registered on the camera.
(5) [Recording Options]
Specify the duration of recording before and after an event.
84
Page 85

5
Specify the Camera Angle for Recording
(1)
(2)
(3)
(4)
H730
H710
M620
C500
C300
C60
(1) [Not Specified]
Select this item when you do not want to specify the camera angle.
(2) [Custom]
Specify the camera angle using the [Preview] window.
Setting a Recording Schedule
Drag the slider to change the camera zoom and click or drag inside the video to change the camera angle.
Digital zoom operations are possible when [Digital Zoom] and [Enhanced Digital Zoom] are set to [Enable] on
the camera. However, recording settings in which an area that exceeds the maximum telephoto of the optical
zoom (in the case where the extended digital zoom can be used, the maximum telephoto of the extended digital
zoom) is specified cannot be configured. For details, see “About Digital Zoom” (P. 105).
(3) [Presets]
Select the camera angle from the list of preset camera angles registered in the camera.
(4) [Preset Tour]
Move the camera through a series of preset camera angles while recording. Click [Settings] to display the
[Preset Tour Settings] dialog box, and then specify the order of the presets.
S80x S90x H630 H610
[Presets] and [Preset Tour] are unavailable.
C50F S30 S31
[Preset Tour] is unavailable.
If the digital zoom is used when setting the preset angle with the camera, the viewing angle seen when the setting is
made and the viewing angle that will be recorded may be different.
C300
C50i
If you initialize the head position (the camera points the head forward, reinitializes, and then returns the head to the
former position) during recording, the video during the movement of the head will also be recorded.
C50F
C50i
When an external camera is connected and [Use External Video Input] is enabled, the settings on this dialog box are
unavailable.
M600M720
M700
85
Page 86

Note
• Clicking the [Settings] button alone does not perform a preset tour. You must first configure the settings in the [Preset Tour
Settings] dialog box.
• You are not able to specify camera angle settings when configuring the intelligent function, configuring motion detection settings
with [Detect Motion Using] > [Camera], or when configuring multiple cameras. You are not able to specify [Preset Tour] settings
when configuring motion detection settings with [Detect Motion Using] > [Storage Server].
• To be able to select [Presets] or [Preset Tour], you must first register camera angle presets on the camera. For details, please
refer to the camera manual. When digital PTZ positions are registered in the camera's presets, set the video format to [Digital PTZ
(JPEG)] in the [Edit Schedule Item] dialog box (P. 73).
• Changing the preset name on the camera after making [Presets] or [Preset Tour] settings will disable those settings. If you want
to change the preset name, be sure to repeat the [Presets] or [Preset Tour] settings after you change the preset name.
Configure a Preset Tour
Select [Preset Tour] in [Camera Position] settings and specify the order of the presets that are registered in the
camera.
Click [Settings] to display the [Preset Tour Settings] dialog box.
1
Click [Add] to open the [Edit Preset Tour] dialog box.
2
Select a preset from the [Preset] list.
3
Configure the speed and pause settings using the sliders ([Speed (PT)], [Speed (Z)], and [Pause (sec)]).
4
Click [OK].
5
86
Page 87

5
Note
Note
Repeat steps 2 to 5 for additional presets.
Important
(1)
(2)
6
Selecting [Return to default focus when the camera is operated] enables you to restore the focus settings to the
default (“Auto”) during the preset tour.
Specify the order of the presets.
7
The tour starts with the first preset and proceeds down the list. Change the order by selecting a preset,
and then clicking [Move Up] or [Move Down].
To remove a preset, select the preset and click [Remove]. To edit a preset in the list, select the preset and click
[Edit].
Click [OK] to close the dialog box.
8
Setting a Recording Schedule
• Using preset tour with MPEG-4 or H.264 format will consume a large amount of disk space.
• The preset tour settings can effect the durability of the camera’s pan/tilt mechanism.
• The camera returns to the first preset position after reaching the last preset position.
• Click [Start Test] to run through the preset tour once to confirm your settings.
About the Warning Message Displayed During the Preset Tour
Depending on the preset tour settings, a warning message about the camera’s pan/tilt mechanism may be displayed
when you click [OK] to close the [Preset Tour Settings] dialog box. If this happens, consider changing the settings.
A warning will appear when the pan/tilt mechanisms reach their estimated lifetime of 100,000 round trips over the full
range of motion.
Specify the Option for Recording Before and/or After an Event
You can record a number of seconds before and/or after an event, such as sensor input or Intelligent Function, using
the [Recording Options] setting.
(1) [sec. before event]
Number of seconds to record before an event (max. 30 seconds).
(2) [sec. after event]
Number of seconds to record after an event (max. 999 seconds).
• [Recording Options] cannot be specified when setting continuous recording.
87
Page 88

• Even if [sec. before event] is set to 0, recording will continue when events are continuously generated.
(1)
(2)
(3)
(4)
(5)
(6)
(8)
(7)
• The higher the value for [sec. before event], the greater the memory usage is for the Storage Server. If the Storage Server has
insufficient memory and the duration to record before an event is set high, the server will run out of virtual memory, which
consumes hard disk space, significantly reducing processing performance.
• If you specify a preset camera angle for sensor recording, the camera angle will change to the preset angle when sensor
recording starts. Therefore, the camera angle of the recording before the sensor recording event will be different from the one
after the event. If [Recording Options] is set to record a short time after an event and the sensor input is very short, recording may
stop before the camera reaches the preset camera angle.
Adjust Video Quality ([Image Adjustment] Tab)
(1) [Not Specified] / [Specify]
When [Not Specified] is selected, all items in this tab are locked to [Not Specified]. In this case, video quality is
determined by camera settings.
To activate tab settings, select [Specify].
(2) [Exposure]
The settings change according to the selected exposure setting.
•[Auto]
Automatically control the exposure.
• [Auto (Flickerless)]
Reduce flicker from light sources, such as fluorescent lighting. The shutter speed is automatically adjusted
according to the lighting conditions.
• [Auto (Flickerless 2)]
Select this when flicker reduction with [Auto (Flickerless)] is not sufficient. As the auto adjustment range for
the shutter speed is suppressed to remain below 1/100 s, overexposure may occur.
• [Auto (Shutter Priority)]
Specify the shutter speed.
88
Page 89

5
• [Auto (Aperture-priority AE)]
Specify the aperture value.
When [Exposure] is set to a value other than [Manual], setting items for exposure correction are displayed.
[Compensation]: Specify exposure compensation. Select negative values to darken the video and positive
values to lighten the video. To disable exposure compensation, specify [Not Specified].
[Metering Mode]: Specify the metering mode setting: [Center-weighted], [Average], or [Spot].
Metering mode Description
Meters the entire scene, with an emphasis on the center.
[Centerweighted]
[Average]
[Spot]
[Shutter]: Specify the shutter speed when [Exposure] is set to [Auto (Shutter Priority)] or [Manual].
• [Manual]
Compensate for the exposure manually. The following exposure compensation settings are displayed.
Correct exposure is obtained for a subject near the center of the scene, even though the
periphery may be slightly darker or lighter.
Use for subjects that are in the center of the scene.
Meters an average of the entire scene.
A uniform exposure is obtained even when the scene has significant differences in
brightness.
Use for scenes where, for example, cars are passing through or people are entering and
exiting.
Meters the center of the scene.
The correct exposure is obtained for a subject near the center of the scene, irrespective of
the brightness of the periphery.
Use if the subject is lit by a spotlight or is backlit, where the exposure should be adjusted to
the center of the scene.
Setting a Recording Schedule
[Iris]: Specify the iris setting. Drag the slider to the left to close down the iris and make the video darker or to the
right to open up the iris and make the video brighter.
[Shutter]: Specify the shutter speed.
[Gain]: Specify the gain (sensitivity to brightness). Drag the slider to the left to decrease the gain and make the
video darker or to the right to increase the gain and make the video brighter.
(3) [Smart Shade Control]
Specify a value to use for the camera’s smart shade control feature when recording.
[Off]: Record with the smart shade control disabled.
[Auto]: Set smart shade control to automatic.
[1] to [7]: Select one of seven strength levels when setting the smart shade control function manually.
(4) [Haze Compensation]
Specify a value to use for the camera’s haze compensation feature when recording. Cameras without the haze
compensation feature will always be set to [Not supported].
[Off]: Record with haze compensation disabled.
[Auto]: Set haze compensation to automatic.
[1] to [7]: Select one of seven strength levels when setting the haze compensation function manually.
(5) [Clear IR Mode]
Specify whether to record while using Clear IR mode or not.
[On]: Record while reducing heat haze or blur in backgrounds.
[Off]: Record with Clear IR mode disabled.
89
Page 90

Note
When [Clear IR Mode] is set to [On], both the displayed and recorded video will be black and white.
Note
Important
Important
Important
C300
(6) [Aperture Mode]
Specify the camera aperture mode.
[Night Mode]
• [Disabled]
Disable the Night Mode function.
• [Enabled]
Record in Night Mode.
•[Auto]
The camera automatically decides when to switch to Night Mode. When recording ends, the Night Mode
setting returns to the value before recording started.
When [Clear IR Mode] is set to [On], [Night Mode] cannot be specified.
When [Night Mode] is enabled in [Aperture Mode], both the recorded and displayed video is in black and white.
(7) [Infrared]
Specify whether or not to use infrared lighting during night mode. Cameras without the infrared lighting feature
will always be set to [Not supported].
[Off]: Record with infrared lighting disabled.
[Day/Night Operation]: Use infrared lighting together with night mode. Infrared lighting will be irradiated during
night mode.
[1] to [5]: Select one of five strength levels for the infrared lighting used during night mode when [Exposure] is
set to [Manual].
When [Clear IR Mode] is set to [On], [Infrared] cannot be specified.
(8) [White Balance]
Specify the appropriate white balance by selecting one of the camera’s light source settings displayed in the list.
If [Manual] is selected, use one of the following two methods to adjust the white balance.
• [R Gain] and [B Gain]
Specify the white balance parameters by dragging the sliders. Drag to the right to increase the gain (the
sensitivity to brightness).
• [One Shot WB]
Force white balance adjustment to a light source. Using a white object (such as a piece of white paper) as a
standard, fill the shot with the object and click this button.
C50F
C50i
It may take approximately 30 sec. for [Exposure], [Night Mode] and [White Balance] settings to be reflected in the
view after recording starts.
When [Clear IR Mode] is set to [On] or when [Night Mode] is set to [Enabled], the white balance cannot be specified.
If you select [Auto] for Night Mode, however, you will be able to set the white balance, but the settings will be cleared when the
camera switches to Night Mode.
90
Page 91

5
Set the Focus ([Focus] Tab)
(1)
(2)
(3)
(4)
Setting a Recording Schedule
(1) [Not Specified]
Record using the existing focal position of the camera.
(2) [Auto], [Auto (for domes)]
Automatically focus the video.
Use [Auto (for domes)] for cameras equipped with an indoor dome housing. The setting prevents the camera
from focusing onto the dome surface.
(3) [Fixed at infinity]
Fix the focal point at infinity.
(4) [Manual]
Adjust the focus manually by clicking the [Far] or [Near] button.
Click [One Shot AF] to focus once on the current subject and then return to manual focus.
91
Page 92

Configure External Device Outputs ([External Outputs] tab)
Note
(1)
(2)
Important
Enable or disable output to external devices registered on the camera when the recording schedule starts.
This feature can be used with sensor recording, motion detection recording, intelligent function recording or volume
detection recording. For example, by connecting a buzzer as an external device and linking it to motion detection,
the buzzer will sound when motion is detected.
(1) [Not Specified]
Disable the external output.
(2) [On]
Enable the external output.
• You must first specify the external device settings on the camera. For details, please refer to the camera manual.
• The number of external outputs is different for different camera models.
• The external outputs are enabled only during recording. This will not turn on during standby.
Copy a Weekly Schedule to Another Camera
Copy the weekly schedule by exporting it from one camera and importing it to another.
When a weekly schedule is imported to a camera that already has a specified weekly schedule, the original schedule will be deleted.
RM-64/2 5/9
Export a Weekly Schedule
92
In the schedule area, select the recording schedule to export, and then click [Export].
1
Page 93

5
Specify the location to save the recording schedule and the file name, and then click [Save As].
Important
2
Import from a Weekly Schedule
Select a camera to import a recording schedule to, and then click [Import].
1
Select the exported recording schedule file, and then click [Open].
2
Click [OK].
3
• In some cases, not all settings can be imported. Check the [Activity Log] for event results.
• The settings may not be properly imported, if the camera’s firmware has not been updated to the latest version.
Setting a Recording Schedule
93
Page 94
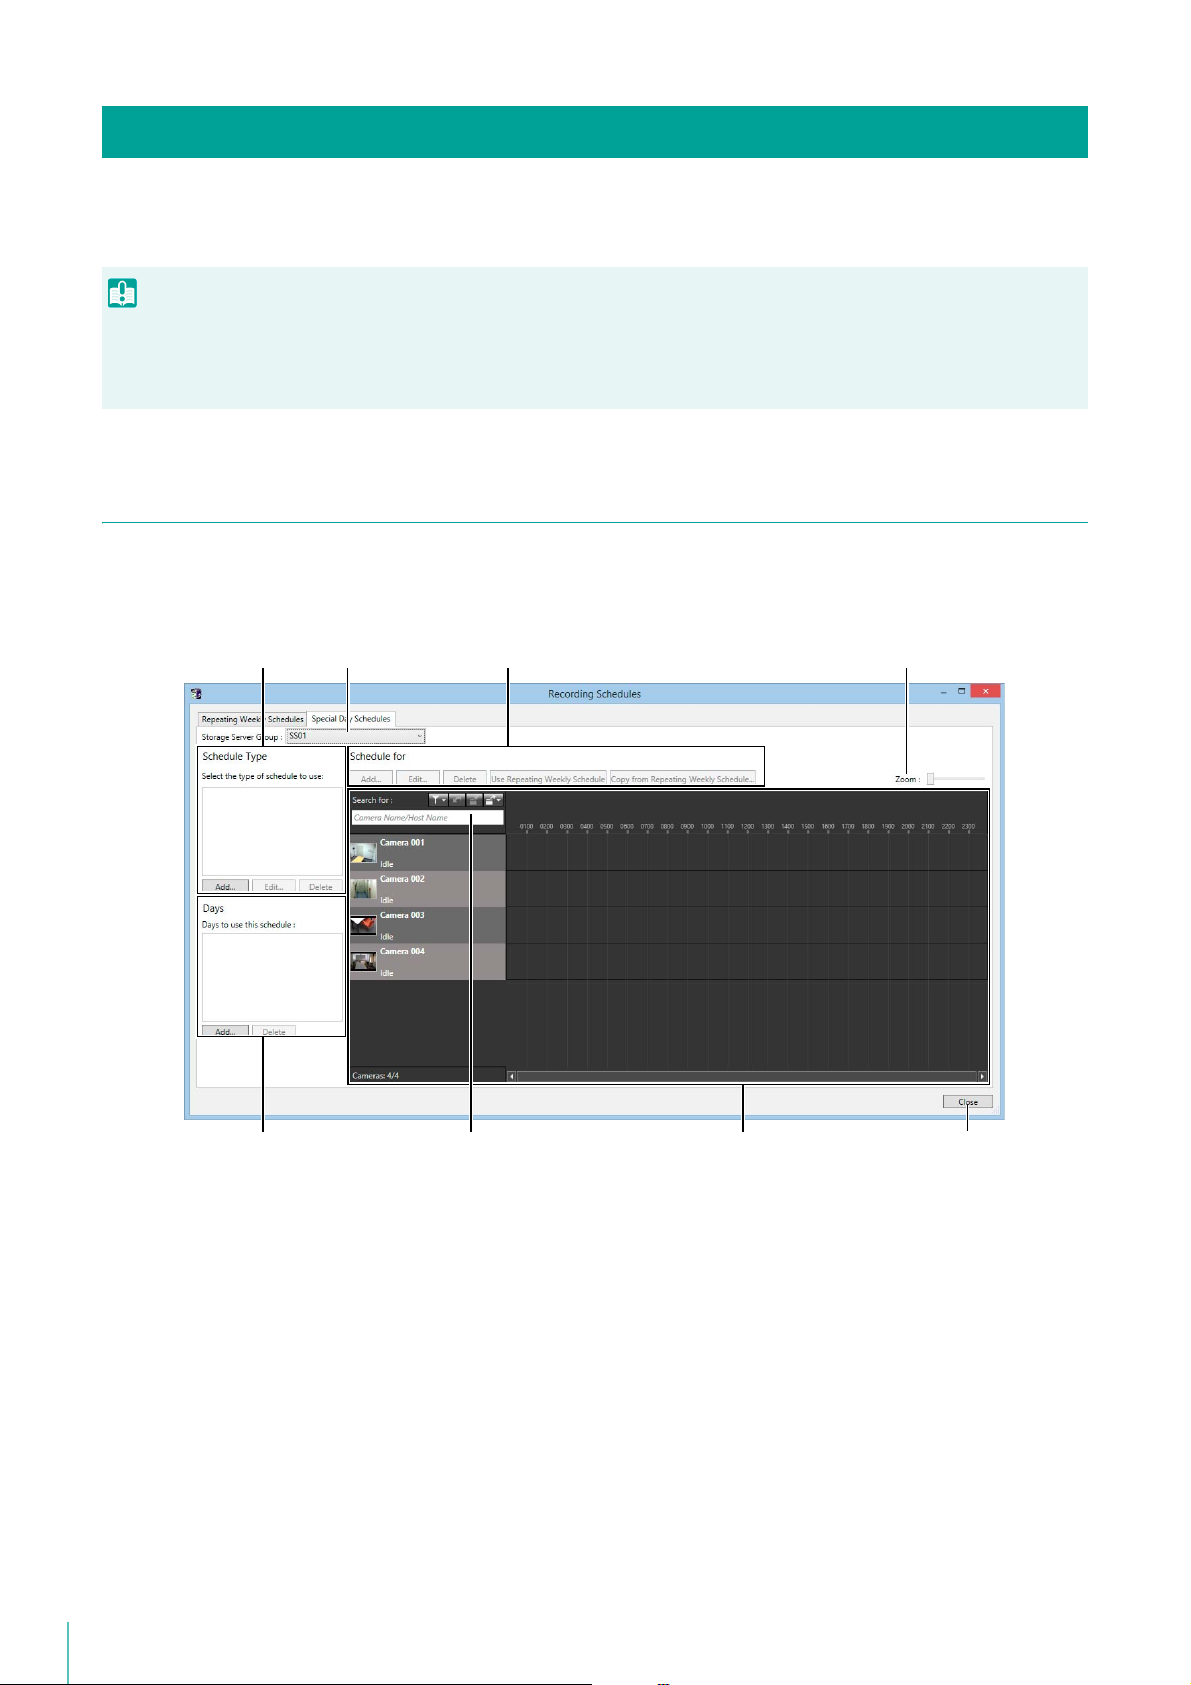
Record at Specific Times (Special Day Schedule Settings)
Important
(8)(7)(6)(5)
(1) (2) (3) (4)
Set a special day schedule when you want to record on days that differ from public holidays and repeating weekly
schedules.
When you assign a special day schedule to a certain number of the registered cameras, the weekly schedules assigned to the remaining
cameras for the special day are disabled. For cameras where you want to continue to record using a repeating weekly schedule without
a special day schedule, you must re-import the repeating weekly schedule. For details, please refer to “Import from a Weekly Schedule”
(P. 93).
Display the [Special Day Schedules] Tab
Display the [Recording Schedules] window (P. 72)
1
Click the [Special Day Schedules] tab.
2
94
(1) Special day schedule type area
Add, edit or delete a special day schedule type.
(2) [Storage Server Group]
Display the Storage Server Group name.
(3) Special day schedule settings
• [Add], [Edit], and [Delete]
Add, edit or delete a special day schedule.
• [Use Repeating Weekly Schedule]/[Not Use Repeating Weekly Schedules]
Enable or disable the special day schedule for the applicable day of the weekly schedule registered on the
selected camera.
• [Copy from Repeating Weekly Schedule]
Specify a day of an existing weekly schedule registered on the selected camera, and import it as a special
day schedule.
(4) [Zoom] slider
Zoom in and zoom out the timeline of the schedule area.
Page 95

5
(5) Days area
Note
Note
Note
Specify the day for the special day schedule selected in (1).
(6) Camera search
Search for the camera to be used for display.
(7) Schedule area
Displays the currently registered cameras and their corresponding recording schedules by day.
This area also has a search function for finding cameras using search criteria, such as the camera name or tags.
(P. 101)
(8) [Close]
Closes this window.
A special day schedule takes precedence over a weekly schedule.
Name the Special Day Recording Schedule
Special day recording schedules are set by the day.
Click [Add] in the schedule type area.
1
Enter the name of a special day schedule and click [OK].
2
The name is added to the schedule type area.
Before deleting a schedule name from the schedule type area, first delete the applicable day from the days area.
Specify the Day
Setting a Recording Schedule
Click the schedule name you want to use in the schedule type area.
1
Click [Add] in the days area.
2
Specify the date for the special day schedule on the calendar and click [OK].
3
• Special day schedules can only be set for a one-day time period (00:00 to 24:00). For example, for a three-day long weekend
(Saturday, Sunday and Monday) you will need to set a separate schedule for each of the three days.
95
Page 96

• You cannot apply different special day schedules to the same day.
Note
Specify the Schedule for Each Camera
The days for the special day schedule will disable the weekly schedule for all cameras registered to the Storage Server
Group and record using the special day schedule. You can configure a recording schedule for each camera.
Click the [Add] button to display the [Edit Schedule Item] dialog box.
1
Set a recording schedule in the same way as a weekly schedule.
2
• To apply a weekly schedule with the same days as the special day schedule, select a camera, and then click [Use Repeating
Weekly Schedule].
• To apply a weekly schedule with different days from the special day schedule, select a camera, click [Copy from Repeating
Weekly Schedule], and then specify the days from the original schedule.
Check the set schedule in the schedule area.
3
96
Page 97

Chapter
Monitor Video with the Viewer
This chapter describes how to view live video with the Viewer. It also describes how to play back recorded
video and how to check events.
Page 98

Note
Launch the Viewer
Important
(1)
(2)
Launch the Viewer and connect to the Storage Server Group. You can view video from cameras connected to the Storage
Server Group.
Double-click the [RM Viewer] icon on your desktop.
1
Double-click the [RM-Lite Viewer v4.3] icon on your desktop.
If the [User Account Control] dialog box appears, click [Yes] (or [Continue]).
Specify the information required to connect to the Storage Server Group.
2
(1) [Group Name]
Select the name of Storage Server Group you want to connect to.
(2) [User Name], [Password]
Enter your user name and password.
Click [Connect].
3
• The first time you connect to the Storage Server Group, you must enter the host name and port number. However, from the
second time onward, you can simply specify the Storage Server Group name.
• When there is a time difference of five seconds or longer between the Storage Server and the Viewer computers, a message
prompting you to synchronize them will appear. Adjust the system time of the Viewer computer to the time of the Storage Server.
You can disable the message display in [Viewer Settings]. For details, please refer to “Configure the Viewer Display and
Operation Settings” (P. 120).
• You can configure the Viewer to launch without displaying the launching screen or the [Connect to Storage Server Group] dialog
box. For details, please refer to “Create a Shortcut Icon for Launching the Viewer” (P. 160).
• You can launch the Viewer using a Storage Server host name instead of the Storage Server Group name. Enter the host name or
the IP address of the Storage Server Group in [Host Name]. If the Viewer and the Storage Server are installed on the same
computer, enter “localhost”.
• If there are no cameras added, a message is displayed asking if you want to add a camera. Launch RM Manager and then add
cameras.
• If you want to connect to another Storage Server Group after launching the Viewer, click [File] > [Connect to Storage Server
Group].
98
Page 99

6
Note
Viewer Features
Important
■ Tabs
Switch between multiple layout displays using tabs. (Tab display is not
available in RM-Lite)
■ Toolbar
Displays buttons for executing oftenused functions.
■ Camera Selector
Specify conditions to search for cameras
and select a camera to view video
(P. 101).
■ Audio
Send and receive camera audio and play
back recorded audio (P. 106).
■ Live Events Log
Check events that occurred one hour or
less after Viewer startup (P. 115).
■ Viewing Area
Place a Video Window
■ Timeline
Events are displayed here. Click
an event to play back the
recording (P. 109).
■ Video window
Display live video from a camera or
playback from a recording.
■ Playhead
Drag to change the playback position
in the video window (P. 110).
■ Camera Control
Operate the camera (P. 103).
Monitor Video with the Viewer
Toolbar
[Back]
When multiple layouts are open, click to display to the previous layout, and click to display the next layout.
[Layouts]
Select and switch layouts in the video window.
[Grids]
Display a grid in the background of the video window.
[Zoom]
Zooms in and out on the viewing area. Each click zooms in or out on the viewing area.
The quality of the video in the video window decreases when you zoom in. To increase the video quality, change the resolution (P. 124).
• Select [Actual Size] from the [View] menu to return the view to the actual size.
• You cannot zoom out further than the actual size.
[Control Cameras]
Opens camera control panel.
99
Page 100

[Record Now]
Starts video recording. Recording is stored in JPEG format.
[Capture]
Save a still image of the displayed video.
[Viewer PTZ]
You can zoom a region of the camera video in the video window using Viewer PTZ (pan/tilt/zoom).
[Search]
You can search for past events that have occurred. You can search for and play back video of recorded events
100
 Loading...